Adding an Online Reservation App to Your Site - Checkout and Confirmed Pages
This page describes the /checkout and /confirmed sub-nodes in the Online Reservation App. These are the final sub-nodes in the hotel room booking process and will confirm to the visitor to your website that their hotel booking has been recorded. Please refer to the following pages for details about the other sub-nodes:
---
After an online user has logged in and decided to progress with their reservation, they will pass from the /summary sub-node to /checkout. Here they will choose a payment option.
To prepare for the /checkout sub-node, you should specify on the 'Step 6' card in the Online Reservation Settings setting which payment options you will offer to browser users:
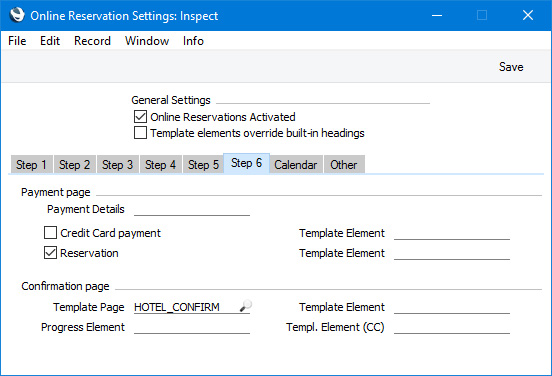
- Credit Card payment
- Payment by credit card will be implemented in a future version of Standard ERP.
- Reservation
- Select this option if you would like to offer the option of charging a user when they arrive to check in or when they check out. Please refer here for details about creating Invoices from Reservations.
Two additional options are available:
- You can specify that a Down Payment Invoice will be created for the Reservation. Select the Generate Down Payment Invoice option on the 'Other' card in the Online Reservation Settings setting. The value of the Down Payment Invoice will be calculated by applying a percentage to the value of the Reservation. This percentage (and the Payment Term for the Down Payment) will be taken from the 'Defaults Online' card in the Hotel Settings setting or, if blank, from the Down Payments setting in the Hotel module or the Down Payments setting in the Sales Orders module.
- You can specify that when a browser user passes on from the /checkout sub-node, the Status of their Reservation(s) will be upgraded to Confirmed. To do this, specify a Confirmed Status on the 'Defaults Online' card in the Hotel Settings setting.
You must select one or both of the options in the Online Reservation Settings setting (i.e.
Credit Card Payment and/or
Reservation), otherwise online users will not be able to reach the end of the booking process, so the Status of the resulting Reservations will not be upgraded to Confirmed.
If you have selected the Reservation option, the /checkout sub-node will appear as follows:
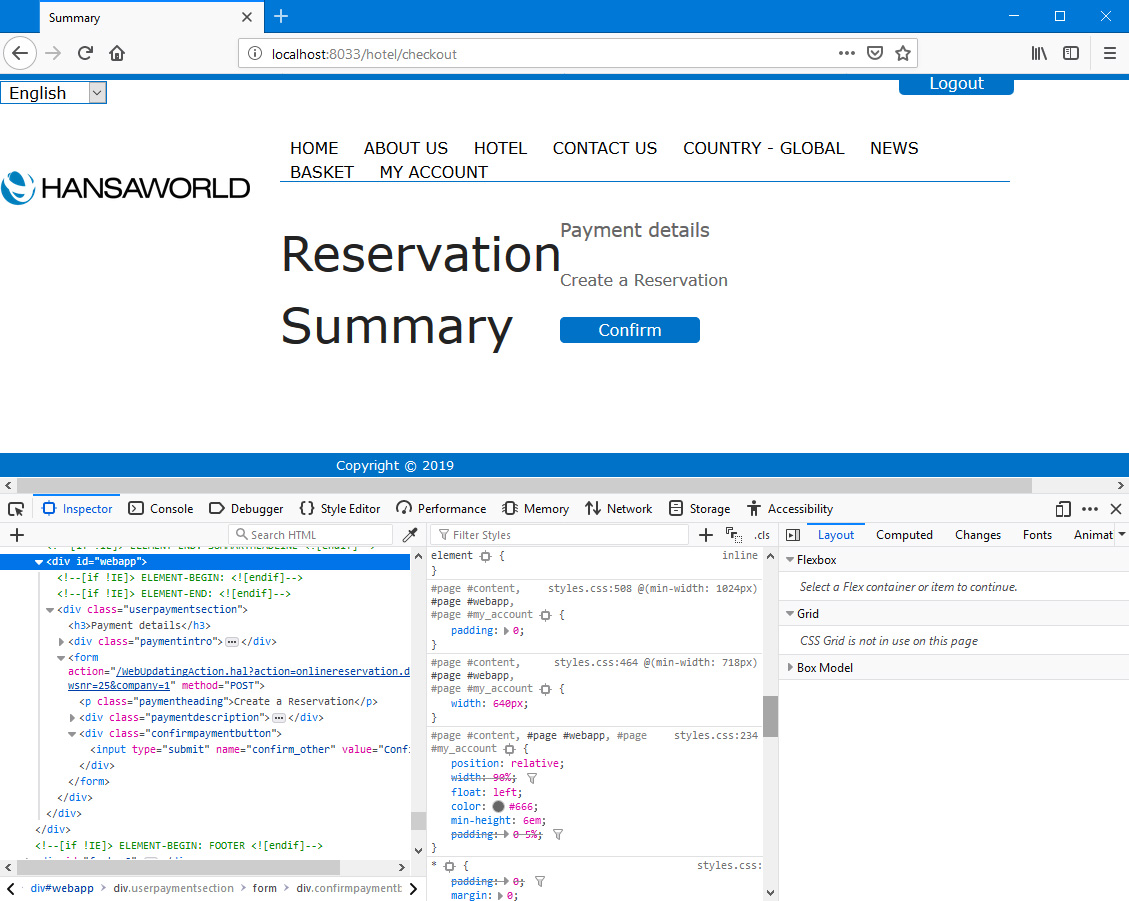
When the user presses [Confirm] (
Web Text 25740), they will be taken to the /confirmed sub-node, the last step in the online reservation process that will confirm that their Reservation has been received. This sub-node is described later on this page. If you have selected the
Generate Down Payment Invoice option in the Online Reservation Settings setting, a
Down Payment Invoice will be created and attached to the Reservation. If you have specified a Confirmed Status in the Hotel Settings setting, the Status of the Reservation(s) will be changed to that Status.
In the illustration above, the following attributes are assigned automatically by Standard ERP (i.e. you will not be able to change these attributes, but you will be able to apply styling to them in your .css file):
- <div class="userpaymentsection"> (used for the entire summary area)
- <div class="paymentintro"> (used for the Payment Details Element if there is one. The Payment Details Element is described below)
- <form> (used for the summary area below the previous <div>)
- <p class="paymentheading"> (inside the previous <form>, used for the "Create a Reservation" (Web Text 25738) text)
- <div class="paymentdescription"> (used for the Reservation Template Element if there is one. The Reservation Template Element is described below)
- <input> inside <div class="confirmpaymentbutton"> (used for the [Confirm] button (Web Text 25740))
You can use the following options to change the appearance of the /checkout sub-node:
- By default, the browser page displaying the /checkout sub-node will be based on the Page specified in the Structure record for the "Online Reservation App" Node. Specify a Template Page in the "Summary/Checkout page" section on the 'Step 5' card in the Online Reservation Settings setting in the Hotel module if you would like it to be based on a different Page (this Template Page will also be used for the /summary sub-node). In the illustration, we have specified a Template Page in the Online Reservations Settings setting so that the headline "Reservation Summary" can be displayed to the left of the summary area.
- Using the Progress Element field in the "Summary/Checkout page" section on the 'Step 5' card in the Online Reservation Settings setting, you can add an Element to the top of <div id="webapp">. This Progress Element will also be used by the /summary sub-node. Please refer to steps 1 and 2 on the 'Resort' page for an illustrated example.
- Using the Template Element field in the "Summary/Checkout page" section on the 'Step 5' card in the Online Reservation Settings setting, you can specify that a header and/or footer will be added to the beginning and end of <div id="webapp">. This Template Element will also be used by the /summary sub-node. Please refer to step 4 on the 'Resort' page for an illustrated example.
- You can insert an Element between the "Payment details" (Web Text 25736) <h3> heading and the <form> displaying the payment options (a "Payment Details Element"). To do this, specify the Element in the Payment Details field in the "Payment page" section on the 'Step 6' card in the Online Reservation Settings setting. This Element will be wrapped in <div class="paymentintro">.
- You can also insert an Element between the "Create a Reservation" (Web Text 25738) text and the [Confirm] button (a "Reservation Template Element"). To do this, specify the Element in the Template Element field next to the Reservation checkbox in the "Payment page" section on the 'Step 6' card in the Online Reservation Settings setting. This Element will be wrapped in <div class="paymentdescription">.
When the user presses the [Confirm] (
Web Text 25740) button, they will be taken to the /confirmed/Reservation_Number sub-node. This is the last step in the online reservation process. It confirms to the user that their Reservation has been received and displays the Reservation Number.
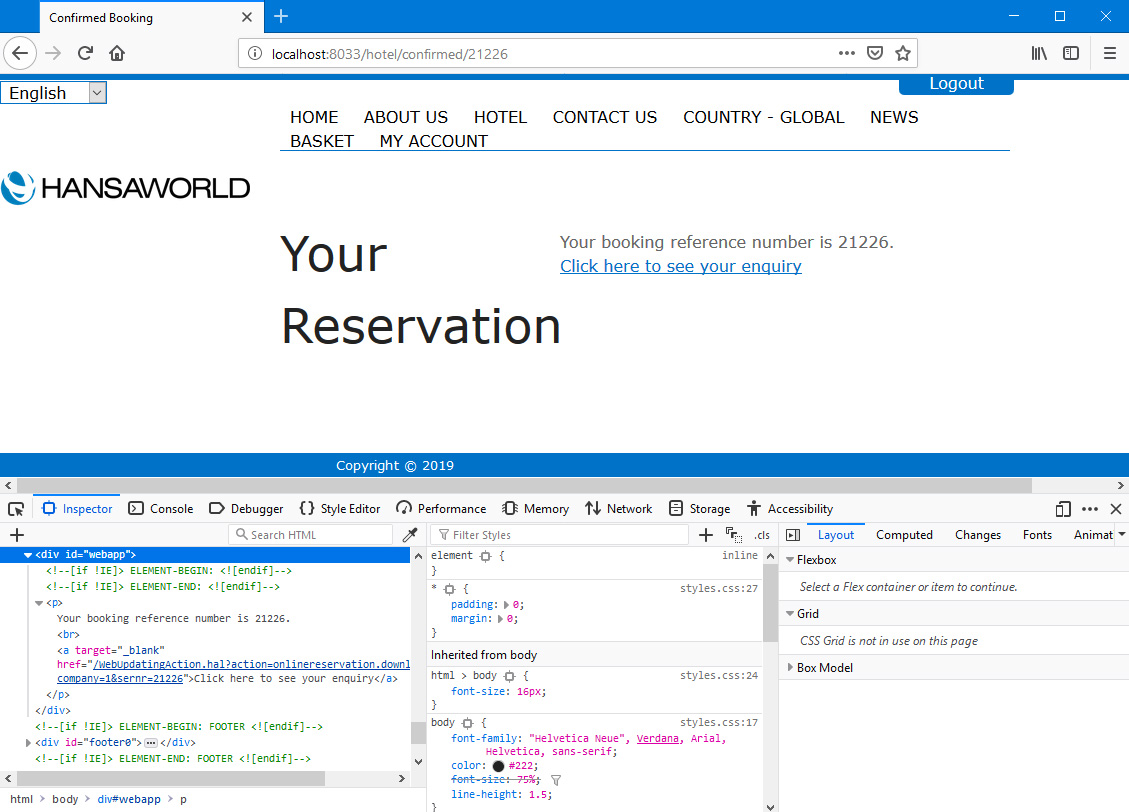
The link "Click here to see your enquiry" (
Web Text 25430) allows the user to download a PDF version of the Reservation. This requires you to have designed a suitable Form Template, and to have assigned that Form Template to the
Reservation Enquiries form using the
'Define Form' function. If you are using the
Generate Down Payment Invoice option in the Online Reservation Settings setting, the "Click here to see your enquiry" link will be replaced by "Click here to see your invoice" (
Web Text 25411) which will allow the user to download a PDF version of the Down Payment Invoice. This will use the Form Template that you assigned to the
Invoices Form.
You can use the following options to change the appearance of the /confirmed sub-node:
- By default, the browser page displaying the /checkout sub-node will be based on the Page specified in the Structure record for the "Online Reservation App" Node. Specify a Template Page in the "Confirmation page" section on the 'Step 6' card in the Online Reservation Settings setting in the Hotel module if you would like it to be based on a different Page. In the illustration, we have specified a Template Page in the Online Reservations Settings setting so that the headline "Confirmation of Reservation" can be displayed to the left of the summary area.
- Using the Progress Element field in the "Confirmation page" section on the 'Step 6' card in the Online Reservation Settings setting, you can add an Element to the top of <div id="webapp">. Please refer to steps 1 and 2 on the 'Resort' page for an illustrated example.
- Using the Template Element field in the "Confirmation page" section on the 'Step 6' card in the Online Reservation Settings setting, you can specify that a header and/or footer will be added to the beginning and end of <div id="webapp">. Please refer to step 4 on the 'Resort' page for an illustrated example.
You can use the
Web Texts setting to change the following texts:
| Node/Sub-Node | Default Text | Web Text Code |
| | |
| /checkout | Payment details [<h3> headline] | 25736 |
| /checkout | Create a Reservation | 25738 |
| /checkout | Confirm [button label] | 25740 |
| /confirmed | Your booking reference number is | [include the trailing space as the Reservation Number will be added as a suffix] |
| /confirmed | Click here to see your enquiry | 25430 |
| /confirmed | Click here to see your invoice | 25411 |
The Online Reservation App in Standard ERP:
---
Go back to: