Adding an Online Reservation App to Your Site
This page describes adding a hotel room booking feature to a website the following Structure Type:
All the settings and registers mentioned on this page are located in the Webshop and CMS module or in the Hotel module unless otherwise specified.
---
The online reservation app is in effect a separate application within the Webshop and CMS module. This separate application allows customers to book hotel rooms through a webshop.
Using the online reservation app requires an https connection. You should therefore obtain an SSL certificate and private key as described on the Obtaining and Configuring an SSL/TLS Certificate page and place them in the folder containing your Standard ERP server application.
After obtaining the certificate, open the Program Mode register in the Technics module. Select the Use HTTPS option on the 'Web' card, specify an HTTPS port and fill in the Certificate and Private Key fields (and the Password field if a password was set up for the SSL certification process). It is usual practice to use 443 as the HTTPS port, so it is recommended that you use that port number. The Certificate and Private Key fields should contain the location (path) of the certificate and the private key.
For testing purposes only, you can configure the online reservation app in an official HansaWorld sample data file. This will allow you to test the full process over an http connection. This method has been used in this documentation when producing the illustrations. Do not use this method for your live site because an http connection is not in any way secure and because it will not be possible to print any forms.
To add a hotel room booking feature to your website, follow these steps:
- Working in the Webshop and CMS module, add a record to the Structure register in which the Type is "Online Reservation App". This record will define the URL of the hotel room booking area in the website:
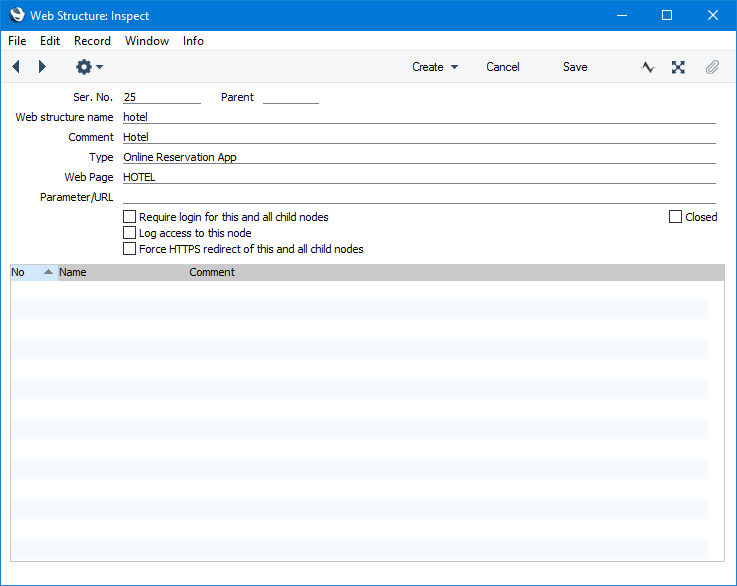
In this example we have already named the Page that we will go on to create in step 2.
Note that it will not be possible for browser users to go to the exact URL created by the Web structure name. For example, if the Web structure name is "hotel" as shown in the illustration, users will not be able to go to https://domainname/hotel. They will automatically be redirected to Webshop_App_Web_structure_name/resort (e.g. to https://domainname/hotel/resort). "resort" is hard-coded. So, when you add a menu or a button to take browser users to the hotel room booking area in your webshop, you can specify that the menu or button will take users to Webshop_App_Web_structure_name or to Webshop_App_Web_structure_name/resort: the end result will be the same.
- Add a new record to the Page register that you will then use to list the Elements that will be displayed on the hotel room booking page.
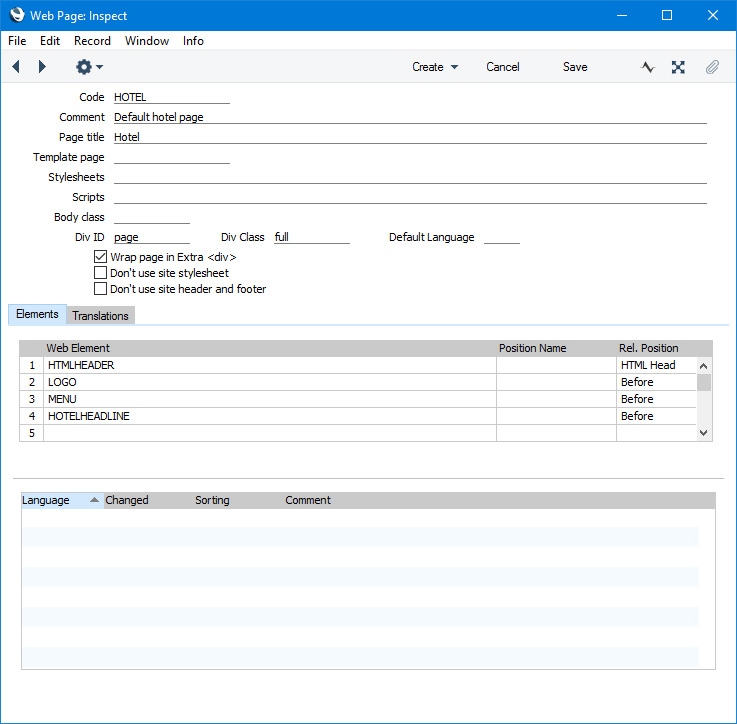
When the Type of the Structure record is "Online Reservation App", the "Content" Rel. Position will be occupied by hotel room booking features (e.g. areas where users can choose the resort, the room type and dates of stay and specify the number of guests, etc). These features will be placed in the "Content" Rel. Position automatically. Because of this, any Elements that you place in the "Content" Rel. Position will not be displayed. You will therefore be limited to the "Before" and "After" Rel. Positions, depending on where you need your Elements to appear relative to the room booking features. This in turn may prevent you from using the usual template in the Page. Usually, you will have specified that template Elements will be placed in the "Before" Rel. Position, and these will not be displayed if you place any Elements in that Rel. Position in the current Page. In the example illustrated below, we have not used a template, and instead we have included the Elements from the template in the Page. We have also used the same Div ID and Div Class that we used in the template. We are not using the template because we will go on to add further Elements that are not needed in the usual template (for example, the headline Element that we have already added to the Page in the illustration above). An alternative method to the one we are using here might be to create a second template that we will only use for this Page.
The area of the page occupied by the "Content" Rel. Position displaying webshop information (e.g. areas where users can choose the resort, the room type and dates of stay and specify the number of guests, etc) has been given the name "Hotel Area" in this documentation. This whole area will be wrapped in a <div> with ID "webapp":

The size of the Hotel Area (i.e. the <div id="webapp">) will be adjusted depending on its contents. In the illustration above, this area contains the /resort sub-node, where browser users will be able to choose the resort where they wish to stay.
As mentioned above the illustration, the Hotel Area can display areas where users can choose the resort, the room type and dates of stay and specify the number of guests, etc, the contents of the basket (confirming booking details) or the checkout. Each of these is a separate step in the booking process with its own sub-page within the Online Reservation App. The URL of each sub-page will include a sub-node that represents the type of page being displayed, as follows:
The Page that you add in this step will be used for each of these sub-nodes i.e. it will determine the Elements that will be placed around the Hotel Area in a browser, irrespective of what is within the Hotel Area. If you would like to use different Pages for each sub-node, use the Online Reservation Settings setting as described in step 4 below.
- Add a menu item or link to the Structure from step 1. In this example, we have added a record to the Menu register:
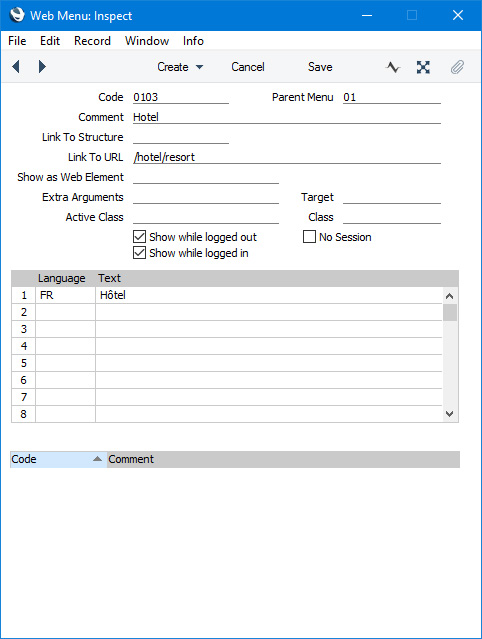
As usual, you can enter the Code of the Structure record in the Link to Structure field, or (as shown in the illustration) you can enter the Web structure name in the Link to URL field. As mentioned in step 1, you can enter Webshop_App_Web_structure_name or Webshop_App_Web_structure_name/resort.
- To activate the Online Reservation App, change to the Hotel module, open the Online Reservations Settings setting and select the Online Reservations Activated option:
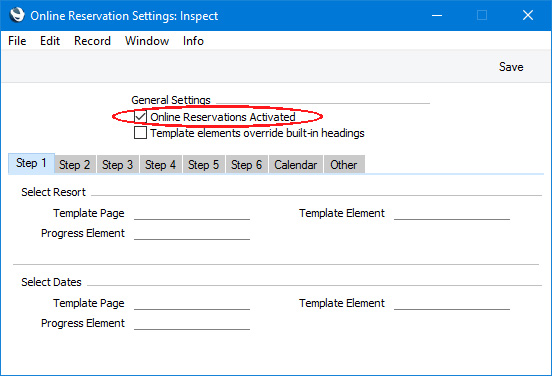
As previously mentioned, the Page that you specified in the Structure record in step 1 and that you created in step 2 will be used for each sub-node in the Online Reservation App. If you would like different Pages to be used for each sub-node, specify these Pages using the Template Page fields in the same setting, as follows:
| Card in Setting | Sub-Node |
| | |
| Step 1 | /resort (i.e. use the 'Step 1' card in the setting to specify the Page and/or Template and Progress Elements for the /resort sub-node) |
| Step 2 | /dates |
| Step 3 | /rooms |
| Step 4 | /guests |
| Step 5 | /summary and /checkout |
| Step 6 | /confirmed |
| Calendar | /availability/Room_Type_Code |
| Other | /register |
For example, you can specify different Pages to change the headline that is shown in each sub-node. This has been done in the example illustrations in this documentation.
You can also add headers and footers to be the first and last Elements in the <div id="webapp">. Each sub-node can have different headers and footers. Please refer to the description of the /resort sub-node for an illustrated example.
Having added a hotel room booking feature to your website, please refer to the following pages for details about each sub-node:
---
Go back to: