Obiekty - w HansaWorld Enterprise
Obiekty w HansaWorld można wykorzystać do klasyfikowania zapisów księgowych. W tej części zaprezentujemy wykorzystanie Obiektów dla analiz sprzedaży według regionu, branży, sprzedawcy i sprzedanego asortymentu. Jeśli Twoja firma posiada wiele oddziałów lub prowadiz kilka rodzajów działalności, możesz wykorzystać obiekty do analizy sprzedaży dla oddziału czy działalności. Do każdego zapisu księgowego można przypisać do 30 obiektów (20 to limit ze względów praktycznych), umożliwiając szerokie możliwości analityczne. Oto jak ustawimy system w naszym przykładzie:
- Definicję należy rozpocząć od określenia Typów obiektów w ustawieniu w module Księga Główna. W naszym przykładzie potrzebujemy cztery typy obiektów : region, branża, sprzedawca i asortymant.
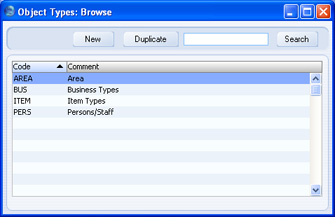
- Następnie definiujemy Obiekty w kartotece Obiekty dostępnej w modułach Księga głowna oraz System. Każdy obiekt musi być przyporządkowany do odpowiedniego typu.

- Każdemu pracownikowi działu sprzedaży w kartotece Osoby w module System można przypisać odpowiedni Obiekt na zakładce 'Konta' card:
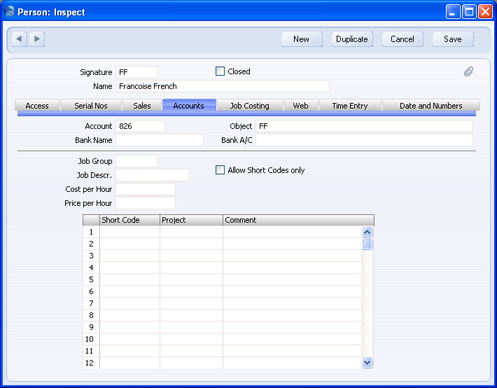
W naszym przykładzie pozwoli to dokonywać analiz według sprzedawcy. Odpowiedni obiekt będzie automatycznie pobrany przez system przy sprzedaży dokonanej przez danego pracownika. Obiekty dotyczące pracowników są również wykorzystywane przez moduł Wydatki pracownicze. Jeśli wykorzystujesz ten moduł zalecamy przyporządkowanie do osób indywidualnych kont rozrachunków z pracownikami do ewidencji zaliczek i ich rozliczania (konto 826 na ilustracji powyżej). W innym przypadku należy przynajmniej przypisać oddziene Obiekty dla każdeog pracownika. Tylko jeśli dla każdej ososby będzie unikalna kombinacja konto/obiekt raport Okresowe zestawienie pracowników będzie poprawnie prezentował salda dla każdej osoby. - Wprowadzając nowego
odbiorcę do kartoteki Kontrahenci możesz przyporządkować mu Obiekt. Będzie on automatycznie wstawiony we wszystkie dokumenty związane ze sprzedażą dla tego odbiorcy. Do jednego odbiorcy można przypisać wiele obiektów jednocześnie oddzielając je przecinkiem. Pole Obiekt może zawierać do 60 znaków. Jak wspomniano już wcześniej oznacza to, że do odbiorcy możesz przyporządkować do 30 obiektów. Jednakże porponujemy aby kod obiektu posiadał min. 2 znaki, co ogranicza tę liczbę w praktyce do 20 obiektów.
Dla każdego odbiorcy przyporządkuj po jednym obiekcie należącym do typu "AREA" i "BUS" wstawiając je w pole Obiekty - sprzedaż na zakładce 'Konta księgowe' oddzielając je od siebie przecinkiem.
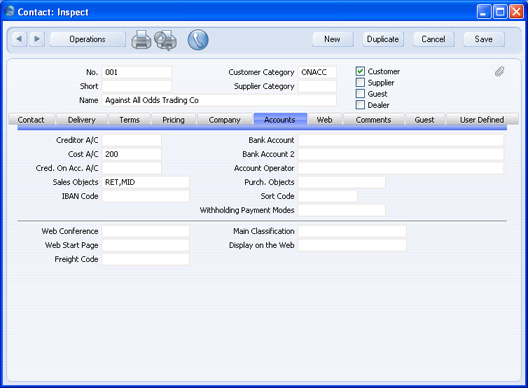
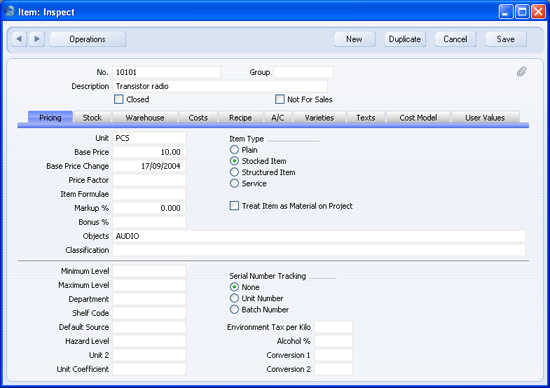
Nie podawaj więcej niż jeden obiekt należący do tego samego typu. Nie ma potrzeby wskazywania obiektu związanego ze sprzedawcą, gdyż zostanie on pobrany do każdego dokumnetu z karty osoby. Pole Obiekt działa podobnie jak pole Klasyfikacja na karcie 'kontrahenta'. Oba mogą zawierać kilka wstawionych informacji oddzielonych przecinkiem i w niektórych sytuacjach mogą to być te same dane. Pole Klasyfikacja umożliwi dokonywanie analiz dla celów związanych z CRM (marketing, mailingi, itp.), natomiast pole Obiet umożliwi analizy finansowe w księdze głównej. W naszym przykładzie region i branża klienta może być informacją niezbędną w obu przypadkach, więc informacje na tn temat powinny być określone w poul Klasyfikacja i Obiekty - sprzedaż. - Wprowadzając towar do kartoteki Towary możesz w nalogiczny sposób przypiać do niego Obiekt w polu Obiekty na zakładce 'Ceny'. W naszym przykładzie podaj Obiekt wskazujący na typ asortymentu, do ktorego należy dany towar. Jak zaprezentowano na ilustracji obiekt powinien wskazywać ogólny typ asortymentu nie zaś opisywać jego konkretny model (np. do towaru Radio przypisaliśmy obiekt określający typ asortymentu audio):
- As already mentioned, the Objects assigned to each Customer, Person and Item will automatically be transferred to all sales transactions. However, there may be Customers or Items that do not have Objects, perhaps because there was insufficient information to be able to assign the correct Objects when the record was first created (e.g. it was not possible to assign an Object belonging to the "BUS" Type because the nature of the Customer's business was not known). As a result, sales transactions using these Customers or Items will not contain the complete set of Objects, so the subsequent Object analysis will be incomplete if not inaccurate.
To guard against this, use the Object Type Control setting in the Nominal Ledger to ensure that every sales transaction contains Objects belonging to the correct Types:
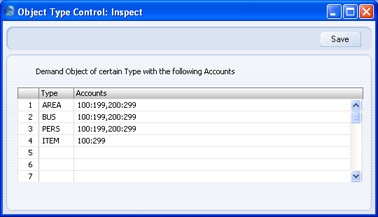
In the example illustrated above, we have specified that whenever we use an Account between 100 and 199 (i.e. any of our Sales Accounts) or one between 200 and 299 (i.e. any of our Cost of Sales Accounts), it must be together with Objects belong to each of the "AREA", "BUS", "PERS" and "ITEM" Object Types. We will not be able to save the transaction if an Object belonging to at least one of these Types is missing. Accounts 100 and 199 are separated by a colon, signifying a range i.e. all Accounts between 100 and 199. Use a comma to separate the two ranges 100:199 and 200:299: this has been done in the example to illustrate separating two ranges of Accounts, although in this case as shown on the last line we could also use one large range to the same effect.
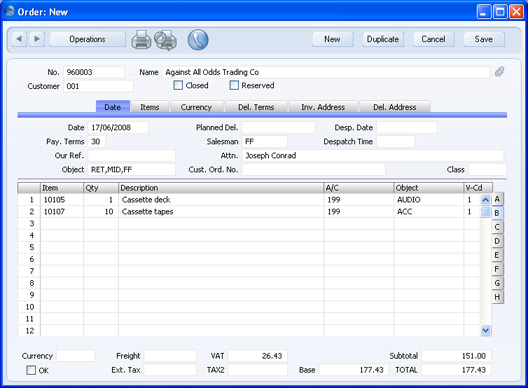
- Whenever you use the Customer in a Sales Invoice or in any record that will eventually lead to an Invoice (i.e. Quotation, Order, Project, Service Order), the Customer's Objects and that of the Salesman will be brought in automatically. In the case of the Order, they will be visible in the field on the 'Date' card. When you add Items to the Order, their Objects will be brought in to flip B of the 'Items' card:
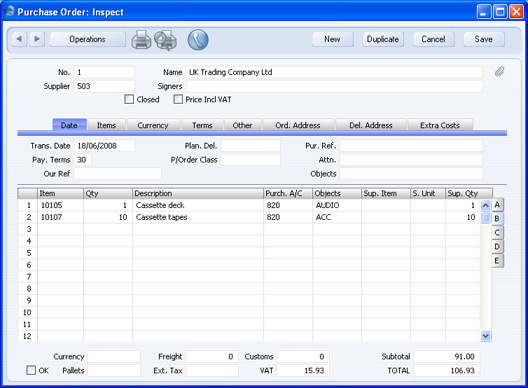
- If you need to raise a Purchase Order for the Items on the Sales Order, the Objects from the Items are again brought in to flip B of the Purchase Order:
From the Purchase Order, these Objects are transferred to the Goods Receipt: 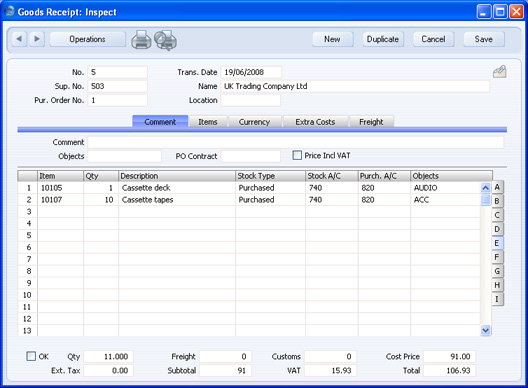
In the resulting Nominal Ledger Transaction, these Objects are assigned both to the credit posting to the Purchase Accruals Account and to the debit posting to the Stock Account. 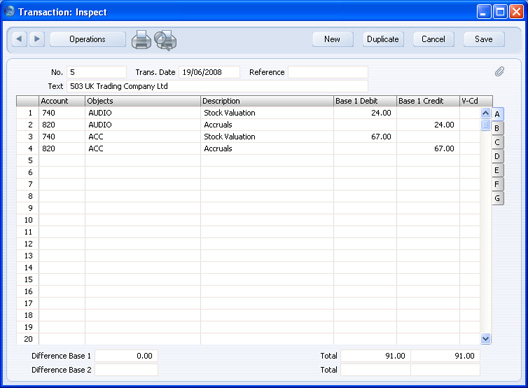
When you create the Purchase Invoice from the Purchase Order, the Objects are again included: 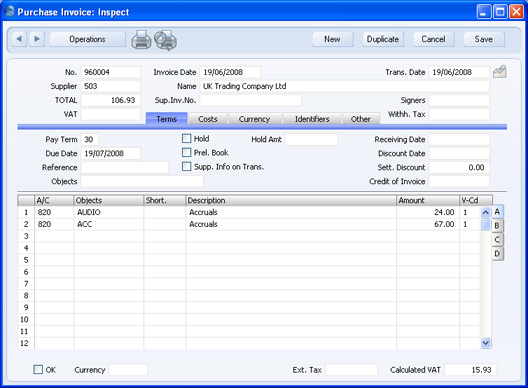
These are transferred to the debit postings to the Purchase Accruals Account(s): 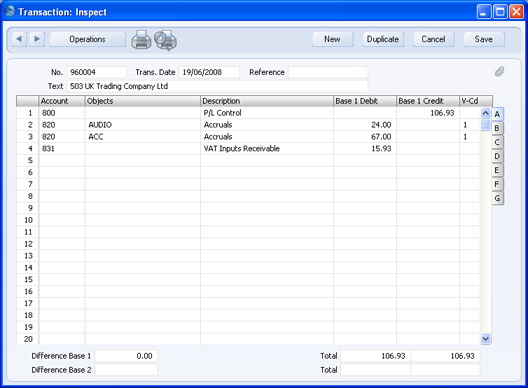
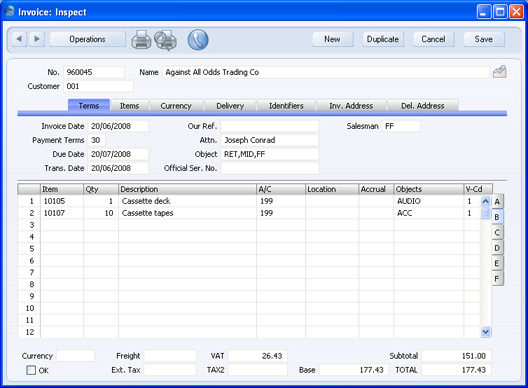
- On the sales side, the Customer, Person and Item Objects will all be transferred from the Order to the Delivery and to the resulting Invoice:
At any stage in the process, you can change the Objects (subject to Object Type Control if you are using that setting as described in step 6 above) or add extra ones if you need to. If a record already contains an Object and you decide to choose a new Object using the 'Paste Special' feature, type the comma or colon before opening the 'Paste Special' list. This will cause the next Object to be added to the one(s) already there. Otherwise, the previous Object will be overwritten.
Usually, the 'Paste Special' list of Objects is the standard one: 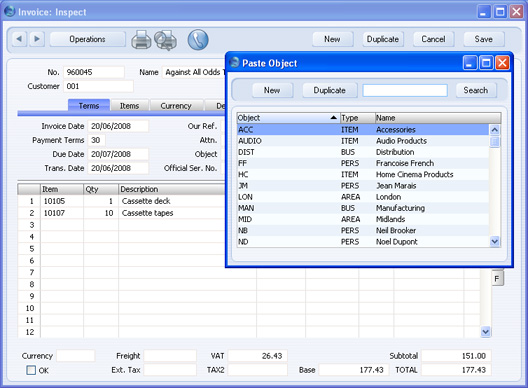
You can find the Object that you need by sorting the list by Object, Type or Name.However, if you are using the Object Type Control feature, the standard 'Paste Special' list when opened from the Invoice will be replaced by the 'Assisted Object Entry' window: 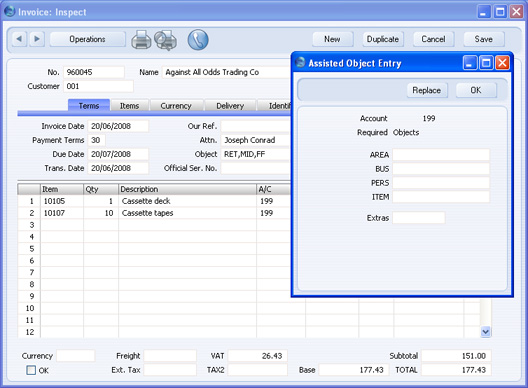
In the example illustrated above, we opened the 'Assisted Object Entry' window from the Object field on flip B of the 'Items' card. The window therefore prompts us to enter Objects belonging to the "AREA", "BUS", "PERS" and "ITEM" Object Types, since we have to use Objects belonging to these Object Types together with all Sales Accounts. Using 'Paste Special' in the usual way, enter an Object belonging to each Type in the appropriate field. 'Paste Special' here will only list the Objects belonging to the Type in question. Use the Extras field if you want to add another Object belonging to a fifth Type. - When we approve and save the Invoice, the "MID" and "RET" Objects from the Customer, the "FF" Object from the Person and the appropriate Object from the Item will be attached to the postings to the Sales and the Cost of Sales Accounts. These Objects will be arranged in alphabetical order automatically:
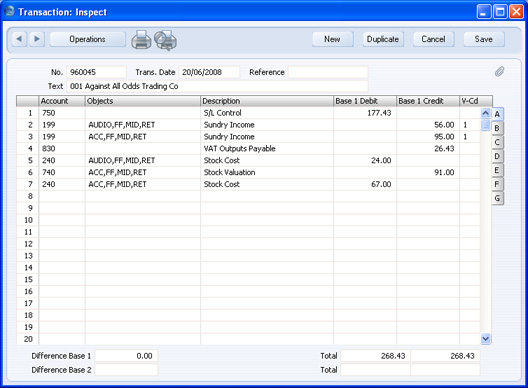
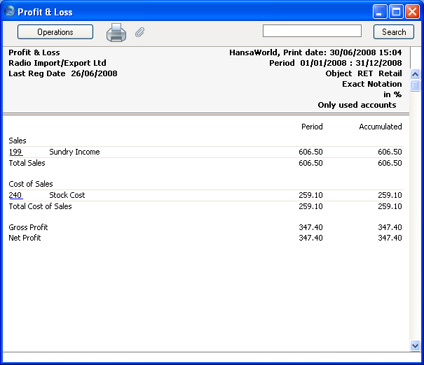
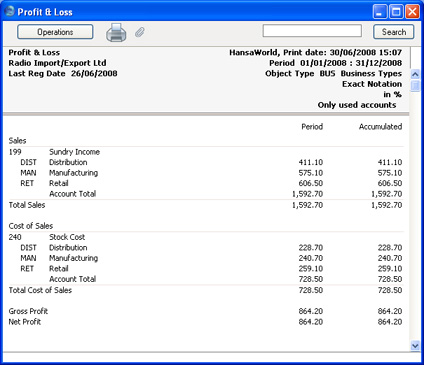
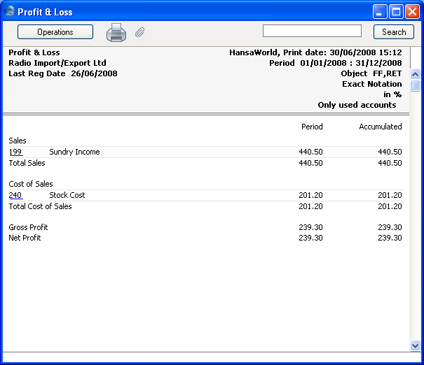
In this illustration, as we are using the Object on Stock Account option in the Cost Accounting setting, the Objects have also been attached to the posting to the Stock Account. - As shown in the previous steps, once you have allocated Objects to your Customers, Persons and Items, they will be transferred via every Invoice to the Nominal Ledger automatically. After entering some more transactions to make the example more complete, you can now produce Profit & Loss reports for each Object, or for any Object combination. For example, to see the profitability of sales to retail Customers, produce a report for the "RET" Object:

This is the resulting report:
You can produce a report for the "BUS" Object Type, to compare the profitability of each Object belonging to that Object Type:
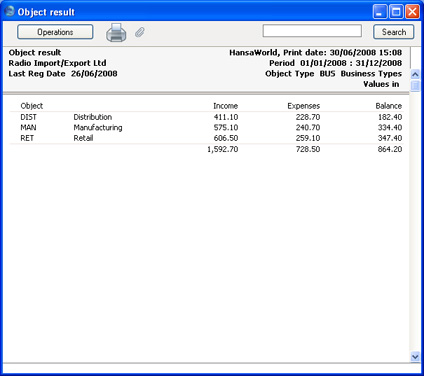
If you need to see individual profit figures for each Object belonging to the "BUS" Object Type, produce an Object Results report for this Object Type:
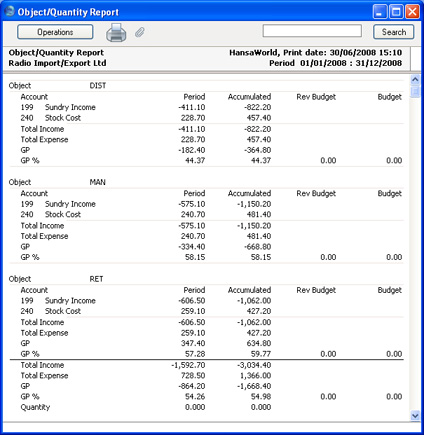
If you need to see individual profit and margin figures for each Object belonging to the "BUS" Object Type, produce an Object/Quantity Results report for this Object Type:
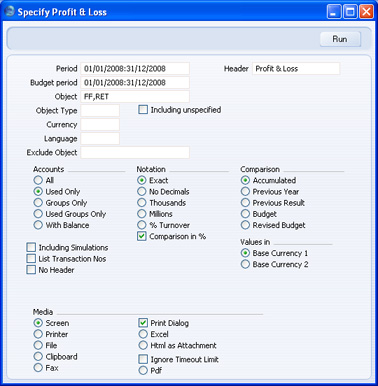
You can also produce reports for a combination of Objects. For example, to report on sales by Person FF to retail Customers, produce a report for the "FF" and "RET" Objects, separated by a comma:
Because you specified two Objects separated by a comma, the calculations in the report will only use those postings with both Objects:
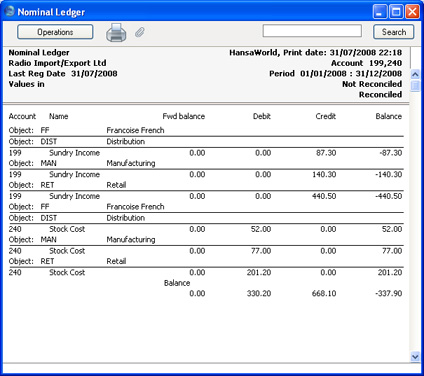
The Nominal Ledger report offers exceptionally powerful multi-level Object analysis. For example, you can use it to list the sales Person FF made to each member of the "BUS" Object Type, by entering Object "FF" in the Loop 2 field and Object Type "BUS" in the Loop 3 field. In this example, we are reporting on Accounts 199 (sales) and 240 (cost of sales):

This is the resulting report (produced using the Show Object and Balances Only options for clarity):
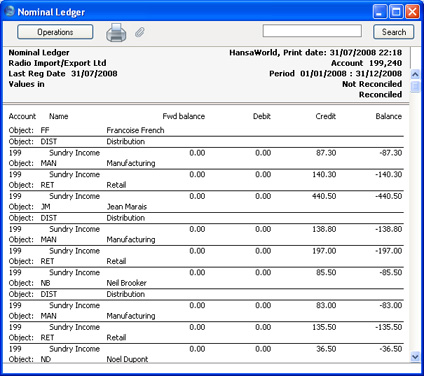
If we change the Loop 2 field to the "PERS" Object Type, the report will show the sales made by each Person (i.e. each member of the "PERS" Object Type) to each Business Type:
As shown above, the Object feature is a very powerful one, allowing you to produce profitability reports in the Nominal Ledger for any cost centre (e.g. departments, Customer and Item types, employees and geographical areas) on its own or in any combination.
If you have the Job Costing module, you can also assign a dedicated Object to each Project. This Object will be attached automatically to every transaction related to the Project (e.g. Items supplied, work done, expenses incurred), so Project profitability will be easy to ascertain. Any work carried out by an employee will contain that employee's Object in addition to the ones for the Project and the Customer, once again allowing very detailed analysis.
All Objects can span several years. This is a consequence of the continuous database used by HansaWorld Enterprise, where the end of year is simply a user-defined reporting interval. The Object balances are thus automatically transferred from one fiscal year to the next. This gives you the ability to keep track of the budget and results of an Object (e.g. a building project) for several years.
You can close an Object, to prevent further postings to it. Working in the Object register (in the Nominal Ledger or the System module), switch on the Closed check box to close it. If you want to open the Object again later, you simply click in the box again to remove the check.
You can use the hierarchical Objects feature to help make assigning Objects easier and faster and reduce the risk of making mistakes. Please click here for details.
|