Operations Menu - Delivery - Print Freight Labels
This page describes the 'Print Freight Labels' function on the
Operations menu in the Delivery record window. If you are using iOS or Android, the 'Print Freight Labels' function is on the Tools menu (with 'wrench' icon).
---
If you need to print Freight Labels for a particular Delivery, you can do so using the following methods:
- While entering or inspecting a Delivery, select 'Print Freight Labels' from the Operations menu (Windows/macOS) or Tools menu (iOS/Android).
- If you need to print Freight Labels from Deliveries in batches, first ensure you are in the Stock module. Then, if you are using Windows or macOS, click the [Forms] button in the Home Screen or use the Ctrl-D/z-D keyboard shortcut. Double-click 'Freight Labels' in the 'Forms' list window, or select it and press the Enter key. If you are using iOS or Android, tap the [Routines] button in the Home Screen and then tap [Forms]. Tap 'Freight Labels' in the 'Forms' list window. In both cases, enter the Number of the Delivery (or range of Delivery Numbers) for which labels are to be printed and press [Run].
- You can also have Freight Labels printed automatically when you save Deliveries after marking them as OK. Select one of the Delivery Freight Label options on the 'Labels' card in the Auto Actions setting in the System module:
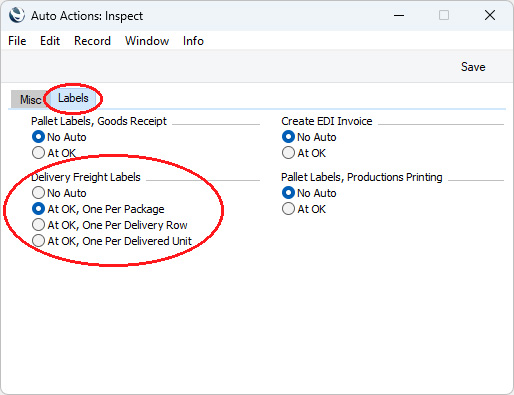
You can specify how many labels will be printed from an individual Delivery. The options are:
- One per Package
- One label will be printed for each Package in a Delivery. The number of Packages will be taken from the Packages field on the 'Packaging' card in each Delivery. If the Packages field is empty in a Delivery, one label will be printed for that Delivery.
- One per Delivery Row
- One label will be printed for each row in a Delivery.
- Labels will not be printed for any rows with Items belonging to an Item Group in which you have selected the Do Not Print Freight Labels option. This may be useful for Service Items such as labour.
- One per Delivered Unit
- One label will be printed for each unit in a Delivery. For example, if the Del. Qty in a row is 3, three labels will be printed for that row.
- As with the previous option, labels will not be printed for any rows with Items belonging to an Item Group in which you have selected the Do Not Print Freight Labels option. Labels will also not be printed for any rows that do not have Item Numbers.
If you print Freight Labels using method 1 above, by default they will be printed using the
1 per Package option. However, if you have selected one of the other options in the Auto Actions setting, that option will also apply to method 1. For example, if you have selected the
At OK, 1 per Item option in the Auto Actions setting, the 'Print Freight Labels' function will also use the
One per Item option.
You can prevent Freight Labels being printed for Deliveries with particular Delivery Modes. To do this, select the Do Not Print Freight Labels option in the appropriate Delivery Mode records, using the setting in the Sales Orders module.
To specify the Form Template that will be used when you print Freight Labels, follow these steps using Windows or macOS (not iOS or Android):
- Design the label Form Template using the Form Template register in the System module. Use the 'Properties' function on the Operations menu to name the Form Template (in this description, we have used the name "FREIGHT_LABEL") and to assign it a Form Type of "Delivery Labels". A full list of the fields you can include in the Template design can be found here.
Usually when designing Form Templates that will be used to print labels, you should use fields with Field Arguments and no Fieldnames to have static text printed on the labels (i.e. text that identifies the information on the labels, such as "Item Name"). As each Freight Label will be printed on a separate page, you don't need to use this method in the Form Template that will be used by the Freight Labels form. Instead you can use text objects as you would in Form Templates that will not be used to print labels.
A file containing samples of each Form Template including a sample "FREIGHT_LABEL" is supplied with Standard ERP: if you want to use these samples as templates for your own designs, import the "UKForms.txt" file as described on the Importing Set-up Data page.
- Having designed the Freight Label Form Template, you should now specify that it should be used when printing Freight Labels. Select the Stock module using the [Switch Module] button in the Home Screen.
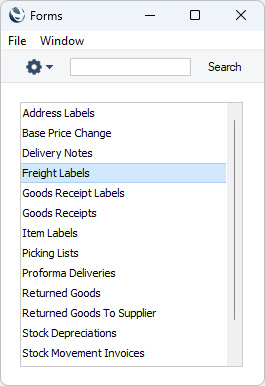
- Click the [Forms] button, also in the Home Screen, or use the Ctrl-D/z-D keyboard shortcut. The 'Forms' list window is opened: highlight 'Freight Labels'.
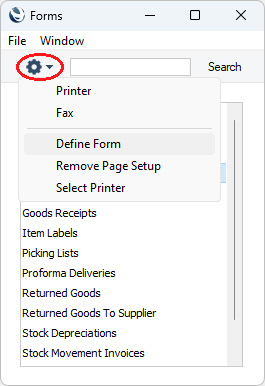
- Select 'Define Form' from the Operations menu (with "cog" icon):
- In the subsequent 'Form Definition' window, enter "FREIGHT_LABEL" in the Form Template field in the first row (you can use 'Paste Special' to ensure the spelling is correct).
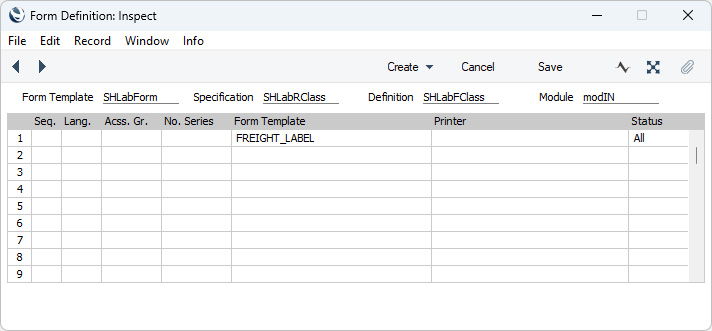
- Click [Save] to save the Freight Label form definition. From now on, the Form Template that you have designed will be used when you print Freight Labels using any of the methods listed at the beginning of this page.
---
The Delivery register in Standard ERP:
Go back to:


 Introduction to the Delivery Register
