Creating a Report Generator Report - Specifying the Primary Register
This page describes adding a primary register to a new Report Generator report.
---
After creating a new Report Generator report, the first task is to specify the register that will be the basis of the report (the report's "primary" register). The report will be constructed by looping once through the records in the primary register (usually a report will be a list of the records in the primary register). In the case of the example Customer List that we are using in this documentation to illustrate the process of creating Report Generator reports, the primary register will be the Contact register. Follow these steps:
- On the 'Data' card of the 'Report Definition: New' window, click the [Register] button above the report display area. The 'Register' dialogue box opens:
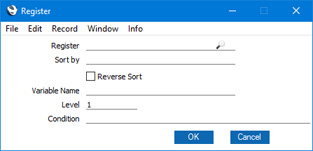
- Register
- Paste Special
Registers in Standard ERP
- Choose the register that is to provide the basis of the report. Use the 'Paste Special' function to ensure the register name is spelt correctly.
- Sort by
- Paste Special
Fields and indexes in the selected register
- Use this field to specify the sort order that you want to be used in the report.
- Each register contains a number of pre-defined sort orders. Each sort order is known as an "index". An index might include a secondary or even a tertiary sort order (e.g. you can select an index to sort Contacts by Customer Category and then by Contact Number). You can sort by a single field, or you can choose one of the pre-defined indexes. The 'Paste Special' list is a list of fields in the
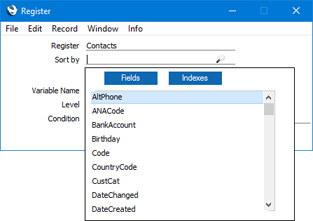
- Click the [Indexes] button to see the indexes in the register in question.
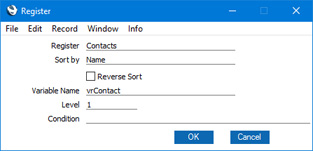
- In the example Customer List, we will specify that the report will list records in the Contact register in Contact Name order.
- Reverse Sort
- By default, the sort order that you specify in the field above will result in a report sorted in ascending order (e.g. from 1 to 10). Select this option if you want the report to be sorted in descending order (from 10 to 1).
- Variable Name
- Enter a name for the variable that will contain the records that will be printed in the report. These records may be the entire contents of the register, or they may be a selection resulting from a search.
- You may need to refer to this variable elsewhere in the Report Definition, and therefore you need to give it a name. Do that here. Include at least one alpha character in the name and do not use spaces or punctuation marks of any kind. Use the underscore _ instead of a space.
- Level
- A Report Definition can contain a number of levels, allowing the printing of information from several registers. For example, you might want to print a Customer List that shows outstanding Invoices for each Customer. This list could include total outstanding amounts for each Customer. The first Customer will be printed in the report, then that Customer's Invoices, then the second Customer, then that Customer's Invoices, and so on. The primary register in this case is therefore the Contact register, so this is the Level 1 register. The secondary register is the Invoice register, so that register would occupy Level 2.
- In the example of a simple Customer List with no related information, there is only one Level, so this field should be set to 1.
- Condition
- If necessary, enter a condition that must be met for the register to be processed (i.e. for the report to loop through the records in the register). For example, you may be designing a report that will simply list the records in various registers, and you intend that the person producing the report will choose the registers that will be printed by selecting radio button or check box options in the specification window. When the user selects a check box or radio button, this will set a variable to true. In the Condition field for each register, specify that the register will only be printed if the corresponding variable is true. Please refer here for an example.
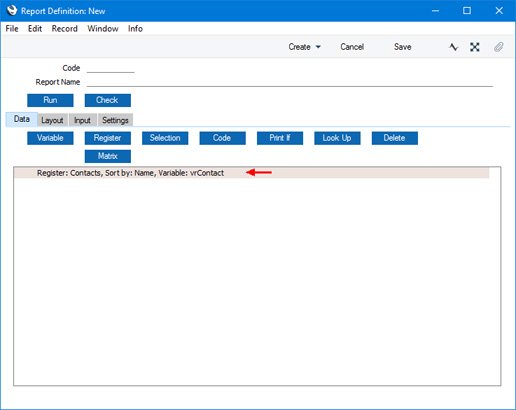
- When the 'Register' dialogue box is complete, click the [OK] button to close it. A line of text summarising the information that you entered will be placed in the report display area. Each line in the report display area begins with an identifying word, in this case "Register:":
Having specified the primary register, please refer
here for details about designing the appearance of the report.
---
Creating a Report Generator Report:
Go back to: