Introduction to the Transaction Register
In a company, all accounting events are entered as Transactions. Depending on the nature of the Transaction, this can be done directly to the Transaction register or remotely from the Sales and Purchase Ledgers or the Stock module.In Hansa, you can decide which Transactions are be entered directly and which are to be created remotely from other Ledgers (or 'Sub Systems'). This is done using the Sub Systems setting.
Typically, Transactions representing Sales and Purchase Invoices, Receipts and Payments will be generated remotely from the Sales and Purchase Ledgers. Other types of transactions will be entered directly to the Transaction register: these might include bank transfers, overhead costs, salaries etc.
Before you start entering Transactions, you must ensure that you have defined the current financial (accounting) year, using the Fiscal Years setting in the System module. You should also have defined a basic journal number series for Transactions using the Number Series - Transactions setting in the Nominal Ledger.
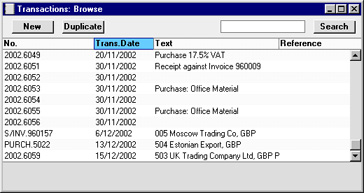
In the Nominal Ledger, select 'Transactions' from the Registers menu, or click the [Transactions] button in the Master Control panel. The 'Transactions: Browse' window is opened, showing a list of Transactions already entered.
! | In Hansa you may separate Transaction Date and Registration Date. This is particularly important in relation to your external reporting, e.g. the VAT reporting, and your internal accounting, where you may wish Transactions to go into the correct month. |
In the Text column you can see the short explanatory text that was entered for each Transaction. For those Transactions created from Sub Systems, the Text column usually shows details of the Customer or Supplier involved and, if appropriate, the Currency and Exchange Rate used.
As in other lists you may sort the Transactions by the contents of the different columns. The current sort column is shown with its heading underlined. You can also scroll the list with the scroll bars. Finally, you can search for a record by entering a keyword in the field in the top right-hand corner. Hansa will search for the first record matching the keyword in the same column as the selected sorting order.
There are four things you can do with your Transactions:
- Enter Transactions
- Inspect Transactions
- Make corrections
- Print the Transactions
Entering a Transaction
To enter a Transaction, first open the Transaction register using the 'Transactions' item on the Registers menu or the [Transactions] button in the Master Control panel.Then, click [New] in the Button Bar or use the Ctrl-N (Windows and Linux) or ⌘-N (Macintosh) keyboard shortcut. Alternatively, highlight a Transaction similar to the one you want to enter and click [Duplicate] on the Button Bar.
The 'Transaction: New' window is opened, empty if you clicked [New] or containing a duplicate of the highlighted Transaction.
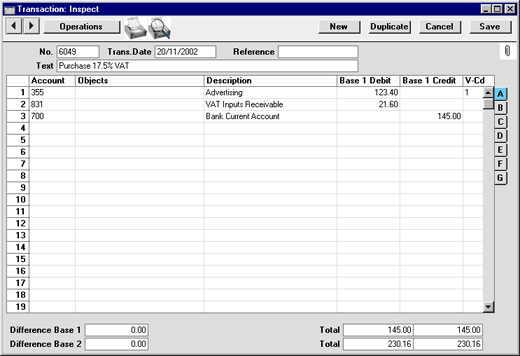
Entering a Transaction - Header

- No
- Paste Special
Select from another Number Series
- Transaction Number. When creating a new Transaction, Hansa will enter the next unused number from the current number sequence (set on the 'Ser Nos' card of the user's Person record) or from the Number Series - Transactions setting. You may change this number, but not to one that has already been used. If you are working in a multi-user environment, the Transaction Number is assigned when the Transaction is saved.
- Trans. Date
- Paste Special
Current Date
- The date of the Transaction does not have to coincide with the date when the Transaction was recorded. The last used Transaction Date is offered as a default.
- Reference
- An optional reference field whose contents are shown in the 'Transactions: Browse' window.
- Text
- A short description of the Transaction.
Entering a Transaction - Footer

- Difference
- Any difference between the sums of Debited and Credited amounts is shown here: the two sums must be the same before the Transaction can be saved. A balancing entry shows a zero balance.
- Total
- These two fields show the sums of Debits and Credits for this Transaction.
Entering a Transaction - Transaction Rows (Journal Postings)
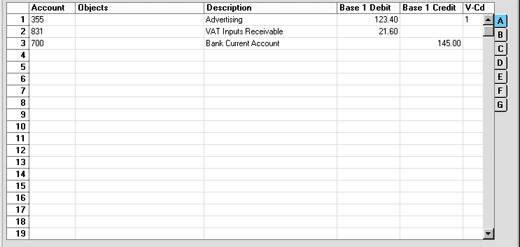
The Transaction row matrix is divided into seven horizontal flips. When you click a flip tab (marked A-G), the two or three right-hand columns of the grid are replaced.
Flip A
- Account
- Paste Special
Account register, Nominal Ledger/System module
- Specify here the Account used by the Transaction row.
- You can also enter the Code of an Autotransaction to this field. Autotransactions are used to automate the entry of frequently used Transactions, not only reducing labour but also ensuring the correct Accounts are used every time. Autotransactions are fully described here.
- You can also enter the Code of an Autotransaction to this field. Autotransactions are used to automate the entry of frequently used Transactions, not only reducing labour but also ensuring the correct Accounts are used every time. Autotransactions are fully described here.
- Object
- Paste Special
Object register, Nominal Ledger/System module
- Up to 20 Objects, separated by commas, can be assigned to this Transaction row. You might define separate Objects to represent different departments, cost centres or product types. This provides a flexible method of analysis that can be used in Nominal Ledger reports.
- You can use a check box in the Transaction Settings setting to have the cursor skip over this field when you press Return or Enter if you don't use Objects.
- You can use a check box in the Transaction Settings setting to have the cursor skip over this field when you press Return or Enter if you don't use Objects.
- Description
- A default Description is brought in from the Account record. It can be modified for this Transaction if necessary. As with Objects, you can have the cursor skip over this field when you press Return or Enter.
- Base 1 Debit, Base 1 Credit
- For each row, specify a debit or credit amount. Use figures in Base Currency 1 as specified in the Base Currency setting in the System module or in your home Currency if you are not using the Dual-Base Currency system. The debits total must equal the credits total before the Transaction can be saved: each Transaction must therefore have at least two rows. If you have the Transaction setting Warn On Unusual Amount switched on and a particular Account can only have amounts posted to one side (debit or credit) you will be warned if you attempt to post a figure to the other side. Note that this warning will not be enforced and can be overridden.
- V-Cd
- Paste Special
VAT Codes setting, Nominal Ledger
- You can mark each row in a Transaction with a VAT Code. The code may be entered automatically with the Account number, or manually. No calculation ensues: the field is for reporting purposes only. Nevertheless, take care to ensure you enter the correct VAT Code (if any), since it will affect the accuracy of the figures for Net Sales and Net Purchases in your VAT Return, as shown in the illustration of the VAT Report Definition.
If you are using the Dual-Base Currency system, values in Base Currency 2 should be entered on flip B. The Dual-Base system will be useful for companies that have offices in two countries that need to report in both Currencies, for companies operating in countries where there is a second Currency (usually the US Dollar or Euro) in common use in addition to the national one, and for companies in the Euro zone who retain their old national Currency for comparison purposes.
If the Transaction is one which uses a simple conversion from a foreign tom the home Currency, the foreign Currency together with values in that Currency should be entered on flip C.
All exchange rates are entered on Flip D.
Please click here for full details of these features.
In the case of Transactions solely in the home Currency where the Dual-Base or simple conversion systems are not being used, flips B-D can be ignored.
Flip E
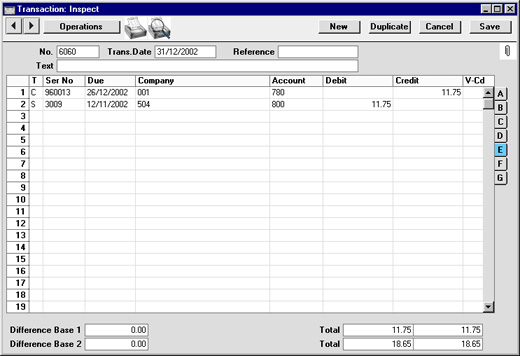
Flip E can be used to pay off Sales and Purchase Invoices. On one row of the Transaction, specify the Bank Account to be debited (in the case of a Sales Invoice) or credited (in the case of a Purchase Invoice). On the next line, specify the Debtor or Creditor Account as appropriate and, on flip E, specify the Invoice(s) being paid as described below.
Invoices and Purchase Invoices paid off in this manner will no longer be treated as open, but records in the Receipt or Payment registers will not be created.
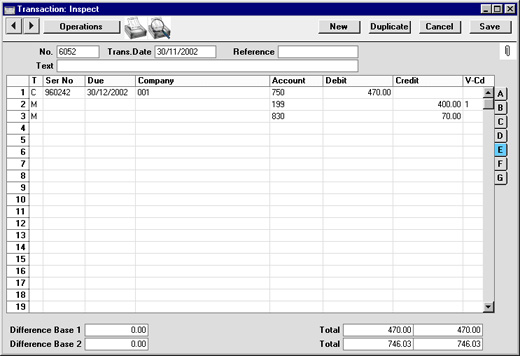
It is also possible to create Invoices and Purchase Invoices using flip E. Again, records will not be created in the Invoice or Purchase Invoice registers, but such Invoices will appear in any Open Invoice 'Paste Special' list until they have been paid off: in this respect they are treated as normal Invoices. On separate rows of the Transaction, specify the Debtor/Creditor Account, Sales/Purchase Account(s) and VAT Output/Input Account. No defaults are offered. On flip E in the row posting to the Debtor/Creditor Account, set the T (Type) field to "C" or "S" as appropriate and enter a Customer or Supplier and an Invoice Number.
If you are going to use flip E, there is no need to turn off the Sub-ledger Checking options in the Account Usage S/L and P/L settings. Any Accounts that have been protected by this feature can still be used if the T (Type) field is set to "C" or "S". This means that there is no risk of allowing the Debtor or Creditor Account to be used accidentally and incorrectly in other Nominal Ledger Transactions, thus rendering them inaccurate.
In the case of Transactions generated automatically from Sales and Purchase Invoices, Receipts and Payments, the fields on flip E will contain values if the Cust. Info. on Trans. (in the case of the Sales Ledger) or Supp. Info. on Trans. (Purchase Ledger) check box options have been used.
- T (Type)
- Paste Special
Choices of possible entries
- Use this field to specify whether the Transaction row is a debtor or creditor posting. Enter "C" (for "Customer") if a Receipt or Sales Invoice is being registered or "S" (for "Supplier") if a Payment or Purchase Invoice is being registered. The 'Paste Special' lists attached to the Serial No and Company fields will vary according to what has been entered here.
- "C" or "S" should only be entered if the row is a posting to the Debtor or Creditor Accounts. Balancing postings to Sales, Purchase, VAT and Bank/Cash Accounts should carry the default entry of "M". "M" should also be used in all other Transactions.
- "C" or "S" should only be entered if the row is a posting to the Debtor or Creditor Accounts. Balancing postings to Sales, Purchase, VAT and Bank/Cash Accounts should carry the default entry of "M". "M" should also be used in all other Transactions.
- Ser No
- Paste Special
Open, approved Purchase or Sales Invoices
- Once "C" or "S" has been entered to the Type field, a Sales or Purchase Invoice Number must be entered here before the Transaction can be saved.
- If an existing number is entered, that will signify the Invoice to be paid off. When you press the Tab or Enter key, its Customer or Supplier Number will appear in the Company field, the appropriate Debtor or Creditor Account will be brought in, and the outstanding amount will be placed in the Credit (Sales Invoice) or Debit (Purchase Invoice) field.
- If a non-existent number is entered, that will signify that a new Invoice is to be created.
- If an existing number is entered, that will signify the Invoice to be paid off. When you press the Tab or Enter key, its Customer or Supplier Number will appear in the Company field, the appropriate Debtor or Creditor Account will be brought in, and the outstanding amount will be placed in the Credit (Sales Invoice) or Debit (Purchase Invoice) field.
- Due
- Paste Special
Current Date
- Once a Sales or Purchase Invoice has been entered to the Serial No field, its Due Date will be shown here.
- If creating a new Invoice, enter a Due Date as appropriate.
- If creating a new Invoice, enter a Due Date as appropriate.
- Company
- Paste Special
Customer or Supplier register
- Once a Sales or Purchase Invoice has been entered to the Serial No field, its Customer or Supplier will be shown here.
- If creating a new Invoice, enter a Customer or Supplier as appropriate.
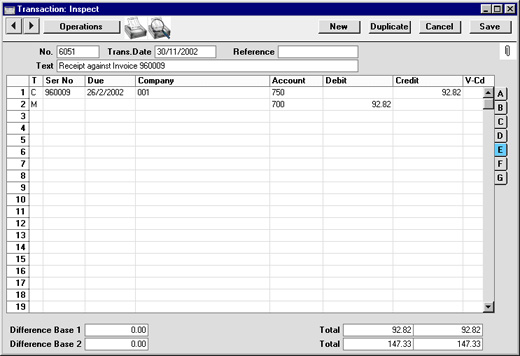
An example creation of a Sales Invoice is shown below (again, flip E is shown in the illustration).
- Corr
- Hansa contains a feature whereby the Accounts used on each side (debit/credit) of a Transaction can be subject to certain rules (corresponding rules). If the Check Corresponding A/C Rules option in the Transaction Settings setting is being used, Hansa will prevent the saving of complex Transactions, where, for example, the first two lines are debit Accounts and there are then several credit lines. These Corresponding Rules are fully explained on the page describing the Transaction Settings setting.
- In circumstances where the option is on, but it is still necessary to enter such complex Transactions, you must establish correspondence manually using this field. For each Transaction row, you can put a number in the Corr field. All rows with the same number will be treated as corresponding to each other. The numbers used are arbitrary.
The Quantity field can be used when entering Transactions manually from a list produced by the N/L Transfer - Invoices report in the Sales Ledger. There is an option to show quantities in this report. Typically, this field will be used for Transactions representing Invoices raised in the Job Costing module.
Entering a Transaction - Example
Hansa provides several shortcuts to simplify your work when entering Transactions. You may enter the current date into a date field using the Ctrl-Enter key combination (Macintosh users can press ⌘-Enter). If you will be entering Transactions of the same type repeatedly (e.g. salaries), you can automate their entry using Autotransactions. Their use is fully described here.- Open the Transactions register by selecting 'Transactions' from the Registers menu or by clicking the [Transactions] button in the Master Control panel. Then, click [New] or press Ctrl-N/⌘-N or highlight a Transaction similar to the one you want to enter, and click [Duplicate] in the Button Bar.
The 'Transaction: New' window is opened, containing an empty Transaction or a duplicate of the highlighted one. Hansa suggests the next unused Transaction Number from the correct journal number series, and as Transaction Date the date from the last entered Transaction.
- Enter and edit the data in the normal way. We will show how to enter the various items with the help of a few examples.
We assume that you have bought some office material from the local stationery store.
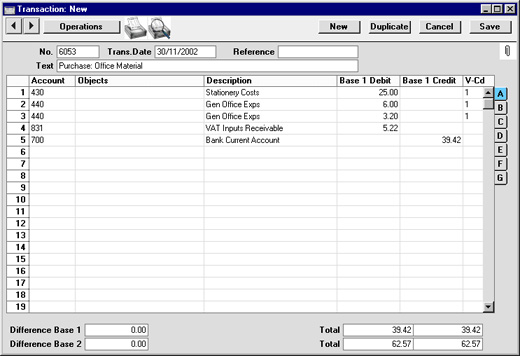
You have purchased two boxes of copy paper at 12.50 each, a box of pencils for 6.00, and a box of adhesive tape for 3.20. The VAT was 5.22, and the total 39.42. You paid by cheque from the company's current account.
The Transaction will look like this:
- Click [Save] to enter the Transaction in the Nominal Ledger.
The next Transaction records the purchasing of a new desk. Start by clicking [New]. The stationery Transaction is closed and replaced with an empty record ready for data entry.
The desk cost 247.00 excluding VAT. You are charged 20.00 for transport, and then of course VAT.
Here you can try the automatic balancing function, since all crediting is done to the same Account. Enter the three debit postings and continue with row 4 until you are going to enter the amount. The Transaction will look like this:
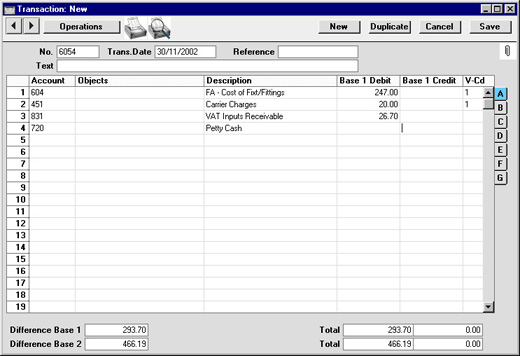
- With the cursor in the Base 1 Credit column, press the Return or Enter key. Hansa enters the correct credit amount to balance the entry for you. If you press Return or Enter again, the Transaction will be saved, closed and committed to the Nominal Ledger, and a new, empty, Transaction will be opened. You can use this feature when you need to enter several Transactions quickly in one sitting.
Correcting Transactions
In the program you can easily correct Transactions in a legal manner.! | You may not alter an entry in your Ledger just any way you want to. A correction of a Transaction means that you create a new Transaction, which also cancels the old one. The altered Transaction should be marked that it has been cancelled. |
When a Transaction is open for data entry, the Operations menu is available in the menu bar, allowing you to make several types of corrections after the Transaction has been entered.
Assume that you have entered the wrong VAT percentage, and that you find out only after entering the Transaction.
- Highlight the Transaction containing the error in the 'Transactions: Browse' window and click [Duplicate].
This creates a copy of the faulty Transaction. First you want to remove the error.
- Select 'Swap Debit & Credit' from the Operations menu. This takes the existing Transaction rows and reverses them (what were Credit amounts become Debits). This action thus cancels out the original, erroneous, Transaction.
- Then select 'Correction Mark' from the same menu. This will add a new line where you can enter a cross reference to the Transaction containing the error.
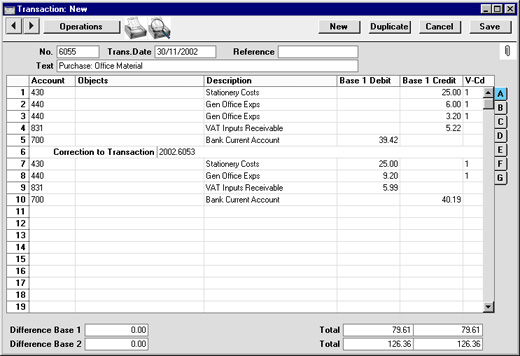
- Enter the journal number of the transaction to be corrected, including the financial year prefix, and then on the following rows make new, correct, entries as in the illustration above. Click [Save] when you have finished.
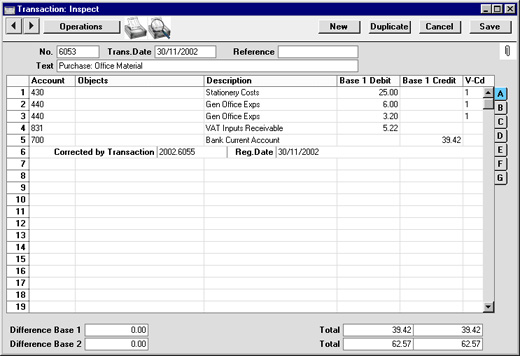
The new Transaction is saved, and the old Transaction is marked as corrected automatically, as shown in the following picture:
- In the 'Transactions: Browse' window, find and double-click the old Transaction you want to change. Select 'Update Mark' from the Operations menu. A new line is added in the Transaction, showing your initials and the original date of the Transaction.
- You will now want to cancel - draw a (red) line across - the faulty row. Highlight the row by clicking the number to the left of the row. Press the Backspace key to draw the correction line across the row. Then you can enter the correct information. Save in the normal way.
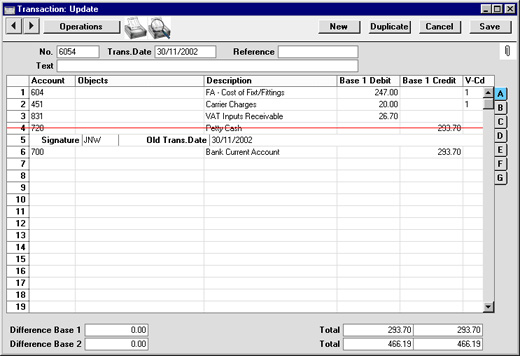
- If the error is in the header area of the Transaction (i.e., the Transaction Date is wrong), it can also be corrected using the 'Update Mark' function. Select the function and change the date as appropriate. There is no need to use the 'Update Mark' function to change the Text or the Reference.
If it is discovered that a Transaction which falls within a closed month contains an error, it cannot be corrected using 'Update Mark'. This is because 'Update Mark' modifies the Transaction and attempts to save it using the original Transaction Date. This falls in a period when modifications are not permitted. Therefore, the only way of correcting such Transactions is by using the 'Correction Mark' function to create a new, correcting, Transaction whose Transaction Date must fall within an open month.
Operations Menu
When a Transaction is open in a record window, the Operations menu is available. The menu has eight commands.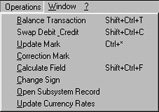
Operations Menu - Balance Transaction
If the cursor is in one of the Transaction rows, selecting this command changes the Debit or Credit value in that row, so that the Transaction balances. This is particularly practical when you have made an error of the amount in just one line.An alternative to selecting this function is to place the cursor in the Credit field of the last row and press the Return or Enter key.
Operations Menu - Swap Debit & Credit
This command swaps the entries of a Transaction, transferring all Debit values to the Credit column and all Credit values to the Debit column.This is useful when you wish to cancel a Transaction with an opposing correction Transaction. To do this, find the erroneous Transaction in the 'Transactions: Browse' window, highlight it and click [Duplicate]. A copy of the Transaction is opened. Select this function and save by clicking [Save]. The erroneous Transaction is now cancelled. Full details are contained on the 'Correcting Transactions' page.
Operations Menu - Update Mark
In the case of a Transaction that contains an error, use this command to insert a special update mark allowing you to record a signature before entering the correct posting on the Transaction. Full details are contained on the 'Correcting Transactions' page.Operations Menu - Correction Mark
When you use a correction Transaction to correct a Transaction, use this command to enter the number of the cancelled Transaction. The cancelled Transaction will also gain a cross-reference to the correction Transaction. Full details are contained on the 'Correcting Transactions' page.Operations Menu - Calculate Field
Please click here for full details of this function.Operations Menu - Change Sign
This function changes the sign (negative to positive, positive to negative) of all Debit and Credit amounts in the Transaction.Operations Menu - Open Subsystem Record
If the Transaction was created when a Sub Systems record (e.g. an Invoice or Purchase Invoice) was approved and saved, this function can be used to open that Sub System record in a new window.Operations Menu - Update Currency Rates
Please click here for full details of this function.Create Menu - Transactions

'New' and 'Duplicate' are standard functions that are provided on every Create and + menu. Use these functions to create new records, in this case in the Transaction register. Please follow the link below for details about the single function on the Create menu:
The Transaction register in Standard ERP:
- Introduction
- Entering a Transaction
- Entering a Transaction - Example
- Correcting Transactions
- Operations menu
- Create menu
- Home page for Nominal Ledger manual
- Home page for Standard ERP manual
Create Menu - Transaction - Add Account
This page describes the 'Add Account' function on the Create menu in the Transaction record window. If you are using iOS or Android, the Add Account' function is on the + menu.---
The 'Add Account' function provides an easy way of creating a new Account record while looking at a Transaction. When you select the function from the Create menu (Windows/Mac OSX) or + menu (iOS/Android), the 'Account: New' window will be opened immediately. Enter the details of the new Account and click [Save] (Windows/macOS) or tap √ (iOS/Android). Please refer here for full details about the Account register.
---
The Transaction register in Standard ERP:
- Introduction
- Entering a Transaction
- Entering a Transaction - Example
- Correcting Transactions
- Operations menu
- Create menu, including:
- Add Account
- Home page for Nominal Ledger manual
- Home page for Standard ERP manual