Introduction to the Transaction Register
The Transaction register is where you should record the accounting events that occur every day in the life of the business. Each individual Transaction should be a record of a single accounting event. Transactions are double-sided and so should each include at least one debit posting and at least one credit posting. In a Transaction, the value of the debit postings must be the same as the value of the credit postings.Depending on the nature of an individual Transaction, you will enter it directly to the Transaction register in the Nominal Ledger yourself or you will have it created remotely and automatically from the Sales and Purchase Ledgers, the Cash Book or the Stock module. Registers in these modules that can cause Transactions to be created are known as "Sub Systems".
You can decide which Transactions are to be entered directly to the Transaction register and which are to be created remotely from Sub Systems. To do this, use the Sub Systems setting. Typically, Transactions representing Sales and Purchase Invoices, Receipts and Payments will be generated remotely from the Sales and Purchase Ledgers. Transactions representing inward and outgoing movements of stock and movements of stock between warehouses will be generated remotely from the Stock module, and Transactions representing the movement of cash will be generated remotely from the Cash Book module. Transactions representing the registration and payment of expenses will be generated remotely from the Expenses module. You will enter other types of transactions directly to the Transaction register: these might include bank transfers, overhead costs, salaries etc.
When you save a Transaction, the postings that it contains will be committed to the Nominal Ledger immediately. After saving, it will usually not be possible to edit a Transaction, except through the use of correction functions. You can edit a Transaction if you are using the Use Preliminary Transactions option in the Transaction Settings setting, but this option cannot be used in many countries. An alternative is to enter a Simulation, as you can edit Simulations after saving and you can create Transactions from Simulations when you are satisfied that they are complete and correct.
Before you start entering Transactions, you must ensure that you have defined the current financial (accounting) year, using the Fiscal Years setting in the Nominal Ledger. You should also have defined a basic journal number series for Transactions using the Number Series - Transactions setting, also in the Nominal Ledger.
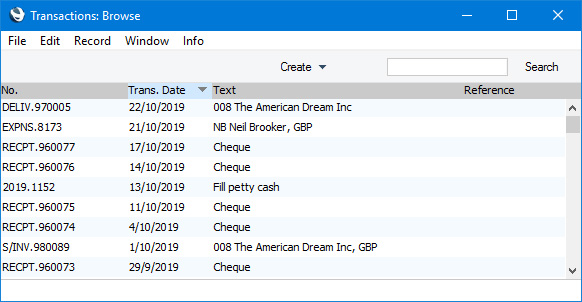
To open the Transaction register, first ensure you are in the Nominal Ledger. Then, if you are using Windows or macOS, click the [Registers] button in the Navigation Centre and double-click 'Transactions' in the resulting list. If you are using iOS or Android, tap the [Registers] button in the Navigation Centre and then tap 'Transactions' in the 'Registers' list. The 'Transactions: Browse' window will be opened, listing the Transactions that you have already entered.
! | You can have different Transaction and Registration Dates in a Transaction. This is particularly important in relation to your external reporting, e.g. the VAT reporting, and your internal accounting, where you may wish Transactions to go into the correct month. |
In the Text column you can see the short explanatory text that was entered for each Transaction. For those Transactions created from Sub Systems, the Text column will usually show details of the Customer or Supplier involved and, if appropriate, the Currency and Exchange Rate used.
If you are using Windows or macOS, you can change the sort order by clicking on the column headings. To reverse any sort, click once again on the same column heading. The current sort column will be shown with its heading coloured blue. If you are using iOS or Android, tap on the column heading and choose the sort order you need. Repeat the procedure to reverse the sort.
To search for a particular Transaction, first sort the list by the column that you want to use for the search. Then, enter the text that you want to find in the Search field in the top of the window (in the top right-hand corner if you are using Windows/macOS) and press the Return key (macOS) or Search (iOS/Android). The first record containing a match for your search string will be highlighted (if you are using Windows, a match will be highlighted as you type each character). If you need to search for a particular Transaction Number, you can either include the Fiscal Year or Sub System prefix in your keyword (e.g. search for "2007.2023" not "2023" or for "DELIV.960077" not "960077"), or you can use the * wildcard instead of the prefix (e.g. "*2023", "*960077").
There are four things you can do with your Transactions:
- Enter Transactions
- Inspect Transactions
- Make corrections
- Print the Transactions
The Transaction register in Standard ERP:
- Introduction
- Entering a Transaction
- Entering a Transaction - Example
- Correcting Transactions
- Operations menu
- Create menu
- Home page for Nominal Ledger manual
- Home page for Standard ERP manual
Entering a Transaction
To enter a Transaction, first open the Transaction register as described here and select 'New' from the Create menu (Windows/macOS) or the + menu (iOS/Android). You can also use the Ctrl-N (Windows) or ⌘-N (macOS) keyboard shortcuts. Alternatively, highlight a Transaction similar to the one you want to enter and select 'Duplicate' from the same menu. If you don't want to open the 'Transactions: Browse' window before creating a new record, you can also use the + menu in the Navigation Centre (all platforms).The 'Transaction: New' window will be opened, empty if you selected 'New' or containing a duplicate of the highlighted Transaction.
---
The Transaction register in Standard ERP:
- Introduction
- Entering a Transaction, including:
- Entering a Transaction - Example
- Correcting Transactions
- Operations menu
- Create menu
- Home page for Nominal Ledger manual
- Home page for Standard ERP manual
Entering a Transaction - Header
This page describes the fields in the Header of the Transaction record. Please follow the links below for descriptions of the other parts of the Transaction record window:---

- No
- Paste Special
Select from another Number Series
- The number of the Transaction. The default will be chosen as follows:
- It will be taken from the number sequence allocated to the current user on the 'Number Series' card of their Person record.
- It will be taken from the number sequence specified in the Number Series Defaults setting in the System module.
- It will be taken from the first valid row in the Number Series - Transactions setting.
- It will be the next number following on from the last Transaction entered.
You may change the default, but not to a number that has already been used. If you have defined at least one number sequence in the Number Series - Transactions setting, the number you change to must be inside a valid number sequence.
- You will not be able to save a Transaction if the No. does not belong to a valid number sequence. A valid number sequence is one for the period in which the Transaction Date of the Transaction falls and with unused numbers, so this problem will most usually occur at the beginning of a new calendar or financial year. If you change number sequences each year, remember to update your Person records and Number Series Defaults setting if you are using them (steps 1 and 2 above) so that they refer to the new number sequences.
- If you are working in a multi-user environment, the Transaction Number will be assigned when you first save the Transaction, chosen as described above and providing you have not already specified a number yourself. If you have left the Number Series - Transactions setting empty, the Transaction Number sequence will be restarted from 1 at the beginning of each financial year.
- If you are using the Warn on non-sequenced Transaction Number option in the Transaction Settings setting, you will be given a warning if you enter a new Transaction whose Transaction Number is lower than the previous Transaction Number used. You will still be able to save the Transaction (assuming the new Transaction Number has not already been used, and assuming it is in a valid Number Series).
- In the case of a Transaction that was created from a Sub System, the No. will be the same as the No. of the Sub System record. For example, a Transaction generated from a Sales Invoice will have a Transaction Number that is the same as the Invoice Number of the Invoice.
- It will be taken from the number sequence allocated to the current user on the 'Number Series' card of their Person record.
- Trans. Date
- Paste Special
Choose date
- The date when the Transaction took place. The last used Transaction Date is offered as a default.
- Reference
- An optional reference field whose contents will be shown in the 'Transactions: Browse' window.
- Text
- A short description of the Transaction.
The Transaction register in Standard ERP:
- Introduction
- Entering a Transaction, including:
- Entering a Transaction - Example
- Correcting Transactions
- Operations menu
- Create menu
- Home page for Nominal Ledger manual
- Home page for Standard ERP manual
Entering a Transaction - Footer
This page describes the fields in the Header of the Transaction record. Please follow the links below for descriptions of the other parts of the Transaction record window:---

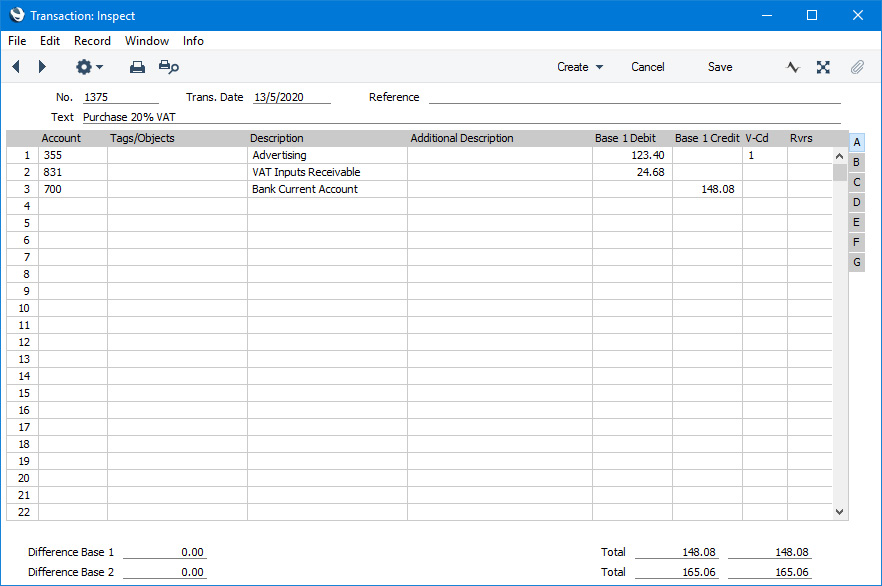
- Difference Base 1, Difference Base 2
- Each Transaction must balance (the total value of the debit postings must be the same as the total value of the credit postings) for you to be able to save it.
- The Difference Base 1 field will display any difference between the debit and credit totals when expressed in your home Currency (Base Currency 1). If you are using the Dual-Base system, the Difference Base 2 field will display any difference between the debit and credit totals when expressed in Base Base Currency 2.
- Both fields will be recalculated whenever you add or change a row in a Transaction. You will be able to save the Transaction when these fields contain zero values.
- The Difference Base 1 field will display any difference between the debit and credit totals when expressed in your home Currency (Base Currency 1). If you are using the Dual-Base system, the Difference Base 2 field will display any difference between the debit and credit totals when expressed in Base Base Currency 2.
- Total
- These two fields show the total debit and credit values for the Transaction and will be recalculated whenever you add or change a row in a Transaction.
The Transaction register in Standard ERP:
- Introduction
- Entering a Transaction, including:
- Entering a Transaction - Example
- Correcting Transactions
- Operations menu
- Create menu
- Home page for Nominal Ledger manual
- Home page for Standard ERP manual
Entering a Transaction - Transaction Rows (Journal Postings)
This page describes the fields in the matrix in the Transaction record window. Please follow the links below for descriptions of the other parts of the Transaction record window:---
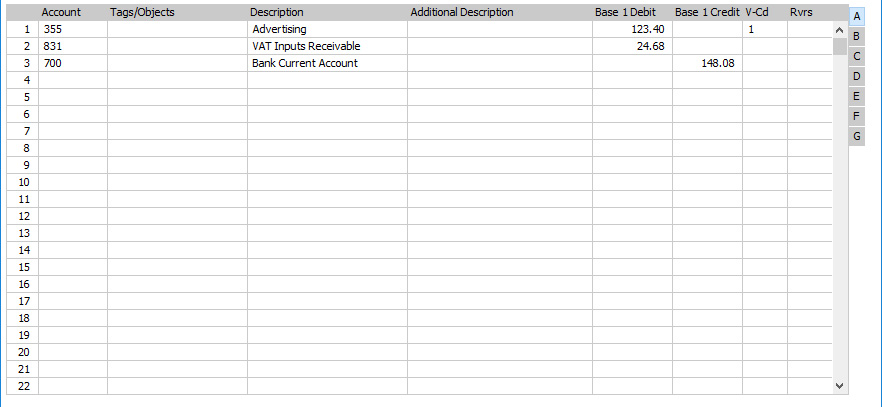
The Transaction row matrix is divided into seven horizontal flips. When you click (Windows/macOS) or tap (iOS/Android) a flip tab (marked A-G), the two or three right-hand columns of the grid will be replaced.
If you are using iOS or Android, you can add rows by tapping the + button below the matrix. To remove a row, long tap on the row number on the left of the row and select 'Delete Row' from the resulting menu. To insert a row, long tap on the row number where the insertion is to be made and select 'Insert Row' from the resulting menu.
Flip A
- Account
- Paste Special
Account register, Nominal Ledger/System module
- Specify here the Account to which the debit or credit value in the row is to be posted.
- You can also enter the Code of an Autotransaction to this field. You can use Autotransactions to automate the entry of frequently used Transactions, not only reducing labour but also ensuring the correct Accounts are used every time.
- You can also enter the Code of an Autotransaction to this field. You can use Autotransactions to automate the entry of frequently used Transactions, not only reducing labour but also ensuring the correct Accounts are used every time.
- Tags/Objects
- Paste Special
Tag/Object register, Nominal Ledger/System module
- You can assign up to 20 Tags/Objects, separated by commas, to each Transaction row. You might define separate Objects to represent different departments, cost centres or product types. This provides a flexible method of analysis that can be used in Nominal Ledger reports.
- If you don't use Objects, you can use the Skips Object option in the Transaction Settings setting to have the insertion point skip over this field when you press Return or Enter (but not Tab).
- If you enter more than one Tag/Object, they will automatically be sorted alphabetically when you move to the next field.
- If you have specified a Tag/Object On All Rows in the Transaction Settings setting, that Tag/Object will be placed here automatically when you enter a debit or credit amount.
- If you don't use Objects, you can use the Skips Object option in the Transaction Settings setting to have the insertion point skip over this field when you press Return or Enter (but not Tab).
- Description
- The Account Name will be entered here automatically when you enter an Account Number in the field above. You can change the Description in a particular Transaction row if necessary.
- You can use the Skips Description option in the Transaction Settings setting to have the insertion point skip over this field when you press Return or Enter (but not Tab).
- If you have entered a Language in the Company Info setting in the System module, if you have entered an appropriate translation of the Account Name on the 'Texts' card of the Account record and if you are using the Account Description in Company Language option in the Transaction Settings setting in the Nominal Ledger, then the appropriate translation of the Account Name for the Company Info Language will be brought in.
- You can use the Skips Description option in the Transaction Settings setting to have the insertion point skip over this field when you press Return or Enter (but not Tab).
- Additional Description
- Use this field to record any further comments about the row as necessary.
- The Additional Description will be included in the Transaction Journal and Transaction Summary reports. If you need it to be printed on Transaction forms, add the "Other Comment, Row" field to the Form Template.
- The Additional Description will be included in the Transaction Journal and Transaction Summary reports. If you need it to be printed on Transaction forms, add the "Other Comment, Row" field to the Form Template.
- Base 1 Debit, Base 1 Credit
- Use one of these fields to enter the debit or credit value of a Transaction row. Enter a value in Base Currency 1 as specified in the Base Currency setting in the System module or in your home Currency if you are not using the Dual-Base Currency system.
- The debits total must equal the credits total before you can save the Transaction: each Transaction must therefore have at least two rows.
- If you are using the Warn On Unusual Amount option in the Transaction setting and you have specified using the Normal Amount options in an Account record that the Account can only have amounts posted to one side (debit or credit) you will be warned ("Not a normal amount for this account") if you attempt to post a figure to the other side. Note that this warning will not be enforced and you will be able to override it.
- The debits total must equal the credits total before you can save the Transaction: each Transaction must therefore have at least two rows.
- V-Cd
- Paste Special
VAT Codes setting, Nominal Ledger
- Default taken from Account
- You can mark each row in a Transaction with a VAT Code. This Code may be brought in automatically when you enter the Account number, or you can enter it yourself. No calculation ensues: the field is for reporting purposes only. Nevertheless, take care to ensure you enter the correct VAT Code (if any), since it will affect the accuracy of the figures for Net Sales and Net Purchases in your VAT Return, as shown in the illustration of the VAT Report Definition.
- You can mark each row in a Transaction with a VAT Code. This Code may be brought in automatically when you enter the Account number, or you can enter it yourself. No calculation ensues: the field is for reporting purposes only. Nevertheless, take care to ensure you enter the correct VAT Code (if any), since it will affect the accuracy of the figures for Net Sales and Net Purchases in your VAT Return, as shown in the illustration of the VAT Report Definition.
- Rvrs
- This field will only be visible in Lithuania, Poland and the UK (i.e. it will be visible when the VAT Law in the Company Info setting is "Lithuanian", "Polish" or "Default"). Please refer to the Reverse Charge VAT in Sales Invoices' page for details.
Flips B-D: Multi Currency accounting
If you are using the Dual-Base Currency system, every Transaction row should contain debit or credit values in Base Currency 1 and in Base Currency 2. If you enter a value in Base Currency 1 (in the Base 1 Debit or Base 1 Credit fields on flip A), a converted value in Base Currency 2 will be placed in the Base 2 Debit or Base 2 Credit field on flip B automatically. Alternatively, you can enter a value in Base Currency 2 and a converted value will be placed in the relevant Base Currency 1 field. The conversion rate will be shown in the Base Rate 1 and Base Rate 2 fields on flip D.If a Transaction is in a Currency other than Base Currency 1 or 2, specify the Currency on flip C together with values in that Currency. If the Account that you have entered on flip A is one in which you have specified a Currency, this Currency will be brought in automatically. When you specify the Currency or it is brought in from the Account, the current Exchange Rates will be brought in to flip D.
Please refer here for full details about these features.
If you are entering a Transaction in your home Currency and you are not using the Dual-Base or simple conversion systems, you can ignore flips B-D.
Flip E
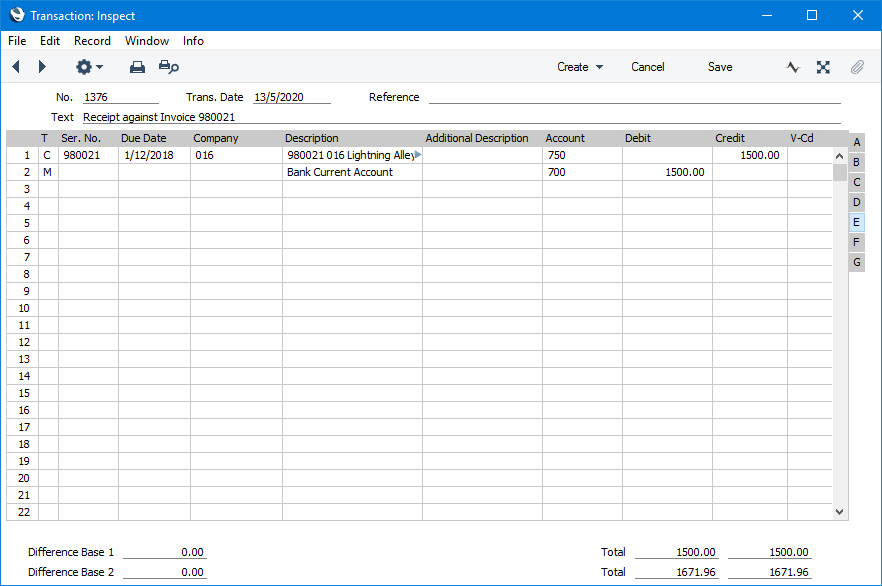
You can use a Transaction to record a payment against a Sales or Purchase Invoice. In the first row of the Transaction, specify the Bank Account to be debited (in the case of a Sales Invoice) or credited (in the case of a Purchase Invoice). On the next line, on flip E, specify the Invoice(s) being paid as described below. The Debtor or Creditor Account as appropriate will be brought in automatically from the Invoice.
Invoices and Purchase Invoices paid off in this manner will no longer be treated as open, but records in the Receipt or Payment registers will not be created.
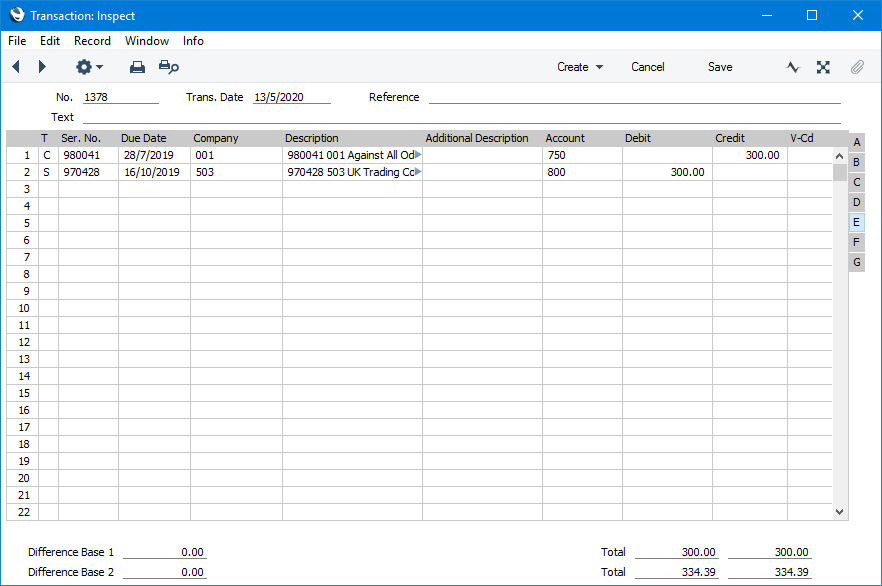
You can also create Invoices and Purchase Invoices using flip E. Again, records will not be created in the Invoice or Purchase Invoice registers, but such Invoices will appear in any Open Invoice 'Paste Special' list until they have been paid off: in this respect they are treated as normal Invoices. On separate rows of the Transaction, specify the Debtor/Creditor Account, Sales/Purchase Account(s) and Output/Input VAT Account. No defaults will be offered. On flip E in the row posting to the Debtor/Creditor Account, set the T (Type) field to "C" (for "Customer") or "S" (for "Supplier") as appropriate and enter a Customer or Supplier and an Invoice Number.
Setting the T (Type) field to "C" or "S" in a Transaction row means that you can only use that row to create or pay off an Invoice. There is therefore no need to turn off the Sub-ledger Checking options in the Account Usage S/L and P/L settings. You will only be able to use an Account that has been protected by this feature in a row in which the Type is "C" or "S".
In Transactions generated automatically from Sales and Purchase Invoices, Receipts and Payments, the fields on flip E will contain values if you are using the Invoice Info. on N/L Transaction (in the case of the Sales Ledger) and Supp. Info. on Trans. (Purchase Ledger) options in the Account Usage S/L and P/L settings.
- T (Type)
- Paste Special
Choices of possible entries
- Use this field to specify whether the Transaction row is a debtor or creditor posting. Enter "C" (for "Customer") if you are registering a Receipt or Sales Invoice or "S" (for "Supplier") if you are registering a Payment or Purchase Invoice. The 'Paste Special' lists attached to the Serial No and Company fields will vary, depending on what you have entered here.
- You should only use "C" or "S" if the row is a posting to the Debtor or Creditor Accounts. Balancing postings to Sales, Purchase, VAT and Bank/Cash Accounts should carry the default entry of "M". You should also use "M" in all other Transactions.
- You should only use "C" or "S" if the row is a posting to the Debtor or Creditor Accounts. Balancing postings to Sales, Purchase, VAT and Bank/Cash Accounts should carry the default entry of "M". You should also use "M" in all other Transactions.
- Ser. No.
- Paste Special
Open, approved Purchase or Sales Invoices
- Once you have entered "C" or "S" in the Type field, you must enter a Sales or Purchase Invoice Number here before you can save the Transaction.
- Enter an existing Invoice Number to signify the Invoice that you want to be paid off. When you press the Tab or Enter key, its Customer or Supplier Number will appear in the Company field, the appropriate Debtor or Creditor Account will be brought in, and the outstanding amount will be placed in the Credit (Sales Invoice) or Debit (Purchase Invoice) field.
- Enter a non-existent number to signify that a new Invoice is to be created.
- Enter an existing Invoice Number to signify the Invoice that you want to be paid off. When you press the Tab or Enter key, its Customer or Supplier Number will appear in the Company field, the appropriate Debtor or Creditor Account will be brought in, and the outstanding amount will be placed in the Credit (Sales Invoice) or Debit (Purchase Invoice) field.
- Due Date
- Paste Special
Choose date
- Once you have entered a Sales or Purchase Invoice in the Serial No field, its Due Date will be shown here.
- If you are creating a new Invoice, enter a Due Date as appropriate.
- If you are creating a new Invoice, enter a Due Date as appropriate.
- Company
- Paste Special
Customers or Suppliers in Contact register
- Once you have entered a Sales or Purchase Invoice in the Serial No field, its Customer or Supplier will be shown here.
- If you are creating a new Invoice, enter a Customer or Supplier as appropriate.
- If the Type is "C", the 'Paste Special' list will contain Customers. If the Type is "S", it will contain Suppliers. If the Type is "M", the 'Paste Special' list will not open.
- If you are creating a new Invoice, enter a Customer or Supplier as appropriate.
An example creation of a Sales Invoice is shown below (again, flip E is shown in the illustration).
Flip F
- Corr
- If you are using the Check Corresponding A/C Rules option in the Transaction Settings setting, the Accounts used on each side (debit/credit) of a Transaction will be subject to certain rules (the "Corresponding Account Rules"). These rules mean you should enter Transactions in such way that clearly shows how each individual posting is balanced. You will not be able to save a Transaction that does not comply with these rules.
- It can be difficult to establish correspondence in some complex Transactions, where, for example, the first two lines are debit Accounts and there are then several credit lines. So, if you are using this option and you need to enter such a complex Transaction, you must establish correspondence manually using this field. Enter an arbitrary number in the Corr field in each Transaction row. Enter the same number in the rows that correspond to each other.
- Corresponding Account Rules are fully explained on the page describing the Transaction Settings setting.
- It can be difficult to establish correspondence in some complex Transactions, where, for example, the first two lines are debit Accounts and there are then several credit lines. So, if you are using this option and you need to enter such a complex Transaction, you must establish correspondence manually using this field. Enter an arbitrary number in the Corr field in each Transaction row. Enter the same number in the rows that correspond to each other.
Flip G
- Tax Account
- This field is used in Russia. Please refer to your local HansaWorld representative for details.
- Qty
- In a posting to a Stock Account in a Transaction created from a Sub System record that updates stock (e.g. from a Goods Receipt, Delivery or Invoice), the number of units added to or removed from stock will be recorded in this field. Quantities will be included in the Analytical Balance report if you print it using the Show Quantity option.
- Type
- Paste Special
Choice of possible entries
- This field is used in Argentina and Portugal.
- In Argentina, the 'Year End Simulation' Maintenance function will be used at the end of each financial year to create three Simulations:
Simulation Type Closing Year: Swap Results to Equity Year End Stage 1 Closing Year: Swap Equity Accounts Year End Stage 1 Opening Year: Swap Equity Accounts Year End Stage 2
- When Transactions are created from these Simulations, the appropriate Type will be copied to this field in each Transaction row.
- In Portugal, this field is used to classify each Transaction row when included in SAF-T exports. Use 'Paste Special' to choose the option that is appropriate for each Transaction. Every row in an individual Transaction must have the same Type so, if you change the Type in a row that change will copied to the other rows in the Transaction. You can change the Type in a Transaction that has been saved without the need for an Update Mark or a Correction Mark.
- In Argentina, the 'Year End Simulation' Maintenance function will be used at the end of each financial year to create three Simulations:
The Transaction register in Standard ERP:
- Introduction
- Entering a Transaction, including:
- Entering a Transaction - Example
- Correcting Transactions
- Operations menu
- Create menu
- Home page for Nominal Ledger manual
- Home page for Standard ERP manual
Entering a Transaction - Example
There are several shortcuts that you can use to simplify your work when entering Transactions. You can bring a date into a date field using the Paste Special' feature. If you will be entering Transactions of the same type repeatedly (e.g. salaries), you can automate their entry using Autotransactions. Their use is fully described here.- To enter a Transaction, ensure you are in the Nominal Ledger and then open the Transactions register. If you are using Windows or macOS, click the [Registers] button in the Navigation Centre and double-click 'Transactions' in the resulting list. You can also use the Ctrl-1 (Windows) or ⌘-1 (macOS) keyboard shortcut. If you are using iOS or Android, tap the [Registers] button in the Navigation Centre and then tap 'Transactions' in the subsequent list.
- If you are using Windows or macOS, select 'New' from the Create menu or press Ctrl-N/⌘-N to create a new Transaction. If you are using iOS or Android, select 'New' from the + menu.
The 'Transaction: New' window opens. In a single-user system, a Transaction Number will have already been entered in the No. field. In a multi-user system, the No. field will be empty, and a Transaction Number will be assigned when you save the Transaction for the first time. The Transaction Date will be the date from the previously entered Transaction.
On all platforms, if you don't need to open the 'Transactions: Browse' window, you can go straight to the 'Transaction: New' window from the Navigation Centre. Open the + drop-down menu in the top right-hand corner of the Navigation Centre (towards the top left if you are using macOS), and select 'New Transaction'.
- Enter and edit the data in the normal way. We will show how to enter the various items with the help of a few examples.
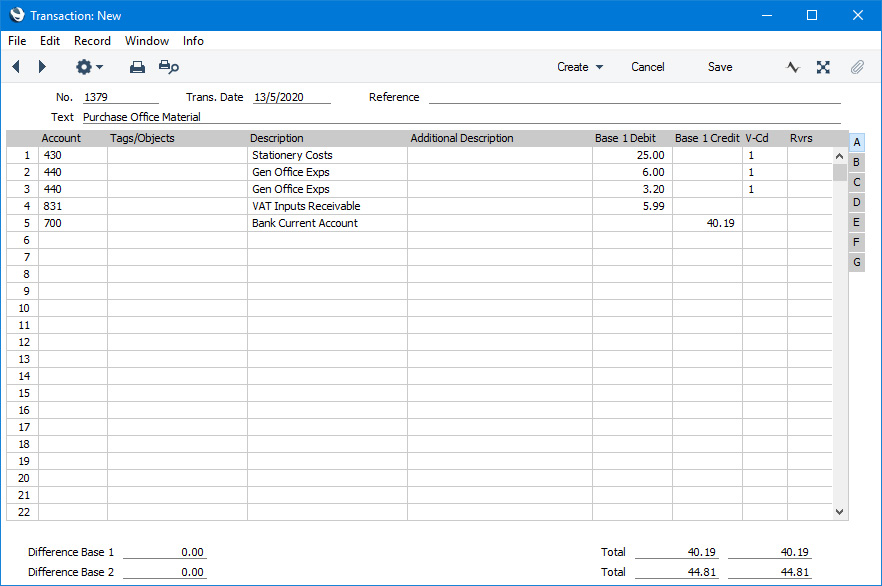
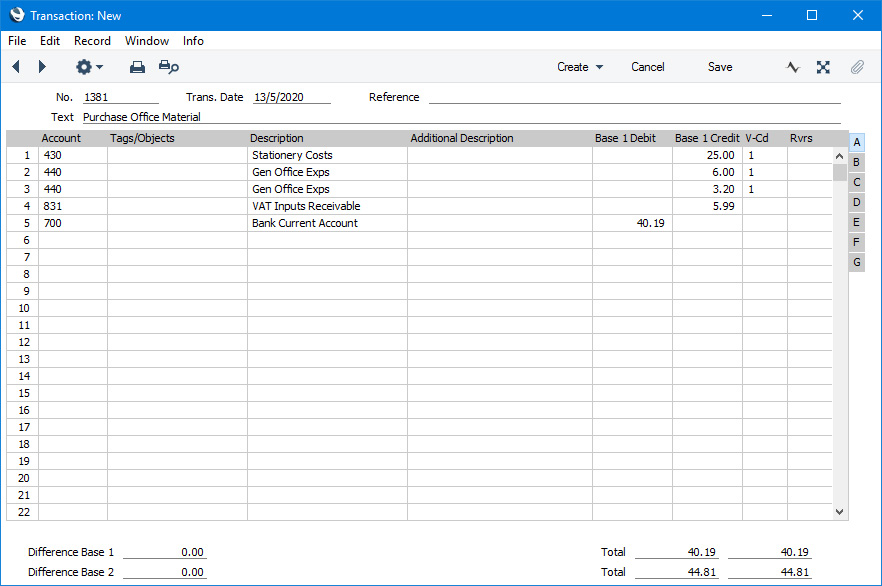
We assume that you have bought some office material from the local stationery store.
You have purchased two boxes of copy paper at 12.50 each, a box of pencils for 6.00, and a box of adhesive tape for 3.20. The VAT was 5.99, and the total 39.42. You paid by cheque from the company's current account.
The Transaction will look like this:
- Click [Save] (Windows/macOS) or tap √ (iOS/Android) to enter the Transaction in the Nominal Ledger.
- The next Transaction records the purchasing of a new desk. Start by selecting 'New' from the Create menu (Windows/macOS) or √ (iOS/Android). The stationery Transaction is closed and replaced with an empty record ready for data entry.
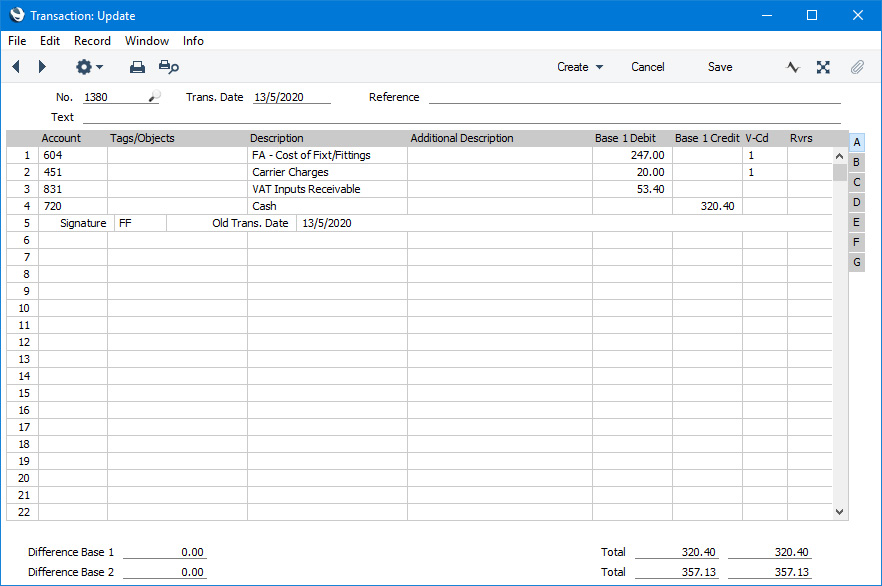
The desk cost 247.00 excluding VAT. You are charged 20.00 for transport, and then of course VAT.
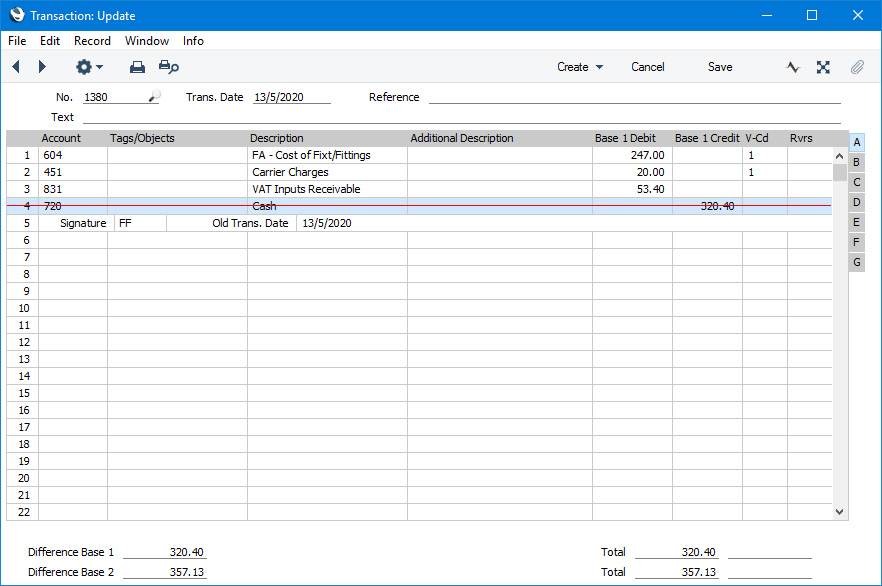
Since there will be a single credit posting in this Transaction, you can try the automatic balancing function that is available when you are using Windows or macOS. Enter the three debit postings and continue with row 4 until you are going to enter the amount. The Transaction will look like this:
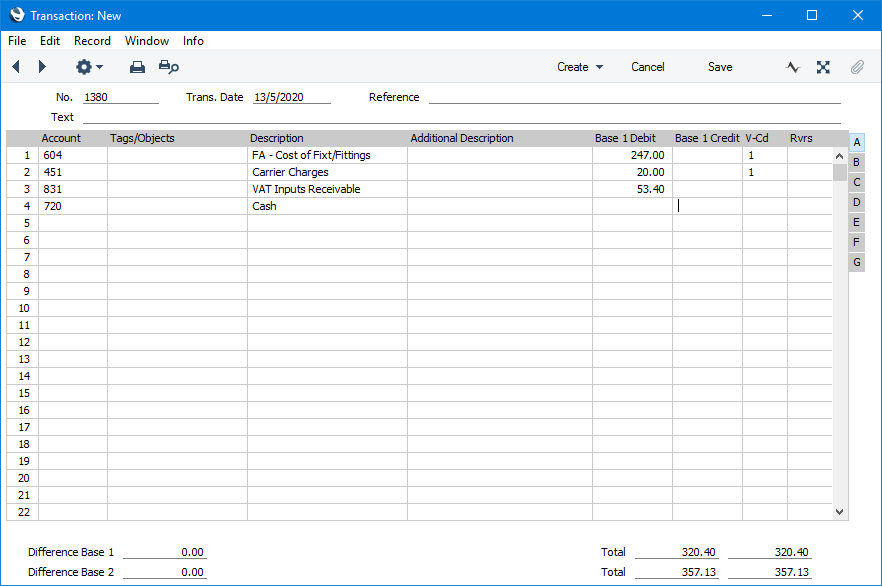
- With the insertion point in the Base 1 Credit column, press the Return or Enter key. The correct credit amount to balance the entry will be brought in for you. If you press Return or Enter again, the Transaction will be saved, closed and committed to the Nominal Ledger, and a new, empty, Transaction will be opened. You can use this feature when you need to enter several Transactions quickly in one sitting.
The Transaction register in Standard ERP:
- Introduction
- Entering a Transaction
- Entering a Transaction - Example
- Correcting Transactions
- Operations menu
- Create menu
- Home page for Nominal Ledger manual
- Home page for Standard ERP manual
Correcting Transactions
Standard ERP contains two methods that you can use to correct errors in Nominal Ledger Transactions in a legal manner. Both methods will include the creation of an audit trail to show that a Transaction has been changed. The two methods are the 'Correction Mark' and the 'Update Mark', both of which are available on the Operations menu in the Transaction record window (Tools menu if you are using iOS or Android):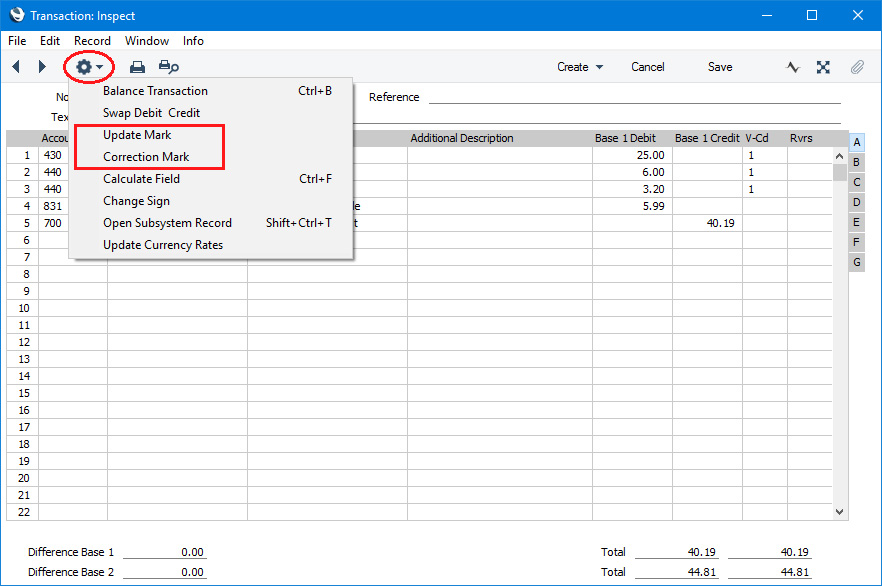
Correction Mark
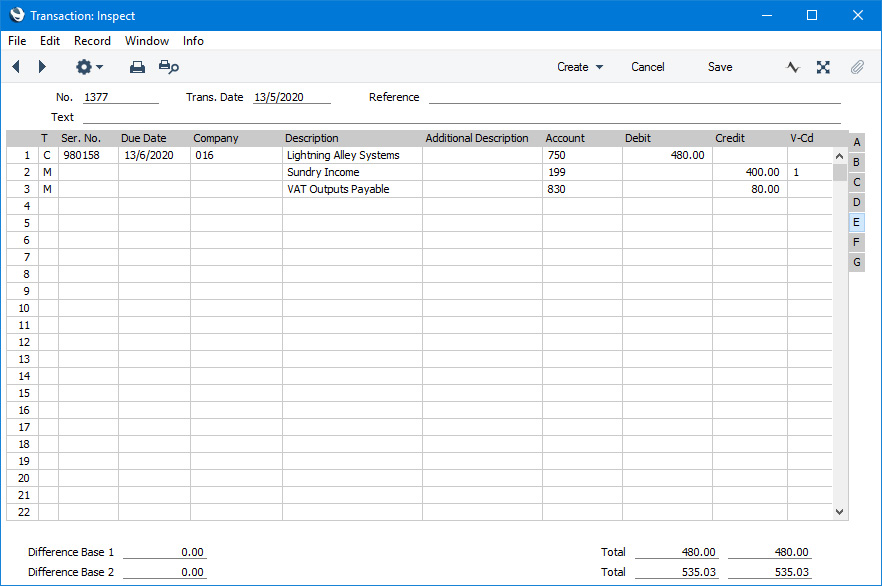
In this example we will use the 'Correction Mark' function to correct a Transaction that was entered with the wrong VAT figure.- Highlight the Transaction containing the error in the 'Transactions: Browse' window and select 'Duplicate' from the Create menu (Windows/macOS) or + menu (iOS/Android). If you have already opened the Transaction in a record window, you can also duplicate it from there.
This creates a copy of the faulty Transaction.

- In this step you will remove the error. Select 'Swap Debit & Credit' from the Operations menu (Windows/macOS) or Tools menu (iOS/Android). This reverses the postings in the Transaction rows (credit postings become debits). This action thus cancels out the original, erroneous, Transaction.
- Select 'Correction Mark' from the same menu. This will add a new line where you should enter a cross reference to the Transaction containing the error. Note: do not save the Transaction before selecting 'Correction Mark'.
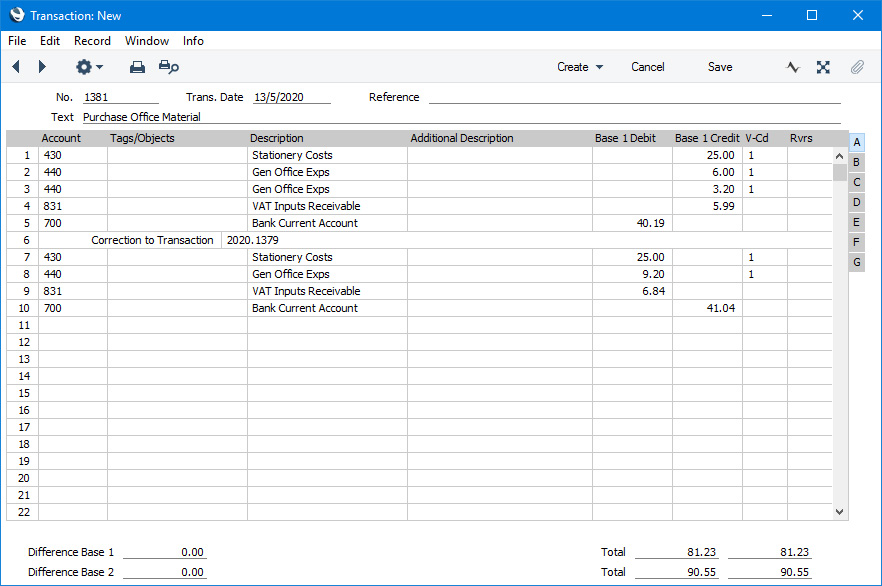
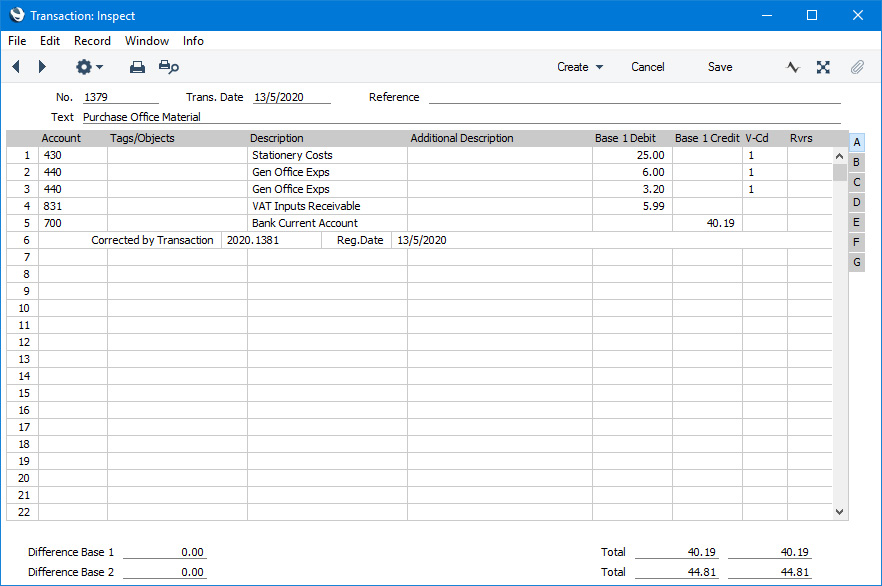
- Enter the journal number of the transaction to be corrected, including the Fiscal Year or Sub System prefix, and then in the following rows list the correct, entries as in the illustration above. Add all the postings again, including the ones that were previously correct. Click [Save] (Windows/macOS) or tick √ (iOS/Android) when you have finished.
The new Transaction will be saved, and the old Transaction will be marked automatically as having been corrected:
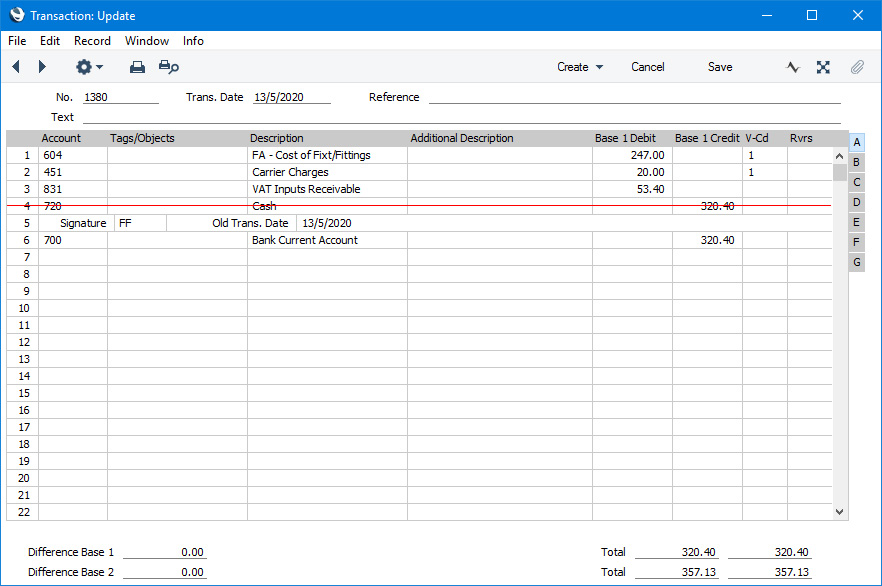
- Open the Transaction containing the error in a record window and select 'Update Mark' from the Operations or Tools menu. A new line will be added in the Transaction, containing your Signature and the original date of the Transaction.
- You will now want to cancel - draw a (red) line across - the faulty row. If you are using Windows or macOS, highlight the row by clicking the number to the left of the row and press the Backspace key on the keyboard to draw the correction line across the row. If you are using iOS or Android, long tap on the row number on the left of the row and select 'Delete Row' from the resulting menu.
- Below the row containing your Signature, add a new row containing the correct posting and save in the normal way. While the 'Correction Mark' method requires you to list every row again, the 'Update Mark' method requires you only to replace the faulty row.
- If the error is in the header area of the Transaction (i.e., the Transaction Date is wrong), you can again use the 'Update Mark' function to make the correction. Select the function and change the date as appropriate (but not to a date in a different fiscal year). There is no need to use the 'Update Mark' function to change the Text or the Reference or the Description in any of the rows.
If you discover an error in a Transaction that falls within a closed month, you cannot correct it using 'Update Mark'. This is because 'Update Mark' modifies the Transaction and attempts to save it using the original Transaction Date, which falls in a period when modifications are not permitted. If you need to correct such a Transaction, use the 'Correction Mark' function in a new correcting Transaction with a Transaction Date in an open month.
If you need to see a list of corrections and updates made to Transactions from a specified period, produce a Correction List report.
---
The Transaction register in Standard ERP:
- Introduction
- Entering a Transaction
- Entering a Transaction - Example
- Correcting Transactions
- Operations menu
- Create menu
- Home page for Nominal Ledger manual
- Home page for Standard ERP manual
Operations Menu - Transactions
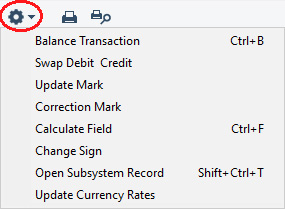
If you are using Windows or macOS, you can open the Operations menu by clicking the button with the 'cog' icon (shown highlighted in the illustration above). If you are using iOS or Android, you can access the Operations menu functions through the Tools menu (with 'wrench' icon).
Please follow the links below for details about each function on the Operations menu:
- Balance Transaction
- Swap Debit & Credit
- Update Mark
- Correction Mark
- Calculate Field
- Change Sign
- Open Subsystem Record
- Update Currency Rates
The Transaction register in Standard ERP:
- Introduction
- Entering a Transaction
- Entering a Transaction - Example
- Correcting Transactions
- Operations menu
- Create menu
- Home page for Nominal Ledger manual
- Home page for Standard ERP manual
Operations Menu - Transaction - Balance Transaction
This page describes the 'Balance Transaction' function on the Operations menu in the Transaction record window. If you are using iOS or Android, the 'Balance Transaction' function is on the Tools menu (with 'wrench' icon).---
In order to be able to save a Transaction, it must balance: the value of the debit postings must be the same as the value of the credit postings. You can use the following methods to balance a Transaction:
- Place the insertion point in the Base 1 Debit or Base 1 Credit field in any row and select 'Balance Transaction' from the Operations or Tools menu. A balancing figure will be brought in to the field containing the insertion point.
- If the last row in a Transaction is a credit posting, place the insertion point in the Base 1 Credit field in that row and press the Return or Enter key on the keyboard. A balancing figure will be brought in to that field. Pressing the Return or Enter key again will save the Transaction and open a new, empty, Transaction.
- Referring to the Difference Base 1 and Total fields in the footer of the Transaction, adjust the debit and credit values in the rows as necessary until the Difference is zero and the debit and credit totals match.
The Transaction register in Standard ERP:
- Introduction
- Entering a Transaction
- Entering a Transaction - Example
- Correcting Transactions
- Operations menu, including:
- Balance Transaction
- Swap Debit & Credit
- Update Mark
- Correction Mark
- Calculate Field
- Change Sign
- Open Subsystem Record
- Update Currency Rates
- Balance Transaction
- Create menu
- Home page for Nominal Ledger manual
- Home page for Standard ERP manual
Operations Menu - Transaction - Swap Debit & Credit
This page describes the 'Swap Debit & Credit' function on the Operations menu in the Transaction record window. If you are using iOS or Android, the 'Swap Debit & Credit' function is on the Tools menu (with 'wrench' icon).---
The 'Swap Debit & Credit' command will reverse all the postings in a Transaction, transferring all debit values to the Credit column and all credit values to the Debit column.
Reversing the postings in a Transaction will be useful when you need to cancel a Transaction by entering an opposing correction Transaction. To do this, find the erroneous Transaction in the 'Transactions: Browse' window, highlight it and select 'Duplicate' from the Create menu (Windows/macOS) or + menu (iOS/Android). A copy of the Transaction will be opened. Select the 'Swap Debit & Credit' function from the Operations or Tools menu to reverse the postings and save the new Transaction. The erroneous Transaction is now cancelled. Full details are contained on the 'Correcting Transactions' page.
You can only use the 'Swap Debit & Credit' function in a Transaction that you have not saved (i.e. when the window title is 'Transaction: New').
---
The Transaction register in Standard ERP:
- Introduction
- Entering a Transaction
- Entering a Transaction - Example
- Correcting Transactions
- Operations menu, including:
- Balance Transaction
- Swap Debit & Credit
- Update Mark
- Correction Mark
- Calculate Field
- Change Sign
- Open Subsystem Record
- Update Currency Rates
- Balance Transaction
- Create menu
- Home page for Nominal Ledger manual
- Home page for Standard ERP manual
Operations Menu - Transaction - Update Mark
The 'Update Mark' command allows you to insert an update mark in a Transaction that contains an error. You will then be able to cancel the posting with the error, add the correct posting to the Transaction and to enter the date and your Signature as an audit trail. Full details are contained on the 'Correcting Transactions' page.---
The Transaction register in Standard ERP:
- Introduction
- Entering a Transaction
- Entering a Transaction - Example
- Correcting Transactions
- Operations menu, including:
- Balance Transaction
- Swap Debit & Credit
- Update Mark
- Correction Mark
- Calculate Field
- Change Sign
- Open Subsystem Record
- Update Currency Rates
- Balance Transaction
- Create menu
- Home page for Nominal Ledger manual
- Home page for Standard ERP manual
Operations Menu - Transaction - Correction Mark
When adding a correction Transaction to correct an error in an earlier Transaction, the 'Correction Mark' command allows you to include a reference to the Transaction Number of the Transaction containing the error. The earlier Transaction will also gain a cross-reference to the correction Transaction. Full details are contained on the 'Correcting Transactions' page.---
The Transaction register in Standard ERP:
- Introduction
- Entering a Transaction
- Entering a Transaction - Example
- Correcting Transactions
- Operations menu, including:
- Balance Transaction
- Swap Debit & Credit
- Update Mark
- Correction Mark
- Calculate Field
- Change Sign
- Open Subsystem Record
- Update Currency Rates
- Balance Transaction
- Create menu
- Home page for Nominal Ledger manual
- Home page for Standard ERP manual
Operations Menu - Transaction - Calculate Field
Please click here for full details about this function.---
The Transaction register in Standard ERP:
- Introduction
- Entering a Transaction
- Entering a Transaction - Example
- Correcting Transactions
- Operations menu, including:
- Balance Transaction
- Swap Debit & Credit
- Update Mark
- Correction Mark
- Calculate Field
- Change Sign
- Open Subsystem Record
- Update Currency Rates
- Balance Transaction
- Create menu
- Home page for Nominal Ledger manual
- Home page for Standard ERP manual
Operations Menu - Transaction - Change Sign
This page describes the 'Change Sign' function on the Operations menu in the Transaction record window. If you are using iOS or Android, the 'Change Sign' function is on the Tools menu (with 'wrench' icon).---
The 'Change Sign' function will change the sign (negative to positive, positive to negative) of every debit and credit amount in a Transaction.
You can only use the 'Change Sign' function in a Transaction that you have not saved (i.e. when the window title is 'Transaction: New').
---
The Transaction register in Standard ERP:
- Introduction
- Entering a Transaction
- Entering a Transaction - Example
- Correcting Transactions
- Operations menu, including:
- Balance Transaction
- Swap Debit & Credit
- Update Mark
- Correction Mark
- Calculate Field
- Change Sign
- Open Subsystem Record
- Update Currency Rates
- Balance Transaction
- Create menu
- Home page for Nominal Ledger manual
- Home page for Standard ERP manual
Operations Menu - Transaction - Open Subsystem Record
This page describes the 'Open Subsystem Record' function on the Operations menu in the Transaction record window. If you are using iOS or Android, the 'Open Subsystem Record' function is on the Tools menu (with 'wrench' icon).---
When you mark a Sub System record (e.g. an Invoice or Purchase Invoice) as OK and save it, a Nominal Ledger Transaction will be created (if so defined in the Sub Systems setting in the Nominal Ledger and in the relevant Number Series setting). If you are viewing such a Transaction, you can use the 'Open Subsystem Record' function to open the originating Sub System record in a new window. The Sub System record will not be opened if the user does not have access to the relevant register.
---
The Transaction register in Standard ERP:
- Introduction
- Entering a Transaction
- Entering a Transaction - Example
- Correcting Transactions
- Operations menu, including:
- Balance Transaction
- Swap Debit & Credit
- Update Mark
- Correction Mark
- Calculate Field
- Change Sign
- Open Subsystem Record
- Update Currency Rates
- Balance Transaction
- Create menu
- Home page for Nominal Ledger manual
- Home page for Standard ERP manual
Operations Menu - Transaction - Update Currency Rates
Please refer here for full details about this function.---
The Transaction register in Standard ERP:
- Introduction
- Entering a Transaction
- Entering a Transaction - Example
- Correcting Transactions
- Operations menu, including:
- Balance Transaction
- Swap Debit & Credit
- Update Mark
- Correction Mark
- Calculate Field
- Change Sign
- Open Subsystem Record
- Update Currency Rates
- Balance Transaction
- Create menu
- Home page for Nominal Ledger manual
- Home page for Standard ERP manual
Create Menu - Transactions

'New' and 'Duplicate' are standard functions that are provided on every Create and + menu. Use these functions to create new records, in this case in the Transaction register. Please follow the link below for details about the single function on the Create menu:
The Transaction register in Standard ERP:
- Introduction
- Entering a Transaction
- Entering a Transaction - Example
- Correcting Transactions
- Operations menu
- Create menu
- Home page for Nominal Ledger manual
- Home page for Standard ERP manual
Create Menu - Transaction - Add Account
This page describes the 'Add Account' function on the Create menu in the Transaction record window. If you are using iOS or Android, the Add Account' function is on the + menu.---
The 'Add Account' function provides an easy way of creating a new Account record while looking at a Transaction. When you select the function from the Create menu (Windows/Mac OSX) or + menu (iOS/Android), the 'Account: New' window will be opened immediately. Enter the details of the new Account and click [Save] (Windows/macOS) or tap √ (iOS/Android). Please refer here for full details about the Account register.
---
The Transaction register in Standard ERP:
- Introduction
- Entering a Transaction
- Entering a Transaction - Example
- Correcting Transactions
- Operations menu
- Create menu, including:
- Add Account
- Home page for Nominal Ledger manual
- Home page for Standard ERP manual