Introduction to Settings in the Nominal Ledger
The Nominal Ledger module has the following settings:
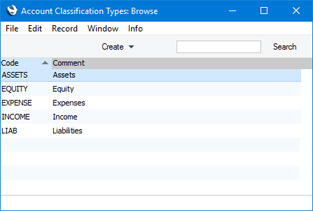
Account Classification Types
Account Classification Types allow you to divide Account Classifications into groups.To open the Account Classification Types setting, first ensure you are in the Nominal Ledger. Then, if you are using Windows or Mac OS X, click the [Settings] button in the Navigation Centre or use the Ctrl-S/⌘-S keyboard shortcuts and then double-click 'Account Classification Types' in the resulting list. If you are using iOS or Android, select 'Settings' from the Tools menu (with 'wrench' icon) and tap 'Account Classification Types' in the 'Settings' list.
---
Please follow the links below for details about each setting:
- Account Classification Types
- Account Classifications
- Account Short Codes
- Account Transfers
- Accounting Periods
- Auto Eliminations
- Autotransactions
- Bank Transactions
- Brought Forward Balances
- Budget Classes
- Budget Keys
- Calculation Formulae
- Electronic VAT Declaration
- Fiscal Years
- Income & Expense Book
- Liquidity Report Info
- N/L Accruals
- Number Series - Simulations
- Number Series - Transactions
- Presentation of Balances
- Rate Gain/Loss
- Rate Gains/Losses
- Reconciliation Descriptions
- Reconciliation Settings
- Report Settings
- Sub-ledger Control Accounts
- Sub Systems
- Tag/Object Type Control
- Tag/Object Types
- Tax Reports
- Tax Templates
- Template Transactions, Template Transactions - Accounts
- Transaction Settings
- VAT Code Control
- VAT Code on Transaction rows
- VAT Codes
- VAT Declarations
- XBRL Reporting Elements, XBRL Reporting Settings
- Home page for Nominal Ledger manual
- Home page for Standard ERP manual
Account Classifications
Whenever you need to enter an Account in a record such as a Nominal Ledger Transaction or a Simulation or in a setting such as Account Usage S/L, Account Usage P/L or Payment Modes, you can use the 'Paste Special' feature to help you choose the correct Account.When you open the 'Paste Special' list from any Account field, the resulting 'Paste Account' window will usually be a simple list in which you can choose the Account you need by double-clicking (Windows/Mac OS X) or tapping (iOS/Android):
If you have many Accounts in your database, you can use Account Classifications to build a 'Paste Special' list that provides a greater level of help with Account selection. Follow these steps:
- Spend some time planning your Account Classifications with the aim of helping users to choose Accounts quickly and easily.
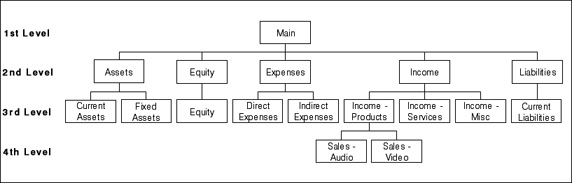
Planning your Account Classifications will result in a hierarchical structure similar to the example illustrated below:
- To work with Account Classifications, first use the [Switch Module] button in the Navigation Centre to enter the Nominal Ledger. Then, if you are using Windows or Mac OS X, click the [Settings] button, also in the Navigation Centre and double-click 'Account Classifications' in the resulting list. If you are using iOS or Android, select 'Settings' from the Tools menu (with 'wrench' icon) and then tap 'Account Classifications' in the 'Settings' list. The 'Account Classifications: Browse' window opens, listing the Account Classifications that you have already entered:
To enter a new record, select 'New' from the Create menu (Windows/Mac OS X) or from the + menu (iOS/Android). The 'Item Classification: New' window appears: enter the details as appropriate and click [Save] (Windows/Mac OS X) or tap √ (iOS/Android) to save the new record.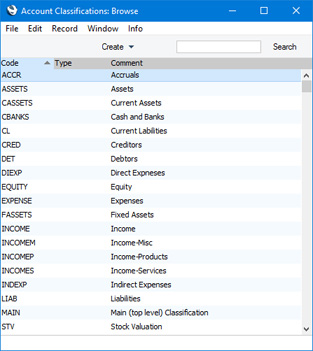

- Code
- Enter a unique code to identify the Account Classification. It can consist of up to five alphanumeric characters.
- Name
- Assign a descriptive name to the Account Classification. This will be shown in the 'Account Classifications: Browse' window and the 'Paste Special' list, so it should be descriptive enough to make the selection of the correct Account Classification easy for all users.
- Type
- Paste Special
Account Classification Types setting, Nominal Ledger
- If necessary, you can group Account Classifications of a broadly similar nature together by assigning them to the same Classification Type.
- Classification
- Paste Special
Account Classifications setting, Nominal Ledger
- An Account Classification can belong to another Account Classification, allowing you to define a hierarchical Classification structure. use this field to construct the Item Classification hierarchy. In each record on a lower level, this field should contain the Classification on the level immediately above.
- For example, if the "MAIN" Classification is on the top level, the Classification field in the "MAIN" record should be blank:
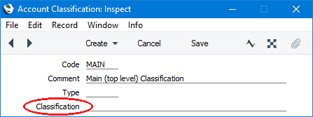
- The "MAIN" Classification has five sub-Classifications "Assets, "Liabilities", "Equity". "Income" and "Expenses". In these Classifications, the Classification field should contain "MAIN", the superior Classification to which they belong:
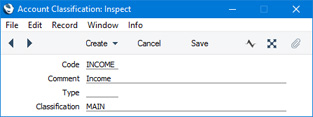
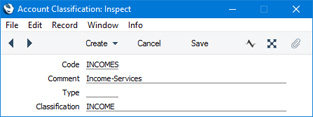
- Within the "Income" Classification, there are three sub-Classifications, "Income - Products", "Income - Services" and "Income - Misc". In these Classifications, the Classification field should contain "Income", the immediately superior Classification:
- For example, if the "MAIN" Classification is on the top level, the Classification field in the "MAIN" record should be blank:
- Code
- After entering your Account Classifications, you can assign them to the appropriate Accounts. To do this, use the Classification field on the 'Misc' card of each Account record. You can assign several Classifications to the same Account, separated by commas:
Every Account should have at least one Classification: Accounts without a Classification will not appear in the new 'Paste Special' list.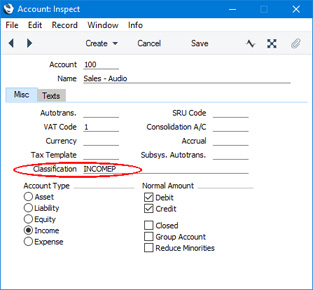
- Decide which Classification is to be your default Classification. This is the Classification whose Accounts will be listed when you open the Account 'Paste Special' list. Enter this Classification in the Account Classification field in the Transaction Settings setting in the Nominal Ledger:
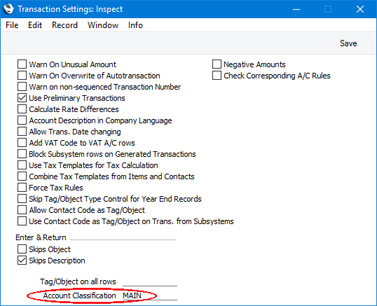
- Entering an Account Classification in the Transaction Settings setting will cause the standard 'Paste Special' window to be replaced with the following window when you open the 'Paste Special' list from any Account field (in this case, from the Account field in a Transaction):
In this example, we have specified that our "MAIN" Classification (i.e. the top level Classification) is the top level Classification. As a result, the list on the left-hand side is headed "MAIN", and the five second-level Classifications that belong to the "MAIN" Classification are listed there. The list of Accounts on the right is empty because no Accounts belong directly to the "MAIN" Classification.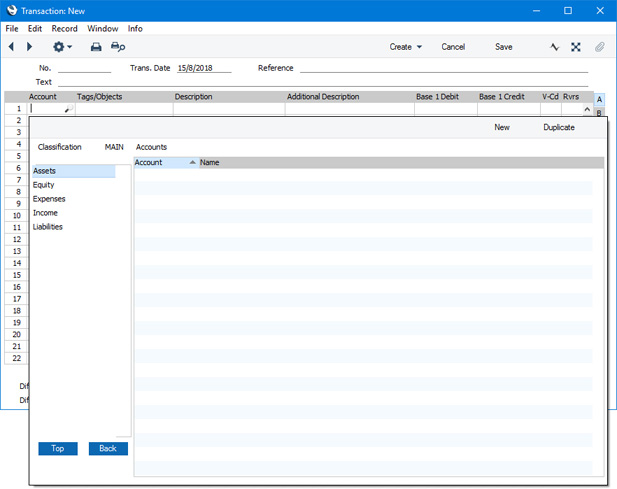
If the Account that we want is a type of Sales Account, we can double-click or tap on "Income" in the left-hand list, with the following result:
The title of the left-hand list changes to "Income", the Classification Code for Income Accounts. This list now shows the three sub-Classifications that belong to the "Income" Classification. The right-hand list is still empty, again because no Accounts belong directly to the "Income" Classification.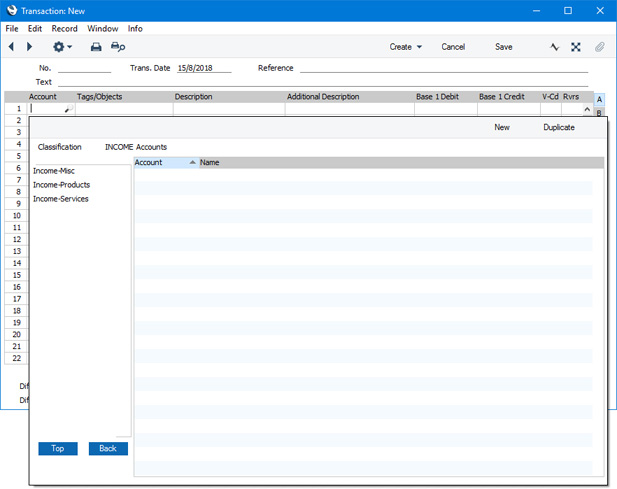
We can now double-click or tap on one of the sub-Classifications in the left-hand list, with the following result:
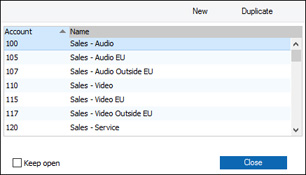
The left-hand list is now empty, because the Classification that we chose has no sub-Classifications. The right-hand list now shows the Accounts that belong to this Classification. You can sort and search in this right-hand list in the usual fashion and, as in the standard 'Paste Special' window, you can create a new Item by clicking the [New] or [Duplicate] buttons (Windows/Mac OS X) or + (iOS/Android). If the Account we want is in the list, we can click or tap it to add it to the Transaction.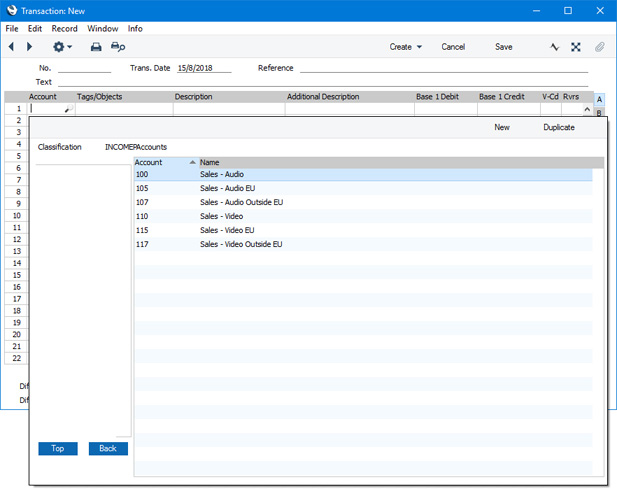
If the Account that we want does not belong to the Classification that we selected, we can click or tap the [Back] button to go up one level in the hierarchy (to the "Income" Classification), or we can click the [Top] button to go to the top level (to the "MAIN" Classification).
The advantage of specifying our "MAIN" Classification (i.e. the top level Classification) in the Account Classification field in the Transaction Settings setting is that when the 'Paste Special' list opens, the major Classifications are all shown in the left-hand list, helping us to find the Item that we want quickly and easily.
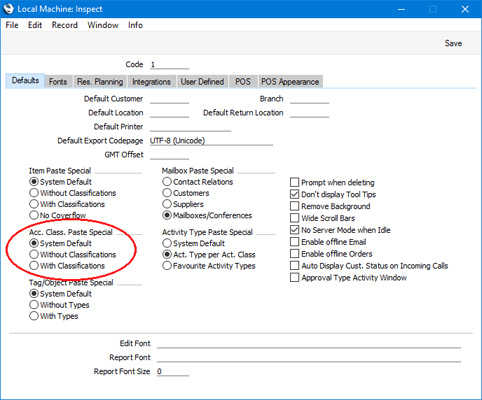
- After you have specified an Account Classification in the Transaction Settings setting, the 'Paste Account' window with Classifications will be used on every machine in the network. If you only need the standard 'Paste Account' window to be used on a particular machine, change to the User Settings module on that machine and open the Local Machine setting. Choose "Without Classifications" as the Acc. Class. Paste Special option:
Settings in the Nominal Ledger:
- Account Classification Types
- Account Classifications
- Account Short Codes
- Account Transfers
- Accounting Periods
- Auto Eliminations
- Autotransactions
- Bank Transactions
- Brought Forward Balances
- Budget Classes
- Budget Keys
- Calculation Formulae
- Electronic VAT Declaration
- Fiscal Years
- Income & Expense Book
- Liquidity Report Info
- N/L Accruals
- Number Series - Simulations
- Number Series - Transactions
- Presentation of Balances
- Rate Gain/Loss
- Rate Gains/Losses
- Reconciliation Descriptions
- Reconciliation Settings
- Report Settings
- Sub-ledger Control Accounts
- Sub Systems
- Tag/Object Type Control
- Tag/Object Types
- Tax Reports
- Tax Templates
- Template Transactions, Template Transactions - Accounts
- Transaction Settings
- VAT Code Control
- VAT Code on Transaction rows
- VAT Codes
- VAT Declarations
- XBRL Reporting Elements, XBRL Reporting Settings
- Home page for Nominal Ledger manual
- Home page for Standard ERP manual
Account Short Codes
Account Short Codes can help reduce errors when selecting Accounts and Objects in Purchase Invoices, Expenses and Stock Depreciations. You can also use them if you do not want members of staff using Purchase Invoices, Expenses and Stock Depreciations to have any access to the Account and Object registers (which means that they will not be able to use the 'Paste Special' function to choose Accounts and Objects).Once you have defined your Short Codes, using the 'Paste Special' function from the Short Code field in a Purchase Invoice, Expense or Stock Depreciation record means the correct Account and Object will be brought in automatically.
To enter a new Account Short Code or to edit an existing one, first open the 'Settings' list by clicking the [Settings] button in the Master Control panel or using the Ctrl-S/⌘-S keyboard shortcut. Double-click 'Account Short Codes' in the list. The 'Account Short Codes: Browse' window is displayed, showing all Account Short Codes previously entered. Double-click a record in the list to edit it, or add a new record by clicking the [New] button in the Button Bar. When the record is complete, save it by clicking the [Save] button in the Button Bar or by clicking the close box and choosing to save changes. To close it without saving changes, click the close box.
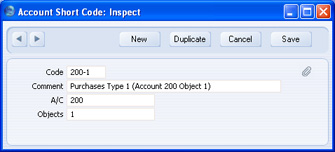
- Code
- Enter a unique Code for the Short Code. You can use up to five characters.
- Comment
- Enter a name for the Short Code, to be shown in the 'Account Short Codes: Browse' window and the 'Paste Special' list.
- A/C
- Paste Special
Account register, Nominal Ledger/System module
- Specify here the Account that is to be brought into a Purchase Invoice, Expense or Stock Depreciation record whenever you use this Short Code.
- Objects
- Paste Special
Object register, Nominal Ledger/System module
- Specify here the Object that is to be brought into a Purchase Invoice, Expense or Stock Depreciation record whenever you use this Short Code. You can enter several Objects, separated by commas.
Account Transfer
This setting together with the 'Account Balance Transfer' Maintenance function allows you to transfer balances from one Account to another, or to transfer the balances of a range of Accounts to a single Account. An example use for this feature is in Portugal, where it can be necessary to amalgamate the balances of several VAT Accounts in a single Account at the end of a VAT reporting period. It is also used when closing a financial year. Please refer to the End of Year Procedures in Portugal page for more details about closing a financial year.You should use this setting to define the sets of rules that you will then use to control the operation of the Maintenance function. The function will use one of these sets of rules to create a new record in the Simulation or Transaction register containing the necessary postings. Therefore, once you have defined a particular set of rules, you can use it many times.
Please click for details about:
- The Account Transfers setting;
- The 'Account Balance Transfer' Maintenance function;
- An example
- End of Year Procedures in Portugal.
Account Transfer - The Account Transfer Setting
To enter a new Account Transfer record or to edit an existing one, first open the 'Settings' list by clicking the [Settings] button in the Master Control panel or using the Ctrl-S/⌘-S keyboard shortcut. Double-click 'Account Transfer' in the list. The 'Account Transfers: Browse' window is displayed, showing all Account Transfer records previously entered. Double-click a record in the list to edit it, or add a new record by clicking the [New] button in the Button Bar. When the record is complete, save it by clicking the [Save] button in the Button Bar or by clicking the close box and choosing to save changes. To close it without saving changes, click the close box.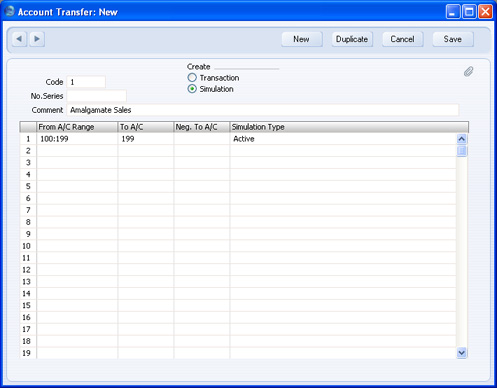
- Code
- Enter a unique Code by which the Account Transfer record will be identified.
- Create
- Use these options to determine whether the 'Account Balance Transfer' Maintenance function will create a Simulation or a Transaction.
- If the function is to create a Simulation, you will be able to check it for accuracy before converting it into a Transaction using the 'Transactions' Operations menu function on the 'Simulations: Browse' window.
- If the function is to create a Simulation, you will be able to check it for accuracy before converting it into a Transaction using the 'Transactions' Operations menu function on the 'Simulations: Browse' window.
- No. Series
- You can specify that the Transaction or Simulation created by the 'Account Balance Transfer' Maintenance function will be numbered using a particular number sequence in the Number Series - Transactions or Number Series - Simulations settings. To do this, enter the first number of the number sequence here. If you leave this field empty, the Number Series will be chosen in the usual manner, taking the Number Series Defaults setting and the 'Serial Nos' card of the user's Person record into account. If you enter a number that does not fall into a recognised or currently valid number sequence, the Maintenance function will not create a Simulation or a Transaction. This will occur most commonly when Number Series are tied to a period such as a calendar year and that period ends.
!
Be sure to specify a valid Number Series, otherwise no Simulations or Transactions will be created.
- Comment
- Enter a name for the Account Transfer record, to be shown in the 'Account Transfers: Browse' window and the 'Paste Special' list. The Comment is also transferred to the Text field of any Simulation or Transaction created by the 'Account Balance Transfer' Maintenance function.
- From A/C Range
- Paste Special
Account register, Nominal Ledger/System module
- Range Reporting Alpha
- Specify here the Account whose balance is to be transferred. If you want to move balances out of a number of Accounts, enter the first and last Account Numbers in the range, separated by a colon (as shown in the illustration).
- Specify here the Account whose balance is to be transferred. If you want to move balances out of a number of Accounts, enter the first and last Account Numbers in the range, separated by a colon (as shown in the illustration).
- To A/C
- Paste Special
Account register, Nominal Ledger/System module
- Specify here the Account that is to receive the balances from the Account(s) specified above.
- In the example illustration, the Accounts in the range from 100 to 198 will have their balances moved to Account 199. If the original balance is a positive figure, it will be credited to the original Account and debited to this Account. If the original balance is negative and the Neg. To A/C field (below) is blank, it will be debited to the original Account and credited to this Account.
- In the example illustration, the Accounts in the range from 100 to 198 will have their balances moved to Account 199. If the original balance is a positive figure, it will be credited to the original Account and debited to this Account. If the original balance is negative and the Neg. To A/C field (below) is blank, it will be debited to the original Account and credited to this Account.
- Neg. To A/C
- Paste Special
Account register, Nominal Ledger/System module
- If necessary, you can specify here a separate Account to be credited with balances from the Account(s) specified in the first column if those balances are negative.
- Simulation Type
- Paste Special
Choices of possible entries
- This field has two effects.
- First, if the 'Account Balance Transfer' Maintenance function is to create a Simulation, specify here the Status that will be applied to each Simulation row (flip B). Please refer to the page describing the Simulation register for a description of the "Active", "Transferred" and "Invalid" options, and to the End of Year Procedures in Portugal page for details of the "Year End Stage 1" and "Year End Stage 2" options.
- Second, irrespective of whether the 'Account Balance Transfer' Maintenance function will create a Simulation or a Transaction, this field controls how the balances that will be transferred are calculated:
- Active
- The balances that will be transferred will be calculated from Transactions and from Simulations whose Status is "Active", "Year End Stage 1" or "Year End Stage 2".
- Year End Stage 1
- The balances that will be transferred will be calculated from Transactions only (i.e. these balances will be "actual" balances).
- Year End Stage 2
- The balances that will be transferred will be calculated from Transactions and from Simulations whose Status is "Year End Stage 1" or "Year End Stage 2".
- First, if the 'Account Balance Transfer' Maintenance function is to create a Simulation, specify here the Status that will be applied to each Simulation row (flip B). Please refer to the page describing the Simulation register for a description of the "Active", "Transferred" and "Invalid" options, and to the End of Year Procedures in Portugal page for details of the "Year End Stage 1" and "Year End Stage 2" options.
Account Transfer - The 'Account Balance Transfer' Maintenance function
Once you have defined a set of rules using the Account Transfer setting as described here, it will be used by the 'Account Balance Transfer' Maintenance function to create a new record in the Simulation or Transaction register containing the necessary postings.To use this function, ensure you are in the Nominal Ledger and click the [Routines] button in the Master Control panel. Then click the [Maintenance] button in the subsequent window. Double-click 'Account Balance Transfer' in the list. The following dialogue box appears:
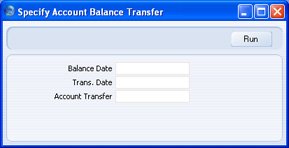
- Balance Date
- Paste Special
Current Date
- The balances to be transferred are calculated using a period that ends with the date entered here. This date will also be the start date of the period the next time you run the function for the same Accounts.
- If you have not used the function before, the date of the first Transaction will be used as the start date. This may be too early if you have Transactions for several years in your database. In this case, it is recommended that you obtain the correct start date by running the function to create a temporary Simulation using the day before that start date as the Balance Date. Then run the function once again to create the required Simulation or Transaction, this time entering the appropriate Balance Date. Then, if necessary, delete the temporary Simulation.
- If you do not enter a date here, the function will have no effect.
- If you have not used the function before, the date of the first Transaction will be used as the start date. This may be too early if you have Transactions for several years in your database. In this case, it is recommended that you obtain the correct start date by running the function to create a temporary Simulation using the day before that start date as the Balance Date. Then run the function once again to create the required Simulation or Transaction, this time entering the appropriate Balance Date. Then, if necessary, delete the temporary Simulation.
- Trans Date
- Paste Special
Choose date
- Enter a date to be used as the Transaction Date in the Transaction or Simulation created by the function. If you do not enter a date, the Balance Date (above) will be used.
- Account Transfer
- Paste Special
Account Transfers setting, Nominal Ledger
- Enter the Code of a record in the Account Transfers setting. This will determine whether the function will create a Simulation or a Transaction and will specify the Accounts from which balances are to be transferred and the Accounts that are to receive those balances.
Account Transfer - Example

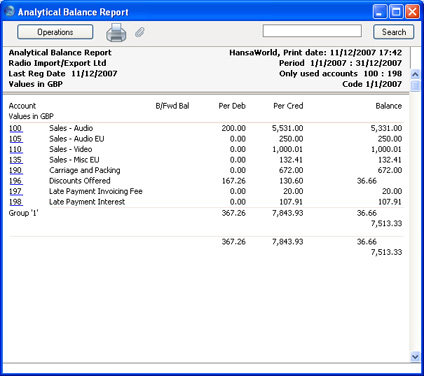
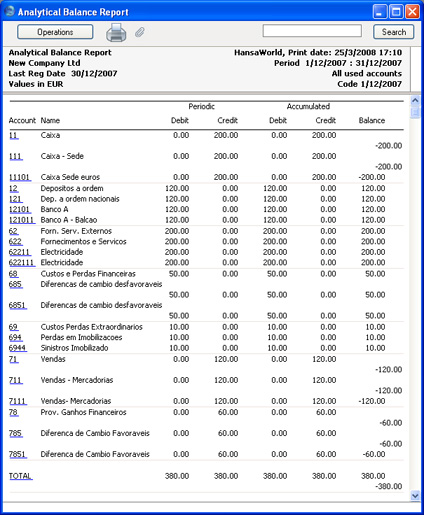
The Analytical Balance report (or the Nominal Ledger report if you want more detail) shows the balances that will be transferred:
When you are certain that the Simulation is correct, you can convert it into a Transaction using the 'Transactions' function on the Operations menu of the 'Simulations: Browse' window.
Account Transfer - End of Year Procedures in Portugal
In Portugal, you should use the Account Balance Transfer feature to post your year-end results. This is a six-stage process as follows:- The total operation results from Expense and Income Accounts for the year should be posted to an intermediate operation result Account (an Income Account);
- The total financial results from Expense and Income Accounts for the year should be posted to an intermediate financial result Account (an Income Account);
- The total extraordinary results and profits from Expense and Income Accounts for the year should be posted to an intermediate extraordinary result Account (an Income Account);
- The combined operation and financial results from the two intermediate Accounts (steps 1 and 2) should be posted to the Current Results Account (an Income Account);
- The extraordinary results from the intermediate Account (step 3) and the current results (step 4) should be combined and posted to an Account for results before taxes (an Income Account);
- The results before taxes (step 5) and the taxes should be combined and posted to the Net Result Account (an Equity Account).
It is recommended that each record in the Account Transfers setting should create a Simulation. If you then make a mistake in the sequence, you can delete the Simulations created so far and start again.
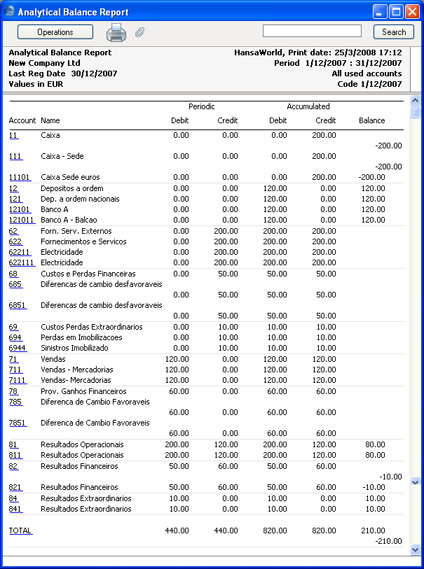
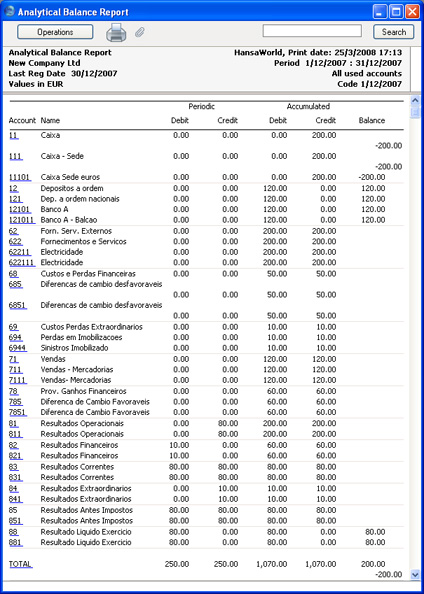
The first three records in the sequence should create Simulations with the "Year End Stage 1" Status. The final three should create Simulations with the "Year End Stage 2" Status. After creating the Simulations, you should print the Analytical Balance report once excluding Simulations, once including "Year End Stage 1" Simulations and once including "Year End Stage 1" and "Year End Stage 2" Simulations, to check the results are correct and to keep a record for official purposes. The report period should be the last month in the financial year. Finally, if you need the result transferred to the following year, you can convert the six Simulations into Transactions using the 'Create NL Transactions' Operations menu function on the 'Simulations: Browse' window.
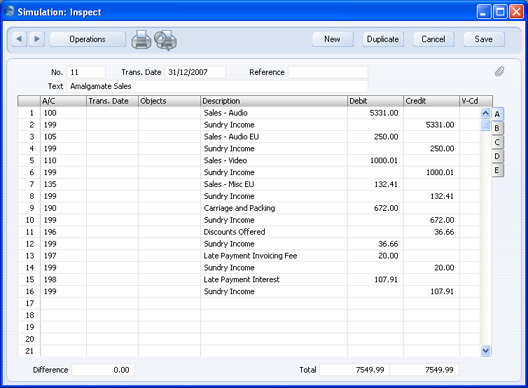
Illustrated below is the first of the records in the Account Transfers setting:

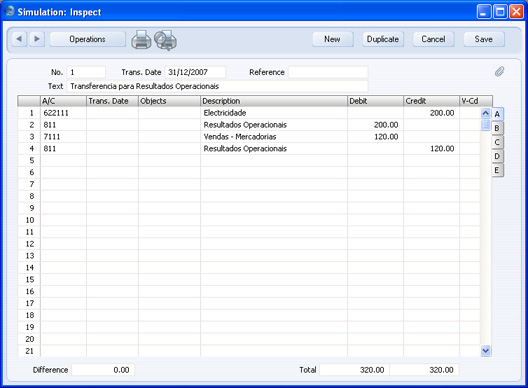
The rows in the resulting Simulation will each have the Status "Year End Stage 1":
The rows in the fourth Account Transfer record should have a Simulation Type of "Year End Stage 2":

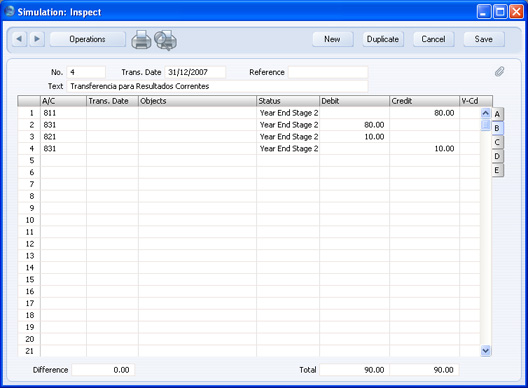
The rows in the resulting Simulation will have the Status "Year End Stage 2":
Having used the 'Account Balance Transfer' Maintenance function to create Simulations from the six Account Transfer records strictly in turn, you should print the Analytical Balance report excluding all Simulations. You should choose With Group Accounts as the Presentation option, and the period should be the last month in the financial year. This will show the operation, financial and extraordinary results and profits (Accounts in Groups 6 and 7):
Accounting Periods
When you enter an Invoice or Purchase Invoice, its Due Date will usually be calculated from its Invoice Date using its Payment Terms. However, in some countries (e.g. in southern Africa), Due Dates are not calculated directly from Invoice Dates in this manner. Instead, a Due Date will depend on the Period in which the Invoice Date falls. This Period may not necessarily be a calendar month.To use this system, follow these steps:
- To enter a new Accounting Period or to edit an existing one, first open the 'Settings' list by clicking the [Settings] button in the Master Control panel or using the Ctrl-S/⌘-S keyboard shortcut. Double-click 'Accounting Periods' in the list. The 'Accounting Periods: Browse' window is displayed, showing all Accounting Periods previously entered. Double-click a record in the list to edit it, or add a new record by clicking the [New] button in the Button Bar. When the record is complete, save it by clicking the [Save] button in the Button Bar or by clicking the close box and choosing to save changes. To close it without saving changes, click the close box.
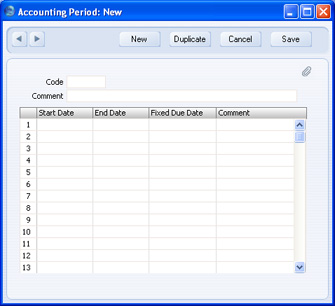
- Enter a Code for the Accounting Period. This must be the same as the Code of a Fiscal Year. When you press Tab or Return, the Fiscal Year will be divided into twelve periods, one for each calendar month, and these periods will be listed in the grid:
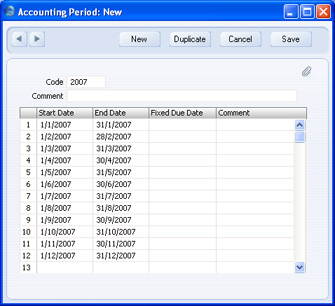
- Change the Start and End Dates of each Period as necessary. The Start Date of the first Period must be the same as the Start Date of the Fiscal Year. The End Date of the last Period must be the same as the End Date of the Fiscal Year. The Periods can be irregular in duration, but do not omit any dates.
- Specify Due Dates for each Period in the Fixed Due Dates column:
In the example illustrated above, an Invoice or Purchase Invoice dated between 21st June and 26th July will have a Due Date of 26th August.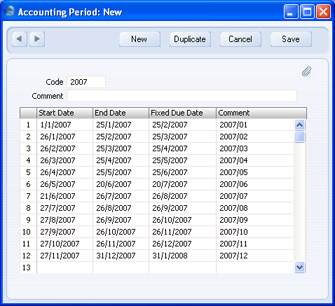
If you do not specify a Fixed Due Date for a Period, then the End Date of that Period will also be its Due Date.
The Comment will be printed in reports if you decide to use Accounting Periods to determine the ageing periods in those reports. This is described in point 6 below.
- If you want Accounting Periods to be used when calculating Due Dates, choose the Accounting Period + Net Days option in your Payment Term records:
In the example illustrated above, the Net Days is 5. This means a Due Date will be five days later than the Due Date specified in the Accounting Periods setting. So, our example Invoice or Purchase Invoice dated between 21st June and 26th July will now have a Due Date of 31st August, if it uses this Payment Term.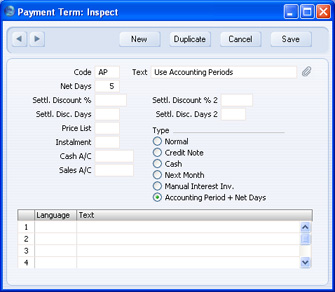
- You can also use Accounting Periods to determine the ageing periods in the Sales Ledger report (Aged and Aged Detailed options), the Purchase Ledger report (Aged option), the Customer and Supplier Status reports, the Payments and Receipts Forecast reports, and the Open Invoice Customer and Supplier documents. To do this, use the Use Accounting Periods instead of Age Limits option in the Age Limits setting in the Sales Ledger, and specify how many Accounting Periods you want to use:
If you are using this option, there is no need to specify Periods 1-6 for the purposes of debit and credit management, as illustrated above. However, you may still wish to do so as these fields provide the defaults for the Aged Stock Analysis report in the Stock module.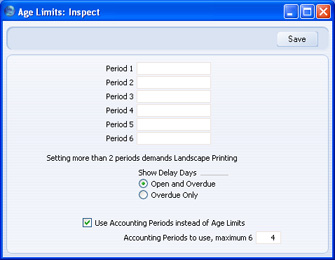
The example Sales Ledger report illustrated below was produced using the Aged option. It has four ageing periods as specified in the Age Limits setting (in addition to the Not Due column and the column for Invoices that are older than the last ageing period). These ageing periods are the four most recent Accounting Periods at the time the report is produced. The name (column heading) of each ageing period is taken from the Accounting Periods setting illustrated earlier in this section:
The due figure in each ageing period is calculated from the Invoices that became due during the corresponding Accounting Period. In the example illustration, the figures in the 2007/09 column are calculated from the Invoices that became due between 27th August and 26th September.
Auto Elimination
Please click here for details of this setting.Autotransactions
Autotransactions are accounting templates that you can use to simplify the entering of various transactions. You can use Autotransactions in Transactions, Simulations, Purchase Invoices and Expenses.
When a certain type of Transaction occurs repeatedly, you can create a template in which you put all the recurring data once and for all, e.g. a certain combination of Account numbers. Next time you wish to enter this type of Transaction, you can use the automatic function instead. This will create a ready-made Transaction, except for the data that is unique for each particular entry. Examples might include rent payments, salary payments and recurring journals. Autotransactions can thus save labour and ensure that you use the correct Accounts every time.
Please click for details about:
- Creating an Autotransaction record;
- An example;
- Duplicating an Autotransaction record;
- Changing an Autotransaction;
- Deleting an Autotransaction.
Autotransactions - Creating a new Autotransaction
Double-click 'Autotransactions' in the 'Settings' list. A list of existing Autotransactions appears. Click [New] in the Button Bar to enter a new record. When the Autotransaction has been entered, save it using the [Save] button and close the window by clicking the close box. Then, close the browse window using the close box again.
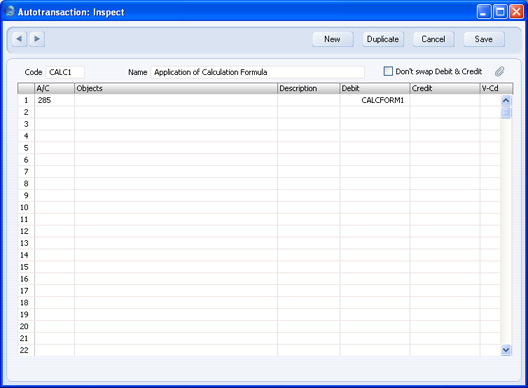
- Code
- This is the code that identifies this particular template. The code can consist of up to six alphanumeric characters. Each template must have a unique code, and you should use codes that do not duplicate Account numbers.
- When you need to use the Autotransaction in a Transaction, Simulation, Purchase Invoice or Expense record, enter this code in the Account field. When you press Tab or Return, the calculations defined in the grid of the Autotransaction record will be applied to the Transaction, Simulation, Purchase Invoice or Expense record.
- When you need to use the Autotransaction in a Transaction, Simulation, Purchase Invoice or Expense record, enter this code in the Account field. When you press Tab or Return, the calculations defined in the grid of the Autotransaction record will be applied to the Transaction, Simulation, Purchase Invoice or Expense record.
- Name
- Assign a descriptive name to the template, e.g. "Sales VAT included". The name is then shown in the 'Autotransactions: Browse' window.
- Don't swap Debit & Credit
- Please refer to the description of the Debit and Credit fields below for details of this option.
When you use an Autotransaction in a Transaction, you will do so by entering the Autotransaction Code in the Account field in a Transaction row. When you press Tab or Return, the Autotransaction will be applied to the Transaction. Usually, the result of the first row of the Autotransaction will appear in the Transaction row where you entered the Autotransaction Code. The exception is when the Account field in the first Autotransaction row contains !. In this case, the result of the first row of the Autotransaction will appear in the Transaction row above the one where you entered the Autotransaction Code, overwriting what was previously there. The results of the other rows of the Autotransaction will appear in new Transaction rows underneath. Each Autotransaction row will therefore generate a corresponding Transaction row. There is an example here.
- Account
- Paste Special
Account register, Nominal Ledger/System module
- You can make three types of entry in this field, as follows:
- An Account Number
- You can enter an Account number, using 'Paste Special' if necessary to choose the correct one.
- This Account Number will be copied to the corresponding Transaction row.
- This Account Number will be copied to the corresponding Transaction row.
- The hash sign (#)
- # in this field will cause the Account to be copied from the preceding line of the Transaction when you use the template. # is obtained using Alt-3 on a UK Macintosh keyboard.
- The exclamation mark (!)
- ! in this field will cause the amount in the previous line of the Transaction is to be overwritten by the result of the Autotransaction row. See the following example for a detailed description of how this works.
- An Account Number
- Object
- Paste Special
Object register, Nominal Ledger/System module
- The Object(s) specified here will be copied to the corresponding Transaction row. You can also enter a # sign to copy the Objects from the preceding line of the Transaction.
- Description
- By default, the Description in the corresponding Transaction row will be taken from the relevant Account record as usual. If you need this default to be overwritten, enter the new Description here. You can also enter a # sign to copy the Description from the preceding line of the Transaction.
- Debit, Credit
- Paste Special
Calculation Formulae setting, Nominal Ledger
- You can enter a fixed amount here (e.g. a salary or a rent), or a formula for a calculation. You can enter a percentage as a number followed by a % sign (e.g. 30%). The Autotransaction will then apply the specified percentage to the amount on the preceding line of the Transaction. If you enter a number followed by two % signs (e.g. 30%%), the result of the percentage calculation will be rounded to the nearest whole number. You can also define a more complex formula using the Calculation Formulae setting and then enter the Code of that formula here. The Autotransaction will then apply the specified formula to the amount on the preceding line of the Transaction.
- By default, if you enter the amount or percentage in the Debit field, the calculated amount will be entered on the same side of the Transaction as the original amount. If you enter the amount or percentage in the Credit field, the calculated amount will be entered on the opposite side. But, if you use the Don't Swap Debit & Credit option in the Autoransaction header, if you enter the amount or percentage in the Debit field, the calculated amount will be entered on the debit side, irrespective of whether the original amount was a debit or credit. If you enter the amount or percentage in the Credit field, the calculated amount will be entered on the Credit side.
- However, if you enter a Calculation Formula in the Debit field, it will calculate an amount based on the figure in the row above and enter the result as a Debit. If you enter the Calculation Formula in the Credit field, the calculated amount will be entered as a Credit. In other words, if you enter a Calculation Formula in an Autotransaction row, that row will always behave as if you are using the Don't Swap Debit & Credit option.
- You can balance all the preceding lines of the Transaction by entering an equal sign (=) in the Debit or Credit field.
- By default, if you enter the amount or percentage in the Debit field, the calculated amount will be entered on the same side of the Transaction as the original amount. If you enter the amount or percentage in the Credit field, the calculated amount will be entered on the opposite side. But, if you use the Don't Swap Debit & Credit option in the Autoransaction header, if you enter the amount or percentage in the Debit field, the calculated amount will be entered on the debit side, irrespective of whether the original amount was a debit or credit. If you enter the amount or percentage in the Credit field, the calculated amount will be entered on the Credit side.
- V-Cd
- Paste Special
VAT Codes setting, Nominal Ledger
- By default, the VAT Code in the corresponding Transaction row will be taken from the relevant Account record as usual. If you need this default to be overwritten, or if there is no default in the relevant Account record, enter the new VAT Code here. You can also enter a # sign to copy the VAT Code from the preceding line of the Transaction, if the A/C is ! or #.
Autotransactions - Example in Transactions and Simulations
The following example shows a template that distributes an amount across four Objects on a percentage basis after you have entered that amount in a Transaction row. You might use such a template to allocate shares of overhead costs to four departments.
The first row contains an exclamation mark in the Account field and a percentage in the Debit field. The exclamation mark indicates that when the Autotransaction is specified in a Transaction, the amount of the previous row of the Transaction is to be overwritten by a figure determined by the application of the Autotransaction (in this case, by a percentage of the original figure). That figure will be on the same side (debit or credit) as the original, as the percentage has been entered to the Debit field of the Autotransaction (and the Don't Swap Debit & Credit option is not being used). In other words, the original figure entered will be reduced by 90%. The Object specified will be entered to the Object field of the Transaction row and the Description and VAT Code will be retained.
The second line of the Autotransaction will again refer to the original figure and calculate a percentage from it, on the same side (debit or credit) as the original, using a new line in the Transaction. The # sign in the Account, Description and VAT Code fields signifies that the Account, Description and VAT Code originally specified are to be used in the new line, which will contain "DEPT2" in its Object field. The third and fourth lines of the Autotransaction will have a similar effect, creating new lines in the Transaction with different Objects and percentages to the original figure.
The fifth line calculates VAT from the original figure at the standard rate of 17.5% and places it in a new row in the Transaction, posting to the VAT Inputs Receivable Account on the same side (debit or credit) as the original figure.
The final line of the Autotransaction contains an Account number and an equal sign (=) in the Credit field. This signifies that the sum of the previous lines of the Transaction is to be posted to that Account. The posting will be on the opposite side (debit or credit) to the original figure, since the equal sign is in the Credit field.
This is an example of a double-sided Autotransaction. The = in the final row means that when you use it in a Transaction, the result will be a Transaction that balances. You can also use a single-sided Autotransaction in a Transaction, in which case you will need to ensure the Transaction balances yourself before you save it.
When you enter a Transaction or Simulation, begin by entering the Account Number for the relevant expense category, and the amount excluding VAT. On the second row, enter the code of the Autotransaction in the Account field.
Press Return. The Autotransaction is applied to the first row of the Transaction, and the amounts are recalculated as follows:
If you know that a particular Autotransaction will always be used with an Account, enter it in the Autotrans. field in the Account record: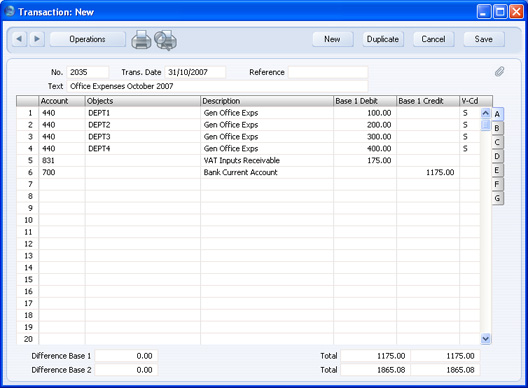
When you enter the Account in a Transaction or Simulation and press Tab or Return, the Autotransaction Code will be brought in to the next row automatically: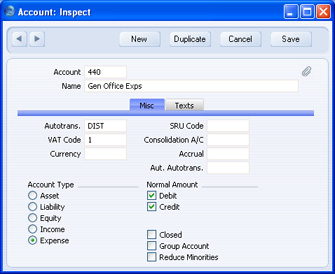
Enter the amount on the first row as normal, then press Return twice. The Autotransaction will be applied to the Transaction or Simulation as previously described.
Autotransactions - Example in Purchase Invoices and Expenses
The Autotransaction in the previous example was designed to be used from the Nominal Ledger and was therefore double-sided to produce a balancing Transaction. As was mentioned in that example, you can also use a single-sided Autotransaction in a Transaction, in which case you will need to ensure the Transaction balances yourself before you save it.
You can also use Autotransactions in Purchase Invoices and Expense records. For example, it may be that you will enter many overhead costs in the Purchase Ledger from your Suppliers' Purchase Invoices. You can enter Autotransaction Codes to the Account field of a Purchase Invoice row in the same way as illustrated above for Transactions, so in our example Purchase Invoices can also be distributed across departments. However, the Autotransaction that you use in this situation should be single-sided: it should not have the final balancing line posting to the Bank Account. When you post the Purchase Invoice to the Nominal Ledger, a balancing posting to a Creditor Account will be made automatically as normal. Payment will reach the Bank Account when the Purchase Invoice is paid. In addition, any Autotransaction used in Purchase Invoices and Expense records will not need to calculate VAT because that will be handled by the VAT Code.
An example single-sided Autotransaction is shown below:
The first row contains an exclamation mark in the Account field and a percentage in the Debit field. The exclamation mark indicates that when the Autotransaction is specified in a Purchase Invoice (or Expense record), the amount of the previous row of the Purchase Invoice is to be overwritten by a figure determined by the application of the Autotransaction (in this case, by a percentage of the original figure). In effect, that figure will be on the same side (debit or credit) as the original, as the percentage has been entered to the Debit field of the Autotransaction. In other words, the original figure entered will be reduced by 90%. If the percentage had been entered to the Credit field of the Autotransaction, the original figure entered would be reduced by 90% and made negative, thus in effect changing sides. The Object specified will be entered to the Object field of the Transaction row and the Description and VAT Code will be retained.
The second line of the Autotransaction will again refer to the original figure and calculate a percentage from it, on the same side (debit or credit) as the original, using a new line in the Purchase Invoice. The # sign in the Account, Description and VAT Code fields signifies that the Account, Description and VAT Code originally specified are to be used in the new line, which will contain "DEPT2" in its Object field. The third and fourth lines of the Autotransaction will have a similar effect, creating new lines in the Purchase Invoice with different Objects and percentages to the original figure.
When you enter a Purchase Invoice or Expense record, begin by entering the Account Number for the relevant expense category, and the amount excluding VAT. On the second row, enter the code of the Autotransaction in the Account field.
Press Return. The Autotransaction is applied to the first row of the Purchase Invoice, and the amounts are recalculated as follows: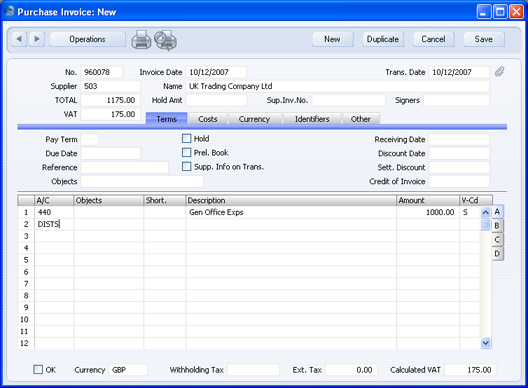
If you know that a particular Autotransaction will always be used with an Account, enter it in the Autotrans. field in the Account record: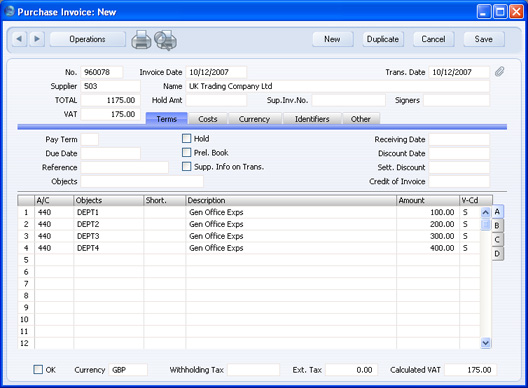
When you enter the Account in a Purchase Invoice or Expense record and press Tab or Return, the Autotransaction Code will be brought in to the next row automatically:
Enter the amount on the first row as normal, then press Return twice. The Autotransaction will be applied to the Purchase Invoice or Expense record as previously described.
Autotransactions - Example Automatic Autotransactions
In the previous example, when we entered an Autotransaction in a Purchase Invoice, its effects were visible immediately. As the Purchase Invoice was not saved at this point, we could then change any of the Purchase Invoice rows, including those that were added and calculated by the Autotransaction. For example, we could remove the row posting to DEPT2 and add that amount to the DEPT3 row.
In some situations (for example, calculating a second tax in addition to VAT that is not included in the price), the ability to change the effects of the Autotransaction might not be necessary or desirable. In this case, you might want the Purchase Invoice to contain a single row posting to an Account, with the results of the Autotransaction not being editable and only being visible in the Nominal Ledger.
To use this feature, first define the Autotransaction that calculates the extra tax:
Then, enter the Autotransaction in the Aut. Autotrans. field in the Account record:
Use the Account in a transaction such as a Purchase Invoice as normal:
The results of the Autotransaction are not shown in the Purchase Invoice. But, in the resulting Nominal Ledger Transaction, the Autotransaction causes the extra tax to be calculated and posted to the correct Accounts:
In this example, the Aut. Autotrans was attached to Account 440. The extra tax will therefore be calculated by applying the percentages in the Autotransaction to the amount posted to that Account (3% of 1000.00 in the example). The Don't Swap Debit & Credit option is not being used in the Autotransaction and in the first line the percentage was entered in the Credit field, so the result of the percentage calculation will be placed on the opposite side to the original. In the second line of the Autotransaction, the percentage was entered in the Debit field, so the result of this calculation will be placed on the same side as the original. This means we can use this Autotransaction in both Invoices and Credit Notes.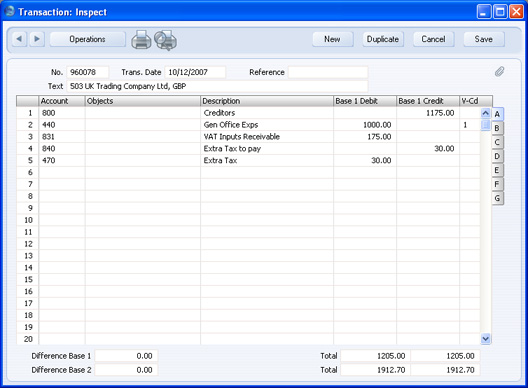
Unlike other Autotransactions, Automatic Autotransactions will not change the original posting (to Account 440 in the example). So, you cannot use them to distribute amounts to different Objects as was illustrated in the previous examples. You can only use them to add extra postings to Transactions. Therefore, you should not use the ! character in the first line of these Autotransactions. You can use # in the Objects field if you want to copy the Objects from the original posting to the extra postings.
This is a very powerful feature, to be used with care. It extends the reach of Autotransactions from Purchase Invoices and Expenses to Invoices, Stock Depreciations, Productions, Receipts, Payments, Personnel Payments and Cash In and Cash Out records. Each time you use an Account with an Aut. Autotrans (Account 440 in the example) in any of these records, in the resulting Nominal Ledger Transaction, the extra tax will be calculated as illustrated above. In the case of a Sales Invoice only, you can disable the application of the Autotransaction in Credit Notes using the Don't use Aut. Autotransactions on Credit Notes option on the 'Credit' card of the Account Usage S/L setting in the Sales Ledger.
A second example where Automatic Autotransactions can be used is in Poland, where companies producing their own goods need to post two sets of cost accounting postings when removing those goods from stock. The first set will debit the Cost Account and credit the Stock Account as normal, while the second set will debit the same value to a second Cost Account that depends on where the goods are produced and credit a Cost Reconciliation Account. This second set of postings will be generated automatically from outgoing stock transactions if you specify an Autotransaction in the Aut. Autotrans. field in the main Cost Account. This Autotransaction will debit 100% of the stock value to the second Cost Account and credit 100% of the stock value to the Cost Reconciliation Account.
Autotransactions - Deleting an Autotransaction
- Double-click 'Autotransactions' in the 'Settings' list.
The 'Autotransactions: Browse' window opens.
- Find the Autotransaction you are interested in, using the Search field in the top right-hand corner of the window if necessary.
- Double-click the row or press the Enter key. The Autotransaction is opened in a window with the title 'Autotransactions: Inspect'.
- Select 'Delete' from the Records menu. The Autotransaction is permanently deleted. The previous Autotransaction in the list is shown.
- Click the close box.
!
You cannot undo the deletion of an Autotransaction.
Bank Transactions
If your database is registered in Estonia, you can use the SEB Bank Payments Internet Service to make and receive payments through SEB Bank. Built in to the SEB Bank Payments Internet Service is a second Internet Service: SEB Bank Statements. This Internet Service will allows Bank Statements to be sent from SEB Bank to your HansaWorld Enterprise database electronically. When your database receives a bank statement, a new record will be created automatically in this setting for each transaction in the statement. You can then print the Bank Transactions report and compare it with the Account Reconciliation or Nominal Ledger reports if you need to reconcile the bank statement with your Nominal Ledger Transactions.
SEB Bank Payments and SEB Bank Statements are chargeable Internet Services. To use them, you must have registered your database in Estonia using the Automatic Internet Enabler method, as described on the Enabler Key page. You must also have registered with SEB Bank to enable electronic payments. Please contact your local HansaWorld representative for more details about subscribing to these Services.
Records in the Bank Transactions setting will be created when a new bank statement is sent from SEB Bank to your database. You cannot create new records in this setting yourself. To view the records in this setting, first open the 'Settings' list by clicking the [Settings] button in the Master Control panel or using the Ctrl-S/⌘-S keyboard shortcut. Double-click 'Bank Transactions' in the list. The 'Bank Transactions: Browse' window is displayed, showing the Bank Transactions already received. Double-click a record in the list to view it.
The header of each Bank Transaction record contains its unique identifying number, generated automatically when the record is created, and the date when it was created.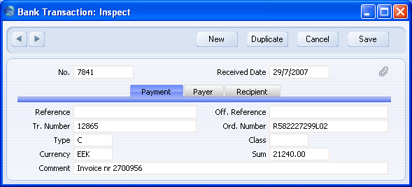
The 'Payment' card contains various reference numbers received from SEB Bank, the Currency of the Bank Transaction and its value. The Type field will contain "C" if the Bank Transaction represents the receipt of monies into your bank account, or "D" if it represents a payment issued from your bank account.
The 'Payer' card contains details of the bank account issuing the payment. If the Bank Transaction is a receipt, this will be the Customer's bank account. If the Bank Transaction is a payment, this will be your bank account.
The 'Recipient' card contains details of the bank account receiving the payment. If the Bank Transaction is a receipt, this will be your bank account. If the Bank Transaction is a payment, this will be the Supplier's bank account.

Brought Forward Balances
Please refer here for details about this setting.
---
Settings in the Nominal Ledger:
- Account Classification Types
- Account Classifications
- Account Short Codes
- Account Transfers
- Accounting Periods
- Auto Eliminations
- Autotransactions
- Bank Transactions
- Brought Forward Balances
- Budget Classes
- Budget Keys
- Calculation Formulae
- Electronic VAT Declaration
- Fiscal Years
- Income & Expense Book
- Liquidity Report Info
- N/L Accruals
- Number Series - Simulations
- Number Series - Transactions
- Presentation of Balances
- Rate Gain/Loss
- Rate Gains/Losses
- Reconciliation Codes
- Reconciliation Settings
- Report Settings
- Sub Systems
- Sub-ledger Control Accounts
- Tag/Object Type Control
- Tag/Object Types
- Tax Reports
- Template Transactions, Template Transactions - Accounts
- Transaction Settings
- VAT Code Control
- VAT Code on Transaction rows
- VAT Codes
- VAT Declarations
- XBRL Reporting Elements, XBRL Reporting Settings
- Home page for Nominal Ledger manual
- Home page for Standard ERP manual
Budget Classes
This page describes the Budget Classes setting in the Nominal Ledger.
---
When entering Budget and Revised Budget records, you may need to budget for different market or other scenarios. In other words, you may need to enter more than one Budget or Revised Budget record for the same Account-Tag/Object combination for a particular period. To do this, you can use this setting to create Budget Classes that represent the various market or other scenarios, and then assign a Budget Class to each Budget and Revised Budget record.
To open the Budget Classes setting, first ensure you are in the Nominal Ledger module. Then, if you are using Windows or macOS, click the [Settings] button in the Navigation Centre or use the Ctrl-S/⌘-S keyboard shortcuts and then double-click 'Budget Classes' in the 'Settings' list. If you are using iOS or Android, select 'Settings' from the Tools menu (with 'wrench' icon) and tap 'Budget Classes' in the 'Settings' list. The window illustrated below will open.
Enter each new Budget Class on the first blank line and, when finished, click the [Save] button (Windows/macOS) or tap √ (iOS/Android) to save the changes. To close the window without saving changes, click the close box (Windows/macOS) or tap < (iOS/Android).
It is recommended that you enter Budget Classes in alphabetical order, as shown in the illustration. You can insert a new Budget Class in the correct place in the list by clicking on a row number and pressing the Return key (Windows/macOS) or long tapping on a row number and selecting 'Insert Row' (iOS/Android). When you enter a new Budget or Revised Budget record and use 'Paste Special' to choose a Budget Class, the Classes will be listed in the same order as they are listed in this setting. If they are in alphabetical order, you will be able to find the correct one quickly and easily.
---
Settings in the Nominal Ledger:
- Account Classification Types
- Account Classifications
- Account Short Codes
- Account Transfers
- Accounting Periods
- Auto Eliminations
- Autotransactions
- Bank Transactions
- Brought Forward Balances
- Budget Classes
- Budget Keys
- Calculation Formulae
- Electronic VAT Declaration
- Fiscal Years
- Income & Expense Book
- Liquidity Report Info
- N/L Accruals
- Number Series - Simulations
- Number Series - Transactions
- Presentation of Balances
- Rate Gain/Loss
- Rate Gains/Losses
- Reconciliation Codes
- Reconciliation Settings
- Report Settings
- Sub Systems
- Sub-ledger Control Accounts
- Tag/Object Type Control
- Tag/Object Types
- Tax Reports
- Template Transactions, Template Transactions - Accounts
- Transaction Settings
- VAT Code Control
- VAT Code on Transaction rows
- VAT Codes
- VAT Declarations
- XBRL Reporting Elements, XBRL Reporting Settings
- Home page for Nominal Ledger manual
- Home page for Standard ERP manual
Budget Keys
Budget Keys are one of the tools available in HansaWorld Enterprise to help you calculate budgets. Budget Keys allow you to apply a formula to a yearly budget total in order to divide it into monthly or quarterly figures.
For example, suppose that for a particular Account each month of the year is budgeted to have the same balance, except June, July and August, which are to have balances half the size of the other months. Enter a Budget Key value of 1 for each of the three summer months, and 2 for the other months. The sum will be 21, which then corresponds to the annual balance.
When the sum of the Budget Keys is 100, each month will have a certain percentage of the annual figure. You can use percentage values as Budget Keys, but you don't have to. And remember that in case you start entering percentage values that add up to 100, changing a value will also change the sum away from 100.
You should define your Budget Key records to co-ordinate with your budgeting methods. For example, if you start with an annual budget figure and break it down into quarterly totals, your Budget Keys should feature four lines, one for each quarter. If you work to monthly totals, each Budget Key should have twelve lines, and so on.
Please refer to the description of the Budget register to see how Budget Keys are used to help calculate budgets.
To enter Budget Keys, double-click 'Budget Keys' in the 'Settings' list. Then, open the 'Budget Key: New' window by clicking the [New] button. When the Budget Key record has been entered, save it using the [Save] button and close the window by clicking the close box. Then, close the browse window using the close box again.
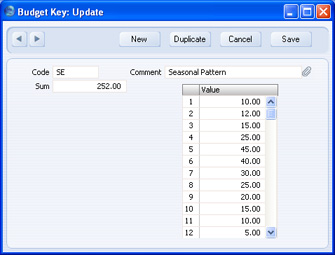
- Code
- This is a code that identifies the Budget Key, when used for budgeting. You can only use uppercase letters and numbers.
- Comment
- Give the Budget Key a descriptive name, to be shown in the 'Budget Keys: Browse' and 'Paste Special' windows. Ideally, the Comment should include a reference to the number of periods (i.e. the number of rows used in the grid, usually 12 for monthly periods or four for quarterly periods). This will help you when entering Budget records because these should have the same number of periods as the Budget Keys they use.
- Sum
- This figure will be updated automatically as you add the monthly or quarterly key values to the Value grid
- In most cases, you will enter percentages in the Value grid, in which case the Sum should be 100 when the Budget Key is complete..
- In most cases, you will enter percentages in the Value grid, in which case the Sum should be 100 when the Budget Key is complete..
- Value
- Enter the monthly or quarterly key values.
- Usually, you will enter percentages here, although it is not necessary to do so. When you use the Budget Key in a Budget record, each of these key values will be applied in turn to the Budget's Base Value on a ratio basis to produce a monthly or quarterly Budget value. For example, if the Base Value in a Budget is 6000.00 and you apply the Budget Key illustrated above to this Budget, the first monthly Budget value will be calculated to be 6000 * 10/252, the second monthly Budget value will be calculated to be 6000 * 12/252, and so on.
Calculation Formulae
You can use this setting to define formulae that you can then use in Autotransactions.
Entering a Calculation Formula
Double-click 'Calculation Formulae' in the 'Settings' list. A list of existing Calculation Formulae appears. Click [New] in the Button Bar to enter a new record, or [Duplicate] to create a new record that is based on an existing one. When you have entered the Formula, save it using the [Save] button and close the window by clicking the close box. Then, close the browse window using the close box again.
To enter a Calculation Formula, follow these steps: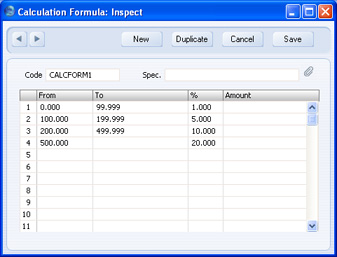
- Enter a unique Code by which the Formula can be identified. This can consist of up to 12 alphanumeric characters. Do not use a code that could be mistaken for a formula (e.g. do not use a code of a number followed by a % sign such as "10%" or "+10%").
- Assign a descriptive name to the Formula, to be shown in the 'Calculation Formulae: Browse' window.
- Use the grid area to draw up the Formula. This can use any combination of percentages (entered in the % column) and fixed values (entered in the Amount column).
The example in the illustration above takes an amount and calculates from it a figure based on a graduated percentage scale, in a similar manner to income tax calculations. It functions by adding the following figures together:
- 1% of the first 99.999 of any amount
- 5% of the next 99.999
- 10% of the next 299.999
- 20% of any remaining amount.
- 5% of the next 99.999
It is recommended that the number ranges of the different rows of the Formula (the From and To columns) are defined to two decimal places or are almost made to overlap. For example, ranges of 0-99.999 and 100-199.999 (or even 0-100 and 100-200) will produce a more accurate result than 0-100 and 101-200.
- 1% of the first 99.999 of any amount
Using a Calculation Formula in an Autotransaction
You should attach a Calculation Formula to the Debit or Credit fields of an Autotransaction as follows. If you attach it to the Debit field of the Autotransaction, the Formula will be applied to the value entered in the previous row of the Transaction and the result placed in the Debit field of the Transaction. If you enter the Formula in the Credit field of the Autotransaction, the result will be placed in the Credit field of the transaction.
In the illustration below, the code of the example Formula shown above has been entered to the Debit field of an Autotransaction:
In Use
When you enter a Transaction, begin by entering the Account code for the relevant expense category, and the amount. On the second row, enter the code of the Autotransaction in the Account field.
Press Return. The Autotransaction is applied to the first row of the Transaction, and the amounts are recalculated as follows: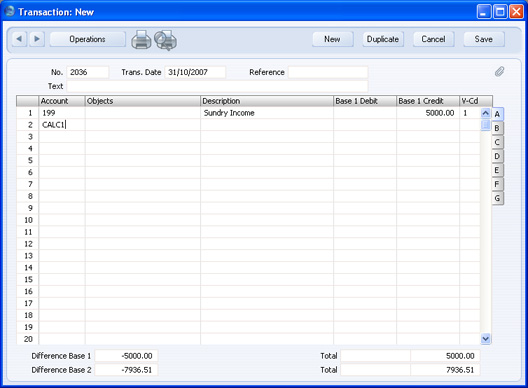

Electronic VAT Declaration
Please refer to the Submitting a VAT Return Electronically page for details of this setting.Rok obrotowy -definicje
System Hansa umożliwia prowadzenie wieloletniej bazy danych. W tym ustawieniu można zdefiniować kolejne lata obrotowe. Każdy roku obrotowy musi mieć zdefiniowany kod oraz może trwać od 6 do 18 miesięcy. Kod będzie wykorzystywany w prefixie operacji księgowej wprowadzanej w kartotece
Operacje w Księdze Głównej.
Kolejne lata obrotowe należy wprowadzić w porządku chronologicznym jak pokazano to na ilustracji. Nie można wprowadzić kolejnego roku obrotowego na początku listy lub usunąć wprowadzonego już roku obrotowego. Nie można zmienić roku obrotowego w ustawieniu, jeśli została wprowadzona operacja księgowa w danym roku obrotowym.
System wyświetli komunikat z informacją zawsze przy próbie wprowadzenia operacji z datą, która nie będzie zgodna z rokiem obrotowym zdefiniowanym w ustawieniu.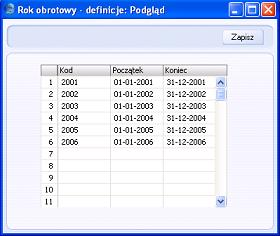
Income & Expense Book
Please refer to the description of the Income & Expense Book report for details about this setting.
---
Settings in the Nominal Ledger:
- Account Classification Types
- Account Classifications
- Account Short Codes
- Account Transfers
- Accounting Periods
- Auto Eliminations
- Autotransactions
- Bank Transactions
- Brought Forward Balances
- Budget Classes
- Budget Keys
- Calculation Formulae
- Electronic VAT Declaration
- Fiscal Years
- Income & Expense Book
- Liquidity Report Info
- N/L Accruals
- Number Series - Simulations
- Number Series - Transactions
- Presentation of Balances
- Rate Gain/Loss
- Rate Gains/Losses
- Reconciliation Codes
- Reconciliation Settings
- Report Settings
- Sub Systems
- Sub-ledger Control Accounts
- Tag/Object Type Control
- Tag/Object Types
- Tax Reports
- Template Transactions, Template Transactions - Accounts
- Transaction Settings
- VAT Code Control
- VAT Code on Transaction rows
- VAT Codes
- VAT Declarations
- XBRL Reporting Elements, XBRL Reporting Settings
- Home page for Nominal Ledger manual
- Home page for Standard ERP manual
Liquidity Report Info
This page describes the Liquidity Report Info setting in the Nominal Ledger.
---
The Liquidity Forecast report is a forecast of future incoming and outgoing payments that will be useful for cash flow prediction purposes. The forecast will include open (unpaid) Purchase and Sales Invoices that it will predict will be paid on their Due Dates.
The Liquidity Report Info setting allows you to change the Due Date of an Invoice solely for the Liquidity Forecast report (i.e. without changing the Invoice itself).The information in the Liquidity Report Info setting will be included in the Liquidity Forecast report if you product it using the Detailed incl. Liq. Info. option.
Illustrated below is an example Liquidity Forecast report (Detailed version):
If it seems likely that Invoice 980160 will be paid one month later than its Due Date, we can create a record in the Liquidity Report Info setting to this effect. We will not change the Due Date in the Invoice itself because we do not want the later Due Date to be used in statements and other documents that we might send to the Customer. The change is only for our internal cash flow prediction.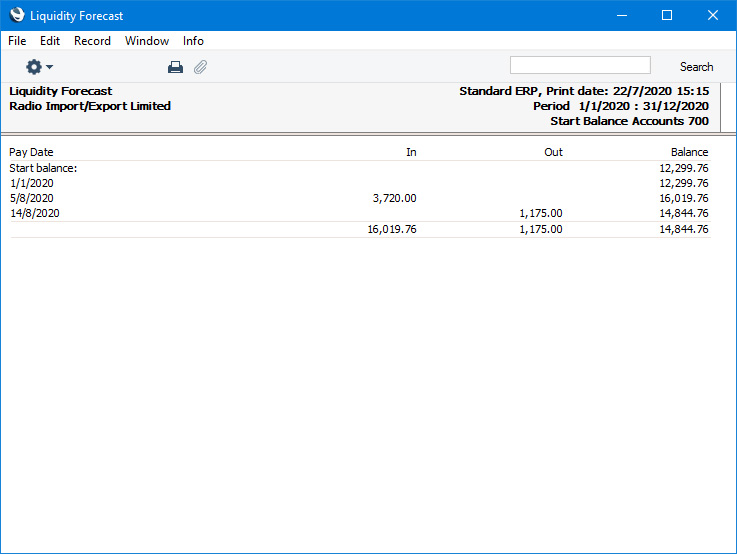
At this stage, fill in the following fields: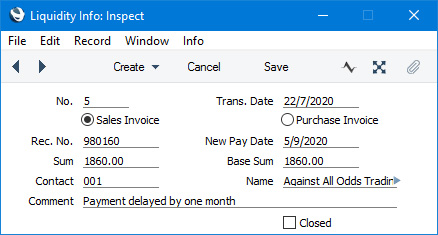
- No.
- A unique identifying number will be assigned to the record automatically.
- Trans. Date
- Paste Special
Choose date
- The Trans. Date will default to the current date and so will show when the record was first saved. You can change this date if necessary.
- Sales Invoice, Purchase Invoice
- Select one of these options to specify whether the record you are entering refers to a Sales Invoice or a Purchase Invoice.
- Rec. No.
- Enter the Invoice Number or the Purchase Invoice Number of the Invoice whose Due Date you are changing. When you leave the field, the Due Date, outstanding amount and Contact Number and Name will be brought in to the fields below.
- New Pay Date
- Paste Special
Choose date
- Enter the new Due Date in this field. When you specify a Record Number in the field above, the Due Date from the relevant Invoice or Purchase Invoice will be copied here as a reminder.
- Sum, Base Sum
- When you specify a Record Number in the field above, the amount that is outstanding against the relevant Invoice or Purchase Invoice will be copied to these fields. The Sum is the outstanding amount in the Invoice Currency, while the Base Sum is the outstanding amount in your home Currency (Base Currency 1).
- Comment
- Enter a comment such as the reason why you are changing the Due Date. This Comment will be shown in the 'Liquidity Info: Browse' window and in the Liquidity Forecast report. The Comment from the Invoice or Purchase Invoice will be brought in as a default.
When the Invoice is paid or credited, the Liquidity Report Info record will be marked as Closed. If the Invoice is partially paid or credited, the Liquidity Report Info record will be marked as Closed and a new one created for the remaining outstanding amount. This new record will contain the same New Pay Date as the original one, but you can change it if necessary.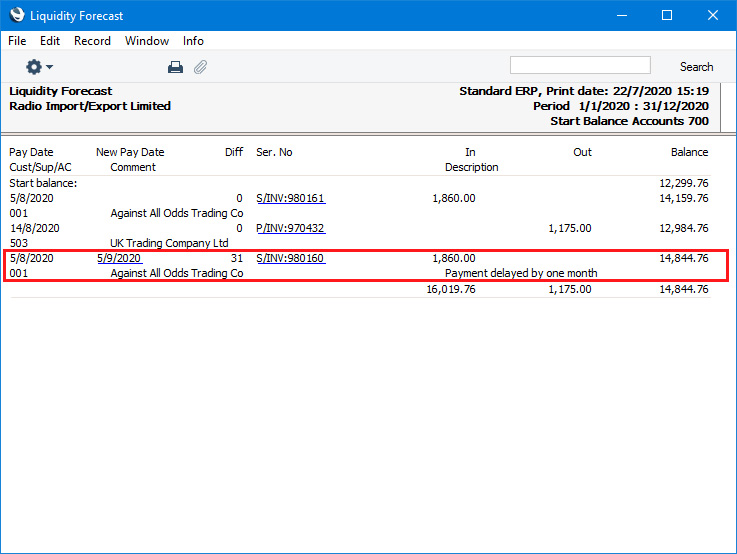
You can also use the Liquidity Report Info setting to schedule payment in instalments. Enter a record as described above with the date of the first instalment in the New Pay Date field and the first instalment amount in the Sum and Base Sum fields. Then enter separate records for the subsequent instalments. In each case, when you enter the Record Number, the outstanding amount less the sum of the previous instalments will be brought in to the Sum and Base Sum fields.
The instalments will be listed separately in the Liquidity Forecast report: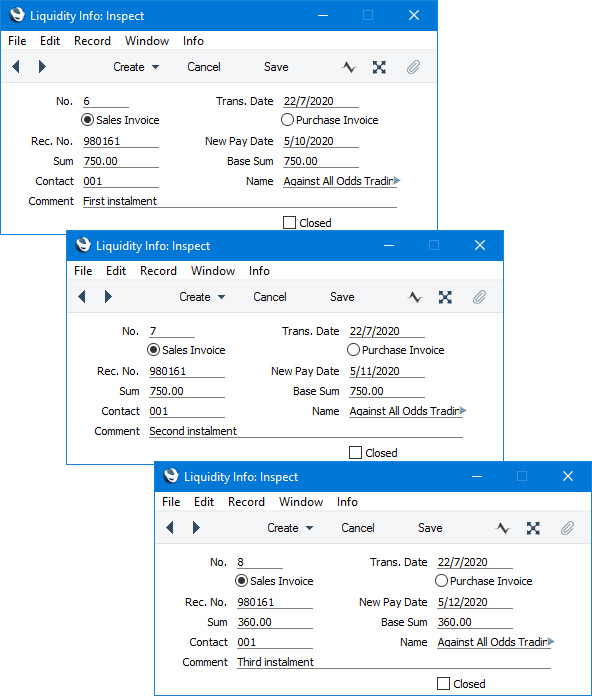
If an Invoice was originally payable in Instalments (i.e. it uses a Payment Term that is connected to a record in the Instalments setting in the Sales Ledger), those Instalments will be listed individually in the Liquidity Forecast report. If you enter a Liquidity Forecast Info record for such an Invoice, that record will replace all the Instalments in the report. Depending on the circumstances, you may need to enter separate Liquidity Forecast Info records for each Instalment (e.g. when each Instalment will be one month later than originally scheduled).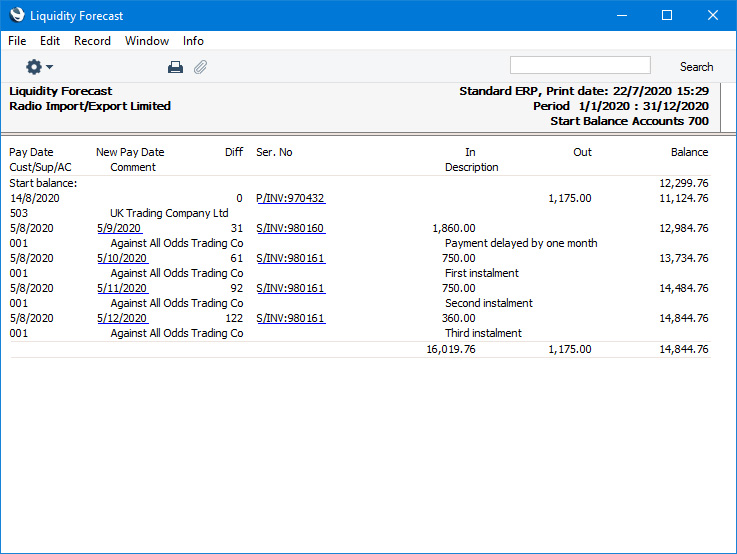
---
Settings in the Nominal Ledger:
- Account Classification Types
- Account Classifications
- Account Short Codes
- Account Transfers
- Accounting Periods
- Auto Eliminations
- Autotransactions
- Bank Transactions
- Brought Forward Balances
- Budget Classes
- Budget Keys
- Calculation Formulae
- Electronic VAT Declaration
- Fiscal Years
- Income & Expense Book
- Liquidity Report Info
- N/L Accruals
- Number Series - Simulations
- Number Series - Transactions
- Presentation of Balances
- Rate Gain/Loss
- Rate Gains/Losses
- Reconciliation Codes
- Reconciliation Settings
- Report Settings
- Sub Systems
- Sub-ledger Control Accounts
- Tag/Object Type Control
- Tag/Object Types
- Tax Reports
- Template Transactions, Template Transactions - Accounts
- Transaction Settings
- VAT Code Control
- VAT Code on Transaction rows
- VAT Codes
- VAT Declarations
- XBRL Reporting Elements, XBRL Reporting Settings
- Home page for Nominal Ledger manual
- Home page for Standard ERP manual
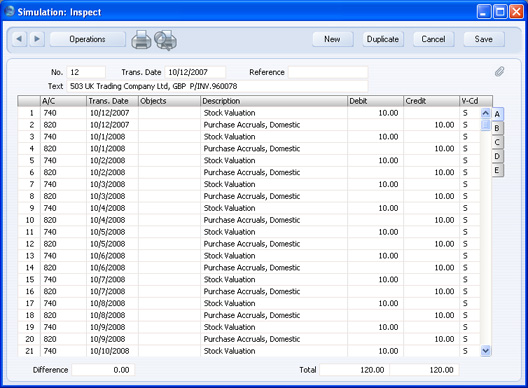
N/L Accruals
In normal circumstances the full value of each Invoice row is posted to a Sales or Purchase Account when the Nominal Ledger Transaction is generated. However, this might not be appropriate if the Invoice is for a service or contract that is spread over time. In this case, it might be appropriate for the Invoice row value to be posted to the Sales or Purchase Account gradually over the period of the service or contract, especially if that period crosses over into a new fiscal year.
For example, you receive an Invoice for a service contract for one year to the value of 120. You do not want the Purchase Account to be debited with the 120 at once: instead it is to be debited with 10 per month over the year (the contract period). When entering such an Invoice, enter the Code of an N/L Accrual record on flip C (flip B in the case of a Sales Invoice). This N/L Accruals record will contain the rules governing the accrual process. When you approve the Invoice, the resulting Nominal Ledger Transaction will post its value to the Accrual Account specified in the N/L Accrual record, not to the Purchase Account. A record will also be created in the Simulation register containing the appropriate number of sets of balancing postings (twelve in the example, one per month), each crediting the Accrual Account and debiting the Purchase Account with one twelfth of the total amount (10 in the example). One Nominal Ledger Transaction per month will then be created from these balancing postings when you run the 'Generate N/L Accrual Transactions' Maintenance function. This process transfers the value of the Invoice row from the Accrual Account to the Purchase Account at the rate of 10 per month.
If you need to see a list of the postings to the Accrual Account that have not yet been debited to Purchase Accounts (or, on the sales side, credited to Sales Accounts), produce an Accrual Report.
Please click for details about:
- The N/L Accruals setting;
- The 'Generate N/L Accrual Transactions' Maintenance function.
N/L Accruals - The N/L Accruals Setting
To enter a new N/L Accrual record or to edit an existing one, first open the 'Settings' list by clicking the [Settings] button in the Master Control panel or using the Ctrl-S/⌘-S keyboard shortcut. Double-click 'N/L Accruals' in the list. The 'N/L Accruals: Browse' window is displayed, showing all N/L Accrual records previously entered. Double-click a record in the list to edit it, or add a new record by clicking the [New] button in the Button Bar. When the record is complete, save it by clicking the [Save] button in the Button Bar or by clicking the close box and choosing to save changes. To close it without saving changes, click the close box.
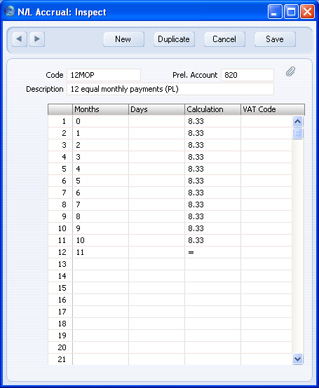
- Code
- Enter a unique Code by which the N/L Accrual record will be identified. The Code should be one that has not already been used for an Autotransaction.
- Description
- Enter a name for the N/L Accrual record, to be shown in the 'N/L Accruals: Browse' window and the 'Paste Special' list.
- Prel. Account
- Paste Special
Account register, Nominal Ledger/System module
- Specify here an Accrual Account, which will usually be a Balance Sheet Account.
- When you use this N/L Accrual record in a Sales Invoice row, this Account will be credited with the value of the Invoice row (excluding VAT). Use of the 'Generate N/L Accrual Transactions' Maintenance function will then gradually move the value out of this Account into the Sales Account.
- When you use this N/L Accrual record in a Purchase Invoice row, this Account will be debited with the value of the Invoice row (excluding VAT). Again, use of the 'Generate N/L Accrual Transactions' Maintenance function will then gradually move the value out of this Account into the Purchase Account.
- When you use this N/L Accrual record in a Sales Invoice row, this Account will be credited with the value of the Invoice row (excluding VAT). Use of the 'Generate N/L Accrual Transactions' Maintenance function will then gradually move the value out of this Account into the Sales Account.
- Months, Days
- These two columns are used to calculate the Transaction Date of each balancing set of debit and credit postings in the Simulation. This will become the Date of the Nominal Ledger Transaction when one is created from the pair of postings by the 'Generate N/L Accrual Transactions' Maintenance function.
- If a Transaction Date is to be a certain number of months after the Invoice Date, specify that number of months in the Months column. The day in the month will be the same as that of the Invoice Date. If you enter "0", the Transaction Date will be the same as the Invoice Date.
- If each Transaction Date is to be a certain number of days after the Invoice Date, specify that number of days in the Days column.
- If values are entered in both the Months and Days fields, the Transaction Date will be calculated using both (i.e. Invoice Date + Months + Days).
- If a Transaction Date is to be a certain number of months after the Invoice Date, specify that number of months in the Months column. The day in the month will be the same as that of the Invoice Date. If you enter "0", the Transaction Date will be the same as the Invoice Date.
- Calculation
- Specify here the percentage of the Invoice value that is to be the value of the corresponding set of debit and credit postings in the Simulation.
- On the final row of the grid, you can enter an equal sign (=) to signify that the value of the corresponding set of postings in the Simulation is to be the remaining Invoice amount. This ensures that nothing is lost when reducing the percentage to two decimal places.
- On the final row of the grid, you can enter an equal sign (=) to signify that the value of the corresponding set of postings in the Simulation is to be the remaining Invoice amount. This ensures that nothing is lost when reducing the percentage to two decimal places.
- VAT
- Paste Special
VAT Codes setting, Nominal Ledger
- If you enter a VAT Code here, it will be copied to the corresponding set of debit and credit postings in the Simulation (and, from there, to the Transaction). It will not affect the calculation, but will be used for reporting (e.g. VAT Return).
- If you leave this field empty, the VAT Code will be taken from the Invoice or Purchase Invoice row.
N/L Accruals - The 'Generate N/L Accrual Transactions' Maintenance Function
Once a month, you can use the 'Generate N/L Accrual Transactions' Maintenance function to create Transactions from any pair of balancing debit and credit postings in Accrual Simulations whose Transaction Date has passed. This will allow the Invoice amounts to be moved gradually from the Accrual Account to the Sales or Purchase Account as appropriate.
To use this function, ensure you are in the Nominal Ledger and click the [Routines] button in the Master Control panel. Then click the [Maintenance] button in the subsequent window. Double-click 'Generate N/L Accrual Transactions' in the list. The following dialogue box appears:

- Simulation Period
- Paste Special
Reporting Periods setting, System module
- Enter a report period: all records in the Simulation register whose Transaction Date (shown in the header) falls within this period will be considered by the function.
- Simulations
- Range Reporting
Numeric
- Use this field to ensure the function refers to a particular record in the Simulation register (or range of Simulations).
- N/L Accruals Until
- Paste Special
Choose date
- Enter a date: all rows in the selected Simulations whose Transaction Date is earlier than this date will be converted into Transactions, providing their Status (flip B) is "Active". The Transaction Date in the Simulation header will be used if there are any Simulation rows that do not have their own Transaction Date.
- If you do not enter a date, Transactions will be created for all rows in the selected Simulations, again providing their Status is "Active".
An example Transaction is illustrated below. This was created from the Simulation illustrated above.
When the function creates a Transaction from each pair of postings, it will change the Status of these postings (shown on flip B of the Simulation) from "Active" to "Transferred", preventing the creation of another Transaction the next time you use the function. The function will only create Transactions from "Active" rows, not from rows with any other Status.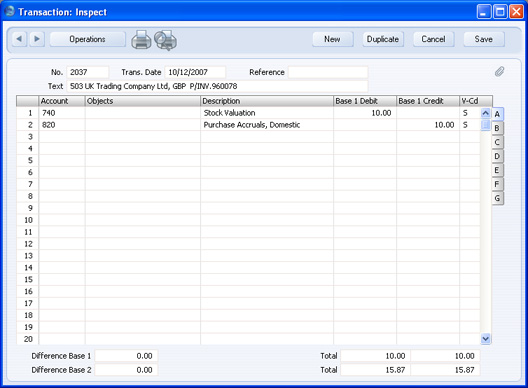
Note that you should use this function with care as it is more powerful than its name suggests: it will create Transactions from all Simulations in the selection, not just those representing Accruals. Therefore, you can use it as a general function to create Transactions from Simulations. Take care to enter a date in the N/L Accruals Until field in the dialogue box: if you do not, Transactions will be created for every row in every Simulation in the selection. If you would like to see the details of the Transactions before they are created, produce an N/L Accrual Transactions report before using this function.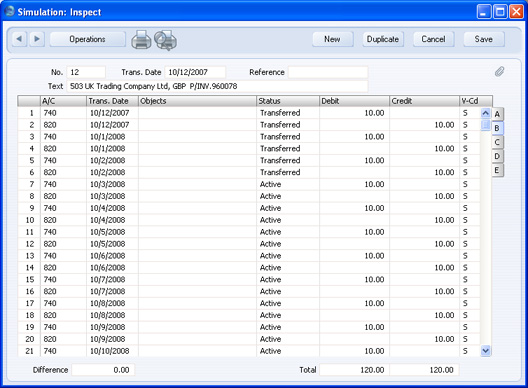
Number Series - Simulations
Use this setting to define the number sequences for Simulations in a similar manner to that described for Transactions.Number Series - Transactions
Each record in the Transaction register has its own unique identifying number, based on a sequential series. When you enter a new Transaction, the next number in the series will be used. If required, you can have a number of such sequences running concurrently, perhaps representing different years or different departments.
Use this setting to define these sequences, or Number Series. The different series should not overlap. If you leave the setting empty, Transaction Numbers will start at 1 and continue consecutively.
Once you have defined number sequences for Transactions, you can allocate a specific sequence to an individual user using the Trans No. field on the ('Serial Nos' card of the user's Person record in the System module. When that user enters a new Transaction, its Transaction Number will be the first unused number in that specific sequence. You can also set a universal default sequence in the Number Series Defaults setting, also in the System module. If you do not allocate a specific sequence to a particular user or set a universal default, Transaction Numbers will be taken from the first valid Number Series in this setting. For a particular Transaction, any user can change to the first unused number in any other Number Series using 'Paste Special'.
When you double-click 'Number Series - Transactions' in the 'Settings' list, the following window appears:
Enter each new Number Series on the first blank line. The Comment will be shown in the 'Paste Special' list, so enter some text that will help you choose a number from the correct sequence. Then, click the [Save] button in the Button Bar to save the changes. To close the window without saving changes, click the close box.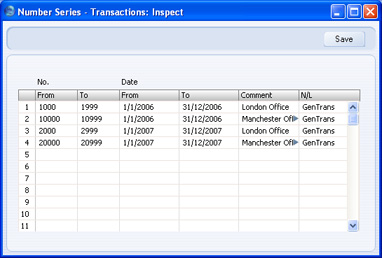
The N/L field common to all Number Series settings is not used in this instance.
Presentation of Balances
Internally, HansaWorld Enterprise treats a Credit entry as a value that is to be subtracted from an account balance, while a Debit entry is to be added. Assets and expenses are therefore stored as positive values, while liabilities, equity and incomes are negative.
These internal calculation and storage methods are often impractical when it comes to displaying balances in reports on the screen or on paper. Therefore, you can use the Presentation of Balances setting to control how balances will be printed in reports. You can reverse the sign of each type of Account, so that, for example, liabilities, equity and incomes will be shown as positive values in reports.
On occasion, you may wish to exchange data with other accounting systems using conventions other than your default method. It is not unusual for the board, the bank, auditors, and tax authorities to request different presentations of the company's figures. You can solve this easily by changing the Presentation of Balances setting. You can do this at any time, e.g. between printing two reports of the same kind.
Open the 'Presentation of Balances' window by double-clicking 'Presentation of Balances' in the 'Settings' list.
As you can see, the window contains a set of check boxes. The five rows represent the five Account Types, and the three columns represent various reports, as follows:
- Column 1
- Balance Sheet, Profit & Loss, Accumulated Monthly P/L Report export
- Column 2
- Trial Balance report and export, Nominal Ledger report
- Column 3
- Monthly Balances export
In the example shown in the illustration, values for Assets and Expenses will always be presented with the standard signs. Income, Equity and Liabilities will be presented with the opposite sign in the Balance Sheet and the Profit & Loss report, and with the standard sign in other reports.
Check the boxes in the window to select your settings.
Confirm your changes by clicking [Save] or revert to the previously saved setting by clicking [Cancel].
Rate Gain/Loss
Please click here for full details of this setting.Rate Gains/Losses
Please click here for full details of this setting.Reconciliation Descriptions
When you enter records to the Account Reconciliation register, you can record a Reconciliation Code in the Recon. field in the grid on flip D. If you define various standard texts in this setting, you can access them from the grid in the Account Reconciliation record using 'Paste Special'. You can then have the standard texts printed in the Account Reconciliation report (by printing it using the Show Reconciliation Comments option).
The 'Reconciliation Descriptions: Browse' window lists the available Reconciliation Descriptions: to enter a new item, click the [New] button in the Button Bar. The 'Reconciliation Description: New' window appears: enter the details as appropriate and click [Save] to save the new record.
Reconciliation Settings
This page describes the Reconciliation Settings setting in the Nominal Ledger.
---
The Reconciliation Settings setting contains some miscellaneous options controlling the behaviour of the 'Account Reconciliation' window.
To open the Reconciliation Settings setting, first ensure you are in the Nominal Ledger. Then, if you are using Windows or macOS, click the [Settings] button in the Navigation Centre or use the Ctrl-S/⌘-S keyboard shortcuts and then double-click 'Reconciliation Settings' in the 'Settings' list. If you are using iOS or Android, select 'Settings' from the Tools menu (with 'wrench' icon) and tap 'Reconciliation Settings' in the 'Settings' list. The window illustrated below will open.
- Require Reconciliation Date
- When marking a posting in the Nominal Ledger as reconciled, you can specify the date of the reconciliation. Select this option if you need it to be mandatory to specify a date for each posting that you reconcile.
- Require Reconciliation Code
- When marking a posting in the Nominal Ledger as reconciled, you can specify a Reconciliation Code. Reconciliation Codes are arbitrary codes that you can use to identify postings that you have reconciled on a particular day or from a particular bank statement. Select this option if you need it to be mandatory to specify a Reconciliation Code for each posting that you reconcile.
- Ignore Period Start Date for Unreconciled Transactions
- When using the 'Account Reconciliation' window to reconcile your bank statements with the postings to the Bank Account in your Nominal Ledger, the first step is to specify a period and the Account Number of your Bank Account and then to tick the Unreconciled box. The 'Account Reconciliation' window will now list the postings to the specified Bank Account made during the period that you have not yet reconciled. Select this option if you would like the start date in this period to be ignored (i.e. you need all unreconciled postings entered from any date up to the end of the period to be listed). This option will also apply when listing unreconciled postings in the Account Reconciliation report.
---
Settings in the Nominal Ledger:
- Account Classification Types
- Account Classifications
- Account Short Codes
- Account Transfers
- Accounting Periods
- Auto Eliminations
- Autotransactions
- Bank Transactions
- Brought Forward Balances
- Budget Classes
- Budget Keys
- Calculation Formulae
- Electronic VAT Declaration
- Fiscal Years
- Income & Expense Book
- Liquidity Report Info
- N/L Accruals
- Number Series - Simulations
- Number Series - Transactions
- Presentation of Balances
- Rate Gain/Loss
- Rate Gains/Losses
- Reconciliation Codes
- Reconciliation Settings
- Report Settings
- Sub-ledger Control Accounts
- Sub Systems
- Tag/Object Type Control
- Tag/Object Types
- Tax Reports
- Tax Templates
- Template Transactions, Template Transactions - Accounts
- Transaction Settings
- VAT Code Control
- VAT Code on Transaction rows
- VAT Codes
- VAT Declarations
- XBRL Reporting Elements, XBRL Reporting Settings
- Home page for Nominal Ledger manual
- Home page for Standard ERP manual
Report Settings
You can change the appearance and format of some Nominal Ledger reports to suit your specific requirements. This is known as changing the report's definition. The reports for which this facility is available are the Balance Sheet, Key Financial Ratios, Profit & Loss Report and VAT Report.
To change a report definition, ensure you are in the Nominal Ledger and click the [Settings] button in the Master Control panel. Then, double-click 'Report Settings' in the subsequent list. Then, highlight a report name in the list on the left-hand side of the 'Report Settings' window and click the [Definition] button. The subsequent definitions windows are described on the pages describing the Balance Sheet, Key Financial Ratios, Profit & Loss Report and VAT Report.
You can only use the [Definition] button with the four reports named above. You can use the remaining three buttons with every report, in every module. If you change to another module using the [Select Module] button in the Master Control panel in the usual way, the list of reports on the left-hand side of the 'Report Settings' window will change appropriately. Highlight a report in the list and then click a button, as described below.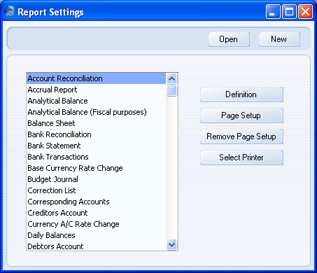
When you have finished working with the 'Report Settings' window, close it by clicking the close box.
- Page Setup, Remove Page Setup
- The [Page Setup] button allows you to set the page size, number of copies and other printer options for the highlighted report. These settings will be used whenever you print the report. Windows users can also use this function to choose the printer on which the report is to be printed.
- You can also specify the Page Setup of a report by highlighting it in the 'Reports' list and selecting 'Page Setup' from the File menu.
- Click the [Remove Page Setup] button to revert to standard.
- You can also specify the Page Setup of a report by highlighting it in the 'Reports' list and selecting 'Page Setup' from the File menu.
- Select Printer
- If you are using a Macintosh, use the [Select Printer] button to re-direct the output of the highlighted report to the modem port, to which you can connect a serial (PC) printer (e.g. a dot matrix printer for printing on pre-printed stock of pin-feed paper).
Sub Systems
The integration between different modules in HansaWorld Enterprise means that Nominal Ledger Transactions can be generated automatically when you approve (mark as OK and save) records in other ledgers and modules ("Sub Systems"). For example, when you approve an Invoice in the Sales Ledger, this can cause a Nominal Ledger Transaction to be generated automatically, debiting a Debtor Account and crediting a Sales Account and, if appropriate, a VAT Account.
Use this setting to specify when you want this automatic generation of Transactions to be activated, and from which Sub Systems. Double-click 'Sub Systems' in the 'Settings' list to open the following window:
Check boxes containing a tick represent those Sub Systems from which Nominal Ledger Transactions will be generated. Further Sub Systems are shown on the 'Logistics' and 'Cash and Other' cards. Whenever you approve a record (i.e. mark the record as OK and save it) in a Sub System register that you have selected here, a Nominal Ledger Transaction will be generated automatically. Make sure you have specified the Accounts that will be used in these Transactions in the appropriate settings (start with Account Usage S/L in the Sales Ledger, Account Usage P/L in the Purchase Ledger and Account Usage Stock in the Stock module).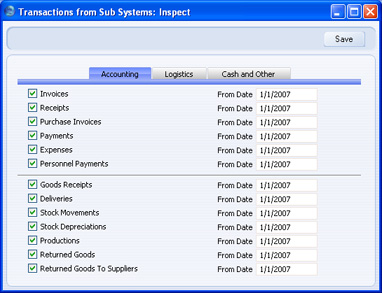
Once you have specified that a particular Sub System is to generate Nominal Ledger Transactions, you can make an exception for Sub System records that fall within a particular number sequence. For example, if it is the general case that Invoices will generate Nominal Ledger Transactions when they are approved, you can choose to not have Transactions created for Invoices whose Number falls within a particular range. You should do this using the appropriate Number Series setting for the Sub System in question (Number Series - Invoices in the example). Please refer to the web page describing the appropriate Number Series setting for details.
Use the From Date field to indicate the date from which Transactions are to be generated. This will be useful when you are entering opening balances when you are changing to HansaWorld Enterprise from another accounting system. If you have entered an overall opening balance for the Debtor Account for example, any Invoices that you transfer from the old system and enter as Sales Ledger opening balances should not generate Transactions posting to that Account as well.
It is therefore recommended that you switch on the check boxes according to your requirements and that, for each Sub System, you enter a From Date that is later than the Transaction Date used in all your opening balance transactions. This will ensure that the opening balances will not be posted to the Nominal Ledger, and there will also be no danger that you will forget to switch the check boxes on when you need to enter new Sub System transactions.
If you do not wish to use the feature whereby Nominal Ledger Transactions are generated automatically, or if you forget to turn it on, you can use the N/L Transfer, Sub Systems report in the Nominal Ledger to print a list of all Sub System transactions. You can use this report as a basis for entering the equivalent Nominal Ledger Transactions manually. You can also use the 'Create N/L Transactions' Maintenance function in the System module to create such Nominal Ledger Transactions in batches.
Sub-ledger Control Accounts
Please click here for full details of this setting.Object Type Control
This setting allows you to make sure that you will always use an Object belonging to a certain Object Type whenever you post to a particular Account. This feature serves as a handy reminder always to use Objects. It does not prevent you using additional Objects not in the specified Object Type.
!
This setting is valid in the Sales and Purchase Ledgers as well as in the Nominal Ledger.
Enter and edit the fields in the usual way. (Don't forget the 'Paste Special' feature!)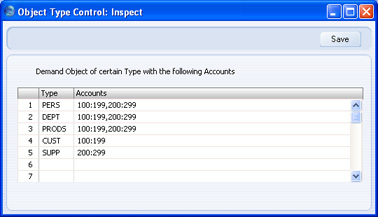
- Type
- Paste Special
Object Types setting, Nominal Ledger
- Specify the Object Type, one of whose members you must use together with the Account(s) specified in the field to the right.
- Accounts
- Paste Special
Account register, Nominal Ledger/System module
- Enter the Accounts that require Objects belonging to the Object Type specified in the Type field. You can specify a range of Account numbers by separating the first and the last number in the range with a colon. Use commas to separate single Account numbers (e.g. 1000:2000, 3011, 3013, 3200:3499.)
- If you need to use 'Paste Special' to enter several Accounts, type the comma or colon before opening the 'Paste Special' list. This will cause the next Account to be added to those already entered. Otherwise, the previous Account will be overwritten.
If you use an Account in a transaction of any kind and forget to enter an Object belonging to the required Object Type, the following alert will be shown when you try to save the record:
Click [OK] to close the message, and then enter an Object belonging to the requested Object Type.
Object Type Control - Assisted Object Entry
If you are using Object Type Control, the Assisted Object Entry feature will help you choose the correct Objects when entering Transactions (in the rows only), Invoices (on the 'Terms' card and in the rows), Purchase Invoices ('Terms' card and rows), Deliveries (rows only), Orders (rows only) and Stock Depreciation (header and rows) and Expense records (rows only), as follows: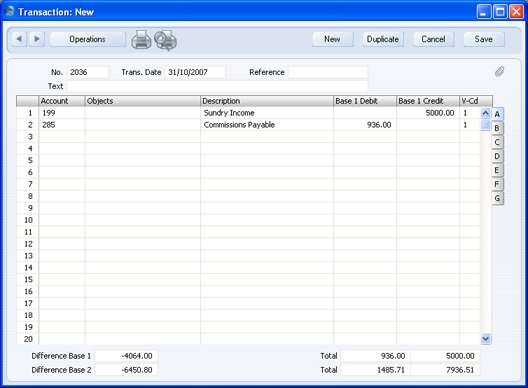
- In a Transaction, Invoice, Purchase Invoice, Delivery or Stock Depreciation or Expense record, use an Account that has been quoted at least once in the Object Type Control setting. In the example Object Type Control setting illustrated above, this means any Account between 100 and 299.
- From the Object field, activate the 'Paste Special' feature using Ctrl-Enter or ⌘-Enter as usual. Instead of the usual 'Paste Special' list, the 'Assisted Object Entry' window opens.
In this example, Account 200 has been used in a Transaction. The illustration of the Object Type Control setting earlier on this page shows that Account 200 requires Objects belonging to four different Object Types. As a result, the 'Assisted Object Entry' window has four fields, one for each required Object Type. (The maximum number of Object Types that can be required by a particular Account is seven.)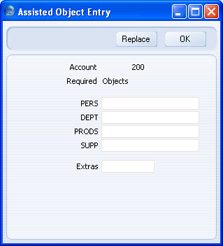
- Using 'Paste Special' in the usual way, enter an Object belonging to each Type in the appropriate field. 'Paste Special' here will only list the Objects belonging to the Type in question. Use the Extras field if you want to add another Object belonging to a fifth Type.
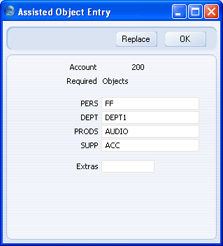
- If you close the 'Assisted Object Entry' window by clicking the [OK] button, the Objects will be added to anything previously in the Object field, providing you typed a comma after the previous Object before activating 'Paste Special'. If you click the [Replace] button, the Objects will replace anything that was previously in the Object field.
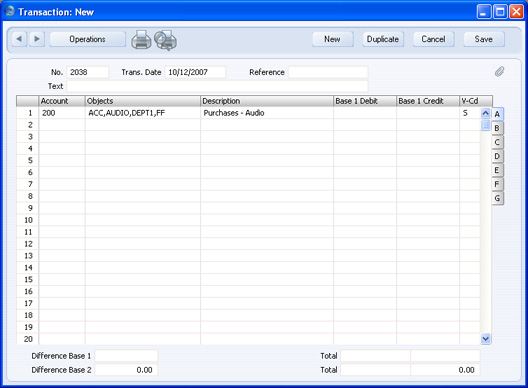
Object Types
Use this setting to define the different Object categories you are going to use in the accounting. Objects are discussed in greater detail here: Object Types allow you to group Objects of a similar nature together.
When you enter a Nominal Ledger Transaction, you can only use one Object of a particular Object Type in a Transaction row. Also, you can only specify one Object of a particular Object Type in a Sub System record (e.g. an Invoice). If you try to use more than one Object of the same Object Type, the following warning appears when you try to save the record:
Creating an Object Type
Double-click 'Object Types' in the 'Settings' list. A list of existing Object Types appears. Click [New] in the Button Bar to enter a new record.
Enter the text. The code field will show only uppercase letters. (Lower-case letters are automatically converted to uppercase.) You can move between fields with the arrow keys or with Enter. Use a name that identifies the Object Type as clearly as possible.
If you specify a series of characters in the Start String field, the Object Codes of all Objects belonging to this Type will have to begin with those characters. If you specify a number of characters in the Length field, the Object Codes of all Objects belonging to this Type will have to have that number of characters.
Confirm the entry by clicking [Save], or, if modifying an existing record, restore the old data by closing the window or by clicking [Cancel]. Close the window with the close box.
Deleting an Object Type
- Double-click 'Object Types' in the 'Settings' list.
The 'Object Types: Browse' window opens.
- Find the Object Type you are interested in, using the Search field in the top right-hand corner of the window if necessary.
- Press the Enter key (or double-click the line).
The Object Type is shown in a window with the title 'Object Types: Inspect'.
- Select 'Delete' from the Records menu. The Object Type is removed permanently. The window changes to show the previous Object Type in the list.
- Close the window with the close box. The list of Object Types is shown again.
!
You cannot undo a deletion of an Object Type.
Tax Account Groups
This setting is used in Russia. Please refer to your local HansaWorld representative for details.Tax Accounts
This setting is used in Russia. Please refer to your local HansaWorld representative for details.Tax Reports
You can use this setting together with the Tax Calculations report and the Tax Report document to design and produce custom reports. The basic steps in this process are:
- Use the Tax Reports setting to define the calculation formulae that are to be used in your report.
- Use the Tax Calculations report to test your formulae and to check the results.
- Use the Form register in the System module to design a Form to be used by the Tax Report document.
- Use the Tax Report document to print a report for sending to the tax authorities.
Tax Reports - The Tax Reports Setting
Use this setting to define the tax calculation formulae that will be used in your custom reports. Each record in this setting contains a complete report definition.
To enter a new Tax Report definition or to edit an existing one, first open the 'Settings' list by clicking the [Settings] button in the Master Control panel or using the Ctrl-S/⌘-S keyboard shortcut. Double-click 'Tax Reports' in the list. The 'Tax Reports: Browse' window is displayed, showing all Tax Report definitions previously entered. Double-click a record in the list to edit it, or add a new record by clicking the [New] button in the Button Bar. When the record is complete, save it by clicking the [Save] button in the Button Bar or by clicking the close box and choosing to save changes. To close it without saving changes, click the close box.
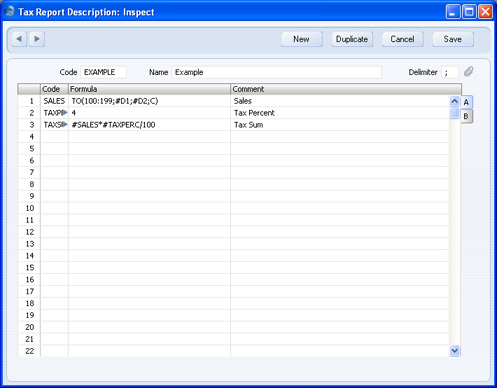
- Code
- The unique code identifying this Tax Report record (i.e. this set of report definitions).
- Name
- Enter a name for the Tax Report record to be shown in the 'Tax Records: Browse' window and the 'Paste Special' list: it should therefore be descriptive enough to make the selection of the correct Tax Report record easy for all users.
- Delimiter
- Specify the character that you will use to separate the parameters in the formula commands. It is recommended that you use the semi colon (;). This has been used in the illustration above and in the examples below. Do not use the colon (:) because this is used to separate the first and last Accounts in a range.
- If you leave this field empty, you should use the comma to separate the parameters in the formula commands. But this may produce unexpected (and incorrect) results if you are using the comma as the Thousands, Decimal or Date Separator in the Company Date and Numeric Formats setting in the System module (or, if you are using them, in the Client Date and Numeric Formats setting in the User Settings module or on the 'Date and Numbers' card of the user's Person record). If you are using the comma as the Thousands, Decimal or Date Separator, make sure you enter a different character here as the Delimiter, and that you use that character to separate the parameters in the formula commands.
Flip A
- Code
- A unique Code identifying each row.
- You should use this Code to refer to the row in other formulae (i.e. in other rows), when it must be preceded by the # character. #SALES and #TAXPERC in row 3 of the illustration are examples, referring to rows 1 and 2 respectively. The Code referred to must already have been defined. Therefore, in the example illustration, the TAXSUM row must appear below the SALES and TAXPERC rows. If you place the TAXSUM row above the SALES and TAXPERC rows, the result of the TAXSUM row will be 0.00. # is alt-3 on the UK Macintosh keyboard.
- You should use this Code to refer to the row in other formulae (i.e. in other rows), when it must be preceded by the # character. #SALES and #TAXPERC in row 3 of the illustration are examples, referring to rows 1 and 2 respectively. The Code referred to must already have been defined. Therefore, in the example illustration, the TAXSUM row must appear below the SALES and TAXPERC rows. If you place the TAXSUM row above the SALES and TAXPERC rows, the result of the TAXSUM row will be 0.00. # is alt-3 on the UK Macintosh keyboard.
- Formula
- The formula used to calculate the value of this row.
- Comment
- The name of this row of the report, to be shown in the Tax Calculations report. You can choose to omit rows without a Comment from this report.
- Format
- You can specify a format to be used when the result of the formula is printed. You must specifying separate formatting rules for positive numbers, zero and negative numbers, in that order, separated by semi-colons (;). For example:
- #,###.##;0.00;(#,###.##)
- # ###$;0$;-# ###$
- ####;zero;(-####)
- # ###$;0$;-# ###$
If you do not specify a format, the decimal and thousands separators will be taken from the Date and Numeric Format setting, and the following format will be used:
- #,###.##;0.00;-#,###.##
If you specify a Format, you then have a choice whether to use it when you print the Tax Calculations report. If you want to use it, use the Use Format option when you print the report. However, the Format will always be used in the Tax Report document.
- #,###.##;0.00;(#,###.##)
- TO(Account Code;Date 1;Date 2;Type)
- This command returns the net change between Date 1 and Date 2 for the specified Account.
- Use the Type parameter as follows:
- C
- returns the net change resulting from credit postings to the specified Account
- D
- returns the net change resulting from debit postings to the specified Account
- A
- returns the overall net change (Debit - Credit)
- Some examples of the use of this command are as follows:
- TO(100;01/01/2007;31/12/2007;C)
- Returns the sum of the credit postings to Account 100 for the year 2007.
- TO(100:1999;01/01/2007;31/12/2007;A)
- Returns the sum of the net changes in Accounts 100 to 1999 for the year 2007. The Account range is determined using an alpha sort, rather than a numeric one. Thus Account 1000001 will be included in the example range, while Account 200 will not.
- -TO(100:1999;01/01/2007;31/12/2007;A)
- As the previous example, but the sign of the final figure is changed. This is useful when displaying figures for sales, which are stored as negative figures in HansaWorld Enterprise. Prefixing the TO command with a minus sign will cause sales to be displayed as positive figures in the report.
- Use the Type parameter as follows:
- OTO(Object Code;Account Code;Date 1;Date 2;Type)
- This command is similar to TO, but in calculating the net change during the period for the specified Account, only postings with the specified Object Code are taken into account.
- The reference to the Object Code is case sensitive. For example:
- OTO(A;100;01/01/2007;31/12/2007;C)
- Returns the sum of the credit postings with Object A to Account 100 for the year 2007. Credit postings with Object A will not be included.
- The reference to the Object Code is case sensitive. For example:
- VTO(VAT Code;Account Code;Date 1;Date 2;Type)
- This command is similar to TO, but in calculating the net change during the period for the specified Account, only postings with the specified VAT Code are taken into account.
- The reference to the VAT Code is case sensitive.
- The reference to the VAT Code is case sensitive.
- TO2(Account Code 1;Account Code 2;Date 1;Date 2)
- This command returns the net change between two Accounts (i.e. between two corresponding Accounts) between Date 1 and Date 2. For example:
- TO2(750;100;01/01/2007;31/12/2007)
- Returns the sum of the postings during the year 2007 where Account 750 is the debit Account and 100 is the corresponding credit Account.
- TO2(750;100:1999;01/01/2007;31/12/2007)
- Returns the sum of the postings during the year 2007 where Account 750 is the debit Account and any Account between 100 and 1999 is the corresponding credit Account.
- TO2(750;100;01/01/2007;31/12/2007)
- OTO2(Object Code;Account Code 1;Account Code 2;Date 1;Date 2)
- This command is similar to TO2, but in calculating the net change between the corresponding Accounts, only double-sided postings where the specified Object Code is used on both sides are taken into account.
- The reference to the Object Code is case sensitive.
- The reference to the Object Code is case sensitive.
- BAL(Account Code;Date;Type)
- This command returns the balance for the specified Account on the specified Date. It therefore differs from the TO command in that balances brought forward from previous periods are taken into account.
- The command can return the sum of the balances of a range of Accounts in the same manner as the TO command: please refer to the description of the TO command above for examples.
- The command can return the sum of the balances of a range of Accounts in the same manner as the TO command: please refer to the description of the TO command above for examples.
- OBAL(Object Code;Account Code;Date;Type)
- This command is similar to BAL, but in calculating the balance for the specified Account on the specified date, only postings with the specified Object Code are taken into account.
- VBAL(VAT Code;Account Code;Date;Type)
- This command is similar to BAL, but in calculating the balance for the specified Account on the specified date, only postings with the specified VAT Code are taken into account.
- ABS(expression)
- This command returns the absolute (positive) value of the expression. The expression can be a hard-coded number or a formula using one of the Tax Report commands. For example:
- ABS(-1)
- Returns 1
- ABS(1)
- Returns 1
- ABS(TO(100:1999;01/01/2007;31/12/2007;A))
- Returns the sum of the net changes in the income Accounts 100 to 1999 for the year 2007, expressed as a positive figure. Balances for income Accounts are stored as negative figures in HansaWorld Enterprise.
- ABS(-1)
- SIGN(expression)
- This command returns the following:
- 1
- if the value of the expression is positive
- -1
- if the value of the expression is negative
- 0
- the value of the expression is zero
- The expression can be a hard-coded number or a formula using one of the Tax Report commands. For example:
- SIGN(TO(100:1999;01/01/2007;31/12/2007;A))
- Returns -1 since the balances of income Accounts are negative
- SIGN(ABS(TO(100:1999;01/01/2007;31/12/2007;A)))
- Returns 1, since the ABS command expresses the balances of income Accounts as positive figures
- 1
- ROUND(expression;number of decimal places)
- This command returns the value of the expression rounded to the specified number of decimal places. The expression can be a hard-coded number or a formula using one of the Tax Report commands. For example:
- ROUND(1234.24;0)
- Returns 1234
- ROUND(1234.24;1)
- Returns 1234.2
- ROUND(1234.24;-2)
- Returns 1200
- ROUND(TO(100:1999;01/01/2007;31/12/2007;A);2)
- Returns the sum of the net changes in the income Accounts 100 to 1999 for the year 2007, rounded to two decimal places.
- ROUND(1234.24;0)
- IF(expression;return 1;return 2)
- This command returns the following:
- return 1
- if the value of the expression is positive or zero
- return 2
- if the value of the expression is negative
- The expression, return 1 and return 2 can all be hard-coded numbers or formulae using one of the Tax Report commands. For example:
- IF(BAL(100;31/12/2007;A);1;-1)
- Returns 1 if BAL(100;31/12/2007;A) is positive or -1 if it is negative
- return 1
- NOT(expression)
- Returns 1 if the value of the expression is 0 or 1 otherwise.
- APDUE(Number of days;Date 1)
- This command returns the total in the Purchase Ledger that is overdue for payment by the specified number of days on Date 1. For example, APDUE(20;31/12/2007) will return the total that became due 20 days or more before 31/12/2007.
- ARDUE(Number of days;Date 1)
- This command is the Sales Ledger equivalent of APDUE above.
- Dates
- If you need to include a date in a formula, you can hard-code it as in the examples above, or, preferably, you can use one of the following variables:
- #D1
- The first date of the report period, as entered in the report or document specification window.
- #D2
- The last date of the report period, as entered in the report or document specification window.
- #D3, #D4
- The Previous Dates, as entered in the report or document specification window. You could use these two dates, for example, to define a period whose figures are to be compared with the main report period (#D1 and #D2).
- It is recommended that you use these variables, to ensure that you can use your formulae at any time without modification.
- For example, to print the closing balance for Account 100 for the report period 1/1/2007:31/12/2007, you could hard-code the date in the formula as follows:
- BAL(100;31/12/2007;A)
- Alternatively, you could take the date from the report period, as follows:
- BAL(100;#D2;A)
- #D1
Tax Reports - The Tax Calculations Report
You should use the Tax Calculations report to test your formulae and to check the results. As you add or change formulae in a record in the Tax Report setting, you can recalculate this report to see the consequences of the changes immediately.
On double-clicking 'Tax Calculations' in the 'Reports' list in the Nominal Ledger, the 'Specify Tax Calculations' window opens:
- Period
- Paste Special
Reporting Periods setting, System module
- Specify the period to be covered by the report.
- To refer to the first date of this period in your formulae, use the expression #D1.
- To refer to the last date of this period in your formulae, use the expression #D2.
- To refer to the first date of this period in your formulae, use the expression #D1.
- Previous Date (D3), Previous Date (D4)
- Paste Special
Choose date
- Enter any comparison dates, as required by the formulae in your record in the Tax Reports setting. To refer to these dates in your formulae, use the expressions #D3 and #D4.
- Report
- Paste Special
Tax Reports setting, Nominal Ledger
- Specify the record in the Tax Report setting that contains the formulae that you wish to test.
- Display Values in
- Paste Special
Currency register, System module
- Specify the Currency that is to be used in the report. Leave the field empty to use the home Currency (Base Currency 1).
- Don't Show Formulas
- By default, the Code and Formula of each row in the Tax Report record will be printed in the report. Use this option if you don't want this information to be printed.
- Don't Show Rows with Empty Comments
- Use this option if you want any rows in the Tax Report record that do not have Comments to be omitted from the report.
- Use Format
- Use this option if you have specified a Format on flip B of any row in the Tax Report record and if you want the figure resulting from that row to be printed using that Format.
The calculated result of the formula is shown in the second column, while the formula itself is shown in the fourth column.
Tax Reports - Designing a Form to be used with the Tax Report Document
The Tax Report document prints the results of your formulae, using the correct formatting. Design the Form used by this document in the usual way (as described here) with these exceptions:
- When creating a new Form, select 'Properties' from the Operations menu. Enter an appropriate Code and Comment (name), but leave the Document Type blank:
- You should link a particular Form to a single record in the Tax Reports setting. You will establish this link using the 'Define Document' function. Each field in the Form will relate to a particular row in the Tax Report record. When you add fields to the Form, leave the Fieldname blank. Instead, enter the Code of the row in the Tax Report record as the Field Argument:
- Since a particular Form is linked to a single record in the Tax Reports setting, you should design a new Form for each record in that setting.
Use this window to link a record in the Tax Reports setting to a Form. Enter the Code of a Tax Report record in the first column, and its associated Form in the second. You can use 'Paste Special' in both cases if necessary. As you create further Tax Report records and design the Forms to go with them, list them in the document definition window:
Click [Save] to save the Tax Report document definition.
Tax Reports - The Tax Report Document
When the time comes, you can print the Tax Report document in the usual way, by opening the 'Documents' list in the Nominal Ledger and double-clicking 'Tax Report'. The 'Specify Tax Report' window appears:
Use this window in the same way as the 'Specify Tax Calculations' window described here. Specify the Tax Report record to be printed in the Report field: the correct Form for that Tax Report record will be printed, providing you have completed the document definition window as described here. Click the [Run] button in the Button Bar to print the document. If you have checked the Preview box, it will be printed to screen: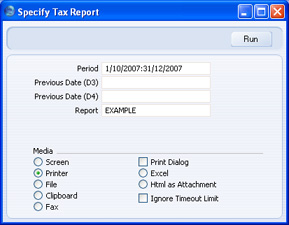
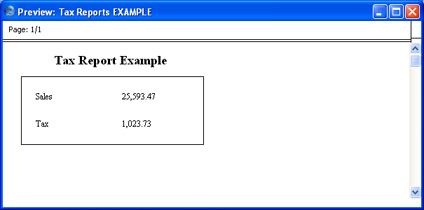
Tax Templates
Whenever you buy or sell an Item, you will need to charge or pay VAT and/or other sales or purchase tax in order to comply with local tax regulations. You will therefore need VAT/tax to be calculated in each transaction, and you will need to account for that VAT/tax in the Nominal Ledger.
In some countries (for example, most countries in Europe), each Item that is bought or sold (e.g. each row in an Invoice) will be taxed at a single rate. In this situation, you can use VAT Codes to calculate and account for the tax. Each row in the Invoice will have its own VAT Code. For example, an Item that is taxed at the national standard rate will have a VAT Code that calculates VAT/tax at that rate, while a zero-rated Item will have a different VAT Code that calculates VAT/tax at a 0% rate.
In other countries (for example, Brazil and the US), each Item that is bought or sold will be taxed using different taxes and/or several tax rates. In this case, you should use Tax Templates to calculate and account for the tax. A Tax Template allows you to apply several taxes to a single transaction (e.g. to a single row in an Invoice). To use Tax Templates, you should first enter each individual tax and tax rate in separate rows in the VAT Codes setting, and then create Tax Templates. A Tax Template is a tax structure, built up using a number of VAT Codes.
If you need to use Tax Templates, follow these steps:
- Select the Use Tax Templates for Tax Calculation option in the Transaction Settings setting in the Nominal Ledger. This option will cause a Tax Template field ("T-Cd") to appear in all Sub System transactions (e.g. in Sales and Purchase Invoices) instead of the VAT Code field ("V-Cd").
- Enter each individual tax rate as a separate row in the VAT Codes setting.
- Create Tax Templates that use the VAT Codes.
- Go to the 'Sales' card in the Account Usage S/L setting and the 'VAT' card in the Account Usage P/L setting to specify the default Tax Templates that will be used in most situations. You can also specify Tax Templates in each Item Group and in each Item and in each Sales and Cost Account. On the purchase side, when entering a Purchase Invoice, the Tax Template in a Cost Account will override the default Tax Template specified in the Account Usage P/L setting. You can also specify Sales and Purchase Tax Templates in the Contact records for your Customers and Suppliers. Do not specify VAT Codes in any of these settings or records. This configuration will ensure that tax is calculated correctly in sales and purchase transactions and posted to the correct Nominal Ledger Accounts.
- You can construct your Tax Templates so that they include every tax that will be applied to a transaction. This method will be suitable in situations where several taxes need to be applied to each transaction.
- You can construct your Tax Templates so that they include every tax that can possibly be applied to a transaction. For example, it might be that you have several stores and the sales tax calculation will depend on the store where the Item is purchased. In this situation, you should create one Tax Template for the Item and separate Tax Templates for each store. The Item Tax Template should list the different tax rates for all stores: assign this Tax Template to your Item Groups and/or Items. The Tax Template for a store should only list the tax rates that apply to that store. You can then create Contact records for each store, assign a Tax Template to each one as appropriate, and specify a store in the Branch field in the Local Machine setting in the User Settings module on each client machine. When you sell an Item, tax will be calculated using the tax rate(s) that are common to both Tax Templates. If you need to calculate tax in this way, select the Combine Tax Templates from Items and Contacts option in the Transaction Settings setting (as well as the Use Tax Templates for Tax Calculation option).
To work with Tax Templates, first use the [Switch Module] button in the Navigation Centre to ensure you are in the Nominal Ledger. Then, if you are using Windows or Mac OS X, click the [Settings] button, also in the Navigation Centre, or use the Ctrl-S/⌘-S keyboard shortcut and, when the 'Settings' list window opens, double-click 'Tax Templates'. If you are using iOS or Android, select 'Settings' from the Tools menu (with 'wrench' icon) and tap 'Tax Templates' in the 'Settings' list. The 'Tax Templates: Browse' window will open, listing the Tax Templates that you have previously entered. Double-click (Windows/Mac OS X) or tap (iOS/Android) a Tax Template in the list to edit it, or add a new record by selecting 'New' from the Create menu (Windows/Mac OS X) or the + menu (iOS/Android). The Tax Template record window illustrated below will open:

- Code
- Enter the unique Code by which the Tax Template record is to be identified from elsewhere in Standard ERP. The Code can consist of up to ten characters, and you can use both numbers and letters.
- Tax Identifier
- If the Tax Template represents a tax structure that has an official code or other identifier, enter that identifier here. The Tax Identifier will be shown in the 'Tax Templates: Browse' window but is otherwise for information only.
- Closed
- Check this box if you no longer want the Tax Template to be used. It will not appear in the 'Paste Special' selection window. You can re-open a Closed Tax Template at any time.
- Comment
- Enter the name for the Tax Template, to be shown in the 'Tax Templates: Browse' window and the 'Paste Special' list.
- Code
- Paste Special
VAT Codes setting, Nominal Ledger
- Use 'Paste Special' to choose a VAT Code.
- Excl %
- The tax rate will be brought in from the VAT Code.
- If the VAT Code has an Excl % (i.e. a percentage to be applied to a figure that excludes VAT in order to calculate the VAT amount), that figure will be brought in. Otherwise, the Incl % (a percentage to be applied to a figure that includes VAT in order to calculate the VAT amount) will be converted to an Excl % and brought in.
- You can change the figure if necessary.
- If the VAT Code has an Excl % (i.e. a percentage to be applied to a figure that excludes VAT in order to calculate the VAT amount), that figure will be brought in. Otherwise, the Incl % (a percentage to be applied to a figure that includes VAT in order to calculate the VAT amount) will be converted to an Excl % and brought in.
- Comment
- The Comment will be brought in from the VAT Code.
- Base
- Paste Special
Choices of possible entries
- Use this field to specify how the Base figure for the calculation (i.e. the taxable amount, the figure to which the tax percentage will be applied) will be chosen. The options are:
- Net
- The base figure will be the row sum in the transaction row to which the Tax Template is being applied. For example, in an Invoice row, the base figure will be the figure in the Sum field.
- Incl. all previously Calculated Taxes
- The base figure will be the row sum in the transaction row to which the Tax Template is being applied plus the tax amounts that will be calculated using the previous rows in the Tax Template.
- Net
---
Settings in the Nominal Ledger:
- Account Short Codes
- Account Transfer
- Accounting Periods
- Auto Eliminations
- Autotransactions
- Bank Transactions
- Brought Forward Balances
- Budget Classes
- Budget Keys
- Calculation Formulae
- Electronic VAT Declaration
- Fiscal Years
- Income & Expense Book
- Liquidity Report Info
- N/L Accruals
- Number Series - Simulations
- Number Series - Transactions
- Object Type Control
- Object Types
- Presentation of Balances
- Rate Gain/Loss
- Rate Gains/Losses
- Reconciliation Descriptions
- Reconciliation Settings
- Report Settings
- Sub-ledger Control Accounts
- Sub Systems
- Tax Reports
- Tax Templates
- Template Transactions, Template Transactions - Accounts
- Transaction Settings
- VAT Code Control
- VAT Code on Transaction rows
- VAT Codes
- VAT Declarations
- XBRL Reporting Elements, XBRL Reporting Settings
- Home page for Nominal Ledger manual
- Home page for Standard ERP manual
Tax Templates - Workflow and Examples
These examples describe using Tax Templates to collect and report sales tax.
The examples will be based on a store in a county where sales are subject to two taxes: the state sales tax (6%); and a county tax (1%). To begin with, the store will only sell to Customers in the same county.
The examples are divided into the following sections:
- Configuration
- Using a Tax Template in an Invoice
- Defining the VAT Report
- Selling a Tax-Exempt Item
- Selling to a Different Tax Jurisdiction
- Store Has More Than One Branch
Settings in the Nominal Ledger:
- Account Short Codes
- Account Transfer
- Accounting Periods
- Auto Eliminations
- Autotransactions
- Bank Transactions
- Brought Forward Balances
- Budget Classes
- Budget Keys
- Calculation Formulae
- Electronic VAT Declaration
- Fiscal Years
- Income & Expense Book
- Liquidity Report Info
- N/L Accruals
- Number Series - Simulations
- Number Series - Transactions
- Object Type Control
- Object Types
- Presentation of Balances
- Rate Gain/Loss
- Rate Gains/Losses
- Reconciliation Descriptions
- Reconciliation Settings
- Report Settings
- Sub-ledger Control Accounts
- Sub Systems
- Tax Reports
- Tax Templates
- Template Transactions, Template Transactions - Accounts
- Transaction Settings
- VAT Code Control
- VAT Code on Transaction rows
- VAT Codes
- VAT Declarations
- XBRL Reporting Elements, XBRL Reporting Settings
- Home page for Nominal Ledger manual
- Home page for Standard ERP manual
Tax Templates - Workflow and Examples - Configuration
This example describes using Tax Templates to collect and report sales tax.
The example will be based on a store in a county where sales are subject to two taxes: the state sales tax (6%); and a county tax (1%). To begin with, the store will only sell to Customers in the same county.
This page describes the configuration work that is required before being able to use Tax Templates (all settings are in the Nominal Ledger unless specified otherwise):
- In the Transaction Settings setting, select the Use Tax Templates for Tax Calculation option:
Selecting this option will have two effects: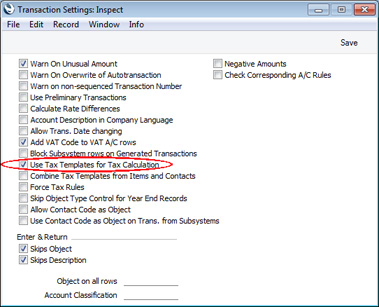
- Tax will be calculated using Tax Templates, instead of using VAT Codes directly.
- A Tax Template field ("T-Cd") will appear in all Sub System transactions (e.g. in Sales and Purchase Invoices) instead of the VAT Code field ("V-Cd").
- Tax will be calculated using Tax Templates, instead of using VAT Codes directly.
- In the VAT Codes setting, enter separate rows for each tax. In this example, two rows are needed for the two standard taxes (the state tax and the county tax):
The county tax is only payable on the first 5000.00 of a large sale. To cater for this, enter 5000.00 as the Max. Amount on flip F and, using 'Paste Special', enter "Amount in Range" as the Tax Calculation Rule: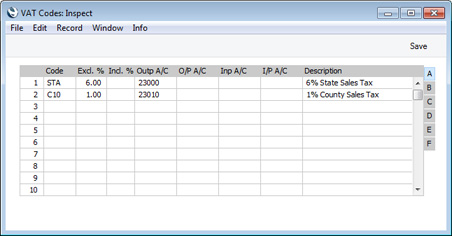
If there are other taxes in addition to the standard ones, enter them in separate rows in the setting. In the example illustrated below, we have entered a tax on prepared food and a zero-rated tax for exempt Items:
As all these taxes will only be applied to sales, we have only specified Output Accounts.
- The next step is to create the Tax Templates that will calculate the tax when you make a sale. The Tax Template illustrated below is suitable for Items that will be taxed at the standard rate:
We will use this Tax Template to apply the state tax and the county tax to the sales of most Items. If some Items (e.g. prepared food or tax-exempt Items) will be taxed differently, create separate Tax Templates containing the appropriate combination of VAT Codes:
- The next step is to specify when each Tax Template will be used in a sales transaction (i.e. in a Quotation, Order or Invoice).
When you specify an Item in a sales transaction, the Tax Template will be chosen as follows:
- The Sales Tax Template specified in the Contact record for the Customer will be used.
- The Tax Template will be taken from the appropriate row for the Item or Item Group in the Customer's Price List.
- It will be taken from the Item record.
- It will be taken from the Item Group to which the Item belongs.
- The Tax Template on the ' Sales' card of the Account Usage S/L setting will be used.
As the "ITNORMAL" Tax Template from the previous step is intended to be used in most sales, we will set it as the default in the Account Usage S/L setting:
If some Items (e.g. prepared food or tax-exempt Items) will be taxed differently, specify the relevant Tax Templates in the Item Group or Item records.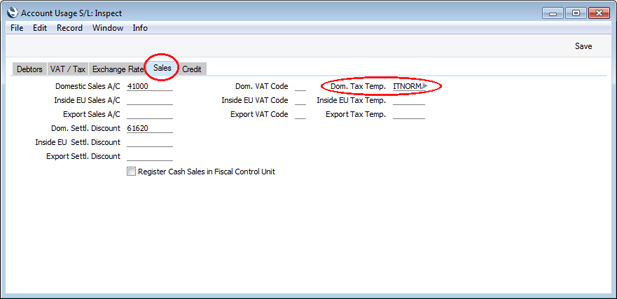
If a Customer will be taxed differently, specify the relevant Tax Template in the Contact record for that Customer (in the Sales Tax Temp. field on the 'Company' card). Usually you would only specify a Tax Template in the Contact record for a Customer if you need that Tax Template to be used to calculate taxes in every Invoice issued to the Customer (e.g. if the Customer holds a certificate of tax exemption).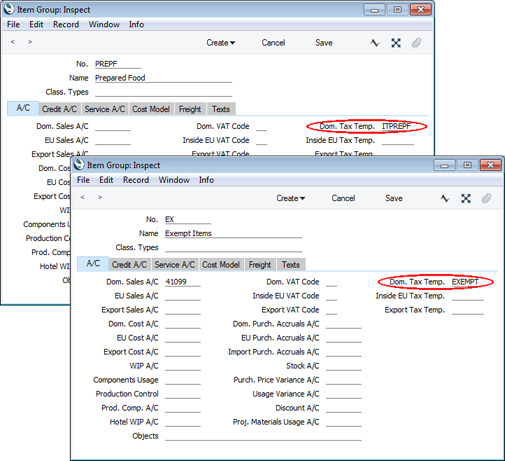
In this example, we are using the "EXEMPT" Tax Template both for exempt Items and exempt Customers. You could use different Tax Templates if you need to separate these sales in reports.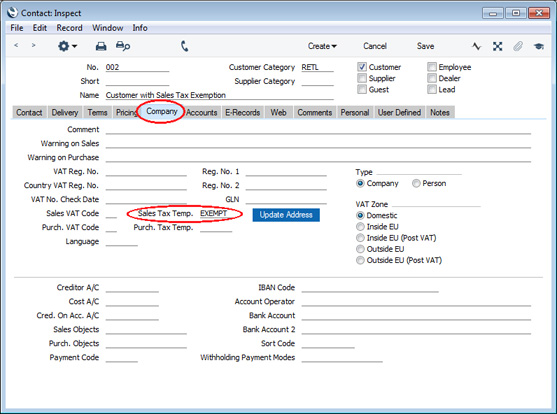
- The Sales Tax Template specified in the Contact record for the Customer will be used.
- In the Nominal Ledger Transaction that is created when you mark an Invoice or Purchase Invoice as OK and save, the appropriate VAT Code will be copied to the V-Cd or T-Cd field in each Transaction row posting to a Sales or Cost Account. If you are using Tax Templates, there will usually be more than one VAT Code that can be copied in this way as a Tax Template can contain several VAT Codes.
The final configuration step is to use the VAT Code on Transaction rows setting to specify which VAT Codes will be copied to the Transaction rows posting to Sales and Cost Accounts. For ease and flexibility in reporting, it is recommended that you choose the All VAT Codes option as shown in the illustration below:

- Introduction
- Configuration
- Using a Tax Template in an Invoice
- Defining the VAT Report
- Selling a Tax-Exempt Item
- Selling to a Different Tax Jurisdiction
- Store Has More Than One Branch
Settings in the Nominal Ledger:
- Account Short Codes
- Account Transfer
- Accounting Periods
- Auto Eliminations
- Autotransactions
- Bank Transactions
- Brought Forward Balances
- Budget Classes
- Budget Keys
- Calculation Formulae
- Electronic VAT Declaration
- Fiscal Years
- Income & Expense Book
- Liquidity Report Info
- N/L Accruals
- Number Series - Simulations
- Number Series - Transactions
- Object Type Control
- Object Types
- Presentation of Balances
- Rate Gain/Loss
- Rate Gains/Losses
- Reconciliation Descriptions
- Reconciliation Settings
- Report Settings
- Sub-ledger Control Accounts
- Sub Systems
- Tax Reports
- Tax Templates
- Template Transactions, Template Transactions - Accounts
- Transaction Settings
- VAT Code Control
- VAT Code on Transaction rows
- VAT Codes
- VAT Declarations
- XBRL Reporting Elements, XBRL Reporting Settings
- Home page for Nominal Ledger manual
- Home page for Standard ERP manual
Tax Templates - Workflow and Examples - Using a Tax Template in an Invoice
This example describes using Tax Templates to collect and report sales tax.
The example is based on a store in a county where sales are subject to two taxes: the state sales tax (6%); and a county tax (1%). To begin with, the store will only sell to Customers in the same county.
After following the configuration steps, you will be able to enter an Invoice. Follow these steps:
- When you create an Invoice and specify an Item, a Tax Template will be brought in to the T-Cd field on flip B, and the tax value will be shown in the Tax field in the footer:
In this example, the Tax Template is the default Tax Template, brought in from the Account Usage S/L setting (step 4 on the Configuration page).
- If you need to see how the tax value is calculated, select 'Open Tax Matrix' from the Operations menu (Windows/Mac OS X) or Tools menu (iOS/Android). A new window will be opened, displaying the tax calculation, as follows:
- If you place the insertion point in an Invoice row, the function will display the tax calculation for that row.
- If you place the insertion point in a header field, the function will display the tax calculation for the Invoice as a whole.
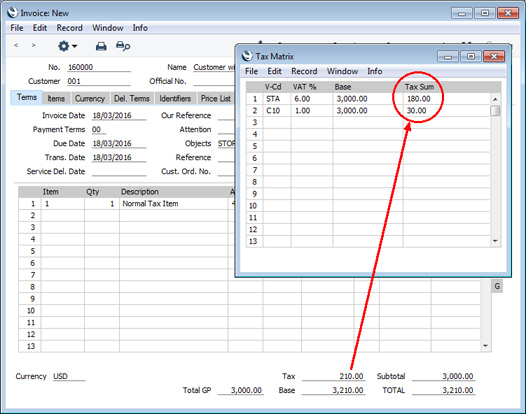
- If you place the insertion point in an Invoice row, the function will display the tax calculation for that row.
- When you mark the Invoice as OK and save, a Nominal Ledger Transaction will be created in which the tax will be credited to the Output Accounts specified in each VAT Code:
Although not fully visible in the illustration, the T-Cd field in row 2 contains "C10,STA". As we selected the All VAT Codes option in the VAT Code on Transaction rows setting (step 6 on the Configuration page), every VAT Code applying to the sale will be copied to this field.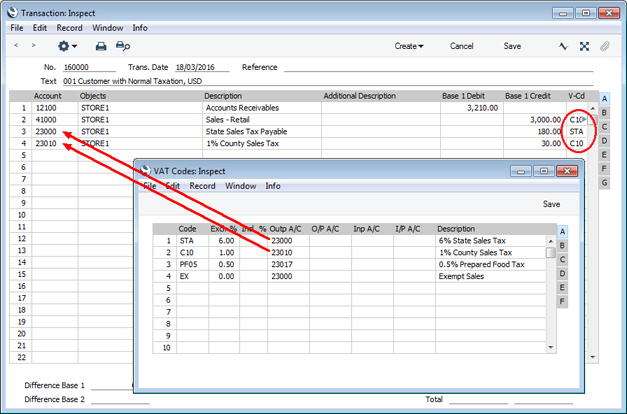
For clarity, we also selected the Add VAT Code to VAT A/C rows option in the Transaction Settings setting in step 1 on the Configuration page. The effect of this is that the relevant VAT Codes will also be copied to the T-Cd field in rows 3 and 4.
- Introduction
- Configuration
- Using a Tax Template in an Invoice
- Defining the VAT Report
- Selling a Tax-Exempt Item
- Selling to a Different Tax Jurisdiction
- Store Has More Than One Branch
Settings in the Nominal Ledger:
- Account Short Codes
- Account Transfer
- Accounting Periods
- Auto Eliminations
- Autotransactions
- Bank Transactions
- Brought Forward Balances
- Budget Classes
- Budget Keys
- Calculation Formulae
- Electronic VAT Declaration
- Fiscal Years
- Income & Expense Book
- Liquidity Report Info
- N/L Accruals
- Number Series - Simulations
- Number Series - Transactions
- Object Type Control
- Object Types
- Presentation of Balances
- Rate Gain/Loss
- Rate Gains/Losses
- Reconciliation Descriptions
- Reconciliation Settings
- Report Settings
- Sub-ledger Control Accounts
- Sub Systems
- Tax Reports
- Tax Templates
- Template Transactions, Template Transactions - Accounts
- Transaction Settings
- VAT Code Control
- VAT Code on Transaction rows
- VAT Codes
- VAT Declarations
- XBRL Reporting Elements, XBRL Reporting Settings
- Home page for Nominal Ledger manual
- Home page for Standard ERP manual
Tax Templates - Workflow and Examples - Defining the VAT Report
This example describes using Tax Templates to collect and report sales tax.
The example is based on a store in a county where sales are subject to two taxes: the state sales tax (6%); and a county tax (1%). To begin with, the store will only sell to Customers in the same county.
After following the configuration steps and entering an Invoice, the next step is to define the VAT Report.
Before producing a VAT Report for the first time, you should specify how the figures in the report will be calculated and format the report so that it suits your specific requirements. This is known as "Defining" the VAT Report: a full description is here. An example report definition is illustrated below:
Each row in the definitions list will cause a line to be printed in the VAT Report, as shown in the illustration below: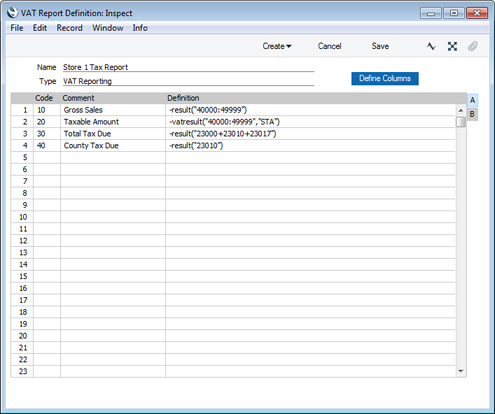
In more detail the calculations in the report definition are as follows: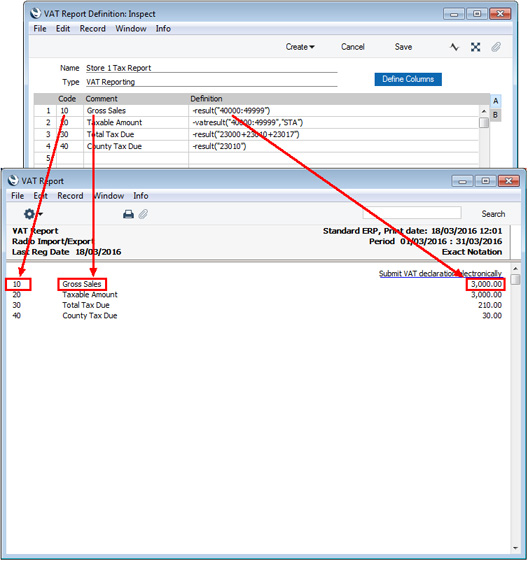
Row 1 -result("40000:49999") The RESULT command will print the net change in a specified Account or Accounts over the report period i.e. the net amount posted to the Account. Accounts 40000:49999 are the Sales Accounts. This row will therefore print the total value of sales made during the report period. Sales figures are stored as negative figures in Standard ERP, so the negative sign will convert them to positive.
Row 2 -vatresult("40000:49999","STA") The VATRESULT command will print the net amount posted with a specified VAT Code to a specified Account or Accounts. This row will therefore print the total value of sales made with the "STA" VAT Code (i.e. the VAT Code representing the state tax). In other words, this row prints the total value of taxable sales. Row 3 -result("23000+23010+23017") This row will print the total sales tax payable on sales made during the report period, calculated from three Accounts: 23000, the output Account for state tax; 23010, the output Account for county tax; and 23017, the output Account for the prepared food tax (not used in this example). Row 4 -result("23010") 23010 is the output Account for county tax, so this row prints the total county tax on sales made during the report period.
Tax Template Examples:
- Introduction
- Configuration
- Using a Tax Template in an Invoice
- Defining the VAT Report
- Selling a Tax-Exempt Item
- Selling to a Different Tax Jurisdiction
- Store Has More Than One Branch
Settings in the Nominal Ledger:
- Account Short Codes
- Account Transfer
- Accounting Periods
- Auto Eliminations
- Autotransactions
- Bank Transactions
- Brought Forward Balances
- Budget Classes
- Budget Keys
- Calculation Formulae
- Electronic VAT Declaration
- Fiscal Years
- Income & Expense Book
- Liquidity Report Info
- N/L Accruals
- Number Series - Simulations
- Number Series - Transactions
- Object Type Control
- Object Types
- Presentation of Balances
- Rate Gain/Loss
- Rate Gains/Losses
- Reconciliation Descriptions
- Reconciliation Settings
- Report Settings
- Sub-ledger Control Accounts
- Sub Systems
- Tax Reports
- Tax Templates
- Template Transactions, Template Transactions - Accounts
- Transaction Settings
- VAT Code Control
- VAT Code on Transaction rows
- VAT Codes
- VAT Declarations
- XBRL Reporting Elements, XBRL Reporting Settings
- Home page for Nominal Ledger manual
- Home page for Standard ERP manual
Tax Templates - Workflow and Examples - Selling a Tax-Exempt Item
This example describes using Tax Templates to collect and report sales tax.
The example is based on a store in a county where sales are subject to two taxes: the state sales tax (6%); and a county tax (1%). To begin with, the store will only sell to Customers in the same county.
Please refer here for a list of the configuration steps.
In this part of the example, we will sell an Item that is exempt from tax. We created a suitable "EXEMPT" Tax Template in step 3 on the Configuration page and assigned it to an Item Group for tax-exempt Items in step 4.
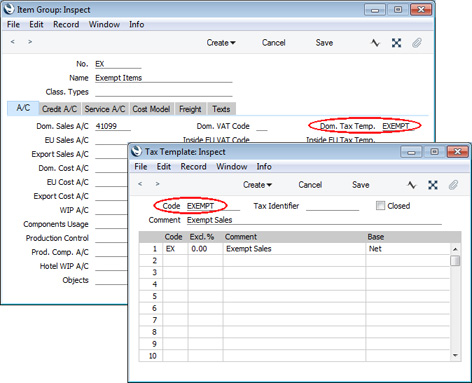
- When you create an Invoice and specify an Item, a Tax Template will be brought in to the T-Cd field on flip B. In this example, as we are selling an Item that is exempt from tax, the "EXEMPT" Tax Template will be brought in from the Item Group to which the Item belongs:
It might be that we sell a taxable Item but the sale is not taxable (e.g. the Customer holds a certificate of tax exemption, or is purchasing the Item for resale). If all sales to the Customer are tax-exempt, we would specify the "EXEMPT" Tax Template in the Contact record for the Customer as illustrated in step 4 on the Configuration page, and the Invoice would be the same as illustrated above. Otherwise (i.e. if we have not specified the "EXEMPT" Tax Template for the Customer, because only some sales to the Customer are tax-exempt) we would need to change the Tax Template in the Invoice row as appropriate.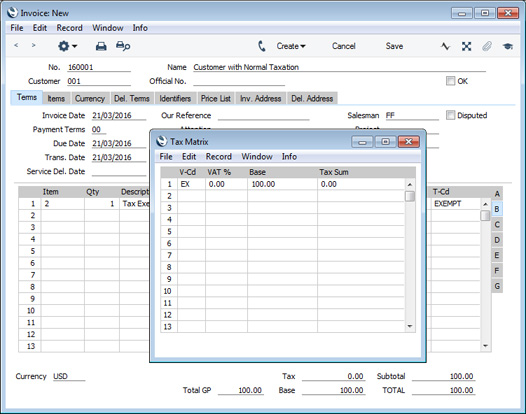
- In the Nominal Ledger Transaction that results from the Invoice, no tax will be included, while the "EX" VAT Code will be assigned to the posting to the Sales Account:
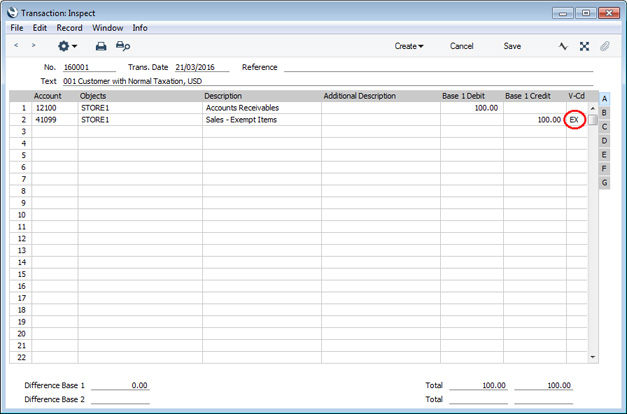
- In this next step, we will add a row to the VAT Report Definition to print the value of tax-exempt sales during the report period:

Row 2 -vatresult("40000:49999","EX") This row will print the total value of sales made with the "EX" VAT Code (i.e. the VAT Code representing exempt sales). In other words, this row prints the total value of tax-exempt sales.
This is the resulting report:
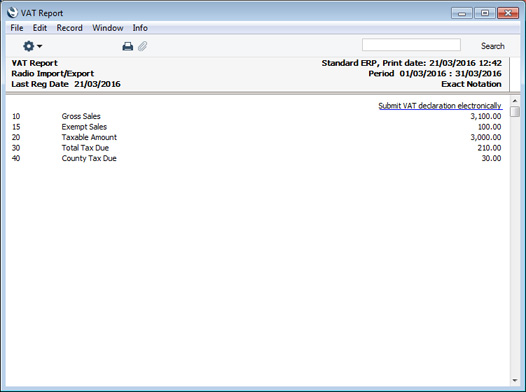
- Introduction
- Configuration
- Using a Tax Template in an Invoice
- Defining the VAT Report
- Selling a Tax-Exempt Item
- Selling to a Different Tax Jurisdiction
- Store Has More Than One Branch
Settings in the Nominal Ledger:
- Account Short Codes
- Account Transfer
- Accounting Periods
- Auto Eliminations
- Autotransactions
- Bank Transactions
- Brought Forward Balances
- Budget Classes
- Budget Keys
- Calculation Formulae
- Electronic VAT Declaration
- Fiscal Years
- Income & Expense Book
- Liquidity Report Info
- N/L Accruals
- Number Series - Simulations
- Number Series - Transactions
- Object Type Control
- Object Types
- Presentation of Balances
- Rate Gain/Loss
- Rate Gains/Losses
- Reconciliation Descriptions
- Reconciliation Settings
- Report Settings
- Sub-ledger Control Accounts
- Sub Systems
- Tax Reports
- Tax Templates
- Template Transactions, Template Transactions - Accounts
- Transaction Settings
- VAT Code Control
- VAT Code on Transaction rows
- VAT Codes
- VAT Declarations
- XBRL Reporting Elements, XBRL Reporting Settings
- Home page for Nominal Ledger manual
- Home page for Standard ERP manual
Tax Templates - Workflow and Examples - Selling to a Different Tax Jurisdiction
This example describes using Tax Templates to collect and report sales tax.
The example is based on a store in a county where sales are subject to two taxes: the state sales tax (6%); and a county tax (1%). So far, the store has only sold to Customers in the county where it is located. In this county, the county tax is 1%. In this next example, the store will start making deliveries to Customers in counties where the county tax is a different percentage.
Depending on the state, sales tax on out-of-county sales can be charged in one of three ways:
- The store must charge county tax at the rate in the Customer's location.
- The store must charge the taxes that are common to the Customer's location and the store's location (for example, the store must charge state tax because this is common to both locations, but not county tax).
- The store must charge county tax at the rate in the store's location.
The change in circumstances requires some configuration work. Follow these steps:
- The first step is to select the Combine Tax Templates from Items and Contacts option in the Transaction Settings setting:
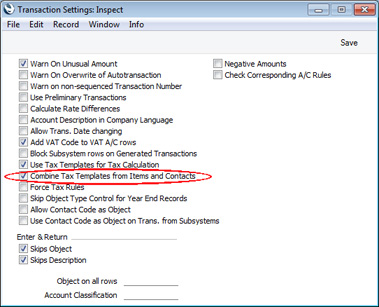
- In the VAT Codes setting, enter separate rows for each county tax rate, with Max. Amounts on flip F if necessary. In some states, it is only necessary to enter rows for each rate, it isn't necessary to enter rows for each county:
In this example, we have entered a different Output Account for each county tax. This will help with reporting.
- Return to the Tax Template that you created in step 3 on the original Configuration page and add the county taxes:
In the Tax Template, list every tax that can be charged on the sale of an Item. If you have more than one Tax Template because you sell Items that are taxed at different rates (e.g. prepared food), add the various county taxes to those Tax Templates as well.
These Tax Templates will be termed "Item Tax Templates" in this description.
- Create new Tax Templates for each county tax rate. In some states, it is only necessary to enter Tax Templates for each rate, it isn't necessary to enter them for each county. Each of these Tax Templates should contain the state tax and the appropriate county tax. If you have any special tax rates (e.g. for prepared food), include them in these Tax Templates as well:
These Tax Templates will be termed "Customer Tax Templates" in this description.
- In the Contact records for each Customer that is located in a different county to the store, specify the relevant Customer Tax Template in the Sales Tax Temp. field on the 'Company' card:
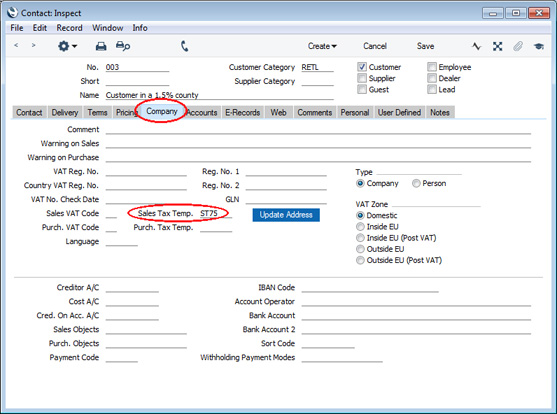
- Enter a record in the Contact register to represent the store. On the 'Company' card, specify the Sales Tax Template representing the location of the store:
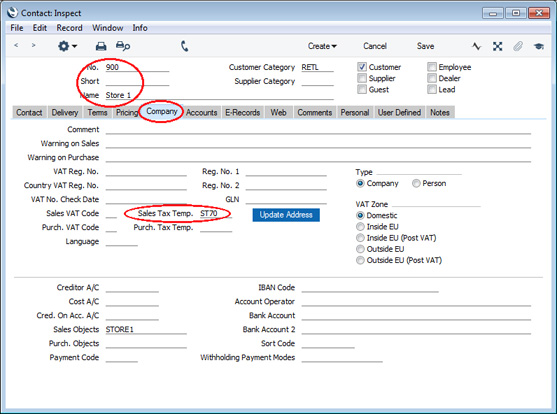
- The Local Machine setting in the User Settings module contains some settings specific to a particular client machine (e.g. to a particular terminal or till). On each client machine in the store, open the Local Machine setting and specify the Contact record from step 6 above in the Branch field:
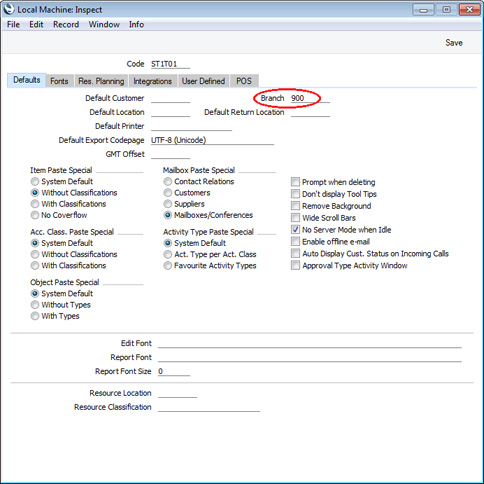
- When you enter an Invoice and specify an Item, the Combine Tax Templates from Items and Contacts option (step 1 above) will mean that at least two Tax Templates will be shown in the T-Cd field on flip B: a Customer Tax Template and an Item Tax Template. The Customer Tax Template will be chosen as follows:
- If the Customer is in the same county as the store, the Customer will not have its own Tax Template. Instead the Customer Tax Template will be taken from the Contact record specified as the Branch in the Local Machine setting (steps 6 and 7 above).
- If the Customer is in a different county to the store, the Customer will have its own Tax Template (step 5 above) and this will be used in the Invoice. This is illustrated below:
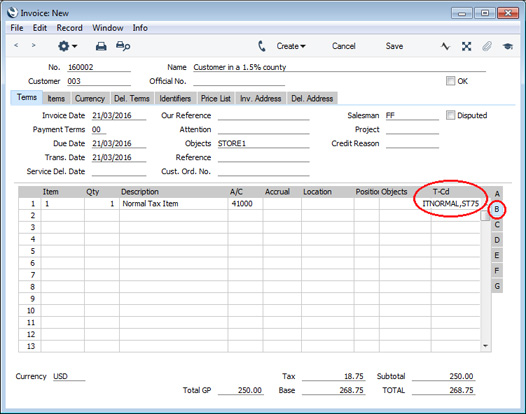
- If the Customer is in the same county as the store, the Customer will not have its own Tax Template. Instead the Customer Tax Template will be taken from the Contact record specified as the Branch in the Local Machine setting (steps 6 and 7 above).
- Opening the Tax Matrix from the Operations menu shows that the tax will be calculated using the VAT Codes that are common to both Tax Templates:
Because the Item Tax Template contains every county tax rate and the Customer Tax Template only contains the appropriate county tax rate for the Customer, selecting the VAT Codes that are common to both Tax Templates means that the correct one(s) will be picked in every sales transaction.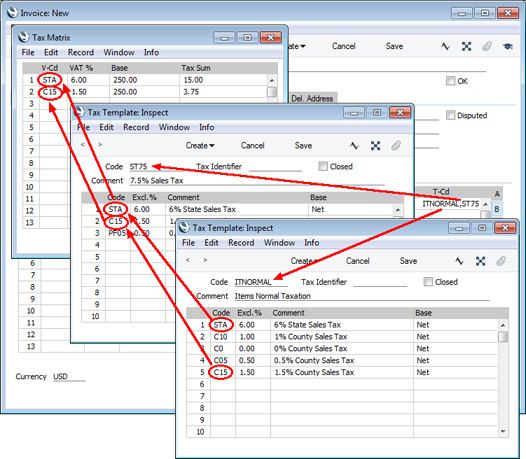
- In the Nominal Ledger Transaction that will result from the Invoice, the tax will be credited to the Output Accounts specified in each VAT Code. Although not fully visible in the illustration, the T-Cd field in row 2 will contain "C15,STA":
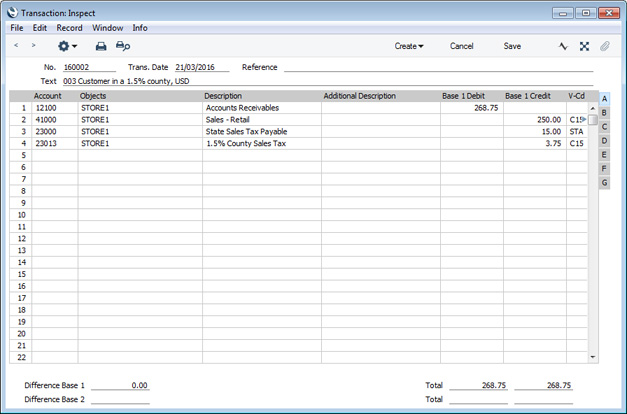
- In this next step, we will add two more rows to the VAT Report Definition. Row 6 will print the value of sales made to counties where there is no county tax, and row 7 will print the value of sales where the county tax is different to the rate applying in the county where the store is located. Both rows use the VATRESULT command to print the total value of sales made during the report period with particular VAT Codes, and thus illustrate again the value of using the All VAT Codes option in the VAT Code on Transaction rows setting (step 5 on the Configuration page). We also increased the range of Accounts in rows 4 and 5 to include all the county tax Accounts:
This is the resulting report: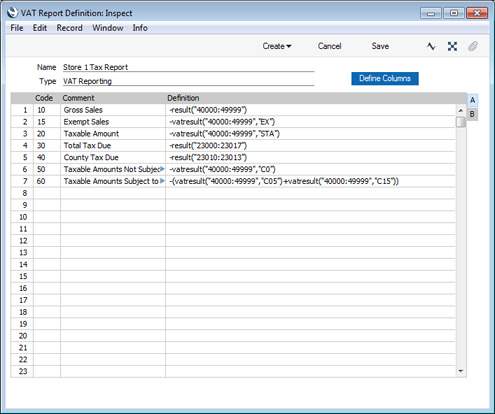
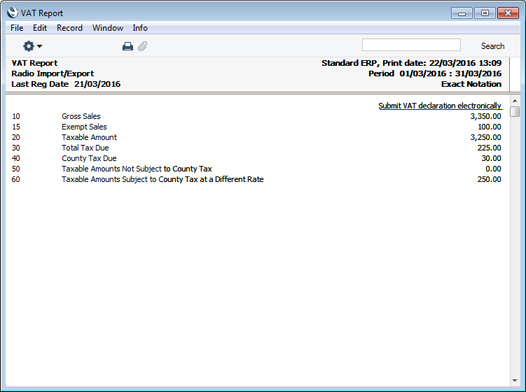
- As mentioned at the beginning of this section, in some states stores should charge the taxes that are common to both the Customer's location and the store's location. For example, a store should charge state tax because this is common to both locations, but not county tax.
In this situation, the configuration work is broadly the same as described in steps 1-7 above, with one exception: do not follow step 5 (i.e. do not specify Sales Tax Templates in the Contact records for out-of-county Customers).
Instead, create records in the Delivery Addresses setting in the Sales Orders module for each Customer's Delivery Address(es). Specify the relevant Customer Tax Template in these Delivery Address records.
As each Customer does not have a Tax Template, when you create an Invoice, the Customer Tax Template will be taken from the Contact record specified as the Branch in the Local Machine setting (steps 6 and 7 above). If a Customer has a Delivery Address in a different county to the store and you specify this Delivery Address in the Invoice, the Tax Templates from the Branch and from the Delivery Address will both be copied to the Invoice. This will mean that each Invoice row will have three Tax Templates, including the Item Tax Template. Tax will be calculated using the VAT Codes that are common to all three Tax Templates (usually this will mean that tax will only be calculated using the VAT Code that represents state tax, together with any special taxes that might apply, such as the tax on prepared foods). The key factor is that there are no Tax Templates in the Contact records for the Customers. This ensures that the Branch Tax Template will always be used, together with the Delivery Address Tax Template when appropriate.
- Introduction
- Configuration
- Using a Tax Template in an Invoice
- Defining the VAT Report
- Selling a Tax-Exempt Item
- Selling to a Different Tax Jurisdiction
- Store Has More Than One Branch
Settings in the Nominal Ledger:
- Account Short Codes
- Account Transfer
- Accounting Periods
- Auto Eliminations
- Autotransactions
- Bank Transactions
- Brought Forward Balances
- Budget Classes
- Budget Keys
- Calculation Formulae
- Electronic VAT Declaration
- Fiscal Years
- Income & Expense Book
- Liquidity Report Info
- N/L Accruals
- Number Series - Simulations
- Number Series - Transactions
- Object Type Control
- Object Types
- Presentation of Balances
- Rate Gain/Loss
- Rate Gains/Losses
- Reconciliation Descriptions
- Reconciliation Settings
- Report Settings
- Sub-ledger Control Accounts
- Sub Systems
- Tax Reports
- Tax Templates
- Template Transactions, Template Transactions - Accounts
- Transaction Settings
- VAT Code Control
- VAT Code on Transaction rows
- VAT Codes
- VAT Declarations
- XBRL Reporting Elements, XBRL Reporting Settings
- Home page for Nominal Ledger manual
- Home page for Standard ERP manual
Tax Templates - Workflow and Examples - Store Has More Than One Branch
This example describes using Tax Templates to collect and report sales tax.
The example has so far been based on a store in a county where sales are subject to two taxes: the state sales tax (6%); and a county tax (1%). In this final example, a second store will be opened in a county where the county tax is 1.5%.
This development again requires some configuration work:
- Enter separate records in the Contact register for each store or other sales location (these are given the term "Branch" in Standard ERP). On the 'Company' card, specify the Sales Tax Template representing the location of the Branch. On the 'Accounts' card, specify a unique Sales Object for each Branch:
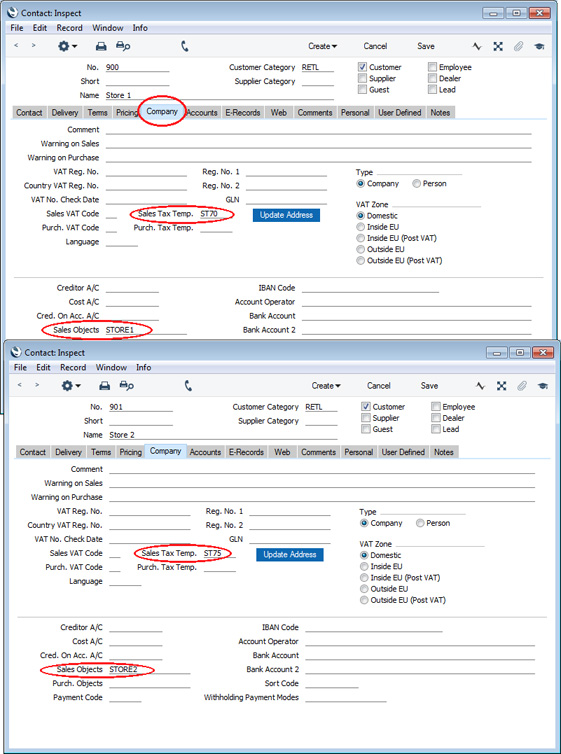
- The Local Machine setting in the User Settings module contains some settings specific to a particular client machine (e.g. to a particular terminal or till). On each client machine in each Branch, open the Local Machine setting and specify the relevant Contact record from step 1 above in the Branch field:
The effect of this is that every sales transaction recorded on any client machine in a particular Branch will be marked with the Object representing that Branch. This will make it possible to keep the transactions separate in reports.
- For tax reporting purposes, you need the Branch Object to be assigned to the rows in the Nominal Ledger Transaction in which tax is credited to the Output Accounts. Select the Objects on VAT Account option on the 'VAT / Tax' card in the Account Usage S/L setting in the Sales Ledger:
If you only have one Branch, it is recommended that you select the Objects on Tax Account option if you are planning more Branches in the future. This will mean that past Transactions will be compatible with the multi-Branch structure when it is implemented. This has been done in these examples.
- When a Customer walks into one of the stores, they should be charged sales tax at the rate applying in the city or county where the store is located. So, there is no need to specify a Sales Tax Template in the Contact records for such Customers, especially if they are likely to be Customers in more than one store. In an Invoice, this will mean the Customer Tax Template will be taken from the Branch, so tax will be charged at the rate applying in the location of the Branch.
The calculation of sales tax on Items that are delivered out-of-county can vary, depending on the state:
- If the store must charge county tax at the rate in the Customer's location, specify a Sales Tax Template in the Contact records for out-of-county Customers. In an Invoice, this will mean the Customer Tax Template will be taken from those Contact records, so tax will be charged at the rate applying in the location of the Customer.
- If the store must charge the taxes that are common to the Customer's location and the store's location (for example, the store must charge state tax because this is common to both locations, but not county tax), do not specify a Sales Tax Template in the Contact records for out-of-county Customers. Instead, create records in the Delivery Addresses setting in the Sales Orders module for each Customer's Delivery Address(es). Specify the relevant Customer Tax Template in these Delivery Address records (as described above in step 12 on the Selling to a Different Tax Jurisdiction page).
- If the store must charge county tax at the rate in the store's location, steps 1-3 above still apply, but do not assign Sales Tax Templates to Customers or Delivery Addresses unless the Customer will be taxed differently to the norm (e.g. if the Customer holds a certificate of tax exemption).
- If the store must charge county tax at the rate in the Customer's location, specify a Sales Tax Template in the Contact records for out-of-county Customers. In an Invoice, this will mean the Customer Tax Template will be taken from those Contact records, so tax will be charged at the rate applying in the location of the Customer.
- When you create an Invoice on a client machine in the either store, the relevant Object will be brought in. In this case, the Invoice is being created in the second store:
In this example, a walk-in Customer is charged tax at the local rate for the second store:
- In the resulting Nominal Ledger Transaction, having selected the Objects on VAT Account option in the Account Usage S/L setting (step 3 above), the Branch Object will be assigned to the postings to the state and county tax Accounts (as well as to the Sales Account):
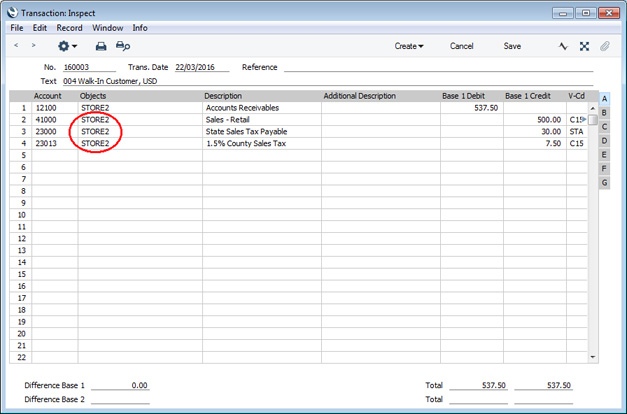
- You will probably need to define separate VAT Reports for each Branch. In our example, row 7 will be different for each store, as this row will print the value of sales where the county tax is different to the rate applying in the county where the store is located:
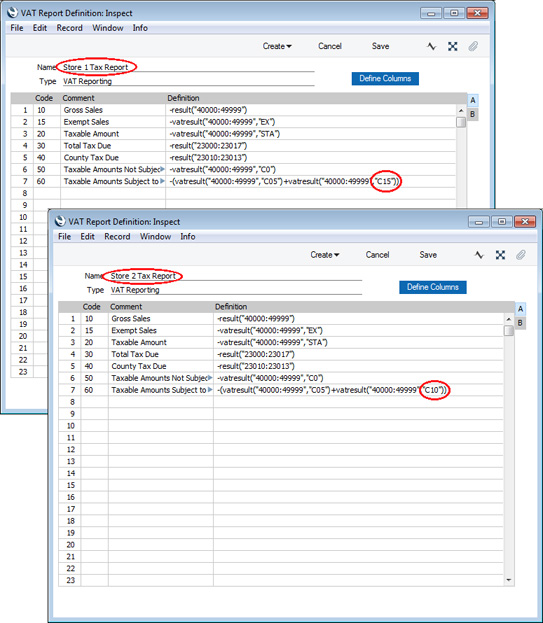
- When running the report for a particular store, enter the relevant Branch Object in the specification window:
The report will be compiled from Transaction rows with the specified Object (i.e. it will display figures for the store that corresponds to the specified Object):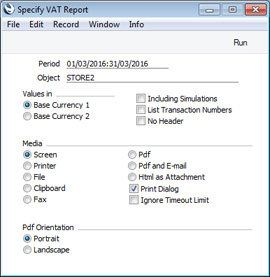
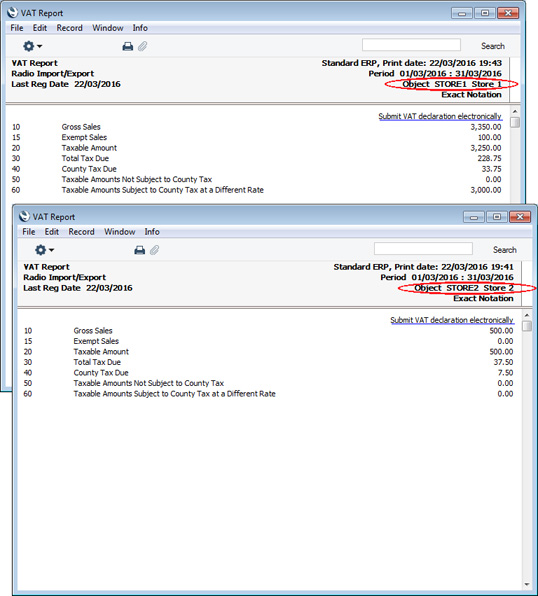
- Introduction
- Configuration
- Using a Tax Template in an Invoice
- Defining the VAT Report
- Selling a Tax-Exempt Item
- Selling to a Different Tax Jurisdiction
- Store Has More Than One Branch
Settings in the Nominal Ledger:
- Account Short Codes
- Account Transfer
- Accounting Periods
- Auto Eliminations
- Autotransactions
- Bank Transactions
- Brought Forward Balances
- Budget Classes
- Budget Keys
- Calculation Formulae
- Electronic VAT Declaration
- Fiscal Years
- Income & Expense Book
- Liquidity Report Info
- N/L Accruals
- Number Series - Simulations
- Number Series - Transactions
- Object Type Control
- Object Types
- Presentation of Balances
- Rate Gain/Loss
- Rate Gains/Losses
- Reconciliation Descriptions
- Reconciliation Settings
- Report Settings
- Sub-ledger Control Accounts
- Sub Systems
- Tax Reports
- Tax Templates
- Template Transactions, Template Transactions - Accounts
- Transaction Settings
- VAT Code Control
- VAT Code on Transaction rows
- VAT Codes
- VAT Declarations
- XBRL Reporting Elements, XBRL Reporting Settings
- Home page for Nominal Ledger manual
- Home page for Standard ERP manual
Tax Transactions
This setting is used in Russia. Please refer to your local HansaWorld representative for details.Tax Trans Fields
This setting is used in Russia. Please refer to your local HansaWorld representative for details.Tax Trans Maps
This setting is used in Russia. Please refer to your local HansaWorld representative for details.Tax Trans Settings
This setting is used in Russia. Please refer to your local HansaWorld representative for details.Template Transactions, Template Transactions - Accounts
The Template Transactions setting provides you with a alternative method of entering Nominal Ledger Transactions. This method is commonly used in Denmark. To use this method, follow these steps:
- This first step is optional. Use the Template Transactions - Accounts setting to specify up to four Accounts whose balances you want to be visible each time you enter a Template Transaction. You can enter one record to this setting for each user.
Use 'Paste Special' to choose the Person and the four Accounts.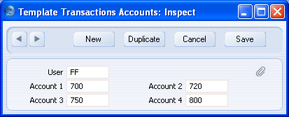
- The next step is to enter the Template Transaction itself. You can use various methods when entering a Template Transaction. In all cases, the Template Transaction must balance before you can save it (i.e. the figure in the Total field in the bottom right-hand corner must be 0.00). The various methods are:
- You can enter the individual journal postings on separate rows. In the example illustrated below, Account 355 will be debited and Account 700 will be credited. You can choose the Accounts using 'Paste Special'.
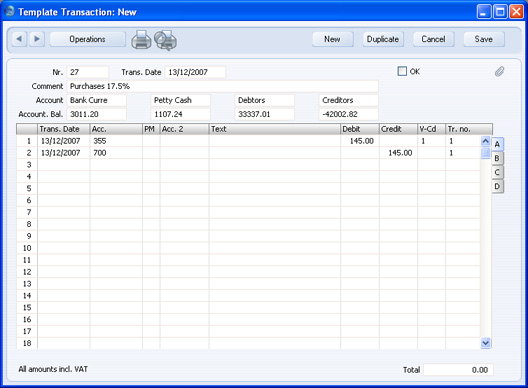
- If two journal postings balance each other exactly, you can enter them both in a single row:
- In this example, a VAT Code was brought in automatically from the Account record when we entered Account 355. It is also possible to enter a VAT Code manually. If there is a VAT Code, the amount in that row (145.00 in the example) should include VAT.
In a more complex Template Transaction with many rows, you can enter a balancing amount by placing the insertion point in one of the rows and selecting 'Balance Transaction' from the Operations menu. The Debit or Credit value in that row will be changed, to ensure the Template Transaction balances.
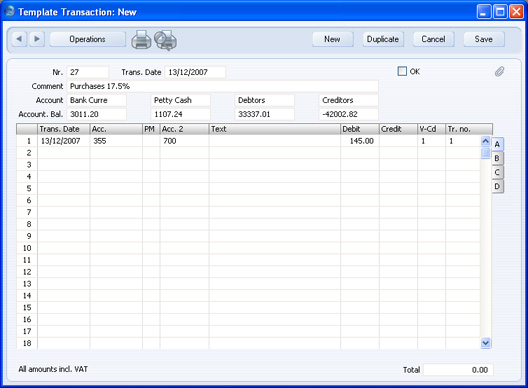
- In this example, the amount is in the Debit field. This means it will be debited to the Acc. (Account 355 in the illustration) and credited to the Acc. 2 (Account 700 in the illustration). If the amount was in the Credit field, it would be credited to the Acc. and debited to the Acc. 2. You can choose the Acc. and the Acc. 2 using 'Paste Special'.
As in example (i), a VAT Code was brought in automatically from the Account record when we entered Account 355. It is also possible to enter a VAT Code manually. If there is a VAT Code, the amount in that row (145.00 in the example) should include VAT. If one of the Accounts has a VAT Code, you must enter this Account in the Acc. field, not the Acc. 2 field. If both Accounts have VAT Codes, use method (i).
If the Template Transaction affects the Bank or Cash Account, you can enter that Account in the Acc. 2 field as shown above, or you can enter the appropriate Payment Mode in the PM field using 'Paste Special'. The relevant Account will be placed in the Acc. 2 field automatically, brought in from the Payment Mode:
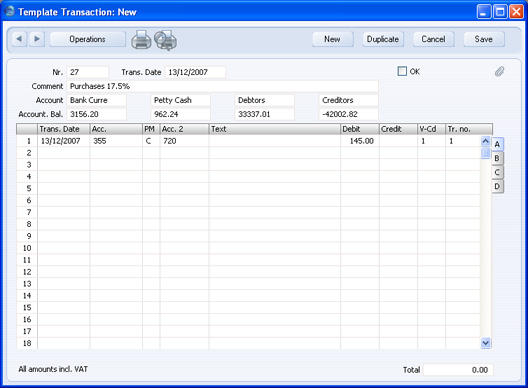
- If you need to post an amount in Currency, you can use either of the two methods described above. If both sides of the Transaction are in Currency, you should use method (i). If one side of the Transaction is in Currency and you use method (ii), you should enter the Currency Account in the Acc. field.
After entering the Transaction Date and Currency Account, go to flip D and specify the Currency. The Exchange Rate for the Transaction Date is brought in. Enter an amount in the Cur. D. (Currency Debit) or Cur. C. (Currency Credit) field as appropriate. An amount converted to your home Currency will be placed in the Base 1D. or Base 1 C. field.
- Note the different Account balances above the matrix for the Bank and Cash Accounts in the two previous illustrations. These are balance figures for the four Accounts specified in the Template Transactions - Account setting in step 1. These balance figures include the Template Transaction you are working on, even though it hasn't yet been saved. They will be updated as you add or change details in the rows. In this case, the balances reflect the change from the Bank to the Cash Account in the Acc. 2. field.
- You can use Template Transactions to pay off Sales and Purchase Invoices. First, enter the appropriate Payment Mode in the PM field using 'Paste Special'. The relevant Bank or Cash Account will be placed in the Acc. 2 field automatically, brought in from the Payment Mode. Then, change to flip C. Set the T (Type) field to "C" (if you are receiving a payment against a Sales Invoice) or "S" (if you are issuing a payment against a Purchase Invoice). Use 'Paste Special' from the Invoice field to choose an open Invoice. The outstanding (unpaid) value of the Invoice will be placed in the Credit field (in the case of Sales Invoices) or the Debit field (in the case of Purchase Invoices) on flip A. You can amend this figure if necessary.
- When you are sure the Template Transaction is complete and correct, approve it by clicking the OK check box and saving. A Nominal Ledger Transaction will be generated, and you will no longer be able to modify the Template Transaction. You can open the Nominal Ledger Transaction from the Template Transaction by selecting 'Open NL Transaction' from the Operations menu.
- The example Nominal Ledger Transaction illustrated below was generated from the Template Transaction illustrated in step 2i above (that in step 2ii would create an identical Transaction). Since Account 355 had a VAT Code, VAT has been calculated using the percentage specified in that VAT Code. Since Account 355 is an Expense Account, the VAT is posted to the VAT Input Account specified in the VAT Code. If we had used an Income Account, the VAT would be posted to the VAT Output Account. The Text in the Transaction header is copied from the Comment in the Template Transaction header.
- The Transaction Number is copied back to the Tr. no. field in each row in the Template Transaction:
- If you approve a Template Transaction and then discover it contains a mistake, duplicate it by clicking the [Duplicate] button. Then, select 'Swap Debit & Credit' from the Operations menu. All Debit values will be moved, to become Credits, and all Credit values will be moved, to become Debits. Alternatively, you can use the 'Change Sign' command, also on the Operations menu. This will change the sign (negative to positive, positive to negative) of all Debit and Credit amounts in the Template Transaction. In either case, when you approve this second Template Transaction, you will effectively cancel the Template Transaction containing the mistake.
- At any time while entering a Template Transaction, you can produce a Nominal Ledger report listing the previous postings to one of the Accounts in the Template Transaction. The previous postings listed in the report will be those made during the first period in the Reporting Periods setting in the System module. To do this, place the insertion point in the Acc. or Acc. 2 field and select 'Nominal Ledger Report' from the Operations menu. A Nominal Ledger report for the Account in that field will be opened.
Transaction Settings
This setting contains some miscellaneous options controlling the behaviour of various aspects of the Transaction screen.
- Warn On Unusual Amount
- When you define Accounts using the Account register (available in the Nominal Ledger and in the System module), you should specify whether each Account will normally be used on the credit side of a transaction, the debit side or both. In the case of Accounts that are normally used on one side only (for example, debit), you can have a warning appear if you try, in the example, to credit the Account when entering a Transaction. The warning will not prevent the posting from taking place. If you would like this warning to appear, switch this option on.
- Use Preliminary Transactions
- This option allows Nominal Ledger Transactions to remain fully editable even after you have saved them. If you are using this feature, you can restrict its scope using the Not Preliminary Transactions field in the Locking setting in the System module. If you enter a date in this field, you will only be able to modify Transactions whose Transaction Date is later than this date (i.e. they will be "Preliminary" Transactions); you will not be able to modify Transactions whose Transaction Date is on or before that date (i.e. they will be of "actual" status).
- When you print reports for a month that is not locked, the report heading will state that the report contains Preliminary Transactions.
- You must lock months chronologically. You cannot close transactions for June while May is still open. (When a month is locked for Preliminary Transactions it may still be open for "actual" Transaction entry, depending on the Lock Transactions date in the Locking setting.)
- When you print reports for a month that is not locked, the report heading will state that the report contains Preliminary Transactions.
- Check Corresponding A/C Rules
- Corresponding Account Rules can help ensure that you will enter every Transaction clearly, so that you will easily be able to see which credit posting is balancing which debit posting. The following examples illustrate compliance with these rules:
Eg Account Debit Credit 1 750 1000 110 1000 OK 2 750 1000 110 800 831 200 OK 3 750 1000 120 200 110 1000 831 200 Wrong 4 750 1000 110 1000 120 200 831 200 OK - Use this option if you want to make sure that every Transaction complies with these rules. This is mandatory in some countries. You will be given an error message if you try to save a Transaction that does not comply with the rules.
- If you are using this option and you need to enter a Transaction where the correspondence is not clear (i.e. one that you will not be able to save), you will need to establish correspondence manually using the Corr. field on flip F of the Transaction screen. Please refer to the description of flip F on this page for full details.
- Use this option if you want to make sure that every Transaction complies with these rules. This is mandatory in some countries. You will be given an error message if you try to save a Transaction that does not comply with the rules.
- Calculate Rate Differences
- Please refer to the description of flip E on this page for full details about this check box.
- Account Description in Company Language
- You can use the 'Texts' card of each Account record to enter various translations of each Account Name.
- When you use an Account in a Transaction or Simulation row, its Account Name will be copied to the Description field. This applies both when you create the Transaction yourself by entering it to the Transaction register and when you create it by approving a Sub System record. Similarly, when you use an Account in a Purchase Invoice row, its Account Name will be copied to the Description field. However, if the Purchase Invoice has a Language specified on its 'Others' card, the appropriate translation of the Account Name will be copied there.
- When you print the Balance Sheet, Nominal Ledger, Profit & Loss, Transaction Journal and Trial Balance reports, you can specify the Language that you want to be used. The appropriate translations of the Account Names will be printed in the report.
- However, it may be that you want a particular translation to be used by default (i.e. in a Transaction or Simulation row, in a Purchase Invoice row if the Language field is empty, and in the four reports if you produce them without specifying a Language. If so, specify the Language that you want to use in the Company Info in the System module, and use this option. This may be useful in a company where many Languages (and a multi-language version of HansaWorld Enterprise) are used, and you want Account Names in Nominal Ledger Transactions always to be in the same Language (one that was not used for the Account Names themselves).
- When you use an Account in a Transaction or Simulation row, its Account Name will be copied to the Description field. This applies both when you create the Transaction yourself by entering it to the Transaction register and when you create it by approving a Sub System record. Similarly, when you use an Account in a Purchase Invoice row, its Account Name will be copied to the Description field. However, if the Purchase Invoice has a Language specified on its 'Others' card, the appropriate translation of the Account Name will be copied there.
- Negative Amounts
- When you create a Sales or Purchase Credit Note, Returned Goods record or Returned Goods to Supplier record, the Nominal Ledger Transaction will usually reverse the postings of the original Invoice, Delivery or Goods Receipt. For example, in the case of the Sales Credit Note, the Debtors Account will be credited and the Sales and Output VAT Accounts will be debited. If you are using this option, negative amounts will be posted, on the same side as in the original Transaction. In the case of the example Sales Credit Note, negative amounts will be debited to the Debtors Account and credited to the Sales and Output VAT Accounts.
- Allow Trans. Date changing
- Invoices, Receipts, Point Of Sale Invoices and Personnel Payments all contain separate fields for registration date and transaction date. In some countries, these dates can be different, while in other countries they must be the same. For example, in some countries, the Invoice Date of an Invoice can be different to its Transaction Date. This can mean there will be a difference between your Sales and Nominal Ledgers, visible when comparing the Aged Debtors report with the Debtor Account. Use this option if you would like to allow different registration and transaction dates.
- Add VAT Code to VAT A/C rows
- In the Nominal Ledger Transaction that is created when you approve a Sub System record (e.g. Invoice or Purchase Invoice), the appropriate VAT Code will be copied to the V-Cd field in each Transaction row posting to a Sales or Cost Account. However, by default, the VAT Code will not be copied to the rows posting to a VAT Account. If you would like the VAT Code to be copied to these rows as well, use this option. This option also applies to the Transaction rows posting VAT from Expenses, Cash In and Cash Out records, and from Receipts or Payments if you are posting VAT from them. This can help with VAT reporting: please refer to the description of the VAT Report Definition for an example.
- Enter and Return
- When you press the Return or Enter key when the insertion point is in the Account field in a Transaction row, it will usually move to the Object field and then to the Description field. Use one or both of these options if you would like the insertion point to skip these fields (going to the Base 1 Debit field if you are using both options). You will still be able to move the cursor into those fields using the mouse or the Tab key if necessary.
- Warn on non-sequenced Transaction Number
- Use this option if you would like to be given a warning if you enter a new Transaction whose Transaction Number is not one greater than the previous Transaction Number used. You will still be able to save the Transaction (assuming the new Transaction Number has not already been used, and assuming it is in a valid Number Series).
- Object on all rows
- Paste Special
Object register, Nominal Ledger/System module
- If you would like an Object to be added to every Transaction row automatically, specify that Object here. This includes Transaction rows in Transactions created automatically when you approve Sub System records, in Transactions created by Maintenance functions, and those in Transactions that you enter to the Transaction register yourself. In the last case, this Object will be placed in the Transaction row when you enter a debit or credit amount.
VAT Code Control
This page describes the VAT Code Control setting in the Nominal Ledger.
---
The VAT Code Control setting allows you to specify that you must assign a VAT Code to every posting to a particular Account. This can be a useful tool that will help ensure that VAT Reports will balance with the Nominal Ledger.
To open the VAT Code Control setting, first ensure you are in the Nominal Ledger module. Then, if you are using Windows or macOS, click the [Settings] button in the Navigation Centre or use the Ctrl-S/⌘-S keyboard shortcuts and then double-click 'VAT Code Control' in the 'Settings' list. If you are using iOS or Android, select 'Settings' from the Tools menu (with 'wrench' icon) and tap 'VAT Code Control' in the 'Settings' list. The 'VAT Code Control: Inspect' window will open:
Use each row to connect a VAT Code to an Account, a number of Accounts or a range of Accounts. Doing so will mean that whenever you post to one of the Accounts, you must assign the specified VAT Code to the posting. The VAT Code Control check will be carried out whenever you save a Nominal Ledger Transaction, and whenever you save a Sub System transaction (a record such as an Invoice, Purchase Invoice or Goods Receipt that will cause a Nominal Ledger Transaction to be generated).
In the example illustrated above, we have specified that whenever we post to an Account between 100 and 199 (i.e. any of our Sales Accounts) or one between 200 and 299 (i.e. any of our Cost of Sales Accounts), it must be together with VAT Codes 1, 2 or 3. We will not be able to save the transaction if we have used any other VAT Code or not specified a VAT Code at all. In the first row in the illustration, we have listed our Sales Accounts individually, separated by commas. The VAT Code in this row is 1, setting up the requirement that a posting to a Sales Account must be accompanied by VAT Code 1. The VAT Code in the second row is again 1, but here we have entered our Cost of Sales Accounts as a range, with the first and last Accounts separated by a colon. You should not enter more than one range in a single row or mix a range with individual Accounts. Instead you should enter each range in a separate row with the same VAT Code (as we have done in rows 3 and 4 in the illustration). The example pictured is mainly illustrative: it would be more practical to use one large range for each VAT Code as shown in the last row.
If necessary, you can use 'Paste Special' to choose the VAT Code and the Accounts. If you need to use 'Paste Special' to enter several Accounts, type the comma or colon before opening the 'Paste Special' list. This will cause the next Account to be added to those already entered. Otherwise, the previous Account will be overwritten.
Click the [Save] button (Windows/macOS) or tap √ (iOS/Android) when you are done. Click the close box (Windows/macOS) or tap < (iOS/Android) if you wish to close the setting without saving any changes.
If you use an Account in a transaction of any kind and forget to enter a VAT Code, the following alert will be shown when you try to save the record:
If you enter a VAT Code that is not allowed by the VAT Code Control setting, the incorrect VAT Code will be included in the message:
Press [OK] to close the message, and then enter one of the required VAT Codes.
---
Settings in the Nominal Ledger:
- Account Classification Types
- Account Classifications
- Account Short Codes
- Account Transfer
- Accounting Periods
- Auto Eliminations
- Autotransactions
- Bank Transactions
- Brought Forward Balances
- Budget Classes
- Budget Keys
- Calculation Formulae
- Electronic VAT Declaration
- Fiscal Years
- Income & Expense Book
- Liquidity Report Info
- N/L Accruals
- Number Series - Simulations
- Number Series - Transactions
- Presentation of Balances
- Rate Gain/Loss
- Rate Gains/Losses
- Reconciliation Codes
- Reconciliation Settings
- Report Settings
- Sub Systems
- Sub-ledger Control Accounts
- Tag/Object Type Control
- Tag/Object Types
- Tax Reports
- Tax Templates
- Template Transactions, Template Transactions - Accounts
- Transaction Settings
- VAT Code Control
- VAT Code on Transaction rows
- VAT Codes
- VAT Declarations
- XBRL Reporting Elements, XBRL Reporting Settings
- Home page for Nominal Ledger manual
- Home page for Standard ERP manual
VAT Code on Transaction Rows
The VAT Code on Transaction rows setting is one that you will only need to use if you are using Tax Templates.
In the Nominal Ledger Transaction that is created when you mark an Invoice or Purchase Invoice as OK and save, the appropriate VAT Code will be copied to the V-Cd or T-Cd field in each Transaction row posting to a Sales or Cost Account. If you are using Tax Templates, there will usually be more than one VAT Code that can be copied in this way as a Tax Template can contain several VAT Codes.
The VAT Code on Transaction rows setting allows you to specify which VAT Codes will be copied to the Transaction rows posting to Sales and Cost Accounts. For ease and flexibility in reporting, it is recommended that you choose the All VAT Codes option as shown in the illustration below. In particular, when defining a Key Financial Ratios or VAT report, the All VAT Codes option will allow you to use the VATRESULT and VATBALANCE commands with any VAT Code.
In the Invoice illustrated below, the Tax Matrix shows that the sale of an Item will be taxed using two taxes (i.e. two VAT Codes)—
In the resulting Nominal Ledger Transaction, the VAT Code that will be copied to the T-Cd field in the Transaction row posting to the Sales Account will depend on the option chosen in this setting as follows—
- First VAT Code
- The first VAT Code in the Tax Matrix will be copied to the T-Cd field in the Transaction row posting to the Sales Account.

- All VAT Codes
- Every VAT Code in the Tax Matrix will be copied to the T-Cd field in the Transaction row posting to the Sales Account.

- No VAT Code
- No VAT Codes will be copied to the T-Cd field in the Transaction row posting to the Sales Account.
Settings in the Nominal Ledger:
- Account Short Codes
- Account Transfer
- Accounting Periods
- Auto Eliminations
- Autotransactions
- Bank Transactions
- Brought Forward Balances
- Budget Classes
- Budget Keys
- Calculation Formulae
- Electronic VAT Declaration
- Fiscal Years
- Income & Expense Book
- Liquidity Report Info
- N/L Accruals
- Number Series - Simulations
- Number Series - Transactions
- Object Type Control
- Object Types
- Presentation of Balances
- Rate Gain/Loss
- Rate Gains/Losses
- Reconciliation Descriptions
- Reconciliation Settings
- Report Settings
- Sub-ledger Control Accounts
- Sub Systems
- Tax Reports
- Tax Templates
- Template Transactions, Template Transactions - Accounts
- Transaction Settings
- VAT Code Control
- VAT Code on Transaction rows
- VAT Codes
- VAT Declarations
- XBRL Reporting Elements, XBRL Reporting Settings
- Home page for Nominal Ledger manual
- Home page for Standard ERP manual
VAT Codes
In order to comply with VAT regulations in various countries, you may need to charge or pay VAT at different rates, depending on the Item in question. You also need to differentiate between domestic, EU and external trade. To address these issues, you should use the VAT Codes setting to define as many VAT Codes as you need, with different accounting specifications.
After defining your VAT Codes, you can then assign them to Customers, Suppliers, Items and also to individual Sales and Purchase Accounts. The VAT Codes ensure HansaWorld Enterprise will use the correct VAT percentages, post VAT to the correct Nominal Ledger Accounts and provide VAT statistics. The standard VAT Codes used in the UK are supplied with the program.
To edit the VAT Codes, double-click 'VAT Codes' in the 'Settings' list. The following window appears:
To edit a VAT Code, simply click in the field to be changed and overtype the existing entry. To add a new VAT Code record, scroll down to the first blank line.
VAT Codes - Flip A
- Code
- Each VAT Code record should be identified by a unique Code.
- Excl %
- Specify the percentage to be applied to a figure that excludes VAT in order to calculate the VAT amount.
- You must specify an Input or Output Account if the percentage is zero, as shown in the illustration above.
- You must specify an Input or Output Account if the percentage is zero, as shown in the illustration above.
- Incl %
- Specify the percentage to be applied to a figure that includes VAT in order to calculate the VAT amount.
- Outp A/C
- Paste Special
Account register, Nominal Ledger/System module
- Specify here the VAT Outputs Account to be credited whenever you use this VAT Code in a sales transaction.
- In any Nominal Ledger Transaction resulting from Purchase Invoices from the EU Zone, VAT is debited to the Input Account of the selected VAT Code and credited to the Output Account. Therefore, it is recommended that you use a dedicated VAT Code for VAT on EU Acquisitions, with an Output Account that is not used in any other VAT Code.
- In any Nominal Ledger Transaction resulting from Purchase Invoices from the EU Zone, VAT is debited to the Input Account of the selected VAT Code and credited to the Output Account. Therefore, it is recommended that you use a dedicated VAT Code for VAT on EU Acquisitions, with an Output Account that is not used in any other VAT Code.
- O/P A/C
- Paste Special
Account register, Nominal Ledger/System module
- You only need use this field if you are using the Post Receipt VAT and/or Post Prepayment VAT options on the 'VAT & Tax' card of the Account Usage S/L setting. Users of the Cash VAT scheme in the UK will need to use both options, users resident in the Baltic States may only need to use the Post Prepayment VAT option, and users in Poland may only need to use the Post Receipt VAT option.
- If you are using the Post Receipt VAT option, your output VAT liability is calculated from your Receipts, not from your Invoices. In this case, the Outp A/C will be treated as a preliminary VAT Output Account, to be credited whenever you approve an Invoice. When the Invoice is paid, the Transaction from the Receipt will include an extra VAT element, in which the VAT is moved from the Outp A/C to the O/P A/C. This therefore becomes the final VAT Output Account. The Post Receipt VAT option also posts VAT from On Account Receipts (Receipts with no Invoice Number or Prepayment Number).
- If you are using the Post Prepayment VAT option, VAT will also be posted from Prepayment Receipts (Receipts with no Invoice Number but with a Prepayment Number). VAT will be credited to the O/P A/C and debited to the Prepayment VAT Account specified in the Account Usage S/L setting.
- In all cases, if a particular VAT Code does not have an O/P Account, the VAT (C/A) Account from the 'VAT & Tax' card of the Account Usage S/L setting will be used instead.
- If you are using this feature, don't forget to alter the definition of the VAT Report so that it uses this Account and not the Outp Account.
- If you are using the Post Receipt VAT option, your output VAT liability is calculated from your Receipts, not from your Invoices. In this case, the Outp A/C will be treated as a preliminary VAT Output Account, to be credited whenever you approve an Invoice. When the Invoice is paid, the Transaction from the Receipt will include an extra VAT element, in which the VAT is moved from the Outp A/C to the O/P A/C. This therefore becomes the final VAT Output Account. The Post Receipt VAT option also posts VAT from On Account Receipts (Receipts with no Invoice Number or Prepayment Number).
- Inp A/C
- Paste Special
Account register, Nominal Ledger/System module
- Specify here the VAT Inputs Account to be debited whenever you use this VAT Code in a purchase transaction.
- I/P A/C
- Paste Special
Account register, Nominal Ledger/System module
- You only need use this field if you are using the Post Payment VAT and/or Post Prepayment VAT options on the 'VAT' card of the Account Usage P/L setting. This will be the case for users in Latvia and for users of the Cash VAT scheme in the UK. Users in Poland may only need to use the Post Payment VAT option.
- If you are using the Post Payment VAT option, the value of the input VAT that you can reclaim is calculated from your Payments, not from your Purchase Invoices. In this case, the Inp A/C will be treated as a preliminary VAT Input Account, to be debited whenever you approve a Purchase Invoice. When you pay the Purchase Invoice, the Transaction from the Payment will include an extra VAT element, in which the VAT is moved from the Inp A/C to the I/P A/C. This therefore becomes the final VAT Input Account. The Post Payment VAT option also posts VAT from On Account Payments (Payments with no Invoice Number or Prepayment Number).
- If you are using the Post Prepayment VAT option, VAT will also be posted from Prepayment Payments (Payments with no Invoice Number but with a Prepayment Number). VAT will be debited to the I/P A/C and credited to the On Account VAT Account specified in the Account Usage P/L setting.
- In all cases, if a particular VAT Code does not have an I/P Account, the Prepayment VAT Account from the 'VAT' card of the Account Usage P/L setting will be used instead.
- If you are using this feature, don't forget to alter the definition of the VAT Report so that it uses this Account and not the Inp Account.
- If you are using the Post Payment VAT option, the value of the input VAT that you can reclaim is calculated from your Payments, not from your Purchase Invoices. In this case, the Inp A/C will be treated as a preliminary VAT Input Account, to be debited whenever you approve a Purchase Invoice. When you pay the Purchase Invoice, the Transaction from the Payment will include an extra VAT element, in which the VAT is moved from the Inp A/C to the I/P A/C. This therefore becomes the final VAT Input Account. The Post Payment VAT option also posts VAT from On Account Payments (Payments with no Invoice Number or Prepayment Number).
- Description
- The description entered here will appear in the 'Paste Special' list, so should be detailed enough to ensure the correct VAT Code is always chosen.
VAT Codes - Flip B
- Tax %, Tax A/C, Tax Min.
- These three fields will be useful in situations where you need to apply a second tax such as an environmental tax to Sales and Purchase Invoices, and where this tax is calculated as a percentage of the Invoice value. This additional tax is usually termed "Extra Tax". If you need to charge an additional tax on the sales side only that is based on the weight of the Items sold, use the Environment Tax setting in the Sales Ledger. setting in the Sales Ledger.
- To add an Extra Tax to a VAT Code, enter the taxable percentage in the Tax % field and the Account to be credited by the tax amount in the Tax A/C field, using 'Paste Special' if necessary. If there is a minimum tax amount, enter this figure in the Tax Min. field.
- The tax will be applied when you use an Item with a VAT Code with the Extra Tax provision in a Quotation, Sales or Purchase Order, Goods Receipt or Sales or Purchase Invoice. The Zone must be Domestic, Inside EU (Post VAT) or Outside EU (Post VAT). The tax amount will be shown in the Ext. Tax field in the footer area of the transaction. It will also be shown in the Tax Sum field on the Del' card of the Quotation.
- The calculation of the Extra Tax in both the Sales and Purchase Ledgers is controlled using the TAX options on the 'VAT & Tax' card of the Account Usage S/L setting in the Sales Ledger, as follows:
- Calculate TAX on Sum incl. VAT
- The tax amount will be calculated from the transaction total including VAT.
Item Price 1000.00 VAT (17.5%) 175.00 Subtotal 1175.00 TAX (10% of Subtotal) 117.50 Total 1292.50 - Calculate TAX on Sum excl. VAT
- The tax amount will be calculated from the transaction total excluding VAT
Item Price 1000.00 VAT (17.5%) 175.00 Subtotal 1175.00 TAX (10% of Item Price) 100.00 Total 1275.00 - Calculate TAX on Sum excl. VAT and calculate VAT on TAX
- The tax amount will be calculated from the transaction total excluding VAT, and VAT will be charged on the extra tax amount.
Item Price 1000.00 VAT (17.5%) 175.00 Subtotal 1175.00 TAX (10% of Item Price) 100.00 VAT on TAX 17.50 Total 1292.50 A single VAT figure of 192.50 will be shown on the Invoice and in the Nominal Ledger Transaction.
- If you have specified a Tax Min. figure, no Extra Tax will be levied if the calculated Extra Tax is less than the minimum. For example, the Tax % is 10% and the minimum is 100.00. If you buy or sell an Item for 100.00, the Extra Tax will be 10.00 (if you are calculating it using the Calculate TAX on Sum excl. VAT option). This is less than the minimum, so the Extra Tax in the Invoice will be blank and no Extra Tax will be charged. You will need to buy or sell Items with the same VAT Code to the value of at least 1000.00 in the Invoice to incur the Extra Tax. Note that the Tax Min. is in Currency, so you will incur the Extra Tax in Invoices whose value is USD 1000.00 or more, and those whose value is GBP 1000.00 or more.
- On the sales side only, if you have a Customer that is not to be charged Extra Tax, check the No Extra Tax box on the 'Terms' card of the Contact record for the Customer. If you want to charge Extra Tax to a Customer but at a discounted rate, use the Extra Tax Customer Discounts setting in the Sales Ledger. On the purchase side, Extra Tax will always be calculated at the full rate for the VAT Code, subject to the minimum.
- To add an Extra Tax to a VAT Code, enter the taxable percentage in the Tax % field and the Account to be credited by the tax amount in the Tax A/C field, using 'Paste Special' if necessary. If there is a minimum tax amount, enter this figure in the Tax Min. field.
- Real Sales
- Paste Special
Choices of possible entries
- You should use the options attached to this field for specific reporting requirements as follows:
- -
- Choose this option when the VAT Code is to have no special properties.
- Exclude from Official Reports
- Choose this option if rows with this VAT Code in Invoices and Purchase Invoices are to be excluded from the VAT Customer Sales and VAT Supplier Purchases reports respectively. These reports are designed for use in Portugal. You should only use this option for zero-rated VAT Codes.
- No VAT
- This option is used by the Sales Book and Purchase Book reports, designed for use in Russia. Please refer to your local HansaWorld representative for more information.
- -
VAT Codes - Flip C
- Outp A/C Corr., Inp A/C Corr.
- Paste Special
Account register, Nominal Ledger/System module
- These fields must contain values if you will be using the VAT Correction feature in the Sales and Purchase Ledgers.
VAT Codes - Flip D
This page describes Flip D of the VAT Codes setting. Please follow the links below for descriptions of the other parts of the setting:
---
- Credit Outp A/C, Credit Inp A/C
- Paste Special
Account register, Nominal Ledger/System module
- By default, VAT from Invoices and Credit Notes will be posted to the Output VAT Account (on the sales side) and the Input VAT Account (on the purchase side) specified on flip A. If you would like VAT to be posted to different Accounts from Credit Notes, specify those Accounts here.
Settings in the Nominal Ledger:
- Account Short Codes
- Account Transfer
- Accounting Periods
- Auto Eliminations
- Autotransactions
- Bank Transactions
- Brought Forward Balances
- Budget Classes
- Budget Keys
- Calculation Formulae
- Electronic VAT Declaration
- Fiscal Years
- Income & Expense Book
- Liquidity Report Info
- N/L Accruals
- Number Series - Simulations
- Number Series - Transactions
- Object Type Control
- Object Types
- Presentation of Balances
- Rate Gain/Loss
- Rate Gains/Losses
- Reconciliation Descriptions
- Reconciliation Settings
- Report Settings
- Sub-ledger Control Accounts
- Sub Systems
- Tax Reports
- Tax Templates
- Template Transactions, Template Transactions - Accounts
- Transaction Settings
- VAT Code Control
- VAT Code on Transaction rows
- VAT Codes, including:
- VAT Declarations
- XBRL Reporting Elements, XBRL Reporting Settings
- Home page for Nominal Ledger manual
- Home page for Standard ERP manual
VAT Codes - Flip E
This page describes Flip E of the VAT Codes setting. Please follow the links below for descriptions of the other parts of the setting:
---

- Tax Variance A/C
- Paste Special
Account register, Nominal Ledger/System module
- Please refer to the description of the Include in Total field below for details about this Account.
- Hotel WIP A/C
- Paste Special
Account register, Nominal Ledger/System module
- In the Hotel module, the 'Nightly Maintenance' Maintenance function has a Work in Progress Transaction option. This option will create a Nominal Ledger Transaction recording uninvoiced room occupation and extras, together with a second Transaction dated a day later that reverses the first Transaction. The VAT element in these Transactions will be posted to the Hotel WIP A/C specified for the relevant VAT Code. If a VAT Code does not have a Hotel WIP A/C, the VAT element will be posted to the Output A/C specified on flip A.
- Valid Until
- Paste Special
Choose date
- If a VAT Code is no longer used, enter here the last date when it was valid. In most countries, this is for information only, but in Portugal you must specify a date to satisfy a SAF-T reporting requirement.
- Include in Total
- Paste Special
Choices of possible entries
- This field will only be used if you are calculating tax using Tax Templates (i.e. if you are using the Use Tax Templates for Tax Calculation option in the Transaction Settings setting). If you are not using Tax Templates, each VAT Code will always behave as if this field has been set to "Tax included in Total".
- If you are using Tax Templates, you can use this field to specify whether VAT or other tax amounts calculated using the VAT Code will be included in the VAT and TOTAL fields in the footer of Sales and Purchase Invoices. The two options are:
- Tax included in Total
- Select this option if VAT or other tax amounts are to be included in the TOTAL field. You will use this option in the majority of VAT Codes.
- Tax not included in Total
- Select this option if VAT or other tax amounts are not to be included in the TOTAL field.
- This option will be useful in cases where VAT or other tax is not shown on an Invoice that you send or receive but where some VAT or tax accounting is required.
- An example situation where this option will be useful is an out-of-state purchase of a taxable Item in the US (i.e. the purchase of a taxable Item that you will use in the business and not resell). Depending on the state where the Supplier is located, the Supplier may send you an Invoice in which they do not charge you sales tax. If so, you will need to pay the Supplier the value of the Invoice, and you will also need to pay tax (use tax) to your own state.
- When entering such an Invoice as a Purchase Invoice, enter the amount to be paid to the Supplier in the TOTAL field in the header and in the Amount field in the row(s). In each row, choose a Tax Template that contains VAT Codes in which you have selected this Tax not included in Total option.
- In the Nominal Ledger Transaction that will be created from the Purchase Invoice, the use tax will be debited to the Input Accounts specified in each VAT Code and credited to the Tax Variance A/C specified in the field to the left. The postings to the Creditor Account and the Cost Account(s) will not include tax.
- You must specify a Tax Variance A/C in a VAT Code if you choose the Tax not included in Total option.
- This option will be useful in cases where VAT or other tax is not shown on an Invoice that you send or receive but where some VAT or tax accounting is required.
- If you are using Tax Templates, you can use this field to specify whether VAT or other tax amounts calculated using the VAT Code will be included in the VAT and TOTAL fields in the footer of Sales and Purchase Invoices. The two options are:
Settings in the Nominal Ledger:
- Account Short Codes
- Account Transfer
- Accounting Periods
- Auto Eliminations
- Autotransactions
- Bank Transactions
- Brought Forward Balances
- Budget Classes
- Budget Keys
- Calculation Formulae
- Electronic VAT Declaration
- Fiscal Years
- Income & Expense Book
- Liquidity Report Info
- N/L Accruals
- Number Series - Simulations
- Number Series - Transactions
- Object Type Control
- Object Types
- Presentation of Balances
- Rate Gain/Loss
- Rate Gains/Losses
- Reconciliation Descriptions
- Reconciliation Settings
- Report Settings
- Sub-ledger Control Accounts
- Sub Systems
- Tax Reports
- Tax Templates
- Template Transactions, Template Transactions - Accounts
- Transaction Settings
- VAT Code Control
- VAT Code on Transaction rows
- VAT Codes, including:
- VAT Declarations
- XBRL Reporting Elements, XBRL Reporting Settings
- Home page for Nominal Ledger manual
- Home page for Standard ERP manual
VAT Codes - Flip F
This page describes Flip F of the VAT Codes setting. Please follow the links below for descriptions of the other parts of the setting:
---
- Min. Amount, Max. Amount
- Tax Calculation Rule
- Paste Special
Choices of possible entries
- Tax Calculation Rule
- These fields allow you to specify that VAT will be calculated on a proportion of a sales or purchase value. Choose an option in the Tax Calculation Rule field using 'Paste Special' as follows:
- Full Amount
- VAT will be calculated on the full sales or purchase value.
- Amount in Range
- VAT will be calculated on the part of the sales or purchase value that is between the Min. Amount and Max. Amount that you specify in the fields to the left.
- For example, if the Min. Amount is 100.00, the Max. Amount is 500.00 and the Excl. % is 5%, then VAT on 300.00 will be (300-100)*5% = 10.00.
- You do not need to specify both a Min. Amount and a Max. Amount. If you only specify a Min. Amount, VAT will only be calculated on values greater than or equal to that amount. If you only specify a Max. Amount, VAT will only be calculated on values lower than that amount.
- For example, if the Min. Amount is 100.00, the Max. Amount is 500.00 and the Excl. % is 5%, then VAT on 300.00 will be (300-100)*5% = 10.00.
- Skip Calculation
- VAT will not be calculated.
- Full Amount
Settings in the Nominal Ledger:
- Account Short Codes
- Account Transfer
- Accounting Periods
- Auto Eliminations
- Autotransactions
- Bank Transactions
- Brought Forward Balances
- Budget Classes
- Budget Keys
- Calculation Formulae
- Electronic VAT Declaration
- Fiscal Years
- Income & Expense Book
- Liquidity Report Info
- N/L Accruals
- Number Series - Simulations
- Number Series - Transactions
- Object Type Control
- Object Types
- Presentation of Balances
- Rate Gain/Loss
- Rate Gains/Losses
- Reconciliation Descriptions
- Reconciliation Settings
- Report Settings
- Sub-ledger Control Accounts
- Sub Systems
- Tax Reports
- Tax Templates
- Template Transactions, Template Transactions - Accounts
- Transaction Settings
- VAT Code Control
- VAT Code on Transaction rows
- VAT Codes, including:
- VAT Declarations
- XBRL Reporting Elements, XBRL Reporting Settings
- Home page for Nominal Ledger manual
- Home page for Standard ERP manual
VAT Declarations
This page describes the VAT Declarations setting in the Nominal Ledger.
---
The VAT Declarations setting is used in the following countries:
- Croatia
- Use the Tax Reports setting to create a VAT declaration in the correct format. You should also ensure the XML Schema Definitions setting in the System module contains a suitable XML Scheme for the VAT declaration. To submit a VAT declaration, add a new record to the VAT Declarations setting in which the Report Type is "Tax Report", specify the Code of the record in the Tax Report setting in the Report Code field and enter the period. Then select 'Calculate' from the Operations menu (Windows/macOS) or Tools menu (iOS/Android). Mark the record as OK, save and then select 'Export' from the Operations or Tools menu. Specify the XML Scheme in the subsequent specification window.
- Please refer to your local HansaWorld representatives for details using the Tax Reports and XML Schema Definitions settings.
- Please refer to your local HansaWorld representatives for details using the Tax Reports and XML Schema Definitions settings.
- Finland
- Use the XBRL Reporting settings to create a VAT declaration in the correct format. Add separate records to the XBRL Reporting Elements setting for each element in the VAT declaration, and then use the XBRL Reporting Settings setting to connect these Elements to the definition of the VAT Report. You should only create a single record in the XBRL Reporting Settings setting, and the User Def. Report field in each row should contain "VAT2Rn". To submit a VAT declaration, you can either produce a VAT Report and use the [Submit VAT declaration electronically] text link in the report or you can add a new record to the VAT Declarations setting, enter the period and then select 'Calculate' from the Operations menu (Windows/macOS) or Tools menu (iOS/Android). In both cases, the result will be a VAT Declarations record formatted using the record in the XBRL Reporting Settings setting. Mark the record as OK, save and then select 'Export' from the Operations or Tools menu.
- Germany
- Use the XBRL Reporting settings to create a VAT declaration in the correct format. Add separate records to the XBRL Reporting Elements setting for each element in the VAT declaration, and then use the XBRL Reporting Settings setting to connect these Elements to the definition of the VAT Report. You should only create a single record in the XBRL Reporting Settings setting, and the User Def. Report field in each row should contain "VAT2Rn". To submit a VAT declaration, produce a VAT Report for a single calendar month and use the [Submit VAT declaration electronically] text link in the report. This will copy information from the report to a new record in the VAT Declarations setting. Select 'Send VAT Report' from the Operations menu (Windows/macOS) or Tools menu (iOS/Android) to submit the VAT Report. The VAT Declaration will be marked as OK automatically as confirmation that it has been sent successfully.
- Please refer to your local HansaWorld representatives for details about configuring Standard ERP to send VAT declarations electronically.
- Please refer to your local HansaWorld representatives for details about configuring Standard ERP to send VAT declarations electronically.
- Norway
- To submit a VAT declaration in Norway, produce a VAT or Skattemelding Report and use the [Submit VAT declaration electronically] text link in the report. This will copy information from the report to a new record in the VAT Declarations setting. Select 'Send VAT Report' from the Operations menu (Windows/macOS) or Tools menu (iOS/Android) to submit the VAT Report. Then, select 'Check Status' from the same menu to check whether the declaration was sent successfully. A Note will be attached to the record containing a status report. If declaration was sent successfully, the 'Check Status' function will mark the record as OK.
- You can prevent certain users from using the [Submit VAT declaration electronically] text link in the VAT and or Skattemelding Reports using Access Groups, by denying them access to the 'Sending Electronic VAT Declaration' Action.
- Please refer to your local HansaWorld representatives for details about configuring Standard ERP to send VAT declarations electronically.
- You can prevent certain users from using the [Submit VAT declaration electronically] text link in the VAT and or Skattemelding Reports using Access Groups, by denying them access to the 'Sending Electronic VAT Declaration' Action.
- Poland
- To submit a VAT declaration in the UK, produce a VAT Report and use the [Create VAT Declaration]) text link in the report. This will copy information from the report to a new record in the VAT Declarations setting. After marking the record as OK and saving, the information in the record will be included in the export file created by the 'Unified Export' function in the Nominal Ledger if you run it using the VAT and Declaration options or the VAT, Correction and Specification and Declaration or Only Declaration options.
- Please refer to your local HansaWorld representatives for details about defining the VAT Report to use the format required by the 'Unified Export' function.
- Please refer to your local HansaWorld representatives for details about defining the VAT Report to use the format required by the 'Unified Export' function.
- UK
- To submit a VAT declaration in the UK, produce a VAT Report and use the [Submit VAT declaration electronically] text link in the report. This will copy information from the report to a new record in the VAT Declarations setting. After marking the record as OK and saving, select 'Submit VAT Report' from the Operations menu (Windows/macOS) or Tools menu (iOS/Android) to submit the VAT Report. Please refer here for an introduction to Making Tax Digital and Standard ERP and for a link to a full manual.
---
Settings in the Nominal Ledger:
- Account Classification Types
- Account Classifications
- Account Short Codes
- Account Transfer
- Accounting Periods
- Auto Eliminations
- Autotransactions
- Bank Transactions
- Brought Forward Balances
- Budget Classes
- Budget Keys
- Calculation Formulae
- Electronic VAT Declaration
- Fiscal Years
- Income & Expense Book
- N/L Accruals
- Number Series - Simulations
- Number Series - Transactions
- Presentation of Balances
- Rate Gain/Loss
- Rate Gains/Losses
- Reconciliation Codes
- Reconciliation Settings
- Report Settings
- Sub Systems
- Sub-ledger Control Accounts
- Tag/Object Type Control
- Tag/Object Types
- Tax Reports
- Tax Templates
- Template Transactions, Template Transactions - Accounts
- Transaction Settings
- VAT Code Control
- VAT Code on Transaction rows
- VAT Codes
- VAT Declarations
- XBRL Reporting Elements, XBRL Reporting Settings
- Home page for Nominal Ledger manual
- Home page for Standard ERP manual
XBRL Reporting Elements, XBRL Reporting Settings
This page describes the two XBRL Reporting settings in the Nominal Ledger.
---
In some countries, companies need to present their official reports to the authorities in XBRL format. These reports must use an official taxonomy or structure. These two settings (XBRL Reporting Elements and XBRL Reporting Settings) allow you to map the report definitions in Standard ERP to the official taxonomy.
After configuring these settings, you can produce official reports using the following options:
- In Estonia, use the 'XBRL Report' export function. This will create reports from every record in the XBRL Reporting Settings setting and export those reports to a single file.
- In Finland and Germany you will usually only need to produce VAT declarations in XBRL format. Work from the VAT Declarations setting or the VAT Report to produce VAT declarations.
Follow these steps:
- Use the XBRL Reporting Elements setting to list the XML codes (taxonomy elements) that are used in the official taxonomy. Add separate records to the setting for each taxonomy element:
- Code
- Enter a unique code for each Element. You can use up to ten alphanumeric characters, and you can change the Code after saving.
- XML Element
- The XBRL taxonomy codes (tags) of each Element.
- Field Name
- If the official authority offers a web interface through which reports can be submitted, enter here the field names for each Element in that interface.
- Field Type
- Paste Special
Choices of possible entries
- Specify the type of each Element as follows:
- Monetary
- The Element should contain a calculated value or a value that is used in a report. In Estonia, every Element should be Monetary.
- Text
- The Element should contain a hard-coded text string.
- Text Formula
- The Element should contain a non-numeric value that is stored in the database or specified in a VAT Declaration record.
- Monetary
- Report Type
- Paste Special
Choices of possible entries
- The Report Type will determine the value that will be used as the contextRef attribute in the Element when it is included in an export file created by the 'XBRL Report' export function (used in Estonia, step 5 below). The options in the 'Paste Special' list are:
'Paste Special' option contextRef attribute Balance Sheet I_BAL Profit & Loss 1 D_PL1 Profit & Loss 2 D_PL2 Cash Flow 1 D_CF1 Cash Flow 2 D_CF2 VAT Report D_VAT
In all cases, the Code of the current Fiscal Year will be added to the contextRef as a suffix (e.g. I_BAL_2020).
- Code
- Use the XBRL Reporting Settings setting to map the fields listed in the XBRL Reporting Elements setting in step 1 to rows in user-defined reports (i.e. in the Balance Sheet, Profit & Loss and VAT reports). In Estonia, you should add a separate record to this setting for each user-defined report. The 'XBRL Report' export function (step 5 below) will create reports from every record in this setting and export those reports to a single file. In other countries (e.g. Finland and Germany), you should at least add a record to this setting for the VAT Report.
- Report Type
- Paste Special
Choices of possible entries
- Specify the type of report that the record represents.
Use the matrix to list the elements in the report:
- Element
- Paste Special
XBRL Reporting Elements setting, Nominal Ledger
- Choose an XBRL Reporting Element from step 1.
- Field Name
- The Field Name of the XBRL Reporting Element will be brought in automatically.
- Field Type
- The Field Type of the XBRL Reporting Element will be brought in automatically.
- Formula
- If the Field Type is "Text Formula", the value of the report element will be calculated by a formula that you should enter in this field. The formula should be one of the following:
- CYVatNo
- Returns the VAT Reg. No. from the Company Info setting (in Finland only, returns the Reg. No. from the Company Info setting).
- ReportingPeriod
- Returns the period specified in the VAT Declaration record.
- ReportingPeriodType
- Returns "M", "Q" or "Y" depending on the duration of the period specified in the VAT Declaration record.
- ReportingPeriodTypeCode
- If the duration of the period specified in the VAT Declaration record is one month, returns the month number of the month in the period start date (e.g. returns "4" if the period begins in April).
- If the duration of the period specified in the VAT Declaration record is one quarter, returns the quarter number of the month in the period start date (e.g. returns "2" if the period begins in April, May or June).
- If the duration of the period specified in the VAT Declaration record is one year, returns blank.
- If the duration of the period specified in the VAT Declaration record is one quarter, returns the quarter number of the month in the period start date (e.g. returns "2" if the period begins in April, May or June).
- ReportingPeriodYear
- Returns the year from the start date in the period specified in the VAT Declaration record.
- CYVatNo
- User Defined Report, Report Row
- Paste Special
Choices of possible entries
- If the Field Type is "Monetary", the value of the report element will be taken from a row in the definition of a user-definable report (i.e. a Balance Sheet, Profit & Loss Report, Key Financial Ratios report or VAT Report).
- First, use the User Defined Report field to choose the report definition that the value should be taken from. Choose one of the following options from the 'Paste Special' list:
- BalRn
- Balance Sheet
- KeyRn
- Key Financial Ratios report
- ResRn
- Profit & Loss Report
- VAT2Rn
- VAT Report. You must choose "VAT2Rn" in a report that you will produce from a VAT Declaration record.
- other report name
- Any additional report definition that you may have added using the Report Settings setting (i.e. any additional Balance Sheet or Key Financial Ratios report definition).
After specifying the report definition, use the Report Row field to specify the Id (Balance Sheet or Profit & Loss) or Code (Key Financial Ratios or VAT Report) of the row in the report definition.
- First, use the User Defined Report field to choose the report definition that the value should be taken from. Choose one of the following options from the 'Paste Special' list:
- Reverse
- Paste Special
Choices of possible entries
- If the Field Type is "Monetary", use this field if you need to reverse the sign of the value of the report element (e.g. change a negative figure to positive). For example, in Estonia you should use this field to ensure that all Cost Accounts have negative balances.
- If the Report Type is Balance Sheet or Profit & Loss, the sign of the value of the report element will be subject to the specifications you have set in column 1 in the Presentation of Balances setting. If you use this field to reverse the sign, you will reverse the sign determined by the Presentation of Balances setting.
- If the Report Type is Balance Sheet or Profit & Loss, the sign of the value of the report element will be subject to the specifications you have set in column 1 in the Presentation of Balances setting. If you use this field to reverse the sign, you will reverse the sign determined by the Presentation of Balances setting.
- Comment
- When you specify the User Defined Report and Report Row above, the Text or Comment from the specified report definition row will be brought in automatically. If the Field Type is "Text", this comment will become the value of the report element.
- Report Type
- In Finland and Germany, work from the VAT Declarations setting or the VAT Report to produce VAT declarations in XBRL format.
- In Estonia, produce an XBRL Report to check what will be included in the export file created by the 'XBRL Report' Export function. The report will contain separate sections for each record in the XBRL Reporting Settings setting.
- Period
- Paste Special
Reporting Periods setting, System module
- Specify the period to be covered by the report. This should be a fiscal year.
- Include previous Fiscal Year
- Select this option if you need figures from the previous financial year to be included to the report.
- As previously mentioned, the standard report will contain separate sections for each record in the XBRL Reporting Settings setting. If you select this option, these sections will be duplicated with the first one showing figures for the previous financial year and the second one showing figures for the specified financial year.
- As previously mentioned, the standard report will contain separate sections for each record in the XBRL Reporting Settings setting. If you select this option, these sections will be duplicated with the first one showing figures for the previous financial year and the second one showing figures for the specified financial year.
- Values in
- If you are using the Dual-Base system, use these options to specify whether you would like the values in the report to be expressed in Base Currency 1 or Base Currency 2.
- If you are not using the Dual-Base system, use the Base Currency 1 option to produce a report in your home Currency.
- If you are not using the Dual-Base system, use the Base Currency 1 option to produce a report in your home Currency.
- Period
- In Estonia, produce an official report by running the 'XBRL Report' export function. This will create reports from every record in the XBRL Reporting Settings setting and export those reports to a single file.
Fill in the specification window as described for the XBRL Report in step 5. Then click the [Run] button to start the export process. A dialogue box will open where you can name the export file and specify where it is to be saved. Enter a name for the file and click [Save] or press the Enter key. The export file will be created and saved. When the export finishes, you can close the 'Export' window using the close box.
Settings in the Nominal Ledger:
- Account Classification Types
- Account Classifications
- Account Short Codes
- Account Transfer
- Accounting Periods
- Auto Eliminations
- Autotransactions
- Bank Transactions
- Brought Forward Balances
- Budget Classes
- Budget Keys
- Calculation Formulae
- Electronic VAT Declaration
- Fiscal Years
- Income & Expense Book
- N/L Accruals
- Number Series - Simulations
- Number Series - Transactions
- Presentation of Balances
- Rate Gain/Loss
- Rate Gains/Losses
- Reconciliation Codes
- Reconciliation Settings
- Report Settings
- Sub Systems
- Sub-ledger Control Accounts
- Tag/Object Type Control
- Tag/Object Types
- Tax Reports
- Tax Templates
- Template Transactions, Template Transactions - Accounts
- Transaction Settings
- VAT Code Control
- VAT Code on Transaction rows
- VAT Codes
- VAT Declarations
- XBRL Reporting Elements, XBRL Reporting Settings
- Home page for Nominal Ledger manual
- Home page for Standard ERP manual
- Creating an Autotransaction record;