Printing a Balance Sheet
Click the [Reports] button in the Master Control panel and then double-click 'Balance Sheet' in the 'Reports' list. The 'Specify Balance Sheet' window is opened.
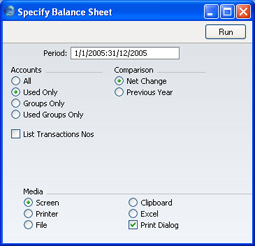
- Period
- Paste Special
Reporting Periods setting
- Enter the period for the Balance Sheet you want to print. FirstOffice will suggest the first period in the Reporting Periods setting as a default.
- Accounts
- Select how you want the Accounts printed in the report.
- All
- This option will show all Accounts that have been included in the Balance Sheet definitions.
- Used Only
- This option will only show Accounts that have been used. This includes Accounts that have balances brought forward from a previous period but that have not been used in the report period.
- Groups Only
- This option does not show balances for individual Accounts. Instead, it simply shows an overall balance for each row as entered in the Balance Sheet definitions.
- Used Groups Only
- This option only shows balances for rows as entered in the Balance Sheet definitions that have been used.
- Comparison
- Choose to compare with Net Change or the Previous Year.
- List Transaction Nos
- With this box checked, the Transaction Numbers of all Transactions that fall within the reporting period, together with debit and credit totals, will be listed at the bottom of the report.
When you click [Run], the Balance Sheet is printed as you have specified it.
When printed to screen, the Balance Sheet has FirstOffice's Drill-down feature. Click on the Account Number of any Account in the report to open the Nominal Ledger Report for the same Account and period. From the Nominal Ledger report, you can click on any Transaction Number to open an individual Transaction record.