Browse Window
Browse windows are used to display lists of records. On opening a register (i.e. on clicking (Windows/macOS) or tapping (iOS/Android) the [Registers] button in the Navigation Centre and then double-clicking or tapping a register in the list), you will see a browse window listing every record stored in that register. In a browse window, you can search for a certain record and select a specific record for processing. If you are using Windows or macOS, you can have several different browse windows open at any time.
For example, if you open the Contact register, the window that opens is a browse window, entitled 'Contacts: Browse'. This window lists all the Contacts in the register.
You can scroll through the list using the scroll bar on the right. If you are using Windows or macOS, you can scroll down or up a screen at a time by selecting 'Next' or 'Previous' respectively from the Record menu, or using the PgDn or PgUp keys.
You can change the sort order of the list. If you are using Windows or macOS, click the heading of the column you want to sort by, and the list will re-sort immediately. If you are using Windows, the heading of the column will be coloured blue to show the selected sort order, and a small triangle will indicate whether the sort is ascending or descending. If you click on the heading a second time, the sort order will be reversed (and on Windows the small triangle will be inverted). If you are using iOS or Android, tap on any column heading and choose the sort order you need. Repeat the procedure to reverse the sort.
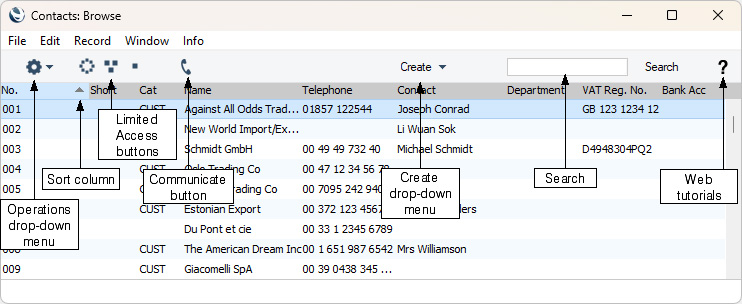
At the top of each browse window there is an area known as the Button Bar. This contains a set of buttons:


- (Operations menu)
- This button only appears in some browse windows. Click it to open the Operations drop-down menu. Highlight one or more records in the list (hold down the Shift key while clicking) and then choose a function from this menu. The function will be applied to all highlighted records. The contents of the Operations menu will vary depending on the browse window. Each function is described in full on the appropriate web page.
- If you are using iOS or Android, the Operations menu functions are on the Tools menu (with ‘wrench’ icon).

- (Create menu)
- The 'Create' button appears in every browse window and contains various functions that you can use to create new records. It always contains the functions described immediately below and may contain additional functions, depending on the browse window. For example, the browse window for Sales Orders contains functions that you can use to create Deliveries and Invoices. Usually you will need to highlight a record in the browse window before selecting one of the additional functions.
- The Create menu always contains the following functions:
- New
- Windows keyboard shortcut: Ctrl-N
- macOS keyboard shortcut: ⌘-N
- Select this function to open a new blank record for data entry.
- Duplicate
- Windows keyboard shortcut: Ctrl-K or Ctrl-Y
- macOS keyboard shortcut: ⌘-Y
- If you need to create a new record that is a copy of one that already exists, first find the earlier record in the list and highlight it by clicking once. Then, select this function. A new record will be opened, a duplicate of that highlighted. In many cases, the new record will contain the current date, not the date of the copied record.
- If you are using iOS or Android, the Create menu functions are on the + menu.
- [Search]
- Please refer to the 'Searching in Browse Windows' section later on this page for details about searching in browse windows.
If you want to view or modify an existing record, first find it using the Search facility described below. Then, open it by double-clicking its line in the list, or by selecting the line and pressing the Enter key (Windows/macOS) or by tapping its line in the list (iOS/Android).
! | It is not possible to delete a record directly from the browse window. You must open the record first. |
|
If you are using Windows or macOS, some browse windows will have three extra buttons in the centre of their Button Bars. You can use these buttons if the Limited Access module is present (i.e. if you are using the Limited Access option in the Configuration setting in the System module), as follows (Windows buttons illustrated on the left, macOS on the right):

- Lists all records in the register.

- Lists records belonging to members of the same Sales Group as the current user (i.e. records whose Sales Group is the same as that of the current user).

- Lists records belonging to the current user (i.e. records whose Person field contains the Signature of the current user).
You can use the Person register to prevent a user from seeing every record in the register by restricting their view to their own records or to those of their Sales Group. This feature is described
here.
Finally, again if you are using Windows or macOS, some browse windows will also have a [Communicate] button in the centre of their Button Bars:

This button will appear if the browse window belongs to a register such as the Activity, Invoice and Contact registers where you may need to communicate with a Contact (e.g. with the Contact quoted in an Activity or Invoice). Please refer to the
Business Communicator Window page for details.
Searching in Browse Windows
Use the Search field (on the right of the Button Bar) to find a particular record in a browse window.
Follow these steps:
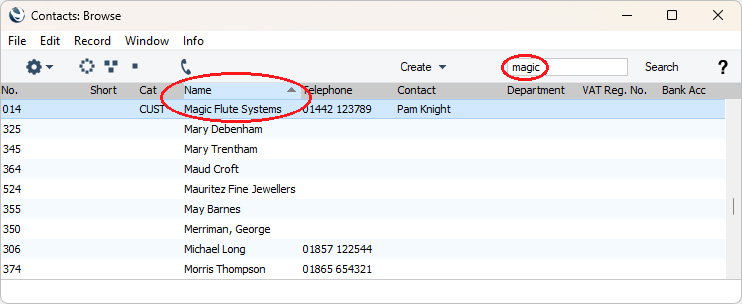
- Sort the list by the column that you want to use for the search. In the illustration below, for example, the list is sorted by Name allowing you to search for a Contact with a certain Name.
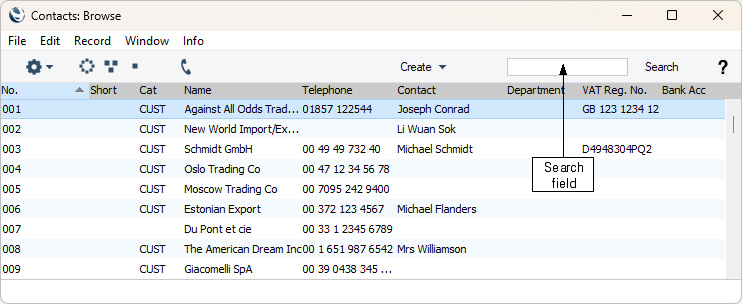
- Type your Search term in the Search field at the top of the window (in the top right-hand corner if you are using Windows/macOS). If you are using Windows/macOS, there is no need to click in the field before typing. For example, referring to the example illustrated above, type the first few letters of the Name you are looking for.
- Press the Enter or Return key (macOS) or tap the [Search] button (iOS/Android). The first row with an exact match in the sort column (or, if there is no exact match, with the nearest match) will be highlighted. If you are using Windows, a match will be highlighted as you type each character:
Colour Coding
Invoices in the 'Invoices: Browse' window are colour-coded:
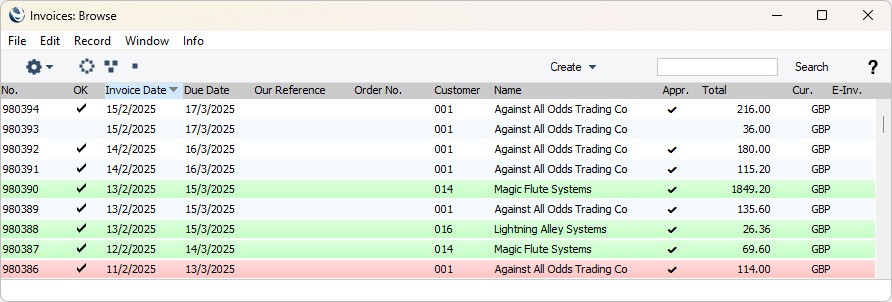
- (no colour)
- Invoices not yet due for payment or that have not been marked as OK yet.
- red
- Invoices that are overdue for payment.
- green
- Invoices that are fully paid or credited.
---
Types of window in Standard ERP:
Go back to: