Item History
This page describes the Item History report in the Stock module.
---
The Item History report is a comprehensive report listing every goods in and goods out transaction for each Item during the report period.
When printed to screen, the Detailed version of the Item History report has the Standard ERP Drill-down feature. Click (Windows/macOS) or tap (iOS/Android) on any stock transaction number (e.g. Delivery Number, Goods Receipt Number or Invoice Number) to open the corresponding record and on any Customer or Supplier Name to open the Contact record for the Customer or Supplier.
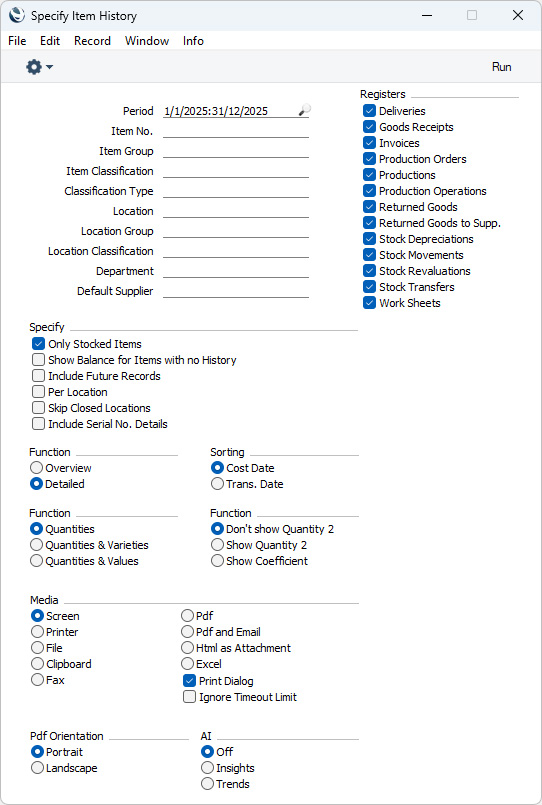
- Period
- Paste Special
Reporting Periods setting, System module
- Enter the start and end date of the report period, separated by a colon (:).Every goods in and goods out transaction that has been marked as OK that was recorded during the period specified here will be included in the report.
- Item No.
- Paste Special
Item register
- Range Reporting Alpha
- If you need to see the history of a particular Item, enter its Item Number here. The history of an Item is a list of every goods in and goods out transaction recorded for the Item during the report period. You can also enter a range of Item Numbers separated by a colon (:).
- Item Group
- Paste Special
Item Group register, Sales Ledger
- If you need to see the histories of every Item belonging to a particular Item Group, specify that Item Group here. Each Item will be listed separately, together with each goods in and goods out transaction.
- Item Classification
- Paste Special
Item Classifications setting, Sales Ledger
- Enter an Item Classification in this field if you want the report to show the histories of every Item with a particular Classification. If the field is empty, every Item, with and without Classification, will be included in the report. If you enter a number of Classifications separated by commas, the report will only include Items featuring all the Classifications that you have listed. If you enter a number of Classifications separated by plus signs (+), all Items featuring at least one of the Classifications listed will be included in the report. If you enter a Classification preceded by an exclamation mark (!), the report will include Items featuring any Classification except the one listed.
- For example:
- 1,2
- Includes Items with Classifications 1 and 2 (including Items with Classifications 1, 2 and 3).
- 1+2
- Includes Items with Classifications 1 or 2.
- !2
- Includes all Items except those with Classification 2.
- 1,!2
- Includes Items with Classification 1 but excludes those with Classification 2 (i.e. Items with Classifications 1 and 2 will not be included). Note the comma before the exclamation mark in this example.
- !1,!2
- Includes all Items except those with Classification 1 or 2 or both. Again, note the comma.
- !(1,2)
- Includes all Items except those with Classifications 1 and 2 (Items with Classifications 1, 2 and 3 will not be included).
- !1+2
- Includes Items without Classification 1 and those with Classification 2 (Items with Classifications 1 and 2 will be included).
- (1,2)+(3,4)
- Includes Items with Classifications 1 and 2, and those with Classifications 3 and 4.
- 1*
- Includes Items with Classifications beginning with 1 (e.g. 1, 10, 100).
- 1*,!1
- Includes Items with Classifications beginning with 1 but not 1 itself.
- *1
- Includes Items with Classifications ending with 1 (e.g. 1, 01, 001).
- 1*,*1
- Includes Items with Classifications beginning and ending with 1.
- Classification Types
- Paste Special
Classification Types setting, CRM module
- Enter a Classification Type in this field if you want the report to show the histories of Items with Classifications belonging to a particular Classification Type. If the field is empty, all Items, with and without Classification, will be included in the report. If you enter a number of Classification Types separated by commas, Items featuring a Classification belonging to any of those Types will be shown.
- Location
- Paste Special
Locations setting, Stock module
- If you need the report to list the movements into and out of a particular stock Location, specify that Location here.
- Location Group
- Paste Special
Location Groups setting, Stock module
- If you need the report to list the movements into and out of Locations belonging to a particular Location Group, specify that Location Group here.
- Location Classification
- Paste Special
Location Classifications setting, Stock module
- Enter a Location Classification here if you need to restrict the report to movements into and out of Locations with that Location Classification. If you enter a number of Classifications separated by commas, the report will only include movements into and out of Locations featuring all the Classifications that you have listed. You can also construct a complex search string using the +, ! and * characters as described under Item Classification above.
- Department
- Paste Special
Departments setting, Assets/Human Resources Management/System module
- Range Reporting Alpha
- If the report is to list Items assigned to a particular Department (specified on the 'Stock' card of each Item record), enter that Department here.
- Default Supplier
- Paste Special
Suppliers in Contact register
- Enter the Contact Code of a Supplier here if you need the report to list Items that can be purchased from that Supplier (i.e. Items with Default Purchase Items in the name of that Supplier).
- Registers
- The history of an Item is a list of every goods in and goods out transaction recorded for the Item during the report period. If you only need transactions recorded in particular registers to be listed in the report, specify those registers by selecting the relevant options here.
- Only Stocked Items
- Use this option to exclude Plain, Structured and Service Items from the report.
- Show Balance for Items with no History
- By default, the report will only list Items for which at least one stock transaction was entered during the report period. Items that were received into stock before the report period and that were not subject to any subsequent movement will not be listed. If you would like to include such Items in the report together with opening balance figures, select this option.
- Include Future Records
- Usually, the report does not include Sales and Purchase Orders because they do not directly result in any movement of stock. They will not affect stock until you create Deliveries and Goods Receipts from them.
- Select this option if you would like to have certain Sales and Purchase Orders included in the report: this could help with planning future requirements for particular Items. To be included in the report, Sales and Purchase Orders must be unfulfilled and must have Planned Delivery Dates that fall within the report period. The Planned Delivery Date field must use the Date format, set in the Planned Delivery setting in the Sales Orders module.
- Per Location
- By default, the report is a list of Items. For each Item, the stock transactions will be listed in Cost Date or Transaction Date order depending on which of the Sorting options below you have selected. The stock transactions will not be sorted by Location.
- If you choose this option, the report will be a list of Locations. For each Location, there will be a list of Items. Then for each Item, the stock transactions will be listed in Cost Date or Transaction Date order.
- Skip Closed Locations
- Select this option if you would like stock transactions relating to Closed Locations to be excluded from the report.
- Include Serial No. Details
- Use this option if you require Serial Numbers to be shown in the Detailed version of the report.
- Selecting this option will have no effect in the Overview version of the report or in the Detailed version of the report if you also select the Per Location option above.
- Function
- Use these options to specify the level of detail that you need to be shown in the report.
- Overview
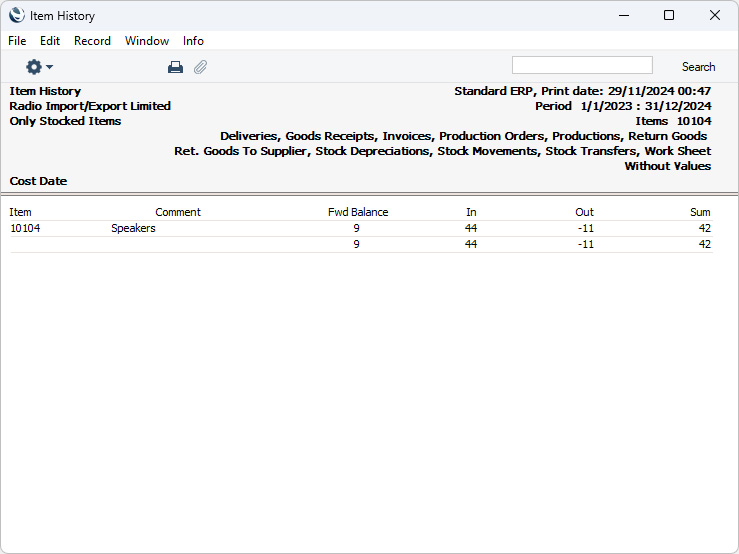
- This option produces a report with a single row for each Item, showing for each the quantity or value received and the quantity or value removed from stock over the report period.
- If you also select the Per Location option above, the report will contain separate sections for each Location. For each Location, there will be a row for each Item as described in the previous paragraph.
- If an Item is a component and has been used in Stock Depreciations as part of a Structured Item, these movements will be shown separately.
- Detailed
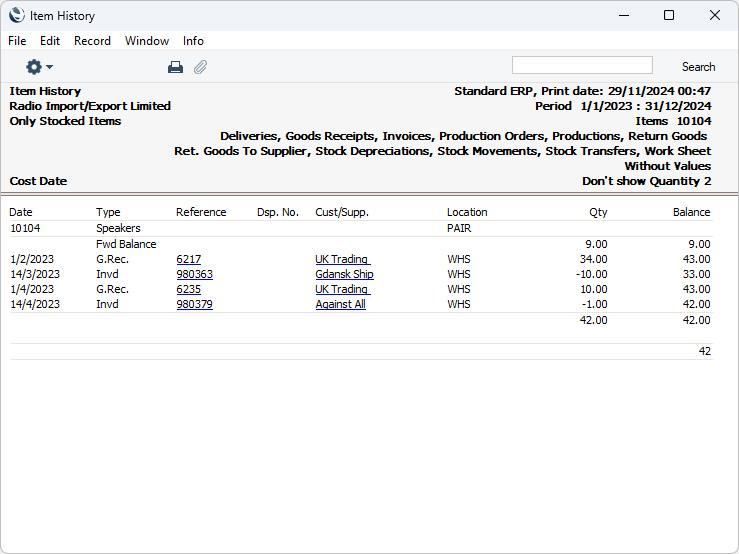
- For each Item, the Detailed version of the report will list every stock transaction from the report period individually. Locations will also be shown.
- Sorting
- Use these options to specify how the stock transactions will be sorted in the report. Usually the Cost Date and the Transaction Date will be the same, but they may be different if you have some Returned Goods and you are using the Insert At Original Position in Cost Queue option in the Cost Accounting setting. In this case, the Transaction Date will be the date of the Returned Goods record, while the Cost Date will be the date of the original Goods Receipt.
- Function
- Select one of these options to specify which figures will be shown in the report.
- Quantities
- The report will contain only stock quantities i.e. the Overview will show for each Item the quantity received and the quantity removed from stock over the report period, while the Detailed version of the report will show the quantity added to or removed from stock by each stock transaction.
- Quantities & Varieties
- In the case of an Item with Varieties, the Detailed version of the report will show the Variety that was used in each stock transaction.. This option has no effect in the Overview, which will behave as though you had selected the Quantities option above.
- Quantities & Values
- The Overview will show for each Item the values added to and removed from stock over the report period, while the Detailed option, while the Detailed version of the report will show the both the quantity and the value added to or removed from stock by each stock transaction.
- Function
- Use these options if you have some Items for which stock levels can be expressed using different units of measurement (e.g. metres and yards, litres and gallons, etc). You should configure these Items with a main Unit on the 'Pricing' card and a Unit 2 (the secondary Unit) and Coefficient (the relationship between the two Units) on the 'Stock' card. For example, an Item sold in litres and gallons should have "LITRE" as the main Unit, "GALLON" as the Unit 2 and "0.22" will be the Coefficient. The Quantity 2 figure in this report will be the quantity measured in gallons i.e. using the Unit 2 unit of measurement.
- These options will only affect the Detailed version of the report, when you are also using the Quantities and Quantities & Varieties options described above.
- Don't show Quantity 2
- Use this option to express stock quantities using the main unit of measurement (litres in the example).
- Show Quantity 2
- Use this option to express stock quantities using both units of measurement (litres and gallons in the example). Quantity 2 figures will only be shown for Items that have a Unit 2 and a Unit Coefficient specified on the 'Stock' card. Selecting this option will have no effect if you are producing the Detailed version of the report together with the Quantities & Values option.
- Show Coefficient
- Use this option to express stock quantities using the main unit of measurement, together with the Coefficients where appropriate. Selecting this option will have no effect if you are producing the Detailed version of the report together with the Quantities & Values option.
---
Go back to:
|


 Introduction to Reports in the Stock Module
