
 Introduction to the Delivery Register
Entering a Delivery
Inspecting Deliveries, Marking as OK and Posting to the Nominal Ledger
Nominal Ledger Transactions From Deliveries
Deliveries from the Sales Ledger
Printing Picking Lists and Delivery Notes
Operations Menu - Deliveries
Create Menu - Deliveries
y - Invoice
y - Returned Goods
Row Menu - Deliveries Introduction to the Delivery Register
Entering a Delivery
Inspecting Deliveries, Marking as OK and Posting to the Nominal Ledger
Nominal Ledger Transactions From Deliveries
Deliveries from the Sales Ledger
Printing Picking Lists and Delivery Notes
Operations Menu - Deliveries
Create Menu - Deliveries
y - Invoice
y - Returned Goods
Row Menu - Deliveries
 Tutorials for Standard Accounts Tutorials for Standard Accounts
Search HansaManuals.com HansaManuals Home >> Standard ERP >> Stock >> Delivery Register Предыдущая Следующая Вариант всей главы для печати Поиск Данный текст относится к версии программы 2026-06-25 Create Menu - Delivery - Invoice This page describes the 'Invoice' function on the Create menu in the Delivery record window. If you are using iOS or Android, the 'Invoice' function is on the + menu.--- You can raise an Invoice from a Delivery or Sales Order using the following methods:
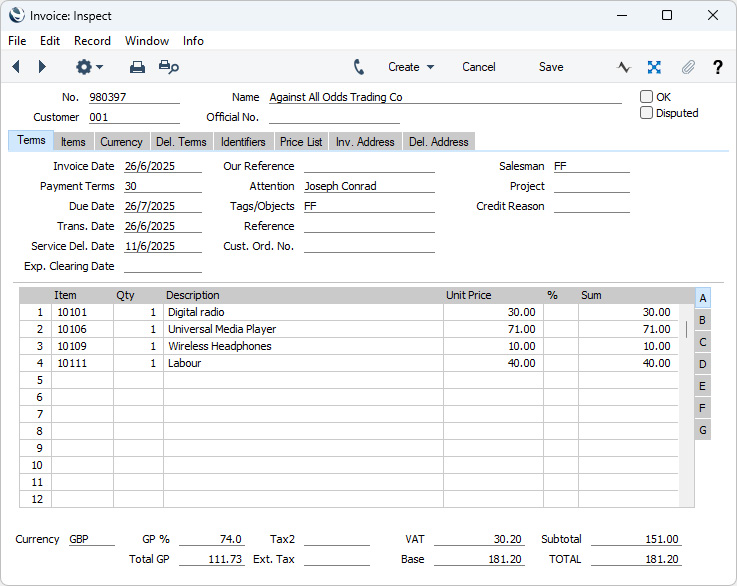
To create an Invoice from a Delivery, open the Delivery in a record window and select 'Invoice' from the Create menu (Windows/macOS) or + menu (iOS/Android). For the function to have any effect, you must first mark the Delivery as OK and then save it. When you select the function, a new record will be created in the Invoice register (in the Sales Ledger) and opened in a new window, entitled 'Invoice: Inspect'. This means that it has been created and saved and is being opened for checking and approval.
If an Order contains an Item that requires Serial Numbers, it will usually be in a single Order row with the correct Quantity. When you create the Delivery, it will contain the appropriate number of rows each with a Del. Qty of one. An Invoice that you create from the Delivery will also contain the appropriate number of rows each with a Quantity of one, so the individual Serial Numbers will be included in the Invoice. An Invoice that you create from the Order can mirror the Order (i.e. with a single row for the Serial Numbered Item with the Quantity from the Order) or it can mirror the Delivery (i.e. with a number of rows each with a Quantity of one). If you wish to use the latter option, select the Invoice Based on Delivery option in the Order Settings setting. This will be useful if you need to have Serial Numbers listed in Invoices created from Orders. Subject to access rights, you can change the Quantity in any row in the Invoice as appropriate, but not to a Quantity that is greater than was delivered. If you need to use Access Groups to prevent certain users from changing the quantity in Invoice rows, deny them access to the 'Disallow Changing quantity on an Invoice created from an Order' Action. You can also remove entire rows from the Invoice, by clicking on the row number to the left and pressing the Backspace key (Windows/macOS). If you are using iOS or Android, long tap on the row number on the left of the row and select 'Delete Row' from the resulting menu. You can also add new rows. If you need to invoice a greater Quantity than was delivered, you must do so by adding a new row to the Invoice. Ensure that the Update Stock box on the 'Delivery' card of the Invoice is ticked so that stock levels are updated accordingly and, if appropriate, to cause Cost of Sales postings to be made in the Nominal Ledger for the extra quantity. The Update Stock box will only apply to Invoice rows that are not related to the Delivery. Two options on the 'Debtors' card of the Account Usage S/L setting, Update Base Currency when Invoicing and Update Foreign Currency when Invoicing, control the Base and Exchange Rates on the 'Currency' card of the Invoice. If you are not using these options and you have selected "From Order" as the Invoice Rate option in the Sales Invoice Settings setting, the rates will be copied from the Order. Otherwise, the latest Base and Exchange Rates will be used in the Invoice. In the latter case, the prices in Currency of the Items in the Invoice will not be changed. This means the Customer will still be charged the agreed price, but the value of the Invoice in your home Currency (and therefore in the Nominal Ledger) will be different to that of the Order. If you want to update the pricing in the Invoice to reflect new Base and Exchange Rates (i.e. to change the price charged to the Customer but to maintain the original value in your home Currency and in the Nominal Ledger), enter the correct rates and then select 'Update Currency Price List Items' from the Operations menu (Windows/macOS) or Tools menu (IOS/Android). If you have assigned a Default Item record to the Customer (on the 'Pricing' card of their Contact record), every Item in that record will be added to the Invoice automatically (they will not be shown in the Order or the Delivery). Note that these Items will not have a Quantity, so be sure to enter one before marking the Invoice as OK or printing it. If an open Prepayment (i.e. one that has not yet been allocated to an Invoice) exists in the Customer's name, a message will appear when the Invoice opens. This will remind you to allocate the Prepayment to the Invoice. You can do this by selecting 'Connect to Prepayment' from the Operations or Tools menu and then choosing the Prepayment using 'Paste Special'. If you would like to have the Invoice connected to any relevant Prepayments automatically, select the Connect to Prepayments when Invoicing option in the Order Settings setting. A relevant Prepayment is one created from the Order (i.e. with the Order Number on flip D of the Receipt row). Please refer here for more details about Prepayments. To print an Invoice, click the Printer icon (Windows/macOS) or select 'Print' from the File menu (all platforms). If you have not yet marked the Invoice as OK and if you are not using the No Test Printout option in the Optional Features setting in the System module, the printed Invoice will be marked as a test print, so that you cannot confuse it with the final version of the Invoice. When the Invoice is complete, tick the OK check box and save. This signifies that you have approved the Invoice. Associated transactions in the Nominal Ledger (including Cost of Sales postings if you are using this option) will be created if you have so determined using the Sub Systems setting in the Nominal Ledger and in the Number Series - Invoices setting. You will no longer be able to modify the Invoice. If you are raising part Invoices from a Delivery, you will be able to raise further Invoices even if you have not marked the previous one as OK. Please refer here for a full description of the Invoice window including detailed information about marking Invoices as OK, printing them and generating Nominal Ledger Transactions. To close the window and return to the Delivery, click the close box (Windows/macOS) or tap < (iOS/Android). You will be asked if you want to save any changes. The Invoiced figure in each row in the originating Order (visible on flip D) will be updated automatically. If the function does not create an Invoice, the probable causes are:
You can use Access Groups to prevent certain users from creating Invoices from Deliveries. To do this, deny them access to the 'Invoice from Delivery' Action. A separate Action, 'Invoice from Order', governs the creation of Invoices from Orders. --- The Delivery register in Standard ERP:
|