Record Window - Changing the Fields in a Record Window
This page describes how to change the attributes of fields and check boxes in
record windows.
---
You can change some of the attributes of the fields and check boxes in a record window. For example, you can change field labels, hide fields and make fields mandatory. Follow these steps:
- Log in as a Global User or Person belonging to an Access Group in which Full access has been granted to the 'Field Settings' Action.
- Choose 'Edit Field Settings' from the File menu. This option will only be available to users with Full access to the 'Field Settings' Action mentioned in step 1.
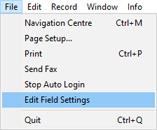
- A 'Field Settings' window will appear:

This window contains an Access Group field and a View changes check box, as follows:
- Access Group
- Paste Special
Access Groups setting, System module
- When you change the attributes of the fields in a record window, you will do so for the members of a particular Access Group. Choose that Access Group here using 'Paste Special' and then press [OK]. Note that the selection of an Access Group is case-sensitive, so it is recommended that you use 'Paste Special' to ensure the spelling and case usage are correct.
- View changes
- When editing the fields in a record window, use this check box to switch between the original version of the window (as originally defined in Standard ERP) and your edited version.
The presence of this 'Field Settings' window signifies that you are in 'Edit Field' mode. While you are in this mode, you will not be able to edit any records. Instead, whenever you open a record window, you will be able to change the attributes of the fields in that record window. As a further reminder that you are in 'Edit Field' mode, the window title of every window that you open will include the word 'Editing' (instead of 'New', 'Inspect', 'Update' or 'Browse').
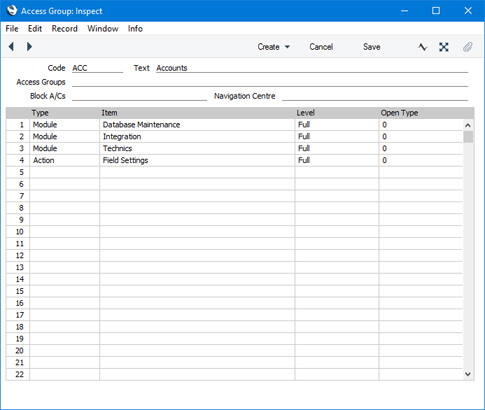
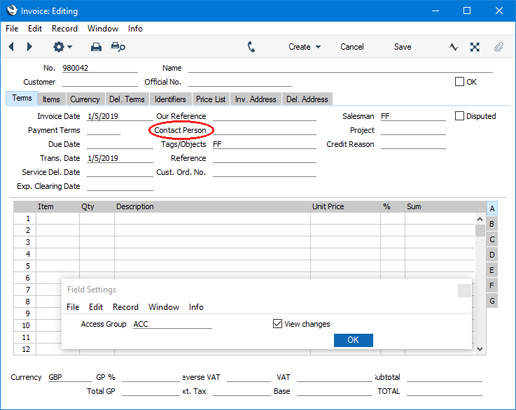
- To change the attributes of the fields in a record window, open the window in the usual way. For example, if you need to change the attributes of a field or fields in the Invoice window, you can either open an existing Invoice from the 'Invoices: Browse' window or you can open an empty new Invoice. When the window opens, you will see it as it will be shown to members of the Access Group specified in step 3.

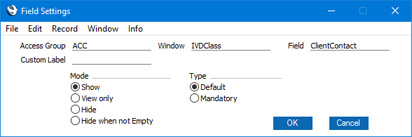
- Click in the field whose attributes you need to change. This must be a header field, not a row field. You can also click a check box. A second 'Field Settings' window will appear. In the example illustrated below we clicked on the Attention field:
- Access Group
- Paste Special
Access Groups setting, System module
- When you change the attributes of the fields in a record window, you will do so for the members of a particular Access Group. The default here will be the Access Group that you chose in step 3. You can change the Access Group, but do not leave the field empty.
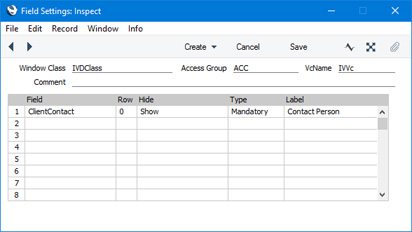
- Window
- This field displays the internal name of the window (the internal name is the name given to the window inside the program) and cannot be changed.
- Field
- The internal name of the field or check box whose attributes you are changing and cannot be changed.
- Custom Label
- If you want to change the name of the field in the window, enter the new name here.
- Mode
- Choose an attribute for the field or check box as follows:
- Show
- The default attribute for the field (as originally defined in Standard ERP) will be used.
- View only
- The field will not be editable. Choosing this option for a check box will have no effect.
- Hide
- The field or check box will not be visible.
- Hide when not Empty
- The field will not be visible if it contains a value. Choosing this option for a check box will have no effect.
- Type
- Specify whether it should be mandatory for members of the Access Group specified above to enter a value in the field whenever they create or modify a record in the window in question. Choosing this option for a check box will have no effect.
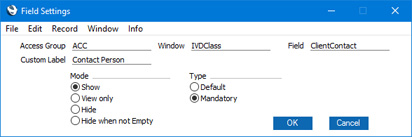
- Press [OK] to save the new field attributes. The second 'Field Settings' window will be closed, and the changes will immediately be visible (in a single-user installation only):
- If you need to compare the original version of the window with your modified version, select and deselect the View changes check box in the first 'Field Settings' window.
- Repeat steps 5 and 6 if you need to change the field attributes of other fields or check boxes.
- If you need to change the field attributes of a field or check box for other Access Groups, the following options are available:
- Change the Access Group in the first 'Field Settings' window and press [OK], as described in step 3. The appearance of the record window (e.g. of the Invoice window) will be changed so that you will be shown what is visible to members of the new Access Group. When you next click on a field or check box, the new Access Group will be the default in the second 'Field Settings' window.
- Change the Access Group in the second 'Field Settings' window.
- Duplicate a record in the Fields Settings setting as described below in step 11 and change the Access Group there.
You must specify an Access Group in the second 'Field Settings' window. Leaving the Access Group field blank in this window will not mean that the field attribute change will be visible to every Access Group.
- To leave 'Edit Field' mode, select 'Edit Field Settings' from the File menu once again.
- The field attribute settings will be saved in the Fields Settings setting in the Technics module. This setting will contain separate records for each window/Access Group combination. An individual record will contain a matrix listing the changed field attributes. If you need to change the field attributes in a particular window for several Access Groups, you can duplicate the record created in steps 5 and 6, and change the Access Group and the options as necessary.
You do not need to be in 'Edit Field' mode to work in the Fields Settings setting. However, note that the Window Class and VcName fields are not editable, so you cannot create a new record in this setting and specify the window or register (VcName). In other words, if there is no record in this setting for a particular window, you must create at least one record for that window following steps 3-6 above. You can then duplicate that record in this setting as needed.
Any records that you add or change in this setting will not take effect until you close Standard ERP and restart. You don't need to restart the server.
---
Types of window in Standard ERP:
Go back to: