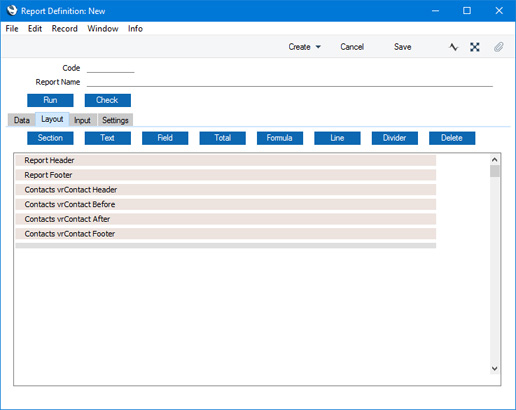
Language:

HansaManuals

Creating a Report Using the Report Generator
Creating a Report Generator Report - Specifying the Primary Register
Creating a Report Generator Report - The Appearance of the Report
   - Adding a Report Title
   - Adding Column Headings
   - Adding Fields to the Report
Creating a Report Generator Report - Choosing a Print Destination
Creating a Report Generator Report - The Width of the Report Window
Creating a Report Generator Report - Printing the Report
Creating a Report Generator Report - Adding White Space
Creating a Report Generator Report - Adding Searches
Creating a Report Generator Report - Adding a Secondary Register
   - Linking the Primary and Secondary Registers
   - Printing Information from the Secondary Register
   - Printing Elements with Red Line Overstrikes
   - If there are no Records in the Secondary Register
Creating a Report Generator Report - Using Variables and Formulae
Creating a Report Generator Report - Printing Information from Matrices
Creating a Report Generator Report - Bringing Information in from Other Registers
Creating a Report Generator Report - Page Breaks
Creating a Report Generator Report - Filtering Records (Print If)
Creating a Report Generator Report - Adding Check Boxes to the Specification Window
Creating a Report Generator Report - Adding Radio Buttons to the Specification Window
Creating a Report Generator Report - Searching for Records within a Period
Creating a Report Generator Report - Break Points, Subtotals and Totals
Creating a Report Generator Report - Blocks
Creating a Report Generator Report - Syntax
Creating a Report Generator Report - Useful Functions
Example Reports - Listing Sales Figures
Creating a Report Generator Report - Common Error Messages

Tutorials for Standard Accounts

Creating a Report Generator Report - The Appearance of the Report

After creating a Report Generator report and specifying the primary register, the next step is to specify what information from the primary register is to be printed in the report. In the example Customer List that we are using in this documentation to illustrate the process of creating Report Generator reports, we will specify that the Contact Number, Name, Category and Telephone Number will be printed. Change to the 'Layout' card:

The report layout is divided into various sections. There is always an overall Header and Footer for the report, both of which will be printed once. Each register that you add to the report on the 'Data' card will have four sections: Header, Before, After and Footer.

The six sections in the example Customer List will be printed in this order:

Header
Contact Header
Contact Before
Contact After
Contact Footer
Footer
The Contact Before and Contact After sections will be printed once for each record, thus building up the report. The Contact Header and Contact Footer sections will be printed once per report, so are appropriate places for column headings and totals respectively. Empty sections will not be printed.

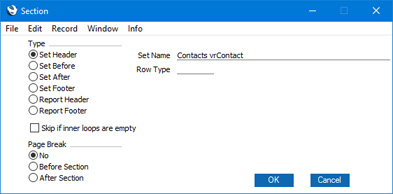
A report section can contain any combination of elements (i.e. text, fields, totals and formulae). Overlapping elements of any kind are not allowed. The Header and Footer are not related to specific registers, so you cannot place fields in these sections. You can only place text elements and formulae in them. The Contact Header, Contact Before, Contact After and Contact Footer sections are connected to the Contact register. You can place fields from the Contact register in these sections, but not fields from any other register.

The width of the grey bars containing the section names represents the width of the report window that will be used when you print the report to screen. Elements placed beyond the grey bars (on the extreme right) will not be printed. You can change the width of the report window using the Width field on the 'Settings' card.

If you need to remove an element, click on it and then press the Backspace key on your keyboard, select 'Clear' from the Edit menu or click the [Delete] button above the report display area.

You can also remove an entire section, by clicking on the relevant grey bar and then pressing Backspace, selecting pressing Backspace, selecting 'Clear' or clicking the [Delete] button. Every element in the section will be removed as well. Be careful as you cannot undo removals. If you remove a section by mistake, click the [Section] button to replace it. When the 'Section' dialogue box opens, specify the section using the Type options, and choose the Set Name using 'Paste Special':

Please follow the links below for more details about using the 'Layout' card to design the output of a report:
---

Creating a Report Generator Report:

Go back to: