Sub-ledger Control Accounts
This page describes the Sub-ledger Control Accounts setting in the System module and the Nominal Ledger.
---
Standard ERP contains a Sub-ledger Checking feature that you can use to prevent incorrect postings being made to your Debtor and Creditor Control Accounts. Usually postings to these Accounts should only be made from Invoices, Purchase Invoices, Receipts and Payments. You should not post to these Accounts from Nominal Ledger Transactions that you enter directly to the Transaction register as doing so will mean that the balances on these Accounts will no longer agree with your Debtor and Creditor reports. The Sub-ledger Checking feature will prevent you posting to these Accounts accidentally.
To enable and configure the Sub-ledger Checking feature, follow these steps:
- To enable the Sub Ledger Checking feature in the Sales Ledger, select the Sub-ledger Checking option in the Account Usage S/L setting. This will prevent you posting to Debtor Control Accounts from Nominal Ledger Transactions that you enter yourself.
- To enable the Sub Ledger Checking feature in the Purchase Ledger, select the Sub-ledger Checking option in the Account Usage P/L setting. Similarly, this will prevent you posting to Creditor Control Accounts.
- To configure the feature for both ledgers, list your Debtor and Creditor Accounts in the Sub-ledger Control Accounts setting, which is located in the System module and in the Nominal Ledger.
If you are using this feature, you will still be able to enter Receipts and Payments by journal in the Nominal Ledger. However, you will not be able to post to the Debtor and Creditor Accounts accidentally and incorrectly in other Nominal Ledger Transactions, thus rendering their balances inaccurate. For details about entering Receipts and Payments by journal, please refer to the description of flip E of the Transaction window on
this page.
You must list every Debtor and Creditor Account in this setting, including the Debtor and Creditor Control Accounts that you have specified or intend to specify on the 'Debtors' and 'Creditors' cards of the Account Usage S/L and P/L settings respectively.
To open the Sub-ledger Control Accounts setting, first ensure you are in the System module or the Nominal Ledger. Then, if you are using Windows or macOS, click the [Settings] button in the Navigation Centre and then double-click 'Sub-ledger Control Accounts' in the 'Settings' list. If you are using iOS or Android, select 'Settings' from the Tools menu (with 'wrench' icon) and tap 'Sub-ledger Control Accounts' in the 'Settings' list. The 'Sub-ledger Control Accounts: Inspect' window will open:
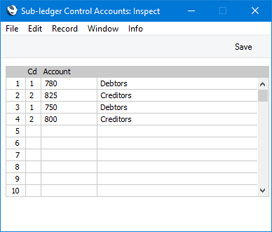
List your Debtor and Creditor Accounts in any order, one in each row. Use the Code field to signify whether the Account in the row is a Debtor Account or a Creditor Account. Enter "1" for a Debtor Account and "2" for a Creditor Account. In the Account field, enter the Account Number of the Debtor or Creditor Account. Use 'Paste Special' if necessary. The text in the right-hand field will be entered automatically, depending on the Code.
When the setting is complete, click the [Save] button (Windows/macOS) or tap √ (iOS/Android) to save the changes and close, or use the close box (Windows/macOS) or tap < (iOS/Android) to close without saving changes.
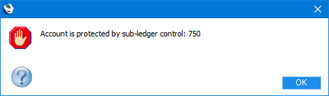
If you try to save a Transaction that posts to a protected Account, you will be given the following message:
If you are using the Sub-ledger Checking feature, you will need to choose an Account that you have listed in this setting whenever you need to specify a Debtor or Creditor Account (e.g. in the Account Usage S/L and P/L settings, and in
Customer and
Supplier Categories.
It is recommended that you periodically check that the balances on your Debtor and Creditor Accounts match your Debtor and Creditor reports. To do this, use one of the following methods:
- On the sales side, produce the Sales Ledger report and a report with the Nominal Ledger report for the Creditor Account.
- Produce Sales Ledger Checking and Purchase Ledger Checking reports (in the Data Integrity module) for a particular date. In effect, this option is an automated version of the first option, as the Checking reports compare the overall total in the Sales or Purchase Ledger report for the specified date with the balance on the Debtor or Creditor Account on the same date.
---
Settings in the System module:
- Access Groups
- Active Users
- Auto Actions
- Bank Holidays
- Base Currency
- Base Currency Rates
- Cloud Security
- Company Date and Numeric Format
- Company Info
- Configuration
- Conversions - Master, Conversions - Accounts and VAT Code
- Conversions - Master, Conversions - Activity Types
- Conversions - Master, Conversions - Contact Classifications
- Conversions - Master, Conversions - Contacts
- Conversions - Master, Conversions - Currency Codes
- Conversions - Master, Conversions - Items
- Conversions - Master, Conversions - Locations
- Conversions - Master
- Conversions - Master, Conversions - Suppliers
- Conversions - Master, Conversions - Tags/Objects
- Conversions - Master, Conversions - Users
- Countries
- Countries Regions
- Currency Round Off
- Days and Months
- Departments
- Discount Options
- Display Groups
- Exchange Rates Settings
- Form Settings
- Global Warnings on UnOKed Records
- Internet Enablers
- Journaling
- KPIs
- Languages
- Locking
- Locking Exceptions
- Nature of Business
- Number Series Defaults
- Opened Windows History
- Optional Features
- Password Security
- Printers
- Reporting Periods
- Round Off
- Sales Groups
- Single Functions
- Styles
- Sub-Ledger Control Accounts
- Task Manager Access
- User Warnings on UnOKed Records
- Values in Text
- VAT Reg. Number Masks
- Weeks
Go back to: