Adding Companies
This page describes adding Companies to an existing Standard ERP database. Please also refer to:
---
Every Standard ERP database will contain at least one Company. When creating a new database, the first task will be to create the first Company and the first user account. Please follow the links on the Creating a New Database page for details about this process.
You can add Companies to a database immediately after creating it or at any later time. Follow these steps:
- To be able to add Companies, you should log in as a Global User with access to the Technics module and to all Companies. Please refer here for details about Global Users, and here for details about gaining access to the Technics module.
- After logging in, open the Configuration setting in the System module and ensure you have registered the appropriate number of Companies in the relevant field under the 'Companies' heading:
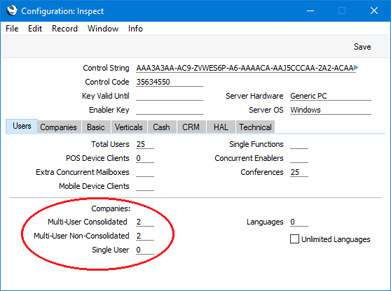
- Multi User Consolidated
- A Multi-User Consolidated Company is a Company in a client-server database (i.e. the Company will be stored in a database on a server), and the information in the company is to be included in consolidated reports. Please refer here for more information.
- Multi User Non-Consolidated
- A Multi-User Non-Consolidated Company is a Company in a client-server database, and the information in the company will not be included in consolidated reports.
- Single User
- A Single User Company is one where only one user will be able to log in at any one time (i.e. the Company will be stored in a database on your local machine).
- You should carry out this step if you are working from a client machine and have logged in to a server. Omit this step if you are working in a single-user database.
Change to "Admin Client" mode. To do this, change to the Technics module, open the Program Mode register and choose 'Admin Client' from the Operations menu (with 'cog' icon, Windows/macOS) or Tools menu (with 'wrench' icon, iOS/Android).
If you are not in "Admin Client" mode when you enter the new Companies as described in steps 4 and 5 below, the new Companies will be saved in the local database on your client machine and not in the main database on the server.
Please refer here for more information about "Admin Client" mode.
- The next step is to open the Company register. You can do this using one of two methods:
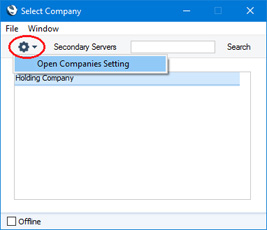
- Working in any module, click (Windows/macOS) or tap (iOS/Android) the [Companies] button in the Navigation Centre. When the 'Select Company' window opens, choose 'Open Companies Setting' from the Operations or Tools menu:
- Working in the System module, click (Windows/macOS) or tap (iOS/Android) the [Registers] button in the Navigation Centre and select 'Companies' in the resulting list.
- Add the Companies that you need.
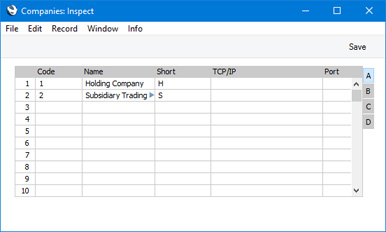
Please refer to the Fields in the Company Register page for details about each field.
- If you are working from a client machine and have logged in to a server, you will need to close the Standard ERP client application and log in to the server again in order to gain access to the new Companies.
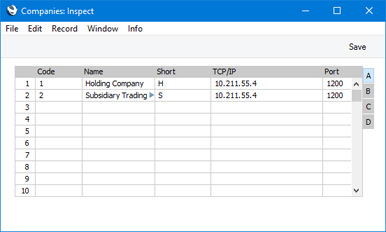
Each time you log in to the server, the Company register from the server will be copied to the database on your client machine. Included in the copying process will be the IP address of the server machine and the port specified in the Program Mode register in the server database:
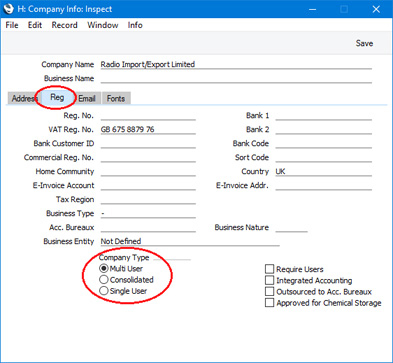
- Log in to each Company in turn, open the Company Info setting in the System module and enter the Company Name, Address and other details as appropriate and as described on the Entering your Company Name and Address page.
If you are working from a client machine and if you specified in step 2 that some Companies will be Multi User Consolidated, a "More Non-Consolidated Companies than allowed. Some companies are now disabled" message will appear when you log in to each Company. While you are in the Company Info setting in the relevant Companies, you can address this issue by setting the Company Type to "Consolidated" on the 'Reg.' card:
If you are unable to log in to the new Companies, the probable reason is that you are not logging in as a Global User as described in step 1.
- Working in each of the new Companies in turn, use the Person register in the System module to add the relevant User Accounts with passwords, as described on the User Accounts page.
- In each Company, configure the basic settings and registers, such as Company Date and Numeric Format, Accounts, VAT Codes, Fiscal Years, Reporting Periods, the Account Usage settings, Payment Modes, Payment Terms, the Balance Sheet, Key Financial Ratios, Profit & Loss Report and VAT report definitions, Form Templates and so on. Various options are available to help with this task:
- One option is to import the set-up data supplied with Standard ERP using the 'Automatic' or 'Manual file search' Import functions in the System module, as described on the Importing Set-up Data page. Import the set-up data to each Company individually. You can start using the set-up data immediately, or you can use it as a template and modify it as required.
- If you are working in a single-user database, some basic settings will be imported to each new Company from the Default.txt file, providing it is in the same folder as your Standard ERP application. The contents of the Default.txt file may vary depending on location but typically they will include Reporting Periods and Values in Text. If you are working from a client machine and have logged in to a server, the Default.txt file will not be imported to the new Companies, but you can import it yourself using the 'Automatic' or 'Manual file search' Import functions.
- If the basic settings and registers will be similar in each of the new Companies, you can configure them in one Company and then export them to text files using the 'System Data' Export function in the Integration module. To export Customer, Supplier and other Contact information, use the 'Base Registers' Export, and to export Item and Pricing information, use the 'Item Base Registers' Export, both of which are also in the Integration module. You will need to log in as a user whose Access Group explicitly grants full access to the Integration module to use these Export functions. Change to another Company and then import the text files using the 'Automatic' or 'Manual file search' Import functions. Then make any Company-specific changes required.
- You may be able to share some registers, as described here. If a register is shared, the contents of that register will be the same in every Company, and Company-specific variations will not be possible.
---
The Company register in Standard ERP:
---
See also:
- Consolidation module - To be used to produce consolidated reports that include many or all Companies in a database
- Inter Company module - To be used when sending Invoices between Companies in a database
---
Go back to:
|