Creating a New Database - Settings - Entering your Company Name and Address
After creating a new database, one of next steps will be entering your company's name, address, VAT and company registration numbers and other details. These details will be needed when you register your copy of Standard ERP, and they can also be printed on documentation such as Invoices. To do this, you will use the Company Info setting. Follow these steps:
- Click the [Switch Module] button in the Navigation Centre or use the Ctrl-0 (zero) (Windows) or ⌘-0 (macOS) keyboard shortcut. A list of modules will appear:
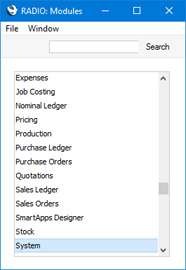
Choose the System module by double-clicking.
In all list windows such as this one, you can navigate to and select an option using the keyboard if you so prefer. Type the first few characters of the name of the option you want (in this case, "sys" for example) and then press the Enter or Return key twice.
- Click the [Settings] button in the Navigation Centre or use the Ctrl-S (Windows) or ⌘-S (macOS) keyboard shortcut to bring up a list of the settings in the System module:
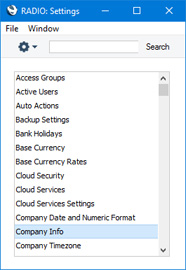
- Double-click the 'Company Info' option. The 'Company Info: Inspect' window appears.
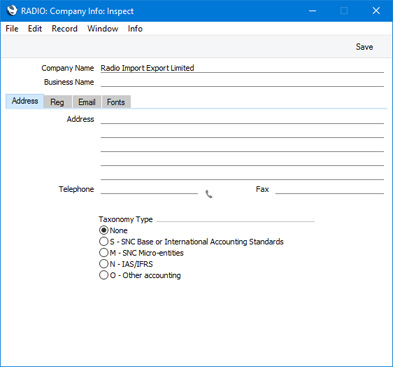
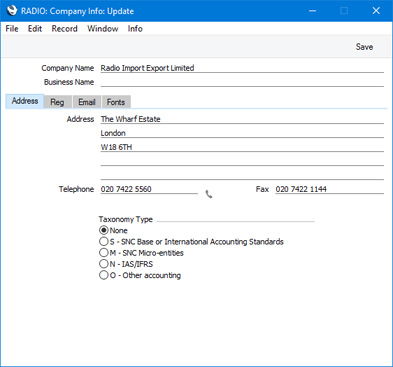
The Company Name that you entered in the 'Enter Company Name' window (step 3 on the Creating a New Database - Server page or the Creating a New Database - Single-user page) will be shown in the first field. Use the Business Name field if your company has two names (for example, a registered name and a commercial name). It is mandatory to enter a Business Name (i.e. registered name) in Portugal. Enter your address and contact information as shown in the example illustration below.
- Click the button marked 'Reg' towards the top centre of the window to see the other important fields in this setting.

Here you can enter your company registration number and VAT Number:
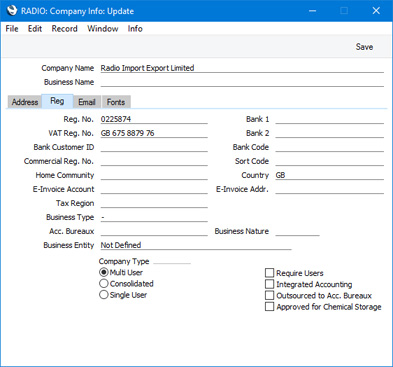
Make sure the company name and telephone number (on the 'Address' card) and the company registration number and VAT number (on the 'Reg' card) are exactly as written and spelt in your HansaWorld contract, as this information will be used when you register the software. This information will also be printed on the documents such as Invoices and Purchase Orders that you send to your Customers and Suppliers. You should also check that the Company Type is correct, as this will also be used during the registration process:
- Multi User
- Choose this option if more than one person will have access to the company (i.e. the company will be stored in the database on a server machine).
- Consolidated
- Choose this option if the information in the company will be included in consolidated reports. Please refer here for more information.
- Single User
- This option means that only one user will be able to log in to the company at any one time.
Enter your company's bank account details in the Bank 1 and Bank 2 fields. This information can be printed on documents such as Invoices, and will also be used if you will pay your Purchase Invoices by credit transfer. In most countries, you should enter your bank account number in the Bank 1 field and the bank account number in IBAN format (including two-character country prefix) in the Bank 2 field. In Namibia enter your account number in Bank 1 and the sort code in Bank 2. In Finland, enter your bank account number in IBAN format in the Bank 1 field.
The Bank Customer ID is required when issuing payment instructions to banks in some countries. In Norway, you should enter your company's VAT number with non-numeric characters removed. For example, if your company's VAT number is NO 987654321 MVA, enter 987654321. In Sweden, if you have a PlusGirot account, enter your Customer Number at PlusGirot in this field. In Finland and Spain, enter your business ID or customer number at your bank.
In Portugal, you must also enter information required for SAF-T reporting in the following two fields:
- Commercial Reg. No.
- Enter the commercial registration number of your company.
- Home Community
- Enter the region or district in which your company is located. This is also required in Lithuania and Norway.
The format required by the Country field depends on your location. It is usually recommended that you use the two-character ISO 3166-1 alpha-2 format (e.g. "FI" for Finland or "LV" for Latvia).
- Click the button marked 'Email' towards the top centre of the window to see the other fields in this setting.

The Edit and Report Font fields allow you to select different fonts for use on screen and in reports respectively. If you leave these fields empty, default fonts selected for maximum readability will be used. You should only change them if you have good reasons to do so. In non-English versions of Standard ERP, use these fields to select fonts with special character sets. In both cases, choose the font by clicking in one of these fields and then pressing the Ctrl-Enter (Windows) or ⌘-Enter (macOS) key combination. A selection list will appear where you can choose an option by double-clicking.
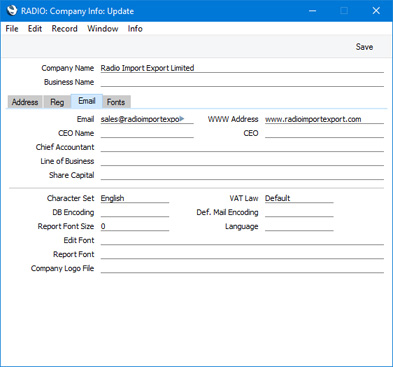
VAT Law and Character Set are used to ensure the behaviour of Standard ERP conforms to certain local conventions of the country in which it is being used. To choose the correct VAT Law and Character Set for your location, you can again click in one of these fields and then press the Ctrl-Enter (Windows) or ⌘-Enter (macOS) key combination to open a selection list. In the case of the VAT Law field, if your country is not listed in the selection list, choose the "Default" option.
Details about the other fields in this setting can be found on the Company Info page.
- When you have completed the window, click the [Save] button in top right-hand corner to save the changes and close the window.
---
Multi-user Installation:
Single-user Installation:
Go back to: