Conversions - Master, Conversions - Contact Classifications
This page describes the Conversions - Master and Conversions - Contact Classifications settings in the System module.
---
The Conversions - Master and Conversions - Contact Classifications settings together allow you to change the Code of a Contact Classification in the Contact Classifications setting, and in all Contacts, Customer Letters and other registers. For example, you might have been using Contact Classification "S" before realising that you should have been using Contact Classification "ST" instead. Using these settings, you can change Contact Classification "S" in every record in which it has been used to Contact Classification "ST". Follow these steps:
- Change to the System module and open the Conversions - Contact Classifications setting. Enter each pair of old and new Contact Classifications as shown in the illustration below. In the example illustrated, we will change "S" (the old Contact Classification) to "ST" (the new Contact Classification):
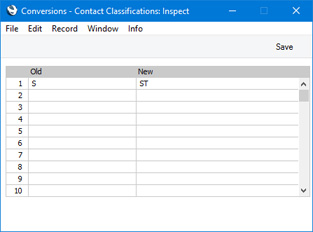
The new Contact Classification does not have to exist in the Contact Classifications setting. In this example, if "ST" is not an existing Contact Classification, Contact Classification "S" will be changed to "ST" by the conversion process and so "S" will no longer exist. If "ST" is an existing Contact Classification, Contact Classification "S" will be deleted. In effect, this will mean that you are merging "S" with "ST".
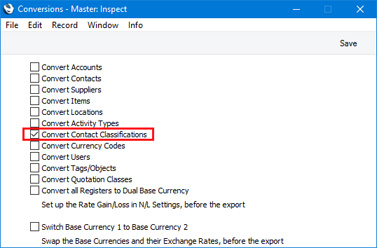
- Remaining in the System module, open the Conversions - Master setting and select the Convert Contact Classifications option:
- Make a text or timed back-up of your database and quit Standard ERP.
- Remove the Standard ERP database file (named "Hansa.HDB") from the folder or directory containing your Standard ERP application.
- Launch Standard ERP again. Because there is now no "Hansa.HDB" file, the 'Welcome to Standard ERP' window will appear. Select the [Restore from Backup] option.
- When the 'Import files available' window appears, choose to import the back-up file that you created in step 3.
- During the import process, the new Contact Classification will be applied to all records with the old Classification. In the example, Contacts, Customer Letters and other records that had Classification "S" will be given the new Classification "ST".
Note that use of the old Contact Classification in some settings (settings of types 1 and 2 as described here) will not be updated. Examples include Legal Record Numbers and several settings in the Business Alerts module. You will need to update these settings yourself to ensure that they contain valid Contact Classifications.
- Return to the Conversions - Master setting in the System module and turn off the option to Convert Contact Classifications.
- Return to the Conversions - Contact Classifications setting and delete everything line by line.
If you have more than one Company in your database, you must repeat steps 1 and 2 above in every Company in which the conversion is to take place. In all other Companies, leave the Conversions - Contact Classifications setting empty and do not tick any of the options in the Conversions - Master setting. If you want a different conversion to take place in another Company, enter old and new Contact Classifications in the Conversions - Contact Classifications setting in that Company as necessary, and select the option to
Convert Contact Classifications in the Conversions - Master setting in that Company as well.
If the Contact Classifications setting is shared, you should repeat steps 1 and 2 above in every Company that shares it. For example, if you have three Companies and Companies 2 and 3 are sharing the Contact Classifications setting, follow steps 1 and 2 in Companies 2 and 3.
If the Contact Classifications setting is shared and is stored in Company 0 (i.e. in the Shared Registers setting in the Technics module, the In Company field is empty), you should again repeat steps 1 and 2 above in every Company that shares the register. Then, follow the procedure described above, but replace steps 5 and 6 with the following:
- Launch Standard ERP again. Because there is now no "Hansa.HDB" file, the 'Welcome to Standard ERP' window will appear. Then:
- Close the 'Welcome to Standard ERP window using the close box .
- You will be prompted to enter a new Company: a Code and Name will be sufficient. Press [Save].
- You will be presented with a blank screen: quit Standard ERP and restart.
- Repeat steps 1 and 2.
- Ensure you are in the System module and use the 'Automatic' or 'Manual file search' import functions to import the back-up file that you created in step 3.
Steps 1 and 2 will cause the old Contact Classification to be replaced by the new one in every register (e.g. in
Contacts,
Customer Letters, etc) in the relevant Companies. The new step 5 will cause the old Contact Classification to be replaced by the new one in the Contact Classifications setting in Company 0.
---
Settings in the System module:
- Introduction
- Access Groups
- Active Users
- Auto Actions
- Bank Holidays
- Base Currency
- Base Currency Rates
- Cloud Security
- Company Date and Numeric Format
- Company Info
- Configuration
- Conversions - Master, Conversions - Accounts and VAT Code
- Conversions - Master, Conversions - Activity Types
- Conversions - Master, Conversions - Contact Classifications
- Conversions - Master, Conversions - Contacts
- Conversions - Master, Conversions - Currency Codes
- Conversions - Master, Conversions - Items
- Conversions - Master, Conversions - Locations
- Conversions - Master
- Conversions - Master, Conversions - Suppliers
- Conversions - Master, Conversions - Tags/Objects
- Conversions - Master, Conversions - Users
- Countries
- Countries Regions
- Currency Round Off
- Days and Months
- Departments
- Discount Options
- Display Groups
- Exchange Rates Settings
- Form Settings
- Global Warnings on UnOKed Records
- Internet Enablers
- Journaling
- KPIs
- Languages
- Locking
- Locking Exceptions
- Number Series Defaults
- Opened Windows History
- Optional Features
- Password Security
- Printers
- Reporting Periods
- Round Off
- Sales Groups
- Single Functions
- Special Days
- Styles
- Sub-Ledger Control Accounts
- Task Manager Access
- User Warnings on UnOKed Records
- Values in Text
- VAT Number Masks
- Weeks
Go back to: