Entering a Goods Receipt - Items Card Part 1 (Flips A-D)
This page describes the fields on flips A-D of the 'Items' card in the Goods Receipt window. Please follow the links below for descriptions of the other cards:
---
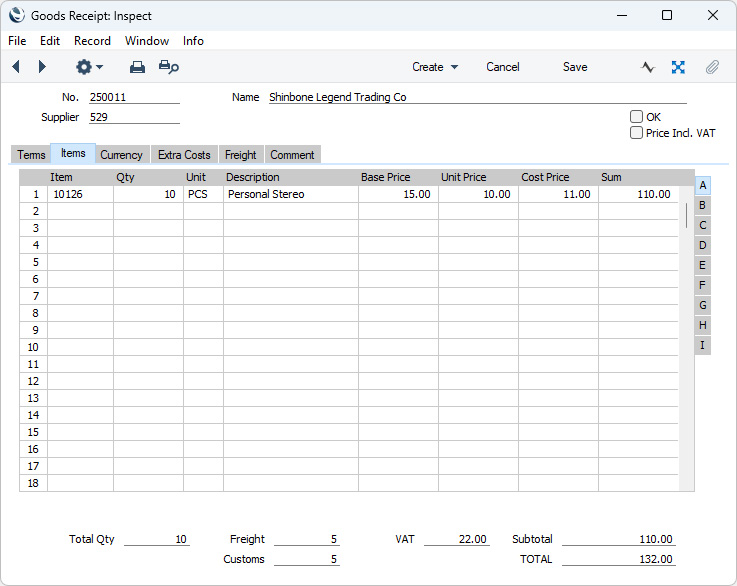
Use the grid on the 'Items' card to list the Items being received into stock. This grid is divided into nine horizontal flips. When you click (Windows/macOS) or tap (iOS/Android) on a flip tab (marked A-I), the two or three right-hand columns of the grid will be replaced.

Before adding any rows to a Goods Receipt, ensure that the Currency and Exchange Rate specified are correct. If you specify an Exchange Rate, all prices transferred from the Purchase Item or Item registers will be converted. If you then change the Currency or Exchange Rate or you change the Trans. Date and the Exchange Rate changes as a consequence, prices of the Items already in the Goods Receipt will be updated.
If you are using Windows or macOS, you can add rows to a Goods Receipt by clicking in any field in the first blank row and entering appropriate text. To remove a row, click on the row number on the left of the row and press the Backspace key. To insert a row, click on the row number where the insertion is to be made and press Return.
If you are using iOS or Android, you can add rows by tapping the + button below the matrix. To remove a row, long tap on the row number on the left of the row and select 'Delete Row' from the resulting menu. To insert a row, long tap on the row number where the insertion is to be made and select 'Insert Row' from the resulting menu.
When you create a Goods Receipt from a Purchase Order, every Order row will be copied to the Goods Receipt. If the Goods Receipt is partial, reduce the Qty in any of the rows as appropriate. You can also remove entire rows. Subsequent Goods Receipts that you create from the Purchase Order will usually only include the rows that have not already been fully received. However, if you are using the Set Goods Receipt Quantity to zerooption in the Purchase Order Settings setting, the default Qty for each Item will be zero. You can change the Qty in any row as appropriate but you will not be able to enter a quantity greater than was ordered (unless you are using the Allow Over Receive option in the Stock Settings setting). You can remove entire rows, but you will not be able to add or insert rows.
If an Item is Serial Numbered, you will be prompted to enter Serial Numbers before saving (unless you are using the No Serial No. on Goods Receipts option in the Stock Settings setting).
Flip A - Item
- Paste Special
Item register
- Enter the Item Number, Bar Code or Alternative Code of the Item received. You can also add Items to a Goods Receipt using the 'Item Search' function on the Operations menu (Windows/macOS) or Tools menu (iOS/Android).
- A warning will appear if you specify an Item that is not a Stocked Item.
- You cannot change Item Numbers in Goods Receipts that you created from Purchase Orders.
- Qty
- The received quantity, to be added to stock.
- This figure refers to the main Unit of the Item (the Unit you use to sell the Item, shown on the 'Pricing' card of the Item record and in the field immediately to the right). This may not be the Unit used by the Supplier. For example, your firm might sell an Item in single units, but the Supplier might sell in boxes of 12. If so, enter "12" to the Unit Conversion field in the Purchase Item for the Item/Supplier combination. Then, if you receive 240 of the Item into stock, enter "240" here as the Quantity. The Supp. Qty field on flip D will be calculated to show "20", i.e. the quantity from the Supplier's point of view (Quantity divided by Unit Conversion). Alternatively (and preferably if you are creating the Goods Receipt by reading from the Supplier's delivery note), enter the quantity on the document to the Supp. Qty field, since this quantity will refer to the Supplier's Unit. The appropriate figure will be placed here automatically.
- In a Goods Receipt that you create from a Purchase Order, the default Qty will be the outstanding order quantity. You will be able to reduce the Qty in a row if needed, but you will not be able to enter a quantity greater than was ordered unless you are using the Allow Over Receive option in the Stock Settings setting. You will not be able to add or insert rows.
- If you need the Qty in each row always to be zero in new Goods Receipts created from Purchase Orders (perhaps because you will use the Scan Barcode field on the 'Terms' card to fill in received quantities), select the Set Goods Receipt Quantity to Zero option on the 'Del. Terms' card in the originating Purchase Order before creating the Goods Receipt. This option will be selected by default if you have selected the Set Goods Receipt Quantity to Zero option in the Purchase Order Settings setting.
- Negative values are not accepted.
- Unit
- The Unit of the Item will be brought in from the Item record when you enter the Item Number. It cannot be changed.
- Description
- The Item description is brought in from the Item record when you enter the Item Number. It may be altered.
- Base Price
- This field shows the unit Base Price (retail price) of the Item in your home Currency, taken from the Item record.
- Unit Price
- The normal purchase price in the Currency of the Goods Receipt, taken from the Purchase Order, from the Purchase Item for the Item/Supplier combination or from the Cost Price field in the Item record. This figure excludes any extra costs such as delivery or customs duties, but includes VAT if you have selected the Price Incl. VAT option on the 'Terms' card. You can change the price in an individual Goods Receipt (subject to access rights mentioned below).
- If you change the Currency and/or Exchange Rate of the Goods Receipt or you change the Trans. Date and the Exchange Rate changes as a consequence, the figure in this field will not be recalculated. Instead, it will be treated as being a fixed price (e.g. it will be treated as being in the new Currency) and the Cost Price (below) will be recalculated.
- You can prevent certain users from changing Unit Prices (and Cost Prices, Sums, Extra Costs, Freight Costs, Customs Costs and Extra Costs 1-5) in Goods Receipts using Access Groups, by denying them access to the 'Change Cost on Goods Receipt' Action.
- The Unit Price is also visible on flip C.
- Cost Price
- The Unit Price of the Item in your home Currency (or in Base Currency 1 as defined in the Base Currency setting in the System module), including any freight and other additional costs. The figure in this field will not include VAT, even if you have selected the Price Incl. VAT option on the 'Terms' card.
- When you mark the Goods Receipt as OK and save, the Cost Price will be the unit value with which the Item(s) in the row will be received into stock, and it is the unit value that will be debited to the Stock Account.
- You can use the Upd. Cost Price at Goods Receipt options on the 'Costs' card of each Item record to have its Cost Price updated automatically whenever you save a Goods Receipt after marking it as OK. The following options are available:
- Last Purchase Cost (incl. extras)
- The figure in this field (i.e. the unit price including any freight and other additional costs) will become the new Cost Price of the Item.
- Weighted Average
- The Cost Price of the Item will be updated to the latest Weighted Average including this figure.
- Last Purchase Cost (excl. extras)
- The figure in the Unit Price field (converted to your home Currency or Base Currency 1) will become the new Cost Price of the Item, so extra costs such as freight and other additional costs will be excluded.
- In all cases, this figure will be rounded up or down according to the Cost Price rounding rules set in the Round Off setting in the System module before it is used to update the Cost Price of the Item.
- You can prevent certain users from changing Cost Prices (and Unit Prices, Sums, Extra Costs, Freight Costs, Customs Costs and Extra Costs 1-5) in Goods Receipts using Access Groups, by denying them access to the 'Change Cost on Goods Receipt' Action.
- You can control whether it is possible to mark a Goods Receipt as OK if the Cost Price of at least one Item varies from its Weighted Average by more than a specified percentage. Please refer to the Cost Price Variance Alerts for details about this feature.
- The Cost Price is also visible on flip C.
- Sum
- The row total, including any additional costs, in your home Currency (or in Base Currency 1 as defined in the Base Currency setting in the System module). The Sum will include VAT if you have selected the Price Incl. VAT option on the 'Terms' card.
- You can prevent certain users from changing Sums (and Unit Prices, Cost Prices, Extra Costs, Freight Costs, Customs Costs and Extra Costs 1-5) in Goods Receipts using Access Groups, by denying them access to the 'Change Cost on Goods Receipt' Action.
Flip B- Location
- Paste Special
Locations setting, Stock module
- You can enter a separate stock Location for each row of the Goods Receipt.
- If the Item is Serial Numbered at the Batch level, you can receive units with the same Batch Number into different using Locations separate Goods Receipt rows, but they must have the same Unit and Cost Prices and Best Before Dates.
- Serial No.
- If the Item uses Serial Numbers or batch numbers, you should enter a valid number here.
- For Items with Serial Numbers at the Unit level, if the received quantity is greater than 1 you will usually need to add an appropriate number of separate rows each with a Qty of 1, allowing you to enter Serial Numbers individually. A Goods Receipt that you have created from a Purchase Order will contain the appropriate number of rows for these Items, depending on the Qty in the Purchase Order. However, you can use a single row for a Qty greater than 1 if you are using the Generate Bulk Serial Numbers automatically option: this option is described two paragraphs below.
- You can record Items with Serial Numbers at the Batch level on a single Goods Receipt row, where the Qty is the size of the batch. A Goods Receipt created from a Purchase Order will contain a single row for such an Item, with the Qty being the outstanding quantity from the Purchase Order. If in fact you receive more than one batch, use the 'Split Row' Row menu (Windows/macOS) or Tools menu (iOS/Android) function to divide the row into two, and then enter the appropriate quantities and Serial Numbers in both rows. The 'Split Row' function will ensure that both Goods Receipt rows remain connected to the originating Purchase Order row, so the Received Quantities in that row will be correct. You can use the same Batch Number in more than one row, but the Unit and Cost Prices and Best Before Dates must be the same in those rows. This can be useful if you receive a large number of Items with the same Batch Number, which you need to store in different Positions or Locations. You will not be able to use a particular Batch Number in more than one Goods Receipt.
- If you receive a large quantity of an Item that is Serial Numbered at the Unit level into stock, use the 'Generate Serial No' function on the Operations menu (Windows/macOS) or Tools menu (iOS/Android) to help enter consecutive Serial Numbers. This will be most useful for companies that generate their own Serial Numbers. Enter the Item Number in the appropriate number of rows and specify the lowest Serial Number for the first one. Then select the function: the remaining rows will be given Serial Numbers, each incremented by one. Alternatively, using the Generate Bulk Serial Numbers automatically option in the Serial Number Tracking setting will mean that you will be able to enter a range of Serial Numbers in this field. If you enter a Qty and then the first Serial Number in this field, it will be overwritten by a range of Serial Numbers separated by a colon (:) when you move to the next field. If you need to add a Serial Number that does not fit in the range, you will need to use the 'Split Row' function as described in the previous paragraph. If you change the Qty (or the Supp. Qty), the number of Serial Numbers in the range will be updated automatically. If you change the last Serial Number in the range, the Qty (and the Supp. Qty) will be updated. This field can only contain a range if you are using the Generate Bulk Serial Numbers automatically option.
- By default, if an Item is one that uses Serial Numbers, you must specify a Serial Number here before you can mark the Goods Receipt as OK and save. If you do not know the Serial Number at this stage, you should use the No Serial No. on Goods Receipts option in the Stock Settings setting. This will allow you to mark Goods Receipts as OK without Serial Numbers, but you will still have to specify them in goods out transactions.
- Note that Serial and Batch Numbers cannot contain spaces.
- Best Before
- If the Item is perishable, enter a Best Before date here.
- If you have entered a Serial or Batch Number as well, when you mark the Goods Receipt as OK and save, a record will be added to the Batch Specifications setting in the Stock module recording the Best Before date of the Item or Batch. You can view this record immediately by selecting 'Open Batch Specification' from the Row menu (Tools menu if you are using iOS or Android).
- When you sell the Item, the Best Before date will be brought in to the Delivery record. If you want it to be printed on delivery documentation, include the "Best Before Date" field in your Form Template design. If you want to prevent the sale of Items that have passed their Best Before date, use the Batch Status and Batch Quality Control settings, as described here.
- Status
Paste Special Batch Status setting, Service Orders module
- If the Item in the row is one that requires periodic quality control testing to ensure that it is safe or otherwise suitable for sale and you carry out an initial test when you receive it into stock, you can enter the result (i.e. a Batch Status) of the test here. If you have specified a Batch Status in this field in a row containing a Serial Numbered Item, a record will be added automatically to the Batch Quality Control setting in the Service Orders module when you mark the Goods Receipt as OK and save. The Batch Quality Control record will be marked as OK automatically, meaning that it has been activated.
- You can also use a more manual method to create the Batch Quality Control record, by highlighting the relevant row in the Goods Receipt and then selecting 'Quality Control' from the Row menu (Windows/macOS) or Tools menu (iOS/Android). You can also enter the Batch Quality Control record directly to the Batch Quality Control setting in the Service Orders module.
- Please refer to the Batch Quality Settings page for more details about quality control testing.
Flip C- Price Varian.
- Please refer to the Price Variances page for details about this field.
- Extra Cost
- Default taken from
Item (Extra Cost)
- Enter here any extra costs per unit that you will incur when receiving the Item into stock. You can either a unit cost (in your home Currency (or in Base Currency 1 as defined in the Base Currency setting in the System module)), or you can enter a percentage followed by the % character. The percentage will be applied to the Unit Price of the Item in your home Currency. The Extra Cost will be included in the Cost Price figure to the right (and on flip A).
- If you have specified an Extra Cost on the 'Costs' card of the relevant Item record, that figure will be placed here as a default.
- In the Nominal Ledger Transaction generated from the Goods Receipt, any costs in this field will be included in the debit posting to the Stock Account. They will also be credited to the Extra Costs Account specified in the Account Usage Stock setting. Note that the Extra Cost Account is an Expense Account, not an Accrual Account, and that this Extra Cost will not be included in any Purchase Invoices that you create from the Goods Receipt or from the originating Purchase Order. The Extra Cost field is therefore intended for internal costs for which you will not be invoiced. If you need Extra Costs to be accrued and included in the Purchase Invoice, enter them in the Freight or Customs fields or any of the Extra Cost 1-5 fields (depending on the nature of the Extra Cost) on flip H.
- Usually the Nominal Ledger Transaction will only contain a single credit posting to the Extra Cost Account, irrespective of the number of rows in the Goods Receipt. No Tags/Objects will be assigned to this posting. If the rows in the Goods Receipt have Tags/Objects and you would like there to be separate credit postings to the Extra Cost Account for each Tag/Object, select the Post Extra Cost per Tag/Object option on the 'Variances' card in the Account Usage Stock setting.
- You can prevent certain users from changing Extra Costs (and Unit Prices, Cost Prices, Sums, Freight Costs, Customs Costs and Extra Costs 1-5) in Goods Receipts using Access Groups, by denying them access to the 'Change Cost on Goods Receipt' Action.
- V-Cd
- Paste Special
VAT Codes setting, Nominal Ledger
- When you create a Purchase Invoice from the Goods Receipt, the VAT Code entered here will determine the rate at which VAT will be charged on this Item and the Input VAT Account to be debited. If you created the Goods Receipt from a Purchase Order, the VAT Code will be taken from the appropriate Purchase Order row.
- If you have selected the Price Incl. VAT option on the 'Terms' card, the relationship between the Unit Price and the Cost Price will depend on the VAT Code specified here.
- Please refer here for details about how the VAT Code in each row will be chosen when you enter a Goods Receipt directly to the Goods Receipt register.
- T-Cd
- Paste Special
Tax Templates setting, Nominal Ledger
- In some countries, Tax Templates are used instead of VAT Codes. VAT Codes should be used where each sales and purchase transaction (e.g. each row in a Goods Receipt) is taxed at a single rate, while Tax Templates should be used where different taxes and/or several tax rates are applied to one transaction (e.g. to one row).
- If you need to use Tax Templates, you should choose the Use Tax Templates for Tax Calculation option in the Transaction Settings setting in the Nominal Ledger. This option will cause a Tax Template field ("T-Cd") to appear here instead of the VAT Code field ("V-Cd"). Having done so and having entered your Tax Templates in the Tax Templates setting also in the Nominal Ledger, you should specify the Tax Templates that are to be used in each Goods Receipt row here.
- Please refer here for details about how the Tax Template in each row will be chosen.
Flip D- Supp. Item No.
- The Code allocated to the Item by the Supplier. If you created the Goods Receipt from a Purchase Order, the Supplier's Item Number will be brought in from flip B of that Purchase Order.
- If you need the Supp. Item No. to be printed on the Goods Receipt form, include the "Supplier Item No." field in your Form Template design. If you want to print the Item Number from flip A in the document as well, include the "Item Code" field.
- S. Unit
- The Unit used by the Supplier for shipping and pricing the Item. This information will be taken from the Purchase Order or from the Purchase Item record for the Supplier/Item combination and cannot be changed.
- Supp. Qty
- The Supp. Qty is the number of units received into stock expressed using the Supplier's Unit above. This figure is dependent on the Unit Conversion field in the Purchase Item record for the Supplier/Item combination. For example, your firm might sell an Item in single units, but the Supplier might sell in boxes of 12. If so, enter "12" to the Unit Conversion field of the Purchase Item. Then, if you receive 240 of the Item into stock, enter "240" as the Qty on flip A. The Supp. Qty field will be calculated to show "20", i.e. the quantity from the Supplier's point of view (Qty divided by Unit Conversion). Alternatively (and preferably if you are creating a Goods Receipt by reading from a Supplier's Delivery Note), enter "20" here and the Qty on flip A will be calculated to show "240".
- If the Purchase Item does not have a Unit Conversion, or there is no Purchase Item, then this figure will be the same as the Qty on flip A.
- Coeff.
- Default taken from
Item
- The Unit Coefficient of the Item is shown here, taken from the 'Stock' card of the Item record. If you are maintaining stock quantities using different units of measurement, this coefficient is the ratio between those units of measurement.
Flips E-I of the 'Items' card are described in Part 2 here and the Footer is described here.
---
The Goods Receipt register in Standard ERP:
Go back to:
|


 Introduction to the Goods Receipt Register
