Opening Balances in the Nominal Ledger
In the Nominal Ledger, the task of entering opening balances has two stages. First, it is recommended that you enter balances for each Account as they stood at the end of the previous fiscal year. This is done using the
Brought Forward Balances register. This information should be available on the Trial Balance report obtained from your old system. Then, if appropriate, Transactions for the current year to date should be entered, using the
Transaction register.
Once all Balances and Transactions have been entered, print out a Trial Balance and compare it with that obtained from your old system. Any discrepancies should be investigated immediately: any delay will make this more difficult.
The following section assumes that a Chart of Accounts and a set of VAT Codes have already been defined. To enter Account balances as they stood at the end of the previous financial year to the Nominal Ledger, follow these steps:
- Select the Nominal Ledger module from the Modules menu.
- Click the [B/FW Balances] button in the Master Control panel or select 'BW Balances' from the Registers menu.
- Click [New] on the Button Bar.
- Enter the information as shown in the following illustration. Full details of the fields are to be found in the description of the Brought Forward Balances register. It is recommended that you choose a Transaction Date that is at the end of the previous fiscal year and that is, in any case, prior to the date when you will be starting work with Hansa.
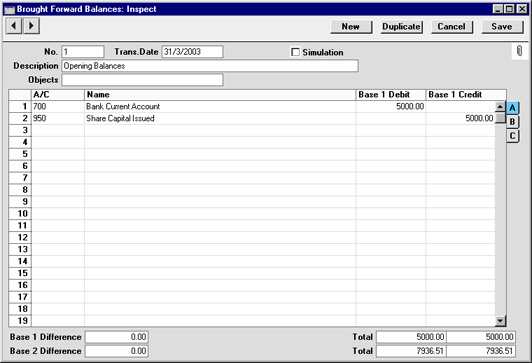
Use the Base 1 Debit and Credit fields for values in your home Currency. If you are using the Dual-Base currency conversion system you should already have defined which Currencies are to be used as Base Currencies 1 and 2. This system will be useful for companies that have offices in two countries that need to report in both Currencies, for companies operating in countries where there is a second Currency (usually the US Dollar or Euro) in common use in addition to the national one, and for companies in the Euro zone who retain their old national Currency for comparison purposes. If your country is a member of the European Monetary Union, the Euro should be defined as Base Currency 1. To record values in a second Currency, use the Base 2 Debit and Credit fields on flip B. To record values in a foreign Currency, use the fields on flip C. All values should be entered manually: no Currency conversion will take place because users will have many different methods of converting opening balance figures.
- The Brought Forward Balances screen does not have an OK check box, so Account Balances are updated as soon as the record is saved. Therefore, before clicking [Save], make sure that no mistakes have been made. One check is that the Debit and Credit totals are the same. If a mistake is discovered at a later date, you will be able to correct the record without difficulty.
- Finish with [New] (or use the Ctrl-N/⌘-N keyboard shortcut) if you wish to enter more Balances.
- If you are using Objects, you should enter a separate record to the Brought Forward Balances register for each Object and one for the total. For example, if you have a Cash Account with a balance of 100.00 that is divided between two departments so that 49.00 belongs to Department 1 and 51.00 to Department 2, enter three Brought Forward Balance records as follows:
- 1st record, Cash Account, no Objects, total figure (100.00)
- 2nd record, Cash Account, Object for Dept 1, figure for Dept 1 (49.00)
- 3rd record, Cash Account, Object for Dept 2, figure for Dept 2 (51.00)
- Finish with [Save] when you have entered the last Balance, and close the window by clicking the close box.
If you are starting to use Hansa in the middle of a financial year, you should now enter the Transactions for the current year so far. These should be entered from the original documentation, not copied from Transaction Journal reports produced from your old system. This will ensure that you do not enter any Transactions that relate to the Sales or Purchase Ledger. These will be entered later. Follow these steps:
- Using the Modules menu, ensure you are in the Nominal Ledger.
- Click the [Transactions] button in the Master Control panel or select 'Transactions' from the Registers menu.
- Click [New] on the Button Bar.
- Enter the information as shown in the following illustration. Full details of the fields are to be found in the description of the Transaction register. Ensure you use the same Transaction Date that was used when entering the Transaction to your previous system.
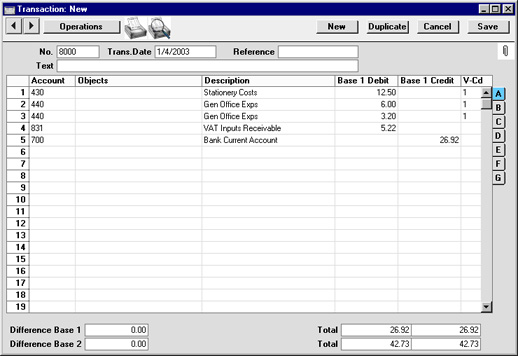
The Base 1 Debit and Credit fields should be used for values in your home Currency. Please refer here for details about using foreign Currencies in Nominal Ledger Transactions.
- The Transaction screen does not have an OK check box, so Account Balances are updated as soon as the Transaction is saved. Therefore, before clicking [Save], make sure that no mistakes have been made. One check is that the Debit and Credit totals are the same.
- Finish with [New] (or use the Ctrl-N/⌘-N keyboard shortcut) if you wish to enter more Transactions.
You can use another feature when you need to enter several Transactions quickly in one sitting and don't want to interrupt your typing by reaching for the mouse. Enter the debits in a Transaction first and then, with the cursor in the Base 1 Credit field in the final credit row, press the Return or Enter key twice. The first pressing causes Hansa to enter the correct credit amount to balance the entry for you. The second saves, closes and commits the Transaction to the Nominal Ledger and opens a new, empty, Transaction.
- Finish with [Save] when you have entered the last Transaction, and close the window by clicking the close box.