Routines - Documents
Documents are more formal printouts, usually printed using forms, such as invoices or delivery notes, for sending to third parties (e.g. Customers or Suppliers). Enterprise by HansaWorld offers several documents in each module.
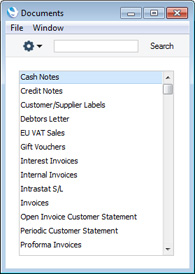
When you click the [Documents] button in the Master Control panel or use the Ctrl-D (Windows and Linux) or ⌘-D (Mac OS X) keyboard shortcut, a window will be opened, containing a list of the available documents. The documents available vary with the selected module: the illustration below shows those in the Sales Ledger module:
Choose a document by clicking an item in the list once. If you need to set the page size, number of copies and other printer options for the document, choose 'Page Setup' from the File menu. You can also use this function to choose the printer on which the document is to be printed. These settings will be used whenever you print the particular document until you choose 'Page Setup' once again, or until you choose 'Remove Page Setup' from the Operations menu of the 'Documents' list.
Once you have done this, double-click the document name in the list. A specification window will open, where you can choose the record or records that you want to be printed. For example, when printing Invoices, you can use the specification window (illustrated below) to choose the Invoices that you want to print.
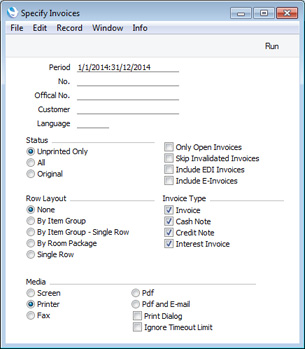
While the specification window is open, you can choose the destination of the printout by selecting one of the Media options at the bottom of the window. If your database is in restricted mode, you can only use the Screen option. You can only use the Fax option on a Windows machine with Fax Services installed. If you need to use the Pdf or Pdf and E-mail options, you may need to use Styles that will embed fonts in the resulting pdf files. You may also need to choose a code page and page setup, which you can do in the Form Properties (the 'Page Setup' function mentioned earlier in this section does not apply when you choose the Pdf or Pdf and E-mail Media options). Please refer
here for details about Styles and
here for details about Form Properties.
Once you have specified the documents that you want to be printed and have chosen a print destination, click [Run] to print the documents.
Threaded Documents
In multi-user systems, a user printing many documents may cause performance to suffer for the other users. If you have a suitable server (i.e. a multiple-core or multiple-processor server), you can use the Documents on Threads option to attempt to optimise the performance for all users. You will find this option on the 'Performance' card of the Optional Features setting in the System module.
Choosing the Documents on Threads option will mean that in most cases document processing on the server will run on a separate thread, reducing the disturbance to other users. The exceptions are documents that write to the database when they are printed. Examples include Invoices, Receipts and Payments, which update the database to prevent repeated printing of the same record, and Open Invoice Customer Statements and Reminders, which can increase the Reminder Level in outstanding Invoices.
You will need to restart the server after changing this option.
Defining Documents
You must assign a Form to each document before you print it for the first time. The Form is the design or layout of the document. You can have a single Form for each document, or you may have several versions of a particular type of document, to be used on different occasions. To assign a Form or Forms to a document, open the 'Documents' list as described above, highlight the document in the list, and select 'Define Document' from the Operations menu. Click the following button to access the Operations menu:

The example described below imagines you to have two different invoice layouts, one for French language customers, and one for all other customers. In this case, you will need two Forms named, for example, "INV" and "INVFRE". Design these Forms using the Form register in the System module. Full details of this design process can be found
here.
Having designed the two Forms, use the 'Define Document' function to specify when each one will be used, as follows:
- Use the [Module] button in the Master Control panel or the Ctrl-0/⌘-0 keyboard shortcut to choose the module in which the document is to be found. In the case of the Invoice document, this is the Sales Ledger.
- Click the [Documents] button in the Master Control panel or use the Ctrl-D/⌘-D keyboard shortcut. The 'Documents' list window will be opened showing a list of available documents. Highlight the document that you need to define ('Invoices' in the example).
- Select 'Define Document' from the Operations menu. Specify "INV" as the Form on the first row and "INVFRE" as the Form on the second row:
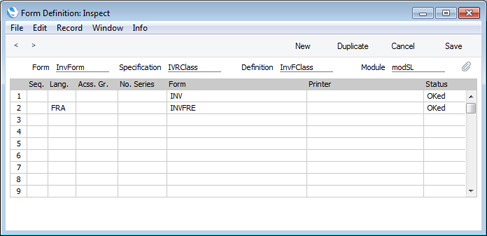
The "FRA" Language has been specified in the second row, meaning that the "INVFRE" Form will be used when you print Invoices with this Language. No Language has been specified in the first row, so the "INV" Form will be used when you print Invoices with all other Languages. The Status in both cases is "OKed". This means the Invoices must be approved (marked as OK and saved, so that they are posted to the Sales and Nominal Ledgers) to use these Forms when you print them. As there is no row with the "Not OKed" Status, it will not be possible to print unapproved Invoices.
In more detail, the fields in the 'Form Definition' window are as follows:
- Seq.
- Use this column if you want to print two (or more) different documents from a single command. For example, you might want to print a Delivery Note and an Invoice together. In this case, you would enter the Delivery Note with Seq. no. 1 on the first row of the grid, and the Invoice with Seq. no 2 on the second row.
- Lang.
- If necessary, enter a Language code in some or all rows. You can use 'Paste Special' (Ctrl-Enter or ⌘-Enter) to select from a list of Languages as set up in the System module. The 'Paste Special' feature is described here. You can also assign a Language to each Customer and/or Invoice. When you print an Invoice with a particular Language, the row with the same Language will determine the Form that will be used. If there is no document with the relevant Language, the first one with no Language will be used. This allows you to ensure that, for example, an English Invoice will be printed for all Customers except those who have been assigned the Language code for French, for whom a French Invoice will be printed.
- Acss. Gr.
- You can assign a particular Form to an Access Group. If you log in as a member of this Access Group, when you print the document, the system will automatically select the Form assigned to your Access Group. Use 'Paste Special' to select from a list of Access Groups as set up in the System module.
- Ser No
- You can assign a particular Form to a Number Series, so that records with numbers from that series will be printed using the assigned Form. For example, if you use different number sequences for Invoices and Credit Notes, you can use this feature to print Invoices and Credit Notes using different Forms.
- Form
- Enter the Form Code of the relevant Form in this field. This field is case sensitive: you should only use upper case characters. Use 'Paste Special' to select from a list of Forms as set up in the System module. Please refer to the description of the Form register for details about designing Forms.
- Printer
- Enter a printer code to send the printout to extra printers defined in the System module (use 'Paste Special' to obtain a selection list). Leave this field blank to use the default printer as selected in the Windows Control Panel or the Mac OS X Print & Fax System Preference.
- Status
- You can use this field to use different Forms when printing approved and unapproved records e.g. you might want to use a Form entitled "Proforma Invoice" when printing an unapproved Invoice, and a different Form entitled "Invoice" when printing an approved Invoice. In this case, enter two rows in the 'Form Definition' window, one for the Proforma and one for the standard Invoice, with appropriate Status in each case. An approved Invoice is one that you have marked as OK and saved i.e. one that has been committed to the Sales and Nominal Ledgers.
- Enter one of the following values in this field, using 'Paste Special' to check the spelling is correct:
- OKed
- The specified Form will only be used when you are printing an approved record.
- Not OKed
- The specified Form will only be used when you are printing an unapproved record.
- All
- The specified Form will be used when you are printing both approved and unapproved records.
You can use this feature as a security measure. If you restrict printing to approved records only, and you also use Access Groups to control who can approve records, this will help prevent the fraudulent creation and printing of unauthorised records such as Purchase Orders and Invoices. You can also use Access Groups to restrict access to the 'Form Definition window. For example, to make sure unauthorised Purchase Orders cannot be printed:
- In the 'Form Definition' window for Purchase Orders, set the Status to "OKed" in every row. This will mean that Purchase Orders can only be printed if they have been approved.
- Use Access Groups to restrict access to the 'OKing Purchase Orders' Action. This will control who can approve Purchase Orders.
- Use Access Groups to give no access to the Purchase Order document to most users (i.e. set the Level to "None" for this document). These users will be able to open a Purchase Order and print it, but they will not be able to open the 'Form Definition' window for Purchase Orders to change the Status to "Not OKed" or "All".
- Click [Save] to save the document definition. In this example, when you print Invoices from now on, the correct Form will be selected automatically according to the Language of the Customer, without further user intervention.
You can repeat this process for almost every document as required.
You can also use the Language to specify the printer that will be used to print a document. This can include sending the document to a fax machine, if your hardware can support this feature. To do this, enter separate rows in the 'Form Definition' window for printing and faxing. The fax row should have a dedicated Language (e.g. "FAX") in the Lang field.
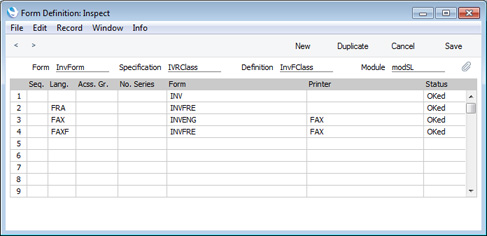
In this example, Invoices will be printed as follows:
- The first row determines that Invoices with no Language will be printed using the "INVENG" Form on the default printer.
- The second row determines that Invoices with the "FRA" Language (French) will be printed using the "INVFRE" Form on the default printer.
- The third row determines that Invoices with the "FAX" Language will be printed using the "INVENG" Form on the "FAX" printer (fax machine).
- The last row determines that Invoices with the "FAXF" Language (i.e. Invoices in French that are to be faxed) will be printed using the "INVFRE" Form on the "FAX" printer (fax machine).
You can change the Language in a record before printing it, to ensure it is printed on the correct printer or fax machine.
Individual Documents
Please click the links for details about the individual documents in the following modules:
Go back to: