Introduction to Documents in the Sales Ledger
The 'Documents' function permits the printing in batches of particular documents or Forms. It is selected using the 'Documents' item on the File menu or by clicking the [Documents] button in the Master Control panel.
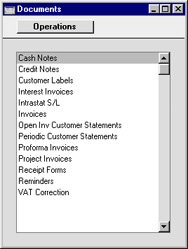
On selecting the function, the window illustrated below appears, listing the documents which can be printed from the Sales Ledger. Each item in the list ("Document") will be printed using a different Form.
To print a document, follow this procedure:
- Highlight the appropriate item in the list.
- Using the Operations menu, determine the print destination of the documents. The default is to print to the chosen printer. Other options available are the Print Queue or Fax (if your hardware can support this feature).
- Double-click the document name or press the Enter key. A specification window will then appear, where you can determine the information that is to be included in the printed documents (e.g. which Invoices or Receipts are to be printed). The specification window for each document is described in detail on the pages describing each document.
- Click [Run] to print the documents.
- Close the 'Documents' window using the close box.
To determine which Form is printed by each option in the 'Documents' window, follow this procedure (when Hansa is supplied, a sample Form is attached to each document):
- For each option, design a Form (or change the sample Form supplied to reflect your own requirements) using the Form register in the System module.
- Change to the Sales Ledger and open the 'Documents' window using the 'Documents' item on the File menu or by clicking the [Documents] button in the Master Control panel.
- Highlight each item in the list and select 'Define Document' from the Operations menu. The subsequent window is used to assign a Form (or more than one Form) to each document and is fully described here For example, each option can use different Forms determined perhaps by the Language of the Customer or the Number Series of the Invoice or Receipt.
- For each document, the 'Define Document' function only needs be used once. After this has been done, Form selection will be automatic.
The selection process for each document is described on the pages describing each document. In all cases, leave all the fields in the specification window blank if documents for all the records in the database are to be printed. If it is necessary to restrict the number of documents printed, use the fields as described.
It is often possible to report on a selection range, such as a range of Invoice Numbers. To do this, enter the lowest and highest values of the range, separated by a colon. For example, to report on Customers 001 to 010, enter "001:010" in the Customer field. Depending on the field, the sort used might be alpha or numeric. In the case of an alpha sort, a range of 1:2 would also include 100, 10109, etc.