Introduction to Settings in the Assets Module
The Assets module has the following settings: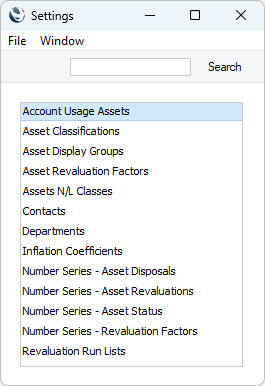
To edit a setting when you are using iOS or Android, ensure you are in the Sales Ledger using the [Switch Module] button in the Navigation Centre. Select 'Settings' from the Tools menu (with 'wrench' icon). A list similar to the one shown above appears. Then, tap the item that you need in the list.
Please follow the links below for details about each setting:
- Introduction
- Account Usage Assets
- Asset Categories
- Asset Classifications
- Asset Display Groups
- Asset N/L Classes
- Contacts
- Departments
- Depreciation Models
- Inflation Coefficients
- Number Series - Asset Disposals
- Number Series - Asset Revaluations
- Number Series - Asset Status
- Number Series - Revaluation Factors
- Revaluation Factors, Revaluation Run Lists
- Home page for Assets module manual
- Home page for Standard ERP manual
Account Usage Assets
This page describes the Account Usage Assets setting in the Assets module.---
The Account Usage Assets setting allows you to choose the Accounts that will be used as defaults in your Asset Simulations and Transactions. Take care to ensure that the Accounts specified here exist in the Account register, otherwise there is a risk that Simulations and Transactions will not be created.
To open the Account Usage Assets setting, first ensure you are in the Assets module. Then, if you are using Windows or macOS, click the [Settings] button in the Navigation Centre and then double-click 'Account Usage Assets' in the 'Settings' list. If you are using iOS or Android, select 'Settings' from the Tools menu (with 'wrench' icon) and tap 'Account Usage Assets' in the 'Settings' list. Fill in the fields as described below. Then, to save changes and close the window, click the [Save] button (Windows/macOS) or tap √ (iOS/Android). To close the window without saving changes, click the close box (Windows/macOS) or tap < (iOS/Android).
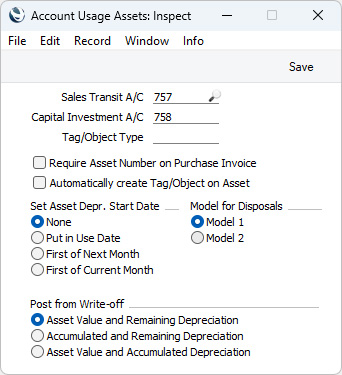
- Sales Transit A/C
- Paste Special
Account register, Nominal Ledger/System module
- Specify here the Account that is to be debited with the Sales Price of an Asset when you sell it, which you can do using a Disposal record of Type "Sale".
- Capital Investment A/C
- Paste Special
Account register, Nominal Ledger/System module
- If you will be creating "Put In Use" Transactions to record the implementation of your Assets in the Nominal Ledger, the Purchase Value of each Asset will be credited to the Account that you specify here.
- If you revalue an Asset and create a Simulation from the Revaluation using the 'NL Simulation' function on the Create menu (Windows/macOS) or + menu (iOS/Android), an increase in value will be credited to this Account, while a decrease will be debited to this Account.
- If you revalue an Asset and create a Simulation from the Revaluation using the 'NL Simulation' function on the Create menu (Windows/macOS) or + menu (iOS/Android), an increase in value will be credited to this Account, while a decrease will be debited to this Account.
- Tag/Object Type
- Paste Special
Tag/Object Types setting, Nominal Ledger
- If you need to create Tags/Objects that are specific to each Asset, there are two methods that you can use:
- You can have a Tag/Object created automatically whenever you save an Asset record for the first time. To use this method, select the Automatically create Tag/Object on Asset option below.
- After saving an Asset record, you can create a Tag/Object by selecting 'Object' from the Create menu (Windows/macOS) or + menu (iOS/Android).
- In both cases, the new Tag/Object will be assigned to the Asset automatically, being added to any Tags/Objects that are already there. The existing Tags/Objects will not be overwritten.
- The Inventory Number of the Asset will be used as the Code of the new Tag/Object. For example, Tag/Object 001 will be created from Asset 001.
- If you need the new Tag/Object to be assigned to a Tag/Object Type, specify that Tag/Object Type in this field. If you have specified a Start String in the Tag/Object Type, it will be included in the Codes of the new Tags/Objects. If you have specified a Length (maximum numbers of characters) in the Tag/Object Type, take care that it is sufficient for Tag/Object Codes to be constructed from the Start String and Inventory Numbers.
- You can have a Tag/Object created automatically whenever you save an Asset record for the first time. To use this method, select the Automatically create Tag/Object on Asset option below.
- Require Asset Number on Purchase Invoice
- This option controls behaviour when you enter a Purchase Invoice with at least one row in which the Cost Account is also an Asset or Asset 2 Account that you have specified in any row in the Asset N/L Classes setting. If you are using this option, it will be mandatory to specify the Inventory Number of an Asset on flip E of the Purchase Invoice row. This in turn will mean you also have to specify an Asset Trans. Type, signifying that the Purchase Invoice row is to cause a new Asset record to be created or an existing one to be updated. Please refer to the description of the fields on flip E of the 'Costs' card of the Purchase Invoice window at the bottom of this page for more details.
- Automatically create Tag/Object on Asset
- Select this option if you would like Tags/Objects to be created automatically from and assigned to Asset records when you save them for the first time. Please refer to the description of the Tag/Object Type field above for more details.
- Set Asset Depr. Start Date
- When you specify a Used From date in an Asset record, you can have it copied to the Start Date 1 field automatically and immediately. Choose an option as follows:
- None
- The Used From date will not be copied to the Start Date 1 field.
- Put in Use Date
- The Used From date will be copied to the Start Date 1 field.
- First of Next Month
- The Start Date 1 field will be set to the first day of the month after the Used From date.
- First of Current Month
- The Start Date 1 field will be set to the first day of the month in which the Used From date falls.
- None
- Model for Disposals
- When you save a Disposal record that you have marked as OK, a Nominal Ledger Transaction will be created if you have so determined using the Sub Systems setting in the Nominal Ledger and in the Number Series - Disposals setting. This Transaction will include postings to an Asset Account and an Acc. Depr Account. Please refer to the description of the Post from Write-off options below for more details about these postings. The choice of Asset and Acc. Depr Accounts (and associated Tags/Objects) will depend on the option that you choose here as follows:
- Model 1
- The Asset Account and the Acc. Depr Account in the Asset Class to which the Asset belongs will be used. The Asset Tags/Objects will be assigned to the posting to the Asset Account, and the Acc. Depr Tags/Objects will be assigned to the posting to the Acc. Depr Account.
- Model 2
- The Asset 2 Account and the Acc. Depr 2 Account in the Asset Class to which the Asset belongs will be used. The Asset 2 Tags/Objects will be assigned to the posting to the Asset 2 Account, and the Acc. Depr 2 Tags/Objects will be assigned to the posting to the Acc. Depr 2 Account.
- Model 1
- Post from Write-off
- Select one of these options to specify the postings that will be included in the Nominal Ledger Transaction that will be created when you write off an Asset by marking a Disposal record as OK and saving. The option that you select will depend on how the writing off of Assets should be accounted for in your country. The options are:
- Asset Value and Remaining Depreciation
- The value of the Asset (from the most recent Revaluation or, if there are no Revaluations, the Purchase Value) will be debited to the Account specified in the Disposal record.
- The value of the Asset (from the most recent Revaluation or, if there are no Revaluations, the Purchase Value) will be credited to the Asset or Asset 2 Account specified in the Asset Class to which the Asset belongs. The Asset or Asset 2 Tags/Objects specified in the Asset Class will be assigned to this posting. As in all postings described here, the choice of Asset or Asset 2 Account and Asset or Asset 2 Tags/Objects will depend on the Model for Disposals that you have selected above.
- The value of the Asset (from the most recent Revaluation or, if there are no Revaluations, the Purchase Value) will be debited to the Acc. Depr or Acc. Depr 2 Account specified in the Asset Class, and the depreciation to date will be credited to the same Account. The Acc. Depr or Acc. Depr 2 Tags/Objects specified in the Asset Class will be assigned to both postings. The net effect of these two postings will be that the future depreciation will be debited to the Acc. Depr or Acc. Depr 2 Account.
- The depreciation to date will be credited to the Account specified in the Disposal record.
- The Tags/Objects specified in the (which by default will have been copied from the Asset record) and in the Tags/Objects field in the Asset Class will be assigned to all postings.
- The value of the Asset (from the most recent Revaluation or, if there are no Revaluations, the Purchase Value) will be credited to the Asset or Asset 2 Account specified in the Asset Class to which the Asset belongs. The Asset or Asset 2 Tags/Objects specified in the Asset Class will be assigned to this posting. As in all postings described here, the choice of Asset or Asset 2 Account and Asset or Asset 2 Tags/Objects will depend on the Model for Disposals that you have selected above.
- Accumulated and Remaining Depreciation
- The depreciation to date will be debited to the Acc. Depr or Acc. Depr 2 Account specified in the Asset Class. The Acc. Depr or Acc. Depr 2 Tags/Objects specified in the Asset Class will be assigned to this posting.
- The depreciation to date will be credited to the Asset or Asset 2 Account specified in the Asset Class. The Asset or Asset 2 Tags/Objects specified in the Asset Class will be assigned to this posting.
- Future depreciation will be debited to the Account specified in the Disposal record.
- Future depreciation will be credited to the Asset or Asset 2 Account specified in the Asset Class. The Asset or Asset 2 Tags/Objects specified in the Asset Class will be assigned to this posting.
- The Tags/Objects specified in the (which by default will have been copied from the Asset record) and in the Tags/Objects field in the Asset Class will be assigned to all postings.
- The depreciation to date will be credited to the Asset or Asset 2 Account specified in the Asset Class. The Asset or Asset 2 Tags/Objects specified in the Asset Class will be assigned to this posting.
- Asset Value and Accumulated Depreciation
- The value of the Asset (from the most recent Revaluation or, if there are no Revaluations, the Purchase Value) will be debited to the Account specified in the Disposal record.
- The value of the Asset (from the most recent Revaluation or, if there are no Revaluations, the Purchase Value) will be credited to the Asset or Asset 2 Account specified in the Asset Class. The Asset or Asset 2 Tags/Objects specified in the Asset Class will be assigned to this posting.
- The depreciation to date will be debited to the Acc. Depr or Acc. Depr 2 Account specified in the Asset Class. The Acc. Depr or Acc. Depr 2 Tags/Objects specified in the Asset Class will be assigned to this posting.
- The depreciation to date will be credited to the Account specified in the Disposal record.
- The Tags/Objects specified in the (which by default will have been copied from the Asset record) and in the Tags/Objects field in the Asset Class will be assigned to all postings.
- The value of the Asset (from the most recent Revaluation or, if there are no Revaluations, the Purchase Value) will be credited to the Asset or Asset 2 Account specified in the Asset Class. The Asset or Asset 2 Tags/Objects specified in the Asset Class will be assigned to this posting.
- If you sell an Asset, the Nominal Ledger Transaction created from the Disposal record will include the postings listed above, and there will be two further postings in which the Sales Price will be debited to the Sales Transit Account specified above and credited to the Account specified in the Disposal record. No Tags/Objects will be assigned to the debit posting, while the Tags/Objects specified in the Disposal row and in the Tags/Objects field in the Asset Class will be assigned to the credit posting.
- Asset Value and Remaining Depreciation
Go back to:
- Home page for Settings in the Assets module
- Home page for Assets module manual
- Home page for Standard ERP manual
Asset Classifications
This page describes the Asset Classifications setting in the Assets module.---
The Asset Classification is a means of classifying Assets for reporting.
After defining your Asset Classifications, you can assign them to your Assets using the Classification field in the header of the Asset window. This field can contain one or more Asset Classifications, separated by commas.
You can use the Asset Classification as a search criterion in the Asset List report.
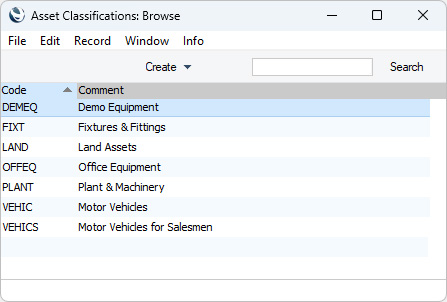
To work with Asset Classifications, first use the [Switch Module] button in the Navigation Centre to ensure you are in the Assets module. Then, if you are using Windows or macOS, click the [Settings] button, also in the Navigation Centre, and double-click 'Asset Classifications' in the resulting list. If you are using iOS or Android, select 'Settings' from the Tools menu (with 'wrench' icon) and tap 'Asset Classifications' in the 'Settings' list. The 'Asset Classifications: Browse' window opens, listing the Asset Classifications that you have already entered:
---
Go back to:
- Home page for Settings in the Assets module
- Home page for Assets module manual
- Home page for Standard ERP manual
Asset Display Groups
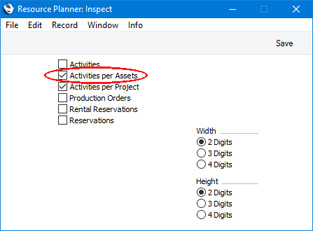
You will need to use the Asset Display Groups setting in the Assets module if you have the Resource Planning module and you will use it to administer the use of internal Assets. Follow these steps:- Using the Resource Planner setting in the Resource Planning module, choose to display Activities per Assets in the Resource Planner.
- Change to the Assets module and open the Asset Display Groups setting.
Assign each Asset that is available for booking or reservation to an Asset Display Group:
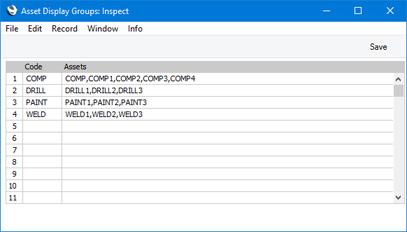
- Code
- Specify a unique identification Code for each Display Group. You can use up to five alphanumeric characters.
- Assets
- Paste Special
Asset register, Assets module
- Enter the Asset Number of each Asset that belongs to the Display Group, separated by commas.
- If you need to use 'Paste Special' to enter several Assets, type the comma before opening the 'Paste Special' list. This will cause the next Asset to be added to those already entered. Otherwise, the previous Asset will be overwritten.
- A particular Asset can belong to more than one Display Group.
- If you need to use 'Paste Special' to enter several Assets, type the comma before opening the 'Paste Special' list. This will cause the next Asset to be added to those already entered. Otherwise, the previous Asset will be overwritten.
- Code
- When you need to book or reserve an Asset, you can use the Resource Planner to check whether it is available. Open the Resource Planner by clicking (Windows/Mac OS X) or tapping (iOS/Android) the [Resources] button in the Navigation Centre:
The 'Resource Month Overview' window opens, with Asset Display Groups listed in a column down the left-hand side of the window.
If you are using more than one of the options in the Resource Planner setting, the column down the left-hand side of the window will include records of different kinds. For example, if you are using the Activities per Assets and Activities per Projects options in the Resource Planner setting, the column down the left-hand side of the window will list Projects and Asset Display Groups (as shown in the illustration above). Therefore it is recommended that you use Project Numbers and Asset Display Group Codes that make it easy for all users to distinguish Projects and Asset Display Groups in this window.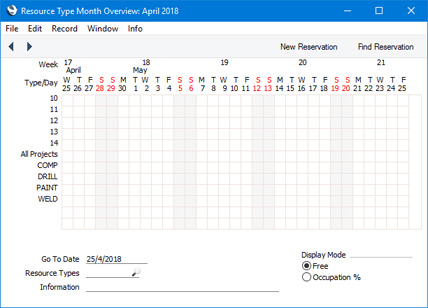
- To see whether an Asset is already reserved, double-click or tap the Asset Display Group to which it belongs:
This window makes it easy to see when each Asset is available for use. In this example, Asset COMP1 is booked for three days. The current date (April 25 in the illustration) is marked with a vertical red line. Weekends are shaded, with dates in red.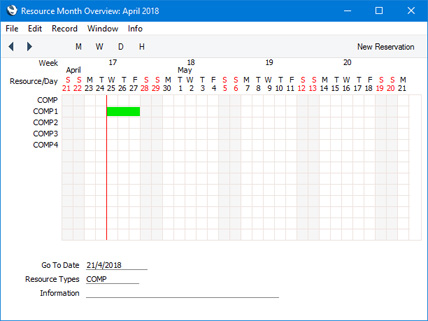
To change the month shown, use the 'Next' and 'Previous' functions on the Record menu or the equivalent buttons on the left of the Button Bar (Windows/Mac OS X only). To jump to a different date, enter the date in the Go To Date field under the grid.
To see an individual day in more detail, double-click or tap on a date above the grid.
- To reserve an Asset, create an Activity and specify the Asset on the 'Resources' card:
Enter the date and time and ensure the Task Type is Calendar and the Calendar Type is Time: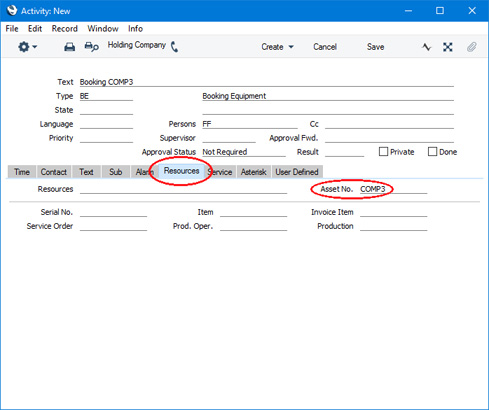
When you save the Activity, it will be added to the Resource Planner window: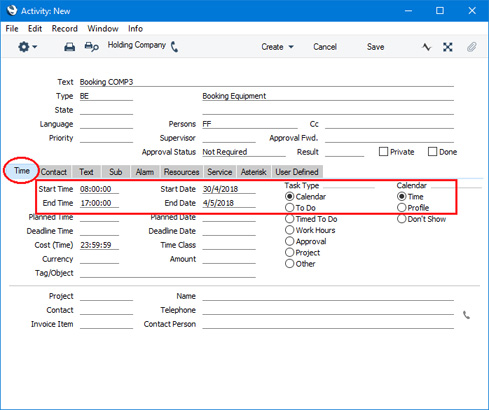
The colour of the bar representing the reserving Activity will be taken from the Activity Class to which its Activity Type belongs. If the Activity Type does not belong to a Class, the colour will be red. Double-click or tap the coloured bar if you need to inspect or alter the Activity.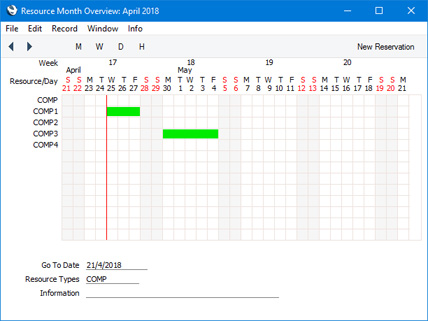
Settings in the Assets module:
- Introduction
- Account Usage Assets
- Asset Categories
- Asset Display Groups
- Asset N/L Classes
- Contacts
- Departments
- Depreciation Models
- Inflation Coefficients
- Number Series - Asset Status
- Number Series - Disposals
- Number Series - Revaluations
- Number Series - Revaluation Factors
- Revaluation Factors
- Home page for Assets module manual
- Home page for Standard ERP manual
Asset N/L Classes
This page introduces the Asset N/L Classes setting in the Assets module. Asset N/L Classes are also known as "Asset Classes" and "N/L Classes".---
The Asset N/L Classes setting is where you should specify how depreciation and other accounting events involving Assets will be accounted for in the Nominal Ledger. In each Asset Class, you can specify the Accounts that will be used for each posting and the Tags/Objects that will be assigned to those postings. This will be in addition to any Tags/Objects that you have specified in the individual Asset records.
To open the Asset N/L Classes setting, first ensure you are in the Assets module. Then, if you are using Windows or macOS, click the [Settings] button in the Navigation Centre and then double-click 'Asset N/L Classes' in the 'Settings' list. If you are using iOS or Android, select 'Settings' from the Tools menu (with 'wrench' icon) and tap 'Asset N/L Classes' in the 'Settings' list. The following window will appear:
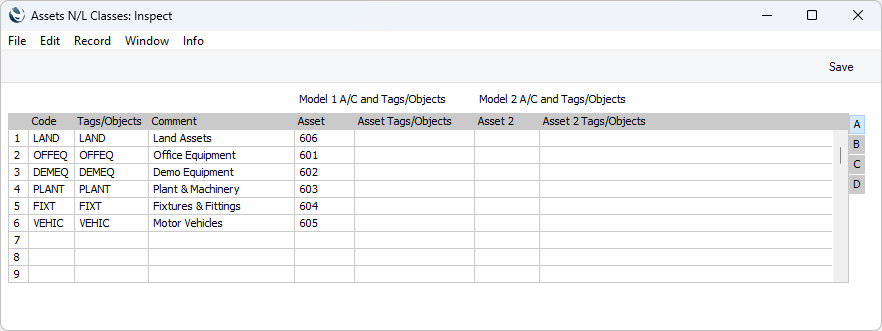
Fill in the fields as described below and, when finished, click the [Save] button (Windows/macOS) or tap √ (iOS/Android) to save the changes and close the window. To close the window without saving changes, click the close box (Windows/macOS) or tap < (iOS/Android).
The Account N/L Classes setting is spread over four flips. To view specific flips, click (Windows/macOS) or tap (iOS/Android) one of the four flip tabs (marked A-D) on the right of (Windows/macOS) or under (iOS/Android) the matrix:

- Flip A - includes Code, Comment, Tags/Objects and Asset Account fields
- Flip B - includes Depreciation Account fields
- Flip C - includes Cost Account fields
Go back to:
- Home page for Settings in the Assets module
- Home page for Assets module manual
- Home page for Standard ERP manual
Asset N/L Classes - Flip A
This page describes Flip A of the Asset N/L Classes setting in the Assets module. Please follow the links below for descriptions of the other parts of the setting:- Introduction
- Flip A - includes Code, Comment, Tags/Objects and Asset Account fields
- Flip B - includes Depreciation Account fields
- Flip C - includes Cost Account fields
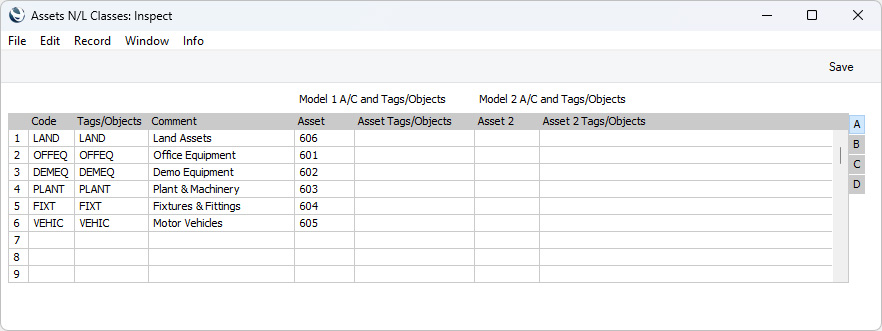
- Code
- Enter the unique code by which the Asset Class is to be identified from elsewhere in the Assets module. You can use up to five characters.
- Tags/Objects
- Paste Special
Tag/Object register, Nominal Ledger/System module
- You can assign a Tag/Object (or several Tags/Objects, separated by commas) to each Asset Class.
- You can also assign additional Tags/Objects to individual Assets as required.
- In any Nominal Ledger Transactions representing the depreciation of Assets belonging to an Asset Class, any Tags/Objects specified here and in the Asset itself will be assigned both to the credit posting to the Depreciation Account and to the debit posting to the Cost Account.
- You can also assign additional Tags/Objects to individual Assets as required.
- Comment
- The comment or Asset Class name that you enter here will be shown in the 'Paste Special' list: it should therefore be descriptive enough to make the selection of the correct Asset Class easy for all users.
- Asset, Asset 2
- Paste Special
Account register, Nominal Ledger/System module
- Specify here the Asset Account to which the purchase of Assets belonging to the Class will be posted.
- If you will be creating ("Put In Use" Transactions to record the implementation of your Assets in the Nominal Ledger, the Purchase Value of each Asset will be debited to the Account that you specify here.
- If you revalue an Asset and create a Simulation from the Revaluation using the 'NL Simulation' function on the Create menu (Windows/macOS) or + menu (iOS/Android), an increase in value will be debited to this Account, while a decrease will be credited to this Account.
- If you revalue an Asset using the 'Revaluate Asset Acquisition Value' Maintenance function and create a Simulation using the Russian model, an increase in value will be debited to this Account, while a decrease in value will be credited to this Account.
- If you choose to have a Nominal Ledger Transaction created when an Asset is sold or written off, this Account will be credited with the last value of the Asset (i.e. the Starting Value from the latest Revaluation or, if there are no Revaluations, the Purchase Value from the Asset record) or with the total depreciation of the Asset (depending on the Post from Write-off option that you have selected in the Account Usage Assets setting).
- The Asset Account will be used if you choose to have values calculated using Depreciation Model 1, while the Asset 2 Account will be used with Depreciation Model 2. Usually you will be able to make this choice when running the relevant Maintenance function, but in the case of Disposals you should control the choice of Depreciation Model using the Model for Disposals options in the Account Usage Assets setting. Simulations created from Revaluations will always post to the Asset Account.
- Usually these Accounts will be Balance Sheet Accounts.
- If you will be creating ("Put In Use" Transactions to record the implementation of your Assets in the Nominal Ledger, the Purchase Value of each Asset will be debited to the Account that you specify here.
- Asset Tags/Objects, Asset 2 Tags/Objects
- Paste Special
Tag/Object register, Nominal Ledger/System module
- Any Tags/Objects that you specify here will be assigned to all postings to the Asset Account in ("Put In Use" and Disposal Transactions (in addition to the Tags/Objects in the Tags/Objects field above and in the Asset itself).
- The Asset Tags/Objects will be used if you choose to have values calculated using Depreciation Model 1, while the Asset 2 Tags/Objects will be used with Depreciation Model 2.
- Introduction
- Flip A - includes Code, Comment, Tags/Objects and Asset Account fields
- Flip B - includes Depreciation Account fields
- Flip C - includes Cost Account fields
Go back to:
- Home page for Settings in the Assets module
- Home page for Assets module manual
- Home page for Standard ERP manual
Asset N/L Classes - Flip B
This page describes Flip B of the Asset N/L Classes setting in the Assets module. Please follow the links below for descriptions of the other parts of the setting:- Introduction
- Flip A - includes Code, Comment, Tags/Objects and Asset Account fields
- Flip B - includes Depreciation Account fields
- Flip C - includes Cost Account fields
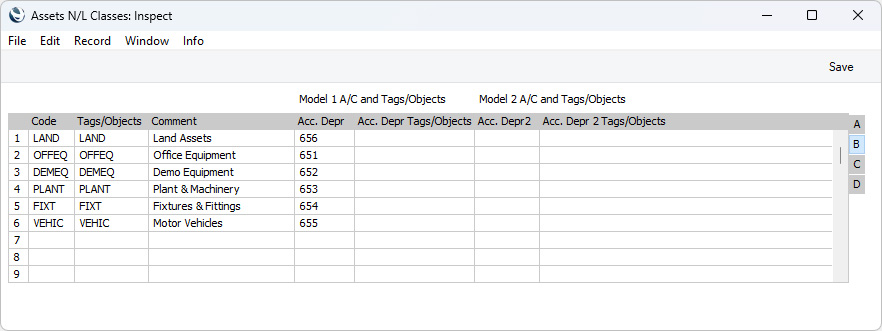
- Acc. Depr, Acc. Depr 2
- Paste Special
Account register, Nominal Ledger/System module
- Specify here the Account that is to be credited with the depreciation of members of the Asset Class. You can choose to credit depreciation directly against the Asset Account or against a separate accumulated depreciation Account set up for the purpose.
- In Russia and Ukraine, if you revalue an Asset and create a Simulation from the Revaluation using the 'NL Simulation' function on the Create menu (Windows/macOS) or + menu (iOS/Android), the previous depreciation will be credited to this Account.
- If you revalue an Asset using the 'Revaluate Asset Acquisition Value' Maintenance function and create a Simulation using the Russian model, the change in depreciation resulting from the Revaluation will be credited to this Account if the value of the Asset has increased, or debited to this Account if the value of the Asset has decreased.
- On disposal, the future depreciation of the Asset or the depreciation to date will be debited to this Account (depending on the Post from Write-off option that you have selected in the Account Usage Assets setting).
- The Acc. Depr Account will be used if you choose to have values calculated using Depreciation Model 1, while the Acc. Depr 2 Account will be used with Depreciation Model 2. Usually you will be able to make this choice when running the relevant Maintenance function, but in the case of Disposals you should control the choice of Depreciation Model using the Model for Disposals options in the Account Usage Assets setting. Simulations created from Revaluations will always post to the Acc. Depr Account.
- Usually these Accounts will be Balance Sheet Accounts.
- In Russia and Ukraine, if you revalue an Asset and create a Simulation from the Revaluation using the 'NL Simulation' function on the Create menu (Windows/macOS) or + menu (iOS/Android), the previous depreciation will be credited to this Account.
- Acc. Depr Tags/Objects, Acc. Depr 2 Tags/Objects
- Paste Special
Tag/Object register, Nominal Ledger/System module
- Any Tags/Objects specified here will be assigned to all postings to the Acc. Depr Account in Depreciation and Disposal Transactions (in addition to the Tags/Objects in the Tags/Objects field described on flip A and in the Asset itself).
- The Acc. Depr Tags/Objects will be used if you choose to have values calculated using Depreciation Model 1, while the Acc. Depr 2 Tags/Objects will be used with Depreciation Model 2.
- Introduction
- Flip A - includes Code, Comment, Tags/Objects and Asset Account fields
- Flip B - includes Depreciation Account fields
- Flip C - includes Cost Account fields
Go back to:
- Home page for Settings in the Assets module
- Home page for Assets module manual
- Home page for Standard ERP manual
Asset N/L Classes - Flip C
This page describes Flip C of the Asset N/L Classes setting in the Assets module. Please follow the links below for descriptions of the other parts of the setting:- Introduction
- Flip A - includes Code, Comment, Tags/Objects and Asset Account fields
- Flip B - includes Depreciation Account fields
- Flip C - includes Cost Account fields
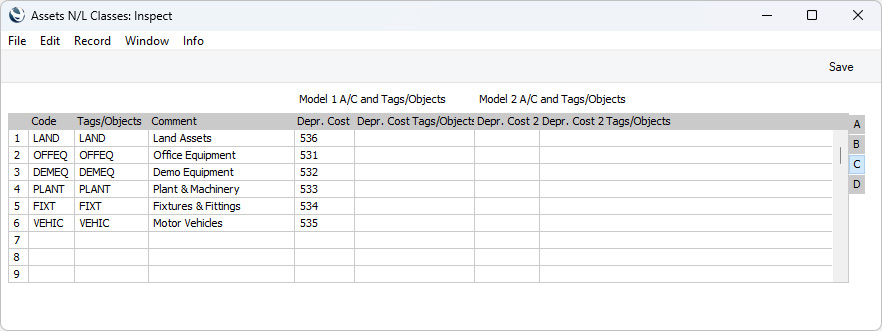
- Depr. Cost, Depr. Cost 2
- Paste Special
Account register, Nominal Ledger/System module
- Specify here the expense Account that is to be debited with the depreciation of members of the Asset Class.
- The Depr. Cost Account will be used if you choose to have values calculated using Depreciation Model 1, while the Depr Cost 2 Account will be used with Depreciation Model 2.
- Usually these Accounts will be Profit & Loss Accounts.
- The Depr. Cost Account will be used if you choose to have values calculated using Depreciation Model 1, while the Depr Cost 2 Account will be used with Depreciation Model 2.
- Depr. Cost Tags/Objects, Depr. Cost 2 Tags/Objects
- Paste Special
Tag/Object register, Nominal Ledger/System module
- Any Tags/Objects that you specify here will be assigned to all postings to the Depr. Cost Account in Depreciation Transactions (in addition to the Tags/Objects in the Tags/Objects field described on flip A and in the Asset itself).
- The Depr Cost Tags/Objects will be used if you choose to have values calculated using Depreciation Model 1, while the Depr Cost 2 Tags/Objects will be used with Depreciation Model 2.
- Introduction
- Flip A - includes Code, Comment, Tags/Objects and Asset Account fields
- Flip B - includes Depreciation Account fields
- Flip C - includes Cost Account fields
Go back to:
- Home page for Settings in the Assets module
- Home page for Assets module manual
- Home page for Standard ERP manual
Contacts
The standard Contact register is available in many modules: please refer here for full details.---
Go back to:
- Home page for Settings in the Assets module
- Home page for Assets module manual
- Home page for Standard ERP manual
Departments
This page describes the Departments setting in the Assets, Human Resources Management and System modules.---
Use the Departments setting to list the different Departments in your business. You can assign each Asset to a Department and, if you need to move an Asset from one Department to another, you can easily record this change by creating a record in the Asset Status register. This will help maintain a history of the Asset.
The Departments setting is located in the Assets, Human Resources Management and System modules. To add a new Department record, open the 'Settings' list in any of these modules and double-click (Windows/macOS) or tap (iOS/Android) 'Departments'. The 'Departments: Browse' window will be opened, showing the Departments that you have already entered. To open a new record, select 'New' from the Create menu (Windows/macOS) or from the + menu (iOS/Android). You can also use the Ctrl-N (Windows) or ⌘-N (macOS) keyboard shortcuts. Alternatively, highlight in the list a Department that is similar to the one you want to enter and select 'Duplicate' from the same menu.
The 'Department: New' window is opened, empty if you selected 'New' or containing a duplicate of the highlighted Department. Complete the record as described below the picture and save it by clicking the [Save] button (Windows/macOS) or by tapping √ (iOS/Android). You can also click the close box or tap < and choose to save changes. To close it without saving changes, click the close box or tap < and choose not to save changes.
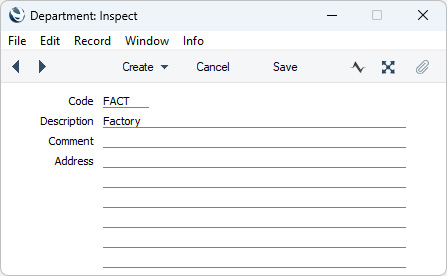
- Code
- Enter a Department Code.
- Name
- Department Name.
- Comment
- Any comment.
- Address
- The Address of the Department.
Go back to:
- Home page for Settings in the Assets module
- Home page for Settings in the Human Resources Management module
- Home page for Settings in the System module
- Home page for Assets module manual
- Home page for Human Resources Management module manual
- Home page for System module manual
- Home page for Standard ERP manual
Inflation Coefficients
The Inflation Coefficients setting in the Assets module is used by the 'Revaluate Asset Acquisition Value' Maintenance function. Please refer here for a description.---
Go back to:
- Home page for Settings in the Assets module
- Home page for Assets module manual
- Home page for Standard ERP manual
Number Series - Asset Disposals
This page describes the Number Series - Asset Disposals setting in the Assets module.---
Each new record in the Disposal register that you enter will be given a unique identifying number, based on a sequential series.
You can have more than one sequential number series running at the same time, or at different times. For example you may want to use different sequences to represent different departments or different branches, or you may want to use different sequences to represent different fiscal or calendar years.
The Number Series - Asset Disposals setting allows you to take advantage of this feature. Here you can define the number sequences that you would like to use with Disposal records.
To open the Number Series - Asset Disposals setting, ensure you are in the Assets module and double-click (Windows/macOS) or tap (iOS/Android) 'Number Series - Asset Disposals' in the 'Settings' list. The following window will appear:
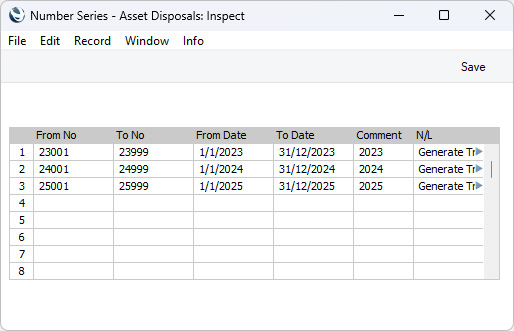
For each number sequence, you have a measure of control over whether Nominal Ledger Transactions are generated automatically when you approve Disposals in that sequence. Using 'Paste Special' from the N/L field brings up a selection list containing two options: "Generate Transactions" and "Do Not Generate Transactions". Select the first option if Nominal Ledger Transactions are to be generated and the second if they are not. In effect, this feature is an exclusionary one in that you can only choose to not have Nominal Ledger Transactions created for a particular number sequence. If the overall preference (set in the Sub Systems setting in the Nominal Ledger) is to not have such transactions created, you cannot decide to have them created for a single sequence.
When the setting is complete, click the [Save] button in the Button Bar (Windows/macOS) or tap √ (iOS/Android) to save the changes. To close the window without saving changes, click the close box (Windows/macOS) or tap < (iOS/Android).
When you enter a new Disposal record, the next number in the first valid Number Series entered to this setting will be used as a default. If necessary, you can change to the next number in any other Number Series using 'Paste Special'.
If you leave the setting empty, Disposal Numbers will start at 1 and continue consecutively. If you want to start from another number, simply specify it in a new Disposal record before saving.
---
Go back to:
- Home page for Settings in the Assets module
- Home page for Assets module manual
- Home page for Standard ERP manual
Number Series - Asset Revaluations
This page describes the Number Series - Asset Revaluations setting in the Assets module.---
Each new record in the Revaluation register that you enter will be given a unique identifying number, based on a sequential series.
You can have more than one sequential number series running at the same time, or at different times. For example you may want to use different sequences to represent different departments or different branches, or you may want to use different sequences to represent different fiscal or calendar years.
The Number Series - Asset Revaluations setting allows you to take advantage of this feature. Here you can define the number sequences that you would like to use with Revaluation records.
To open the Number Series - Asset Revaluations setting, ensure you are in the Assets module and double-click (Windows/macOS) or tap (iOS/Android) 'Number Series - Asset Revaluations' in the 'Settings' list. The following window will appear:
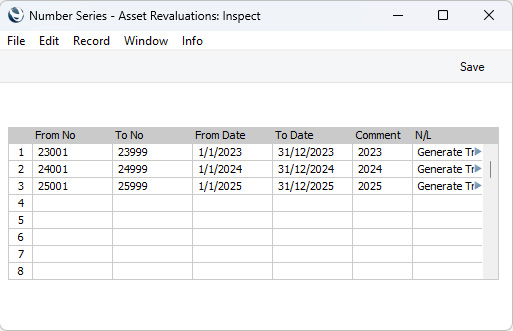
When the setting is complete, click the [Save] button in the Button Bar (Windows/macOS) or tap √ (iOS/Android) to save the changes. To close the window without saving changes, click the close box (Windows/macOS) or tap < (iOS/Android).
When you enter a new Revaluation record, the next number in the first valid Number Series entered to this setting will be used as a default. If necessary, you can change to the next number in any other Number Series using 'Paste Special'.
If you leave the setting empty, Revaluation Numbers will start at 1 and continue consecutively. If you want to start from another number, simply specify it in a new Revaluation record before saving.
---
Go back to:
- Home page for Settings in the Assets module
- Home page for Assets module manual
- Home page for Standard ERP manual
Number Series - Asset Status
This page describes the Number Series - Asset Status setting in the Assets module.---
Each new record in the Asset Status register that you enter will be given a unique identifying number, based on a sequential series.
You can have more than one sequential number series running at the same time, or at different times. For example you may want to use different sequences to represent different departments or different branches, or you may want to use different sequences to represent different fiscal or calendar years.
The Number Series - Asset Status setting allows you to take advantage of this feature. Here you can define the number sequences that you would like to use with Asset Status records.
To open the Number Series - Asset Status setting, ensure you are in the Assets module and double-click (Windows/macOS) or tap (iOS/Android) 'Number Series - Asset Status' in the 'Settings' list. The following window will appear:
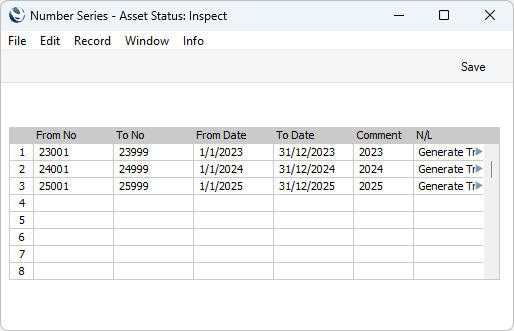
When the setting is complete, click the [Save] button in the Button Bar (Windows/macOS) or tap √ (iOS/Android) to save the changes. To close the window without saving changes, click the close box (Windows/macOS) or tap < (iOS/Android).
When you enter a new Asset Status record, the next number in the first valid Number Series entered to this setting will be used as a default. If necessary, you can change to the next number in any other Number Series using 'Paste Special'.
If you leave the setting empty, Asset Status Numbers will start at 1 and continue consecutively. If you want to start from another number, simply specify it in a new Asset Status record before saving.
---
Go back to:
- Home page for Settings in the Assets module
- Home page for Assets module manual
- Home page for Standard ERP manual
Number Series - Revaluation Factors
This page describes the Number Series - Revaluation Factors setting in the Assets module.---
Each new record in the Revaluation Factors setting that you enter will be given a unique identifying number, based on a sequential series.
You can have more than one sequential number series running at the same time, or at different times. For example you may want to use different sequences to represent different departments or different branches, or you may want to use different sequences to represent different fiscal or calendar years.
The Number Series - Revaluation Factors setting allows you to take advantage of this feature. Here you can define the number sequences that you would like to use with Revaluation Factor records.
To open the Number Series - Revaluation Factors setting, ensure you are in the Assets module and double-click (Windows/macOS) or tap (iOS/Android) 'Number Series - Revaluation Factors' in the 'Settings' list. The following window will appear:
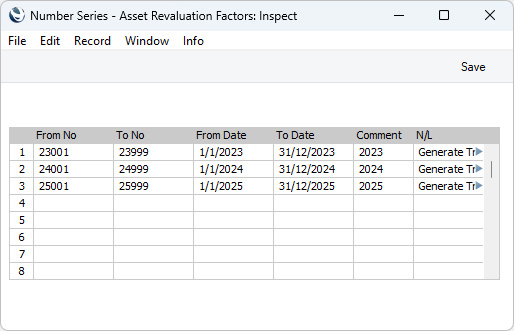
When the setting is complete, click the [Save] button in the Button Bar (Windows/macOS) or tap √ (iOS/Android) to save the changes. To close the window without saving changes, click the close box (Windows/macOS) or tap < (iOS/Android).
When you enter a Revaluation Factor, the next number in the first Number Series entered to this setting will be used as a default; change to the next number in any other Number Series using 'Paste Special'.
If you leave the setting empty, Revaluation Factor Numbers will start at 1 and continue consecutively. If you want to start from another number, simply specify it in a new Revaluation record before saving.
---
Go back to:
- Home page for Settings in the Assets module
- Home page for Assets module manual
- Home page for Standard ERP manual
Revaluation Factors, Revaluation Run Lists
The Revaluation Factors and Revaluation Run Lists settings in the Assets module are used by the 'Revaluate Asset Acquisition Value' Maintenance function. Please refer here for a description of the Revaluation Factors setting and here for a description of the Revaluation Run Lists setting.---
Go back to:
- Home page for Settings in the Assets module
- Home page for Assets module manual
- Home page for Standard ERP manual