Introduction to the Room Register
The Room register should contain separate records for each Room in the hotel.Before you start adding Rooms to the Room register, you should carry out the following configuration work:
- Enter at least one Room Type. Typical Room Types can include single, double and twin.
- Enter at least two records in the Room Status setting. The Status of a Room signifies whether it is available for checking in.
- If necessary, enter some Room Classifications: these describe features about particular Rooms that Guests might request, such as rooms where smoking is allowed, rooms with sea views, rooms with wheelchair access etc.
- Before being able to use Rooms in Reservations, you should also enter at least one Room Package (a list of everything that you will supply when a Room is hired except the Room itself). Example Room Packages might include basic room hire, bed and breakfast and honeymoon package.
- Use the Invoice Items setting to set the pricing for each Room Type/Room Package combination.
- Introduction
- Entering a Room record
- Operations menu
Go back to:
- Home page for Hotel module manual
- Home page for Standard ERP manual
Entering a Room Record
To open the Room register, first ensure you are in the Hotel module. Then, if you are using Windows or macOS, click the [Registers] button in the Navigation Centre and then double-click 'Rooms' in the resulting list. If you are using iOS or Android, tap the [Registers] button in the Navigation Centre and then tap 'Rooms' in the 'Registers' list. The 'Rooms: Browse' window will be opened, showing the Rooms that you have already entered.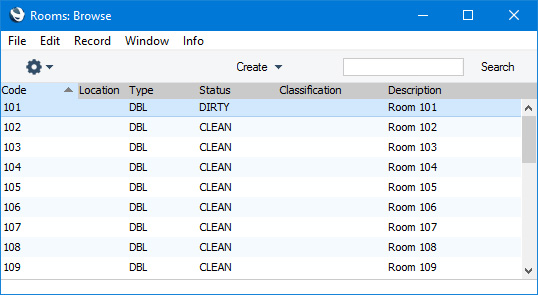
The 'Room: New' window will be opened, empty if you selected 'New' or containing a duplicate of the highlighted Room.
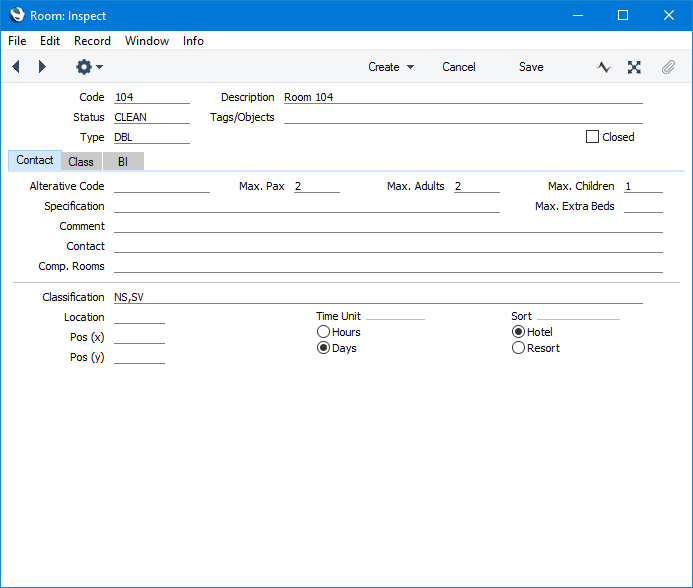
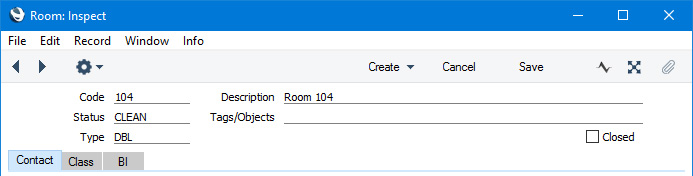
Since the amount of information stored about each Room will not fit on a single screen, the Room window has been divided into three cards. At the top of each is the header. This contains the Room Number, Description, Status, Type and Tags/Objects field and the Closed check box. There are three named buttons ('tabs') in the header.

Complete the Room record as appropriate and as described below, then save it using the [Save] button (Windows/macOS) or by tapping √ (iOS/Android). The window title will change from 'Room: New' to 'Room: Inspect'.
Please refer to the following pages for details about the fields on each card:
The Room register in Standard ERP:
- Introduction
- Entering a Room record
- Operations menu
- Home page for Hotel module manual
- Home page for Standard ERP manual
Entering a Room Record - Header
This page describes the fields in the Header of the Room record window. Please follow the links below for descriptions of the other parts of the Room record window:---
- Code
- Enter a unique Code for the Room. Usually this will be the Room Number. The Code can consist of up to ten characters, and you can use both numbers and letters. The Code cannot be the same as a Signature that you have used in the Person register in the System module.
- Description
- Enter a descriptive name for the Room record. This will be shown in the 'Rooms: Browse' window and the 'Paste Special' list and so should be clear enough to make the selection of the correct Room easy for all users.
- Status
- Paste Special
Room Status setting, Hotel module
- The availability of a Room for new Reservations will depend on its Status, which will be updated automatically whenever a Guest checks out and when the Room is cleaned.
- When you create a Room record, you should set the Status to the Available Status that you have specified in the Hotel Settings setting. This will make the new Room available for checking in. After this point and subject to the next paragraph Status changes will be automatic and there will usually be no need to change the Status of a Room yourself.
- If you need the Status of a Room to be changed to Available automatically after it has been cleaned, you will need to set up an Activity Consequence that will do this when the cleaner marks the cleaning Activity as Done. Please refer here for details.
- You can also change the Status of Rooms in batches, by highlighting them in the 'Rooms: Browse' window and selecting 'Change State' from the Operations menu.
- When you create a Room record, you should set the Status to the Available Status that you have specified in the Hotel Settings setting. This will make the new Room available for checking in. After this point and subject to the next paragraph Status changes will be automatic and there will usually be no need to change the Status of a Room yourself.
- Tags/Objects
- Paste Special
Tag/Object register, Nominal Ledger/System module
- If you need a particular Tag/Object to be assigned to every Reservation for the Room, specify that Tag/Object here. You can enter more than one Tag/Object, separated by commas.
- From a Reservation, the Tag/Object will be copied to the Tags/Objects field on the 'Terms' card of the resulting Invoice and to the Tags/Objects field in each Invoice row.
- Tags/Objects in a Reservation can be copied from the Room, Room Type, Room Package and Booking Origin record and from the Contact records for the Customer, the Agent and the Branch. The Tags/Objects that you specify in these records should each belong to different Tag/Object Types, because you can only use one Tag/Object belonging to a particular Tag/Object Type in an Invoice.
- From a Reservation, the Tag/Object will be copied to the Tags/Objects field on the 'Terms' card of the resulting Invoice and to the Tags/Objects field in each Invoice row.
- Type
- Paste Special
Room Types setting, Hotel module
- You must assign each Room to a Room Type. Assigning a Room to a Room Type has the following consequences:
- The Room Type classifies the Room for the Resource Planner.
- The Room Type is part of the charging structure for Room rates and also determines whether the Room will be charged per hour or per day.
- The Room Type determines when Guest Accounts will be updated from each Reservation.
- The Room Type classifies the Room for the Resource Planner.
- Closed
- Select this option if the Room is no longer to be used (you cannot delete a Room record altogether if you have used it in at least one Reservation). Closed Rooms will appear in the 'Rooms: Browse' window but not in the Rooms 'Paste Special' list or in the 'Overview Rooms' window (the second window in the Resource Planner). You will not be able to create a Reservation for a closed Room. You can re-open a closed Room at any time.
- An alternative to marking a Room as Closed is to set the Status to the Closed Status that you have specified in the Hotel Settings setting. You will not be able to use a Room with the Closed Status in Reservations.
- A second alternative is to create a blocking Reservation in which the Status is the Out of Order Status specified in the Hotel Settings setting. This Reservation can record the reason for the closure. You can enter such a Reservation yourself or you can create it using the [Block Room] button in the 'Reservations: Browse' window. Rooms with Out of Order Reservations will be shown on a separate line in the Daily Statistics report.
- If you mark a Room as Closed and there is a record in the Agent Rooms setting reserving the Room for an Agent for a period that includes the current date, that record will be marked as Closed automatically as well. However, re-opening the Room will not re-open the Agent Room record.
- An alternative to marking a Room as Closed is to set the Status to the Closed Status that you have specified in the Hotel Settings setting. You will not be able to use a Room with the Closed Status in Reservations.
The Room register in Standard ERP:
- Introduction
- Entering a Room record, including:
- Operations menu
- Home page for Hotel module manual
- Home page for Standard ERP manual
Entering a Room Record - Contact Card
This page describes the fields on the 'Contact' card in the Room record window. Please follow the links below for descriptions of the other parts of the Room record window:---
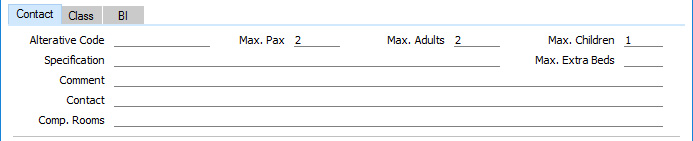
- Max. Pax, Max Adults, Max. Children
- Use these fields to specify the maximum numbers of people, adults and children respectively that can be accommodated in the Room. These figures will be copied to the footer of the 'Guest' card of each Reservation for the Room.
- You will not be able to save a Reservation if any of the maximum figures is exceeded.
- If you do not specify maximum figures, the Max Adults field will be set to 1 automatically when you save the record. Max. Pax and Max. Children will be left blank.
- You will not be able to save a Reservation if any of the maximum figures is exceeded.
- Comment
- Use this field to record notes about the Room. This is for information only.
The Room register in Standard ERP:
- Introduction
- Entering a Room record, including:
- Operations menu
- Home page for Hotel module manual
- Home page for Standard ERP manual
Entering a Room Record - Class Card
This page describes the fields on the 'Class' card in the Room record window. Please follow the links below for descriptions of the other parts of the Room record window:---
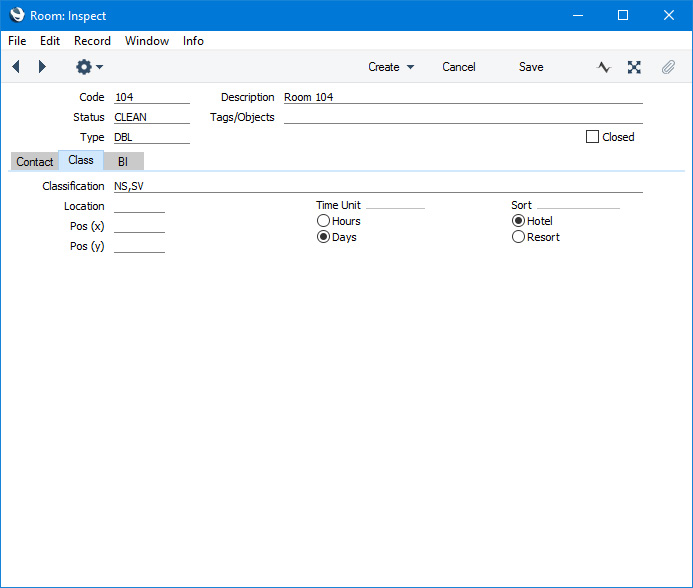
- Classification
- Paste Special
Room Classifications setting, Hotel module
- Together with Room Types, you can use Room Classifications to group Rooms of a similar type together. You can assign several Classifications to each Room record, separated by commas.
- A typical use for Classifications will be to record features about particular Rooms that Guests might request, such as Rooms where smoking is allowed, Rooms with sea views, Rooms with wheelchair access etc.
- You can use the Classification as a search criterion in the 'Month Overview of Room Types' and the 'Overview Rooms' windows (the Resource Planner windows) and in several reports.
- A typical use for Classifications will be to record features about particular Rooms that Guests might request, such as Rooms where smoking is allowed, Rooms with sea views, Rooms with wheelchair access etc.
- Location
- Paste Special
Room Locations setting, Hotel module
- If you have more than one hotel location e.g. more than one building, you should enter separate records for each one in the Room Locations setting. You should then specify the relevant Location in each Room record.
- If you will use Reservation Quotations and/or Group Reservations and you have more than one hotel location, you must specify a Location in each Room, and you must assign the Room to a Room Type that is in the same Location.
- If you will allow hotel bookings to be made online through the Online Reservation App in the Webshop and CMS module, you must specify a Location in each Room Type, even if you only have one Location.
- You can specify a Room Location in the 'Month Overview of Room Types' window (the first Resource Planner window) so that it only shows the Room Types and Rooms in that Location (and the Room Types in which the Location is blank). If you specify a Room Location on the 'Hotel' card in the Local Machine setting in the User Settings module (individually on each client machine), that Location will be used by default whenever you open the Resource Planner on a particular client machine.
- If you only wish to allow a user to be able to enter Reservations for Rooms in the Location that is specified in the Local Machine setting on the machine they are using, assign that user to an Access Group in which you have granted Full access to the 'Limit User to Hotel Room Location' Action. The user will be able to use Rooms in any Location if no Location has been specified in the Local Machine setting.
- If you have specified a Branch in the Location to which a Room belongs, that Branch will be copied to all Reservations for that Room.
- If you have specified a maximum number of extra beds in the Location, you will not be able to enter a Reservation for the Room in which you have specified a number of extra beds that is greater than that maximum.
- If you change the Location in a Room after having entered any Reservations, you should then run the 'Rebuild Resource Type Support' Maintenance function. This will update the Room availability figures in the Resource Type Support setting so that they take the changed Check In Time into account. This setting controls the Room availability figures that are shown in the 'Month Overview of Room Types' window and associated reports.
- If you will use Reservation Quotations and/or Group Reservations and you have more than one hotel location, you must specify a Location in each Room, and you must assign the Room to a Room Type that is in the same Location.
The Room register in Standard ERP:
- Introduction
- Entering a Room record, including:
- Operations menu
- Home page for Hotel module manual
- Home page for Standard ERP manual
Entering a Room Record - BI Card
This page describes the fields on the 'BI' card in the Room record window. Please follow the links below for descriptions of the other parts of the Room record window:---
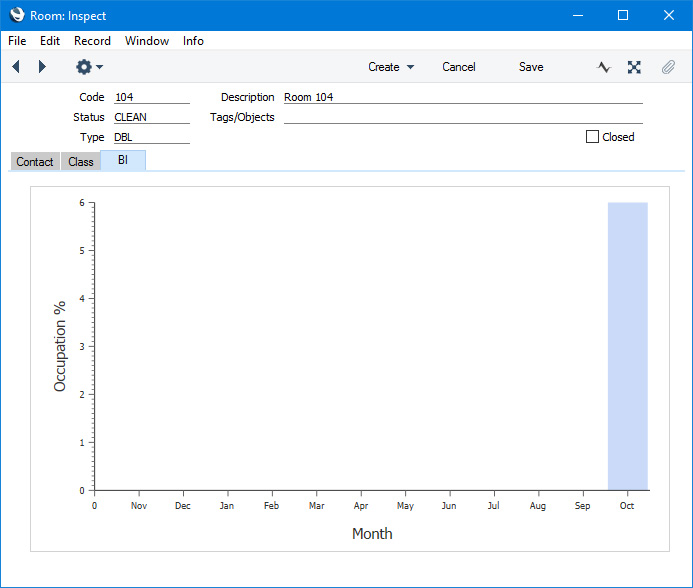
Occupation will be calculated from Reservations that do not have a Reservation Status and those that have a Normal (not checked in) or Normal (checked in) Status. If you have selected the Include Unconfirmed in Availability option in the Hotel Settings setting, Reservations that have an Unconfirmed Status will be included as well.
---
The Room register in Standard ERP:
- Introduction
- Entering a Room record, including:
- Operations menu
- Home page for Hotel module manual
- Home page for Standard ERP manual
Operations Menu - Rooms

If you are using Windows or macOS, you can open the Operations menu by clicking the button with the 'cog' icon (shown highlighted in the illustration above). If you are using iOS or Android, you can access the Operations menu functions through the Tools menu (with 'wrench' icon).
Before using the functions on the Operations menu in the 'Rooms: Browse' window, you should highlight a record or records in the browse window. The function will then be applied to that record or records. If you are using Windows or macOS, you can highlight several Rooms in the list by holding down the Shift key while clicking. If you need to apply a function to a number of Rooms that aren't in a range, highlight them while holding the Ctrl (Windows) or ⌘ (macOS) keys before selecting the function. If you are using iOS or Android, you can highlight a single record in the browse window by searching for it, so you can only apply these functions to a single record at a time.
Please follow the links below for details about each function on the Operations menu:
---The Room register in Standard ERP:
- Introduction
- Entering a Room record
- Operations menu
- Home page for Hotel module manual
- Home page for Standard ERP manual
Operations Menu - Rooms - Change State
This page describes the 'Change State' function on the Operations menu in the Room browse window. If you are using iOS or Android, the 'Change State' function is on the Tools menu.---
The 'Change State' command is only available on the Operations menu for the 'Rooms: Browse' window. It allows you to change the Status of selected Rooms from the browse window.
If you are using Windows or macOS, you can use this function to change the Status of several Rooms at once. Simply highlight a number of Rooms in the browse window and select the function. To highlight a range of Rooms, click the top one in the range and then hold down the Shift key and click the last one. If you need to apply the function to a number of Rooms that aren't in a range, highlight them while holding the Ctrl (Windows) or ⌘ (macOS) keys before selecting the function.
If you are using iOS or Android, you can only highlight a single Room at a time, by searching for it, so you can only change the Status of a single Room at a time.
When you select the function, the Status of each highlighted Room will be changed immediately, as follows:
- If the existing Status of a Room is the Available Status specified in the Hotel Settings setting, its Status will be changed to the Dirty Status specified in the same setting.
- If the existing Status of a Room is Dirty, its Status will be changed to Available.
- If the existing Status of a Room is not Available or Dirty but a third Status, its Status will not be changed.
The Room register in Standard ERP:
- Introduction
- Entering a Room record
- Operations menu, including:
- Change State
- Last Guest
- Room History
- Change State
- Home page for Hotel module manual
- Home page for Standard ERP manual
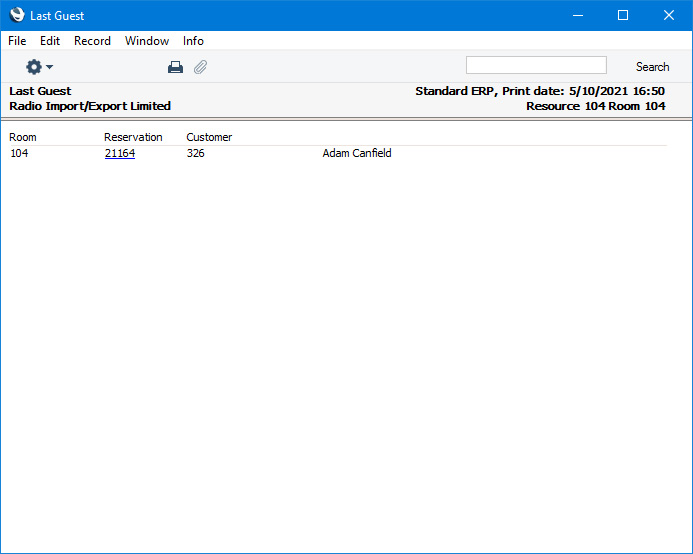
Operations Menu - Rooms - Last Guest
This page describes the 'Last Guest' function on the Operations menu in the Room browse and record windows. If you are using iOS or Android, the 'Last Guest' function is on the Tools menu.---
The 'Last Guest' command prints a report to screen showing the Customer in the latest Reservation for the Room currently open in a record window or for the first Room highlighted in the 'Rooms: Browse' window. The latest Reservation might be the current Reservation for the Room, or the most recent past Reservation, but not a future Reservation. If you are using iOS or Android, you can highlight a Room in the browse window by searching for it.
---
The Room register in Standard ERP:
- Introduction
- Entering a Room record
- Operations menu, including:
- Change State
- Last Guest
- Room History
- Change State
- Home page for Hotel module manual
- Home page for Standard ERP manual
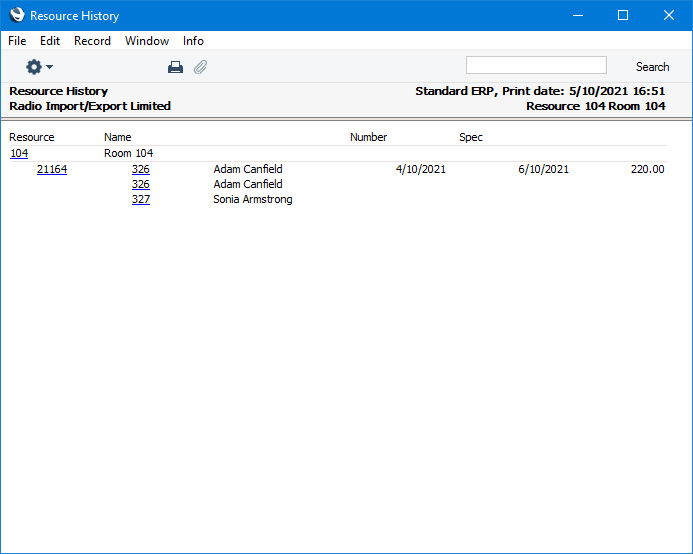
Operations Menu - Room - Room History
This page describes the 'Room History' function on the Operations menu in the Room record window. If you are using iOS or Android, the 'Room History' function is on the Tools menu.---
The 'Room History' command prints to screen a Room History report for the Room currently open in a record window. The report period will be the year to the current date, and the report will be printed with the Always print all Rooms option selected.
---
The Room register in Standard ERP:
- Introduction
- Entering a Room record
- Operations menu, including:
- Change State
- Last Guest
- Room History
- Change State
- Home page for Hotel module manual
- Home page for Standard ERP manual