Introduction to the Person Register
One of your first tasks in creating a new database should be to create a User Account for each member of staff. One reason for doing this is to protect your data: User Accounts allow you to assign a password to each User. It's a good idea to do this even in a single-user system: protecting your database with a password might prove to be a wise precaution if your computer is stolen.Each User Account can consist of the following components, some of which are optional:
- The basic component of a User Account is a record in the Person register in the System module. Creating a record in this register for each member of staff allows you to assign passwords to them. Using this register together with the Access Groups setting (also in the System module) allows you to ensure each member of staff only has access to the modules and functions that are relevant to their job.
- Each User can have their own Mailbox. Mailboxes allow members of staff to send and receive mail, and to use the Personal Desktop.
If the User is a Named User, you must create a Mailbox for them. If the User is a Concurrent User, you should only give them a Mailbox if you have purchased an Extra Mailbox for them. Details about Named and Concurrent Users can be found later on this page.
- Each User should have a StandardID, which should be a valid email address. You should specify each User's StandardID in their Person record. A StandardID will have an associated password: Users will be able to log in to your Standard ERP database using their StandardID password or their database password (they are not the same). Please refer here for more details about Standard IDs.
- Each User can also have their own record in the Contact register. This will contain any or all of their telephone, mobile and home numbers, Skype name, SIP user name, extension number and email address. This record must exist if the User will use Standard ERP to make calls through an Asterisk-based or TAPI switchboard, and it is recommended that it exists if the User will use Standard ERP to send record for that User. This will make it easier to manage that User's access rights, passwords, Calendar and Task Manager. You should enter the User's StandardID in their Global User record. You should also create Person records in each Company the User has access to: the Person records and the Global User record should all have the same Signature. The Person records will carry Company-specific information for the User, such as Email Address, Advances and Settlements Account and Tag/Object. The Global User should be a Named User, one of the Person records can optionally be a Named User and the other Person records should be Concurrent or Timekeeper Users. You should only have one of the Person records as a Named User because any more will take up additional Named User licences.
If you will use Global Users, select the Use Global Users option in the Optional Features setting in the System module.
- It will allow that member of staff to log in to your Standard ERP database.
- You can use the Person record to control the access privileges that the member of staff has to your database.
- Person records also play a role in the licensing of your copy of Standard ERP.
- Named Users
- Named Users are useful in cases where access to a Standard ERP database is to be limited to certain specific employees in an organisation.
- For example, if you have purchased three Named Users, you can register a maximum of three Named Users in the Person register. Named Users must have Mailboxes, so you will also be able to register a maximum of three Mailboxes. All three will be able to log in to Standard ERP at once. The purchase of three Named Users acts as a limit on both the number of Named Users you can enter in the Person and Mailbox registers and on the number of Named Users who can log in to the system at the same time.
- For example, if you have purchased three Named Users, you can register a maximum of three Named Users in the Person register. Named Users must have Mailboxes, so you will also be able to register a maximum of three Mailboxes. All three will be able to log in to Standard ERP at once. The purchase of three Named Users acts as a limit on both the number of Named Users you can enter in the Person and Mailbox registers and on the number of Named Users who can log in to the system at the same time.
- Concurrent Users
- Concurrent Users are useful in cases where many employees in an organisation will need access to Standard ERP, but not all at the same time.
- For example, if you have purchased three Concurrent Users, you can register any number of Concurrent Users in the Person register. Any three will be able to log in to Standard ERP at once. The purchase of three Concurrent Users does not act as a limit on the number of Concurrent Users you can enter in the Person register, only on the number of Concurrent Users who can log in at the same time.
- Concurrent Users should not have Mailboxes, unless you have purchased Extra Mailboxes for them.
- For example, if you have purchased three Concurrent Users, you can register any number of Concurrent Users in the Person register. Any three will be able to log in to Standard ERP at once. The purchase of three Concurrent Users does not act as a limit on the number of Concurrent Users you can enter in the Person register, only on the number of Concurrent Users who can log in at the same time.
If you need Person records for employees who will not use Standard ERP themselves, you should register them as Concurrent or Timekeeper Users. For example, you might use Standard ERP to record time worked by or expenses claimed by employees who will not use Standard ERP themselves.
Before entering any Person records (especially Person records for Named Users), you should ensure the numbers of Named and Concurrent Users are correct in the Configuration setting in the System module, as follows:
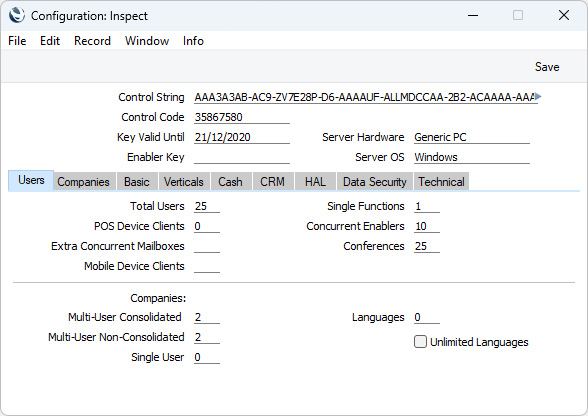
- Total Users
- The total number of Users (Named + Concurrent)
- Concurrent Enablers
- The number of Concurrent Users that can log in at any one time. The number of Named Users is therefore Total Users - Concurrent Enablers.
- Extra Concurrent Mailboxes
- The number of Concurrent Users that have Mailboxes. All Named Users have Mailboxes, so their Mailboxes should not be included in this figure.
- Single Functions
- The number of single functions or tasks. For example, if you have a user who will only be able to create Quotations and Orders (two tasks), you will need two Single Functions. If you have two such users, you will need four Single Functions.
The Person register in Standard ERP:
- Introduction
- Entering a Person Record
- Operations menu
- Create menu
- Home page for System Module manual
- Home page for Standard ERP manual
Entering a Person Record
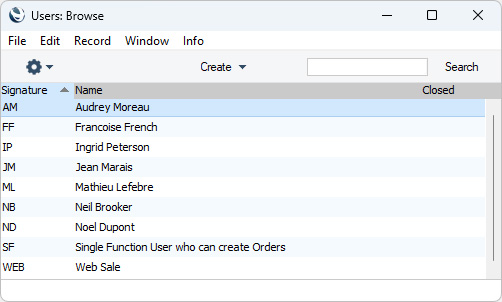
To open the Person register, first ensure you are in the System module. Then, if you are using Windows or macOS, click the [Registers] button in the Navigation Centre and double-click 'Persons' in the resulting list. If you are using iOS or Android, tap the [Registers] button in the Navigation Centre and then tap 'Persons' in the 'Registers' list.The 'Persons: Browse' window will be opened, listing Persons that you have already entered.
- Choose 'Named User' from the Create menu (Windows/macOS) or + menu (iOS/Android). This method will create a Named User with Mailbox and connected record in the Contact register. Please refer here for details about this method.
- Select 'New' from the Create menu of + menu (or use the Ctrl-N (Windows) or ⌘-N (MacOS) keyboard shortcuts). Alternatively, highlight a Person similar to the one you want to enter and select 'Duplicate' from the same menu. You will be able to choose whether the new record will be a Named or Concurrent User. If it will be a Named User, you will need to create their Mailbox and, if necessary, their connected record in the Contact register yourself.
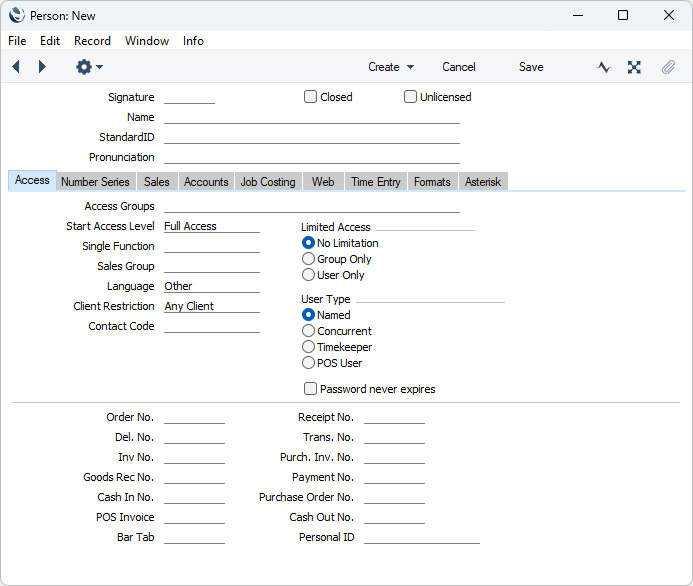
Since the amount of information stored about each Person will not fit on a single screen, the Person window has been divided into nine cards. At the top of each is the header. This contains the Person's Signature, Name and StandardID. There are nine named buttons ('tabs') in the header.

If you are using iOS or Android, the cards will be arranged vertically on screen. You can scroll down to see each one, or you can jump to any card by tapping on any tab and selecting the tab you want to go to.
Please refer to the following pages for details about each card:
- Header
- 'Access' card
- 'Number Series' card
- 'Sales' card
- 'Accounts' card
- 'Job Costing' card
- 'Time Entry' card
- 'Formats' card
- 'Asterisk' card
The Person register in Standard ERP:
- Introduction
- Entering a Person Record
- Operations menu
- Create menu
- Home page for System Module manual
- Home page for Standard ERP manual
Entering a Person Record - Header
This page describes the fields in the Header of the Person record. Please follow the links below for descriptions of the other cards:- Header
- 'Access' card
- 'Number Series' card
- 'Sales' card
- 'Accounts' card
- 'Job Costing' card
- 'Time Entry' card
- 'Formats' card
- 'Asterisk' card
- Signature
- The Signature is one of the Person's log-in IDs, the others being the StandardID described below and the Email Address on the 'Sales' card. It is also the Person's unique ID, which identifies them elsewhere in Standard ERP (e.g. in the Salesman field in an Invoice).
- Once you have saved the record, you cannot change the Signature simply by typing into the field. If you need to change a Signature, use the Conversions - Master and Conversions - Users settings in the System module. These settings will change the Signature both here and in all other registers where the Person has been used.
- If you have more than one Company in your database, records in the Person register (as with all registers unless they are shared) will be specific to the Company in which they are entered. However, if you are using the Mail facilities in Standard ERP, each Person's Mailbox will be open to all Companies in the database. This allows mail to be sent between Persons in different Companies. One implication of this is that all Persons across all Companies should have different Signatures. If there are two or more Persons in different Companies with the same Signatures, they will not be able to have separate Mailboxes.
You cannot include commas or full stops in Signatures.
- Once you have saved the record, you cannot change the Signature simply by typing into the field. If you need to change a Signature, use the Conversions - Master and Conversions - Users settings in the System module. These settings will change the Signature both here and in all other registers where the Person has been used.
- Name
- The name of the Person.
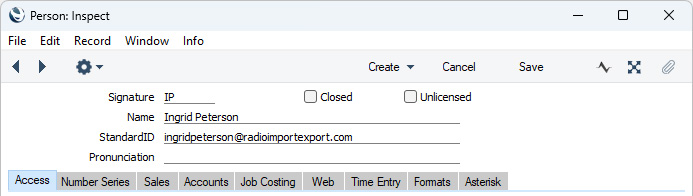
- StandardID
- The StandardID is a unique identifier for each Person that they can use to log in to your Standard ERP system and to log in to services provided by HansaWorld, such as your MyStandard page, which you can use to monitor and control your server if it is located in the cloud or controlled by a Cloud Node, and the support forum.
- When you create a Person record for an employee, you can specify a StandardID immediately but it is not necessary to do so. If you do not specify a StandardID in this field, the Person will be asked to provide one when they log in to your Standard ERP system for the first time.
- A Person's StandardID must be a valid email address. When the Person logs in to your Standard ERP system for the first time, an email address validation mail will be sent to the email address that they are using as their StandardID. The Person should follow the link in the validation mail to confirm that their email address is valid and to enter a StandardID password. If you would like an email address validation mail to be sent to a user immediately after entering their Person record, save the Person record and then choose 'Validation Email' from the Create menu (Windows/macOS) or + menu (iOS/Android). If you need to check whether an Email Address has already been validated, use the 'Check StandardID' function on the Operations or Tools menu. You can also use the Email Validation Status report in the Email and Conferences module, which lists the validation status of every Person and Global User.
- The Person will use their StandardID password to log in to HansaWorld services such as the "MyStandard" page and the support forum. It is not the same as the password they will use to log in to your Standard ERP system. If a Person needs to change their StandardID password, they should go to https://standard-id.hansaworld.com/reset-password.
- When you create a Person record for an employee, you can specify a StandardID immediately but it is not necessary to do so. If you do not specify a StandardID in this field, the Person will be asked to provide one when they log in to your Standard ERP system for the first time.
- Pronunciation
- Paste Special
Voice Synonyms setting, CRM module
- If you are using the Anna Talk Bot, specify here a record in the Voice Synonyms setting in the CRM module that will inform the Talk Bot how the Person's Name should be pronounced.
- Closed
- Check this box if the Person is no longer to be used. If the Person has a Mailbox, it will automatically be marked as Closed as well. Closed Persons will appear in the 'Persons: Browse' window but not in the Persons 'Paste Special' list. A closed Person cannot log in to your Standard ERP database, but can be re-opened at any time. Their Mailbox will also be re-opened.
- If you do not mark a Person as Closed (e.g. an employee may have left your company but you still need them to appear in the Persons 'Paste Special' list and to be able to use them in records such as Expense records), an alternative is to change the Start Access Level on the 'Access' card to "No Access" and to change the Access Group to one in which the matrix is empty.
- If you do not mark a Person as Closed (e.g. an employee may have left your company but you still need them to appear in the Persons 'Paste Special' list and to be able to use them in records such as Expense records), an alternative is to change the Start Access Level on the 'Access' card to "No Access" and to change the Access Group to one in which the matrix is empty.
- Unlicensed
- If you add more Named Users than specified in the Configuration setting, the most recently added ones will be marked as Unlicensed automatically the next time the enabler is checked. If an Unlicensed user logs in to your system, other users will be prevented from logging in until the Unlicensed user logs out again. If you purchase more Named User licences, the Unlicensed box will be unticked automatically the next time the enabler is checked.
The Person register in Standard ERP:
- Introduction
- Entering a Person Record, including:
- Header
- 'Access' card
- 'Number Series' card
- 'Sales' card
- 'Accounts' card
- 'Job Costing' card
- 'Time Entry' card
- 'Formats' card
- 'Asterisk' card
- Header
- Operations menu
- Create menu
- Home page for System Module manual
- Home page for Standard ERP manual
Entering a Person Record - Access Card
This page describes the fields on the 'Access' card of the Person record. Please follow the links below for descriptions of the other cards:- Header
- 'Access' card
- 'Number Series' card
- 'Sales' card
- 'Accounts' card
- 'Job Costing' card
- 'Time Entry' card
- 'Formats' card
- 'Asterisk' card
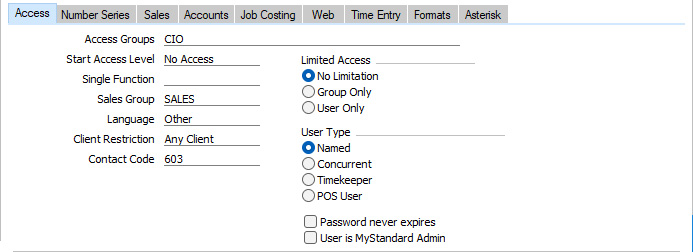
- Access Groups
- Paste Special
Access Groups setting, System module
- The Access Group that you specify here will control the level of access that the Person has to your Standard ERP system. For example, you may want to give the Person access to the Sales and Purchase Ledgers while preventing them from entering the Nominal Ledger.
- You can enter several Access Groups, separated by commas. This can be useful, for example, if you have configured separate Access Groups for each module.
- After specifying an Access Group, use the Start Access Level field immediately below to choose whether the User will start from No Access or from Full Access.
- Please refer here for full details about Access Groups.
- You can enter several Access Groups, separated by commas. This can be useful, for example, if you have configured separate Access Groups for each module.
- Start Access Level
- Paste Special
Choices of possible entries
- There are two ways of configuring an Access Group:
- You can exclude members of the Access Group from everywhere in your Standard ERP database except those areas that you list in the Access Group record i.e. you specify what they can do. This is known as "Starting from No Access".
- You can allow members of the Access Group to go everywhere in your Standard ERP database except to those areas that you list in the Access Group record i.e. you specify what they cannot do. This is known as "Starting from Full Access".
Specify here using 'Paste Special' whether the Person should start from No Access or Full Access.
- You can exclude members of the Access Group from everywhere in your Standard ERP database except those areas that you list in the Access Group record i.e. you specify what they can do. This is known as "Starting from No Access".
- Single Function
- Paste Special
Single Functions setting, System module
- A Single Function User is one with access to a limited number of Standard ERP functions (e.g. the ability to enter Orders, Invoices and/or Quotations). If this Person is to be treated as a Single Function User when they log in to your Standard ERP system, specify here which function(s) the Person can use, and set the User Type (using the options to the right) to Named. You must also create a Mailbox for them. Named, Concurrent and Single Function Users are described here.
- Sales Group, Limited Access
- Paste Special
Sales Groups setting, System module
- You can assign each Person to a Sales Group. This can help with reporting, as several reports allow you to list sales or purchases made by members of a specified Sales Group.
- The Sales Group is also part of the Limited Access feature. In some browse windows (e.g. those for Contacts, Invoices, Orders, Projects, Project Budgets, Purchase Invoices, Purchase Orders, Quotations, Service Orders, Work Orders and Work Sheets), there is a set of Limited Access buttons that allows any user to reduce the number of records listed in the window. This can be useful where a register contains many records, making it easier to find the correct one.
- The Limited Access buttons are as follows (Windows buttons illustrated on the left, macOS on the right):

- Lists all records in the register.

- Lists records belonging to members of the same Sales Group as the current user (i.e. records in which the Sales Group is the same as that of the current user).

- Lists records belonging to the current user (i.e. records in which the Person field contains the Signature of the current user).
- You can also use the Limited Access feature to control the records that each user will see in browse windows. Using the Limited Access options to the right of the Sales Group field, you can restrict the view of each user to their own records or to those of their Sales Group. This applies to registers whose browse windows feature the Limited Access buttons. The Limited Access options are:
- No Limitation
- Select this option if the Person is to be able to see every record in the register. They will be able to use the Limited Access buttons to reduce the list so that it only shows records belonging to members of their Sales Group or their own records.
- Group Only
- If you select this option, the Person will only be able to see records belonging to members of their Sales Group. They will be able to reduce the list so that it only shows their own records.
- User Only
- Select this option if the Person is only to be able to see their own records.
- The Limited Access module must be active if you want to choose the Group Only or User Only option for any Person, or if you want to use the Limited Access buttons in browse windows. To activate the Limited Access module, select the Limited Access option on the 'Technical' card of the Configuration setting in the System module. Remember that any changes made in this setting will require you to apply for a new Enabler Key.
- The Sales Group is also part of the Limited Access feature. In some browse windows (e.g. those for Contacts, Invoices, Orders, Projects, Project Budgets, Purchase Invoices, Purchase Orders, Quotations, Service Orders, Work Orders and Work Sheets), there is a set of Limited Access buttons that allows any user to reduce the number of records listed in the window. This can be useful where a register contains many records, making it easier to find the correct one.
- Language
- Paste Special
Choice of possible entries
- This field is only used in multi-language versions of Standard ERP. Enter the language used by this Person: all screens, menu items, field names and reports will appear in the correct language when this Person signs in to Standard ERP.
- Multi-language versions of Standard ERP are produced according to need and will usually only contain a few of these languages. If you are using a standard version of Standard ERP, you can leave this field empty as the application will only contain only one language.
- Multi-language versions of Standard ERP are produced according to need and will usually only contain a few of these languages. If you are using a standard version of Standard ERP, you can leave this field empty as the application will only contain only one language.
- Client Restriction
- Paste Special
Choices of possible entries
- Use this field if you want to ensure the Person can only log into your Standard ERP system using devices with a particular operating system. This field is only used in client-server installations: it will be ignored in a single-user system.
- Contact Code
- Paste Special
All Contacts in Contact register
- Use this field to connect the Person to a record in the Contact register. This record can contain additional information about the Person, such as Skype Name and SIP Address. You must connect a Person to a record in the Contact register if they will use Standard ERP to make calls through an Asterisk-based or TAPI switchboard, and it is recommended that you do so if the User will use Standard ERP to send text (SMS) messages.
- User Type
- Select an option for each Person as follows:
- Named, Concurrent
- Use these options to specify whether the Person is to be treated as a Named or Concurrent User when they log in to your Standard ERP system.
- If the Person is a Single Function User, specify in the Single Function field above which function(s) the Person can use, and set the User Type to Named.
- You must also create a Mailbox for each Named and Single Function User. If a Named or Single Function User without a Mailbox logs in to your system, other users will not be able to log in and the Named User in question will automatically be logged out after one minute. If you used the 'Named User' function on the Create menu (Windows/macOS) or + menu (iOS/Android) in the 'Persons: Browse' window to create the Person record for a Named User, a Mailbox will be created automatically. If you used the 'New' or 'Duplicate' functions on the same menu, you will need to create the Mailbox yourself, which you can do using the 'Mailbox' function, also on the Create or + menu.
- Creating a Mailbox for a Concurrent User is optional: if a Concurrent User needs a Mailbox, you can create it using the 'Mailbox' function. You must purchase Mailboxes for Concurrent Users separately and record them in the Extra Concurrent Mailboxes field in the Configuration setting.
- Named, Concurrent and Single Function Users are described here.
- If the Person is a Single Function User, specify in the Single Function field above which function(s) the Person can use, and set the User Type to Named.
- Timekeeper
- You should mark a Person as a Timekeeper User in the following circumstances (you can also mark them as a Concurrent User but you may prefer Timekeeper to help with administration and data management):
- If you have more than one Company in your database and you want a User to have access to some or all of those Companies, you will usually create a Global User record for that User. You will also need to create Person records for that User in each Company the User has access to: the Person records and the Global User record should all have the same Signature. The Person records will carry Company-specific information for the User, such as Email Address, Advances and Settlements Account and Tag/Object. One of these Person records can optionally be a Named User and the other Person records should be Timekeeper Users. You should only have one of the Person records as a Named User because any more will take up additional Named User licences.
- If you need Person records for employees who will not use Standard ERP themselves, you should register them as Timekeeper Users. For example, you might use Standard ERP to record time worked by or expenses claimed by employees that will not use Standard ERP themselves. For security, it is recommended that you also choose "No Access" as the Start Access Level above and that you assign these Person records to an Access Group in which the matrix is empty.
- If you have more than one Company in your database and you want a User to have access to some or all of those Companies, you will usually create a Global User record for that User. You will also need to create Person records for that User in each Company the User has access to: the Person records and the Global User record should all have the same Signature. The Person records will carry Company-specific information for the User, such as Email Address, Advances and Settlements Account and Tag/Object. One of these Person records can optionally be a Named User and the other Person records should be Timekeeper Users. You should only have one of the Person records as a Named User because any more will take up additional Named User licences.
- Named, Concurrent
- Password never expires
- You can use the Password Security setting to force every user to change their password periodically. If you need to make an exception to this rule for particular users, select this option in their Person records. For example, if you have Person records to allow external TAPI and/or mail gateways to log in to your server automatically, it will not be convenient to force these users to change their passwords.
- User is MyStandard Admin
- This check box will become visible in a client-server system after you have set up a Cloud Node. It will not be visible in a single-user (standalone) system. Please refer here for details.
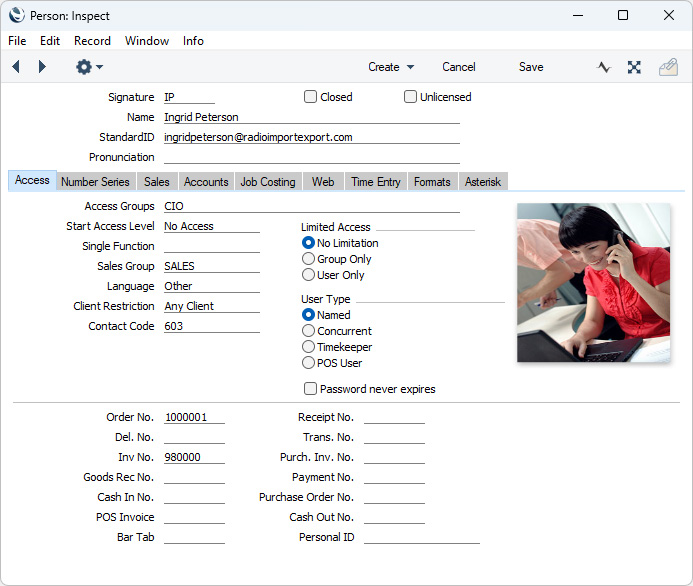
- Picture, [Add picture]
- You can attach pictures to records in the Person register from Windows and macOS clients. Follow these steps:
- Open the record in question. The record must already have been saved at least once (i.e. the window title must be 'Inspect' or 'Update').

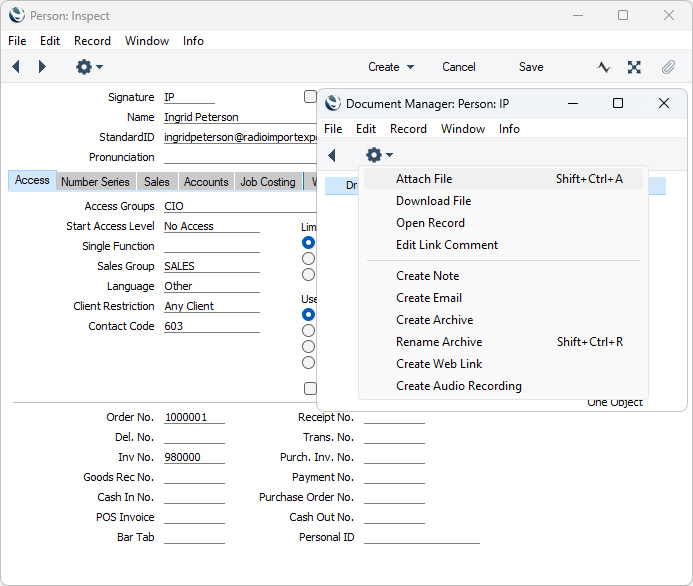
- Click the [Document Manager] button (with the paper clip icon, in the top right-hand corner of the window) or select 'Attachments' from the Record menu. A list of objects currently attached to the record is opened.
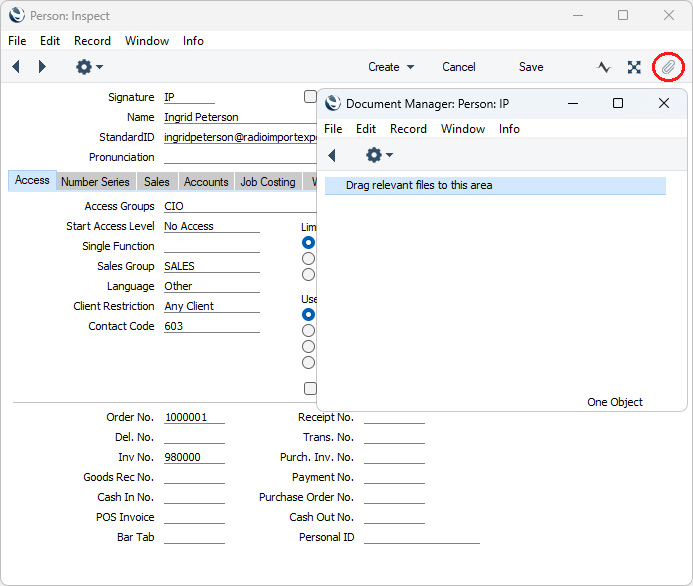
- Choose 'Attach File' from the Operations menu of this list.
- Locate the picture file on your hard disk and click [Open]. The picture will be attached to the record. It must be a .jpg file (or a .png file if you are using macOS). Pictures larger than 280 x 280 pixels will be scaled.
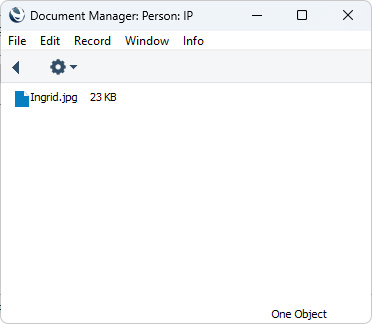
- After the picture file has uploaded, you may need to close and reopen the record to see the picture:
When you click this button, the 'Edit Picture' window opens:
If the picture is already on your hard disk, click the [Other] button to locate it. Alternatively, click the button with the camera icon to take a photograph of the Person using your computer's camera.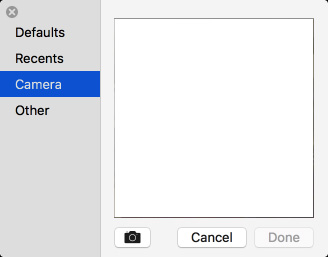
- In both cases you can then scale the picture using the slider and, if the picture is too big, move the picture by dragging so that the part you need is in the centre of the frame (the part outside the frame will be cropped).
- Finally, click the [Done] button to add the picture to the Item. The picture will be converted to .PNG format and will appear in the Document Manager with the name "image.png". You may need to close and reopen the Item record to see the picture:
It is not recommended that you use the [Add picture] button in mixed networks. The [Add picture] buttons converts picture files to the .PNG format, and .PNG pictures will not be displayed in Person records on Windows clients.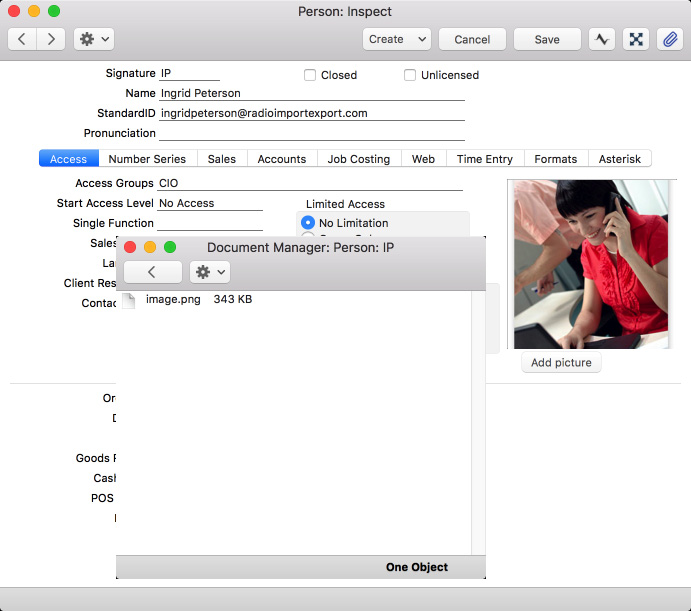
- Open the record in question. The record must already have been saved at least once (i.e. the window title must be 'Inspect' or 'Update').
The Person register in Standard ERP:
- Introduction
- Entering a Person Record, including:
- Header
- 'Access' card
- 'Number Series' card
- 'Sales' card
- 'Accounts' card
- 'Job Costing' card
- 'Time Entry' card
- 'Formats' card
- 'Asterisk' card
- Header
- Operations menu
- Create menu
- Home page for System Module manual
- Home page for Standard ERP manual
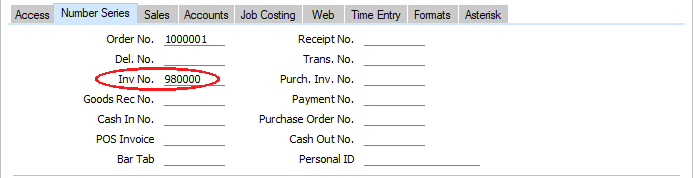
Entering a Person Record - Number Series Card
This page describes the 'Number Series' card of the Person record. Please follow the links below for descriptions of the other cards:- Header
- 'Access' card
- 'Number Series' card
- 'Sales' card
- 'Accounts' card
- 'Job Costing' card
- 'Time Entry' card
- 'Formats' card
- 'Asterisk' card
You can define the number sequences (known as "Number Series") that you want be used when generating Order Numbers, Invoice Numbers, Transaction Numbers and so on.
If you have not defined a Number Series for a particular register, the sequence will begin at 1 and continue consecutively. For example, if you have not defined a Number Series for Invoices, the first Invoice that you enter will carry the Invoice Number 1, the second one will be Number 2, and so on. If you change the sequence at any time, the sequence will continue from that point. For example, if you change the Number of the first Invoice from 1 to 1000 before you save it for the first time, the next Invoice will be given the Number 1001.
For many registers, you can define a Number Series, or several Number Series that are to run concurrently. For example, the Number Series - Invoices setting allows you to define Number Series for Invoices. Defining a Number Series involves specifying the first and last Numbers and the period during which the Number Series can be used. The period can be open-ended.
Having defined Number Series for a particular register, each new record in that register will by default take its Number from the first current Number Series in the setting. When entering a record, you will be able to change to the first unused number in any other current Number Series using 'Paste Special'.
Depending on the register, if you have defined several number sequences in the relevant Number Series setting, you can use the Number Series Defaults setting to specify which sequence is to be used as the default when creating new records. You can often specify that a particular sequence will be used when a particular user creates new records, using these fields on the 'Number Series' card of their Person record.
The illustration below shows a Number Series - Invoices setting in which we have defined three number sequences for Invoices for the year 2023:
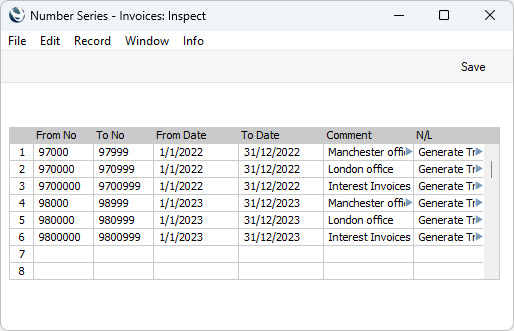
If we want to use a different Number Series as the overall default, we can choose one in the Number Series Defaults setting. In the illustration below, we have specified that the second sequence (980000 - 980999) is to be used as the overall default in standard Invoices. Enter the first number in the sequence (980000 in this example) in the Invoices field. We have also specified that we want to use the third sequence for Interest Invoices:

You do not need to specify a Number Series in every field. A Person can have their own number sequence for Invoices, for example, but use the default sequences for all other records.
In a single-user installation, you will need to quit Standard ERP and restart (or log in again using the button in the Navigation Centre) for any changes that you make to the number series fields to take effect. In a client-server system, you only need log in again (i.e. you don't need to restart the server).
Do not specify number sequences for POS Invoices (in the POS Invoice field) for any users who will enter POS Invoices on tills with live-sync connections to the server. On these tills, POS Invoice Numbers should always be taken from the Number Series - POS Invoices setting, which will be controlled by the Synchronised Number Series setting in the Technics module.
In countries where personal identity cards are carried, you can enter the Person's ID number from their card in the Personal ID field. You can have this printed on forms such as the Expense form (by including the "Person ID" field in the Form Template).
---
The Person register in Standard ERP:
- Introduction
- Entering a Person Record, including:
- Header
- 'Access' card
- 'Number Series' card
- 'Sales' card
- 'Accounts' card
- 'Job Costing' card
- 'Time Entry' card
- 'Formats' card
- 'Asterisk' card
- Header
- Operations menu
- Create menu
- Home page for System Module manual
- Home page for Standard ERP manual
Entering a Person Record - Sales Card
This page describes the fields on the 'Sales' card of the Person record. Please follow the links below for descriptions of the other cards:- Header
- 'Access' card
- 'Number Series' card
- 'Sales' card
- 'Accounts' card
- 'Job Costing' card
- 'Time Entry' card
- 'Formats' card
- 'Asterisk' card

- Bonus
- The Bonus Salesman report in the Sales Ledger will calculate bonuses and commissions payable to sales staff, based on the sales made during a specified period. You can have these bonuses and commissions calculated using up to three methods: you can set a fixed bonus percentage for each sales person; you can set a fixed bonus percentage for each Item; and you can configure a more complex system of percentages using the Bonus setting in the Sales Ledger.
- If you need bonuses and commissions to be calculated using a fixed bonus percentage for each sales person, enter that percentage in this field.
- If you need bonuses and commissions to be calculated using a fixed bonus percentage for each sales person, enter that percentage in this field.
- Location
- Paste Special
Locations setting, Stock module
- If you specify a Location in this field, it will be offered as a default whenever this Person enters a stock transaction, Order, Purchase Order, Quotation or Invoice.
- You can also specify a Default Location for each client machine, using the Local Machine setting in the User Settings module. This will be used if the Location in a Person record is blank.
- You can also specify a Default Location for each client machine, using the Local Machine setting in the User Settings module. This will be used if the Location in a Person record is blank.
- Service Location
- Paste Special
Locations setting, Stock module
- If you specify a Service Location here, it will be copied to the Service Location field in each Service Order that the Person enters. The Service Location is where you will store repair Items (i.e. Items brought in by Customers for repair).
- Order Reserv. Location
- Paste Special
Locations setting, Stock module
- If you are using the Stock Reservations feature with virtual Locations, you can assign a virtual Location to each sales person. This virtual Location is where they can store the Items reserved for their Sales Orders.
- One way to do this is to specify a virtual Location in the Location field above in the Person record for a sales person. The virtual Location will then be copied to every sales transaction entered by that sales person, which will mean that they will need to move stock to that virtual Location every time before it can be delivered.
- An alternative is to specify a physical Location in the Location field above and a virtual Location in this field. You should also choose the Reservation Location on User option in the Stock Reservation Settings setting in the Sales Orders module. The physical Location will then be the default in sales transactions. If there is sufficient stock in the physical Location to satisfy a Sales Order, it can be delivered immediately. If it is necessary to reserve the stock for future delivery against a Sales Order, the sales person can start the reservation process in the usual way by selecting 'Reservations' from the Operations menu. This action will change the Location in the Sales Order to the virtual Location specified in this field, where the reserved stock can be stored until it is needed.
- One way to do this is to specify a virtual Location in the Location field above in the Person record for a sales person. The virtual Location will then be copied to every sales transaction entered by that sales person, which will mean that they will need to move stock to that virtual Location every time before it can be delivered.
- Order Reserv. Access
- Paste Special
Stock Reservation Access setting, Sales Orders module
- Use this field to specify the Locations from which the Person can remove stock.
- If you enter an access code in this field (or more than one, separated by commas), the Person will be able to remove stock from any Location with the same access code (in its Reserv. Access field), and from Locations whose Reserv. Access field is empty.
- For example, a Person with "1,2" in this field will be able to remove stock from any Location with "1", "2" or blank in its Reserv. Access field. The Person will not be able to remove stock from a Location with "3" as its Reserv. Access. A Person with a blank in this field will only be able to take stock from the blank Location, not from the "1", "2" or "3" Locations.
- "Removing stock" in this context means entering the Location in a Quotation, Sales Order, Invoice, Stock Depreciation or Stock Movement (From Location field), and removing stock using the Stock Reservations feature. The Stock Reservations feature is described here.
- One use for the Reserv. Access fields in Person records and Locations will be as part of the Stock Reservations feature with virtual Locations. If each sales person has their own virtual Location where they can store the Items reserved for their Sales Orders, you can use the Reserv. Access fields to prevent them from taking each other's reserved Items.
- If you enter an access code in this field (or more than one, separated by commas), the Person will be able to remove stock from any Location with the same access code (in its Reserv. Access field), and from Locations whose Reserv. Access field is empty.
- Email Address
- The employee's email address. If you will be using Standard ERP to send email, this will be used as the return address in all email sent by the Person. Please refer here for details about sending email.
- A Person can use their Email Address to log in to Standard ERP, instead of their Signature.
- A Person can use their Email Address to log in to Standard ERP, instead of their Signature.
- Specification, Comment
- Use these fields to record any comments about the Person.
- You can have the Specification of the responsible Person printed in the following forms: Cash In, Cash In Receipts, Cash Out, Cash Out Payments, Cash Out Personnel Payments, Daily Allowances and Expenses. Add the "Person Specification" field to your Form Template designs if you need the Person's Specification to be printed in this way. The Person's Specification will also be printed in the "Job Description" field in the Asset Status form.
- Similarly, the Comment of the responsible Person will be printed in the "Person Comment" field in the following forms: Cash In, Cash In Receipts, Cash Out and Cash Out Payments.
- The Specification field is also used for a specific purpose in Portugal, where Deliveries, Returned Goods to Supplier and Stock Movements all have to be registered as transport documents with the tax authority. You can do this manually on the tax authority's web site, or you can register them electronically. If you will register them electronically, you need to create sub-users on the tax authority website with passwords and access rights to submit electronic documents. Then, enter the sub-user ID in the Specification field in the Person records of each user with the authority to submit electronic documents.
- You can have the Specification of the responsible Person printed in the following forms: Cash In, Cash In Receipts, Cash Out, Cash Out Payments, Cash Out Personnel Payments, Daily Allowances and Expenses. Add the "Person Specification" field to your Form Template designs if you need the Person's Specification to be printed in this way. The Person's Specification will also be printed in the "Job Description" field in the Asset Status form.
- Our Ref
- Use the Our Ref field to assign a short (up to 20 characters) reference text for the employee. This text will be copied to the Our Reference field in every transaction entered by the Person.
- If you create a Person record using the 'Named User' function on the Create menu of the 'Persons: Browse' window, the Person's Name will be copied to this field as a default.
- If you create a Person record using the 'Named User' function on the Create menu of the 'Persons: Browse' window, the Person's Name will be copied to this field as a default.
- Department
- Paste Special
Departments setting, Assets module/System module
- If the Person works for a particular Department in your organisation, enter that Department here.
- If you include the "Department" field in your Form Template designs, a Person's Department will be printed in the Daily Allowances and Expenses forms.
- If you include the "Department" field in your Form Template designs, a Person's Department will be printed in the Daily Allowances and Expenses forms.
- Phone 1, Phone 2
- Enter the Person's mobile phone number including international code and preceded by + or 00 (preferably + as it is the standard method of signifying international numbers and will not change).
- If the Person will send Text (SMS) messages, the originating phone number will be chosen as follows:
- The Mobile Number in the Person's record in the Contact register will be used. A Person's Contact record is the record quoted in the Contact Code field on the 'Access' card of their Global User or Person record;
- If a Person does not have a connected record in the Contact register, or this record does not have a Mobile Number, it will be taken from these Phone 1 or Phone 2 fields (in that order).
Please refer to this page for details about sending Text (SMS) messages.
- If the Person will receive Internal Order Alerts, Internal Quotation Alerts and/or Approval Request notifications by Text (SMS) message, those messages will be sent to a mobile number chosen in the same way (i.e. from the Person's Contact record or from the Phone 1 or Phone 2 fields in their Person record).
- If the Person will send Text (SMS) messages, the originating phone number will be chosen as follows:
- Minimum Price List
- Paste Special Price List register, Pricing module
- This field allows you to set minimum prices that sales persons can use in Quotations, Orders and Invoices.
- To set minimum prices for each Item, first create a Price List (using the Price List register in the Pricing module). Then, create records in the Price register for each Item that is to have a minimum price. Assign each Price record to the Price List. Finally, specify the Price List in this field in the Person records for each sales person. You can of course create more than one Price List, if you want to set different minimum prices for different Persons.
- When a Person with a Minimum Price List enters and tries to save a Quotation, Order or Invoice, a check will be made that the Unit Price less Discount of each Item is not less than the figure in the relevant Price record (i.e. not less than the minimum). If there is no Price record for an Item, the Base Price in the Item record will be treated as the minimum. If the Unit Price less Discount of any Item is below the minimum, it will usually not be possible to save the record, unless a manager has approved the price. A manager in this context is a Person with a Discount Password: please refer here for details about setting Discount Passwords.
- You can also specify a Minimum Price List in the manager's Person record. After the manager has approved a price in a Quotation, Order or Invoice row, the manager's Minimum Price List will then apply to that row. The manager will not be able to approve a price that is lower than their minimum.
- If you do not specify a Minimum Price List for a particular Person, the prices in that Person's Quotations, Orders and Invoices will not be checked.
- This field allows you to set minimum prices that sales persons can use in Quotations, Orders and Invoices.
- POS ID
- In Italy, if you are using the Epson FP-81 II or Epson FP-81 II over TCP/IP Fiscal Printers, enter unique cashier IDs in the POS ID field on the 'Sales' card in the Person records for each member of staff who will act as cashiers. This information will be sent to fiscal printers when printing POS Invoices, with "01" being sent for cashiers with POS IDs.
---
The Person register in Standard ERP:
- Introduction
- Entering a Person Record, including:
- Header
- 'Access' card
- 'Number Series' card
- 'Sales' card
- 'Accounts' card
- 'Job Costing' card
- 'Time Entry' card
- 'Formats' card
- 'Asterisk' card
- Header
- Operations menu
- Create menu
- Home page for System Module manual
- Home page for Standard ERP manual
Entering a Person Record - Accounts Card
This page describes the fields on the 'Accounts' card of the Person record. Please follow the links below for descriptions of the other cards:- Header
- 'Access' card
- 'Number Series' card
- 'Sales' card
- 'Accounts' card
- 'Job Costing' card
- 'Time Entry' card
- 'Formats' card
- 'Asterisk' card

- Account
- Paste Special
Account register, Nominal Ledger/System module
- Specify here the Account that is to be used as the Person's Advances and Settlements Account. This Account will be credited with the value of the Person's expense claims (recorded in the Expense register in the Expenses module) and debited with the value of payments issued to the Person (recorded in the Personnel Payment register in the same module).
- It is recommended that you use a separate Account be used for each Person (or, if this is not possible, a separate Account - Tag/Object combination). If you do not follow this rule, the Periodic Personnel Statement report in the Expenses module may be misleading.
- It is recommended that you use a separate Account be used for each Person (or, if this is not possible, a separate Account - Tag/Object combination). If you do not follow this rule, the Periodic Personnel Statement report in the Expenses module may be misleading.
- Sort Code
- Enter the Sort Code (branch number) of the Person's bank here. This will be transferred to any Personnel Payments entered in their name.
- Tag/Object
- Paste Special
Tag/Object register, Nominal Ledger/System module
- The Tag/Object that you specify here will be copied to all Contracts, Invoices, Orders and Quotations in which the Person is the Salesman.
- In the Nominal Ledger Transaction generated from an Invoice, the Tag/Object representing the Salesman will be assigned to the credit posting(s) to the Sales Account(s) and, if the Invoice will update the stock valuation in the Nominal Ledger, to the Cost of Sales postings. If you are using the Tags/Objects on Debtors A/C option in the Account Usage S/L setting, the Object will also be assigned to the debit posting to the Debtor Account. Finally, if you are using Tags/Objects on VAT Account option in the same setting, they will be assigned to the credit posting(s) to the Output VAT Account(s). This allows you to analyse sales made by each Person in the Nominal Ledger. For example, if you ensure that each Person's Tag/Object belongs to the same Tag/Object Type, you can then produce an Tag/Object/Quantity Results report for that Tag/Object Type, to compare the profitability of sales made by each Person. Please refer here for more examples.
- This Tag/Object will also be assigned to the credit posting to the Person's Advances and Settlements Account from their Expense claims, and to the debit posting to the same Account from Personnel Payments. If it is not possible to use a different Advances and Settlements Account for each Person, you should at least use a separate Tag/Object for each Person. If you do not have a unique Account-Tag/Object combination for each Person, the Periodic Personnel Statement report will not be correct because it will not be able to calculate separate balances for each Person.
- You can only enter a single Tag/Object in this field for each Person. You can easily create a Tag/Object for the Person using the 'Tag/Object' function on the Create menu (Windows/macOS) or + menu (iOS/Android).
- In the Nominal Ledger Transaction generated from an Invoice, the Tag/Object representing the Salesman will be assigned to the credit posting(s) to the Sales Account(s) and, if the Invoice will update the stock valuation in the Nominal Ledger, to the Cost of Sales postings. If you are using the Tags/Objects on Debtors A/C option in the Account Usage S/L setting, the Object will also be assigned to the debit posting to the Debtor Account. Finally, if you are using Tags/Objects on VAT Account option in the same setting, they will be assigned to the credit posting(s) to the Output VAT Account(s). This allows you to analyse sales made by each Person in the Nominal Ledger. For example, if you ensure that each Person's Tag/Object belongs to the same Tag/Object Type, you can then produce an Tag/Object/Quantity Results report for that Tag/Object Type, to compare the profitability of sales made by each Person. Please refer here for more examples.
- Bank A/C
- Enter the Person's bank account number here. This will be transferred to any Personnel Payments entered in their name.
- Bank Name
- Paste Special
Banks setting, Purchase Ledger
- The name of the Person's Bank.
The Person register in Standard ERP:
- Introduction
- Entering a Person Record, including:
- Header
- 'Access' card
- 'Number Series' card
- 'Sales' card
- 'Accounts' card
- 'Job Costing' card
- 'Time Entry' card
- 'Formats' card
- 'Asterisk' card
- Header
- Operations menu
- Create menu
- Home page for System Module manual
- Home page for Standard ERP manual
Entering a Person Record - Job Costing Card
Please refer here for details about the 'Job Costing' Card.---
The Person register in Standard ERP:
- Introduction
- Entering a Person Record, including:
- Header
- 'Access' card
- 'Number Series' card
- 'Sales' card
- 'Accounts' card
- 'Job Costing' card
- 'Time Entry' card
- 'Formats' card
- 'Asterisk' card
- Header
- Operations menu
- Create menu
- Home page for System Module manual
- Home page for Standard ERP manual
Entering a Person Record - Time Entry Card
Please refer here for details about the 'Time Entry' Card.---
The Person register in Standard ERP:
- Introduction
- Entering a Person Record, including:
- Header
- 'Access' card
- 'Number Series' card
- 'Sales' card
- 'Accounts' card
- 'Job Costing' card
- 'Time Entry' card
- 'Formats' card
- 'Asterisk' card
- Header
- Operations menu
- Create menu
- Home page for System Module manual
- Home page for Standard ERP manual
Entering a Person Record - Formats Card
Please refer to the description of the Company Date and Numeric Format setting for details about this card.---
The Person register in Standard ERP:
- Introduction
- Entering a Person Record, including:
- Header
- 'Access' card
- 'Number Series' card
- 'Sales' card
- 'Accounts' card
- 'Job Costing' card
- 'Time Entry' card
- 'Formats' card
- 'Asterisk' card
- Header
- Operations menu
- Create menu
- Home page for System Module manual
- Home page for Standard ERP manual
Entering a Person Record - Asterisk Card
This page describes the 'Asterisk' card of the Person record. Please click the following links for descriptions of the other cards:- Header
- 'Access' card
- 'Number Series' card
- 'Sales' card
- 'Accounts' card
- 'Job Costing' card
- 'Time Entry' card
- 'Formats' card
- 'Asterisk' card
Asterisk is switchboard software that runs on computers using Linux and other operating systems. It is an open-source software project that is available for anybody to download and install without charge. It supports the SIP standard for connecting to IP-based telephones (e.g. softphones such as EyeBeam and X-Lite, hardphones from Cisco and other vendors, Nokia E-series cellphones with built-in SIP softphone etc.). Standard ERP integrates with the Asterisk switchboard, not the telephones themselves.
Each Standard ERP user that will communicate through the Asterisk switchboard must have a SIP user name (i.e. SIP address) that is registered as a SIP user on that switchboard. Follow these steps:
- The first step is to specify SIP user names for each Person and Global User. To do this, create records in the Contact register for each member of staff, and enter their SIP user names in the SIP field. The Contact records should also contain extension numbers that other members of staff can call within the Asterisk server. Connect these Contact records to the relevant Person or Global User records using the Contact Code field on the 'Access' card.
- The second step is to register those SIP user names in the Asterisk switchboard. Depending on the switchboard, you can do this on the switchboard itself, or you can create a configuration file in Standard ERP and send it to the switchboard. To use the second method, register the SIP user names on the 'Asterisk' card of each Person and Global User record:
If you need to register SIP user names for members of staff who are not Standard ERP users, or SIP user names that are not tied to particular users (e.g. a phone for public use), enter them in the Asterisk Users setting in the Telephony module.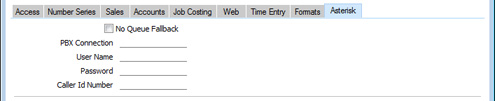
Finally, run the 'Asterisk SIP Configuration Files' Maintenance function in the Telephony module to create the configuration file and send it to the Asterisk switchboard.
In this chapter:
- Introduction to the Person register
- Entering a Person Record, including:
- Header
- 'Access' card
- 'Number Series' card
- 'Sales' card
- 'Accounts' card
- 'Job Costing' card
- 'Time Entry' card
- 'Formats' card
- 'Asterisk' card
- Header
- Operations menu
- Create menu
- Home page for System Module manual
- Home page for Standard ERP manual
Operations Menu - Persons

If you are using Windows or macOS, you can open the Operations menu by clicking the button with the 'cog' icon (shown highlighted in the illustration above). If you are using iOS or Android, you can access the Operations menu functions through the Tools menu (with 'wrench' icon).
Before using the functions on the Operations menu in the 'Persons: Browse' window, you should highlight a Person in the list and then select a function to apply to that Person. If you are using iOS or Android, you can highlight a single record in the browse window by searching for it.
Note that in Standard ERP version 8.0, some functions that were previously on the Operations menu were moved to the Create menu (Windows/macOS) or + menu (iOS/Android).
Please follow the links below for details about each function on the Operations menu:
The Person register in Standard ERP:
- Introduction
- Entering a Person Record
- Operations menu
- Create menu
- Home page for System Module manual
- Home page for Standard ERP manual
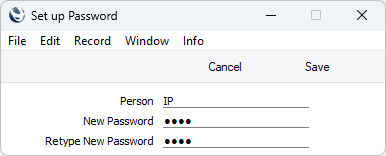
Operations Menu - Persons - Change Password
This page describes the 'Change Password' function on the Operations menu in the 'Persons: Browse' window. If you are using iOS or Android, the 'Change Password' function is on the Tools menu.---
Once you have recorded a user or employee in the Person register, they will be able to log in to and use your Standard ERP database. For security reasons, therefore, it is recommended that all Persons have their own passwords and that these are changed from time to time.
You can assign Passwords to Persons as you add them to the Person register. If you do not do this, each Person will be asked to set a password the first time they log in. To set a password for a Person as you add them to the Person register (or to change a password at any other time, for example if a Person leaves the company), highlight their name in the 'Persons: Browse' window and select 'Change Password' from the Operations menu (Windows/macOS) or Tools menu (iOS/android. The following window will be opened:
Each Person can also change their own password, even if they do not have access to the System module. After logging in, the Person should open the Navigation Centre or the 'Settings' list in any module and select 'Change Password' from the Operations or Tools menu. Then, they should follow the instructions above, with the difference that they will also need to confirm their existing password.
If you want to set rules for passwords (e.g. to impose a minimum number of characters, or to require at least one alpha or numeric character), use the Password Security setting.
Note that if you are using Windows, you cannot include special characters such as *, å, ä, ö in passwords. Bear this in mind if you are creating the User Account on a macOS machine but the person will need to be able to log in when using Windows.
This function will change a Person's database password, which is not the same as their StandardID password. If a Person needs to change their StandardID password, they should go to https://standard-id.hansaworld.com/reset-password.
---
The Person register in Standard ERP:
- Introduction
- Entering a Person Record
- Operations menu, including:
- Change Password
- Change Discount Password
- Check StandardID
- To Do List
- Change Password
- Create menu
- Home page for System Module manual
- Home page for Standard ERP manual
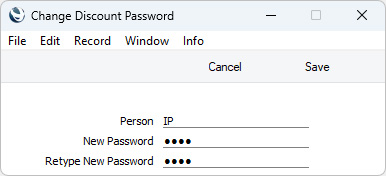
Operations Menu - Persons - Change Discount Password
This page describes the 'Change Discount Password' function on the Operations menu in the 'Persons: Browse' window. If you are using iOS or Android, the 'Change Discount Password' function is on the Tools menu.---
You can prevent users from saving a Quotation, Order or Invoice after they have entered a price (i.e. a unit price less discount) in any row that is below a specified minimum for the Item. To do this, follow these steps:
- Create a Price List (using the Price List register in the Pricing module).
- Create records in the Price register for each Item that is to have a minimum price, specifying the minimum prices in those records. Assign each Price record to the Price List from step 1.
- Specify the Price List in the Minimum Price List field on the 'Sales' card in the Person records for each sales person.
In some circumstances, you may wish to allow the saving of a Quotation, Order or Invoice in which at least there is at least one row where the Unit Price less Discount is below the minimum. In order to allow the record to be saved, a manager must approve the price. A manager in this context is a Person with a Discount Password, set using this function.
To set a Discount Password for a Person, highlight their name in the 'Persons: Browse' window and select 'Change Discount Password' from the Operations menu (Windows/macOS) or Tools menu (iOS/Android). The following window will be opened:
Assigning a Discount Password to a Person immediately qualifies that Person as a manager, able to approve prices in Quotations, Orders and Invoices that are below the Salesman's minimum. To approve a price, the manager should run the 'Manager's Discount Override' function from the Quotation, Order or Invoice. If you would like to define minimum prices for the manager, specify a Minimum Price List in their Person record. They will then not be able to approve prices that are below the minimum set in that Price List.
Any Person that has a Minimum Price List can also change their own Discount Password, even if they do not have access to the System module. After logging in, the Person should open the Navigation Centre or the 'Settings' list in any module and select 'Change Discount Password' from the Operations or Tools menu. Then, they should follow the instructions above, with the difference that they will also need to confirm their existing password. The 'Change Discount Password' function is not available to Persons that have not been assigned a Minimum Price List.
Note that if you are using Windows, you cannot include special characters such as *, å, ä, ö in passwords. Bear this in mind if you are creating the Discount Password on a macOS machine but the Person will need to be able to use the Password on a Windows machine.
---
The Person register in Standard ERP:
- Introduction
- Entering a Person Record
- Operations menu, including:
- Change Password
- Change Discount Password
- Check StandardID
- To Do List
- Change Password
- Create menu
- Home page for System Module manual
- Home page for Standard ERP manual
Operations Menu - Persons - Check StandardID
This page describes the 'Check StandardID' function on the Operations menu in the Persons browse and record windows. If you are using iOS or Android, the 'Check StandardID' function is on the Tools menu.---
The StandardID is a unique identifier for each Person that they can use to log in to your Standard ERP system and to log in to services provided by HansaWorld, such as your MyStandard page, which you can use to monitor and control your server if it is located in the cloud or controlled by a Cloud Node, and the support forum.
When you create a Person record for an employee, you can specify a StandardID immediately (in the header of the Person record) but it is not necessary to do so. If you do not specify a StandardID, the Person will be asked to provide one when they log in to your Standard ERP system for the first time.
A Person's StandardID must be a valid email address. When the Person logs in for the first time, an email address validation mail will be sent to the email address that they are using as their StandardID. The Person should follow the link in the validation mail to confirm that their StandardID is a valid email address and to enter a StandardID password.
If you would like to check whether a Person has validated their StandardID, open the Person register, highlight the Person in the list and choose this 'Check StandardID' function from the Operations menu (Windows/macOS) or Tools menu (iOS/Android). If you are using iOS or Android, you can highlight a Person record by searching for it. You can also open a Person record in a record window and select this function from the Operations or Tools menu. In all cases, a message will appear, informing you whether the StandardID has been validated. An alternative method is to use the Email Validation Status report in the Email and Conferences module, which lists the validation status of every Person and Global User.
---
The Person register in Standard ERP:
- Introduction
- Entering a Person Record
- Operations menu, including:
- Change Password
- Change Discount Password
- Check StandardID
- To Do List
- Change Password
- Create menu
- Home page for System Module manual
- Home page for Standard ERP manual
Operations Menu - Persons - To Do List
This page describes the 'To Do List' function on the Operations menu in the 'Persons: Browse' window. If you are using iOS or Android, the 'To Do List' function is on the Tools menu.---
To produce a To Do List report for a Person, open the Person register, highlight the Person in the list and select 'To Do List' from the Operations menu (Windows/macOS) or Tools menu (iOS/Android). A To Do List report will be printed to screen:

Activities are described here.
---
The Person register in Standard ERP:
- Home page for System Module manual
- Home page for Standard ERP manual
Operations Menu - Open Mailbox
This function was removed from the application in version 4.1.---
In this chapter:
- Introduction to the Person register
- Entering a Person Record
- Operations menu, including:
- Create menu
- Home page for System Module manual
- Home page for Standard ERP manual
Operations Menu - Open Calendar
This function was removed from the application in version 7.0.---
In this chapter:
- Introduction to the Person register
- Entering a Person Record
- Operations menu, including:
- Create menu
- Home page for System Module manual
- Home page for Standard ERP manual
Create Menu - Persons

'New' and 'Duplicate' are standard functions provided on the Create menu on every window that allow you to create new records, in this case in the Person register. Please click the links below for details about the other functions:
The Person register in Standard ERP:
- Introduction
- Entering a Person Record
- Operations menu
- Create menu
- Home page for System Module manual
- Home page for Standard ERP manual
Create Menu - Mailbox
This page describes the 'Mailbox' function on the Create menu in the 'Persons: Browse' window. If you are using iOS or Android, the 'Mailbox' function is on the + menu.---
If you need to create a Mailbox for a Person, open the Person register, highlight the Person in the list and then select 'Mailbox' from the Create menu (Windows/macOS) or + menu (iOS/Android).
The Mailbox will be opened in a new window entitled 'Conference/Mailbox: New'. This means that it has not yet been saved. After amendment if necessary, save the Mailbox by clicking the [Save] button (Windows/macOS) or tap √ (iOS/Android). Alternatively, if you no longer require the Mailbox, click [Cancel] or tap <.
The Person's Signature and Name will be copied from the Person record to the new Mailbox, and the Class will be set to "Mailbox". This leaves only the Conference Access Groups to be specified.
To close the window and return to the 'Persons: Browse' window, click the close box (Windows/macOS) or tap <. You will be asked if you would like to save any changes that you may have made.
You can only create one Mailbox for a particular Person. If a Person already has a Mailbox, you will be told "User has a mailbox already" when you select the function.
Please refer here for details about Mailboxes, and here for details about Conference Access Groups.
---
The Person register in Standard ERP:
- Home page for System Module manual
- Home page for Standard ERP manual
Create Menu - Persons - Named User
This page describes the 'Named User' function on the Create menu in the 'Persons: Browse' window. If you are using iOS or Android, the 'Named User' function is on the + menu.---
The 'Named User' function allows you to create a Named User with a Mailbox and a connected record in the Contact register in one step. This saves you the work of creating the Mailbox and Contact record separately.
To use this function, open the 'Persons: Browse' window and choose 'Named User' from the Create menu (Windows/macOS) or + menu (iOS/Android). The 'Set up User' window will appear:
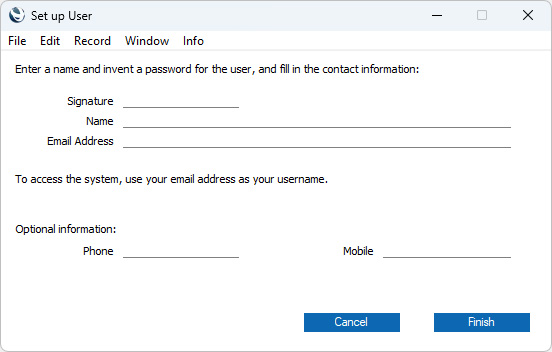
When you press the [Finish] button, a new user will be created. The 'Set up User' window will be closed, returning you to the 'Persons: Browse' window.
Behind the scenes the process of creating a new User Account includes the following:
- a new record for the user will be created in the Person register (as a Named User);
- a new Mailbox will be created for that user, allowing them to use the Personal Desktop as well as to send and receive Mail;
- a new record for the user will be created in the Contact register, containing the information that you entered in the optional section of the 'Set up User' window; and
- a validation email will be sent to the Email Address. The user should follow the link in this mail to validate the address and to supply a password for the StandardID: they will not be able to log in until they have done this.
Before the user logs in for the first time, you may want to assign them to an Access Group, to restrict the access they have to your Standard ERP system.
Note that the Name will be copied to the Name field in the Person record but also to the Our Ref field on the 'Sales' card as a default.
---
The Person register in Standard ERP:
- Introduction
- Entering a Person Record
- Operations menu
- Create menu, including:
- Mailbox
- Named User
- Validation Email
- Workflow Activity
- Tag/Object
- Mailbox
- Home page for System Module manual
- Home page for Standard ERP manual
Create Menu - Persons - Validation Email
This page describes the 'Validation Email' function on the Create menu in the Persons browse and record windows. If you are using iOS or Android, the 'Validation Email' function is on the + menu.---
The StandardID is a unique identifier for each Person that they can use to log in to your Standard ERP system and to log in to services provided by HansaWorld, such as your MyStandard page, which you can use to monitor and control your server if it is located in the cloud or controlled by a Cloud Node, and the support forum.
When you create a Person record for an employee, you can specify a StandardID immediately (on the 'Sales' card of the Person record) but it is not necessary to do so. If you do not specify a StandardID, the Person will be asked to provide one when they log in to your Standard ERP system for the first time.
A Person's StandardID must be a valid email address. When the Person logs in for the first time, an email address validation mail will be sent to the email address that they are using as their StandardID. The Person should follow the link in the validation mail to confirm that their StandardID is a valid email address and to enter a StandardID password.
If you would like an email address validation mail to be sent to a user immediately after entering their Person record, save the Person record and then choose this 'Validation Email' function from the Create menu (Windows/macOS) or + menu (iOS/Android).
If you need to check whether an Email Address has already been validated, use the 'Check StandardID' function on the Create or + menu. You can also use the Email Validation Status report in the Email and Conferences module, which lists the validation status of every Person and Global User.
---
The Person register in Standard ERP:
- Introduction
- Entering a Person Record
- Operations menu
- Create menu, including:
- Mailbox
- Named User
- Validation Email
- Workflow Activity
- Tag/Object
- Mailbox
- Home page for System Module manual
- Home page for Standard ERP manual
Create Menu - Workflow Activity
This page describes the 'Workflow Activity' function on the Create menu in the Person record window. If you are using iOS or Android, the 'Workflow Activity' function is on the + menu.---
The 'Workflow Activity' function allows you to create Activities from Person records. This can be useful if, for example, you need to schedule a call to a new Person.
To create an Activity from an Invoice, first open the Invoice in a record window and then select 'Workflow Activity' from the Create menu (Windows/macOS) or + menu (iOS/Android). The following window appears, allowing you to create a new Activity:
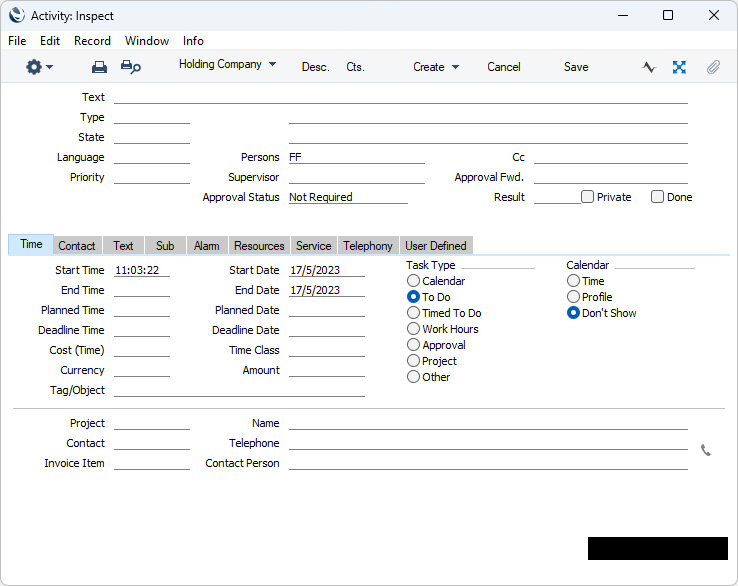
- The Task Type will be To Do
- The Symbol will be Other.
- No default Activity Type will be offered.
- The Start and End Dates of the Activity will be the current date, and the Start Time will be the current time.
- The Person will be the current user. As the Task Type will be To Do, the Activity will be placed in the current user's Task Manager.
The Person and the Activity will be connected to each other in the Link Manager and Workflow Manager. When reviewing the Activity, you can return to the Person quickly and easily using the Link Manager in the Activity, while you can open the Activity from the Person using the Workflow Manager.
You must save a Person record at least once before you can create an Activity from it. This is to ensure that the links mentioned in the previous paragraph can be established.
The 'Activity: Inspect' window is fully described here.
---
The Person register in Standard ERP:
- Introduction
- Entering a Person Record
- Operations menu
- Create menu, including:
- Mailbox
- Named User
- Validation Email
- Workflow Activity
- Tag/Object
- Mailbox
- Home page for System Module manual
- Home page for Standard ERP manual
Create Menu - Person - Tag/Object
This page describes the 'Tag/Object' function on the Create menu in the Person record window. If you are using iOS or Android, the 'Tag/Object' function is on the + menu.---
If you need to create a record in the Tag/Object register (in the System module and Nominal Ledger) to represent a Person, open the relevant Person record in a record window and select 'Tag/Object' from the Create menu (Windows/macOS) or + menu (iOS/Android). By default, the Code in the new Tag/Object record will be the same as the Person's Signature and the Name in the new record will be the same as the Person's Name. Creating a new Tag/Object dedicated to a particular Person can be useful because it will allow their sales to be easily analysed in the Nominal Ledger and it will ensure the correct operation of the Periodic Personnel Statement report in the Expenses module. This report requires each Person to have a unique Account-Tag//Object combination, if not different Accounts.
When you select the function, the following window will open, allowing you to create a new Tag/Object:
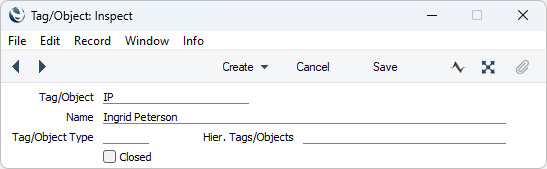
The Person record does not have to be saved before creating a Tag/Object, but if it hasn't been saved the Person's Name will not be copied to the new Tag/Object record.
If a Tag/Object with the relevant Code already exists when you select the function, that Tag/Object will be opened in a window entitled 'Tag/Object: Inspect'.
Please refer here for a full description of the Tag/Object register, and here for some examples.
---
The Person register in Standard ERP:
- Introduction
- Entering a Person Record
- Operations menu
- Create menu, including:
- Mailbox
- Named User
- Validation Email
- Workflow Activity
- Tag/Object
- Mailbox
- Home page for System Module manual
- Home page for Standard ERP manual