Reservation Register - Introduction and Workflow
The Reservation register is the central register in the Hotel module. It provides the basis for all the work that you will carry out in this module. The Reservation is where you will book a Room for a Customer for a particular period of time, where you will list the Guests that will stay in the Room and where you will specify the Package and therefore set the Room pricing. From the Reservation you will charge all costs including Room rates and Items consumed to Guest Accounts and from the Reservation you will create Invoices for those costs.You can use Reservations in two ways:
- You can use a single Reservation record to represent a standalone booking.
- You can group Reservations together so that they will be included in the same Invoice. In this case the individual Reservations will be known as "Sub Reservations". The Sub Reservations will belong to an organising Reservation known as a "Group Reservation" from where you will create the Invoice. Examples might be Room bookings that are to be invoiced to a company and family bookings requiring more than one Room. You will enter the Sub Reservations as records in the Reservation register (i.e. in a similar manner to standalone Reservations). A Group Reservation is a special kind of Reservation that you can enter in the Group Reservation register. Group Reservations are described in more detail here.
- It is likely that most work in the Hotel module will start from the Resource Planner. You can open the Resource Planner by clicking (Windows/macOS) or tapping (iOS/Android) the [Resources] button in the Navigation Centre.
A Resource Planner window entitled 'Month Overview of Room Types' will open. This window will list the Room Types (e.g. single, double, twin), showing the number of available Rooms belonging to each Room Type on each date.
Please refer here for more details about the 'Month Overview of Room Types' window.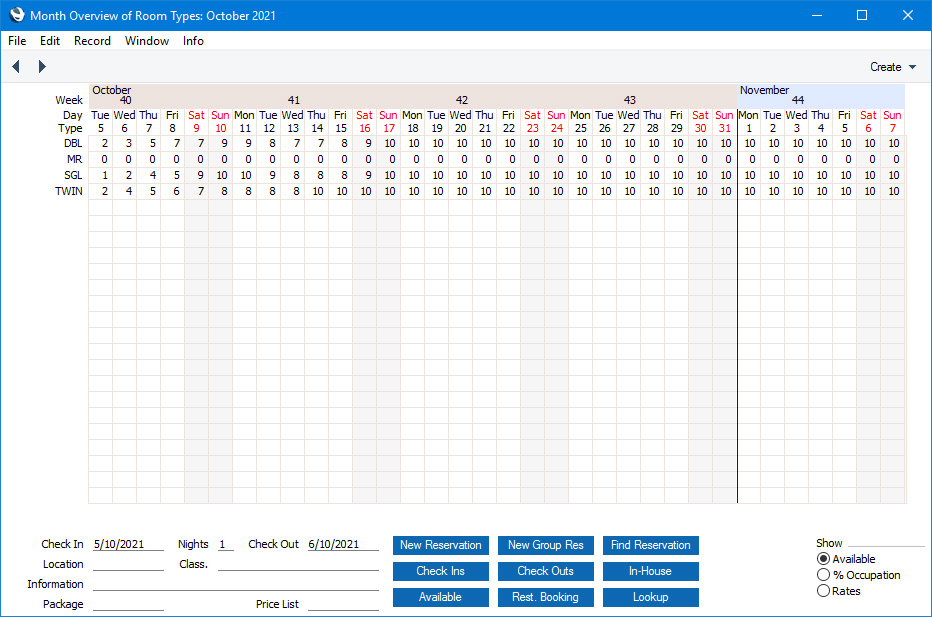
- When an enquiry comes in, double-click (Windows/macOS) or tap (iOS/Android) on the Room Type that the Customer is interested in. A second Resource Planner window entitled 'Overview Rooms' will open. This window will list the Rooms that belong to the Room Type, and will show the Reservations for each Room on each date. Reservations for the Room Type in which you have not yet specified a Room will also be shown. Each Reservation is represented by a coloured block, with different colours being used to indicate the Status of the Reservation (e.g. enquiry, confirmed, checked in etc).
Please refer here for more details about the 'Overview Rooms' window.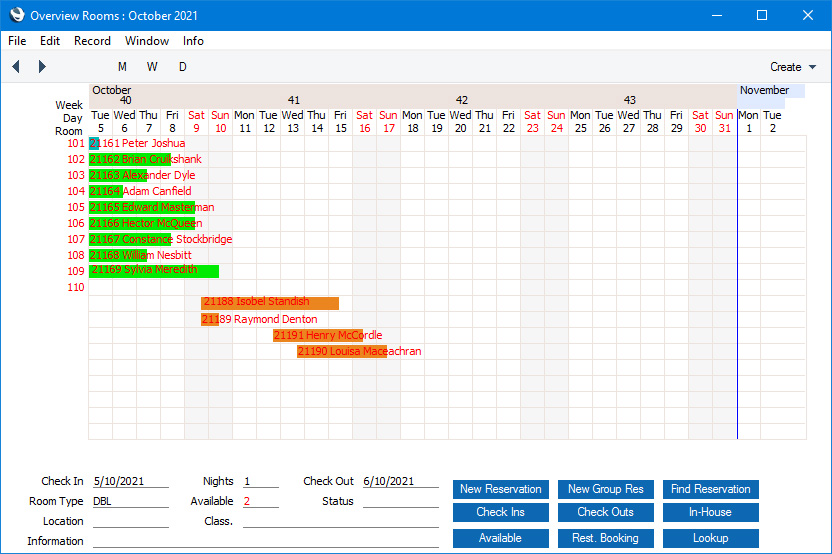
- In the lower part of the 'Overview Rooms' window, enter the Check In Date required by the Customer, together with the number of nights or the Check Out Date. The window will be redrawn so that the graphical Room display begins at the Check In Date. This will reveal the Rooms that will be available to be reserved by the Customer. As Reservations in which you have not yet specified a Room will also be shown, you will see whether it is likely that Rooms will be available.
In this example we selected the Room Type first (in step 2) and then specified the dates required by the Customer (in step 3). If it is not clear what Type of Room is required, you can enter the dates in step 2 to see how many Rooms belonging to each Type will be available. You can also press the [Available] button in either step to print a report to screen that again shows how many Rooms belonging to each Type will be available: this report is described and illustrated below here.
- Press the [New Reservation] button in either Resource Planner window to create a new Reservation. The dates and Room Type will be copied from the Resource Planner window to the new Reservation. The fields in the Reservation window are described here.
If you pressed the [Available] button in the previous step, you can create a new Reservation from the resulting report, by clicking or tapping on a Room rate description.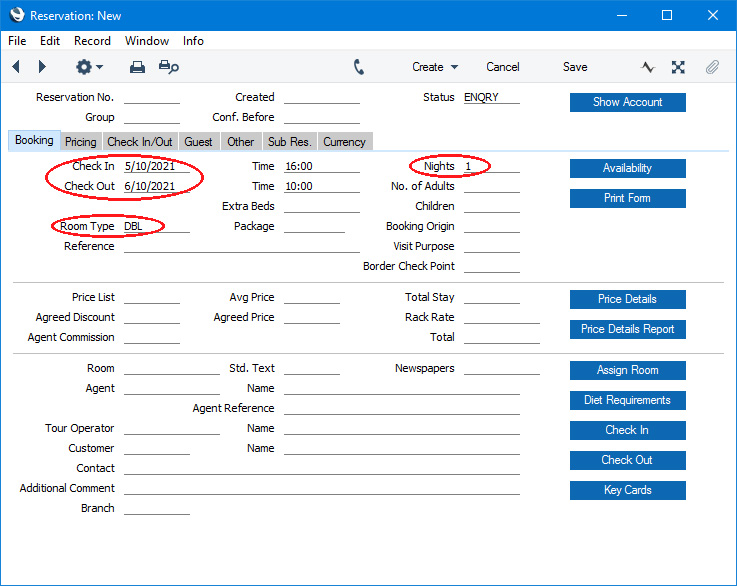
- At this stage you can leave many fields (e.g. the Room Number) empty, but you must specify a Room Type and either a Customer or at least one Guest. Use the Customer field on the 'Check In/Out' card to specify a Customer, or go to the 'Guest' card and add the Guest in the first line in the matrix. The Customer or first Guest is the person who will be invoiced for the Room charge (assuming you do not also specify an Agent in the Reservation).
If the Customer or Guest has not stayed at the hotel before, you will need to create new records in the Contact register (in the case of the Customer) or the Guest register (in the case of the Guest). Open 'Paste Special' from the Customer or Guest field (highlighted in the previous illustration) and add new records (containing information such as name, address and contact information) by pressing the [New] button. The Guest register is described here and the Contact register is described here.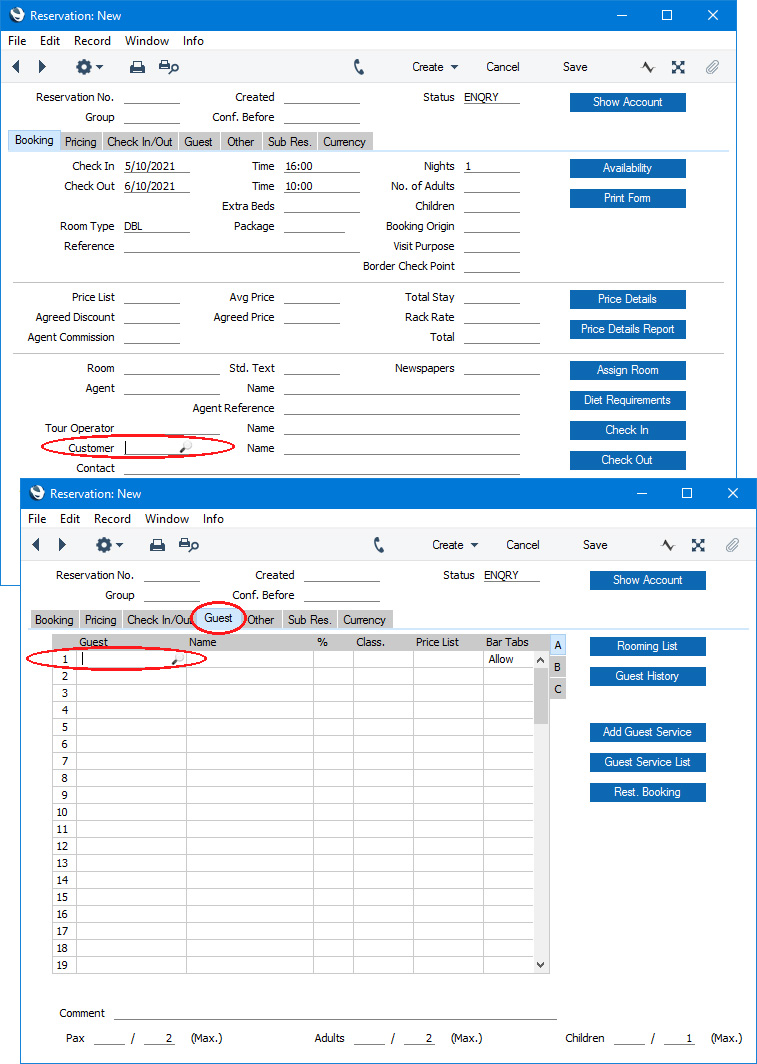
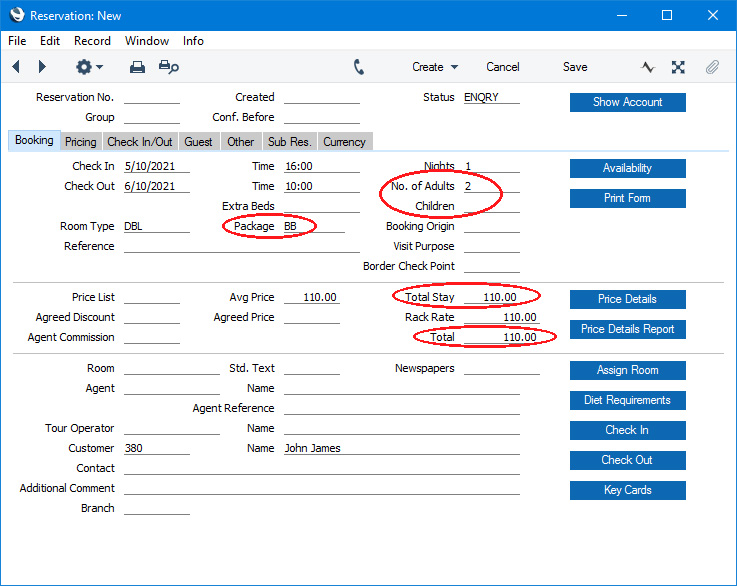
- As you enter the Reservation, the Customer will be interested in the Room charge. Enter the numbers of adults and children that will be staying, and specify a Room Package (e.g. room hire only, bed and breakfast, honeymoon, etc). The Total Stay field will show the total Room charge for the stay, while the Total field will show the Room charge together with any Package Items (e.g. breakfasts, newspapers, etc) that are included in the Room Package.
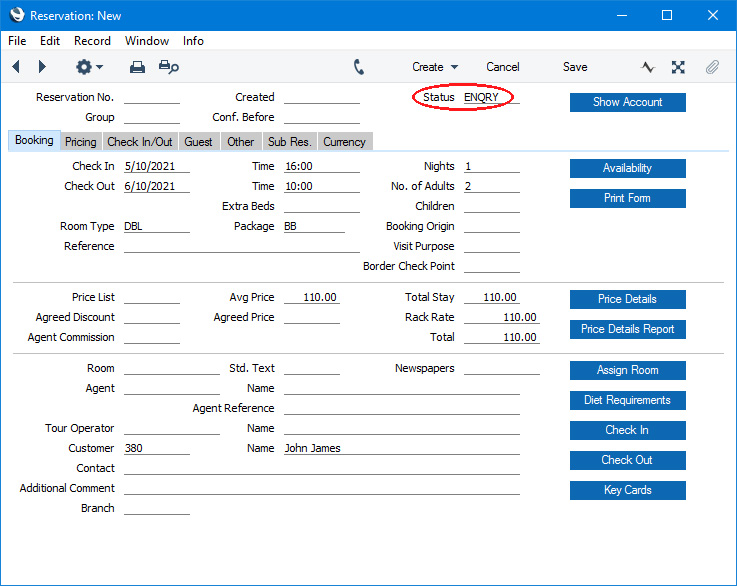
- The life of a Reservation will include several stages. Typical stages will be Enquiry, Confirmed, Cancelled, Checked In and Checked Out. At this stage, the Reservation is an Enquiry or Confirmed. Use the Status field to mark the stage that the Reservation has reached. Please refer here for more details about Reservation Statuses.
- If you need the Customer to pay a deposit, save the Reservation and select or + menu (iOS/Android). Down Payment Invoices are described here.
- If a Customer cancels a Reservation, change the Status in the Reservation to one in which the Type is Cancelled. If you have assigned a Room to the Reservation, you will need to remove it before being able to save the Reservation. If you need to credit a Down Payment or other Invoice, open the Invoice and select 'Credit Note' from the Create menu (Windows/macOS) or + menu (iOS/Android). You can use the Cancellation Terms setting to configure a refund structure that will refund a specified percentage of the invoiced value depending on when the Customer cancels (i.e. on the number of days before the Check In Date).
- When the Customer arrives to check in, you can find the Reservation using the following methods:
- Open the second Resource Planner window as described in step 2 above and double-click (Windows/macOS) or tap (iOS/Android) on the coloured bar representing the Reservation to open it. If you have not assigned the Reservation to a Room yet, you can drag the coloured bar to a Room before opening it.
- Press the [Check Ins] button in either Resource Planner window to print a report to screen that lists the Reservations that are due to check in today. Both enquiries and confirmed Reservations will be listed. Click or tap on the Reservation Number to open the Reservation.
- Use the [Find Reservation] button in either Resource Planner window to search for the Reservation.
- Open the second Resource Planner window as described in step 2 above and double-click (Windows/macOS) or tap (iOS/Android) on the coloured bar representing the Reservation to open it. If you have not assigned the Reservation to a Room yet, you can drag the coloured bar to a Room before opening it.
- If you have not already done so, you must specify a Room before being able to check in. As mentioned in step 9 i above, you can do this by dragging and dropping in the second Resource Planner window. If you have opened the Reservation, you can specify a Room in the Room field or you can press the [Assign Room] button to print a report to screen listing the Rooms that are available. Click (Windows/macOS) or tap (iOS/Android) on a Room Number in the report to add the Room to the Reservation.
Note that a Room can be "Clean" (available for checking in) or "Dirty" (vacated by the previous Guests and not yet cleaned). You can only check a Reservation in to a Clean Room.
- If necessary, fill in the names of the Guests on the 'Guests' card as described in step 5. If you need each Guest to sign in, press the [Print Form] button and select the Guest Registration Cards option. Please refer here for more details about the document that will be printed.
- Press the [Check In] button to check in the Reservation. The Status of the Reservation will be changed to Checked In.
If a Check In List or Check In Message has been specified in the Room Package or in the Hotel Settings setting, a report will be printed to screen providing a reminder of the services that you can offer the Guest, such as wake-up calls, newspapers, etc. From the report, you can book the services that the Guest requires. Please refer to the description of the Checklists setting here for more details.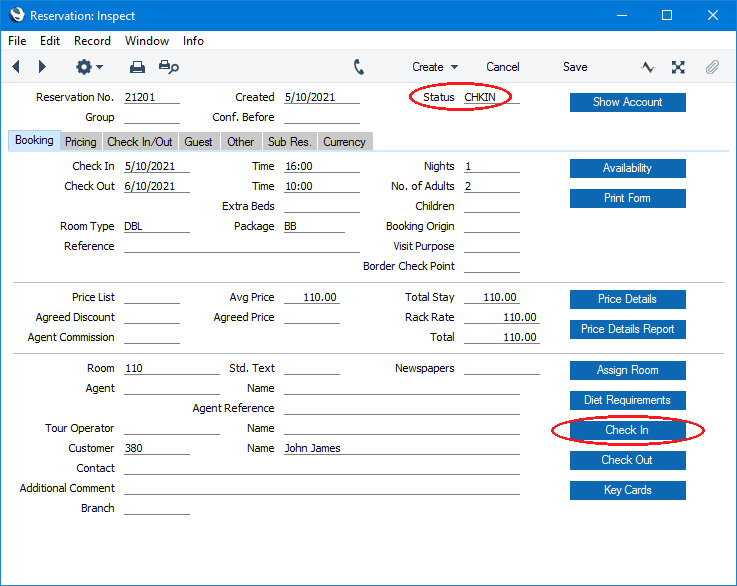
- Every Guest that you list in a Reservation (on the 'Guest' card) will automatically be given their own Guest Account. If the Customer in a Reservation is not one of the Guests, they will also be given a Guest Account automatically, as will the Agent.
All costs in a Reservation including the Room charge, additional Items in the Room Package and any additional Items required by a Guest must be added to a Guest Account so that they can be invoiced to the Customer.
The most convenient way to add the Room charge and additional Items in the Room Package to a Guest Account is to do it daily by running the 'Nightly Maintenance' Maintenance function every night with the Charge Stay option selected.
If a Guest requires an additional Item, you can add it to their Guest Account by opening the Reservation using one of the methods described in step 9 and selecting 'Add Items' from the Operations menu (Windows/macOS) or Tools menu (iOS/Android).
If you need to see a list of the costs on each Guest Account in a Reservation, open the Reservation and press the [Show Account] button to print a report to screen.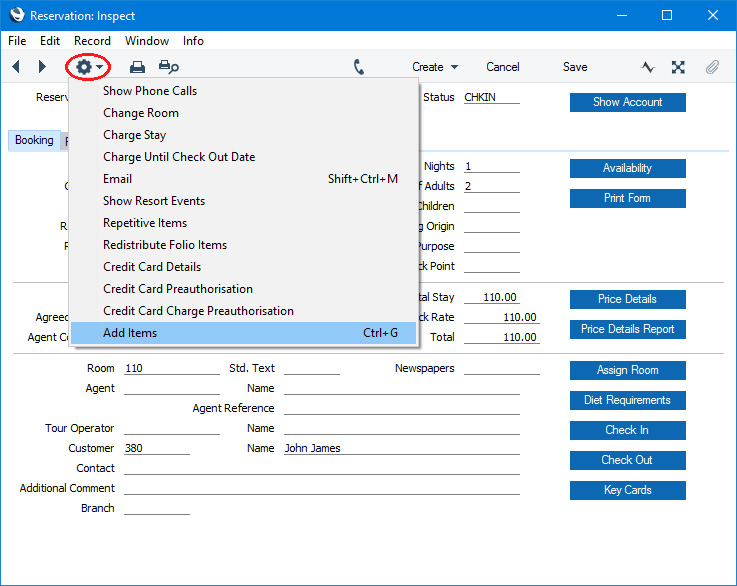
Please refer here for more details about Guest Accounts and here for details about the various methods that you can use to add charges and costs to Guest Accounts, to move them between Guest Accounts and to remove incorrectly charged costs.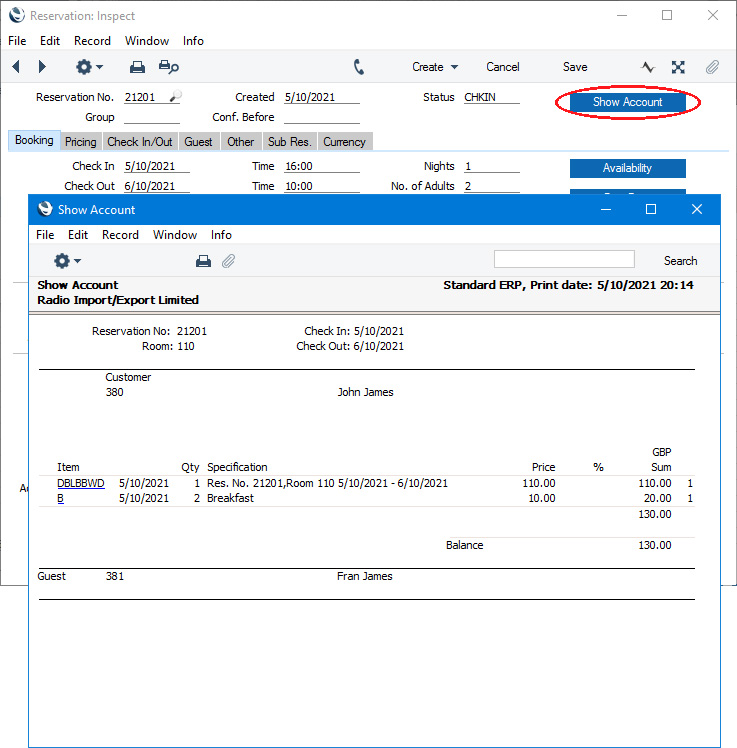
- If a Guest requires additional Guest Services (e.g. wake-up calls, newspapers, etc), you can arrange them from the Reservation. Open the Reservation, select the relevant Guest on the 'Guest' card and press the [Add Guest Service] button. Please refer here for details about Guest Services.
If you need to see a list of Guest Services that are to be provided today, press the [Guest Service List] button in the Reservation or, for Guest Services for all Reservations, produce a Guest Services List report.
If a Guest Service is chargeable, add it to the relevant Guest Account as mentioned in step 13.
- When the Guests need to check out, you can find the Reservation using the methods listed in step 9, but substituting the [Check Outs] button for [Check Ins] in step 9 ii.
- Before being able to check-out, all Room charges and additional Items in the Room Package must be added to Guest Accounts. Selecting 'Charge Until Check Out Date' from the Operations menu (Windows/macOS) or Tools menu (iOS/Android) will ensure charging is complete.
If the Customer or a Guest needs to see a list of the costs on each Guest Account, press the [Show Account] button as mentioned in step 13 and print the report if needed.
At this stage you can also use the 'Add Items' function also mentioned in step 13 to add any additional Items to Guest Accounts (e.g. Items from the bar in the Room).
- All Guest Accounts must also be invoiced before checking out is possible. To do this, select 'Invoice' from the Create menu (Windows/macOS) or + menu (iOS/Android) in the Reservation. This function is described here.
If a Reservation only has one Guest Account, the Invoice will be opened on screen from where you can mark it as OK and print it. If a Reservation has more than one Guest Account, more than one Invoice might be created. You can open them from the Link Manager in the Reservation or by pressing the [Show Account] button, mark them as OK and print them.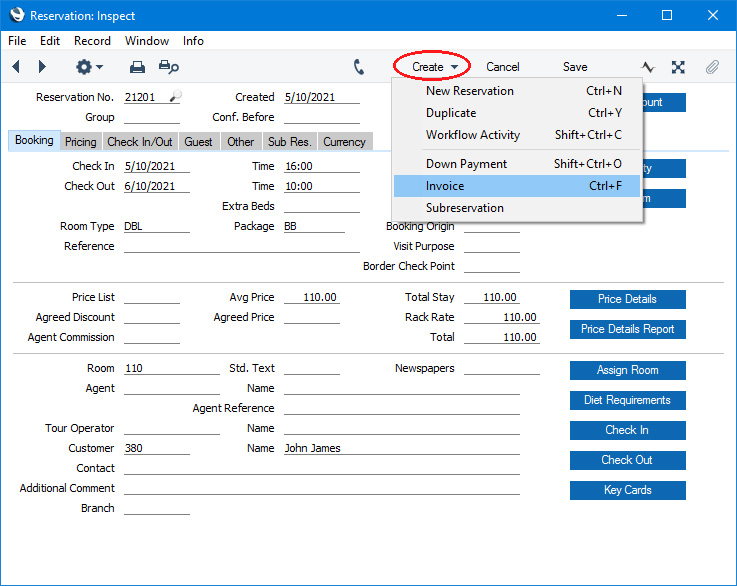
After marking an Invoice as OK and saving, you can record the payment of an Invoice by selecting 'Cash In' or 'Receipt' from the Create or + menu in the Invoice.
- Press the [Check Out] button to check out the Reservation. The Status of the Reservation will be changed to Checked Out, and the Status of the Room will be changed to Dirty. Please refer here for details about cleaning the Room (housekeeping).
- Introduction and Workflow
- The 'Reservations: Browse' Window
- Entering a Reservation
- Guest Accounts (Folios)
- Adding and Managing Items on Guest Accounts (Folio Items)
- Work in Progress (WIP)
- Operations Menu
- Create Menu
Go back to:
- Home page for Hotel module manual
- Home page for Standard ERP manual
The 'Reservations: Browse' Window
This page describes the browse window in the Reservation register.---
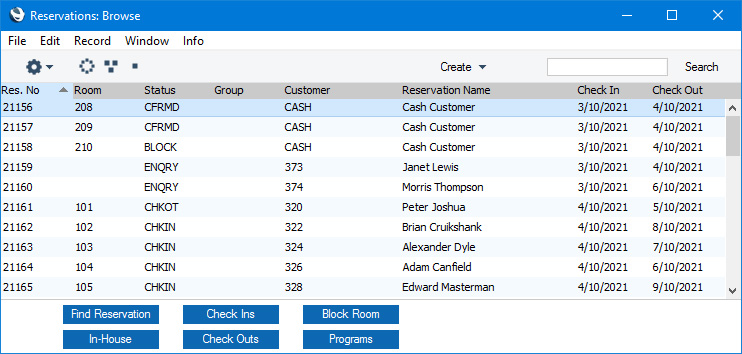
To open the Reservation register, first ensure you are in the Hotel module. Then, if you are using Windows or macOS, click the [Registers] button in the Navigation Centre and double-click 'Reservations' in the resulting list. If you are using iOS or Android, tap the [Registers] button in the Navigation Centre and then tap 'Reservations' in the 'Registers' list. The 'Reservations: Browse' window will be opened, listing Reservations that you have already entered.
If you are using Windows or macOS, you can change the sort order by clicking on the column headings. To reverse any sort, simply click once again on the column heading. The current sort order is marked by the column heading being coloured blue. If you are using iOS or Android, tap on the column heading and choose the sort order you need. Repeat the procedure to reverse the sort.
To search for a particular record, first sort the list by the column that you want to use for the search. Then, enter the text that you want to find in the Search field in the top of the window (in the top right-hand corner if you are using Windows/macOS) and press the Return key (macOS) or Search (iOS/Android). The first record containing a match for your search string will be highlighted (if you are using Windows, a match will be highlighted as you type each character). For example, to search for Reservations with a particular Check In Date, sort by Check In before entering the Date (or the first few characters) in the Search field. You can also use the [Find Reservation] button described below.
If you are using Windows or macOS, there will be three buttons in the top left-hand corner of the browse window. These are part of the Limited Access feature. You can use them as follows (Windows versions of the buttons illustrated on the left, macOS on the right):

- Lists all Reservations.
- Lists Reservations belonging to members of the same Sales Group as the current user.
- Lists Reservations belonging to the current user (i.e. Reservations in which the Salesman field contains the Signature of the current user).


When you enter a new Reservation record, your Signature will be placed in the Salesman field on the 'Other' card, and the Reservation will be assigned to your Sales Group. The Salesman and Sales Group fields are not modifiable.
Please refer to the page describing the 'Access' card of the Person register in the 'System Module' manual for full details about the Limited Access feature.
The lower part of the 'Reservations: Browse' window contains the following buttons:
- [Find Reservation] button
- To find a Reservation, press the [Find Reservation] button. A 'Find Reservation' window will open, where you can enter any information that you have about the Reservation you are looking for:
Press the [Run] button. A report will be printed to screen, listing the Reservations that match the information that you entered in the 'Find Reservation' window: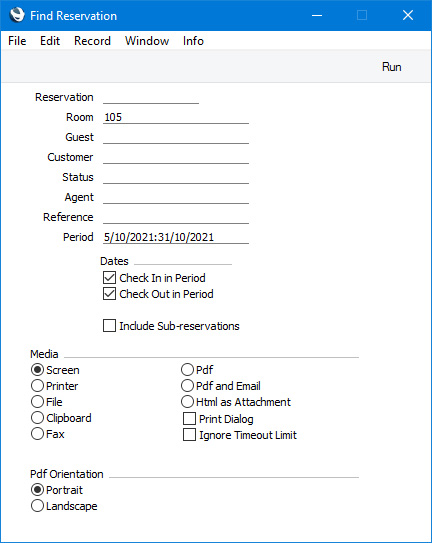
Double-click (Windows/macOS) or tap (iOS/Android) the Reservation Number of the Reservation that you need to open it.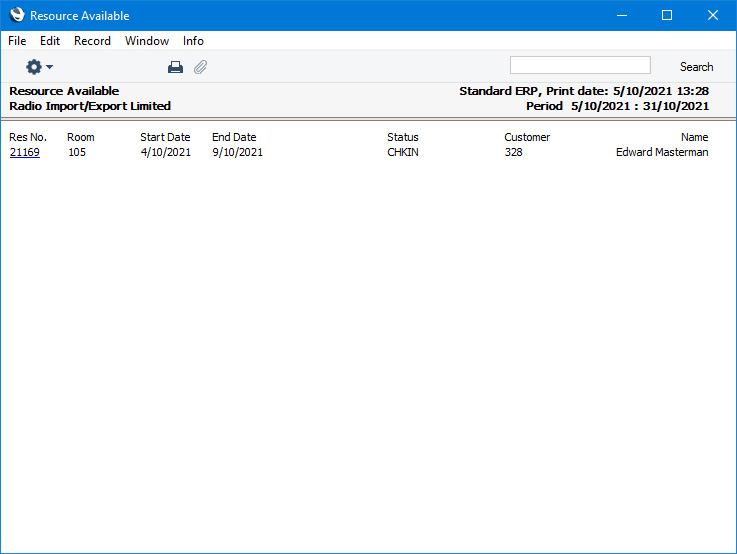
- [In-House] button
- If you need to see a list of occupied Rooms and current Guests (i.e. Reservations in which the Status is Normal (checked in)), press the [In-House] button. An In-House Guests report will be printed to screen:
From the report you can open an individual Reservation by clicking (Windows/macOS) or tapping (iOS/Android) on a Reservation Number.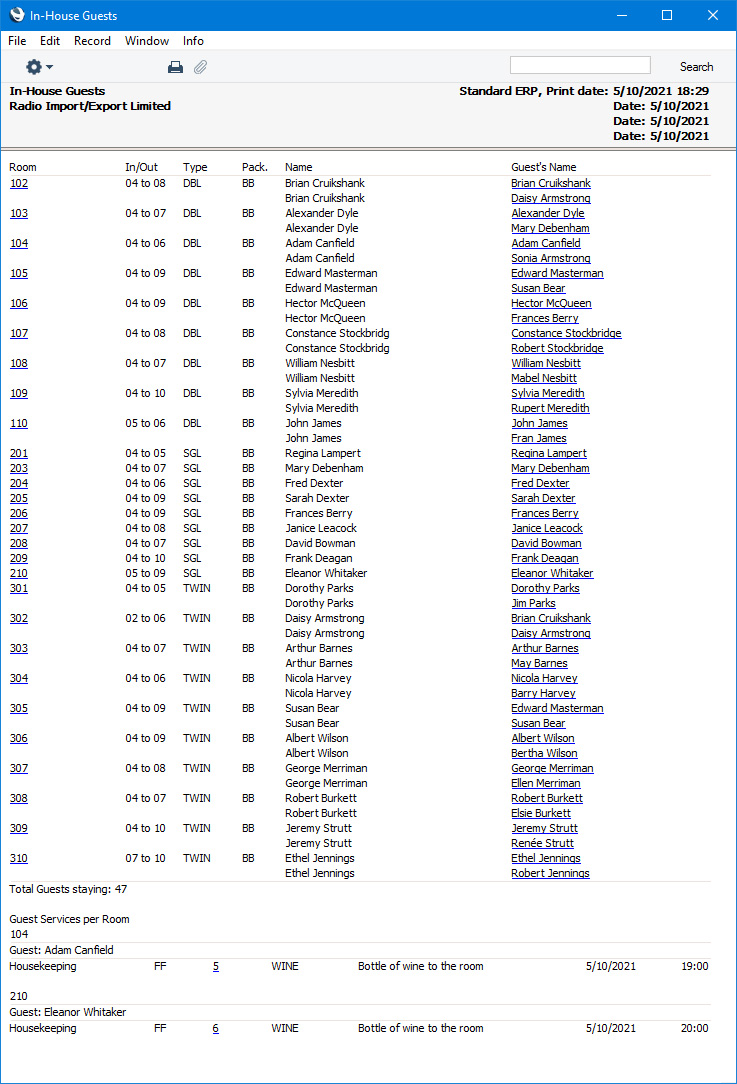
- [Check Ins] button
- If you need to see a list of the day's check ins (i.e. Reservations where the Guests are expected to check in and those where they have checked in), press the [Check Ins] button. A Check Ins report will be printed to screen listing Reservations sorted by Status:
From the report you can open an individual Reservation by clicking (Windows/macOS) or tapping (iOS/Android) on a Reservation Number or a Room Number.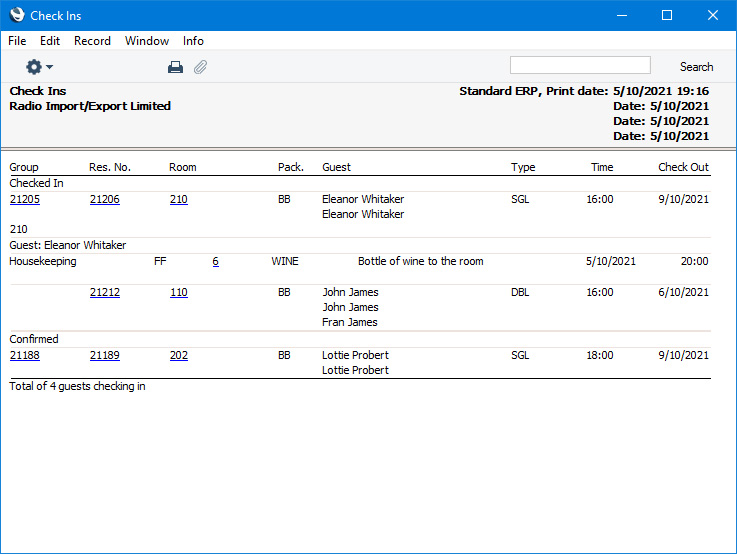
- [Check Outs] button
- If you need to see a list of the day's check outs (i.e. Reservations where the Guests are expected to check out and those where they have checked out), press the [Check Outs] button. A Check Outs report will be printed to screen listing Reservations sorted by Status:
From the report you can open an individual Reservation by clicking (Windows/macOS) or tapping (iOS/Android) on a Reservation Number or a Room Number.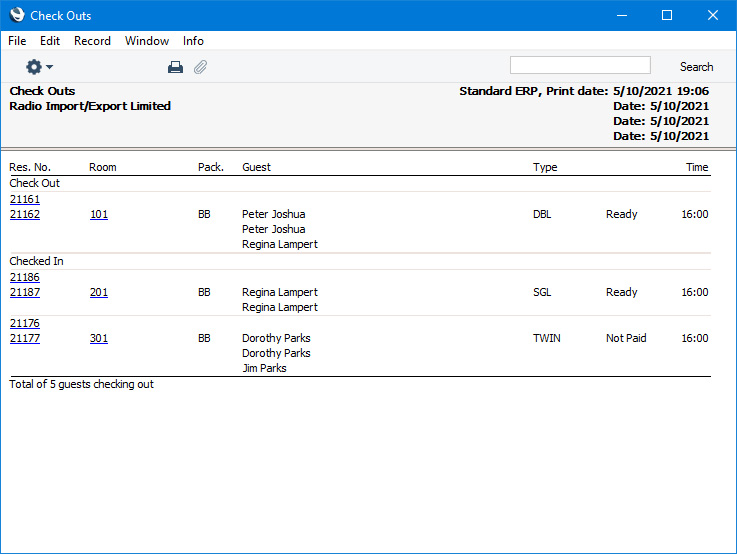
- In the report, a Reservation will be marked as "Ready" if everything has been invoiced or "Not Paid" otherwise.
- In the report, a Reservation will be marked as "Ready" if everything has been invoiced or "Not Paid" otherwise.
- [Block Room] button
- If a Room will be out of order for the short to medium term (e.g. it is being decorated), there are several methods you can use to prevent it being used in Reservations. One is to create a blocking Reservation in which the Status is the Out of Order Status specified in the Hotel Settings setting. You can enter such a Reservation yourself or you can create it using the [Block Room] button.
- On pressing the button, the following window will open:
Specify the Room that you need to be marked as Out of Order and the period during which it cannot be used and press the [Run] button. The Start and End Times in the resulting Reservation will be the Check In and Check Out Times specified in the Hotel Settings setting. If you enter some text in the Name Blocking field, it will be copied to the Customer Name field in the Reservation.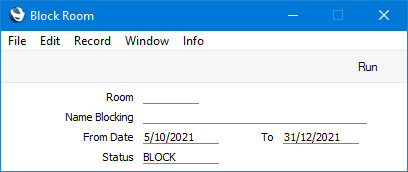
- Rooms with Out of Order Reservations will be shown on a separate line in the Daily Statistics report.
- On pressing the button, the following window will open:
---
The Reservation register in Standard ERP:
- Introduction and Workflow
- The 'Reservations: Browse' Window
- Entering a Reservation
- Guest Accounts (Folios)
- Adding and Managing Items on Guest Accounts (Folio Items)
- Work in Progress (WIP)
- Operations Menu
- Create Menu
- Home page for Hotel module manual
- Home page for Standard ERP manual
Entering a Reservation
This page describes adding a new record to the Reservation register in the Hotel module.---
You can create a Reservation using the following methods:
- Open either window in the Resource Planner and press the [New Reservation] button. The Check In and Check Out Dates in the Resource Planner window will be copied to the new Reservation and the Number of Nights will be calculated accordingly. If you create the Reservation from the second Resource Planner window (the 'Overview Rooms' window), the Room Type will be copied to the new Reservation as well.
- Press the [Available] button in either window in the Resource Planner and then click or tap on a Room rate to create a new Reservation. The Check In and Check Out Dates in the Resource Planner window will be copied to the new Reservation and the Number of Nights will be calculated accordingly. The Room Type and Room Package will be copied to the new Reservation as well.
- Open the 'Reservations: Browse' window as described here and select 'New' from the Create menu (Windows/macOS) or the + menu (iOS/Android). You can also use the Ctrl-N (Windows) or ⌘-N (macOS) keyboard shortcut. Alternatively, highlight a Reservation similar to the one you want to enter and select 'Duplicate' from the same menu. If you don't want to open the 'Reservations: Browse' window before creating a new record, you can also use the + menu in the Navigation Centre (all platforms).
- You can create a Sub Reservation from a Group Reservation, by selecting 'New Sub Reservation' from the Create or + menu in the Group Reservation.
- If you have created a Reservation that you intend to convert to a Group Reservation, you can create a Sub Reservation from that original Reservation by selecting 'Sub Reservation' from the Create or + menu. Use the 'Create Group Reservations from Mother Reservations' Maintenance function to convert the original Reservation to a Group Reservation.
- You can create a Reservation from a Reservation Quotation, by marking the Reservation Quotation as Accepted and/or OK and saving.
- Reservations can be created online by Customers through SiteMinder. Please refer here for details.

If you are using iOS or Android, there will only be two tabs, marked 'Items' and 'Details'. If you tap 'Details', you will see every card except 'Guest' arranged vertically on screen. You can scroll down to see each one, or you can jump to any card by tapping on any tab and selecting the tab you want to go to.
Complete the Reservation record as appropriate and as described on the following pages, then save it using the [Save] button (Windows/macOS) or by tapping √ (iOS/Android) and close the window by clicking the close box (Windows/macOS) or by tapping < (iOS/Android). Then, close the browse window using the close box or < again.
If you would like to be warned when saving a Reservation that is a duplicate of an existing Reservation, select the Warning if Similar Reservation Exists option on the 'Defaults' card in the Hotel Settings setting. For this purpose, a duplicate Reservation is one with same Check In Date, Room Type and Customer or first Guest. The warning will not prevent the second Reservation from being saved.
Please refer to the following pages for details about the fields on each card in the Reservation window:
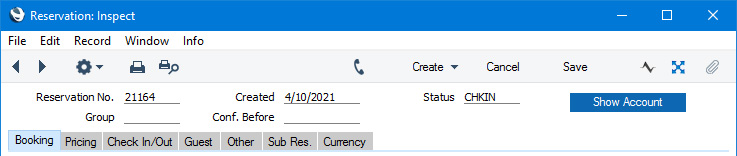
- Header
- Booking card
- Pricing card
- Check In/Out card
- Guest card
- Other card
- Sub Res. card
- Currency card
The Reservation register in Standard ERP:
- Introduction and Workflow
- The 'Reservations: Browse' Window
- Entering a Reservation
- Guest Accounts (Folios)
- Adding and Managing Items on Guest Accounts (Folio Items)
- Work in Progress (WIP)
- Operations Menu
- Create Menu
- Home page for Hotel module manual
- Home page for Standard ERP manual
Entering a Reservation - Header
This page describes the fields in the Header of the Reservation record window. Please follow the links below for descriptions of the other parts of the Reservation record window:- Header
- Booking card
- Pricing card
- Check In/Out card
- Guest card
- Other card
- Sub Res. card
- Currency card
- Reservation No.
- Paste Special
Select from another Number Series
- The unique identifying number of the Reservation. The default will be chosen as follows:
- It will be taken from the first valid row in the Number Series - Reservations setting.
- It will be the next number following on from the last Reservation or Group Reservation entered.
- You may change the default, but not to a number that has already been used. If you have defined at least one number sequence in the Number Series - Reservations setting, the number you change to must be inside a valid number sequence.
- You will not be able to save a Reservation if the Reservation No. does not belong to a valid number sequence. A valid number sequence is one for the period in which the Check In Date falls and with unused numbers, so this problem will most usually occur at the beginning of a new calendar or financial year.
- If you are working in a multi-user environment, the Reservation Number will be assigned when you save the Reservation for the first time.
- If you create a Reservation from a Reservation Quotation or from a Group Reservation using the (Last Daughter Res. field). If this field is empty, the No. will be chosen as listed in the numbered points above.
- It will be taken from the first valid row in the Number Series - Reservations setting.
- Created
- This field automatically records the date when a Reservation was added to your Standard ERP database and cannot be changed.
- Status
- Paste Special
Reservation Status setting, Hotel module
- Default taken from Hotel Settings setting (Default Status field or, in the case of online Reservations, In-Progress Status field)
- The life of a Reservation will usually see it pass through several stages. As it does so, its Status will be changed automatically, to signify the stage it has reached. For example, a Reservation may begin as an enquiry, then be confirmed, then the Guests will check in and finally the Guests will check out. Alternatively, from being an enquiry or being confirmed, a Reservation might be cancelled.
- After listing the Reservation Statuses that you need in the Reservation Status setting, you should use the Reservation Status Sequences setting to specify the order in which the Statuses are to be used. For example, you can specify in the Reservation Status Sequences setting that a Reservation can proceed from being an enquiry to being confirmed or to being checked in, but not to being checked out. The 'Paste Special' list will only show the Statuses that can follow on from the current Status, as defined in the Reservation Status Sequences setting, and you will not be able to save a Reservation if you enter a Status that does not follow on from the current Status.
- The Status of a Reservation controls how that Reservation will be treated within the system (e.g. how the Reservation is shown in the Resource Planner and in reports). Please refer to the description of the Type field in the Reservation Status setting here for details. If the Status in a Reservation is blank, the Reservation will be treated as though it has a Normal (not checked in) Status.
- If you are using the Do not Allow Check In/Out Status Manually option in the Hotel Settings setting, you will not be able to check Guests in and out simply by changing this Status to the Check In Status or the Check Out Status specified on the 'Check In/Out' card in the same setting. Instead, you will need to check Guests in or out by pressing the [Check In] and [Check Out] buttons on the 'Check In/Out' card.
- You can have a text (SMS) message sent automatically to the Customer whenever you mark a Reservation with a particular Status and save it. For example, you can use this feature if you would like to confirm to Customers that you have received their acceptance of their Reservations. Please refer to the Contact Reservation Alerts page for details about this feature. Note that these text (SMS) messages can only be sent to Customers, so they will not be sent from Reservations in which you have only specified Guests and left the Customer field empty.
- The life of a Reservation will usually see it pass through several stages. As it does so, its Status will be changed automatically, to signify the stage it has reached. For example, a Reservation may begin as an enquiry, then be confirmed, then the Guests will check in and finally the Guests will check out. Alternatively, from being an enquiry or being confirmed, a Reservation might be cancelled.
- Group
- Paste Special
Group Reservation register, Hotel module
- A Group Reservation is a special type of Reservation that you can use to gather several individual Reservations together for administrative purposes such as checking in, invoicing and checking out. For example, a family may create two Reservations to hire two Rooms for the parents and for the children. You can assign these two Reservations to a third Reservation (a "Group Reservation"), so that they will be invoiced together. They can be checked in together or separately, and checked out together or separately. The two Room Reservations will then become "Sub Reservations".
- If an individual Reservation is part of a Group, the Reservation Number of the Group Reservation will appear here.
- You can change this field if you need to assign an existing Reservation to a Group or if you need to remove a Reservation from a Group. You can also create Reservations from a Group Reservation, in which case this field will be filled in automatically.
- If you need to assign several existing Reservations to a Group, you can highlight those Reservations in the 'Reservations: Browse' window and then select 'Assign to Group Reservation' from the Operations menu (Windows/macOS) or Tools menu (iOS/Android).
- If you need an existing Reservation to become a Group Reservation, enter its Reservation Number in this field in at least one Sub Reservation and then run the 'Create Group Reservations from Mother Reservations' Maintenance function.
- Please refer here for more details about Group Reservations.
- If an individual Reservation is part of a Group, the Reservation Number of the Group Reservation will appear here.
- Conf. Before
- Paste Special
Choose date
- If you expect a Reservation to be confirmed on a particular date, enter that date here.
- In a Reservation that you create from a Reservation Quotation, a default will be placed in this field, calculated by adding the Confirmation Days specified in the Hotel Settings setting to the current date.
- You can use the 'Unconfirmed Reservations' Maintenance function to delete Reservations (and Group Reservations) that remain unconfirmed after a specified period, or to change the Status of those Reservations e.g. to a Cancelled Status.
- In a Reservation that you create from a Reservation Quotation, a default will be placed in this field, calculated by adding the Confirmation Days specified in the Hotel Settings setting to the current date.
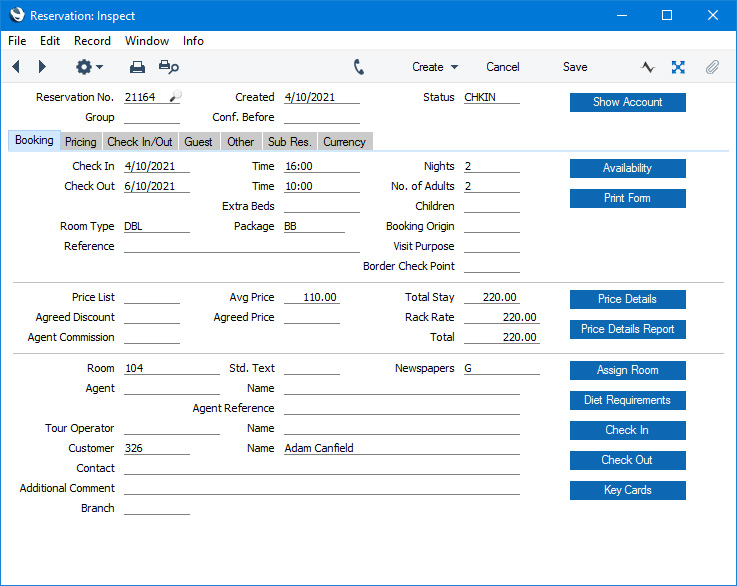
- [Show Account] button
- The [Show Account] button will print a report to screen listing the Items (e.g. Room charges, Package Items, Repetitive Items and any other Items) on each Guest Account in the Reservation. Please refer here for details about Guest Accounts and the Show Account report.
- If you need to prevent particular users from using the [Show Account] button, assign them to an Access Group in which you have denied access to the 'Reservation: Display Account' Action.
- If you need the report only to include a single Guest Account, click (Windows/macOS) or tap (iOS/Android) in the Agent or Customer field or in one of the rows on the 'Guest' card before pressing the button.
- If you need to prevent particular users from using the [Show Account] button, assign them to an Access Group in which you have denied access to the 'Reservation: Display Account' Action.
The Reservation register in Standard ERP:
- Introduction and Workflow
- The 'Reservations: Browse' Window
- Entering a Reservation, including:
- Header
- Booking card
- Pricing card
- Check In/Out card
- Guest card
- Other card
- Sub Res. card
- Currency card
- Header
- Guest Accounts (Folios)
- Adding and Managing Items on Guest Accounts (Folio Items)
- Work in Progress (WIP)
- Operations Menu
- Create Menu
- Home page for Hotel module manual
- Home page for Standard ERP manual
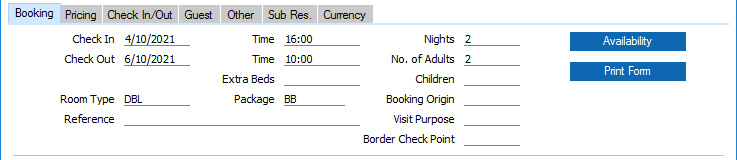
Entering a Reservation - Booking Card
This page describes the fields on the 'Booking' card in the Reservation record window. Please follow the links below for descriptions of the other parts of the Reservation record window:- Header
- Booking card
- Pricing card
- Check In/Out card
- Guest card
- Other card
- Sub Res. card
- Currency card
- Check In Date
- Paste Special
Choose date
- Specify here the date when the Guests will check in to the hotel. You must specify a Check In Date in each Reservation, but you will be able to change to another date if necessary up to the point when check-in occurs (i.e. you will not be able to change this date in a checked-in or checked-out Reservation).
- Check In Time
- Default taken from
Hotel Settings (Check In Time)
- The default Check In Time in each Reservation will be taken from the Hotel Settings setting. If you need it to be updated on check-in automatically in each Reservation, assign the check-in staff to Access Groups in which you have denied access to the 'Check In before or after Planned Date' Action.
- You will be able to change this time if necessary up to the point when check-in occurs (i.e. you will not be able to change this time in a checked-in or checked-out Reservation).
- You will be able to change this time if necessary up to the point when check-in occurs (i.e. you will not be able to change this time in a checked-in or checked-out Reservation).
- Nights
- Specify here how many nights the Guests will stay in the hotel.
- Whenever you change the number of nights, the Check Out Date will be updated automatically. Similarly, if you change the Check Out Date, the number of nights will be updated automatically.
- If you have already specified a Room Type and Room Package in a Reservation, changing the number of nights either yourself or by changing the Check Out Date will cause the prices in the Reservation to be recalculated appropriately.
- Whenever you change the number of nights, the Check Out Date will be updated automatically. Similarly, if you change the Check Out Date, the number of nights will be updated automatically.
- Check Out Date
- Paste Special
Choose date
- Specify here the date when the Guests will check out from the hotel. You must specify a Check Out Date in each Reservation, but you will be able to change to another if necessary up to the point when check-out occurs.
- Whenever you change the Check Out Date, the number of nights will be updated automatically. Similarly, if you change the number of nights, the Check Out Date will be updated automatically.
- Whenever you change the Check Out Date, the number of nights will be updated automatically. Similarly, if you change the number of nights, the Check Out Date will be updated automatically.
- Check Out Time
- Default taken from
Hotel Settings (Check Out Time)
- The default Check Out Time in each Reservation will be taken from the Hotel Settings setting. If you need it to be updated on check-out automatically in each Reservation, assign the check-out staff to Access Groups in which you have denied access to the 'Check In after Planned Date' Action.
- No. of Adults
- Specify the number of adults that will be staying in the Room.
- If you have already specified a Room Type and Room Package in a Reservation, changing the number of adults will cause the prices in the Reservation to be recalculated appropriately.
- The number of adults cannot be more than the Max. Adults specified on the footer of the 'Guest' card. The Max. Adults figure will be brought in to the Reservation when you specify the Room Type and again when you specify the Room.
- If you need it to be mandatory that a number of adults is specified in every Reservation, select the Request No. of Guests on Reservations option on the 'Guests' card in the Hotel Settings setting.
- If you have already specified a Room Type and Room Package in a Reservation, changing the number of adults will cause the prices in the Reservation to be recalculated appropriately.
- Extra Beds
- If the Guest requires any extra beds, specify here how many are needed. It will not be possible for the total number of extra beds in all current Reservations in a Room Location to exceed the Max. Extra Beds specified in the .Room Location record.
- Children
- Specify the number of children that will be staying in the Room.
- If you have already specified a Room Type and Room Package in a Reservation, changing the number of children will cause the prices in the Reservation to be recalculated appropriately.
- The number of children cannot be more than the Max. Children specified on the footer of the 'Guest' card. The Max. Children figure will be brought in to the Reservation when you specify the Room Type and again when you specify the Room.
- For the purposes of counting the number of children in a Reservation, a child is a Guest with a Classification belonging to the Class. Type (Child) specified in the Hotel Settings setting. All other Guests will be counted as adults.
- If you charge reduced Room rates for children, include Classification Terms in your pricing structure.
- If the Room Package includes Items that will be supplied and charged on a "Per Guest" basis, children will be included when calculating the number of guests.
- If you have already specified a Room Type and Room Package in a Reservation, changing the number of children will cause the prices in the Reservation to be recalculated appropriately.
- Room Type
- Paste Special
Room Types setting, Hotel module
- Specify the type of Room that is required by the Customer. Typical Room Types will be single, double, twin, etc.
- You must specify a Room Type in each Reservation, as it will not be possible to save a Reservation if this field is empty. However you will be able to change the Room Type if needed up to the point when check-in occurs (i.e. you will not be able to change the Room Type in a checked-in or checked-out Reservation). If you need to change the Room and Room Type after checking in, use the 'Change Room' function on the Operations (Windows/macOS) or Tools menu (iOS/Android).
- After specifying a Room Type, the Tags/Objects in the Room Type will be copied to the Reservation ('Other' card), and Max Pax, Max Adults and Max Children to the footer of the 'Guest' card.
- If there is a Room Location specified in the Local Machine setting on the client machine you are using and if you belong to an Access Group in which you have been given Full access to the 'Limit User to Hotel Room Location' Action, the 'Paste Special' list will only show the Room Types in that Room Location.
- Pressing the [Assign Room] button on the 'Check In/Out' card will print a report to screen listing the Rooms that belong to the Room Type specified here and that are available for checking in.
- If you have selected the Disallow Overbookings option in the Hotel Settings setting, you will not be able to create more Reservations for Rooms belonging to a particular Room Type than the total number of Rooms that belong to that Type. If you will allow a level of overbooking, specify that level in the Overbook % field in the Room Type record. For example, if you have 100 Rooms belonging to a particular Room Type and you have entered 20 as the Overbook % figure, you will be able to enter 120 Reservations for that Room Type for a particular date. If you are using the Disallow Overbookings option and you do not specify an Overbook % figure, no overbooking will be possible.
- You must specify a Room Type in each Reservation, as it will not be possible to save a Reservation if this field is empty. However you will be able to change the Room Type if needed up to the point when check-in occurs (i.e. you will not be able to change the Room Type in a checked-in or checked-out Reservation). If you need to change the Room and Room Type after checking in, use the 'Change Room' function on the Operations (Windows/macOS) or Tools menu (iOS/Android).
- Package
- Paste Special
Room Packages setting, Hotel module
- Default taken from Hotel Settings setting (Default Package)
- A Room Package is a list of everything that you will supply when a Room is hired except the Room itself. For example, you might include champagne on arrival, massage, access to the swimming pool, breakfast and so on in your Room Packages. Room Packages can be more or less comprehensive, ranging from the basic (room hire only) through bed and breakfast to the luxurious (e.g. a honeymoon Package). A Room Package can also include checklists that will appear when checking in and when checking out.
- Although you can save a Reservation without specifying a Room Package, you should always specify one because doing so will trigger the price calculation in the Reservation.
- After specifying a Room Package, the Tags/Objects in the Room Package will be copied to the Reservation ('Other' card).
- Two special Packages that you can use are the Complimentary Rooms and Rooms to Staff Packages. Reservations with these Packages will be shown separately in the Daily Statistics report. Use the Daily Statistics setting to specify which Packages are to be used for these purposes.
- A Room Package is a list of everything that you will supply when a Room is hired except the Room itself. For example, you might include champagne on arrival, massage, access to the swimming pool, breakfast and so on in your Room Packages. Room Packages can be more or less comprehensive, ranging from the basic (room hire only) through bed and breakfast to the luxurious (e.g. a honeymoon Package). A Room Package can also include checklists that will appear when checking in and when checking out.
- Booking Origin
- Paste Special
Booking Origins setting, Hotel module
- Use this field to make a note of how the Customer heard about the hotel.
- Any Tags/Objects that you have specified for the Booking Origin will be copied to the Reservation ('Other' card).
- A Booking Origin will brought in from the 'Personal' card of the Contact record for the Agent or Customer (but not from the Contact record for the Default Customer). If you specify an Agent and then a Customer, this field will contain the Customer's Default Booking Origin. But if you specify a Customer and then an Agent, it will contain the Agent's Default Booking Origin.
- If you need it to be mandatory that a Booking Origin is specified in every Reservation, select the Force Entry of Booking Origin option on the 'Defaults' card in the Hotel Settings setting.
- Any Tags/Objects that you have specified for the Booking Origin will be copied to the Reservation ('Other' card).
- Reference
- Use this field if you need to identify the Reservation by means other than the Reservation Number. Examples might be the name of a tour group or the Purchase Order Number issued by the tour operator.
- In a Reservation that was created from a Reservation Quotation or from a Group Reservation (using the 'New Sub Reservation' function), the Reference will be copied from the creating record. In turn, the Reference will be copied to any Down Payment Invoices that you create from the Reservation.
- If you need Reservation References to be shown for each Reservation in the 'Overview Rooms' window (the second Resource Planner window), select the Reference or Reference and Mother Res. Ref. options on the 'Defaults' card in the Hotel Settings setting.
- If you need the Reference to be printed on the Reservation form, add the "Reference" field to the Form Template.
- In a Reservation that was created from a Reservation Quotation or from a Group Reservation (using the 'New Sub Reservation' function), the Reference will be copied from the creating record. In turn, the Reference will be copied to any Down Payment Invoices that you create from the Reservation.
- Visit Purpose
- Paste Special
Visit Purposes setting, Hotel module
- Default taken from Hotel Settings (Default Visit Purpose field)
- Use this field to record the reason why the Customer or Guest is visiting and staying at the hotel.
- If you need it to be mandatory that a Visit Purpose is specified in every Reservation, select the Force Visit Purpose on Reservations option on the 'Guests' card in the Hotel Settings setting.
- Use this field to record the reason why the Customer or Guest is visiting and staying at the hotel.
- Border Check Point
- Paste Special
Border Check Points setting, Hotel module
- If the Customer or Guest arrived from abroad, specify here the check point that they passed through when arriving in the country.
- This field must contain a value in Croatia (i.e. if the VAT Law in the Company Info setting is "Croatian").
- This field must contain a value in Croatia (i.e. if the VAT Law in the Company Info setting is "Croatian").
- [Availability] button
- The [Availability] button opens a 'Month Overview Rooms' window, a Resource Planner window that shows Room availability for the dates in the Reservation:
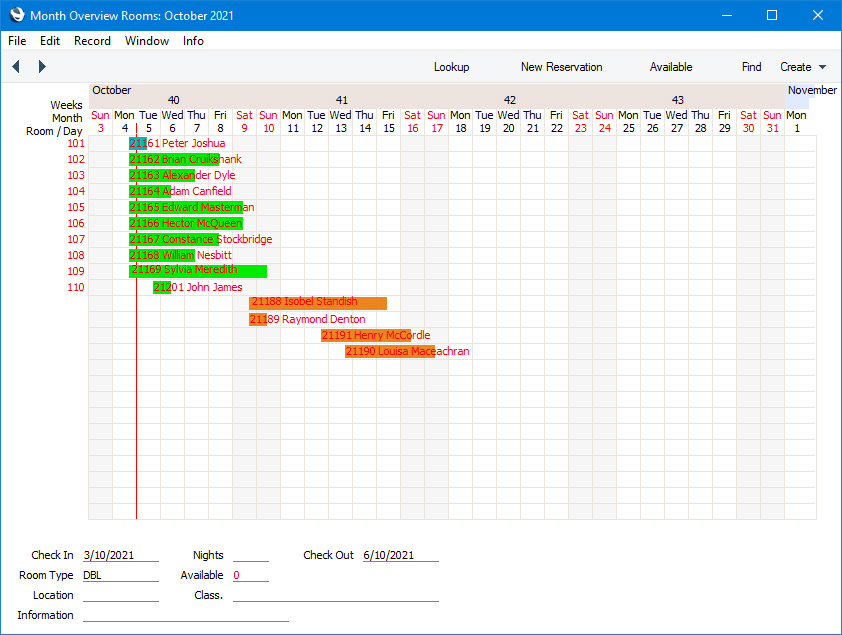
- The 'Month Overview Rooms' window is essentially the same as the 'Overview Rooms' window, the second Resource Planner window. Please refer here for full details.
- The 'Month Overview Rooms' window will be opened with the following defaults:
- Check In
- One day before the Check In Date in the Reservation.
- Room Type
- Room Type from the Reservation.
- Location
- Location of the Room already specified in the Reservation, from the Room Type specified in the Reservation or from the Local Machine setting on the machine being used.
- Class.
- Classification(s) of the Room already specified in the Reservation or from the Local Machine setting on the machine being used.
- Opening the 'Month Overview Rooms' window from a Reservation by pressing the [Availability] button will be useful when you need to assign a Reservation to a Room. The 'Month Overview Rooms' window will show the Rooms that are available and you will be able to drag the Reservation to a suitable Room.
- The 'Month Overview Rooms' window is essentially the same as the 'Overview Rooms' window, the second Resource Planner window. Please refer here for full details.
- [Print Form] button
- The [Print Form] button allows you to print a Reservation using a selection of forms. Pressing the button opens the following window:
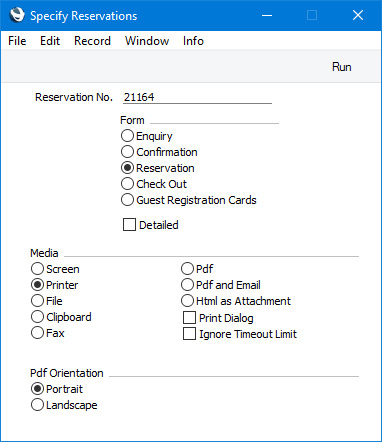
- Choose a document and press the [Run] button. Please refer to the following pages for details about each option:
- You can also print the Reservation form by clicking the Printer icon (Windows/macOS) or selecting 'Print' from the File menu (all platforms).
- Choose a document and press the [Run] button. Please refer to the following pages for details about each option:
The Reservation register in Standard ERP:
- Introduction and Workflow
- The 'Reservations: Browse' Window
- Entering a Reservation, including:
- Header
- Booking card
- Pricing card
- Check In/Out card
- Guest card
- Other card
- Sub Res. card
- Currency card
- Header
- Guest Accounts (Folios)
- Adding and Managing Items on Guest Accounts (Folio Items)
- Work in Progress (WIP)
- Operations Menu
- Create Menu
- Home page for Hotel module manual
- Home page for Standard ERP manual
Entering a Reservation - Pricing Card
This page describes the fields on the 'Pricing' card in the Reservation record window. Please follow the links below for descriptions of the other parts of the Reservation record window:- Header
- Booking card
- Pricing card
- Check In/Out card
- Guest card
- Other card
- Sub Res. card
- Currency card

- Price List
- Paste Special
Price List register, Pricing module
- Specify here the Price List that is to be used to calculate the prices in the Reservation.
- In a new Reservation, the Price List that is brought in as a default will depend on whether you have specified a Default Customer on the 'Defaults' card in the Hotel Settings setting, as follows:
- If you have not specified a Default Customer, the Price List that you have specified on the 'POS' card in the Local Machine setting on the machine you are using will be copied here as a default. This allows a different Price List to be offered as a default on different client machines. If no Price List has been specified in the Local Machine setting, the Default Price List also specified on the 'Defaults' card in the Hotel Settings setting will be brought in.
- If you have specified a Default Customer, that Customer's Price List will be copied here as a default. If no Price List has been specified for the Default Customer, the Price List in the Local Machine setting will be brought in.
- If you specify a Customer on the 'Check In/Out' card (or change the existing Customer), that Customer's Price List (or, if blank, the Price List in the Customer Category to which the Customer belongs) will be brought in. If this field is empty when you specify or change the Agent, the Agent's Price List will be brought in. In other words, the Customer's Price List will be given priority over the Agent's. In all cases, changing the Price List (including when changing it yourself) will cause any prices already in the Reservation to be recalculated accordingly.
- In a new Reservation, the Price List that is brought in as a default will depend on whether you have specified a Default Customer on the 'Defaults' card in the Hotel Settings setting, as follows:
- Avg Price
- If the Room Type is priced by the day, the average Room charge per night will be calculated when you specify a Room Type and Room Package on the 'Booking' card (and, if appropriate, a Price List in the field above). It will be recalculated whenever you change the number of adults or children and when listing Guests on the 'Guest' card. If the pricing is hourly, the Avg Price will be calculated to be the total Room charge.
The Avg. Price will be calculated using the records in the Invoice Items setting for the Room Type and Room Package. Each Invoice Item record will connect the Room Type/Room Package combination to a record in the Item register that will carry the daily or hourly rate (if there is a record for the Item in the Price register for the Price List specified in the field to the left, the daily or hourly rate will be taken from that record not from the Item record itself). You may have more than one Invoice Item record for each Room Type/Room Package combination to cater for different pricing over weekends and/or holidays: the calculation of the Avg. Price will include these differences. Please refer to the description of the Invoice Items setting here for more details. If you are using Classification Terms to allow different pricing depending on the type of Guest (e.g. different pricing for children), the Avg. Price will be recalculated as you add Guests to the 'Guest' card. Classification Terms are described here. If you need to see how the pricing is calculated, save the Reservation and then press the [Price Details] or [Price Details Report] buttons (described below).
- This figure will include VAT if the Price List is one that is Inclusive of VAT or if you have specified on the 'Invoicing' card of the Hotel Settings setting that Base Prices include VAT.
- If the Reservation has a Currency and Exchange Rate, the figure shown will be in the Currency concerned (i.e. having undergone currency conversion).
- If you are using the Force Price on Reservations option in the Hotel Settings setting, you will not be able to save a Reservation if this field and the Agreed Price field are both empty or contain 0.00.
- This figure will include VAT if the Price List is one that is Inclusive of VAT or if you have specified on the 'Invoicing' card of the Hotel Settings setting that Base Prices include VAT.
- Total Stay
- The total Room charge: Agreed Price * No. of Nights, or Avg Price * No. of Nights.
- The Total Stay figure does not include the value of any Package Items. These are included in the Total figure (below).
- This figure will include VAT if the Price List is one that is Inclusive of VAT or if you have specified on the 'Invoicing' card of the Hotel Settings setting that Base Prices include VAT.
- If the Reservation has a Currency and Exchange Rate, the figure shown will be in the Currency concerned (i.e. having undergone currency conversion).
- The Total Stay figure does not include the value of any Package Items. These are included in the Total figure (below).
- Agreed Discount
- If you have specified a Discount Matrix in the Contact record for the Customer, the Column 0 percentage in that Discount Matrix will be brought in to this field. This figure will be used as a discount percentage to be applied to Room charges (but not to any Package Items).
- Agreed Price
- The daily or hourly Room charge as agreed with the Customer. If you enter an Agreed Price, it will be used as the Room rate, overriding all other price calculations. However, the Agreed Price will be per Room or per Guest depending on whether you have selected Price not depending on No. of Guests in the Invoice Item records applying on each day of the stay, and any Classification Terms that you are using (e.g. discounts for children) will apply.
- The Agreed Price that you enter should include VAT if the Price List is one that is Inclusive of VAT or if you have specified on the 'Invoicing' card of the Hotel Settings setting that Base Prices include VAT. The Agreed Price should also be in the Currency of the Reservation.
- If you are using the Force Price on Reservations option in the Hotel Settings setting, you will not be able to save a Reservation if this field and the Avg Price field are both empty or contain 0.00.
- Changing the Agreed Price is the only way that users can change the pricing in a Reservation as all the other price fields are calculated. If you need to prevent users from changing the Agreed Price, assign them to an Access Group in which you have denied access to the 'Change Prices' Action.
- The Agreed Price that you enter should include VAT if the Price List is one that is Inclusive of VAT or if you have specified on the 'Invoicing' card of the Hotel Settings setting that Base Prices include VAT. The Agreed Price should also be in the Currency of the Reservation.
- Rack Rate
- The Rack Rate is the standard Room charge for a Reservation (i.e. not including any discounts or special pricing e.g. for children).
- If you need Rack Rates to be calculated using a particular Price List, specify that Price List in the Rack Rate Price List field on the 'Defaults' card in the Hotel Settings setting. If you leave the Rack Rate Price List field empty, Rack Rates will be calculated using the Base Prices of the Items in the relevant Invoice Item records.
- Specifying a Rack Rate Price List and changing it from time to time allows you to change standard Room charges depending on the season.
- If the Reservation has a Currency and Exchange Rate, the figure shown will be in the Currency concerned (i.e. having undergone currency conversion).
- If you need Rack Rates to be calculated using a particular Price List, specify that Price List in the Rack Rate Price List field on the 'Defaults' card in the Hotel Settings setting. If you leave the Rack Rate Price List field empty, Rack Rates will be calculated using the Base Prices of the Items in the relevant Invoice Item records.
- Total
- The total Room charge including Package Items: Total Stay + Package Items.
- This figure will include VAT if the Price List is one that is Inclusive of VAT or if you have specified on the 'Invoicing' card of the Hotel Settings setting that Base Prices include VAT.
- If the Reservation has a Currency and Exchange Rate, the figure shown will be in the Currency concerned (i.e. having undergone currency conversion).
- This figure will include VAT if the Price List is one that is Inclusive of VAT or if you have specified on the 'Invoicing' card of the Hotel Settings setting that Base Prices include VAT.
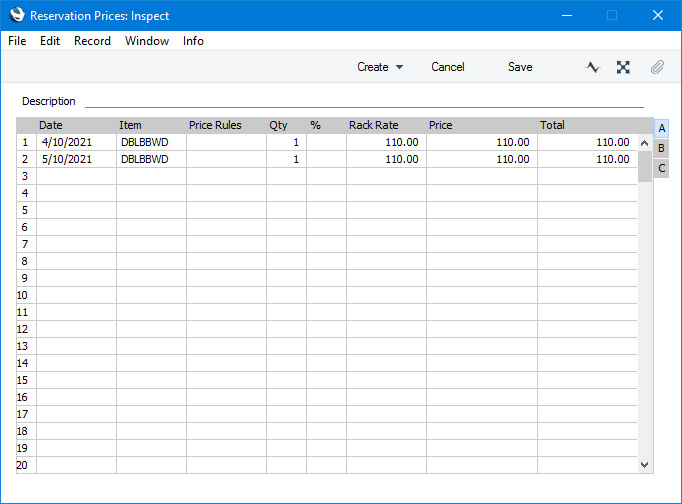
- [Price Details] button
- The Reservation Prices setting keeps a record of the Room charges for each Reservation, and shows how the Room charge for each night is calculated. A record in the Reservation Prices setting will be created or updated each time you save a Reservation. You can open this record from the Reservation by pressing the [Price Details] button. Please refer to the description of the Reservation Prices setting here for details.
- [Price Details Report] button
- Pressing the [Price Details Report] button will print a report to screen showing how the Total figure in the Reservation is calculated.
- While the [Price Details] button above will open the record for the Reservation in the Reservation Prices setting and therefore shows how the Room charge is calculated, the [Price Details Report] will open a printable report and the report will include Package Items as well as the Room charge.
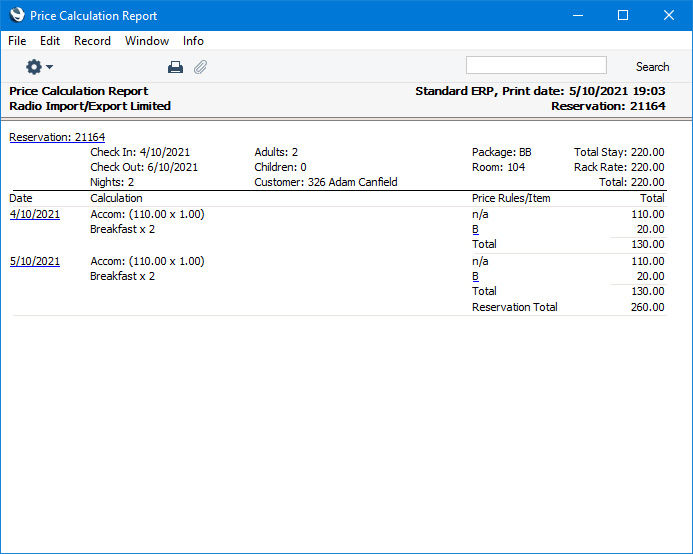
- While the [Price Details] button above will open the record for the Reservation in the Reservation Prices setting and therefore shows how the Room charge is calculated, the [Price Details Report] will open a printable report and the report will include Package Items as well as the Room charge.
The Reservation register in Standard ERP:
- Introduction and Workflow
- The 'Reservations: Browse' Window
- Entering a Reservation, including:
- Header
- Booking card
- Pricing card
- Check In/Out card
- Guest card
- Other card
- Sub Res. card
- Currency card
- Header
- Guest Accounts (Folios)
- Adding and Managing Items on Guest Accounts (Folio Items)
- Work in Progress (WIP)
- Operations Menu
- Create Menu
- Home page for Hotel module manual
- Home page for Standard ERP manual
Entering a Reservation - Check In/Out Card
This page describes the fields on the 'Check In/Out' card in the Reservation record window. Please follow the links below for descriptions of the other parts of the Reservation record window:- Header
- Booking card
- Pricing card
- Check In/Out card
- Guest card
- Other card
- Sub Res. card
- Currency card
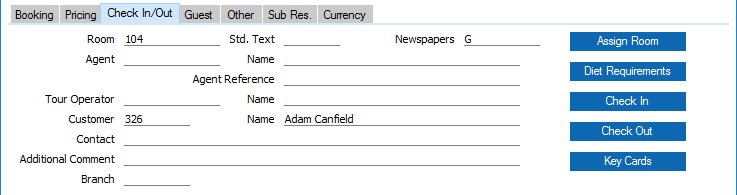
- Room
- Paste Special
Room register, Hotel module
- There are three methods that you can use to assign a Reservation to a Room:
- Specify the Room in this field.
- Press the [Assign Room] button (described below) to print a report to screen listing the Rooms that are available. Click (Windows/macOS) or tap (iOS/Android) on a Room Number in the report to add the Room to the Reservation.
- Working in the 'Overview Rooms' window (the second window in the Resource Planner) or the 'Month Overview Rooms' window, drag the Reservation to an available Room. You can open the 'Month Overview Rooms' window from a Reservation by pressing the [Availability] button on the 'Booking' card.
- You do not need to specify a Room in a Reservation with an Unconfirmed or Normal (not checked in) Status (e.g. in an enquiry or in a provisional or confirmed booking), but you will need to do so before checking in. After checking in, you will not be able to change the Room. If you need to change the Room after checking in, use the 'Change Room' function on the Operations (Windows/macOS) or Tools menu (iOS/Android). You can specify a Room with a Clean or Dirty Room Status in an enquiry or in a provisional or confirmed booking but you can only check in to a Clean Room. The Clean and Dirty Room Statuses are as specified in the Hotel Settings setting.
- If you specify a Room in a Reservation with an Unconfirmed or Normal (not checked in) Status, you will usually be able to change it before checking in. If you do not want that Room to be changed, select the Block Room Change option on the 'Other' card. Users who belong to an Access Group in which you have denied access to the 'Change Hotel Rooms' Action will be able to select the Block Room Change option but not deselect it, so they will not be able to change the Room.
- After specifying the Room, the Room Type on the 'Booking' card will be updated and the Room Tag/Object will be copied to the 'Other' card, and Max Pax, Max Adults and Max Children to the footer of the 'Guest' card.
- By default, the 'Paste Special' list will include all Rooms. However, if there is a Room Location specified in the Local Machine setting on the client machine you are using and if you belong to an Access Group in which you have been given Full access to the 'Limit User to Hotel Room Location' Action, the 'Paste Special' list will only show the Rooms in that Room Location. The 'Limit User to Hotel Room Location' Action will also mean that you will not be able to specify a Room in a different Location.
- If a Reservation is connected to a Group Reservation in which you have specified a Room Location, you will only be able to specify a Room in that Location.
- Pressing the [Assign Room] button on the 'Check In/Out' card will print a report to screen listing the Rooms that belong to the Room Type in the Reservation and that are available for checking in. Click (Windows/macOS) or tap (iOS/Android) on a Room Number in the report to add it to the Reservation.
- If you have set Rooms aside for the Agent specified below in the Agent Rooms setting, one of those Rooms will be brought in to the Reservation when you save it for the first time. The Room that is brought in will be one that has the appropriate Room Type and that is not already assigned to a Confirmed Reservation. This default Room will not be brought in if you specify a Room yourself before saving.
- If you try to use a Room that you have set aside in the Agent Rooms setting for a different Agent to the one specified below, you will be warned "Agent has first rights to this room" when you save the Reservation, but it will be saved i.e. the Room will be assigned to the Reservation. If you do not want to be able to save such a Reservation i.e. you need to prevent Agent Rooms from being used with other Agents, select the Disallow Agent Room for Walk in Customer option in the Hotel Settings setting.
- Specify the Room in this field.
- Std Text
- Paste Special
Standard Text register, CRM module
- Text from any Standard Text record that you specify here will be printed on Reservation forms, if you have included the 'Text' field in the Form Template.
- Newspapers
- Paste Special
Newspapers setting, Hotel module
- If the Guest requires daily newspapers to be delivered to the Room, specify here the newspapers that they want. You can enter several newspapers separated by commas.
- You can also specify a newspaper in each Guest record. The newspaper specified for the last Guest that you list on the 'Guest' card will be copied here.
- Running the Newspaper List report for a particular date will produce a list of the newspapers that are required by each Room on that date.
- You can also specify a newspaper in each Guest record. The newspaper specified for the last Guest that you list on the 'Guest' card will be copied here.
- Agent
- Paste Special
Customers in Contact register
- If the Reservation was placed by an Agent, specify the Contact Number of that Agent here. The Agent must have a record in the Contact register in which the Customer box is ticked.
- After specifying an Agent, the Agent's Sales Tags/Objects will be copied to the 'Other' card and Default Booking Origin to the 'Booking' card.
- The Agent will be charged for the Room and the Package Items if you are using the Charge Reservations to Agent option on the 'Defaults' card in the Hotel Settings setting. If you have not selected this option, the Room and the Package Items will be charged to the Customer if there is one or the first Guest if not.
- If you have set Rooms aside for the Agent in the Agent Rooms setting, one of those Rooms will be brought in to the Reservation when you save it for the first time. The Room that is brought in will be one that has the appropriate Room Type and that is not already assigned to a Confirmed Reservation. This default Room will not be brought in if you specify a Room yourself before saving.
- If you have not specified an Agent when you add the first charge or Item to a Guest Account, you will not then be able to specify one. However you will be able to change the Agent providing the charge or Item you added was to a different Guest Account (i.e. providing the Agent's Guest Account is empty) and providing the Reservation has not checked in.
- After specifying an Agent, the Agent's Sales Tags/Objects will be copied to the 'Other' card and Default Booking Origin to the 'Booking' card.
- Name
- The Agent's Name will be placed in this field when you specify the Agent in the field to the left.
- Tour Operator
- Paste Special
Customers in Contact register
- If the Reservation was placed by a Tour Operator, specify the Contact Number of that Tour Operator here. This is for information only.
- Name
- The Tour Operator's Name will be placed in this field when you specify the Tour Operator in the field to the left.
- Customer
- Paste Special
Customers in Contact register
- Default taken from Hotel Settings setting (Default Customer field)
- Specify the Customer for the Reservation here.
- You must specify either a Customer or at least one Guest in the matrix on the 'Guest' card before you can save the Reservation.
- If you do not specify a Customer or an Agent, the first Guest will be treated as the Customer and will be charged for the Room and the Package Items.
- f you have specified an Agent in a Reservation and you are not using the Charge Reservations to Agent option on the 'Defaults' card in the Hotel Settings setting, the Room and the Package Items will be charged to the Customer if there is one or the first Guest if not. If you are using this option, the Agent will be charged for the Room and the Package Items.
- After specifying a Customer, the Customer's Sales Tags/Objects will be copied to the 'Other' card and Default Booking Origin to the 'Booking' card.
- If you have not specified a Customer when you add the first charge or Item to a Guest Account, you will not then be able to specify one. However you will be able to change the Customer providing the charge or Item you added was to a different Guest Account (i.e. providing the Customer's Guest Account is empty).
- Specify the Customer for the Reservation here.
- Name
- The Customer's Name will be placed in this field when you specify the Customer in the field to the left.
- Contact
- Paste Special
Contact Persons in the Contact register
- If the Agent or Customer is a company, you can use this field to record the name of the Contact Person who is dealing with the Reservation.
- If you have specified an Agent in the field above, the 'Paste Special' will list the Contact Persons belonging to the Agent. Otherwise, it will list the Contact Persons belonging to the Customer.
- If you need the Contact to be printed on Reservation forms, add the "Partner Contact" field to the Form Templates.
- If you have specified an Agent in the field above, the 'Paste Special' will list the Contact Persons belonging to the Agent. Otherwise, it will list the Contact Persons belonging to the Customer.
- Additional Comment
- Use this field to record notes about Reservations as necessary. Additional Comments will be included in the Detailed version of the Unconfirmed Reservations report.
- Branch
- Default taken from
Room Location or Local Machine setting, User Settings module
- If your company has several Branches (e.g. several hotel buildings), you should add separate records for each Branch to the Contact register. These records should contain details about the Branches such as addresses and contact details. You should then go to the Local Machine setting in the User Settings module separately on each client machine and specify the Branch where each machine is located. Having done so, whenever you create a Reservation, the Branch where the client machine is located will be recorded in this field and usually cannot be changed.
- If you have separate hotel buildings, you will usually have entered separate records in the Room Locations setting to represent each one. You can specify the Branch in each of these records. When you specify the Room in a Reservation, the Branch from the appropriate Room Location record will be brought in to this field, overriding the default from the Local Machine setting.
- Branch details such as the address in the relevant Contact record will be printed on the Reservation document if you have included the various Branch fields in your Form Template. Any Sales Tags/Objects in that Contact record will be copied to the Tags/Objects field on the 'Other' card of the Reservation.
- If you would like it to be possible for some users to change the Branch in Reservations, assign them to an Access Group in which you have granted Full access to the 'Change Branch Code on Reservation' Action. Separate similar Actions are available for Quotations, Orders and Invoices.
- If you have separate hotel buildings, you will usually have entered separate records in the Room Locations setting to represent each one. You can specify the Branch in each of these records. When you specify the Room in a Reservation, the Branch from the appropriate Room Location record will be brought in to this field, overriding the default from the Local Machine setting.
- [Assign Room] button
- The [Assign Room] button is one of the methods that you can use to choose a Room for the Reservation. Pressing this button will cause a report to be printed to screen listing the Rooms that are available and that belong to the Room Type specified in the Reservation. If you have specified a Location in the Room Type, the report will list available Rooms in that Location. An available Room is one that not occupied for the duration of the Reservation:
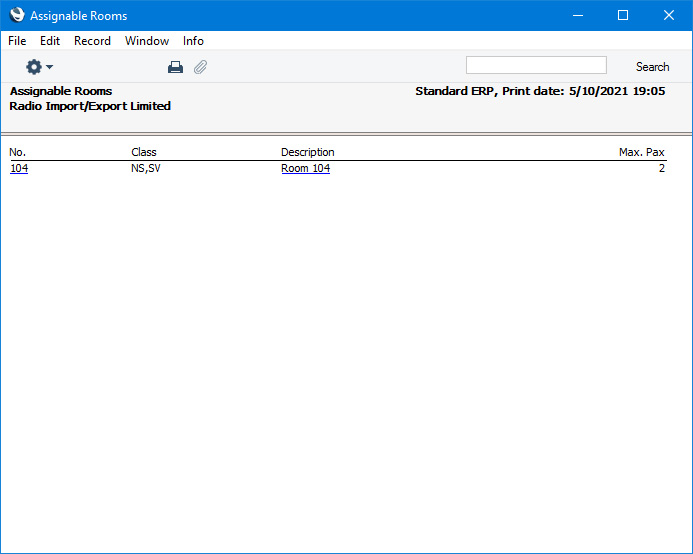
- Click (Windows/macOS) or tap (iOS/Android) on a Room Number in the report to add the Room to the Reservation.
- Click (Windows/macOS) or tap (iOS/Android) on a Room Number in the report to add the Room to the Reservation.
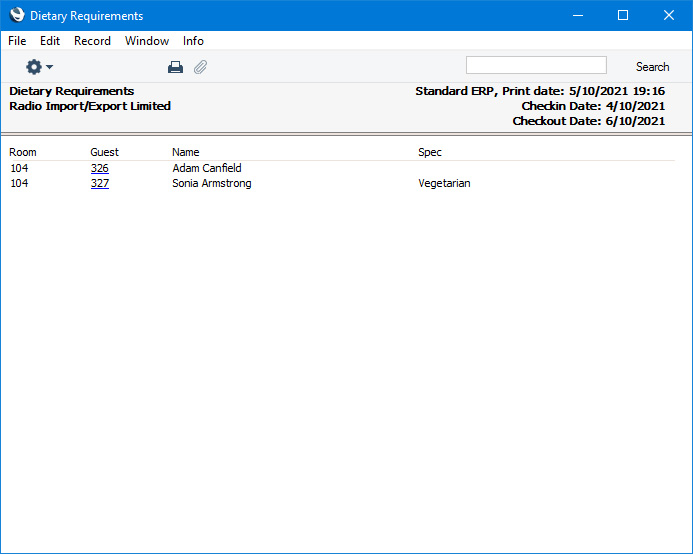
- [Diet Requirements] button
- The [Diet Requirements] button will print a report to screen listing the dietary requirements of each Guest in the Reservation. You can record the dietary requirements of a Guest using the Diet Remarks field on the 'Guest' card in the relevant Guest record.
- [Check In] button
- Press this button to check the Guests in.
- The Status of the Reservation will be changed to the Check In Status specified in the Hotel Settings setting. The change from the existing Status to the Check In Status must be a change that is allowed by the Reservation Status Sequences setting.
- If a Check In List or Check In Message has been specified in the Room Package or in the Hotel Settings setting, a report will be printed to screen providing a reminder of the services that you can offer the Guest, such as wake-up calls, newspapers, etc. From the report, you can book the services that the Guest requires. Please refer to the description of the Checklists setting here for more details.
- If the user belongs to an Access Group that has been denied access to the 'Check In before or after Planned Date' Action, it will only be possible to check in if the Check In Date is the current date: change it if this is not the case before checking in. On checking in, the Check In Time will be updated to the current time. You can also use Access Groups to prevent certain users from checking Guests in. To do this, deny them access to the 'Reservation: Check In' Action.
- It will not be possible to check in to a Room that is already occupied or to one whose Status is not the Available Status specified in the Hotel Settings setting.
- The Status of the Reservation will be changed to the Check In Status specified in the Hotel Settings setting. The change from the existing Status to the Check In Status must be a change that is allowed by the Reservation Status Sequences setting.
- [Check Out] button
- Press this button to check the Guests out.
- The Status of the Reservation will be changed to the Check Out Status specified in the Hotel Settings setting. The change from the existing Status (usually the Check In Status) to the Check Out Status must be a change that is allowed by the Reservation Status Sequences setting. The Status of the Room will be changed as well, to the Dirty Status also as specified in the Hotel Settings setting.
- If a Check Out List or Check Out Message has been specified in the Room Package or in the Hotel Settings setting, a report will be printed to screen providing a reminder of the services that you can offer the Guest, such as wake-up calls, newspapers, etc. From the report, you can book the services that the Guest requires. Please refer to the description of the Checklists setting here for more details.
- If the user belongs to an Access Group that has been denied access to the 'Check In after Planned Date' Action, it will only be possible to check out if the Check Out Date is the current date: change it if this is not the case before checking out. On checking out, the Check Out Time will be updated to the current time. You can also use Access Groups to prevent certain users from checking Guests out. To do this, deny them access to the 'Reservation: Check Out' Action.
- It will not be possible to check out if the Guest Accounts have not been fully updated with Room charges and Package Items for the full duration of the stay (for details, please refer to the Adding and Managing Items on Guest Accounts (Folio Items) page) and/or if an Invoice has not been created (for details, please refer to the description of the 'Invoice' function on the Create or + menu here).
- The Status of the Reservation will be changed to the Check Out Status specified in the Hotel Settings setting. The change from the existing Status (usually the Check In Status) to the Check Out Status must be a change that is allowed by the Reservation Status Sequences setting. The Status of the Room will be changed as well, to the Dirty Status also as specified in the Hotel Settings setting.
- [Key Cards]
- Please refer to the description of the Electronic Locking System setting here for details about the [Key Cards] button.
The Reservation register in Standard ERP:
- Introduction and Workflow
- The 'Reservations: Browse' Window
- Entering a Reservation, including:
- Header
- Booking card
- Pricing card
- Check In/Out card
- Guest card
- Other card
- Sub Res. card
- Currency card
- Header
- Guest Accounts (Folios)
- Adding and Managing Items on Guest Accounts (Folio Items)
- Work in Progress (WIP)
- Operations Menu
- Create Menu
- Home page for Hotel module manual
- Home page for Standard ERP manual
Entering a Reservation - Guest Card
This page describes the fields on the 'Guest' card in the Reservation record window. Please follow the links below for descriptions of the other parts of the Reservation record window:- Header
- Booking card
- Pricing card
- Check In/Out card
- Guest card
- Other card
- Sub Res. card
- Currency card
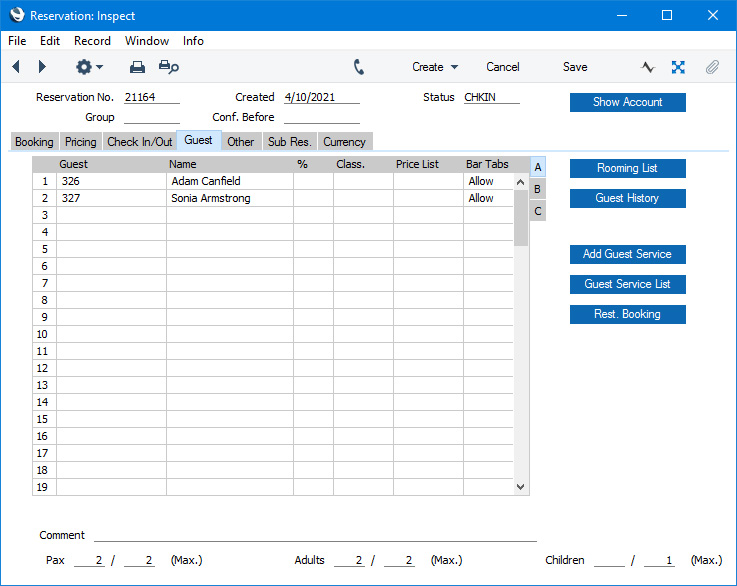
Use the 'Guest' card in a Reservation to list the Guests who will be staying in the Room specified on the 'Check In/Out' card.
Each Guest will automatically be given their own Guest Account. Before checking out, you will need to charge one of the Guest Accounts with Room charges and Package Items for the full duration of the stay, and you will also need to create Invoices for each Guest Account to which Items have been assigned. Please refer to the Adding and Managing Items on Guest Accounts (Folio Items) page for details about charging Room charges and Package Items to Guest Accounts and to the description of the 'Invoice' function on the Create or + menu here for details about invoicing.
If you do not specify a Customer on the 'Check In/Out' card in a Reservation, you must list at least one Guest on the 'Guest' card. If there is no Customer, the first Guest will be treated as the Customer and will be charged for the Room and the Package Items.
When you save a Reservation, a check will be made that you have not listed more adults and/or children in the matrix than you have specified in the fields in the footer. For this purpose, a child is a Guest with a Classification belonging to the Class. Type (Child) specified in the Hotel Settings setting. All other Guests will be counted as adults.
The Request Guest Classification and Request Guests on Reservations options on the 'Guests' card in the Hotel Settings setting give you an additional measure of control over the Guests that you list in the matrix. Please refer to the description of the 'Guests' card in the Hotel Settings setting here for details.
The matrix on the 'Guest' card is divided into three horizontal flips. When you click (Windows/macOS) or tap (iOS/Android) a flip tab (marked A-C), the two or three right-hand columns of the grid will be replaced.
If you are using iOS or Android, you can add rows by tapping the + button below the matrix. To remove a row, long tap on the row number on the left of the row and select 'Delete Row' from the resulting menu. To insert a row, long tap on the row number where the insertion is to be made and select 'Insert Row' from the resulting menu.
Flip A
- Guest
- Paste Special
Guests in Guest/Contact register
- Specify the Guest Number (i.e. Contact Number) of the Guest.
- It is quite likely that you will need to create new Guest records while entering Reservations. Follow these steps:
- Click (Windows/macOS) or tap (iOS/Android) in the Guest field in the first empty row.
- Open 'Paste Special' (press Ctrl-Return or Ctrl-Enter (Windows) or ⌘-Return or ⌘-Enter (macOS) on your keyboard, click the magnifying glass icon in the field (Windows/macOS) or tap the > icon on the right of the field (iOS and Android)).
- Click or tap the [New] button to create a new Guest record.
- Please refer here for more details about entering a new Guest record.
- Before adding any Room charges or Items to any of the Guest Accounts in the Reservation, you will be able to add, edit and remove Guests as necessary. After adding to a Guest Account, you will still be able to add Guests but you will not be able to remove or change existing Guests.
- It is quite likely that you will need to create new Guest records while entering Reservations. Follow these steps:
- Name
- The Guest's Name will be placed in this field when you specify the Guest in the field to the left.
- Class.
- Paste Special
Contact Classifications setting, CRM module
- Classification Terms allow you to offer percentage discounts or uplifts on Room charges depending on the Contact Classification of a Guest. For example, you can use Classification Terms to reduce Room charges for children.
- If you are using Classification Terms, enter the appropriate Classification for a Guest here.
- The 'Paste Special' list will only display Classifications belonging to the Class. Type (Adult) and to the Class. Type (Child) specified in the Hotel Settings setting, and only Classifications belonging to those Types will be brought in to the Reservation from the Contact record for the Guest.
- Adding a Guest with a Classification to a Reservation and changing the Classification in a row will both cause the pricing in the Reservation to be recalculated automatically. Please refer to the description of the Classification Terms setting here for more details.
- If you are using Classification Terms, enter the appropriate Classification for a Guest here.
- Price List
- Paste Special
Price List register, Pricing module
- If you specify a Price List for a Guest here, this Price List will be used to calculate the prices in any Bar Tab or POS Invoice that you assign to the Guest's Guest Account. This Price List will not affect any pricing (e.g. of Room charges) in the Reservation itself.
- A default Price List can be brought in to this field, chosen as follows:
- It will be brought in from the 'Pricing' card of the Guest's Contact record. Note that you cannot specify a Price List when viewing a record in the Guest register, only when viewing the same record in the Contact register.
- The Price List for the Customer Category to which the Guest belongs will be used.
- If you need Guests' Price Lists to be printed on Reservation forms, add the "Price List, row" field to the Form Template.
- If you need to be able to add Bar Tabs and POS Invoices to Guest Accounts, add "On Hotel Guest Account" buttons to the Bar Tab and POS Invoice windows.
- A default Price List can be brought in to this field, chosen as follows:
- Bar Tabs
- Paste Special
Choices of possible entries
- Set this field to "Do not allow" for a particular Guest if you want to prevent that Guest from adding Bar Tabs or POS Invoices to their Guest Account.
Flip B
- Visa No., Visa Type, Visa Valid Until
- Use these fields to record information about the Guest's visa as necessary. This information will be included in the Guest Book report in Croatia only (i.e. if the VAT Law in the Company Info setting is "Croatian").
Flip C
- Arrival Sequence
- The Arrival Sequence is a sequential number for Guests that will be filled in automatically when you check a Reservation in.
Footer
- Comment
- Use this field to record notes about the Reservation.
- If you enter the Code of a record in the Text Types setting in the CRM module, the Comment from that Text Type field will be brought in automatically, replacing the Code.
- The Comment will be copied to the Comment field in any Down Payment Invoices that you create from the Reservation.
- If you need this Comment to be printed on Reservation forms, add the "Comment" field to the Form Template(s). The Comment will also be included in the Guest History report.
- If you enter the Code of a record in the Text Types setting in the CRM module, the Comment from that Text Type field will be brought in automatically, replacing the Code.
- Pax, Adults, Children
- The Adults and Children fields are the same fields as the No. of Adults and Children fields on the 'Booking' card: you can change these figures in either place. The Pax figure is the number of Guests in the Reservation, calculated by adding together the figures in these two fields.
- When you save a Reservation, a check will be made that you have not listed more adults and/or children in the matrix than you have specified in these fields. For this purpose, a child is a Guest with a Classification belonging to the Class. Type (Child) specified in the Hotel Settings setting. All other Guests will be counted as adults.
- When you save a Reservation, a check will be made that you have not listed more adults and/or children in the matrix than you have specified in these fields. For this purpose, a child is a Guest with a Classification belonging to the Class. Type (Child) specified in the Hotel Settings setting. All other Guests will be counted as adults.
- Max Pax, Max Adults, Max Children
- These fields display the maximum numbers of Guests, adults and children respectively that you can include in the Reservation.
- When you specify a Room Type in a Reservation, these figures will be copied from the relevant Room Type record. This can be useful as a guide when taking a provisional Reservation. When you specify the Room, these figures will be overwritten by the equivalent figures from the relevant Room record.
- You will be warned immediately if you enter a number of pax, adults or children that is greater than the relevant maximum, and this will also mean that you will not be able to save the Reservation.
- When you specify a Room Type in a Reservation, these figures will be copied from the relevant Room Type record. This can be useful as a guide when taking a provisional Reservation. When you specify the Room, these figures will be overwritten by the equivalent figures from the relevant Room record.
- [Rooming List] button
- The [Rooming List] button will print a report to screen listing the Guests in the Reservation.
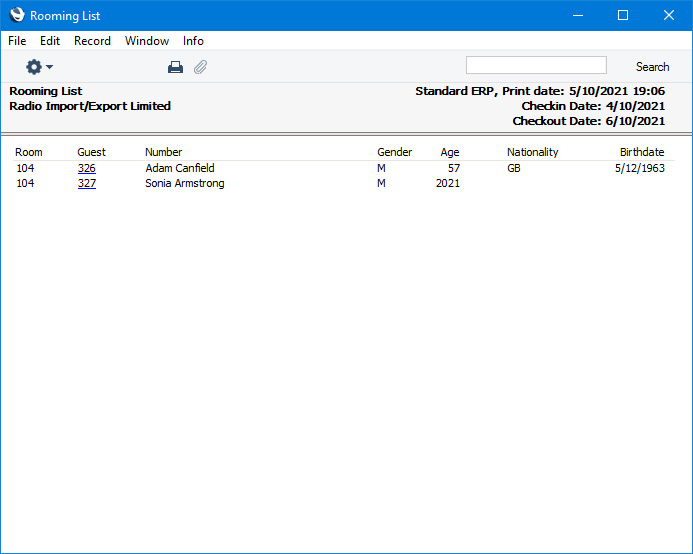
- [Guest History] button
- The [Guest History] button will print a Guest History report to screen for one of the Guests in the Reservation. This report will list the Reservations representing the times when the Guest stayed in the hotel, and will also list the Guest Services requested by the Guest.
- If you click (Windows/macOS) or tap (iOS/Android) in a row in the Guest matrix before pressing the [Guest History] button, the report will be for the Guest you selected. Otherwise it will be for the first Guest in the matrix.
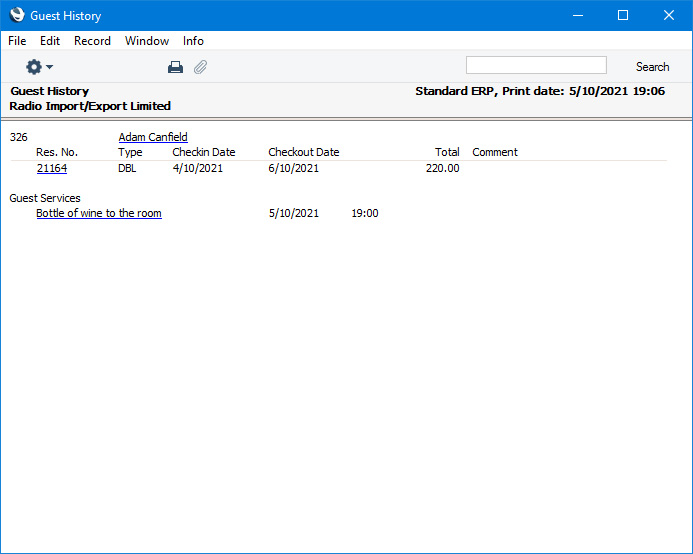
- Please refer here for more details about Guest Services and here for more details about the Guest History report.
- If you click (Windows/macOS) or tap (iOS/Android) in a row in the Guest matrix before pressing the [Guest History] button, the report will be for the Guest you selected. Otherwise it will be for the first Guest in the matrix.
- [Add Guest Service] button
- Use this button to add Guest Services to the Reservation. A Guest Service is an instruction to the relevant department (e.g. the front desk or housekeeping) to provide a service required by a Guest.
- If a Reservation includes more than one Guest, click or tap in any field in the row containing the relevant Guest before pressing the button. This will ensure the Guest Service is created in the name of the correct Guest.
- When you press the button, a 'Guest Service: New' window will open. On the 'Other Details' card, the Guest field will be filled in as mentioned in the previous paragraph and the Check In and Check Out Dates will be copied from the Reservation. Referring to the description of the Guest Services setting here, enter the details of the Service that is required by the Guest and save. The Service will be saved in the Guest Services setting.
- If you need to charge for a Guest Service, add it to the relevant Guest Account by selecting 'Add Items' from the Operations or Tools menu. If a service will be provided daily, use the function on the same menu.
- If a Reservation includes more than one Guest, click or tap in any field in the row containing the relevant Guest before pressing the button. This will ensure the Guest Service is created in the name of the correct Guest.
- [Guest Service List] button
- Use this button to print a Guest Services List report for the Reservation to screen. This report will list Daily Guest Services of all Types, and Specific Day Guest Services that are scheduled for the date when you produce the report. If you click or tap in any field in a row in the matrix before pressing the button, the report will list the Guest Services requested by the Guest in that row. Otherwise, it will list the Guest Services requested by every Guest. Please refer here for more details about the Guest Services List report.
- [Rest. Booking] button
- Use the [Rest. Booking] button if you need to create a Booking in the Restaurant. A 'Restaurant Booking: New' window will appear, allowing you to create a Booking:
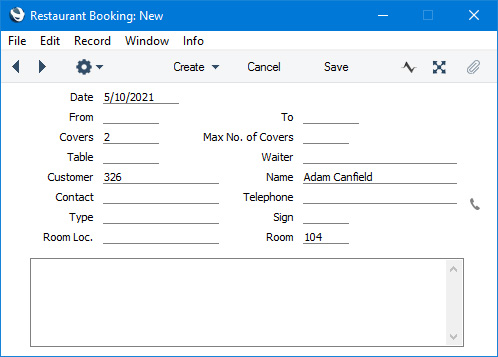
- Please refer here for details about Restaurant Bookings.
The Reservation register in Standard ERP:
- Introduction and Workflow
- The 'Reservations: Browse' Window
- Entering a Reservation, including:
- Header
- Booking card
- Pricing card
- Check In/Out card
- Guest card
- Other card
- Sub Res. card
- Currency card
- Header
- Guest Accounts (Folios)
- Adding and Managing Items on Guest Accounts (Folio Items)
- Work in Progress (WIP)
- Operations Menu
- Create Menu
- Home page for Hotel module manual
- Home page for Standard ERP manual
Entering a Reservation - Other Card
This page describes the fields on the 'Other' card in the Reservation record window. Please follow the links below for descriptions of the other parts of the Reservation record window:- Header
- Booking card
- Pricing card
- Check In/Out card
- Guest card
- Other card
- Sub Res. card
- Currency card

- Salesman
- This field will contain the Signature of the user who created the Reservation. This cannot be changed.
- The Salesman field will be used by the Limited Access feature: please refer to the description of the Sales Group field below for details.
- The Salesman field will be used by the Limited Access feature: please refer to the description of the Sales Group field below for details.
- Language
- Paste Special
Languages setting, System module
- Default taken from Contact record for the Customer, Guest or Agent
- The Language will determine the Form Template that will be used when you print the Reservation, and the printer that will be used to print it. This can include sending the form to a fax machine, if your hardware can support this feature. Do this in the 'Form Definition' window for each form, as described here.
- If the Language field is blank when you specify the Customer, the Agent or a Guest, the Language will be brought in from the relevant Contact record. However, if the Language field is not blank, it will not be changed.
- This Language field will not be used when creating Invoices from the Reservation. Instead, the Languages in the Contact records for the Customer, Agent and Guests will be used. This allows for Invoices to be created and printed in the various Languages of the Guests if needed.
- The Language will determine the Form Template that will be used when you print the Reservation, and the printer that will be used to print it. This can include sending the form to a fax machine, if your hardware can support this feature. Do this in the 'Form Definition' window for each form, as described here.
- Block Room Change
- If you specify a Room in a Reservation with an Unconfirmed or Normal (not checked in) Status, you will usually be able to change it before checking in. If you do not want that Room to be changed, select this option. Users who belong to an Access Group in which you have denied access to the 'Change Hotel Rooms' Action will be able to select this option but not deselect it, so they will not be able to change the Room.
- Sales Group
- The Sales Group will be brought in from the Person record for the current user when they created the Reservation. If you are using the Limited Access feature, you can use this field to prevent a user from seeing every Reservation in the 'Reservations: Browse' window by restricting their view to their own Reservations or to those of their Sales Group.
- Please refer to the page describing the Person register here for full details about the Limited Access feature.
- Please refer to the page describing the Person register here for full details about the Limited Access feature.
- Total Incl. Room Package Items
- This is the same field as Total on the 'Pricing' card and so shows the total Room charge including Package Items: Total Stay + Package Items.
- Pay Separately
- If a Reservation is connected to a Group Reservation (i.e. if it is a Sub Reservation), it is likely that you will create Invoices from the Group Reservation for the main Guest Account (i.e. for the Customer in the Group Reservation). Guest Accounts in this Customer's name from each Sub Reservation will all be included in the same Invoice. If a Sub Reservation is to be invoiced separately, select this option in the relevant Reservation record. You will not be able to create the separate Invoice from the Group Reservation, only from the Sub Reservation in which you have selected the option.
- Last Charge Date
- The Last Charge Date will be updated whenever you add the Room charge, the Package Items and the Repetitive Items to the Reservation Guest Account(s). You can do this by selecting 'Charge Stay' or 'Charge Until Check Out Date' from the Operations menu (Windows/macOS) or Tools menu (iOS/Android) or by running the 'Nightly Maintenance' Maintenance function with the Charge Stay option selected.
- The Last Charge Date will be updated to tomorrow's date (if you used 'Charge Stay' or the 'Nightly Maintenance' function) or the Check Out Date (if you used 'Charge Until Check Out Date').
- The Last Charge Date serves two purposes:
- It provides a reminder of the date when you last added the Room charge, the Package Items and the Repetitive Items to the Reservation Guest Account(s).
- Whenever you add charges to the Reservation Guest Account(s), this date prevents the adding again of charges from previous dates that have already been added to the Guest Accounts(s).
- You should usually not modify this field.
- If you use the 'Repetitive Items' function to add Items to a Reservation that are to be charged daily to Guest Accounts, the Repetitive Items will only be added to Guest Accounts from the Last Charge Date onwards. Use the 'Add Items' function for previous dates if needed.
- The Last Charge Date will be updated to tomorrow's date (if you used 'Charge Stay' or the 'Nightly Maintenance' function) or the Check Out Date (if you used 'Charge Until Check Out Date').
- Tags/Objects
- Paste Special
Tag/Object register, Nominal Ledger/System module
- You can assign up to 20 Tags/Objects, separated by commas, to a Reservation. You might define separate Tags/Objects to represent different departments, cost centres or product types. This provides a flexible method of analysis that you can use in Nominal Ledger reports.
- Tags/Objects can be copied here from the connected Room, Room Type, Room Package and Booking Origin records and from the Contact records for the Customer, the Agent and the Branch.
- From the Reservation, these Tags/Objects will be copied to the Tags/Objects field on the 'Terms' card of the resulting Invoice and to the Tags/Objects field in each Invoice row.
- Tags/Objects can be copied here from the connected Room, Room Type, Room Package and Booking Origin records and from the Contact records for the Customer, the Agent and the Branch.
The Reservation register in Standard ERP:
- Introduction and Workflow
- The 'Reservations: Browse' Window
- Entering a Reservation, including:
- Header
- Booking card
- Pricing card
- Check In/Out card
- Guest card
- Other card
- Sub Res. card
- Currency card
- Header
- Guest Accounts (Folios)
- Adding and Managing Items on Guest Accounts (Folio Items)
- Work in Progress (WIP)
- Operations Menu
- Create Menu
- Home page for Hotel module manual
- Home page for Standard ERP manual
Entering a Reservation - Sub Res. Card
This page describes the fields on the 'Sub Res.' card in the Reservation record window. Please follow the links below for descriptions of the other parts of the Reservation record window:- Header
- Booking card
- Pricing card
- Check In/Out card
- Guest card
- Other card
- Sub Res. card
- Currency card
If a Reservation is a Group Reservation, the main part of the 'Sub Res.' card will list the Sub Reservations that are part of the Group. A Sub Reservation is a Reservation in which the Group field in the header contains the Reservation Number of a Group Reservation.
You can add new Sub Reservations to a Reservation by selecting 'Sub Reservation' from the Create menu (Windows/macOS) or + menu (iOS/Android). The Reservation from which you create the Sub Reservation does not need to be a Group Reservation, and you can convert it into a Group Reservation using the 'Create Group Reservations from Mother Reservations' Maintenance function.
Please refer here for details about Group Reservations.
- Due Text
- This is the same field as Additional Comment on the 'Check In/Out' card.
The Reservation register in Standard ERP:
- Introduction and Workflow
- The 'Reservations: Browse' Window
- Entering a Reservation, including:
- Header
- Booking card
- Pricing card
- Check In/Out card
- Guest card
- Other card
- Sub Res. card
- Currency card
- Header
- Guest Accounts (Folios)
- Adding and Managing Items on Guest Accounts (Folio Items)
- Work in Progress (WIP)
- Operations Menu
- Create Menu
- Home page for Hotel module manual
- Home page for Standard ERP manual
Entering a Reservation - Currency Card
This page describes the fields on the 'Currency' card in the Reservation record window. Please follow the links below for descriptions of the other parts of the Reservation record window:- Header
- Booking card
- Pricing card
- Check In/Out card
- Guest card
- Other card
- Sub Res. card
- Currency card

- Currency
- Paste Special
Currency register, System module
- Default taken from Contact record for the Customer (Sales Currency) or Default Base Currency
- The Currency of the Reservation is shown together with the exchange rate, which you can change in an individual Reservation if necessary. Leave the field blank to use your home Currency (unless you have set a Default Base Currency, in which case this will be offered as a default and should be treated as your home Currency).
- If you change the Currency, prices in the Reservation will be recalculated automatically, and so will the prices of any charges and Items you have already charged to Guest Accounts.
- The Currency of the Reservation is shown together with the exchange rate, which you can change in an individual Reservation if necessary. Leave the field blank to use your home Currency (unless you have set a Default Base Currency, in which case this will be offered as a default and should be treated as your home Currency).
- Exchange Rates
- Default taken from
Base Currency Rates setting and/or Exchange Rate register, System module
- By default, these fields will display the exchange rates for the specified Currency on the Check In Date.
- If you change the Check In Date, the exchange rates will change automatically. Prices in the Reservation will be recalculated automatically, and so will the prices of any charges and Items you have already charged to Guest Accounts.
- You can also change the exchange rates in an individual Reservation yourself. Again, all prices will be updated.
- One of two conversion methods will be used to calculate prices in Currency. The Dual-Base system will be useful for companies that have offices in two countries that need to report in both Currencies, for companies operating in countries where there is a second Currency (usually the US Dollar or Euro) in common use in addition to the national one, and for companies in the Euro zone who retain their old national Currency for comparison purposes. The second method is a simple conversion from the foreign Currency to the home Currency, applicable to the majority of worldwide Currency transactions. These are described below.
- Exchange Rates (Dual-Base System)
- In the example illustrated above, the Currency of the Reservation is the Euro. Base Currency 1 is the home Currency (GBP, Pounds Sterling) and Base Currency 2 is the Euro. The fields on the left show in the form of a ratio the exchange rate between the two base Currencies (taken from the record in the Base Currency Rates setting that applies on the Check In Date). The illustration shows that GBP 0.89715 buys one Euro.
- Note that European Monetary Union (EMU) regulations specify that the ratios must always show how many units of the home or foreign Currency can be bought with one Euro.
- Note that European Monetary Union (EMU) regulations specify that the ratios must always show how many units of the home or foreign Currency can be bought with one Euro.
- Exchange Rates (Simple Currency Conversion System)
- In the case of a simple currency conversion system, the Rate and right-hand Base Currency 1 fields are used to show a simple exchange rate between the foreign and home Currencies. In the example illustrated below, the home Currency is US Dollars (USD) and the foreign Currency Japanese Yen (JPY). JPY 136.727 buys USD 1.00.

- Please refer here for more examples.
- If you change the Check In Date, the exchange rates will change automatically. Prices in the Reservation will be recalculated automatically, and so will the prices of any charges and Items you have already charged to Guest Accounts.
The Reservation register in Standard ERP:
- Introduction and Workflow
- The 'Reservations: Browse' Window
- Entering a Reservation, including:
- Header
- Booking card
- Pricing card
- Check In/Out card
- Guest card
- Other card
- Sub Res. card
- Currency card
- Header
- Guest Accounts (Folios)
- Adding and Managing Items on Guest Accounts (Folio Items)
- Work in Progress (WIP)
- Operations Menu
- Create Menu
- Home page for Hotel module manual
- Home page for Standard ERP manual
Guest Accounts (Folios)
A Guest Account (also known as a "Folio") is a list of the charges incurred by a Guest during the course of a Reservation. The charges on a Guest Account will include Room charges, Package Items, Repetitive Items and any other Items purchased by the Guest.Every Guest that you list in a Reservation (on the 'Guest' card) will automatically be given their own Guest Account. If the Customer in a Reservation is not one of the Guests, they will also be given a Guest Account automatically, as will the Agent.
You can add charges to a Guest Account at any time during the life of a Reservation, including before check-in (but not after check-out). This allows you to create an Invoice for the full Room charge in advance of checking in if necessary. Please refer to the Adding and Managing Items on Guest Accounts (Folio Items) page for details about adding charges to Guest Accounts.
Before being able to check a Reservation out, you will need to create Invoices for each Guest Account that is not empty. Please refer here for full details about this process.
Take care if you will be issuing Down Payment Invoices. The Customer in the Down Payment Invoice will be the Agent in the Reservation (if you clicked or tapped in the Agent field before creating the Down Payment) or the Customer in the Reservation or, if there is no Customer, the first Guest listed on the 'Guest' card (otherwise). As the value of a Down Payment Invoice will be deducted from the final Invoice, be sure to assign the charges to the correct Guest Account(s) before creating the final Invoice(s), so that the Down Payment value will be correctly and fully deducted.
You can check the contents of the Guest Accounts in a Reservation at any time, by opening the Reservation and pressing the [Show Account] button. This will print a Show Account report to screen. When you first create a Reservation and before you have added any charges to the Guest Accounts, the Show Account report will simply list the Guest Accounts:
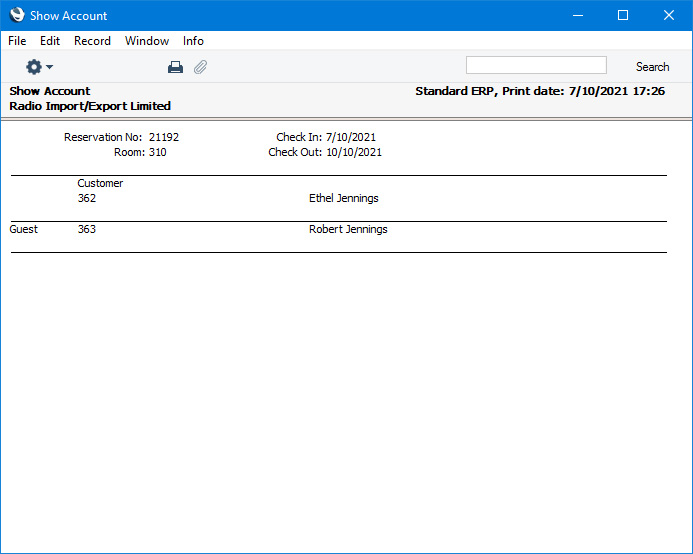
As you add charges to the Guest Accounts, they will be included in the Show Account report:
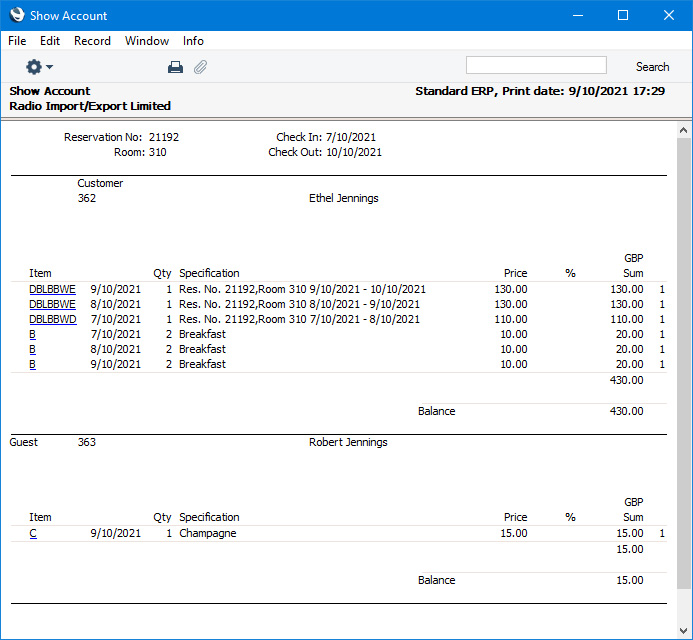
After invoicing, the charges will be removed from the Show Account report, to be replaced by details of the Invoice(s):
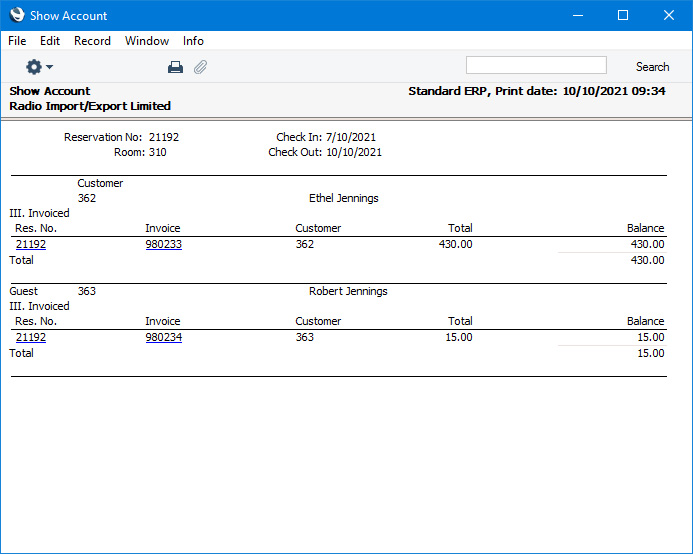
If you need the Show Account report only to include a single Guest Account, click (Windows/macOS) or tap (iOS/Android) in the Agent or Customer field or in one of the rows on the 'Guest' card before pressing the [Show Account] button. The report will then only include the Guest Account of the Agent, Customer or selected Guest respectively.
If you need to prevent any users from being able to use the [Show Account] button, assign them to an Access Group in which you have denied access to the 'Reservation: Display Account' Action.
---
The Reservation register in Standard ERP:
- Introduction and Workflow
- The 'Reservations: Browse' Window
- Entering a Reservation
- Guest Accounts (Folios)
- Adding and Managing Items on Guest Accounts (Folio Items)
- Work in Progress (WIP)
- Operations Menu
- Create Menu
- Home page for Hotel module manual
- Home page for Standard ERP manual
Adding and Managing Items on Guest Accounts (Folio Items)
This page describes the various methods you can use to add charges and Items to Guest Accounts, to move Items between Guest Accounts and to remove Items from Guest Accounts. Please refer to the Guest Accounts (Folios) page for other details about Guest Accounts.Behind the scenes, whenever you add a Room charge or an Item to a Guest Account, this will be accomplished by the addition of a record to the Shopping Basket register. This register is visible in the Webshop module. When you create an Invoice from a Reservation, the Invoice will be constructed using the relevant Shopping Basket records (i.e. the Shopping Basket records for the Reservation and for the Customer or Guest being invoiced), and the Invoice Number will be copied to those Shopping Basket records.
Adding Charges and Items to Guest Accounts
You can add Room charges together with any Package Items to Guest Accounts using the following methods:
- To add the Room charge and Package Items for an individual Reservation for the current day to a Guest Account, open the Reservation and select 'Charge Stay' from the Operations (Windows/macOS) or Tools (iOS/Android) menu. This function will not usually add Room charges and Package Items for previous days to the Guest Account, but it will do so if you did not run the function on those previous dates. It will not add Room charges and Package Items for future days to the Guest Account.
- To add the Room charge and Package Items for an individual Reservation for the entire duration of the stay to a Guest Account, open the Reservation and select 'Charge Until Check Out Date' from the Operations or Tools menu.
- Running the 'Nightly Maintenance' Maintenance function with the Charge Stay option selected will in effect run the 'Charge Stay' function (method 1 above) for each Reservation. It will only run the 'Charge Stay' function for Rooms belonging to Room Types in which the Charge option is "Automatic". If the Charge option in a Room Type is "Manual" or "At Start" you will need to use methods 1 or 2 above. If you will use the 'Nightly Maintenance' function at the end of every day, it is recommended that you choose "Automatic" as the Charge option for each Room Type. This will ensure that Guest Accounts are updated daily with Room charge and Package Items.
You can add additional Items to a Guest Account using the following methods:
- To add Items that are one-off purchases to a Guest Account, open the relevant Reservation and select 'Add Items' from the Operations or Tools menu. The Items will be added to the Guest Account immediately.
- To add Items that will be purchased repeatedly to a Guest Account, open the relevant Reservation and select 'Repetitive Items' from the Operations or Tools menu. In this case, the Items will not be added to the Guest Account immediately: this will be done when you next run one of the functions described in steps 1-3 above.
If you are using methods 1 or 3 above to add charges to Guest Accounts on a daily basis, a Repetitive Item will only be added from the date when you created it, not for any previous dates that have already been charged. Use 'Add Items' for previous dates if needed. If you have used 'Charge Until Check Out Date', you will only be able to use 'Add Items' to add additional Items to the Guest Account.
- You can add Bar Tabs and POS Invoices to Guest Accounts providing you have added "On Hotel Guest Account" buttons to the Bar Tab and POS Invoice windows. The Items will be added to the Guest Account when you press the "Finish" button in the Bar Tab or POS Invoice.
If you need to prevent individual Guests from being able to add Bar Tabs and POS Invoices to their Guest Accounts, open the Reservation, go to the 'Guest' card and set the Bar Tabs field in the relevant rows to "Do not allow".
Choice of Guest Account
Methods 1-3 above will add Room charges and Package Items to Guest Accounts as follows:- If you have specified an Agent in a Reservation, the Room charge and the Package Items will be added to the Agent's Guest Account or the Customer's Guest Account as follows:
- If you have selected the Charge Reservations to Agent option on the 'Defaults' card in the Hotel Settings setting, the Room charge and the Package Items will be added to the Agent's Guest Account.
- If you have not selected the Charge Reservations to Agent option, the Room charge and the Package Items will be added to the Customer's Guest Account (if you have specified a Customer in the Reservation) or to the Guest Account of the first Guest listed on the 'Guest' card.
- If you have selected the Charge Reservations to Agent option on the 'Defaults' card in the Hotel Settings setting, the Room charge and the Package Items will be added to the Agent's Guest Account.
- If you have not specified an Agent in a Reservation, the Room charge and the Package Items will be added to the Customer's Guest Account (if you have specified a Customer in the Reservation) or to the Guest Account of the first Guest listed on the 'Guest' card.
You will be able to specify the Guest Account when using methods 4-6.
Inspecting Guest Accounts
If you need to inspect a Guest Account, open the relevant Reservation in a record window and press the [Show Account] button. A Show Account report will be printed to screen, showing the contents of each Guest Account in the Reservation. Please refer here for more details about this report.
Moving, Changing and Removing Charges and Items from Guest Accounts
If you add a charge or Item to the wrong Guest Account, you can move it to the correct one by opening the Reservation and selecting 'Redistribute Folio Items' from the Operations or Tools menu.
If a Guest would like more than one Guest Account i.e. the Guest would like more than one Invoice, again use the 'Redistribute Folio Items' function to create the new Guest Account and to move charges or Items to it.
If you need to change an Item on a Guest Account (e.g. you need to change the quantity) or remove an Item from a Guest Account, follow these steps:
- Open the Reservation in a record window and press the [Show Account] button. A Show Account report will be printed to screen, showing the contents of each Guest Account in the Reservation:
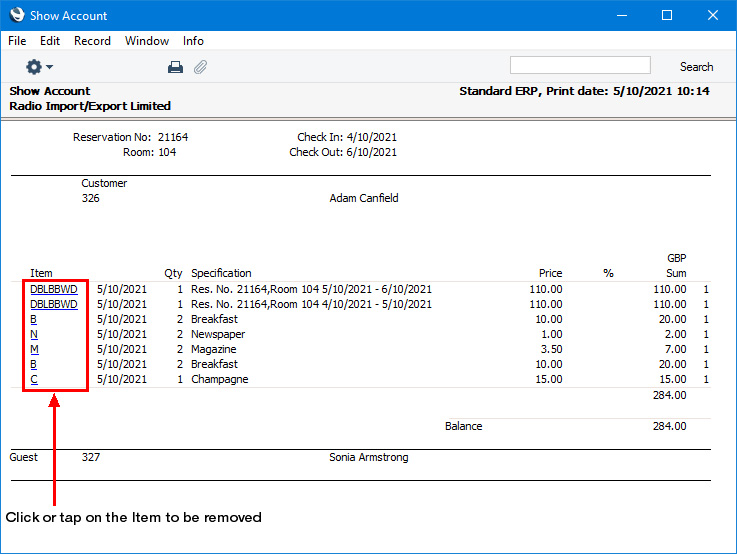
- Click or tap on the Item Number of the Item that is to be edited or removed. The Item will be opened in an 'Account Item: Inspect' window.
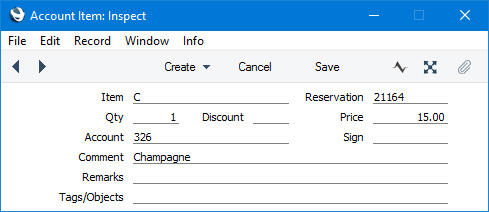
- To edit the Item, make the necessary changes and press the [Save] button (Windows/macOS) or tap √ (iOS/Android). If you need to prevent users from changing the Qty or Discount, assign them to an Access Group in which you have denied access to the 'Change Prices' Action. The Signature of the user editing the record will be copied to the Sign field.
- To delete the Item, select 'Delete' from the Record menu (which has a 'cog' icon if you are using iOS or Android). You will only be able to delete an Item if you have logged in as a Global User or Person belonging to an Access Group with Full access to the 'Deleting Records' Action.
- You can also open the 'Account Item: Inspect' window from the Folio Journal and Guest Folios reports when printed to screen by drilling down from a date or from an Item Number respectively. Again you can edit or delete an Item as described in steps iii and iv.
The Reservation register in Standard ERP:
- Introduction and Workflow
- The 'Reservations: Browse' Window
- Entering a Reservation
- Guest Accounts (Folios)
- Adding and Managing Items on Guest Accounts (Folio Items)
- Work in Progress (WIP)
- Operations Menu
- Create Menu
- Home page for Hotel module manual
- Home page for Standard ERP manual
Work in Progress
At the end of a day, a hotel considers all services used that day, including Room charges, as income for that day, regardless of whether they have been invoiced. Reports should include this income, to allow there to be a clear picture of the income realised on a particular day.
For example, a Guest checks in and will stay for five days. In normal circumstances, if an Invoice is not raised until the Guest checks out, the revenue raised from the stay will not be recorded until the Check Out date. However, the hotel will require revenue to be recorded daily. The revenue for a particular day will include the Room charge for the day, Bar Tabs and all services that are chargeable to the Guest. These are all services that are considered to be sold on the day.
The Work in Progress feature allows daily sales (i.e. daily sales that have not been invoiced yet) to be recorded in the Nominal Ledger. You can create Work in Progress Transactions using the 'Nightly Maintenance' Maintenance function. This function will create a Transaction posting a day's uninvoiced sales on the day in question, and a second Transaction dated a day later reversing those postings. In the example of a five-day stay, the first running of the 'Nightly Maintenance' function will post the first day's Room charge and services, the second running of the function will post the first and second days' Room charges and services and so on.
To configure the Work in Progress feature, follow these steps:
- Specify Hotel WIP A/Cs for each Item and/or Item Group (on the 'A/C' card in both cases). These Accounts will be credited with the value of each day's sales in the WIP Transaction created at the end of each day, and debited in the reverse WIP Transaction created for the next day. The Account for each Item will be used but if an Item doesn't have an Account the Account for the Item Group will be used.
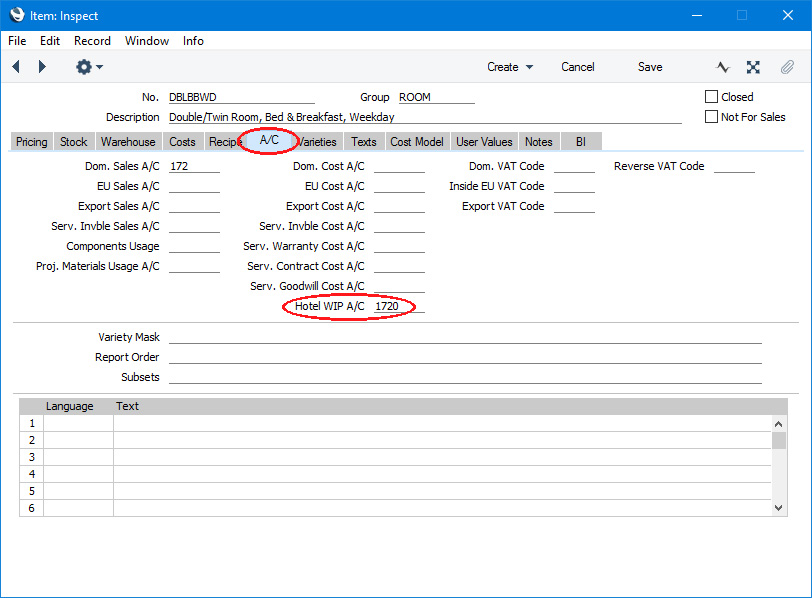
- Specify Hotel WIP A/Cs for each VAT Code (on flip E of the VAT Codes setting). These Accounts will be credited with the value of each day's VAT in the WIP Transaction created at the end of each day, and debited in the reverse WIP Transaction created for the next day. If you do not specify a Hotel WIP A/C for a VAT Code, the Outp A/C for that VAT Code will be used instead.
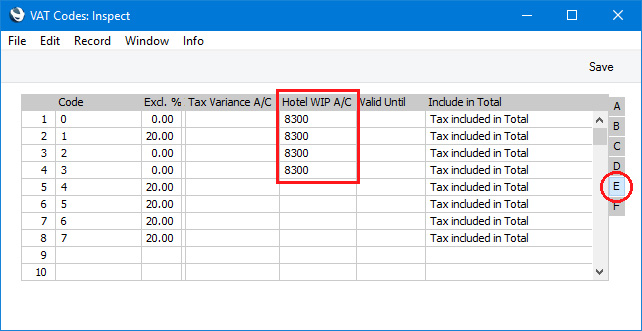
- Specify a WIP N/L Control A/C in the Hotel Settings setting ('Invoicing' card). This Account will be debited with the value of each day's sales and VAT in the WIP Transaction created at the end of each day, and credited in the reverse WIP Transaction created for the next day. This Account will also be used in the event that there is no Hotel WIP A/C specified for an individual Item or Item Group as described in step 1.
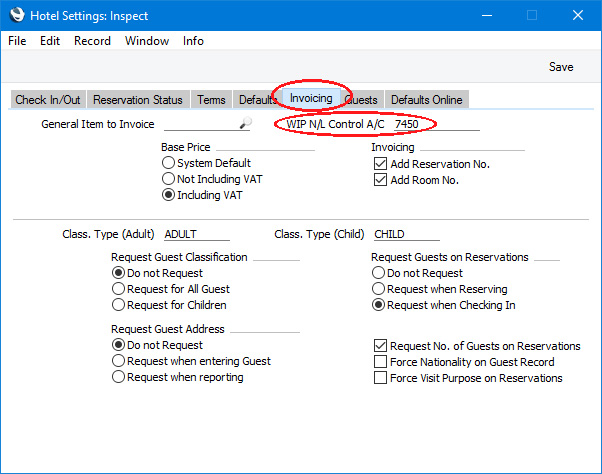
- If you need WIP Transactions to include a particular Text, specify that Text in the Nightly Maintenance setting:
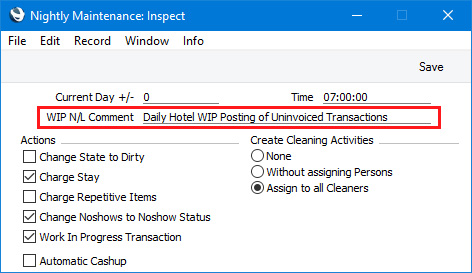
At the end of each day, run the 'Nightly Maintenance' function with the Work In Progress Transaction option selected:
This will create two WIP Transactions for any uninvoiced Items in Guest Accounts: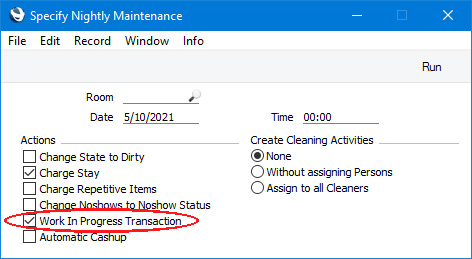
- The first Transaction will be dated for the day when you run the function. This will credit uninvoiced sales to the Hotel WIP A/Cs specified in the Item and Item Group records as described in step 1 above and the VAT to the Hotel WIP A/Cs specified in the VAT Codes (step 2) and debit the WIP N/L Control A/C specified in the Hotel Settings setting:
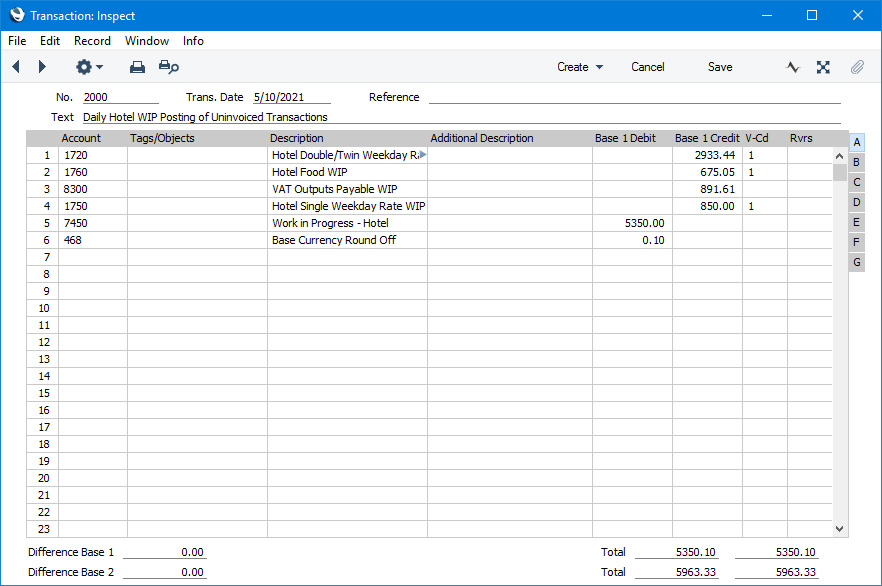
- The second Transaction will be dated the next day and will be the reverse of the first:
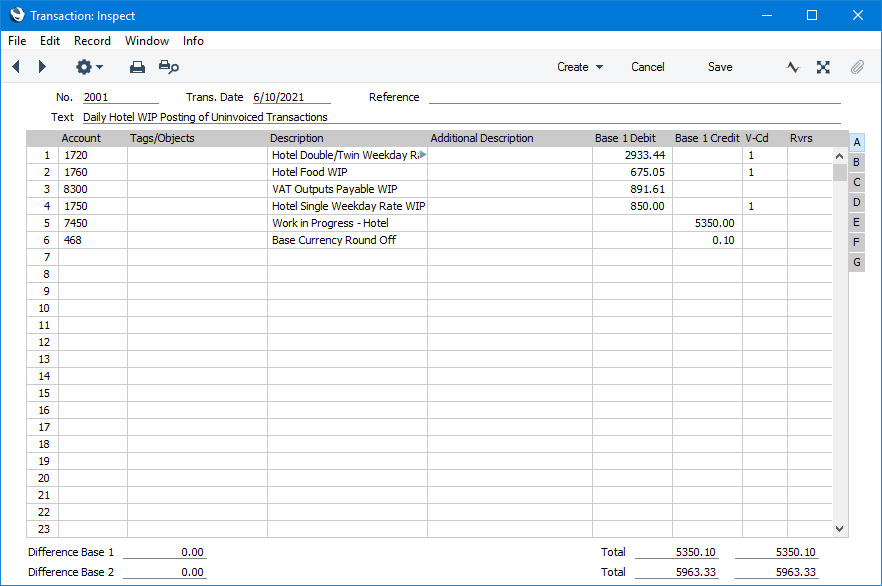
---
The Reservation register in Standard ERP:
- Introduction and Workflow
- The 'Reservations: Browse' Window
- Entering a Reservation
- Guest Accounts (Folios)
- Adding and Managing Items on Guest Accounts (Folio Items)
- Work in Progress (WIP)
- Operations Menu
- Create Menu
- Home page for Hotel module manual
- Home page for Standard ERP manual
Operations Menu - Reservations
The Operations menus for Reservations are shown above. On the left is the Operations menu for the 'Reservations: Browse' window, and on the right is the Operations menu for the 'Reservation: New' and 'Reservation: Inspect' windows.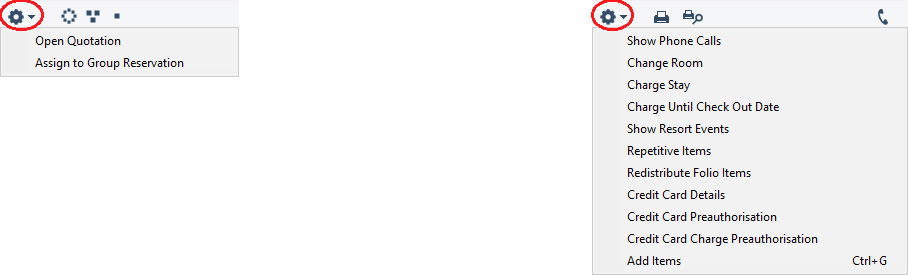
If you are using Windows or macOS, you can open the Operations menu by clicking the button with the 'cog' icon (shown highlighted in the illustration above). If you are using iOS or Android, you can access the Operations menu functions through the Tools menu (with 'wrench' icon).
Before using the functions on the Operations menu in the 'Reservations: Browse' window, you should highlight a record or records in the browse window. The function will then be applied to that record or records. If you are using Windows or macOS, you can highlight several Reservations in the list by holding down the Shift key while clicking. If you need to apply a function to a number of Reservations that aren't in a range, highlight them while holding the Ctrl (Windows) or ⌘ (macOS) keys before selecting the function. If you are using iOS or Android, you can highlight a single record in the browse window by searching for it, so you can only apply these functions to a single record at a time.
Please follow the links below for details about each function on the Operations menu:
- Open Quotation
- Assign to Group Reservation
- Change Room
- Charge Stay, Charge Until Check Out Date
- Repetitive Items
- Redistribute Folio Items
- Add Items
The Reservation register in Standard ERP:
- Introduction and Workflow
- The 'Reservations: Browse' Window
- Entering a Reservation
- Guest Accounts (Folios)
- Adding and Managing Items on Guest Accounts (Folio Items)
- Work in Progress (WIP)
- Operations Menu
- Create Menu
- Home page for Hotel module manual
- Home page for Standard ERP manual
Operations Menu - Reservations - Open Quotation
This page describes the 'Open Quotation' function on the Operations menu in the 'Reservations: Browse' window. If you are using iOS or Android, the 'Open Quotation' function is on the Tools menu.
---
When viewing the 'Reservations: Browse' window, you can use the 'Open Quotation' function if you need to open the Reservation Quotation from which a Reservation was created.
To use this function, first highlight a Reservation and then select 'Open Quotation' from the Operations menu (Windows/macOS) or Tools menu (iOS/Android). If you are using iOS or Android, you can highlight a Reservation in the browse window by searching for it. The Reservation Quotation record will be opened in a new window. If the Reservation that you highlighted was not created from a Reservation Quotation, selecting the function will have no effect. If you highlighted more than one Reservation, the Quotation that created the first highlighted Reservation will be opened.
Please refer here for full details about the Reservation Quotation register.
---
The Reservation register in Standard ERP:
- Introduction and Workflow
- The 'Reservations: Browse' Window
- Entering a Reservation
- Guest Accounts (Folios)
- Adding and Managing Items on Guest Accounts (Folio Items)
- Work in Progress (WIP)
- Operations Menu, including:
- Open Quotation
- Assign to Group Reservation
- Change Room
- Charge Stay, Charge Until Check Out Date
- Repetitive Items
- Redistribute Folio Items
- Add Items
- Open Quotation
- Create Menu
- Home page for Hotel module manual
- Home page for Standard ERP manual
Operations Menu - Reservations - Assign to Group Reservation
This page describes the 'Assign to Group Reservation' function on the Operations menu in the 'Reservations: Browse' window. If you are using iOS or Android, the 'Assign to Group Reservation' function is on the Tools menu.
---
A Group Reservation is a special type of Reservation that you can use to gather several individual Reservations together for administrative purposes such as checking in, invoicing and checking out. For example, a family may create two Reservations to hire two Rooms for the parents and for the children. You can assign these two Reservations to a third Reservation (a "Group Reservation"), so that they will be invoiced together. They can be checked in together or separately, and checked out together or separately. The two Room Reservations will then become "Sub Reservations".
If you need to assign an existing Reservation to an existing Group Reservation, you can do so using the following methods:
- Open the Reservation in a record window and enter the Reservation Number of the Group Reservation in the Group field:
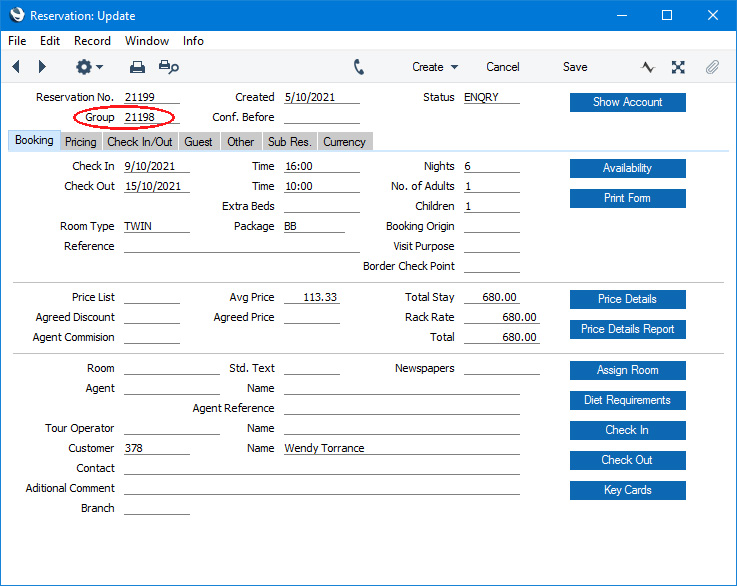
- Open the Group Reservation in a record window and choose 'Add Sub Reservation' from the Create menu (Windows/macOS) or + menu (iOS/Android). The 'Add Sub Reservation' function is described here.
- If the Reservation has already been assigned to a Group, open that Group Reservation in a record window, highlight the Reservation on the 'Reservations' card and select 'Move Sub Reservation' from the Operations or Tools menu. The 'Move Sub Reservation' function is described here.
- Highlight the Reservation in the 'Reservations: Browse' window and then select 'Assign to Group Reservation' from the Operations menu (Windows/macOS) or Tools menu (iOS/Android).
If you are using Windows or macOS, you can use this function to assign several Reservations to the Group Reservation at one stroke. Highlight a number of Reservations in the browse window and select the function. To highlight a range of Reservations, click the top one in the range and then hold down the Shift key and click the last one. If you need to apply the function to a number of Reservations that aren't in a range, highlight them while holding the Ctrl (Windows) or ⌘ (macOS) keys before selecting the function.
If you are using iOS or Android, you can only highlight a single Reservation at a time, by searching for it, so you can only assign a single Reservation to a Group Reservation at a time.
If you are using the last method, selecting the 'Assign to Group Reservation' function will cause the following window to open:
Use 'Paste Special' to enter the Reservation Number of the Group Reservation and press the [Run] button. The Reservation(s) that you highlighted in the browse window will be assigned to the Group Reservation immediately.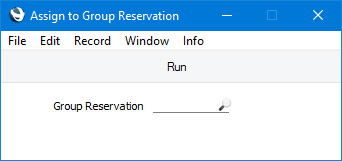
---
The Reservation register in Standard ERP:
- Introduction and Workflow
- The 'Reservations: Browse' Window
- Entering a Reservation
- Guest Accounts (Folios)
- Adding and Managing Items on Guest Accounts (Folio Items)
- Work in Progress (WIP)
- Operations Menu, including:
- Open Quotation
- Assign to Group Reservation
- Change Room
- Charge Stay, Charge Until Check Out Date
- Repetitive Items
- Redistribute Folio Items
- Add Items
- Open Quotation
- Create Menu
- Home page for Hotel module manual
- Home page for Standard ERP manual
Operations Menu - Reservation - Change Room
This page describes the 'Change Room' function on the Operations menu in the Reservation record window. If you are using iOS or Android, the 'Change Room' function is on the Tools menu.
---
After a Reservation has checked in, you will not be able to change the Room (or the Room Type) in that Reservation. If the Guests need to move to another Room, you will need to use the 'Change Room' function. This function will create a new Reservation from the moment of the change, and any Guest Accounts will be moved to the new Reservation. The original Reservation will become a Sub Reservation of the new one.
To move Guests from one Room to another, follow these steps:
- Open the Reservation for the original Room in a record menu.
- Choose 'Change Room' from the Operations menu (Windows/macOS) or Tools menu (iOS/Android). The following window opens:
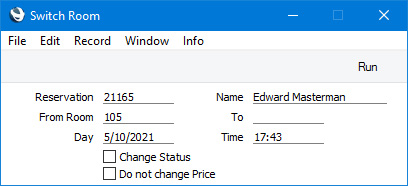
- To
- Paste Special
Room register, Hotel module
- Specify the new Room here.
- Day, Time
- Specify the date and time when the Guests will change to the new Room. By default these fields will contain the current date and time.
- Change Status
- Select this option if you would like the Status of the Reservation for the original Room to be changed to the Check Out Status specified in the Hotel Settings setting. It is usually recommended that you select this option.
- Do not change Price
- Select this option if you would like the Room rate for the original Room to be applied to the new Room. The Agreed Price or, if blank, the Average Price from the Reservation for the original Room will be transferred to the Agreed Price field in the Reservation for the new Room.
- A Reservation will usually contain an Agreed Price if you have agreed a special rate with the Customer. If a Reservation has an Agreed Price, you will usually need to select this Do not change Price option when changing Rooms. You should also select this option if the new Room is of a different Room Type and so usually attracts different rates but you need to preserve the pricing.
- To
- When you press the [Run] button, the following changes will be made:
- A Reservation for the new Room will be created. This will be a duplicate of the original Reservation, with the exception that it will start from the date and time that you specified when you ran the function.
- The Reservation Number of the new Reservation will be copied to the Group field in the Reservation for the original Room. If you selected the Change Status option, the Status of this Reservation will be updated to the Check Out Status specified in the Hotel Settings setting.
- All Guest Accounts will be moved from the original Reservation to the new one.
- The Status of the original Room will be changed to the Dirty Status specified in the Hotel Settings setting.
- A Reservation for the new Room will be created. This will be a duplicate of the original Reservation, with the exception that it will start from the date and time that you specified when you ran the function.
As the Guest Accounts will be transferred to the Reservation for the new Room, the future Room charges and other Items will be added to the existing Guest Accounts. The Invoices that you create from the Reservation for the new Room will include all charges from the original Reservation. Although the Reservation Number of the new Reservation will be copied to the Group field in the Reservation for the original Room and the new Reservation is therefore to some extent a Group Reservation, do not convert it to a full Group Reservation using the 'Create Group Reservations from Mother Reservations' Maintenance function because this will break the continuity in the Guest Accounts.
---
The Reservation register in Standard ERP:
- Introduction and Workflow
- The 'Reservations: Browse' Window
- Entering a Reservation
- Guest Accounts (Folios)
- Adding and Managing Items on Guest Accounts (Folio Items)
- Work in Progress (WIP)
- Operations Menu, including:
- Open Quotation
- Assign to Group Reservation
- Change Room
- Charge Stay, Charge Until Check Out Date
- Repetitive Items
- Redistribute Folio Items
- Add Items
- Open Quotation
- Create Menu
- Home page for Hotel module manual
- Home page for Standard ERP manual
Operations Menu - Reservation - Charge Stay, Charge Until Check Out Date
This page describes the 'Charge Stay' and 'Charge Until Check Out Date' functions on the Operations menu in the Reservation record window. If you are using iOS or Android, the 'Charge Stay' and 'Charge Until Check Out Date' functions are on the Tools menu.
---
The 'Charge Stay' and 'Charge Until Check Out Date' functions allow you to add the Room charge, the Package Items and the Repetitive Items to the Reservation Guest Account(s). The difference between the two functions is as follows:
- The 'Charge Stay' function will add charges up to the current date to the Guest Account(s) (up to the current date and time if the Room is being charged hourly). This allows you to build the Guest Account(s) periodically (usually daily), as charges from previous days will not be added again.
- The 'Charge Until Check Out Date' function will add all charges up to the Check Out Date to the Guest Account(s), even if the Check Out Date is in the future.
If you are using the Work in Progress feature, it is recommended that you use the 'Charge Stay' function. This will ensure that the uninvoiced services that you have sold on a particular day (and previous days) will be recorded as work in progress in the Nominal Ledger. If you use the 'Charge Until Check Out Date' function before the Check Out Date, you risk including future sales in the work in progress posting.
If you need to run the 'Charge Stay' function for all Reservations in a batch, run the 'Nightly Maintenance' Maintenance function with the Charge Stay option selected. The Charge Stay option will add Room charges, Package Items and Repetitive Items to the Guest Account(s) as previously mentioned. Although the 'Nightly Maintenance' function has a separate Charge Repetitive Items option, you will usually not need to select it together with the Charge Stay option because Repetitive Items will then be added to the Guest Account(s) twice.
You can also run the 'Charge Stay' and 'Charge Until Check Out Date' functions from a Group Reservation, in which case they will be run for all Reservations in the Group.
If you have specified an Agent in a Reservation, the Room charge and the Package Items will be added to the Agent's Guest Account or the Customer's Guest Account as follows:
- If you have selected the Charge Reservations to Agent option on the 'Defaults' card in the Hotel Settings setting, the Room charge and the Package Items will be added to the Agent's Guest Account.
- If you have not selected the Charge Reservations to Agent option, the Room charge and the Package Items will be added to the Customer's Guest Account (if you have specified a Customer in the Reservation) or to the Guest Account of the first Guest listed on the 'Guest' card.
Repetitive Items will be added to the Guest Account that you specified when adding them to the Reservation.
If the 'Charge Stay' and 'Charge Until Check Out Date' functions do not update the Guest Account(s) from a Reservation when expected, the probable reason is that the Status of the Reservation is the Check Out Status specified on the 'Check In/Out' card in the Hotel Settings setting or the No Show Status specified on the 'Reservation Status' card in the same setting.
If the Charge Stay option in the 'Nightly Maintenance' function does not update the Guest Account(s) from a Reservation when expected, the probable reasons are:
- The Status of the Reservation is not the Check In Status specified on the 'Check In/Out' card in the Hotel Settings setting.
- The Charge option in the Room Type specified in the Reservation is "Manual" or "At Start".
---
The Reservation register in Standard ERP:
- Introduction and Workflow
- The 'Reservations: Browse' Window
- Entering a Reservation
- Guest Accounts (Folios)
- Adding and Managing Items on Guest Accounts (Folio Items)
- Work in Progress (WIP)
- Operations Menu, including:
- Open Quotation
- Assign to Group Reservation
- Change Room
- Charge Stay, Charge Until Check Out Date
- Repetitive Items
- Redistribute Folio Items
- Add Items
- Open Quotation
- Create Menu
- Home page for Hotel module manual
- Home page for Standard ERP manual
Operations Menu - Reservation - Repetitive Items
This page describes the 'Repetitive Items' function on the Operations menu in the Reservation record window. If you are using iOS or Android, the 'Repetitive Items' function is on the Tools menu.
---
The 'Repetitive Items' function allows you to add Items to a Reservation that are to be charged daily to Guest Accounts. If you need to add Items that are to be charged occasionally or only once, use the 'Add Items' function.
To add Repetitive Items to Guest Accounts, follow these steps:
- Open the Reservation in a record window.
- Select 'Repetitive Items' from the Operations menu (Windows/macOS) or Tools menu (iOS/Android). The following window appears:
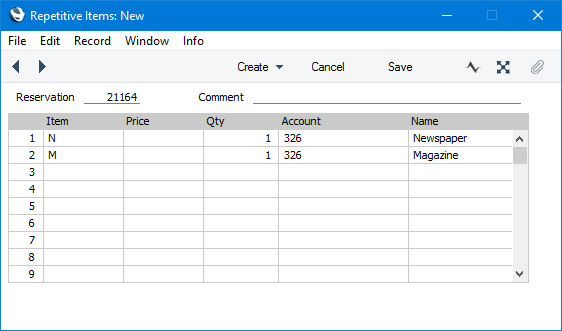
- Reservation
- The Reservation Number will be placed here and cannot be changed.
- Comment
- Add any comment about the Repetitive Items or Reservation here as necessary.
Use the matrix to list the Repetitive Items that are required by the Guests in the Reservation.
- Item
- Paste Special
Item register
- Specify the Item.
- Price
- Leave this field empty if the Item is to be charged to the Guest at its usual sales price (i.e. its Price in the Price List in the Reservation or its Base Price), or enter a price if the Item is to be charged at a special price.
- If you enter a price, it should be in the Currency of the Reservation, and it should include VAT if the Price List in the Reservation is one that is Inclusive of VAT or if you have specified on the 'Invoicing' card of the Hotel Settings setting that Base Prices include VAT.
- If you enter a price, it should be in the Currency of the Reservation, and it should include VAT if the Price List in the Reservation is one that is Inclusive of VAT or if you have specified on the 'Invoicing' card of the Hotel Settings setting that Base Prices include VAT.
- Qty
- Specify the quantity of the Item that you will supply on a daily basis.
- Account
- Paste Special
Customer, Agent, Guests and any additional Guest Accounts in the Reservation
- Choose the Guest Account to which the Item is to be added.
- Name
- The Name of the Item specified in the Item field will be copied here.
- Reservation
- Press [Save] (Windows/macOS) or √ (iOS/Android) to save the Repetitive Item record.
- The next step is to add the Repetitive Items to the Guest Account(s). To do this, use one of the following methods (it is likely that you will regularly be using these functions to add Room charges to Guest Accounts, so there will usually be no need to carry out this step solely for Repetitive Items):
- Choose 'Charge Stay' from the Operations or Tools menu in the Reservation. The first time you choose this option in a Reservation, Repetitive Items (and Room charges and Package Items) will be added to the Guest Account(s) for each day from the Check In Date to the current date. On subsequent occasions, Repetitive Items will be added to the Guest Account(s) for each day from the previous date to the current date.
- Choose 'Charge Until Check Out Date' from the Operations or Tools menu in the Reservation. Repetitive Items will be added to the Guest Account(s) for each day from the Check In Date to the Check Out Date.
- Run the 'Nightly Maintenance' Maintenance function with the Charge Stay option selected. This will in effect run the 'Charge Stay' function from option i for each checked-in Reservation.
If you are using the Work in Progress feature, it is recommended that you use options i or iii. These options will ensure that the uninvoiced Items that you have sold on a particular day (and previous days) will be recorded as work in progress in the Nominal Ledger. If you use the 'Charge Until Check Out Date' function before the Check Out Date, you risk including future sales in the work in progress posting.
- Choose 'Charge Stay' from the Operations or Tools menu in the Reservation. The first time you choose this option in a Reservation, Repetitive Items (and Room charges and Package Items) will be added to the Guest Account(s) for each day from the Check In Date to the current date. On subsequent occasions, Repetitive Items will be added to the Guest Account(s) for each day from the previous date to the current date.
- You can edit the Repetitive Items in a Reservation at any time, using one of the following methods:
- Open the Reservation in a record window and select 'Repetitive Items' from the Operations or Tools menu as described in steps 1 and 2 above.
- Open the Repetitive Items setting in the Hotel module and open the record for the Reservation.
You can add, amend or remove Repetitive Items as necessary.
If you are using methods 4 i or 4 iii to add Repetitive Items to the Guest Account(s), the next time you do so the changes you make will be taken into account. For example, if you add an extra Repetitive Item to a Reservation on the third day, that Repetitive Item will be added to the Guest Account from that day onwards, but it will not be added for the first and second days. Use the 'Add Items' function for the first and second days if needed. If you remove a Repetitive Item on the third day, that Repetitive Item will no longer be added to the Guest Account from that day onwards.
If you are using method 4 ii and you ran the 'Charge Until Check Out Date' function towards the beginning of a stay, the Guest Account will be judged to be complete so no further Repetitive Item will be added by any subsequent running of the function. Again, use the 'Add Items' function instead. If you run the 'Charge Until Check Out Date' function towards the end of a stay, all Repetitive Items that are listed when you run the function will be charged for each day of the stay, or for each day since you last ran the 'Charge Stay' function for the Reservation.
- Open the Reservation in a record window and select 'Repetitive Items' from the Operations or Tools menu as described in steps 1 and 2 above.
- If you need to move an Item from one Guest Account to another, use the 'Redistribute Folio Items' function on the Operations or Tools menu in the Reservation (described here).
- If you need to change or remove an Item from a Guest Account, work from the Show Account report. Please refer to the Adding and Managing Items on Guest Accounts (Folio Items) page for details.
The Reservation register in Standard ERP:
- Introduction and Workflow
- The 'Reservations: Browse' Window
- Entering a Reservation
- Guest Accounts (Folios)
- Adding and Managing Items on Guest Accounts (Folio Items)
- Work in Progress (WIP)
- Operations Menu, including:
- Open Quotation
- Assign to Group Reservation
- Change Room
- Charge Stay, Charge Until Check Out Date
- Repetitive Items
- Redistribute Folio Items
- Add Items
- Open Quotation
- Create Menu
- Home page for Hotel module manual
- Home page for Standard ERP manual
Operations Menu - Reservation - Redistribute Folio Items
This page describes the 'Redistribute Folio Items' function on the Operations menu in the Reservation record window. If you are using iOS or Android, the 'Redistribute Folio Items' function is on the Tools menu.
---
The 'Redistribute Folio Items' function allows you to move Items such as Room charges, Package Items or other Items from one Guest Account to another, and, depending on access rights, from one Reservation to another.
Follow these steps:
- Open the Reservation in question in a record window.
- Select 'Redistribute Folio Items' from the Operations menu (Windows/macOS) or Tools menu (iOS/Android). A 'Redistribute Folio Items' report will be printed to screen:
If the report is not printed to screen, the probable reason is that you have logged in as a Global User or Person belonging to an Access Group that denies access to the 'Reservation: Display Guest Account' Action.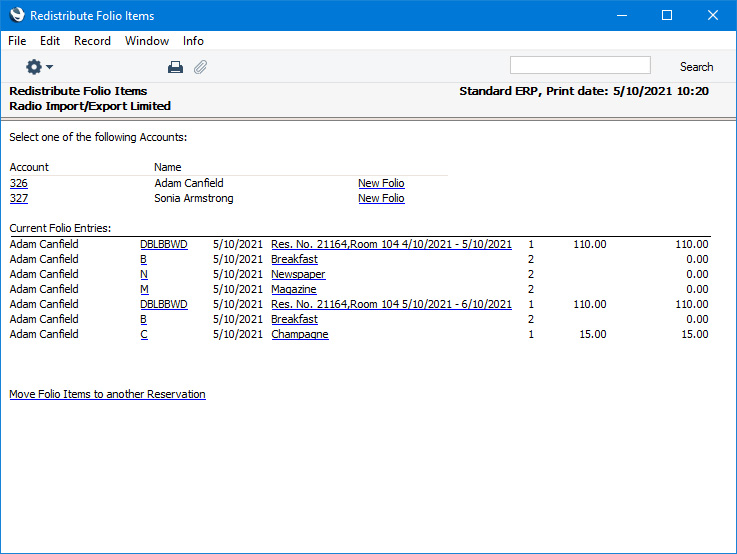
- The Customer, Agent and Guests in the Reservation will be listed at the top of the report, followed by the Items that have been charged to their Guest Accounts. Items will not be listed if they have already been invoiced.
If you need to assign one or more Items to a different Guest Account, follow these steps:
- In the first section of the report, click or tap the Account to which the Item is to be moved.
A message will confirm your choice.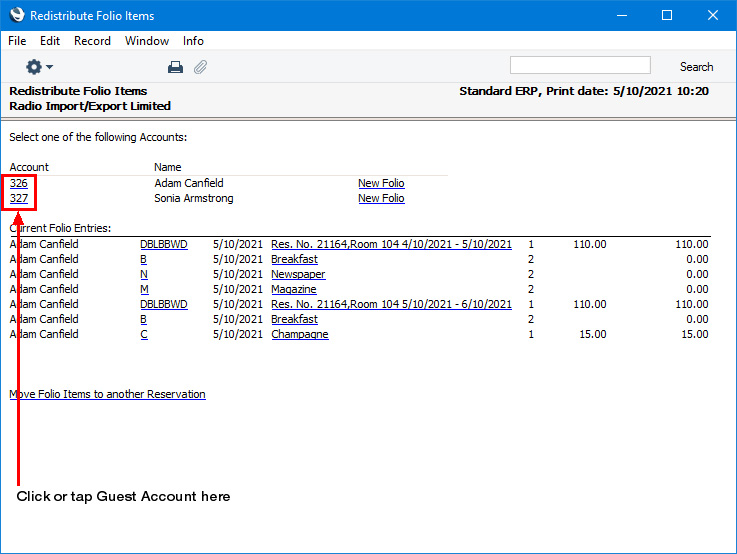
- In the second section of the report, click or tap the Item Number of the Item that is to be moved.
The report will be recalculated, with the Item re-assigned.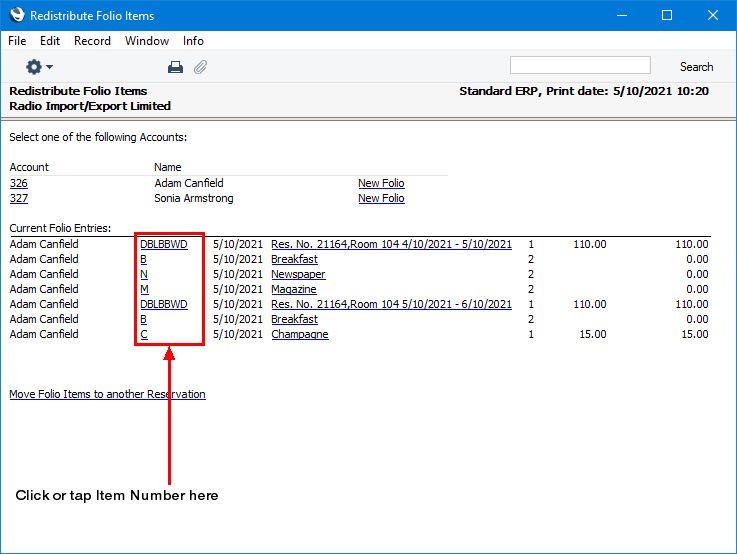
- If you need to move further Items to the same Account, click or tap the Items as necessary.
- If you need to change the quantity of an Item, click or tap the relevant Item Name.
- In the first section of the report, click or tap the Account to which the Item is to be moved.
- If a Guest wants to maintain more than one Account (usually this will be because the Guest wants some Items to be invoiced separately e.g. because they will claim some Items as expenses from their employer), click or tap the [New Folio] text link next to their name. A new Guest Account will be created, with a number as a suffix:
As described in step 3, click or tap on the new Guest Account number with the suffix and then on an Item or Items in the second section of the report to add them to the new Guest Account. When you create Invoices from the Reservation, these Items will be invoiced to the Guest but in a separate Invoice. Note that you will need to create the separate Invoice from the Reservation, the 'Create Group Invoice from Reservations' Maintenance function will not create Invoices for these additional Guest Accounts.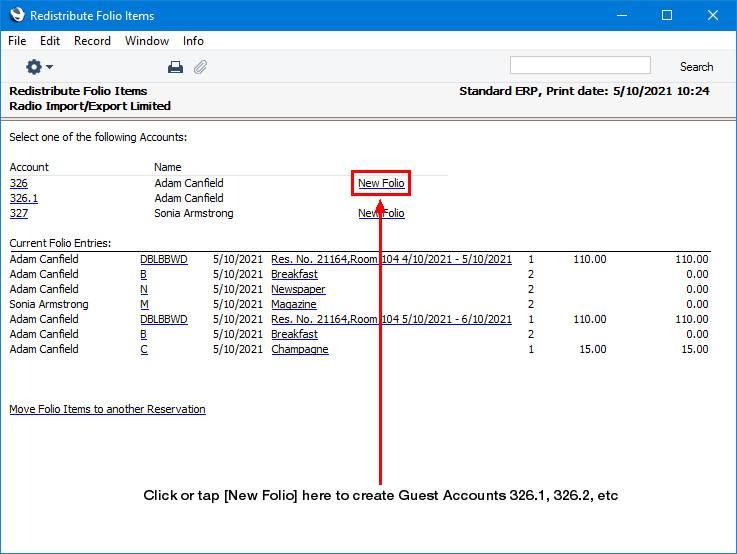
After creating an additional Guest Account and assigning at least one Item to it, you will then be able to add further Items to it using the 'Repetitive Items' and 'Add Items' functions as it will be added to the 'Paste Special' list that you will use to choose the Account.
If you do not move any Items to the new Guest Account, it will not be saved.
- If you need to move Items to a different Reservation, follow these steps:
- Click or tap the [Move Folio Items to another Reservation] text link at the end of the report.
By default, the [Move Folio Items to another Reservation] text link will not be included in the Redistribute Folio Items report. If you need the text link to be visible i.e. you need it to be possible to move Items to different Reservations, assign users to Access Groups in which you have granted Full access to the 'Move Folio Items to another Hotel Reservation' Action.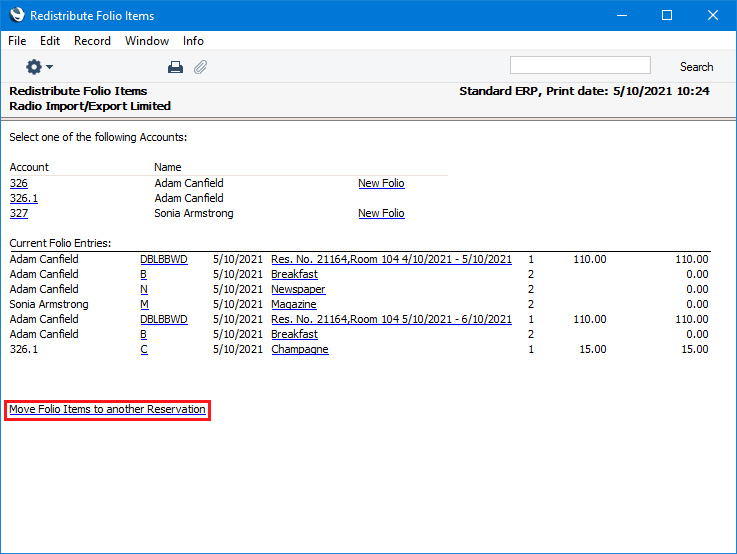
- The report will be recalculated and will now include the currently checked-in Reservations:
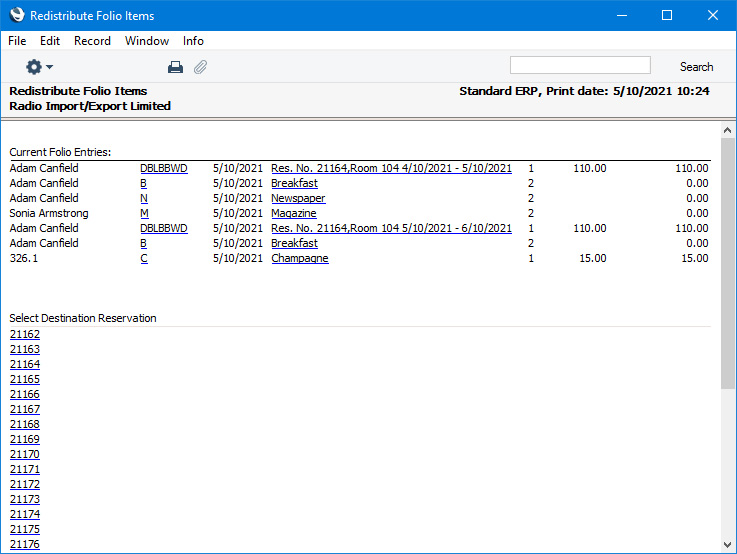
- Click or tap the Reservation to which the Item is to be moved. A message will confirm your choice, and the report will be recalculated to list the Customer, Agent and Guests in the destination Reservation.
- Follow step 3 to assign Items to one of the Guest Accounts in the destination Reservation i.e. select a Guest Account and then select the Item(s) to be moved (if you do not select a Guest Account, the Item(s) will be assigned to the Guest Account of the Customer in the destination Reservation).
- Click or tap the [Move Folio Items to another Reservation] text link at the end of the report.
The Reservation register in Standard ERP:
- Introduction and Workflow
- The 'Reservations: Browse' Window
- Entering a Reservation
- Guest Accounts (Folios)
- Adding and Managing Items on Guest Accounts (Folio Items)
- Work in Progress (WIP)
- Operations Menu, including:
- Open Quotation
- Assign to Group Reservation
- Change Room
- Charge Stay, Charge Until Check Out Date
- Repetitive Items
- Redistribute Folio Items
- Add Items
- Open Quotation
- Create Menu
- Home page for Hotel module manual
- Home page for Standard ERP manual
Operations Menu - Reservation - Add Items
This page describes the 'Add Items' function on the Operations menu in the Reservation record window. If you are using iOS or Android, the 'Add Items' function is on the Tools menu.
---
The 'Add Items' function allows you to add Items to a Reservation. Each Item that you add will be charged once to a Guest Account. If you need to add Items that are to be charged daily, use the 'Repetitive Items' function.
To add an Item or Items to a Guest Account, follow these steps:
- Open the Reservation in a record window.
- Select 'Add Items' from the Operations menu (Windows/macOS) or Tools menu (iOS/Android). The following window appears:
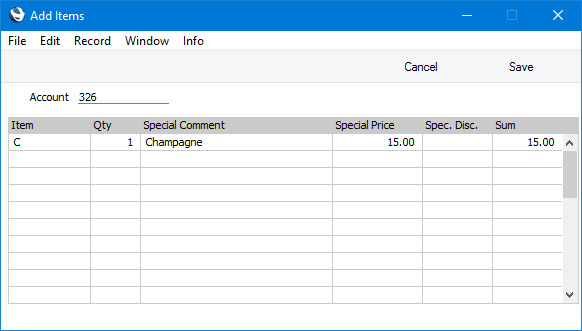
- Account
- Paste Special
Customer, Agent, Guests and any additional Guest Accounts in the Reservation
- Choose the Guest Account to which the Items are to be added.
Use the matrix to list the Items that are required by the Customer, Agent or Guest specified in the Account field above.
- Item
- Paste Special
Item register
- Specify the Item.
- Qty
- Specify the quantity of the Item that is required.
- Special Comment
- The Name of the Item specified in the Item field will be copied here.
- Special Price
- The usual sales price of the Item (i.e. its Price in the Price List in the Reservation or its Base Price) will be brought in to this field.
- If you change the Price, the Price that you enter should be in the Currency of the Reservation, and it should include VAT if the Price List in the Reservation is one that is Inclusive of VAT or if you have specified on the 'Invoicing' card of the Hotel Settings setting that Base Prices include VAT.
- If you need to prevent users from changing the Price, Discount and Sum, assign them to an Access Group in which you have denied access to the 'Change Prices' Action.
- If you change the Price, the Price that you enter should be in the Currency of the Reservation, and it should include VAT if the Price List in the Reservation is one that is Inclusive of VAT or if you have specified on the 'Invoicing' card of the Hotel Settings setting that Base Prices include VAT.
- Spec. Disc.
- If you have specified a Discount Matrix in the Contact record for the Customer, Agent or Guest specified in the Account field above, the Column 0 percentage in that Discount Matrix will be brought in to this field. This figure will be used as a discount percentage to be applied to the Item.
- Sum
- The total for the row: Quantity multiplied by Price less Discount. Changing this figure will cause the Discount Percentage to be recalculated.
- Account
- Press [Save] (Windows/macOS) or √ (iOS/Android) to save the record. The Item(s) will be added to the Guest Account immediately.
- If you need to move an Item from one Guest Account to another, use the 'Redistribute Folio Items' function on the Operations or Tools menu in the Reservation (described here.
- If you need to change or remove an Item from a Guest Account, work from the Show Account report. Please refer to the Adding and Managing Items on Guest Accounts (Folio Items) page for details.
---
The Reservation register in Standard ERP:
- Introduction and Workflow
- The 'Reservations: Browse' Window
- Entering a Reservation
- Guest Accounts (Folios)
- Adding and Managing Items on Guest Accounts (Folio Items)
- Work in Progress (WIP)
- Operations Menu, including:
- Open Quotation
- Assign to Group Reservation
- Change Room
- Charge Stay, Charge Until Check Out Date
- Repetitive Items
- Redistribute Folio Items
- Add Items
- Open Quotation
- Create Menu
- Home page for Hotel module manual
- Home page for Standard ERP manual
Create Menu - Reservations
The Create menu for the 'Reservation: Inspect' window is shown above. If you are using iOS or Android, you can access the Create menu functions through the + menu.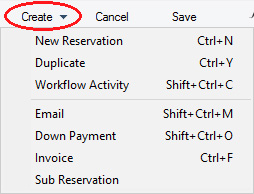
'New' and 'Duplicate' are standard functions that are provided on every Create and + menu. Use these functions to create new records, in this case in the Reservation register. Please follow the links below for details about the other functions:
---
The Reservation register in Standard ERP:
- Introduction and Workflow
- The 'Reservations: Browse' Window
- Entering a Reservation
- Guest Accounts (Folios)
- Adding and Managing Items on Guest Accounts (Folio Items)
- Work in Progress (WIP)
- Operations Menu
- Create Menu
- Home page for Hotel module manual
- Home page for Standard ERP manual
Create Menu - Reservation - Email
This page describes the 'Email' function on the Create menu in the Reservation record window. If you are using iOS or Android, the 'Email' function is on the + menu.
---
The 'Email' function allows you to create a Mail containing details of a Reservation, which you can use to send the Reservation to the Customer by email. To be able to use this function, the Email and Conferences option in the Configuration setting in the System module must be ticked.
To create a Mail from a Reservation, first open the Reservation in a record window and then select 'Email' from the Create menu (Windows/macOS) or + menu (iOS/Android). The following window will appear, in which you can create a new Mail:
A new record will be opened in a window entitled 'Mail: Inspect'. This means that it has already been saved and is being opened for checking. The details in the Mail will be as follows: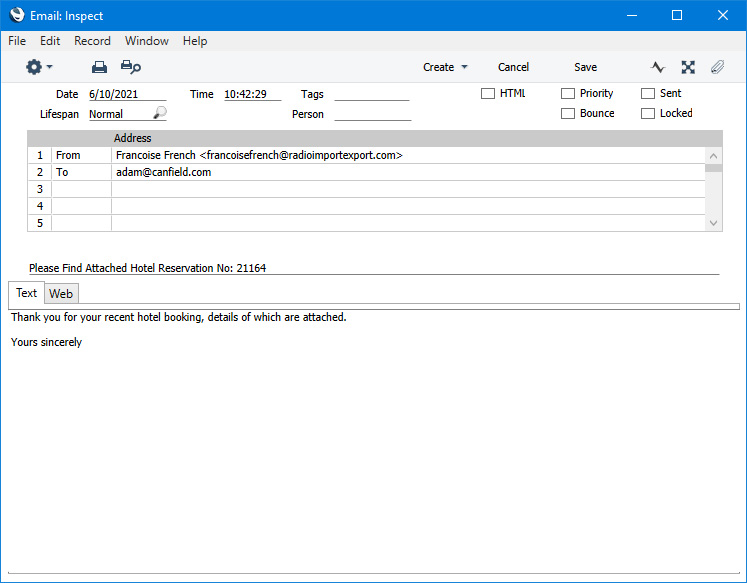
- The sender of the Mail will be the current user. If the current user doesn't have a Mailbox, no Mail will be created.
- The Recipient of the Mail will be the Customer in the Reservation or, if no Customer has been specified, the first Guest. The recipient email address will be taken from the Contact record for the Customer or first Guest (this Contact record is visible in and can be edited from the Contact register and the Guest register).
- The Subject and Text of the Mail will be taken from the record in the Mail Texts setting in the Email and Conferences module in which the Form is "Reservations". If the Reservation has a Language and the Mail Text record contains a row for that Language, the Subject and Text will be determined by the fields in that row. Otherwise, they will be determined by the fields in the Mail Text header, as follows:
- The Subject in the mail will be composed from the Subject in the Mail Text record (which does not need a trailing space as this will be added automatically), the text "Reservation No: " and the Reservation Number. For example, if the Subject in the Mail Text record is "Please find attached" (without trailing space), the Subject of the Mail will be "Please find attached Reservation No: XXXX" (where XXXX is the Reservation Number).
- The Text of the Mail will be built up as follows:
- The initial text will be taken from the Standard Text record quoted in the First Text field in the Mail Text record.
- The final text will be taken from the Standard Text record quoted in the Last Text field in the Mail Text record.
If either Standard Text record is in HTML format, the Mail will be in HTML format as well.
If there is no suitable record in the Mail Texts setting, the Subject of the Mail will be "Reservation No: XXXX" (where XXXX is the Reservation Number). The Text of the Mail will be empty.
- The initial text will be taken from the Standard Text record quoted in the First Text field in the Mail Text record.
- The Subject in the mail will be composed from the Subject in the Mail Text record (which does not need a trailing space as this will be added automatically), the text "Reservation No: " and the Reservation Number. For example, if the Subject in the Mail Text record is "Please find attached" (without trailing space), the Subject of the Mail will be "Please find attached Reservation No: XXXX" (where XXXX is the Reservation Number).
- A PDF version of the Reservation will be attached to the Mail, accessible through the Document Manager. This requires you to have designed a Form Template to be used when printing Reservations, and to have assigned that Form Template to the Reservation Form using the 'Define Form' function. When you design the Form Template, you may need to use Styles that will embed fonts in PDF files (this will depend on the fonts you use). You may also need to choose a code page and page setup, which you can do in the Form Template Properties. Please refer here for details about designing Form Templates, and here for a list of the fields you can include in the Form Template used by the Reservation form.
- The Reservation record itself will also be connected to the Mail through its Link Manager, and similarly the Mail will be connected to the Reservation. This allows you to open the Mail quickly and easily when reviewing the Reservation, or to open the Reservation from the Mail.
If the function does not create a Mail, the probable causes are:
- The current user does not have a Mailbox.
- No suitable recipient email address was found.
- The Reservation has not been saved.
---
The Reservation register in Standard ERP:
- Introduction and Workflow
- The 'Reservations: Browse' Window
- Entering a Reservation
- Guest Accounts (Folios)
- Adding and Managing Items on Guest Accounts (Folio Items)
- Work in Progress (WIP)
- Operations Menu
- Create Menu, including:
- Home page for Hotel module manual
- Home page for Standard ERP manual
Create Menu - Reservation - Down Payment
This page describes the 'Down Payment' function on the Create menu in the Reservation record window. If you are using iOS or Android, the 'Down Payment' function is on the + menu.
---
You should raise a Down Payment Invoice when you receive a deposit against a Reservation or if you wish to ask for one.
A Down Payment Invoice must be connected to a Reservation. If you need to issue a Down Payment Invoice, you must therefore create a Reservation first.
The process of creating a Down Payment Invoice from a Reservation is governed by the Down Payments setting described briefly here and in more detail here. In this setting, you can compose a standard text that will be printed on Down Payment Invoices, you should specify the percentage that will be used to calculate the value of each Down Payment, and you should specify the Sales Account that is to be credited from Down Payment Invoices.
You can create a Down Payment Invoice by opening a Reservation and selecting 'Down Payment' from the Create menu (Windows/macOS) or the + menu (iOS/Android). There is no need to charge anything to the Guest Accounts in the Reservation before creating a Down Payment Invoice.
A Down Payment Invoice will be created immediately, and it will be opened in a window entitled 'Invoice: Inspect'. This means that it has already been saved and is being opened for checking.
The Customer in the Down Payment Invoice will be chosen as follows: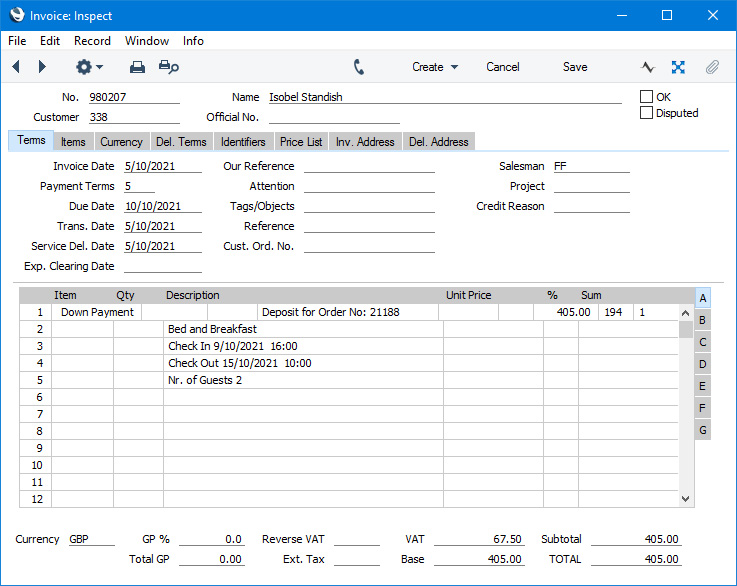
- If you click or tap in the Agent field in the Reservation before creating the Down Payment, the Agent will be the Down Payment Customer.
- Otherwise, the Customer in the Reservation or, if there is no Customer, the first Guest listed on the 'Guest' card will be the Down Payment Customer.
The Payment Term in the Down Payment Invoice will be taken from the Down Pay. Terms field in the Customer Terms record for the Customer, from the Down Payment Terms field in the Hotel Settings setting or from the Pay. Terms field in the Down Payments setting.
The Down Payment Invoice will contain a single row with the Down Payment amount. This row will contain the following information:
- The Invoice text ("Deposit for Order No:" in the illustration) will be taken from the Text field in the Down Payments setting. If the Text field is empty, the Description of the Item specified in the same setting will be used.
- The Down Payment value will be calculated by multiplying the Reservation value by a specific percentage. The percentage will be taken from the Down Pay. Prc field in the Customer Terms record for the Customer, from the Down Payment Prc. field in the Hotel Settings setting or from the Percentage field in the Down Payments setting. You should also specify in the Down Payments setting whether this percentage is to be applied to the value of the Reservation including or excluding VAT. You can change the default Down Payment amount in the Invoice if necessary.
If a Reservation is a Group Reservation and you need the Down Payment value to be calculated from the total value of the Reservation and all Sub Reservations, select the Down Payments include Prices of Sub Reservations option in the Hotel Settings setting.
If you create a second Down Payment Invoice from a Reservation, the default Down Payment amount will be calculated in the same way, Again, you can change this figure if necessary. You will be able to create subsequent Down Payment Invoices until the full value of the Reservation has been invoiced.
- The Account in the Down Payment row (Account 194 in the illustration above) will be chosen as follows:
- The Sales Account in the Item specified in the Down Payments setting will be used.
- If no Sales Account has been specified in that Item, the Sales Account in the Item Group to which that Item belongs will be used.
- If this is blank, the Sales Account specified on the 'Sales' card of the Account Usage S/L setting in the Sales Ledger will be used.
The appropriate Sales Account for the Zone of the Order will be used. You can change this Account in a particular Down Payment Invoice if necessary.
- The Sales Account in the Item specified in the Down Payments setting will be used.
- The VAT Code in the Down Payment row will be taken from the VAT Code field in the Down Payments setting. If you have not specified a VAT Code there, it will be chosen in the same way as the Account: it will be taken from the Item specified in the Down Payments setting, from the Item Group to which this Item belongs or from the Account Usage S/L setting in the Sales Ledger will be used. In each case, the appropriate VAT Code for the Zone of the Order will be used.
When you are sure the Down Payment Invoice is correct, mark it as OK and save it. As with all Invoices, this will cause the Sales Ledger to be updated and, if so defined in the Sub Systems setting in the Nominal Ledger and in the Number Series - Invoices setting, a Nominal Ledger Transaction to be created. You can then print the Invoice and send it to the Customer.
In the Nominal Ledger Transaction, the Account shown in the first row of the Invoice will be credited with the value of the Down Payment, while the Debtor Account will be debited as usual. It might be that you need to use a dedicated Account to hold the value of a Down Payment until you issue the final Invoice. This has been done in the illustration, using Account 194.
When you raise the final Invoice from the Reservation in the usual way (from the Create or + menu in the Reservation), the Invoice will contain a row deducting the Down Payment amount. The effect will be that the aggregate total of the Down Payment Invoice and the final Invoice will equal the Reservation total.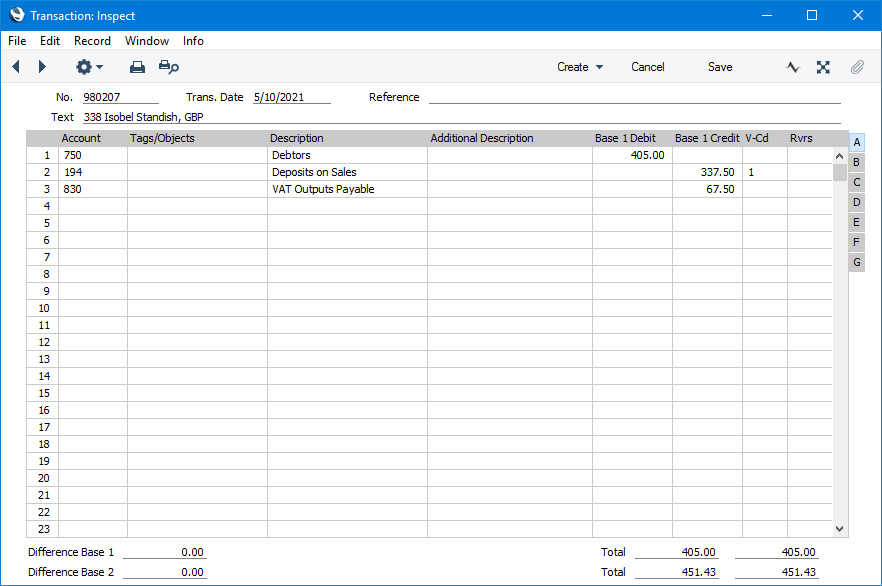
In the resulting Nominal Ledger Transaction, the Down Payment Account will be debited with the Down Payment amount.
If the function does not create a Down Payment, the probable causes are: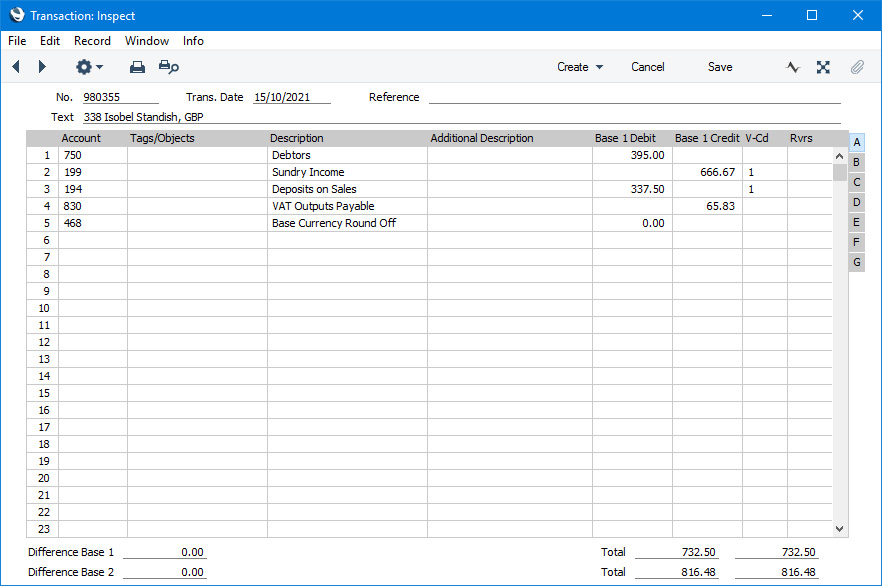
- You have not specified an Item in the Down Payments setting.
- You have already created a Down Payment or Down Payments for the full value of the Reservation.
- You have logged in as a user who is not able to create Down Payments from Reservations. You can use Access Groups to prevent certain users from creating Down Payments from Reservations, by denying them access to the 'Reservation: Generate Prepayment' Action.
- There is no valid record in the Number Series - Invoices setting (in the Sales Ledger). This might be a fault in the setting itself, or it might be because the default Invoice Number on the 'Number Series' card of the current user's Person record or in the Number Series Defaults setting (in the System module) is not in a valid Number Series. This problem will usually occur at the beginning of a new year. If you make a change to the 'Number Series' card of the Person record, you will need to quit Standard ERP and restart for it to take effect.
If you need to reverse a Down Payment Invoice, follow the standard crediting procedure. Open the Down Payment Invoice and select 'Credit Note' from the Create menu, then mark the resulting Credit Note as OK and save. Using the 'Credit Note' function will ensure that the correct Guest Account will be updated with the value of the Credit Note. If you try to reverse a Down Payment using other methods (e.g. creating a second Down Payment Invoice from the Order in which the Down Payment value is negative), the Guest Account will not be updated correctly. It is also not possible to create a Credit Note by duplicating a Down Payment Invoice and changing the Payment Term. If you have Cancellation Terms in effect, the 'Credit Note' function will calculate a reduced value for the Credit Note depending on when you create it (i.e. on how many days it is before the Check In Date). Please refer to the description of the Cancellation Terms setting here for details.
Down Payment Invoices can also be created as part of the process of creating Reservations online. These Down Payment Invoices will be constructed as described above, with one exception. The Payment Term and Down Payment percentage will be chosen as follows:
- The Payment Term and percentage will be taken from the Down Pay. Terms and Down Pay. Prc fields in the Customer Terms record for the Customer.
- They will be taken from the 'Defaults Online' card in the Hotel Settings setting.
- They will be taken from the 'Terms' card in the same setting.
- They will be taken from the Down Payments setting in the Hotel and Sales Orders module.
The Reservation register in Standard ERP:
- Introduction and Workflow
- The 'Reservations: Browse' Window
- Entering a Reservation
- Guest Accounts (Folios)
- Adding and Managing Items on Guest Accounts (Folio Items)
- Work in Progress (WIP)
- Operations Menu
- Create Menu, including:
- Email
- Down Payment
- Invoice
- Sub Reservation
- Email
- Home page for Hotel module manual
- Home page for Standard ERP manual
Create Menu - Reservation - Invoice
This page describes the 'Invoice' function on the Create menu in the Reservation record window. If you are using iOS or Android, the 'Invoice' function is on the + menu.
---
You can create an Invoice from a Reservation using the following methods:
- Open the Reservation in a record window and select 'Invoice' from the Create menu (Windows/macOS) or + menu (iOS/Android). Save any changes you have made to the Reservation before selecting the function. This method is described on this page.
- If the Reservation is part of a Group (i.e. if it is a Sub Reservation), you can create an overall Invoice from the Group Reservation for the main Guest Account (i.e. for the Customer in the Group Reservation). You can do this in two ways:
- Open the Group Reservation in a record window and select 'Invoice' from the Create or + menu.
- Run the 'Create Invoice from Group Reservation' Maintenance function and specify the Group Reservation Number in the specification window.
Guest Accounts from each Sub Reservation that are in the name of the Customer from the Group Reservation will all be included in the same Invoice. If you do not want a Sub Reservation to be included in this Invoice and instead you need it to be invoiced separately, select the Pay Separately option on the 'Other' card in the Sub Reservation. You will only be able to create Invoices for the Sub Reservation from the Sub Reservation itself (i.e. using the method in the first bullet point above).
If other Guest Accounts need to be invoiced, you will need to create those Invoices from the individual Reservations, again using the method in the first bullet point above.
Please refer here for more details about creating Invoices from Group Reservations.
- Open the Group Reservation in a record window and select 'Invoice' from the Create or + menu.
- To create an Invoice for a particular Guest Account especially in the situation where that Guest Account has been used in more than one Reservation, use the 'Create Group Invoice from Reservations' Maintenance function. This will create an Invoice in which the Items (e.g. Room charges, Package Items, Repetitive Items and/or any other Items) that have been assigned to the Guest Account in each Reservation will be gathered together.
- Open the Reservation in a record window and select 'Charge Stay' or 'Charge Until Check Out Date' as necessary from the Operations or Tools menu. 'Charge Stay' will add charges up to the current date to the Guest Account(s) (up to the current date and time if the Room is being charged hourly), while 'Charge Until Check Out Date' will add all charges up to the Check Out Date to the Guest Account(s), even if the Check Out Date is in the future.
- You can also run the 'Charge Stay' and 'Charge Until Check Out Date' functions from a Group Reservation, to add charges to the Guest Accounts in all the Reservations in a Group.
- If you need to run the 'Charge Stay' function for all Reservations in a batch, run the 'Nightly Maintenance' Maintenance function with the Charge Stay option selected.
The behaviour of the 'Invoice' function will depend on how many Guest Accounts there are in the Reservation, as follows:
- If there is only one Guest Account, an Invoice will be created immediately and opened in a window entitled 'Invoice: Inspect'. This means that it has already been saved and is being opened for checking. A Reservation contains a single Guest Account if:
- If there is only one Guest Account but an Agent has been specified in the Reservation, click or tap in the Agent field before selecting the function if you need to invoice the Agent. Again an Invoice will be created immediately and opened in a window entitled 'Invoice: Inspect'.
- If there is more than one Guest Account, the window illustrated below will open. Use this window to specify the Guest Account that is to be invoiced (or that all Guest Accounts are to be invoiced):
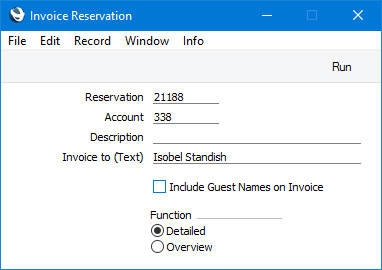
- Reservation
- This field provides a reminder of the Reservation Number.
- Account
- Paste Special
Customer, Agent, Guests and any additional Guest Accounts in the Reservation
- Specify the Guest Account that is to be invoiced.
- If this field is empty, every Guest Account (except empty Guest Accounts) in the Reservation will be invoiced.
- Note that specifying a Guest Account does not mean the entire Reservation will be invoiced to that Account but instead that an Invoice will be created for the Items on the specified Account. The [Show Account] button in the Reservation will show the Items that will be included in the Invoice.
- If this field is empty, every Guest Account (except empty Guest Accounts) in the Reservation will be invoiced.
- Invoice to (Text)
- The Name of the Guest Account (i.e. from the relevant Contact record) will be copied here when you specify the Account in the field above. You can change this Name if you need a particular name to appear in the Invoice(s).
- Include Guest Names on Invoice
- Select this option if you need the Guests to be listed on the Invoice.
- Function
- Choose an option to specify how many rows the Invoice should have, as follows:
- Detailed
- This option will assign each daily Room charge and each Item to its own row in the Invoice. For example, if a Guest stays for three nights and takes a newspaper and breakfast each day, the Invoice will contain three rows for the Room charge for each night, three rows for the individual newspapers and three rows for the individual breakfasts.
- Overview
- This option will add a single row to the Invoice for each Item. Continuing the previous example, the Invoice will contain a single row for the Room charges, a single row for the newspapers and a single row for the breakfasts. The Qty in each row will be 3.
- Detailed
When you press the [Run] button, the appropriate number of Invoices will be created, but they will not be opened for checking or printing. You can find and open the Invoices using the following methods:
- The Invoices will be attached to the Reservation and will be visible in the Link Manager. Open the Link Manager and open the Invoices from there.
- The Show Account report will be updated to show that the Guest Account(s) have been invoiced. Open the Show Account report by pressing the [Show Account] button in the Reservation and open the Invoices by clicking or tapping the Invoice Numbers.
- Reservation
The Invoice will be constructed using the following options in the Hotel Settings setting: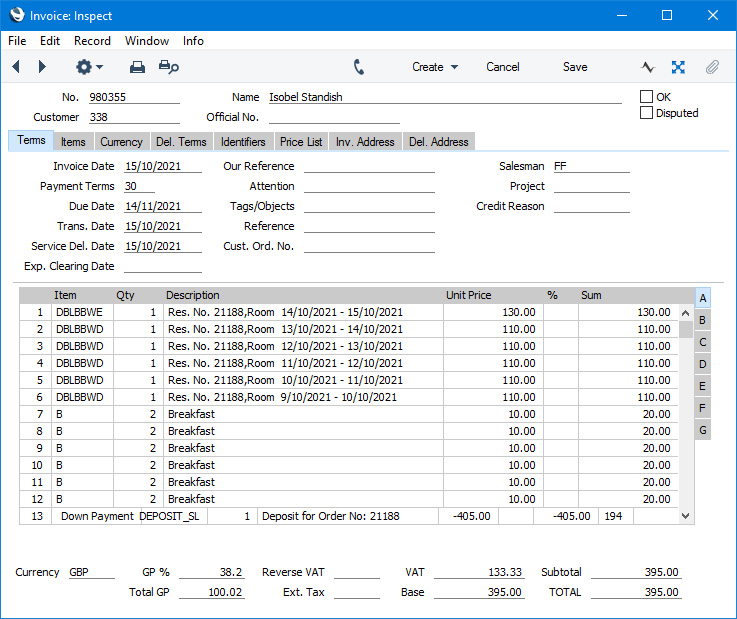
- Invoice Currency ('Terms' card)
- If you specify an Invoice Currency, all Hotel Invoices will be in that Currency. Otherwise, they will be in the Currency used in the Reservation.
- Add Reservation No., Add Room No. ('Invoicing' card)
- When a Room charge is included in an Invoice, the description in the Invoice row will include the period covered by the Room charge. If you have selected these options, it will include the Reservation Number and/or the Room Number as well.
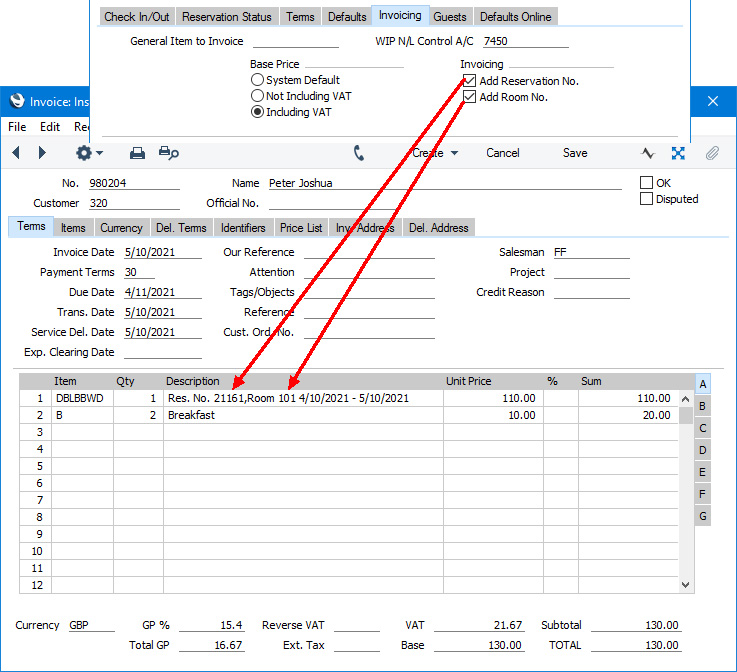
When the Invoice is complete, tick the OK check box and save. This signifies that the Invoice has been approved. Associated transactions in the Nominal Ledger (including cost of sales postings if you are using this option) will be created if you have so determined using the Sub Systems setting in the Nominal Ledger and in the Number Series - Invoices setting. You will no longer be able to modify the Invoice.
Please refer here for a full description of the Invoice window, including detailed information about marking Invoices as OK, printing them and generating Nominal Ledger Transactions.
As already mentioned, the Reservation and the Invoice(s) will be connected to each other through the Link Manager facility. This allows you to open the Reservation quickly and easily when reviewing one of the Invoices, or to open the Invoices from the Reservation.
You can use Access Groups to prevent certain users from creating Invoices from Reservations. To do this, deny them access to the 'Invoice from Hotel Reservation' Action.
If you need to reverse a Hotel Invoice, follow the standard crediting procedure. Open the Hotel Invoice and select 'Credit Note' from the Create menu, then mark the resulting Credit Note as OK and save. Using the 'Credit Note' function will ensure that Guest Account will be updated with the value of the Credit Note. If you have Cancellation Terms in effect, the 'Credit Note' function will calculate a reduced value for the Credit Note depending on when you create it (i.e. on how many days it is before the Check In Date). Please refer to the description of the Cancellation Terms setting here for details.
---
The Reservation register in Standard ERP:
- Introduction and Workflow
- The 'Reservations: Browse' Window
- Entering a Reservation
- Guest Accounts (Folios)
- Adding and Managing Items on Guest Accounts (Folio Items)
- Work in Progress (WIP)
- Operations Menu
- Create Menu, including:
- Email
- Down Payment
- Invoice
- Sub Reservation
- Email
- Home page for Hotel module manual
- Home page for Standard ERP manual
Create Menu - Reservation - Sub Reservation
This page describes the 'Sub Reservation' function on the Create menu in the Reservation record window. If you are using iOS or Android, the 'Sub Reservation' function is on the + menu.
---
A Group Reservation is a special type of Reservation that you can use to gather several individual Reservations together for administrative purposes such as checking in, invoicing and checking out. For example, a family may create two Reservations to hire two Rooms for the parents and for the children. You can assign these two Reservations to a third Reservation (a "Group Reservation"), so that they will be invoiced together. They can be checked in together or separately, and checked out together or separately. The two Room Reservations will then become "Sub Reservations".
You may need to create a Sub Reservation from a Reservation in the following circumstances:
- You need an existing Reservation to be converted into a Group Reservation. You can only convert a Reservation to a Group Reservation if it has at least one Sub Reservation. Creating the Sub Reservation from the existing Reservation will fulfil this requirement.
To do this, open the existing Reservation in a record window and select this 'Sub Reservation' function from the Create menu (Windows/macOS) or + menu (iOS/Android). The Group field in the new Sub Reservation will be filled in automatically with the Reservation Number of the existing Reservation. After saving the new Sub Reservation, you can use the 'Create Group Reservations from Mother Reservations' Maintenance function to convert the original Reservation into a Group Reservation.
- You need to add a new Reservation to an existing Group. You can do this in two ways:
- Open the Group Reservation in a record window and select 'New Sub Reservation' from the Create or + menu.
- Open one of the existing Reservations in a record window and select this 'Sub Reservation' function from the Create or + menu.
In both cases, the Group field in the new Sub Reservation will be filled in automatically with the Reservation Number of the Group Reservation.
- Open the Group Reservation in a record window and select 'New Sub Reservation' from the Create or + menu.
---
The Reservation register in Standard ERP:
- Introduction and Workflow
- The 'Reservations: Browse' Window
- Entering a Reservation
- Guest Accounts (Folios)
- Adding and Managing Items on Guest Accounts (Folio Items)
- Work in Progress (WIP)
- Operations Menu
- Create Menu, including:
- Email
- Down Payment
- Invoice
- Sub Reservation
- Email
- Home page for Hotel module manual
- Home page for Standard ERP manual
- Open the Reservation in a record window and press the [Show Account] button. A Show Account report will be printed to screen, showing the contents of each Guest Account in the Reservation: