Introduction to Forms in the Restaurant Module
The 'Forms' function allows you to print particular records or documents in batches.Each separate document that you can print contains two elements, the "Form" and the "Form Template". The Form element extracts the relevant information from the database and places it in printable fields, while the Form Template is the graphic layout design of the printed output i.e. it determines where on the page the printable fields will be placed.
To begin printing, first ensure you are in the Restaurant module. Then, if you are using Windows or macOS, click the [Forms] button in the Navigation Centre or use the Ctrl-D (Windows and Linux)/⌘-D (macOS) keyboard shortcut. If you are using iOS or Android, tap the [Routines] button in the Navigation Centre and then tap [Forms]. A window similar to the one illustrated below appears, listing the forms that you can print from the Restaurant module.
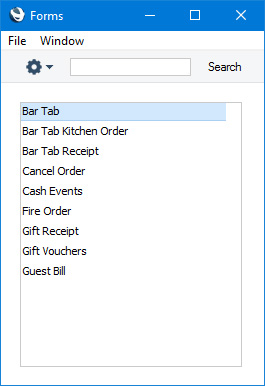
- If you are using Windows or macOS, double-click the form name in the list or highlight it and press the Enter key. If you are using iOS or Android, tap the form name. In both cases, a specification window will then appear, where you can determine the records that you want to be printed (e.g. which Bar Tabs are to be printed). The specification window for each document is described in detail on the pages describing each form.
- Click or tap [Run] to print the forms.
- Close the 'Forms' window using the close box (Windows/macOS) or by tapping < (iOS/Android).
Before you can print a form, you must connect it to a Form Template. The Form Template contains the layout of the printed output. If necessary you can connect a form to more than one Form Template: for example, you might need a particular form to be able to produce printed output in different Languages determined by the Language of the Customer. To connect a form to a Form Template, follow this procedure, which you must carry out using Windows or macOS:
- For each option, design a Form Template using the Form Template register in the System module. A file containing samples of each Form Template is supplied with Standard ERP: if you want to use these samples as the basis for your own designs, import the "UKForms.txt" file as described on the Importing Set-up Data page.
- Change to the Restaurant module and open the 'Forms' window by clicking the [Forms] button in the Navigation Centre or using the Ctrl-D/⌘-D key combination.
- Highlight each item in the list in turn and for each one select 'Define Form' from the Operations menu. In the subsequent 'Form Definition' window, assign a Form Template (or more than one Form Template) to each form. The 'Form Definition' window is fully described here.
- You only need use the 'Define Form' function once. Afterwards, Form Template selection will be automatic.
You can often print forms from a range of records, such as a range of Bar Tabs. To do this, enter the lowest and highest values of the range, separated by a colon. For example, to print Bar Tabs 001 to 010, enter "001:010" in the Bar Tab Number field. Depending on the field, the sort used might be alpha or numeric. In the case of an alpha sort, a range of 1:2 would also include 100, 10109, etc.
---
Please follow the links below for details about each form:
- Introduction
- Bar Tab
- Bar Tab Kitchen Order
- Bar Tab Receipt
- Cash Events
- Gift Vouchers
- and please refer here for a list of standard fields that you can include in almost every Form Template
- Home page for Restaurant module manual
- Home page for Standard ERP manual
Bar Tab
This page describes the Bar Tab form in the Restaurant module.---
The Bar Tab form allows you to print Bar Tabs in batches.
The Bar Tab form will not print any Items in a Bar Tab that have been voided using the "Void Item" button. This separates the Bar Tab form from the Bar Tab Receipt form, which will include voided Items.
If the Bar Tab being printed has not been finished, it will printed with a "Test Printout" watermark. If you do not need this watermark, select the No Test printout option in the Optional Features setting in the System module. If the Bar Tab has been finished it will be printed with a "Copy" watermark, which is not optional (finishing a Bar Tab will cause it to be printed automatically using the Bar Tab Receipt form, so all subsequent printings will be copies).
You can also print an individual Bar Tab using the Bar Tab form using the following methods:
- Bar Tabs will be printed automatically using the Bar Tab form if you have specified in the Auto Actions setting in the System module that Bar Tabs will be printed An Insert or At Insert & Update and providing the Bar Tab will not be printed on a fiscal printer (i.e. providing the Customer is not one in which the Fiscal Invoices Only check box has been ticked).
- The "Finish and Print" button will first print a Bar Tab using the Bar Tab Receipt form (providing the Bar Tab will not be printed on a fiscal printer) and then using the Bar Tab form.
- The "Print Tab" button will print a Bar Tab using the Bar Tab form.
- The "Print Preview" button will print a preview of a Bar Tab to screen using the Bar Tab form.
- If you have selected the Print Receipt option in the Restaurant Settings setting, a Bar Tab will be printed automatically using the Bar Tab form after you register a payment using the "Pay" button.
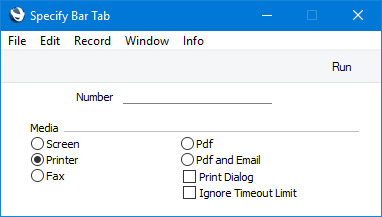
- Number
- Range Reporting
Numeric
- Enter a Bar Tab Number to print a single Bar Tab, or a range of Bar Tab Numbers, separating the first and last number with a colon (:).
See also:
Guidelines that will be useful when designing the Form Template---
Go back to:
- Home page for Forms in the Restaurant module
- Home page for Restaurant module manual
- Home page for Standard ERP manual
Bar Tab - Header Fields
The fields that you can use when you design the Form Template to be used by the Bar Tab form are listed on two pages, as follows:- Header Fields
- Row Fields
Header Fields (these print once per Bar Tab). If you do not want to print the decimal places in numeric fields, choose the Cut Decimals option in the record in the Values in Text setting for the Language specified in the Company Info setting. This will remove the decimals even in fields where you have used the Field Argument to control the rounding.
Please refer to the 'USB/Wifi Receipt Printers with user-definable print-outs' section on the USB/Wifi Receipt Printers with user-definable print-outs page for guidelines that will be useful when designing the Form Template.
Basic Information
The following fields print information taken directly from the Bar Tab being printed
| Field in Form Template | Prints (from Bar Tab) |
| Address | Name (if you are using the Organisation name option in the Form Settings setting) and Invoice Address. This information will be printed on separate lines, so you should specify a Line Height for this field. Use the Form Settings setting to set the format of this field (e.g. to specify whether blank lines will be printed, whether parts of the address will be printed on the same line, etc.). |
| The Address will be brought in to the Bar Tab from the Contact record for the Customer, and can be changed using the "Change Address" button | |
| Address 1 | First line of Address |
| Address 2 | Second line of Address |
| Address 3 | Third line of Address |
| Address 4 | Fourth line of Address |
| Address 5 | Fifth line of Address |
| Address 6 | Sixth line of Address |
| Branch | Branch |
| Change | Change |
| Class | Bar Tab Class |
| Comment | Customer Name (in Bar Tabs connected to Hotel Reservations) or blank (otherwise) |
| Current User Name | Name from the current user's Person record |
| Customer Fax Number | Fax from the Contact record for the Customer |
| Customer Name | Customer Name |
| Customer Number | Customer Number |
| Customer Registration No. 1 | Reg. No. 1 (brought in to the Bar Tab from the Contact record for the Customer) |
| Customer Registration No. 2 | Reg. No. 2 (brought in to the Bar Tab from the Contact record for the Customer) |
| Customer Telephone Number | Telephone from the Contact record for the Customer |
| Customer VAT Reg. Number | VAT Reg. No. (brought in to the Bar Tab from the Contact record for the Customer) |
| Duplicate | Prints "Duplicate as of " followed by the current date (only prints if the Bar Tab has previously been printed) |
| Guest | Contact Number of Hotel Guest (in Bar Tabs connected to Hotel Reservations) or blank (otherwise) |
| Guest Name | Contact Name of Hotel Guest (in Bar Tabs connected to Hotel Reservations) or blank (otherwise) |
| Local Machine | Local Machine Code of the till or device on which the Bar Tab was created, taken from the Local Machine setting |
| Location | Location |
| Loyalty Card Number | Loyalty Card Number |
| Net Amount | TOTAL - VAT |
| Print Date | When you print a Bar Tab for the first time using the "Finish", "Finish and Print" and "Print Tab" buttons, the date of printing will first be saved in the Bar Tab and then printed in this field. The date of printing will not be updated if you print the Bar Tab again, so in effect this field will print the date of first printing. If you register a payment for a previously unprinted Bar Tab using the "Pay" button and the Bar Tab is then printed because you are using the Print Receipt option in the Restaurant Settings setting, this field will print the date of printing but it will not be saved in the Bar Tab |
| Reporting Date | The date when the current Session was opened (if you are using the Require Open Session option) or the Transaction Date of the Bar Tab (otherwise) |
| Room Number | Hotel Room Number (in Bar Tabs connected to Hotel Reservations) or blank (otherwise) |
| Sales Group | Sales Group |
| Subtotal without discount | Sum of (Qty * Unit Price) for each row |
| Sum | Subtotal |
| Table | Table Number |
| To Pay | TOTAL |
| To Pay in Text | Prints TOTAL as a phrase. The phrase will be constructed using the relevant record in the Values in Text setting for the Language of the Bar Tab or, if that is blank, the Language in the current user's Person record or in the Company Info setting |
| Total Discount | Sum of (Qty * Unit Price) for each row - Subtotal |
| Total Row Total | Sum of the Sums in each row in Bar Tabs in which prices include VAT, or sum of (Sum + VAT) in each row otherwise (i.e. the total Bar Tab value including VAT). |
| Total VAT Base | Sum of the Sums in each row in Bar Tabs in which prices exclude VAT, or sum of (Sum - VAT) in each row otherwise (i.e. the total Bar Tab value excluding VAT). |
| Total VAT Value | Sum of the VAT values in each row |
| Transaction Date (transdate) | Trans. Date |
| Transaction Time (transtime) | Trans. Time |
| Transaction Number | No. |
| VAT | VAT |
| Waiter | Waiter Signature |
| Waiter Name | Name from the Waiter's Person record |
Location Information
The following fields print information from the record in the Locations setting for the Location specified in the Bar Tab:| Field in Form Template | Prints (from Location) |
| Location Address | Address. This information will be printed on separate lines, so you should specify a Line Height for this field |
| Location Contact | Contact |
| Location Email | |
| Location Fax | Fax |
| Location Name | Name |
| Location Phone | Telephone |
Note: use the "Location" field to print the Location itself, taken from the Location field in the Bar Tab.
Official Serial Number information
The following fields print information regarding the Official No. of a Bar Tab, taken from the Bar Tab being printed or from the relevant row in the Legal Record Numbers setting for the Official No.| Field in Form Template | Prints (from Bar Tab or Legal Record Numbers setting) |
| Official Serial Number | Prints the Official No. 2 if there is one or the Official No. otherwise. |
| Official Serial Number 2 | Official No. 2 |
| Official Serial Number without Serie | Official No. (without the Serie specified in the relevant row in the Legal Record Numbers setting) |
Tax Template Summary
If you are using Tax Templates (i.e. you are using the Use Tax Templates for Tax Calculation option in the Transaction Settings setting), you can use the following fields to add a table to the Form listing the VAT Codes used in the Tax Templates in the Bar Tab together with various totals. These fields will each be printed once for each VAT Code used in a Bar Tab. "VAT Base" and "VAT Value" will print negative figures if you specify a minus sign as the Field Argument. You should specify a Line Height in these fields, and set the Format to "Header":| Field in Form Template | Prints |
| Excl. VAT Percentage | VAT percentage |
| VAT Base | Total excluding VAT |
| VAT Code Total | VAT Code |
| VAT Comment | Description from the VAT Codes setting |
| VAT Value | VAT value |
If you are not using Tax Templates, please refer to the 'VAT Code Summary' section immediately below for a list of the fields you can include in a table listing the VAT Codes used in a Bar Tab.
VAT Code Summary
The following fields allow you to add a table to the Form listing the VAT Codes used in the Bar Tab together with various totals. These fields will each be printed once for each VAT Code used in a Bar Tab. You should specify a Line Height in these fields, and set the Format to "Header":| Field in Form Template | Prints |
| VAT % | VAT percentage |
| VAT Base | Total excluding VAT |
| VAT Comment | Description from the VAT Codes setting |
| VAT Total | Total including VAT |
| VAT Value | VAT value |
If you are using Tax Templates, please refer to the 'Tax Template Summary' section immediately above for a list of the fields you can include in a table listing the VAT Codes used in an Bar Tab.
Country-Specific Fields - Croatia
| Field in Form Template | Prints |
| Control Code (Croatia) | Prints the Control Code of a Bar Tab. This is generated automatically when the Bar Tab is marked as OK and contains unique identifying data for each Bar Tab, encrypted and presented in hexadecimal format |
| Croatian QR Barcode | Prints a QR barcode constructed from the Tax Seal, the Date and Time of the Bar Tab and the Bar Tab TOTAL You should give this field a Style in which the Barcode has been set to "QR Code", the QR Error Correction is "L" and the QR Version is "9". This field will only be printed if the VAT Law in the Company Info setting is set to "Croatian" |
| Tax Administration Service Seal | Tax Seal |
---
Go to:
- Header Fields
- Row Fields
- Standard Fields
Guidelines that will be useful when designing the Form Template---
Go back to:
- Home page for Forms in the Restaurant module
- Home page for Restaurant module manual
- Home page for Standard ERP manual
Bar Tab - Row Fields
The fields that you can use when you design the Form Template to be used by the Bar Tab form are listed on two pages, as follows:- Header Fields
- Row Fields
Row fields will be printed once for each Bar Tab row, so in each one you should specify a Line Height and set the Format to "Matrix". If you do not want to print the decimal places in numeric fields, choose the Cut Decimals option in the record in the Values in Text setting for the Language specified in the Company Info setting. This will remove the decimals even in fields where you have used the Field Argument to control the rounding.
Please refer to the 'USB/Wifi Receipt Printers with user-definable print-outs' section on the USB/Wifi Receipt Printers with user-definable print-outs page for guidelines that will be useful when designing the Form Template.
| Field in Form Template | Prints (from Bar Tab row) |
| Description 1 | Description. If a row has been voided using the "Void Item" button, the Description will be preceded by "(VOIDED)" as a prefix. Voided rows will not be printed by the Bar Tab form |
| Discount | % |
| Item Code | Item |
| Price, row | Unit Price. This field prints the Unit Price as shown on screen in the Bar Tab record (i.e. including VAT in Bar Tab in which prices include VAT, excluding VAT otherwise) |
| Quantity | Qty |
| Row Base | Sum excluding VAT (i.e. prints Sum in Bar Tabs in which prices exclude VAT, or Sum - VAT otherwise). |
| If prices exclude VAT, the number of decimal places will be as shown on screen in the Bar Tab. If prices include VAT, the calculation of the VAT value to be subtracted will obey the Default for Calculated Values rounding rules in the Round Off setting. You can enter an ad hoc rounding (which will be applied after the subtraction of VAT when prices include VAT) by entering "0" or a positive number as the Field Argument. For example, to round to the nearest whole number, enter "0", or to round to one decimal place, enter "1" | |
| Row Number | Row number (only printed if a row has a Description) |
| Row Sum | Sum ("0" will be printed for zero sums) |
| Row Text | Prints the word "Void" if a row has been voided using the "Void Item" button or blank otherwise. Voided rows will not be printed by the Bar Tab form |
| Total Row | Sum (blank will be printed for zero sums) |
| Unit | If the Item has a Unit, the correct translation for the Language of the Bar Tab of the Comment from the Units setting, the Comment itself or the Unit Code |
| Unit Price | Unit Price. This field prints the Unit Price as shown on screen in the Bar Tab record (i.e. including VAT in Bar Tab in which prices include VAT, excluding VAT otherwise). |
| This figure will be rounded to a maximum of three decimal places if you have set Discount Calculation to "Row Sum" in the Round Off setting. If you have set Discount Calculation to "Unit Price", rounding will obey the Default for Calculated Values rounding rules in the same setting. However, you can overrule this by entering "0" or a positive number as the Field Argument. For example, to round to the nearest whole number, enter "0", or to round to one decimal place, enter "1" | |
| VAT Code | V-Cd |
| VAT % excl., row | VAT rate with the % character as a suffix |
| VAT %, row | VAT rate without the % character |
| VAT Value, row | VAT value of the row. |
| Usually, the number of decimal places will obey the Default for Calculated Values rounding rules set in the Round Off setting. However, you can overrule this by entering "0" or a positive number as the Field Argument. For example, to round to the nearest whole number, enter "0", or to round to one decimal place, enter "1" |
Receiving Cash Payments
The following fields will only be printed from rows recording the receiving of cash payments. You should specify a Line Height and set the Format to "Matrix" in these fields:| Field in Form Template | Prints |
| Payment Mode, row | Prints "Cash" |
| Payment Mode Summary (Amount) | Cash payment amount |
| Payment Mode Summary (Text) | The Label of the "Cash" button that was used to receive the cash payment, as defined in the POS Buttons setting (or, if the payment was registered using the "Pay" button, the Label in the row in the Local Machine Payment Modes setting that added the cash payment method to the 'Payment' window) |
| Received Currency | Currency or, if blank, Base Currency 1 |
Standard row fields will not be printed from rows recording the receiving of cash payments.
Receiving Credit Card Payments
The following fields will only be printed from rows recording the receiving of credit card payments. You should specify a Line Height and set the Format to "Matrix" in these fields:| Field in Form Template | Prints |
| Authorisation Code, row | Authorisation Code |
| Payment Mode, row | Prints "Credit Card" |
| Payment Mode Summary (Amount) | Credit card payment amount |
| Payment Mode Summary (Text) | The Label of the "Credit Card" button that was used to receive the cash payment, as defined in the POS Buttons setting (or, if the payment was registered using the "Pay" button, the Label in the row in the Local Machine Payment Modes setting that added the credit card payment method to the 'Payment' window) |
Standard row fields will not be printed from rows recording the receiving of credit card payments.
Receiving Gift Vouchers in Payment
The following fields will only be printed from rows recording the receiving of Gift Vouchers in payment. You should specify a Line Height and set the Format to "Matrix" in these fields:| Field in Form Template | Prints |
| Gift Voucher No. | Gift Voucher Number |
| Payment Mode, row | Prints "Gift Voucher Received" |
| Payment Mode Summary (Amount) | Gift Voucher payment amount |
| Payment Mode Summary (Text) | The Label of the "Gift Voucher" button that was used to receive the Gift Voucher in payment, as defined in the POS Buttons setting |
Standard row fields will not be printed from rows recording the receiving of Gift Vouchers in payment.
Receiving Loyalty Points in Payment
The following fields will only be printed from rows recording the receiving of Loyalty Points in payment. You should specify a Line Height and set the Format to "Matrix" in these fields:| Field in Form Template | Prints |
| Payment Mode, row | Prints "Loyalty Points" |
| Payment Mode Summary (Amount) | Loyalty Points payment amount |
| Payment Mode Summary (Text) | Prints "LOYPOINTS" |
Standard row fields will not be printed from rows recording the receiving of Loyalty Points in payment.
---
Go to:
- Header Fields
- Row Fields
- Standard Fields
Guidelines that will be useful when designing the Form TemplateGo back to:
- Home page for Forms in the Restaurant module
- Home page for Restaurant module manual
- Home page for Standard ERP manual
Bar Tab Kitchen Order
This page describes the Bar Tab Kitchen Order form in the Restaurant module.---
The Bar Tab Kitchen Order form allows you to print Bar Tabs in batches. After printing Bar Tabs, it will create Kitchen Orders from them.
If you add Items to a Bar Tab after you have printed it using the Bar Tab Kitchen Order form and after the Kitchen Order has been created, printing the Bar Tab again using the same form will create a second Kitchen Order for the additional Items only (and only the additional Items will be printed).
The usual method of printing a Bar Tab using the Bar Tab Kitchen Order form will be through the "Print Tab to Kitchen" button in the Bar Tab window. The primary purpose of the Bar Tab Kitchen Order form option is to allow you to specify the Form Template that will be used by this button. To do this, highlight 'Bar Tab Kitchen Order' in the 'Forms' list and select 'Define Form' from the Operations menu. In the subsequent 'Form Definition' window, specify a Form Template using 'Paste Special' if necessary. The 'Form Definition' window is fully described here.
Depending on the restaurant, it can be necessary for the various Items on a Bar Tab to be printed on different printers. For example, it might be that food Items should be printed on a kitchen printer, while drinks Items should be printed on the bar printer. In the kitchen, it may be that meat Items for example should be printed on a printer at the meat station, while dessert Items should be printed on a printer at the dessert station. The Bar Tab Kitchen Order form will print each Item on the appropriate printer. Please refer to the Kitchen Orders page for details.
When designing the Form Template that will be used by the Bar Tab Kitchen Order form, the fields that you can use are the same as the ones you can use in the Form Template for the Bar Tab form. Please refer here for a list of the header fields and here for the row fields.
---
Go back to:
- Home page for Forms in the Restaurant module
- Home page for Restaurant module manual
- Home page for Standard ERP manual
Bar Tab Receipt
This page describes the Bar Tab Receipt form in the Restaurant module.---
The Bar Tab Receipt form allows you to print Bar Tabs in batches.
The Bar Tab Receipt form will include Items in a Bar Tab that have been voided using the "Void Item" button. The removed line will be printed with "(VOIDED)" added to the Item Description as a prefix, and the added line with negative quantity will also be printed. This separates the Bar Tab Receipt form from the Bar Tab form, which will not include voided Items.
If the Bar Tab being printed has not been finished, it will printed with a "Test Printout" watermark. If you do not need this watermark, select the No Test printout option in the Optional Features setting in the System module. Finishing a Bar Tab will usually cause it to be printed automatically using this Bar Tab Receipt form with no watermark (the Bar Tab will not be printed using this form and instead will be printed on a fiscal printer if the Customer is one in which the Fiscal Invoices Only check box has been ticked).
The usual method of printing a Bar Tab using the Bar Tab Receipt form will be through the "Finish" button in the Bar Tab window, as just mentioned. The primary purpose of the Bar Tab Receipt form option is to allow you to specify the Form Template that will be used by this button. To do this, highlight 'Bar Tab Receipt' in the 'Forms' list and select 'Define Form' from the Operations menu. In the subsequent 'Form Definition' window, specify a Form Template using 'Paste Special' if necessary. The 'Form Definition' window is fully described here.
When designing the Form Template that will be used by the Bar Tab Kitchen Order form, the fields that you can use are the same as the ones you can use in the Form Template for the Bar Tab form. Please refer here for a list of the header fields and here for the row fields.
---
Go back to:
- Home page for Forms in the Restaurant module
- Home page for Restaurant module manual
- Home page for Standard ERP manual
Cash Events
The Cash Event form can be printed from the Point of Sales and Restaurant modules. Please refer here for a description.—
Go back to:
- Home page for Forms in the Restaurant module
- Home page for Restaurant module manual
- Home page for Standard ERP manual
Gift Vouchers
The Gift Vouchers form is available in the Sales Ledger as well as the Restaurant and Point of Sales modules. Please refer here for details.---
Go back to:
- Home page for Forms related to the Restaurant module
- Home page for Restaurant module manual
- Home page for Standard ERP manual