Introduction to Reports in the Data Integrity module
As with all modules, to print a report in the Data Integrity module, click (Windows/macOS) or tap (iOS/Android) the [Reports] button in the Navigation Centre. You can also use the Ctrl-R (Windows) or ⌘-R (macOS) keyboard shortcuts. The 'Reports' window will open, listing the reports that are available in the Data Integrity module: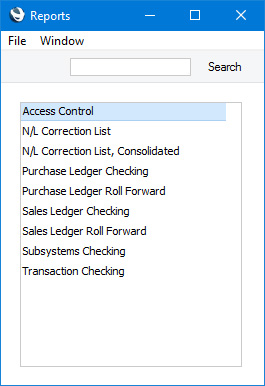
Where specified below, you can often report on a selection range, such as a range of Accounts, or a range of Items. To do this, enter the lowest and highest values of the range, separated by a colon. For example, to report on Accounts 001 to 010, enter "001:010" in the Account field. Depending on the field, the sort used might be alpha or numeric. In the case of an alpha sort, a range of 1:2 would also include 100, 10109, etc.
Use the Media options at the bottom of the specification window to determine the print destination of the report. The default is to print to screen. You can initially print to screen and subsequently send the report to a printer by clicking the Printer icon at the top of the window (Windows/macOS) or by selecting 'Recalculate and Print' from the Operations menu. If you are using iOS or Android, you will find this function on the Tools menu (with 'wrench' icon). You can also print the report to disk as a text file. This will be useful if you want to format the report in your house style before printing.
Once you have entered the reporting criteria and have chosen a print destination, click or tap [Run].
If you print a report to screen, you can use the 'Recalculate' command on the Operations menu of the report window to update the report after making alterations to background data. The 'Reopen Report Specification' command on the same menu allows you to produce a new report using different reporting criteria. If you are using iOS or Android, the 'Recalculate' function will be on the Tools menu. There will be no 'Reopen Report Specification' command: tap < to go back to the specification window instead.
Please follow the links below for details about each report:
- Introduction
- Access Control
- N/L Correction List
- N/L Correction List, Consolidated
- Purchase Ledger Checking
- Purchase Ledger Roll Forward
- Sales Ledger Checking
- Sales Ledger Roll Forward
- Subsystems Checking
- Transaction Checking
Go back to:
- Home page for Data Integrity module manual
- Home page for Standard ERP manual
Access Control
The Access Control report is a list of Global Users and Persons, showing the Companies that each user has access to, together with the level of access.When printed to screen, the Access Control report has the Standard ERP Drill-down feature. Click (Windows/macOS) or tap (iOS/Android) on an Access Group in the report to open the corresponding Access Group record.
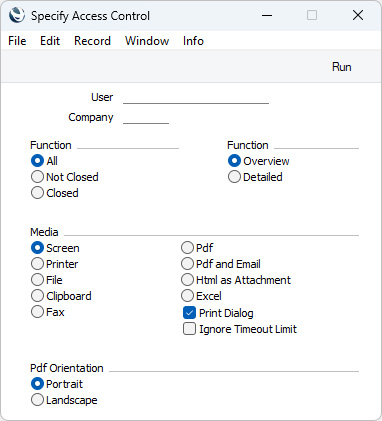
- User
- Paste Special
Person register, System module and Global User register, Technics module
- If you need the report to list the Companies that a particular user has access to, enter that user's Signature here.
- If you have more than one Company in your database, the 'Paste Special' list will only include the Person records that are stored in the Company in which you are working. If you need to report on a Person from another Company, that Person will not be included in the 'Paste Special' list but you can enter their Signature in this field yourself.
- If you have more than one Company in your database, the 'Paste Special' list will only include the Person records that are stored in the Company in which you are working. If you need to report on a Person from another Company, that Person will not be included in the 'Paste Special' list but you can enter their Signature in this field yourself.
- Company
- If you need the report to list the users that have access to a particular Company, enter the Company Code of that Company here.
- Function
- Use these options to specify whether the report should include or exclude Global Users and Persons that have been marked as Closed.
- Function
- Use these options to specify the level of detail that you need to be included in the report.
- In both cases, the report will first list Global Users, then Persons stored in the first Company, followed by Persons stored in the second Company and so on.
- Overview
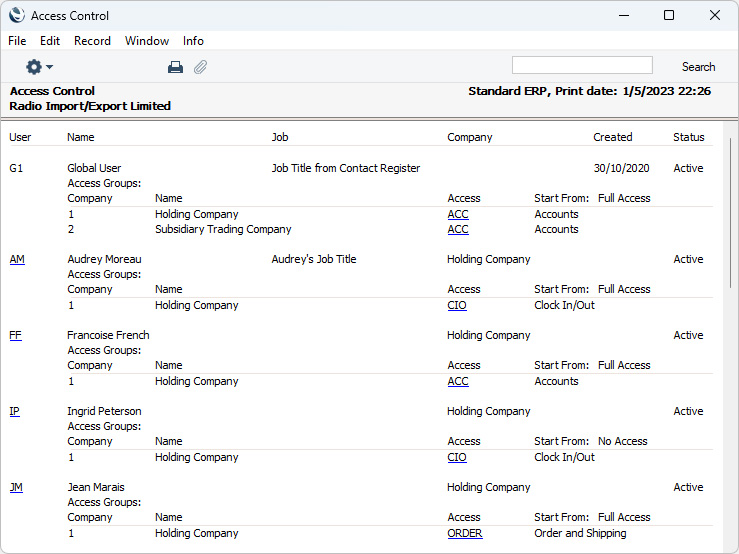
- This version of the report will show the Signature and Name of each user, their Job Title, the date when the Global User or Person record was created, the Status (Active or Closed) and the Start Access Level (No Access or Full Access).
- The Job Title will be taken from the user's Contact record (Job Title field on the 'Comments' card). If a user is a Global User, their Job Title will only be shown if you produce the report from the Company containing their Contact record.
- If the user is a Global User, the Companies that they have access to will then be listed, together with Access Groups.
- If the user is a Person, the Company in which their Person record is stored will be shown next to their Job Title, together with Access Groups.
- In the example report illustrated below, G1 is a Global User with access to two Companies. The other visible users are Persons stored in Company 1 (Persons stored in Company 2 would be visible on scrolling down). A Person has the Company Name ("Holding Company") between their Job Title and their Status, while this space is empty for Global Users.
- The Job Title will be taken from the user's Contact record (Job Title field on the 'Comments' card). If a user is a Global User, their Job Title will only be shown if you produce the report from the Company containing their Contact record.
- Detailed
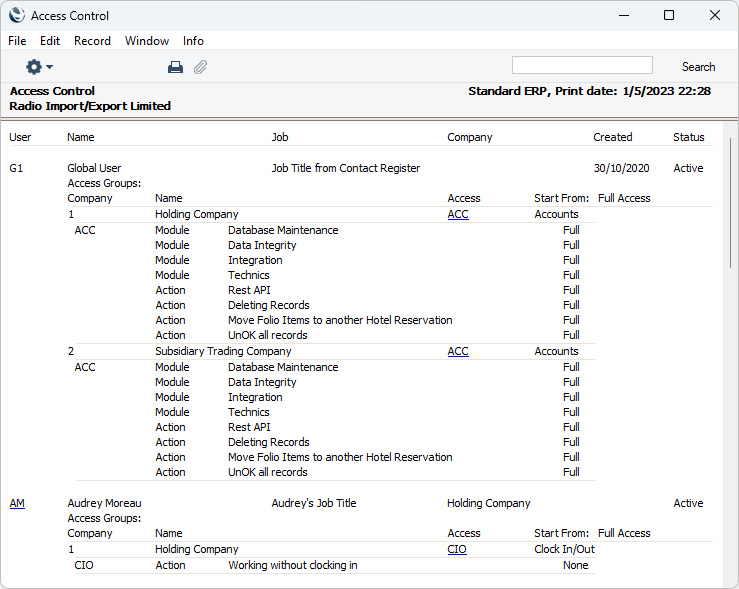
- In addition to the information shown in the Overview, this option also lists the contents of the relevant Access Group.
- In both cases, the report will first list Global Users, then Persons stored in the first Company, followed by Persons stored in the second Company and so on.
Reports in the Data Integrity module:
- Introduction
- Access Control
- N/L Correction List
- N/L Correction List, Consolidated
- Purchase Ledger Checking
- Purchase Ledger Roll Forward
- Sales Ledger Checking
- Sales Ledger Roll Forward
- Subsystems Checking
- Transaction Checking
- Home page for Data Integrity module manual
- Home page for Standard ERP manual
N/L Correction List
The Correction List report is also available in the Nominal Ledger. Please refer here for details.---
Reports in the Data Integrity module:
- Introduction
- Access Control
- N/L Correction List
- N/L Correction List, Consolidated
- Purchase Ledger Checking
- Purchase Ledger Roll Forward
- Sales Ledger Checking
- Sales Ledger Roll Forward
- Subsystems Checking
- Transaction Checking
- Home page for Data Integrity module manual
- Home page for Standard ERP manual
N/L Correction List, Consolidated
The N/L Correction List, Consolidated report is similar to the Correction List in the Nominal Ledger, with the exception that it lists corrected or updated Transactions in every Company in the database. You can run the report from any Company. Please refer here for full details about this report.---
Reports in the Data Integrity module:
- Introduction
- Access Control
- N/L Correction List
- N/L Correction List, Consolidated
- Purchase Ledger Checking
- Purchase Ledger Roll Forward
- Sales Ledger Checking
- Sales Ledger Roll Forward
- Subsystems Checking
- Transaction Checking
- Home page for Data Integrity module manual
- Home page for Standard ERP manual
Purchase Ledger Checking
The Purchase Ledger Checking report is a tool designed to help track down the cause of any discrepancy between the overall result in the Purchase Ledger report and the balance on the Creditor Account. To use this tool, follow these steps:- The overall result in the Purchase Ledger report and the balance on the Creditor Account should always match. It is recommended that you check periodically that this is the case. You can do this in two ways:
- Produce the Purchase Ledger report and a Nominal Ledger report for the Creditor Account and compare the results.
- Produce a Purchase Ledger Checking report for a particular date. In effect, this option is an automated version of the first option, as the Purchase Ledger Checking report will compare the overall total in the Purchase Ledger report for the specified date with the balance on the Creditor Account on the same date.
- Produce the Purchase Ledger report and a Nominal Ledger report for the Creditor Account and compare the results.
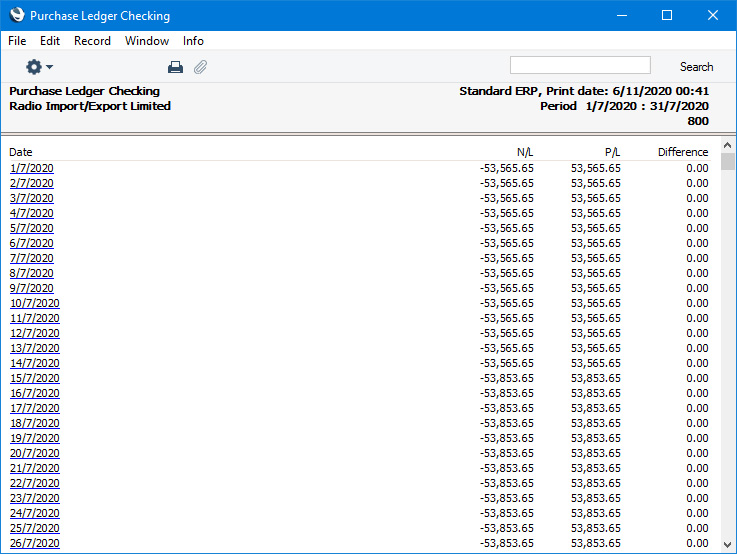
- If there is a discrepancy between the Purchase Ledger report and the balance on the Creditor Account, produce the Purchase Ledger Checking report for the period between the last date when you know when there was no difference and the current date. This will reveal the date when the discrepancy occurred.
- Drill down from the date in the report when the discrepancy occurred. This will produce a Purchase Ledger Roll Forward report for that date, listing the Purchase Ledger records (Purchase Invoices, Payments, etc) and Nominal Ledger Transactions posting to the Creditor Account for that date.
- Again using drill-down, check that each record and Transaction is correct and make any corrections as necessary.
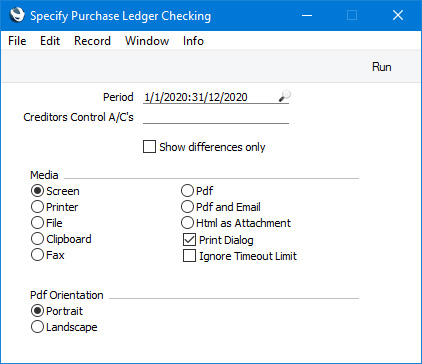
- Period
- Paste Special
Reporting Periods setting, System module
- Specify the period to be covered by the report.
- For each day in the period, the report will display the overall result of the Purchase Ledger report and the balance on the Creditor Account, comparing the two figures. Because the Purchase Ledger report will be calculated for each day in the period, the report may take some time to be produced if you specify a period that is more than a few days in duration.
- For each day in the period, the report will display the overall result of the Purchase Ledger report and the balance on the Creditor Account, comparing the two figures. Because the Purchase Ledger report will be calculated for each day in the period, the report may take some time to be produced if you specify a period that is more than a few days in duration.
- Creditors Control A/C's
- Paste Special
Account register, Nominal Ledger/System module
- Specify the Creditor Account that is to be the subject of the report.
- Show differences only
- By default, the report will contain a separate line for each date in the report period. Select this option if you would only like a date to be included in the report if there is a difference between the overall result of the Purchase Ledger report and the balance on the Creditor Account. This can make the report easier to read, but will not make the report faster to produce because the Purchase Ledger report will still need to be calculated for each day in the period.
Reports in the Data Integrity module:
- Introduction
- Access Control
- N/L Correction List
- N/L Correction List, Consolidated
- Purchase Ledger Checking
- Purchase Ledger Roll Forward
- Sales Ledger Checking
- Sales Ledger Roll Forward
- Subsystems Checking
- Transaction Checking
- Home page for Data Integrity module manual
- Home page for Standard ERP manual
Purchase Ledger Roll Forward
The Purchase Ledger Roll Forward report is a list of Purchase Invoices, Payments, Cash Transactions and Nominal Ledger Transactions from a particular date that post to a specified Creditor Account. It is one of the tools that you can use when you need to track down the cause of any discrepancy between the overall result in the Purchase Ledger report and the balance on the Creditor Account.If you have such a discrepancy, follow these steps:
- Use the Purchase Ledger Checking report to find the date when the discrepancy occurred.
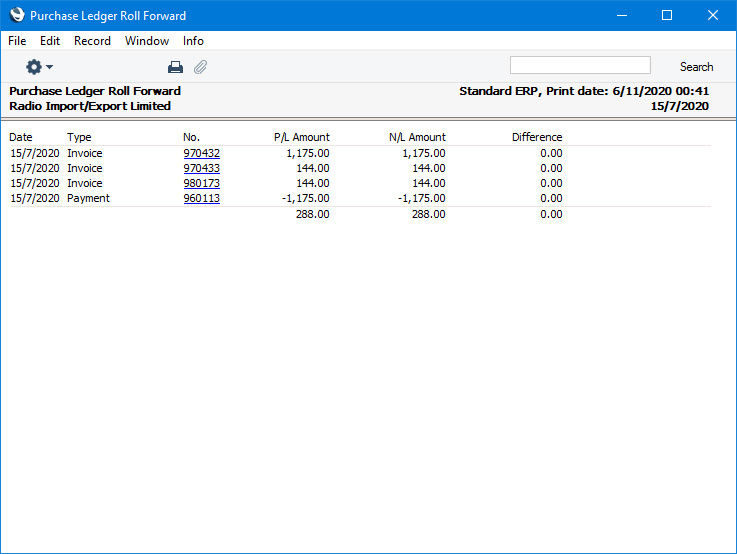
- Produce a Purchase Ledger Roll Forward report for that date. This will list the Purchase Ledger records (Purchase Invoices and Payments), Cash In and Cash Out records and Nominal Ledger Transactions posting to the Creditor Account on that date.
You can produce the Purchase Ledger Roll Forward report by drilling down from a date in the Purchase Ledger Checking report, and as a separate report from the 'Reports' list in the Data Integrity module.
- Use drill-down from the Purchase Ledger Roll Forward report to check that each record and Transaction is correct and make any corrections as necessary.
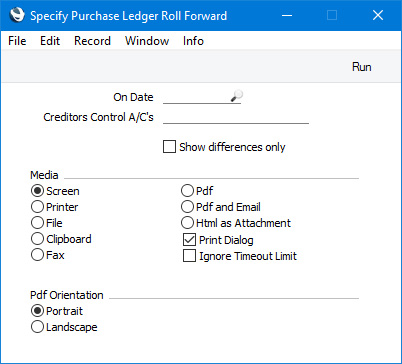
- On Date
- Paste Special
Choose date
- Specify a date for the report. The report will list the Purchase Invoices, Payments, Cash In and Cash Out records and Nominal Ledger Transactions from this date that post to the Creditor Account specified below.
- Creditors Control A/C's
- Paste Special
Account register, Nominal Ledger/System module
- Specify the Creditor Account that is to be the subject of the report. You can also specify a number of Creditor Accounts, separated by commas.
---
Reports in the Data Integrity module:
- Introduction
- Access Control
- N/L Correction List
- N/L Correction List, Consolidated
- Purchase Ledger Checking
- Purchase Ledger Roll Forward
- Sales Ledger Checking
- Sales Ledger Roll Forward
- Subsystems Checking
- Transaction Checking
- Home page for Data Integrity module manual
- Home page for Standard ERP manual
Sales Ledger Checking
The Sales Ledger Checking report is a tool designed to help track down the cause of any discrepancy between the overall result in the Sales Ledger report and the balance on the Debtor Account. To use this tool, follow these steps:- The overall result in the Sales Ledger report and the balance on the Debtor Account should always match. It is recommended that you check periodically that this is the case. You can do this in two ways:
- Produce the Sales Ledger report and a Nominal Ledger report for the Debtor Account and compare the results.
- Produce a Sales Ledger Checking report for a particular date. In effect, this option is an automated version of the first option, as the Sales Ledger Checking report will compare the overall total in the Sales Ledger report for the specified date with the balance on the Debtor Account on the same date.
- Produce the Sales Ledger report and a Nominal Ledger report for the Debtor Account and compare the results.
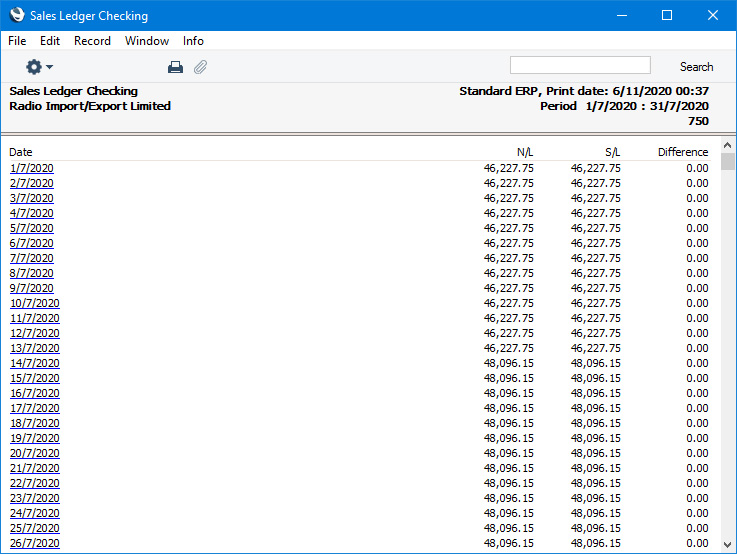
- If there is a discrepancy between the Sales Ledger report and the balance on the Debtor Account, produce the Sales Ledger Checking report for the period between the last date when you know when there was no difference and the current date. This will reveal the date when the discrepancy occurred.
- Drill down from the date in the report when the discrepancy occurred. This will produce a Sales Ledger Roll Forward report for that date, listing the Sales Ledger records (Invoices and Receipts) and Nominal Ledger Transactions posting to the Debtor Account for that date.
- Again using drill-down, check that each record and Transaction is correct and make any corrections as necessary.
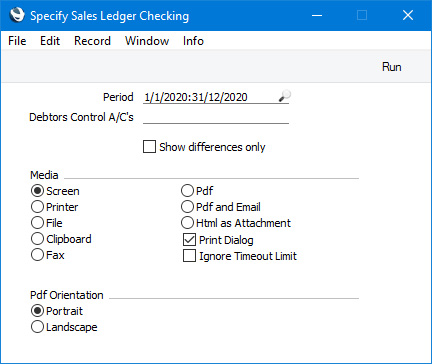
- Period
- Paste Special
Reporting Periods setting, System module
- Specify the period to be covered by the report.
- For each day in the period, the report will display the overall result of the Sales Ledger report and the balance on the Debtor Account, comparing the two figures. Because the Sales Ledger report will be calculated for each day in the period, the report may take some time to be produced if you specify a period that is more than a few days in duration.
- For each day in the period, the report will display the overall result of the Sales Ledger report and the balance on the Debtor Account, comparing the two figures. Because the Sales Ledger report will be calculated for each day in the period, the report may take some time to be produced if you specify a period that is more than a few days in duration.
- Debtors Control A/C's
- Paste Special
Account register, Nominal Ledger/System module
- Specify the Debtor Account that is to be the subject of the report.
- Show differences only
- By default, the report will contain a separate line for each date in the report period. Select this option if you would only like a date to be included in the report if there is a difference between the overall result of the Sales Ledger report and the balance on the Debtor Account. This can make the report easier to read, but will not make the report faster to produce because the Sales Ledger report will still need to be calculated for each day in the period.
Reports in the Data Integrity module:
- Introduction
- Access Control
- N/L Correction List
- N/L Correction List, Consolidated
- Purchase Ledger Checking
- Purchase Ledger Roll Forward
- Sales Ledger Checking
- Sales Ledger Roll Forward
- Subsystems Checking
- Transaction Checking
- Home page for Data Integrity module manual
- Home page for Standard ERP manual
Sales Ledger Roll Forward
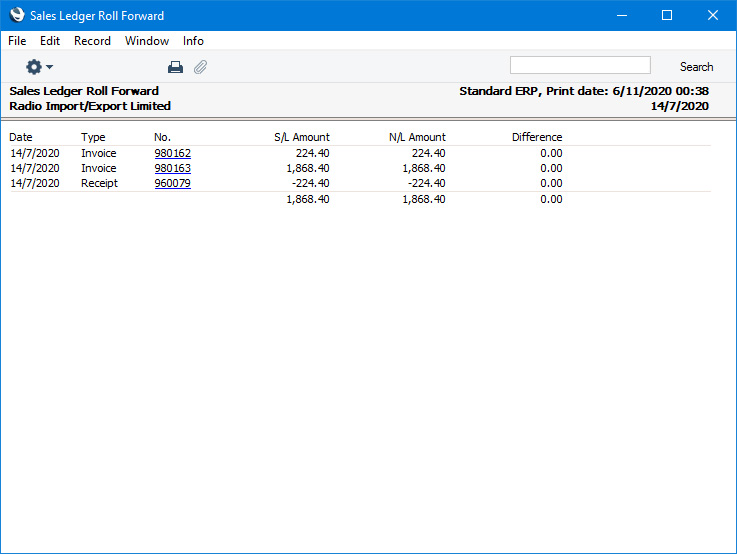
The Sales Ledger Roll Forward report is a list of Invoices, Receipts and Nominal Ledger Transactions from a particular date that post to a specified Debtor Account. It is one of the tools that you can use when you need to track down the cause of any discrepancy between the overall result in the Sales Ledger report and the balance on the Debtor Account.If you have such a discrepancy, follow these steps:
- Use the Sales Ledger Checking report to find the date when the discrepancy occurred.
- Produce a Sales Ledger Roll Forward report for that date. This will list the Sales Ledger records (Invoices and Receipts) and Nominal Ledger Transactions posting to the Debtor Account on that date.
You can produce the Sales Ledger Roll Forward report by drilling down from a date in the Sales Ledger Checking report, and as a separate report from the 'Reports' list in the Data Integrity module.
- Use drill-down from the Sales Ledger Roll Forward report to check that each record and Transaction is correct and make any corrections as necessary.
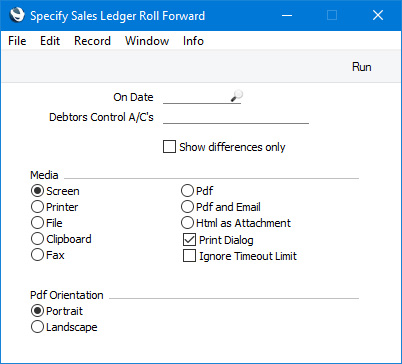
- On Date
- Paste Special
Choose date
- Specify a date for the report. The report will list the Invoices, Receipts and Nominal Ledger Transactions from this date that post to the Debtor Account specified below.
- Debtors Control A/C's
- Paste Special
Account register, Nominal Ledger/System module
- Specify the Debtor Account that is to be the subject of the report. You can also specify a number of Debtor Accounts, separated by commas.
---
Reports in the Data Integrity module:
- Introduction
- Access Control
- N/L Correction List
- N/L Correction List, Consolidated
- Purchase Ledger Checking
- Purchase Ledger Roll Forward
- Sales Ledger Checking
- Sales Ledger Roll Forward
- Subsystems Checking
- Transaction Checking
- Home page for Data Integrity module manual
- Home page for Standard ERP manual
Subsystems Checking
The Subsystems Checking report is also available in the System module. Please refer here for details.---
Reports in the Data Integrity module:
- Introduction
- Access Control
- N/L Correction List
- N/L Correction List, Consolidated
- Purchase Ledger Checking
- Purchase Ledger Roll Forward
- Sales Ledger Checking
- Sales Ledger Roll Forward
- Subsystems Checking
- Transaction Checking
- Home page for Data Integrity module manual
- Home page for Standard ERP manual
Transaction Checking
The Transaction Checking report is also available in the System module. Please refer here for details.---
Reports in the Data Integrity module:
- Introduction
- Access Control
- N/L Correction List
- N/L Correction List, Consolidated
- Purchase Ledger Checking
- Purchase Ledger Roll Forward
- Sales Ledger Checking
- Sales Ledger Roll Forward
- Subsystems Checking
- Transaction Checking
- Home page for Data Integrity module manual
- Home page for Standard ERP manual