Introduction to the Pricing Module
Standard ERP contains a powerful set of features that you can use to calculate and maintain the prices of the goods and services that you offer to your Customers. Most of these features are located in the Pricing module.When you sell an Item to a Customer, the price can be determined by some or all of the following factors:
- The Base Price of the Item. This is the standard sales price of the Item.
- The Item Formula in the Item record. If an Item has an Item Formula, its sales price will be a calculated figure based on the other Items in the sale. Examples are insurance, maintenance fees and delivery.
- The Price List that you have assigned to the Customer. You can have the prices in a Price List calculated using different formulae, and you can update prices periodically. You can have Price Lists in different Currencies, in which case the calculation of prices will include Currency conversion using the latest Exchange Rate.
A Price List can belong to one of two basic types. A "Single Price per Item" Price List will contain a single price for each Item, while a "Qty Dep Prices" Price List allows you to charge different prices for each Item depending on the quantity purchased by the Customer.
- The Discount Matrix that you have assigned to the Customer. Discount Matrices allow you to offer discounts on each Item depending on the quantity purchased by the Customer.
- The Multi-buy Discount that you have assigned to any of the Items purchased by the Customer. A "Multi-buy Discount" is a discount offered on the price of one Item that depends on the purchase of another. Examples are "Buy one get one free" and "Buy any three Items from a selection for a fixed price" offers.
The Pricing module in Standard ERP:
- Introduction
- The Base Price
- Prices for Different Units of Measure
- Item Formulae
- Structure of Price Lists
- Price Formulae
- Price Lists
- Prices
- Deleting a Price List
- Price List Examples
- Quantity Discounts
- Multi-buy Discounts
- Home page for Items and Pricing manual
- Home page for Standard ERP manual
The Base Price
This page describes the role of the Base Price in determining the sales price of an Item.---
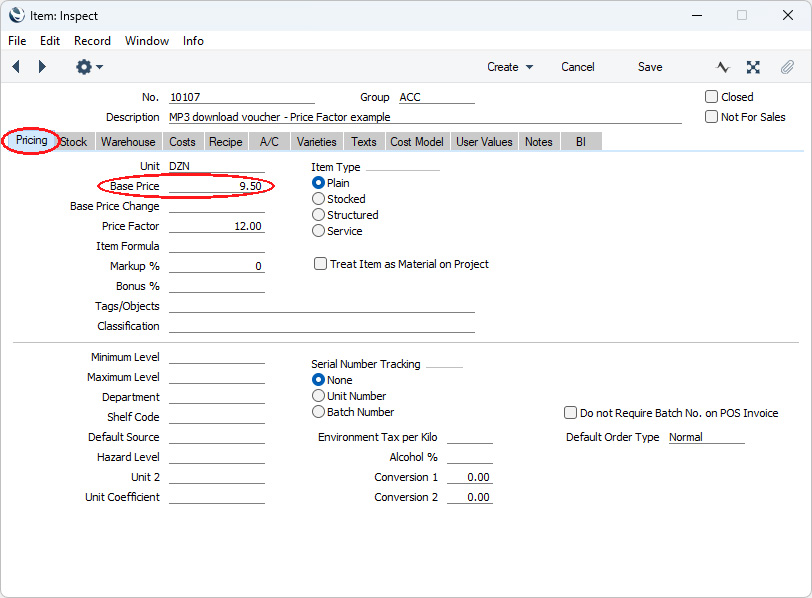
Each Item has a Base Price field, shown on the 'Pricing' card. This is the Item's normal sales price:
On the 'Costs' card of the Item record, there is also a Cost Price. This is the cost of purchasing or making the Item. The Cost Price will be used to calculate the Gross Profit of Orders and Invoices.
The 'Pricing' card of the Item record also contains a Unit field. This is the unit of measurement to which all prices refer. When you include the Item in a transaction of any kind (e.g. Invoice, Sales or Purchase Order, Goods Receipt), the Quantity that you enter should refer to this Unit.
For example, if you buy and sell an Item in boxes of twelve, its Unit should be "Dozen". If the Quantity in an Invoice is 2, this means "two boxes of twelve". The Base and Cost Prices of the Item will also refer to this Unit, as will any prices in Price Lists. If the Base Price is 85.00, this means "85.00 for a box of twelve"
If you need to sell an Item using different units of measurement (e.g. in single units and boxes of twelve), please refer to the Prices for Different Units of Measure page.
---
The Pricing module in Standard ERP:
- Introduction
- The Base Price
- Prices for Different Units of Measure
- Item Formulae
- Structure of Price Lists
- Price Formulae
- Price Lists
- Prices
- Deleting a Price List
- Price List Examples
- Quantity Discounts
- Multi-buy Discounts
- Home page for Items and Pricing manual
- Home page for Standard ERP manual
Prices for Different Units of Measure
This page describes how prices will be calculated when you sell an Item using different units of measurement.---
Price Factors
If an Item can be sold using two units of measure (for example, in individual units and in boxes of twelve), you can use the Price Factor field on the 'Pricing' card of the Item record to help calculate pricing. For example, if the Unit is one dozen because the Item is usually sold in dozens, enter "12" as the Price Factor if the Item can also be sold individually:
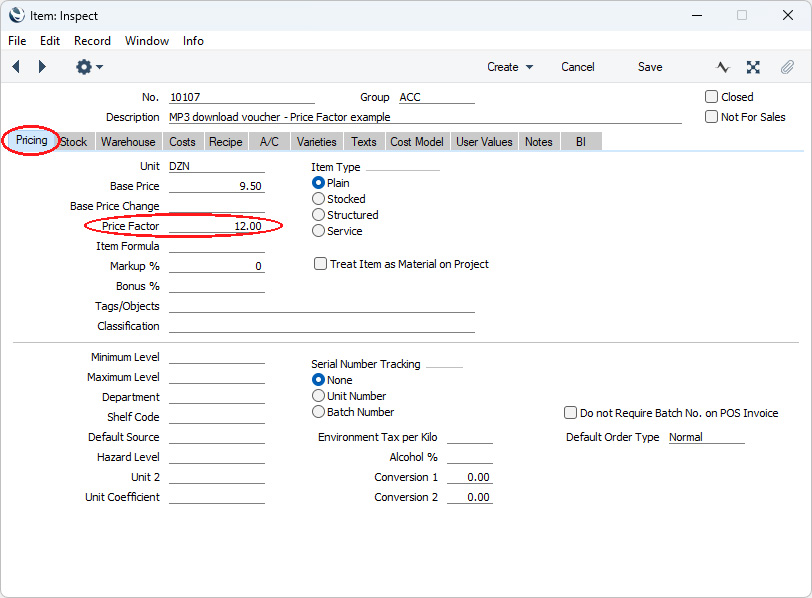
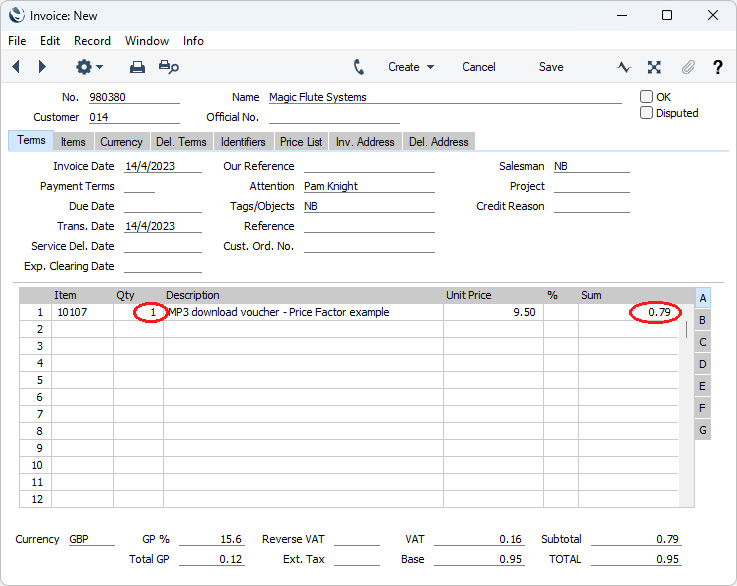
Using a Price Factor can be useful if a price per unit has more than three decimal places (the Unit Price field in a sales transaction and the Base Price field in the Item record can only support three decimal places). For example, if the price per unit is 0.0001, you can enter 0.01 as the Base Price and 100 as the Price Factor. This will result in a price per unit of 0.0001.
The Price Factor also applies to Purchase Orders. Again, you should enter the quantity of single units that you need to buy, and the Sum will be calculated using the same formula.
Unit Quantity Factors
The Price Factor can therefore be useful for Items that you sell using two units of measure (e.g. single units and dozens). However, it can be difficult to know which unit of measure to use when entering a transaction, and it is limited to two units of measure.
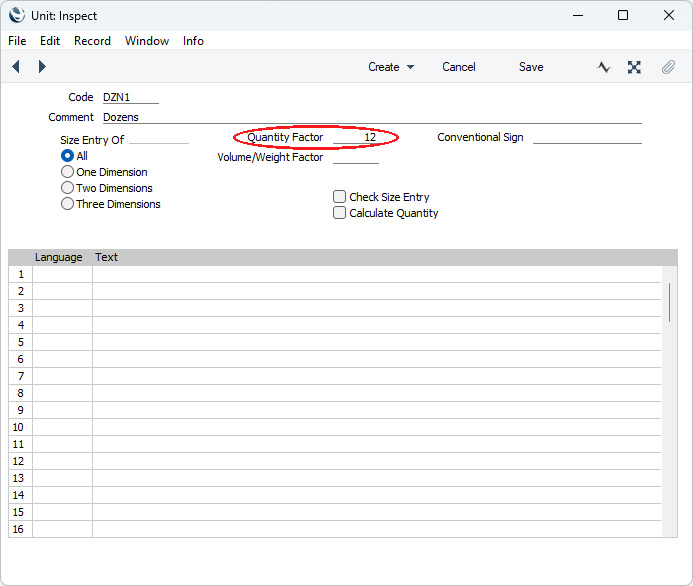
An alternative to the Price Factor is to specify a Quantity Factor in each Unit record (i.e. for each unit of measure). The Quantity Factor will allow you to relate each unit of measure to a single unit. For example, in a Unit record representing a dozen, the Quantity Factor will be 12 since a dozen is twelve individual units. In a Unit record representing a single Item, the Quantity Factor will be 1. In the example in the illustrations below we have used a new Unit and Item to remove the influence of the Price Factor.
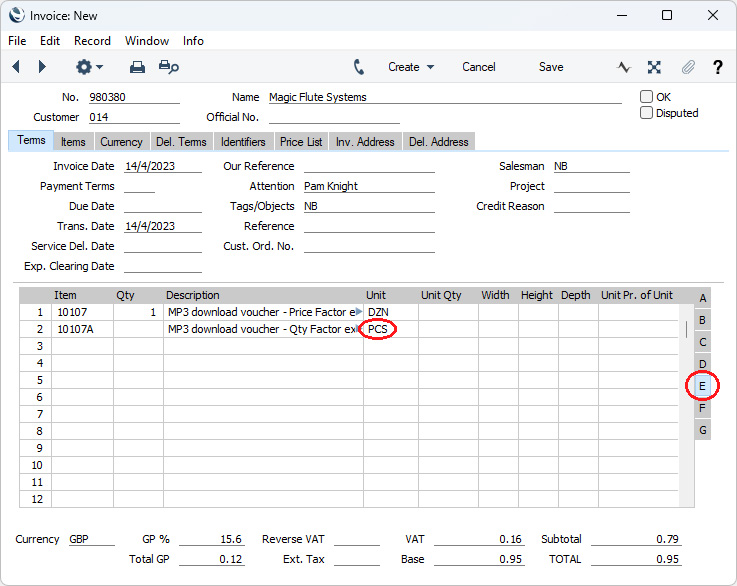
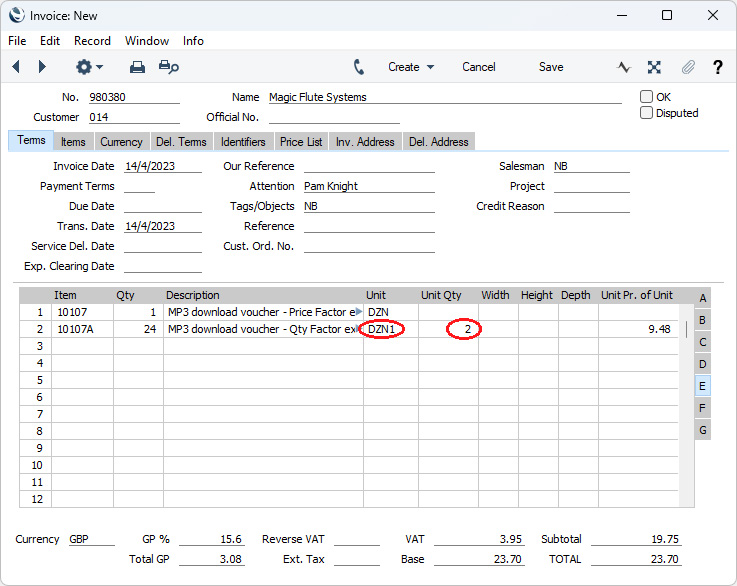
When you enter the unit of measure in the Unit field, the Unit Pr. of Unit field will be updated. This shows the unit price of the new unit of measure (9.48 per dozen in the example illustrated above). You can change this price if necessary. One situation where this can be useful is when you are selling an Item that has a very low unit price. For example, an Item might have a price of 0.01 for a single unit. If you sell the Item in boxes of one hundred, a box will usually sell for 1.00. If you sell a box for 0.95, you can change the Unit Pr. of Unit to 0.95 or you can enter a 5% discount. However, you cannot change the Unit Price on flip A from 0.01 to 0.0095 because this price has too many decimal places for the Unit Price field.
Supplier Units
If you buy and sell an Item using different units of measurement, enter the purchasing unit of measurement in the relevant Purchase Items, in the Supplier Unit field. Please refer to the description of the Supplier Unit and Unit. Conv fields in the Purchase Item register here for more details.
---
The Pricing module in Standard ERP:
- Introduction
- The Base Price
- Prices for Different Units of Measure
- Item Formulae
- Structure of Price Lists
- Price Formulae
- Price Lists
- Prices
- Deleting a Price List
- Price List Examples
- Quantity Discounts
- Multi-buy Discounts
- Home page for Items and Pricing manual
- Home page for Standard ERP manual
Item Formulae
This page describes using Items with calculated prices in sales transactions.---
When entering Quotations, Orders or Invoices, you can use Items whose prices are calculated from the value of the other Items sold. Examples might be freight or freight insurance. Use the Item Formula register in the Pricing module to define the formulae used in these calculations.
To use this feature, follow these steps:
- Enter an Item Formula as described below.
- Assign the Item Formula to an Item in the Item register, using the Item Formula field on the 'Pricing' card.
- Enter this Item on the last line of a Quotation, Order or Invoice. The Unit Price of the Item will be calculated by applying the Formula to the value of the other Items sold.
To work with Item Formulae, change to the Pricing module using the [Switch Module] button in the Navigation Centre. Then, if you are using Windows or macOS , click the [Registers] button, also in the Navigation Centre and then double-click 'Item Formulae' in the resulting list. If you are using iOS or Android, tap the [Registers] button in the Navigation Centre and then tap 'Item Formulae' in the 'Registers' list . The 'Item Formulae: Browse' window is displayed, showing the Item Formulae that you have previously entered.
To enter a new Item Formula, select 'New' from the Create menu (Windows/macOS) or the + menu (iOS/Android). You can also use the Ctrl-N (Windows) or ⌘-N (macOS) keyboard shortcut. Alternatively, highlight or open an Item Formula similar to the one you want to enter, and select 'Duplicate' from the same menu. If you don't want to open the 'Item Formulae: Browse' window before creating a new record, you can also use the + menu in the Navigation Centre (all platforms).
When you have finished working with the Item Formula, save it by clicking the [Save] button in the Button Bar (Windows/macOS) or by tapping √ (iOS/Android). You can then close it using the close box (Windows/macOS) or by tapping < (iOS/Android). To close the record without saving changes, click the close box.
For each record, enter a unique Code and a name and then use the grid to define the Item Formula. This is perhaps best explained by a series of examples.
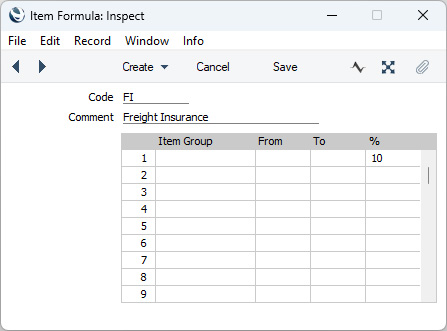
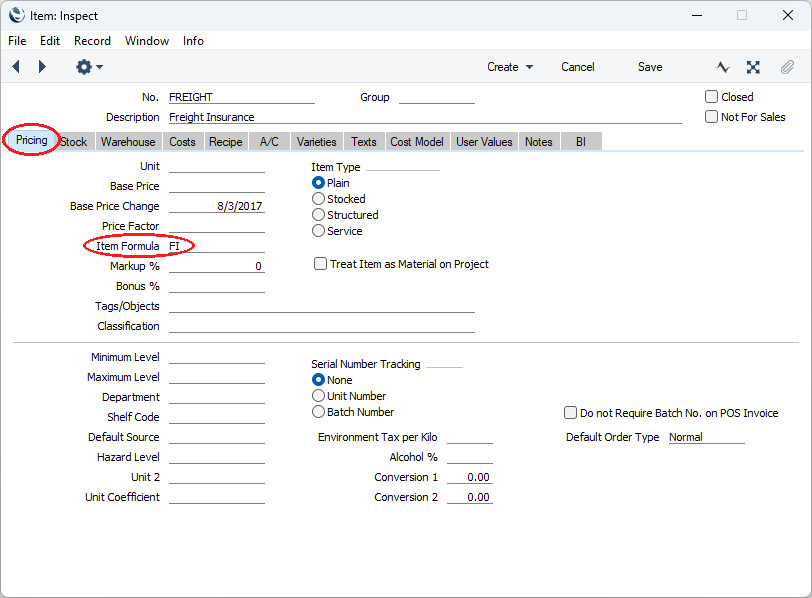
Once you have entered your Item Formulae, you can assign them to your Item records. The Item shown below is Freight Insurance: we have left the Base Price empty and entered the "FI" Item Formula in the Item Formula field (if you enter both a Base Price and an Item Formula, the Base Price will be ignored):
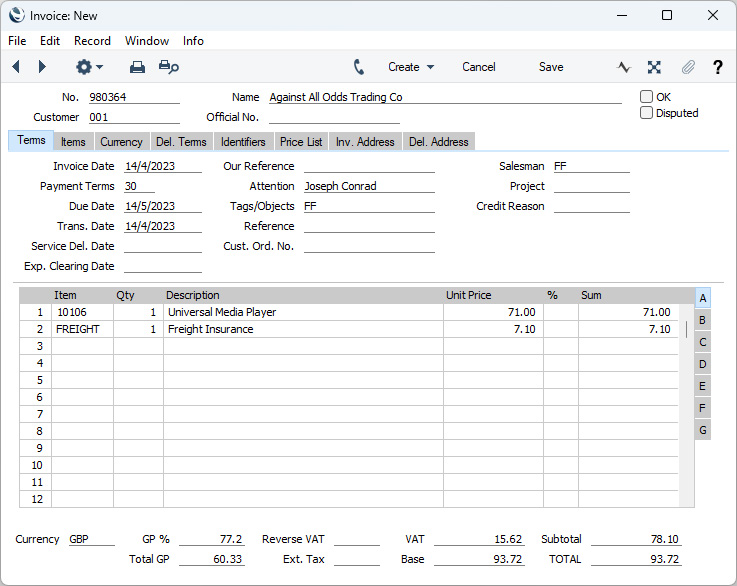
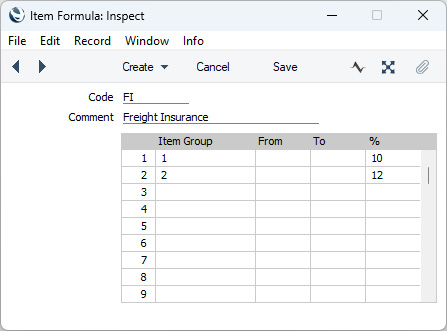
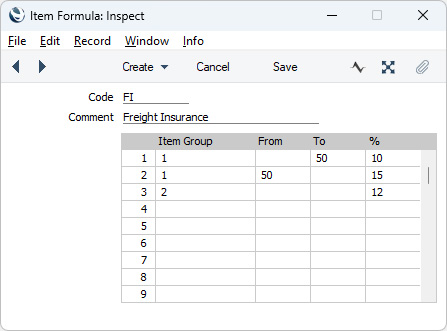
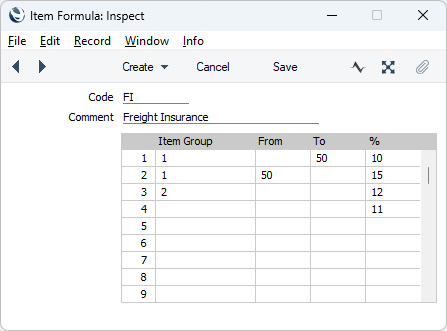
Please refer here for details about using Item Formulae when sales prices include VAT.
---
The Pricing module in Standard ERP:
- Introduction
- The Base Price
- Prices for Different Units of Measure
- Item Formulae, including:
- Structure of Price Lists
- Price Formulae
- Price Lists
- Prices
- Deleting a Price List
- Price List Examples
- Quantity Discounts
- Multi-buy Discounts
- Home page for Items and Pricing manual
- Home page for Standard ERP manual
Item Formulae when Prices include VAT
The page describes using Item Formulae when sales prices include VAT Please refer here for more information about Item Formulae.---
Prices in Invoices, Orders and Quotations will include VAT in two circumstances:
- You have specified in the Account Usage S/L setting in the Sales Ledger that Base Prices include VAT.
- An individual Invoice, Order or Quotation uses a Price List that includes VAT.
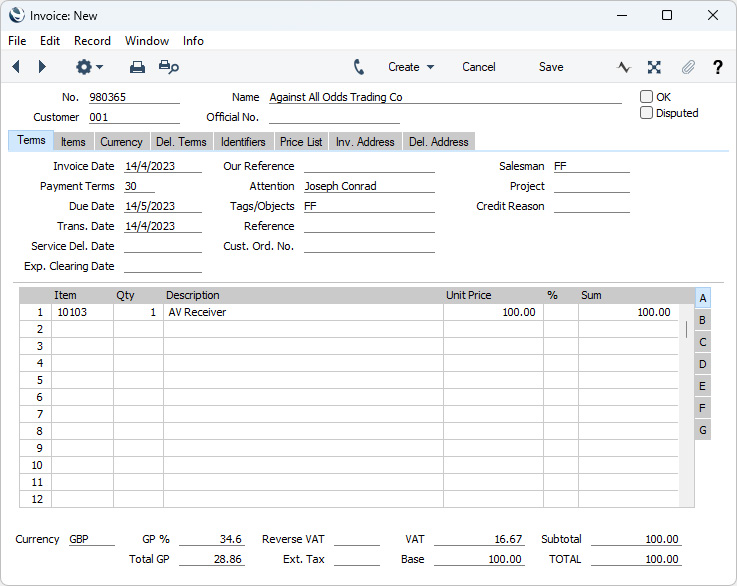
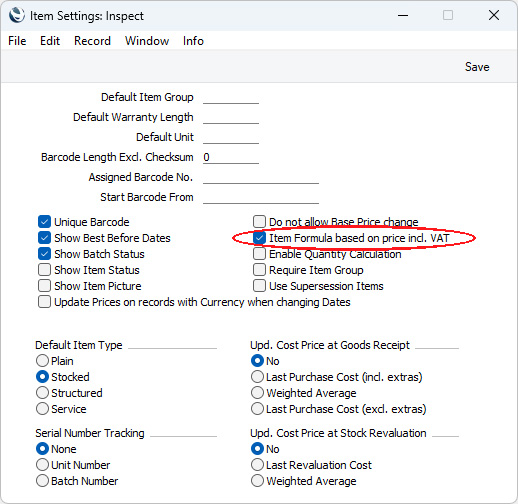
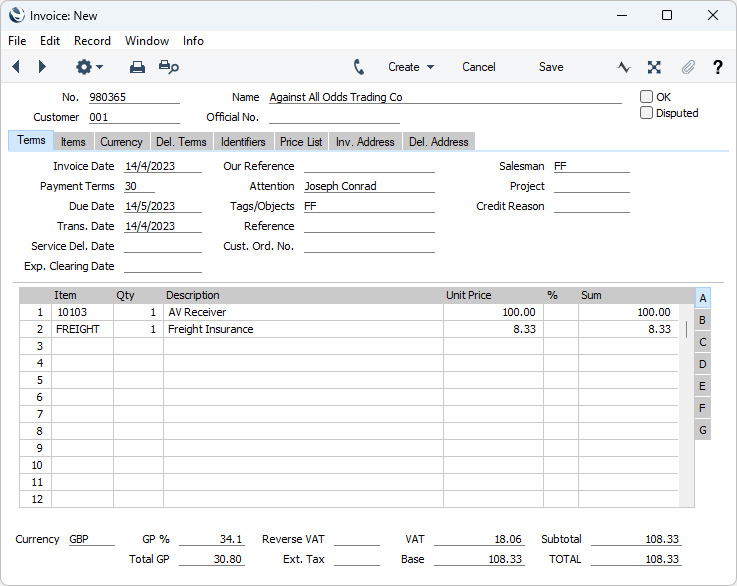
If you are using the Item Formula based on price incl. VAT option, the Item Formula calculation will be based on the sales prices of the other Items including VAT:
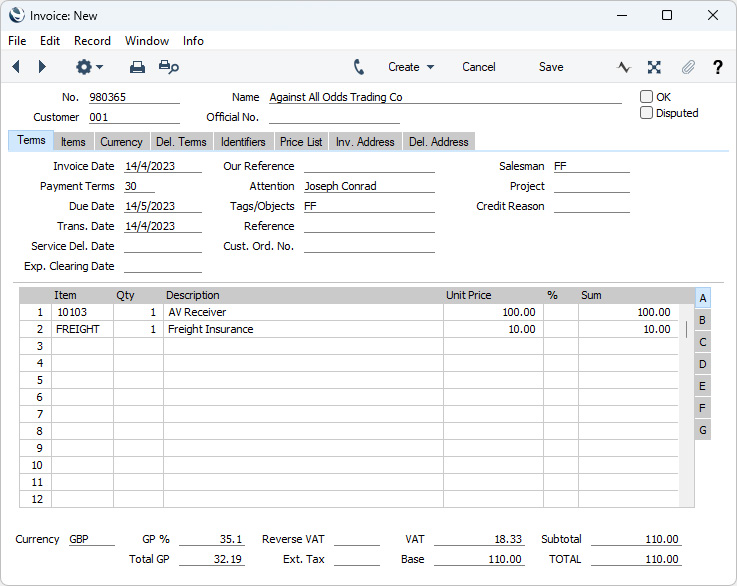
The Item Formula based on price incl. VAT option will only be used when prices include VAT as described above: it has no effect in other circumstances.
---
The Pricing module in Standard ERP:
- Introduction
- The Base Price
- Prices for Different Units of Measure
- Item Formulae, including:
- Item Formulae when Prices include VAT
- Structure of Price Lists
- Price Formulae
- Price Lists
- Prices
- Deleting a Price List
- Price List Examples
- Quantity Discounts
- Multi-buy Discounts
- Home page for Items and Pricing manual
- Home page for Standard ERP manual
Structure of Price Lists
The Price Lists feature in Standard ERP allows you to sell Items at different prices to different Customers. In other words, you can use Price Lists when you need more than one sales price for each Item. For example, you might offer different prices to retail and trade Customers, and/or to retail and educational Customers. You will then need separate trade, educational and possibly retail Price Lists, which you should assign to each Customer as appropriate. When you enter a Customer in an Order, Quotation or Invoice, the appropriate Price List will be used and so the correct prices will be selected automatically. Depending on access rights, you will be able to change to a different Price List in an individual sales transaction. A Price List in Standard ERP consists of two elements: the Price List itself and the individual prices. These elements are as follows:
- The Price List register contains the basic details of each Price List (the name, Currency, period of validity, etc). In the example mentioned in the previous paragraph, you will need at least two Price Lists: a trade Price List and an education Price List. You could rely on each Item's Base Price when selling to retail Customers, or you could use a third Price List with these Customers. In a Price List record you will specify its name, Currency if there is one and VAT status (whether the prices in the Price List include or exclude VAT).
- Having defined your Price Lists, you should then enter the prices themselves. You can do this in one of two places, depending on the Type of the Price List:
- A "Single Price per Item" Price List will contain a single price for each Item. These prices will be stored in the Price register. The prices in a "BuyBack" Price List will also be stored in the Price register in the Pricing module.
- A "Qty Dep Prices" Price List can contain several prices for each Item, allowing you to charge different prices for an Item depending on the quantity that you sell. These prices will be stored in the Qty Dependent Prices setting, also in the Pricing module.
The Price register and the Qty Dependent Prices setting will both usually contain one record for each Item/Price List combination (although in the case of the Price register you can create separate records for specific Customers). In the example and assuming a "Single Price per Item" Price List, you will need to enter one record to the Price register for the trade price of an Item, one record for the educational price of the same Item and, if you are not relying on the Item's Base Price, a third record for its retail price. You can enter these records yourself, or you can have them created by the 'Calculate Prices' Maintenance function. - A "Single Price per Item" Price List will contain a single price for each Item. These prices will be stored in the Price register. The prices in a "BuyBack" Price List will also be stored in the Price register in the Pricing module.
- The Unit Price will be taken from the Price record with the relevant Item/Price List/Customer combination. There can only be one Price record for a particular Item/Price List/Customer combination.
- It will be taken from the Price record with the relevant Item/Price List combination where the Customer field is empty. Again, there can only be one Price record with this combination.
- The Base Price from the Item record will be used.
- The Unit Price will be taken from the Qty Dependent Prices record with the relevant Item/Price List combination and will depend on the quantity sold. There can only be one Qty Dependent Price record with this combination.
- The Base Price from the Item record will be used.
- Enter the Items with their Base Prices, using the Item register. An Item's Base Price should be its standard sales price.
- Define Price Formulae, using the Price Formula register in the Pricing module. If you will use the 'Calculate Prices' Maintenance function to create your prices as mentioned in step 4 below, the next step is to define the Price Formulae that the function will use to calculate these prices. In our example, the retail price might be the same as the Base Price, the trade price might represent a discount of 20% and an educational price might represent a discount of 30%. For these three calculations, you will need three Price Formulae.
To define Price Formulae, use the Price Formula register in the Pricing module. This register is described in detail here.
- Define each Price List (in our example, retail, trade and educational) using the Price List register in the Pricing module.
If you will use the 'Calculate Prices' Maintenance function to create the Prices in each Price List, you should list the Items or Item Groups in each Price List together with the appropriate Price Formulae. For example, in the educational Price List, list every Item that you are likely to sell such Customers, together with the 30% discount Price Formula. The Maintenance function will create Price records for all the Items that you include in the Price List, and these Price records will contain prices calculated using the Price Formulae.
Price Lists are described in detail here.
- In this step, you should enter the prices themselves, as follows:
- If the Type of the Price List is "Single Price per Item", you can either do this yourself, or you can use the 'Calculate Prices' Maintenance function in the Pricing module to have them calculated at one stroke. If you will do it yourself, you should add separate records to the Price register in the Pricing module for each Item on each Price List with an appropriate price. The 'Calculate Prices' function will create these records and calculate the prices records by applying the specified Price Formula to each Item in each Price List.
The first time that you run the 'Calculate Prices' function, it will create the relevant Price records. In our example, it will create three Price records for each Item: one each containing the retail, trade and education prices. The next time you run the function, it will not create more Price records but will instead recalculate the prices in the existing ones. This ensures that there will always only be a single Price record for each Item/Price List combination.
It is important that you run the 'Calculate Prices' function whenever the Base Value of an Item changes or, if you have Price Lists in various Currencies, whenever there is a change in the Exchange Rate. Otherwise, you risk quoting out-of-date prices to your Customers. The Base Value of an Item is the figure that is the basis of the price calculation (i.e. the figure to which the Price Formula is applied). This will usually be its Base Price or its Cost Price.
- If the Type of the Price List is "Qty Dep Prices", you can again create the prices yourself or you can use the 'Calculate Prices' function. In this case, do not add the records to the Price register but instead add them to the Quantity Dependent Prices setting in the Pricing module.
The first time that you run the 'Calculate Prices' function, it will create the relevant records in the Quantity Dependent Prices setting: one for each Item in each Price List. In each record, the function will add a single row in which it has calculated a price by applying the specified Price Formula to the relevant Item in each Price List. The function will not be able to add the quantity pricing to these records, so you will need to do this yourself. The next time you run the function, it will not update existing Quantity Dependent Price records to preserve the quantity pricing. It will only create new Quantity Dependent Price records for new Items if necessary. So, if the Base Value of an Item changes or, if you have Price Lists in various Currencies, whenever there is a change in the Exchange Rate, you will need to update the Quantity Dependent Price records yourself as the 'Calculate Prices' function will not be able to do this.
- If the Type of the Price List is "BuyBack", you can again use the 'Calculate Prices' function to create records in the Price register. This time, the function will create Price records in which the Price field is empty and the BuyBack Cost is the Cost Price of the Item. If the Type of a Price List is "BuyBack", an empty Price field means the Item's Base Price will be the price charged to Customers (this does not apply to "Single Price per Item" Price Lists). In each Price record as necessary, change the BuyBack Cost to the discounted Cost Price (i.e. to the final cost after Supplier refund). For this reason, re-running the 'Calculate Prices' function will not update existing Price records for "BuyBack" Price Lists.
Please refer to the following pages for more details about:
- If the Type of the Price List is "Single Price per Item", you can either do this yourself, or you can use the 'Calculate Prices' Maintenance function in the Pricing module to have them calculated at one stroke. If you will do it yourself, you should add separate records to the Price register in the Pricing module for each Item on each Price List with an appropriate price. The 'Calculate Prices' function will create these records and calculate the prices records by applying the specified Price Formula to each Item in each Price List.
- You can now assign a Price List to each Customer, Customer Category and/or Payment Term. Assigning a Price List to a Payment Term can be useful if you have different prices for Customers who pay by different methods (for example, special prices for credit card payments). If you use Loyalty Cards, you can also assign a Price List to each Loyalty Card Membership Level. This will allow you to charge different prices depending on the level of the Loyalty Card that a Customer holds.
When you enter a Quotation, Order or Invoice for a particular Customer, the Price List will be chosen as follows:
- If the Customer has a Loyalty Card, the Price List will be brought in from the relevant row in the Loyalty Card Membership Level Structure setting in the Point of Sales module.
- The Price List will be brought in from the 'Pricing' card of the Customer's Contact record.
- The Price List for the Customer Category to which the Customer belongs will be used.
- The Price List will be taken from the Payment Term in the Quotation, Order or Invoice. Usually this will be the Sales Payment Term that you have specified in the Contact record for the Customer.
As you add Items to the Quotation, Order or Invoice, prices will be taken from the specified Price List automatically. If you sell an Item that is not on the appropriate Price List, the Base Price will be used.
- If the Customer has a Loyalty Card, the Price List will be brought in from the relevant row in the Loyalty Card Membership Level Structure setting in the Point of Sales module.
- After you have created Price records as described in step 4, you can print Price Lists, or export them to disk for incorporation into your company's publicity material. You can print Price Lists using the report of the same name, available in the Pricing and Sales Orders modules and in the Sales Ledger. This report is fully described here.
---
The Pricing module in Standard ERP:
- Introduction
- The Base Price
- Prices for Different Units of Measure
- Item Formulae
- Structure of Price Lists
- Price Formulae
- Price Lists
- Prices
- Deleting a Price List
- Price List Examples
- Quantity Discounts
- Multi-buy Discounts
- Home page for Items and Pricing manual
- Home page for Standard ERP manual
Price Formulae
This page describes the Price Formula register in the Pricing module. After defining your Price Formulae, please refer to the Price Lists page for details about including Price Formulae in Price Lists.---
If you will use the 'Calculate Prices' Maintenance function to calculate the prices of the Items on a Price List, you should first define the formulae that will be used in the calculations.
To define a new Price Formula, first move into the Pricing module using the [Switch Module] button in the Navigation Centre. Then, if you are using Windows or macOS, click the [Registers] button in the Navigation Centre and then double-click 'Price Formulae' in the resulting list. If you are using iOS or Android, tap the [Registers] button in the Navigation Centre and then tap 'Price Formulae' in the 'Registers' list. When the 'Price Formulae: Browse' window appears, select 'New' from the Create menu (Windows/macOS) or from the + menu (iOS/Android) to create a new record. Once entered, click [Save] (Windows/macOS) or tap √ (iOS/Android) to save the record.
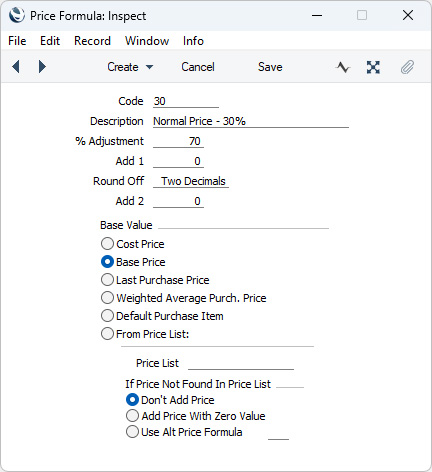
- Code
- Enter a code by which the Price Formula can be identified.
- Description
- Specify a name for the Formula.
- % Adjustment
- Enter the percentage multiplier that the 'Calculate Prices' function will apply to the Base Value in order to calculate a price. Choose the Base Value using one of the options below.
- For example, if you want the price to be 10% more than the Base Price, enter "110" here and choose the Base Price option below. To deduct 10% from the Base Price, enter "90".
- For example, if you want the price to be 10% more than the Base Price, enter "110" here and choose the Base Price option below. To deduct 10% from the Base Price, enter "90".
- Add 1
- Use this field if you need to add or deduct a fixed amount from the Base Value. If you have also entered a % Adjustment in the field above, the addition or deduction will take place after the percentage adjustment.
- Round Off
- Paste Special
Choices of possible entries
- Specify here the number of decimal places you wish to be used in the calculation.
- Add 2
- Use this field if you need to add or deduct another fixed amount after the rounding process.
- Base Value
- Specify here the figure on which the calculation is to be based. The Cost Price, Base Price, Last Purchase Price (excluding extras) and Weighted Average Purchase Price are all taken from the Item record, while Default Purchase Item refers to the Cost Price of the Default Purchase Item representing the Item.
- You can also use a price from another Price List as the Base Value. Specify the other Price List using 'Paste Special' from the Price List field. Then select an option to specify how the price of an Item that is not in the other Price List should be calculated. If you choose the Use Alt Price Formula option, choose a Price Formula using 'Paste Special' from the field next to the option.
---
The Pricing module in Standard ERP:
- Introduction
- The Base Price
- Prices for Different Units of Measure
- Item Formulae
- Structure of Price Lists
- Price Formulae
- Price Lists
- Prices
- Deleting a Price List
- Price List Examples
- Quantity Discounts
- Multi-buy Discounts
- Home page for Items and Pricing manual
- Home page for Standard ERP manual
Price Lists
A Price List in Standard ERP consists of two elements: the Price List itself and the individual prices. The Price List itself is stored in the Price List register in the Pricing module and consists of the basic details of each Price List (the name, Currency, period of validity, etc). Depending on the Type of a Price List, the prices that it contains can be stored in the Price register or in the Qty Dependent Prices setting, both also in the Pricing module.This page describes the Price List register. Please refer here for details about the Price register and the Qty Dependent Prices setting.
To define a new Price List, first ensure you are in the Pricing module using the [Switch Module] button in the Navigation Centre. Then, if you are using Windows or macOS, click the [Registers] button in the Navigation Centre and then double-click 'Price Lists' in the resulting list. If you are using iOS or Android, tap the [Registers] button in the Navigation Centre and then tap 'Price Lists' in the 'Registers' list.
When the 'Price Lists: Browse' window appears, select 'New' from the Create menu (Windows/macOS) or the + menu (iOS/Android) to create a new Price List. When the record is complete, click the [Save] button (Windows/macOS) or tap √ (iOS/Android). You can then close it using the close box (Windows/macOS) or by tapping < (iOS/Android). Then, close the browse window using the close box or < again.
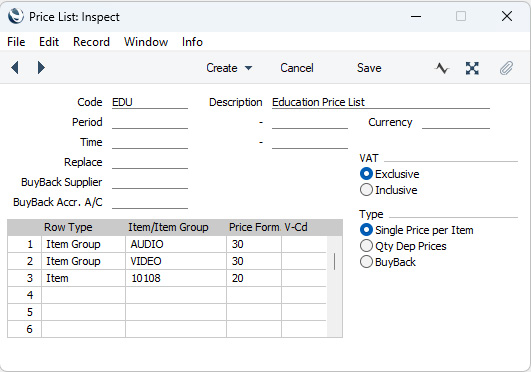
- Code
- Enter here the unique code by which the Price List will be identified elsewhere in Standard ERP.
- Description
- Name the Price List here.
- The Description will be shown in the 'Paste Special' list that you will use when assigning Price Lists to Customers, so it should be descriptive enough to make the selection of the correct Price List easy for all users.
- The Description will be shown in the 'Paste Special' list that you will use when assigning Price Lists to Customers, so it should be descriptive enough to make the selection of the correct Price List easy for all users.
- Period
- Paste Special
Choose date
- If the Price List is valid for a certain period, enter that period in these two fields.
- You cannot change these fields once you have saved the Price List for the first time.
- You should use the Period in combination with the Replace field (below): you cannot leave the Replace field empty if you enter a Period. Please refer to the description of the Replace field for more information.
- You cannot change these fields once you have saved the Price List for the first time.
- Currency
- Paste Special
Currency register, System module
- Indicate here the Currency in which the prices in the Price List are expressed. When you use the 'Calculate Prices' function to calculate prices, the Currency conversion (using the most recent applicable Exchange Rate) will take place before any Formula is applied.
!
If, for whatever reason, you change the Currency of a Price List, run the 'Calculate Prices' function immediately. Otherwise, the prices in Orders and Invoices will not be as you expect.
- Replace
- Paste Special
Price List register, Pricing module
- If you have assigned a standard Price List to a Customer or Customer Category, you can replace that standard Price List with a temporary Price List for a particular time period.
- In the standard Price List, leave the Period and Replace fields blank. Create a new record for the temporary Price List, enter the Period for which it is valid and specify the Code of the standard Price List in the Replace field. Do not change the Customer or Customer Category. When entering Quotations, Orders or Invoices, the temporary Price List will be used during the specified Period and the standard Price List will be used at all other times, both before and after this Period.
- In the case of Quotations and Invoices, the relevant dates for the Period will be the Quotation and Invoice Dates respectively. In the case of Orders, you can use the Order Date, Planned Delivery Date or the Despatch Date can be used to determine whether the temporary Price List is valid. You can make this choice for each Customer separately, using the Price Based On options on the 'Pricing' card of each Contact record.
- You cannot change the Replace field once you have saved the Price List has been saved for the first time. You cannot leave the Replace field empty if you enter a Period.
- The temporary Price List will not replace the standard Price List if it has no connected records in the Price register (i.e. it won't be used in a Quotation, Order or Invoice if it is an empty Price List). The temporary Price List also won't be used if its Type is "Qty Dep Prices". Instead, the standard Price List will continue to be used as though there is no replacement.
- In the standard Price List, leave the Period and Replace fields blank. Create a new record for the temporary Price List, enter the Period for which it is valid and specify the Code of the standard Price List in the Replace field. Do not change the Customer or Customer Category. When entering Quotations, Orders or Invoices, the temporary Price List will be used during the specified Period and the standard Price List will be used at all other times, both before and after this Period.
- BuyBack Supplier
- Paste Special
Suppliers in Contact register
- BuyBack Accr. A/C
- Paste Special
Account register, Nominal Ledger/System module
- These fields are only used when the Type (below) of the Price List is "BuyBack". Please refer here for details.
- VAT
- Choose the Exclusive option if the prices in the Price List are to exclude VAT, and the Inclusive option if they are to include VAT.
- If you have "Inclusive" and "Exclusive" Price Lists that use the same Price Formulae, the prices calculated by the 'Calculate Prices' function will numerically be the same but in the former case the figures will be treated as including VAT.
- If you use an "Inclusive" Price List in a sales transaction (e.g. an Invoice, Order or Quotation), the Unit Price, Sum and Total figures will all include VAT, but if you use an "Exclusive" Price List, the Unit Price and Sum figures will exclude VAT. In both cases, VAT will be calculated using the VAT Code specified in the sales transaction row.
- If you use "Inclusive" Price Lists and you have Customers in the Inside EU and/or Outside EU Zones, it is recommended that you create separate Price Lists for these Customers. In most cases, these Customers should be charged prices that exclude VAT. If you use a common "Inclusive" Price List for every Zone, VAT usually will not be deducted from the "Inclusive" prices because it is likely that the VAT Codes that you use for the Inside EU and Outside EU Zones will be zero-rated (i.e. it will not be possible to establish the rate at which VAT should be deducted).
- If you have "Inclusive" and "Exclusive" Price Lists that use the same Price Formulae, the prices calculated by the 'Calculate Prices' function will numerically be the same but in the former case the figures will be treated as including VAT.
- Type
- A Price List can be one of three Types:
- Single Price per Item
- A "Single Price per Item" Price List is one where each Item has a single price. These prices will be stored in the Price register: this register will contain separate records for each Item in the Price List.
- Qty Dep Prices
- A "Qty Dep Prices" Price List is one where each Item can have several prices, allowing you to sell at different prices depending on the quantity purchased by the Customer. These prices will be stored in the Quantity Dependent Prices setting: again, this setting will contain separate records for each Item in the Price List.
- BuyBack
- Using a "BuyBack" Price List allows you to sell Items to particular Customers and then receive a refund from the Supplier. For example, if you sell an Item to a Customer in education at a special price, you may be able to receive a refund from the Supplier. Please refer to the description of the BuyBack register here for details.
- If you will use the 'Calculate Prices' function to calculate prices, it will create records in the Price register or in the Quantity Dependent Prices setting, depending on the Type of the Price List. If the Type is "BuyBack", records will be created in the Price register.
- When you use a Price List in a sales transaction (e.g. in a Quotation, Order or Invoice), the prices in the sales transaction will be taken from the Price register or from the Quantity Dependent Prices setting, again depending on the Type of the Price List.
- Single Price per Item
Second, you can use the matrix if you would like particular VAT Codes (or Tax Templates) to be used whenever the Price List is used in a sales transaction.
- Row Type
- Paste Special
Choices of possible entries
- This field can contain one of two entries: "Item" or "Item Group". Use it to indicate whether the Item/Item Group field immediately to the right contains or will contain an Item or an Item Group. Use 'Paste Special' to increase input speed.
- Item/Item Group
- Paste Special
Item or Item Group registers
- Specify an Item or Item Group that the 'Calculate Prices' Maintenance function is to add to the Price List. If you want every Item in the Item register to be added to the Price List, leave the field blank.
- If you enter an Item here, set the Row Type to "Item". If you enter an Item Group, set the Row Type to "Item Group". If you set the Row Type before entering an Item or Item Group, this will determine whether the 'Paste Special' window will list Items or Item Groups when you open it from this field.
- If you enter an Item here, set the Row Type to "Item". If you enter an Item Group, set the Row Type to "Item Group". If you set the Row Type before entering an Item or Item Group, this will determine whether the 'Paste Special' window will list Items or Item Groups when you open it from this field.
- Price Formula
- Paste Special
Price Formula register, Pricing module
- Specify here the code of a Price Formula. The 'Calculate Prices' function will use this Formula to calculate the prices of the Item or Item Group for the Price List. Specifying a Formula in each row allows different Items in the same Price List to have their Prices calculated using different Formulae.
! | You must specify a Price Formula in each row. Otherwise, when you use the 'Calculate Prices' function, the Item or Item Group will be given a blank price. Use a Price Formula with a % Adjustment of 100 if you want an Item's Base Value to appear in the Price List. |
- VAT Code
- Paste Special
VAT Codes setting, Nominal Ledger
- Enter the VAT Code that is to be used with the Item or Item Group specified immediately to the left. If you have not specified an Item or Item Group, the VAT Code will be used with every Item.
- The VAT Code will determine the rate at which VAT will be charged whenever you use the Item or members of the Item Group in a sales transaction (e.g. in an Invoice, Order or Quotation).
Please refer here for details about how the VAT Code in each row in a sales transaction will be chosen.
- The VAT Code will determine the rate at which VAT will be charged whenever you use the Item or members of the Item Group in a sales transaction (e.g. in an Invoice, Order or Quotation).
- T-Cd
- Paste Special
Tax Templates setting, Nominal Ledger
- In some countries, Tax Templates are used instead of VAT Codes to determine the rate at which VAT or sales tax will be charged on an Item and the Output VAT Account that will be credited with the VAT or sales tax value. VAT Codes should be used where each sales and purchase transaction (e.g. each row in an Invoice) is taxed at a single rate, while Tax Templates should be used where different taxes and/or several tax rates are applied to one transaction (e.g. to one row).
- If you need to use Tax Templates, you should choose the Use Tax Templates for Tax Calculation option in the Transaction Settings setting in the Nominal Ledger. This option will cause a Tax Template field ("T-Cd") to appear here instead of the VAT Code field ("V-Cd"). Having done so and having entered your Tax Templates in the Tax Templates setting also in the Nominal Ledger, enter the Tax Template that is to be used with the Item or Item Group specified immediately to the left. If you have not specified an Item or Item Group, the Tax Template will be used with every Item.
- Please refer here for details about how the Tax Template in each row in a sales transaction will be chosen.
- If you need to use Tax Templates, you should choose the Use Tax Templates for Tax Calculation option in the Transaction Settings setting in the Nominal Ledger. This option will cause a Tax Template field ("T-Cd") to appear here instead of the VAT Code field ("V-Cd"). Having done so and having entered your Tax Templates in the Tax Templates setting also in the Nominal Ledger, enter the Tax Template that is to be used with the Item or Item Group specified immediately to the left. If you have not specified an Item or Item Group, the Tax Template will be used with every Item.
If you need to print a Price List and its prices, use the Price List report, available in the Pricing and Sales Orders modules and the Sales Ledger.
---
The Pricing module in Standard ERP:
- Introduction
- The Base Price
- Prices for Different Units of Measure
- Item Formulae
- Structure of Price Lists
- Price Formulae
- Price Lists
- Prices
- Deleting a Price List
- Price List Examples
- Quantity Discounts
- Multi-buy Discounts
- Home page for Items and Pricing manual
- Home page for Standard ERP manual
Prices
A Price List in Standard ERP consists of two elements: the Price List itself and the individual prices. The Price List itself consists of the basic details of each Price List (the name, Currency, period of validity, etc). Depending on the Type of a Price List, the prices that it contains can be stored in the Price register or in the Qty Dependent Prices setting, both also in the Pricing module.This page describes the Price register and the Qty Dependent Prices setting. Please refer here for details about the Price List register.
A Price List can belong to one of three Types:
- A "Single Price per Item" Price List will contain a single price for each Item. These prices will be stored in the Price register.
- A "Qty Dep Prices" Price List can contain several prices for each Item, allowing you to charge different prices for an Item depending on the quantity that you sell. In this case, the prices are not stored in the Price register but in the Qty Dependent Prices setting.
- A third Type of Price List, the "BuyBack" Price List, allows you to sell Items to Customers and then receive a refund from the Supplier. For example, if you sell an Item to a Customer in education at a special price, you may be able to receive a refund from the Supplier. Prices in a "BuyBack" Price List will be stored in the Price register. Please refer here for details about "BuyBack" Price Lists.
Creating prices depends on the Type of the Price List, as follows:
- If the Type of the Price List is "Single Price per Item", you can enter prices to the Price register yourself, but in most cases you will use the 'Calculate Prices' Maintenance function in the Pricing module to have them created at one stroke. If any factor influencing your Prices changes (e.g. there is a change in exchange rates, or you have changed the Base Prices in your Item records), you can run the 'Calculate Prices' function again to update the existing Prices and to create any new ones that may be necessary.
Please refer here for details about the 'Calculate Prices' function and here for details about the Price register and entering prices yourself.
- If the Type of the Price List is "Qty Dep Prices", the 'Calculate Prices' function is less useful, because it cannot generate quantity pricing. It will add records to the Qty Dependent Prices setting, but with only a single price, and it will not update any existing records, to preserve the quantity pricing that the records contain. If you do use the 'Calculate Prices' function to add records to the Qty Dependent Prices setting, you should then check those records and add the quantity pricing to each one. Otherwise, you can enter prices including quantity pricing to the Quantity Dependent Prices setting yourself.
Please refer here for details about the Quantity Dependent Prices setting.
- If the Type of the Price List is "BuyBack", you can again use the 'Calculate Prices' function to create records in the Price register. This time, the function will create Price records in which the Price field is empty and the BuyBack Cost is the Cost Price of the Item. If the Type of a Price List is "BuyBack", an empty Price field means the Item's Base Price will be the price charged to Customers (this does not apply to "Single Price per Item" Price Lists). In each Price record as necessary, change the BuyBack Cost to the discounted Cost Price (i.e. to the final cost after Supplier refund). For this reason, re-running the 'Calculate Prices' function will not update existing Price records for "BuyBack" Price Lists.
The Pricing module in Standard ERP:
- Introduction
- The Base Price
- Prices for Different Units of Measure
- Item Formulae
- Structure of Price Lists
- Price Formulae
- Price Lists
- The Price Register, including:
- The 'Calculate Prices' function
- The Price register (Entering Price Records Yourself)
- The Quantity Dependent Prices setting
- The 'Calculate Prices' function
- Deleting a Price List
- Price List Examples
- Quantity Discounts
- Multi-buy Discounts
- Home page for Items and Pricing manual
- Home page for Standard ERP manual
Prices - The 'Calculate Prices' Function
After you have defined Price Formulae and created a Price List, you will be ready to enter the prices for that Price List. You can do this yourself or you can use the 'Calculate Prices' Maintenance function. This page describes the 'Calculate Prices' function: please refer here for details about entering prices yourself. The operation of the 'Calculate Prices' function will depend on the Type of the Price List as follows:
- Single Price per Item
- For each Item on a "Single Price per Item" Price List, the 'Calculate Prices' function will calculate a new price using the Price Formula specified in the Price List and save it in a record in the Price register.
- The first time you run the function for a particular Price List, it will create separate records in the Price register for each Item on the Price List (i.e. following the instructions in the matrix in the Price List record). The next time you run the function, it will recalculate the prices in those Price records. It will not usually create new Price records unless you have added new Items to the Price List (e.g. unless you have listed new Items in the matrix in the Price List record, or you have listed Item Groups in the Price List matrix and you have created new Items that belong to those Item Groups). This ensures that there will always only be a single, unique, Price record for each Item/Price List combination, making the use of Price Lists in Orders and Invoices extremely fast.
- Each time you change a price that is used as the Base Value by a Price Formula, you should run the 'Calculate Prices' function again to update the Price records. The Base Value of an Item is the figure that is the basis of the price calculation (i.e. the figure to which the Price Formula is applied). This will usually be its Base Price or its Cost Price. You should also run the function regularly if you have Price Lists in foreign Currencies with exchange rates that change frequently.
- If you need to prevent an individual price being recalculated when you re-run the 'Calculate Prices' function, select the Do not Recalculate option in the relevant Price record.
- The Price register will usually contain one record for each Item/Price List combination. In other words, a particular Item can only be included once in a Price List. However, you can add separate records for specific Customers yourself. The 'Calculate Prices' function will not create or update Price records that you have created for specific Customers. It will only create and update Price records in which the Customer field is blank.
- The first time you run the function for a particular Price List, it will create separate records in the Price register for each Item on the Price List (i.e. following the instructions in the matrix in the Price List record). The next time you run the function, it will recalculate the prices in those Price records. It will not usually create new Price records unless you have added new Items to the Price List (e.g. unless you have listed new Items in the matrix in the Price List record, or you have listed Item Groups in the Price List matrix and you have created new Items that belong to those Item Groups). This ensures that there will always only be a single, unique, Price record for each Item/Price List combination, making the use of Price Lists in Orders and Invoices extremely fast.
- Qty Dep Prices
- For each Item on a "Qty Dep Prices" Price List, the 'Calculate Prices' function will create a record in the Quantity Dependent Prices setting instead of the Price register. The function will calculate a new price using the Price Formula specified in the Price List and save this in the first row in the new Qty Dependent Price record. You will need to use the other rows to enter the quantity pricing, as described here. If you re-run the 'Calculate Prices' function for the Price List, it will not update the existing Qty Dependent Price records, because to do so will mean that the quantity pricing structures will be lost.
- BuyBack
- If the Type of a Price List is "BuyBack", its prices will be stored in the Price register and you can use the 'Calculate Prices' Maintenance function to create them. In this case, the function will create records in the Price register in which the sales price is blank and the BuyBack Cost is the Cost Price from the relevant Item record. In each Price record as necessary, enter a sales price if it is different to the Item's Base Price and change the BuyBack Cost to the discounted Cost Price (i.e. to the final cost after Supplier refund). If you re-run the 'Calculate Prices' function for the Price List, it will not update the existing Price records, because to do so will mean that the BuyBack Cost Prices will be lost.
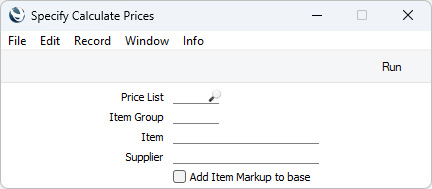
To restrict the calculation process, use the fields as described below before pressing [Run].
- Price List
- Paste Special
Price List register, Pricing module
- If you need to create or update the prices in a particular Price List, enter the code identifying that Price List here. Leave the field blank to calculate prices in every Price List.
- Item Group
- Paste Special
Item Group register, Sales Ledger
- If you need to create or update the prices of Items belonging to a particular Item Group, specify the Item Group here. Prices of these Items will only be calculated if the Item Group is explicitly included in the grid of the Price List that you specify in the field above. If you do not specify a Price List, prices will be recalculated for every Price List in which the Item Group is included.
- Item
- Paste Special
Item register
- Use this field when you need to calculate the prices of a single Item. The Item does not have to be included explicitly in the grid of the specified Price List: its price will also be recalculated if its Item Group is in the grid or if the Item/Item Group field in the grid is blank (i.e. if the Price List includes all Items). If you do not specify a Price List in the field above, prices will be calculated for the Item for every Price List in which it is included.
- Supplier
- Paste Special
Suppliers in Contact register
- If you enter a Supplier Number here, the Price calculation will be restricted to Items that have a Default Purchase Item in the name of that Supplier.
- Add Item Markup to Base
- Select this option to add the Markup % (specified on the 'Pricing' card of each Item record) to the Base Value specified in the Price Formula before applying the Price Formula.
If you are calculating prices for a Price List that has a Currency, the resulting prices will be in that Currency, converted from Base Values in the home Currency to that specified using the most recent Exchange Rate.
If you need to print a Price List and its prices, use the Price List report, available in the Pricing and Sales Orders modules and the Sales Ledger.
Please refer here for details about creating records in the Price register yourself and modifying existing records.
---
The Pricing module in Standard ERP:
- Introduction
- The Base Price
- Prices for Different Units of Measure
- Item Formulae
- Structure of Price Lists
- Price Formulae
- Price Lists
- Prices, including:
- The 'Calculate Prices' function
- The Price register (Entering Price Records Yourself)
- The Quantity Dependent Prices setting
- The 'Calculate Prices' function
- Deleting a Price List
- Price List Examples
- Quantity Discounts
- Multi-buy Discounts
- Home page for Items and Pricing manual
- Home page for Standard ERP manual
Prices - The Price Register (Entering Price Records Yourself)
After you have defined Price Formulae and created a Price List, you will be ready to enter the prices for that Price List. You can do this yourself or you can use the 'Calculate Prices' Maintenance function. This page describes entering prices yourself: please refer here for details about the 'Calculate Prices' function.The prices in a Price List can be stored in one of two places, depending on the Type of the Price List:
- If the Type of a Price List is "Single Price per Item" or "BuyBack", its prices will be stored in the Price register in the Pricing module. These Price Lists can contain a single price for each Item.
- If the Type of a Price List is "Qty Dep Prices", its prices will be stored in the Qty Dependent Prices setting, also in the Pricing module. These Price Lists can contain several prices for each Item, allowing you to charge different prices for an Item depending on the quantity that you sell.
Entering records to the Price records yourself can be useful if you need to assign a price that cannot be calculated using a formula to an Item. It can also be useful if you want to charge a particular price to a particular Customer.
To enter a new Price record, first use the [Switch Module] button in the Navigation Centre to change to the Pricing module. Then, if you are using Windows or macOS, click the [Registers] button in the Navigation Centre and then double-click 'Prices' in the resulting list. If you are using iOS or Android, tap the [Registers] button in the Navigation Centre and then tap 'Prices' in the 'Registers' list. The 'Prices: Browse' window will be opened, listing the Price records that you have already entered.
To enter a new Price record, select 'New' from the Create menu (Windows/macOS) or the + menu (iOS/Android). You can also use the Ctrl-N (Windows) or ⌘-N (macOS) keyboard shortcut. The 'Price: New' window will be opened: complete the record as appropriate and as described below, then save it using the [Save] button (Windows/macOS) or by tapping √ (iOS/Android). You can then close it using the close box (Windows/macOS) or by tapping < (iOS/Android). Then, close the browse window using the close box or < again.
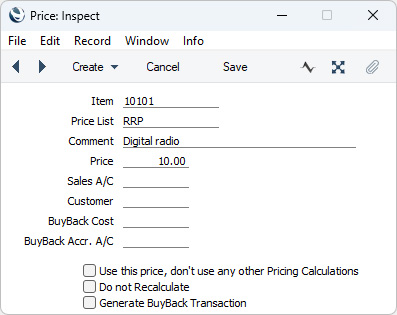
- Item
- Paste Special
Item register
- Specify the Item for which you are entering a Price.
- If you enter a Price record for an Item that has its pricing controlled by Item Formula, the Price record will be ignored when you add the Item to a sales transaction (e.g. Quotation, Order or Invoice). The Item Formula will continue to be used to set the price of the Item.
- If you enter a Price record for an Item that has its pricing controlled by Item Formula, the Price record will be ignored when you add the Item to a sales transaction (e.g. Quotation, Order or Invoice). The Item Formula will continue to be used to set the price of the Item.
- Price List
- Paste Special
Price List register, Pricing module
- Specify the Price List for which you are entering a Price.
- You will not be able to enter more than one record in the Price register for the same Item/Price List combination.
- You will not be able to enter more than one record in the Price register for the same Item/Price List combination.
- Comment
- The Item Description will appear here when you enter an Item Number in the field above.
- Price
- Enter the Price that you want to charge for the Item when it is included in the Price List specified above.
- If the Price List in the field above is one that includes VAT, the Price that you enter here should include VAT. If the Price List in the field above has a Currency, this Price should be in that Currency.
- When you enter a sales transaction (e.g. a Quotation, Order or Invoice) in the name of a Customer that uses a "Single Price per Item" Price List, the Price List will determine the Prices in the sales transaction. When you add an Item to the transaction, its Unit Price will be chosen as follows:
- It will be taken from the Price record with the relevant Item/Price List/Customer combination.
- It will be taken from the Price record with the relevant Item/Price List combination where the Customer field is empty.
- The Base Price from the Item record will be used.
- The maximum number of decimal places that you can use in a Price is three. If you need more decimal places, use the Price in combination with the Price Factor in the relevant Item record.
- This Price will be included in the Price List when you print it using the report in the Pricing and Sales Orders module and in the Sales Ledger.
- If the Price List in the field above is one that includes VAT, the Price that you enter here should include VAT. If the Price List in the field above has a Currency, this Price should be in that Currency.
- Sales A/C
- Paste Special
Account register, Nominal Ledger/System module
- If you specify a Sales Account here, it will be used as the Sales Account in Invoices where pricing is determined by the Price record (i.e. by the unique Price record for the Item/Price List combination). This Account will take priority over those for the Item and Item Group and that in the Account Usage S/L setting. Please refer here for more details about how Sales Accounts will be chosen in Quotations, Orders and Invoices.
- Customer
- Paste Special
Customers in Contact register
- If the Price is only to be offered to a single Customer, specify that Customer here. You should also create a Price record for the same Item/Price List combination in which the Customer field is empty, to be used by the other Customers that have the same Price List.
- Each time you run the 'Calculate Prices' Maintenance function, it will usually recalculate and update the prices in existing Price records. It will only do this in Price records in which the Customer field is blank, it will not update the prices in Price records that you have created for specific Customers.
- Each time you run the 'Calculate Prices' Maintenance function, it will usually recalculate and update the prices in existing Price records. It will only do this in Price records in which the Customer field is blank, it will not update the prices in Price records that you have created for specific Customers.
- BuyBack Cost
- BuyBack Accr. A.C
- Paste Special
Account register, Nominal Ledger/System module
- BuyBack Accr. A.C
- These fields are only used when the Type of the Price List specified above is "BuyBack". Please refer here for details.
- Use this price, don't use any other Pricing Calculations
- When you create a sales transaction (e.g. a Quotation, Order or Invoice) in the name of a particular Customer, the Price List specified for that Customer will determine the Prices in that sales transaction, as described under the Price field above.
- If you have also assigned a Discount Matrix to the Customer, the Prices in the sales transaction will still be determined by the Price List but they may also be subject to a percentage discount. The level of discount will depend on the quantity sold, as specified in the Discount Matrix. If you do not want such a discount being applied to a Price, select this option.
- Please refer here for details about quantity discounts and Discount Matrices.
- If you have also assigned a Discount Matrix to the Customer, the Prices in the sales transaction will still be determined by the Price List but they may also be subject to a percentage discount. The level of discount will depend on the quantity sold, as specified in the Discount Matrix. If you do not want such a discount being applied to a Price, select this option.
- Do not Recalculate
- Each time you run the 'Calculate Prices' Maintenance function, it will usually recalculate and update the prices in existing Price records. If you do not want the price in a particular Price record to be updated in this way, select this option. This may be the case, for example, if the price is not one that can be calculated using a formula.
- Generate BuyBack Transaction
- This option is only used when the Type of the Price List specified above is "BuyBack". Please refer here for details.
---
The Pricing module in Standard ERP:
- Introduction
- The Base Price
- Prices for Different Units of Measure
- Item Formulae
- Structure of Price Lists
- Price Formulae
- Price Lists
- Prices, including:
- The 'Calculate Prices' function
- The Price register (Entering Price Records Yourself)
- The Quantity Dependent Prices setting
- The 'Calculate Prices' function
- Deleting a Price List
- Price List Examples
- Quantity Discounts
- Multi-buy Discounts
- Home page for Items and Pricing manual
- Home page for Standard ERP manual
Prices - Quantity Dependent Prices
After you have created a Price List, you will be ready to enter the prices for that Price List. These prices can be stored in one of two places, depending on the Type of the Price List:- If the Type of a Price List is "Single Price per Item" or "BuyBack", its prices will be stored in the Price register in the Pricing module. These Price Lists can contain a single price for each Item.
- If the Type of a Price List is "Qty Dep Prices", its prices will be stored in the Qty Dependent Prices setting, also in the Pricing module. These Price Lists can contain several prices for each Item, allowing you to charge different prices for an Item depending on the quantity that you sell.
You can use the 'Calculate Prices' Maintenance function in the Pricing module to create records in the Quantity Dependent Prices setting, but this function is less useful here than with a "Single Price per Item" Price List because it cannot generate quantity pricing. It will add records to the Qty Dependent Prices setting but only containing a single row. You will then need to enter the quantity pricing in each record yourself. Note too that although records in the Quantity Dependent Price register can be created by the 'Calculate Prices' function, they will not subsequently be updated by that function.
The Quantity Dependent Prices setting is in the Pricing module. To work with this setting, first ensure you are in this module. Then, if you are using Windows or macOS, click the [Settings] button in the Navigation Centre and then double-click 'Qty Dependent Prices' in the 'Settings' list. If you are using iOS or Android, select 'Settings' from the Tools menu (with 'wrench' icon) and tap 'Qty Dependent Prices' in the 'Settings' list. The 'Qty Dependent Prices: Browse' window opens, showing the Quantity Dependent Prices that you have previously entered. Double-click (Windows/macOS) or tap (iOS/Android) a Quantity Dependent Price in the list to edit it, or add a new record by selecting 'New' from the Create menu (Windows/macOS) or the + menu (iOS/Android). When the record is complete, save it by clicking the [Save] button (Windows/macOS) or tapping √ (iOS/Android) in the Button Bar. To close it without saving changes, click the close box (Windows/macOS) or tap < (iOS/Android).
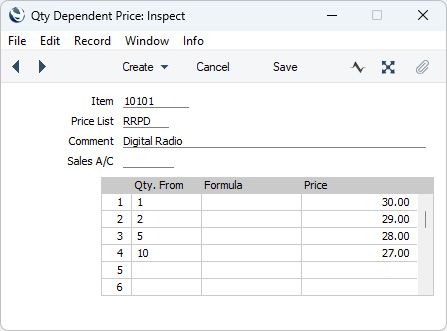
- Item
- Paste Special
Item register
- Specify the Item for which you are entering Quantity Dependent Prices.
- If you enter a Quantity Dependent Price record for an Item that has its pricing controlled by Item Formula, the Quantity Dependent Price record will be ignored when you add the Item to a sales transaction (e.g. Quotation, Order or Invoice). The Item Formula will continue to be used to set the price of the Item.
- If you enter a Quantity Dependent Price record for an Item that has its pricing controlled by Item Formula, the Quantity Dependent Price record will be ignored when you add the Item to a sales transaction (e.g. Quotation, Order or Invoice). The Item Formula will continue to be used to set the price of the Item.
- Price List
- Paste Special
Price List register, Pricing module
- Specify the Price List for which you are entering Quantity Dependent Prices.
- You will not be able to enter more than one record in the Quantity Dependent Prices setting for the same Item/Price List combination.
- You will not be able to enter more than one record in the Quantity Dependent Prices setting for the same Item/Price List combination.
- Comment
- Enter a description or comment about the Quantity Dependent Price record here. This comment will be shown in the 'Quantity Dependent Prices: Browse' window.
- Sales A/C
- Paste Special
Account register, Nominal Ledger/System module
- If you specify a Sales Account here, it will be used as the Sales Account in Invoices where pricing is determined by the Quantity Dependent Price record (i.e. by the unique record for the Item/Price List combination). This Account will take priority over those for the Item and Item Group and that in the Account Usage S/L setting. Please refer here for more details about how Sales Accounts will be chosen in Quotations, Orders and Invoices.
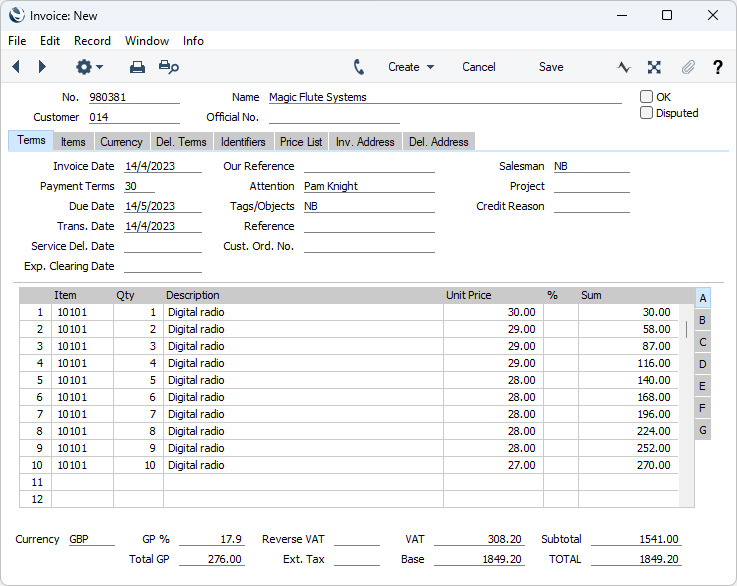
| Quantity Sold | Unit Price |
| 1 | 30.00 |
| 2-4 | 29.00 |
| 5-9 | 28.00 |
| 10 and over | 27.00 |
In this example, we have used the Price column to specify an absolute price for each quantity break. You can instead use the Formula column if you need each price to be calculated using a formula: use 'Paste Special' to choose the correct Price Formula. Using a Formula could mean less maintenance because if the calculation base (e.g. the Base Price) changes, the quantity prices will change automatically.
If the Price List in the field above the matrix is one that includes VAT, the prices that you enter in the matrix should include VAT. If the Price List has a Currency, these prices should be in that Currency.
You should enter the lowest quantity in the quantity break in the Qty Limit field i.e. treat the quantity as a "Quantity From". In the first row you will usually enter 0 or 1 as the Qty Limit or leave the field empty. If you enter a higher quantity in the first row, you risk selling for a zero price. For example, do not enter 10 as the Qty Limit in the first row intending this to mean "up to 10". It will be interpreted as "10 or more", and a sale for a lower quantity will be given a zero price.
When you enter a sales transaction (i.e. an Order, Quotation or Invoice) in the name of a Customer that uses a "Qty Dep Prices" Price List, the Price List will determine the Prices in the sales transaction. When you add an Item to the transaction, its Unit Price will be chosen as follows:
- It will be taken from the Quantity Dependent Price record with the relevant Item/Price List combination. When you change the Quantity in the sales transaction row, the Unit Price will be updated.
- The Base Price from the Item record will be used.
---
The Pricing module in Standard ERP:
- Introduction
- The Base Price
- Prices for Different Units of Measure
- Item Formulae
- Structure of Price Lists
- Price Formulae
- Price Lists
- Prices, including:
- The 'Calculate Prices' function
- The Price register (Entering Price Records Yourself)
- The Quantity Dependent Prices setting
- The 'Calculate Prices' function
- Deleting a Price List
- Price List Examples
- Quantity Discounts
- Multi-buy Discounts
- Home page for Items and Pricing manual
- Home page for Standard ERP manual
Deleting a Price List
You can delete a Price List at any time. Follow these steps:- Ensure you are in the Pricing module using the [Switch Module] button in the Navigation Centre and open the Price List register from the [Registers] button, also in the Navigation Centre.
- In the 'Price Lists: Browse' window, find the Price List you want to remove, and open it by double-clicking (Windows/macOS) or tapping (iOS/Android).
- Select 'Delete' from the Record menu (which has a 'cog' icon if you are using iOS or Android).
The Price List will be removed permanently, and the window will now show the preceding Price List.
- Close the window using the close box (Windows/macOS) or by tapping < (iOS/Android).
! | You cannot undo the deletion of a Price List. |
When you delete a Price List in this way, the related records in the Price register or in the Quantity Dependent Prices setting will not be deleted. If you want to delete these as well, run the 'Delete Prices' Maintenance function in the Pricing module:
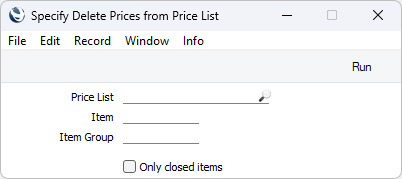
- Price List
- Paste Special
Price List register, Pricing module
- Specify the Price List whose Prices or Quantity Dependent Prices are to be deleted.
- Item
- Paste Special
Item register
- If you need to delete the Price and Quantity Dependent Price records relating to a particular Item, specify that Item here.
- Item Group
- Paste Special
Item Group register
- If you need to delete the Price and Quantity Dependent Price records relating to the Items belonging to a particular Item Group, specify that Item Group here.
- Only closed items
- Select this option if you want to delete the Price and Quantity Dependent Price records relating to Items that have been marked as Closed.
! | Be careful using this function. If you run it with all three fields empty, every record in the Price register and in the Quantity Dependent Prices setting will be deleted. |
---
The Pricing module in Standard ERP:
- Introduction
- The Base Price
- Prices for Different Units of Measure
- Item Formulae
- Structure of Price Lists
- Price Formulae
- Price Lists
- Prices
- Deleting a Price List
- Price List Examples
- Quantity Discounts
- Multi-buy Discounts
- Home page for Items and Pricing manual
- Home page for Standard ERP manual
Price List Examples
This section contains three examples:---
The Pricing module in Standard ERP:
- Introduction
- The Base Price
- Prices for Different Units of Measure
- Item Formulae
- Structure of Price Lists
- Price Formulae
- Price Lists
- Prices
- Deleting a Price List
- Price List Examples, including:
- Quantity Discounts
- Multi-buy Discounts
- Home page for Items and Pricing manual
- Home page for Standard ERP manual
Price List Examples - Creating Price Lists
This page describes creating a new Price List using as an example a Price List in which the Price for each Item will be its Base Price less 7%. Follow these steps:- Start by creating a new Price Formula record using the Price Formula register in the Pricing module, as shown below.
Give a name to the formula. In the % Adjustment field, enter the value "93" (representing a 7% discount) as the calculation formula. The Round Off field gives instructions for rounding off the calculated value. Use 'Paste Special' to choose the option you need. For the example, enter "Two Decimals". Finally, select the Base Price to act as the Base Value for the calculation (i.e. the calculation will be Base Price * 93/100). Save the Price Formula by pressing the [Save] button (Windows/macOS) or by tapping √ (iOS/Android).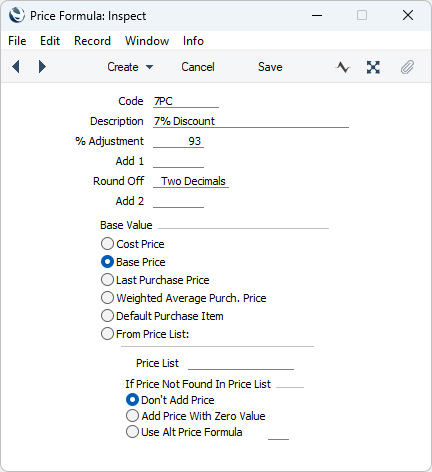
- The next step is to create a new Price List using the register in the Pricing module, with the code "SEVEN", and an appropriate name. Enter the Code of the Price Formula that you have just set up in the Formula field in the first row of the matrix.
If you leave the Item/Item Group field blank as shown in the illustration, every Item in the Item register will be listed with a 7% discount when you generate the Price List. Otherwise, enter one or more Items or Item Groups in separate rows if you need to apply different Price Formulae to different products. Save the Price List by pressing [Save] or by tapping √.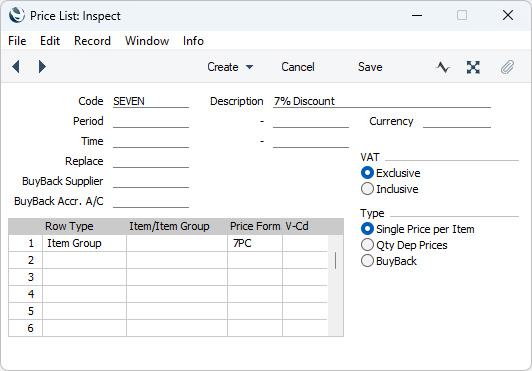
- To create the new Price records (i.e. to generate the Price List), ensure you are still in the Pricing module and click (Windows/macOS) or tab (iOS/Android) the [Routines] button in the Navigation Centre. When the 'Routines' window opens, click or tap the [Maintenance] button. Double-click or tap 'Calculate Prices' in the subsequent window. When the 'Specify Calculate Prices' window opens, use the Price List field to specify that you want to create Price records for the Price List "SEVEN":
New Price records will be added to the Price register if this is the first time you have run the function for the "SEVEN" Price List. Otherwise, the Prices that are already there will simply be recalculated. The creation will take some time, depending on the number of records. When the job is finished, the new records will be visible in the Price register.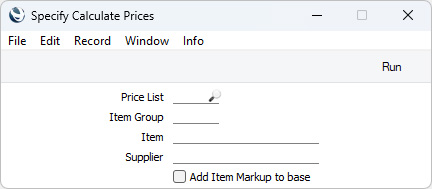
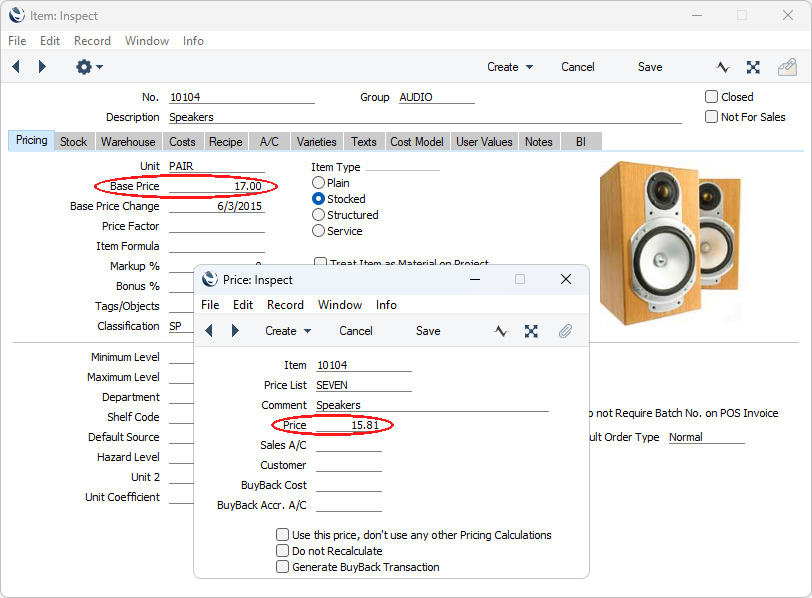
The illustration below shows Item 10104 and the Price record for this Item that belongs to the "SEVEN" Price List, showing the 7% reduction from the Base Price: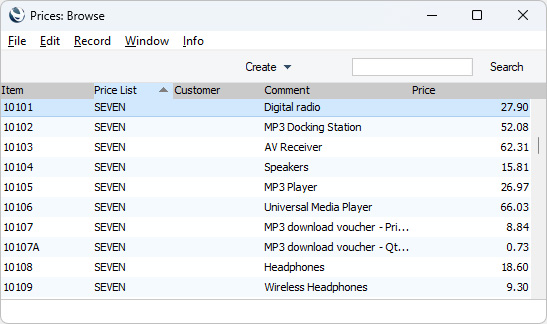
- If you need to print the new Price List, use the Price List report, which is available in the Pricing and Sales Orders modules and the Sales Ledger.
- You can now allocate the new Price List to the Customers that are to be allowed to take advantage of the 7% discount. Specify the Price List on the 'Pricing' card of the Contact record for each such Customer:
You can also assign the new Price List to a Customer Category, removing the need to assign it individually to the Customers belonging to that Category. Every Customer in that Category will use the same Price List, unless you have specified a different one for a particular Customer.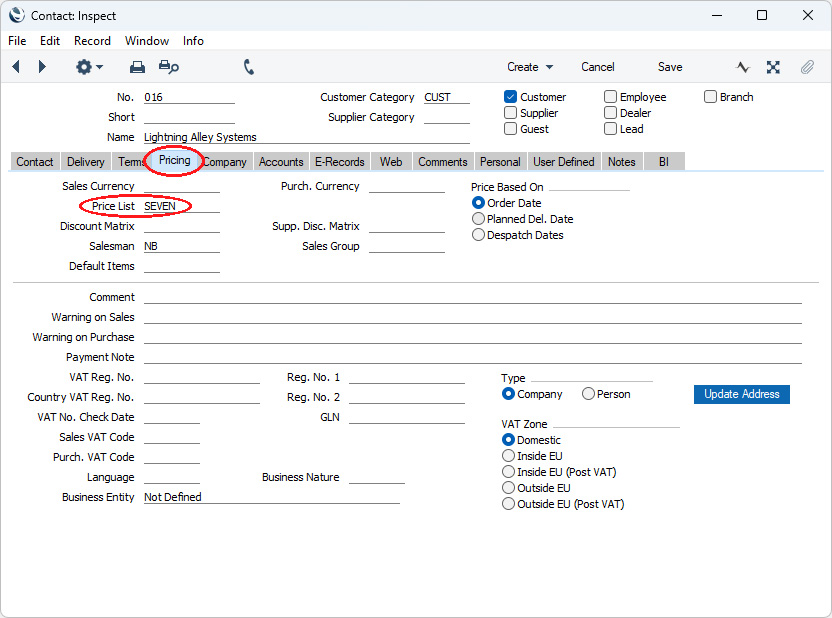
- When you enter a Quotation, Order or Invoice for one of these Customers, the Price List will be brought in to the 'Price List' card:
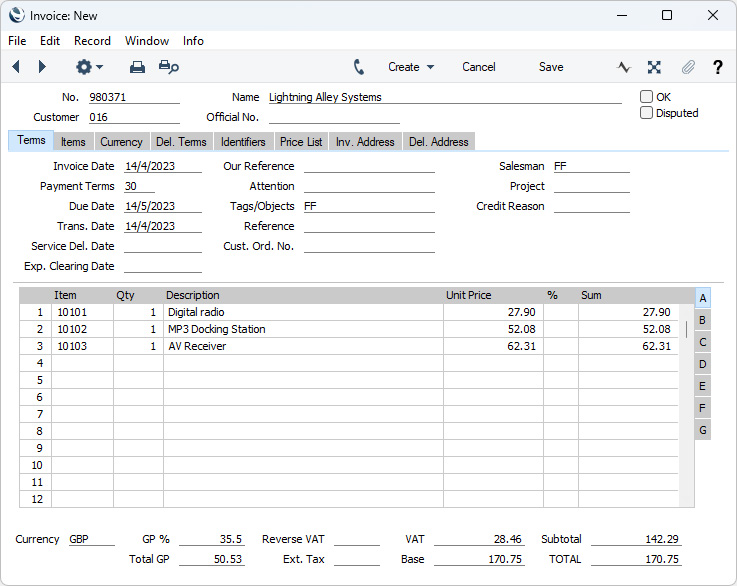
As you add Items to the transaction, the correct prices will be brought in automatically: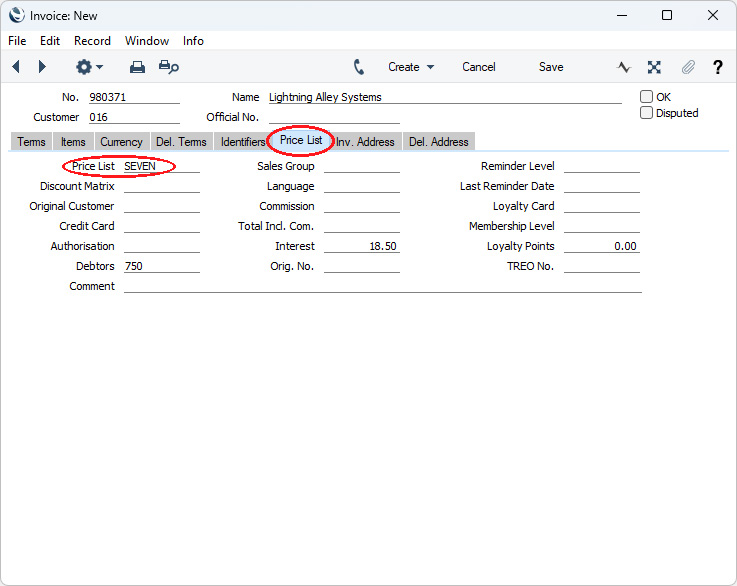
The Pricing module in Standard ERP:
- Introduction
- The Base Price
- Prices for Different Units of Measure
- Item Formulae
- Structure of Price Lists
- Price Formulae
- Price Lists
- Prices
- Deleting a Price List
- Price List Examples, including:
- Creating Price Lists
- Prices in Currency
- Dated Price Lists
- Creating Price Lists
- Quantity Discounts
- Multi-buy Discounts
- Home page for Items and Pricing manual
- Home page for Standard ERP manual
Price List Examples - Prices in Currency
This page describes using a Price List with Currencies. Follow these steps:- To create a Price List and accompanying Prices in Currency, follow steps 1-3 in the procedure described here here, with one amendment. When you create the Price List (step 2), specify the appropriate Currency. This will mean that when you run the 'Calculate Prices' function (step 3), it will calculate the new prices of each Item by first converting the Base Value to the selected Currency using the current Exchange Rate and then applying the Price Formula. The Price records created by the function will therefore contain Prices in the specified Currency.
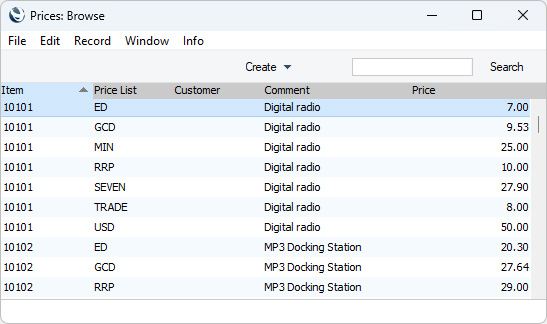
In the example illustration below, the last four Prices in the list are from the "USD" Price List, which has US Dollars as its Currency. The prices shown in the last column in the illustration are therefore in Dollars.
- Assign the "USD" Price List to the appropriate Customers or Customer Categories, In the example below, we have assigned the Price List to the "USS" Customer Category:
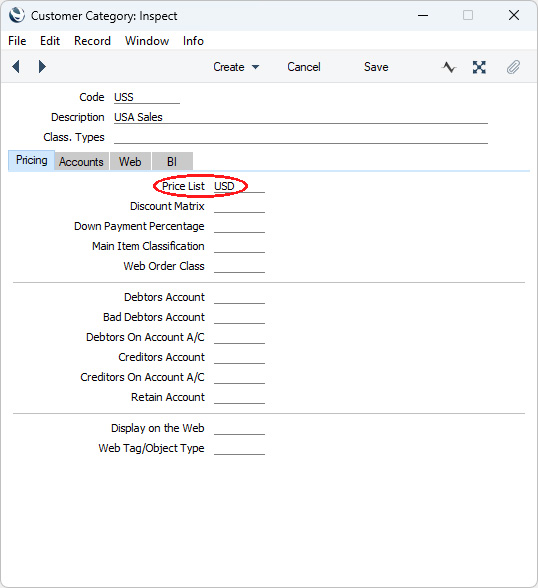
- Customer 008 is a member of this Customer Category. When you create a Quotation, an Order or an Invoice for this Customer, the prices on the "USD" Price List will be used automatically.
If you have specified that USD is the Customer's Sales Currency, this Currency will be brought in to the Invoice automatically when you specify the Customer, and you won't be able to change it. If you have left the Customer's Sales Currency empty, the Invoice will by default be in your home Currency. In this case you will be able to change the Invoice Currency to USD. In both cases, if the Invoice Currency is USD, the Unit Prices will be taken straight from the "USD" Price List without any further conversion:
The Nominal Ledger Transaction generated from this Invoice will contain figures in both foreign and home Currencies (and in the second base Currency if appropriate): the conversion rate shown on the 'Currency' card of the Invoice will be used.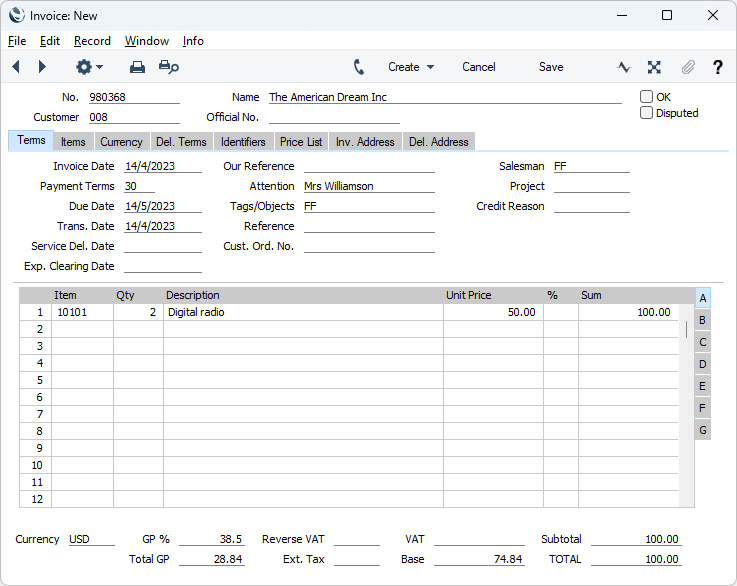
- If a Customer belonging to the sale Customer Category (i.e. using the same Price List) is to be invoiced in your home Currency, ensure the Currency field in the Invoice is blank or contains your home Currency (Pounds Sterling in the example). Prices from the "USD" Price List will be converted from US Dollars using the current conversion rate as you add Items to the Invoice:
If you are using a standard Price List with Prices in your home Currency for many or all Customers, these Prices will also be converted to other Currencies if necessary. For example, if you issue an Invoice in Japanese Yen, prices from this Price List will be converted in the Invoice, using the Exchange Rate for that Invoice Date: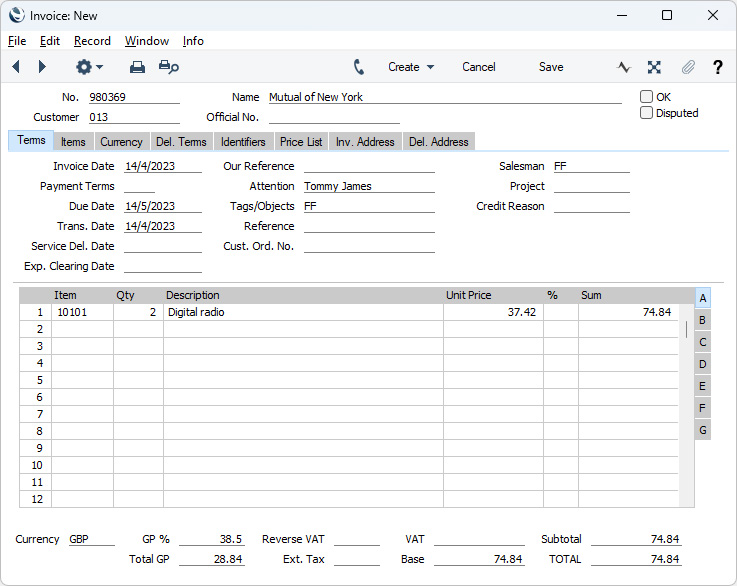
Note that in each illustration, the Total GP and the Base remain the same, because they are always expressed in the home Currency.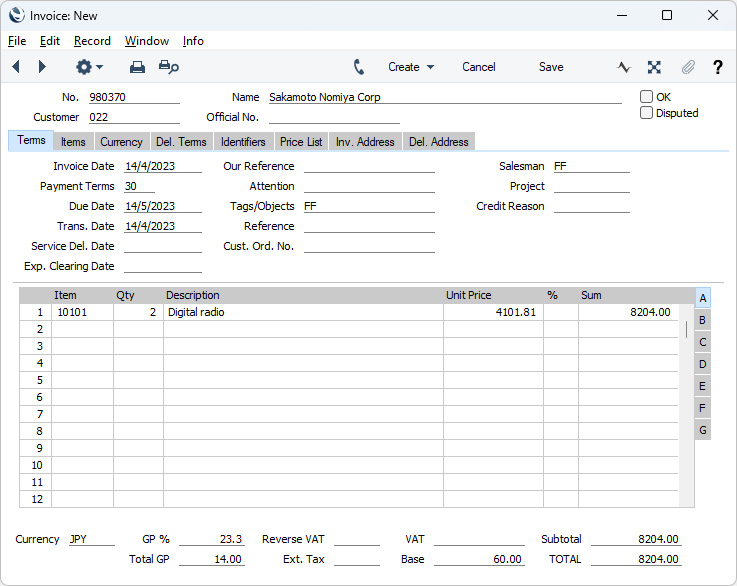
The Pricing module in Standard ERP:
- Introduction
- The Base Price
- Prices for Different Units of Measure
- Item Formulae
- Structure of Price Lists
- Price Formulae
- Price Lists
- Prices
- Deleting a Price List
- Price List Examples, including:
- Creating Price Lists
- Prices in Currency
- Dated Price Lists
- Creating Price Lists
- Quantity Discounts
- Multi-buy Discounts
- Home page for Items and Pricing manual
- Home page for Standard ERP manual
Price List Examples - Dated Price Lists
This page describes using a Price List that is valid for a particular period of time.- A Price List that is valid for a particular period of time is a temporary Price List. Typically you will use it in place of a standard Price List during its period of validity. For this example, start by assigning a standard Price List to your Customers and/or Customer Categories:
In the "RRP" (Recommended Retail Price) Price, each Item is listed with its Base Price.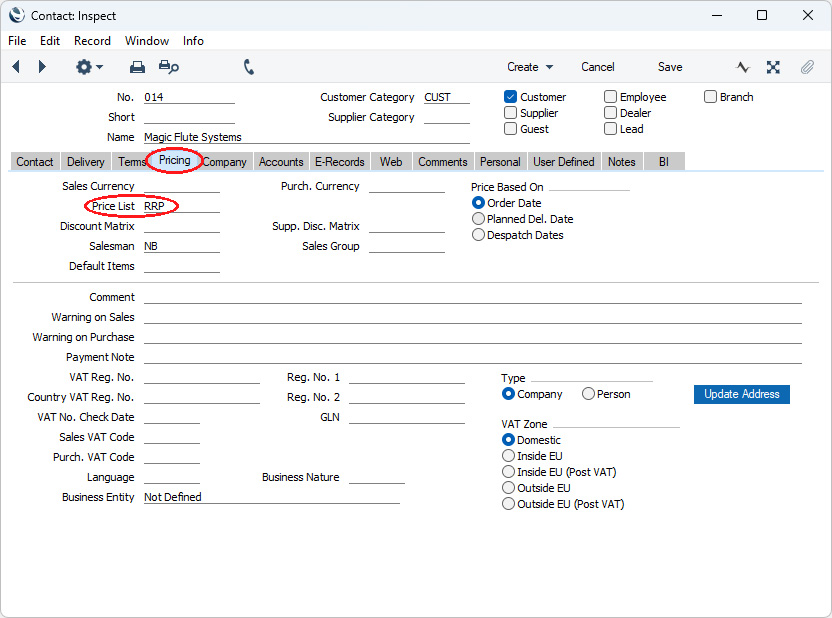
- You decide you want to offer an 18% discount for the month following the annual trade show, and a 14% discount for the two weeks after that.
Do not change the "RRP" Price List or your Customers or Customer Categories. Instead, define a new Price List with an 18% Price Formula. Enter the period of validity (the month after the trade show) in the two Period fields, and use the Replace field to signify that this new Price List is to take the place of the "RRP" Price List during that period:
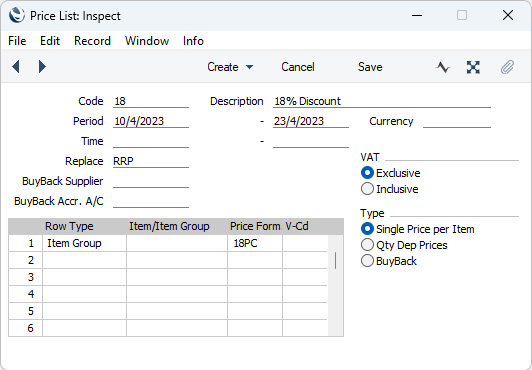
- Similarly, enter a new Price List with a 14% Price Formula for the next two week period. Again, use the Replace field to signify that this new Price List is to take the place of the "SEVEN" Price List during this period. When this Period expires, the "SEVEN" Price List will be used once again.
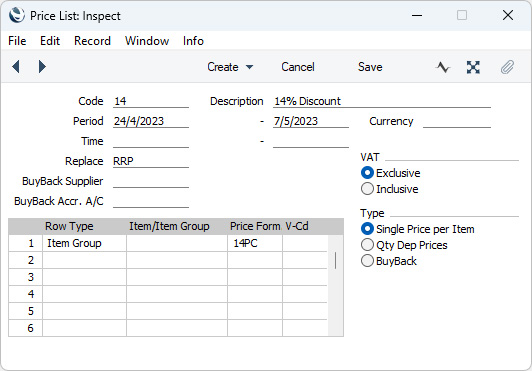
- Use the 'Calculate Prices' Maintenance function to create new Price records for both new Price Lists.
- When you enter a Quotation or Invoice, the appropriate Price List will be used, based on the Quotation Date or the Invoice Date respectively. However, in Orders, you can choose whether choice of Price List will be controlled by the Order Date, the Planned Delivery Date or the Despatch Date. This choice is set for each Customer, using the Price Based On options on the 'Pricing' card of each Contact record:
If you change the determining date (e.g. if you change the Invoice Date in an Invoice) after specifying the Customer, use the 'Update Currency Price List Items' Operations menu function to recalculate the prices of any Items that you have already added to the record.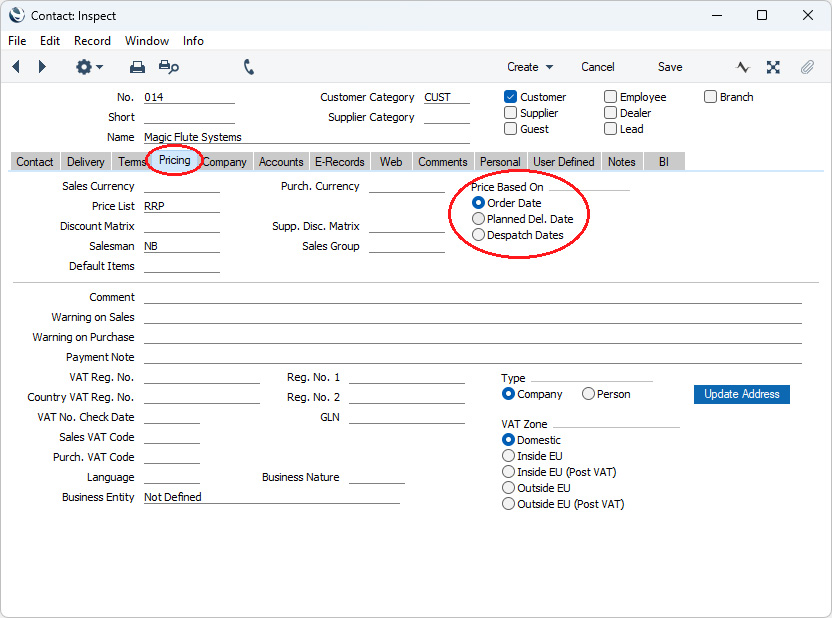
It is not recommended that you enter dated Price Lists (i.e. the "14" or "18" Price Lists) in Contact records or in Customer Categories, because results will be inconsistent when they expire.
---
The Pricing module in Standard ERP:
- Introduction
- The Base Price
- Prices for Different Units of Measure
- Item Formulae
- Structure of Price Lists
- Price Formulae
- Price Lists
- Prices
- Deleting a Price List
- Price List Examples, including:
- Creating Price Lists
- Prices in Currency
- Dated Price Lists
- Creating Price Lists
- Quantity Discounts
- Multi-buy Discounts
- Home page for Items and Pricing manual
- Home page for Standard ERP manual
Quantity Discounts
Standard ERP contains three methods that you can use to control pricing if you need to charge different prices for a particular Item depending on the quantity sold:- You can offer different discounts, depending on the quantity sold. This method uses the Discount Matrix register in the Pricing module and is described on this page. If you offer this method to a Customer, it can be in combination with a standard Price List (i.e. the discount can be applied to an Item's Base Price or to a price in a Price List). This method can print the discount percentage on the paperwork (e.g. Invoices) that you send to Customers and, if you are using the Post Discount option in the Account Usage S/L setting, it will post to a Discount Account in the Nominal Ledger. This method also allows you to apply quantity discounts based on weight, volume or value sold, in addition to quantity sold.
- You can charge different prices depending on the quantity sold. This option uses "Qty Dep Prices" Price Lists and the Quantity Dependent Prices setting and is described here. If you offer this method to a Customer, it will be in place of a standard Price List. This method changes the Unit Price in a sale, so there will be no discount percentage to be printed on paperwork or to post to a Discount Account in the Nominal Ledger.
- You can offer a discount on one Item that depends on another Item being purchased (for example, "Buy one get one free" and "Buy any three Items from a selection for a fixed price" offers). This option is described on the Multi-Buy Discounts page.
To set up a quantity discount system, you will use two registers that are both in the Pricing module: Quantity Dependent Discounts and Discount Matrices. You should define Quantity Dependent Discounts first, as they are used by the Discount Matrices.
When you enter Quotations, Orders or Invoices, quantity discounts will be applied automatically as appropriate, after an Item's Unit Price has been determined by reference to any Price Lists that may apply.
You can also use quantity discounts on the purchase side, in Purchase Quotation Requests and in Purchase Orders. As on the sales side and with no differences, use the Quantity Dependent Discount and Discount Matrix registers to configure the quantity discounts for the purchase side.
In planning such a discount structure, follow these steps:
- Enter the Items with their Base Prices, using the Item register. An Item's Base Price should be its standard sales price. Assign each Item to an Item Group.
- Define the various quantity breaks using the Quantity Dependent Discount register in the Pricing module. Quantity breaks can be based on quantity, weight, volume or value. You can define different quantity breaks for different Items, by entering as many Quantity Dependent Discount records as necessary.
Quantity Dependent Discounts are described in detail here.
- The next step is to define the discount percentages for each quantity break, using the Discount Matrix register in the Pricing module. A single set of discount levels (i.e. a "Discount Matrix") can be applied to every Item, or to specific Items or Item Groups.
Discount Matrices are described in detail here.
- You can now assign a Discount Matrix to each Customer or Customer Category. If you use Loyalty Cards, you can also assign a Discount Matrix to each Loyalty Card Membership Level. This will allow you to offer different discounts depending on the level of the Loyalty Card that a Customer holds.
When you enter a Quotation, Order or Invoice for a particular Customer, the Discount Matrix will be used chosen as follows.
- If the Customer has a Loyalty Card, the Discount Matrix will be brought in from the relevant row in the Loyalty Card Membership Level Structure setting in the Point of Sales module.
- The Discount Matrix will be brought in from the 'Pricing' card of the Customer's Contact record.
- The Discount Matrix for the Customer Category to which the Customer belongs will be used.
As you add Items to the Quotation, Order or Invoice, discount percentages will be placed in the % discount field in each row. The discount will be updated each time you change the quantity.
On the purchase side, you can assign a Discount Matrix to each Supplier, using the Supp. Disc Matrix field in the Suppliers' Contact records ('Pricing' card). This Discount Matrix will be brought in to each Purchase Quotation Request and Purchase Order.
- If the Customer has a Loyalty Card, the Discount Matrix will be brought in from the relevant row in the Loyalty Card Membership Level Structure setting in the Point of Sales module.
---
The Pricing module in Standard ERP:
- Introduction
- The Base Price
- Prices for Different Units of Measure
- Item Formulae
- Structure of Price Lists
- Price Formulae
- Price Lists
- Prices
- Deleting a Price List
- Price List Examples
- Quantity Discounts, including:
- Multi-buy Discounts
- Home page for Items and Pricing manual
- Home page for Standard ERP manual
Quantity Discounts - Quantity Dependent Discounts
If you need to set up a system of quantity discounts, you will use two registers in the Pricing module:- The Quantity Dependent Discount register will contain the quantity breaks, which can be based on quantity, weight, volume or value. Each record in this register will contain a set of quantity breaks that can be used by any number of Discount Matrices, allowing you to define different discount structures based on the same quantity breaks.
- The Discount Matrix register will contain the discount percentages.
To define a new set of quantity breaks, first ensure you are in the Pricing module using the [Switch Module] button in the Navigation Centre. Then, if you are using Windows or macOS, click the [Registers] button in the Navigation Centre and then double-click 'Quantity Dependent Discounts' in the resulting list. If you are using iOS or Android, tap the [Registers] button in the Navigation Centre and then tap 'Quantity Dependent Discounts' in the 'Registers' list.
When the 'Quantity Dependent Discounts: Browse' window appears, select 'New' from the Create menu (Windows/macOS) or the + menu (iOS/Android) to create a new record. When the record is complete, click the [Save] button (Windows/macOS) or tap √ (iOS/Android). You can then close it using the close box (Windows/macOS) or by tapping < (iOS/Android). Then, close the browse window using the close box or < again.
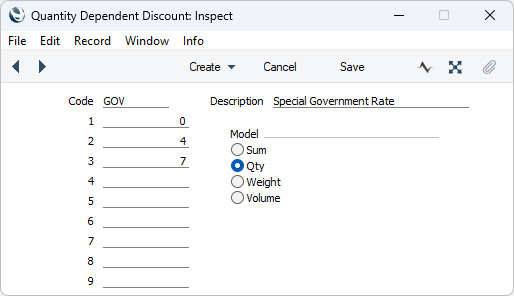
- Code
- Enter the unique code by which the Quantity Dependent Discount record will be identified from the Discount Matrix window.
- Description
- Enter here some text that describes the set of quantity breaks in the Quantity Dependent Discount record. This Description will be shown in the 'Paste Special' list that you will use when choosing a Quantity Dependent Discount record in a Discount Matrix, so it should be descriptive enough to make choosing the correct record easy for all users.
- 1-9
- Use these fields to list the quantity breaks. The figures that you enter in these fields can be values, quantities, weights or volumes, depending on the Model option (to the right) that you have selected.
- In the example illustrated above, the discount structure is based on sales quantity. There are three quantity breaks, 0, 4 and 7, resulting in three discount levels: fewer than four units sold; between four and six units; and seven units or more.
- In the example illustrated above, the discount structure is based on sales quantity. There are three quantity breaks, 0, 4 and 7, resulting in three discount levels: fewer than four units sold; between four and six units; and seven units or more.
- Model
- Select one of these options to choose how the quantity breaks will be measured.
- Sum
- Quantity breaks will be based on the total value of a row in a sale (e.g. in a Quotation, Order or Invoice row).
- Qty
- Quantity breaks will be based on the sales quantity (i.e. on the Quantity in a Quotation, Order or row).
- Weight, Volume
- Quantity breaks will be based on the total weight or volume of an Item in a sale (i.e. on the Quantity * Item Weight or Quantity * Item Volume in a Quotation, Order or Invoice row).
- Sum
The Pricing module in Standard ERP:
- Introduction
- The Base Price
- Prices for Different Units of Measure
- Item Formulae
- Structure of Price Lists
- Price Formulae
- Price Lists
- Prices
- Deleting a Price List
- Price List Examples
- Quantity Discounts, including:
- Quantity Dependent Discounts
- Discount Matrices
- Quantity Discounts - Example
- Quantity Dependent Discounts
- Multi-buy Discounts
- Home page for Items and Pricing manual
- Home page for Standard ERP manual
Quantity Discounts - Discount Matrices
If you need to set up a system of quantity discounts, you will use two registers in the Pricing module:- The Quantity Dependent Discount register will contain the quantity breaks, which can be based on quantity, weight, volume or value.
- The Discount Matrix register will contain the discount percentages. Each record in this register will contain a set of discount percentages, one percentage for each quantity break.
To define a new set of discount percentages, first ensure you are in the Pricing module using the [Switch Module] button in the Navigation Centre. Then, if you are using Windows or macOS, click the [Registers] button in the Navigation Centre and then double-click 'Discount Matrices' in the resulting list. If you are using iOS or Android, tap the [Registers] button in the Navigation Centre and then tap 'Discount Matrices' in the 'Registers' list.
When the 'Discount Matrices: Browse' window appears, select 'New' from the Create menu (Windows/macOS) or the + menu (iOS/Android) to create a new record. When the record is complete, click the [Save] button (Windows/macOS) or tap √ (iOS/Android). You can then close it using the close box (Windows/macOS) or by tapping < (iOS/Android). Then, close the browse window using the close box or < again.
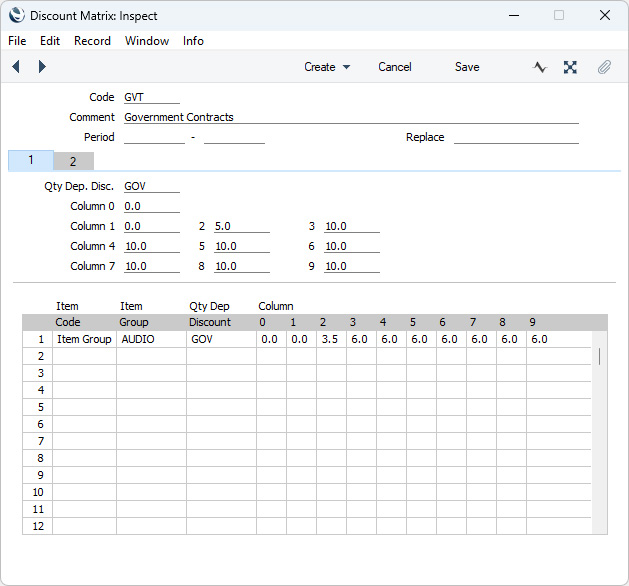
- Code
- Enter the unique code by which the Discount Matrix will be identified from other areas of Standard ERP.
- Comment
- Enter a name for the Discount Matrix here. This Comment will be shown in the 'Paste Special' list that you will use to assign Discount Matrices to Customers and Customer Categories, so it should be descriptive enough to make choosing the correct record easy for all users.
- Period
- Paste Special
Choose date
- If the Discount Matrix is valid for a certain period, enter that period in these two fields.
- You should use the Period in combination with the Replace field (immediately below): you cannot leave the Replace field empty if you enter a Period. Please refer to the description of the Replace field for more information.
- You should use the Period in combination with the Replace field (immediately below): you cannot leave the Replace field empty if you enter a Period. Please refer to the description of the Replace field for more information.
- Replace
- Paste Special
Discount Matrix register, Pricing module
- If you have assigned a standard Discount Matrix to a Customer or Customer Category, you can replace that standard Discount Matrix with a temporary Discount Matrix that is valid for a particular time period.
- In the standard Discount Matrix, leave the Period and Replace fields blank. Create a new record for the temporary Discount Matrix, enter the Period for which it is valid and specify the Code of the standard Discount Matrix in the Replace field. Do not change the Customer or Customer Category. When entering Quotations, Orders or Invoices, the temporary Discount Matrix will be used during the specified Period and the standard Discount Matrix will be used at all other times, both before and after this Period.
- In the case of Quotations and Invoices, the relevant dates for the Period will be the Quotation and Invoice Dates respectively. In the case of Orders, you can use the Order Date, Planned Delivery Date or the Despatch Date to determine whether the temporary Discount Matrix is valid. You can make this choice for each Customer separately, using the Price Based On options on the 'Pricing' card of the Customer record.
- In the standard Discount Matrix, leave the Period and Replace fields blank. Create a new record for the temporary Discount Matrix, enter the Period for which it is valid and specify the Code of the standard Discount Matrix in the Replace field. Do not change the Customer or Customer Category. When entering Quotations, Orders or Invoices, the temporary Discount Matrix will be used during the specified Period and the standard Discount Matrix will be used at all other times, both before and after this Period.
- Qty Dep. Disc.
- Paste Special
Quantity Dependent Discount register, Pricing module
- Use 'Paste Special' to connect the Discount Matrix to a Quantity Dependent Discount record. You can then use the fields below to specify discount percentages for the quantity breaks that are listed in that Quantity Dependent Discount record.
- Column 1-9
- Specify here the discount percentages for each quantity break. Usually, the percentage discount will increase with the size of the purchase.
- The Column 1-9 fields correspond to the 1-9 fields in the Quantity Dependent Discount record. For example, in the Column 1 field, enter the percentage discount that you wish to offer on quantities up to the quantity in the 2 field in the Quantity Dependent Discount record. In the Column 2 field, enter the percentage discount for quantities up to the quantity in the 3 field in the Quantity Dependent Discount record.
- For example, the Discount Matrix illustrated above uses the Quantity Dependent Discount record illustrated here. This will result in the following discount structure:
Quantity Sold Discount Field Up to 3 0% Column 1 4-6 5% Column 2 7 and over 10% Column 3 - Always fill in each of the Column 1-9 fields, even if you are not going to use them all. The Column fields that you're not using should contain the same discount percentage as the highest numbered Column field that you are using (Columns 4-9 all contain "10" in the illustration, copied from Column 3).
- The Column 1-9 fields correspond to the 1-9 fields in the Quantity Dependent Discount record. For example, in the Column 1 field, enter the percentage discount that you wish to offer on quantities up to the quantity in the 2 field in the Quantity Dependent Discount record. In the Column 2 field, enter the percentage discount for quantities up to the quantity in the 3 field in the Quantity Dependent Discount record.
- Column 0
- You can use the Column 0 field if you need to specify a single discount percentage that will be applied to every row in a sale. This is the easiest way to apply an overall discount to a sale (e.g. to a Quotation, Order or Invoice). If you specify a Column 0, there is no need to specify a Quantity Dependent Discount and you can leave the Column 1-9 fields empty. Column 0 will not be used if the Column 1-9 fields contain values and there is a valid Quantity Dependent Discount.
- Item Type
- Paste Special
Choices of possible entries
- This field can contain one of two entries: "Item" or "Item Group". Use it to indicate whether the Item/Group field (in the next column) contains or will contain an Item or an Item Group. Use 'Paste Special' to increase input speed.
- If the entry is "Item", the appropriate discount percentage will be placed in a sales transaction row (e.g. in a Quotation, Order or Invoice row) as soon as you specify the Item and Quantity. However, if the entry is "Item Group", the discount percentage of an Item will depend on how many other Items belonging to the same Item Group have been used in the same transaction. This is because the discount percentage will be calculated using the total quantity, value, weight or volume of every Item in the Item Group in the sale. To calculate the discount percentage for every Item in the Group, select 'Recalculate Discount' from the Operations menu after you have added all the Items to the transaction.
- If you set this field to "Item Group" and the next field is blank, the Discount Matrix will cause the 'Recalculate Discount' function to calculate an overall discount percentage for a transaction, from the total quantity, value, weight or volume of the Items sold.
- If the entry is "Item", the appropriate discount percentage will be placed in a sales transaction row (e.g. in a Quotation, Order or Invoice row) as soon as you specify the Item and Quantity. However, if the entry is "Item Group", the discount percentage of an Item will depend on how many other Items belonging to the same Item Group have been used in the same transaction. This is because the discount percentage will be calculated using the total quantity, value, weight or volume of every Item in the Item Group in the sale. To calculate the discount percentage for every Item in the Group, select 'Recalculate Discount' from the Operations menu after you have added all the Items to the transaction.
- Item/Group
- Paste Special
Item Group register, Sales Ledger or Item register
- Specify here the Item or Item Group to which the discounts in the row are to be applied.
- If you enter an Item here, set the Item Type to "Item". If you enter an Item Group, set the Item Type to "Item Group". If you set the Item Type before entering an Item or Item Group, this will determine whether the 'Paste Special' window will list Items or Item Groups when you open it from this field.
- If you enter an Item here, set the Item Type to "Item". If you enter an Item Group, set the Item Type to "Item Group". If you set the Item Type before entering an Item or Item Group, this will determine whether the 'Paste Special' window will list Items or Item Groups when you open it from this field.
- Qty Dep. Discount
- Paste Special
Quantity Dependent Discount register, Pricing module
- Use 'Paste Special' to connect the row to a Quantity Dependent Discount record. You can then use the fields to the right to specify discount percentages for the quantity breaks that are listed in that Quantity Dependent Discount record.
- Column 0-9
- Use these fields in the same way as those with the same names on card 1 and as described above.
In the illustration above, card 2 contains a special discount structure for Items belonging to the "AUDIO" Item Group, as follows:Quantity Sold Discount Field Up to 3 0% Column 1 4-6 3.5% Column 2 7 and over 6% Column 3
After entering a set of discount percentages in a Discount Matrix record, you can then assign that Discount Matrix to the appropriate Customers and/or Customer Categories. To do this, use the Discount Matrix field on the 'Pricing' card of the Contact record for each Customer and/or the Discount Matrix field on the 'Pricing' card of each Customer Category. When you sell a particular Item to those Customers, the Discount Matrix will control the discounts that you offer. Please refer here for an illustrated example. Similarly, on the purchase side, you can assign a Discount Matrix to the appropriate Suppliers using the Supp. Disc. Matrix field, again on the 'Pricing' card of the Contact record for each Supplier.
---
The Pricing module in Standard ERP:
- Introduction
- The Base Price
- Prices for Different Units of Measure
- Item Formulae
- Structure of Price Lists
- Price Formulae
- Price Lists
- Prices
- Deleting a Price List
- Price List Examples
- Quantity Discounts, including:
- Quantity Dependent Discounts
- Discount Matrices
- Quantity Discounts - Example
- Quantity Dependent Discounts
- Multi-buy Discounts
- Home page for Items and Pricing manual
- Home page for Standard ERP manual
Quantity Discounts - Example
This page contains an illustrated example that describes the use of Discount Matrices. The example uses the following Quantity Dependent Discount record: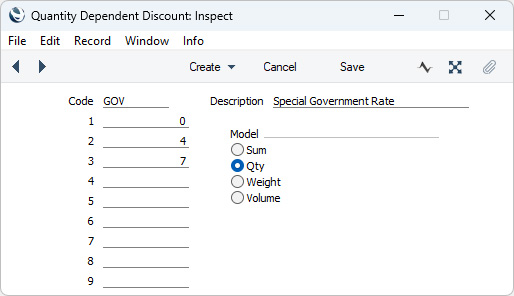
The Quantity Dependent Discount record is used by the following Discount Matrix:
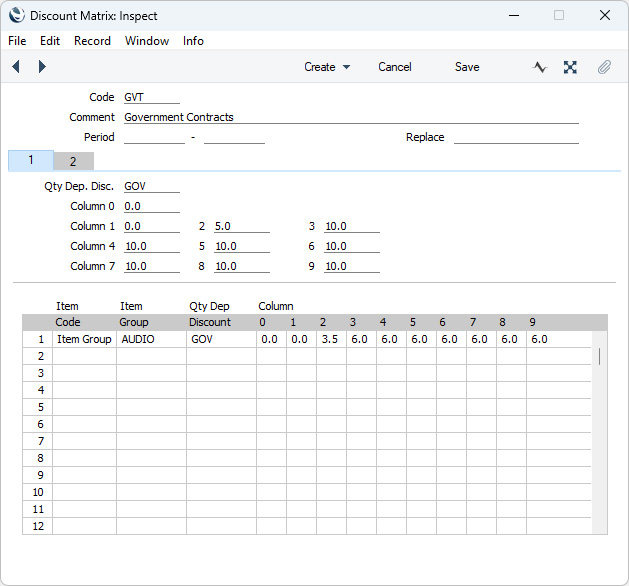
| Quantity Sold | Std Discount | AUDIO Discount |
| Fewer than 4 | 0% | 0% |
| 4-6 | 5% | 3.5% |
| 7 and over | 10% | 6% |
These figures are determined as follows:
- Quantity Sold
- From the Quantity Dependent Discount record
- Std Discount
- From card 1 of the Discount Matrix, applies to all Items except those listed in the matrix on card 2
- AUDIO Discount
- From card 2 of the Discount Matrix, which contains special discount rates for Items belonging to the "AUDIO" Item Group.
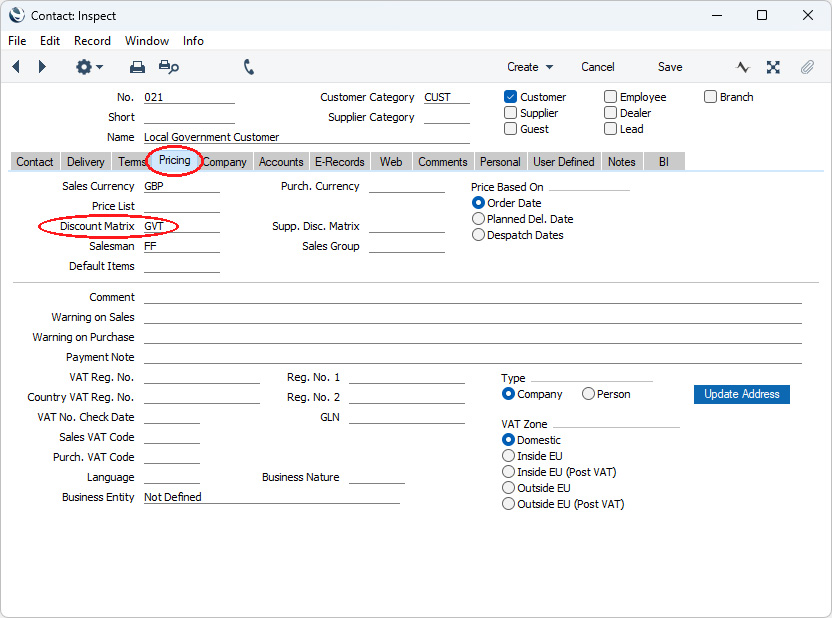
When you add an Item to a sales transaction (e.g. a Quotation, Order or Invoice) made out to one of these Customers, the correct price will first be brought in automatically to the Unit Price field from the relevant Price List or from the Item register:
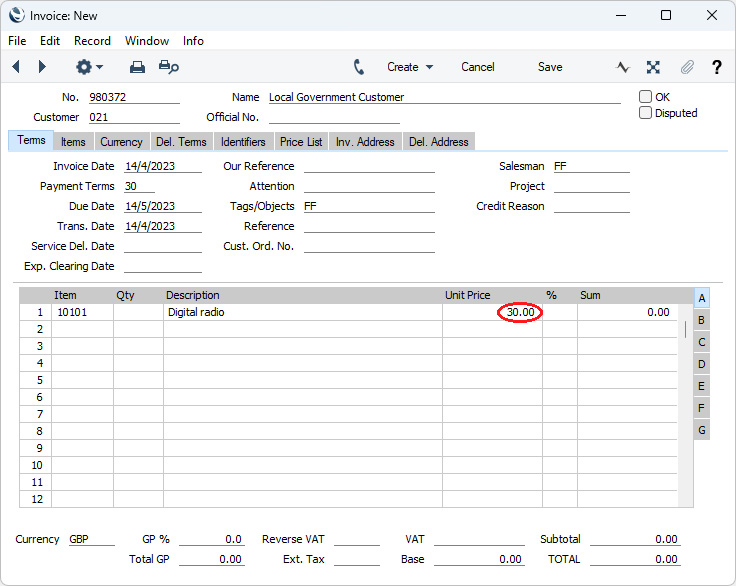
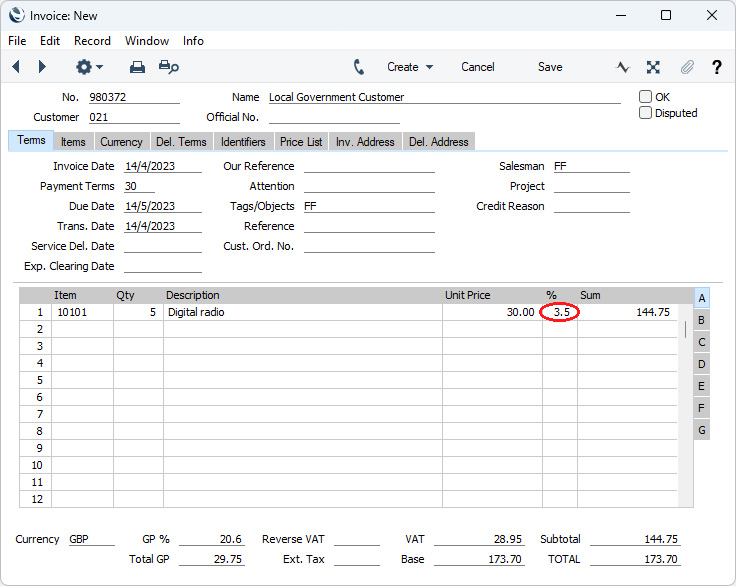
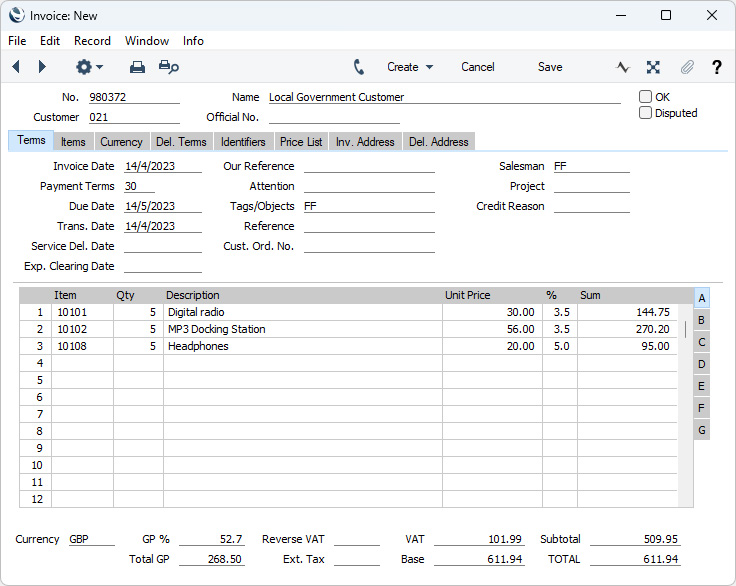
However, in this example, the first two Items belong to the "AUDIO" Item Group, so in total 10 units belonging to this Group have been sold. On card 2 of the Discount Matrix, we did not specify separate discount structures for Items 10101 and 10102, we specified one for the "AUDIO" Item Group. This means that the discounts should not be calculated on a row-by-row basis but on an aggregate basis. As the Invoice contains ten units belonging to this Group, the Discount Matrix stipulates that the discount for each Item should be 6%, not 3.5%. To calculate the discount percentage for the aggregate total for the Item Group select 'Recalculate Discount' from the Operations menu:
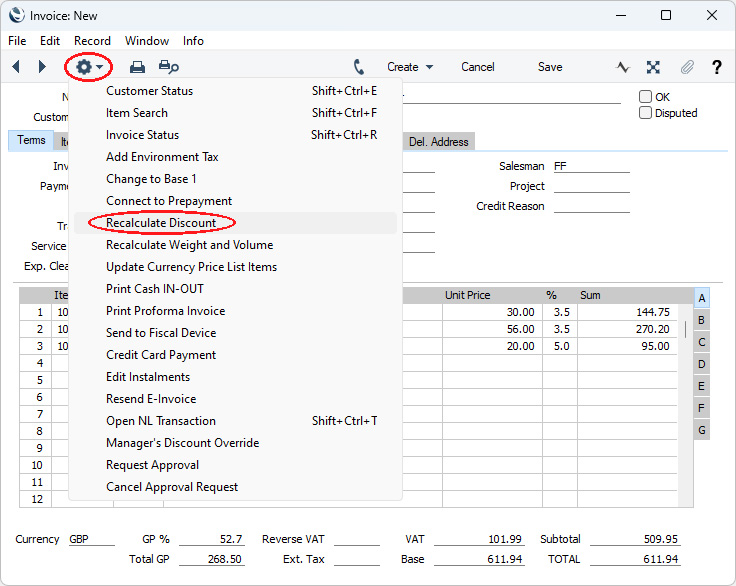
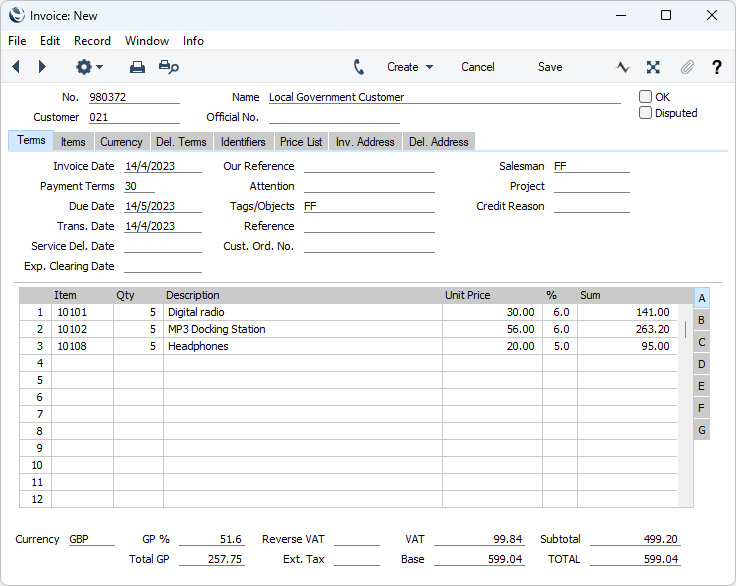
---
The Pricing module in Standard ERP:
- Introduction
- The Base Price
- Prices for Different Units of Measure
- Item Formulae
- Structure of Price Lists
- Price Formulae
- Price Lists
- Prices
- Deleting a Price List
- Price List Examples
- Quantity Discounts , including:
- Quantity Dependent Discounts
- Discount Matrices
- Quantity Discounts - Example
- Quantity Dependent Discounts
- Multi-buy Discounts
- Home page for Items and Pricing manual
- Home page for Standard ERP manual
Multi-buy Discounts
A "Multi-buy Discount" is a discount offered on the price of one Item that depends on the purchase of another. Examples are "Buy one get one free" and "Buy any three Items from a selection for a fixed price" offers. If you need to set up a quantity discount system (where the discount offered on the price of an Item depends on the quantity of that Item that is purchased), please refer to the page.After you have set up Multi-buy Discounts, they will be used in Invoices and POS Invoices automatically where appropriate. Multi-buy Discounts will not be used in other registers such as Sales Orders or Quotations.
Setting up a Multi-buy Discount requires a single step: entering a record in the Multi-Buy Discount register. To open this register, first ensure you are in the Pricing module. Then, if you are using Windows or macOS, click the [Registers] button in the Navigation Centre and then double-click 'Multi-buy Discounts' in the resulting list. If you are using iOS or Android, tap the [Registers] button in the Navigation Centre and then tap 'Multi-buy Discounts' in the 'Registers' list. The 'Multi-buy Discounts: Browse' window will be opened, listing the Multi-buy Discount records that you have already entered.
To enter a new Multi-buy Discount, select 'New' from the Create menu (Windows/macOS) or the + menu (iOS/Android). You can also use the Ctrl-N (Windows) or ⌘-N (macOS) keyboard shortcut. Alternatively, highlight or open a Multi-buy Discount similar to the one you want to enter, and select 'Duplicate' from the same menu. If you don't want to open the 'Multi-buy Discounts: Browse' window before creating a new record, you can also use the + menu in the Navigation Centre (all platforms).
The 'Multi-buy Discount: New' window will be opened, empty if you selected 'New' or containing a duplicate of the highlighted Multi-buy Discount record. Complete the Multi-buy Discount record as appropriate and as described below, then save it using the [Save] button (Windows/macOS) or by tapping √ (iOS/Android). You can then close it using the close box (Windows/macOS) or by tapping < (iOS/Android). Then, close the browse window using the close box or < again.
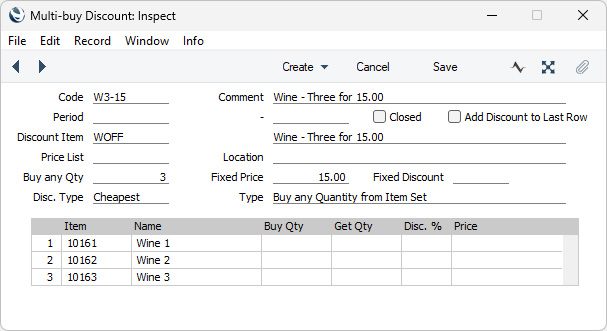
- Code
- Enter the unique Code by which the Multi-buy Discount record is to be identified from elsewhere in Standard ERP. The Code can consist of up to ten characters, and you can use both numbers and letters.
- Comment
- Enter the name for the Multi-buy Discount, to be shown in the 'Multi-buy Discounts: Browse' window.
- Period
- Paste Special
Choose date
- If the Multi-buy Discount is valid for a certain period, enter that period in these two fields.
- Closed
- Check this box if you no longer want the Multi-buy Discount to be used.
- You cannot re-open a Closed Multi-buy Discount record. If you need to do so, create a new record by duplicating the Closed record, and remove the tick from the Closed box before saving. Alternatively, if there is a possibility that you will need to re-use a Multi-buy Discount record in the future, you could close it using the Period fields above instead of marking it as Closed. You could also set the Disc. Type (below) to "None".
- You cannot re-open a Closed Multi-buy Discount record. If you need to do so, create a new record by duplicating the Closed record, and remove the tick from the Closed box before saving. Alternatively, if there is a possibility that you will need to re-use a Multi-buy Discount record in the future, you could close it using the Period fields above instead of marking it as Closed. You could also set the Disc. Type (below) to "None".
- Discount Item
- Paste Special
Item register
- You must specify a Discount Item in each Multi-buy Discount record. This should be a Plain or Service Item. The Name of the Item will be brought in to the field to the right: you can change it if necessary.
- When the Multi-buy Discount is used in an Invoice or POS Invoice, the Name of the Discount Item will be brought in and printed as the Description of the discount.
- In the case of POS Invoices only, the Sales Account in the Discount Item will be debited with the value of the discount in Nominal Ledger Transactions created by the 'Cash Up' Maintenance function and from POS Balances (the full sales value will be credited to the Item Sales Account(s)). If a Discount Item does not have a Sales Account, then the sales value less the discount will be credited to the Item Sales Account(s).
- In the case of Sales Ledger Invoices, the Sales Account in the Discount Item will not be used. Instead, the value of the discount will be debited to the Invoice Discount Account specified in the Account Usage S/L setting.
- When the Multi-buy Discount is used in an Invoice or POS Invoice, the Name of the Discount Item will be brought in and printed as the Description of the discount.
- Price List
- Paste Special
Price List register, Pricing module
- If you would like the Multi-buy Discount record to be used in combination with a particular Price List, specify that Price List here. The Multi-buy Discount record will only be used in Invoices and POS Invoices that also use the specified Price List.
- Location
- Paste Special Locations setting, Stock module
- If you would like the Multi-buy Discount record to be used in combination with a particular Location, specify that Location here. The Multi-buy Discount record will only be used in Invoices and POS Invoices that also use the specified Location (in the case of Invoices, the Location should be specified on the 'Del. Terms' card, not in the rows).
- If you would like the Multi-buy Discount record to be used in combination with a particular Location, specify that Location here. The Multi-buy Discount record will only be used in Invoices and POS Invoices that also use the specified Location (in the case of Invoices, the Location should be specified on the 'Del. Terms' card, not in the rows).
- Buy any Qty
- If the Type (below) is "Buy any Quantity from Item Set", specify here the quantity that must be purchased to qualify for the discount. For example, if the offer is "Buy any three Items from a selection for a fixed price", enter "3" in this field and list the Items in the selection in the matrix.
- Fixed Price, Fixed Discount
- If the Type (below) is "Buy any Quantity from Item Set", you can either set the price that will be charged to the Customer in a qualifying sale or you can offer a fixed discount.
- For example, if the offer is "Buy any three Items from a selection for 15.00", enter "15.00" as the Fixed Price. If the offer is "Buy any three Items from a selection and receive a 15.00 discount", enter "15.00" as the Fixed Discount. Finally, if the offer is "Buy any three Items from a selection and receive a 15% discount", enter "15.00%" as the Fixed Discount.
- You cannot specify both a Fixed Price and a Fixed Discount.
- For example, if the offer is "Buy any three Items from a selection for 15.00", enter "15.00" as the Fixed Price. If the offer is "Buy any three Items from a selection and receive a 15.00 discount", enter "15.00" as the Fixed Discount. Finally, if the offer is "Buy any three Items from a selection and receive a 15% discount", enter "15.00%" as the Fixed Discount.
- Disc. Type
- Paste Special
Choices of possible entries
- If the Type (below) is "Buy any Quantity from Item Set", use this field to control pricing when the Customer buys more Items than are subject to the offer.
- For example, if the offer is "Buy any three Items from a selection for 15.00" and the Customer buys four Items from the selection, three of those Items should be charged at 15.00 and one should be charged at full price. If you set the Disc. Type to "Cheapest", the three cheapest Items will qualify for the offer and the most expensive Item will be charged at full price. If the Disc. Type is "Most Expensive", the three most expensive Items will qualify for the offer and the cheapest Item will be charged at Full Price.
- You must choose a Disc. Type if the Type (below) is "Buy any Quantity from Item Set". Setting the Disc. Type to "None" will effectively disable the Multi-buy Discount. If a "Buy any Quantity from Item Set" Multi-buy Discount is not added automatically to an Invoice or POS Invoice when expected, a probable reason is the Disc. Type is "None".
- For example, if the offer is "Buy any three Items from a selection for 15.00" and the Customer buys four Items from the selection, three of those Items should be charged at 15.00 and one should be charged at full price. If you set the Disc. Type to "Cheapest", the three cheapest Items will qualify for the offer and the most expensive Item will be charged at full price. If the Disc. Type is "Most Expensive", the three most expensive Items will qualify for the offer and the cheapest Item will be charged at Full Price.
- Type
- Paste Special
Choices of possible entries
- Use this field to specify the type of the Multi-buy Discount. Two options are available:
- Buy x get y for free
- Choose this option if the offer will allow the Customer to purchase an Item at a discount or for free providing they also purchase another Item or Items.
- If you choose this option, list the Items that the Customer must purchase in the matrix and specify a Buy Qty for each one. The Buy Qty is the quantity that the Customer must purchase to qualify for the offer. Add the discounted or free Item to the matrix as well, but this time specify a Get Qty and a Disc % or a Price. The Get Qty is the quantity that is subject to the offer (for example, if the offer is "Buy one get two free", the Get Qty will be "2").
- If you choose this option, list the Items that the Customer must purchase in the matrix and specify a Buy Qty for each one. The Buy Qty is the quantity that the Customer must purchase to qualify for the offer. Add the discounted or free Item to the matrix as well, but this time specify a Get Qty and a Disc % or a Price. The Get Qty is the quantity that is subject to the offer (for example, if the offer is "Buy one get two free", the Get Qty will be "2").
- Buy any Quantity from Item Set
- Choose this option if the offer will allow the Customer to buy a specified quantity of Items from a selection for a fixed price or for a fixed discount.
- If you choose this option, list the selected Items in the matrix, specify the quantity in the Buy any Qty field and enter the fixed price or the fixed discount in the Fixed Price or Fixed Discount field as appropriate.
- Buy x get y for free
If the Type is "Buy x get y for free", list the Items that the Customer must buy in order to qualify for the offer and specify a Buy Qty for each one. Add the discounted or free Item to the matrix as well, but this time specify a Get Qty and a Disc % or a Price.
If the Type is "Buy any Quantity from Item Set", list the Items that are included in the set. In this case, there's no need to specify a Buy Qty, Get Qty, Disc % or Price for any of the Items.
- Item
- Paste Special
Item register
- Enter the Item Numbers of each of the Items that are part of the offer.
- Name
- The Item Name from the Item register will be placed here when you enter the Item Number.
- Buy Qty, Get Qty
- These fields are only used if the Type of the Multi-buy Discount is "Buy x get y for free".
- For the Items that a Customer must buy to qualify for the offer, use the Buy Qty field to specify here how many the Customer must buy. For the Item that is being offered at a discount or for free, use the Get Qty field to specify how many are being offered.
- For example, if the offer is "Buy two, get one free", enter "2" as the Buy Qty for the qualifying Item and "1" as the Get Qty for the offer Item.
- For the Items that a Customer must buy to qualify for the offer, use the Buy Qty field to specify here how many the Customer must buy. For the Item that is being offered at a discount or for free, use the Get Qty field to specify how many are being offered.
- Disc %, Price
- Again, these fields are only used if the Type of the Multi-buy Discount is "Buy x get y for free".
- For the Item that is being offered at a discount or for free, use these fields to specify the offer.
- For example, if the offer is "Buy two, get one free", use enter a 100% discount or a zero price for the offer Item.
- For the Item that is being offered at a discount or for free, use these fields to specify the offer.
---
The Pricing module in Standard ERP:
- Introduction
- The Base Price
- Prices for Different Units of Measure
- Item Formulae
- Structure of Price Lists
- Price Formulae
- Price Lists
- Prices
- Deleting a Price List
- Price List Examples
- Quantity Discounts
- Multi-buy Discounts
- Home page for Items and Pricing manual
- Home page for Standard ERP manual
Multi-buy Discounts - Example - Buy x get y for free
This example describes using a Multi-buy Discount record to implement a "Buy ten, get one free" offer. Please refer here for full details about the fields in the Multi-Buy Discount record.The "Buy ten, get one free" offer will be implemented by the Multi-buy Discount record illustrated below. If the Customer purchases ten MP3 download vouchers, they will be able to get an extra one for free:
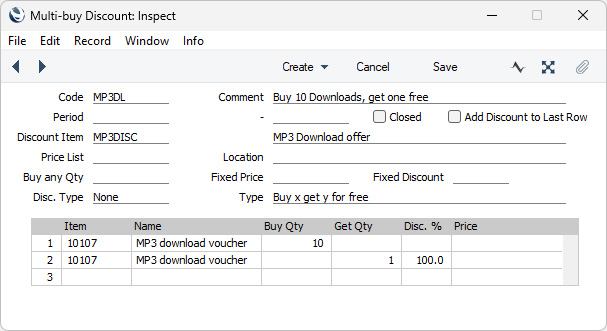
- The Type is "Buy x get y for free".
- The Buy any Qty, Fixed Price and Fixed Discount fields are not used.
- In the first row in the matrix, we have specified the Item that Customers must buy to qualify for the offer. The Buy Qty is "10", so Customers must purchase a quantity of ten to qualify.
- In the second row in the matrix, we have specified the offer Item. The Get Qty is "1", so Customers will be able to purchase a quantity of one at the offer price. The Disc % is "100", so the offer Item will be free to Customers.
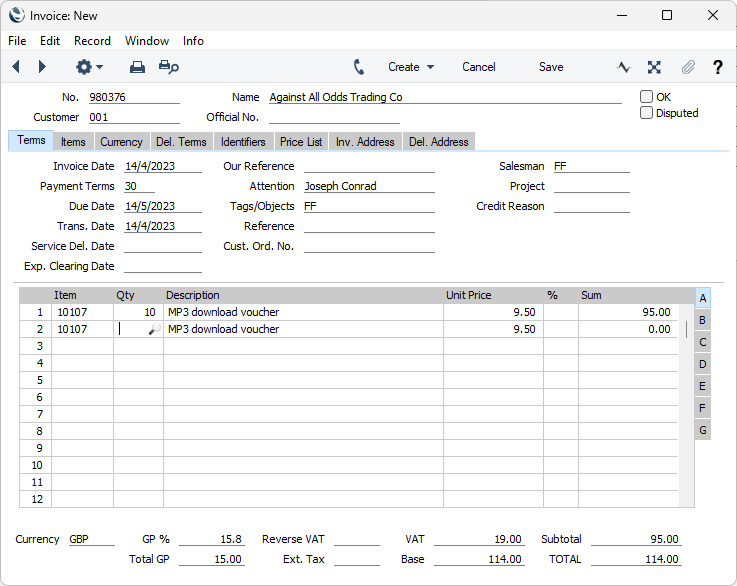
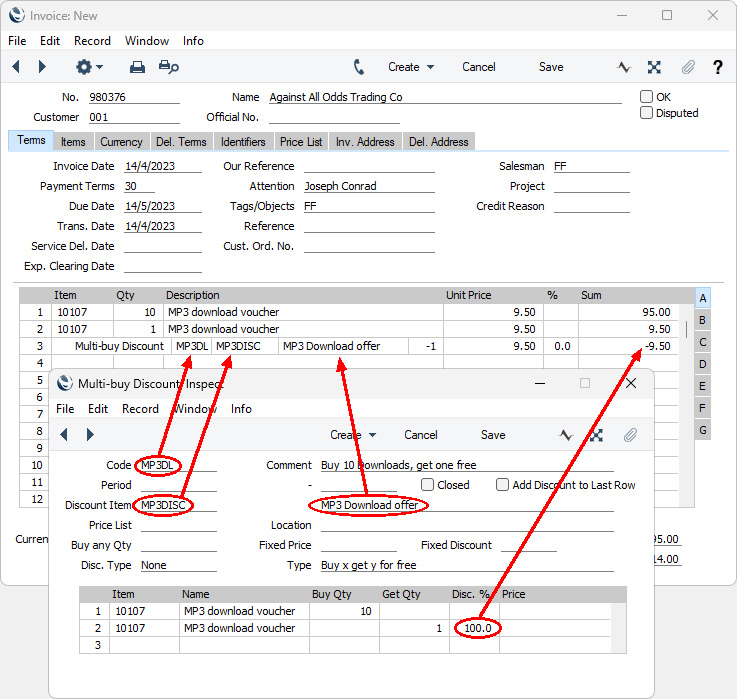
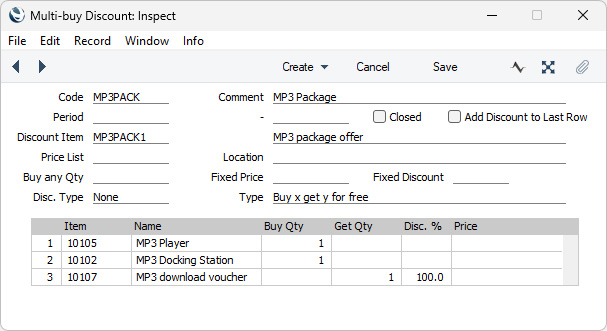
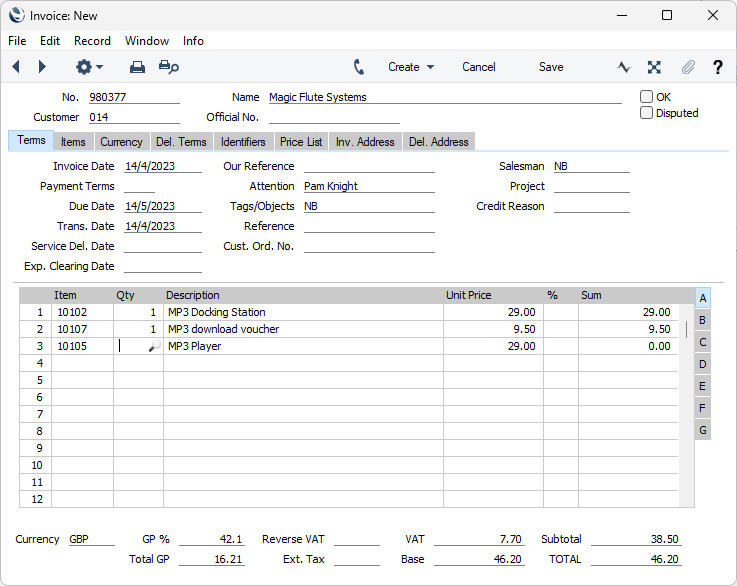
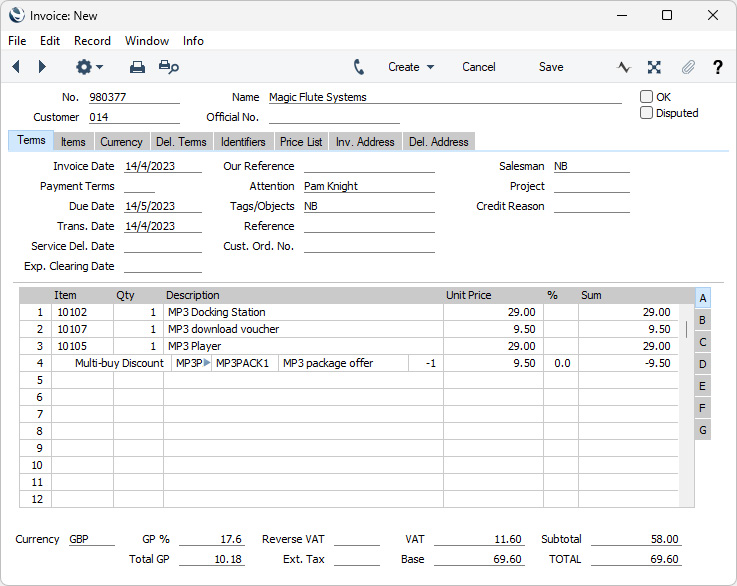
The Pricing module in Standard ERP:
- Introduction
- The Base Price
- Prices for Different Units of Measure
- Item Formulae
- Structure of Price Lists
- Price Formulae
- Price Lists
- Prices
- Deleting a Price List
- Price List Examples
- Quantity Discounts
- Multi-buy Discounts, including:
- Example - Buy x get y for free)
- Example - Buy any Quantity from Item Set
- Example - Buy x get y for free)
- Home page for Items and Pricing manual
- Home page for Standard ERP manual
Multi-buy Discounts - Example - Buy any Quantity from Item Set
This example describes using a Multi-buy Discount record to implement a "Buy any three Items for a fixed price" offer. Please refer here for full details about the fields in the Multi-Buy Discount record.The "Buy any three Items for a fixed price" offer will be implemented by the Multi-buy Discount record illustrated below.
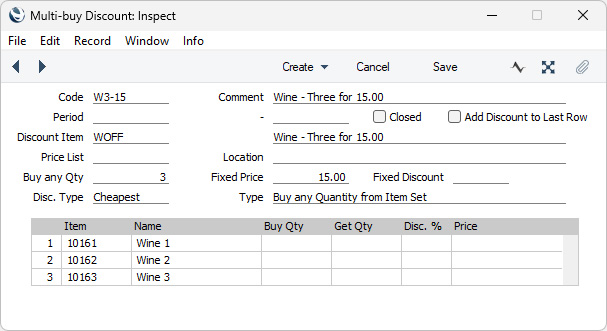
- The Type is "Buy any Quantity from Item Set".
- The Disc. Type is "Cheapest". If a Customer purchases four of the selected Items, this means that the three cheapest Items will qualify for the offer and the most expensive Item will be charged at full price.
- The offer is "Buy any three Items for a fixed price", so we have entered "3" in the Buy any Qty field.
- The fixed price is 15.00, so we have entered "15.00" in the Fixed Price field.
- We have listed the qualifying Items in the matrix. To qualify for the offer, a Customer needs to purchase any three of these Items. This can be in any combination: for example, three different Items each with a quantity of one or a single Item with a quantity of three will both qualify.
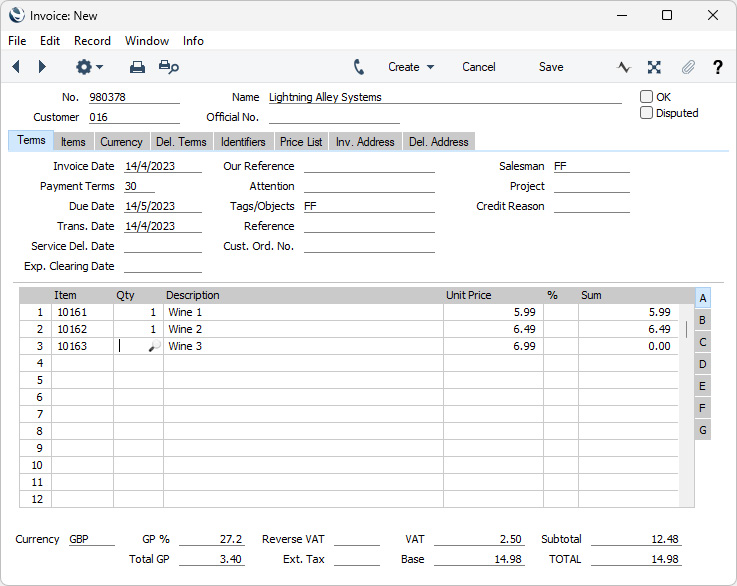
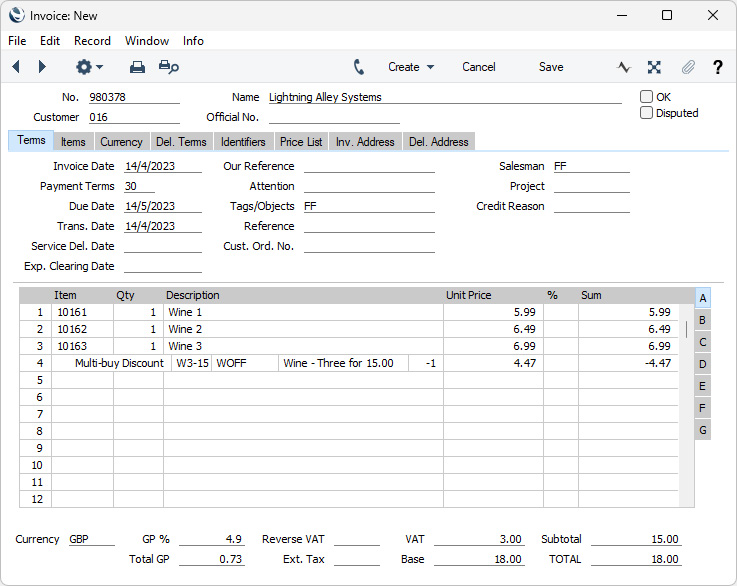
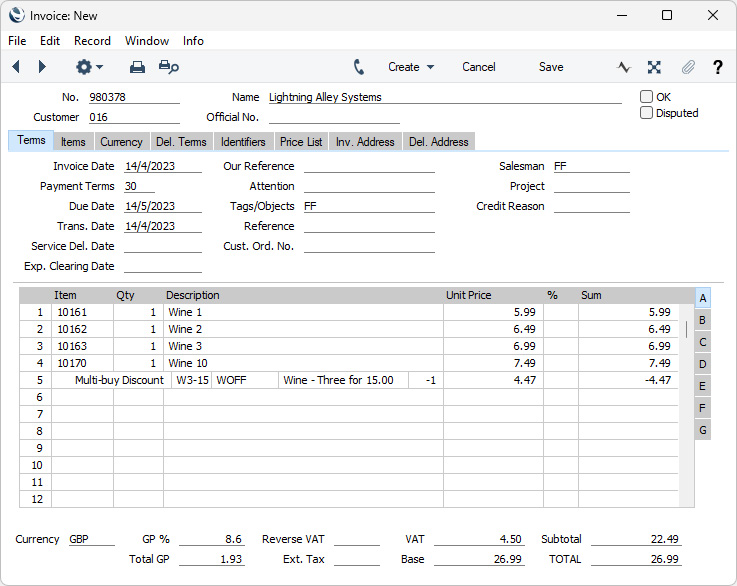
The Pricing module in Standard ERP:
- Introduction
- The Base Price
- Prices for Different Units of Measure
- Item Formulae
- Structure of Price Lists
- Price Formulae
- Price Lists
- Prices
- Deleting a Price List
- Price List Examples
- Quantity Discounts
- Multi-buy Discounts, including:
- Example - Buy x get y for free
Example - Buy any Quantity from Item Set
- Example - Buy x get y for free
- Home page for Items and Pricing manual
- Home page for Standard ERP manual