Introduction to Settings in the Sales Ledger
The Sales Ledger contains the following settings:
---
Please click the links below for details about each setting:
- Introduction
- Account Usage S/L
- Age Limits
- Alternative Items
- Bonus
- Classification Types
- Contact Credit Limits
- Contact Document Types
- Contact Settings
- Credit Limit
- Cross Sales Items
- Customer Categories
- Default Items
- Default Payment Modes
- Environment Tax
- Extra Tax Customer Discounts
- Factoring Export
- Freight
- Freight/Weight Calculation
- Gift Voucher settings
- Instalments
- Interest
- Interest Codes, Interest Terms
- Intrastat Transaction Codes
- Invoice Mail Settings
- Item Classifications
- Item Group Withholdings
- Item Settings
- Item Status Settings
- Legal Record Numbers
- Number Series - Contacts
- Number Series - Gift Vouchers
- Number Series - Gift Vouchers Received
- Number Series - Internal Invoices
- Number Series - Invoices
- Number Series - Receipts
- Official Invoice Serial Number
- Payment Modes
- Payment Term Sales A/C
- Payment Terms
- Receipt Settings
- Regional Sales Taxes
- Regions
- Registration Defaults
- Reminder Texts
- Sales Invoice Settings
- Standard Problems
- Units
- VAT Corrections S/L
- VAT Zone Label
- Home page for Sales Ledger manual
- Home page for Standard ERP manual
Account Usage S/L
You should use the Account Usage S/L setting to choose the default Accounts and VAT Codes that will be used as defaults in your Sales Ledger transactions (i.e. Invoices and Receipts). These defaults will be used in the absence of Accounts or VAT Codes being specified elsewhere (for example, for the Items, Item Groups, Customers or Customer Categories used in the transactions). Please click for complete descriptions of how Accounts and VAT Codes will be selected in Invoices and Receipts. The Accounts that you use here must exist in the Account register, otherwise Standard ERP will not be able to create transactions.If you have imported the sample Chart of Accounts supplied with Standard ERP, you will find that most of the fields in the Account Usage S/L setting contain suggested values. If you have modified this Chart of Accounts or have used your own, you must ensure that you replace these values with the correct Accounts.
! | The Accounts that you use in this setting must also exist in the Chart of Accounts. Otherwise, Standard ERP will not be able to create Transactions. You must either add the Accounts to the Chart of Accounts (i.e. to the Account register in the Nominal Ledger and System module), or use Accounts that already exist in the Chart of Accounts. |
To open the Account Usage S/L setting, ensure you are in the Sales Ledger and then click the [Settings] button in the Navigation Centre. Double-click 'Account Usage S/L' in the 'Settings' list. Fill in the fields as described on the pages that are linked below. Then, to save changes and close the window, click the [Save] button. To close the window without saving changes, click the close box.
The Account Usage S/L setting is spread over five cards. To view specific cards, click one of the five named tabs:

- 'Debtors' card - Fields
- 'Debtors' card - Check Boxes
- 'VAT / Tax' card
- 'Exchange Rate' card
- 'Sales' card
- 'Credit' card
Settings in the Sales Ledger:
- Introduction
- Account Usage S/L
- Age Limits
- Alternative Items
- Bonus
- Classification Types
- Contact Credit Limits
- Contact Document Types
- Contact Settings
- Credit Limit
- Cross Sales Items
- Customer Categories
- Default Items
- Default Payment Modes
- Environment Tax
- Extra Tax Customer Discounts
- Factoring Export
- Freight
- Freight/Weight Calculation
- Gift Voucher settings
- Instalments
- Interest
- Interest Codes, Interest Terms
- Intrastat Transaction Codes
- Invoice Mail Settings
- Item Classifications
- Item Group Withholdings
- Item Settings
- Item Status Settings
- Legal Record Numbers
- Number Series - Contacts
- Number Series - Gift Vouchers
- Number Series - Gift Vouchers Received
- Number Series - Internal Invoices
- Number Series - Invoices
- Number Series - Receipts
- Official Invoice Serial Number
- Payment Modes
- Payment Term Sales A/C
- Payment Terms
- Receipt Settings
- Regional Sales Taxes
- Regions
- Registration Defaults
- Reminder Texts
- Sales Invoice Settings
- Standard Problems
- Units
- VAT Corrections S/L
- VAT Zone Label
- Home page for Sales Ledger manual
- Home page for Standard ERP manual
Account Usage S/L - Debtors Card - Fields
This page describes the fields on the 'Debtors' card of the Account Usage S/L setting. Please click the following links for descriptions of the other cards:- Introduction
- 'Debtors' card - Fields
- 'Debtors' card - Check Boxes
- 'VAT / Tax' card
- 'Exchange Rate' card
- 'Sales' card
- 'Credit' card
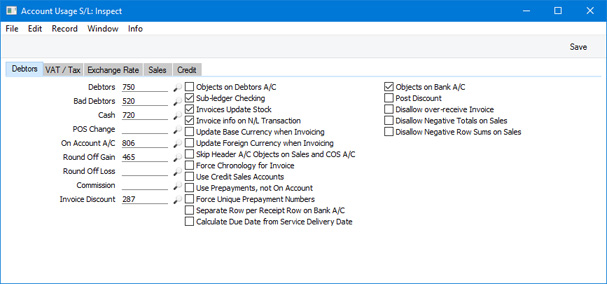
Account Fields
Each of these fields requires you to enter an Account Number. In each case, you can use the 'Paste Special' function (Ctrl-Return or ⌘-Return) to help you choose the correct Account.- Debtors
- When you post an Invoice to the Nominal Ledger, its value including VAT will be debited to a Debtor Account. When you post a Receipt to the Nominal Ledger, its value will be credited to the same Account. This Account therefore shows how much your company is owed at a particular time.
- Specify here the Account that you wish to be used as your main default Debtor Account. This Account will be overridden if you have specified a separate Debtor Account in the Customer Category to which a Customer belongs.
- Specify here the Account that you wish to be used as your main default Debtor Account. This Account will be overridden if you have specified a separate Debtor Account in the Customer Category to which a Customer belongs.
- Bad Debtors
- The 'Transfer to Bad Debtors' Maintenance function allows you to transfer the outstanding balances of overdue Invoices from the Debtor Account specified above to a Bad Debtor Account.
- Enter here the Account Code of the Account that you wish to be used as your Bad Debtor Account. This Account will be overridden if you have specified a separate Bad Debtors Account in the Customer Category to which a Customer belongs.
- Enter here the Account Code of the Account that you wish to be used as your Bad Debtor Account. This Account will be overridden if you have specified a separate Bad Debtors Account in the Customer Category to which a Customer belongs.
- Cash
- The Account entered here will be debited from a cash sale (Cash Note), instead of the Debtor Account. Please click here for a full description of Cash Notes.
- This Cash Account will be overridden if you have specified a separate Cash Account in the Payment Term used in a Cash Note.
- This Cash Account will be overridden if you have specified a separate Cash Account in the Payment Term used in a Cash Note.
- POS Change
- This Account will be used from POS Invoices. When a Customer overpays using cash or a credit card and requires the difference to be paid back in cash, the full amount paid by the Customer will be debited to the Cash or Credit Card Account (taken from the Payment Mode) and the change will be credited to the POS Change Account. This allows the change to be visible in the Nominal Ledger.
- If you do not specify a POS Change Account or the POS Change Account is the same as the Cash or Credit Card Account, then the sale value will be debited to the Cash or Credit Card Account (i.e. the change will not be recorded in the Nominal Ledger).
- If you do not specify a POS Change Account or the POS Change Account is the same as the Cash or Credit Card Account, then the sale value will be debited to the Cash or Credit Card Account (i.e. the change will not be recorded in the Nominal Ledger).
- On Account A/C
- If you receive a Prepayment or On Account Receipt from a Customer without reference to a specific Invoice (such a payment might be a deposit that you receive before you have raised an Invoice), you can enter it to the Receipt register with a Prepayment Number on flip D of the Receipt row (a "Prepayment") or without a Prepayment Number (an "On Account" Receipt).
- When you enter and post a Prepayment or On Account Receipt to the Nominal Ledger, its value will be credited to the Account that you specify here. Usually this Account should be one that acknowledges that receiving a deposit creates a liability.
- This Account will be overridden if you have specified a separate On Account A/C in the Debtors On Account A/C field in the Customer Category to which a Customer belongs.
- To be able to receive a Prepayment or On Account Receipt from a Customer, you must tick the On Account check box on the 'Terms' card of the Contact record for the Customer in question. Otherwise, you will asked 'Enter invoice number' when you try to save the Receipt.
- When you enter and post a Prepayment or On Account Receipt to the Nominal Ledger, its value will be credited to the Account that you specify here. Usually this Account should be one that acknowledges that receiving a deposit creates a liability.
- Round Off Gain, Round Off Loss
- The total value of each Invoice will be rounded up or down according to rounding rules defined for its Currency/Payment Term combination in the Currency Round Off setting in the System module. If that setting does not contain an entry for that combination, rounding rules will be taken from the Round Off setting also in the System module Whenever you post an Invoice to the Nominal Ledger, any amount lost or gained by this rounding process will be posted to the Round Off Loss or Round Off Gain Accounts specified here, as appropriate.
- You must specify an Account in at least one of these fields, but it is not necessary to specify one in both fields.
- A separate setting in the System module, Round Off, is used to set the rounding rules for Invoices where no Currency has been specified and those with a Currency that has not been entered in the Currency Round Off setting. Again, amounts lost or gained by this rounding process are posted to this Account.
- You can only specify Round Off Gain and Loss Accounts in the Account Usage S/L setting: there are no equivalent fields in the Account Usage P/L setting. So, the Accounts that you specify here will also be used in Transactions generated from the Purchase Ledger.
- You must specify an Account in at least one of these fields, but it is not necessary to specify one in both fields.
- Commission
- This Account is used in Russia. Please refer to your local HansaWorld representative for details.
- Invoice Discount
- If you sell an Item for a discounted price, the discounted price will usually be credited to the Sales Account.
- If you would like the full sales price of the Item to be credited to the Sales Account and the value of the discount to be debited to a separate Account, specify that Account here. You must also select the Post Discount option towards the top right of the window (for most Invoices and described here) or in the Hotel Settings setting in the Hotel module (for Invoices created from Hotel Reservations).
- This Account will be overridden if you have specified a separate Discount A/C in the Item Group to which an Item belongs.
- If you are using Multi-Buy Discounts, those discounts will also be debited to the Account specified here. In this situation, there is no need to select the Post Discount option.
- If you would like the full sales price of the Item to be credited to the Sales Account and the value of the discount to be debited to a separate Account, specify that Account here. You must also select the Post Discount option towards the top right of the window (for most Invoices and described here) or in the Hotel Settings setting in the Hotel module (for Invoices created from Hotel Reservations).
Settings in the Sales Ledger:
- Introduction
- Account Usage S/L, including:
- 'Debtors' card - Fields
- 'Debtors' card - Check Boxes
- 'VAT / Tax' card
- 'Exchange Rate' card
- 'Sales' card
- 'Credit' card
- 'Debtors' card - Fields
- Age Limits
- Bonus
- Classification Types
- Contact Credit Limits
- Contact Document Types
- Contact Settings
- Credit Limit
- Cross Sales Items
- Customer Categories
- Default Items
- Default Payment Modes
- Environment Tax
- Extra Tax Customer Discounts
- Factoring Export
- Freight
- Freight/Weight Calculation
- Gift Voucher settings
- Instalments
- Interest
- Interest Codes, Interest Terms
- Intrastat Transaction Codes
- Invoice Mail Settings
- Item Classifications
- Item Group Withholdings
- Item Settings
- Item Status Settings
- Legal Record Numbers
- Number Series - Contacts
- Number Series - Gift Vouchers
- Number Series - Gift Vouchers Received
- Number Series - Internal Invoices
- Number Series - Invoices
- Number Series - Receipts
- Official Invoice Serial Number
- Payment Modes
- Payment Term Sales A/C
- Payment Terms
- Receipt Settings
- Regional Sales Taxes
- Regions
- Registration Defaults
- Reminder Texts
- Sales Invoice Settings
- Standard Problems
- Units
- VAT Corrections S/L
- VAT Zone Label
- Home page for Sales Ledger manual
- Home page for Standard ERP manual
Account Usage S/L - Debtors card - Check Boxes
This page describes the check boxes on the 'Debtors' card of the Account Usage S/L setting. Please click the following links for descriptions of the other cards:- Introduction
- 'Debtors' card - Fields
- 'Debtors' card - Check Boxes
- 'VAT / Tax' card
- 'Exchange Rate' card
- 'Sales' card
- 'Credit' card

Check Boxes
- Objects on Debtors A/C
- This option has three effects:
- When you post an Invoice to the Nominal Ledger, this option will cause the Objects specified on the 'Terms' card of the Invoice (i.e. Objects usually representing the Customer and/or Salesman) to be assigned to the debit posting to the Debtor Account in the resulting Nominal Ledger Transaction.
If you are not using the Skip Header A/C Objects on Sales and COS A/C option below, these Objects will be assigned to the credit posting(s) to the Sales Account(s) and to any Cost of Sales postings as well.
- When you specify an Invoice Number in a Receipt, this option will cause the Objects specified on the 'Terms' card of the Invoice to be copied to the Objects field on flip F of the Receipt row. From there, they will be assigned to the credit posting to the Debtor Account.
- When you enter an On Account Receipt or a Prepayment, this option will cause the Objects specified on the 'Accounts' card of the Contact record for the Customer (in the case of an On Account Receipt and a Prepayment that is not connected to a Sales Order) or from the 'Terms' card of the Sales Order (in the case of a Prepayment that is connected to a Order) to be copied to flip F of the Receipt row. If you are not using this option, no default Objects will be offered in Prepayments and On Account Receipts.
- When you post an Invoice to the Nominal Ledger, this option will cause the Objects specified on the 'Terms' card of the Invoice (i.e. Objects usually representing the Customer and/or Salesman) to be assigned to the debit posting to the Debtor Account in the resulting Nominal Ledger Transaction.
- Sub-ledger Checking
- Check this box if you want to use the sub-ledger checking feature in the Sales Ledger. This feature will prevent you from posting to specified control Accounts (such as Debtor Accounts) by journal from the Nominal Ledger (i.e. from Nominal Ledger Transactions that you enter yourself). This prevents you posting to control Accounts by mistake, and thus helps ensure the balances of control Accounts remain accurate.
- If you try to post to a control Account directly from a Nominal Ledger Transaction register, you will be given the message "Account is protected by sub-ledger control".
- To specify the control Accounts that you want to be protected by the sub-ledger checking feature (i.e. the Accounts that are not to be used in the Transaction register), use the Sub-ledger Control Accounts setting in the Nominal Ledger and the System module.
- If you are using this feature, you will still be able to enter Receipts by journal in the Nominal Ledger. For details of this process, please refer to the description of flip E of the Transaction window on this page.
- Using this feature also means that wherever you need to specify a Debtor Account (e.g. in this setting, in Customer Categories and in Invoices), you must specify a recognised control Account (i.e. one listed in the Sub-ledger Control Accounts setting). This therefore ensures that you must use a control Account where necessary, and that you don't use one by mistake in any other circumstance.
- Note that this check box controls the sub-ledger checking feature on the sales side only (i.e. it protects Debtor Accounts). There is a similar check box in the Account Usage P/L setting that performs an equivalent function on the purchase side (i.e. for Creditor Accounts).
- If you try to post to a control Account directly from a Nominal Ledger Transaction register, you will be given the message "Account is protected by sub-ledger control".
- Invoices Update Stock
- Use this option to specify the default setting of the Update Stock check box on the 'Del. Terms' card of each Invoice. You can of course override the default setting in an individual Invoice.
- If you will enter Invoices directly to the Invoice register (i.e. you will not create them from Sales Orders or Deliveries), selecting the Update Stock check box in those Invoices will have the following effects:
- If you are using the Update Stock option, the stock level of each Stocked Item in an Invoice will be reduced by the appropriate quantity whenyou mark it as OK and save it. It is recommended that you also use the Do Not Allow Over Delivery option in the Stock Settings setting in the Stock module, as this will ensure that stock levels will be checked whenever you save an Invoice, and will prevent saving if you have insufficient stock for the quantity sold.
- Selecting the Update Stock option will cause cost accounting postings (Cost of Sales postings) to be included in the Nominal Ledger Transactions generated when you mark Invoices as OK and save them. These postings will help maintain stock values in the Nominal Ledger.
- If you will create Invoices from Sales Orders or Deliveries, you can decide whether you want Cost of Sales postings to be made from those Invoices or from Deliveries. The Update Stock check box is part of this decision, as follows:
- If you need Cost of Sales postings to be made from Invoices, select the Update Stock option and also specify in the Cost Accounting setting in the Stock module that Cost of Sales postings are to be made from Invoices.
- If you need Cost of Sales postings to be made from Deliveries, there is no requirement to select the Update Stock option in Invoices. However, it is still recommended that you have it selected by default, just in case you sell a Stocked Item from an Invoice without a Sales Order (i.e. where there is no Delivery) or in case you create an Invoice from an Order or a Delivery and add an extra Stocked Item to the Invoice.
- Please refer to the Cost Accounting page for full details of this feature.
- If you will enter Invoices directly to the Invoice register (i.e. you will not create them from Sales Orders or Deliveries), selecting the Update Stock check box in those Invoices will have the following effects:
- Invoice info on N/L Transaction
- When Nominal Ledger Transactions are generated automatically from Invoices, Receipts and Cash In records, this option will cause the Invoice Number, Due Date and Customer (in the case of Invoices). the Receipt Number, Payment Date and Customer (in the case of Receipts) or the Invoice Number (depending on the Type of the Cash In row), Date and Customer (in the case of Cash In records) to be copied to flip E of the Transaction row posting to the Debtor Account.
- You should use this option if you want to use the Debtors Account report in the Nominal Ledger. This report lists debit and credit postings to the Debtor Account, organised by Customer. In order to provide this analysis, the report needs the Customer Number to be copied to flip E of each posting to the Debtor Account.
- You can change this setting in an individual Invoice, Receipt or Cash In record using the Cust. Info. on Trans. check box.
- You should use this option if you want to use the Debtors Account report in the Nominal Ledger. This report lists debit and credit postings to the Debtor Account, organised by Customer. In order to provide this analysis, the report needs the Customer Number to be copied to flip E of each posting to the Debtor Account.
- Update Base Currency when Invoicing, Update Foreign Currency when Invoicing
- When you create an Invoice from an Order or a Delivery, these check boxes control the Base and Exchange Rates on the 'Currency' card of the Invoice. If you are not using these options, the Base and Exchange Rates will be copied from the Order. If you are using them, the latest Base and Exchange Rates will be used in the Invoice, although the prices in Currency of the Items will not be changed. This means the Customer will still be charged the agreed price, but the value of the Invoice in your home Currency (and therefore in the Nominal Ledger) will be different to that of the Order. If you want to update the pricing in the Invoice to reflect new Base and Exchange Rates (and therefore to maintain the original value in the home Caurrency in the Nominal Ledger), enter the correct rates and then select 'Update Currency Price List Items' from the Operations menu.
- If you do not use these options, the Base and Exchange Rates in the Invoice will be determined by the Invoice Rate options in the Sales Invoice Settings setting.
- If you do not use these options, the Base and Exchange Rates in the Invoice will be determined by the Invoice Rate options in the Sales Invoice Settings setting.
- Skip Header A/C Objects on Sales and COS A/C
- You usually cannot specify more than one Object belonging to a particular Object Type in an Invoice. For example, if there is an Object belonging to Object Type A on the 'Terms' card of an Invoice, you will not be able to use any Object belonging to the same Type in any of the rows.
- This option, which is provided to meet a requirement of Estonian state companies, bypasses this check by disabling the assignment of header Objects to certain postings in Nominal Ledger Transactions, as follows:
- From an Invoice, this option will prevent header Objects being assigned to the postings to the Sales, Cost of Sales and Stock Accounts. Header Objects will still be assigned to the posting to the Debtor Account if you are using the Objects on Debtors A/C option above and to the Output VAT Account if you are using the Objects on VAT Account option on the 'VAT / Tax' card.
- From a POS Invoice, this option will prevent header Objects being assigned to the postings to the Sales Accounts. Header Objects will still be assigned to the posting to the Cash or Bank Account.
- From a Delivery or a Work Sheet, this option will prevent header Objects being assigned to the postings to the Cost of Sales Accounts and, if you are using the Object on Stock Account option in the Cost Accounting setting in the Stock module, to the postings to the Stock Account.
- In a Sales Order, using this option will mean that the check for Objects belonging to the same Type will not take place.
- This option, which is provided to meet a requirement of Estonian state companies, bypasses this check by disabling the assignment of header Objects to certain postings in Nominal Ledger Transactions, as follows:
- Force Chronology for Invoice
- By default, when you create a new Invoice, Standard ERP will enter the next unused number from the number sequence allocated on the 'Number Series' card of the user's Person record, from the Number Series Defaults setting in the System module or from the Number Series - Invoices setting. You may change this default Invoice Number, providing you choose another number in a valid Number Series.
- In some countries (e.g. Hungary), however, it is a legal requirement that Invoice Numbers use a strict numeric sequence. This means the Invoice Number sequence should have no gaps, and that a new Invoice cannot have an earlier date than any Invoice previously entered. If you want to follow a strictly enforced chronological number series, use this option. It will mean that the Invoice Number of a new Invoice must be one greater than that of the previous Invoice entered. You will not be able to change the Date of an Invoice. In the Number Series - Invoices setting, you will not be able to change the From number in or delete any Number Series that has been used.
- In some countries (e.g. Hungary), however, it is a legal requirement that Invoice Numbers use a strict numeric sequence. This means the Invoice Number sequence should have no gaps, and that a new Invoice cannot have an earlier date than any Invoice previously entered. If you want to follow a strictly enforced chronological number series, use this option. It will mean that the Invoice Number of a new Invoice must be one greater than that of the previous Invoice entered. You will not be able to change the Date of an Invoice. In the Number Series - Invoices setting, you will not be able to change the From number in or delete any Number Series that has been used.
- Use Credit Sales Accounts
- By default, the same Sales Accounts and VAT Codes will be used in both Invoices and Credit Notes. You can specify these Accounts and VAT Codes in Item records, in Item Group records and on the 'Sales' card of this setting. If you would like to use different Sales Accounts and VAT Codes in Credit Notes, select this option this box and specify the Accounts and VAT Codes to be used on the 'Credit A/C' card of your Item Group records and on the 'Credit' card of this setting.
- Use Prepayments, not On Account
- If you receive a payment from a Customer without reference to a specific Invoice (for example, a deposit that you receive before you have raised an Invoice), you can enter it to the Receipt register with a Prepayment Number on flip D of the Receipt row (a "Prepayment" Receipt) or without a Prepayment Number (an "On Account" Receipt).
- As each Prepayment has an identifying Prepayment Number, reporting in much greater detail is possible than with On Account Receipts. It is only possible to maintain an overall On Account balance for a particular Customer, while the history of an individual Prepayment can be followed down to transaction level. The added precision given to a Prepayment by its identifying Prepayment Number also means that you must use Prepayments for deposits that you receive in foreign Currencies. When you allocate such a Prepayment to an Invoice at a later date, the exchange rate might have changed and this can be accounted for. This is not possible with On Account Receipts.
- For these reasons, you may wish to prevent the entering of On Account Receipts. If so, select this option. This will mean that every Receipt row will need to have either an Invoice Number or a Prepayment Number before you can save the Receipt. The Account Usage P/L setting does not have an equivalent option, so selecting it here will prevent the entering of On Account Payments in the Purchase Ledger as well.
- On the Sales Ledger side only, you can also ensure that any Prepayment Number used in a Receipt is also a Sales Order Number. Do this by selecting the Only allow Sales Order Numbers as Prepayment Numbers option in the Down Payments setting in the Sales Orders module. This will be useful if the Prepayments that you receive will all be deposits against Sales Orders.
- As each Prepayment has an identifying Prepayment Number, reporting in much greater detail is possible than with On Account Receipts. It is only possible to maintain an overall On Account balance for a particular Customer, while the history of an individual Prepayment can be followed down to transaction level. The added precision given to a Prepayment by its identifying Prepayment Number also means that you must use Prepayments for deposits that you receive in foreign Currencies. When you allocate such a Prepayment to an Invoice at a later date, the exchange rate might have changed and this can be accounted for. This is not possible with On Account Receipts.
- Force Unique Prepayment Numbers
- Check this box if you would like to ensure that you always use unique Prepayment Numbers when entering Prepayment Receipts (in the Prepayment No. field on flip D of a Receipt row). If you are also using the Only allow Sales Order Numbers as Prepayment Numbers option in the Down Payments setting in the Sales Orders module, this will mean that you can only receive one deposit per Sales Order.
- You should use this option if you are using First Event Sales, a feature that is only available if the VAT Law in the Company Info setting is "Ukrainian".
- The Account Usage P/L setting also has a Force Unique Prepayment Numbers option, so this one only applies to the Sales Ledger.
- You should use this option if you are using First Event Sales, a feature that is only available if the VAT Law in the Company Info setting is "Ukrainian".
- Separate Row per Receipt Row on Bank A/C
- When you enter a Receipt with several rows, the resulting Nominal Ledger Transaction will usually contain a single debit posting to the Bank Account. Check this box if you would like such Transactions to contain separate debit postings for each Receipt row. The Description in each debit posting will show the Invoice Number and Customer Name, so you should use this option if you want this information to appear in the Account Reconciliation register (used for bank reconciliation).
- Calculate Due Date from Service Delivery Date
- In some countries (e.g. Slovenia), the Due Date of an Invoice should be calculated from its Service Delivery Date, not from the Invoice Date. Use this option if you want the Due Date to be calculated in this way.
- Objects on Bank A/C
- When you post a Receipt to the Nominal Ledger, any Objects specified on flip F (i.e. Objects usually representing the Customer and/or Salesman) will be assigned to the credit posting to the Debtor Account in the resulting Nominal Ledger Transaction. If you are using this option, they will be assigned to the debit posting to the Bank or Cash Account as well.
- If you are using the Separate Row per Receipt Row on Bank A/C option above and you enter a Receipt with several rows, the resulting Nominal Ledger Transaction will contain separate Bank Account postings for each Object combination.
- If you are using the Separate Row per Receipt Row on Bank A/C option above and you enter a Receipt with several rows, the resulting Nominal Ledger Transaction will contain separate Bank Account postings for each Object combination.
- Post Discount
- Please refer to the description of the Invoice Discount Account on this page for details about this option.
- Disallow over-receive Invoice
- Use this option if you want to prevent Invoices from being overpaid. When you receive payment against an Invoice using a Receipt or a Cash In record or using flip E of a Nominal Ledger Transaction, this option will prevent you from receiving an amount that is greater than the outstanding amount. If you credit an Invoice, it will prevent the Credit Note having a value greater than the outstanding amount on the Invoice.
- This option can prevent you receiving payment against an Invoice twice by mistake. This mistake can occur if you duplicate a Receipt and then do not change the Invoice Numbers.
- This option should be used in countries where an overpayment must be treated as a Prepayment, not as a negative posting to the Debtor Account.
- This option can prevent you receiving payment against an Invoice twice by mistake. This mistake can occur if you duplicate a Receipt and then do not change the Invoice Numbers.
- Disallow Negative Totals on Sales
- Select this option if you need to prevent the marking as OK and saving of an Invoice if the TOTAL is negative. This will also apply to POS Invoices and Sales Orders, and you also will not be able to save a Quotation if the TOTAL is negative.
- Disallow Negative Row Sums on Sales
- Select this option if you need to prevent the marking as OK and saving of an Invoice if the Sum in any row is negative. This will also apply to POS Invoices and Sales Orders, and you also will not be able to save a Quotation if the Sum in any row is negative.
Settings in the Sales Ledger:
- Introduction
- Account Usage S/L, including:
- 'Debtors' card - Fields
- 'Debtors' card - Check Boxes
- 'VAT / Tax' card
- 'Exchange Rate' card
- 'Sales' card
- 'Credit' card
- 'Debtors' card - Check Boxes
- Age Limits
- Bonus
- Classification Types
- Contact Credit Limits
- Contact Document Types
- Contact Settings
- Credit Limit
- Cross Sales Items
- Customer Categories
- Default Items
- Default Payment Modes
- Environment Tax
- Extra Tax Customer Discounts
- Factoring Export
- Freight
- Freight/Weight Calculation
- Gift Voucher settings
- Instalments
- Interest
- Interest Codes, Interest Terms
- Intrastat Transaction Codes
- Invoice Mail Settings
- Item Classifications
- Item Group Withholdings
- Item Settings
- Item Status Settings
- Legal Record Numbers
- Number Series - Contacts
- Number Series - Gift Vouchers
- Number Series - Gift Vouchers Received
- Number Series - Internal Invoices
- Number Series - Invoices
- Number Series - Receipts
- Official Invoice Serial Number
- Payment Modes
- Payment Term Sales A/C
- Payment Terms
- Receipt Settings
- Regional Sales Taxes
- Regions
- Registration Defaults
- Reminder Texts
- Sales Invoice Settings
- Standard Problems
- Units
- VAT Corrections S/L
- VAT Zone Label
- Home page for Sales Ledger manual
- Home page for Standard ERP manual
Account Usage S/L - VAT / Tax Card
This page describes the 'VAT / Tax' card of the Account Usage S/L setting. Please click the following links for descriptions of the other cards:- Introduction
- 'Debtors' card - Fields
- 'Debtors' card - Check Boxes
- 'VAT / Tax' card
- 'Exchange Rate' card
- 'Sales' card
- 'Credit' card
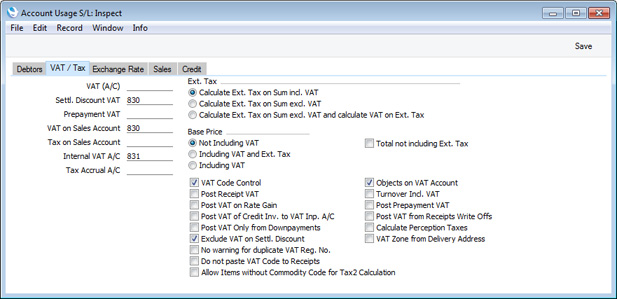
Account Fields
Each of these fields requires you to enter an Account Number. In each case, you can use the 'Paste Special' function (Ctrl-Return or ⌘-Return) to help you choose the correct Account.- VAT (A/C)
- This Account is used for four purposes:
- The Post Receipt VAT and/or Post Prepayment VAT options (described below) allow you to account for VAT based on Receipts. When you post a Receipt to the Nominal Ledger, VAT will be moved from a temporary Output VAT Account to the final one. Usually, the final Output Account will be the O/P Account specified in the VAT Codes setting. If a particular VAT Code does not have an O/P Account, the VAT amount will be credited to this Account instead.
- This Account is used if you need to reduce VAT when you give a settlement discount. Please refer to the description of the Settl. Discount VAT Account below for details.
- This Account will also be used if you are using the Turnover Incl. VAT option and you are also using prices that include VAT in Invoices. The Turnover Incl. VAT option will mean that whenever you post an Invoice to the Nominal Ledger, the amount(s) credited to the Sales Account(s) will include VAT. As a result, you must specify a VAT (A/C) Account here. This Account will be debited with the VAT total, to balance the normal credit posting to the Output VAT Account. Please refer to the description of the Turnover Incl. VAT option below for details.
- If you are using the Post VAT Only from Downpayments option below, this Account will be debited with VAT values in Nominal Ledger Transactions created from Down Payment Invoices. Please refer to the description of this option below for details.
- The Post Receipt VAT and/or Post Prepayment VAT options (described below) allow you to account for VAT based on Receipts. When you post a Receipt to the Nominal Ledger, VAT will be moved from a temporary Output VAT Account to the final one. Usually, the final Output Account will be the O/P Account specified in the VAT Codes setting. If a particular VAT Code does not have an O/P Account, the VAT amount will be credited to this Account instead.
- Settl. Discount VAT
- This Account will be used when you enter a Receipt with a settlement discount.
- For example, you have a Payment Term with a 10% early settlement discount and you enter an Invoice worth 100 + 20.00 VAT. When you enter the Receipt, the settlement discount will be calculated to be 12.00. This 12.00 discount can be accounted for in the Nominal Ledger in one of three ways, as follows:
- If the Settlement Discount VAT Account field is empty, 12.00 will be debited to the Settlement Discount Account specified on the 'Sales' card of this setting.
- If there is a Settlement Discount VAT Account, but the VAT (A/C) Account is empty, 10.00 will be debited to the Settlement Discount Account and 2.00 will be debited to the Settlement Discount VAT Account.
- If you have specified both a Settlement Discount VAT Account and a VAT (A/C) Account, 12.00 will be debited to the Settlement Discount Account, 2.00 will be debited to the Settlement Discount VAT Account and 2.00 will be credited to the VAT (A/C) Account.
Settlement Discount * Invoice VAT Total Invoice Total (including VAT) - The figures in this example assume you are not using the Exclude VAT on Settl. Discount option below. If you are using this option, the discount will be 9.50 and the VAT will be 1.45. Please refer to the description of this option below on this page for details of the discount calculation. The three posting options described above will still apply.
- The use of this Account depends on local VAT legislation.
- For example, you have a Payment Term with a 10% early settlement discount and you enter an Invoice worth 100 + 20.00 VAT. When you enter the Receipt, the settlement discount will be calculated to be 12.00. This 12.00 discount can be accounted for in the Nominal Ledger in one of three ways, as follows:
- Prepayment VAT
- The Account specified here will be used when the Nominal Ledger Transactions from Prepayment Receipts are to include a VAT element (i.e. if you are using the Post Prepayment VAT option described below). This is the case in the Baltic countries and Russia and for users of the Cash VAT scheme in the UK. When you record a Prepayment Receipt, you should specify the VAT Code and Amount on flip E of the Receipt row. The VAT Amount will be debited to this Prepayment VAT Account and credited to the O/P Account for the VAT Code (or the VAT (A/C) Account specified above if the O/P Account is blank) when you post the Receipt to the Nominal Ledger.
- VAT on Sales Account
- The VAT on Sales Account will be used if you are using the Turnover Incl. VAT option and you are also using prices that exclude VAT in Invoices. The Turnover Incl. VAT option will mean that whenever you post an Invoice to the Nominal Ledger, the amount(s) credited to the Sales Account(s) will include VAT. As a result, a debit posting to the value of the VAT will be needed, to balance the normal credit posting to the Output VAT Account. This debit posting will be made to the VAT on Sales Account, if you have specified one in this field. If you have not specified a VAT on Sales Account, this debit posting will be made to the relevant Sales Account. Please refer to the description of the Turnover Incl. VAT option below for details.
- Tax on Sales Account
- When you define VAT Codes using the setting in the Nominal Ledger, you can use the fields on flip B to specify that an additional tax, such as an environmental tax, is to be levied. This additional tax is usually termed "Extra Tax".
- If the VAT Code in any of the rows of an Invoice is one that includes Extra Tax, that Extra Tax will be credited to the Tax Account specified for the VAT Code. It will also be included in the debit posting to the Debtor Account.
- However, if you are using the Total not including Ext. Tax option (to the right of this field), the Extra Tax will not be included in the TOTAL of the Invoice, and it will not be included in the debit posting to the Debtor Account. Instead, the debit posting will be made to the Tax on Sales Account that you specify in this field. If you are using Total not including Ext. Tax option, you must specify a Tax on Sales Account otherwise you will not be able to post an Invoice that includes Extra Tax to the Nominal Ledger.
- Please refer to the description of flip B of the VAT Codes setting here for full details about the calculation of Extra Tax.
- If the VAT Code in any of the rows of an Invoice is one that includes Extra Tax, that Extra Tax will be credited to the Tax Account specified for the VAT Code. It will also be included in the debit posting to the Debtor Account.
- Internal VAT A/C
- Specify here the Input VAT Account that is to be debited from Internal Invoices.
- Tax Accrual A/C
- The Account specified here will be used when the Nominal Ledger Transactions from Prepayment Receipts are to include an Extra Tax element (i.e. if you are using the Post Prepayment VAT option described below with a VAT Code that includes Extra Tax). When you record a Prepayment Receipt, you should specify the VAT Code, VAT amount and Extra Tax amount on flip E of the Receipt row. The Extra Tax amount will be debited to this Tax Accrual Account and credited to the Tax Account for the VAT Code when you post the Receipt to the Nominal Ledger.
Check Boxes and Options
- Ext. Tax
- When you define VAT Codes using the setting in the Nominal Ledger, you can use the fields on flip B to specify that an additional tax, such as an environmental tax, is to be levied. This additional tax is usually termed "Extra Tax".
- These options control how Extra Tax will be calculated, in both the Sales and Purchase Ledgers. Please refer to the description of flip B of the VAT Codes setting here for full details.
- These options control how Extra Tax will be calculated, in both the Sales and Purchase Ledgers. Please refer to the description of flip B of the VAT Codes setting here for full details.
- Base Price
- Use these options to specify whether the Base Prices in Item records are to include VAT, or VAT and Extra Tax. By extension, all prices, subtotals and totals in sales transactions (e.g. Invoices, Orders and Quotations) will include VAT and Extra Tax, depending on the option that you choose here. In particular, you may need to do this if you specify that Base Prices include VAT and you have Customers in the Inside EU and/or Outside EU Zones. In most cases, these Customers should be charged prices that exclude VAT. If you use Base Prices that include VAT for every Zone, VAT usually will not be deducted because it is likely that the VAT Codes that you use for the Inside EU and Outside EU Zones will be zero-rated (i.e. it will not be possible to establish the rate at which VAT should be deducted).
- You can use these options to set a general rule, and then create a different rule for particular Customers by assigning them a Price List that excludes VAT, includes VAT or includes VAT and Extra Tax.
- Please refer to the description of the VAT Codes setting in the Nominal Ledger for full details about VAT and Extra Tax rates.
- You can use these options to set a general rule, and then create a different rule for particular Customers by assigning them a Price List that excludes VAT, includes VAT or includes VAT and Extra Tax.
- Total not including Ext. Tax
- Select this option if you do not want Extra Tax to be included in the TOTAL of each Invoice (i.e. if the Extra Tax is not to be paid by Customers). This means it will also not be included in the debit posting to the Debtor Account.
- If you select this option, you must also specify a Tax on Sales Account in the field to the left.
- If you select this option, you must also specify a Tax on Sales Account in the field to the left.
- VAT Code Control
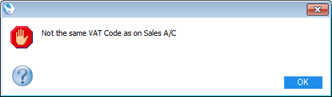
- This option provides a double-check that you are using the correct VAT Codes in Invoices. One effect is that it prevents you changing the VAT Code in an Invoice row.
- When you add an Item to an Invoice, the VAT Code will usually be taken from the Item, the Item Group or the 'Sales' card of this setting. If you are using this option, a check will be made when you save the Invoice that the selected VAT Code is also the one specified in the Sales Account (in the Account register). If this is not the case, the following warning message will appear:
- The check will not be carried out if you have not specified a VAT Code in the Sales Account record. So, if you are using this option, it is recommended that you specify VAT Codes in all your Sales Accounts, and that you take care to specify the same VAT Codes in your Customers, Items and Item Groups and in this setting ('Sales' card), to prevent possible conflicts.
- Using this option also means that you will probably need to use different Sales Accounts for Customers in the Inside EU and Outside EU Zones. This is because you will probably need to use different (zero-rated) VAT Codes with these Customers, but you can only specify one VAT Code in an Account record. Therefore, you will need separate Sales Accounts for each Zone, containing appropriate VAT Codes.
- When you add an Item to an Invoice, the VAT Code will usually be taken from the Item, the Item Group or the 'Sales' card of this setting. If you are using this option, a check will be made when you save the Invoice that the selected VAT Code is also the one specified in the Sales Account (in the Account register). If this is not the case, the following warning message will appear:
- Post Receipt VAT
- This option allows you to account for VAT based on Receipts (rather than Invoices) and On Account Receipts. An On Account Receipt is a Receipt with no Invoice Number or Prepayment Number. If you need to use this option, you should enter O/P Accounts for all your VAT Codes (in the VAT Codes setting in the Nominal Ledger), or at least a VAT (A/C) Account in the field above. Please refer to the description of the VAT Codes setting for full details about the Post Receipt VAT feature.
- The accounting of VAT based on Receipts is a requirement in the UK for users of the Cash VAT scheme. If you are using the UK Cash VAT scheme, you should also select the Post Prepayment VAT option below and the equivalent options in the Account Usage P/L setting. Users in Poland can also use this option and the Post Payment VAT option in the Purchase Ledger, but should not use the Post Prepayment VAT options. Users in Latvia should leave this option switched off but should select the Post Payment VAT option in the Account Usage P/L setting.
- This option cannot be used in Russia.
- The exact calculation and posting of VAT from Receipts will be controlled by the Do not paste VAT Code to Receipts option below.
- The accounting of VAT based on Receipts is a requirement in the UK for users of the Cash VAT scheme. If you are using the UK Cash VAT scheme, you should also select the Post Prepayment VAT option below and the equivalent options in the Account Usage P/L setting. Users in Poland can also use this option and the Post Payment VAT option in the Purchase Ledger, but should not use the Post Prepayment VAT options. Users in Latvia should leave this option switched off but should select the Post Payment VAT option in the Account Usage P/L setting.
- Post VAT of Credit Inv. to VAT Inp. A/C
- When you create a Credit Note from an Invoice, the Nominal Ledger Transaction will usually reverse the postings of the original Invoice, so that the Debtors Account will be credited and the Sales and Output VAT Accounts will be debited. Use this option if you would like Input VAT Accounts to be debited instead.
- Post VAT Only from Downpayments
- A Down Payment Invoice is an Invoice that you create from a Sales Order for part of or the whole amount, ahead of the delivery of the goods or service. You can create a Down Payment Invoice from an Order using the 'Create Down Payment Invoice' Operations menu function or, if you have already been paid the deposit, from the Receipt using the 'Create Down Payment' Operations menu function.
- When you post a Down Payment Invoice to the Nominal Ledger, the resulting Transaction will usually debit the Debtors Account and credit the Sales and Output VAT Accounts as normal. These postings are not correct for some countries (e.g. Slovenia). As there has not yet been a Delivery or sales event, the postings to the Debtors and Sales Accounts should not occur. Instead, only the VAT should be posted. Use this option if you need such a Transaction from a Down Payment Invoice. The VAT will be credited to the Output VAT Account and debited to the VAT (A/C) Account specified above.
- When you post a Down Payment Invoice to the Nominal Ledger, the resulting Transaction will usually debit the Debtors Account and credit the Sales and Output VAT Accounts as normal. These postings are not correct for some countries (e.g. Slovenia). As there has not yet been a Delivery or sales event, the postings to the Debtors and Sales Accounts should not occur. Instead, only the VAT should be posted. Use this option if you need such a Transaction from a Down Payment Invoice. The VAT will be credited to the Output VAT Account and debited to the VAT (A/C) Account specified above.
- Exclude VAT on Settl. Discount
- Use this option if the settlement discount percentage (defined in the Payment Terms setting) is to be applied to the Invoice total excluding VAT. Otherwise, it will be applied to the total including VAT. This option is likely to be used in the UK only (until 1 April 2015, after which there will be a change in rules announced in the 2014 Budget).
- For example, you have a Payment Term with a 10% early settlement discount. If you are not using this option, when you enter an Item worth 100.00 in an Invoice, VAT will be calculated on the full 100.00. If the VAT rate is 20%, this will give an Invoice total of 120.00. When you enter the Receipt, the settlement discount will be calculated to be 12.00. This figure will be debited to the Settl. Discount Account specified on the 'Sales' card of this setting. However, if you are using this option, VAT in the Invoice will be calculated on 90.00 (i.e. on 100.00 less the 10% discount), giving a figure of 18.00 at the 20% rate. This will give an Invoice total of 118.00 (100.00 plus 18.00 VAT). When you enter the Receipt, the settlement discount will be calculated to be 10.00. This figure will be debited to the Settl. Discount Account.
- The Exclude VAT on Settlement Discount option will also be used to calculate the settlement discount when you enter Purchase Invoices. If you are not using this option, the settlement discount will be:
- TOTAL x Settlement Discount %
- (TOTAL - Calculated VAT) x Settlement Discount %
Again, the Settlement Discount % will be taken from the relevant Payment Term. You will be able overwrite the calculated settlement discount figure if necessary.
- For example, you have a Payment Term with a 10% early settlement discount. If you are not using this option, when you enter an Item worth 100.00 in an Invoice, VAT will be calculated on the full 100.00. If the VAT rate is 20%, this will give an Invoice total of 120.00. When you enter the Receipt, the settlement discount will be calculated to be 12.00. This figure will be debited to the Settl. Discount Account specified on the 'Sales' card of this setting. However, if you are using this option, VAT in the Invoice will be calculated on 90.00 (i.e. on 100.00 less the 10% discount), giving a figure of 18.00 at the 20% rate. This will give an Invoice total of 118.00 (100.00 plus 18.00 VAT). When you enter the Receipt, the settlement discount will be calculated to be 10.00. This figure will be debited to the Settl. Discount Account.
- No warning for duplicate VAT Reg. No.
- Each time you enter a new Contact or modify an existing one, there will be a check that you have not used the VAT and Company Registration Numbers in any other Contact record. If this check fails, you will be warned, but you will still be able to save the record. Select this option if you do not want this check to take place.
- Objects on VAT Account
- When you post an Invoice to the Nominal Ledger, this option will cause the Objects specified on the 'Terms' card of the Invoice to be assigned to the credit posting(s) to the Output VAT Account(s) in the resulting Nominal Ledger Transaction.
- When you post a Receipt to the Nominal Ledger and if you are using the Post Receipt VAT and/or Post Prepayment VAT options, this option will cause the Objects specified on flip F of a Receipt row to be assigned to all VAT postings in the resulting Nominal Ledger Transaction.
- When you post a Receipt to the Nominal Ledger and if you are using the Post Receipt VAT and/or Post Prepayment VAT options, this option will cause the Objects specified on flip F of a Receipt row to be assigned to all VAT postings in the resulting Nominal Ledger Transaction.
- Turnover Incl. VAT
- This option was designed for use in Russia. If you have selected it, turnover will be recorded inclusive of VAT. In other words, whenever you post an Invoice to the Nominal Ledger, the amount(s) credited to the Sales Account(s) will include VAT. As there will also be a normal credit posting to the Output VAT Account, a balancing debit posting to the value of the VAT will be required. This posting will be made to an Account chosen as follows:
- If the prices in the Invoice exclude VAT (i.e. the Price List in the Invoice is one that is Exclusive of VAT or if you have specified using the options above that Base Prices exclude VAT), the debit posting will be made to the VAT on Sales Account specified in the field towards the top left of the window.
- If the prices in the Invoice exclude VAT and you have not specified a VAT on Sales Account, the debit posting will be made to the relevant Sales Account.
- If the prices in the Invoice include VAT, the debit posting will be made to the VAT (A/C) Account specified in the field at the top left of the window.
- If the prices in the Invoice exclude VAT (i.e. the Price List in the Invoice is one that is Exclusive of VAT or if you have specified using the options above that Base Prices exclude VAT), the debit posting will be made to the VAT on Sales Account specified in the field towards the top left of the window.
- Post Prepayment VAT
- This option allows the posting of VAT from Prepayment Receipts, a requirement in the Baltic countries and for users of the Cash VAT scheme in the UK. A Prepayment Receipt is a Receipt without an Invoice Number but with a Prepayment Number specified on flip D. If you are using this option, you should also specify a Prepayment VAT Account in the field to the left of this check box.
- Post VAT from Receipt Write Offs
- Select this option if you need to claim back VAT for Invoices that you have written off as bad debts.
- If you are not using this option, the full amount written off will be debited from the Write Offs Loss or Write Offs Gain Account (depending on which one you have specified on the 'Exchange Rate' card of this setting) when you write off an Invoice. If you are using this option, the amount written off less VAT will be debited from the Write Offs Loss Account, and the VAT amount will be debited from the relevant Output VAT Account (taken from the VAT Code).
- If you write off an Invoice that contains rows with different VAT Codes, separate "Writeoff" rows for each VAT Code will be added to the Receipt. This ensures the correct VAT amounts will be debited to the Output VAT Accounts for each VAT Code. If you are only writing off a part of the Invoice value, the write-off amount will be distributed to each VAT Code proportionally, based on the row sums.
- If necessary, you can also add lines to the VAT Report showing the value of the write offs for which you are claiming back VAT (one for each VAT Code). These lines should have the following Definition:
- VATRESULT("Write Off A/C","VAT Code")
- Please refer here for details about writing off Invoices.
- If you are not using this option, the full amount written off will be debited from the Write Offs Loss or Write Offs Gain Account (depending on which one you have specified on the 'Exchange Rate' card of this setting) when you write off an Invoice. If you are using this option, the amount written off less VAT will be debited from the Write Offs Loss Account, and the VAT amount will be debited from the relevant Output VAT Account (taken from the VAT Code).
Settings in the Sales Ledger:
- Introduction
- Account Usage S/L, including:
- 'Debtors' card - Fields
- 'Debtors' card - Check Boxes
- 'VAT / Tax' card
- 'Exchange Rate' card
- 'Sales' card
- 'Credit' card
- 'Debtors' card - Fields
- Age Limits
- Alternative Items
- Bonus
- Classification Types
- Contact Credit Limits
- Contact Document Types
- Contact Settings
- Credit Limit
- Cross Sales Items
- Customer Categories
- Default Items
- Default Payment Modes
- Environment Tax
- Extra Tax Customer Discounts
- Factoring Export
- Freight
- Freight/Weight Calculation
- Gift Voucher settings
- Instalments
- Interest
- Interest Codes, Interest Terms
- Intrastat Transaction Codes
- Invoice Mail Settings
- Item Classifications
- Item Group Withholdings
- Item Settings
- Item Status Settings
- Legal Record Numbers
- Number Series - Contacts
- Number Series - Gift Vouchers
- Number Series - Gift Vouchers Received
- Number Series - Internal Invoices
- Number Series - Invoices
- Number Series - Receipts
- Official Invoice Serial Number
- Payment Modes
- Payment Term Sales A/C
- Payment Terms
- Receipt Settings
- Regional Sales Taxes
- Regions
- Registration Defaults
- Reminder Texts
- Sales Invoice Settings
- Standard Problems
- Units
- VAT Corrections S/L
- VAT Zone Label
- Home page for Sales Ledger manual
- Home page for Standard ERP manual
Account Usage S/L - Exchange Rate Card
This page describes the 'Exchange Rate' card of the Account Usage S/L setting. Please click the following links for descriptions of the other cards:- Introduction
- 'Debtors' card - Fields
- 'Debtors' card - Check Boxes
- 'VAT / Tax' card
- 'Exchange Rate' card
- 'Sales' card
- 'Credit' card
Each of the fields on this card requires you to enter an Account Number. In each case, you can use the 'Paste Special' function (Ctrl-Return or ⌘-Return) to help you choose the correct Account.
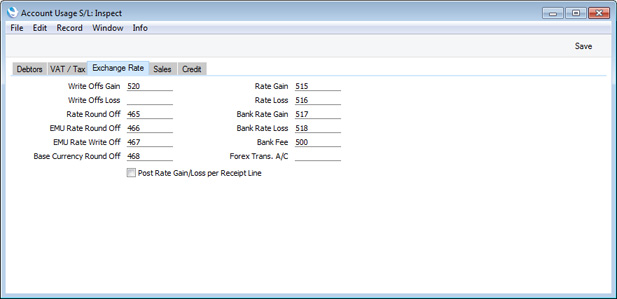
- Write Offs Gain. Write Offs Loss, Rate Round Off, EMU Rate Round Off, EMU Rate Write Off
- These Accounts will be used in the situation where an Invoice is to be treated as fully paid if the amount received is slightly different to that outstanding, providing that difference is within an allowable margin. The difference will be posted to one of these Accounts on the following basis:
- Write Offs Gain, Write Offs Loss
- if the Received Currency is the same as the Invoice Currency, and it is not a member of the EMU;
- Rate Round Off
- if the Received Currency is different to the Invoice Currency, and the Received Currency is not a member of the EMU;
- EMU Rate Round Off
- if the Received Currency is different to the Invoice Currency, and the Received Currency is a member of the EMU;
- EMU Rate Write Off
- if the Received Currency is the same as the Invoice Currency, and it is a member of the EMU.
- If you need to use this feature, you should set an allowable margin for each Currency, using the Automatic Round Off Limit and Automatic Write Off Limit fields on the 'Round Off' card of each Currency record. If you do this in the record representing your home Currency, you can also use this feature as an easy way of automatically writing off small outstanding amounts in domestic Invoices (i.e. those in your home Currency), reducing the need to use the 'Write off Invoices' Maintenance function.
- Please refer to the pages describing the 'EMU' and 'Round Off' cards of the Currency record for more details about using this feature.
- If the difference between the amount received and the outstanding amount is caused by a change in Exchange Rate, it will not be posted to one of these Accounts, but to the Rate Gain or Loss Accounts described below.
- A more common use of the Write Offs Account will be for bad debts written off by the 'Add Write-off' Row menu function of the Receipt and by the 'Write off Invoices' Maintenance function. You only need specify a Write Offs Loss Account or a Write Offs Gain Account: amounts written off by these functions will be debited from whichever one you specify. If you specify both, they will be debited from the Write Offs Loss Account.
- Write Offs Gain, Write Offs Loss
- Rate Gain, Rate Loss
- These Accounts will be used when you issue a Currency Invoice and the Exchange Rate changes before it is paid. When this happens, the amount paid, when converted to your home Currency, will no longer be the same as the outstanding amount. Any difference will be posted from the Receipt to one of these Accounts, depending on whether a gain or loss is involved.
- Bank Rate Gain, Bank Rate Loss
- These Accounts will be used when the amount received at the bank against an Invoice is not the same as the outstanding amount, because the exchange rate levied by the bank is different to the rate offered to the Receipt (i.e. because you change the Bank Amount in a Receipt). Any difference will be posted from the Receipt to one of these Accounts, depending on whether a gain or loss is involved.
- Bank Fee
- Specify here the Account that you want to be credited by any bank charges that you may incur when banking Receipts. Please refer here for details about including Bank Fees in Receipts.
- Forex Trans A/C
- If you will use the Forex Transaction register to buy and sell foreign exchange, specify here the Account to which amounts in your home Currency will be posted. This Account will be credited with the transaction value in your home Currency when you buy foreign exchange, and debited when you sell.
- Post Rate Gain/Loss per Receipt Line
- When you enter a Receipt in which more than one row will post an exchange rate difference, the resulting Nominal Ledger Transaction will usually contain a single posting to the relevant Account (i.e. to the Rate Gain or Loss Accounts and/or the Bank Rate Gain or Loss Accounts described immediately above). Use this option if you would like such Transactions to contain separate exchange rate difference postings for each Receipt row. The Description in each posting will include the Invoice Number.
Settings in the Sales Ledger:
- Introduction
- Account Usage S/L, including:
- 'Debtors' card - Fields
- 'Debtors' card - Check Boxes
- 'VAT / Tax' card
- 'Exchange Rate' card
- 'Sales' card
- 'Credit' card
- 'Debtors' card - Fields
- Age Limits
- Alternative Items
- Bonus
- Classification Types
- Contact Credit Limits
- Contact Document Types
- Contact Settings
- Credit Limit
- Cross Sales Items
- Customer Categories
- Default Items
- Default Payment Modes
- Environment Tax
- Extra Tax Customer Discounts
- Factoring Export
- Freight
- Freight/Weight Calculation
- Gift Voucher settings
- Instalments
- Interest
- Interest Codes, Interest Terms
- Intrastat Transaction Codes
- Invoice Mail Settings
- Item Classifications
- Item Group Withholdings
- Item Settings
- Item Status Settings
- Legal Record Numbers
- Number Series - Contacts
- Number Series - Gift Vouchers
- Number Series - Gift Vouchers Received
- Number Series - Internal Invoices
- Number Series - Invoices
- Number Series - Receipts
- Official Invoice Serial Number
- Payment Modes
- Payment Term Sales A/C
- Payment Terms
- Receipt Settings
- Regional Sales Taxes
- Regions
- Registration Defaults
- Reminder Texts
- Sales Invoice Settings
- Standard Problems
- Units
- VAT Corrections S/L
- VAT Zone Label
- Home page for Sales Ledger manual
- Home page for Standard ERP manual
Account Usage S/L - Sales Card
This page describes the 'Sales' card of the Account Usage S/L setting. Please follow the links below for descriptions of the other cards:- Introduction
- 'Debtors' card - Fields
- 'Debtors' card - Check Boxes
- 'VAT / Tax' card
- 'Exchange Rate' card
- 'Sales' card
- 'Credit' card
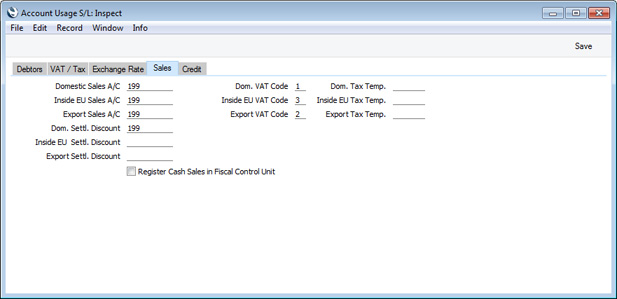
- Domestic Sales A/C, Inside EU Sales A/C, Export Sales A/C
- Paste Special
Account register, Nominal Ledger/System module
- A Sales Account will be credited whenever you sell an Item, allowing you to record the levels of sales of different types of Items in the Nominal Ledger.
- Use these fields to specify Sales Accounts for each VAT Zone, to be used if you have not specified Sales Accounts at the Item or Item Group level. Please refer here for full details about how a Sales Account will be chosen when you sell an Item (i.e. whenever you specify an Item in a row in an Invoice, Order, Quotation or other sales transaction).
- You can change the name of the Inside EU Sales A/C field if it is not suitable. Using the VAT Zone Label setting in the Sales Ledger, you can replace the string "EU" with your own string (for example "SACU" in South Africa).
- Use these fields to specify Sales Accounts for each VAT Zone, to be used if you have not specified Sales Accounts at the Item or Item Group level. Please refer here for full details about how a Sales Account will be chosen when you sell an Item (i.e. whenever you specify an Item in a row in an Invoice, Order, Quotation or other sales transaction).
- Dom. Settl. Discount, Inside EU Settl. Discount, Export Settl. Discount
- Paste Special
Account register, Nominal Ledger/System module
- In the event of an Invoice attracting a settlement discount when it is paid on time, the Account specified here will be debited with the discount amount in the Nominal Ledger Transaction resulting from the Receipt.
- The appropriate Settlement Discount Account for the Zone of the Invoice being paid will be used.
- Use the Payment Terms setting to configure settlement discounts.
- The appropriate Settlement Discount Account for the Zone of the Invoice being paid will be used.
- Dom. VAT Code, EU VAT Code, Export VAT Code
- Paste Special
VAT Codes setting, Nominal Ledger
- The VAT Code will determine the Output VAT Account that will be credited whenever you sell an Item and the rate at which VAT will be charged.
- Use these fields to specify VAT Codes for each VAT Zone, to be used if you have not specified VAT Codes at the Item or Item Group level. Please refer here for full details about how a VAT Code will be chosen when you sell an Item (i.e. when you specify an Item in a row in an Invoice, Order, Quotation or other sales transaction).
- You can change the name of the Inside EU VAT Code field if it is not suitable. Using the VAT Zone Label setting in the Sales Ledger, you can replace the string "EU" with your own string (for example "SACU" in South Africa).
- Use these fields to specify VAT Codes for each VAT Zone, to be used if you have not specified VAT Codes at the Item or Item Group level. Please refer here for full details about how a VAT Code will be chosen when you sell an Item (i.e. when you specify an Item in a row in an Invoice, Order, Quotation or other sales transaction).
- Dom. Tax Temp., Inside EU Tax Temp., Export Tax Temp.
- Paste Special Tax Templates setting, Nominal Ledger
- In some countries, Tax Templates are used instead of VAT Codes. VAT Codes should be used where each sales and purchase transaction is taxed at a single rate, while Tax Templates should be used where different taxes and/or several tax rates are applied to one transaction.
- If you need to use Tax Templates, you should select the Use Tax Templates for Tax Calculation option in the Transaction Settings setting in the Nominal Ledger. Wherever a VAT Code field would appear, this option will cause a Tax Template field to appear instead. Having done so and having entered your Tax Templates in the Tax Templates setting also in the Nominal Ledger, you should use these fields to specify Tax Templates for each VAT Zone, to be used if you have not specified Tax Templates at the Item or Item Group level. Please refer here for full details about how a Tax Template will be chosen when you sell an Item (i.e. when you specify an Item in a row in an Invoice, Order, Quotation or other sales transaction).
- You can change the names of two of these fields if they are not suitable. Using the VAT Zone Label setting in the Sales Ledger, you can replace the string "EU" with your own string (for example "SACU" in South Africa).
- In some countries, Tax Templates are used instead of VAT Codes. VAT Codes should be used where each sales and purchase transaction is taxed at a single rate, while Tax Templates should be used where different taxes and/or several tax rates are applied to one transaction.
- Register Cash Sales in Fiscal Control Unit
- This option should only be used in Sweden, where it is a legal requirement that all cash or credit card payments in shops should be made through a certified Point of Sale (POS) solution that contains a fiscal control unit. The control unit will record these payments, which can later be read by tax authorities to ensure that a shop's sales have been registered and reported correctly.
- The fiscal control unit supported by Standard ERP is the CleanCash Type A from RetailInnovation. Each client or Till likely to receive cash or credit card payments should be connected to a CleanCash Type A unit via an RS232 serial cable. Standard ERP does not currently support the CleanCash Types B and C units.
- Select this option if you need cash and credit card payments to be recorded in CleanCash Type A fiscal control units. This option applies to Sales Ledger Invoices with a “Cash” Type Payment Term (i.e. Sales Ledger Cash Notes), while a similarly named option in the POS Settings setting applies to POS Invoices. Please refer to your local HansaWorld representative for more details. If you are using this option, you will not be able to change Item Descriptions and Unit Prices in Invoices.
- If you use this option without connecting a fiscal control unit (e.g. you are outside Sweden), you will be shown the message "Serial Port Device not defined" when you try to save an Invoice with a "Cash" Type Payment Term (Payment Terms are described here).
- The fiscal control unit supported by Standard ERP is the CleanCash Type A from RetailInnovation. Each client or Till likely to receive cash or credit card payments should be connected to a CleanCash Type A unit via an RS232 serial cable. Standard ERP does not currently support the CleanCash Types B and C units.
Settings in the Sales Ledger:
- Introduction
- Account Usage S/L, including:
- 'Debtors' card - Fields
- 'Debtors' card - Check Boxes
- 'VAT / Tax' card
- 'Exchange Rate' card
- 'Sales' card
- 'Credit' card
- 'Debtors' card - Fields
- Age Limits
- Bonus
- Classification Types
- Contact Credit Limits
- Contact Document Types
- Contact Settings
- Credit Limit
- Cross Sales Items
- Customer Categories
- Default Items
- Default Payment Modes
- Environment Tax
- Extra Tax Customer Discounts
- Factoring Export
- Freight
- Freight/Weight Calculation
- Gift Voucher settings
- Instalments
- Interest
- Interest Codes, Interest Terms
- Intrastat Transaction Codes
- Invoice Mail Settings
- Item Classifications
- Item Group Withholdings
- Item Settings
- Item Status Settings
- Legal Record Numbers
- Number Series - Contacts
- Number Series - Gift Vouchers
- Number Series - Gift Vouchers Received
- Number Series - Internal Invoices
- Number Series - Invoices
- Number Series - Receipts
- Official Invoice Serial Number
- Payment Modes
- Payment Term Sales A/C
- Payment Terms
- Receipts Setting
- Regional Sales Taxes
- Regions
- Registration Defaults
- Reminder Texts
- Sales Invoice Settings
- Standard Problems
- Units
- VAT Corrections S/L
- VAT Zone Label
- Home page for Sales Ledger manual
- Home page for Standard ERP manual
Account Usage S/L - Credit Card
This page describes the 'Credit' card of the Account Usage S/L setting. Please click the following links for descriptions of the other cards:- Introduction
- 'Debtors' card - Fields
- 'Debtors' card - Check Boxes
- 'VAT / Tax' card
- 'Exchange Rate' card
- 'Sales' card
- 'Credit' card
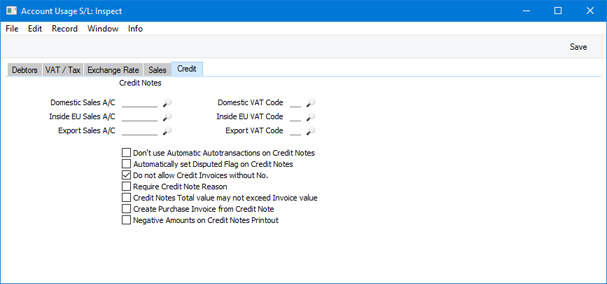
Please refer to the description of the 'Sales' card for details about Sales Accounts and VAT Codes.
If you would like to use the same VAT Codes in Credit Notes but have them post to different Output VAT Accounts, you can specify those Output VAT Accounts on flip D in the VAT Codes setting. There is no need to select the Use Credit Sales Accounts option in this case.
These Accounts and VAT Codes will be used when no credit Sales Account or VAT Code has been specified for an Item Group and for Items that do not belong to an Item Group. If any field here is blank, the standard Account or VAT Code from the 'Sales' card of this setting will be used instead.
- Don't use Automatic Autotransactions on Credit Notes
- If you use an Account with an Automatic Autotransaction in an Invoice, the Autotransaction will be applied automatically to the amount that you post to that Account when you mark the Invoice as OK and save. If you then credit the Invoice, the Autotransaction will be applied automatically once again. Use this option if you do not want the Autotransaction to be applied automatically to the Credit Note. Please refer to this page for more details about Automatic Autotransactions and an example.
- Automatically set Disputed Flag on Credit Notes
- Select this option if you would like all Credit Notes to be marked as Disputed automatically. Please refer here for details about the Disputed check box.
- Do not allow Credit Invoices without No.
- Check this box if you would like Credit Notes always to be allocated to previous Invoices.
- Require Credit Note Reason
- Select this option if you need it to be mandatory that a Credit Reason is specified in every Credit Note.
- If you are likely to use the Credit Notes Only option when producing the VAT Customer Sales report, it is recommended that you select this option. The Credit Notes Only option will cause the VAT Customer Sales report to summarise the Credit Notes issued to each Customer, sorted by Credit Note Reason. Credit Notes without Reasons will not be included in the report, so using this Require Credit Note Reason option will ensure that every Credit Note will be included in the report.
- If you are likely to use the Credit Notes Only option when producing the VAT Customer Sales report, it is recommended that you select this option. The Credit Notes Only option will cause the VAT Customer Sales report to summarise the Credit Notes issued to each Customer, sorted by Credit Note Reason. Credit Notes without Reasons will not be included in the report, so using this Require Credit Note Reason option will ensure that every Credit Note will be included in the report.
- Credit Notes Total value may not exceed Invoice value
- Use this option if you want to prevent the possibility of a Credit Note having a greater value than the Invoice being credited. If you create more than one Credit Note from a single Invoice, the total value of those Credit Notes will be limited to the value of the Invoice.
- This option does not take into account any payment you may have received against an Invoice. It simply compares the value of a Credit Note with the value of the Invoice being credited, less the value of any previous Credit Notes. If you need the value of a Credit Note to be compared with the outstanding value of the Invoice being credited (i.e. taking payments received into account as well as previous Credit Notes), use the Disallow over-receive Invoice option on the 'Debtors' card of this setting.
- If you create a Credit Note from an Invoice using the 'Credit Note' function on the Create menu (Windows/Mac OS X) or + menu (iOS/Android), it will not be possible for an individual row in the Credit Note to have a higher value than the corresponding row in the Invoice, irrespective of whether you are using this option. A Credit Note created by duplicating an Invoice and changing the Payment Term will not have the same control, because the rows in the Credit Note will not explicitly be connected to rows in the originating Invoice (this connection is made using the Cred. Row field on flip F of the 'Items' card of the Credit Note).
- Please refer here for more details about creating Credit Notes.
- This option does not take into account any payment you may have received against an Invoice. It simply compares the value of a Credit Note with the value of the Invoice being credited, less the value of any previous Credit Notes. If you need the value of a Credit Note to be compared with the outstanding value of the Invoice being credited (i.e. taking payments received into account as well as previous Credit Notes), use the Disallow over-receive Invoice option on the 'Debtors' card of this setting.
- Negative Amounts on Credit Notes Printout
- When you print a Credit Note, all figures will by default be printed as positive. If you would like them to be printed as negative, select this option.
Settings in the Sales Ledger:
- Introduction
- Account Usage S/L, including:
- 'Debtors' card - Fields
- 'Debtors' card - Check Boxes
- 'VAT / Tax' card
- 'Exchange Rate' card
- 'Sales' card
- 'Credit' card
- 'Debtors' card - Fields
- Age Limits
- Bonus
- Classification Types
- Contact Credit Limits
- Contact Document Types
- Contact Settings
- Credit Limit
- Cross Sales Items
- Customer Categories
- Default Items
- Default Payment Modes
- Environment Tax
- Extra Tax Customer Discounts
- Factoring Export
- Freight
- Freight/Weight Calculation
- Gift Voucher settings
- Instalments
- Interest
- Interest Codes, Interest Terms
- Intrastat Transaction Codes
- Invoice Mail Settings
- Item Classifications
- Item Group Withholdings
- Item Settings
- Item Status Settings
- Legal Record Numbers
- Number Series - Contacts
- Number Series - Gift Vouchers
- Number Series - Gift Vouchers Received
- Number Series - Internal Invoices
- Number Series - Invoices
- Number Series - Receipts
- Official Invoice Serial Number
- Payment Modes
- Payment Term Sales A/C
- Payment Terms
- Receipt Settings
- Regional Sales Taxes
- Regions
- Registration Defaults
- Reminder Texts
- Sales Invoice Settings
- Standard Problems
- Units
- VAT Corrections S/L
- VAT Zone Label
- Home page for Sales Ledger manual
- Home page for Standard ERP manual
Account Usage S/L - Card 5
The fields on this card were moved to the Account Usage Stock setting in version 4.3. Please click here for details.---
Settings in the Sales Ledger:
- Introduction
- Account Usage S/L, including:
- 'Debtors' card - Fields
- 'Debtors' card - Check Boxes
- 'Exchange Rate' card
- 'Sales' card
- 'Credit' card
- 'Debtors' card - Fields
- Age Limits
- Alternative Items
- Bonus
- Classification Types
- Contact Credit Limits
- Contact Document Types
- Contact Settings
- Credit Limit
- Cross Sales Items
- Customer Categories
- Default Items
- Default Payment Modes
- Environment Tax
- Extra Tax Customer Discounts
- Factoring Export
- Freight
- Freight/Weight Calculation
- Gift Voucher settings
- Instalments
- Interest
- Interest Codes, Interest Terms
- Intrastat Transaction Codes
- Invoice Mail Settings
- Item Classifications
- Item Group Withholdings
- Item Settings
- Item Status Settings
- Legal Record Numbers
- Number Series - Contacts
- Number Series - Gift Vouchers
- Number Series - Gift Vouchers Received
- Number Series - Internal Invoices
- Number Series - Invoices
- Number Series - Receipts
- Official Invoice Serial Number
- Payment Modes
- Payment Term Sales A/C
- Payment Terms
- Receipt Settings
- Regional Sales Taxes
- Regions
- Registration Defaults
- Reminder Texts
- Sales Invoice Settings
- Standard Problems
- Units
- VAT Corrections S/L
- VAT Zone Label
- Home page for Sales Ledger manual
- Home page for Standard ERP manual
Account Usage S/L - Card 6
The fields on this card were moved to the Account Usage Stock setting in version 4.3. Please click here for details.---
Settings in the Sales Ledger:
- Introduction
- Account Usage S/L, including:
- 'Debtors' card - Fields
- 'Debtors' card - Check Boxes
- 'Exchange Rate' card
- 'Sales' card
- 'Credit' card
- 'Debtors' card - Fields
- Age Limits
- Alternative Items
- Bonus
- Classification Types
- Contact Credit Limits
- Contact Document Types
- Contact Settings
- Credit Limit
- Cross Sales Items
- Customer Categories
- Default Items
- Default Payment Modes
- Environment Tax
- Extra Tax Customer Discounts
- Factoring Export
- Freight
- Freight/Weight Calculation
- Gift Voucher settings
- Instalments
- Interest
- Interest Codes, Interest Terms
- Intrastat Transaction Codes
- Invoice Mail Settings
- Item Group Withholdings
- Item Classifications
- Item Settings
- Item Status Settings
- Legal Record Numbers
- Number Series - Contacts
- Number Series - Gift Vouchers
- Number Series - Gift Vouchers Received
- Number Series - Internal Invoices
- Number Series - Invoices
- Number Series - Receipts
- Official Invoice Serial Number
- Payment Modes
- Payment Term Sales A/C
- Payment Terms
- Receipt Settings
- Regional Sales Taxes
- Regions
- Registration Defaults
- Reminder Texts
- Sales Invoice Settings
- Standard Problems
- Units
- VAT Corrections S/L
- VAT Zone Label
- Home page for Sales Ledger manual
- Home page for Standard ERP manual
Age Limits
This setting allows you to define up to six ageing periods that will be used in aged debtor and aged creditor reports. The reports that include ageing periods are the Sales and Purchase Ledger reports (Aged and Detailed options), the Customer and Supplier Status reports, the Payments and Receipts Forecast reports, and the Open Invoice Customer and Supplier Statement forms and the Aged Stock Analysis report in the Stock module.To open the Age Limits setting, ensure you are in the Sales Ledger and then click the [Settings] button in the Navigation Centre. Double-click 'Age Limits' in the 'Settings' list. Fill in the fields as described below. Then, to save changes and close the window, click the [Save] button. To close the window without saving changes, click the close box.
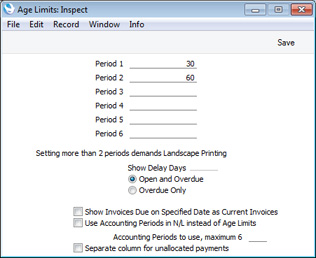
- Period 1 - Period 6
- Use these fields to define your ageing periods as shown above. Simply enter the maximum age in days in each field. Leave the lower fields blank if you don't need them.
- In the example illustrated above, two of the Period fields have been used, meaning that three ageing periods will be displayed in reports: 0-30 days, 31-60 days and 61 days and over.
- In aged debtor and aged creditor reports, outstanding Invoices will be grouped together according to their age, as shown in the example aged debtor report illustrated below (i.e. Sales Ledger report produced using the Aged option). The number of columns in the report will correspond to the number of ageing periods defined in this setting.
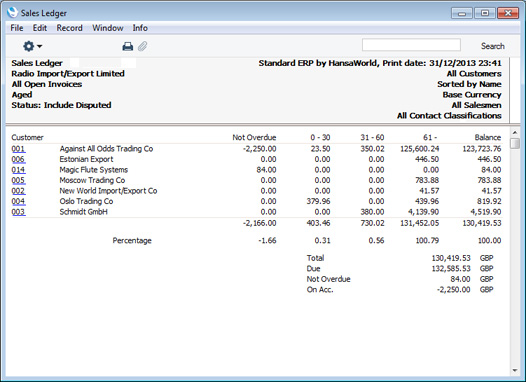
- When you produce a Sales Ledger or Purchase Ledger report using the Aged or Aged Detailed options, you will be able to choose whether the ageing calculation is to start from the Due Date of an Invoice or its Invoice Date.
- In the example illustrated above, two of the Period fields have been used, meaning that three ageing periods will be displayed in reports: 0-30 days, 31-60 days and 61 days and over.
- Show Delay Days
- Use these options to control how age figures will be printed in reports and forms, as follows:
- Open and Overdue
- The number of days by which an Invoice is overdue will be printed as a negative figure. In the case of an Invoice is not yet due for payment, the number of days until the Due Date will be printed as a positive figure.
- Overdue Only
- The number of days by which an Invoice is overdue will be printed as a positive figure. In the case of an Invoice is not yet due for payment, "0" will be printed.
- Open and Overdue
- Use Accounting Periods instead of Age Limits, Accounting Periods to use, maximum 6
- An alternative to using the Period fields to define ageing periods as described above is to use Accounting Periods. To do this, select the Use Accounting Periods instead of Age Limits option, and specify in the Accounting Periods to use field how many Accounting Periods you want to use. In this example, we have specified that we want to use four Accounting Periods:
This is an example record from the Accounting Periods setting: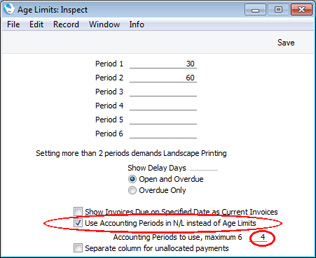
As we have specified that we want to use four Accounting Periods, four ageing periods will be calculated, based on the four most recent Accounting Periods at the time the report is produced. For example, in a report produced on 31/12/2013, the ageing periods will be 2013/12 (showing Invoices that became due between 26/12/2013 and 31/12/2013), 2013/11 (showing Invoices that became due between 26/11/2013 and 25/12/2013), 2013/10 and 2013/09. The report will also have a column for Invoices that are not yet due and one column for Invoices that are older than the last ageing period: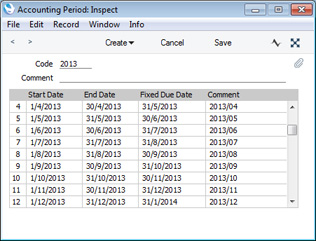
Please refer here for more details about the Accounting Periods setting.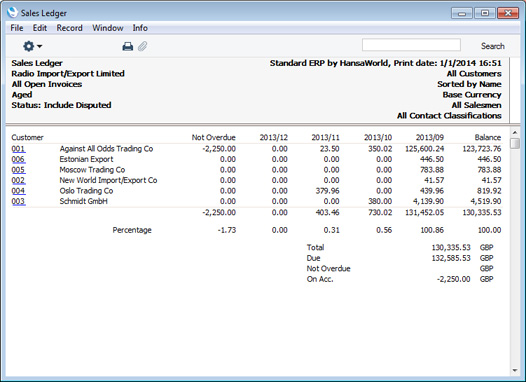
- If you are using this option, you should still specify Periods 1-6 in the fields above, as they will still provide the defaults for the Aged Stock Analysis report in the Stock module. It is recommended that the periods you specify in the Age Limits setting are similar to those in the Accounting Periods setting (e.g. if you have periods one month in duration in the Accounting Periods setting, you should have the same in the Age Limits setting).
- If you are using this option, you should still specify Periods 1-6 in the fields above, as they will still provide the defaults for the Aged Stock Analysis report in the Stock module. It is recommended that the periods you specify in the Age Limits setting are similar to those in the Accounting Periods setting (e.g. if you have periods one month in duration in the Accounting Periods setting, you should have the same in the Age Limits setting).
- Show Invoices Due on Specified Date as Current Invoices
- You can use Accounting Periods for two purposes:
- You can use them to calculate ageing periods for reports, as described above.
- You can use them to calculate Due Dates in Invoices. If you need to use them for this purpose, set the Type to "Accounting Period + Net Days" in your Payment Term records.
- A problem that may occur, especially if your Due Dates are always the last day of a month, is that you will print statements and debtor reports on the same day that the previous month's Invoices become due for payment. So, these Invoices are neither Not Due nor Overdue (i.e. they will be "Current"). For example, if you print statements and reports on 31/12/2013, Invoices from November will be Current, while Invoices from December will be Not Due.
- In the Aged and Detailed Aged versions of the Sales Ledger report, Current Invoices (i.e. those that became due on the date of printing) will by default be included in the "Not Overdue" figure. If you need them to be shown in a separate column, select this option. An extra column (labelled "Cur.") will be added to the report to show these Invoices, and a "Current" total will be added to the end of the report. In the example illustrated below, which uses the same data as the previous illustration), Customer 014 has one Invoice that became due on the date of printing and one that will become due at the end of the next month:
This option will also affect the Open Invoice Customer Statement and Periodic Customer Statement forms. If you are not using this option, the "Aged Value 0" and "Aged On Date Value 0" fields will print the Current total plus the Not Due total (plus any open Prepayment and On Account values). If you are using this option, these fields will print the Not Due total, and the "Aged Current" and "Aged On Date Current" fields will print the Current total.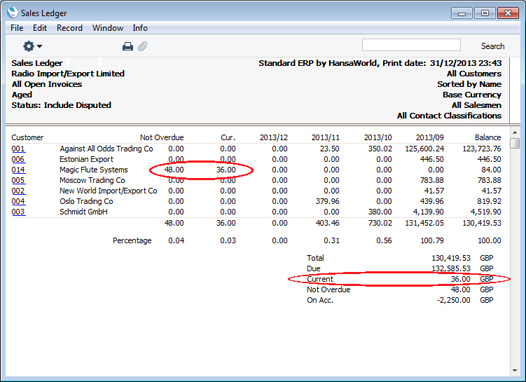
- You can use them to calculate ageing periods for reports, as described above.
- Separate column for unallocated payments
- This option affects the Aged version of the Sales Ledger report. By default, the Not Overdue figures in this report will include open Prepayments and On Account values. Use this option if you would like open Prepayments and On Account values to be shown in a separate column, headed "Unallocated".
Settings in the Sales Ledger:
- Introduction
- Account Usage S/L
- Age Limits
- Alternative Items
- Bonus
- Classification Types
- Contact Credit Limits
- Contact Document Types
- Contact Settings
- Credit Limit
- Cross Sales Items
- Customer Categories
- Default Items
- Default Payment Modes
- Environment Tax
- Extra Tax Customer Discounts
- Factoring Export
- Freight
- Freight/Weight Calculation
- Gift Voucher settings
- Instalments
- Interest
- Interest Codes, Interest Terms
- Intrastat Transaction Codes
- Invoice Mail Settings
- Item Classifications
- Item Group Withholdings
- Item Settings
- Item Status Settings
- Legal Record Numbers
- Number Series - Contacts
- Number Series - Gift Vouchers
- Number Series - Gift Vouchers Received
- Number Series - Internal Invoices
- Number Series - Invoices
- Number Series - Receipts
- Official Invoice Serial Number
- Payment Modes
- Payment Term Sales A/C
- Payment Terms
- Receipt Settings
- Regional Sales Taxes
- Regions
- Registration Defaults
- Reminder Texts
- Sales Invoice Settings
- Standard Problems
- Units
- VAT Corrections S/L
- VAT Zone Label
- Home page for Sales Ledger manual
- Home page for Standard ERP manual
Alternative Items
You can use the Alternative Items setting as a sales aid in certain situations. Examples might be:- A Customer tries to buy an Item that is out of stock or obsolete. The Alternative Items setting can help you sell a similar Item that is in stock or is current.
- A Customer is not sure about the specification of the Item they require (for example, when selling hardware Items such as nuts, bolts, nails, screws, etc). The Alternative Items setting can help you sell the correct Item.
- Enter the Items in the Item register as normal. As an example, we will enter three similar Items:
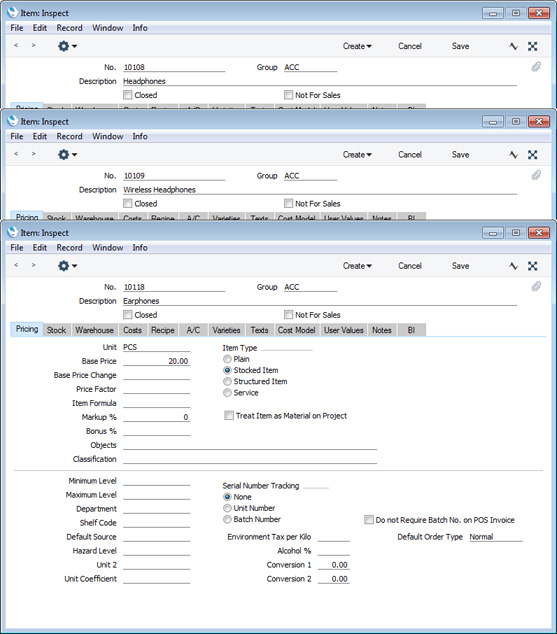
- The next step is to connect the Items together using the Alternative Items setting. Ensure you are in the Sales Ledger, open the Alternative Items setting, and create a new record:
As shown in the illustration, specify one Item number in the Original Item field and one Item number in the Alternative Item field. You can use 'Paste Special' to choose the correct Item in both cases. In this example, Item 10109 has been specified as an alternative to Item 10108.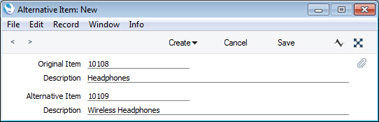
- Depending on the situation, you may want to set up a reciprocal arrangement. This would not be appropriate if the Original Item (10108 in the example) has been discontinued and the Alternative Item is its replacement, but it will be useful if you are trying to build up a list of similar Items as a sales aid. A short cut is to save the Alternative Item record from step 2 and then to select 'Reverse Relation' from the Create menu (in versions prior to 8.0, use 'Create Reverse Relation' from the Operations menu):
A second Alternative Item record will be created and saved: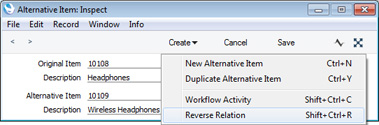
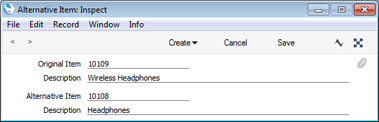
- Continue creating Alternative Item records as necessary until you have connected each of the Items together. In the example, we have created the following records:
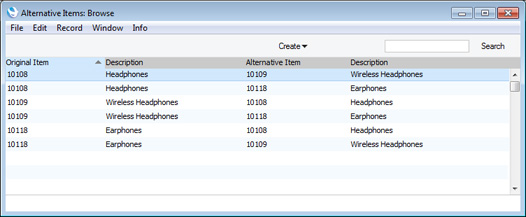
- When entering a sales transaction (e.g. a Quotation, Order or Invoice), activate 'Paste Special' from the Item field in a row as normal:
The last column of the 'Paste Special' list displays the current stock levels of each Item. So, in this example, if the Customer has expressed interest in Item 10109, you will immediately be able to inform them that this Item is out of stock.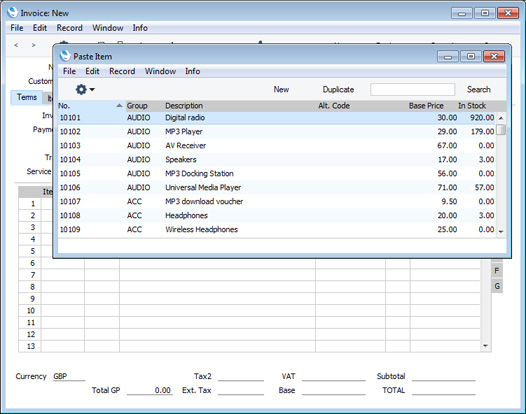
- To see if there are any alternatives you can offer the Customer, highlight the Item in the list and then select 'Alternative Items' from the Operations menu (or use the Ctrl-Shift-L/⌘-Shift-L keyboard shortcut):
The 'Paste Special' list will now show the alternatives to the highlighted Item: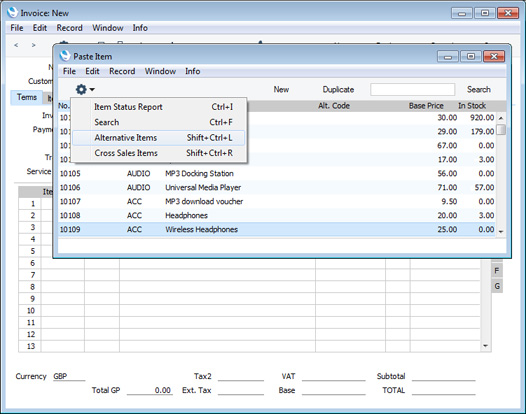
If you have the 'Item Status' window open, you can click on each of the alternatives to see stock levels. You can open the 'Item Status' window from the sales transaction.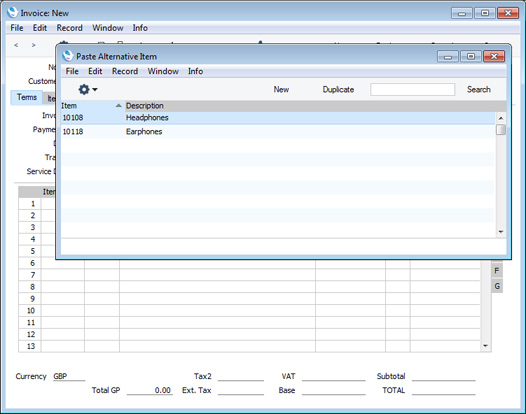
- Select an Item in the usual way by double-clicking or, if you need to go back to the main list of Items, select 'All Items' from the Operations menu (or use the Ctrl-I/⌘-I keyboard shortcut).
Settings in the Sales Ledger:
- Introduction
- Account Usage S/L
- Age Limits
- Alternative Items
- Bonus
- Classification Types
- Contact Credit Limits
- Contact Document Types
- Contact Settings
- Credit Limit
- Cross Sales Items
- Customer Categories
- Default Items
- Default Payment Modes
- Environment Tax
- Extra Tax Customer Discounts
- Factoring Export
- Freight
- Freight/Weight Calculation
- Gift Voucher settings
- Instalments
- Interest
- Interest Codes, Interest Terms
- Intrastat Transaction Codes
- Invoice Mail Settings
- Item Classifications
- Item Group Withholdings
- Item Settings
- Item Status Settings
- Legal Record Numbers
- Number Series - Contacts
- Number Series - Gift Vouchers
- Number Series - Gift Vouchers Received
- Number Series - Internal Invoices
- Number Series - Invoices
- Number Series - Receipts
- Official Invoice Serial Number
- Payment Modes
- Payment Term Sales A/C
- Payment Terms
- Receipt Settings
- Regional Sales Taxes
- Regions
- Registration Defaults
- Reminder Texts
- Sales Invoice Settings
- Standard Problems
- Units
- VAT Corrections S/L
- VAT Zone Label
- Home page for Sales Ledger manual
- Home page for Standard ERP manual
Bonus
You can use the Bonus, Salesman report to calculate bonuses and commissions payable to sales staff, based on the sales made during a specified period. In this report, you can have these bonuses and commissions calculated using up to three methods:- You can set a fixed bonus percentage for each sales person, using the Bonus field on the 'Sales' card of their Person records in the System module. This percentage will be applied to every Item sold by a Person. To calculate bonuses and commissions using this method, produce the Bonus, Salesman report using the User option. No bonuses will be calculated for sales persons with no Bonus set in the Person register.
- You can set a fixed bonus percentage for each Item, using the Bonus % field on the 'Pricing' card of the Item record. This percentage will be applied to all sales of the Item, irrespective of the sales person. To calculate bonuses and commissions using this method, produce the Bonus, Salesman report using the Item option. If an Item has no Bonus % set in the Item register, the bonus for that Item will be calculated using the percentage set for the sales person in the Person register. If no percentage has been set for an Item and for the sales person, no bonuses will be calculated for that Item.
- You can configure a more complex system of percentages can be configured using this setting. You can set different bonus and commission rates for as many combinations as necessary of sales staff, Items and Customers. To calculate bonuses and commissions using this method, produce the Bonus, Salesman report using the User or Item options. If there are any Items with a Bonus % set in the Item register, this Bonus % will be used in place of all records in the Bonus setting.
In the example illustrated below, the Bonus, Salesman report will show that sales person FF should receive a commission of 2.7% when she sells Item 10108 to Customer 001, 2.8% for Item 10132, and 2.5% when she sells any Item belonging to the AUDIO Item Group to that Customer. If she sells any other Item to that Customer, she will receive a commission of 2.0%. You will be able to choose when producing the report whether the percentages are to be applied to turnover or gross profit.
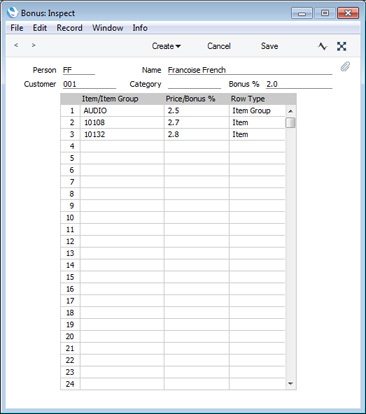
- Person
- Paste Special
Person register, System module
- Specify the Person whose bonus or commission rates are to be contained in the Bonus record.
- This field must contain a value: do not leave it blank in the hope of defining bonus rates for all Persons.
- You can only enter one Bonus record for each Person/Customer/Category combination.
- This field must contain a value: do not leave it blank in the hope of defining bonus rates for all Persons.
- Name
- The name of the Person will appear here after you have entered their Signature in the field to the left.
- Customer
- Paste Special
Customers in Contact register
- If you have different bonus rates for each Customer, enter a Customer here. Leave the blank to define bonus rates for all Customers, or if you have entered a Category in the field to the right.
- Category
- Paste Special
Customer Categories setting, Sales Ledger
- If you have different bonus rates for each Customer Category, enter a Category here. Leave the field blank to define bonus rates for all Categories, or if you have entered a Customer in the field to the left.
- Bonus %
- Enter here a default bonus percentage, to be used for any Item that the Person sells to the Customer(s). If you need to set different bonus percentages for particular Items or for Items belonging to particular Item Groups, list them in the grid below. Bonus percentages in the grid will override the percentage in this field.
- Item/Item Group
- Paste Special
Item or Item Group registers
- This field can contain either an Item Number or an Item Group Code. This field must contain a value: do not leave it blank in the hope of applying a bonus rate to all Items.
- If you enter an Item here, set the Row Type (in the right-hand column) to "Item". If you enter an Item Group, set the Row Type to "Item Group". If you set the Row Type before entering an Item or Item Group here, this will determine whether the 'Paste Special' window will list Items or Item Groups when you open it from this field.
- If you will enter both Item Groups and Items, list the Item Groups first, as shown in the illustration.
- If you enter an Item here, set the Row Type (in the right-hand column) to "Item". If you enter an Item Group, set the Row Type to "Item Group". If you set the Row Type before entering an Item or Item Group here, this will determine whether the 'Paste Special' window will list Items or Item Groups when you open it from this field.
- Price Bonus %
- The percentage bonus or commission payable on the Item or Item Group.
- If you have specified a Bonus % in the Item record, that will be used instead of the percentage specified here. In general, you may not need to specify Bonus percentages in Item records if you are using the Bonus setting.
- If you have specified a Bonus % in the Item record, that will be used instead of the percentage specified here. In general, you may not need to specify Bonus percentages in Item records if you are using the Bonus setting.
- Row Type
- Paste Special
Choices of possible entries
- This field can contain one of two entries: "Item" or "Item Group". Use it to indicate whether you have entered an Item Number or an Item Group Code in the Item/Item Group field (in the left-hand column). Use 'Paste Special' to increase input speed.
Settings in the Sales Ledger:
- Introduction
- Account Usage S/L
- Age Limits
- Alternative Items
- Bonus
- Classification Types
- Contact Credit Limits
- Contact Document Types
- Contact Settings
- Credit Limit
- Cross Sales Items
- Customer Categories
- Default Items
- Default Payment Modes
- Environment Tax
- Extra Tax Customer Discounts
- Factoring Export
- Freight
- Freight/Weight Calculation
- Gift Voucher settings
- Instalments
- Interest
- Interest Codes, Interest Terms
- Intrastat Transaction Codes
- Invoice Mail Settings
- Item Classifications
- Item Group Withholdings
- Item Settings
- Item Status Settings
- Legal Record Numbers
- Number Series - Contacts
- Number Series - Gift Vouchers
- Number Series - Gift Vouchers Received
- Number Series - Internal Invoices
- Number Series - Invoices
- Number Series - Receipts
- Official Invoice Serial Number
- Payment Modes
- Payment Term Sales A/C
- Payment Terms
- Receipt Settings
- Regional Sales Taxes
- Regions
- Registration Defaults
- Reminder Texts
- Sales Invoice Settings
- Standard Problems
- Units
- VAT Corrections S/L
- VAT Zone Label
- Home page for Sales Ledger manual
- Home page for Standard ERP manual
Classification Types
Please click here for full details of this setting.---
Settings in the Sales Ledger:
- Introduction
- Account Usage S/L
- Age Limits
- Alternative Items
- Bonus
- Classification Types
- Contact Credit Limits
- Contact Document Types
- Contact Settings
- Credit Limit
- Cross Sales Items
- Customer Categories
- Default Items
- Default Payment Modes
- Environment Tax
- Extra Tax Customer Discounts
- Factoring Export
- Freight
- Freight/Weight Calculation
- Gift Voucher settings
- Instalments
- Interest
- Interest Codes, Interest Terms
- Intrastat Transaction Codes
- Invoice Mail Settings
- Item Classifications
- Item Group Withholdings
- Item Settings
- Item Status Settings
- Legal Record Numbers
- Number Series - Contacts
- Number Series - Gift Vouchers
- Number Series - Gift Vouchers Received
- Number Series - Internal Invoices
- Number Series - Invoices
- Number Series - Receipts
- Official Invoice Serial Number
- Payment Modes
- Payment Term Sales A/C
- Payment Terms
- Receipt Settings
- Regional Sales Taxes
- Regions
- Registration Defaults
- Reminder Texts
- Sales Invoice Settings
- Standard Problems
- Units
- VAT Corrections S/L
- VAT Zone Label
- Home page for Sales Ledger manual
- Home page for Standard ERP manual
Contact Credit Limits
The Contact Credit Limits setting offers a convenient method for storing and managing credit limits on both the sales and purchase sides.You can set credit terms for a Customer or a Supplier in two ways:
- You can enter a record for the Customer or a Supplier in this setting.
- You can use the Credit Limit and/or Credit Limit Days fields on the 'Terms' card of the Contact record for the Customer or Supplier (separate sales and purchase fields are provided).
On the sales side, after setting Credit Limits for each Customer, use the Credit Limit setting in the Sales Ledger to control behaviour in sales transactions when Customers have exceeded their credit terms (e.g. to warn against or prevent the entering of Orders and Invoices) and to specify how it should be determined whether a Customer has exceeded their credit terms.
To work with this setting, first ensure you are in the Sales Ledger. Then, if you are using Windows or Mac OS X, click the [Settings] button in the Navigation Centre or use the Ctrl-S/⌘-S keyboard shortcut and then double-click 'Contact Credit Limits' in the 'Settings' list. If you are using iOS or Android, select 'Settings' from the Tools menu (with 'wrench' icon) and tap 'Contact Credit Limits' in the 'Settings' list. The 'Contact Credit Limits: Browse' window will open, listing the records previously entered. Double-click (Windows/Mac OS X) or tap (iOS/Android) an item in the list to edit, or add a new record by selecting 'New' from the Create menu (Windows/Mac OS X) or the + menu (iOS/Android). When the record is complete, click the [Save] button (Windows/Mac OS X) or tap √ (iOS/Android) in the Button Bar to save it.
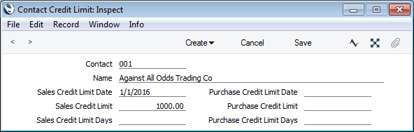
- Contact
- Paste Special
Customers, Suppliers and Contact Persons in Contact register
- Specify the Customer or Supplier for whom you are entering credit terms.
- Name
- The Customer or Supplier Name will appear here when you specify a Contact Number in the field above.
- Sales Credit Limit Date
- Paste Special
Choose date
- If the Contact is a Customer, specify the date when the sales credit terms specified below took effect.
- You must enter a Sales Credit Limit Date or a Purchase Credit Limit Date, otherwise you will not be able to save the record.
- If you have more than one record in this setting for a particular Customer, the most recent one will determine their credit terms. This allows you to build up histories of credit terms for each Customer. A record with a future date will not be used until that date is reached.
- You must enter a Sales Credit Limit Date or a Purchase Credit Limit Date, otherwise you will not be able to save the record.
- Sales Credit Limit
- If the Contact is a Customer, specify here the Credit Limit that you have granted to them. This figure should be in your home Currency.
- If you have specified a Sales Credit Limit in the Contact record for the Customer, it will be copied here as a default.
- If you need a list of Customers comparing their account status with their Credit Limits, produce a Customer Credit Status report (in the Sales Ledger). This information will also be shown for a particular Customer in the report produced by the 'Customer Status' Operations menu function, but only if there is a record in the Info in Customer Status Report setting in the CRM module for the user producing the report.
- In multi-user systems, you can prevent certain users from changing the Sales Credit Limit in any Contact and in the Contact Credit Limits setting using Access Groups (by denying them access to the 'Change Credit Limits' Action).
- If you have specified a Sales Credit Limit in the Contact record for the Customer, it will be copied here as a default.
- Sales Credit Limit Days
- If the Contact is a Customer, you can use this field to specify the maximum number of days credit you will allow them.
- If you have specified a Sales Credit Limit Days in the Contact record for the Customer, it will be copied here as a default.
- If you have specified a Sales Credit Limit Days for a Customer, that Customer will immediately be said to have exceeded their credit terms as soon as an Invoice of any value becomes outstanding for more than that number of days (measured from its Due Date). Please refer to the description of the Credit Limit setting for more details about determining when a Customer has exceeded their credit terms.
- In multi-user systems, you can prevent certain users from changing the Sales Credit Limit Days in any Contact and in the Contact Credit Limits setting using Access Groups (by denying them access to the 'Change Credit Limit Days' Action).
- If you have specified a Sales Credit Limit Days in the Contact record for the Customer, it will be copied here as a default.
- Purchase Credit Limit Date
- Paste Special
Choose date
- If the Contact is a Supplier, specify the date when the purchase credit terms specified below took effect.
- You must enter a Sales Credit Limit Date or a Purchase Credit Limit Date, otherwise you will not be able to save the record.
- You must enter a Sales Credit Limit Date or a Purchase Credit Limit Date, otherwise you will not be able to save the record.
- Purchase Credit Limit
- If the Contact is a Supplier, specify the Credit Limit extended to your firm by them here. This is for information only: it will be shown for a particular Supplier in the report produced by the 'Supplier Status' Operations menu function.
- If you have specified a Purch. Credit Limit in the Contact record for the Supplier, it will be copied here as a default.
- In multi-user systems, you can prevent certain users from changing the Purchase Credit Limit in the Contact Credit Limits setting using Access Groups (by denying them access to the 'Change Credit Limit' Action).
- If you have specified a Purch. Credit Limit in the Contact record for the Supplier, it will be copied here as a default.
- Purchase Credit Limit Days
- If the Contact is a Supplier, specify the maximum number of days credit extended to your firm by them here. This is for information only.
- If you have specified a Purch. Credit Limit Days in the Contact record for the Supplier, it will be copied here as a default.
- In multi-user systems, you can prevent certain users from changing the Purchase Credit Limit Days in any Contact and in the Contact Credit Limits setting using Access Groups (by denying them access to the 'Change Credit Limit Days' Action).
- If you have specified a Purch. Credit Limit Days in the Contact record for the Supplier, it will be copied here as a default.
Settings in the Sales Ledger:
- Introduction
- Account Usage S/L
- Age Limits
- Alternative Items
- Bonus
- Classification Types
- Contact Credit Limits
- Contact Document Types
- Contact Settings
- Credit Limit
- Cross Sales Items
- Customer Categories
- Default Items
- Default Payment Modes
- Environment Tax
- Extra Tax Customer Discounts
- Factoring Export
- Freight
- Freight/Weight Calculation
- Gift Voucher settings
- Instalments
- Interest
- Interest Codes, Interest Terms
- Intrastat Transaction Codes
- Invoice Mail Settings
- Item Classifications
- Item Group Withholdings
- Item Settings
- Item Status Settings
- Legal Record Numbers
- Number Series - Contacts
- Number Series - Gift Vouchers
- Number Series - Gift Vouchers Received
- Number Series - Internal Invoices
- Number Series - Invoices
- Number Series - Receipts
- Official Invoice Serial Number
- Payment Modes
- Payment Term Sales A/C
- Payment Terms
- Receipts Setting
- Regional Sales Taxes
- Regions
- Registration Defaults
- Reminder Texts
- Sales Invoice Settings
- Standard Problems
- Units
- VAT Corrections S/L
- VAT Zone Label
- Home page for Sales Ledger manual
- Home page for Standard ERP manual
Contact Document Types
The Contact Document Types setting allows you to construct a look-up table for the Doc. Type field on the 'Personal' card of the Contact record.You can use the Doc. Type field in a Contact record for one of two purposes, and therefore you should use this setting to list typical values for that field that you will be able to choose using 'Paste Special'. The two purposes are:
- If a Contact is a Hotel Guest, use the Doc. Type field to record the type of ID document that the Guest shows when they check in. Example values might be "passport" or "driving licence".
- In Argentina, if a Contact is a Customer or a Supplier, the Doc. Type field should contain a code representing the type of ID document that the Contact has. For example, if the Contact is registered with the tax authority as a company, the type of the ID document will usually be "80", but if the Contact is a private individual, it might be "86" or "96". This code will be used in e-invoicing and tax exports.
It is recommended that you enter Document Types in alphabetical order, as shown in the illustration. You can insert a new Document Type in the correct place in the list by clicking on a row number and pressing the Return key (Windows/Mac OS X) or long tapping on a row number and selecting 'Insert Row' (iOS/Android). When you enter a new Contact and use 'Paste Special' to choose a Doc. Type, they will be listed in the same order as they are listed in this setting.
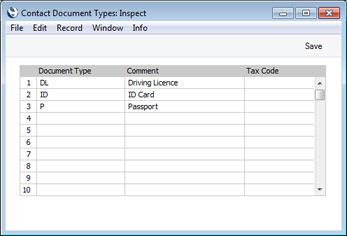
- Document Type
- Specify a unique Code for each Document Type in this field. In Argentina, this is the code that will be used in e-invoicing and tax exports.
- Comment
- Enter a brief description of each Document Type here. This description will be shown in the 'Paste Special' list and so should be clear enough to make the selection of the correct Document Type easy for all users.
- Tax Code
- This field is used in Argentina only, and can contain an alternative ID code. This information will be included in files created by the 'P/L Withholdings and Perceptions (Argentina)' ('Retenciones y Percepciones (ARCIBA) (Argentina)') export function (available in the Sales and Purchase Ledgers if the VAT Law in the Company Info setting is "Argentinean").
Settings in the Sales Ledger:
- Introduction
- Account Usage S/L
- Age Limits
- Alternative Items
- Bonus
- Classification Types
- Contact Credit Limits
- Contact Document Types
- Contact Settings
- Credit Limit
- Cross Sales Items
- Customer Categories
- Default Items
- Default Payment Modes
- Environment Tax
- Extra Tax Customer Discounts
- Factoring Export
- Freight
- Freight/Weight Calculation
- Gift Voucher settings
- Instalments
- Interest
- Interest Codes, Interest Terms
- Intrastat Transaction Codes
- Invoice Mail Settings
- Item Classifications
- Item Group Withholdings
- Item Settings
- Item Status Settings
- Legal Record Numbers
- Number Series - Contacts
- Number Series - Gift Vouchers
- Number Series - Gift Vouchers Received
- Number Series - Internal Invoices
- Number Series - Invoices
- Number Series - Receipts
- Official Invoice Serial Number
- Payment Modes
- Payment Term Sales A/C
- Payment Terms
- Receipts Setting
- Regional Sales Taxes
- Regions
- Registration Defaults
- Reminder Texts
- Sales Invoice Settings
- Standard Problems
- Units
- VAT Corrections S/L
- VAT Zone Label
- Home page for Sales Ledger manual
- Home page for Standard ERP manual
Contact Persons
This setting was removed from Standard ERP after version 5.1, when Customers, Suppliers and Contact Persons were unified in a single register, the Contact register. Please click here for details about copying your Contact Person information out of the old Contact Person setting into the new unified Contact register.---
Settings in the Sales Ledger:
- Introduction
- Account Usage S/L
- Age Limits
- Alternative Items
- Bonus
- Classification Types
- Contact Credit Limits
- Contact Document Types
- Contact Settings
- Credit Limit
- Cross Sales Items
- Customer Categories
- Default Items
- Default Payment Modes
- Environment Tax
- Extra Tax Customer Discounts
- Factoring Export
- Freight
- Freight/Weight Calculation
- Gift Voucher settings
- Instalments
- Interest
- Interest Codes, Interest Terms
- Intrastat Transaction Codes
- Invoice Mail Settings
- Item Classifications
- Item Group Withholdings
- Item Settings
- Item Status Settings
- Legal Record Numbers
- Number Series - Contacts
- Number Series - Gift Vouchers
- Number Series - Gift Vouchers Received
- Number Series - Internal Invoices
- Number Series - Invoices
- Number Series - Receipts
- Official Invoice Serial Number
- Payment Modes
- Payment Term Sales A/C
- Payment Terms
- Receipt Settings
- Regional Sales Taxes
- Regions
- Registration Defaults
- Reminder Texts
- Sales Invoice Settings
- Standard Problems
- Units
- VAT Corrections S/L
- VAT Zone Label
- Home page for Sales Ledger manual
- Home page for Standard ERP manual
Contact Settings
Please click here for full details of this setting.---
Settings in the Sales Ledger:
- Introduction
- Account Usage S/L
- Age Limits
- Alternative Items
- Bonus
- Classification Types
- Contact Credit Limits
- Contact Document Types
- Contact Settings
- Credit Limit
- Cross Sales Items
- Customer Categories
- Default Items
- Default Payment Modes
- Environment Tax
- Extra Tax Customer Discounts
- Factoring Export
- Freight
- Freight/Weight Calculation
- Gift Voucher settings
- Instalments
- Interest
- Interest Codes, Interest Terms
- Intrastat Transaction Codes
- Invoice Mail Settings
- Item Classifications
- Item Group Withholdings
- Item Settings
- Item Status Settings
- Legal Record Numbers
- Number Series - Contacts
- Number Series - Gift Vouchers
- Number Series - Gift Vouchers Received
- Number Series - Internal Invoices
- Number Series - Invoices
- Number Series - Receipts
- Official Invoice Serial Number
- Payment Modes
- Payment Term Sales A/C
- Payment Terms
- Receipt Settings
- Regional Sales Taxes
- Regions
- Registration Defaults
- Reminder Texts
- Sales Invoice Settings
- Standard Problems
- Units
- VAT Corrections S/L
- VAT Zone Label
- Home page for Sales Ledger manual
- Home page for Standard ERP manual
Cost Model
The Cost Model setting was merged with the Cost Accounting setting in the Stock module in version 5.1. Please refer to the description of the Cost Accounting setting here for full details.---
Settings in the Sales Ledger:
- Introduction
- Account Usage S/L
- Age Limits
- Alternative Items
- Bonus
- Classification Types
- Contact Credit Limits
- Contact Document Types
- Contact Settings
- Credit Limit
- Cross Sales Items
- Customer Categories
- Default Items
- Default Payment Modes
- Environment Tax
- Extra Tax Customer Discounts
- Factoring Export
- Freight
- Freight/Weight Calculation
- Gift Voucher settings
- Instalments
- Interest
- Interest Codes, Interest Terms
- Intrastat Transaction Codes
- Invoice Mail Settings
- Item Classifications
- Item Group Withholdings
- Item Settings
- Item Status Settings
- Legal Record Numbers
- Number Series - Contacts
- Number Series - Gift Vouchers
- Number Series - Gift Vouchers Received
- Number Series - Internal Invoices
- Number Series - Invoices
- Number Series - Receipts
- Official Invoice Serial Number
- Payment Modes
- Payment Term Sales A/C
- Payment Terms
- Receipt Settings
- Regional Sales Taxes
- Regions
- Registration Defaults
- Reminder Texts
- Sales Invoice Settings
- Standard Problems
- Units
- VAT Corrections S/L
- VAT Zone Label
- Home page for Sales Ledger manual
- Home page for Standard ERP manual
Credit Limit
You can set credit terms for a Customer in two ways:- You can enter a record for the Customer in the Contact Credit Limits setting.
- You can use the Sales Credit Limit and/or Sales Credit Limit Days fields on the 'Terms' card of the Contact record for the Customer.
Having set credit terms for each Customer, you should use this Credit Limit setting for the following purposes:
- You can use it to control behaviour in sales transactions when the credit terms of a Customer have been (or are about to be) exceeded.
- You can use it to specify how it should be determined whether a Customer has exceeded their credit terms.
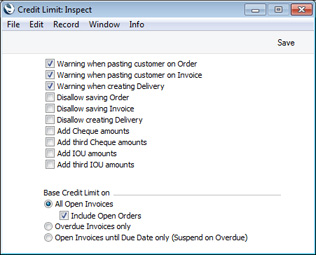
- Warnings
- Select these options in any combination as appropriate if you would like a warning to be shown when you enter a Customer that has already exceeded their credit terms in an Order or Invoice or when you create a Delivery. You will be able to override the warnings and continue.
- The warning message will usually be "Customer owes more than his credit limit specifies". However, if you are using the Open Invoices until Due Date only (Suspend on Overdue) option below and the Customer has at least one Overdue Invoice, the message will be "Customer has Overdue Invoices".
- The warning message will usually be "Customer owes more than his credit limit specifies". However, if you are using the Open Invoices until Due Date only (Suspend on Overdue) option below and the Customer has at least one Overdue Invoice, the message will be "Customer has Overdue Invoices".
- Disallow
- Select these options in any combination as appropriate if you would like it not to be possible to save an Order or Invoice or to create a Delivery for a Customer that has exceeded their credit terms. If you are using the All Open Invoices or Open Invoices until Due Date only (Suspend on Overdue) options below, you will not be able to save an Invoice if it will take the Customer over their Credit Limit.
- Base Credit Limit on
- Use these options to specify how to determine whether a Customer has exceeded their credit terms.
- If you have specified a Sales Credit Limit Days for a Customer (either in the Contact Credit Limits setting or in the Contact record for the Customer), that Customer will immediately be said to have exceeded their credit terms as soon as an Invoice of any value becomes outstanding for more than that number of days (measured from its Due Date). If you have not specified a Sales Credit Limit Days for a Customer, or the Customer does not have an Invoice that has been outstanding for that length of time, then the Customer's credit status will depend on these Base Credit Limit on options, as follows :
- All Open Invoices
- The Customer will be said to have exceeded their credit terms if the total outstanding value of unpaid Invoices is greater than their Sales Credit Limit. This includes both Invoices that are overdue for payment and Invoices that are not yet due for payment.
- Include Open Orders
- If you have selected the All Open Invoices option above, you should also select this option if you would like the value of open (i.e. uninvoiced Sales Orders) to be included in the calculations when assessing whether a Customer has exceeded their Sales Credit Limit. The Customer will be said to have exceeded their Sales Credit Limit if the outstanding value of all unpaid Invoices plus the value of uninvoiced Orders is greater than their Sales Credit Limit.
- This option will have no effect if you have not selected the All Open Invoices option above.
- This option will have no effect if you have not selected the All Open Invoices option above.
- Invoices Overdue only
- The Customer will be said to have exceeded their credit terms if the total outstanding value of Overdue Invoices is greater than their Sales Credit Limit. An Invoice is Overdue if it has not been paid in full and its Due Date is in the past.
- Open Invoices until Due Date only (Suspend on Overdue)
- If there are any Overdue Invoices, the Customer will immediately be said to have exceeded their credit terms, irrespective of the value of those Invoices. If there are no Overdue Invoices, the total outstanding value of unpaid Invoices that are not yet due will be compared with the Customer's Sales Credit Limit.
- If you have specified a Sales Credit Limit Days for a Customer (either in the Contact Credit Limits setting or in the Contact record for the Customer), that Customer will immediately be said to have exceeded their credit terms as soon as an Invoice of any value becomes outstanding for more than that number of days (measured from its Due Date). If you have not specified a Sales Credit Limit Days for a Customer, or the Customer does not have an Invoice that has been outstanding for that length of time, then the Customer's credit status will depend on these Base Credit Limit on options, as follows :
- Add Cheque amounts, Add third Cheque amounts, Add IOU amounts, Add third IOU amounts
- If you have the Cheques module, you can select these options if you would like the value of Accepted Cheques of various Types to be taken into account when assessing whether a Customer has exceeded their Sales Credit Limit. The Customer will be said to have exceeded their Sales Credit Limit if the outstanding value of all unpaid Invoices (depending on the options described above) plus the value of Accepted Cheques with the selected Type(s) is greater than their Sales Credit Limit.
---
Settings in the Sales Ledger:
- Introduction
- Account Usage S/L
- Age Limits
- Alternative Items
- Bonus
- Classification Types
- Contact Credit Limits
- Contact Document Types
- Contact Settings
- Credit Limit
- Cross Sales Items
- Customer Categories
- Default Items
- Default Payment Modes
- Environment Tax
- Extra Tax Customer Discounts
- Factoring Export
- Freight
- Freight/Weight Calculation
- Gift Voucher settings
- Instalments
- Interest
- Interest Codes, Interest Terms
- Intrastat Transaction Codes
- Invoice Mail Settings
- Item Classifications
- Item Group Withholdings
- Item Settings
- Item Status Settings
- Legal Record Numbers
- Number Series - Contacts
- Number Series - Gift Vouchers
- Number Series - Gift Vouchers Received
- Number Series - Internal Invoices
- Number Series - Invoices
- Number Series - Receipts
- Official Invoice Serial Number
- Payment Modes
- Payment Term Sales A/C
- Payment Terms
- Receipts Setting
- Regional Sales Taxes
- Regions
- Registration Defaults
- Reminder Texts
- Sales Invoice Settings
- Standard Problems
- Units
- VAT Corrections S/L
- VAT Zone Label
- Home page for Sales Ledger manual
- Home page for Standard ERP manual
Cross Sales Items
You can use the Cross Sales Items setting as a sales aid in certain situations. For example, if a Customer buys a particular Item, you can use the Cross Sales Items setting to sell associated accessories as well.The Cross Sales Items setting allows you to connect Items to their accessories so that the accessories will be shown in their own 'Paste Special' list. To work with Cross Sales Items, follow these steps:
- Enter the Items in the Item register as normal. As an example, we will enter an Item with two accessories:
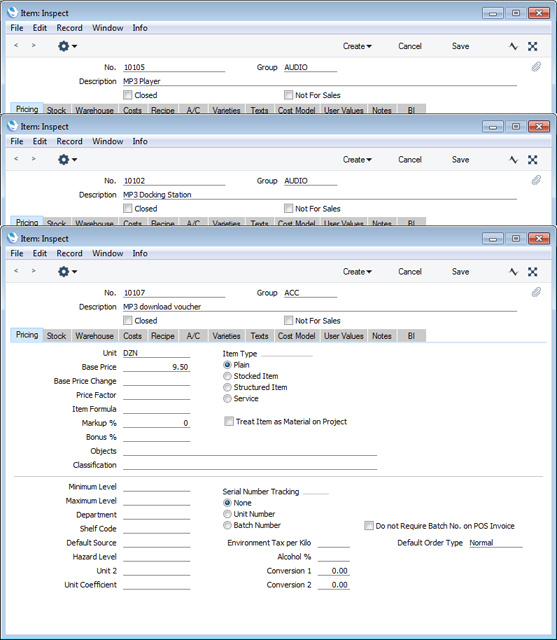
- The next step is to connect the Items together using the Cross Sales Items setting. Ensure you are in the Sales Ledger, open the Cross Sales Items setting, and create a new record:
As shown in the illustration, specify one Item number in the Original Item field and one Item number in the Cross Sales Item field. You can use 'Paste Special' to choose the correct Item in both cases. In this example, Item 10102 has been specified as an accessory for Item 10105.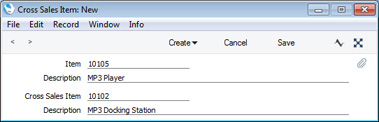
- Depending on the situation, you may want to set up a reciprocal arrangement. A short cut is to save the Cross Sales Item record from step 2 and then to select 'Reverse Relation' from the Create menu (in versions prior to 8.0, use 'Create Reverse Relation' from the Operations menu):
A second Cross Sales Item record will be created and saved: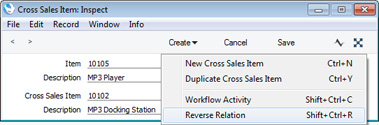
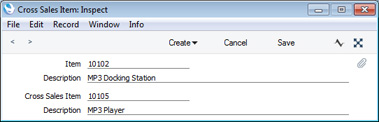
- Continue creating Cross Sales Item records as necessary until you have connected each of the Items together. In the example, we have created the following records:
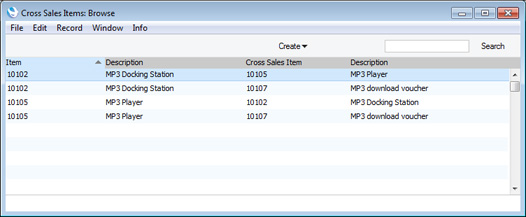
- When entering a sales transaction (e.g. a Quotation, Order or Invoice), activate 'Paste Special' from the Item field in a row as normal:
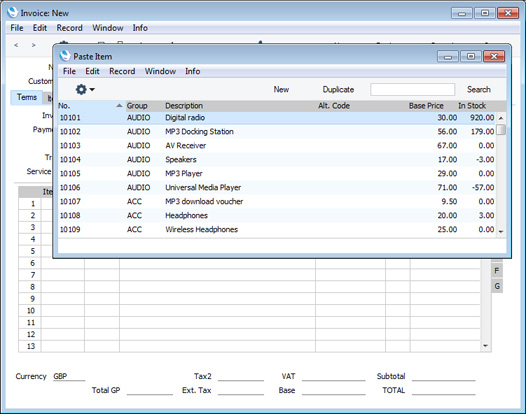
- To see if there are any Cross Sales Items you can offer the Customer, highlight the Item required by the Customer in the list and then select 'Cross Sales Items' from the Operations menu (or use the Ctrl-Shift-R/⌘-Shift-R keyboard shortcut):
The 'Paste Special' list will now show the Cross Sales Items for the highlighted Item: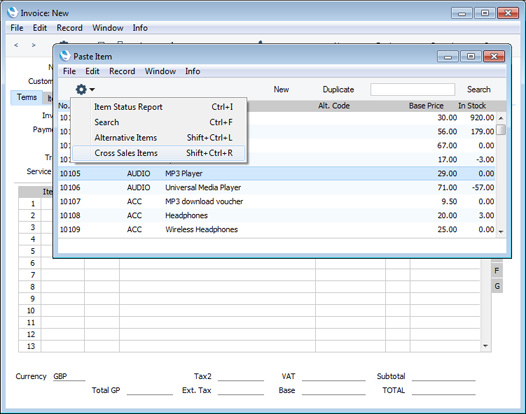
If you have the 'Item Status' window open, you can click on each of the alternatives to see stock levels. You can open the 'Item Status' window from the sales transaction.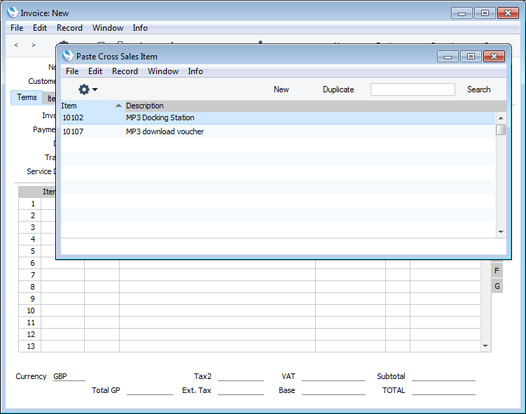
- Add a Cross Sales Item or Items to the sales transaction by dragging and dropping.
- Select 'All Items' from the Operations menu (or use the Ctrl-I/⌘-I keyboard shortcut) to go back to the main list of Items.
- Add the original Item to the sales transaction in the usual way by double-clicking.
Settings in the Sales Ledger:
- Introduction
- Account Usage S/L
- Age Limits
- Alternative Items
- Bonus
- Classification Types
- Contact Credit Limits
- Contact Document Types
- Contact Settings
- Credit Limit
- Cross Sales Items
- Customer Categories
- Default Items
- Default Payment Modes
- Environment Tax
- Extra Tax Customer Discounts
- Factoring Export
- Freight
- Freight/Weight Calculation
- Gift Voucher settings
- Instalments
- Interest
- Interest Codes, Interest Terms
- Intrastat Transaction Codes
- Invoice Mail Settings
- Item Classifications
- Item Group Withholdings
- Item Settings
- Item Status Settings
- Legal Record Numbers
- Number Series - Contacts
- Number Series - Gift Vouchers
- Number Series - Gift Vouchers Received
- Number Series - Internal Invoices
- Number Series - Invoices
- Number Series - Receipts
- Official Invoice Serial Number
- Payment Modes
- Payment Term Sales A/C
- Payment Terms
- Receipt Settings
- Regional Sales Taxes
- Regions
- Registration Defaults
- Reminder Texts
- Sales Invoice Settings
- Standard Problems
- Units
- VAT Corrections S/L
- VAT Zone Label
- Home page for Sales Ledger manual
- Home page for Standard ERP manual
Customer Categories
Please click here for full details about this setting.---
Settings in the Sales Ledger:
- Introduction
- Account Usage S/L
- Age Limits
- Alternative Items
- Bonus
- Classification Types
- Contact Credit Limits
- Contact Document Types
- Contact Settings
- Credit Limit
- Cross Sales Items
- Customer Categories
- Default Items
- Default Payment Modes
- Environment Tax
- Extra Tax Customer Discounts
- Factoring Export
- Freight
- Freight/Weight Calculation
- Gift Voucher settings
- Instalments
- Interest
- Interest Codes, Interest Terms
- Intrastat Transaction Codes
- Invoice Mail Settings
- Item Classifications
- Item Group Withholdings
- Item Settings
- Item Status Settings
- Legal Record Numbers
- Number Series - Contacts
- Number Series - Gift Vouchers
- Number Series - Gift Vouchers Received
- Number Series - Internal Invoices
- Number Series - Invoices
- Number Series - Receipts
- Official Invoice Serial Number
- Payment Modes
- Payment Term Sales A/C
- Payment Terms
- Receipt Settings
- Regional Sales Taxes
- Regions
- Registration Defaults
- Reminder Texts
- Sales Invoice Settings
- Standard Problems
- Units
- VAT Corrections S/L
- VAT Zone Label
- Home page for Sales Ledger manual
- Home page for Standard ERP manual
Default Items
Please click here for full details about this setting.---
Settings in the Sales Ledger:
- Introduction
- Account Usage S/L
- Age Limits
- Alternative Items
- Bonus
- Classification Types
- Contact Credit Limits
- Contact Document Types
- Contact Settings
- Credit Limit
- Cross Sales Items
- Customer Categories
- Default Items
- Default Payment Modes
- Environment Tax
- Extra Tax Customer Discounts
- Factoring Export
- Freight
- Freight/Weight Calculation
- Gift Voucher settings
- Instalments
- Interest
- Interest Codes, Interest Terms
- Intrastat Transaction Codes
- Invoice Mail Settings
- Item Classifications
- Item Group Withholdings
- Item Settings
- Item Status Settings
- Legal Record Numbers
- Number Series - Contacts
- Number Series - Gift Vouchers
- Number Series - Gift Vouchers Received
- Number Series - Internal Invoices
- Number Series - Invoices
- Number Series - Receipts
- Official Invoice Serial Number
- Payment Modes
- Payment Term Sales A/C
- Payment Terms
- Receipt Settings
- Regional Sales Taxes
- Regions
- Registration Defaults
- Reminder Texts
- Sales Invoice Settings
- Standard Problems
- Units
- VAT Corrections S/L
- VAT Zone Label
- Home page for Sales Ledger manual
- Home page for Standard ERP manual
Default Payment Modes
The Default Payment Modes setting allows you to set various defaults that will be used when you receive payments in Invoices and POS Invoices.The Default Payment Modes setting is available in the Sales Ledger and in the Point of Sales and Restaurant modules. To work with this setting, first ensure you are in one of these modules. Then, if you are using Windows or Mac OS X, click the [Settings] button in the Navigation Centre or use the Ctrl-S/⌘-S keyboard shortcut and then double-click 'Default Payment Modes' in the 'Settings' list. If you are using iOS or Android, select 'Settings' from the Tools menu (with 'wrench' icon) and tap 'Default Payment Modes' in the 'Settings' list. Fill in the fields as described below. Then, to save changes and close the window, click the [Save] button (Windows/Mac OS X) or tap ‚àö (iOS/Android). To close the window without saving changes, click the close box (Windows/Mac OS X) or tap < (iOS/Android).
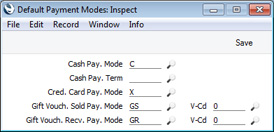
- Cash Pay. Mode
- Paste Special
Payment Modes setting, Sales/Purchase Ledger
- Specify here the Payment Mode that you would like to be used for cash payments, in the absence of a suitable Payment Mode elsewhere in the system. The Cash Payment Mode will determine the Nominal Ledger Account that will be debited with the value of each cash payment.
- If you will allow cashiers to create Cash Events from POS Invoices, the Payment Mode specified here will be the default Payment Mode in these Cash Events, which will record movements of cash into and out of tills. To allow cashiers to create Cash Events, use the POS Buttons setting to add "Put Cash Float" and "Get Cash Float" buttons to the POS Invoice window. The "Put Cash Float" button will allow cashiers to place cash floats in tills, while the "Get Cash Float" button will allow them to retrieve cash floats and takings and send them to the back office.
- If you have set up a POS Command that cashiers will use to receive cash payments, you must specify a Cash Pay. Mode in this field.
- If you will use the 'Add Cash Line' function on the Row menu when entering a Sales Ledger Invoice to register a cash payment, the cash payment will use the Payment Mode specified here if no suitable one is found in the Local Machine Payment Modes setting in the Point of Sales module.
- If you will allow cashiers to create Cash Events from POS Invoices, the Payment Mode specified here will be the default Payment Mode in these Cash Events, which will record movements of cash into and out of tills. To allow cashiers to create Cash Events, use the POS Buttons setting to add "Put Cash Float" and "Get Cash Float" buttons to the POS Invoice window. The "Put Cash Float" button will allow cashiers to place cash floats in tills, while the "Get Cash Float" button will allow them to retrieve cash floats and takings and send them to the back office.
- Cred. Card Pay. Mode
- Paste Special
Payment Modes setting, Sales/Purchase Ledger
- Specify here the Payment Mode that you would like to be used for credit card payments, in the absence of a suitable Payment Mode elsewhere in the system. The Credit Card Payment Mode will determine the Nominal Ledger Account that will be debited with the value of each credit card payment.
- If you will use the 'Add Credit Card Line' function on the Row menu when entering a Sales Ledger Invoice to register a credit card payment, the credit card payment will use the Payment Mode specified here if no suitable one is found in the Local Machine Payment Modes setting in the Point of Sales module.
- If you will use the 'Add Credit Card Line' function on the Row menu when entering a Sales Ledger Invoice to register a credit card payment, the credit card payment will use the Payment Mode specified here if no suitable one is found in the Local Machine Payment Modes setting in the Point of Sales module.
- Gift Vouch. Sold Pay. Mode
- Paste Special
Payment Modes setting, Sales/Purchase Ledger
- Specify here the Payment Mode that you would like to be used when you sell Gift Vouchers, in the absence of a suitable Payment Mode elsewhere in the system. This Payment Mode will determine the Nominal Ledger Account that will be credited with the value of each Gift Voucher sold (i.e. it will effectively be the Gift Voucher Sales Account). Please refer here for more details about selling Gift Vouchers.
- Gift Vouch. Recv. Pay. Mode
- Paste Special
Payment Modes setting, Sales/Purchase Ledger
- Specify here the Payment Mode that you would like to be used when you receive Gift Vouchers in payment, in the absence of a suitable Payment Mode elsewhere in the system. This Payment Mode will determine the Nominal Ledger Account that will be debited with the value of each payment by Gift Voucher.
Settings in the Sales Ledger:
- Introduction
- Account Usage S/L
- Age Limits
- Alternative Items
- Bonus
- Classification Types
- Contact Credit Limits
- Contact Document Types
- Contact Settings
- Credit Limit
- Cross Sales Items
- Customer Categories
- Default Items
- Default Payment Modes
- Environment Tax
- Extra Tax Customer Discounts
- Factoring Export
- Freight
- Freight/Weight Calculation
- Gift Voucher settings
- Instalments
- Interest
- Interest Codes, Interest Terms
- Intrastat Transaction Codes
- Invoice Mail Settings
- Item Classifications
- Item Group Withholdings
- Item Settings
- Item Status Settings
- Legal Record Numbers
- Number Series - Contacts
- Number Series - Gift Vouchers
- Number Series - Gift Vouchers Received
- Number Series - Internal Invoices
- Number Series - Invoices
- Number Series - Receipts
- Official Invoice Serial Number
- Payment Modes
- Payment Term Sales A/C
- Payment Terms
- Receipts Setting
- Regional Sales Taxes
- Regions
- Registration Defaults
- Reminder Texts
- Sales Invoice Settings
- Standard Problems
- Units
- VAT Corrections S/L
- VAT Zone Label
- Home page for Sales Ledger manual
- Home page for Standard ERP manual
Environment Tax
This setting is part of the feature that allows you to add an environment tax to your Invoices (e.g. a tax on packaging), or any tax based on the Weight of the Items on an Invoice. If you need to add an environment or other tax based on the value of the Items sold, do not use this setting and instead refer to flip B of the VAT Codes setting in the Nominal Ledger.To use this feature, follow these steps:
- Create a new Plain Item to represent the environment tax. The purpose of this Item is to allow you to specify the Account that will be credited with environment tax from each Invoice (in the Sales A/C fields for each Zone) and the VAT Codes (again, for each Zone) that you want to be used with environment tax.
- Open the Environment Tax setting in the Sales Ledger and enter the Item Number of the Item from step 1.
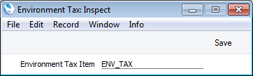
- In the Environment Tax per Kilo field on the 'Stock' card of each Item record, specify how much tax is to be charged when the Item is sold, and enter the Weight on the 'Warehouse' card:
In this example, the environment tax is 2.00 per kilo and the Weight is 3.00 kg, so 6.00 per unit will charged as environment tax whenever you sell the Item.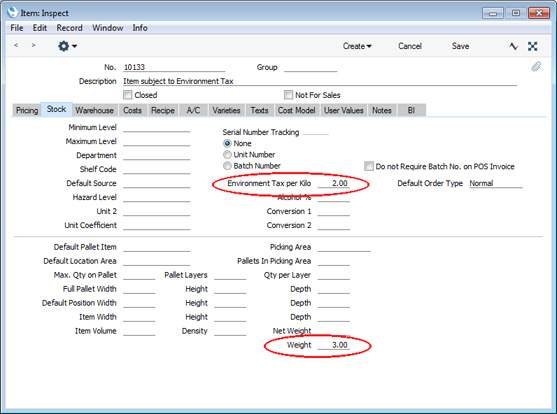
- When you sell each Item, the environment tax will be shown on flip F of each Invoice row:
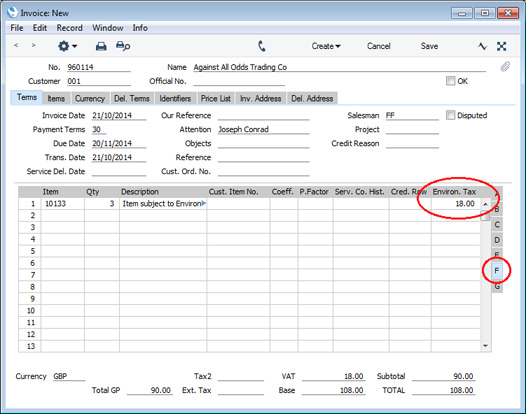
- When the Invoice is complete, choose 'Add Environment Tax' from the Operations menu. A new row is added to the Invoice, with the Item from the Environment Tax setting, and the Sales Account and VAT Code from that Item. The Value of the environment tax will be added to the Invoice totals:
If you find the Invoice is not correct, remove the row with the environment tax, correct the Invoice, then select 'Add Environment Tax' again.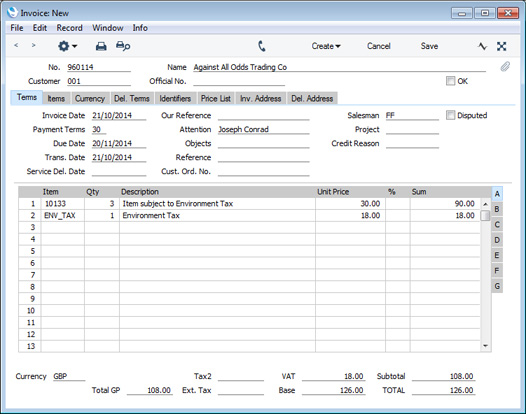
- If you have a Customer that is not to be charged environment tax, tick the No Environment Tax box on the 'Terms' card of the Contact record for the Customer. When you enter an Invoice for such a Customer and use the 'Add Environment Tax' function, the environment tax row will be added to the Invoice, but with a 100% discount.
Settings in the Sales Ledger:
- Introduction
- Account Usage S/L
- Age Limits
- Alternative Items
- Bonus
- Classification Types
- Contact Credit Limits
- Contact Document Types
- Contact Settings
- Credit Limit
- Cross Sales Items
- Customer Categories
- Default Items
- Default Payment Modes
- Environment Tax
- Extra Tax Customer Discounts
- Factoring Export
- Freight
- Freight/Weight Calculation
- Gift Voucher settings
- Instalments
- Interest
- Interest Codes, Interest Terms
- Intrastat Transaction Codes
- Invoice Mail Settings
- Item Classifications
- Item Group Withholdings
- Item Settings
- Item Status Settings
- Legal Record Numbers
- Number Series - Contacts
- Number Series - Gift Vouchers
- Number Series - Gift Vouchers Received
- Number Series - Internal Invoices
- Number Series - Invoices
- Number Series - Receipts
- Official Invoice Serial Number
- Payment Modes
- Payment Term Sales A/C
- Payment Terms
- Receipt Settings
- Regional Sales Taxes
- Regions
- Registration Defaults
- Reminder Texts
- Sales Invoice Settings
- Standard Problems
- Units
- VAT Corrections S/L
- VAT Zone Label
- Home page for Sales Ledger manual
- Home page for Standard ERP manual
Extra Tax Customer Discounts
When you define VAT Codes using the setting in the Nominal Ledger, you can use flip B to specify that an additional tax, such as an environmental tax, is to be levied on sales. This additional tax is usually termed "Extra Tax".If you have a Customer that is not to be charged Extra Tax, tick the No Extra Tax box on the 'Terms' card of the Contact record for the Customer. If you want to charge Extra Tax to a Customer but at a discounted rate, use this setting.
To work with this setting, ensure you are in the Sales Ledger and choose 'Settings' from the File menu or click the [Settings] button in the Navigation Centre. Double-click 'Extra Tax Customer Discounts' in the 'Settings' list: the 'Extra Tax Customer Discounts: Browse' window opens, listing the records previously entered. Double-click an item in the list to edit, or add a new record by selecting 'New' from the Create menu or using the Ctrl-N/⌘-N keyboard shortcut. When the record is complete, click the [Save] button in the Button Bar to save it.
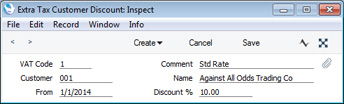
- VAT Code
- Paste Special
VAT Codes setting, Nominal Ledger
- Specify the VAT Code whose Extra Tax is to be discounted. You must enter a VAT Code, otherwise you will not be able to save the record.
- Comment
- The Description from the VAT Code record will appear here when you specify a VAT Code in the field to the left.
- Customer
- Paste Special
Customers in Contact register
- Specify the Customer that is to receive the Extra Tax discount. You must enter a Customer, otherwise you will not be able to save the record. You can only enter one record for each VAT Code/Customer combination.
- Name
- The Customer Name will appear here when you specify a Customer Number in the field to the left.
- From
- Paste Special
Choose date
- If the Extra Tax discount is to apply from a particular date, enter that date here. The discount will only be used in Invoices whose date is the same as or later than the date specified here.
- Discount %
- Specify the Extra Tax discount here. For example, if the Extra Tax rate (Tax % in the VAT Code record) is 10% and you enter a 10% discount here, the Customer will be charged 9% Extra Tax. The discount will not be given if you have specified a VAT Code with no Extra Tax (i.e. one whose Tax % is empty or zero).
Settings in the Sales Ledger:
- Introduction
- Account Usage S/L
- Age Limits
- Alternative Items
- Bonus
- Classification Types
- Contact Credit Limits
- Contact Document Types
- Contact Settings
- Credit Limit
- Cross Sales Items
- Customer Categories
- Default Items
- Default Payment Modes
- Environment Tax
- Extra Tax Customer Discounts
- Factoring Export
- Freight
- Freight/Weight Calculation
- Gift Voucher settings
- Instalments
- Interest
- Interest Codes, Interest Terms
- Intrastat Transaction Codes
- Invoice Mail Settings
- Item Classifications
- Item Group Withholdings
- Item Settings
- Item Status Settings
- Legal Record Numbers
- Number Series - Contacts
- Number Series - Gift Vouchers
- Number Series - Gift Vouchers Received
- Number Series - Internal Invoices
- Number Series - Invoices
- Number Series - Receipts
- Official Invoice Serial Number
- Payment Modes
- Payment Term Sales A/C
- Payment Terms
- Receipt Settings
- Regional Sales Taxes
- Regions
- Registration Defaults
- Reminder Texts
- Sales Invoice Settings
- Standard Problems
- Units
- VAT Corrections S/L
- VAT Zone Label
- Home page for Sales Ledger manual
- Home page for Standard ERP manual
Factoring Export
The 'Invoices for Factoring' Export function will be useful if your company is one that passes its Invoices to a factoring company for payment. This creates text files that you can send to the factoring company.The Factoring Export setting contains various options that you can use to control the operation of the 'Invoices for Factoring' function.
To open the Factoring Export setting, first ensure you are in the Sales Ledger. Then, if you are using Windows or Mac OS X, click the [Settings] button in the Navigation Centre to open the 'Settings' list and then double-click 'Factoring Export' in the list. If you are using iOS or Android, select 'Settings' from the Tools menu (with 'wrench' icon) and tap 'Factoring Export' in the 'Settings' list. The 'Factoring Export: Inspect' window opens. Make any changes as necessary and, when the record is complete, click the [Save] button (Windows/Mac OS X) or tap √ (iOS/Android) in the Button Bar to save changes and close the window, or click the close box (Windows/Mac OS X) or tap < (iOS/Android) if you don't want to save changes.
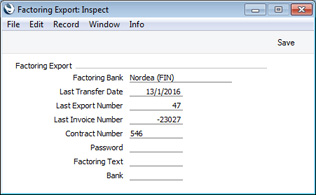
- Factoring Bank
- Paste Special
Choices of possible entries
The 'Invoices for Factoring' Export function in the Sales Ledger is capable of creating files in many different formats suitable for sending to many factoring companies. Use this field to choose the format that you need. Beginning here, details about each Factoring Bank are provided. If your factoring company is not in the 'Paste Special' list, please contact your local HansaWorld representative.
- In Finland, the format of the payment reference or viitenumero in each Invoice depends on the Factoring Bank specified here. If you do not use factoring, you should choose "No Factoring" here so that payment references will be formatted correctly.
- If your Factoring Bank is "SG Finans (NOR)", then you should also specify "Norway - SG Finans" as the Bank of on the 'OCR' card of the Bank Transfer setting in the Purchase Ledger. This will ensure the KID Codes in the export files will be in the correct format.
- If your Factoring Bank is "SG Finans (NOR)", then you should also specify "Norway - SG Finans" as the Bank of on the 'OCR' card of the Bank Transfer setting in the Purchase Ledger. This will ensure the KID Codes in the export files will be in the correct format.
- Last Transfer Date, Last Export Number
- These fields will be updated automatically each time you run the 'Factoring Export' Export function and can't be changed.
- Contract Number
- Enter your contract number with the Factoring Bank here. When you run the 'Factoring Export' function, this Contract Number will be copied to the Client ID field in the 'Specify Invoices for Factoring' window. If the Client ID field is empty, the export will not proceed.
- Factoring Text
- Paste Special
Standard Text register, CRM module
- If the Factoring Bank is "Finvoice (FIN)", choose a Standard Text record using 'Paste Special'. The Text in this record will be exported in the <FactoringFreeText> tag.
- Bank
- Paste Special
Banks setting, Purchase Ledger
- If the Factoring Bank is "Finvoice (FIN)", specify here the record in the Banks setting that represents your Factoring Bank. Please refer here for details of what this Bank record should contain.
Settings in the Sales Ledger:
- Introduction
- Account Usage S/L
- Age Limits
- Alternative Items
- Bonus
- Classification Types
- Contact Credit Limits
- Contact Document Types
- Contact Settings
- Credit Limit
- Cross Sales Items
- Customer Categories
- Default Items
- Default Payment Modes
- Environment Tax
- Extra Tax Customer Discounts
- Factoring Export
- Freight
- Freight/Weight Calculation
- Gift Voucher settings
- Instalments
- Interest
- Interest Codes, Interest Terms
- Intrastat Transaction Codes
- Invoice Mail Settings
- Item Classifications
- Item Group Withholdings
- Item Settings
- Item Status Settings
- Legal Record Numbers
- Number Series - Contacts
- Number Series - Gift Vouchers
- Number Series - Gift Vouchers Received
- Number Series - Internal Invoices
- Number Series - Invoices
- Number Series - Receipts
- Official Invoice Serial Number
- Payment Modes
- Payment Term Sales A/C
- Payment Terms
- Receipts Setting
- Regional Sales Taxes
- Regions
- Registration Defaults
- Reminder Texts
- Sales Invoice Settings
- Standard Problems
- Units
- VAT Corrections S/L
- VAT Zone Label
- Home page for Sales Ledger manual
- Home page for Standard ERP manual
Freight
This setting allows a fixed freight charge to be added to every Order and Invoice automatically. The freight charge will be added both to Invoices created directly in the Sales Ledger and to those created from Sales Orders and Deliveries. The freight charge will be shown in the Freight field on the Del. Terms' cards of the Invoice and Order windows.The freight charge can be calculated using one of two methods:
- The freight charge can be a fixed amount. This fixed amount will be the Base Price of the Item that you specify in this setting.
- The freight charge can be a variable amount based on the total weight of the Items sold. This variable amount will be calculated using the formula that you specify in the Freight/Weight Calculation setting.
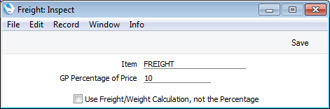
- Item
- Paste Special
Item register
- A record in the Item register for Freight must exist: enter its Item Number here. Usually this will be a Plain or Service Item..Note that the Item must have a Base Price : it cannot have its price calculated by Item Formula. This Base Price will be the freight charge in each Invoice, and the VAT Code and Sales Account will also be taken from the Item.
- GP Percentage of Price
- Specify the percentage of the Freight price that is to represent the cost of the freight for inclusion in Gross Profit calculations (e.g. in the GP, Invoices report). If you do not enter a figure, Freight will not be included in such calculations, even if you have specified a Cost Price for the Item.
- Use Freight/Weight Calculation, not the Percentage
- If you do not want to apply a fixed freight charge to all Invoices but instead would like the freight charge to be calculated from the combined weight of the Items, check this box. You should still specify a Freight Item in the field above as this will still be needed for accounting purposes (i.e. to supply the VAT Code and Sales Account). Use the Freight/Weight Calculation setting to configure the freight calculation.
Settings in the Sales Ledger:
- Introduction
- Account Usage S/L
- Age Limits
- Alternative Items
- Bonus
- Classification Types
- Contact Credit Limits
- Contact Document Types
- Contact Settings
- Credit Limit
- Cross Sales Items
- Customer Categories
- Default Items
- Default Payment Modes
- Environment Tax
- Extra Tax Customer Discounts
- Factoring Export
- Freight
- Freight/Weight Calculation
- Gift Voucher settings
- Instalments
- Interest
- Interest Codes, Interest Terms
- Intrastat Transaction Codes
- Invoice Mail Settings
- Item Classifications
- Item Group Withholdings
- Item Settings
- Item Status Settings
- Legal Record Numbers
- Number Series - Contacts
- Number Series - Gift Vouchers
- Number Series - Gift Vouchers Received
- Number Series - Internal Invoices
- Number Series - Invoices
- Number Series - Receipts
- Official Invoice Serial Number
- Payment Modes
- Payment Term Sales A/C
- Payment Terms
- Receipt Settings
- Regional Sales Taxes
- Regions
- Registration Defaults
- Reminder Texts
- Sales Invoice Settings
- Standard Problems
- Units
- VAT Corrections S/L
- VAT Zone Label
- Home page for Sales Ledger manual
- Home page for Standard ERP manual
Freight/Weight Calculation
If you would like to attach a freight charge to all Orders and Invoices automatically, calculated from the total weight of the Items sold, use this setting to define the calculation formula. The result of the calculation will be added to all Orders and Invoices: it will be shown in the Freight field on the Del. Terms' cards of the Order and Invoice windows.You must select the Use Freight/Weight Calculation, not the Percentage option in the Freight setting if this calculation formula is to be used. You should also specify an Item in the Freight setting: this will ensure the correct VAT Code and Sales Account will be used for the freight charge.To work with this setting, first ensure you are in the Sales Ledger and then click the [Settings] button in the Navigation Centre or use the Ctrl-S/⌘-S keyboard shortcut. Double-click 'Freight/Weight Calculation' in the resulting list. The 'Freight/Weight Calculation: Inspect' window opens. Complete the window as described below the illustration and, when finished, click the [Save] button in the Button Bar to save the changes. To close the window without saving changes, click the close box.
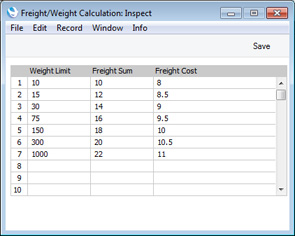
In the example illustration, freight will be charged as follows:
| Weight | Freight Sum |
| Under 10.00 | 0.00 |
| 10.00-14.99 | 10.00 |
| 15.00-29.99 | 14.00 |
| 30.00-74.99 | 16.00 |
and so on.
You can use any unit of measurement in the Weight Limit field, but take care to use the same one here and when entering the weights of Items (in the Weight field in each Item record).
---
Settings in the Sales Ledger:
- Introduction
- Account Usage S/L
- Age Limits
- Alternative Items
- Bonus
- Classification Types
- Contact Credit Limits
- Contact Document Types
- Contact Settings
- Credit Limit
- Cross Sales Items
- Customer Categories
- Default Items
- Default Payment Modes
- Environment Tax
- Extra Tax Customer Discounts
- Factoring Export
- Freight
- Freight/Weight Calculation
- Gift Voucher settings
- Instalments
- Interest
- Interest Codes, Interest Terms
- Intrastat Transaction Codes
- Invoice Mail Settings
- Item Classifications
- Item Group Withholdings
- Item Settings
- Item Status Settings
- Legal Record Numbers
- Number Series - Contacts
- Number Series - Gift Vouchers
- Number Series - Gift Vouchers Received
- Number Series - Internal Invoices
- Number Series - Invoices
- Number Series - Receipts
- Official Invoice Serial Number
- Payment Modes
- Payment Term Sales A/C
- Payment Terms
- Receipt Settings
- Regional Sales Taxes
- Regions
- Registration Defaults
- Reminder Texts
- Sales Invoice Settings
- Standard Problems
- Units
- VAT Corrections S/L
- VAT Zone Label
- Home page for Sales Ledger manual
- Home page for Standard ERP manual
Gift Vouchers Issued, Gift Vouchers Received, Gift Vouchers Settings, Gift Vouchers Sold
Please refer here for full details about Gift Vouchers.---
Settings in the Sales Ledger:
- Introduction
- Account Usage S/L
- Age Limits
- Alternative Items
- Bonus
- Classification Types
- Contact Credit Limits
- Contact Document Types
- Contact Settings
- Credit Limit
- Cross Sales Items
- Customer Categories
- Default Items
- Default Payment Modes
- Environment Tax
- Extra Tax Customer Discounts
- Factoring Export
- Freight
- Freight/Weight Calculation
- Gift Voucher settings
- Instalments
- Interest
- Interest Codes, Interest Terms
- Intrastat Transaction Codes
- Invoice Mail Settings
- Item Classifications
- Item Group Withholdings
- Item Settings
- Item Status Settings
- Legal Record Numbers
- Number Series - Contacts
- Number Series - Gift Vouchers
- Number Series - Gift Vouchers Received
- Number Series - Internal Invoices
- Number Series - Invoices
- Number Series - Receipts
- Official Invoice Serial Number
- Payment Modes
- Payment Term Sales A/C
- Payment Terms
- Receipt Settings
- Regional Sales Taxes
- Regions
- Registration Defaults
- Reminder Texts
- Sales Invoice Settings
- Standard Problems
- Units
- VAT Corrections S/L
- VAT Zone Label
- Home page for Sales Ledger manual
- Home page for Standard ERP manual
Instalments
This setting allows you to define Instalment plans that you can then attach to Payment Terms. These Instalment plans will help you manage Invoices (on both the sales and purchase sides) that are payable in Instalments.To work with this setting, first use the [Switch Module] button in the Navigation Centre to ensure you are in the Sales Ledger. Then, if you are using Windows or Mac OS X, click the [Settings] button, also in the Navigation Centre, or use the Ctrl-S/⌘-S keyboard shortcut and, when the 'Settings' list window opens, double-click 'Instalments'. If you are using iOS or Android, select 'Settings' from the Tools menu (with 'wrench' icon) and tap 'Instalments' in the 'Settings' list. The 'Instalments: Browse' window will open, listing the Instalment plans that you have previously entered. Double-click (Windows/Mac OS X) or tap (iOS/Android) an Instalment plan in the list to edit it, or add a new record by selecting 'New' from the Create menu (Windows/Mac OS X) or the + menu (iOS/Android). The Instalment record window illustrated below will open:
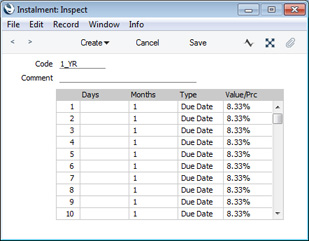
- Days, Months
- Use these two columns to specify how the Due Dates of each Instalment are to be calculated.
- If the period between each instalment is to be a certain number of days, specify that number of days in the Days column. If the period between each instalment is to be a certain number of months, specify that number of months in the Months column.
- If you enter values in both fields (i.e. you enter both a number of Days and a number of Months), they will be added together to calculate the period between instalments.
- The Due Date of the first Instalment will be calculated by adding the number of Days and/or Months that you specify in the first row of the grid to the Invoice or Due Date (depending on the Type that you specify in the field to the right). The Due Dates of subsequent Instalments will be calculated by adding the number of Days and/or Months that you specify in the following rows to the Due Date of the previous Instalment.
- The example Instalment plan illustrated above will cause twelve monthly Instalments of equal value to be created from an Invoice. In the case of a Sales Invoice, the first Instalment will become due one month after the Due Date, the second Instalment will become due one month after the first Instalment, and so on.
- If the period between each instalment is to be a certain number of days, specify that number of days in the Days column. If the period between each instalment is to be a certain number of months, specify that number of months in the Months column.
- Type
- Paste Special
Choices of possible entries
- In the first row of the grid, use this field to specify how the Due Date of the first Instalment will be calculated, as follows:
- Due Date
- The Due Date of the first Instalment will be calculated by adding the number of Days and/or Months to the Due Date of the Invoice.
- The Due Date of the Invoice will be the Invoice Date plus any Net Days specified in the Payment Term.
- The Due Date of the Invoice will be the Invoice Date plus any Net Days specified in the Payment Term.
- Inv. Date
- The Due Date of the first Instalment will be calculated by adding the number of Days and/or Months to the Invoice Date of the Invoice.
- This option will only be operational when creating Instalments from Sales Invoices: from Purchase Invoices, it will behave as if you had selected the Due Date option above.
- This option will only be operational when creating Instalments from Sales Invoices: from Purchase Invoices, it will behave as if you had selected the Due Date option above.
- Rsrv. Date
- You can only use this option in Down Payment Invoices that you will create from Hotel Reservations. As you should not use it in other Invoices, you may need dedicated Instalment plans and Payment Terms for use in such Invoices. Please refer to the 'Example - Hotel Reservations' section below for more details.
- Due Date
- Value/Prc
- Specify here the value of the Instalment. You can enter a fixed amount or a percentage of the Invoice value. Percentages must be followed by the % sign as in the illustration.
- If you enter percentages that do not add up to 100, the percentage in the final row will be ignored and the value of the final Instalment will be the remaining balance on the Invoice. For example, if you enter four Instalments with percentages 25%, 25%, 5% and 10%, the 10% in the last row will be ignored and the final Instalment will be for 45% of the Invoice value. If the four percentages are 25%, 25%, 65% and 10%, the final Instalment will be for -15%. This also applies if you enter fixed amounts. In effect, this balancing feature means you can leave the Value/Prc field in the final row empty.
Example
To work with Instalments, follow these steps:- Configure your Instalment plans in the Instalments setting, as described above. In this example, we will illustrate the use of Instalments using the following Instalment plan:
This Instalment plan will cause twelve monthly Instalments of equal value to be created from an Invoice.
- Assign the Instalment plan to a Payment Term record using the Instalment field. Use 'Paste Special' to ensure you choose the correct one:
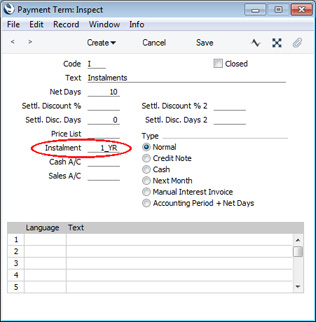
- When you need to enter an Invoice that will be payable in Instalments, specify the appropriate Payment Term but proceed as normal in all other respects:
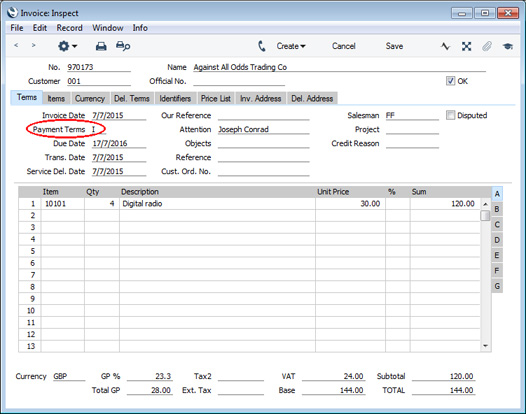
- When you mark the Invoice as OK and save, a normal Nominal Ledger Transaction will be created:
In this case, the full value of the Item was posted to the Sales Account immediately. If you need the value to be posted gradually to the Sales Account (i.e. in line with the Instalment schedule), use the Accruals feature. Please refer here (sales side) or here (purchase side) for details.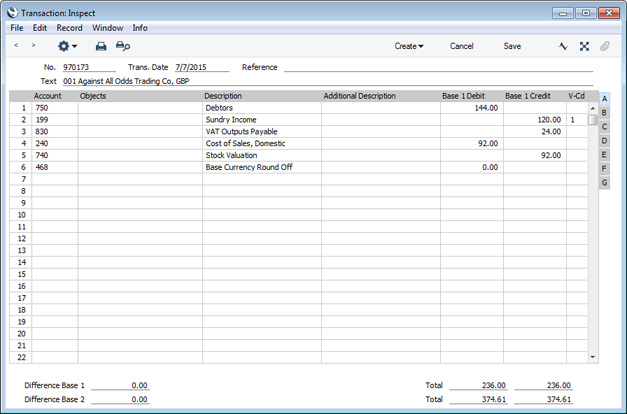
- When you design the Form Template that will be used when you print Invoices, you can include fields that will print an Instalment schedule in a table format. These fields are Instalment Date and Instalment Sum: as these fields print information in a list format, you should specify Line Heights for them. These fields are only available for Sales Invoices.
- On the sales side, Instalments will be listed in the Overview of Instalments, Periodic Customer Statement (Detailed version) and Receipts Forecast reports. They will also be listed in the Open Invoice Customer Statement (both report and form) and the Sales Ledger report if you produce them using the Show Instalments option. Illustrated below is the Overview of Instalments report showing the Instalment schedule for the example Invoice:
On the purchase side, Instalments will be listed in the Overview of Instalments, Periodic Supplier Statement (Detailed version) and Payments Forecast reports. They will also be listed in the Purchase Ledger report if you produce it using the Show Instalments option.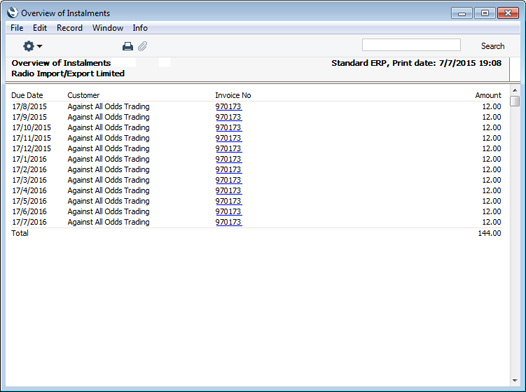
Both sales and purchase Instalments will be included in the Liquidity Forecast report in the Nominal Ledger and, depending on the options that you select, in the file created by the Analytical Cash Flow export function.
Other reports will treat the Invoices as being due on their Due Dates as normal.
- On the sales side only, you can edit an Invoice's Instalments if necessary. Open the Invoice and choose 'Edit Instalments' from the Operations menu. A modified version of the Overview of Instalments report will be printed to screen:
To change an existing Instalment, click (Windows/Mac OS X) or tap (iOS/Android) on a Due Date to open the Instalment that is due on that date: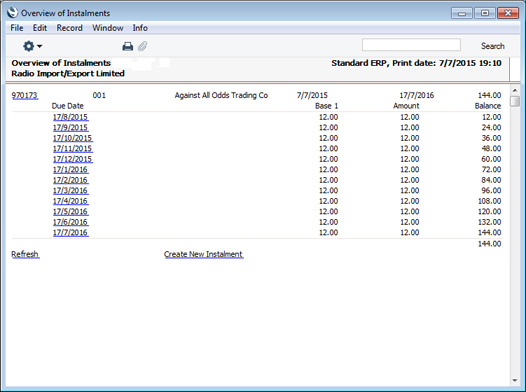
Change the date or the value as appropriate. You can also delete the Instalment altogether by selecting 'Delete' from the Record menu (which has a 'cog' icon if you are using iOS or Android). If you change the value, the values of the other Instalments will be recalculated automatically (you will need to recalculate the report to see this).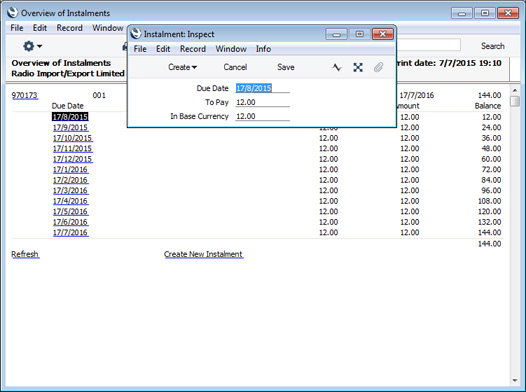
If you need to add an extra Instalment, click or tap the 'Create New Instalment' link at the bottom of the report. The report will be redrawn to show the new Instalment, which will have no value. Click or tap its date to open it and enter the correct date and value.
The report will not show Instalments that have already been paid (as described in the following steps). So, you will only be able to edit or delete Instalments that have not yet been paid.
- When you receive or issue payment against an Invoice payable in instalments, you can enter its Invoice Number on flip A of a Receipt or Payment row respectively in the normal way. When you do so, a message will inform you that the Invoice is payable in Instalments:
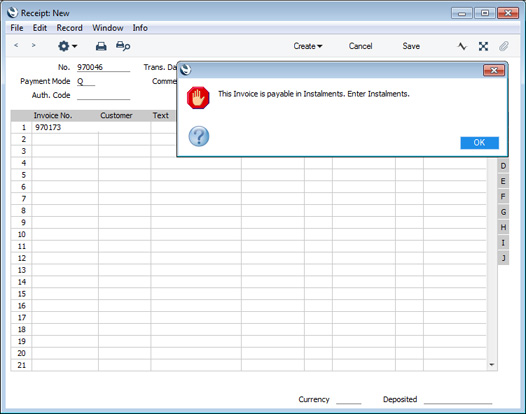
- Go to flip G and activate 'Paste Special' from the Instalment field. A list of open Instalments will be opened. This list will show the open (unpaid) Instalments of the Invoice that you specified on flip A in the previous step, or all open Instalments if you did not specify anything on flip A.
Select the Instalment being paid: the open value of the Instalment will be copied to the Received Value field (in a Receipt) or to the Sent Value field (in a Payment). If you did not specify an Invoice Number on flip A in step 8, the Invoice Number and Customer or Supplier information will be brought in as well.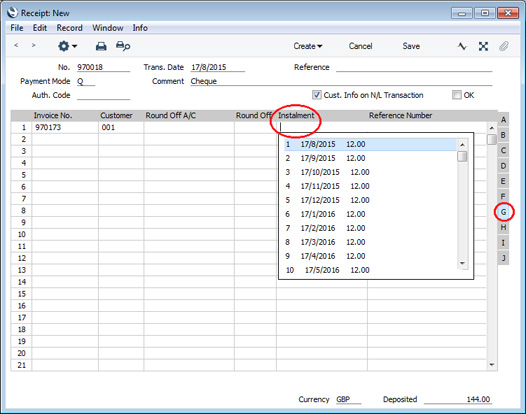
- Mark the Receipt as OK and save in the usual way. The Invoice will be treated as paid to the value of the Instalment, and the Instalment will be removed from the Overview of Instalments report (assuming the full value of the Instalment was paid i.e. that you did not change the Received or Sent Value).
- If you specify an Invoice Number on flip A as described in step 8 and then do not specify an Instalment on flip G, the Invoice will be treated as paid to the value of the Received or Sent Value. By default this will be the full open value on the Invoice and therefore will pay the Invoice in full.
Example - Hotel Reservations
If you are using the Hotel module, you can use Instalments as already described, but the ability to calculate Instalment dates from Reservation Check In Dates provides extra flexibility.For example, when you issue Down Payment Invoices for Reservations that are booked in advance, you may want a percentage to be paid immediately (i.e. on or a few days after the Invoice Date) and the remainder to be paid before Check In (i.e. on or a few days before the Check In Date).
To set up such a system, follow these steps:
- Add a new record to the Instalments setting containing the Instalment plan:
This example will cause two Instalments to be created, as follows: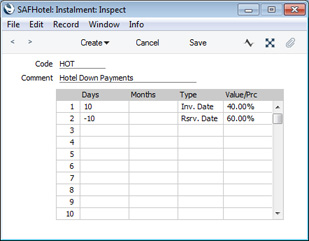
- The first Instalment for 40% of the Invoice value will become due ten days after the Invoice Date.
- The second Instalment for 60% of the Invoice value will become due ten days before the Check In Date (the Type in the second row is "Rsrv. Date").
Be careful when using an Instalment plan with a negative figure in the Days or Months field in any row. Instalments will not be created correctly if the negative figure means that the Due Date of an Instalment will already be in the past. The Instalment Plan in the example can only be used in an Invoice that will be created ten or more days before the Check In Date, so would be useful in situations where bookings tend to be received well in advance.
If any row in an Instalment record has the Type "Rsrv. Date", you should also be careful only to use that Instalment record in Invoices created from Hotel Reservations. An Invoice that was created in any other way will not be connected to a Hotel Reservation and so will not have a Check In Date. Instalments cannot be created correctly from such an Invoice.
- The first Instalment for 40% of the Invoice value will become due ten days after the Invoice Date.
- Assign the Instalment plan to a Payment Term record using the Instalment field. Use 'Paste Special' to ensure you choose the correct one:
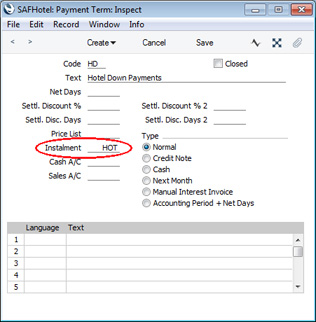
- When you create a Down Payment Invoice from a Hotel Reservation, the Payment Term and Down Payment Percentage will be chosen as follows:
- They will be taken from the record for the Customer in the Customer Terms setting in the Hotel module.
- In the case of Online Reservations only, they will be taken from the 'Defaults Online' card of the Hotel Settings setting, also in the Hotel module.
- They will be taken from the 'Other' card of the Hotel Settings setting.
- They will be taken from the Down Payments setting in the Sales Orders module.
As the example Instalment plan contains a row in which the Type is "Rsrv. Date", it should not be specified in the Down Payments setting, as from there it could be used in Down Payment Invoices that are not related to Hotel Reservations. So, in this example we will specify the Payment Term and the Down Payment Percentage on the 'Other' card of the Hotel Settings setting:
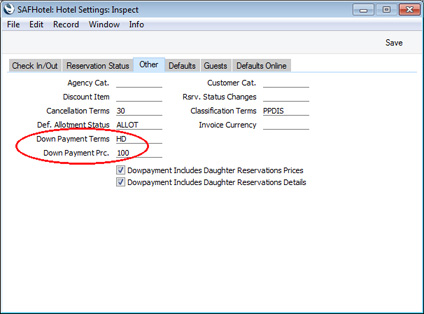
- They will be taken from the record for the Customer in the Customer Terms setting in the Hotel module.
- Although we will not use the Payment Term specified in the Down Payments setting, we should still use that setting to specify the Down Payment Text and the Down Payment Item that will supply the Sales Account and the VAT Code:
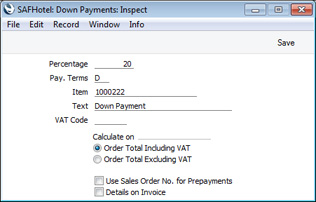
- Create the Reservation and save:
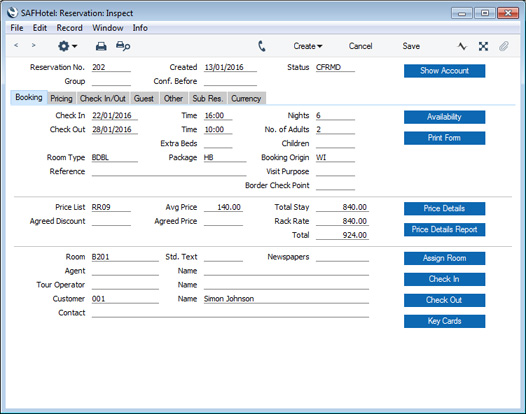
- Create the Down Payment Invoice by choosing 'Down Payment' from the Create menu (Windows/Mac OS X) or + menu (iOS/Android). A Down Payment Invoice will be created:
In this example, note that the Invoice Date is about six weeks before the Check In Date. This means there is sufficient time for the Instalments to be created correctly. The Description, Sales Account and VAT Code in the Down Payment row are as specified in the Down Payments setting (step 4).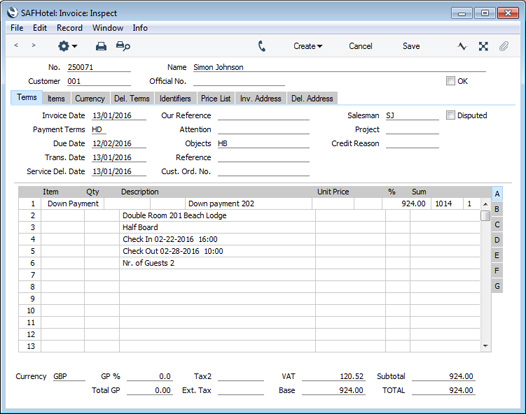
- Mark the Invoice as OK and save.
- The Overview of Instalments report lists the two Instalments, dated ten days after the Invoice Date and ten days before the Check In Date:
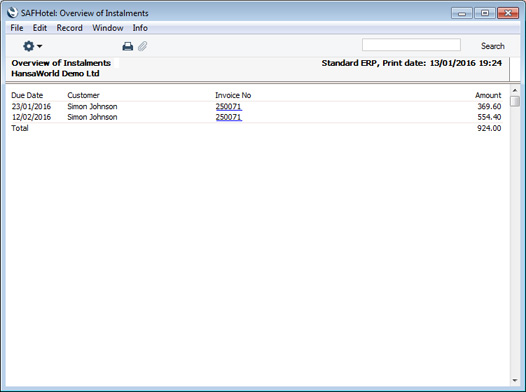
Settings in the Sales Ledger:
- Introduction
- Account Usage S/L
- Age Limits
- Alternative Items
- Bonus
- Classification Types
- Contact Credit Limits
- Contact Document Types
- Contact Settings
- Credit Limit
- Cross Sales Items
- Customer Categories
- Default Items
- Default Payment Modes
- Environment Tax
- Extra Tax Customer Discounts
- Factoring Export
- Freight
- Freight/Weight Calculation
- Gift Voucher settings
- Instalments
- Interest
- Interest Codes, Interest Terms
- Intrastat Transaction Codes
- Invoice Mail Settings
- Item Classifications
- Item Group Withholdings
- Item Settings
- Item Status Settings
- Legal Record Numbers
- Number Series - Contacts
- Number Series - Gift Vouchers
- Number Series - Gift Vouchers Received
- Number Series - Internal Invoices
- Number Series - Invoices
- Number Series - Receipts
- Official Invoice Serial Number
- Payment Modes
- Payment Term Sales A/C
- Payment Terms
- Receipts Setting
- Regional Sales Taxes
- Regions
- Registration Defaults
- Reminder Texts
- Sales Invoice Settings
- Standard Problems
- Units
- VAT Corrections S/L
- VAT Zone Label
- Home page for Sales Ledger manual
- Home page for Standard ERP manual
Interest
You can charge interest on overdue Invoices (those that remain unpaid once the Payment Terms have expired). To charge interest, you will need to raise an Invoice of a special type, known as an "Interest Invoice". In most respects, an Interest Invoice is similar to a "normal" Invoice. However, Interest Invoices will be printed using a different Form Template, and are marked with an "I" in the right-hand column of the 'Invoices: Browse' window.You can raise Interest Invoices using two methods:
- You can use the 'Create Interest Invoices' Maintenance function in the Sales Ledger.
The operation of this function will be controlled by the options that you select in this setting. Here you should determine the interest rate, the minimum amount that you wish to charge, the minimum numbers of days delayed, the Payment Terms for the Interest Invoice and the interest calculation method. You should also specify in this setting whether interest should be charged on Invoices that were outstanding during a specified period, or on outstanding Invoices that were paid during the specified period.
You must tick the Interest box on the 'Terms' card of the Contact record for each Customer that is to be charged interest for late payment.
!
If you have not ticked the Interest box for a particular Customer, the 'Create Interest Invoices' function will not create Interest Invoices for them, no matter how late their payments are.
- You can enter an Interest Invoice directly to the Invoice register. To do this, use a Payment Term in which the Type is "Manual Interest Inv.". In such an Invoice, no reference will be made to this setting and so you will be free to use an ad hoc interest rate.
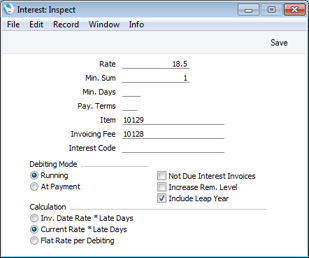
- Rate
- Enter the rate of interest to be used in interest calculations.
- If you are using the first or second Calculation options (below), enter an annual rate of interest. If you are using the third Calculation method, enter the interest rate that you wish to charge each time you raise an Interest Invoice.
- The Interest Rate that you specify here will be copied to each new Invoice, to be shown on the 'Price List' card. If you have specified an Interest Rate on the 'Terms' card of a Contact record for a particular Customer, that figure will be copied to Invoices instead of the one specified here.
- If you need to charge interest at different rates depending on the outstanding value of each overdue Invoice and/or depending on the interest period, leave this field empty and instead use the Interest Code field below.
- If you are using the first or second Calculation options (below), enter an annual rate of interest. If you are using the third Calculation method, enter the interest rate that you wish to charge each time you raise an Interest Invoice.
- Min. Sum
- Use this field if you need to specify a minimum amount to charge. The 'Create Interest Invoices' function will not create an Interest Invoice for a Customer if the total interest chargeable (including VAT if appropriate but excluding any invoicing fee) is less than this minimum figure.
- Min. Days
- You should only use this field if the Debiting Mode (below) is "At Payment" (otherwise leave it empty). Enter the minimum number of days overdue that an Invoice must be when it is paid in order for the 'Create Interest Invoices' function to create an Interest Invoice for it.
- For example, if the Min. Days is 5, interest will not be charged on an Invoice that was paid when it was overdue by four days (measuring from its Due Date). If the Invoice was paid when it was overdue by six days, interest will be charged for all six days.
- For example, if the Min. Days is 5, interest will not be charged on an Invoice that was paid when it was overdue by four days (measuring from its Due Date). If the Invoice was paid when it was overdue by six days, interest will be charged for all six days.
- Pay. Terms
- Paste Special
Payment Terms setting, Sales/Purchase Ledger
- Specify the Payment Term that the 'Create Interest Invoices' function should use in Interest Invoices. If you leave this field empty, the normal Sales Payment Term for the Customer will be used.
- Item
- Paste Special
Item register
- Specify here a Plain or Service Item, the purpose of which is to control the accounting of interest charges in Invoices created by the 'Create Interest Invoices' function. In this Item record, you should specify the Sales Account that is to be credited with interest charges (one for each Zone if necessary) and the VAT Code that will determine whether VAT will be charged on interest and if so the rate at which it will be charged and the Output VAT Account that will be credited (again, one VAT Code for each Zone).
- If you do not specify an Item here, or you specify an Item in which the Sales Accounts and VAT Codes are blank, they will be taken from the Account Usage S/L setting.
- If you do not specify an Item here, or you specify an Item in which the Sales Accounts and VAT Codes are blank, they will be taken from the Account Usage S/L setting.
- Invoicing Fee
- Paste Special
Item register
- If you need an invoicing fee to be added to each Interest Invoice by the 'Create Interest Invoices' function, specify here the Item from the Item register that represents this fee. The Item should be a Plain or Service Item. In this Item record, you should specify a Base Price (i.e. the invoicing fee), a Sales Account (one for each Zone if necessary) and a VAT Code (again, one for each Zone). The 'Create Interest Invoices' function will add the Item once to each Interest Invoice it creates, irrespective of the number of overdue Invoices on which interest is being charged.
- Interest Code
- Paste Special
Interest Codes setting, Sales Ledger
- Interest Codes and Interest Terms allow you to charge interest at different rates depending on the outstanding value of each overdue Invoice and/or depending on the interest period. If you need to use this feature, specify here the Interest Code that you wish to be used as a default. You can enter a different Interest Code in the Interest field on the 'Price List' card of an individual Invoice if necessary.
- If you specify an Interest Code in this field, the Rate (above) will not be used.
- Please refer here for more details about Interest Codes and Interest Terms, together with examples.
- If you specify an Interest Code in this field, the Rate (above) will not be used.
- Debiting Mode
- Use these options to control when the 'Create Interest Invoices' function will charge interest on overdue Invoices.
- Running
- The function will create Interest Invoices charging interest on Invoices that were outstanding during a specified period. Very late Invoices may therefore cause more than one Interest Invoice to be raised.
- For example, an Invoice becomes due on March 25th and is paid on May 10th. If you run the 'Create Interest Invoices' function at the end of every month, interest will be charged three times: at the end of March (for six days as interest is not charged for the Due Date itself), at the end of April (for 30 days) and at the end of May (for ten days), making a total of 46 days.
- For example, an Invoice becomes due on March 25th and is paid on May 10th. If you run the 'Create Interest Invoices' function at the end of every month, interest will be charged three times: at the end of March (for six days as interest is not charged for the Due Date itself), at the end of April (for 30 days) and at the end of May (for ten days), making a total of 46 days.
- At Payment
- The function will create Interest Invoices charging interest on outstanding Invoices that were paid during the specified period. So, only one Interest Invoice will be raised for a particular outstanding Invoice, no matter how late it was when it was paid.
- In the example above, interest will be charged once at the end of May, for the whole overdue period of 46 days.
- Running
- Not Due Interest Invoices
- Check this box if you would like Invoices with a zero interest rate to be listed in Interest Invoices. Interest will not be charged on these Invoices.
- Increase Rem. Level
- Each Invoice contains a code (the Reminder Level, visible on the 'Price List' card) that indicates the number of times it has been subject to a Reminder and included in an Open Invoice Customer Statement.
- Select this option if you want the Reminder Level in each overdue Invoice to be increased by the 'Create Interest Invoices' function.
- When you print Reminders (using the Reminders form), the Reminder Level will determine the message that will be printed on each Reminder (providing you have included the "Reminder Text" field in the Form Template). You should define these messages in the Reminder Texts setting before printing Reminders.
- Select this option if you want the Reminder Level in each overdue Invoice to be increased by the 'Create Interest Invoices' function.
- Include Leap Year
- If you are using the first or second Calculation options (below), the interest rate (including interest rates taken from the Interest Terms setting) will be treated as an annual rate.
- By default, in all calculations, the interest rate will be converted into a daily rate by dividing by 365 before being multiplied by the number of days in the interest period. For example, if the interest rate is 18.5%, interest for the month of April will be calculated using the following formula:
- 18.5% x 30/365
- 18.5% x 30/366
- (18.5% x 31/366) + (18.5% x 31/365)
- By default, in all calculations, the interest rate will be converted into a daily rate by dividing by 365 before being multiplied by the number of days in the interest period. For example, if the interest rate is 18.5%, interest for the month of April will be calculated using the following formula:
- Calculation
- Select one option to specify how the interest rate is to be chosen and used in the interest calculation by the 'Create Interest Invoices' function:
- Inv. Date Rate * Late Days
- Interest will be calculated using the interest rate that was valid on the day when an overdue Invoice was issued. This interest rate will be taken from the 'Price List' card of that Invoice, and will be treated as an annual rate.
- For example, the interest rate is 18.5%. An Invoice for 120.00 (including VAT) becomes due for payment on March 25th. Assuming the Min. Sum to be zero, interest will be charged for the last six days of March as follows:
- 120.00 x 18.5% x 6/365 = 0.36
- Interest will be charged for April as follows:
- 120.00 x 18.5% x 30/365 = 1.82
- If the original Invoice is paid on May 10th, interest will be charged for the first ten days of May as follows:
- 120.00 x 18.5% x 10/365 = 0.61
- As this option takes interest rates from each overdue Invoice, interest will not be calculated for a particular Invoice if the Interest field in that Invoice is blank. This is a possible cause of interest not being calculated when you expect. You can of course remove the interest rate from a particular Invoice if you do not want interest to be charged, but ticking the No Interest box on the 'Identifiers' card would be a more usual method of achieving this. The No Interest box will also be obeyed by the Current Date Rate option immediately below.
- For example, the interest rate is 18.5%. An Invoice for 120.00 (including VAT) becomes due for payment on March 25th. Assuming the Min. Sum to be zero, interest will be charged for the last six days of March as follows:
- Current Date Rate * Late Days
- This option is similar to the one above, with one exception. It uses the interest rate valid on the day when when you run the 'Create Interest Invoices' function. This interest rate will be taken from the 'Terms' card of the Customer record or, if that is blank, from this setting.
- Flat Rate Per Debiting
- Use this option if interest is to be charged based simply on the fact that an Invoice is overdue, not on the number of days it is overdue. In this case, the interest rate is an absolute rate, not an annual figure.
- This option uses the interest rate valid on the day when you run the 'Create Interest Invoices' function, taken from the 'Terms' card of the Customer record or, if that is blank, from this setting.
- Using the example above, interest will be charged for the last six days of March as follows:
- 120.00 x 18.5% = 22.20
- Interest will be charged for April as follows:
- 120.00 x 18.5% = 22.20
- If the original Invoice is paid on May 10th, interest will be charged for the first ten days of May as follows:
- 120.00 x 18.5% = 22.20
- This option uses the interest rate valid on the day when you run the 'Create Interest Invoices' function, taken from the 'Terms' card of the Customer record or, if that is blank, from this setting.
- Inv. Date Rate * Late Days
Settings in the Sales Ledger:
- Introduction
- Account Usage S/L
- Age Limits
- Alternative Items
- Bonus
- Classification Types
- Contact Credit Limits
- Contact Document Types
- Contact Settings
- Credit Limit
- Cross Sales Items
- Customer Categories
- Default Items
- Default Payment Modes
- Environment Tax
- Extra Tax Customer Discounts
- Factoring Export
- Freight
- Freight/Weight Calculation
- Gift Voucher settings
- Instalments
- Interest
- Interest Codes, Interest Terms
- Intrastat Transaction Codes
- Invoice Mail Settings
- Item Classifications
- Item Group Withholdings
- Item Settings
- Item Status Settings
- Legal Record Numbers
- Number Series - Contacts
- Number Series - Gift Vouchers
- Number Series - Gift Vouchers Received
- Number Series - Internal Invoices
- Number Series - Invoices
- Number Series - Receipts
- Official Invoice Serial Number
- Payment Modes
- Payment Term Sales A/C
- Payment Terms
- Receipt Settings
- Regional Sales Taxes
- Regions
- Registration Defaults
- Reminder Texts
- Sales Invoice Settings
- Standard Problems
- Units
- VAT Corrections S/L
- VAT Zone Label
- Home page for Sales Ledger manual
- Home page for Standard ERP manual
Interest Codes, Interest Terms
You can charge interest on overdue Invoices (those that remain unpaid once the Payment Terms have expired). To charge interest, you will need to raise an Invoice of a special type, known as an "Interest Invoice". In most respects, an Interest Invoice is similar to a "normal" Invoice. However, Interest Invoices will be printed using a different Form Template, and are marked with an "I" in the right-hand column of the 'Invoices: Browse' window.The most usual method of creating Interest Invoices will be to use the 'Create Interest Invoices' Maintenance function in the Sales Ledger. This function requires you to set an interest rate that it will use when calculating the interest that it will charge to Customers. You can use the following methods to set this interest rate:
- You can enter a default interest rate in the Rate field in the Interest setting. If this is the only method you use, this interest rate will be universal, charged to all Customers at all times. This default interest rate will be copied to each new Invoice, to be shown on the 'Price List' card.
If an Invoice becomes overdue, interest will be charged using an interest rate chosen as follows:
- If you are using the "Inv. Date Rate * Late Days" option in the Interest setting, the interest rate stored in each Invoice will be used (i.e. interest will be calculated using the interest rate that was valid on the day when an overdue Invoice was issued).
- If you are using the "Current Date Rate * Late Days" or "Flat Rate Per Debiting" options in the Interest setting, the interest rate in the Interest setting will be used (i.e. interest will be calculated using the interest rate valid on the day when you run the 'Create Interest Invoices' function).
- If you are using the "Inv. Date Rate * Late Days" option in the Interest setting, the interest rate stored in each Invoice will be used (i.e. interest will be calculated using the interest rate that was valid on the day when an overdue Invoice was issued).
- If you need to override the default interest rate for a particular Customer, you can enter an interest rate in the Interest Rate field on the 'Terms' card of the Contact record for that Customer. This interest rate will be copied to each new Invoice issued to that Customer.
This will not affect the behaviour of the "Inv. Date Rate * Late Days" option. If you are using the "Current Date Rate * Late Days" or "Flat Rate Per Debiting" options, interest will be calculated using the interest rate in the Contact record (or from the Interest setting in the case of the other Customers).
- If you need interest to be charged using different interest rates depending on the outstanding value of an overdue Invoice and/or depending on the interest period, you should configure your interest rates using the Interest Codes and Interest Terms settings. You should still use the Interest setting to choose other parameters for the 'Create Interest Invoices' function (such as the Item, Running Mode, Calculation, Min. Sum and so on).
- The first step is to enter a record in the Interest Codes setting in the Sales Ledger. The Interest Code is the overall label given to an interest rate structure.
Ensure you are in the Sales Ledger, open the Interest Codes setting, and create a new record:
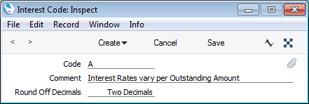
- Code
- Enter the unique Code by which the Interest Code is to be identified from elsewhere in Standard ERP. You can use up to five characters. To avoid confusion, it is recommended that you use at least one alpha character in each Code (see step 6 below).
- Comment
- Enter the name for the Interest Code, to be shown in the 'Interest Codes: Browse' window and the 'Paste Special' list.
- Round Off Decimals
- Paste Special
Choices of possible entries
Specify the maximum number of decimals to be used in each interest calculation.
- Code
- Having entered the Interest Code in the previous step, you can now enter the interest rate structure itself. In this example, we will configure an interest rate structure that charges interest at different rates depending on the outstanding amount.
Remaining in the Sales Ledger, open the Interest Terms setting, and create a new record:
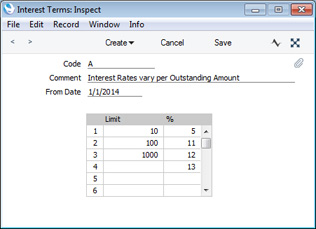
- Code
- Paste Special
Interest Codes setting, Sales Ledger
- Specify the Interest Code to which the Interest Terms record belongs.
- Comment
- The Comment from the Interest Code will be brought in automatically.
- From Date
- Paste Special
Choose date
- Specify the date when the interest rate structure is to take effect.
- If you will only connect a single Interest Terms record to an Interest Code, you can leave this field blank. Otherwise, if you have several Interest Terms records connected to an Interest Code, one can have a blank date but the others must all have a From Date. This allows you to charge different interest rates at different times (see step 5 below).
- If you will only connect a single Interest Terms record to an Interest Code, you can leave this field blank. Otherwise, if you have several Interest Terms records connected to an Interest Code, one can have a blank date but the others must all have a From Date. This allows you to charge different interest rates at different times (see step 5 below).
- Limit, %
- Use the matrix to draw up the interest rate structure.
- The interest rate that you enter in the % field will be applied to outstanding amounts up to the value that you enter in the Limit field.
- In the example, interest of 5% will be charged on outstanding amounts up to 10.00, interest of 11% will be charged on outstanding amounts from 10.01 to 100.00 and so on. The last row states that interest of 13% will be charged if the outstanding amount is greater than 1000.00: if we had not entered this row, interest would be charged at 12% on these amounts.
- If you are using the "Inv. Date Rate * Late Days" or "Current Date Rate * Late Days" options in the Interest setting, you should enter annual rates of interest in the % column. If you are using the "Flat Rate Per Debiting" option, enter the interest rates that you wish to charge each time you raise an Interest Invoice.
- The interest rate that you enter in the % field will be applied to outstanding amounts up to the value that you enter in the Limit field.
- Code
- In the Interest setting, specify the Interest Code that is to supply interest rates to the 'Create Interest Invoices' function:
You should leave the Rate field empty as shown in the illustration. However, you should choose other options in this setting as appropriate as they will still be used as parameters for the 'Create Interest Invoices' function (Interest Codes/Interest Terms provide an alternative means of specifying interest rates, they do not affect the other options in the Interest setting).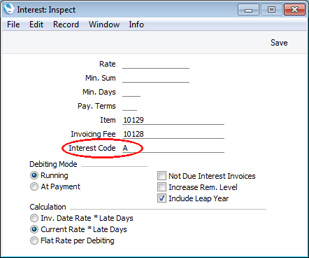
- The Interest Invoicing report lists the Interest Invoices that will be created by the 'Create Interest Invoices' function. This example report illustrates the application of the interest rate structure:
The first Invoice has an outstanding amount of 1.20, so interest is charged at 5% (from the first row in the Interest Term record). The second Invoice has an outstanding amount of 12.00, so interest is charged at 11% (from the second row in the Interest Term record), and so on. The interest amounts themselves (0.01, 0.11, 1.22 and 13.25) are rounded to two decimals as specified in the Interest Code record.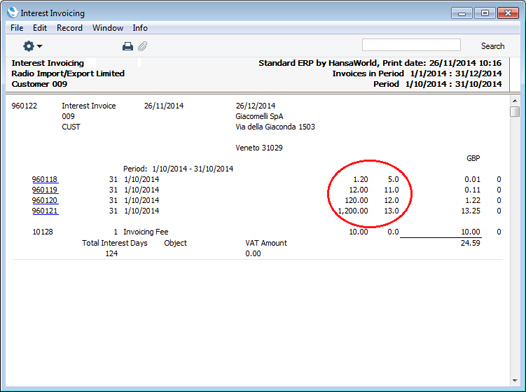
- In this next example, we will create a second Interest Term record, to be used from November onwards:
The Interest Code is the same in both records. So, when you use Interest Code A, the original Interest Term record will be used to calculate interest between January and October, and the new record will be used to calculate interest from November onwards.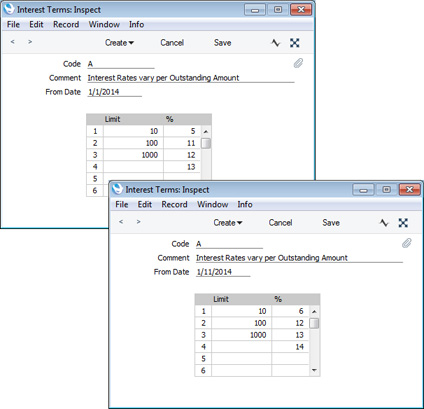
When we produce the Interest Invoicing report with October-November as the interest period, the old and new interest rates will both be shown:
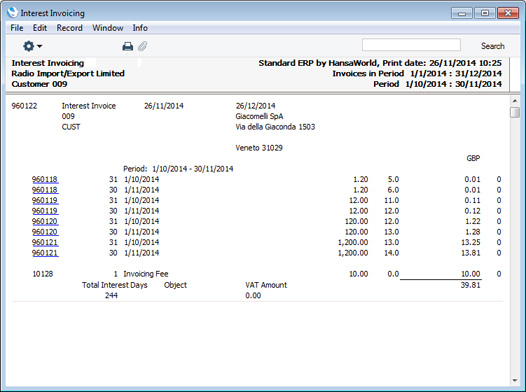
- If you have several Interest Codes, you can specify them yourself in individual Invoices, using the Interest field on the 'Price List' card and using 'Paste Special' to choose the correct one. If you have specified an Interest Code in an individual Invoice, it will be used instead of the one in the Interest setting.
The Interest field in an Invoice can store an interest rate or an Interest Code. If you enter a number in this field, it might be confusing later. For example, if you enter "1" in this field intending to refer to Interest Code 1, it will invoke Interest Code 1, but if you review the Invoice later this might not be apparent immediately (at first glance, it might appear that interest will be charged at 1%). So, as mentioned in step 1, it is recommended that you always include at least one alpha character in your Interest Codes.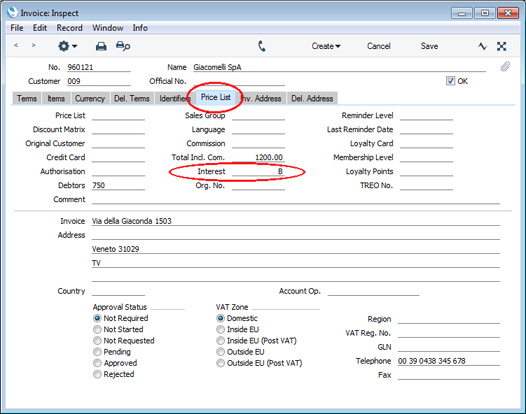
Settings in the Sales Ledger:
- Introduction
- Account Usage S/L
- Age Limits
- Alternative Items
- Bonus
- Classification Types
- Contact Credit Limits
- Contact Document Types
- Contact Settings
- Credit Limit
- Cross Sales Items
- Customer Categories
- Default Items
- Default Payment Modes
- Environment Tax
- Extra Tax Customer Discounts
- Factoring Export
- Freight
- Freight/Weight Calculation
- Gift Voucher settings
- Instalments
- Interest
- Interest Codes, Interest Terms
- Intrastat Transaction Codes
- Invoice Mail Settings
- Item Classifications
- Item Group Withholdings
- Item Settings
- Item Status Settings
- Legal Record Numbers
- Number Series - Contacts
- Number Series - Gift Vouchers
- Number Series - Gift Vouchers Received
- Number Series - Internal Invoices
- Number Series - Invoices
- Number Series - Receipts
- Official Invoice Serial Number
- Payment Modes
- Payment Term Sales A/C
- Payment Terms
- Receipt Settings
- Regional Sales Taxes
- Regions
- Registration Defaults
- Reminder Texts
- Sales Invoice Settings
- Standard Problems
- Units
- VAT Corrections S/L
- VAT Zone Label
- Home page for Sales Ledger manual
- Home page for Standard ERP manual
Intrastat Transaction Codes
The Intrastat Transaction Codes setting allows you to construct a look-up table for the Intrastat Transaction Code field in Quotations, Orders, Invoices and Purchase Orders.In Poland, the Intrastat Transaction Codes that you specify in Invoices will be included in files created by the 'Ist@at - Items Export' export function in the Sales Ledger, while the Intrastat Transaction Codes that you specify in Purchase Orders will be included in files created by the 'Ist@at - Items Import' export function in the Purchase Ledger. Both these export functions are only available if the VAT Law in the Company Info setting is set to "Polish".
To open the Intrastat Transaction Codes setting, ensure you are in the Sales Ledger and then click the [Settings] button in the Navigation Centre. Double-click 'Intrastat Transaction Codes' in the 'Settings' list. The window illustrated below will open. Enter each new Intrastat Transaction Code on the first blank line and, when finished, click the [Save] button in the Button Bar to save the changes. To close the window without saving changes, click the close box.
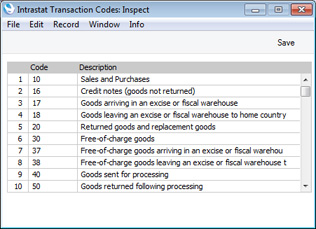
The UK equivalent of the Intrastat Transaction Code is the Nature of Transaction Code (NoTC).
---
Settings in the Sales Ledger:
- Introduction
- Account Usage S/L
- Age Limits
- Alternative Items
- Bonus
- Classification Types
- Contact Credit Limits
- Contact Document Types
- Contact Settings
- Credit Limit
- Cross Sales Items
- Customer Categories
- Default Items
- Default Payment Modes
- Environment Tax
- Extra Tax Customer Discounts
- Factoring Export
- Freight
- Freight/Weight Calculation
- Gift Voucher settings
- Instalments
- Interest
- Interest Codes, Interest Terms
- Intrastat Transaction Codes
- Invoice Mail Settings
- Item Classifications
- Item Group Withholdings
- Item Settings
- Item Status Settings
- Legal Record Numbers
- Number Series - Contacts
- Number Series - Gift Vouchers
- Number Series - Gift Vouchers Received
- Number Series - Internal Invoices
- Number Series - Invoices
- Number Series - Receipts
- Official Invoice Serial Number
- Payment Modes
- Payment Term Sales A/C
- Payment Terms
- Receipt Settings
- Regional Sales Taxes
- Regions
- Registration Defaults
- Reminder Texts
- Sales Invoice Settings
- Standard Problems
- Units
- VAT Corrections S/L
- VAT Zone Label
- Home page for Sales Ledger manual
- Home page for Standard ERP manual
Invoice Mail Settings
If you need to send an Invoice to a Customer by email, you can do so in two ways:- To send a single Invoice to a Customer by email, open the Invoice and select 'E-Mail' from the Create menu (in versions prior to 8.0, use ‘Create E-Mail’ from the Operations menu).
- To send Invoices by email in batches, use the 'Create Mails from Invoices' Maintenance function.
- They will be taken from the record in the Mail Texts setting in the E-mail and Conferences module in which the Form is “Invoices”. If the Invoice being emailed has a Language and the Mail Text record contains a row for that Language, the Subject and Text will be determined by the fields in that row. Otherwise, they will be determined by the fields in the header of the Mail Text record.
- If there is no suitable record in the Mail Texts setting, the Subject and Text will be taken from this Invoice Mail Settings setting.
To open the Invoice Mail Settings setting, ensure you are in the Sales Ledger and then click the [Settings] button in the Navigation Centre. Double-click ‘Invoice Mail Settings’ in the ‘Settings’ list. Fill in the fields as described below. Then, to save changes and close the window, click the [Save] button. To close the window without saving changes, click the close box.
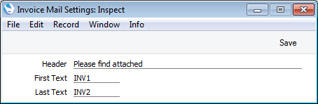
- Header
- Enter the short piece of text that is to be copied to the Subject line of each Mail. Note that a trailing space, the word “Invoice” (or, if appropriate, “Credit Note”) and the Invoice Number will be added to this text automatically.
- First Text
- Paste Special
Standard Text register, CRM module
- Specify here the Code of a record in the Standard Text register in the CRM module. This record will contain the text that will be copied to the beginning of the main body of each Mail, before the Invoice Items are listed. It is not necessary to add a carriage return to the end of the text in this Standard Text record.
- Last Text
- Paste Special
Standard Text register, CRM module
- Again, specify the Code of a record in the Standard Text register. The text in this record will be copied to the main body of each Mail, after the Invoice Items are listed and after the Payment Terms. It is recommended that the first line in this Standard Text record should be a carriage return, to ensure that the text in each Mail is neatly spaced.
- If you have ticked the HTML box in at least one of the connected Standard Text records (i.e. at least one record contains HTML formatting), the HTML box will be ticked in each Mail as well.
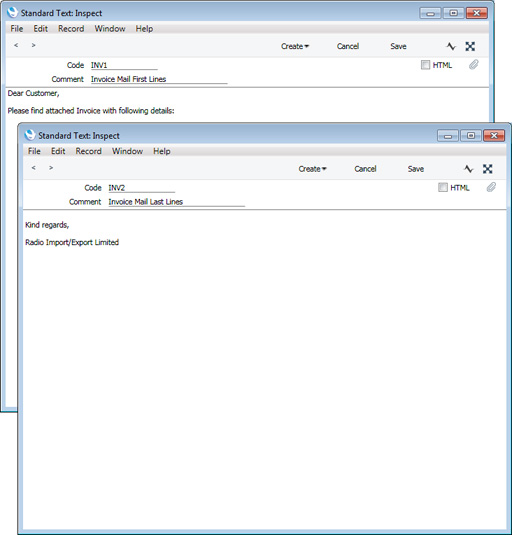
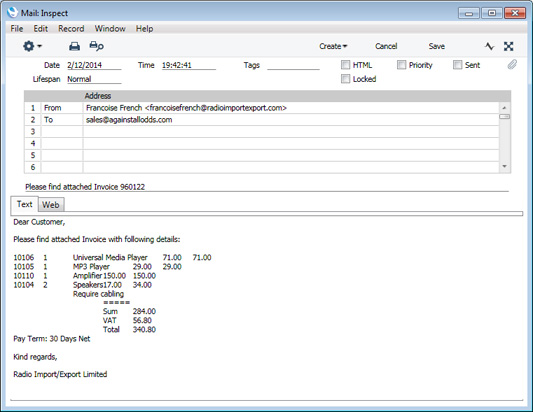
Settings in the Sales Ledger:
- Introduction
- Account Usage S/L
- Age Limits
- Alternative Items
- Bonus
- Classification Types
- Contact Credit Limits
- Contact Document Types
- Contact Settings
- Credit Limit
- Cross Sales Items
- Customer Categories
- Default Items
- Default Payment Modes
- Environment Tax
- Extra Tax Customer Discounts
- Factoring Export
- Freight
- Freight/Weight Calculation
- Gift Voucher settings
- Instalments
- Interest
- Interest Codes, Interest Terms
- Intrastat Transaction Codes
- Invoice Mail Settings
- Item Classifications
- Item Group Withholdings
- Item Settings
- Item Status Settings
- Legal Record Numbers
- Number Series - Contacts
- Number Series - Gift Vouchers
- Number Series - Gift Vouchers Received
- Number Series - Internal Invoices
- Number Series - Invoices
- Number Series - Receipts
- Official Invoice Serial Number
- Payment Modes
- Payment Term Sales A/C
- Payment Terms
- Receipt Settings
- Regional Sales Taxes
- Regions
- Registration Defaults
- Reminder Texts
- Sales Invoice Settings
- Standard Problems
- Units
- VAT Corrections S/L
- VAT Zone Label
- Home page for Sales Ledger manual
- Home page for Standard ERP manual
Item Classifications
Please refer here for full details about this setting.---
Settings in the Sales Ledger:
- Introduction
- Account Usage S/L
- Age Limits
- Alternative Items
- Bonus
- Classification Types
- Contact Credit Limits
- Contact Document Types
- Contact Settings
- Credit Limit
- Cross Sales Items
- Customer Categories
- Default Items
- Default Payment Modes
- Environment Tax
- Extra Tax Customer Discounts
- Factoring Export
- Freight
- Freight/Weight Calculation
- Gift Voucher settings
- Instalments
- Interest
- Interest Codes, Interest Terms
- Intrastat Transaction Codes
- Invoice Mail Settings
- Item Classifications
- Item Group Withholdings
- Item Settings
- Item Status Settings
- Legal Record Numbers
- Number Series - Contacts
- Number Series - Gift Vouchers
- Number Series - Gift Vouchers Received
- Number Series - Internal Invoices
- Number Series - Invoices
- Number Series - Receipts
- Official Invoice Serial Number
- Payment Modes
- Payment Term Sales A/C
- Payment Terms
- Receipt Settings
- Regional Sales Taxes
- Regions
- Registration Defaults
- Reminder Texts
- Sales Invoice Settings
- Standard Problems
- Units
- VAT Corrections S/L
- VAT Zone Label
- Home page for Sales Ledger manual
- Home page for Standard ERP manual
Item Group Withholdings
Please click here for details about this setting.---
Settings in the Sales Ledger:
- Introduction
- Account Usage S/L
- Age Limits
- Alternative Items
- Bonus
- Classification Types
- Contact Credit Limits
- Contact Document Types
- Contact Settings
- Credit Limit
- Cross Sales Items
- Customer Categories
- Default Items
- Default Payment Modes
- Environment Tax
- Extra Tax Customer Discounts
- Factoring Export
- Freight
- Freight/Weight Calculation
- Gift Voucher settings
- Instalments
- Interest
- Interest Codes, Interest Terms
- Intrastat Transaction Codes
- Invoice Mail Settings
- Item Classifications
- Item Group Withholdings
- Item Settings
- Item Status Settings
- Legal Record Numbers
- Number Series - Contacts
- Number Series - Gift Vouchers
- Number Series - Gift Vouchers Received
- Number Series - Internal Invoices
- Number Series - Invoices
- Number Series - Receipts
- Official Invoice Serial Number
- Payment Modes
- Payment Term Sales A/C
- Payment Terms
- Receipt Settings
- Regional Sales Taxes
- Regions
- Registration Defaults
- Reminder Texts
- Sales Invoice Settings
- Standard Problems
- Units
- VAT Corrections S/L
- VAT Zone Label
- Home page for Sales Ledger manual
- Home page for Standard ERP manual
Item Settings
Please click here for full details about this setting.---
Settings in the Sales Ledger:
- Introduction
- Account Usage S/L
- Age Limits
- Alternative Items
- Bonus
- Classification Types
- Contact Credit Limits
- Contact Document Types
- Contact Settings
- Credit Limit
- Cross Sales Items
- Customer Categories
- Default Items
- Default Payment Modes
- Environment Tax
- Extra Tax Customer Discounts
- Factoring Export
- Freight
- Freight/Weight Calculation
- Gift Voucher settings
- Instalments
- Interest
- Interest Codes, Interest Terms
- Intrastat Transaction Codes
- Invoice Mail Settings
- Item Classifications
- Item Group Withholdings
- Item Settings
- Item Status Settings
- Legal Record Numbers
- Number Series - Contacts
- Number Series - Gift Vouchers
- Number Series - Gift Vouchers Received
- Number Series - Internal Invoices
- Number Series - Invoices
- Number Series - Receipts
- Official Invoice Serial Number
- Payment Modes
- Payment Term Sales A/C
- Payment Terms
- Receipt Settings
- Regional Sales Taxes
- Regions
- Registration Defaults
- Reminder Texts
- Sales Invoice Settings
- Standard Problems
- Units
- VAT Corrections S/L
- VAT Zone Label
- Home page for Sales Ledger manual
- Home page for Standard ERP manual
Item Status Settings
Please refer here for full details about this setting.---
Settings in the Sales Ledger:
- Introduction
- Account Usage S/L
- Age Limits
- Alternative Items
- Bonus
- Classification Types
- Contact Credit Limits
- Contact Document Types
- Contact Settings
- Credit Limit
- Cross Sales Items
- Customer Categories
- Default Items
- Default Payment Modes
- Environment Tax
- Extra Tax Customer Discounts
- Factoring Export
- Freight
- Freight/Weight Calculation
- Gift Voucher settings
- Instalments
- Interest
- Interest Codes, Interest Terms
- Intrastat Transaction Codes
- Invoice Mail Settings
- Item Classifications
- Item Group Withholdings
- Item Settings
- Item Status Settings
- Legal Record Numbers
- Number Series - Contacts
- Number Series - Gift Vouchers
- Number Series - Gift Vouchers Received
- Number Series - Internal Invoices
- Number Series - Invoices
- Number Series - Receipts
- Official Invoice Serial Number
- Payment Modes
- Payment Term Sales A/C
- Payment Terms
- Receipt Settings
- Regional Sales Taxes
- Regions
- Registration Defaults
- Reminder Texts
- Sales Invoice Settings
- Standard Problems
- Units
- VAT Corrections S/L
- VAT Zone Label
- Home page for Sales Ledger manual
- Home page for Standard ERP manual
Legal Record Numbers
In some countries, it is a legal requirement that every Invoice is given an Official Invoice Number. It may be that companies will be assigned number sequences to be used for this purpose (perhaps supplied pre-printed on Invoice stationery), or it may be that companies can generate the number sequences themselves using official formatting and other rules. In some countries, (e.g. Portugal), Official Numbers are needed not just for Invoices but for many other records as well, such as Deliveries, Stock Movements and Receipts.If you only need to use a single official number sequence and you only need it to be used in Invoices, enter that number sequence in the Official Invoice Serial Number setting. If you have several such number sequences and/or you need to use Official Numbers in registers other than Invoices, you should specify them here in the Legal Record Numbers setting (and leave the Official Invoice Serial Number setting empty).
Depending on how you have configured this setting, the first unused number from the first valid sequence will be placed automatically in the Official No. field in each new Invoice (or other record) when you save it for the first time or when you save it after marking it as OK. Again depending on the configuration (and also depending on the VAT Law in the Company Info setting), you may be able to use 'Paste Special' to choose from a different sequence. The 'Paste Special' list will only contain number sequences that will provide a valid Official No. to the record you are entering (e.g. sequences not applicable on the date of the record and sequences that cannot be used with the Customer's Classification will not be listed).
When you receive payment for an Invoice, you will be able to find the Invoice in the 'Paste Open Invoices' window by searching for the Invoice Number or the Official Serial Number.
If you need to report on your Legal Record Number sequences (i.e. to see a list of the sequences you have set up, together with an indication of how many Official Numbers you have used in each sequence), use the Legal Invoice Forms Usage report in the Sales Ledger.
To work with the Legal Record Numbers setting, ensure you are in the Sales Ledger and then click the [Settings] button in the Navigation Centre. Double-click 'Legal Record Numbers' in the 'Settings' list. Fill in the fields as described below. Then, to save changes and close the window, click the [Save] button. To close the window without saving changes, click the close box.
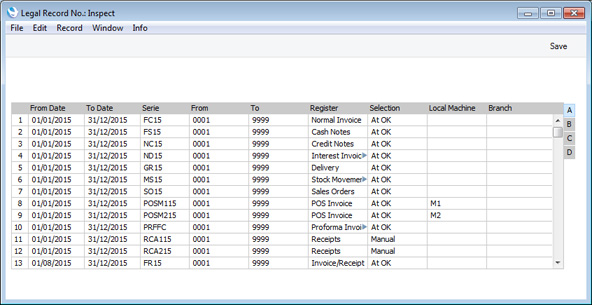

- Legal Record Numbers in Angola
- Legal Record Numbers in Argentina and Bolivia
- Legal Record Numbers in Croatia
- Legal Record Numbers in Portugal
---
Settings in the Sales Ledger:
- Introduction
- Account Usage S/L
- Age Limits
- Alternative Items
- Bonus
- Classification Types
- Contact Credit Limits
- Contact Document Types
- Contact Settings
- Credit Limit
- Cross Sales Items
- Customer Categories
- Default Items
- Default Payment Modes
- Environment Tax
- Extra Tax Customer Discounts
- Factoring Export
- Freight
- Freight/Weight Calculation
- Gift Voucher settings
- Instalments
- Interest
- Interest Codes, Interest Terms
- Intrastat Transaction Codes
- Invoice Mail Settings
- Item Classifications
- Item Group Withholdings
- Item Settings
- Item Status Settings
- Legal Record Numbers
- Number Series - Contacts
- Number Series - Gift Vouchers
- Number Series - Gift Vouchers Received
- Number Series - Internal Invoices
- Number Series - Invoices
- Number Series - Receipts
- Official Invoice Serial Number
- Payment Modes
- Payment Term Sales A/C
- Payment Terms
- Receipts Setting
- Regional Sales Taxes
- Regions
- Registration Defaults
- Reminder Texts
- Sales Invoice Settings
- Standard Problems
- Units
- VAT Corrections S/L
- VAT Zone Label
- Home page for Sales Ledger manual
- Home page for Standard ERP manual
Legal Record Numbers - Angola
This page contains some guidance about how to configure the Legal Record Numbers setting in order for Official Numbers to be generated correctly in Angola. Some parts of the description assume that the VAT Law in the Company Info setting has been set to "Angolan". Please click the following links for details about using the setting in other countries:- Introduction
- Legal Record Numbers in Angola
- Legal Record Numbers in Argentina and Bolivia
- Legal Record Numbers in Croatia
- Legal Record Numbers in Portugal
Flip A
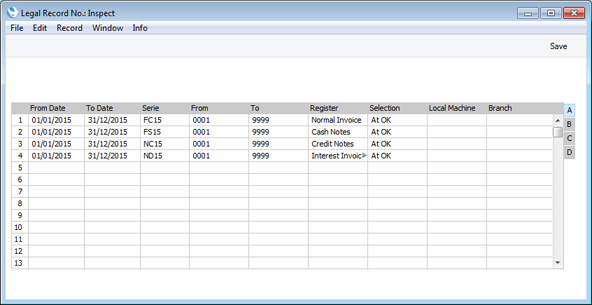
- From Date, To Date
- Paste Special
Choose date
- The period when the Legal Record Number sequence can be used.
- Serie
- Enter a prefix to be used with every Official Number in the sequence. For example, referring to the illustration above, the first Normal Invoice in 2015 will be given FC150001 as its Official Number, the second one will be FC150002 and so on. You must specify a Serie in each row (i.e. in each Legal Record Number sequence).
- The Serie can only contain uppercase characters, numbers, dashes (-) and strokes (/).
- The Serie can only contain uppercase characters, numbers, dashes (-) and strokes (/).
- From, To
- Enter the first and last numbers of the Legal Record Number sequence. These fields can only contain numeric characters.
- Every Legal Record Number sequence must begin at 1. As you should enter new Legal Record Number sequences every year, and as rows with the same Serie/Register/Selection combination must not overlap even if the period is different, you should enter a different Serie for each year.
- The From and To numbers must contain the same number of digits: use leading zeros if necessary (for example, 0001).
- Every Legal Record Number sequence must begin at 1. As you should enter new Legal Record Number sequences every year, and as rows with the same Serie/Register/Selection combination must not overlap even if the period is different, you should enter a different Serie for each year.
- Register
- Paste Special
Choices of possible entries
- Use 'Paste Special' to specify the register in which the Legal Record Number sequence is to be used.
- You should set up Legal Record Number sequences for each Invoice type separately (i.e. "Normal Invoice", "Cash Notes", "Credit Notes" and "Interest Invoices"). You cannot use the "All Invoices" option in Angola.
- You should set up Legal Record Number sequences for each Invoice type separately (i.e. "Normal Invoice", "Cash Notes", "Credit Notes" and "Interest Invoices"). You cannot use the "All Invoices" option in Angola.
- Selection
- The Selection field determines the moment when an Official Number will be assigned to each new record. In all cases, this field will default to "At OK" and cannot be changed, so Official Numbers will be assigned to records automatically when you save them after marking them as OK.
Flip B
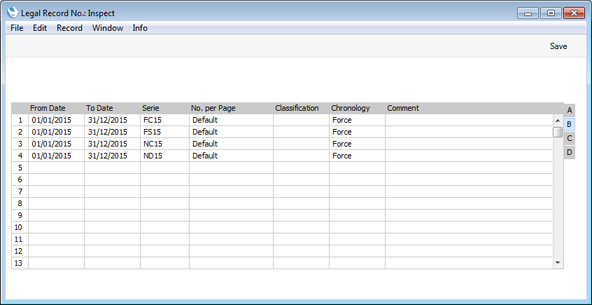
- No. per Page
- Always choose "Default" in this field.
- Chronology
- This field will default to "Force" and cannot be changed. This will mean that you will need to enter all records that use a particular Legal Record Number sequence in chronological order. The date of a new record will need to be the same as or later than the date in the previous record entered. When the Official Number is on the point of being allocated to the record (i.e. "At OK"), a check for chronology will first be carried out. If the record fails the chronology check, you will be so informed and an Official Number will not be allocated.
---
Settings in the Sales Ledger:
- Introduction
- Account Usage S/L
- Age Limits
- Alternative Items
- Bonus
- Classification Types
- Contact Credit Limits
- Contact Document Types
- Contact Settings
- Credit Limit
- Cross Sales Items
- Customer Categories
- Default Items
- Default Payment Modes
- Environment Tax
- Extra Tax Customer Discounts
- Factoring Export
- Freight
- Freight/Weight Calculation
- Gift Voucher settings
- Instalments
- Interest
- Interest Codes, Interest Terms
- Intrastat Transaction Codes
- Invoice Mail Settings
- Item Classifications
- Item Group Withholdings
- Item Settings
- Item Status Settings
- Legal Record Numbers, including:
- Legal Record Numbers in Angola
- Legal Record Numbers in Argentina and Bolivia
- Legal Record Numbers in Croatia
- Legal Record Numbers in Portugal
- Legal Record Numbers in Angola
- Number Series - Contacts
- Number Series - Gift Vouchers
- Number Series - Gift Vouchers Received
- Number Series - Internal Invoices
- Number Series - Invoices
- Number Series - Receipts
- Official Invoice Serial Number
- Payment Modes
- Payment Term Sales A/C
- Payment Terms
- Receipts Setting
- Regional Sales Taxes
- Regions
- Registration Defaults
- Reminder Texts
- Sales Invoice Settings
- Standard Problems
- Units
- VAT Corrections S/L
- VAT Zone Label
- Home page for Sales Ledger manual
- Home page for Standard ERP manual
Legal Record Numbers - Argentina and Bolivia
This page contains some guidance about how to configure the Legal Record Numbers setting in order for Official Numbers to be generated correctly in Argentina and Bolivia. Some parts of the description assume that the VAT Law in the Company Info setting has been set to "Argentinean" or "Bolivian". Please follow these links for details about using the setting in other countries:- Introduction
- Legal Record Numbers in Angola
- Legal Record Numbers in Argentina and Bolivia
- Legal Record Numbers in Croatia
- Legal Record Numbers in Portugal
Flip A
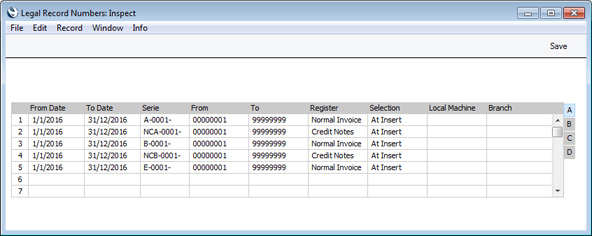
- From Date, To Date
- Paste Special
Choose date
- The period when the Legal Record Number sequence can be used.
- In Argentina, you can extend the period each year by entering new To Dates in each number sequence.
- In Bolivia, you should enter new number sequences each year.
- In Argentina, you can extend the period each year by entering new To Dates in each number sequence.
- Serie
- Enter a prefix to be used with every Official Number in the sequence. For example, referring to the illustration above, the first "A"-Type Normal Invoice in 2016 will be given A-0001-00000001 as its Official Number, the second one will be A-0001-00000002 and so on. You must specify a Serie in each row (i.e. in each Legal Record Number sequence).
- In Argentina, the Serie must include a letter or letters representing the Invoice type ("A", "B" or "E"), a dash, a four-digit number representing the point of sale and a final dash, for example A-0001- or NCA-0001-.
- In Bolivia, there are no prefixes in Official Numbers that you can enter as the Serie. As you must specify a Serie in each row, you will need to enter identifiers such as the year and/or branch instead. You will not want the Serie to be included as part of the Official Number on printed documents, so use the "Official Serial Number (Bolivia)" field in your Form Templates (instead of the "Official Serial Number" field).
- In Argentina, the Serie must include a letter or letters representing the Invoice type ("A", "B" or "E"), a dash, a four-digit number representing the point of sale and a final dash, for example A-0001- or NCA-0001-.
- From, To
- Enter the first and last numbers of the Legal Record Number sequence. These fields can only contain numeric characters.
- The From and To numbers must both contain eight digits. Use leading zeros if necessary (for example, 00000001).
- In Bolivia, sequences must begin at 1. As you should enter new Legal Record Number sequences every year, and as rows with the same Serie/Register/Selection combination must not overlap even if the period is different, you should enter a different Serie for each year.
- The From and To numbers must both contain eight digits. Use leading zeros if necessary (for example, 00000001).
- Register
- Paste Special
Choices of possible entries
- Use 'Paste Special' to specify the register in which the Legal Record Number sequence is to be used.
- You should set up Legal Record Number sequences for each Invoice type separately (i.e. "Normal Invoice", "Cash Notes", "Credit Notes", "Interest Invoices", "Normal Invoice, Special Sales" (Argentina only), "Invoice/Liquidation" and "Invoice/Self Employed Receipt"). You cannot use the "All Invoices" option in Argentina and Bolivia. The "Invoice/Liquidation" and "Invoice/Self Employed Receipt". number sequences will be used for Invoices in which the Tax Type (on the 'Identifiers' card) is "Liquidation" or "Receipt" respectively.
- You should set up Legal Record Number sequences for each Invoice type separately (i.e. "Normal Invoice", "Cash Notes", "Credit Notes", "Interest Invoices", "Normal Invoice, Special Sales" (Argentina only), "Invoice/Liquidation" and "Invoice/Self Employed Receipt"). You cannot use the "All Invoices" option in Argentina and Bolivia. The "Invoice/Liquidation" and "Invoice/Self Employed Receipt". number sequences will be used for Invoices in which the Tax Type (on the 'Identifiers' card) is "Liquidation" or "Receipt" respectively.
- Selection
- Paste Special
Choices of possible entries
- The Selection field allows you to specify the moment when an Official Number will be assigned to each new record.
- In Argentina and Bolivia, you should choose one of the following options:
- Manual
- Use this option if you will assign an Official Number to each record manually using 'Paste Special'.
- At Insert
- Official Numbers will be assigned to records automatically when you save them for the first time.
- At Sending E-Record
- Official Numbers will be assigned to records automatically when they are sent electronically. You should select this option if you are using the Automatically assign Official Ser. No. option (in Cloud Services Settings in the System module).
- If you are using the "Official No. per Page" option on flip C, you should choose "At Insert". When entering a multi-page Invoice, ensure that you have added all the Items to the Invoice before saving, so that the number of pages can be calculated accurately, resulting in the correct range of Official Numbers being allocated.
- If a Legal Record Number sequence will be used for Invoices that will be printed on pre-printed stationery or using a fiscal printer, you may prefer to choose "Manual".
- If a Legal Record Number sequence will be used for Invoices that you will send electronically and if you are using the Automatically assign Official Ser. No. option (in Cloud Services Settings in the System module), then you must choose "At Sending E-Record". These Invoices should not have Official Numbers when communication is first established with the tax authority.
- If you will send Invoices electronically but you will not use the Automatically assign Official Ser. No. option, then you should choose "At Insert" (not "At OK"). In this case, Invoices must have Official Numbers (but must not have been marked as OK) when communication is first established with the tax authority.
- In Argentina and Bolivia, you should choose one of the following options:
- Branch
- Paste Special
Customers in Contact register
- If your company has several Branches (e.g. several shops), you may need to use separate sequences of Official Numbers for each one. You should specify the Branch where each client machine is located in the Local Machine setting in the User Settings module, doing so individually on each client machine. When you create a record, the Branch where the client machine is located will usually be copied to that new record (depending on the register). The Official Number will be taken from the first valid Legal Record Number sequence for that Branch.
- Each Branch can have its own record in the Contact register. The Customer box should be ticked in these records. Entering Contact records for your Branches can be useful as it will allow you to choose the correct Branch in fields such as this one using 'Paste Special'. It will also allow address and other details for the Branch to be printed on Invoices if you have included the various Branch fields in your Form Template design.
- In Argentina, if you will send Invoices electronically using the Automatically assign Official Ser. No. option (in Cloud Services Settings in the System module), then you must specify a Branch in each Legal Record Number sequence. Each Official Number will include an element representing the Branch from where an Invoice was issued.
- Each Branch can have its own record in the Contact register. The Customer box should be ticked in these records. Entering Contact records for your Branches can be useful as it will allow you to choose the correct Branch in fields such as this one using 'Paste Special'. It will also allow address and other details for the Branch to be printed on Invoices if you have included the various Branch fields in your Form Template design.
Flip B
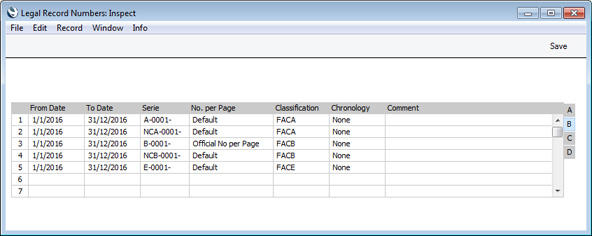
- No. per Page
- Paste Special
Choices of possible entries
- If a Legal Record Number sequence applies to Invoices of any type (e.g. Normal Invoices, Cash Notes, Credit Notes, etc), use this field to specify whether each page in a multi-page Invoice should have a separate Official No.
- When Official Numbers are supplied pre-printed on Invoice stationery, each page will have a separate Official Number. As it will only be possible to list a certain number of Items on each page, a multi-page Invoice will need more than one Official Number.
- Default
- Choose this option if each Invoice should have a single Official Number, irrespective of the number of pages.
- Official No. per Page
- Choose this option if each page in an Invoice should have a separate Official Number. It will usually only be appropriate to choose this option for Invoices that will be printed on pre-printed stationery, not for Invoices that will be sent electronically. So, if you choose the "Official No. per Page" option you should also choose "Do not send" in the Send to AFIP field on flip C.
- If you choose the "Official No. per Page" option you should also choose "At Insert" as the Selection option on flip A. When you save a multi-page Invoice for the first time, the appropriate number of Official Numbers will be assigned to it. They will be shown in the Official No. field in the header as a range, separated by a colon. You should ensure that you have added all the Items to the Invoice before saving. This will ensure that the number of pages can be calculated accurately, resulting in the correct range of Official Numbers being allocated.
- When you design the Form Template that will be used when printing Invoices, use the 'Properties' function on the Operations menu to specify the number of rows that can be printed on each page (using the Single Page, First Page, Middle Pages and Last Page fields). The number of pages in an Invoice will be calculated using these specifications and the number of rows in the Invoice.
- In the Form Template, use the "Official Serial Number per Page" field instead of the "Official Serial Number" field. This will ensure the correct Official Number will be printed on each page.
- If you choose the "Official No. per Page" option you should also choose "At Insert" as the Selection option on flip A. When you save a multi-page Invoice for the first time, the appropriate number of Official Numbers will be assigned to it. They will be shown in the Official No. field in the header as a range, separated by a colon. You should ensure that you have added all the Items to the Invoice before saving. This will ensure that the number of pages can be calculated accurately, resulting in the correct range of Official Numbers being allocated.
- When Official Numbers are supplied pre-printed on Invoice stationery, each page will have a separate Official Number. As it will only be possible to list a certain number of Items on each page, a multi-page Invoice will need more than one Official Number.
- Classification
- Paste Special
Contact Classifications setting, CRM Module
- If a Legal Record Number sequence can only be used with Customers with a particular Classification, enter that Classification here. You can enter a number of Classifications separated by commas, in which case the number sequence will only be used with Customers featuring all those Classifications.
- This field is of particular importance in Argentina, where the assigning of an Official Number to an Invoice depends on the type of Customer. If the Customer is registered with the tax authority as a company, their Invoices should be given "A"-type Official Numbers (i.e. the section of the Serie representing the Invoice type should include the character "A"). Invoices issued to end users or private individuals should be given "B"-type Official Numbers, while Invoices issued to Customers abroad should be given "E"-type Official Numbers. You should enter an appropriate Classification in the Contact records for each Customer (i.e. "A", "B" or "E"), and this will enable Official Numbers of the correct type to be assigned to their Invoices.
- This field is of particular importance in Argentina, where the assigning of an Official Number to an Invoice depends on the type of Customer. If the Customer is registered with the tax authority as a company, their Invoices should be given "A"-type Official Numbers (i.e. the section of the Serie representing the Invoice type should include the character "A"). Invoices issued to end users or private individuals should be given "B"-type Official Numbers, while Invoices issued to Customers abroad should be given "E"-type Official Numbers. You should enter an appropriate Classification in the Contact records for each Customer (i.e. "A", "B" or "E"), and this will enable Official Numbers of the correct type to be assigned to their Invoices.
- Chronology
- Always choose "None" in this field.
- Comment
- If you have any Legal Record Number sequences in which the Selection is "Manual", this comment will be shown in the 'Paste Legal Record No.' list that users will open in order to choose an Official Number. It should therefore be descriptive enough to make the selection of the correct number sequence easy for all users.
Flip C
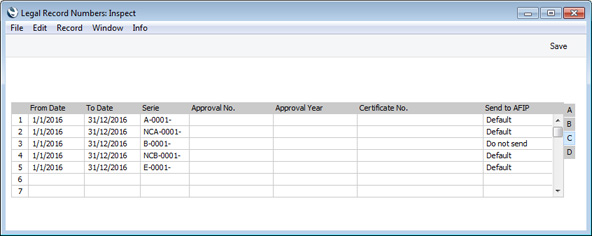
- Send to AFIP
- Paste Special
Choices of possible entries
- In Argentina, every Invoice must have an Official Number. However, Invoices can be sent electronically, printed on pre-printed stationery or printed using a fiscal printer. Use this field to distinguish Legal Record Number sequences that will be used in Invoices that will be sent electronically from those that will be used in Invoices that will be printed by other means.
- For example, a company may have some branches that are registered for sending Invoices electronically and some branches where Invoices are printed on pre-printed stationery. In this case, each branch will have its own Official Number sequence (distinguished using the Branch field on flip A). Use this field to specify whether the Invoices issued by a particular branch will be sent electronically.
- The following options are available:
- Default
- Choose "Default" in a Legal Record Number sequence if Invoices in that sequence are to obey the Send Invoices electronically to AFIP or Send Export Invoices electronically to AFIP options on the 'E-Inv. Argentina' card in the Cloud Services Settings setting in the System module. If you have selected the Send Invoices electronically to AFIP option, "A"- and "B"- type Invoices will be sent electronically. If you have selected the Send Export Invoices electronically to AFIP option on the same card, "E"-type Invoices will be sent electronically.
- Do not send
- Choose "Do not send" in a number sequence if Invoices in that sequence are not to be sent electronically.
- Send using CAE
- This option behaves in the same way as "Default" described above.
- Send using CAEA
- Choose this option in a number sequence if Invoices in that sequence are to be processed electronically using CAEA. This requires you to have selected the Self Billing option on the 'E-Inv. Argentina' card of the Cloud Services Settings setting in the System module and to have obtained an up-to-date CAEA code using the [Request CAEA] button in the same setting.
- Companies will tend to choose to have their Invoices processed electronically using CAEA (instead of using CAE) if sales are usually made to end users or private individuals in stores, where Customers will be given their Invoices at the point of sale. Invoices issued at customers' premises by travelling sales persons will also tend to be processed using CAEA. On the other hand, service companies will need to process their Invoices using CAE.
- For example, a company may have some branches that are registered for sending Invoices electronically and some branches where Invoices are printed on pre-printed stationery. In this case, each branch will have its own Official Number sequence (distinguished using the Branch field on flip A). Use this field to specify whether the Invoices issued by a particular branch will be sent electronically.
Flip E
Flip E is added to the Legal Record Numbers setting if the VAT Law in the Company Info setting is set to "Bolivian". Here you should specify a Tax Authority ID (a number of up to 15 digits provided by the tax authority) and a Dosage Key (a string of up to 256 characters, again provided by the tax authority). This information will be used to calculated the Control Code in each Invoice, together with the Invoice Number, the Transaction Date of the Invoice, the Subtotal and the VAT Registration Number of the Customer.Fields in Form Templates
When designing the Form Templates to be used when printing Invoices, you can use the following fields to print information related to Official Numbers:- Official Serial Number
- Prints the Official Number.
- If Official Numbers are generated from a row in the Legal Record Numbers setting in which the No. per Page field contains "Official No per Page" (i.e. if each page in a multi-page Invoice will have a separate Official No.), do not use this field and instead use the "Official Serial Number per Page" field.
- In the Form Template for printing Receipts, "Official Serial Number" will print the Official Number(s) of the Invoice(s) being paid.
- If Official Numbers are generated from a row in the Legal Record Numbers setting in which the No. per Page field contains "Official No per Page" (i.e. if each page in a multi-page Invoice will have a separate Official No.), do not use this field and instead use the "Official Serial Number per Page" field.
- Official Serial Number of Orig. Invoice
- In the Form Template used for printing Credit Notes, prints the Official Number of the Invoice being credited.
- Official Serial Number (Bolivia)
- Prints the Official Number in the correct format for Bolivia (i.e. with leading zeros but without Serie).
- Official Serial Number of Orig. Invoice (Bolivia)
- In the Form Template used for printing Credit Notes, prints the Official Number of the Invoice being credited, (with leading zeros but without Serie).
- TAX Authority ID To Date
- Prints the To Date in the relevant row in the Legal Record Numbers setting for the Official Number of the Invoice (used in Bolivia).
Settings in the Sales Ledger:
- Introduction
- Account Usage S/L
- Age Limits
- Alternative Items
- Bonus
- Classification Types
- Contact Credit Limits
- Contact Document Types
- Contact Settings
- Credit Limit
- Cross Sales Items
- Customer Categories
- Default Items
- Default Payment Modes
- Environment Tax
- Extra Tax Customer Discounts
- Factoring Export
- Freight
- Freight/Weight Calculation
- Gift Voucher settings
- Instalments
- Interest
- Interest Codes, Interest Terms
- Intrastat Transaction Codes
- Invoice Mail Settings
- Item Classifications
- Item Group Withholdings
- Item Settings
- Item Status Settings
- Legal Record Numbers, including:
- Legal Record Numbers in Angola
- Legal Record Numbers in Argentina and Bolivia
- Legal Record Numbers in Croatia
- Legal Record Numbers in Portugal
- Legal Record Numbers in Angola
- Number Series - Contacts
- Number Series - Gift Vouchers
- Number Series - Gift Vouchers Received
- Number Series - Internal Invoices
- Number Series - Invoices
- Number Series - Receipts
- Official Invoice Serial Number
- Payment Modes
- Payment Term Sales A/C
- Payment Terms
- Receipts Setting
- Regional Sales Taxes
- Regions
- Registration Defaults
- Reminder Texts
- Sales Invoice Settings
- Standard Problems
- Units
- VAT Corrections S/L
- VAT Zone Label
- Home page for Sales Ledger manual
- Home page for Standard ERP manual
Legal Record Numbers - Croatia
This page contains some guidance about how to configure the Legal Record Numbers setting in order for Official Numbers to be generated correctly in Croatia. Please click the following links for details about using the setting in other countries:- Introduction
- Legal Record Numbers in Angola
- Legal Record Numbers in Argentina and Bolivia
- Legal Record Numbers in Croatia
- Legal Record Numbers in Portugal
Flip A
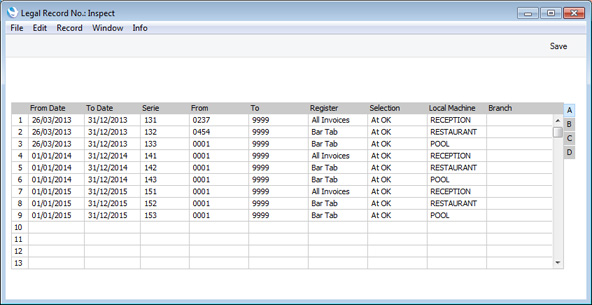
- From Date, To Date
- Paste Special
Choose date
- The period when the Legal Record Number sequence can be used. Usually, this period should be a calendar year, but a number sequence can begin in the middle of a year (e.g. when taking over from a previous system, as shown in the first three rows in the illustration).
- Serie
- Enter a prefix to be used with every Official Number in the sequence. For example, referring to the illustration above, the first Invoice issued from the "RECEPTION" cash machine or till in 2015 will be given 1510001 as its Official Number (from row 7 in the illustration), the second one will be 1510002 and so on.
- In Croatia, there are no prefixes in Official Numbers that you can enter as the Serie. As you must specify a Serie in each row, you will need to enter identifiers such as the year, branch and/or terminal instead. You will not want the Serie to be included as part of the Official Number on printed documents, so use the "Official Serial Number without Serie" field in your Form Templates (instead of the "Official Serial Number" field).
- In Croatia, there are no prefixes in Official Numbers that you can enter as the Serie. As you must specify a Serie in each row, you will need to enter identifiers such as the year, branch and/or terminal instead. You will not want the Serie to be included as part of the Official Number on printed documents, so use the "Official Serial Number without Serie" field in your Form Templates (instead of the "Official Serial Number" field).
- From, To
- Enter the first and last numbers of the Legal Record Number sequence. These fields can only contain numeric characters.
- Each number sequence must begin at 1 (unless a number sequence begins in the middle of a year, taking over from a previous system, as shown in the first three rows in the illustration).
- As Legal Record Number sequences in rows with the same Serie/Register/Selection combination must not overlap, even if the period is different, you should enter a different Serie for each year.
- The From and To numbers must contain the same number of digits: use leading zeros if necessary (for example, 0001).
- Each number sequence must begin at 1 (unless a number sequence begins in the middle of a year, taking over from a previous system, as shown in the first three rows in the illustration).
- Register
- Paste Special
Choices of possible entries
- Use 'Paste Special' to specify the register in which the Legal Record Number sequence is to be used.
- You should set up Legal Record Number sequences for "All Invoices", "Bar Tab" and "POS Invoice" only.
- You should set up Legal Record Number sequences for "All Invoices", "Bar Tab" and "POS Invoice" only.
- Selection
- Paste Special
Choices of possible entries
- The Selection field determines the moment when an Official Number will be assigned to each new record. In all cases, you should choose "At OK", so Official Numbers will be assigned to records automatically when you save them after marking them as OK.
- Local Machine
Paste Special Local Machines setting, Point of Sales/Restaurant/Technics module
- Each Local Machine (e.g. each cash machine or till) should have its own number sequence. When you create a new record (e.g. a new Invoice), the Official Number will be taken from the first valid Legal Record Number sequence for the Local Machine Code of the client machine you are using (set in the Local Machine setting in the User Settings module).
- Be careful not to enter more than one Legal Record Number for the same Register/Local Machine combination for the same period.
- Local Machine Codes can contain alpha and numeric characters (only alpha characters have been used in the illustration). When an Official Number is printed on documentation, it should include an element representing the cash machine or till on which it was generated. This element can only contain numeric characters. To comply with this requirement, you should enter a numeric code in the Terminal ID field on the 'POS' card in the Local Machine setting, doing so individually on each client machine. You can then include the "Terminal ID" field in your Form Templates, to ensure that the numeric Terminal ID will be printed.
- Be careful not to enter more than one Legal Record Number for the same Register/Local Machine combination for the same period.
Flip B
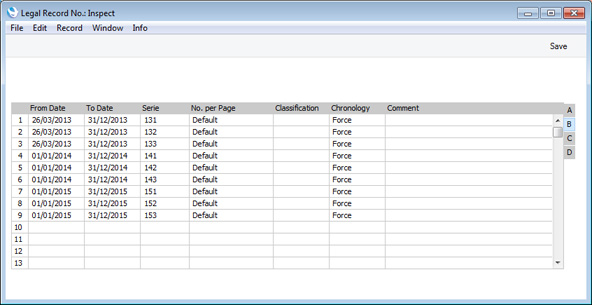
- No. per Page
- Always choose "Default" in this field.
- Chronology
- Always choose "Force" in this field. This will mean that you will need to enter all records that use a particular Legal Record Number sequence in chronological order. The date of a new record will need to be the same as or later than the date in the previous record entered. When the Official Number is on the point of being allocated to the record (i.e. "At OK"), a check for chronology will first be carried out. If the record fails the chronology check, you will be so informed and an Official Number will not be allocated.
Fields in Form Templates
On printed Invoices, POS Invoices and Bar Tabs, the Official Number should be printed using the format Number/Location/Terminal. When designing the Form Templates to be used when printing these records, use the following fields and text objects:- Official Serial Number without Serie
- Prints the Official No. without the Serie and without leading zeros.
- /
- (add / to the Form Template as a text object)
- Location
- Prints the Location from the record being printed.
- /
- (add / to the Form Template as a text object)
- Terminal ID
- Prints the Terminal ID of the machine or till on which the Invoice was created, taken from the Local Machine setting in the User Settings module. The Terminal ID must only contain numeric characters.
Settings in the Sales Ledger:
- Introduction
- Account Usage S/L
- Age Limits
- Alternative Items
- Bonus
- Classification Types
- Contact Credit Limits
- Contact Document Types
- Contact Settings
- Credit Limit
- Cross Sales Items
- Customer Categories
- Default Items
- Default Payment Modes
- Environment Tax
- Extra Tax Customer Discounts
- Factoring Export
- Freight
- Freight/Weight Calculation
- Gift Voucher settings
- Instalments
- Interest
- Interest Codes, Interest Terms
- Intrastat Transaction Codes
- Invoice Mail Settings
- Item Classifications
- Item Group Withholdings
- Item Settings
- Item Status Settings
- Legal Record Numbers, including:
- Legal Record Numbers in Angola
- Legal Record Numbers in Argentina and Bolivia
- Legal Record Numbers in Croatia
- Legal Record Numbers in Portugal
- Legal Record Numbers in Angola
- Number Series - Contacts
- Number Series - Gift Vouchers
- Number Series - Gift Vouchers Received
- Number Series - Internal Invoices
- Number Series - Invoices
- Number Series - Receipts
- Official Invoice Serial Number
- Payment Modes
- Payment Term Sales A/C
- Payment Terms
- Receipts Setting
- Regional Sales Taxes
- Regions
- Registration Defaults
- Reminder Texts
- Sales Invoice Settings
- Standard Problems
- Units
- VAT Corrections S/L
- VAT Zone Label
- Home page for Sales Ledger manual
- Home page for Standard ERP manual
Legal Record Numbers - Portugal
This page contains some guidance about how to configure the Legal Record Numbers setting in order for Official Numbers to be generated correctly in Portugal. Some parts of the description assume that the VAT Law in the Company Info setting has been set to "Portuguese". Please follow the links below for details about using the setting in other countries:- Introduction
- Legal Record Numbers in Angola
- Legal Record Numbers in Argentina and Bolivia
- Legal Record Numbers in Croatia
- Legal Record Numbers in Portugal
In Portugal, it is a legal requirement to have official serial numbers on all sales documents (i.e. Proforma Invoices (from Quotations), Sales Orders, Sales Invoices, simplified Invoices, Invoice/Receipts, POS Invoices, Debit Notes, Credit Notes and Receipts) and all transport documents (i.e. Deliveries, Returned Goods, Returned Goods to Suppliers and Stock Movements).
Flip A
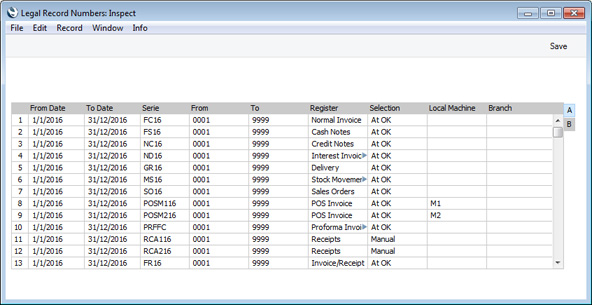
- From Date, To Date
- The period when the Legal Record Number sequence can be used. The From and To dates must be in the same fiscal year, and the fiscal year must be listed in the Fiscal Years setting.
- Serie
- Enter a prefix to be used with every Official Number in the sequence. For example, referring to the illustration above, the first Normal Invoice in 2016 will be given FC160001 as its Official Number (from the first row in the illustration), the second one will be FC160002 and so on. You must specify a Serie in each row (i.e. in each Legal Record Number sequence).
- The Serie can only contain uppercase characters and numbers.
- When the Official Number of any record is printed in forms (using the "Official Serial Number" field), a prefix representing the transaction type will be added and a stroke will be inserted between the Serie and the Number automatically. For example, Invoice FC160001 will be printed as FT FC16/0001. Do not include the prefix representing the transaction type (FT in this example) in the Serie.
- The Serie can only contain uppercase characters and numbers.
- From, To
- Enter the first and last numbers of the Legal Record Number sequence. These fields can only contain numeric characters.
- Every Legal Record Number sequence must begin at 1. As you should enter new Legal Record Number sequences every year, and as rows with the same Serie/Register/Selection combination must not overlap even if the period is different, you should enter a different Serie for each year.
- The From and To numbers must contain the same number of digits: use leading zeros if necessary (for example, 0001).
- Every Legal Record Number sequence must begin at 1. As you should enter new Legal Record Number sequences every year, and as rows with the same Serie/Register/Selection combination must not overlap even if the period is different, you should enter a different Serie for each year.
- Register
- Paste Special
Choices of possible entries
- Use 'Paste Special' to specify the register in which the Legal Record Number sequence is to be used.
- You should set up Legal Record Number sequences for each Invoice type separately (i.e. "Normal Invoice", "Cash Notes", "Credit Notes", "Interest Invoices" and "Invoice/Receipt"). You cannot use the "All Invoices" option in Portugal.
- The 'Paste Special' list contains "Manual" and "Recovered" options for each register, in addition to the registers themselves (for example, "Normal Invoices Manual" and "Normal Invoices Recovered from Damaged Database" in addition to "Normal Invoice"). These options are intended for use in Portugal, as follows:
- Manual
- A "Manual" number sequence for a particular register allows you to enter records to that register that you have already issued on paper or from another system (e.g. a back-up system). For example, you might need to enter an Invoice to the system that you have already issued on paper. When you enter such a record, you must set the Status to "Manual". This will allow you to copy the Official Number from the original record (e.g. from the paper Invoice) to the Official No. 2 field. You must also enter an Official No. in the header of the new record manually (using 'Paste Special' to choose from the "Manual" number sequence for the relevant register).
- Recovered
- A "Recovered" number sequence for a particular register allows you to enter records to that register for a second time. This will only be necessary or allowed when the original entries have been lost, perhaps due to a system crash or similar.
- If you have needed to restore your database from a back-up because of a system crash or similar, and the most recent records are missing from the back-up, follow these steps in the restored database to recreate them. We will illustrate the steps by assuming the last recovered Invoice has an Official No. FC16/234 (i.e. with Serie FC16 and number 234).
- Close the Legal Record Number sequences in which records are missing. To do this, enter the number of the last recovered record in the To field. In the example, in the row in the Legal Number Series setting with Serie FC16 and Register "Invoices", enter 234 as the To number. This prevents the sequence being used again.
- Create a new Legal Record Number sequence for each register with missing records, starting from 1. In the example, you might create a new sequence with Serie FC16B, running from 001 to 999.
- If you have not already done so, create Legal Record Number sequences for each register with missing records, and in the Register field choose the relevant "Recovered" option. In the example, you might create a new sequence with Serie FC16R, running from 001 to 999, and with Register "Normal Invoices Recovered from Damaged Database".
- Re-enter the missing records. In these re-entered records, you must set the Status to "Recovered from Damaged Database". This will allow you to copy the Official Number from the lost record to the Official No. 2 field. In the example, FC16/234 was the last recovered Invoice, so FC16/235 is the first one that was lost and therefore the first one that needs to be re-entered. So, enter FC16/235 in the Official No. 2 field. You must also enter an Official No. in the header of the new record manually. Use 'Paste Special' to choose from the "Recovered" number sequence for the relevant register (in the example, the one with Serie FC16R).
- If you have needed to restore your database from a back-up because of a system crash or similar, and the most recent records are missing from the back-up, follow these steps in the restored database to recreate them. We will illustrate the steps by assuming the last recovered Invoice has an Official No. FC16/234 (i.e. with Serie FC16 and number 234).
- You should set up Legal Record Number sequences for each Invoice type separately (i.e. "Normal Invoice", "Cash Notes", "Credit Notes", "Interest Invoices" and "Invoice/Receipt"). You cannot use the "All Invoices" option in Portugal.
- Selection
- Paste Special
Choices of possible entries
- The Selection field allows you to specify the moment when an Official Number will be assigned to each new record.
- Depending on the register, you can use the following options:
- Manual
- Use this option if you will assign an Official Number to each record manually using 'Paste Special'.
- If the Register field contains one of the "Manual" or "Recovered" options, the Selection will default to "Manual" and cannot be changed.
- If the Register field contains one of the "Manual" or "Recovered" options, the Selection will default to "Manual" and cannot be changed.
- At OK
- Official Numbers will be assigned to records automatically when you save them after marking them as OK.
- In most cases, when the Register field contains a "normal" register (i.e. not one of the "Manual" and "Recovered" options), the Selection will default to "At OK" and cannot be changed.
- If the Register field contains "Receipt", this field will default to "At OK", but you can change it to "Manual". In a smaller company, only one Legal Record Number sequence will be needed for Receipts, in which case the Selection should be "At OK". In a larger company with more than one bank account, it may be necessary to have a separate Legal Record Number sequence for each one (depending on the volume of transactions). This will enable chronology rules to be imposed on each bank account individually, rather than on Receipts as a whole. In each number sequence, the Selection should be "Manual" (they should all be "Manual": do not mix "Manual" and "At OK"). The Serie should be different in each case, and the Comment (on flip B) should also refer to the relevant bank account. When entering a Receipt, you should use 'Paste Special' to choose the Official Number from the "Receipt" number sequences: the Comments will be shown in the 'Paste Special' list to ensure you choose the correct one. If you mark a Receipt as OK and save it without having chosen an Official Number, one will be assigned automatically from the first valid Legal Record Number sequence for Receipts.
- In most cases, when the Register field contains a "normal" register (i.e. not one of the "Manual" and "Recovered" options), the Selection will default to "At OK" and cannot be changed.
- At Sending E-Record
- This option should only be used if the Register field contains "Delivery", "Returned Goods to Supplier" or any of the standard Stock Movement options (i.e. not the "Manual" or "Recovered" options). Records in these registers need to be registered as transport documents with the tax authority.
- If the Register field contains one of these registers, the Selection will default to "At OK", but you will be able to change it to "At Sending E-Record". The "At OK" option will usually be used by smaller companies who will register their stock transactions manually on the tax authority's website, while "At Sending E-Record" will usually be used by larger companies who will register their stock transactions electronically.
- If you choose "At Sending E-Record" in a particular Legal Record Number sequence, you will be able to notify the tax authority electronically whenever you enter a record in the relevant register. For example, you might have a number sequence in which the Register is "Delivery" and the Selection is "At Sending E-Record". Whenever you enter a new record (in the example, a new Delivery), save it without marking it as OK. Then, choose 'Send to Tax Authorities' from the Operations menu. After you log in to the tax authority server, the record will automatically be given the next Official Number from the "At Sending E-Record" number sequence for the relevant register (for Deliveries in the example). When a positive response is received from the tax authority, the record will be marked as OK automatically. Until that response arrives, strict chronology rules mean that you will not be able to send a second record in the same register to the tax authority or mark one as OK yourself.
- If you need both options (i.e. if you need to be able to register your stock transactions with the tax authority both electronically and manually on their web site), you should enter separate Legal Record Number sequences for the relevant register with Selections "At Sending E-Record" and "At OK".
- To use the "At Sending E-Record" option, you should have created sub-users on the tax authority website with passwords and access rights to submit electronic documents. Enter the sub-user ID in the Person records of each user with the authority to submit electronic documents (in the Specification field on the 'Sales' card).
- If the Register field contains one of these registers, the Selection will default to "At OK", but you will be able to change it to "At Sending E-Record". The "At OK" option will usually be used by smaller companies who will register their stock transactions manually on the tax authority's website, while "At Sending E-Record" will usually be used by larger companies who will register their stock transactions electronically.
- Depending on the register, you can use the following options:
- Local Machine
- Paste Special
Local Machines setting, Point of Sales/Restaurant/Technics module
- In a retail environment, an option available to you is the ability to use separate Legal Record Number sequences for each cash machine or till. When you create a new record (e.g. a new Invoice), the Official Number will be taken from the first valid Legal Record Number sequence for the Local Machine Code of the client machine you are using (set in the Local Machine setting in the User Settings module).
- Be careful not to enter more than one Legal Record Number for the same Register/Local Machine combination for the same period.
- Be careful not to enter more than one Legal Record Number for the same Register/Local Machine combination for the same period.
- Branch
- Paste Special
Customers in Contact register
- If your company has several Branches (e.g. several shops), an option available to you is the ability to use separate sequences of Official Numbers for each Branch. You should specify the Branch where each client machine is located in the Local Machine setting in the User Settings module, doing so individually on each client machine. When you create a record, the Branch where the client machine is located will usually be copied to that new record (depending on the register). The Official Number will be taken from the first valid Legal Record Number sequence for that Branch.
- If you are using Branches, each Branch must have its own record in the Contact register. The Customer box should be ticked in these records. This will allow you to choose the correct Branch in fields such as this one using 'Paste Special'. It will also allow address and other details for the Branch to be printed on Invoices if you have included the various Branch fields in your Form Template design.
Flip B
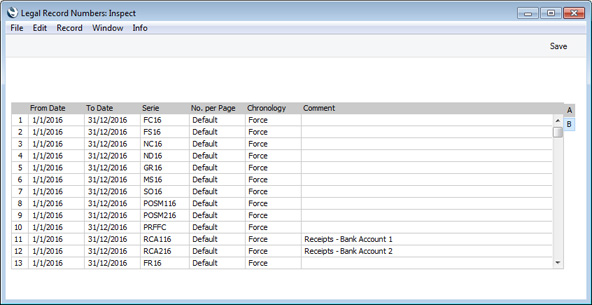
- No. per Page
- Always choose "Default" in this field.
- Chronology
- This field will default to "Force" and cannot be changed. This will mean that you will need to enter all records that use a particular Legal Record Number sequence in chronological order. The date of a new record will need to be the same as or later than the date in the previous record entered. When the Official Number is on the point of being allocated to the record (usually "At OK"), a check for chronology will first be carried out. If the record fails the chronology check, you will be so informed and an Official Number will not be allocated.
- Comment
- If you have any Legal Record Number sequences in which the Selection is "Manual", this comment will be shown in the 'Paste Legal Record No.' list that users will open in order to choose an Official Number. It should therefore be descriptive enough to make the selection of the correct number sequence easy for all users.
Fields in Form Templates
When designing the Form Templates to be used when printing records with Official Numbers, be sure to include the following fields:- Official Serial Number
- Prints the Official Number in the correct format (can be used in all Form Templates).
- In the Form Template for printing Receipts, use "Official Serial Number (Header)" to print the Official Number of the Receipt, and "Official Serial Number" to print the Official Number(s) of the Invoice(s) being paid.
- In the Form Template for printing Receipts, use "Official Serial Number (Header)" to print the Official Number of the Receipt, and "Official Serial Number" to print the Official Number(s) of the Invoice(s) being paid.
- Official Serial Number 2
- Prints the Official Number 2 (can be used in the Form Templates for printing Sales Ledger Invoices of all Types (i.e. Invoice, Cash Note, Credit Note or Interest Invoice), POS Invoices, Bar Tabs and Receipts)
- Official Serial Number of Orig. Invoice
- In the Form Template used for printing Credit Notes, prints the Official Number of the Invoice being credited.
- Copy of the original document (SAFT portugal)
- If the Status of the Invoice being printed is "Manual" or "Recovered from Damaged Database", prints "Cópia do documento original-" followed by characters signifying the Invoice Type (i.e. Invoice, Cash Note, Credit Note or Interest Invoice) followed by the Official No. 2 (can be used in the Form Templates for printing Sales Ledger Invoices of all Types)
Settings in the Sales Ledger:
- Introduction
- Account Usage S/L
- Age Limits
- Alternative Items
- Bonus
- Classification Types
- Contact Credit Limits
- Contact Document Types
- Contact Settings
- Credit Limit
- Cross Sales Items
- Customer Categories
- Default Items
- Default Payment Modes
- Environment Tax
- Extra Tax Customer Discounts
- Factoring Export
- Freight
- Freight/Weight Calculation
- Gift Voucher settings
- Instalments
- Interest
- Interest Codes, Interest Terms
- Intrastat Transaction Codes
- Invoice Mail Settings
- Item Classifications
- Item Group Withholdings
- Item Settings
- Item Status Settings
- Legal Record Numbers, including:
- Legal Record Numbers in Angola
- Legal Record Numbers in Argentina and Bolivia
- Legal Record Numbers in Croatia
- Legal Record Numbers in Portugal
- Legal Record Numbers in Angola
- Number Series - Contacts
- Number Series - Gift Vouchers
- Number Series - Gift Vouchers Received
- Number Series - Internal Invoices
- Number Series - Invoices
- Number Series - Receipts
- Official Invoice Serial Number
- Payment Modes
- Payment Term Sales A/C
- Payment Terms
- Receipts Setting
- Regional Sales Taxes
- Regions
- Registration Defaults
- Reminder Texts
- Sales Invoice Settings
- Standard Problems
- Units
- VAT Corrections S/L
- VAT Zone Label
- Home page for Sales Ledger manual
- Home page for Standard ERP manual
Number Series - Contacts
Please click here for full details about this setting.---
Settings in the Sales Ledger:
- Introduction
- Account Usage S/L
- Age Limits
- Alternative Items
- Bonus
- Classification Types
- Contact Credit Limits
- Contact Document Types
- Contact Settings
- Credit Limit
- Cross Sales Items
- Customer Categories
- Default Items
- Default Payment Modes
- Environment Tax
- Extra Tax Customer Discounts
- Factoring Export
- Freight
- Freight/Weight Calculation
- Gift Voucher settings
- Instalments
- Interest
- Interest Codes, Interest Terms
- Intrastat Transaction Codes
- Invoice Mail Settings
- Item Classifications
- Item Group Withholdings
- Item Settings
- Item Status Settings
- Legal Record Numbers
- Number Series - Contacts
- Number Series - Gift Vouchers
- Number Series - Gift Vouchers Received
- Number Series - Internal Invoices
- Number Series - Invoices
- Number Series - Receipts
- Official Invoice Serial Number
- Payment Modes
- Payment Term Sales A/C
- Payment Terms
- Receipt Settings
- Regional Sales Taxes
- Regions
- Registration Defaults
- Reminder Texts
- Sales Invoice Settings
- Standard Problems
- Units
- VAT Corrections S/L
- VAT Zone Label
- Home page for Sales Ledger manual
- Home page for Standard ERP manual
Number Series - Gift Vouchers
Whenever you enter a new Issued Gift Voucher, it will be given a unique identifying number, based on a sequential number series.You can have more than one sequential number series running at the same time, or at different times. For example, you may want to use different sequences to represent different departments or branches, or you may want to use different sequences to represent different fiscal or calendar years.
The Number Series - Gift Vouchers setting allows you to take advantage of this feature. Here you can define the number sequences that you would like to use with issued Gift Vouchers.
To open the Number Series - Gift Vouchers setting, ensure you are in the Sales Ledger or in the Point of Sales module and double-click (Windows/Mac OS X) or tap (iOS/Android) 'Number Series - Gift Vouchers' in the 'Settings' list. The following window will appear:

When the setting is complete, click the [Save] button (Windows/Mac OS X) or tap √ (iOS/Android) in the Button Bar to save the changes. To close the window without saving changes, click the close box (Windows/Mac OS X) or tap < (iOS/Android).
Once you have defined number sequences for Gift Vouchers, each new Gift Voucher will take its Gift Voucher Number from the first valid Number Series in this setting. For a particular Gift Voucher, any user can change to the first unused number in any other valid Number Series using 'Paste Special'.
If you leave the Number Series - Gift Vouchers setting empty, Gift Voucher Numbers will will all be taken from the same sequence, starting at 1 and continuing consecutively. If you want to start from another number, simply specify it in a new Gift Voucher before saving.
If you will issue Gift Vouchers from tills that use live-sync connections to the server, you must not leave the Number Series - Gift Vouchers setting empty. You must also use the Synchronised Number Series setting to define separate number sequences for each live-sync till, before connecting any of those tills to the server. Please refer here for details.
---
Settings in the Sales Ledger:
- Introduction
- Account Usage S/L
- Age Limits
- Alternative Items
- Bonus
- Classification Types
- Contact Credit Limits
- Contact Document Types
- Contact Settings
- Credit Limit
- Cross Sales Items
- Customer Categories
- Default Items
- Default Payment Modes
- Environment Tax
- Extra Tax Customer Discounts
- Factoring Export
- Freight
- Freight/Weight Calculation
- Gift Voucher settings
- Instalments
- Interest
- Interest Codes, Interest Terms
- Intrastat Transaction Codes
- Invoice Mail Settings
- Item Classifications
- Item Group Withholdings
- Item Settings
- Item Status Settings
- Legal Record Numbers
- Number Series - Contacts
- Number Series - Gift Vouchers
- Number Series - Gift Vouchers Received
- Number Series - Internal Invoices
- Number Series - Invoices
- Number Series - Receipts
- Official Invoice Serial Number
- Payment Modes
- Payment Term Sales A/C
- Payment Terms
- Receipts Setting
- Regional Sales Taxes
- Regions
- Registration Defaults
- Reminder Texts
- Sales Invoice Settings
- Standard Problems
- Units
- VAT Corrections S/L
- VAT Zone Label
- Home page for Sales Ledger manual
- Home page for Standard ERP manual
Number Series - Gift Vouchers Received
Each Received Gift Voucher has its own unique identifying number, based on a sequential series. When you enter a new Gift Voucher, the next number in the sequence will be used. If required, you can have a number of such sequences running concurrently, perhaps representing different years or different departments.Use this setting to define these sequences, or Number Series. The different series should not overlap. If you leave the setting empty, Gift Voucher Numbers will start at 1 and continue consecutively.
Once you have defined number sequences for Gift Vouchers, each new Gift Voucher will take its Gift Voucher Number from the first valid Number Series in this setting. For a particular Gift Voucher, any user can change to the first unused number in any other valid Number Series using 'Paste Special'.
When you double-click 'Number Series - Gift Vouchers Received' in the 'Settings' list, the following window appears:
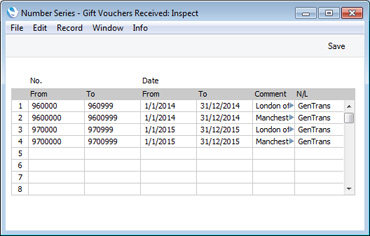
---
Settings in the Sales Ledger:
- Introduction
- Account Usage S/L
- Age Limits
- Alternative Items
- Bonus
- Classification Types
- Contact Credit Limits
- Contact Document Types
- Contact Settings
- Credit Limit
- Cross Sales Items
- Customer Categories
- Default Items
- Default Payment Modes
- Environment Tax
- Extra Tax Customer Discounts
- Factoring Export
- Freight
- Freight/Weight Calculation
- Gift Voucher settings
- Instalments
- Interest
- Interest Codes, Interest Terms
- Intrastat Transaction Codes
- Invoice Mail Settings
- Item Classifications
- Item Group Withholdings
- Item Settings
- Item Status Settings
- Legal Record Numbers
- Number Series - Contacts
- Number Series - Gift Vouchers
- Number Series - Gift Vouchers Received
- Number Series - Internal Invoices
- Number Series - Invoices
- Number Series - Receipts
- Official Invoice Serial Number
- Payment Modes
- Payment Term Sales A/C
- Payment Terms
- Receipt Settings
- Regional Sales Taxes
- Regions
- Registration Defaults
- Reminder Texts
- Sales Invoice Settings
- Standard Problems
- Units
- VAT Corrections S/L
- VAT Zone Label
- Home page for Sales Ledger manual
- Home page for Standard ERP manual
Number Series - Internal Invoices
Each Internal Invoice has its own unique identifying number, based on a sequential series. When you enter a new Internal Invoice, the next number in the sequence will be used. If required, you can have a number of such sequences running concurrently, perhaps representing different years or different departments.Use this setting to define these sequences, or Number Series. The different series should not overlap. If you leave the setting empty, Internal Invoice Numbers will start at 1 and continue consecutively.
Once you have defined number sequences for Internal Invoices, each new Internal Invoice will take its Internal Invoice Number from the first valid Number Series in this setting. For a particular Internal Invoice, any user can change to the first unused number in any other valid Number Series using 'Paste Special'.
The N/L field gives you a measure of control over whether Nominal Ledger Transactions will be generated automatically when you mark Internal Invoices in a particular sequence as OK and save them. Using 'Paste Special' from the N/L field brings up a selection list containing two options: "GenTrans" and "Do Not GenTrans". Select the first option if Nominal Ledger Transactions are to be generated and the second if they are not. In effect, this feature is an exclusionary one in that you can only choose to not have Nominal Ledger Transactions created for a particular number sequence. If the overall preference (set in the Sub Systems setting in the Nominal Ledger) is to not have such transactions created, you cannot decide to have them created for a single sequence.
When you double-click 'Number Series - Internal Invoices' in the 'Settings' list, the following window appears:
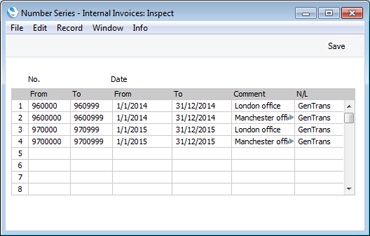
---
Settings in the Sales Ledger:
- Introduction
- Account Usage S/L
- Age Limits
- Alternative Items
- Bonus
- Classification Types
- Contact Credit Limits
- Contact Document Types
- Contact Settings
- Credit Limit
- Cross Sales Items
- Customer Categories
- Default Items
- Default Payment Modes
- Environment Tax
- Extra Tax Customer Discounts
- Factoring Export
- Freight
- Freight/Weight Calculation
- Gift Voucher settings
- Instalments
- Interest
- Interest Codes, Interest Terms
- Intrastat Transaction Codes
- Invoice Mail Settings
- Item Classifications
- Item Group Withholdings
- Item Settings
- Item Status Settings
- Legal Record Numbers
- Number Series - Contacts
- Number Series - Gift Vouchers
- Number Series - Gift Vouchers Received
- Number Series - Internal Invoices
- Number Series - Invoices
- Number Series - Receipts
- Official Invoice Serial Number
- Payment Modes
- Payment Term Sales A/C
- Payment Terms
- Receipt Settings
- Regional Sales Taxes
- Regions
- Registration Defaults
- Reminder Texts
- Sales Invoice Settings
- Standard Problems
- Units
- VAT Corrections S/L
- VAT Zone Label
- Home page for Sales Ledger manual
- Home page for Standard ERP manual
Number Series - Invoices
Each Invoice has its own unique identifying number, based on a sequential series. When you enter a new Invoice, the next number in the sequence will be used. If required, you can have a number of such sequences running concurrently, perhaps representing different years, different departments or different Salesmen.Use this setting to define these sequences, or Number Series. The different series should not overlap. If you leave the setting empty, Invoice Numbers will start at 1 and continue consecutively.
Once you have defined number sequences for Invoices, you can allocate a specific sequence to an individual user using the Inv. No. field on the 'Number Series' card of the user's Person record in the System module. When that user enters a new Invoice, its Invoice Number will be the first unused number in that specific sequence. You can also set a universal default sequence in the Number Series Defaults setting, also in the System module. If you do not allocate a specific sequence to a particular user or set a universal default, Invoice Numbers will be taken from the first valid Number Series in this setting. For a particular Invoice, any user can change to the first unused number in any other valid Number Series using 'Paste Special'.
The N/L field gives you a measure of control over whether Nominal Ledger Transactions will be generated automatically when you mark Invoices in a particular sequence as OK and save them. Using 'Paste Special' from the N/L field brings up a selection list containing two options: "GenTrans" and "Do Not GenTrans". Select the first option if Nominal Ledger Transactions are to be generated and the second if they are not. In effect, this feature is an exclusionary one in that you can only choose to not have Nominal Ledger Transactions created for a particular number sequence. If the overall preference (set in the Sub Systems setting in the Nominal Ledger) is to not have such transactions created, you cannot decide to have them created for a single sequence.
When you double-click 'Number Series - Invoices' in the 'Settings' list, the following window appears:
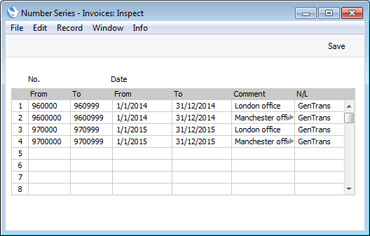
You can use this setting to define separate Number Series for use with Invoices with different Languages. To do this, enter a Language Code in the Comment field, using uppercase letters. Invoices without a Language will default to the Number Series as previously described.
If you are using the Force Chronology for Invoice option in the Account Usage S/L setting, you cannot change the From number in or remove a Number Series that has been used.
If you are using the Common Number Series option in the Cash Book Settings setting in the Cash Book module and you have entered at least one number sequence on flip C of the Payment Modes setting, the number sequences that you enter in this setting must be different to the number sequences in the Payment Modes setting.
---
Settings in the Sales Ledger:
- Introduction
- Account Usage S/L
- Age Limits
- Alternative Items
- Bonus
- Classification Types
- Contact Credit Limits
- Contact Document Types
- Contact Settings
- Credit Limit
- Cross Sales Items
- Customer Categories
- Default Items
- Default Payment Modes
- Environment Tax
- Extra Tax Customer Discounts
- Factoring Export
- Freight
- Freight/Weight Calculation
- Gift Voucher settings
- Instalments
- Interest
- Interest Codes, Interest Terms
- Intrastat Transaction Codes
- Invoice Mail Settings
- Item Classifications
- Item Group Withholdings
- Item Settings
- Item Status Settings
- Legal Record Numbers
- Number Series - Contacts
- Number Series - Gift Vouchers
- Number Series - Gift Vouchers Received
- Number Series - Internal Invoices
- Number Series - Invoices
- Number Series - Receipts
- Official Invoice Serial Number
- Payment Modes
- Payment Term Sales A/C
- Payment Terms
- Receipts Setting
- Regional Sales Taxes
- Regions
- Registration Defaults
- Reminder Texts
- Sales Invoice Settings
- Standard Problems
- Units
- VAT Corrections S/L
- VAT Zone Label
- Home page for Sales Ledger manual
- Home page for Standard ERP manual
Number Series - Receipts
Each Receipt has its own unique identifying number, based on a sequential series. When you enter a new Receipt, the next number in the sequence will be used. If required, you can have a number of such sequences running concurrently, perhaps representing different years or different departments.Use this setting to define these sequences, or Number Series. The different series should not overlap. If you leave the setting empty, Receipt Numbers will start at 1 and continue consecutively.
Once you have defined number sequences for Receipts, you can allocate a specific sequence to an individual user using the Receipt No. field on the 'Number Series' card of the user's Person record in the System module. When that user enters a new Receipt, its Receipt Number will be the first unused number in that specific sequence. You can also set a universal default sequence in the Number Series Defaults setting, also in the System module. If you do not allocate a specific sequence to a particular user or set a universal default, Receipt Numbers will be taken from the first valid Number Series in this setting. For a particular Receipt, any user can change to the first unused number in any other valid Number Series using 'Paste Special'.
The N/L field gives you a measure of control over whether Nominal Ledger Transactions will be generated automatically when you mark Receipts in a particular sequence as OK and save them. Using 'Paste Special' from the N/L field brings up a selection list containing two options: "GenTrans" and "Do Not GenTrans". Select the first option if Nominal Ledger Transactions are to be generated and the second if they are not. In effect, this feature is an exclusionary one in that you can only choose to not have Nominal Ledger Transactions created for a particular number sequence. If the overall preference (set in the Sub Systems setting in the Nominal Ledger) is to not have such transactions created, you cannot decide to have them created for a single sequence.
When you double-click 'Number Series - Receipts' in the 'Settings' list, the following window appears:

Note that you can also define separate Number Series for each Payment Mode: please refer to the page describing the Payment Modes setting for details. If you are using the Common Number Series option in the Cash Book Settings setting in the Cash Book module, the number sequences in Payment Modes must be different to those entered here.
---
Settings in the Sales Ledger:
- Introduction
- Account Usage S/L
- Age Limits
- Alternative Items
- Bonus
- Classification Types
- Contact Credit Limits
- Contact Document Types
- Contact Settings
- Credit Limit
- Cross Sales Items
- Customer Categories
- Default Items
- Default Payment Modes
- Environment Tax
- Extra Tax Customer Discounts
- Factoring Export
- Freight
- Freight/Weight Calculation
- Gift Voucher settings
- Instalments
- Interest
- Interest Codes, Interest Terms
- Intrastat Transaction Codes
- Invoice Mail Settings
- Item Classifications
- Item Group Withholdings
- Item Settings
- Item Status Settings
- Legal Record Numbers
- Number Series - Contacts
- Number Series - Gift Vouchers
- Number Series - Gift Vouchers Received
- Number Series - Internal Invoices
- Number Series - Invoices
- Number Series - Receipts
- Official Invoice Serial Number
- Payment Modes
- Payment Term Sales A/C
- Payment Terms
- Receipt Settings
- Regional Sales Taxes
- Regions
- Registration Defaults
- Reminder Texts
- Sales Invoice Settings
- Standard Problems
- Units
- VAT Corrections S/L
- VAT Zone Label
- Home page for Sales Ledger manual
- Home page for Standard ERP manual
Official Invoice Serial Number
In some countries, it is a legal requirement that all Invoices be given an Official Invoice Number. Each company that issues Invoices will be assigned a number sequence to be used for this purpose, perhaps supplied pre-printed on Invoice stationery. You should specify that number sequence here.This setting only has provision for a single official number sequence. If your requirements are more complex (e.g. you need several official number sequences, or you need to use official number sequences in other registers as well as with Invoices), leave the Official Invoice Serial Number setting empty and use the Legal Record Numbers setting instead. You must use the Legal Record Numbers setting in Angola, Argentina, Bolivia, Croatia, Portugal and Russia.
To work with this setting, first ensure you are in the Sales Ledger and then click the [Settings] button in the Navigation Centre or use the Ctrl-S/⌘-S keyboard shortcut. Double-click 'Official Invoice Serial Number' in the resulting list. The 'Official Invoice Serial Numbers: Inspect' window opens:
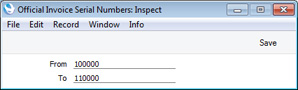
When you enter an Invoice and save it for the first time, the next number from this sequence will be placed in the Official Serial Number field in the header. When you receive payment for an Invoice, you can find the Invoice in the 'Paste Open Invoices' window by searching for the Invoice Number or the Official Serial Number.
---
Settings in the Sales Ledger:
- Introduction
- Account Usage S/L
- Age Limits
- Alternative Items
- Bonus
- Classification Types
- Contact Credit Limits
- Contact Document Types
- Contact Settings
- Credit Limit
- Cross Sales Items
- Customer Categories
- Default Items
- Default Payment Modes
- Environment Tax
- Extra Tax Customer Discounts
- Factoring Export
- Freight
- Freight/Weight Calculation
- Gift Voucher settings
- Instalments
- Interest
- Interest Codes, Interest Terms
- Intrastat Transaction Codes
- Invoice Mail Settings
- Item Classifications
- Item Group Withholdings
- Item Settings
- Item Status Settings
- Legal Record Numbers
- Number Series - Contacts
- Number Series - Gift Vouchers
- Number Series - Gift Vouchers Received
- Number Series - Internal Invoices
- Number Series - Invoices
- Number Series - Receipts
- Official Invoice Serial Number
- Payment Modes
- Payment Term Sales A/C
- Payment Terms
- Receipt Settings
- Regional Sales Taxes
- Regions
- Registration Defaults
- Reminder Texts
- Sales Invoice Settings
- Standard Problems
- Units
- VAT Corrections S/L
- VAT Zone Label
- Home page for Sales Ledger manual
- Home page for Standard ERP manual
Payment Modes
Payment Modes represent the different methods by which your Invoices will be paid by your Customers (and by which you will pay your Suppliers). Typical examples are cash, cheque, direct debit and credit card. For many businesses, the difference between such payment methods in terms of the way they are accounted for is minimal, but where appropriate, you can configure each Payment Mode to debit a different Account and to be paid into a different bank account. In other words, you should have a separate Payment Mode for each bank account that will issue or receive payments. Payment Modes can also be differentiated by Object.The Payment Modes setting is in both the Sales and Purchase Ledgers. To open this setting, ensure you are in either of these modules and then click the [Settings] button in the Navigation Centre. Double-click 'Payment Modes' in the 'Settings' list. Fill in the fields as described below. Then, to save changes and close the window, click the [Save] button. To close the window without saving changes, click the close box.

The Payment Mode in the first row of this setting will be offered as a default in each new Receipt and Payment that you create. It is therefore recommended that you enter your most commonly used Payment Mode in this row.
The Payment Modes setting is spread over five flips. To view specific flips, click one of the five flip tabs (marked A-E) on the right of the matrix:

---
Settings in the Sales Ledger:
- Introduction
- Account Usage S/L
- Age Limits
- Alternative Items
- Bonus
- Classification Types
- Contact Credit Limits
- Contact Document Types
- Contact Settings
- Credit Limit
- Cross Sales Items
- Customer Categories
- Default Items
- Default Payment Modes
- Environment Tax
- Extra Tax Customer Discounts
- Factoring Export
- Freight
- Freight/Weight Calculation
- Gift Voucher settings
- Instalments
- Interest
- Interest Codes, Interest Terms
- Intrastat Transaction Codes
- Invoice Mail Settings
- Item Classifications
- Item Group Withholdings
- Item Settings
- Item Status Settings
- Legal Record Numbers
- Number Series - Contacts
- Number Series - Gift Vouchers
- Number Series - Gift Vouchers Received
- Number Series - Internal Invoices
- Number Series - Invoices
- Number Series - Receipts
- Official Invoice Serial Number
- Payment Modes
- Payment Term Sales A/C
- Payment Terms
- Receipt Settings
- Regional Sales Taxes
- Regions
- Registration Defaults
- Reminder Texts
- Sales Invoice Settings
- Standard Problems
- Units
- VAT Corrections S/L
- VAT Zone Label
- Home page for Sales Ledger manual
- Home page for Standard ERP manual
Payment Modes - Flip A
This page describes Flip A of the Payment Modes setting. Please click the following links for descriptions of the other parts of the setting:- Introduction
- Flip A
- Flip B
- Flip C
- Flip D
- Flip E
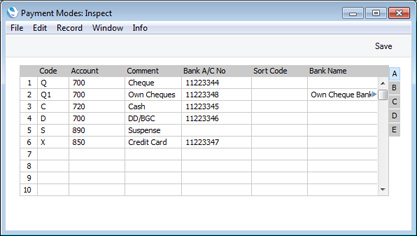
- Code
- Enter the unique code by which the Payment Mode is to be identified from elsewhere in Standard ERP.
- Account
- Paste Special
Account register, Nominal Ledger/System module
- Specify here the cash, bank or other Account to be debited by any Receipt and credited by any Payment using the Payment Mode.
- Comment
- The name of the Payment Mode. This will be shown in the 'Paste Special' list, so it should be descriptive enough to make the selection of the correct Payment Mode easy for all users.
- Bank A/C No
- If the Payment Mode represents a payment method that updates a bank account (for example, electronic payment or cheque), specify here the bank account number of that bank account.
- If this field is empty and you specify a Bank on flip D, the Account (IBAN) from the relevant record in the Banks setting in the Purchase Ledger will be copied here as a default.
- If you will be paying Purchase Invoices using Banking File export files, this bank account will be included in those export files as the payer bank account when you are using one of the following Payment File Formats:
- Australia - ABA
- Czech - ABO
- Czech - CITI bank
- All Danish banks except BGBank
- Finland - SEPA (international)
- Hungary - HVB
- Latvia - FidaVista
- Lithuania - LITAS-ESIS 1.1
- All New Zealand banks. The Bank A/C No should consist of a Bank ID, Branch Code, Account Number and a Suffix.
- All Polish banks
- Spain - SEPA (international)
- All Swedish banks
- UK - BACS
- If this field is empty and you specify a Bank on flip D, the Account (IBAN) from the relevant record in the Banks setting in the Purchase Ledger will be copied here as a default.
- Sort Code
- Enter here the Sort Code (branch number) of the bank where the account is held.
- If you will be paying Purchase Invoices using Banking File export files, this sort code will be included in those export files as the sort code of the payer bank account when you are using one of the following Payment File Formats:
- Australia - ABA. When exporting, a hyphen will be inserted automatically as the fourth character if it is missing.
- Czech - ABO
- All New Zealand banks
- Sweden - Handelsbanken (international). Enter "SE" in this field.
- UK - BACS. Enter the sort code without hyphens or spaces.
- If you will be paying Purchase Invoices using Banking File export files, this sort code will be included in those export files as the sort code of the payer bank account when you are using one of the following Payment File Formats:
- Bank Name
- Record the name of the bank where the account is held here.
- If you will be paying Purchase Invoices using Banking File export files, the Bank Name will be included in those export files when you are using one of the following Payment File Formats:
- If you will be paying Purchase Invoices using Banking File export files, the Bank Name will be included in those export files when you are using one of the following Payment File Formats:
Settings in the Sales Ledger:
- Introduction
- Account Usage S/L
- Age Limits
- Alternative Items
- Bonus
- Classification Types
- Contact Credit Limits
- Contact Document Types
- Contact Settings
- Credit Limit
- Cross Sales Items
- Customer Categories
- Default Items
- Default Payment Modes
- Environment Tax
- Extra Tax Customer Discounts
- Factoring Export
- Freight
- Freight/Weight Calculation
- Gift Voucher settings
- Instalments
- Interest
- Interest Codes, Interest Terms
- Intrastat Transaction Codes
- Invoice Mail Settings
- Item Classifications
- Item Group Withholdings
- Item Settings
- Item Status Settings
- Legal Record Numbers
- Number Series - Contacts
- Number Series - Gift Vouchers
- Number Series - Gift Vouchers Received
- Number Series - Internal Invoices
- Number Series - Invoices
- Number Series - Receipts
- Official Invoice Serial Number
- Payment Modes, including:
- Payment Term Sales A/C
- Payment Terms
- Receipt Settings
- Regional Sales Taxes
- Regions
- Registration Defaults
- Reminder Texts
- Sales Invoice Settings
- Standard Problems
- Units
- VAT Corrections S/L
- VAT Zone Label
- Home page for Sales Ledger manual
- Home page for Standard ERP manual
Payment Modes - Flip B
This page describes Flip B of the Payment Modes setting. Please follow these links for descriptions of the other parts of the setting:- Introduction
- Flip A
- Flip B
- Flip C
- Flip D
- Flip E

- Form Template
- Paste Special
Form Template register, System module
- You can allocate a different Form Template to each Payment Mode. This Form Template will be used when you print a Receipt or Payment that uses the Payment Mode, instead of the standard Form Template specified using the 'Define Form' function for the Receipt Form or Payment Form respectively. This can be useful especially in the Purchase Ledger as it allows you to have a different design of Remittance Advice for each Payment Mode.
- Objects
- Paste Special
Object register, Nominal Ledger/System module
- You can assign up to 20 Objects separated by commas to each Payment Mode. When you use a Payment Mode in a Receipt, Payment, Cash In or Cash Out, the Objects that you specify here will be assigned to the posting to the Bank or Cash Account (i.e. the Account specified on flip A of this setting) in the resulting Nominal Ledger Transaction. This will allow detailed analysis by department or cost centre.
- Type
- Paste Special
Choices of possible entries
- Use this field to specify the Type of the Payment Mode. The Type is a description of the payment method represented by the Payment Mode.
- The Payment Mode Type is used for reporting purposes, as follows:
- If you produce the Liquidity Forecast report in the Nominal Ledger using the Simulations option, the report will list Active Simulation rows posting to Accounts used in Payment Modes in which the Type is "Free", "Received Cheques", "Own Cheques", "Credit Card", "Debit Card", "Cash", "On Account" or "Bank Transfer".
- In Portugal, one of the requirements for SAF-T reporting is that the payment methods used in cash sales should be identified using different codes (representing, for example, cash, credit card, debit card, etc). These codes depend on the Type of the Payment Mode used when registering a cash sale.
- The Customer Withholdings report in the Sales Ledger fulfils a requirement in Argentina to list Receipt rows with Payment Modes in which the Type is "Regional Withholding", "Social Insurance Withholding", "VAT Withholding" or "Withholding". Please refer to your local HansaWorld representative for more details about these Types of Payment Mode.
- Received Cheques
- You can use a Payment Mode whose Type is "Received Cheques" in a Receipt when you receive payment using a cheque that you have recorded in the Cheque register in the Cheques module. Using such a Payment Mode will allow you to use 'Paste Special' (from the Cheque No. field on flip C of a Receipt row) to choose the Cheque, whose Status must be Registered. Alternatively, you will be able to use the 'Create Cheque' or 'Distribute Cheque' functions to choose the Cheque. On marking the Receipt as OK and saving, the Status of the relevant Cheques will be changed to Accepted.
- You can also use a Payment Mode whose Type is "Received Cheques" in a Payment to signify that you are issuing payment by forwarding a cheque that you have received from a Customer. You will be able to use 'Paste Special' (from the Cheque No. field on flip C of a Payment row) to choose the Cheque, whose Status must be Accepted. When you first save the Payment, you will be able to leave the Cheque No. field in each row blank. However, when you mark the record as Ordered, you will then need to specify Cheque Nos in each row before you will be able to save again.
- You can also use a Payment Mode whose Type is "Received Cheques" in a Payment to signify that you are issuing payment by forwarding a cheque that you have received from a Customer. You will be able to use 'Paste Special' (from the Cheque No. field on flip C of a Payment row) to choose the Cheque, whose Status must be Accepted. When you first save the Payment, you will be able to leave the Cheque No. field in each row blank. However, when you mark the record as Ordered, you will then need to specify Cheque Nos in each row before you will be able to save again.
- Own Cheques
- You can use a Payment Mode whose Type is "Own Cheques" in a Payment or a Personnel Payment when you wish to issue payment using a cheque that you have recorded in the Own Cheque register in the Cheques module. Using such a Payment Mode will allow you to use 'Paste Special' (from the Cheque No. field on flip C of a Payment row or flip A of a Personnel Payment row) to choose the Own Cheque, whose Status must be Unused. Alternatively, you will be able to use the 'Prepare Cheque' or 'Cheque Run' functions (only 'Prepare Cheque' in the case of Personnel Payments) to choose the Own Cheque. When you first save the Payment or Personnel Payment, you will be able to leave the Cheque No. field in each row blank. However, when you mark the record as Ordered, you will then need to specify Cheque Nos in each row before you will be able to save again. On marking the record as OK and saving, the Status of the relevant Own Cheques will be changed to Issued.
- Credit Card
- You can use a Payment Mode whose Type is "Credit Card" in a Receipt when you receive a payment by credit card that you have recorded in the Credit Card Slip register in the Cheques module. Using such a Payment Mode will allow you to use 'Paste Special' (from the Cheque No. field on flip C of a Receipt row) to choose the Credit Card Slip, whose Status must be Received (or Deposited if the Received Value is negative). On marking the record as OK and saving, the Status of the relevant Credit Card Slips will be changed to Deposited.
- The Payment Mode Type is used for reporting purposes, as follows:
Settings in the Sales Ledger:
- Introduction
- Account Usage S/L
- Age Limits
- Alternative Items
- Bonus
- Classification Types
- Contact Credit Limits
- Contact Document Types
- Contact Settings
- Credit Limit
- Cross Sales Items
- Customer Categories
- Default Items
- Default Payment Modes
- Environment Tax
- Extra Tax Customer Discounts
- Factoring Export
- Freight
- Freight/Weight Calculation
- Gift Voucher settings
- Instalments
- Interest
- Interest Codes, Interest Terms
- Intrastat Transaction Codes
- Invoice Mail Settings
- Item Classifications
- Item Group Withholdings
- Item Settings
- Item Status Settings
- Legal Record Numbers
- Number Series - Contacts
- Number Series - Gift Vouchers
- Number Series - Gift Vouchers Received
- Number Series - Internal Invoices
- Number Series - Invoices
- Number Series - Receipts
- Official Invoice Serial Number
- Payment Modes, including:
- Payment Term Sales A/C
- Payment Terms
- Receipts Setting
- Regional Sales Taxes
- Regions
- Registration Defaults
- Reminder Texts
- Sales Invoice Settings
- Standard Problems
- Units
- VAT Corrections S/L
- VAT Zone Label
- Home page for Sales Ledger manual
- Home page for Standard ERP manual
Payment Modes - Flip C
This page describes Flip C of the Payment Modes setting. Please click the following links for descriptions of the other parts of the setting:- Introduction
- Flip A
- Flip B
- Flip C
- Flip D
- Flip E

- From/To
- These fields allow you to define separate Number Series for each Payment Mode. You should do this if you are using the Common Number Series option in the Cash Book Settings setting in the Cash Book module. If so, Receipts and Cash In records will use the Number Series in the left-hand From and To fields, while Payments, Purchase Invoices, Cash Out records and Personnel Payments will use those in the right-hand fields. When you enter a new transaction, the next number in the appropriate series will be used when you specify the Payment Mode. In the case of Purchase Invoices, you should enter the Payment Mode in the Payment Terms field. When you mark the Purchase Invoice as OK and save, it will be treated as paid immediately and no posting to the Creditor Account will be made (i.e. it will be a Cash Note).
- This feature can be useful in the Baltic States, where all incoming cash transactions (i.e. using the same cash Payment Mode) must use the same number sequence, irrespective of the originating register (i.e. Cash In and Receipts). Similarly, all outgoing cash transactions (i.e. Purchase Invoices, Cash Out, Payments and Personnel Payments) must use the same number sequence.
- A consequence of this is that you should use different Codes in the Payment Modes and Payment Terms settings. For example, if you have used "C" as a Code in both settings and you enter it to the Payment Terms field in a Purchase Invoice, it will be treated as a reference to the Payment Term and not to the Payment Mode. Consequently, the Invoice Number will not be changed as expected and, depending on the Type of the Payment Term, the Invoice might not be treated as paid.
- If you have not entered number sequences for the current year in the Number Series settings, you are free to use any number sequence for each Payment Mode. Otherwise, if you are using the Common Number Series option, the sequences for each Payment Mode must be different to those entered in those settings (i.e. Payment Mode number sequences must be different to Number Series - Cash In, Number Series - Cash Out, Number Series - Invoices, Number Series - Purchase Invoices, Number Series - Receipts, Number Series - Payments and Number Series - Personnel Payments). The incoming number sequences for each Payment Mode should also be different to each other, as should the outgoing number sequences.
- If you are not using the Common Number Series option, it is recommended that you do not enter number sequences in the Payment Modes setting, and that you only use the Number Series settings.
- This feature can be useful in the Baltic States, where all incoming cash transactions (i.e. using the same cash Payment Mode) must use the same number sequence, irrespective of the originating register (i.e. Cash In and Receipts). Similarly, all outgoing cash transactions (i.e. Purchase Invoices, Cash Out, Payments and Personnel Payments) must use the same number sequence.
- N/L
- Paste Special
Choices of possible entries
- The N/L field gives you a measure of control over whether Nominal Ledger Transactions will be generated automatically when you mark transactions with a particular Payment Mode as OK and save them. Using 'Paste Special' from the N/L field brings up a selection list containing two options: "GenTrans" and "Do Not GenTrans". Select the first option if Nominal Ledger Transactions are to be generated and the second if they are not. In effect, this feature is an exclusionary one in that you can only choose to not have Nominal Ledger Transactions created for a particular Payment Mode. If the overall preference (set in the Sub Systems setting in the Nominal Ledger) is to not have such transactions created, you cannot decide to have them created for a single Payment Mode.
- This option will only be used if you are using the Common Number Series option in the Cash Book Settings setting in the Cash Book module and if you have entered number sequences in the From and To fields to the left.
Settings in the Sales Ledger:
- Introduction
- Account Usage S/L
- Age Limits
- Alternative Items
- Bonus
- Classification Types
- Contact Credit Limits
- Contact Document Types
- Contact Settings
- Credit Limit
- Cross Sales Items
- Customer Categories
- Default Items
- Default Payment Modes
- Environment Tax
- Extra Tax Customer Discounts
- Factoring Export
- Freight
- Freight/Weight Calculation
- Gift Voucher settings
- Instalments
- Interest
- Interest Codes, Interest Terms
- Intrastat Transaction Codes
- Invoice Mail Settings
- Item Classifications
- Item Group Withholdings
- Item Settings
- Item Status Settings
- Legal Record Numbers
- Number Series - Contacts
- Number Series - Gift Vouchers
- Number Series - Gift Vouchers Received
- Number Series - Internal Invoices
- Number Series - Invoices
- Number Series - Receipts
- Official Invoice Serial Number
- Payment Modes, including:
- Payment Term Sales A/C
- Payment Terms
- Receipt Settings
- Regional Sales Taxes
- Regions
- Registration Defaults
- Reminder Texts
- Sales Invoice Settings
- Standard Problems
- Units
- VAT Corrections S/L
- VAT Zone Label
- Home page for Sales Ledger manual
- Home page for Standard ERP manual
Payment Modes - Flip D
This page describes Flip D of the Payment Modes setting. Please click the following links for descriptions of the other parts of the setting:- Introduction
- Flip A
- Flip B
- Flip C
- Flip D
- Flip E
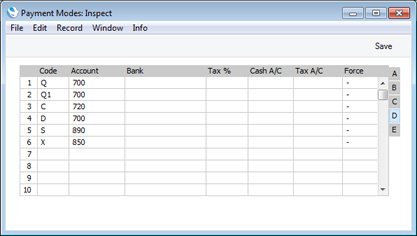
- Bank
- Paste Special
Banks setting, Purchase Ledger
- If the Payment Mode is associated with a Bank (i.e. the Payment Mode represents a bank account into which Receipts will be paid and/or from where Payments will be issued), specify the Bank here.
- If the Bank A/C No field on flip A is empty when you specify a Bank here, the Account (IBAN) from that Bank will be copied to the Bank A/C No field as a default.
- If you will be paying Purchase Invoices using Banking File export files, the Bank will be included in those export files when you are using the following Payment File Formats:
- Australia - ABA
- Finland - SEPA
- Spain - SEPA
- Sweden - Handelsbanken (international)
- If the Bank A/C No field on flip A is empty when you specify a Bank here, the Account (IBAN) from that Bank will be copied to the Bank A/C No field as a default.
- TAX %, Cash A/C, TAX A/C
- These fields are intended for use in Russia, where a Sales Tax is levied on cash Receipts.
- When you mark a Receipt with this Payment Mode as OK and save it, the whole Received Value will be paid into the cash or bank Account in the usual fashion. In addition, a percentage of the Received Value (determined by the Tax %) will be credited to the Tax Account with a balancing debit to the Cash Account.
- These fields will be ignored when you use the Payment Mode in Payments or in Cash Out records.
- Note that these fields are not suitable for users of the Cash VAT scheme in the UK. Cash VAT postings will be made if you are using the Post Receipt VAT option in the Account Usage S/L setting and if you have specified an O/P Account for each VAT Code.
- When you mark a Receipt with this Payment Mode as OK and save it, the whole Received Value will be paid into the cash or bank Account in the usual fashion. In addition, a percentage of the Received Value (determined by the Tax %) will be credited to the Tax Account with a balancing debit to the Cash Account.
- Force
- Paste Special
Choices of possible entries
- You can use this field in a Payment Mode to ensure the Bank Amt. in Cur. 1 and Bank Amt. in Cur. 2 fields on flip I of each Receipt row and the B. Cur. 1 V and B. Cur. 2 V on flip I of each Payment row contain values.
- The Bank Amt. in Cur. 1 and Bank Amt. in Cur. 2 fields in a Receipt row contain the amount received, expressed in Base Currency 1 (i.e. your home Currency) and Base Currency 2 respectively. Similarly, the B. Cur. 1 V and B. Cur. 2 V fields in a Payment row contain the amount paid out, expressed in Base Currencies 1 and 2. These fields are intended to be used when your bank uses a different exchange rate to the one you have in Standard ERP and when you do not want this rate difference to result in gains or losses being posted in the Nominal Ledger.
- The available options for the Force field are:
- -
- The Force field will have no effect. You will be able to enter values in the Bank Amt. in Cur. 1 and Bank Amt. in Cur. 2 fields in a Receipt row and the B. Cur. 1 V and B. Cur. 2 V fields in a Payment row or leave them empty as appropriate.
- Force Bank Values in B1
- The Bank Amt. in Cur. 1 field in every Receipt row and the B. Cur. 1 V field in every Payment row that uses the Payment Mode must contain values, but the Bank Amt. in Cur. 2 and B. Cur. 2 fields will be left optional.
- Force Bank Values in B1 and B2
- The Bank Amt. in Cur. 1 and Bank Amt. in Cur. 2 fields in every Receipt row and the B. Cur. 1 and B. Cur. 2 fields in every Payment row that uses the Payment Mode must contain values.
- The Bank Amt. in Cur. 1 and Bank Amt. in Cur. 2 fields in a Receipt row contain the amount received, expressed in Base Currency 1 (i.e. your home Currency) and Base Currency 2 respectively. Similarly, the B. Cur. 1 V and B. Cur. 2 V fields in a Payment row contain the amount paid out, expressed in Base Currencies 1 and 2. These fields are intended to be used when your bank uses a different exchange rate to the one you have in Standard ERP and when you do not want this rate difference to result in gains or losses being posted in the Nominal Ledger.
Settings in the Sales Ledger:
- Introduction
- Account Usage S/L
- Age Limits
- Alternative Items
- Bonus
- Classification Types
- Contact Credit Limits
- Contact Document Types
- Contact Settings
- Credit Limit
- Cross Sales Items
- Customer Categories
- Default Items
- Default Payment Modes
- Environment Tax
- Extra Tax Customer Discounts
- Factoring Export
- Freight
- Freight/Weight Calculation
- Gift Voucher settings
- Instalments
- Interest
- Interest Codes, Interest Terms
- Intrastat Transaction Codes
- Invoice Mail Settings
- Item Classifications
- Item Group Withholdings
- Item Settings
- Item Status Settings
- Legal Record Numbers
- Number Series - Contacts
- Number Series - Gift Vouchers
- Number Series - Gift Vouchers Received
- Number Series - Internal Invoices
- Number Series - Invoices
- Number Series - Receipts
- Official Invoice Serial Number
- Payment Modes, including:
- Payment Term Sales A/C
- Payment Terms
- Receipt Settings
- Regional Sales Taxes
- Regions
- Registration Defaults
- Reminder Texts
- Sales Invoice Settings
- Standard Problems
- Units
- VAT Corrections S/L
- VAT Zone Label
- Home page for Sales Ledger manual
- Home page for Standard ERP manual
Payment Modes - Flip E
This page describes Flip E of the Payment Modes setting. Please follow the links below for descriptions of the other parts of the setting:- Introduction
- Flip A
- Flip B
- Flip C
- Flip D
- Flip E
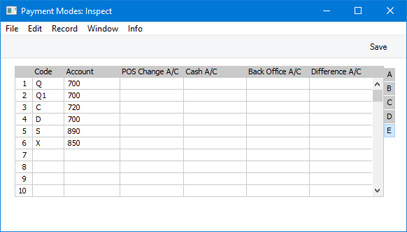
- Cash A/C
- This Account is also on flip D. Please refer here for details.
- Back Office A/C
- Paste Special
Account register, Nominal Ledger/System module
- The Back Office Account will be used in the Point of Sales and Restaurant modules when you record cash movements into and out of your Till Drawers. You should use Cash Events to record such cash movements (i.e. the Cash Events setting in the Point of Sales module or the Cash Event register in the Restaurant module). Examples include placing a cash float into a Till Drawer, and removing the day's takings from the Drawer to the back office.
- You will need to specify a Payment Mode whenever you record a Cash Event. For example, placing a cash float into a Till Drawer and removing cash at the end of a session will typically require a Payment Mode that updates a Cash Account, while removing cheques and credit card slips from the Till at the end of the session may require Payment Modes that update different Accounts.
- At the end of a work session, you will need to record the day’s transactions in the Nominal Ledger. One way to do this is by running the 'Cash Up' Maintenance function. One of the tasks carried out by this function will be to create a Cash Event that moves the contents of the Till to the back office (if you haven't already done this by entering such a Cash Event yourself). It will also post all Cash Events from the session to the Nominal Ledger. Another way is to create a POS Balance record. When you mark a POS Balance record as OK and save, all Cash Events from the session will be posted to the Nominal Ledger. Please refer to step 5 here for more details.
- In the Nominal Ledger Transaction created by the 'Cash Up' function or the POS Balance record, the Back Office Account will be credited with the value of any cash that you place in a Till Drawer (i.e. it will be credited from Cash In Events) and debited with the value of cash, cheques and/or credit card slips that you remove from the Till Drawer (i.e. it will be debited from Cash Out Events). In both cases, the balancing posting will be to the Account on flip A of the relevant Payment Mode.
- In a Cash Event that you enter yourself, the Back Office Account will be chosen as follows:
- The Cred. A/C specified in the Cash Event itself will be used.
- The Back Office A/C in the POS Settings setting will be used.
- The Back Office A/C on flip E of the relevant Payment Mode will be used.
- If you have not specified a Back Office A/C in the POS Settings setting, the Back Office Account from the Payment Mode will therefore be credited at the beginning of the session by the Cash In Event that places a float in a Till and debited at the end of the session by the Cash Out Event that records the emptying of the Till. If you have specified a Back Office A/C in the POS Settings setting, this Account will be credited by the Cash In Event that places the float in the Till, but the Back Office Account from the Payment Mode will still be debited at the end of the session. For example, it may be that cash floats will all be supplied from the same Cash Account, but at the end of the day cash from a Till will go back to the Cash Account but cheques and credit card slips will go to the bank.
- You will need to specify a Payment Mode whenever you record a Cash Event. For example, placing a cash float into a Till Drawer and removing cash at the end of a session will typically require a Payment Mode that updates a Cash Account, while removing cheques and credit card slips from the Till at the end of the session may require Payment Modes that update different Accounts.
Settings in the Sales Ledger:
- Introduction
- Account Usage S/L
- Age Limits
- Alternative Items
- Bonus
- Classification Types
- Contact Credit Limits
- Contact Document Types
- Contact Settings
- Credit Limit
- Cross Sales Items
- Customer Categories
- Default Items
- Default Payment Modes
- Environment Tax
- Extra Tax Customer Discounts
- Factoring Export
- Freight
- Freight/Weight Calculation
- Gift Voucher settings
- Instalments
- Interest
- Interest Codes, Interest Terms
- Intrastat Transaction Codes
- Invoice Mail Settings
- Item Classifications
- Item Group Withholdings
- Item Settings
- Item Status Settings
- Legal Record Numbers
- Number Series - Contacts
- Number Series - Gift Vouchers
- Number Series - Gift Vouchers Received
- Number Series - Internal Invoices
- Number Series - Invoices
- Number Series - Receipts
- Official Invoice Serial Number
- Payment Modes, including:
- Payment Term Sales A/C
- Payment Terms
- Receipt Settings
- Regional Sales Taxes
- Regions
- Registration Defaults
- Reminder Texts
- Sales Invoice Settings
- Standard Problems
- Units
- VAT Corrections S/L
- VAT Zone Label
- Home page for Sales Ledger manual
- Home page for Standard ERP manual
Payment Term Sales A/C
A Sales Account will be credited whenever you sell an Item, allowing you to record the levels of sales of different types of Items in the Nominal Ledger.When you sell an Item (i.e. whenever you specify an Item in a row in an Invoice, Order, Quotation or other sales transaction), one option available is to have the Sales Account determined by the Payment Term that you use in the transaction. If you need to use this option, use this setting to specify exactly when the Payment Term will supply Sales Accounts.
To work with this setting, first ensure you are in the Sales Ledger and then click the [Settings] button in the Navigation Centre or use the Ctrl-S/⌘-S keyboard shortcut. Double-click 'Payment Term Sales A/C' in the resulting list. The 'Payment Term Sales A/C: Inspect' window opens:
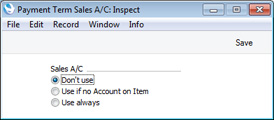
- If you select the Use always option in this setting, the Sales Account will be taken from the Payment Term.
- If the Customer has a Price List and there is a record in the Price register for the Item/Price List/Customer combination or in the Quantity Dependent Prices setting for the Item/Price List combination (depending on the Type of the Price List), the Sales Account will be taken from that Price or Quantity Dependent Price record.
- If you have specified a Sales Account for the Location in the Location Accounts setting in the Stock module, that Sales Account will be used.
- The Sales Account will be taken from the Item record itself.
- If you select the Use if no Account on Item option in this setting, the Sales Account will be taken from the Payment Term.
- The Sales Account will be taken from the Item Group to which the Item belongs.
- The Sales Account on the 'Sales' card of the Account Usage S/L setting will be used.
When finished, click the [Save] button in the Button Bar to save the changes. To close the window without saving changes, click the close box.
---
Settings in the Sales Ledger:
- Introduction
- Account Usage S/L
- Age Limits
- Alternative Items
- Bonus
- Classification Types
- Contact Credit Limits
- Contact Document Types
- Contact Settings
- Credit Limit
- Cross Sales Items
- Customer Categories
- Default Items
- Default Payment Modes
- Environment Tax
- Extra Tax Customer Discounts
- Factoring Export
- Freight
- Freight/Weight Calculation
- Gift Voucher settings
- Instalments
- Interest
- Interest Codes, Interest Terms
- Intrastat Transaction Codes
- Invoice Mail Settings
- Item Classifications
- Item Group Withholdings
- Item Settings
- Item Status Settings
- Legal Record Numbers
- Number Series - Contacts
- Number Series - Gift Vouchers
- Number Series - Gift Vouchers Received
- Number Series - Internal Invoices
- Number Series - Invoices
- Number Series - Receipts
- Official Invoice Serial Number
- Payment Modes
- Payment Term Sales A/C
- Payment Terms
- Receipt Settings
- Regional Sales Taxes
- Regions
- Registration Defaults
- Reminder Texts
- Sales Invoice Settings
- Standard Problems
- Units
- VAT Corrections S/L
- VAT Zone Label
- Home page for Sales Ledger manual
- Home page for Standard ERP manual
Payment Terms
Payment Terms allow you to define when Invoices and Purchase Invoices become due for payment. You can also use them to establish systems of Settlement Discounts.Specifying a Payment Term in an Invoice or Purchase Invoice will immediately cause the Due Date to be calculated. If the Payment Term is one with a Settlement Discount, it will also cause the Discount Date and Discount Amount to be calculated (this information will only be visible in Purchase Invoices, but it is calculated in Sales Invoices as well). Each time you change the Invoice Date or the Payment Term, the Due Date and, if appropriate, the Settlement Discount will be recalculated.
After defining the various Payment Terms that you need in this setting, you can assign default Payment Terms to each Customer and Supplier. In the Contact records for each Customer or Supplier, go to the 'Terms' card and use the Sales Pay. Terms field to specify the Payment Term that will be used by default in Sales Invoices, and the Purch. Pay. Terms field to specify the Payment Term that will be used by default in Purchase Invoices. When you specify a Customer in a Sales Invoice or a Supplier in a Purchase Invoice, the appropriate Payment Term will be brought in automatically.
On the sales side, you can specify that a particular Payment Term will be copied to the Sales Pay. Terms field whenever you create a new Contact. To do this, specify a Default Payment Term in the Contact Settings setting in the Sales Ledger.
As well as controlling the calculation of Due Dates and settlement discounts, the Payment Term is also the mechanism that distinguishes Credit Notes and Cash Notes from "normal" Invoices. When defining Payment Terms in this setting, be sure to enter at least one in which the Type is "Credit Note" and, if you will use Cash Notes, one in which the Type is "Cash".
The Payment Terms setting is in both the Sales and Purchase Ledgers. To work with this setting, ensure you are in either of these modules and then click the [Settings] button in the Navigation Centre. Double-click 'Payment Terms' in the 'Settings' list. The 'Payment Terms: Browse' window opens, showing the Payment Terms that you have previously entered. Double-click a Payment Term in the list to edit it, or add a new Term by selecting 'New' from the Create menu or using the Ctrl-N/⌘-N keyboard shortcut. When the record is complete, save it by clicking the [Save] button in the Button Bar or by clicking the close box and choosing to save changes. To close it without saving changes, click the close box.

- Code
- Enter the unique Code by which the Payment Terms record is to be identified from elsewhere in Standard ERP. The Code can consist of one or two characters, and you can use both numbers and letters.
- Text
- Enter the name for the Payment Term, to be shown in the 'Payment Terms: Browse' window and the 'Paste Special' list.
- Closed
- Check this box if you no longer want the Payment Term to be used. It will not appear in the 'Paste Special' selection window. You can re-open a Closed Payment Term at any time.
- Net Days
- The credit period in days. When you use this Payment Term in an Invoice or Purchase Invoice, the Due Date will be calculated as follows:
- If the Type (below) is "Normal" or "Manual Interest Inv.", the Due Date will be calculated by adding the number of days that you enter here to the Invoice Date.
- If the Type is "Next Month" the Due Date will be a specific date in the next month. For example, if you enter "15" in this field, the Due Date in an Invoice will be the 15th of the next month.
- If the Type is "Accounting Period + Net Days", the Due Date will be calculated by adding the number of days that you enter here to a Fixed Due Date taken from the Accounting Periods setting in the Nominal Ledger.
- If the Type (below) is "Normal" or "Manual Interest Inv.", the Due Date will be calculated by adding the number of days that you enter here to the Invoice Date.
- Settl. Discount %, Settl. Disc. Days
- If the Payment Term is one with a Settlement Discount, enter the Settlement Discount percentage in the Settl. Discount % field and the Discount period (i.e. the number of days within which the Discount can be claimed) in the Settl. Disc. Days field.
- The calculation of the Settlement Discount on an Invoice will depend on this Settl. Discount % and on the Exclude VAT on Settl. Discount option in the Account Usage S/L setting. If you are not using this option, the Settlement Discount will be:
- TOTAL x Settl. Discount %
- For example, if the Settl. Discount % is 10%, the Settlement Discount on an Invoice worth 100 + 20.00 VAT = 120.00 will be calculated to be 120.00 x 10% = 12.00.
- If you are using the Exclude VAT on Settl. Discount option, the Settlement Discount will be:
- (TOTAL - VAT Total) x Settlement Disc. %
- The Exclude VAT on Settl. Discount option is likely to be used in the UK only, and only until 1 April 2015. Please refer to the description of the 'VAT / Tax' card of the Account Usage S/L setting for more details.
- The Settlement Discount will be used when you receive payment against a Sales Invoice or issue payment against a Purchase Invoice within the discount period. When you specify the Invoice Number in a Receipt (sales) or in a Payment (purchases) in which the Receipt or Payment Date is earlier than the Invoice Date + the Sett. Disc. Days, a discount row will be added to the Receipt or Payment automatically. The value in this row will be the value of the Settlement Discount.
- When you mark the Receipt or Payment as OK and save, the value of the Settlement Discount will be debited from the Settlement Discount Account specified on the 'Sales' card of the Account Usage S/L setting (Receipts) or credited to the Settlement Discount Account specified on the 'Creditors' card of the Account Usage P/L setting (Payments).
- In some countries, the entire Settlement Discount should not be posted to the Settlement Discount Account. Instead, the Settlement Discount less VAT should be posted to that Account, and the VAT element should be posted to a Settlement Discount VAT Account. If you need to divide the settlement discount in this way, specify Settlement Discount VAT Accounts in the Account Usage S/L ('VAT / Tax' card) and/or Account Usage P/L ('VAT' card) settings as appropriate.
- In a Purchase Invoice, the value of the Settlement Discount will be shown in the Sett. Discount field on the 'Terms' card.
- Specifying a Settlement Discount % will have no effect if the Type of the Payment Term is "Credit Note" or "Cash".
- The calculation of the Settlement Discount on an Invoice will depend on this Settl. Discount % and on the Exclude VAT on Settl. Discount option in the Account Usage S/L setting. If you are not using this option, the Settlement Discount will be:
- Settl. Discount % 2 , Settl. Disc. Days 2
- Use these fields if you need to configure a two-stage Settlement Discount.
- For example, you may need to offer a 10% Discount for payment within 10 days and a 5% Discount for payment within the following 20 days. If so, use the Settl. Discount % and Settl. Disc. Days fields for the first stage (10% Discount for payment within 10 days), and the Settl. Discount % 2 and Settl. Disc. Days 2 fields for the second stage (5% Discount for payment within the following 20 days). Settl. Disc. Days 2 counts from the Invoice Date, so in this example it should be 30.
- For example, you may need to offer a 10% Discount for payment within 10 days and a 5% Discount for payment within the following 20 days. If so, use the Settl. Discount % and Settl. Disc. Days fields for the first stage (10% Discount for payment within 10 days), and the Settl. Discount % 2 and Settl. Disc. Days 2 fields for the second stage (5% Discount for payment within the following 20 days). Settl. Disc. Days 2 counts from the Invoice Date, so in this example it should be 30.
- Price List
- Paste Special
Price List register, Pricing module
- If you specify a Price List here, it will be brought into sales transactions (e.g. Quotations, Orders and Invoices) that using the Payment Term. This can be useful if you offer different prices to Customers who pay by different methods (for example, special prices for credit card payments).
- Instalment
- Paste Special
Instalments setting, Sales Ledger
- Use this field if you need to connect the Payment Term record to an Instalment plan, defined in the Instalments setting. Please click here for a full description.
- Cash A/C
- Paste Special
Account register, Nominal Ledger/System module
- If the Type (below) is "Cash", enter the Account to be debited by cash sales and credited by cash purchases. If t you do not specify a Cash Account here, it will be taken from the 'Debtors' card of the Account Usage S/L setting (cash sales) or the 'Creditors' card of the Account Usage P/L setting (cash purchases). Cash sales and purchases are known as "Cash Notes": please refer to the section below describing the "Cash" Type for more details.
- Sales A/C
- Paste Special
Account register, Nominal Ledger/System module
- If you would like a particular Sales Account to be credited from Sales Invoices that use the Payment Term, specify that Sales Account here. You should also use the Payment Term Sales A/C setting to specify exactly when this Sales Account will be used (e.g. always, or only when an Item does not have its own Sales Account).
- Type
- A Payment Term can belong to one of the Types described below. The Type determines how Due Dates in Invoices will be calculated, and is also the mechanism that distinguishes Credit Notes and Cash Notes from "normal" Invoices. You should be sure to enter at least one Payment Term in which the Type is "Credit Note" and, if you will use Cash Notes, one in which the Type is "Cash".
- Normal
- If you use a "Normal" or "Next Month" Payment Term in an Invoice, it will signify that the Invoice is a "normal" one. On the sales side, such an Invoice will debit a Debtors Account and credit Sales and Output VAT Accounts. On the purchase side, it will credit a Creditors Account and debit Cost and Input VAT Accounts.
- The Due Date in an Invoice with a "Normal" Payment Term will be calculated by adding the value in the Net Days field to the Invoice Date.
- The Due Date in an Invoice with a "Normal" Payment Term will be calculated by adding the value in the Net Days field to the Invoice Date.
- Credit Note
- Using a "Credit Note" Payment Term in an Invoice will convert that Invoice into a Credit Note. This will cause the Sales or Purchase and Nominal Ledgers to be updated correctly. In the Nominal Ledger, a sales Credit Note will credit a Debtors Account and debit Sales and Output VAT Accounts. A purchase Credit Note will debit a Creditors Account and credit Cost and Input VAT Accounts.
- You will usually create a Credit Note by opening the original Invoice and selecting the 'Credit Note' function from the Create menu. This function will use the first "Credit Note" Payment Term (alphabetically by Code). You should therefore have at least one Payment Term record of this Type if you wish to create Credit Notes in this way.
- Credit Notes on the sales side are described here, and those on the purchase side here.
- You will usually create a Credit Note by opening the original Invoice and selecting the 'Credit Note' function from the Create menu. This function will use the first "Credit Note" Payment Term (alphabetically by Code). You should therefore have at least one Payment Term record of this Type if you wish to create Credit Notes in this way.
- Cash
- Using a "Cash" Payment Term in an Invoice signifies that the Invoice is a cash sale or a cash purchase i.e. it is to be treated as paid immediately. Invoices with this Payment Term are known as "Cash Notes".
- In the Sales Ledger, a Cash Note will debits the Cash Account specified above or on the 'Debtors' card of the Account Usage S/L setting and credit the appropriate Sales and Output VAT Accounts for each Item on the Invoice. Therefore, no posting to a Debtor Account will be made as the Cash Note will immediately be treated as paid, and so there will be no need to enter a Receipt.
- In Sweden, it is a legal requirement that all cash or credit card payments in shops (i.e. Cash Notes) should be made through a certified POS solution that contains a fiscal control unit. If you are in Sweden and you will be using Cash Notes, be sure to choose the Register Cash Sales in Fiscal Control Unit option in the Account Usage S/L setting.
- Cash Notes behave in a similar fashion in the Purchase Ledger. In this case, the Cash Account specified above or on the 'Creditors' card of the Account Usage P/L setting will be credited. Again, there will be no need to enter a Payment.
- In the Sales Ledger, a Cash Note will debits the Cash Account specified above or on the 'Debtors' card of the Account Usage S/L setting and credit the appropriate Sales and Output VAT Accounts for each Item on the Invoice. Therefore, no posting to a Debtor Account will be made as the Cash Note will immediately be treated as paid, and so there will be no need to enter a Receipt.
- Next Month
- "Next Month" is similar to "Normal" above, differing only in the calculation of Due Dates.
- You should use a Payment Term of this Type in an Invoice if you need its Due Date to be a specific date in the next month. For example, if you enter "15" in the Net Days field, the Due Date in an Invoice will be the 15th of the next month.
- This will result in a credit period of between 15 and 45 days, depending on the Invoice Date.
- If you need a Due Date always to be the last day of a month, you cannot use this option because months don't always contain the same number of days. Instead, use the "Accounting Period + Net Days" option below.
- You should use a Payment Term of this Type in an Invoice if you need its Due Date to be a specific date in the next month. For example, if you enter "15" in the Net Days field, the Due Date in an Invoice will be the 15th of the next month.
- Manual Interest Inv.
- This Type allows you to create Interest Invoices (charging interest for late payment) without using the 'Create Interest Invoices' Maintenance function.
- In most respects, this Type is similar to "Normal" described above, so you can also enter a figure in the Net Days field if appropriate. However, Interest Invoices will be printed using a different Form Template, and are marked with an "I" in the right-hand column of the 'Invoices: Browse' window.
- In most respects, this Type is similar to "Normal" described above, so you can also enter a figure in the Net Days field if appropriate. However, Interest Invoices will be printed using a different Form Template, and are marked with an "I" in the right-hand column of the 'Invoices: Browse' window.
- Accounting Period + Net Days
- Use this Type if you need Due Dates to be calculated using the Accounting Periods setting in the Nominal Ledger. This will be the case if you need a Due Date always to be the last day of a month, or you need Invoices issued on any date in a period that crosses calendar months to have the same Due Date. Please follow the link for details. In other respects, this type is similar to Normal described above.
- Employee
- This type allows you to enter Purchase Invoices that have already been paid by employees (e.g. mobile phone contracts).
- When you enter a Payment Term of this Type in a Purchase Invoice, a row will be added to the Purchase Invoice where you can enter the Signature of the Person who paid the Invoice. You will not be able to save the Purchase Invoice until you have done so.
- When you mark the Purchase Invoice as OK and save, the resulting Nominal Ledger Transaction will credit the Account from the relevant Person record ('Accounts' card). The Person’s Object will also be assigned to the credit posting(s).
- The Purchase Invoice will be included in the Periodic Personnel Statement for the Person (marked as “P/INV”) and in the Periodic Supplier Statement for the Suppler (marked as “CASH”).
- In other respects, this Type is similar to “Cash” described above, so the Purchase Invoice will immediately be treated as paid. Please refer here for an illustrated example.
- When you enter a Payment Term of this Type in a Purchase Invoice, a row will be added to the Purchase Invoice where you can enter the Signature of the Person who paid the Invoice. You will not be able to save the Purchase Invoice until you have done so.
- Normal
- Language, Text
- Use the table in the lower part of the window if you need to enter various translations of the Payment Term Text. Specify a Language in the first column using 'Paste Special' if necessary, and the appropriate translation in the second column. There is no need to enter a row for your home Language.
- These translations will be printed on documentation such as Quotations, Orders and Invoices, providing you have included the "Payment Terms " field in your Form Templates. The Language of the Quotation, Order or Invoice will determine which translation will be printed. If a Quotation, Order or Invoice does not have a Language or has a Language with no translation listed in this table, the Payment Term Text itself will be printed.
Settings in the Sales Ledger:
- Introduction
- Account Usage S/L
- Age Limits
- Alternative Items
- Bonus
- Classification Types
- Contact Credit Limits
- Contact Document Types
- Contact Settings
- Credit Limit
- Cross Sales Items
- Customer Categories
- Default Items
- Default Payment Modes
- Environment Tax
- Extra Tax Customer Discounts
- Factoring Export
- Freight
- Freight/Weight Calculation
- Gift Voucher settings
- Instalments
- Interest
- Interest Codes, Interest Terms
- Intrastat Transaction Codes
- Invoice Mail Settings
- Item Classifications
- Item Group Withholdings
- Item Settings
- Item Status Settings
- Legal Record Numbers
- Number Series - Contacts
- Number Series - Gift Vouchers
- Number Series - Gift Vouchers Received
- Number Series - Internal Invoices
- Number Series - Invoices
- Number Series - Receipts
- Official Invoice Serial Number
- Payment Modes
- Payment Term Sales A/C
- Payment Terms
- Receipt Settings
- Regional Sales Taxes
- Regions
- Registration Defaults
- Reminder Texts
- Sales Invoice Settings
- Standard Problems
- Units
- VAT Corrections S/L
- VAT Zone Label
- Home page for Sales Ledger manual
- Home page for Standard ERP manual
Receipt Settings
The Receipts Setting contains a single set of options that you can use to control the operation of the 'Distribute Receipt' function in Receipts.To work with this setting, first ensure you are in the Sales Ledger and then click the [Settings] button in the Navigation Centre or use the Ctrl-S/⌘-S keyboard shortcut. Double-click 'Receipt Setting' in the resulting list. The 'Receipt Setting: Inspect' window opens. Choose an option as described below the illustration and then click the [Save] button in the Button Bar to save the changes. To close the window without saving changes, click the close box.
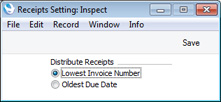
The option in this setting allow you to choose how such payments will be allocated, as follows:
- Lowest Invoice Number
- Payments will be allocated to Invoices in Invoice Number order, starting with the lowest.
- Oldest Due Date
- Payments will be allocated to Invoices in Due Date order, starting with the oldest. This option will be useful if you are using more than one Number Series for Invoice Numbers.
Settings in the Sales Ledger:
- Introduction
- Account Usage S/L
- Age Limits
- Alternative Items
- Bonus
- Classification Types
- Contact Credit Limits
- Contact Document Types
- Contact Settings
- Credit Limit
- Cross Sales Items
- Customer Categories
- Default Items
- Default Payment Modes
- Environment Tax
- Extra Tax Customer Discounts
- Factoring Export
- Freight
- Freight/Weight Calculation
- Gift Voucher settings
- Instalments
- Interest
- Interest Codes, Interest Terms
- Intrastat Transaction Codes
- Invoice Mail Settings
- Item Classifications
- Item Group Withholdings
- Item Settings
- Item Status Settings
- Legal Record Numbers
- Number Series - Contacts
- Number Series - Gift Vouchers
- Number Series - Gift Vouchers Received
- Number Series - Internal Invoices
- Number Series - Invoices
- Number Series - Receipts
- Official Invoice Serial Number
- Payment Modes
- Payment Term Sales A/C
- Payment Terms
- Receipts Setting
- Regional Sales Taxes
- Regions
- Registration Defaults
- Reminder Texts
- Sales Invoice Settings
- Standard Problems
- Units
- VAT Corrections S/L
- VAT Zone Label
- Home page for Sales Ledger manual
- Home page for Standard ERP manual
Regional Sales Taxes
You can use the Regional Sales Taxes setting together with the Regions setting to configure a system of regional sales taxes. The setting was designed for use in Argentina, but may be of use in other countries with similar taxes.Regional sales taxes will not be charged to or be payable by Customers: instead, your company as the selling company will be liable. Regional sales taxes will not be posted to the Nominal Ledger from Invoices (i.e. they will not be recorded immediately sales are made). You should periodically produce the Regional Taxes report and use the information it contains as a basis for reporting to the tax authorities.
To work with Regional Sales Taxes, follow these steps:
- Enter the sales tax regions in the Regions setting.
- Assign a Region to each Customer, using the field on the 'Delivery' card, and to each record in the Delivery Addresses setting in the Sales Orders module.
- Change to the Customs module and, in the Commodity Code register, enter Commodity Codes to represent the various activities undertaken by your business (i.e. the various types of goods and services that you sell).
- Assign a Commodity Code to each Item or Item Group using the Commodity Code field on the 'Recipe' card of the Item record or the Commodity/EAN field on the 'Freight' card of the Item Group record. The Commodity Code will be taken from the Item Group if the field in the Item is blank.
- Enter the sales tax rates for each Region, using the Regional Sales Taxes setting in the Sales Ledger.
After specifying a Code and Comment, choose the Region using 'Paste Special'. In the Reg Tax % field, specify the proportion of your sales that will be liable for regional sales tax. Usually this will be 100% but may vary depending on various factors such as turnover. In the grid, list the Commodity Codes (again using 'Paste Special') and the tax rates applied to each one (i.e. list the specific tax rates for each type of product or service that you sell).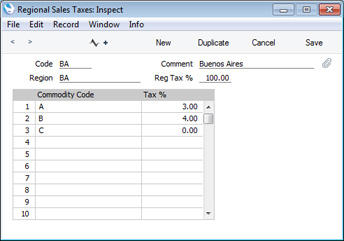
For example, referring to the illustration above, if you sell an Item with Commodity Code B to a Customer in the BA Region for 1000.00 (i.e. the Sum excluding VAT), the Regional Sales Tax will be calculated by applying the Reg. Tax % from the header and then the Tax % from the relevant row (1000.00 * 3.00% * 4.00% = 1.20).
---
Settings in the Sales Ledger:
- Introduction
- Account Usage S/L
- Age Limits
- Alternative Items
- Bonus
- Classification Types
- Contact Credit Limits
- Contact Document Types
- Contact Settings
- Credit Limit
- Cross Sales Items
- Customer Categories
- Default Items
- Default Payment Modes
- Environment Tax
- Extra Tax Customer Discounts
- Factoring Export
- Freight
- Freight/Weight Calculation
- Gift Voucher settings
- Instalments
- Interest
- Interest Codes, Interest Terms
- Intrastat Transaction Codes
- Invoice Mail Settings
- Item Classifications
- Item Group Withholdings
- Item Settings
- Item Status Settings
- Legal Record Numbers
- Number Series - Contacts
- Number Series - Gift Vouchers
- Number Series - Gift Vouchers Received
- Number Series - Internal Invoices
- Number Series - Invoices
- Number Series - Receipts
- Official Invoice Serial Number
- Payment Modes
- Payment Term Sales A/C
- Payment Terms
- Receipts Setting
- Regional Sales Taxes
- Regions
- Registration Defaults
- Reminder Texts
- Sales Invoice Settings
- Standard Problems
- Units
- VAT Corrections S/L
- VAT Zone Label
- Home page for Sales Ledger manual
- Home page for Standard ERP manual
Regions
Use the Regions setting to store specific areas inside your country e.g. counties, states or provinces.Once you have entered the Regions in this setting, you can specify a Region in each Contact record ('Delivery' card) and in each record in the Delivery Addresses setting in the Sales Orders module. The correct Region will then be transferred from the Delivery Address or the Contact to Quotations, Orders and Invoices ('Del. Address' card) and Deliveries ('Address' card). If you need to enter a one-off Delivery Address in one of these records, you can also specify the correct Region.
When you first open the setting, the 'Regions: Browse' window is displayed, showing all Regions previously entered. Double-click a record in the list to edit it, or add a new record by selecting 'New' from the Create menu or using the Ctrl-N/⌘-N keyboard shortcut.

The remaining fields and check boxes in Region records are only used in Argentina. They are briefly described below: please refer to your local HansaWorld representative for full details.
- Reg. Perc. Tax A/C
- Paste Special Account register, Nominal Ledger/System module
- The Account that you specify here will be used as a default when you add a new row for the Region to a record in the Regional Perception Taxes per Customer setting (and when a new for the Region is added by the 'Regional Perceptions & Withholdings (Argentina)' Import function in the Sales and Purchase Ledgers). This Account will be credited with the value of Regional Perceptions Tax from Sales Invoices.
- The Account that you specify here will be used as a default when you add a new row for the Region to a record in the Regional Perception Taxes per Customer setting (and when a new for the Region is added by the 'Regional Perceptions & Withholdings (Argentina)' Import function in the Sales and Purchase Ledgers). This Account will be credited with the value of Regional Perceptions Tax from Sales Invoices.
- Fixed Regional Perception Taxes Rate
- Select this option if you do not want the Tax % field in rows for the Region in Regional Perception Taxes per Customer records to be updated when you run the 'Regional Perceptions & Withholdings Corrections (Argentina)' Import function in the Sales and Purchase Ledgers. This function allows you to import the latest Perception and Withholding Tax specifications when they are updated by the tax authorities.
- Fixed Withholdings Taxes Rates
- Select this option if you do not want the Tax % field in rows for the Region in records in the Supplier Withholdings setting in the Purchase Ledger to be updated when you run the 'Regional Perceptions & Withholdings Corrections (Argentina)' Import function in the Sales and Purchase Ledgers.
Settings in the Sales Ledger:
- Introduction
- Account Usage S/L
- Age Limits
- Alternative Items
- Bonus
- Classification Types
- Contact Credit Limits
- Contact Document Types
- Contact Settings
- Credit Limit
- Cross Sales Items
- Customer Categories
- Default Items
- Default Payment Modes
- Environment Tax
- Extra Tax Customer Discounts
- Factoring Export
- Freight
- Freight/Weight Calculation
- Gift Voucher settings
- Instalments
- Interest
- Interest Codes, Interest Terms
- Intrastat Transaction Codes
- Invoice Mail Settings
- Item Classifications
- Item Group Withholdings
- Item Settings
- Item Status Settings
- Legal Record Numbers
- Number Series - Contacts
- Number Series - Gift Vouchers
- Number Series - Gift Vouchers Received
- Number Series - Internal Invoices
- Number Series - Invoices
- Number Series - Receipts
- Official Invoice Serial Number
- Payment Modes
- Payment Term Sales A/C
- Payment Terms
- Receipts Setting
- Regional Sales Taxes
- Regions
- Registration Defaults
- Reminder Texts
- Sales Invoice Settings
- Standard Problems
- Units
- VAT Corrections S/L
- VAT Zone Label
- Home page for Sales Ledger manual
- Home page for Standard ERP manual
Registration Defaults
The Registration Defaults setting can help you ensure that correct details are copied to certain fields in each record in the Contact register. These details include VAT Codes, Language and Doc. Type.When you enter a Contact record, you can use the 'Paste Special' function from the Reg. No. 2 field on the 'Company' card to link to a row in the Registration Defaults setting. The correct VAT Codes, Language and Doc. Type will be brought in to the Contact record from the Registration Defaults row.
To work with the Registration Defaults setting, first ensure you are in the Sales Ledger and then click the [Settings] button in the Navigation Centre or use the Ctrl-S/⌘-S keyboard shortcut. Double-click 'Registration Defaults' in the resulting list. The 'Registration Defaults: Inspect' window appears. Fill in the fields as described below the illustration and then click the [Save] button in the Button Bar to save the changes. To close the window without saving changes, click the close box.
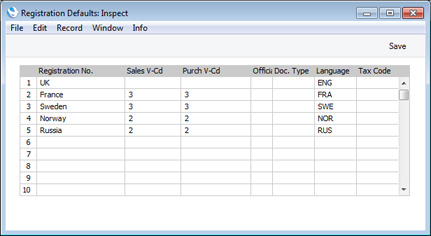
- Registration No.
- Use this field to specify a unique code for each row in the setting. When you activate 'Paste Special' from the Reg. No. 2 field in a Contact record, this code will be shown in the 'Paste Special' window and so should be clear enough to make the selection of the correct row in the Registration Defaults setting easy for all users.
- Sales V-Cd
- Paste Special
VAT Codes setting, Nominal Ledger
- Specify the Sales VAT Code that is to be copied to Contact records. In many countries, note that you should usually only specify a Sales VAT Code for an individual Customer if for some reason your usual VAT accounting method does not apply to them (e.g. charities).
- Purch V-Cd
- Paste Special
VAT Codes setting, Nominal Ledger
- Specify the Purchase VAT Code that is to be copied to Contact records.
- Official Tax Code
- The Official Tax Code field is used in Argentina, where the Registration Defaults setting should contain separate rows for each type of taxpayer. Use the Official Tax Code field to specify the type of taxpayer that a particular row represents.
- The Official Tax Code is different to the other fields in this setting in that it will not be copied from a row in the Registration Defaults setting to Contact records. Instead Official Tax Codes will be included in export files that will be sent to the tax authority. Therefore you should enter a code that will be recognised by that authority, as follows:
Code Type of Taxpayer 01 VAT Registered Taxpayer 02 VAT non-registered Taxpayer
03 VAT non responsible 04 VAT Exempt 05 End User 06 Small Taxpayer's Simplified Scheme 07 Non Categorised subject 08 Foreign Supplier 09 Foreign Customer
Official Tax Codes will be included in the text files created by the 'S/L Taxes - (Argentina)' and 'Withholding Certificates (Argentina)' export functions in the Sales and Purchase Ledgers respectively. These export functions will check the Reg. No. 2 field in each Contact record, find the connected Registration Defaults row and export the Official Tax Code (i.e. the type of taxpayer) from that row, as follows:
- S/L Taxes - (Argentina) - Header option
- An Official Tax Code for each Customer will be exported as field 23 (positions 244-245) in each line in the "CABECERA" file
- S/L Taxes - (Argentina) - Sales option
- An Official Tax Code for each Customer will be exported as field 22 (positions 254-255) in each line in the "VENTAS" file
- S/L Taxes - (Argentina) - Purchases and Include Expenses options
- An Official Tax Code for each Supplier will be exported as field 26 (positions 256-257) in each line in the "COMPRAS" file
- Withholding Certificates (Argentina)
- An Official Tax Code for the Supplier of each Withholding Certificate will be exported as field 10 (positions 77-78).
- The Official Tax Code is different to the other fields in this setting in that it will not be copied from a row in the Registration Defaults setting to Contact records. Instead Official Tax Codes will be included in export files that will be sent to the tax authority. Therefore you should enter a code that will be recognised by that authority, as follows:
- Doc. Type
- Paste Special
Contact Document Types setting, Sales Ledger
- Specify the Doc. Type that is to be copied to Contact records. This will be useful in Argentina, where the Doc. Type field should contain a code representing the type of ID document that the Contact has. For example, if the Contact is registered with the tax authority as a company, the type of the ID document will usually be "80", but if the Contact is a private individual, it might be "86" or "96".
- Language
- Paste Special
Languages setting, System module
- Specify the Language that is to be copied to Contact records.
- Tax Code
- The Tax Code field is used in Argentina only, and can contain a single digit code from 0 to 5. This code will be included in the text files created by the 'P/L Withholdings and Perceptions (Argentina)' export function in both the Sales and Purchase Ledgers. This export function will check the Reg. No. 2 field in the Contact record for each Customer (in the case of Perceptions) or each Supplier (in the case of Withholdings), find the connected Registration Defaults row and export the Tax Code from that row. The Tax Code will be exported as field 14 in position 94.
- The 'P/L Withholdings and Perceptions (Argentina)' ('Retenciones y Percepciones (ARCIBA) (Argentina)') export function will only be available if the VAT Law in the Company Info setting is "Argentinean".
Settings in the Sales Ledger:
- Introduction
- Account Usage S/L
- Age Limits
- Alternative Items
- Bonus
- Classification Types
- Contact Credit Limits
- Contact Document Types
- Contact Settings
- Credit Limit
- Cross Sales Items
- Customer Categories
- Default Items
- Default Payment Modes
- Environment Tax
- Extra Tax Customer Discounts
- Factoring Export
- Freight
- Freight/Weight Calculation
- Gift Voucher settings
- Instalments
- Interest
- Interest Codes, Interest Terms
- Intrastat Transaction Codes
- Invoice Mail Settings
- Item Classifications
- Item Group Withholdings
- Item Settings
- Item Status Settings
- Legal Record Numbers
- Number Series - Contacts
- Number Series - Gift Vouchers
- Number Series - Gift Vouchers Received
- Number Series - Internal Invoices
- Number Series - Invoices
- Number Series - Receipts
- Official Invoice Serial Number
- Payment Modes
- Payment Term Sales A/C
- Payment Terms
- Receipts Setting
- Regional Sales Taxes
- Regions
- Registration Defaults
- Reminder Texts
- Sales Invoice Settings
- Standard Problems
- Units
- VAT Corrections S/L
- VAT Zone Label
- Home page for Sales Ledger manual
- Home page for Standard ERP manual
Reminder Texts
If you need to send Reminders to Customers whose Invoices have become overdue for payment, you can print them using any of the following forms:- Debtors Letter
- Will print a single reminder for each Customer with at least one outstanding Invoice.
- Open Invoice Customer Statement
- Will print a single reminder for each Customer with at least one outstanding Invoice. You can send Open Invoice Customer Statements to Customers by email using the 'Create Open Invoice Customer Statement E-mail' Maintenance function.
- Reminders
- Will print a separate document for each overdue Invoice, so a single Customer may receive several reminders.
You can have a reminder message printed on each of these forms. This message will be of increasing severity depending on the Reminder Levels of the outstanding Invoices. To have the reminder message printed, add the "Reminder Level (remtext)" field to the Form Templates for the Debtors Letter and Open Invoice Customer Statement forms, and the "Reminder Text" field to the Form Template for the Reminders form.
When you print a Debtors Letter or an Open Invoice Customer Statement for a particular Customer, that Customer's open Invoices will be listed together on a single page. The Reminder Levels in the Invoices in the Letter or Statement will be checked and the reminder message for the highest Level will be printed on the form. However, as the Reminders form will print a separate page for each Invoice, the severity of the reminder message will depend on the Reminder Level of the individual Invoice being printed.
Use this Reminder Texts setting to compose your reminder messages. You can enter one record for each Language in this setting: each record should contain a set of three messages.
To work with the Reminder Texts setting, ensure you are in the Sales Ledger and choose 'Settings' from the File menu or click the [Settings] button in the Navigation Centre. Double-click 'Reminder Texts' in the 'Settings' list: the 'Reminders: Browse' window will open, listing the Reminder Texts that you have previously entered. Double-click an item in the list to edit, or add a new record by selecting 'New' from the Create menu or using the Ctrl-N/⌘-N keyboard shortcut. When the record is complete, click the [Save] button in the Button Bar to save it.
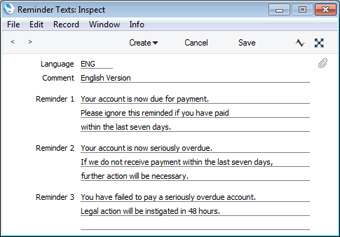
- Language
- Paste Special
Languages setting, System module
- You can enter one set of Reminders for each Language. When you next print a Reminder for an Invoice, its message will be in the Language of the Invoice (shown on the 'Price List' card).
- It can be useful to enter a set of Reminders with a blank Language field. This set will be used for Invoices with no Language, and for Invoices with a Language for which there are no Reminders. For example, if the Language of an Invoice is German and you have no German set of Reminders, the set of Reminders with a blank Language field will be used.
- It can be useful to enter a set of Reminders with a blank Language field. This set will be used for Invoices with no Language, and for Invoices with a Language for which there are no Reminders. For example, if the Language of an Invoice is German and you have no German set of Reminders, the set of Reminders with a blank Language field will be used.
- Comment
- Enter a descriptive name for the set of Reminders.
- Reminder 1, 2, 3
- Use these fields to enter three messages of increasing severity.
- When you print a Reminder for an Invoice, the reminder message will be chosen depending on the Reminder Level of the Invoice. For example, if the Reminder Level of an Invoice is 2, the message will be taken from the Reminder 2 field in this setting, and so on. If the Reminder Level of an Invoice is greater than 3, the message will be taken from the Reminder 3 field.
Settings in the Sales Ledger:
- Introduction
- Account Usage S/L
- Age Limits
- Alternative Items
- Bonus
- Classification Types
- Contact Credit Limits
- Contact Document Types
- Contact Settings
- Credit Limit
- Cross Sales Items
- Customer Categories
- Default Items
- Default Payment Modes
- Environment Tax
- Extra Tax Customer Discounts
- Factoring Export
- Freight
- Freight/Weight Calculation
- Gift Voucher settings
- Instalments
- Interest
- Interest Codes, Interest Terms
- Intrastat Transaction Codes
- Invoice Mail Settings
- Item Classifications
- Item Group Withholdings
- Item Settings
- Item Status Settings
- Legal Record Numbers
- Number Series - Contacts
- Number Series - Gift Vouchers
- Number Series - Gift Vouchers Received
- Number Series - Internal Invoices
- Number Series - Invoices
- Number Series - Receipts
- Official Invoice Serial Number
- Payment Modes
- Payment Term Sales A/C
- Payment Terms
- Receipts Setting
- Regional Sales Taxes
- Regions
- Registration Defaults
- Reminder Texts
- Sales Invoice Settings
- Standard Problems
- Units
- VAT Corrections S/L
- VAT Zone Label
- Home page for Sales Ledger manual
- Home page for Standard ERP manual
Sales Codes
The obsolete Sales Codes setting was removed from version 4.1 of the program.---
Settings in the Sales Ledger:
- Introduction
- Account Usage S/L
- Age Limits
- Alternative Items
- Bonus
- Classification Types
- Contact Credit Limits
- Contact Document Types
- Contact Settings
- Credit Limit
- Cross Sales Items
- Customer Categories
- Default Items
- Default Payment Modes
- Environment Tax
- Extra Tax Customer Discounts
- Factoring Export
- Freight
- Freight/Weight Calculation
- Gift Voucher settings
- Instalments
- Interest
- Interest Codes, Interest Terms
- Intrastat Transaction Codes
- Invoice Mail Settings
- Item Classifications
- Item Group Withholdings
- Item Settings
- Item Status Settings
- Legal Record Numbers
- Number Series - Contacts
- Number Series - Gift Vouchers
- Number Series - Gift Vouchers Received
- Number Series - Internal Invoices
- Number Series - Invoices
- Number Series - Receipts
- Official Invoice Serial Number
- Payment Modes
- Payment Term Sales A/C
- Payment Terms
- Receipts Setting
- Regional Sales Taxes
- Regions
- Registration Defaults
- Reminder Texts
- Sales Invoice Settings
- Standard Problems
- Units
- VAT Corrections S/L
- VAT Zone Label
- Home page for Sales Ledger manual
- Home page for Standard ERP manual
Sales Invoice Settings
This setting contains various options that you can use to control the behaviour of Sales Invoices.To work with this setting, first ensure you are in the Sales Ledger and then click the [Settings] button in the Navigation Centre or use the Ctrl-S/⌘-S keyboard shortcut. Double-click 'Sales Invoice Settings' in the resulting list. The 'Sales Invoice Settings Inspect' window opens, as illustrated below. When you have selected the option that you need, click the [Save] button in the Button Bar to save the changes. To close the window without saving changes, click the close box.
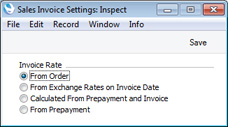
- Invoice Rate
- These options control how the Base and Exchange Rates will be set in a new Sales Invoice when it is created in the following circumstances:
- Invoice created from Sales Order or Delivery
- If you are using the From Order or the From Prepayment options, the Base and Exchange Rates will be copied from the Sales Order. Otherwise, the latest Base and Exchange Rates will be used in the Invoice, although the prices in Currency will not be changed. This means the Customer will still be charged the agreed price, but the value of the Invoice in your home Currency (and therefore in the Nominal Ledger) will be different to that of the Order.
- If you are using the Update Base Currency when Invoicing and/or Update Foreign Currency when Invoicing options in the Account Usage S/L setting, the latest Base and/or Exchange Rates will be used, irrespective of the option that you choose here.
- If you are using the Update Base Currency when Invoicing and/or Update Foreign Currency when Invoicing options in the Account Usage S/L setting, the latest Base and/or Exchange Rates will be used, irrespective of the option that you choose here.
- Invoice connected to Prepayment
- If you are using either of the first two options, the Base and Exchange Rates that are already in an Invoice will be retained when you connect it to a Prepayment. If you are using either of the last two options, the Base and Exchange Rates in the Invoice will be changed to those in the Prepayment.
- Note: the third option is intended for use in Ukraine. Elsewhere, if you need Prepayment Base and Exchange Rates to be copied to Invoices, use the fourth option.
- Invoice created from Sales Order or Delivery
Settings in the Sales Ledger:
- Introduction
- Account Usage S/L
- Age Limits
- Alternative Items
- Bonus
- Classification Types
- Contact Credit Limits
- Contact Document Types
- Contact Settings
- Credit Limit
- Cross Sales Items
- Customer Categories
- Default Items
- Default Payment Modes
- Environment Tax
- Extra Tax Customer Discounts
- Factoring Export
- Freight
- Freight/Weight Calculation
- Gift Voucher settings
- Instalments
- Interest
- Interest Codes, Interest Terms
- Intrastat Transaction Codes
- Invoice Mail Settings
- Item Classifications
- Item Group Withholdings
- Item Settings
- Item Status Settings
- Legal Record Numbers
- Number Series - Contacts
- Number Series - Gift Vouchers
- Number Series - Gift Vouchers Received
- Number Series - Internal Invoices
- Number Series - Invoices
- Number Series - Receipts
- Official Invoice Serial Number
- Payment Modes
- Payment Term Sales A/C
- Payment Terms
- Receipt Settings
- Regional Sales Taxes
- Regions
- Registration Defaults
- Reminder Texts
- Sales Invoice Settings
- Standard Problems
- Units
- VAT Corrections S/L
- VAT Zone Label
- Home page for Sales Ledger manual
- Home page for Standard ERP manual
Standard Problems
When entering a Credit Note, you can use the Credit Reason field on the 'Terms' card to specify the reason why the Credit Note was required. Many other records such as Returned Goods, Returned Goods to Supplier, Stock Depreciation and Stock Revaluation records and Stock Movements also have Reason fields that you can use for a similar purpose. The Standard Problems setting allows you to construct a look-up table that will be used for the Reason fields in these records. The same setting will also provide the look-up table for the Standard Problem field in Service Orders and Work Orders: please click here for more details.---
Settings in the Sales Ledger:
- Introduction
- Account Usage S/L
- Age Limits
- Alternative Items
- Bonus
- Classification Types
- Contact Credit Limits
- Contact Document Types
- Contact Settings
- Credit Limit
- Cross Sales Items
- Customer Categories
- Default Items
- Default Payment Modes
- Environment Tax
- Extra Tax Customer Discounts
- Factoring Export
- Freight
- Freight/Weight Calculation
- Gift Voucher settings
- Instalments
- Interest
- Interest Codes, Interest Terms
- Intrastat Transaction Codes
- Invoice Mail Settings
- Item Classifications
- Item Group Withholdings
- Item Settings
- Item Status Settings
- Legal Record Numbers
- Number Series - Contacts
- Number Series - Gift Vouchers
- Number Series - Gift Vouchers Received
- Number Series - Internal Invoices
- Number Series - Invoices
- Number Series - Receipts
- Official Invoice Serial Number
- Payment Modes
- Payment Term Sales A/C
- Payment Terms
- Receipts Setting
- Regional Sales Taxes
- Regions
- Registration Defaults
- Reminder Texts
- Sales Invoice Settings
- Standard Problems
- Units
- VAT Corrections S/L
- VAT Zone Label
- Home page for Sales Ledger manual
- Home page for Standard ERP manual
Units
The "Unit" of an Item is the quantity to which its price refers. You might, for example, sell some Items singly, some in pairs and others in dozens. In this example, the single Item, the pair and the dozen would all be separate Units.You can list the Units that are used in your business in the Units setting in the Sales Ledger, thus making them available in a 'Paste Special' list. Having done so, you can assign main and secondary Units to your Items as follows:
- The 'Pricing' card of the Item record contains a Unit field. This is the quantity to which all prices refer. For example, if you buy and sell an Item in boxes of twelve, its Unit should be "Dozen". When you include the Item in a transaction of any kind (e.g. Purchase Order, Goods Receipt or Invoice), the Quantity will refer to this Unit. If the Quantity in an Invoice is 2, this means "two boxes of twelve". The Base and Cost Prices of the Item will also refer to this Unit. If the Base Price is 85.00, this means "85.00 for a box of twelve".
- The 'Stock' card of the Item record contains the Unit 2 and Unit Coefficient fields. These are used in some reports in the Stock module for Items where quantities are to be shown in different Units. For example, the main Unit of a liquid might be litres, but you need to know stock levels in both litres and gallons. In this case, "Gallons" will be the Unit 2, and the Unit Coefficient will be the relationship between litres and gallons.
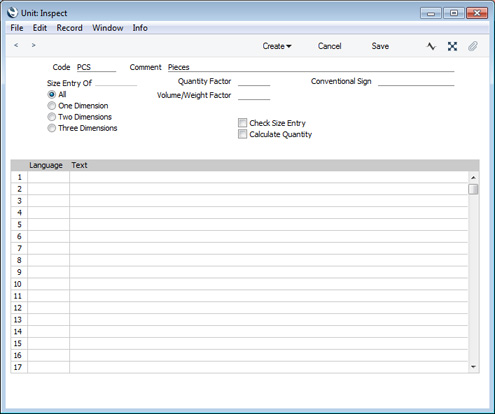
- Code
- Enter the unique Code by which the Unit record is to be identified from elsewhere in Standard ERP . You can enter up to five characters, and you can use both numbers and letters.
- Comment
- Enter a name for the Unit record, to be shown in the 'Units: Browse' window and the 'Paste Special' list.
- Qty Factor
- The Qty Factor allows you to use a different Unit when selling an Item that is usually sold singly. In each Unit record, specify here its relationship to the single Unit. For example, in a Unit record representing a dozen, the Qty Factor will be 12 since a dozen is twelve individual Items. In a Unit record representing a single Item, the Qty Factor will be 1.
- The Qty Factor can be helpful when entering Invoices (flip E), Orders (flip H) and Quotations (flip E). For example, an Item is usually sold in single units. If you sell two dozen of them, you can enter the "dozen" Unit in the Unit field on flip E of the Invoice and "2" to the Unit Qty field. The Qty Factor will cause the Quantity on flip A to change to "24" (i.e. 2 x 12) and the pricing to be adjusted accordingly.
- The Qty Factor can be helpful when entering Invoices (flip E), Orders (flip H) and Quotations (flip E). For example, an Item is usually sold in single units. If you sell two dozen of them, you can enter the "dozen" Unit in the Unit field on flip E of the Invoice and "2" to the Unit Qty field. The Qty Factor will cause the Quantity on flip A to change to "24" (i.e. 2 x 12) and the pricing to be adjusted accordingly.
- Volume/Weight Factor
- The Volume/Weight Factor will be used to calculate the Weight and Density in Items that have been given the Unit. For example, if the Volume/Weight Factor is 3, the Density of an Item will be 3, and its Weight will be three times its Volume. The Density, Volume and Weight fields can be found on the 'Warehouse' card of the Item record.
- Size Entry Of, Check Size Entry
- The 'Warehouse' card of the Item record contains fields for Width, Height and Depth. You can use these options to ensure that any one, two or all three of these fields contain values in every Item record that has been given the Unit.
- For example, you want to specify that Item records must have two measurements (i.e. that two of the Width, Height and Depth fields in an Item record must be filled in). Tick the Check Size Entry box and choose the Two Dimensions option. If you try to save an Item with one or three measurements, you will be told "Invalid Size for the Item". You will be able to save the Item with no measurements.
- Invoices, Orders, Quotations, Deliveries, Goods Receipts and Production records also have Width, Height and Depth fields in the grids on their 'Items' cards. In all cases, the Check Size Entry box will ensure you save these records with the correct number of dimensions.
- For example, you want to specify that Item records must have two measurements (i.e. that two of the Width, Height and Depth fields in an Item record must be filled in). Tick the Check Size Entry box and choose the Two Dimensions option. If you try to save an Item with one or three measurements, you will be told "Invalid Size for the Item". You will be able to save the Item with no measurements.
- Calculate Quantity
- When entering Invoices, Orders, Quotations, Deliveries, Goods Receipts and Productions, you can enter the Width, Height and Depth bought or sold and have the Quantity calculated automatically by multiplying those dimensions together. This can be useful for Items sold by area or volume. An example is provided here.
- If you want to make use of this feature, you must first select the Enable Quantity Calculation option in the Item Settings setting in the Sales Ledger. You should then tick the Calculate Quantity box in each Unit that is to have the feature. You must assign one of these Units to each Item bought or sold in this way: you cannot use the feature with Items that do not have Units specified.
- The Size Entry Of options above control how the Quantity in the transaction will be calculated, as follows:
- One Dimension
- The Quantity will be copied from the Width field
- Two Dimensions
- The Quantity will be calculated by multiplying the Width and Height (i.e. not the Width and Depth or the Height and Depth).
- Three Dimensions
- The Quantity will be calculated by multiplying the Width, Height and Depth.
- If you want to make use of this feature, you must first select the Enable Quantity Calculation option in the Item Settings setting in the Sales Ledger. You should then tick the Calculate Quantity box in each Unit that is to have the feature. You must assign one of these Units to each Item bought or sold in this way: you cannot use the feature with Items that do not have Units specified.
- Language, Text
- Use the table in the lower part of the window if you need to enter various translations of the Unit Comment. Specify a Language in the first column using 'Paste Special' if necessary, and the appropriate translation in the second column. There is no need to enter a row for your home Language.
- These translations will be printed on documentation such as Quotations, Orders, Invoices and Purchase Orders providing you have included the "Unit Comment" (Orders, Invoices) or "Unit" (Quotations, Purchase Orders") fields in your Form Templates. The Language of the Quotation, Order, Invoice or Purchase Order will determine which translation will be printed. If a Quotation, Order, Invoice or Purchase Order does not have a Language or has a Language with no translation listed in this table, the Comment itself will be printed.
Settings in the Sales Ledger:
- Introduction
- Account Usage S/L
- Age Limits
- Alternative Items
- Bonus
- Classification Types
- Contact Credit Limits
- Contact Document Types
- Contact Settings
- Credit Limit
- Cross Sales Items
- Customer Categories
- Default Items
- Default Payment Modes
- Environment Tax
- Extra Tax Customer Discounts
- Factoring Export
- Freight
- Freight/Weight Calculation
- Gift Voucher settings
- Instalments
- Interest
- Interest Codes, Interest Terms
- Intrastat Transaction Codes
- Invoice Mail Settings
- Item Classifications
- Item Group Withholdings
- Item Settings
- Item Status Settings
- Legal Record Numbers
- Number Series - Contacts
- Number Series - Gift Vouchers
- Number Series - Gift Vouchers Received
- Number Series - Internal Invoices
- Number Series - Invoices
- Number Series - Receipts
- Official Invoice Serial Number
- Payment Modes
- Payment Term Sales A/C
- Payment Terms
- Receipts Setting
- Regional Sales Taxes
- Regions
- Registration Defaults
- Reminder Texts
- Sales Invoice Settings
- Standard Problems
- Units, including:
- VAT Corrections S/L
- Home page for Sales Ledger manual
- Home page for Standard ERP manual
Units - Selling Items by Area or Volume
This page describes using the Units setting to sell Items by Area or Volume. Please refer here for descriptions of the fields and options in the Unit record.---
In this example, the Items are fabrics that are sold by the square metre. Follow these steps:
- Create a Unit "M2" (or square metre) in which you have ticked the Check Size Entry box and selected the Two Dimensions option (as the Unit is a measure of area).
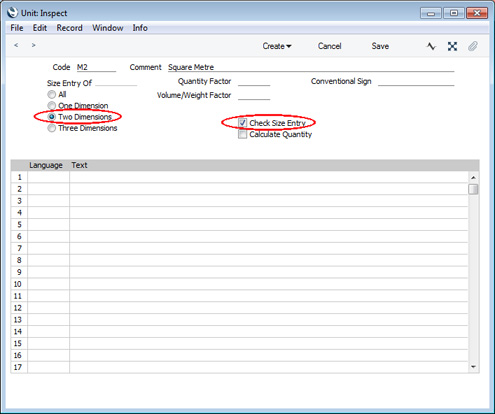
- In your Item records, enter "M2" as the Unit.
Since the Item is sold by the square metre, enter 1 in the Width and Height fields on the 'Warehouse' card. The Base and Cost Prices should be figures for one square metre.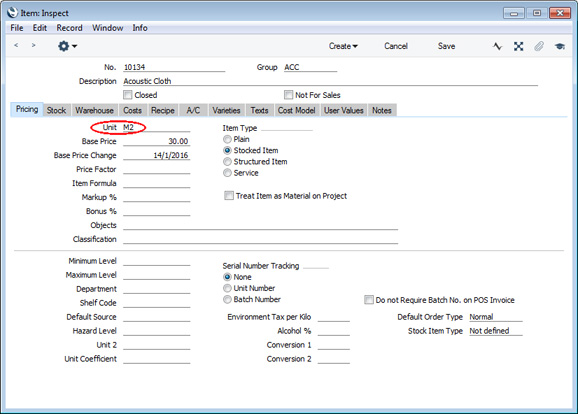

- When you sell the Item, enter the appropriate quantity either to the Quantity field on flip A of the Invoice or to the Unit Qty field on flip E. In the latter case, the Quantity on flip A will be calculated to show the area in square metres and the pricing will be adjusted accordingly.
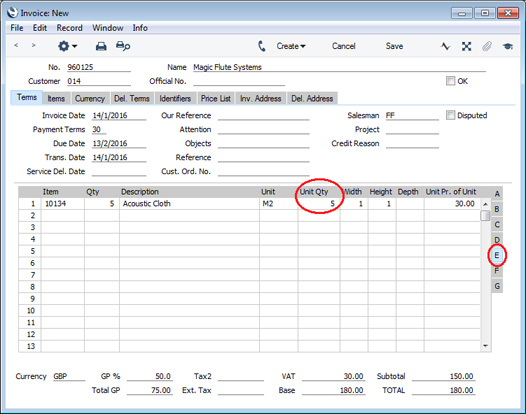
- In the Item record, enter 5 as the Width and 2 as the Height. The Base and Cost Prices should still be figures for one square metre, because that is the Unit.
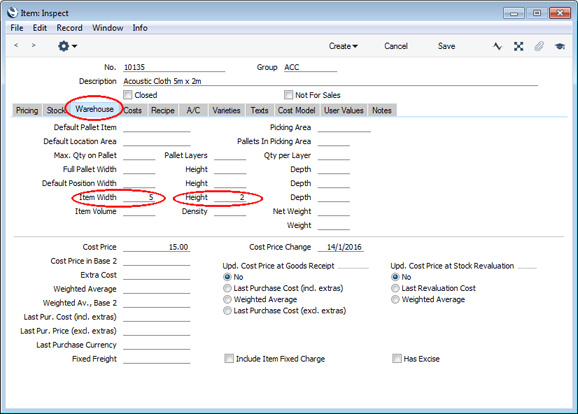
- When you sell the Item, do not enter anything to the Quantity field on flip A of the Invoice. Instead, enter the appropriate quantity to the Unit Qty field on flip E. This should be the quantity of 5 x 2 sheets of fabric purchased by the Customer. The Quantity on flip A will be calculated to show the area in square metres and the pricing will be adjusted accordingly.
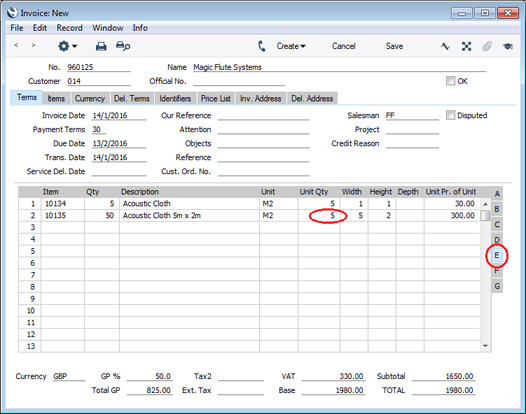
- To enable the ability to have quantities calculated from dimensions, select the Enable Quantity Calculation option in the Item Settings setting.
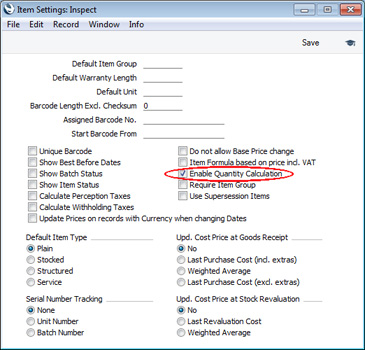
- Create a Unit "M3" (or cubic metre) in which you have ticked the Check Size Entry and Calculate Quantity boxes and selected the Three Dimensions option (as the Unit is a cubic measure).
The option that you ticked in step (a) will mean that it is possible to have quantities calculated from dimensions in a general sense. You also need to specify the Units in which you need this feature to be used, hence the need to select the Calculate Quantity option in this step as well.
- In the Item record, enter "M3" as the Unit to signify that it is priced by the cubic metre. As the individual Items will not be of uniform size, you can leave the Width, Height and Depth fields on the 'Warehouse' card blank. The Base and Cost Prices should be figures for one cubic metre.

- When you sell the Item, enter the quantity of individual Items (e.g. the number of pieces of stone) in the Unit Qty field on flip E of the Invoice row. If the individual Items are shaped irregularly, it may be necessary to enter several rows each with a Unit Qty of 1. Enter the appropriate dimensions in the Width, Height and Depth fields. Because you are using the Enable Quantity Calculation option, the Quantity on flip A will be calculated to show the volume in cubic metres and the pricing will be adjusted accordingly. Since the Check Size Entry box in the Unit record has been marked, you will not be able to save the Invoice if you fail to enter figures in all three measurement fields and instead you will be informed, "Invalid Size for the Item".
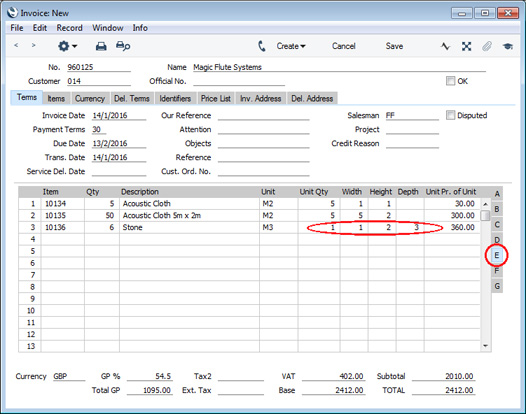
---
Settings in the Sales Ledger:
- Introduction
- Account Usage S/L
- Age Limits
- Alternative Items
- Bonus
- Classification Types
- Contact Credit Limits
- Contact Document Types
- Contact Settings
- Credit Limit
- Cross Sales Items
- Customer Categories
- Default Items
- Default Payment Modes
- Environment Tax
- Extra Tax Customer Discounts
- Factoring Export
- Freight
- Freight/Weight Calculation
- Gift Voucher settings
- Instalments
- Interest
- Interest Codes, Interest Terms
- Intrastat Transaction Codes
- Invoice Mail Settings
- Item Classifications
- Item Group Withholdings
- Item Settings
- Item Status Settings
- Legal Record Numbers
- Number Series - Contacts
- Number Series - Gift Vouchers
- Number Series - Gift Vouchers Received
- Number Series - Internal Invoices
- Number Series - Invoices
- Number Series - Receipts
- Official Invoice Serial Number
- Payment Modes
- Payment Term Sales A/C
- Payment Terms
- Receipts Setting
- Regional Sales Taxes
- Regions
- Registration Defaults
- Reminder Texts
- Sales Invoice Settings
- Standard Problems
- Units, including:
- Selling Items by Area or Volume
- VAT Corrections S/L
- Home page for Sales Ledger manual
- Home page for Standard ERP manual
VAT Corrections S/L
This setting is only available if the VAT Law in the Company Info setting is set to "Croatian", "Polish", "Serbian", "Slovenian" or "Ukrainian". Please refer to the description of the 'Create VAT Correction S/L' function on the Create menu of the Invoice record for details about this setting.---
Settings in the Sales Ledger:
- Introduction
- Account Usage S/L
- Age Limits
- Alternative Items
- Bonus
- Classification Types
- Contact Credit Limits
- Contact Document Types
- Contact Settings
- Credit Limit
- Cross Sales Items
- Customer Categories
- Default Items
- Default Payment Modes
- Environment Tax
- Extra Tax Customer Discounts
- Factoring Export
- Freight
- Freight/Weight Calculation
- Gift Voucher settings
- Instalments
- Interest
- Interest Codes, Interest Terms
- Intrastat Transaction Codes
- Invoice Mail Settings
- Item Classifications
- Item Group Withholdings
- Item Settings
- Item Status Settings
- Legal Record Numbers
- Number Series - Contacts
- Number Series - Gift Vouchers
- Number Series - Gift Vouchers Received
- Number Series - Internal Invoices
- Number Series - Invoices
- Number Series - Receipts
- Official Invoice Serial Number
- Payment Modes
- Payment Term Sales A/C
- Payment Terms
- Receipts Setting
- Regional Sales Taxes
- Regions
- Registration Defaults
- Reminder Texts
- Sales Invoice Settings
- Standard Problems
- Units
- VAT Corrections S/L
- VAT Zone Label
- Home page for Sales Ledger manual
- Home page for Standard ERP manual
VAT Zone Label
The VAT Zone Label setting allows you to change the names of the VAT Zones that are displayed in various windows in Standard ERP.To work with this setting, first use the [Switch Module] button in the Navigation Centre to ensure you are in the Sales Ledger and then click the [Settings] button, also in the Navigation Centre. Double-click 'VAT Zone Label' in the resulting list. The 'User Defined Buttons Label - VAT Zone: Inspect' window opens. Make changes as required and then click the [Save] button in the Button Bar to save changes and close the window (you may need to restart Standard ERP to see the changes take effect). Click the close box if you do not want to save changes.
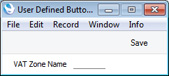
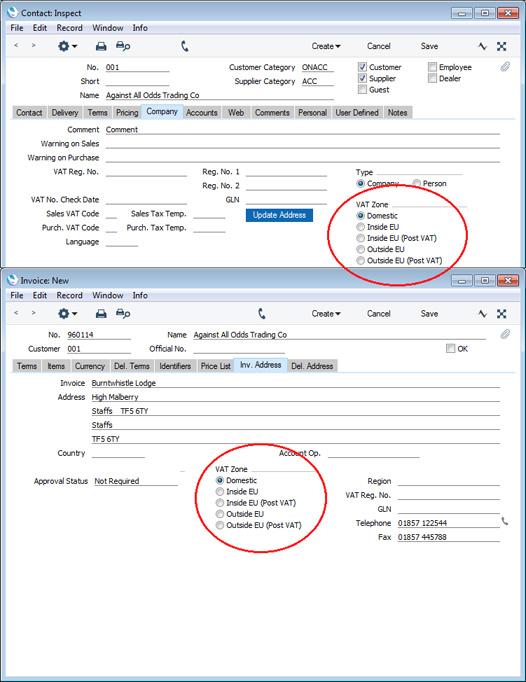
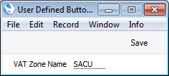
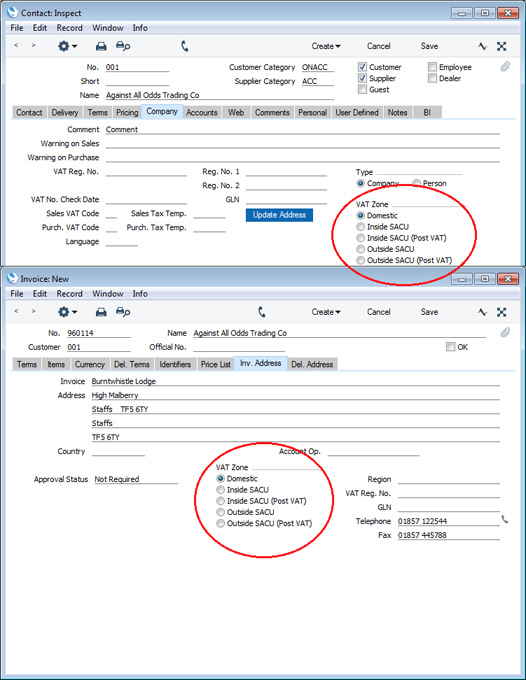
Settings in the Sales Ledger:
- Introduction
- Account Usage S/L
- Age Limits
- Alternative Items
- Bonus
- Classification Types
- Contact Credit Limits
- Contact Document Types
- Contact Settings
- Credit Limit
- Cross Sales Items
- Customer Categories
- Default Items
- Default Payment Modes
- Environment Tax
- Extra Tax Customer Discounts
- Factoring Export
- Freight
- Freight/Weight Calculation
- Gift Voucher settings
- Instalments
- Interest
- Interest Codes, Interest Terms
- Intrastat Transaction Codes
- Invoice Mail Settings
- Item Classifications
- Item Group Withholdings
- Item Settings
- Item Status Settings
- Legal Record Numbers
- Number Series - Contacts
- Number Series - Gift Vouchers
- Number Series - Gift Vouchers Received
- Number Series - Internal Invoices
- Number Series - Invoices
- Number Series - Receipts
- Official Invoice Serial Number
- Payment Modes
- Payment Term Sales A/C
- Payment Terms
- Receipt Settings
- Regional Sales Taxes
- Regions
- Registration Defaults
- Reminder Texts
- Sales Invoice Settings
- Standard Problems
- Units
- VAT Corrections S/L
- VAT Zone Label
- Home page for Sales Ledger manual
- Home page for Standard ERP manual