Introduction to the Item Register
The Item register is where you store information about the products and services that you sell.You can group Items of a similar type together using Item Groups. Every Item belonging to an Item Group can be given the same Sales and Cost Accounts, Stock Account and VAT Codes, saving you the work of having to specify these in each individual Item record. Defining and assigning Item Groups also makes modification easier: if you need to change the Cost Account, for example, you only need make one change (to the Item Group), rather than many (to each of the Items). If necessary you can of course specify an Account or VAT Code in an individual Item record: this will take precedence over the Account or VAT Code specified in the Item Group. Assigning Items to Item Groups can also help with reporting. Many reports in Standard ERP allow you to list Items belonging to a particular Item Group.
---
The Item register in Standard ERP:
- Introduction
- Entering an Item
- Editing an Item
- Deleting an Item
- Items and Pictures
- Operations menu
- Create menu
- Home page for Items and Pricing manual
- Home page for Standard ERP manual
Entering an Item
The Item register is available in the Sales Orders, Purchase Orders and Sales Ledger modules, and from the Contracts, Production, Quotations, Service Orders and Job Costing modules if installed. It is also available as a setting in the Stock module.To open the Item register, first use the [Switch Module] button in the Navigation Centre to enter one of the modules mentioned above. Then, if you are using Windows or Mac OS X, click the [Registers] button, also in the Navigation Centre and double-click 'Items' in the subsequent list. If you are using iOS or Android, tap the [Registers] button in the Navigation Centre and then tap 'Items' in the 'Registers' list.
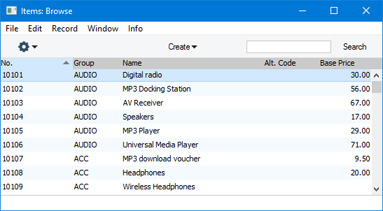
The 'Items: Browse' window will be opened, showing the Items that you have already entered.
The 'Item: New' window will be opened, empty if you selected 'New' or containing a duplicate of the highlighted Item. Complete the Item record as appropriate, then save it using the [Save] button (Windows/Mac OS X) or by tapping √ (iOS/Android) and close the window by clicking the close box (Windows/Mac OS X) or by tapping < (iOS/Android). Then, close the browse window using the close box or < again.


If you are using iOS or Android, there will only be two tabs, marked 'Items' and 'Details'. If you tap 'Details', you will see every card except 'Texts' arranged vertically on screen. You can scroll down to see each one, or you can jump to any card by tapping on any tab and selecting the tab you want to go to.
---
The Item register in Standard ERP:
- Introduction
- Entering an Item, including:
- Header
- 'Pricing' card
- 'Stock' card
- 'Warehouse' card
- 'Costs' card
- 'Recipe' card
- 'A/C' card
- 'Varieties' card
- 'Texts' card
- 'Cost Model' card
- 'User Values' card
- 'Notes' card
- 'BI' card
- Header
- Editing an Item
- Deleting an Item
- Items and Pictures
- Operations menu
- Create menu
- Home page for Items and Pricing manual
- Home page for Standard ERP manual
Entering an Item - Header
This page describes the fields in the Header of the Item record. Please follow the links below for descriptions of the other cards:- Header
- 'Pricing' card
- 'Stock' card
- 'Warehouse' card
- 'Costs' card
- 'Recipe' card
- 'A/C' card
- 'Varieties' card
- 'Texts' card
- 'Cost Model' card
- 'User Values' card
- 'Notes' card
- 'BI' card
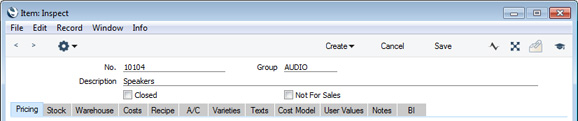
- No.
- Enter the unique identification code you are assigning to this Item. This is the means by which you will identify the Item when including it in Orders, Invoices etc. The field holds up to 20 characters.
- Once you have saved an Item record, you cannot change its Item Number simply by typing into the field. If you need to change an Item Number, use the Conversions - Master and Conversions - Items settings in the System module. These settings will change the Item Number both here and in all other registers where the Item has been used.
- If the Item is one that you will be selling in the Web Shop, you should not use characters such as +, %, ? in your Item Numbers.
- Once you have saved an Item record, you cannot change its Item Number simply by typing into the field. If you need to change an Item Number, use the Conversions - Master and Conversions - Items settings in the System module. These settings will change the Item Number both here and in all other registers where the Item has been used.
- Group
- Paste Special
Item Group register, Sales Ledger
- Default taken from Item Settings (Default Item Group)
- Use this field to assign the Item to an Item Group. Item Groups enable you to classify similar Items together. Each Item belonging to the same Group can use the same default Sales and Cost Accounts, Stock Account and VAT Codes, saving you the work of having to specify these for each Item individually.
- If you have entered a Default Item Group in the Item Settings setting, it will be entered here automatically. If you are using the Demand Item Group option in the same setting, you must specify an Item Group in every Item record.
- Use this field to assign the Item to an Item Group. Item Groups enable you to classify similar Items together. Each Item belonging to the same Group can use the same default Sales and Cost Accounts, Stock Account and VAT Codes, saving you the work of having to specify these for each Item individually.
- Description
- Enter the name or a short description of the Item.
- Closed
- Tick this box if the Item is no longer to be used (you cannot delete an Item altogether if you have used it in Orders, Purchase Orders or Invoices). Closed Items will appear in the 'Items: Browse' window but not in the Items 'Paste Special' list. You will not be able to use a closed Item in Orders or Invoices. You can re-open a closed Item at any time.
- Not For Sales
- Select this option if the Item is one that you do not want to sell.
- Not For Sales Items will not be included in the Items 'Paste Special' list when you open it from a sales record (e.g. from a Quotation, Sales Order or Sales Invoice) or from a sales-related setting (e.g. Bonus, Cross Sales Items, Default Items), and they will not be included in the Price List report. However you will be able to add a Not For Sales Item to a sales record if you enter its Item Number yourself.
- Not For Sales Items will be included in the Items 'Paste Special' list when you open it from a purchase record (e.g. a Purchase Order or Goods Receipt).
- You will usually mark an Item as Not For Sales in two circumstances:
- The Item is one that you will purchase to use in the business, not to resell.
- The Item is one that will only exist for a short time. For example, it is an Item that will be produced in one stage of a production process and will be used up in a subsequent stage of the process. Please refer here for more details about producing and using Items as part of a production process.
- Not For Sales Items will not be included in the Items 'Paste Special' list when you open it from a sales record (e.g. from a Quotation, Sales Order or Sales Invoice) or from a sales-related setting (e.g. Bonus, Cross Sales Items, Default Items), and they will not be included in the Price List report. However you will be able to add a Not For Sales Item to a sales record if you enter its Item Number yourself.
The Item register in Standard ERP:
- Introduction
- Entering an Item, including:
- Header
- 'Pricing' card
- 'Stock' card
- 'Warehouse' card
- 'Costs' card
- 'Recipe' card
- 'A/C' card
- 'Varieties' card
- 'Texts' card
- 'Cost Model' card
- 'User Values' card
- 'Notes' card
- 'BI' card
- Header
- Editing an Item
- Deleting an Item
- Items and Pictures
- Operations menu
- Create menu
- Home page for Items and Pricing manual
- Home page for Standard ERP manual
Entering an Item - Pricing Card
This page describes the fields on the 'Pricing' card of the Item record. Please follow the links below for descriptions of the other cards:- Header
- 'Pricing' card
- 'Stock' card
- 'Warehouse' card
- 'Costs' card
- 'Recipe' card
- 'A/C' card
- 'Varieties' card
- 'Texts' card
- 'Cost Model' card
- 'User Values' card
- 'Notes' card
- 'BI' card
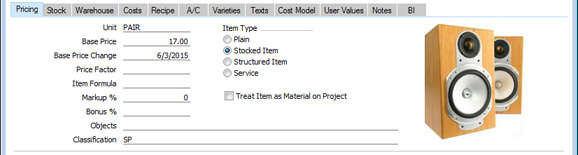
- Unit
- Paste Special
Units setting, Sales Ledger
- Specify here the unit of measurement to which the Base Price (below) refers. In the majority of cases, this will be a single item, but otherwise it might be a pair or a dozen. This also the unit of measurement that will be used when receiving the Item into stock and when calculating the quantity in stock.
- In the Units setting in the Sales Ledger module, you can enter various translations of the name of the Unit. The appropriate translation will be printed on documentation such as Quotations, Orders, Invoices and Purchase Orders, depending on the Language of the Quotation, Order, Invoice or Purchase Order and providing you have included the "Unit Comment" (Orders, Invoices) or "Unit" (Quotations, Purchase Orders") fields in your Form Templates.
- The 'Warehouse' card of the Item record contains fields for Width, Height and Depth. You can specify in the Unit record that one, two or all three of these fields must contain values in each Item record. You can also specify a factor in the Unit record that will link the Weight and Volume in each Item.
- If you need to be able to express the stock quantity of this Item using more than one unit of measurement (for example, metres and yards, gallons and litres or even litres and kilograms), use this field in conjunction with the Unit 2 and Unit Coefficient fields on the 'Stock' card.
- In the case of Service Items (see below), you can enter a Unit here (e.g. minutes or hours), or you can specify a Default Service Unit in the Project Settings setting in the Job Costing module. If you specify a Default Service Unit, it will be used for all Service Items in all transactions (e.g. Orders and Invoices), and it will override any Unit specified for an individual Service Item.
- In the Units setting in the Sales Ledger module, you can enter various translations of the name of the Unit. The appropriate translation will be printed on documentation such as Quotations, Orders, Invoices and Purchase Orders, depending on the Language of the Quotation, Order, Invoice or Purchase Order and providing you have included the "Unit Comment" (Orders, Invoices) or "Unit" (Quotations, Purchase Orders") fields in your Form Templates.
- Base Price
- Used as default in
Quotations, Orders, Invoices, Price Calculations
- Enter the normal sales price for the Item here. This price should always be in your home Currency.
- The maximum number of decimal places that you can use in a Base Price is three. If you need more decimal places, use the Base Price in combination with the Price Factor below. For example, if the price per unit is 0.0001, you can enter 0.01 as the Base Price and 100 as the Price Factor. This will result in a price per unit of 0.0001.
- If you would like to prevent changes to this field, use the Do not allow Base Price change option in the Item Settings setting in the Sales Ledger.
- You can use the Base Price Changes setting in the Stock module to change the Base Price of many Items at a single stroke. You can use this setting even if you are using the Do Not Allow Base Price Change option.
- The maximum number of decimal places that you can use in a Base Price is three. If you need more decimal places, use the Base Price in combination with the Price Factor below. For example, if the price per unit is 0.0001, you can enter 0.01 as the Base Price and 100 as the Price Factor. This will result in a price per unit of 0.0001.
- Base Price Change
- This field shows the date of the last change to the Base Price for the Item and is updated automatically.
- Price Factor
- Used as default in
Quotations, Orders, Purchase Orders, Invoices
- Use the Price Factor when the Base Price of the Item is the price for a certain quantity, but the Item is to be bought and sold individually. The Price Factor will be used to calculate the unit price of a single unit.
- For example, if the Base Price of an Item refers to a box containing 12 units and the Unit (above) is therefore a box or a dozen, enter "12" in this field.
- When you use an Item with a Price Factor in a sales transaction (e.g. an Invoice), the quantity that you specify should be the quantity of single units, not the quantity of boxes. The Sum in the sales transaction row will be calculated using the formula (Quantity/Price Factor) * Unit Price. Similarly, in a Purchase Order, you should enter the quantity of single units that you need to buy, and the Sum will be calculated using the same formula.
- For example, if the Base Price of an Item refers to a box containing 12 units and the Unit (above) is therefore a box or a dozen, enter "12" in this field.
- Item Formula
- Paste Special
Item Formula register, Pricing module
- When entering Quotations, Orders or Invoices, you can use Items whose prices are calculated from the value of the other Items sold. Examples might be freight or freight insurance. You should define the formulae used in these calculations in the Item Formula register in the Pricing module. When entering such an Item, specify the appropriate Item Formula here. Please refer to the description of the Item Formula register here for full details.
- Markup %
- This field is used in combination with the Job Costing module. When you enter a Purchase Invoice for the Item and link that Purchase Invoice to a Project, the Project will be charged with the Item cost plus this percentage. Please refer here for more details.
- You can also use the Markup % when calculating prices: please refer to the description of the 'Calculate Prices' function for details.
- When entering a Markup, simply enter the figure, without the % character. For example, if the Markup is 20%, enter "20", not "20%".
- You can also use the Markup % when calculating prices: please refer to the description of the 'Calculate Prices' function for details.
- Bonus %
- Enter a percentage here for use in the calculation of sales bonuses for sales persons. Bonus calculations are shown in the Bonus , Salesman report in the Sales Ledger. This report has options allowing bonuses to be calculated using percentages entered here, in the Person register ('Sales' card), or in the Bonus setting in the Sales Ledger.
- Objects
- Paste Special
Object register, Nominal Ledger/System module
- Used as default in Quotations, Orders, Invoices
- You can assign up to 20 Objects to each Item, separated by commas. They will be used as defaults in all Orders, Invoices and other transactions involving this Item. You might define separate Objects to represent different departments, cost centres or product types. This provides a flexible method of analysis that can be used in Nominal Ledger reports.
- When you specify the Item in any transaction (e.g. in a Quotation, Order or Invoice), the Objects that you specify here will be copied in automatically.
- If you need the same Objects to be used with every Item belonging to an Item Group, you can specify them in the Item Group instead of in each Item individually. Whenever Objects representing an Item are needed, they will be taken from the Item Group if the Objects field in the Item record is empty.
- You can assign up to 20 Objects to each Item, separated by commas. They will be used as defaults in all Orders, Invoices and other transactions involving this Item. You might define separate Objects to represent different departments, cost centres or product types. This provides a flexible method of analysis that can be used in Nominal Ledger reports.
- Classification
- Paste Special
Item Classifications setting, Sales Ledger
- The Classification is a means of grouping Items of a similar type together. Unlike the Item Group, you can assign more than one Classification to an Item, separated by commas.
- If you have assigned the Item to an Item Group in which you have specified some Classification Types, you must enter Classifications belonging to each of those Types in this field before you will be able to save the Item record.
- If you are using the Standard ERP Web Shop, you may wish to offer different Items to different Customers. You can do this by assigning Classifications to each Item and then specifying a Classification for each Customer. Customers will see only those Items in the relevant Classification when they log in to your Web Shop.
- Outside the Web Shop, you can also use Item Classifications to change the Items 'Paste Special' list. Usually, this is a simple list of Items in which you can choose the Item that you need. If you are using Item Classifications, you can break the list up so that it only shows Items belonging to a particular Classification.
- Please refer to the Item Classifications page for full details about using Item Classifications in a Web Shop and in 'Paste Special' lists.
- If you have assigned the Item to an Item Group in which you have specified some Classification Types, you must enter Classifications belonging to each of those Types in this field before you will be able to save the Item record.
- Item Type
- Each Item must belong to one of four Types, as follows:
- Plain
- Use this Type for non-physical Items that you will not keep in stock, such as delivery charges.
- Stocked
- Use this Type for physical Items that you will keep in stock. Stock levels and values will always be maintained for Stocked Items. You can obtain a stock list and valuation at any time using the Stock List report in the Stock module.
- You should choose a stock valuation method (or "Cost Model") for your Stocked Items. This will be used by the Stock List report to value your stock and will also determine the cost of sales value of each Item when you sell one. You can set an overall valuation method in the Cost Accounting setting in the Stock module. If you want to use a different valuation method for a particular Stocked Item, choose it on the 'Cost Model' card of the Item record or in the Item Group if the Item belongs to one.
- You should also choose a Cost of Sales Account for a Stocked Item. Again, you can do this in the Item record ('A/C' card) or in the Item Group if the Item belongs to one. You should also set a default Cost of Sales Account in the Account Usage Stock setting in the Stock module.
- You should choose a stock valuation method (or "Cost Model") for your Stocked Items. This will be used by the Stock List report to value your stock and will also determine the cost of sales value of each Item when you sell one. You can set an overall valuation method in the Cost Accounting setting in the Stock module. If you want to use a different valuation method for a particular Stocked Item, choose it on the 'Cost Model' card of the Item record or in the Item Group if the Item belongs to one.
- Structured Item
- Use this Type for Items that you will build from components at the moment of delivery. You will never keep a Structured Item in stock, only its components. An example might be a Stereo System, which as an entity is never kept in stock. Its components (e.g. amplifier, CD player) are kept in stock. When you deliver a Stereo System, appropriate quantities of its components will automatically be removed from stock.
- You should specify a Recipe for each Structured Item, on the 'Recipe' card. The Recipe is a list of the components that you will use to build the Item: define each Recipe in the Recipes setting in the Stock module. You will not be able to save a Structured Item without specifying a Recipe.
- When you sell a Structured Item, it will of course be shown on all paperwork (e.g. the Quotation, Order or Invoice). If you would like the components to be listed as well, tick the Paste Components During Entry box on the 'Recipe' card.
- If the Item is one that you will build before the moment of delivery and keep in stock, you should enter it as a Stocked Item. An example might be the CD Player. When you build a CD Player using the Production register in the Production module, its components (circuit boards, laser/scanner unit and digital-analogue converter) will be removed from stock and it will be added to stock.
- You should specify a Recipe for each Structured Item, on the 'Recipe' card. The Recipe is a list of the components that you will use to build the Item: define each Recipe in the Recipes setting in the Stock module. You will not be able to save a Structured Item without specifying a Recipe.
- Service
- Use this Type for chargeable time, such as consultancy, labour and training. If you do not have the Job Costing module, these Items can also be Plain Items. Outside that module Plain and Service Items are handled in a similar manner. If you have the Job Costing module, these Items should be Service Items to take full advantage of the time recording features in that module.
- You can specify which of the four Item Types will be selected by default in each new Item record. To do so, choose a Default Item Type in the Item Settings setting in the Sales Ledger.
- Usually you cannot change the Item Type after saving an Item record for the first time. However, you can use Access Groups to allow certain users to do this (with some limitations), by granting them Full access to the 'Change Item's Type' Action. The limitations are that you will not be able to change the Type from Stocked if you have any stock of the Item, and you will not be able to change the Type to Structured. The 'Change Item's Type' Action will also allow you to change the Serial Number Tracking setting on the 'Stock' card.
- Plain
- Treat Item as Material on Project
- Please refer here for details about this check box.
- Picture, [Add picture]
- Please refer to the Items and Pictures page for details about attaching pictures to Item records.
The Item register in Standard ERP:
- Introduction
- Entering an Item, including:
- Header
- 'Pricing' card
- 'Stock' card
- 'Warehouse' card
- 'Costs' card
- 'Recipe' card
- 'A/C' card
- 'Varieties' card
- 'Texts' card
- 'Cost Model' card
- 'User Values' card
- 'Notes' card
- 'BI' card
- Header
- Editing an Item
- Deleting an Item
- Items and Pictures
- Operations menu
- Create menu
- Home page for Items and Pricing manual
- Home page for Standard ERP manual
Entering an Item - Stock Card
This page describes the fields on the 'Stock' card of the Item record. Please follow the links below for descriptions of the other cards:- Header
- 'Pricing' card
- 'Stock' card
- 'Warehouse' card
- 'Costs' card
- 'Recipe' card
- 'A/C' card
- 'Varieties' card
- 'Texts' card
- 'Cost Model' card
- 'User Values' card
- 'Notes' card
- 'BI' card
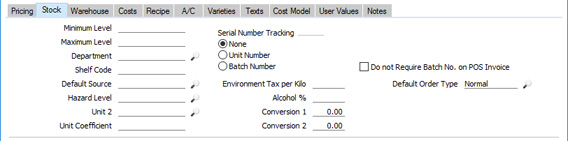
- Minimum Level
- This is the minimum quantity of the Item that you want to keep in stock.
- You can use the 'Create Purchase Orders' function in the Purchase Orders module (on the Operations menu of the 'Purchase Orders: Browse' window) when you need to create Purchase Orders with sufficient quantities to ensure that the stock balance for each Item is brought up to its Minimum Stock Level, taking into account quantities on outstanding Sales Orders ("stocking" Orders).
- The Minimum Stock Level is also used in the Deficiency List and Purchasing Suggestion reports, which produce purchase proposals. You can use these reports to preview the Purchase Orders that will be created by the function described in the previous paragraph.
- If you would like to specify the minimum quantity of the Item that can be held in stock in each Location, leave this field empty and use the Minimum Stock Levels setting in the Stock module.
- You can use the 'Create Purchase Orders' function in the Purchase Orders module (on the Operations menu of the 'Purchase Orders: Browse' window) when you need to create Purchase Orders with sufficient quantities to ensure that the stock balance for each Item is brought up to its Minimum Stock Level, taking into account quantities on outstanding Sales Orders ("stocking" Orders).
- Maximum Level
- Record here the maximum quantity of the Item that can be held in stock. This is for information only.
- Serial Number Tracking
- Use these options to specify whether the Item has Serial Numbers.
- No
- Select this option if the Item is not Serial Numbered.
- Unit Number
- Select this option if each unit of the Item will have a unique Serial Number.
- Usually you will need to specify a Serial Number every time you include the Item in a stock transaction (e.g. a Goods Receipt, Delivery or Stock Depreciation). In the case of outgoing stock transactions, the Serial Number that you specify must be one that is currently in stock. However, if you are using the No Serial No. on Goods Receipts option in the Stock Settings setting in the Stock module, you won't need to specify Serial Numbers in Goods Receipts. You will still need to specify Serial Numbers in outgoing stock transactions, but no check will be made that the Serial Numbers you specify are in stock.
- If you would like the value of outgoing stock transactions (e.g. Cost of Sales values) to be tied to Serial Numbers, select the Cost Price for Serial Number option on the 'Cost Model' card.
- Usually you will need to specify a Serial Number every time you include the Item in a stock transaction (e.g. a Goods Receipt, Delivery or Stock Depreciation). In the case of outgoing stock transactions, the Serial Number that you specify must be one that is currently in stock. However, if you are using the No Serial No. on Goods Receipts option in the Stock Settings setting in the Stock module, you won't need to specify Serial Numbers in Goods Receipts. You will still need to specify Serial Numbers in outgoing stock transactions, but no check will be made that the Serial Numbers you specify are in stock.
- Batch Number
- Select this option if more than one unit of the Item can have the same Serial Number. Each unit with the same Serial Number must have the same Unit and Cost Prices and Best Before Date.
- As with the Unit option, you will need to specify a Serial Number whenever you include the Item in a stock transaction, unless you are using the No Serial No. on Goods Receipts option. You can also use the Cost Price for Serial Number option with Items that are Serial Numbered at the Batch level.
- You can only use the Unit or Batch options with Stocked Items (i.e. if the Item Type (on the 'Pricing' card) is "Stocked").
- You can specify which of the three options will be selected by default in each new Item record. To do so, choose a Serial Number Tracking option in the Item Settings setting in the Sales Ledger.
- Usually you cannot change the Serial Number Tracking option after saving an Item record for the first time. However, you can use Access Groups to allow certain users to do this, by granting them Full access to the 'Change Item's Type' Action. Even then, changes will not be possible after you have received the Item in to stock for the first time. The 'Change Item's Type' Action will also allow you to change the Item Type on the 'Pricing' card.
- If you sell perishable Items with Best Before Dates, you can use the Batch Specifications setting in the Stock module to administer those Best Before Dates. If you will use this setting, you should ensure that your perishable Items are Serial Numbered at the Unit or Batch level.
- You can specify which of the three options will be selected by default in each new Item record. To do so, choose a Serial Number Tracking option in the Item Settings setting in the Sales Ledger.
- No
- Do not Require Batch No. on POS Invoice
- If you add an Item that is Serial Numbered at the Batch or Unit level to a POS Invoice in the Point of Sales module, you will usually be prompted to scan or input the Serial Number immediately. If you do not want this immediate prompt to appear for an Item that is Serial Numbered at the Batch level, select this option. Serial Numbers will instead be selected automatically when you run the 'Update Stock' Maintenance function in POS module to remove the Items sold on POS Invoices from stock.
- Department
- Paste Special
Departments setting, Assets module/System module
- Use this field if the Item is one that will be stocked or sold by a particular Department.
- You can use the Department as a search criterion in many reports. You can also have the Department printed on several forms: if you need this, include the "Department on Item Record" or "Item Department" fields (depending on the form) in your Form Template designs.
- You can use the Department as a search criterion in many reports. You can also have the Department printed on several forms: if you need this, include the "Department on Item Record" or "Item Department" fields (depending on the form) in your Form Template designs.
- Shelf Code
- The Shelf Code recorded here will be printed on the Stocktaking List report and on various forms (e.g. Picking Lists), providing you have included the "Shelf Code" or "Shelf Code (lagerplats)" fields (depending on the form) in your Form Template designs.
- If you need Items to be printed in Shelf Code order in Picking List documents, select the Shelf Code option in the Picking Lists setting in the Stock module.
- If you need Items to be printed in Shelf Code order in Picking List documents, select the Shelf Code option in the Picking Lists setting in the Stock module.
- Default Source
- Paste Special
Sources setting, Stock module
- Used as default in Orders, Deliveries
- You can use this field to record the origin of the Item (e.g. the manufacturer, producer or importer). This can be shown in Orders (flip F) and Deliveries (flip D).
- If your business is situated in an EU country and its trade with companies in other EU countries is greater than a threshold value, it will be necessary to send Intrastat reports periodically to the relevant authorities. These reports should include the countries of origin of the Items you have purchased and sold during the period. This information will be taken from different parts of the database, depending on how you create your Intrastat reports.
- The Intrastat functions listed at the end of this paragraph will all take the country of origin of each Item from the third line of the Address in its Default Source record. If you will use any of these Intrastat functions, you must therefore ensure that each Item has a correctly configured Default Source. The functions that take an Item's country of origin from its Default Source are the Intrastat S/L document in the Sales Ledger and the following export functions in the Purchase and Sales Ledgers: Intrastat P/L (Estonia); Intrastat S/L (Estonia); Intrastat S/L (Finland); Intrastat P/L (Germany); Intrastat S/L (Germany) and Intrastat S/L (Sweden IDEP-SCB).
- The Intrastat P/L (Finland) export will take the country of origin from the Country of Origin field in the first Purchase Item for the Item. If that is blank or an Item does not have a Purchase Item, the country of origin will again be taken from the third line of the Address in the Item's Default Source.
- The Intrastat S/L (Lithuania) export will use the Item's Default Source itself as the country of origin. In the Intrastat P/L (Lithuania) export, an Item's country of origin will be taken from the Country of O. field on flip F of the Goods Receipt row that was used to receive the Item into stock or, if that is blank, the country of origin will be taken from the Purchase Item for the Item/Supplier/Location combination. For the country of origin to be taken from a Goods Receipt row, you must be using the Transfer Each Row Separately option in the Purchase Invoice Settings setting if you will create Purchase Invoices from Purchase Orders.
- By default, the Intrastat P/L document in the Purchase Ledger will also take an Item's country of origin from the third line of the Address in its Default Source. However, if you are using the Country of Origin from Goods Receipts option in the Intrastat Purchase setting in the Purchase Ledger, an Item's country of origin will instead be taken from the Country of O. field on flip F of the Goods Receipt row that was used to receive the Item into stock. If you will use this option, you must also use the Transfer Each Row Separately and Invoices Based on Goods Receipts options in the Purchase Invoice Settings setting if you will create Purchase Invoices from Purchase Orders.
- You can use this field to record the origin of the Item (e.g. the manufacturer, producer or importer). This can be shown in Orders (flip F) and Deliveries (flip D).
- Environment Tax per Kilo
- If you need to charge an environment tax whenever you sell this Item, specify here the tax rate per kilo and then enter the Weight on the 'Warehouse' card. Please refer to the description of the Environment Tax setting here for full details about this feature.
- Default Order Type
- Paste Special Choices of possible entries
- If you receive a Sales Order from a Customer for an Item that you do not have in stock, you will need to order the Item from your Supplier. Usually, the Supplier will deliver the Item to you and you will then deliver it to the Customer, but an alternative is to have the Supplier deliver the Item directly to the Customer. This is known as "Drop Shipping".
- When you create a Sales Order, you can use the Order Type field on flip C of each Order row to specify whether an Item will be Drop Shipped. When you add an Item to an Order row, the Order Type field in that Order row will take its default value from this field in the Item record. The available options are—
- Default
- If the Order Type on flip C of an Order row is "Default", the decision whether to Drop Ship will be determined by the Order Type on the 'Terms' card of the Order.
- Normal
- If the Order Type on flip C of an Order row is "Normal", the Item will not be Drop Shipped. You should therefore choose this option if an Item will not usually be Drop Shipped.
- Drop Ship
- If the Order Type on flip C of an Order row is "Drop Ship", the Item will be Drop Shipped. You should therefore choose this option if an Item will usually or always be Drop Shipped.
- If you receive a Sales Order from a Customer for an Item that you do not have in stock, you will need to order the Item from your Supplier. Usually, the Supplier will deliver the Item to you and you will then deliver it to the Customer, but an alternative is to have the Supplier deliver the Item directly to the Customer. This is known as "Drop Shipping".
- Hazard Level
- Paste Special
Hazard Levels setting, Sales Orders module
- If your business sells hazardous Items (e.g. chemicals), , you can have information describing the nature of the hazard printed on Delivery Notes.
- First, enter each Hazard Level in the Hazard Levels setting in the Sales Orders module. Then assign the appropriate Hazard Level to each Item using this field.
- When you design the Form Template that will be used when printing Delivery Notes, you can use the fields listed below to add a table to the Form listing the Hazard Levels used in a Delivery. These fields will each be printed once for each Hazard Level used in the Delivery. You should specify a Line Height in these fields, and set the Format to "Header":
- Hazard Level Code
- Prints the Hazard Level Code.
- Hazard Level Comment
- Prints the Hazard Level Comment.
- Hazard Level Weight
- Prints the total of (Del. Qty * Item Weight * Hazard Level Weight Coefficient), calculated from every Item on the Delivery with the same Hazard Level.
- Hazard Level Volume
- Prints the total of (Del. Qty * Item Volume), calculated from every Item on the Delivery with the same Hazard Level.
- Total Hazard Level Weight
- Prints the total Hazard Level Weight for the whole Delivery.
- Total Hazard Level Volume
- Prints the total Hazard Level Volume for the whole Delivery.
- First, enter each Hazard Level in the Hazard Levels setting in the Sales Orders module. Then assign the appropriate Hazard Level to each Item using this field.
- Alcohol %
- If appropriate, you can record the alcohol content of one unit of the Item here.
- Unit 2, Unit Coefficient
- Paste Special
Units setting, Sales Ledger
- These fields allow you to produce a stock list showing quantities in different units (for example, single units and dozens, metres and yards, gallons and litres or even litres and kilograms).
- To do this, first enter the alternative unit of measurement in the Unit 2 field, using 'Paste Special' if necessary. Then, use the Unit Coefficient field to show the relationship between the Unit 2 and the Unit on the 'Pricing' card.
- When you add the Item to a row in a stock transaction (e.g. a Goods Receipt), the Unit Coefficient will be brought in to that row (e.g. it will be visible on flip D in a Goods Receipt row). This will allow stock levels to be maintained using the Unit 2 unit of measurement. The stock level expressed using the Unit 2 unit of measurement is known as the "Quantity 2" figure. Several reports in the Stock module offer the option to include Quantity 2 figures.
- You can have Quantity 2 figures calculated in one of two ways. They can be calculated by multiplying the standard quantity by the Unit Coefficient, or by dividing the standard quantity by the Unit Coefficient. Choose the option that you need using the Unit 2 Conversion Calculation options in the Stock Settings setting in the Stock module.
- The value that you enter in the Unit Coefficient field will therefore depend on which of the Unit 2 Conversion Calculation options you are using. If you are using the Multiply by Coefficient option, you should calculate the Coefficient using the formula:
- Unit
- Unit 2
- For example, if the Unit is a single item and the Unit 2 is a dozen, the Unit Coefficient will be 0.0833. If you have 120 in stock, the Quantity 2 will be 120 x 0.0833 = 10 (i.e. you will have ten dozen in stock).
- If you are using the Divide by Coefficient option, you should calculate the Coefficient using the formula:
- Unit x Unit 2
- For example, if the Unit is a single item and the Unit 2 is a dozen, the Unit Coefficient will be 12. If you have 120 in stock, the Quantity 2 will be 120/12 = 10.
- The Unit Coefficient field supports up to five decimal places.
- You should specify the Unit 2 and Unit Coefficient in an Item record when the stock level of that Item is zero. As previously mentioned, the Unit Coefficient will be brought in to each stock transaction. If you specify the Unit 2 and Unit Coefficient for an Item after entering a stock transaction, that stock transaction will not include the Unit Coefficient and so it won't update the Quantity 2 figure. The Quantity 2 figure in reports will therefore not be correct.
- To do this, first enter the alternative unit of measurement in the Unit 2 field, using 'Paste Special' if necessary. Then, use the Unit Coefficient field to show the relationship between the Unit 2 and the Unit on the 'Pricing' card.
- Conversion 1, Conversion 2
- You should use these fields for Items that are sold in different quantities. For example, you might sell a particular Item might be sold in pairs, by the dozen and in boxes of 144. The Unit field on the 'Pricing' card refers to the basic unit of sale, since this is the unit to which the Base Price refers. In this example, the basic unit is a pair. You should enter "72" as the Conversion 1 (72 of the basic unit i.e. 72 pairs make 144) and "6" as the Conversion 2.
- When you design the Invoice and Delivery Note forms using the Form Template register in the System module, you can include three relevant fields. These are "Quantity Conversion 1", "Quantity Conversion 2", and "Quantity Conversion 3". Quantity Conversion 1 refers to the Conversion 1 field, Quantity Conversion 2 refers to the Conversion 2 field, and Quantity Conversion 3 refers to the basic sale quantity.
- If you receive an Order for 158 units of this Item (i.e. 158 pairs, the basic sale quantity), the three Quantity Conversion fields on the printed documentation will appear as follows:
Qty Conv 1 Qty Conv 2 Qty Conv 3 2 2 2 - 2 boxes of 72 pairs + 2 boxes of 6 pairs + 2 pairs = 158 Units (pairs).
- When you design the Invoice and Delivery Note forms using the Form Template register in the System module, you can include three relevant fields. These are "Quantity Conversion 1", "Quantity Conversion 2", and "Quantity Conversion 3". Quantity Conversion 1 refers to the Conversion 1 field, Quantity Conversion 2 refers to the Conversion 2 field, and Quantity Conversion 3 refers to the basic sale quantity.
The Item register in Standard ERP:
- Introduction
- Entering an Item, including:
- Header
- 'Pricing' card
- 'Stock' card
- 'Warehouse' card
- 'Costs' card
- 'Recipe' card
- 'A/C' card
- 'Varieties' card
- 'Texts' card
- 'Cost Model' card
- 'User Values' card
- 'Notes' card
- 'BI' card
- Header
- Editing an Item
- Deleting an Item
- Items and Pictures
- Operations menu
- Create menu
- Home page for Items and Pricing manual
- Home page for Standard ERP manual
Entering an Item - Warehouse Card
This page describes the fields on the 'Warehouse' card of the Item record. Please follow the links below for descriptions of the other cards:- Header
- 'Pricing' card
- 'Stock' card
- 'Warehouse' card
- 'Costs' card
- 'Recipe' card
- 'A/C' card
- 'Varieties' card
- 'Texts' card
- 'Cost Model' card
- 'User Values' card
- 'Notes' card
- 'BI' card
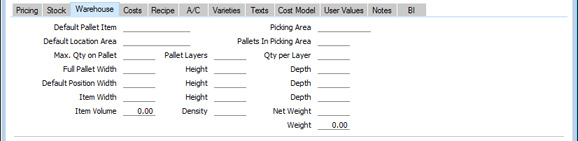
- Width, Height, Depth
- Record the size of one unit of the Item using these fields. If you fill in all three fields, the Volume (below) will be calculated automatically.
- If you would like to ensure that any one, two or all three of these fields contain values, use the Size Entry Of options and the Check Size Entry box in the appropriate Unit record (in the setting in the Sales Ledger).
- You can use these fields with Items that are sold by area or volume. Please refer to the Selling Items by Area or Volume page for details and illustrated examples.
- If you would like to ensure that any one, two or all three of these fields contain values, use the Size Entry Of options and the Check Size Entry box in the appropriate Unit record (in the setting in the Sales Ledger).
- Volume
- Record the Volume of one unit of the Item here. You can use the Volume to calculate quantity discounts: this process is described here.
- If you have specified a Width, Height and Depth in the fields above, the Volume will be calculated automatically. If the Item record has a Unit and that Unit has a Volume/Weight Factor, the Net Weight will be calculated from the Volume automatically.
- If you have specified a Width, Height and Depth in the fields above, the Volume will be calculated automatically. If the Item record has a Unit and that Unit has a Volume/Weight Factor, the Net Weight will be calculated from the Volume automatically.
- Density
- You can record the density of the Item here. If you enter the Volume and Net Weight, the Density will be calculated automatically. Similarly, if you enter the Volume and Density, the Net Weight will be calculated automatically.
- Weight
- Record the Weight of one unit of the Item here.
- You can use the Weight to calculate quantity discounts: this process is described here.
- You can have a freight charge added to an Invoice based on the total weight of the Items on that Invoice: please refer to the descriptions of the Freight and Freight/Weight Calculation settings for details about this feature.
- If you need to charge an environment tax whenever you sell the Item, the tax per unit will be calculated by multiplying this Weight with the Environment Tax per Kilo on the 'Stock' card. Please refer to the description of the Environment Tax setting here for full details of this feature.
- You can use the Weight to calculate quantity discounts: this process is described here.
- Weight, Net Weight
- If you need to use the Intrastat reporting feature, you should enter the Weight of each Item (including immediate packaging) expressed in kilograms in one of these fields.
- The Weight will be used by the following Intrastat functions:
- Exports
- Intrastat S/L (Czech Republic)
- Intrastat P/L (Estonia)
- Intrastat S/L (Estonia)
- Intrastat P/L (Germany)
- Intrastat S/L (Germany)
- Intrastat P/L (Lithuania)
- Intrastat S/L (Sweden, IDEP-SCB)
- Intrastat Purchase Invoices (UK)
- Intrastat Invoices (UK)
- Intrastat P/L (Estonia)
- Forms
- Intrastat P/L
- Intrastat S/L
- Exports
- Intrastat P/L (Finland)
- Intrastat S/L (Finland)
- Intrastat S/L (Lithuania)
- Ist@at - Items Export
- Ist@at - Items Import
- Intrastat S/L (Finland)
- Reports
- Intrastat P/L (Latvia)
- Intrastat S/L (Latvia)
- Exports
- Intrastat Invoices
- The Weight will be used by the following Intrastat functions:
The Item register in Standard ERP:
- Introduction
- Entering an Item, including:
- Header
- 'Pricing' card
- 'Stock' card
- 'Warehouse' card
- 'Costs' card
- 'Recipe' card
- 'A/C' card
- 'Varieties' card
- 'Texts' card
- 'Cost Model' card
- 'User Values' card
- 'Notes' card
- 'BI' card
- Header
- Editing an Item
- Deleting an Item
- Items and Pictures
- Operations menu
- Create menu
- Home page for Items and Pricing manual
- Home page for Standard ERP manual
Entering an Item - Costs Card
This page describes the fields on the 'Costs' card of the Item record. Please follow the links below for descriptions of the other cards:- Header
- 'Pricing' card
- 'Stock' card
- 'Warehouse' card
- 'Costs' card
- 'Recipe' card
- 'A/C' card
- 'Varieties' card
- 'Texts' card
- 'Cost Model' card
- 'User Values' card
- 'Notes' card
- 'BI' card
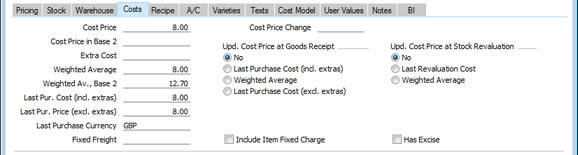
- Cost Price
- Used as default in
Quotations, Orders, Invoices, Purchase Items, Purchase Orders, Goods Receipts
- You should record the Cost Price (i.e. the standard purchase price) of the Item here, in your home Currency.
- This figure will be used to calculate the Gross Profit in sales transactions (e.g. Quotations, Orders, Invoices), so it is important that it relates to the same Unit and Price Factor values as the Base Price on the 'Pricing' card.
- The Cost Price will be used as a default when you create Purchase Items from the Item record. This Cost Price will also be the default value in Purchase Orders and Goods Receipts, if there is no Purchase Item for the relevant Item/Supplier combination.
- Depending on the setting of the Update Cost Price at Goods Receipt options (see below), the Cost Price can be updated automatically whenever you receive the Item into stock (i.e. it will be updated whenever you mark Goods Receipts as OK and save). In a similar manner and depending on the Update Cost Price at Stock Revaluation options, the Cost Price can also be updated whenever you mark Stock Revaluation records as OK and save.
- If the Item is a Structured Item, you can enter a Cost Price here (e.g. the sum of the Cost Prices of the components), or you can leave this field empty. Where costs are required (e.g. in gross margin calculations), they will be taken from this field or, if this field is empty, from the Item records for the components. However, if the Structured Item is one that you will be using in Work Sheets (i.e. it is a spare part made up of components) and you have ticked the Paste Components During Entry box on the 'Recipe' card, you should leave this field empty.
- If the Item is a Stocked Item with a Recipe specified on the 'Recipe' card (i.e. it is an assembly that you will build from components to hold in stock, using the Production register), then you should enter a Cost Price here. You can do this yourself (copying from the Cost field in the footer of the Recipe), or you can use the 'Update Recipes' Maintenance function in the Stock and Production modules. You can have this figure updated automatically from Production records, depending on the Update Cost Price at Goods Receipt options below.
- This figure will be used to calculate the Gross Profit in sales transactions (e.g. Quotations, Orders, Invoices), so it is important that it relates to the same Unit and Price Factor values as the Base Price on the 'Pricing' card.
- Cost Price Change
- This field shows the date when the Cost Price for the Item was last changed and is updated automatically.
- Cost Price in Base 2
- The Cost Price expressed in Base Currency 2.
When you create a new Item record and specify a Cost Price, the Cost Price in Base 2 will not be filled in automatically. However, if you have selected one of the Update Cost Price at Goods Receipt options below, the Cost Price in Base 2 will be updated at the same time as the Cost Price, using the conversion rate applying on the date of the updating transaction.
- Extra Cost
- Enter here any extra costs involved in the purchase of this Item, such as fixed freight costs. This figure should be in your home Currency.
- When you add the Item to a Goods Receipt, its Extra Cost will be copied to the Extra Cost field on flip C of the Goods Receipt row.
- When you add the Item to a sales transaction (i.e. a Quotation, Order or Invoice), its Cost Price will be copied to the Cost field on flip C of the sales transaction row, from where it will be used to calculate the Gross Profit of the transaction. If you would like the Extra Cost to be copied as well (i.e. for the Item's Cost + Extra Cost to be copied to the Cost field on flip C of the sales transaction row), select the Include Item Extra Cost in Cost option in the Cost Accounting setting in the Stock module. When you add the Item to a Project Budget, the Extra Cost will always be included in the Cost on flip B of the Project Budget row.
- When you add the Item to a Goods Receipt, its Extra Cost will be copied to the Extra Cost field on flip C of the Goods Receipt row.
- Weighted Average
- This field contains the average unit cost price of the Item in the home Currency (including extra costs such as freight and customs duties). It will be updated automatically whenever you receive the Item into stock (i.e. whenever you mark a Goods Receipt containing the Item as OK and save), using the following formula:
WA = ((Qty in stock x Current WA) + (Qty on GR x Unit Pr. on GR)) (Qty in stock + Qty on GR) - (where GR means Goods Receipt).
- The Calc FIFO Value rounding rules set in the Round Off setting in the System module will be applied to the calculation.
- The Weighted Average will also be updated from (any Extra Costs will be added in). In addition, it will be updated from Credit Notes (if Update Stock is ticked) and Returned Goods if you are using the Update Weighted Average from Returned Goods And Credit Notes option in the Cost Accounting setting in the Stock module, and from Returned Goods to Suppliers if you are using the Update Weighted Average from Returned Goods to Supplier option in the same setting.
- If you have more than one Location, this figure will be the overall Weighted Average value of the Item in all Locations. Separate Weighted Averages for the Item in each Location are stored in the Weighted Average setting in the Stock module.
- You can recalculate the Weighted Average of an Item using the 'Update Item Cost Price' Maintenance function in the Stock module.
- As the Weighted Average is a calculated figure, you should not change it yourself. Doing so will introduce inaccuracies into the Stock List report and cost of sales postings. You can ensure Weighted Average figures are not changed using Access Groups, by denying users access to the 'Change Item's Weighted Average Cost' Action. This will also prevent users from changing the Weighted Average in Base Currency 2, field immediately below.
- (where GR means Goods Receipt).
- Weighted Av., Base 2
- The Weighted Average expressed in Base Currency 2. This figure will be updated automatically at the same time as the Weighted Average (above).
- When you remove an Item from stock (e.g. using a Delivery, Invoice or Stock Depreciation), the value in Base Currency 1 of that Item will be calculated using the Cost Model. This figure will usually then be converted to Base Currency 2 using the current rate.
- However, if you are using the Weighted Average in Base Currency 2 option in the Cost Accounting setting in the Stock module, the value in Base Currency 1 will still be calculated using the Cost Model. But this figure will not be converted to Base Currency 2: instead the Base Currency 2 figure will be copied from this field.
- If you are using the Weighted Average Cost Model, the Weighted Average in Base Currency 2 option will mean your stock valuation in the Nominal Ledger will be correct in both Base Currencies. You should not use this option if you are using one of the other Cost Models.
- When you remove an Item from stock (e.g. using a Delivery, Invoice or Stock Depreciation), the value in Base Currency 1 of that Item will be calculated using the Cost Model. This figure will usually then be converted to Base Currency 2 using the current rate.
- Last Pur. Cost (incl. extras)
- This figure records the last unit cost price (including extra costs such as freight and customs duties) used when purchasing this Item. It will be updated automatically whenever you receive the Item into stock (i.e. each time you mark a Goods Receipt as OK and save).
- Last Pur. Price (excl. extras)
- This field is similar to the one above, but in this case the figure does not include any extra costs such as freight and customs duties.
- Last Purchase Currency
- This field records the last Currency used when purchasing the Item. It will be updated automatically.
- Upd. Cost Price at Goods Receipt
- Use these options if you would like the Cost Price of the Item to be updated automatically whenever you receive it into stock. This will usually be whenever you mark a Goods Receipt as OK and save. If the Item is one that is constructed from components, the update will occur whenever you mark a Production record as Finished.
- The automatic updating of Cost Prices can be useful if you are using cost accounting (maintaining stock values in the Nominal Ledger) and your goods-out values are based on Items' Cost Prices. In this scenario, it is advantageous if the Cost Prices are always kept up-to-date. Cost Accounting is fully described here.
- A price in a Goods Receipt will be rounded up or down according to the Calc FIFO Value rounding rules set in the Round Off setting in the System module before it is used to update the Cost Price of the Item.
- If you are using Purchase Items, changes to the Cost Price made here will not be copied to the Item's Purchase Items automatically. To update those Purchase Items, use the 'Update Purchase Items' Maintenance function in the 'Purchase Orders' module.
- The following options are available:
- No
- Select this option if you do not want the Item's Cost Price to be updated automatically from Goods Receipts.
- Last Purchase Cost (incl. extras)
- If you choose this option, whenever you mark a Goods Receipt as OK and save, the Cost Price in that Goods Receipt (i.e. the price including extra costs such as carriage and customs duties) will be copied to the Cost Price field in the Item record. You will tend to use this option for Items whose prices do not often change, or where the long-term pattern is for prices to fall or rise.
- Weighted Average
- This option will copy the Item's Weighted Average (as shown in the field to the left) to its Cost Price field. Please refer to the description of this field above for details about how the Weighted Average will be calculated. This option will be useful where prices fluctuate without a pattern, perhaps due to changing exchange rates.
- If you choose this option and you are also using the Update Weighted Average from Returned Goods and Credit Notes option in the Cost Accounting setting in the Stock module, the Item's Weighted Average will be updated from Credit Notes (if Update Stock is ticked) and Returned Goods records. The new Weighted Average will then be copied to the Cost Price. Similarly, if you are using the Update Weighted Average from Returned Goods to Supplier option in the Cost Accounting setting, the Item's Weighted Average will be updated from Returned Goods to Supplier records, and this change will be copied to the Cost Price.
- If you choose this option and you are also using the Update Weighted Average from Returned Goods and Credit Notes option in the Cost Accounting setting in the Stock module, the Item's Weighted Average will be updated from Credit Notes (if Update Stock is ticked) and Returned Goods records. The new Weighted Average will then be copied to the Cost Price. Similarly, if you are using the Update Weighted Average from Returned Goods to Supplier option in the Cost Accounting setting, the Item's Weighted Average will be updated from Returned Goods to Supplier records, and this change will be copied to the Cost Price.
- Last Purchase Cost (excl. extras)
- This option is similar to the Last Purchase Cost (incl. extras) option described above, with the exception that the Unit Price in Goods Receipts will be copied to the Cost Price field in the Item record, so extra costs such as carriage and customs duties will be excluded.
- You can specify which of the four options will be selected by default in each new Item record. To do so, choose an Upd. Cost Price at Goods Receipt option in the Item Settings setting in the Sales Ledger.
- The automatic updating of Cost Prices can be useful if you are using cost accounting (maintaining stock values in the Nominal Ledger) and your goods-out values are based on Items' Cost Prices. In this scenario, it is advantageous if the Cost Prices are always kept up-to-date. Cost Accounting is fully described here.
- Upd. Cost Price at Stock Revaluation
- As well as having the Cost Price updated automatically from Goods Receipts as described above, you can also have it updated from Stock Revaluations. Select one of these options if you would like to use this feature.
- You can specify which of the three options will be selected by default in each new Item record. To do so, choose an Upd. Cost Price at Stock Revaluation option in the Item Settings setting in the Sales Ledger.
- You can specify which of the three options will be selected by default in each new Item record. To do so, choose an Upd. Cost Price at Stock Revaluation option in the Item Settings setting in the Sales Ledger.
- Has Excise
- In Russia, there is a requirement that an Item sold without excise duties should be specifically marked on Invoices. For this purpose, you can include the "Has Excise" field in your Invoice Form Template. When you print an Invoice, the "Has Excise" field will cause the text "No Excise" to be printed for Items where the Has Excise box has not been ticked. Nothing will be printed for Items where the Has Excise box has been ticked.
The Item register in Standard ERP:
- Introduction
- Entering an Item, including:
- Header
- 'Pricing' card
- 'Stock' card
- 'Warehouse' card
- 'Costs' card
- 'Recipe' card
- 'A/C' card
- 'Varieties' card
- 'Texts' card
- 'Cost Model' card
- 'User Values' card
- 'Notes' card
- 'BI' card
- Header
- Editing an Item
- Deleting an Item
- Items and Pictures
- Operations menu
- Create menu
- Home page for Items and Pricing manual
- Home page for Standard ERP manual
Entering an Item - Recipe Card
This page describes the fields on the 'Recipe' card of the Item record. Please follow the links below for descriptions of the other cards:- Header
- 'Pricing' card
- 'Stock' card
- 'Warehouse' card
- 'Costs' card
- 'Recipe' card
- 'A/C' card
- 'Varieties' card
- 'Texts' card
- 'Cost Model' card
- 'User Values' card
- 'Notes' card
- 'BI' card
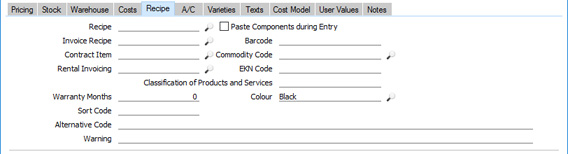
- Recipe
- Paste Special
Recipes setting, Stock module
- If the Item is a Structured or assembled Item, specify here the Recipe (or bill of materials) that describes how it is made up.
- If the Item is a Structured Item, you must specify a Recipe before you can save it. If you need to create a new Recipe, use the 'Recipe' function on the Create menu (Windows/macOS) or + menu (iOS/Android) to create a new empty Recipe. Save the Recipe, save the Item and then return to the Recipe to list the Input and Output Items.
- If the Item is a Stocked Item, you can save it before specifying the Recipe. In this case, when you create the Recipe using the 'Recipe' function on the Create or + menus, the Item will be entered in the new Recipe as the Output Item automatically.
- If the Item is a Structured Item, you must specify a Recipe before you can save it. If you need to create a new Recipe, use the 'Recipe' function on the Create menu (Windows/macOS) or + menu (iOS/Android) to create a new empty Recipe. Save the Recipe, save the Item and then return to the Recipe to list the Input and Output Items.
- Paste Components during Entry
- If the Item is a Structured Item and you would like to display its components in sales and outgoing stock transactions (e.g. Quotations, Orders, Invoices and Stock Depreciations), select this option. The components will be listed in these records when you enter the quantity of the Structured Item.
- If you are using this option and the Item is one that you will be using in Work Sheets (i.e. it is a spare part made up of components), you should set the Cost Price on the 'Costs' card to zero, so that gross margin and profit calculations will use the cost prices of the components.
- This option will cause components to be listed on screen and printed on Delivery Notes and Picking Lists. If you do not want the components listed on screen, you can still have them printed on Delivery Notes and Picking Lists (but not other documents such as Order Acknowledgements, Invoices and Quotations). To do this, use the Structured Items setting in the Stock module.
- If you need cost of sales postings to be made from Invoices and you have Structured Items in which you have not ticked this Paste Components during Entry option, it is recommended that you use the Post Structured Items Cost of Sales on Invoice option in the Cost Accounting setting in the Stock module. This will ensure that cost of sales postings will be made when you sell the Structured Items, both in Invoices that you enter directly to the Invoice register and in Invoices that you create from Sales Orders and Deliveries.
- If you are using this option and the Item is one that you will be using in Work Sheets (i.e. it is a spare part made up of components), you should set the Cost Price on the 'Costs' card to zero, so that gross margin and profit calculations will use the cost prices of the components.
- Invoice Recipe
- Paste Special
Recipes setting, Stock module
- This field is relevant for users in Sweden, where sales of Items containing certain materials (e.g. metals) attract a tax per unit sold. By specifying an Invoice Recipe for such Items, the Recipe components will be listed on Invoices (but not Orders or Deliveries).
- Contract Item
- Paste Special
Item register
- If your business is one that sells both goods and the service contracts to maintain them, you will need separate records in your Item register for the Items that you sell and for the service contracts for those Items.
- The records representing the service contracts are sometimes known as "Contract Items". The Base Price of a Contract Item will be the periodic charge for the contract (e.g. the weekly, monthly or annual fee).
- When you sell a service contract, you will usually create a new record in the Contract register in the Contracts module. This Contract will contain the Contract Item and will allow you to issue periodic Invoices for the service contract.
- When you sell an Item, you can create a Contract for that Item from the Invoice. To do this, open the Invoice in which you have sold the Item and choose ' Contract' from the Create menu. As the Contract should contain a Contract Item and not the Item itself, this function requires the Item and its Contract Item to be linked, which you can do using this field. In the record representing the Item itself, specify here the Item Number of the Contract Item record.
- The records representing the service contracts are sometimes known as "Contract Items". The Base Price of a Contract Item will be the periodic charge for the contract (e.g. the weekly, monthly or annual fee).
- Rental Invoicing
- Paste Special
Item register
- If your business is one that rents Items to Customers, you should have separate records in your Item register for each Item and for the rental charge for that Item. The Item itself will be used in the Stock module (when it is purchased), in the Internal Stock module and in the Assets module (where it will be depreciated), while the Rental Item will provide the rental charge whenever the Item is rented out.
- Use this field to link the two Items. In the record representing the Item itself, specify here the Item Number of the record representing the rental charge for that Item.
- Use this field to link the two Items. In the record representing the Item itself, specify here the Item Number of the record representing the rental charge for that Item.
- Warranty Months
- Record here the length of the warranty period (if any) covering the Item. This information will be used in the Service Orders module to determine whether Items purchased from your company are under warranty when bought in for repair.
- Alternative Code
- Use this field if you need to identify the Item by means other than the Item Number. The Alternative Code is shown in the 'Items: Browse' and 'Paste Special' windows, so you can use it to search for a particular Item.
- If you are using the EDI (Electronic Data Interchange) module, you should record here the code allocated to the Item by the Customer. When importing EDI Orders, this will enable the import function to convert the Customer's Item Number contained in the import file to your own. Please refer to your local representative for full details.
- Providing an Alternative Code does not clash with your Item Numbers, you can enter it instead of the Item Number whenever you need to refer to an Item (in Orders or Invoices, for example). This might be useful if you have Customers who place orders quoting their own Item Numbers.
- If you are using the EDI (Electronic Data Interchange) module, you should record here the code allocated to the Item by the Customer. When importing EDI Orders, this will enable the import function to convert the Customer's Item Number contained in the import file to your own. Please refer to your local representative for full details.
- Warning
- Text entered here will appear as a warning or other message whenever you use the Item in a transaction.
- Barcode
- Record the Item's Barcode here.
- Providing a Barcode does not clash with your Item Numbers, you can enter it instead of the Item Number whenever you need to refer to an Item (in Orders or Invoices, for example). This might be useful if you enter transactions using barcode readers: please refer to your local HansaWorld representative for details about using barcode readers.
- If you need to ensure that each Item has a unique Barcode, select the Unique Barcode option in the Item Settings setting in the Sales Ledger. This setting also contains a Barcode Length Excl. Checksum field, which you can use if you need to ensure that each Barcode contains at least a certain number of characters. If you enter an Item with a shorter Barcode, it will be given the appropriate number of leading zeroes when you save the record. For example, if your Barcode Length is five, a Barcode of "4256" will be converted to "04256". No warning will be issued for Barcodes that are longer than the Barcode Length.
- If you need barcodes to be printed in forms (e.g. in Invoices), include the "Barcode" field in your Form Template designs. Assign the field a Style in which you have chosen the appropriate barcode format (Code 128, Code 39 or EAN 13) and font from the IDAutomation family. If you choose to have barcodes printed as QR Codes, there is no need to specify a font
- If the Item is one that has Varieties and you need to enter a separate Barcode for each Variety, use the Barcodes setting in the Stock module. This is described on the Varieties and Barcodes page.
- Providing a Barcode does not clash with your Item Numbers, you can enter it instead of the Item Number whenever you need to refer to an Item (in Orders or Invoices, for example). This might be useful if you enter transactions using barcode readers: please refer to your local HansaWorld representative for details about using barcode readers.
- Commodity Code
- Paste Special
Commodity Code register, Customs module/Commodity Codes setting, Hotel module
- If your business is situated in an EU country, record the Item's Commodity Code/EAN (European Article Number) here. This is required for Intrastat reporting in the event of trade with another member of the EU. Commodity Codes are listed in the Intrastat Classification Nomenclature document available from https://www.uktradeinfo.com/TradeTools/ICN/Pages/ICNhome.aspx.
- Depending on the Intrastat functions that you need to use, you should enter Commodity Codes in this field or in the EKN Code field immediately below. The following functions use this field:
- Exports
- Intrastat P/L (Finland)
- Intrastat S/L (Finland)
- Intrastat P/L (Germany)
- Intrastat P/L (Lithuania)
- Intrastat S/L (Lithuania)
- Intrastat S/L (Sweden, IDEP-SCB)
- Intrastat Invoices
- Intrastat Invoices (UK) (Items without Commodity Codes will not be included in the export file)
- Intrastat Purchase Invoices (UK) (Items without Commodity Codes will not be included in the export file)
- Intrastat S/L (Finland)
- Reports
- Intrastat P/L (Latvia)
- Intrastat S/L (Latvia)
- This field is also used by the Regional Sales Tax and Regional Perception Tax calculations in Argentina. In configuring these taxes using the Regional Sales Taxes and Regional Perception Taxes settings in the Sales Ledger, you can specify separate tax rates for each Commodity Code. When you sell an Item (i.e. include it in an Invoice or Order row), the appropriate tax rate will be applied to the Item depending on the Commodity Code in the Item record or, if blank, in the Item Group to which the Item belongs. Please refer to your local HansaWorld representative for more details.
- Depending on the Intrastat functions that you need to use, you should enter Commodity Codes in this field or in the EKN Code field immediately below. The following functions use this field:
- EKN Code
- Depending on the Intrastat functions that you need to use, you should enter Commodity Codes in this field or in the Commodity Code field immediately above (in both fields in Germany). The following functions use this field:
- Exports
- Intrastat S/L (Czech Republic)
- Intrastat P/L (Estonia)
- Intrastat S/L (Estonia)
- Intrastat S/L (Germany)
- Ist@at - Items Export (Poland)
- Ist@at - Items Import (Poland)
- Intrastat P/L (Estonia)
- Forms
- Intrastat P/L
- Intrastat S/L
- Exports
- Classification of Products and Services
- This field is used in Brazil and Kenya. In Brazil, a Classification of Products and Services code for each Item on an Invoice should be included when sending the Invoice as an eInvoice (in the <NCM> tag). In Kenya, a Classification of Products and Services code for each Item should be included in the iTax (Kenya) report. In both cases, the Classification of Products and Services code will be taken from the Item record or, if blank, from the Item Group to which the Item belongs.
- This field is also used in Poland, where each Item should be assigned a classification code or PKWiU. The PKWiU for each Item will be printed on Quotations, Orders and Invoices if you have included the "Classification of Products and Services" field in your Form Template designs. The PKWiU will always be taken from the Item record, there will be no fallback to the Item Group.
The Item register in Standard ERP:
- Introduction
- Entering an Item, including:
- Header
- 'Pricing' card
- 'Stock' card
- 'Warehouse' card
- 'Costs' card
- 'Recipe' card
- 'A/C' card
- 'Varieties' card
- 'Texts' card
- 'Cost Model' card
- 'User Values' card
- 'Notes' card
- 'BI' card
- Header
- Editing an Item
- Deleting an Item
- Items and Pictures
- Operations menu
- Create menu
- Home page for Items and Pricing manual
- Home page for Standard ERP manual
Entering an Item - A/C Card
This page describes the fields on the 'A/C' card of the Item record. Please follow the links below for descriptions of the other cards:- Header
- 'Pricing' card
- 'Stock' card
- 'Warehouse' card
- 'Costs' card
- 'Recipe' card
- 'A/C' card
- 'Varieties' card
- 'Texts' card
- 'Cost Model' card
- 'User Values' card
- 'Notes' card
- 'BI' card
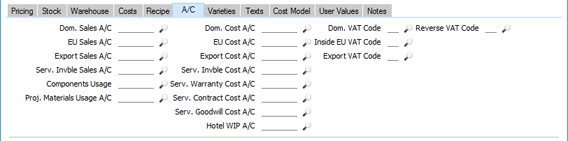
- Dom. Sales A/C, EU Sales A/C, Export Sales A/C
- Paste Special
Account register, Nominal Ledger/System module
- A Sales Account will be credited whenever you sell an Item, allowing you to record the levels of sales of different types of Items in the Nominal Ledger.
- Use these fields to specify Sales Accounts for each VAT Zone, to be used whenever you sell the Item. Please refer here for more details about how a Sales Account will be chosen when you sell an Item (i.e. when you specify an Item in a row in an Invoice, Order, Quotation or other sales transaction).
- If you need to use a dedicated Sales Account in the special case where an Invoice was created from a Service Order, specify that Account using the Serv, Invble Sales A/C field below.
- You can change the name of the EU Sales A/C field if it is not suitable. Using the VAT Zone Label setting in the Sales Ledger, you can replace the string "EU" with your own string (for example "SACU" in South Africa)..
- Use these fields to specify Sales Accounts for each VAT Zone, to be used whenever you sell the Item. Please refer here for more details about how a Sales Account will be chosen when you sell an Item (i.e. when you specify an Item in a row in an Invoice, Order, Quotation or other sales transaction).
- Dom. Cost A/C, EU Cost A/C, Export Cost A/C
- Paste Special
Account register, Nominal Ledger/System module
- If you are maintaining stock valuations in the Nominal Ledger, a Cost of Sales Account will be debited with the calculated cost of goods whenever you sell the Item (if it is a Stocked Item).
- Please refer here for full details about how the Cost of Sales Account will be chosen in an individual transaction.
- In all cases, the correct Cost Account for the VAT Zone of the Customer will be used, so be sure to specify a Cost Account for each Zone.
- If you need to use dedicated Cost Accounts in the special case where the Cost of Sales postings are being made from Work Sheets, specify them using the Serv. Invble Cost, Serv. Warranty Cost, Serv. Contract Cost and Serv. Goodwill Cost A/C fields described below.
- Similarly, if you need to use a dedicated Cost Account in Cost of Sales postings made from Deliveries that have been connected to Projects, specify that Account using the Proj. Materials Usage A/C field (also described below).
- The cost of goods will be calculated using the Cost Model chosen on the 'Cost Model' card, in the Item Group to which the Item belongs or in the Cost Accounting setting.
- Please refer here for full details about how the Cost of Sales Account will be chosen in an individual transaction.
- Dom. VAT Code, EU VAT Code, Export VAT Code
- Paste Special
VAT Codes setting, Nominal Ledger
- On the sales side, the VAT Code will determine the Output VAT Account to be credited whenever you sell the Item and the rate at which VAT will be charged. .
- On the purchase side, if you will be creating Purchase Invoices from Purchase Orders or Goods Receipts, the VAT Code will determine the Input VAT Account to be debited whenever you buy the Item and the rate at which VAT will be charged.
- Use these fields to specify VAT Codes for each VAT Zone, to be used whenever you sell and buy the Item. Please refer here for more details about how a VAT Code will be chosen when you sell an Item (i.e. when you specify an Item in a row in an Invoice, Order, Quotation or other sales transaction) and here for more details about how a VAT Code will be chosen when you purchase an Item (i.e. when you specify an Item in a row in a Purchase Order or Goods Receipt).
- On the purchase side, if you will be creating Purchase Invoices from Purchase Orders or Goods Receipts, the VAT Code will determine the Input VAT Account to be debited whenever you buy the Item and the rate at which VAT will be charged.
- Reverse VAT Code
- Paste Special
VAT Codes setting, Nominal Ledger
- If an Item is one that you will sell on a reverse charge VAT basis to a Customer in the Domestic VAT Zone, enter a Reverse Charge VAT Code in this field. The percentage rate in this VAT Code will be used to calculate the VAT that a Customer should pay to the tax authority on the reverse charge basis. Please refer to the Reverse Charge VAT in Sales Invoices page for more information. This field will only be visible in Lithuania, Poland and the UK (i.e. when the VAT Law in the Company Info setting is "Lithuanian", "Polish" or "Default").
- Dom. Tax Temp., Inside EU Tax Temp., Export Tax Temp.
- Paste Special
Tax Templates setting, Nominal Ledger
- In some countries, Tax Templates are used instead of VAT Codes to determine the rate at which VAT or sales tax will be charged whenever you sell an Item and the Output VAT Account(s) that will be credited with the VAT or sales tax value. VAT Codes should be used where each sales and purchase transaction (e.g. each row in an Invoice) is taxed at a single rate, while Tax Templates should be used where different taxes and/or several tax rates are applied to one transaction (e.g. to one row.
- If you need to use Tax Templates, you should select the Use Tax Templates for Tax Calculation option in the Transaction Settings setting in the Nominal Ledger. Wherever a VAT Code field would appear, this option will cause a Tax Template field to appear instead.
- On the purchase side, if you will be creating Purchase Invoices from Purchase Orders or Goods Receipts, the Tax Template will determine the Input VAT Account(s) to be debited whenever you buy an Item and the rate at which VAT or other tax will be charged.
- Use these fields to specify Tax Templates for each VAT Zone, to be used when you sell and buy the Item. Please refer here for more details about how a Tax Template will be chosen when you sell an Item (i.e. when you specify an Item in a row in an Invoice, Order, Quotation or other sales transaction) and here for more details about how a Tax Template will be chosen when you purchase an Item (i.e. when you specify an Item in a row in a Purchase Order or Goods Receipt).
- If you need to use Tax Templates, you should select the Use Tax Templates for Tax Calculation option in the Transaction Settings setting in the Nominal Ledger. Wherever a VAT Code field would appear, this option will cause a Tax Template field to appear instead.
- Serv. Invble Sales A/C
- Paste Special Account register, Nominal Ledger/System module
- This field allows you to specify a dedicated Account to be used as the Sales Account when you sell the Item in Invoices created from Service Orders.
- When you sell an Item this way, the Service Invoiceable Sales Account will be taken from the Item record or from the Item Group to which the Item belongs, as follows:
- If you are using the Use Item Groups for Cost Accounts option in the Cost Accounting setting in the Stock module, the Service Invoiceable Sales Account will be taken from the Item Group to which the Item belongs. If that is blank or the Item does not belong to an Item Group, the Service Invoiceable Sales Account will be taken from the Item record.
- If you are not using the Use Item Groups for Cost Accounts option, the Service Invoiceable Sales Account will be taken from the Item record. If that is blank, the Service Invoiceable Sales Account will be taken from the Item Group to which the Item belongs.
- This field allows you to specify a dedicated Account to be used as the Sales Account when you sell the Item in Invoices created from Service Orders.
- Serv. Invble Cost A/C, Serv. Warranty Cost A/C, Serv. Contract Cost A/C, Serv. Goodwill Cost A/C
- Paste Special
Account register, Nominal Ledger/System module
- These fields allow you to specify dedicated Accounts that will be debited with the calculated cost of Stocked Items when you remove them from stock using Work Sheets (in the Service Orders module). Usually these Stocked Items will be spare parts that you use in repairs and maintenance.
- When you remove an Item from stock using a Work Sheet, the choice of Service Cost Account will depend on the Item Type specified on flip B of the Work Sheet row. For example, if the Item Type is "Warranty", the Service Warranty Cost Account will be debited. If the Item Type is "Goodwill", the Service Goodwill Cost Account will be debited.
- The Service Cost Account of the appropriate type will be taken from the Item record or from the Item Group to which the Item belongs, as follows:
- If you are using the Use Item Groups for Cost Accounts option in the Cost Accounting setting in the Stock module, the Service Cost Account will be taken from the Item Group to which the Item belongs. If that is blank or the Item does not belong to an Item Group, the Service Cost Account will be taken from the Item record.
- If you are not using the Use Item Groups for Cost Accounts option, the Service Cost Account will be taken from the Item record. If that is blank, the Service Cost Account will be taken from the Item Group to which the Item belongs.
- When you remove an Item from stock using a Work Sheet, the choice of Service Cost Account will depend on the Item Type specified on flip B of the Work Sheet row. For example, if the Item Type is "Warranty", the Service Warranty Cost Account will be debited. If the Item Type is "Goodwill", the Service Goodwill Cost Account will be debited.
- Components Usage
- Paste Special
Account register, Nominal Ledger/System module
- The standard Nominal Ledger Transaction from a Production or Production Operation will credit the value of the components to a Stock Account, credit the Work Cost to a Production Components Account, and debit the value of the final Item to a Stock Account.
- This Transaction therefore simply removes the value of the components from stock and adds the value of the final Item to stock. It will therefore not be possible to distinguish the value of Items removed from stock to be used in Productions from the value of Items removed from stock for other purposes (e.g. delivered Items, depreciated Items). If you need to make such a distinction, specify Components Usage and Production Control Accounts in the Production Settings setting in the Production module, in the Item records for the components and/or in the Item Groups to which the components belong. If you do so, the Transaction will contain additional postings, debiting the value of the components to the Components Usage Account and crediting that value to the Production Control Account.
- The Components Usage and Production Control Accounts will both be taken from the Item Group to which the component Item belongs (if you are using the Use Item Groups for Cost Accounts option in the Cost Accounting setting in the Stock module), from the component Item (in the case of the Components Usage Account only) or from the Production Settings setting.
- This Transaction therefore simply removes the value of the components from stock and adds the value of the final Item to stock. It will therefore not be possible to distinguish the value of Items removed from stock to be used in Productions from the value of Items removed from stock for other purposes (e.g. delivered Items, depreciated Items). If you need to make such a distinction, specify Components Usage and Production Control Accounts in the Production Settings setting in the Production module, in the Item records for the components and/or in the Item Groups to which the components belong. If you do so, the Transaction will contain additional postings, debiting the value of the components to the Components Usage Account and crediting that value to the Production Control Account.
- Hotel WIP A/C
- Paste Special
Account register, Nominal Ledger/System module
- In the Hotel module, the 'Nightly Maintenance' Maintenance function has a Work in Progress Transaction option. This option will create a Nominal Ledger Transaction recording uninvoiced room occupation and extras, together with a second Transaction dated a day later that reverses the first Transaction. The value of the uninvoiced room occupation and extras will be posted to a WIP Account taken from the relevant Item records or from the Item Groups to which those Items belong. If no WIP Account is found, the WIP N/L Control A/C specified in the Hotel Settings setting will be used. The VAT element in these Transactions will be posted to the Hotel WIP A/C specified for the relevant VAT Codes. If a VAT Code does not have a Hotel WIP A/C, the VAT element will be posted to the standard Output A/C.
- Proj. Materials Usage A/C
- Paste Special Account register, Nominal Ledger/System module
- This field allows you to specify a dedicated Account that will be debited with the calculated cost of Stocked Items when you remove them from stock using Deliveries that are connected to Projects.
- This can be useful when carrying out long-term Projects (e.g. building or construction Projects) where the Invoices will not be detailed and will not individually list the Items and materials that were used. In this circumstance, it can be desirable to post the costs of the materials to an Account dedicated to materials used for Projects rather than a Cost of Sales Account.
- The Project Materials Usage Account will be chosen as follows:
- It will be taken from this field in the Item record.
- If you are using the Use Item Groups for Cost Accounts option in the Cost Accounting setting in the Stock module, it will be taken from the Item Group to which the Item belongs.
- It will be taken from the Account Usage Stock setting.
- Note that the Project Materials Usage Account will not be used if you are posting Cost of Sales from Invoices with Accruals from Deliveries. It will only be used if you are posting Cost of Sales from Deliveries (or from Invoices, but using this option if not recommended if you are supplying Stocked Items using Deliveries that are connected to Projects).
- This field allows you to specify a dedicated Account that will be debited with the calculated cost of Stocked Items when you remove them from stock using Deliveries that are connected to Projects.
- Calculate Withholding Taxes
- Tick this box if sales of the Item are to be subject to Withholding Tax. Please refer to the Withholding Taxes in the Sales Ledger page for more details. This option is only visible when the VAT Law in the Company Info setting is "Argentinean", "Brazilian", "Italian", "Kenyan", "Mexican", "Philippinian", "Portuguese", "Singaporean" or "South African".
The Item register in Standard ERP:
- Introduction
- Entering an Item, including:
- Header
- 'Pricing' card
- 'Stock' card
- 'Warehouse' card
- 'Costs' card
- 'Recipe' card
- 'A/C' card
- 'Varieties' card
- 'Texts' card
- 'Cost Model' card
- 'User Values' card
- 'Notes' card
- 'BI' card
- Header
- Editing an Item
- Deleting an Item
- Items and Pictures
- Operations menu
- Create menu
- Home page for Items and Pricing manual
- Home page for Standard ERP manual
Entering an Item - Varieties Card
This page describes the fields on the 'Pricing' card of the Item record. Please follow the links below for descriptions of the other cards:- Header
- 'Pricing' card
- 'Stock' card
- 'Warehouse' card
- 'Costs' card
- 'Recipe' card
- 'A/C' card
- 'Varieties' card
- 'Texts' card
- 'Cost Model' card
- 'User Values' card
- 'Notes' card
- 'BI' card
Please refer to the Defining Varieties page for details about the fields on this card.
---
The Item register in Standard ERP:
- Introduction
- Entering an Item, including:
- Header
- 'Pricing' card
- 'Stock' card
- 'Warehouse' card
- 'Costs' card
- 'Recipe' card
- 'A/C' card
- 'Varieties' card
- 'Texts' card
- 'Cost Model' card
- 'User Values' card
- 'Notes' card
- 'BI' card
- Header
- Editing an Item
- Deleting an Item
- Items and Pictures
- Operations menu
- Create menu
- Home page for Items and Pricing manual
- Home page for Standard ERP manual
Entering an Item - Texts Card
This page describes the fields on the 'Texts' card of the Item record. Please follow the links below for descriptions of the other cards:- Header
- 'Pricing' card
- 'Stock' card
- 'Warehouse' card
- 'Costs' card
- 'Recipe' card
- 'A/C' card
- 'Varieties' card
- 'Texts' card
- 'Cost Model' card
- 'User Values' card
- 'Notes' card
- 'BI' card
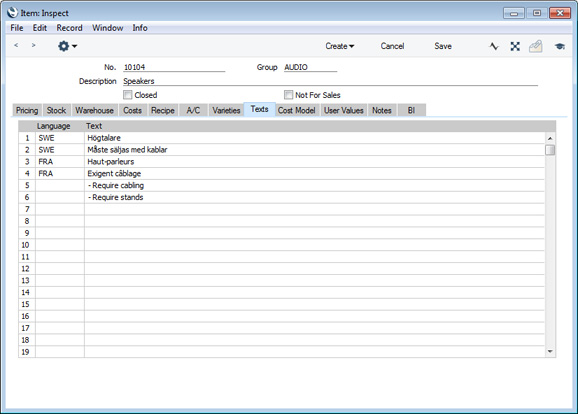
You can also use this table to enter extended comments about the Item, such as a detailed specification. These detailed comments will also be brought in to Quotations, Orders and Invoices. To do this, again enter the appropriate Language (or leave the Language column blank for comments in your home Language) and enter the text, taking up as many rows as necessary. If you want to enter a translation of the Item Name and a comment or specification in the same Language, enter the translation first, as shown in the illustration.
An example Invoice made out to a Swedish Customer is illustrated below. The translation of the Item Name and an extra comment have been brought in from the 'Texts' card of the Item illustrated above. A second comment has been brought in from the 'Texts' card of the Item Group illustrated on this page.
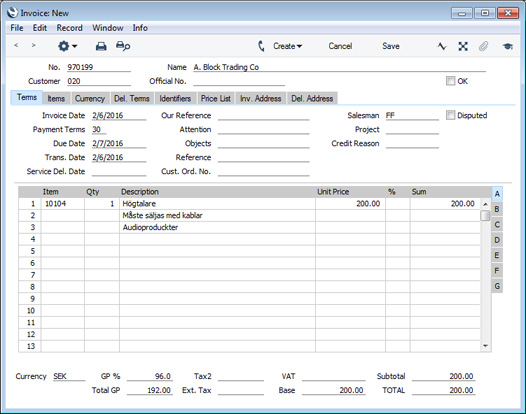
—
The Item register in Standard ERP:
- Introduction
- Entering an Item, including:
- Header
- 'Pricing' card
- 'Stock' card
- 'Warehouse' card
- 'Costs' card
- 'Recipe' card
- 'A/C' card
- 'Varieties' card
- 'Texts' card
- 'Cost Model' card
- 'User Values' card
- 'Notes' card
- 'BI' card
- Header
- Editing an Item
- Deleting an Item
- Items and Pictures
- Operations menu
- Create menu
- Home page for Items and Pricing manual
- Home page for Standard ERP manual
Entering an Item - Cost Model Card
This page describes the fields on the 'Cost Model' card of the Item record. Please follow the links below for descriptions of the other cards:- Header
- 'Pricing' card
- 'Stock' card
- 'Warehouse' card
- 'Costs' card
- 'Recipe' card
- 'A/C' card
- 'Varieties' card
- 'Texts' card
- 'Cost Model' card
- 'User Values' card
- 'Notes' card
- 'BI' card
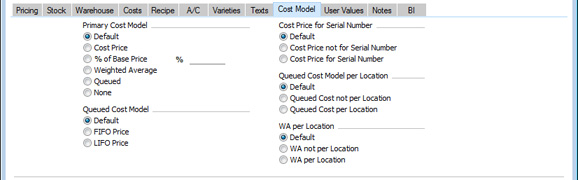
The Cost Model is the method that will be used to calculate the value of the Items that you hold in stock. For example, if you are maintaining stock valuations in the Nominal Ledger ('cost accounting'), the Cost Model is the valuation method that will be used to calculate the value to be debited to the Cost Account and credited to the Stock Account whenever you sell the Item (i.e. the value of the Cost of Sales postings). The Cost Model will also be used by the Stock List report to calculate the value of your stock.
These options will only be used if the Item is a Stocked Item or, if you are using the Cost Accounting For Plain and Service Items option in the Cost Accounting setting in the Stock module, a Plain or Service Item.
Please refer to the description of the 'Cost Model' card of the Item Group record for details about each option.
You can prevent users from changing the Cost Model in Item records (including new records that have not yet been saved) using Access Groups, by denying them access to the 'Change Item's Cost Model' Action. This Action will not prevent changes to Cost Models in Item Group records or in the Cost Accounting setting.
---
The Item register in Standard ERP:
- Introduction
- Entering an Item, including:
- Header
- 'Pricing' card
- 'Stock' card
- 'Warehouse' card
- 'Costs' card
- 'Recipe' card
- 'A/C' card
- 'Varieties' card
- 'Texts' card
- 'Cost Model' card
- 'User Values' card
- 'Notes' card
- 'BI' card
- Header
- Editing an Item
- Deleting an Item
- Items and Pictures
- Operations menu
- Create menu
- Home page for Items and Pricing manual
- Home page for Standard ERP manual
Entering an Item - User Values Card
This page describes the fields on the 'User Values' card of the Item record. Please follow the links below for descriptions of the other cards:- Header
- 'Pricing' card
- 'Stock' card
- 'Warehouse' card
- 'Costs' card
- 'Recipe' card
- 'A/C' card
- 'Varieties' card
- 'Texts' card
- 'Cost Model' card
- 'User Values' card
- 'Notes' card
- 'BI' card
Please refer to the description of the User Defined Fields - Items setting in the CRM module for details about this card.
---
The Item register in Standard ERP:
- Introduction
- Entering an Item, including:
- Header
- 'Pricing' card
- 'Stock' card
- 'Warehouse' card
- 'Costs' card
- 'Recipe' card
- 'A/C' card
- 'Varieties' card
- 'Texts' card
- 'Cost Model' card
- 'User Values' card
- 'Notes' card
- 'BI' card
- Header
- Editing an Item
- Deleting an Item
- Items and Pictures
- Operations menu
- Create menu
- Home page for Items and Pricing manual
- Home page for Standard ERP manual
Entering an Item - Notes Card
This page describes the fields on the 'Notes' card of the Item record. Please follow the links below for descriptions of the other cards:- Header
- 'Pricing' card
- 'Stock' card
- 'Warehouse' card
- 'Costs' card
- 'Recipe' card
- 'A/C' card
- 'Varieties' card
- 'Texts' card
- 'Cost Model' card
- 'User Values' card
- 'Notes' card
- 'BI' card

---
The Item register in Standard ERP:
- Introduction
- Entering an Item, including:
- Header
- 'Pricing' card
- 'Stock' card
- 'Warehouse' card
- 'Costs' card
- 'Recipe' card
- 'A/C' card
- 'Varieties' card
- 'Texts' card
- 'Cost Model' card
- 'User Values' card
- 'Notes' card
- 'BI' card
- Header
- Editing an Item
- Deleting an Item
- Items and Pictures
- Operations menu
- Create menu
- Home page for Items and Pricing manual
- Home page for Standard ERP manual
Entering an Item - BI Card
This page describes the 'BI' card of the Item record. Please follow the links below for descriptions of the other cards:- Header
- 'Pricing' card
- 'Stock' card
- 'Warehouse' card
- 'Costs' card
- 'Recipe' card
- 'A/C' card
- 'Varieties' card
- 'Texts' card
- 'Cost Model' card
- 'User Values' card
- 'Notes' card
- 'BI' card
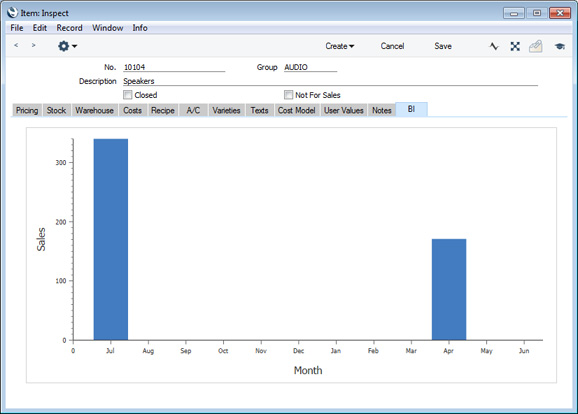
---
The Item register in Standard ERP:
- Introduction
- Entering an Item, including:
- Header
- 'Pricing' card
- 'Stock' card
- 'Warehouse' card
- 'Costs' card
- 'Recipe' card
- 'A/C' card
- 'Varieties' card
- 'Texts' card
- 'Cost Model' card
- 'User Values' card
- 'Notes' card
- 'BI' card
- Header
- Editing an Item
- Deleting an Item
- Items and Pictures
- Operations menu
- Create menu
- Home page for Items and Pricing manual
- Home page for Standard ERP manual
Editing an Item
If you need to edit an Item record and you are using Windows or Mac OS X, follow these steps:- Check the Navigation Centre to make sure you are in a module containing the Item register (e.g. the Sales Orders, Purchase Orders or Sales Ledger modules, or the Contracts, Production, Quotations, Service Orders and Job Costing modules if installed) . If you are in a different module, click the [Switch Module] button in the Navigation Centre or use the Ctrl-0 (zero) (Windows) or z-0 (Mac OS X) keyboard shortcut. Double-click any of the modules mentioned above in the subsequent list.
- To open the Item register, click the [Registers] button in the Navigation Centre and then double-click 'Items' in the resulting list.
- The 'Items: Browse' window opens, listing the Items in Item Number order. Change the sort order by clicking on one of the column headings: the blue heading shows the current sort order.
- Searching for a specific Item depends on whether you are using the Browse Filtering option in the Optional Features setting in the System module, as follows:
- If you are not using the Browse Filtering option, first sort the list by the column that you want to use for the search. Then, enter the text that you want to find in the Search field in the top right-hand corner of the window. If you are using Windows, a match will be highlighted as you type each character. If you are using Mac OS X, press the Return key to search. For example, to search for a particular Item Description, sort by Description before entering a Description (or its first few characters) in the Search field.
- If you are using the Browse Filtering option, all you need to do is to start typing a letter, word, number, or date in the Search field (there is no need to click in the field before typing). As you type each character, non-matching records will be removed from the list. There is no need to sort the list first.
- If you are not using the Browse Filtering option, first sort the list by the column that you want to use for the search. Then, enter the text that you want to find in the Search field in the top right-hand corner of the window. If you are using Windows, a match will be highlighted as you type each character. If you are using Mac OS X, press the Return key to search. For example, to search for a particular Item Description, sort by Description before entering a Description (or its first few characters) in the Search field.
- To modify an Item record, double-click it in the browse window or highlight it and press the Enter key. The record will be opened in a window entitled 'Item: Inspect'. The fields in this window are the same as those in the 'Item: New' window: please refer here for a detailed description of each field.
- Edit the fields as necessary. Use the Tab, Return or Enter keys to move from field to field. In most cases, you will not be able to change the Item Number, the Item Type or the Serial Number Tracking option.
- Click the [Save] button when you are ready to save changes or [Cancel] if you want to leave the record unchanged.
- You can also edit an Item from another register. For example, when entering an Invoice, you might realise that your information about an Item is out of date (the price might have changed, for example). Place the insertion point in the Item field in the Invoice row and press F2 (Windows) or ⌘-Shift-V (Mac OS X). The Item record opens, allowing you to make the necessary changes. You can also do this from the 'Paste Special' list, when you are choosing the Item for the Invoice.
- Check the Navigation Centre to make sure you are in a module containing the Item register (e.g. the Sales Orders, Purchase Orders or Sales Ledger modules, or the Contracts, Production, Quotations, Service Orders and Job Costing modules if installed). If you are in a different module, tap the [Switch Module] button in the Navigation Centre. Tap any of the modules mentioned above in the subsequent list.
- To open the Item register, tap the [Registers] button in the Navigation Centre and then tap 'Items' in the resulting list.
- The 'Items: Browse' window opens, listing the Items in Item Number order. Change the sort order by tapping on any of the column headings and then choosing an option in the resulting pop-up. The current sort column is marked by a dark grey heading.
- Searching for a specific Item depends on whether you are using the Browse Filtering option in the Optional Features setting in the System module, as follows:
- If you are not using the Browse Filtering option, first sort the list by the column that you want to use for the search. Then, enter the text that you want to find in the Search field at the top of the window and tap the Search button on the virtual keyboard. For example, to search for a particular Item Description, sort by Description before entering a Description (or its first few characters) in the Search field.
- If you are using the Browse Filtering option, all you need to do is to start typing a letter, word, number, or date in the Search field (there is no need to click in the field before typing). As you type each character, non-matching records will be removed from the list. There is no need to sort the list first.
- If you are not using the Browse Filtering option, first sort the list by the column that you want to use for the search. Then, enter the text that you want to find in the Search field at the top of the window and tap the Search button on the virtual keyboard. For example, to search for a particular Item Description, sort by Description before entering a Description (or its first few characters) in the Search field.
- To modify an Item record, tap it in the browse window. The record will be opened in a window entitled 'Item: Inspect'. The fields in this window are the same as those in the 'Item: New' window: please refer here for a detailed description of each field.
- When the record opens, the header and the 'Texts' card will be visible. Tap the 'Details' tab to see the other cards.
- Edit the fields as necessary. In most cases, you will not be able to change the Item Number, the Item Type or the Serial Number Tracking option.
- Tap √ in the Button Bar when you are ready to save changes. If you want to leave the record unchanged, select 'Cancel' from the Record menu (with 'cog' icon) or tap <. If you tap <, you will be asked to confirm the cancellation.
The Item register in Standard ERP:
- Introduction
- Entering an Item
- Editing an Item
- Deleting an Item
- Items and Pictures
- Operations menu
- Create menu
- Home page for Items and Pricing manual
- Home page for Standard ERP manual
Deleting an Item
You can only delete an Item if you have not used it in any transaction (e.g. in a Sales or Purchase Order, Invoice or Goods Receipt). Follow these steps:The Item will be deleted, and the window will now show the preceding Item.
! | You cannot undo the deletion of an Item. |
You can delete in bulk Items that you haven't used. To do this, ensure you are in the Sales Ledger and run the 'Delete Unused Items' Maintenance function. This function is fully described here.
---
The Item register in Standard ERP:
- Introduction
- Entering an Item
- Editing an Item
- Deleting an Item
- Items and Pictures
- Operations menu
- Create menu
- Home page for Items and Pricing manual
- Home page for Standard ERP manual
Items and Pictures
Please follow the links below for details about attaching pictures to Item records:- Attaching Pictures to Item records
- Item Pictures and Paste Special
- Printing Item Pictures on Forms
- File Formats of Item Pictures
The Item register in Standard ERP:
- Introduction
- Entering an Item
- Editing an Item
- Deleting an Item
- Items and Pictures
- Operations menu
- Create menu
- Home page for Items and Pricing manual
- Home page for Standard ERP manual
Items and Pictures - Attaching Pictures to Item Records
This page describes the process of attaching pictures to Item records.---
You can attach pictures to records in the Item register from Windows and Mac OS X clients. Follow these steps:
- Open the record in question. The record must already have been saved at least once (i.e. the window title must be 'Inspect' or 'Update').
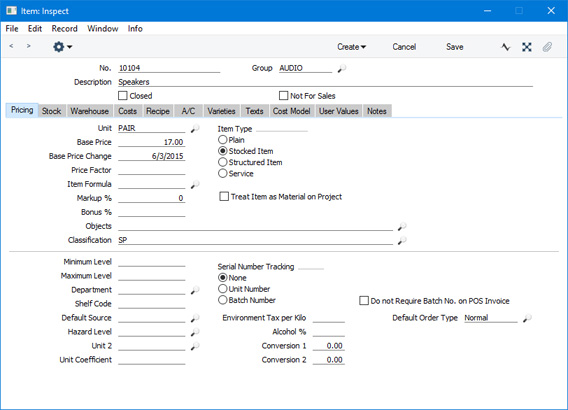
- Click the [Document Manager] button (in the top right-hand corner with the paper clip icon) or select 'Attachments' from the Record menu. A list of objects currently attached to the record will be opened.
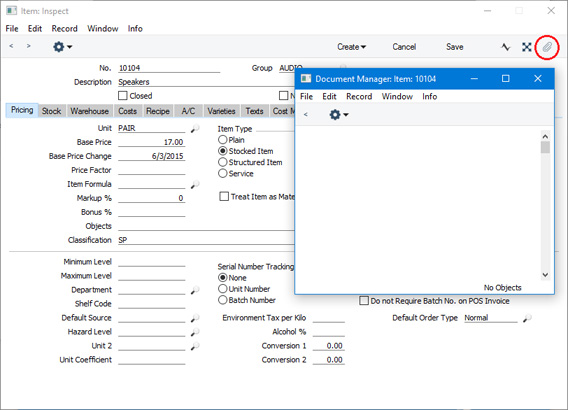
- Choose 'Attach File' from the Operations menu of this list.

- Locate the picture file on your hard disk and click [Open]. The picture will be attached to the record. Pictures larger than 280 x 280 pixels will be scaled. Please refer here for a list of the file formats that you can use.
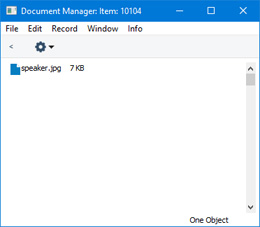
- After the picture file has uploaded, you may need to close and reopen the record to see the picture:

Mac OS X
In the Mac OS X version of Standard ERP, you can attach pictures to Item records as described above, but you can also use the [Add picture] button underneath the picture field: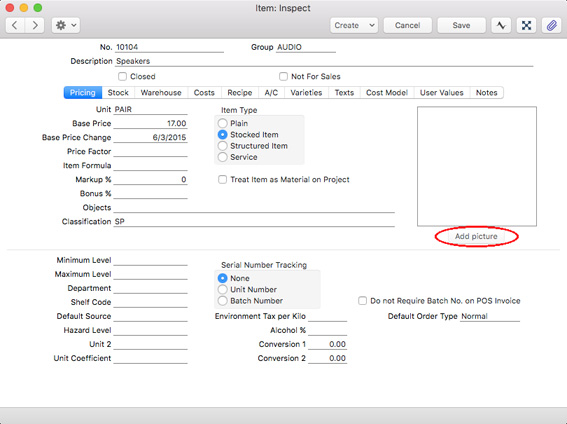
In both cases you can then scale the picture using the slider and, if the picture is too big, move the picture by dragging so that the part you need is in the centre of the frame (the part outside the frame will be cropped).
Finally, click the [Done] button to add the picture to the Item. The picture will be converted to .PNG format and will appear in the Document Manager with the name "image.png". You may need to close and reopen the Item record to see the picture:
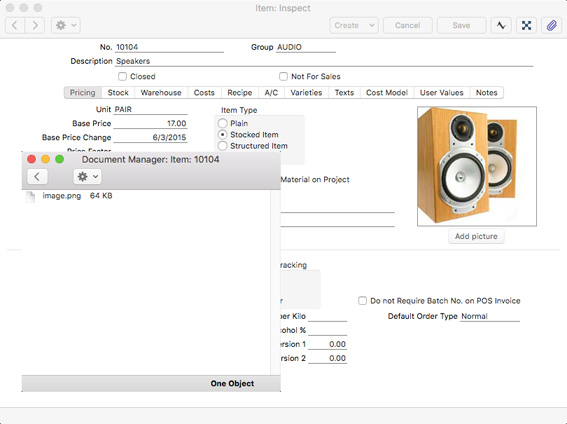
Adding Pictures to Items in Batches
You can also add pictures to Items in batches. Follow these steps:- Save the image files in a folder named "Pictures" which should be in the same folder as your Standard ERP application (on the server in a multi-user system). If you have a Linux server, remember when naming the folder that Linux is case-sensitive.
Each image file should have an Item Number or an Item's Alternative Code as its file name. For example, the image that will be attached to Item 10101 should be named 10101.jpg.
- Run the 'Add Pictures to Items' Maintenance function in the Technics module:
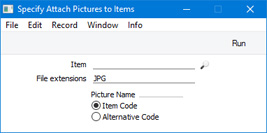
- Item
- Paste Special
Item register
- Range Reporting Alpha
- If necessary, specify an Item or Items to which pictures are to be attached. Leave blank for all Items.
- If necessary, specify an Item or Items to which pictures are to be attached. Leave blank for all Items.
- File extensions
- If the "Pictures" folder contains image files in different formats, specify here the formats that you want to be attached to your Item records. You can specify more than one, separated by commas.
- For example, if your "Pictures" file contains jpg, png and bmp files and you enter "jpg,png" in this field, the jpg and png files will be attached to the relevant Item records, but the bmp files will be ignored.
- Do not enter the full stop in this field. For example, enter "jpg" or "jpg,png", not ".jpg" or ".jpg,.png".
- If you have a Linux server, remember again that Linux is case-sensitive. So, be sure to enter "JPG" here if you have used ".JPG" in your file names.
- For example, if your "Pictures" file contains jpg, png and bmp files and you enter "jpg,png" in this field, the jpg and png files will be attached to the relevant Item records, but the bmp files will be ignored.
- Picture Name
- Use these options to specify whether you have named your image files after your Item Numbers or after the Alternative Codes in your Item records.
- Item
- Press the [Run] button. Pictures will be attached to your Item records as specified. If you have named your image files after Alternative Codes, an image will be attached to every Item record with the same Alternative Code.
The Item register in Standard ERP:
- Introduction
- Entering an Item
- Editing an Item
- Deleting an Item
- Items and Pictures, including:
- Attaching Pictures to Item records
- Item Pictures and Paste Special
- Printing Item Pictures on Forms
- File Formats of Item Pictures
- Attaching Pictures to Item records
- Operations menu
- Create menu
- Home page for Items and Pricing manual
- Home page for Standard ERP manual
Items and Pictures - Item Pictures and Paste Special
One benefit in attaching pictures to Item records if you are using Mac OS X is that the pictures can be displayed in the 'Paste Item' window, to help you choose the correct Item. This variant of the 'Paste Item' window (illustrated below) uses Apple's "Cover Flow" technology as well as including the standard 'Paste Special' features: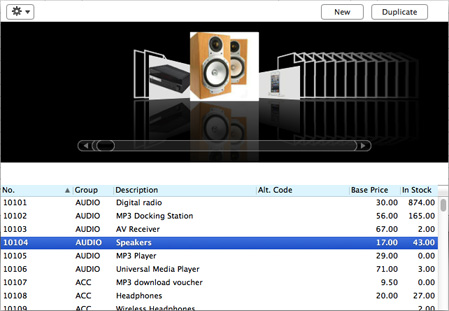
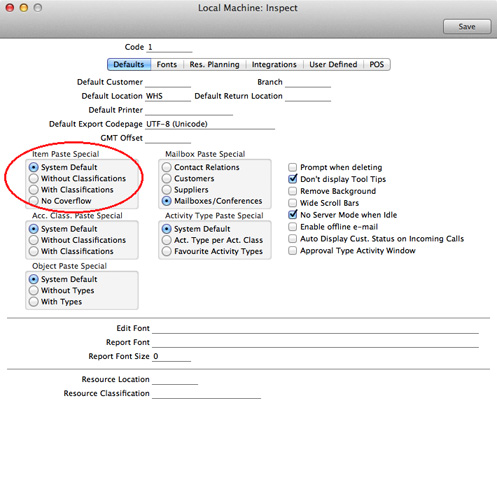
If you are not using Mac OS X, choosing the System Default option will cause the standard 'Paste Item' window to be used.
---
The Item register in Standard ERP:
- Introduction
- Entering an Item
- Editing an Item
- Deleting an Item
- Items and Pictures, including:
- Attaching Pictures to Item records
- Item Pictures and Paste Special
- Printing Item Pictures on Forms
- File Formats of Item Pictures
- Attaching Pictures to Item records
- Operations menu
- Create menu
- Home page for Items and Pricing manual
- Home page for Standard ERP manual
Items and Pictures - Displaying Item Pictures when Entering Records
If you have attached pictures to Item records, you can have the pictures displayed as you add the Items to records such as Quotations, Orders and Invoices. If you need to use this feature, select the Show Item Picture option in the Item Settings setting in the Sales Ledger: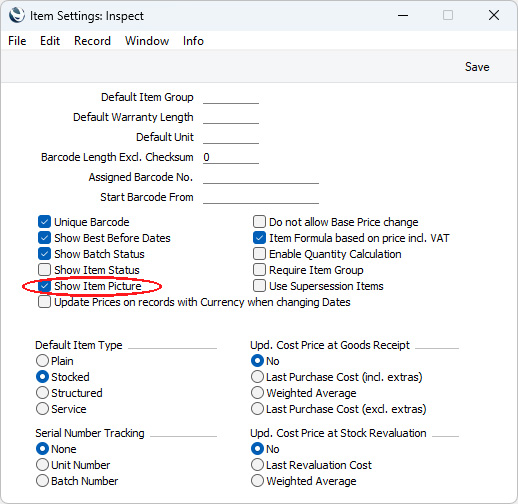
The pictures will be displayed in a separate small window. When you specify an Item in the first row in a record, the relevant picture will be displayed in the small window. The picture will be changed as you add further Items, and will also be changed if you go back to an existing row:
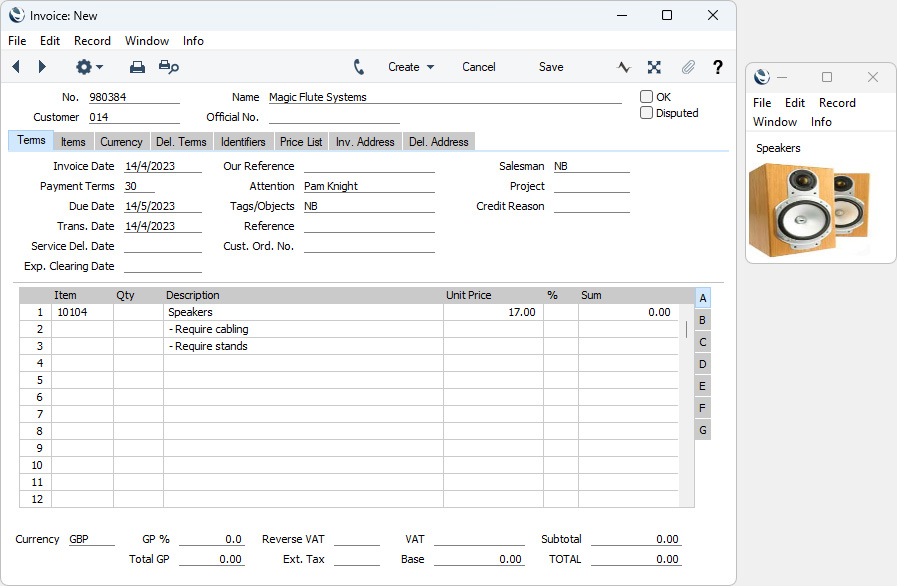
The Item register in Standard ERP:
- Introduction
- Entering an Item
- Editing an Item
- Deleting an Item
- Items and Pictures, including:
- Attaching Pictures to Item records
- Item Pictures and Paste Special
- Displaying Item Pictures when Entering Records
- Printing Item Pictures on Forms
- File Formats of Item Pictures
- Attaching Pictures to Item records
- Operations menu
- Create menu
- Home page for Items and Pricing manual
- Home page for Standard ERP manual
Items and Pictures - Printing Item Pictures on Forms
If you have attached pictures to Item records, you can have those Item pictures to be printed on forms such as Quotations, Order Acknowledgements and Invoices. Follow these steps:- In the System module, open the appropriate Form Template:
- Click the [Picture] button at the top of the 'Form Template' window and then draw a box using the mouse or trackpad in the Form Template where you want the pictures to appear. Usually you will need the pictures to appear in the matrix area together with the Item information. When you release the mouse button, a 'Picture' dialogue box will appear:
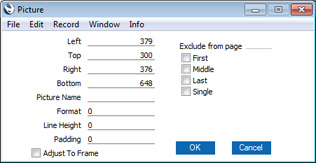
- Fill in the fields as follows:
- Picture Name
- Leave this field empty.
- Format
- Enter "1" in this field. This will mean that the Picture area will be treated in the same way as a row field i.e. the Item pictures will be printed in a column.
- Line Height, Padding, Adjust to Frame
- The Line Height in pixels should be large enough to display the Item pictures correctly.
- Ideally, your Item pictures should all have the same dimensions or at least the same proportions. The height of your pictures should be the same as the Line Height minus the Padding. Ensure that the width of the column (i.e. the Right coordinate - the Left coordinate) is the same as the width of your pictures.
- If your pictures are not all the same size, you may need to tick the Adjust to Frame box to scale the pictures so that they fit the allotted space. This may result in the pictures being distorted if their proportions are different to those of that space.
- It may be that you need pictures in different sizes, because the ideal size for display in the Item records may not be the same as the ideal size for printing. If so, you can attach more than one picture to each Item record. The first picture that you attach will be printed, and the last picture that you attach will be displayed in the Item record.
- The Line Height in the other row fields should be the same as the Line Height that you specify for the picture. This will ensure that the Item Description, Quantity, Price and other information will be aligned correctly with the pictures.
- If you need some white space below each picture, enter a number of pixels in the Padding field. The Padding is included in the Line Height, it is not in addition. For example, if the Line Height is 30 and the Padding is 10, each picture will be 20 pixels high and there will be 10 pixels of white space below it.
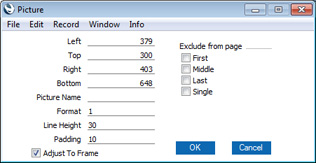
- Ideally, your Item pictures should all have the same dimensions or at least the same proportions. The height of your pictures should be the same as the Line Height minus the Padding. Ensure that the width of the column (i.e. the Right coordinate - the Left coordinate) is the same as the width of your pictures.
- Picture Name
- An example is illustrated below:
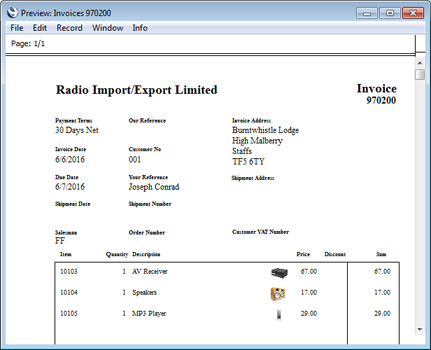
The Item register in Standard ERP:
- Introduction
- Entering an Item
- Editing an Item
- Deleting an Item
- Items and Pictures, including:
- Attaching Pictures to Item records
- Item Pictures and Paste Special
- Printing Item Pictures on Forms
- File Formats of Item Pictures
- Attaching Pictures to Item records
- Operations menu
- Create menu
- Home page for Items and Pricing manual
- Home page for Standard ERP manual
Items and Pictures - File Formats of Item Pictures
This page lists the allowable file formats of the image files that you can attach to Item records.---
Depending on the task, the following file formats are supported for Item pictures:
- Display in Item record
- JPG
- Paste Special Coverflow
- JPG
- Print in Forms (Media = Printer)
- 8-Bit BMP, 24-Bit BMP, JPG, PNG
- Print in Forms (Media = PDF)
- 24-Bit BMP, JPG, PNG
The Item register in Standard ERP:
- Introduction
- Entering an Item
- Editing an Item
- Deleting an Item
- Items and Pictures, including:
- Attaching Pictures to Item records
- Item Pictures and Paste Special
- Printing Item Pictures on Forms
- File Formats of Item Pictures
- Attaching Pictures to Item records
- Operations menu
- Create menu
- Home page for Items and Pricing manual
- Home page for Standard ERP manual
Operations Menu - Items

If you are using Windows or Mac OS X, you can open the Operations menu by clicking the button with the 'cog' icon (shown highlighted in the illustration above). If you are using iOS or Android, you can access the Operations menu functions through the Tools menu (with 'wrench' icon).
Before using the functions on the Operations menu for the 'Items: Browse' window, you should highlight a record or records in the browse window. The function will then be applied to that record or records. If you are using Windows or Mac OS X, you can highlight several Items in the list by holding down the Shift key while clicking. If you need to apply a function to a number of Items that aren't in a range, highlight them while holding the Ctrl (Windows) or ⌘ (Mac OS X) keys before selecting the function. If you are using iOS or Android, you can highlight a single record in the browse window by searching for it, so you can only apply these functions to a single record at a time.
Note that in Standard ERP version 8.0, some functions that were previously on the Operations menu were moved to the Create menu.
Please follow the links below for details about each function on the Operations menu:
The Item register in Standard ERP:
- Introduction
- Entering an Item
- Editing an Item
- Deleting an Item
- Items and Pictures
- Operations menu
- Create menu
- Home page for Items and Pricing manual
- Home page for Standard ERP manual
Operations Menu - Items - Item Status Report
This page describes the 'Item Status Report' function on the Operations menus in the Item browse and record windows. If you are using iOS or Android, you can access the 'Item Status Report' function through the Tools menu (with 'wrench' icon).---
The 'Item Status Report' function prints a report to screen for the Item(s) highlighted in the 'Items: Browse' window or for the Item currently open in a record window. If you are using Windows or Mac OS X and you need to apply the function to a group of Items in the browse window, highlight the first Item of the group and then click on the last while holding down the Shift key. Then select the function. If you are using iOS or Android, you can highlight an Item in the browse window by searching for it.
The report will display stock and order positions and prices in different price lists.
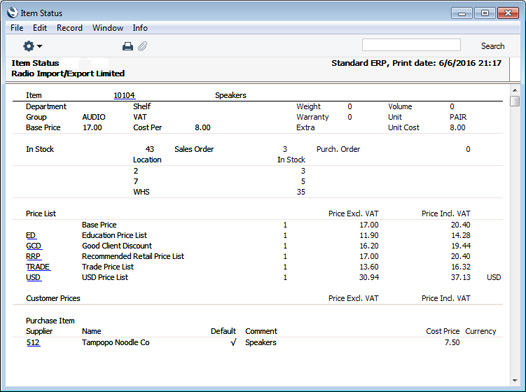
| Option selected | Action | Sales Order figure | In Stock figure |
| Delivery is OKed | Create Order | 1 | 10 |
| Create Delivery | 1 | 10 | |
| OK Delivery | 0 | 9 | |
| When Delivery has been Created | Create Order | 1 | 10 |
| Create Delivery | 0 | 9 | |
| OK Delivery | 0 | 9 |
Note that if you are using the When Delivery has been Created option, the In Stock figure will be reduced when you create a Delivery (from 10 to 9 in the example). At this point, the Stock List will still show 10 as being in stock, so you should treat the In Stock figure as a "free" stock figure (showing the quantity that is available for new Deliveries) rather than a strict stock figure.
The Sales and Purchase Order figures will include all unfulfilled Orders irrespective of whether they have been marked as OK.
---
The Item register in Standard ERP:
- Introduction
- Entering an Item
- Editing an Item
- Deleting an Item
- Items and Pictures
- Operations menu, including:
- Item Status Report
- Item Status
- Item History
- Search
- Item Location Status
- Item Status Report
- Create menu
- Home page for Items and Pricing manual
- Home page for Standard ERP manual
Operations Menu - Items - Item Status
This page describes the 'Item Status' function on the Operations menu in the Items browse window. This function can't be used on iOS or Android.
---
The 'Item Status' function displays the current status (for example, the quantity in stock, the quantity on unfulfilled Sales Orders, etc) of any Item in a separate 'Item Status' window.
To open the 'Item Status' window, first highlight an Item in the 'Items: Browse' window and then select 'Item Status' from the Operations menu. The 'Item Status' window will be opened.

If you leave the 'Item Status' window open, you can open a record such as a Quotation, Sales Order, Invoice, Purchase Order, Delivery, Stock Movement or a Stock Depreciation and click in any row in that record. The 'Item Status' window will be updated to display information about the Item where you clicked. If you move the insertion point to another row containing a different Item, the figures in the 'Item Status' window will again be updated. If you select 'Paste Special' from the Item Number field in any row and highlight an Item in the 'Paste Item' window, the 'Item Status' window will be updated to show figures for the Item highlighted. If the 'Item Status' window is not open, you can also open it from those records. First click in any field in the row containing the Item you are interested in. Then open the Row menu by right-clicking (Windows) or ctrl-clicking (Mac OS X) the row number and select the 'Item Status' function.
Before using the 'Item Status' function for the first time, you should specify which figures will be displayed in the 'Item Status' window. You can do this at a system level, and you can also have different figures displayed to different users. Please refer to the description of the Item Status Settings setting in the Sales Ledger here for details. This description also includes details about how the figures are calculated. If the 'Item Status' window is empty, the probable reasons are that you have not chosen any options in the Item Status Settings setting, or you have created a record in the Item Status Settings register in the User Settings module for the current user in which no options are selected.
You can choose to have the 'Item Status' window opened automatically whenever you open the 'Items: Browse' window or a record window whose Row menu features the 'Item Status' function. To do this, use the Show Item Status option in the Item Settings setting in the Sales Ledger.
You can move the window and put it where you want on the screen. Use the Window menu (Windows and Linux) or the ⌘-Shift-S keystroke (Mac OS X) to ensure it always opens in that position in the future.
---
The Item register in Standard ERP:
- Introduction
- Entering an Item
- Editing an Item
- Deleting an Item
- Items and Pictures
- Operations menu, including:
- Item Status Report
- Item Status
- Item History
- Search
- Item Location Status
- Item Status Report
- Create menu
- Home page for Items and Pricing manual
- Home page for Standard ERP manual
Operations Menu - Items - Item History
This page describes the 'Item History' function on the Operations menus in the Item browse and record windows. If you are using iOS or Android, you can access the 'Item History' function through the Tools menu (with 'wrench' icon).
---
The 'Item History' function produces a report listing every incoming and outgoing stock transaction for the first Item highlighted in the 'Items: Browse' window or for the Item currently open in a record window. If you are using iOS or Android, you can highlight an Item in the browse window by searching for it.
The report period will be the first one entered in the Reporting Periods setting in the System module.
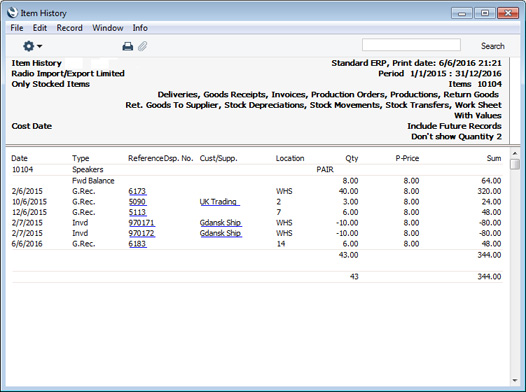
You can also produce the Item History report from the Stock module. When you produce the report using this Operations menu function, the Include Future Records and Quantities & Values options will be assumed to be selected.
---
The Item register in Standard ERP:
- Introduction
- Entering an Item
- Editing an Item
- Deleting an Item
- Items and Pictures
- Operations menu, including:
- Item Status Report
- Item Status
- Item History
- Search
- Item Location Status
- Item Status Report
- Create menu
- Home page for Items and Pricing manual
- Home page for Standard ERP manual
Operations Menu - Items - Search
This page describes the 'Search' function on the Operations menu in the Item browse window. If you are using iOS or Android, you can access the 'Search' function through the Tools menu (with 'wrench' icon).---
You can use the 'Search' function to search for Items containing a certain word or phrase. You can open Item records from the search results, so this function is an alternative to searching for Items in the 'Items: Browse' window. To use the 'Search' function, open the 'Items: Browse' window and select 'Search' from the Operations menu (Windows/Mac OS X) or Tools menu (iOS/Android). The following window opens:
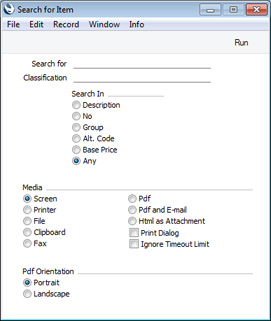
- Search for
- Enter here the string (e.g. part of an Item Number or Name) that you are looking for. You must make an entry in this field, otherwise no search will be carried out.
- Classification
- Paste Special
Item Classifications setting, Sales Ledger
- If you enter an Item Classification here, the search for the string that you specified in the field above will be restricted to Items belonging to that Classification.
- Search In
- Specify the field in which you want to search.
---
The Item register in Standard ERP:
- Introduction
- Entering an Item
- Editing an Item
- Deleting an Item
- Items and Pictures
- Operations menu, including:
- Create menu
- Home page for Items and Pricing manual
- Home page for Standard ERP manual
Operations Menu - Item - Item Location Status
This page describes the 'Item Location Status' function on the Operations menu in the Item record window. If you are using iOS or Android, you can access the 'Item History Status' function through the Tools menu (with 'wrench' icon).---
The 'Item Location Status' function prints a report to screen listing various sales and stock statistics for the Item currently open in a record window. These statistics are broken down by Location.
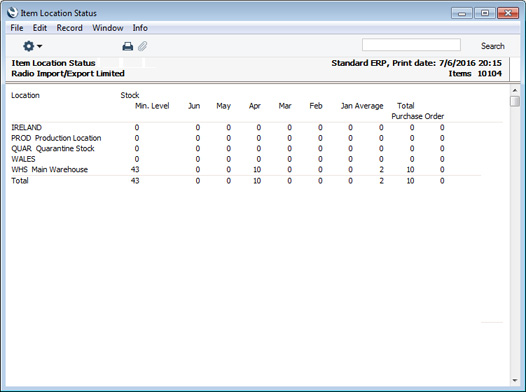
- Stock
- Current stock level of the Item.
- Min. Level
- The Minimum Stock Level, from the Minimum Stock Levels setting in the Stock module or from the Item record.
- Sales figures
- Monthly sales figures for the last six months, followed by the average sales figure per month and the total for the six months. These figures are compiled from Invoices, POS Invoices and Bar Tabs.
- Purchase Order
- Current unfulfilled Purchase Order quantity of the Item (i.e. the quantity ordered but not yet received, including the quantity in Goods Receipts that have not yet been marked as OK).
The Item register in Standard ERP:
- Introduction
- Entering an Item
- Editing an Item
- Deleting an Item
- Items and Pictures
- Operations menu, including:
- Item Status Report
- Item Status
- Item History
- Search
- Item Location Status
- Item Status Report
- Create menu
- Home page for Items and Pricing manual
- Home page for Standard ERP manual
Create Menu - Items

'New' and 'Duplicate' are standard functions that are provided on every Create and + menu. Use these functions to create new records, in this case in the Item register. Please follow the links below for details about the other functions:
The Item register in Standard ERP:
- Introduction
- Entering an Item
- Editing an Item
- Deleting an Item
- Items and Pictures
- Operations menu
- Create menu
- Home page for Items and Pricing manual
- Home page for Standard ERP manual
Create Menu - Item - Purchase Item
This page describes the 'Purchase Item' function on the Create menu in the Item record window. If you are using iOS or Android, the 'Purchase Item' function is on the + menu.---
The Purchase Item register in the Purchase Orders module allows you to connect Items with Suppliers. For example, if you can purchase a particular Item from several Suppliers, you would enter separate Purchase Item records for each Supplier. A Purchase Item record will contain the Supplier's Cost Price, the Supplier's Item Number for the Item and other information specific to the Supplier. Each Item should have a "Default Purchase Item", which is the Purchase Item with your preferred Supplier for the Item. If you have more than one Location, you can have a separate Default Purchase Item for each Location. This can be useful if you prefer to use Suppliers that are local to each Location.
You can create Purchase Item records by entering them directly to the Purchase Item register, and you can also create them from Item records. To do this, open an Item record and then select 'Purchase Item' from the Create menu (Windows/Mac OS X) or + menu (iOS/Android). The following window will open, allowing you to create a new Purchase Item:
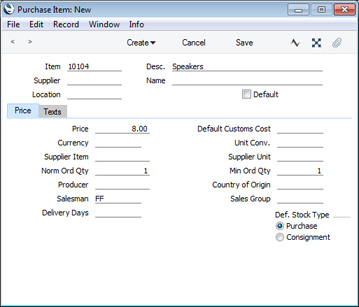
Specify the Supplier and other details and then save the record in the Purchase Item register by clicking the [Save] button (Windows/Mac OS X) or tapping √ (iOS/Android) in the Button Bar. You can then close it using the close box (Windows/Mac OS X) or by tapping < (iOS/Android). Alternatively, if you no longer require the Purchase Item record, click [Cancel] or tap <.
You can find full details about the Purchase Item register here.
---
The Item register in Standard ERP:
- Introduction
- Entering an Item
- Editing an Item
- Deleting an Item
- Items and Pictures
- Operations menu
- Create menu, including:
- Purchase Item
- Recipe
- Purchase Item
- Home page for Items and Pricing manual
- Home page for Standard ERP manual
Create Menu - Item - Recipe
This page describes the 'Recipe' function on the Create menu in the Item record window. If you are using iOS or Android, the 'Recipe' function is on the + menu.---
If an Item is a Structured or assembled Item, it should have a Recipe. The Recipe is the bill of materials that describes how the assembled Item is made up i.e. it is a list of components or other constituent Items together with quantities.
You can create Recipes by entering them directly to the Recipe register (which you can find in the Production module and as a setting in the Stock module), and you can also create them from Item records. To do this, open an existing Item record or create a new one and then select 'Recipe' from the Create menu (Windows/Mac OS X) or + menu (iOS/Android). The following window will open, allowing you to create a new Recipe:
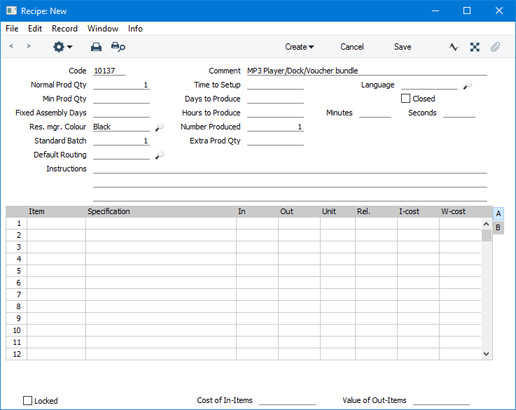
List the Input Items (i.e. the components and other constituent Items) and specify other details as appropriate and then save the record in the Recipe register by clicking the [Save] button (Windows/Mac OS X) or tapping √ (iOS/Android) in the Button Bar. You can then close it using the close box (Windows/Mac OS X) or by tapping < (iOS/Android). Alternatively, if you no longer require the Recipe record, click [Cancel] or tap <.
This function will be useful in the following situations:
- When you need to create a Recipe for a Stocked Item. This is an Item that you will build from components and then keep in stock. When you add such an Item to the Item register, you can save it and then use this function to create the Recipe. The Stocked Item will be listed as the Output Item in the first row in the matrix in the new Recipe automatically.
- When you need to create a Recipe for a Structured Item. A Structured Item is an Item that you will construct on the point of delivery i.e. you will never hold a Structured Item in stock, only its components. When you enter a Structured Item to the Item register, you will need to specify a Recipe before you can save it for the first time. When you use this function to create the Recipe, the Item will not be listed in the Recipe as the Output Item because the Item hasn’t been saved. Save the Recipe, then save the Item and return to the Recipe to list the Input and Output Items.
---
The Item register in Standard ERP:
- Introduction
- Entering an Item
- Editing an Item
- Deleting an Item
- Items and Pictures
- Operations menu
- Create menu, including:
- Purchase Item
- Recipe
- Purchase Item
- Home page for Items and Pricing manual
- Home page for Standard ERP manual
Create Menu - Item - Goods Receipt
This page describes the 'Goods Receipt' function on the Create menu in the Item record window. If you are using iOS or Android, the 'Goods Receipt' function is on the + menu.---
After creating a new Item record or viewing an existing one you may need to create a Goods Receipt to receive units of the Item in to stock. To do this, save all changes to the Item record and then select 'Goods Receipt' from the Create menu (Windows/macOS) or + menu (iOS/Android). Providing the Item is a Stocked Item, the following window will open, allowing you to create a new Goods Receipt:
Fill in other details as appropriate (e.g. specify a Supplier and enter the number of units received in the Qty field in the first row) and then save the record in the Goods Receipt register by clicking the [Save] button (Windows/macOS) or tapping √ (iOS/Android) in the Button Bar. If you marked the Goods Receipt as OK before saving, the units will be received into stock and stock levels and the stock valuation in the Nominal Ledger will be updated. You can then close it using the close box (Windows/macOS) or by tapping < (iOS/Android). Alternatively, if you no longer require the Goods Receipt record, click [Cancel] or tap <.
Please refer here for full details about Goods Receipts.
---
The Item register in Standard ERP:
- Introduction
- Entering an Item
- Editing an Item
- Deleting an Item
- Items and Pictures
- Operations menu
- Create menu, including:
- Purchase Item
- Recipe
- Goods Receipt
- Stocktaking
- Purchase Item
- Home page for Items and Pricing manual
- Home page for Standard ERP manual
Create Menu - Item - Stocktaking
This page describes the 'Stocktaking' function on the Create menu in the Item record window. If you are using iOS or Android, the 'Stocktaking' function is on the + menu.---
After creating a new Item record or viewing an existing one you may need to create a record in the Stocktaking register to note the number of units of the Item that you have in stock. You will then be able to produce a Stocktaking Comparison report that will compare the number of units you have just recorded with the stock figure in the database.
To create a Stocktaking record from an Item, save all changes to the Item record and then select 'Stocktaking' from the Create menu (Windows/macOS) or + menu (iOS/Android). Providing the Item is a Stocked Item, the following window will open, allowing you to create a new Stocktaking record:
Specify the number of units of the Item that you have in stock in the Counted field and other details as appropriate (e.g. Serial Numbers) and then save the record in the Stocktaking register by clicking the [Save] button (Windows/macOS) or tapping √ (iOS/Android) in the Button Bar. If you marked the Stocktaking record as OK before saving, it will be made available to the Stocktaking Comparison report. You can then close it using the close box (Windows/macOS) or by tapping < (iOS/Android). Alternatively, if you no longer require the Stocktaking record, click [Cancel] or tap <.
Please refer here for full details about the Stocktaking register and the recommended procedure for stocktaking.
---
The Item register in Standard ERP:
- Introduction
- Entering an Item
- Editing an Item
- Deleting an Item
- Items and Pictures
- Operations menu
- Create menu, including:
- Purchase Item
- Recipe
- Goods Receipt
- Stocktaking
- Purchase Item
- Home page for Items and Pricing manual
- Home page for Standard ERP manual