Working with Records
Click the links for details about the following subjects:Go back to home pages for:
- Standard Accounts manual
- Standard Contracts manual
- Standard Invoicing manual
- Standard Nominal Ledger manual
- Standard POS manual
Registers
Each Standard product contains a number of registers in which information of a particular type is stored. For example, information about Customers and Suppliers will be stored in the Contact register, information about the products you sell will be stored in the Item register and your Chart of Accounts in the Account register (these example registers are not included in every Standard product).You can open a register using the buttons in the Master Control panel, or using a keyboard shortcut. For example, in the Sales Ledger in Standard Accounts, use ⌘-1 to open the first register (Invoices), ⌘-2 for the second register (Receipts), and so on. Similarly, in Standard Nominal Ledger, use ⌘-1 to open the first register (Transactions), ⌘-2 for the second register (Accounts), and so on.
Individual Registers
Please click the links for details about each register:
- Standard Accounts
- Contacts (Customers, Suppliers and Contact Persons)
- Items (Products and Services)
- Chart of Accounts
- Invoices
- Receipts
- Purchase Invoices
- Payments
- Transactions (Journal Entries)
- Account Reconciliation
- Persons (Employees)
- Contacts (Customers, Suppliers and Contact Persons)
- Standard Contracts
- Standard Invoicing
- Standard Nominal Ledger
- Chart of Accounts
- Transactions (Journal Entries)
- Chart of Accounts
- Standard POS
- POS Invoices
- Items (Products and Services)
- POS Invoices
In this chapter:
- Registers
- Browse Windows
- Record Windows
- Deleting Records
- Standard Accounts manual
- Standard Contracts manual
- Standard Invoicing manual
- Standard Nominal Ledger manual
- Standard POS manual
Browse Windows
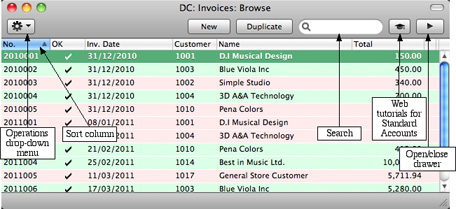
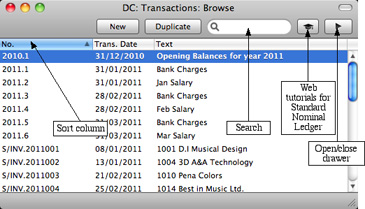
When you open a register, a browse window will open, listing all the existing records in the register.For example, in the Sales Ledger in Standard Accounts, if you click the [Invoices] button in the Master Control panel or use the ⌘-1 keyboard shortcut, the window that opens is a browse window, entitled 'Invoices: Browse'. This window lists all the Invoices in the register:
- Sorting
- Click a column heading to sort the list. Click again to reverse the sort. The sort column has a blue heading, and an arrow indicates the sort direction.
- Adjusting Columns
- Drag the column headings to change the order of the columns.
- To remove a column from a browse window, open the drawer by clicking the button with the arrow icon in the top right-hand corner of the window:
Remove the tick from a check box to remove the corresponding column from the browse window.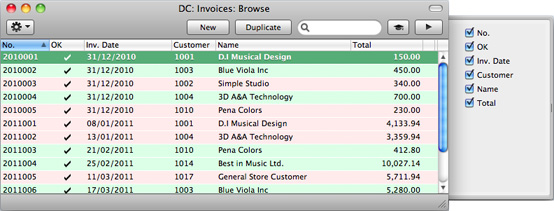
- To remove a column from a browse window, open the drawer by clicking the button with the arrow icon in the top right-hand corner of the window:
- Saving Window Configurations
- If you move or resize a window or change the sort order and you want the change to be remembered, choose 'Save Position' from the Window menu (you can also use the ⌘-Shift-S keyboard shortcut). Use 'Restore Position' to return the window configuration to standard.
- Searching
- To find a particular record in the list, first sort the list by the column that you want to use for the search. In the illustration above, for example, the list is sorted by No. allowing you to search for an Invoice with a certain Number. Then, type a letter, word, number, or date in the Search field (there is no need to click in the field before typing). Then press the Enter key.

- Many browse windows include an Operations drop-down menu. Highlight one or more records in the list (hold down the Shift key while clicking), then click the button with the image shown on the left to open the menu. When you choose a function from this menu, it will be applied to every highlighted record.
- Opening a record
- Open a record by double-clicking, or by selecting the line and pressing the Enter key. The record will be opened in a record window.
- Duplicating a record
- Find the record that you want to duplicate, highlight it and click the [Duplicate] button above the list (or use the ⌘-Y keyboard shortcut). A record window will open, containing the new duplicate record. In many cases, the new record will contain the current date, not the date of the duplicated record.
- Creating a new record
- Click the [New] button above the list, or use the ⌘-N keyboard shortcut. A record window will open, containing a blank new record.
In this chapter:
- Registers
- Browse Windows
- Record Windows
- Deleting Records
- Standard Accounts manual
- Standard Contracts manual
- Standard Invoicing manual
- Standard Nominal Ledger manual
- Standard POS manual
Record Windows
You will use record windows to enter, view and edit individual records. All data entry will be made in windows of this type. Shown below is an Invoice in a record window in Standard Accounts: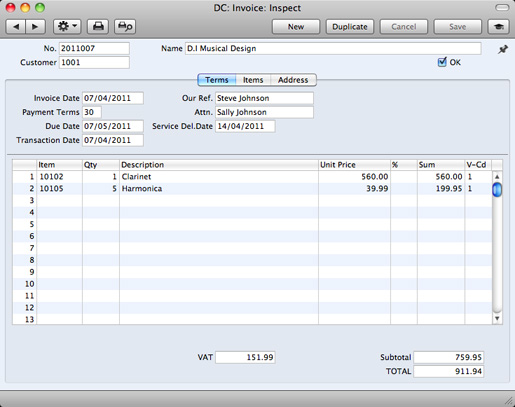
Sometimes a record window contains more information than can be shown on screen at once. If this is the case, there will be a series of tabs (marked 'Terms', 'Items' and 'Address' in the example of the Invoice illustrated above) that you can click to see more pages of information about the parent record.
The window title will contain the name of the register and will also show the status of the record, as follows:
- New
- The window contains a new record that has not yet been saved.
- Inspect
- The window contains a record that has been saved.
- Update
- The window contains a saved record, and a change has been made to that record that has not yet been saved.
- Deleting
- The window contains a record that is in the process of being deleted.

- Keyboard shortcuts: ⌘-- and ⌘-+
- These are the [Previous Record] (on the left) and [Next Record] buttons.
- Use these buttons to move from record to record. Everything you may have changed in the record you are leaving will be saved.
- These are the [Previous Record] (on the left) and [Next Record] buttons.

- Keyboard shortcut: ⌘-P
- Click this Printer icon to print the current record. Please refer here for details.
- Click this Printer icon to print the current record. Please refer here for details.

- Keyboard shortcut: ⌘-Shift-P
- Clicking the Preview icon will cause the current record to be printed to screen in a new window. This will allow you to see what it will look like when you print it on a printer by clicking the Printer icon immediately to the left.
- Clicking the Preview icon will cause the current record to be printed to screen in a new window. This will allow you to see what it will look like when you print it on a printer by clicking the Printer icon immediately to the left.

- Many record windows have an Operations drop-down menu, marked with this icon. This contains various functions that you can apply to the record currently shown in the window. For example, when looking at an Invoice in Standard Accounts, use the Operations menu to view its payment history and its connected Nominal Ledger Transaction.
- [New]
- Keyboard shortcut: ⌘-N
- Click this button to save the current record and to close it. A new blank record will then be opened for data entry.
- Click this button to save the current record and to close it. A new blank record will then be opened for data entry.
- [Duplicate]
- Keyboard shortcut: ⌘-Y
- Click this button to save the current record and to create a copy of it. The original record will be closed and the new copy opened. In many cases, the new record will contain the current date, not the date of the copied record.
- Click this button to save the current record and to create a copy of it. The original record will be closed and the new copy opened. In many cases, the new record will contain the current date, not the date of the copied record.
- [Cancel]
- If you have not saved the current record (i.e. the window title is 'New'), click this button to cancel the data entry process and to close the record window. The record will not be saved. If you have previously saved the current record (i.e. the window title is 'Update'), click this button to discard all changes made since it was last saved. In this case, the record window will not be closed.
- [Save]
- Keyboard shortcut: Shift-Enter
- This button saves all changes to the current record but does not close it.
- This button saves all changes to the current record but does not close it.

- Click this button to connect to the website for the Standard product you are using, where you can see a short tutorial demonstrating how to use the register you are looking at.
In this chapter:
- Registers
- Browse Windows
- Record Windows, including:
- Deleting Records
- Standard Accounts manual
- Standard Contracts manual
- Standard Invoicing manual
- Standard Nominal Ledger manual
- Standard POS manual
Record Windows - Paste Special
You can use the 'Paste Special' feature in many fields to bring information in to a record from another register or setting. For example, when you enter an Invoice in any Standard product, you can use 'Paste Special' to choose a Customer or Payment Term, and when you enter a Transaction, you can use 'Paste Special' to choose an Account. The following example shows pasting a Customer Number into an Invoice: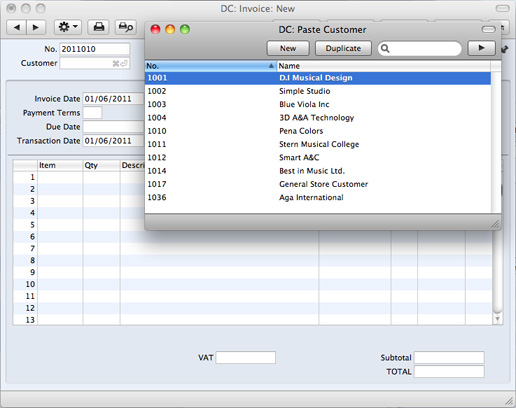
When you move the insertion point into an empty field where you can use the 'Paste Special' feature, you will see the following image in the field:

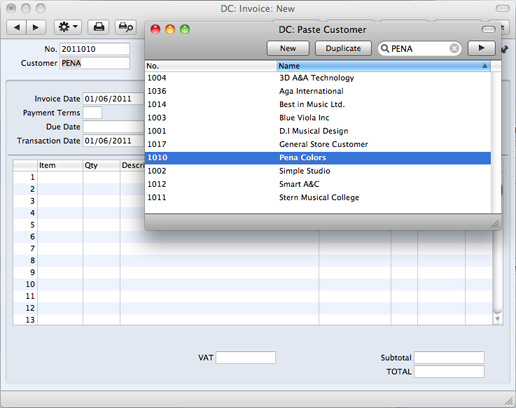
If you realise that your information about the linked record (in this case, the Customer) is out of date (they might have changed their address or telephone number, for example), highlight the Customer in the 'Paste Special' window and press ⌘-Shift-V. The Customer record will be opened, allowing you to make the necessary changes. You can also do this if you have already entered the Customer Number in the Invoice. With the insertion point in the Customer Number field, press ⌘-Shift-V. This feature is available from most fields with a 'Paste Special' link.
You can also drag and drop records from a browse window or 'Paste Special' list onto a record window. For example, you can drag a Customer Number from the 'Contacts: Browse' or the 'Paste Customer' window into an Invoice. When a record contains a list (e.g. the list of Items in an Invoice), you can open the 'Items: Browse' or the 'Paste Item' window and select a range of Items by clicking while holding down the Shift key. Then, drag them to the Item field in the first empty row in the list. All selected Items will be added to the list.
You can also use 'Paste Special' when you are in a date field to choose a date from a calendar.
---
In this chapter:
- Registers
- Browse Windows
- Record Windows, including:
- Paste Special
- Deleting Records
- Standard Accounts manual
- Standard Contracts manual
- Standard Invoicing manual
- Standard Nominal Ledger manual
- Standard POS manual
Deleting Records
To delete a record, open it in a record window and select 'Delete' from the Record menu.You cannot delete Transactions, and you cannot delete a record that you have used in other records, such as an Account that you have used in a Transaction or an Item that you have used in an Invoice.
! | You cannot undo the deletion of a record. |
---
In this chapter:
- Registers
- Browse Windows
- Record Windows
- Deleting Records
- Standard Accounts manual
- Standard Contracts manual
- Standard Invoicing manual
- Standard Nominal Ledger manual
- Standard POS manual