Introduction to Invoices in Books by HansaWorld
The Invoice register is a record of your company's sales. Each time you make a sale, you should enter an Invoice, print it and send it to the Customer. You will therefore use the Invoice register for a number of tasks:- The printed Invoice sent to the Customer acts as a demand for payment;
- Unpaid Invoices in the register provide the basis for your debt chasing reports; and
- Each Invoice causes a General Ledger Transaction to be created, thus generating the turnover and debtor figures in your monthly and yearly management reports. This creation process is automatic, requiring no intervention or work from you.
- You will issue standard Invoices, or demands for payment, when you have delivered goods or carried out work before you have received payment. You should record payments against such Invoices in the Receipt register.
- You will issue a Cash Note when you receive payment at the same time as carrying out the work. When you enter a Cash Note in the Invoice register, Books by HansaWorld will treat it as having being paid, so there will be no need to enter a separate payment record in the Receipt register. Books by HansaWorld will also look after the General Ledger implications for you (debiting the Cash Account rather than the Debtor Account).
- You should use Credit Notes to correct mistakes in Invoices, or to cancel Invoices that have been raised in error. They are, in effect, negative Invoices that reduce your turnover and debtor figures. Again, Books by HansaWorld looks after these General Ledger implications automatically.
The use of the Invoice register, including each of these types of sales transaction, is now described in detail. Before you start entering Invoices, however, you must ensure that you have defined the current financial (accounting) year, using the Fiscal Years setting.
Before working with Invoices, you should also look at the following settings and registers:
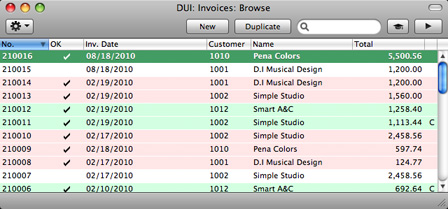
As in all browse windows you can change the sort order by clicking on the column headings. To reverse any sort, simply click once again on the column heading. You can scroll the list using the scroll bars or the trackpad. Finally, you can search for a record by entering a keyword in the field at the top right-hand corner. Books by HansaWorld will search for the first record matching the keyword in the same column as the selected sorting order. If you are using Mac OS X, you can also change the order of the columns by dragging the column headings, and remove columns altogether using the check boxes in the drawer.
On Mac OS X, Invoices are shown color-coded in the 'Invoices: Browse' window, as shown in the illustration above and as follows:
| (no color) | Invoices not yet due for payment |
| red | Invoices that are overdue for payment |
| green | Invoices that are fully paid or credited |
There are three things you can do in the Invoice register:
In this chapter:
- Introduction
- Entering an Invoice
- Entering an Invoice - Examples
- Inspecting and Approving Invoices
- General Ledger Transactions from Invoices
- Printing Invoices
- Cash Notes
- Credit Notes
- Operations menu
- Home page for Books by HansaWorld manual
Entering an Invoice
Books by HansaWorld provides several shortcuts to simplify your work with entering Invoices. You can for example bring a date into a date field using the 'Paste Special' function. You can also use this function to simplify the entering of Item Numbers, Customer Numbers, Payment Terms etc.To enter a new Invoice, first open the 'Invoices: Browse' window as described here. Then click [New] in the Button Bar or use the ⌘-N or Ctrl-N keyboard shortcut. Alternatively, select an Invoice similar to the one you want to enter and click [Duplicate] on the Button Bar.
The 'Invoice: New' window is opened, empty if you clicked [New] or containing a duplicate of the highlighted Invoice. In the case of the duplicate, the Invoice and Transaction Dates of the new Invoice will be the current date, not the date of the duplicated Invoice, and the Due Date will be recalculated accordingly. Complete the Invoice record as described below, then save it using the [Save] button and close the window by clicking the close box. Then, close the browse window using the close box again.
! | You are not bound by the values suggested as defaults by Books by HansaWorld. In most fields you can change the pre-set values to something that suits you better. Such changes are valid only for the Invoice in question. |
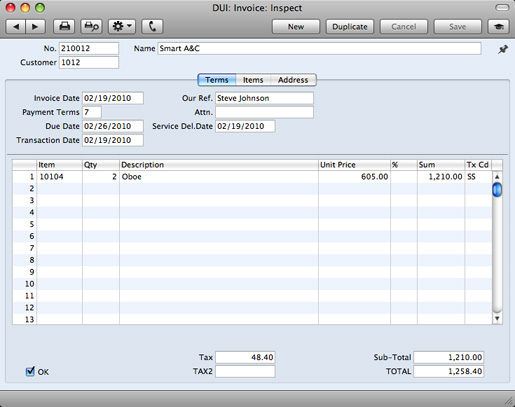
Since the amount of information stored about each Invoice will not fit on a single screen, the Invoice window has been divided into three cards. At the top of each is the header. This contains the Invoice Number, and the Customer Number and Name. At the bottom of the screen is the footer, which contains various totals. There are three named buttons ('tabs') in the header.

When you have added every Item to the Invoice, you may want to check the Invoice. Click the [Save] button to save it and then click the Printer icon in the Button Bar to print a sample Invoice document. If you want to print to screen, click the Preview icon.
You will still be able to make changes until you approve the Invoice by checking the OK check box and saving. Approving the Invoice will cause it to be entered to Accounts Receivable, a General Ledger Transaction for the Invoice will be created, and it will no longer be modifiable.
---
In this chapter:
- Introduction
- Entering an Invoice, including:
- Entering an Invoice - Examples
- Inspecting and Approving Invoices
- General Ledger Transactions from Invoices
- Printing Invoices
- Cash Notes
- Credit Notes
- Operations menu
- Home page for Books by HansaWorld manual
Entering an Invoice - Header

- No.
- Paste Special
Select from another Number Series
- The Invoice Number of a new Invoice is provided automatically by Books by HansaWorld. The default is the first unused number in the first valid number sequence in the Number Series - Invoices setting. You may change this number, but not to one that has already been used.
- If you have not defined any number sequences in the Number Series - Invoices setting, the Invoice Number sequence will start at 1 and continue consecutively. If you want the sequence to start from another number, change the Invoice Number of an Invoice before saving it: Books by HansaWorld will then continue the sequence from there.
- If you are working in a multi-user environment, the Invoice Number will be assigned when you first save the Invoice.
- If you have not defined any number sequences in the Number Series - Invoices setting, the Invoice Number sequence will start at 1 and continue consecutively. If you want the sequence to start from another number, change the Invoice Number of an Invoice before saving it: Books by HansaWorld will then continue the sequence from there.
- Customer
- Paste Special
Customers in Contact register
- Enter the Customer Number or use the 'Paste Special' function. When you press Return, the Customer's name, address and other information will be entered into the appropriate fields.
- Name
- The Customer Name is brought in after you have entered the Customer Number.
In this chapter:
- Introduction
- Entering an Invoice, including:
- Entering an Invoice - Examples
- Inspecting and Approving Invoices
- General Ledger Transactions from Invoices
- Printing Invoices
- Cash Notes
- Credit Notes
- Operations menu
- Home page for Books by HansaWorld manual
Entering an Invoice - Terms Card

- Invoice Date
- Paste Special
Choose date
- The current date according to the computer's clock is entered as a default. If you are not using the Allow Trans. Date Changing option in the Transaction Settings setting, this must be the same as the Transaction Date (below) and cannot be changed independently.
- Our Ref.
- Use this field if you need to identify the Invoice by means other than the Invoice Number. A default will be taken from the Our Ref field of the Person record of the current user.
- Payment Terms
- Paste Special
Payment Terms setting, Receivables/Payables modules
- Default taken from Contact record for the Customer (Sales Pay Terms)
- Payment Terms entered here will be used to calculate the Due Date (below), in addition simply to ensuring that the correct Payment Terms appear on the printed Invoice document. You can also use Payment Terms to configure a system of early settlement discounts.
- Specifying Payment Terms for each Invoice provides the basis for the debt-chasing reports provided in Books by HansaWorld.
- Payment Terms are also the means by which Cash Notes and Credit Notes are distinguished from ordinary Invoices. Using 'Paste Special', select a Payment Term record of the "Cash" or "Credit Note" Type respectively. When you then approve and save the Invoice, the appropriate General Ledger Transaction will be created. In the case of Cash Notes, this will debit the Cash Account (as specified in the Payment Term record) rather than the Debtor Account, while in the case of Credit Notes, the Transaction will be a reversal of the original Invoice Transaction.
- Cash Notes are immediately treated as paid and so will not appear in your debtor reports. There is no need to enter a payment against them. If you need to reverse a Cash Note, use a negative Cash Note, not a Credit Note.
- When you enter a Payment Term of the "Credit Note" type, a crediting message will be entered in the first row of the grid area. Enter the number of the Invoice to be credited, using 'Paste Special' if necessary to bring up a list of open (unpaid) Invoices.
- If an Invoice has a "Cash" or "Credit Note" Payment Term, the Invoice will not use the standard Invoice document when it is printed. Instead, the Cash Note or Credit Note (respectively) document will be used. Please refer to the Printing Invoices page for more details.
- Payment Terms entered here will be used to calculate the Due Date (below), in addition simply to ensuring that the correct Payment Terms appear on the printed Invoice document. You can also use Payment Terms to configure a system of early settlement discounts.
- Attn.
- Paste Special
Contact Persons in Contact register
- Default taken from Contact record for the Customer
- Record here the person for whose attention the Invoice is to be marked. 'Paste Special' will list the Contact Persons belonging to the Customer.
- Record here the person for whose attention the Invoice is to be marked. 'Paste Special' will list the Contact Persons belonging to the Customer.
- Due Date
- Paste Special
Choose date
- This is the date on which the Invoice becomes due for payment. It is calculated by Books by HansaWorld using the Invoice Date and the Payment Term.
- You can change the Due Date after you have approved the Invoice. This will be useful if you agree with the Customer that they will pay the Invoice on a particular date.
- You can change the Due Date after you have approved the Invoice. This will be useful if you agree with the Customer that they will pay the Invoice on a particular date.
- Service Del. Date
- Paste Special
Choose date
- Use this field to record the date when you delivered the goods or services listed in the Invoice. The Invoice Date will be placed here when you save the Invoice for the first time. You can change the date if necessary.
- Transaction Date
- This date will be used as the Transaction Date in the General Ledger Transaction that will result from the Invoice. If you are not using the Allow Trans. Date Changing option in the Transaction Settings setting, this must be the same as the Invoice Date and cannot be changed independently.
In this chapter:
- Introduction
- Entering an Invoice, including:
- Entering an Invoice - Examples
- Inspecting and Approving Invoices
- General Ledger Transactions from Invoices
- Printing Invoices
- Cash Notes
- Credit Notes
- Operations menu
- Home page for Books by HansaWorld manual
Entering an Invoice - Items Card
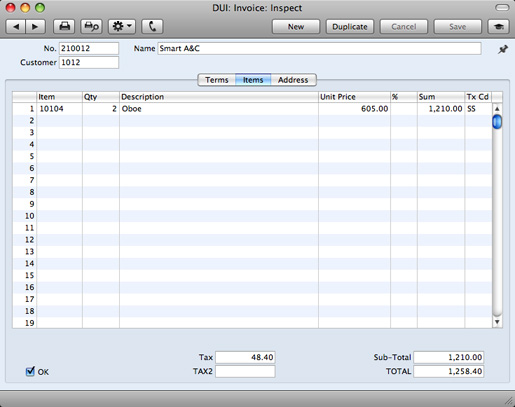
Use the grid on the 'Items' card to list the invoiced Items. To add rows to an Invoice, click in any field in the first blank row and enter appropriate text. To remove a row, click on the row number on the left of the row and press the Backspace key. To insert a row, click on the row number where the insertion is to be made and press Return.You can also bring Items into an Invoice by opening the 'Items: Browse' or 'Paste Special' windows, selecting a range of Items by clicking while holding down the Shift key, and then dragging them to the Item field in the first empty Invoice row. You can also copy a list of Item Numbers from a spreadsheet or word processor and paste them in the Item field in the first empty row.
- Item
- Paste Special
Item register
- With the insertion point in this field, enter the Item Number for each Item sold. Pricing, descriptive and other information will be brought in from the Item record. If you leave this field blank, you can enter any text in the Description field, perhaps using the row for additional comments to be printed on Invoice documentation.
- Qty.
- Enter the number of units sold. If you leave the field by pressing the Return or Enter key, the insertion point will move to the Item field in the next row.
- Description
- Default taken from
Item
- This field shows the name of the Item, brought in from the Item register. If you want to add an extra description, you can do so: there is room for up to 100 characters of text. You can also use the next line if necessary.
- In multi-user systems, you can prevent certain users from changing any Description in an Invoice using Access Groups (by denying access to the 'Change Item Description on Invoice' Action).
- In multi-user systems, you can prevent certain users from changing any Description in an Invoice using Access Groups (by denying access to the 'Change Item Description on Invoice' Action).
- Unit Price
- The Unit Price according to the Customer's Price List is brought in. If the Customer does not have a Price List, or the Item is not on the Price List in question, the Price from the Item record is brought in. This figure will include Sales Tax if the Price List is one that is Inclusive of Tax or if you have specified in the Account Usage A/R setting that Prices include Tax.
- In multi-user systems, you can prevent certain users from changing any Unit Price in an Invoice using Access Groups (by denying access to the 'Change Unit Prices' Action).
- In multi-user systems, you can prevent certain users from changing any Unit Price in an Invoice using Access Groups (by denying access to the 'Change Unit Prices' Action).
- %
- Discount percentage.
- In multi-user systems, denying access to the 'Change Unit Prices' Action described immediately above will also prevent the entering of a discount percentage.
- In multi-user systems, denying access to the 'Change Unit Prices' Action described immediately above will also prevent the entering of a discount percentage.
- Sum
- The total for the row: Quantity multiplied by Unit Price less Discount. Changing this figure will cause the Discount Percentage to be recalculated. This figure will include Sales Tax if the Price List specified is one that is Inclusive of Tax or if you have specified in the Account Usage A/R setting that Prices include Tax.
- In multi-user systems, denying access to the 'Change Unit Prices' Action described immediately above will also prevent the changing of a row sum.
- In multi-user systems, denying access to the 'Change Unit Prices' Action described immediately above will also prevent the changing of a row sum.
- Tx Cd
- Paste Special
Tax Codes setting, General Ledger
- The Tax Code entered here determines the rate at which Tax will be charged on the Item and the Output Tax Account to be credited.
- The default offered in each row will be chosen as follows:
- The Sales Tax Code for the Customer will be used.
- It will be taken from the Item record.
- The Tax Code in the Account Usage A/R setting will be used.
- You can change this default in a particular Invoice row if necessary.
- The default offered in each row will be chosen as follows:

- OK
- You can approve the Invoice by checking this box and saving. This will cause the Invoice to be posted to your Accounts Receivable. A corresponding General Ledger Transaction will also be created in the Transaction register. Because of this consequence, you will no longer be able to make changes to the Invoice.
- In multi-user systems, you can use Access Groups to control who can approve Invoices and Credit Notes. To do this, deny access to the 'OKing Invoices' and 'OKing Credit Notes' Actions respectively.
- If you would like a warning to appear every time you save an Invoice that you have not approved, please refer to the Global Warnings on UnOKed Records setting in the System module.
- References in these web pages to approved Invoices are to Invoices whose OK box has been checked (i.e. an approved Invoice is one that is no longer a Draft).
- In multi-user systems, you can use Access Groups to control who can approve Invoices and Credit Notes. To do this, deny access to the 'OKing Invoices' and 'OKing Credit Notes' Actions respectively.
- Tax
- The Sales Tax total for the Invoice.
- This figure is rounded up or down according to the Default for Currency rounding rules set in the Round Off setting in the System module.
- This figure is rounded up or down according to the Default for Currency rounding rules set in the Round Off setting in the System module.
- Sub-Total
- The total for the Invoice, excluding Sales Tax.
- This figure is rounded up or down according to the Default for Currency rounding rules set in the Round Off setting in the System module.
- This figure is rounded up or down according to the Default for Currency rounding rules set in the Round Off setting in the System module.
- TOTAL
- The total for the Invoice, including Sales Tax.
This figure is rounded up or down according to the Total rounding rules set in the Round Off setting in the System module. In the General Ledger Transaction resulting from an Invoice, any amounts lost or gained in this rounding process are posted to the Round Off Account specified in the Account Usage A/R setting.
In this chapter:
- Introduction
- Entering an Invoice, including:
- Entering an Invoice - Examples
- Inspecting and Approving Invoices
- General Ledger Transactions from Invoices
- Printing Invoices
- Cash Notes
- Credit Notes
- Operations menu
- Home page for Books by HansaWorld manual
Entering an Invoice - Address Card
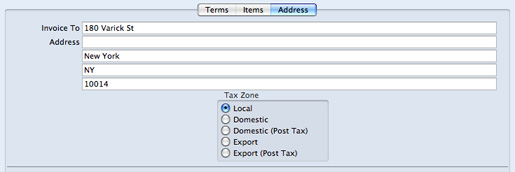
- Invoice To Address
- Default taken from
Contact record for the Customer
- The Customer's address, as entered in the Customer's record in the Contact register. You can change the Address in a particular Invoice, but permanent changes should be made in the Contact register.
- Tax Zone
- Default taken from
$MAIILLINK(BKSUS0104CUST_Entering_Account_Card,Contact) record for the Customer
- These radio buttons show the Customer's Zone, brought in from the Contact register. The Zone can control the choice of Tax Code and Sales Account for each Item in the Invoice: you will have defined separate default Sales Accounts and Tax Codes for each Zone in the Account Usage A/R setting. You cannot change the Zone in an Invoice: you should make any necessary changes in the Contact register before entering Invoices.
In this chapter:
- Introduction
- Entering an Invoice, including:
- Entering an Invoice - Examples
- Inspecting and Approving Invoices
- General Ledger Transactions from Invoices
- Printing Invoices
- Cash Notes
- Credit Notes
- Operations menu
- Home page for Books by HansaWorld manual
Entering an Invoice - Examples
We shall now show how to use the various fields on the Invoice screen with the help of a few examples.To open the Invoice register, first ensure you are in the Receivables module and then click the [Invoices] button in the Master Control panel or use the ⌘-1 (Mac OS X) or Ctrl-1 (Windows) keyboard shortcut. The 'Invoices: Browse' window opens, listing the Invoices that are already in the system. Start entering a new Invoice by clicking the [New] button or using the ⌘-N/Ctrl-N keyboard shortcut. The 'Invoice: New' window opens, containing a new, empty, Invoice with only the Invoice Number and Date entered. The insertion point will be in the Customer Number field. Press ⌘-Return/Ctrl-Return to activate the 'Paste Special' feature. This brings up the 'Paste Customer' window.
Select a Customer from the list by double-clicking on its name (or by using the cursor keys and pressing Return). Press Return again and Customer information such as Name, Address and Payment Terms will be placed in the appropriate fields on the Invoice screen.
Press Return again to move the insertion point to the Item field, the left-hand field in the first Invoice row. Again, you can use 'Paste Special' to select an Item. Use the trackpad to scroll through the Items or use the Search feature until you find the one you want. Select an Item by double-clicking. Press Return to bring in information such as the Item Name, Price and Tax Code.
Then, enter the Quantity sold and press Return. The Amount, Tax, Sum and Totals are calculated automatically, and the insertion point moves to the next line. Repeat this procedure for each Item on the Invoice.
If the Invoice needs altering, edit the fields in the normal way. As you have not yet saved the Invoice, you can also cancel it entirely by clicking [Cancel] or the close box. In the latter case you will be asked to confirm the cancellation:
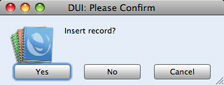
When you have added all the Items, you may want to check the Invoice. Click the [Save] button to save it and then click the Printer icon in the Button Bar to print a sample copy. If you want to print to screen, click the Preview icon.
Until you have approved the Invoice by checking the OK box and saving, you can still change it.
---
In this chapter:
- Introduction
- Entering an Invoice
- Entering an Invoice - Examples
- Inspecting and Approving Invoices
- General Ledger Transactions from Invoices
- Printing Invoices
- Cash Notes
- Credit Notes
- Operations menu
- Home page for Books by HansaWorld manual
Inspecting and Approving Invoices
Before you send an Invoice to a Customer, you should check and approve it, to ensure that the Customer is charged for the correct things. Approving an Invoice causes it to be inserted into your Accounts Receivable. Incoming payments can only be registered against approved Invoices.When you approve and save an Invoice, if so defined in the Sub Systems setting in the General Ledger, a Transaction will be created and automatically transferred to the General Ledger. This Transaction will be assigned a journal number that is the same as the Invoice Number, and is described on the General Ledger Transactions from Invoices page.
There are two ways to approve an Invoice:
- With the Invoice on screen, click the OK check box and then [Save].
- Select an Invoice by clicking on it in the 'Invoices: Browse' window, and select 'OK' from the Operations drop-down menu. By holding down the Shift key while clicking, you can highlight a batch of Invoices to approve at a single stroke using this method.
! | After approving an Invoice, you will no longer be able to change it. |
In multi-user systems, you can use Access Groups to control who can approve Invoices and Credit Notes. To do this, deny access to the 'OKing Invoices' and 'OKing Credit Notes' Actions respectively.
---
In this chapter:
- Introduction
- Entering an Invoice
- Entering an Invoice - Examples
- Inspecting and Approving Invoices
- General Ledger Transactions from Invoices
- Printing Invoices
- Cash Notes
- Credit Notes
- Operations menu
- Home page for Books by HansaWorld manual
General Ledger Transactions from Invoices
When you approve and save an Invoice, a General Ledger Transaction will be generated automatically if you have so determined in the Sub Systems setting in the General Ledger. An example is illustrated below: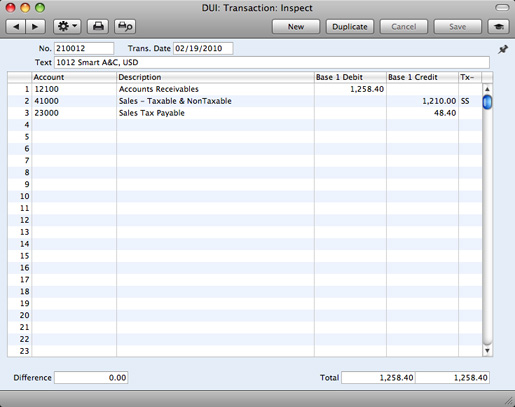
- If the Customer has a Price List and there is a record in the Price register for the Item/Price List combination, the Sales Account will be taken from that Price record. If this Sales Account is blank, or there is no appropriate record in the Price register:
- The Sales Account will be taken from the relevant Item record (in the Item register). If this is blank:
- The Sales Account in the Account Usage A/R setting will be used.
For each row in an Invoice, the Tax Account will be taken from the specified Tax Code. This will be chosen as follows:
- The Sales Tax Code in the record for the Customer in the Contact register will be used. If you have not specified a Sales Tax Code for the Customer in question:
- The Tax Code will be taken from the relevant Item record in the Item register. If this is blank, or if no Item Number has been entered to the Invoice row:
- The Tax Code in the Account Usage A/R setting will be used.
The Debtor Account will be chosen as follows:
- The Debtor Account in the Customer Category to which the Customer belongs will be used. If you have not specified a Debtor Account in the relevant Category record, or the Customer does not belong to a Category:
- The Debtor Account will be taken from the Account Usage A/R setting.
Once the Transaction has been generated, you can look at it straight away using the 'Open GL Transaction' function on the Operations drop-down menu.
---
In this chapter:
- Introduction
- Entering an Invoice
- Entering an Invoice - Examples
- Inspecting and Approving Invoices
- General Ledger Transactions from Invoices
- Printing Invoices
- Cash Notes
- Credit Notes
- Operations menu
- Home page for Books by HansaWorld manual
Printing Invoices
There are several occasions when you may want to print an Invoice: to view a test print-out to check the Invoice before you finally approve it; to produce a copy for your own files, or to send the original Invoice to the Customer.To produce a test print-out, save the Invoice and then click on the Printer icon in the Button Bar before you approve the Invoice. The Invoice will then be printed. If you are not using the No Test Printout option in the Optional Features setting in the System module, the text "Test Printout" will be printed diagonally printed across the page as a watermark. This is to avoid the test being confused with the final version. As you have not yet approved the Invoice by checking the OK box and saving, you can go back and correct any errors you may find in the printout. This is also true for Credit Notes.
If you want to print a range of final Invoices, follow the instructions below:
- Ensure you are in the Receivables module and click the [Documents] button in the Master Control panel or use the ⌘-D (Mac OS X) or Ctrl-D (Windows) keyboard shortcut. Then, double-click 'Invoices' in the 'Documents' list.
The 'Specify Invoices' window is shown.
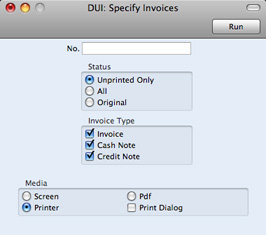
- Enter the Invoice Number for a single Invoice, or the highest and lowest Invoice Numbers of a range of Invoices separated by a colon (:). Use the Status options to specify which Invoices are to be printed:
- Unprinted Only
- This option ignores any Invoices in the range that have already been printed.
- All
- Prints all Invoices in the range. If you are not using the No Test Printout option, any previously printed approved Invoices will have the word "Copy" printed diagonally across the page as a watermark, while any unapproved Invoices will be printed with a "Test Printout" watermark.
- Original
- This option also prints all Invoices in range. Previously printed approved Invoices will be printed again as though they were original copies, without the "Copy" watermark, irrespective of whether you are using the No Test Printout option. Unapproved Invoices will carry the "Test Printout" watermark if you are not using the No Test Printout option.
- Unprinted Only
- Press the [Run] button in the Button Bar to start the printing, or cancel by closing the window.
If you specified in the Invoice Form that several copies are to be printed, perhaps on different printers, these copies will only be printed the first time you print an Invoice after approving it. If you print the Invoice again, or print it before you have approved it, only one copy will be printed. If you need to print all copies again, you must print the Invoice starting from the [Documents] button, and you should choose the Original option.
Whichever method you use to print an Invoice, the Form (i.e. the stationery) used will be determined as follows:
- Using the Form register in the System module, design the invoice Form. Use the 'Properties' function on the Operations menu to name the Form (in this description, we have used the name "INVOICE") and to assign it a Document Type of "Invoice". A sample Invoice Form is supplied with Books by HansaWorld: you can modify this to suit your requirements.
- Select the Receivables module using the [Module] button in the Master Control panel or the ⌘-0 or Ctrl-0 keyboard shortcuts.
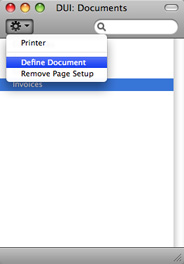
- Click the [Documents] button in the Master Control panel or use the ⌘-D/Ctrl-D keyboard shortcut. The 'Documents' list window is opened: highlight 'Invoices'.
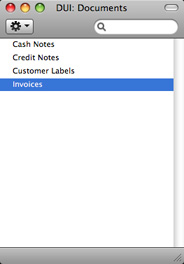
- Select 'Define Document' from the Operations drop-down menu.
- In the subsequent window, enter "INVOICE" in the Form field of the first row (you can use 'Paste Special' to ensure the spelling is correct).
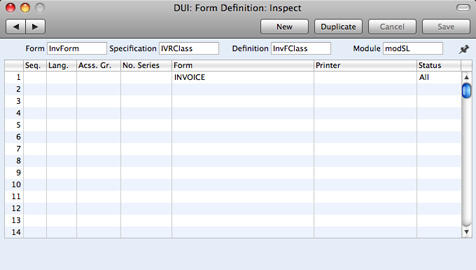
- Click [Save] to save the Invoice Form definition. From now on, the invoice form that you have designed will be used from the 'Documents' function and from the Printer icon, except as described in step 7 below.
- Repeat the previous six steps in turn for the Cash Note and Credit Note documents. These will be used from the 'Documents' function and the Printer and Preview icons instead of the standard Invoice document in the following circumstances:
- Cash Note
- If the Invoice has Payment Terms of the "Cash" type, the Cash Note document will always be used instead of the Invoice document.
- Credit Note
- If the Invoice has Payment Terms of the "Credit Note" type, the Credit Note document will always be used instead of the Invoice document.
- Cash Note
In this chapter:
- Introduction
- Entering an Invoice
- Entering an Invoice - Examples
- Inspecting and Approving Invoices
- General Ledger Transactions from Invoices
- Printing Invoices
- Cash Notes
- Credit Notes
- Operations menu
- Home page for Books by HansaWorld manual
Cash Notes
A Cash Note is an Invoice that is to be treated as being paid. It differs from a normal Invoice in that it does not affect your Debtor Account or appear in any of your debt-chasing reports: instead, a debit posting for the Invoice value is made directly to your Cash Account.To enter a Cash Note, follow the procedure described here for entering Invoices, with just one exception: change the Payment Terms (using the 'Paste Special' function if necessary) to refer to a Payment Term record of Type "Cash". You can register such a Payment Term in the Contact records for Customers that are always issued with Cash Notes (using the Sales Pay. Terms field), so you don't have to make this change every time.
Click the OK check box when you are sure the Cash Note is correct. As with ordinary Invoices, you must approve Cash Notes by checking the OK check box and saving, for them to be posted to your Accounts Receivable and for General Ledger Transactions to be created.
---
In this chapter:
- Introduction
- Entering an Invoice
- Entering an Invoice - Examples
- Inspecting and Approving Invoices
- General Ledger Transactions from Invoices
- Printing Invoices
- Cash Notes
- Credit Notes
- Operations menu
- Home page for Books by HansaWorld manual
Credit Notes (Credit Memos)
If you want to credit an Invoice that you have issued, follow these steps:- Ensure you are in the Receivables module and click the [Invoices] button in the Master Control panel. The 'Invoices: Browse' window is opened, showing all registered Invoices.
- Find the Invoice to be credited in the list, open it and select 'Create Credit Note' from the Operations menu. You can also duplicate the Invoice to be credited or, if you don't want to connect the Credit Note to a particular Invoice, click the [New] button to open an empty new record.
- The 'Invoice: New' window is opened. Enter the Invoice in the normal way, but change the Payment Term to refer to a Payment Term record of Type "Credit Note". The phrase "Credit of Invoice" will be placed in the first row of the grid on the 'Items' card, pushing any existing rows down. In the field to the right of this phrase, enter the number of the Invoice to be credited, using 'Paste Special' if necessary to bring up a list of open (unpaid) Invoices.
If you used the 'Create Credit Note' function to create the Credit Note, the Payment Term and number of the Invoice to be credited will be placed in the new Credit Note automatically.
- On the remaining lines you can enter the items to credit, and by what amount.
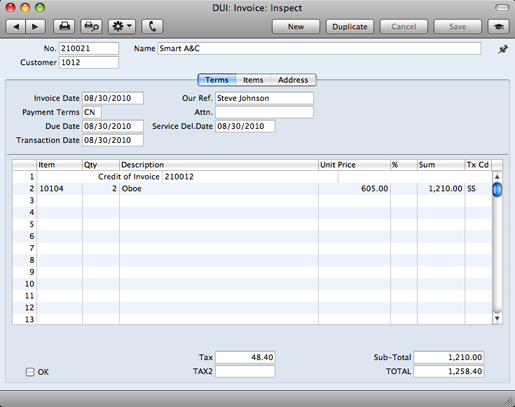
- Click the OK check box when you are sure the Credit Note is correct. As with ordinary Invoices, you must approve Credit Notes using the OK check box for them to be entered into your Accounts Receivable and for General Ledger Transactions to be created.
In multi-user systems, you can use Access Groups to control who can approve Credit Notes: they need not be the same members of staff as those who can approve Invoices. To do this, deny access to the 'OKing Credit Notes' Action.
In this chapter:
- Introduction
- Entering an Invoice
- Entering an Invoice - Examples
- Inspecting and Approving Invoices
- General Ledger Transactions from Invoices
- Printing Invoices
- Cash Notes
- Credit Notes, including:
- Operations menu
- Home page for Books by HansaWorld manual
Credit Notes - Crediting Part of an Invoice
To credit part of an Invoice, start by opening the original Invoice and choosing the 'Create Credit Note' function from the Operations menu. Alternatively, duplicate the original Invoice and enter a Payment Term of Type "Credit Note". Then proceed as follows:- Simply remove all the rows you do not want to credit. Click on the row number to the left to highlight the whole row, and press the backspace key. You will then be left with the rows to credit.
- In the case of individual rows requiring a partial credit, simply alter the Quantity field to show the number to be credited.
- Click the OK check box when you are sure the Credit Note is correct and [Save] to save it.
In this chapter:
- Introduction
- Entering an Invoice
- Entering an Invoice - Examples
- Inspecting and Approving Invoices
- General Ledger Transactions from Invoices
- Printing Invoices
- Cash Notes
- Credit Notes, including:
- Crediting Part of an Invoice
- Crediting Cash Notes
- Invalidating Invoices
- Crediting Part of an Invoice
- Operations menu
- Home page for Books by HansaWorld manual
Credit Notes - and Cash Notes
If you need to reverse a Cash Note, you cannot follow the standard crediting procedure. A Credit Note will credit the Debtor Account, while reversing a Cash Note should credit the Cash Account. Instead you should enter a new Cash Note (i.e. with a Payment Term of Type "Cash") with a negative value.---
In this chapter:
- Introduction
- Entering an Invoice
- Entering an Invoice - Examples
- Inspecting and Approving Invoices
- General Ledger Transactions from Invoices
- Printing Invoices
- Cash Notes
- Credit Notes, including:
- Crediting Part of an Invoice
- Crediting Cash Notes
- Invalidating Invoices
- Crediting Part of an Invoice
- Operations menu
- Home page for Books by HansaWorld manual
Credit Notes - Invalidating Invoices
In some circumstances it can be appropriate to invalidate an Invoice using the 'Invalidate' command on the Record menu. This function will remove the Invoice from your Accounts Receivable; any associated General Ledger Transaction will be removed from the General Ledger as well. An invalidated Invoice is easily distinguished because all fields have red lines drawn through them. These red lines are also shown in the 'Invoices: Browse' window.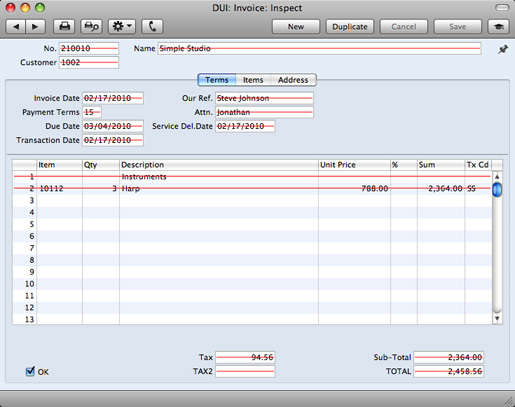
In multi-user systems, you can use Access Groups to control who can invalidate Invoices. To do this, deny access to the 'Invalidating Sales Invoices' or the 'Invalidating Purchase and Sales Invoices' Actions.
---
In this chapter:
- Introduction
- Entering an Invoice
- Entering an Invoice - Examples
- Inspecting and Approving Invoices
- General Ledger Transactions from Invoices
- Printing Invoices
- Cash Notes
- Credit Notes, including:
- Crediting Part of an Invoice
- Crediting Cash Notes
- Invalidating Invoices
- Crediting Part of an Invoice
- Operations menu
- Home page for Books by HansaWorld manual
Operations Menu

---
In this chapter:
- Introduction
- Entering an Invoice
- Entering an Invoice - Examples
- Inspecting and Approving Invoices
- General Ledger Transactions from Invoices
- Printing Invoices
- Cash Notes
- Credit Notes
- Operations menu, including
- Home page for Books by HansaWorld manual
Operations Menu - OK
This command is only available on the Operations menu for the 'Invoices: Browse' window. It allows you to approve an Invoice and is therefore the equivalent of checking the OK box in an Invoice record and saving it. You can also select several Invoices (hold down the Shift key to select a range of Invoices in the list) and approve them all at once. Remember that, if so defined in the Sub Systems setting in the General Ledger, this action causes General Ledger Transactions to be created for each Invoice in the selection and that therefore once it has been carried out you will no longer be able to modify those Invoices.In multi-user systems, you can use Access Groups to control who can approve Invoices and Credit Notes. To do this, deny access to the 'OKing Invoices' and 'OKing Credit Notes' Actions respectively.
---
In this chapter:
- Introduction
- Entering an Invoice
- Entering an Invoice - Examples
- Inspecting and Approving Invoices
- General Ledger Transactions from Invoices
- Printing Invoices
- Cash Notes
- Credit Notes
- Operations menu, including
- Home page for Books by HansaWorld manual
Operations Menu - Invoice Status
This command prints a report to screen summarizing all aspects of the Invoice, including Items and payment history. In the illustration below, the Invoice in question has been paid with a Receipt.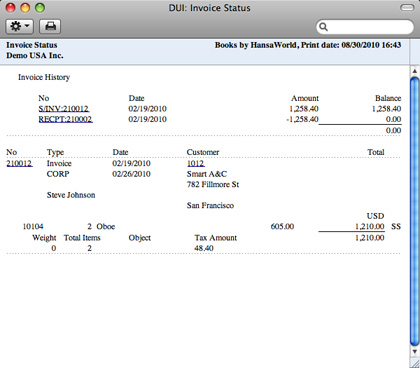
---
In this chapter:
- Introduction
- Entering an Invoice
- Entering an Invoice - Examples
- Inspecting and Approving Invoices
- General Ledger Transactions from Invoices
- Printing Invoices
- Cash Notes
- Credit Notes
- Operations menu, including
- OK
- Invoice Status
- Create Credit Note
- Open GL Transaction
- OK
- Home page for Books by HansaWorld manual
Operations Menu - Create Credit Note
Use this function to create a Credit Note from the Invoice. Please refer here for details.---
In this chapter:
- Introduction
- Entering an Invoice
- Entering an Invoice - Examples
- Inspecting and Approving Invoices
- General Ledger Transactions from Invoices
- Printing Invoices
- Cash Notes
- Credit Notes
- Operations menu, including
- OK
- Invoice Status
- Create Credit Note
- Open GL Transaction
- OK
- Home page for Books by HansaWorld manual
Operations Menu - Open GL Transaction
When you approve and save an Invoice, a General Ledger Transaction will be created. This function allows you to view that Transaction.When you select the function, the Transaction will be opened in a new window.
In multi-user systems, you can use Access Groups to control who can open Transactions from Invoices. To do this, deny access to the 'Open Transactions from Operations Menu' Action or to the General Ledger altogether.
---
In this chapter:
- Introduction
- Entering an Invoice
- Entering an Invoice - Examples
- Inspecting and Approving Invoices
- General Ledger Transactions from Invoices
- Printing Invoices
- Cash Notes
- Credit Notes
- Operations menu, including
- OK
- Invoice Status
- Create Credit Note
- Open GL Transaction
- OK
- Home page for Books by HansaWorld manual