Bienvenido a los manuales online de HansaWorld Enterprise
Por favor, para comenzar click en link de la izquierda...La familia de productos de HansaWorld Enterprise esta formada por varios productos con funcionalidades contables, sistemas de ERP y CRM para ambientes Windows, Mac OS X, Linux, PocketPC 2003 y AIX.
Los programas son diseñados para hacer de las tareas administrativas y contables tan fáciles y rápidas como sea posible. Son muy similares en cuanto al aspecto operacional sin importar la plataforma. En las áreas específicas donde existan diferencias significativas, estas serán descritas e ilustradas por completo. En el resto de los casos los gráficos serán tomados de la versión para Windows XP.
Los textos en corchetes - [Guardar], [Cancelar] - se refieren a los botones de la pantalla.
El término abreviado "Hansa" es utilizado en estos manuales para hacer referencia al producto HansaWorld Enterprise, mientras que "HansaWorld" hace referencia al grupo corporativo.
Introduction to the Job Costing module for companies in service industries
The Job Costing module in Standard ERP is designed primarily for companies in service industries, whose turnover is based mainly on the labour of their employees. Such companies often invoice their work by the hour, the day or the week. In many cases, goods and materials are also supplied and charged to Customers. Pricing arrangements can vary considerably from, for example, a set price for a complete Project to varying hourly charges per individual employee, per task and per Customer. A job costing and time billing system must be flexible enough to handle all possible combinations in an easy and helpful manner.The need for a job costing and time billing system starts to become apparent even in small companies as soon as the task of project administration begins to gain in sophistication. It is often said that when small consulting companies grow beyond 20 to 30 consultants they have reached a threshold. From that moment, further expansion requires more than one full-time manager for sales and administration, and profitability is often affected. By simplifying project administration, Standard ERP allows this threshold to be pushed upwards.
In a business in a service industry, the utilisation of the employees' time is vital for the success of the company. A non-billed hour is lost and can never be recovered. The key to profitability is the constant and systematic administration of Projects, hours worked and billing: the aim of any time billing system must be to aid companies to be more efficient in these areas. But each business has its own ideas about charging and monitoring Projects and employees. Standard ERP therefore has a number of very flexible reports that can give managers the information they require.
Standard ERP's Job Costing module is designed to allow each employee to maintain their own Time Sheets, preferably filling them in on a daily basis. These Time Sheets are monitored by managers, and need to be approved before they can be invoiced, perhaps on a weekly basis. Errors can be corrected and reversals made before the Invoices are raised. There is full control over invoicing, and Time Sheets are fully editable until they have been approved. Employees can also use Activities to record time.
The main function of this module is to accumulate information about the time worked and the materials or services provided for a certain project, task, assignment, client or job. Once this information has been gathered, it can be compared to budget, monitored, adjusted and, in most cases, invoiced. The module thus focuses on income, not on costs. The cost side of each transaction is normally handled in the Nominal Ledger through the use of cost centre or Tag/Object accounting.
Standard ERP's Job Costing module is integrated with the rest of the system. Invoices for services and Projects are passed to the Sales Ledger module, where they are treated as normal Invoices. The Sales Ledger module is in turn integrated with the Nominal Ledger.
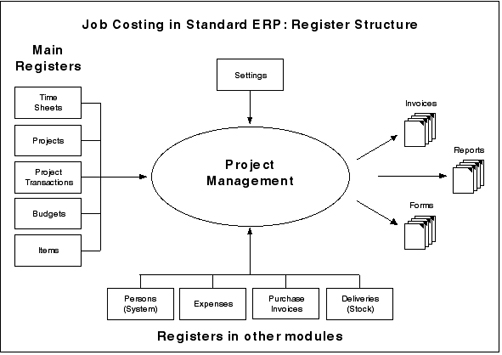
The Job Costing module interacts with several other modules in Standard ERP. The following diagram illustrates the registers in the module, together with the other registers involved in the project management process. To the left are the five main registers in the Job Costing module. At the bottom are the registers in other modules that interact with Job Costing, and that provide some of the information that is required for efficient project management. There are also a number of settings that can influence the behaviour of the module.
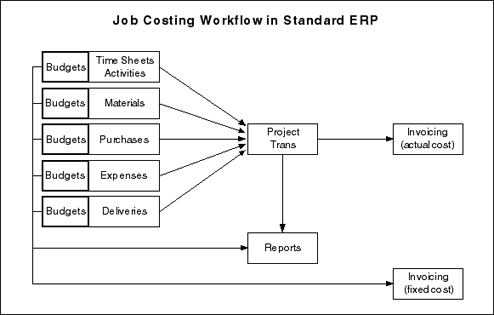
This process is illustrated in the following diagram:
Reports regarding employees and time records are available, as well as several reports showing the status of Projects. When printed to screen, the reports have some unique drill-down facilities that make analysis and control fast and easy.
---
The Job Costing module in Standard ERP:
- Example
- Terminology Pricing and Costs
- Settings
- The Project register, including Projects and the Resource Planner
- The Project Budget register
- The Quotation register and the Job Costing module
- The Time Sheet register
- The Project Transaction register
- The Project Schedule register
- The Item register and the Job Costing module
- The Person register and the Job Costing module
- Maintenance
- Forms
- Reports
- Exports
- Home page for Standard ERP manual
Introduction to the Contracts Module
The Contracts module is designed for use by companies supplying products or services that are invoiced at regular intervals, such as rents, subscriptions or maintenance contracts.Individual agreements or contracts are recorded in the Contract register, and periodic Invoices are then created when appropriate using a special function. These are passed to the Sales Ledger module, where they are treated as normal Invoices.
The module also provides tools for the management of quoting and tendering for Contracts. A history of modifications to quotations can be maintained, and successful quotations can easily be converted into Contracts.
---
In this section:
- Settings
- Contracts
- Contract Quotations
- Contract Status register
- Service Agreements
- Maintenance functions
- Forms/Documents
- Reports
- Export functions
- Home page for Standard ERP manual
Introduction
HansaWorld FirstOffice Start is an integrated accounts and office administration tool for Macintosh and Windows. It includes Sales, Purchase and Nominal Ledgers, and a Calendar and Task Manager that you can use for contact and diary management. The abbreviated term "FirstOffice" is used throughout these web pages when referring to HansaWorld FirstOffice Start.In this introductory section, we will describe the steps you need to follow to get started with FirstOffice. Topics covered include installation and the creation of a new database.
Introduction
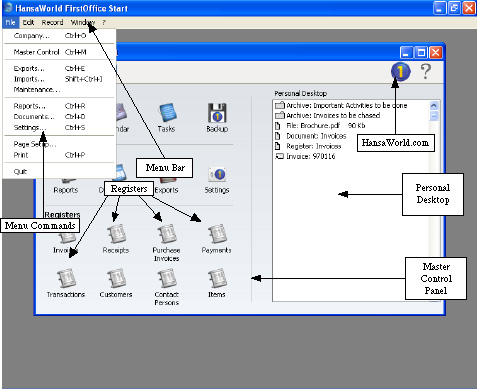
When you create a database or open an existing one, FirstOffice's desktop will appear, with the Master Control panel in the centre of the screen. You can use the icons in this panel as shortcuts to different parts of the program.You can carry out most operations in FirstOffice in three different ways:
- Selecting an option from a menu
- Clicking a button in the Master Control panel
- With a keyboard command
Introduction
Managing your own business is often a rewarding undertaking, but with it come a number of obligations. One is the requirement to keep your accounts up to a certain standard. The legal requirements differ with the type of business and the country of operation, but regardless of these there can be great advantages in having your books in order. In this section some of the basic concepts used in accounting, and their integration into FirstOffice, are described.Introduction
Before starting work with FirstOffice, you should first have created a new database into which you have entered information about your company, the current fiscal year, a set of VAT Codes and a Chart of Accounts. If this is not the case, please turn back to the Starting FirstOffice section of these web pages before proceeding.Introduction
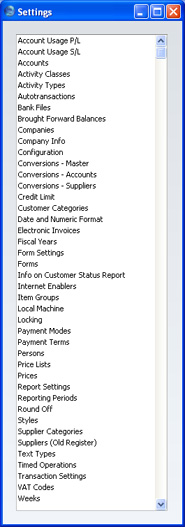
Settings allow you to tailor FirstOffice's operation to your requirements. Many settings take the form of preferences: examples include Account Usage S/L and Account Usage P/L, which you can use to inform FirstOffice which Account is to be used in a particular situation (e.g. the Debtor and Creditor Accounts). Other settings require a number of records to be entered: this information tends to be used in 'look-up' tables (i.e. 'Paste Special' windows) from the main registers.To edit or add to a setting, elect 'Settings' from the File menu or click the [Settings] button in the Master Control panel. You can also use the keyboard shortcut Ctrl-S (Windows) or ⌘-S (Macintosh).

Introduction
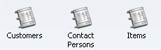
Base registers typically contain information that is then used elsewhere. This information will not itself be changed very often. For example, the Customer register is effectively a list of Customer names and addresses that will be referred to from the Calendar and from Invoices and Receipts.FirstOffice contains three base registers. You can open them by clicking the buttons in the Master Control panel:
Introduction
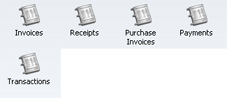
Each transaction register represents a particular type of accounting transaction. Invoices, Receipts (payments that you receive against Invoices that you have issued), Purchase Invoices and Payments (that you issue against Purchase Invoices) are each stored in separate registers. The Transaction register is used for all other kinds of transaction (e.g. credit card payments, salaries, transfers between bank accounts).The Invoice and Receipt registers make up FirstOffice's Sales Ledger, while the Purchase Invoice and Payment registers make up the Purchase Ledger. These four registers are sometimes described as 'Sub Systems'. When you enter a record to any one of these registers and then approve and save it, a corresponding record will be created automatically in the Transaction register. The Transaction register is FirstOffice's Nominal Ledger.
FirstOffice contains five transaction registers. You can open them by clicking the buttons in the Master Control panel:
Introduction
The Calendar and Task Manager are simple and efficient tools for keeping track of contacts with Customers and for planning activities of all kinds. You can use them to record the different tasks and events in the business day, such as customer contacts for sales, service support, consultancy appointments etc. In FirstOffice, each task and event is saved as a separate record in the Activity register. The Calendar and the Task Manager allow you to view, review and change your Activities, and to add new ones (to keep your Activities separate from those of other users, you cannot open the Activity register itself). You can use the Activity register as a planning and monitoring tool for a sales force, or as a tool to log telephone calls to a customer service centre, and in many other ways. As with all FirstOffice features, there is a great deal of flexibility, and different users will adapt it to their own requirements.Introduction
Use the 'Documents' function to print particular documents or Forms in batches. To begin printing documents, select 'Documents' from the File menu or click the [Documents] button in the Master Control panel. You can also use the Ctrl-D (Windows) or ⌘-D (Macintosh) keyboard shortcut.
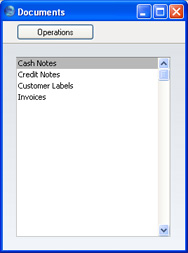
- Double-click the appropriate item in the 'Documents' list.
- A specification window will then appear, where you can determine the documents that you want to be printed (e.g. which Invoices are to be printed). The specification window for each document is described in detail on the pages describing each document.
- Click [Run] to print the documents.
- Close the 'Documents' window using the close box.
- For each option, design a Form (or change the sample Form supplied to reflect your own requirements) using the Forms setting.
- Open the 'Documents' window using the 'Documents' item on the File menu or by clicking the [Documents] button in the Master Control panel.
- Click once on each item in the list and select 'Define Document' from the Operations menu. In the subsequent window, assign a Form (or more than one Form) to each document: this window is fully described here.
- You only need use the 'Define Document' function once for each document. Afterwards, Form selection will be automatic.
It is often possible to report on a selection range, such as a range of Invoice Numbers. To do this, enter the lowest and highest values of the range, separated by a colon. For example, to report on Customers 001 to 010, enter "001:010" in the Customer field. Depending on the field, the sort used might be alpha or numeric. In the case of an alpha sort, a range of 1:2 would also include 100, 10109, etc.
Introduction
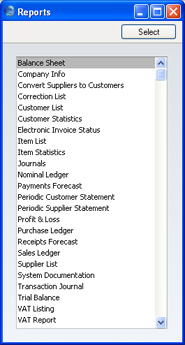
To print a report in FirstOffice, select 'Reports' from the File menu or click the [Reports] button in the Master Control panel. You can also use the Ctrl-R (Windows) or ⌘-R (Macintosh) Keyboard shortcut.
It is often possible to report on a selection range, such as a range of Customers, or a range of Items. To do this, enter the lowest and highest values of the range, separated by a colon (:). For example, to report on Customers 001 to 010, enter "001:010" in the Customer field. Depending on the field, the sort used might be alpha or numeric. In the case of an alpha sort, a range of 1:2 would also include 100, 10109, etc. Similarly, wherever a report period is required, enter the start and end dates, again separated by a colon (e.g. 01/01/2005:31/01/2005).
Use the Media options at the bottom of the specification window to determine the print destination of the report. The default is to print to screen. You can initially print to screen and subsequently send the report to a printer by clicking the Printer icon at the top of the report window. You can also print the report to disk as a text file. This will be useful if you want to format the report in your house style before printing.
When you have specified what is to be included in the report, click [Run] to print the report.
Introduction
You can export several different types of information from FirstOffice. You can incorporate the exported information in external programs such as spreadsheets, word processors etc. Apart from those created by the Back-up functions, all exports are output in simple text format, with fields separated by tabs.To produce an export file, select the 'Exports' item on the File menu or click the [Exports] button in the Master Control panel.

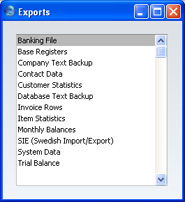
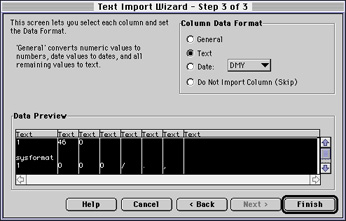
Be careful when opening a FirstOffice Export file with Microsoft Excel with the intention of editing it before importing it to a new database. Under certain circumstances, Excel will, when opening a text file, convert some variables that it interprets as dates into its own internal date format. Where you are expecting a date to appear in the spreadsheet you may see a number such as "35475". When you save the spreadsheet again as a text file these variables will not be converted back to date format. So, if you import this text file to FirstOffice, the dates will all be wrong. To avoid this problem, make sure you use the third step of Excel's Import Wizard to set all imported columns to 'text' format (highlight all the columns in the Data Preview area using the Shift key and select 'Text' as the Column Data Format).
Introduction
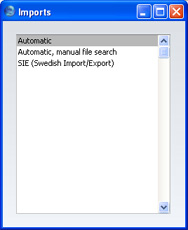
The 'Imports' function allows you to import information from tab-delimited text files exported by other FirstOffice databases or Companies, or from other applications such as spreadsheets. It also imports the encrypted back-up files created by the Company Text Backup and Database Text Backup Export functions.When you select the function using the 'Imports' item on the File menu, an 'Imports' list window appears:
Welcome to the FirstOffice Start manuals online
Please begin by clicking on a link on the left...HansaWorld FirstOffice Start is a powerful accounting system for the Windows, Linux and Macintosh platforms. The program is practically identical in the three environments, and is designed to make administration and accounting as easy and fast as possible. In the specific areas where there are significant differences, these are described and illustrated in full. In all other cases all illustrations are taken from the Windows XP version.
Text in square brackets - [Save], [Cancel] - refers to buttons on screen.
Information in this document is subject to change without notice and does not represent a commitment on the part of HansaWorld. The Software described in this document is a sophisticated information management system. Features are liable to alteration without notice. This documentation is not intended as a de facto representation of the system, but as an overview of its facilities. It cannot be exhaustive in all respects. Whilst effort is made to ensure the accuracy of the information published concerning the features and use of HansaWorld FirstOffice Start software, it is still possible that certain functions mentioned may not be fully implemented, may not be available under certain circumstances, or may possibly relate to a future release of the software. Errors and omissions excepted. HansaWorld accepts no contingent liabilities. All HansaWorld FirstOffice Start software related transactions are subject to HansaWorld's Conditions of Sale and Software Licence Agreement. All rights reserved.
Introduction to the Service Orders Module
The Service Orders module in Standard ERP is designed to be used in companies that provide repair services and that require an efficient tool to organise these services.To use the Service Orders module, you will first define each repair job is recorded as a separate record in the Service Order register. If your company is one that sells and repairs the same Items, the warranty status of repair items will be established automatically (providing as is recommended that you choose to keep the Known Serial Number register updated as this register will supply the warranty information to Service Orders). You can then issue instructions to technicians by creating Work Orders: the technicians will then record the labour and spare parts that they use in the Work Sheet register. This register integrates with the Stock module: marking Work Sheets as OK removes the spare parts used from stock and creates transactions in the Nominal Ledger to update the stock valuation if appropriate. You will be able to generate Purchase Orders for spare parts that are not in stock. Labour and spare parts information will also be transferred automatically from Work Sheets to the Work Sheet Transaction register, which specifies in detail how quantities and prices are to be invoiced and charged to each Service Order. Work Sheet Transactions are fully editable before the invoicing process. Invoices for repairs will be saved in the Invoice register in the Sales Ledger module, where they are treated as normal Invoices. You can also choose to record movements of repair items in and out of the workshops in a dedicated register.
Please refer to the following pages for details:
- Service Order Example and Work Flow
- Note on Terminology
- Settings
- The Service Order register
- The Work Order register
- The Work Sheet register
- The Service Stock Transaction register
- The Work Sheet Transaction register
- The Known Serial Number register
- Maintenance functions
- Forms
- Reports
- Imports
Go back to:
- Home page for Standard ERP manual
Introduction to the Expenses Module
The Expenses module allows you to administer the necessary expenses incurred by employees of the company in their day-to-day work. Using the Expenses module, you can maintain accounts for each employee, produce individual account statements and issue payments to employees for expense claims and other reasons. If you have the Job Costing module, you can record expenses against Projects, this allows you to include them in Project Invoices and in Project profitability calculations.---
The Expenses module in Standard ERP:
- Settings
- The Expense Register
- The Personnel Payment Register
- The Person Register and Expenses
- The Mileage Register
- The Daily Allowance Register
- Forms
- Reports
- Home page for Standard ERP manual
Introduction to the Cash Book Module in Standard ERP
The Cash Book module is an easy means of recording incoming and outgoing cash transactions. You can record each cash transaction individually, or you can enter the day's receipts as a single transaction, providing the same Sales and Cash or Bank Account applies to them all. Similarly, you can also enter the day's payments as a single transaction.---
The Cash Book module in Standard ERP:
- Integration with the Sales and Purchase Ledgers
- Settings
- Cash In and Cash Out registers
- Receipt register (also in the Sales Ledger)
- Payment register (also in the Purchase Ledger)
- Personnel Payment register (also in the Expenses module)
- Simulation register (also in the Nominal Ledger)
- Account Reconciliation (also in the Nominal Ledger)
- Forex Transaction register
- Maintenance
- Forms
- Reports
- Home page for Standard ERP manual
Introduction to the Report Generator in the Standard ERP system
The Report Generator module in Standard ERP allows you to design your own reports. This process includes:- providing search criteria in the report specification window to allow users to find the information that they need;
- searching for the information required by the user;
- specifying a sort order for the report;
- calculating subtotals and totals;
- designing the appearance of the report including the elements (column headings, fields, variables, subtotals and totals) that are to be printed, and where they are to be printed (header, body, footer); and
- choosing where the report is to be printed (e.g. to screen, printer or file).
- Fields and Variables
- Report Structure
- Creating a Report
- Organising Reports
- The Report Generator and SmartApps
- Home page for Home page for Standard ERP manual
Introduction
Managing your own business is often a rewarding undertaking, but with it come a number of obligations. One is the requirement to keep your accounts up to a certain standard. The legal requirements differ with the type of business and the country of operation, but regardless of these there can be great advantages in having your books in order. In this section some of the basic concepts used in accounting, and their integration into FirstOffice, are described.Introduction
Before starting work with FirstOffice, you should first have created a new database into which you have entered information about your company, the current Fiscal Year, a set of VAT Codes and a Chart of Accounts. If this is not the case, please turn back to the Starting FirstOffice section of these web pages before proceeding.Clientes y Proveedores
La información respecto a tu Clientes, Proveedores y otras empresas con quienes mantienes relaciones comerciales, está guardada en el registro Contactos el cual está disponible desde los módulos Ventas, Compras y otros. Básicamente, la razón de almacenar toda esta información en un solo registro, permite un uso pleno del Calendario, Administrador de Tareas, los Mails y las Cartas. Además podrás mantener un solo registro individual para una empresa que es Cliente y Proveedor a la vez.En estas páginas, el término “Cliente” generalmente se usa para referirse a un registro individual en el registro Contactos; mientras, el término “Proveedor” se usar par referirse a un “Proveedor” también en el registro Contactos. Por ejemplo, un Proveedor es aquel cuyo registro individual muestra la casilla ‘Proveedor” tildada (encabezado).
Desde el punto de vista de ventas, puedes agrupar Clientes similares usando las Categorías de Cliente. De este modo, cada Cliente perteneciente a una misma Categoría se someterá por defecto a una Lista de Precios y Cuenta Deudores. Por otro lado, las Categorías de Cliente también pemiten facilitar ciertas modificaciones para que solo tengas que realizar un cambio en la Categoría de Cliente en lugar de hacerlo en cada registro individual de Cliente. No obstante, si especificas algún dato en el registro individual de un Cliente, éste dato sobrescribirá cualquier dato especificado en su Categoría de Cliente. Por ejemplo, si especificas una Lista de Precios en el una Categoría de Cliente y especificas otra Lista de Precios en el registro individual de un Cliente perteneciente a esa Categoría, se utilizará la Lista de Precios especificada en el registro individual de Cliente.
Desde el punto de vista de compras, puedes agrupar Proveedores similares usando las Categorías de Proveedor. De este modo, cada Proveedor perteneciente a una misma Categoría se someterá a una misma Cuenta Acreedores. Nota: Una empresa que constituye tanto un Cliente como un Proveedor, puede pertenecer respectivamente a una Categoría de Cliente y a una Categoría de Proveedor.
Como sabrás, antes los Clientes y Proveedores se almacenaban en registros separados. Por tanto, deberás utilizar la función de Mantenimiento ‘Convertir Proveedores a Contactos’ (módulo Técnico) para extraer la información que anteriormente se almacenaba en dos registros. (Ver página Cómo Uniformizar los Códigos de Clientes y Proveedores).
Introduction to Items and Pricing
The Item register contains information about the products and services that you sell. It is accessible from the Sales Support, Stock and Sales Ledger modules.You can group Items of a similar type together using Item Groups. You can give every Item belonging to the same Group the same default Sales and Cost Accounts, Credit Account and VAT Codes, saving you the work of having to specify these for all Items individually. Defining and assigning Item Groups also makes modification easier: if you need to assign a different Cost Account, for example, you only need make one change (to the Item Group), rather than many (to each of the Items).
If information is specified both for an Item Group and for an Item that belongs to that Group, the information entered for the Item will take precedence.
Introducción al Módulo Sistema
Este módulo posee opcionoes y registros que son usados de forma colectiva por los demás módulos, incluyendo el Plan de Cuentas. Además, es el punto donde se realiza la administración de los usuarios, incluyendo la asignación de accesos a los demás módulos.Introduction to the Sales Ledger
This module is the primary tool for the handling of accounts receivable, and all that is associated with the Invoices the company sends to its Customers. The Sales Ledger interacts with several of FirstOffice's modules: it receives Invoices from the Sales Order register, and it creates and sends accounting transactions to the Nominal Ledger module.Introducción al Módulo Compras
Este módulo es la herramienta principal para el manejo de las cuentas por pagar, y de todo aquello asociado con las Facturas de Compra que recibe de sus Proveedores.Introducción al Módulo Contabilidad
El módulo de Contabilidad es su herramienta para realizar la contabilidad básica, presupuestos, pronósticos y análisis.Introduction to the Sales Support Module
Use the Sales Support module to record and administer the Orders that you receive from Customers, including issuing Deliveries and raising Invoices. The module is integrated with the Sales Ledger (Orders are converted to Invoices) and with the Stock module (Deliveries are created from Orders).Introduction to the Stock Module
The Stock module allows you to record deliveries to and from stock. It interacts with the Sales Support module, with the Sales Ledger and the Nominal Ledger. The Delivery register is always updated from the Sales Order register.All shipments in and out of stock are recorded as transactions in the Stock module. In addition and if required, FirstOffice can automatically update stock valuations in the Nominal Ledger. Several reports give information about the contents and value of your stock.
Introduction
The Calendar and Task Manager are simple and efficient tools for keeping track of contacts with Customers and for planning activities of all kinds. You can use them to record the different tasks and events in the business day, such as customer contacts for sales, service support, consultancy appointments etc. In FirstOffice, each task and event is saved as a separate record in the Activity register. The Calendar and the Task Manager allow you to view, review and change your Activities, and to add new ones. You can use the Activity register as a planning and monitoring tool for a sales force, or as a tool to log telephone calls to a customer service centre, and in many other ways. As with all FirstOffice features, there is a great deal of flexibility, and different users will adapt it to their own requirements.Introduction to Value Packs
Value Packs allow you to add extra features to the basic FirstOffice program. The following Value Packs are available:- Bar Code
- CRM and Mail
- Currencies, Languages and Advanced Pricing
- Dual Base Currencies
- Group Invoicing
- Internet Server, One Internet User
- Three Additional Internet Users
- Purchase Orders
- Quotations
- Stock Locations
You can add a Value Pack to FirstOffice at any time by following these steps:
- If you have a multi-user installation, you can work on the server or on one of the clients.
If you want to work on the server and it is running, ensure no other user is logged in, select 'Quit, Remove Autoserver' from the File menu and restart FirstOffice.
- Use the [Select Module] button in the Master Control panel to change to the System module.
- Click the [Settings] button in the Master Control panel (or select 'Settings' from the File menu). In the resulting list, double-click 'Configuration'.
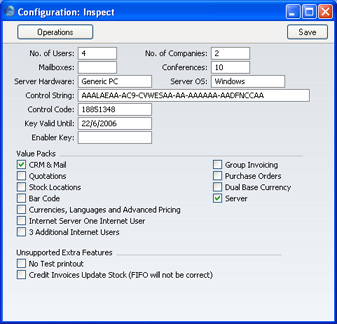
- Check the required Value Pack option(s) and click the [Save] button in the Button Bar to save changes and close the window.
- In single-user installations, quit FirstOffice and restart to allow the changes to take effect.
- In multi-user systems, if you were working on a client, quit FirstOffice and restart to allow the changes to take effect. There is no need to restart the server.
If you were working on the server, select 'Server' using the [Select Module] button in the Master Control panel.
In both cases, the clients can now log in again: they will now have access to the Value Pack(s). If you need to prevent individual users from using Value Packs, you should do so using Access Groups.
- Refer to the Enabler Key page for instructions about applying for a new Enabler Key.
Introduction to the Advanced Pricing Value Pack
The standard version of FirstOffice allows you to define various Price Lists and to allocate those Price Lists to different Customers so that the correct Prices are used when you enter Orders and Invoices. When you specify a Customer in an Order or Invoice, the Price List for that Customer will be activated. When you then add an Item to the Order or Invoice, FirstOffice finds the correct Price by searching in the Price register for the unique record for the Price List/Item combination.The Advanced Pricing Value Pack (part of the Currencies, Languages and Advanced Pricing Value Pack) contains the following features:
- Automatic Price calculation, removing the need to enter records to the Price register manually, and greatly easing the task of updating Prices; and
- Quantity discounts.
Introduction to the CRM Value Pack
The Customer Relationship Manager (part of the CRM and Mail Value Pack) adds various features to Activities, the Calendar and the Task Manager to help you keep track of contacts with Customers. It also contains the Customer Letter register, which you can use to organise and produce mailshots.Introduction to the Currencies Value Pack
FirstOffice offers two Currency conversion methods in two separate Value Packs. You can use either of these methods exclusively, or you can use them in combination, depending on your requirements.- The simple conversion from a foreign Currency to the home Currency, applicable to the majority of worldwide Currency transactions. This is part of the Currencies, Languages and Advanced Pricing Value Pack.
- The dual-base triangulation system, termed the "Dual-Base system" in these web pages. This is provided by the Dual Base Currency Value Pack. Users of this system fall into two categories:
- Voluntary
- The Dual-Base system will be useful for companies that have offices in two countries that need to report in both Currencies, for companies operating in countries where there is a second Currency (usually the US Dollar or Euro) in common use in addition to the national one, and for companies in the Euro zone who retain their old national Currency for comparison purposes.
- Transitional
- The Dual-Base system will also be useful in countries passing through the transitional process of replacing their home Currencies with the Euro. A requirement of this process is that all transactions should be expressible in both the home Currency and the Euro. Direct conversions from the home Currency to any foreign Currency except the Euro are not possible. Instead, the home Currency should first be converted to the Euro, and there should then be a second conversion to the foreign Currency.
- At the time of writing, there were no countries undergoing the transitional process, but future enlargement of the EU was imminent. Therefore, where the transitional process is illustrated in these web pages, historical data from a hypothetical company in Holland is used. In this company, the home Currency is NLG (Dutch Guilders) and foreign Currency sales are in FIM (Finnish Markka).
"Transitional" users should use the Dual-Base system exclusively, in order to comply with European Monetary Union (EMU) rules, while "voluntary" users can be more flexible, using Dual-Base and simple conversion systems in combination as required.
Companies outside the Euro zone but trading with it have the choice of using the simple conversion system or the Dual-Base system. This choice will depend on the volume of trade with the Euro zone and on whether they need the ability to produce all reports in both the home Currency and the Euro. Such a use of the Dual-Base system falls into the "voluntary" category described above.
Similarly companies outside the Euro zone and trading with "transitional" countries can choose whether to use the simple conversion system or the Dual-Base system.
- Voluntary
Introduction to the Group Invoicing Value Pack
The Group Invoicing Value Pack adds one Maintenance function to the Sales Support module. This function allows you to create Invoices in batches. It finds all approved but uninvoiced Deliveries and creates appropriate Invoices, which are saved in an unapproved state. Each Invoice will contain a reference to the Order to which it pertains. If several Deliveries to the same Customer, perhaps from different Orders, require invoicing, they will be grouped together on a single Invoice, providing those Orders have the same Payment Terms. Otherwise, a separate Invoice will be created for each Payment Term used. You can approve all Invoices thus created in a single step, by highlighting them in the 'Invoices: Browse' window and selecting 'OK' from the Operations menu. Remember that if you wish to change any of the Invoices, you must do so before they are approved. You can also print the Invoices in a single batch, using the 'Documents' function on the File menu or the [Documents] button in the Master Control Panel having first selected 'Sales Ledger' using the [Select Module] button in the Master Control panel. Please click for more details about approving and printing Invoices.Selecting the 'Group Invoicing' function brings up the following dialogue box:
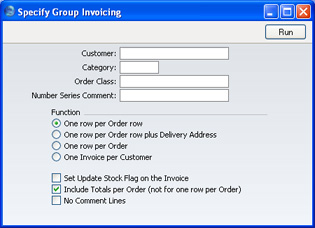
Click [Run] to run the function. It may take a few moments, depending on the number of Invoices to be created. When it has finished, you will be returned to the 'Maintenance' list window.
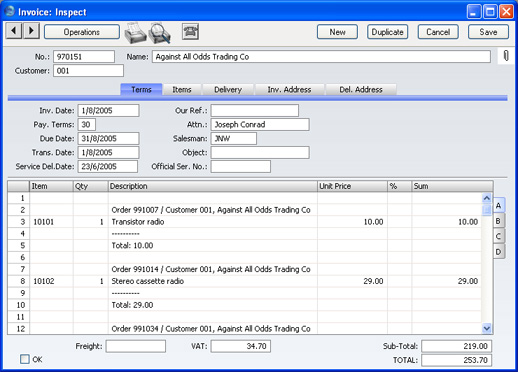
An example of an Invoice created with this function is shown below.
Introduction to the Languages Value Pack
The Languages part of the Currencies, Languages and Advanced Pricing Value Pack allows you to print documents such as Orders, Invoices and Quotations in the Language of the Customer or Supplier, with appropriate translations of Item names, Payment Terms, etc, and using different Forms.To set up such a system, follow these steps:
- Enter the Languages used in your business using the Languages setting in the System module.
- For each Customer and Supplier, enter the appropriate Language to the field on the 'Company' card of the Customer screen, using 'Paste Special' if necessary.
- Enter translations as necessary in the following settings and registers: Items, Delivery Modes, Delivery Terms, Payment Terms and Units.
- Using the Form register in the System module, design as many Forms as necessary in the various Languages. These should include Orders, Invoices of all kinds (including Proforma and Interest Invoices), Delivery Notes, Remittance Advices, Quotations (if you also have the Quotations Value Pack) and Purchase Orders (if you also have the Purchase Orders Value Pack).
- Using the 'Define Document' function in each module, specify when each Form is to be used.
Introduction to the Mail Value Pack
FirstOffice's Mail facilities (part of the CRM and Mail Value Pack) allow users in multi-user systems to:- send Mail to other users in your FirstOffice system, with or without attached files or FirstOffice records;
- send Mail to Conferences, where it can be read by every user;
- update Mail that has been sent by other users;
- send and receive e-mail (electronic mail is also termed "External Mail" in these web pages, signifying that its original source or final destination is outside the FirstOffice Mail system); and
- chat with other users.
Introduction to the Purchase Orders Value Pack
The Purchase Orders Value Pack adds the necessary settings and registers to the Stock module to allow you to enter and print your Purchase Orders, for sending to Suppliers. There is also a separate item register for Purchase Items. This register can be made to cooperate with the normal Item register in the Sales Support and Sales Ledger modules.Introduction to the Quotations Value Pack
Use the Quotations Value Pack to create Quotations for sending to Customers and subsequently to convert the Quotations to Orders or Invoices. It can be used for call management: you can specify Contact Dates for each Quotation, making it easy to produce lists of calls to be made on a particular date.The Quotations Value Pack is part of the Sales Support module and is fully integrated with the Sales Ledger.
Introduction to the Stock Locations Value Pack
This Value Pack allows you to keep stock in different Locations.To start using this Value Pack, all you need do is define your Stock Locations in the Location register in the Stock module. You can then specify a Location both when receiving goods into stock and when delivering. A new Stock Movement register allows you to move Items from one Location to another. Any costs incurred in a Stock Movement will be recorded in the Nominal Ledger. Stock quantities and values for Items are maintained both per Location and in total.
Welcome to the FirstOffice Professional manuals online
Please begin by clicking on a link on the left...HansaWorld FirstOffice Professional is a powerful accounting system for the Windows, Linux and Macintosh platforms. The program is practically identical in the three environments, and is designed to make administration and accounting as easy and fast as possible. In the specific areas where there are significant differences, these are described and illustrated in full. In all other cases all illustrations are taken from the Windows XP version.
Text in square brackets - [Save], [Cancel] - refers to buttons on screen.
Information in this document is subject to change without notice and does not represent a commitment on the part of HansaWorld. The Software described in this document is a sophisticated information management system. Features are liable to alteration without notice. This documentation is not intended as a de facto representation of the system, but as an overview of its facilities. It cannot be exhaustive in all respects. Whilst effort is made to ensure the accuracy of the information published concerning the features and use of HansaWorld FirstOffice Professional software, it is still possible that certain functions mentioned may not be fully implemented, may not be available under certain circumstances, or may possibly relate to a future release of the software. Errors and omissions excepted. HansaWorld accepts no contingent liabilities. All HansaWorld FirstOffice Professional software related transactions are subject to HansaWorld's Conditions of Sale and Software Licence Agreement. All rights reserved.
Introduction to the Sales Orders Module
Use the Sales Orders module to record and administer the Orders that you receive from Customers, including issuing Deliveries and raising Invoices. The module is integrated with the Quotations module (you can convert Quotations into Orders), with the Sales Ledger (you can raise Invoices from Orders), with the Stock module (you can issue Deliveries from Orders, which will remove the delivered Items from stock), and with the Job Costing module (you can ship Items from the Sales Orders module and charge them to Projects).Introduction to the Sales Ledger in Standard ERP
The Sales Ledger module in Standard ERP is where you should create and record the Invoices and Credit Notes that you issue to your Customers, and where you can record both the payments that you receive against those Invoices and deposits that you are paid to secure the future delivery of Items. Reports such as the Sales Ledger report, the Open Invoice Customer Statement and the Periodic Customer Statement will use this information to display the credit position of each Customer in real time, while the Receipts Forecast report will use it to help with payment scheduling and cashflow forecasting.The Sales Ledger is fully integrated with the Nominal Ledger. Transactions generated from Invoices will debit the Debtor Account and credit the Sales and Output VAT Accounts, while Transactions generated from Receipts (recording the payments that you receive from your Customers) will credit the Debtor Account and debit the Bank or Cash Account. The Sales Ledger is also fully integrated with the Sales Orders module, permitting a seamless sales order process workflow in which Invoices can be created from and will remain connected to Sales Orders for goods delivered. You can also create Invoices from many other registers, including Contracts, Projects, Quotations and Service Orders.
---
In this section:
- Settings
- Invoices
- Receipts
- Gift Vouchers
- Loyalty Cards
- Maintenance functions
- Forms/Documents
- Reports
- Export functions
- Home page for Standard ERP by HansaWorld manual
Introducción al Módulo Contabilidad en Standard ERP
El módulo de Contabilidad es el núcleo de un sistema contable. Es donde se registrará cada evento contable que ocurra en la vida del negocio. Cada evento contable estará representado por un registro de un Asiento Contable. Un Asiento Contable puede ser ingresado directamente a la Contabilidad, o puede ser creado a partir de otro registro como una Factura o un Recibo o a partir de una transacción de Stock. La información contenida en las Transacciones se utilizará para elaborar los informes anuales, como el Balance, el Estado de Resultados y el Balance de Prueba. También puede utilizar esta información para la elaboración de presupuestos, previsiones y análisis.---
El módulo Contabilidad en Standard ERP:
- Opciones
- Registro Asientos
- Registro Simulaciones
- Conciliación de Cuenta
- Registro Presupuesto
- Registro Presup. Revisado
- Registro Saldos Iniciales
- Reconciliación de Bancos
- Mantenimientos
- Formularios
- Informes
- Importaciones
- Exportaciones
- Página Principal para manual Standard ERP
Introduction to the Working Environment in Standard ERP
When you create a database or open an existing one, the Standard ERP desktop will appear, with the Navigation Centre in the centre of the screen. You can use the icons in this panel as shortcuts to different parts of the program.You can carry out most operations in Standard ERP using up to three different methods:
- Selecting an option from a menu
- Clicking a button in the Navigation Centre panel
- Using a keyboard command
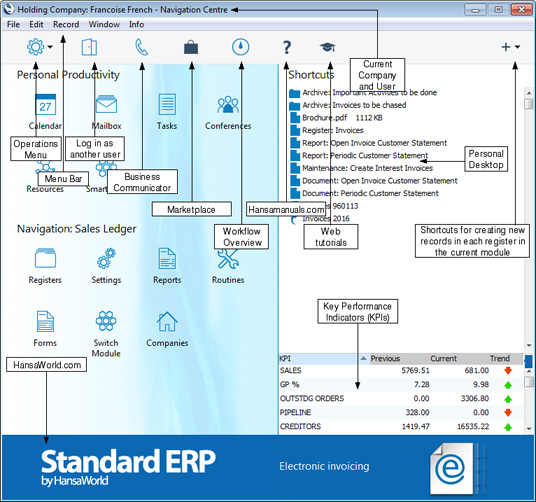
- The Navigation Centre
- Windows
- Menus
- Modules and Registers
- Working with Records
- Working with Companies
- Keyboard Shortcuts
Introduction to the System Module in Standard ERP
The System module in Standard ERP contains settings and registers used collectively by the other modules, including the Chart of Accounts and Tags/Objects. It is also where you can set up and administer access rights and User Accounts.Please refer to the following pages for details:
- Settings
- Companies
- Persons (User Accounts)
- Chart of Accounts
- Tags/Objects
- Form Templates
- Maintenance functions
- Reports
- Imports
- Exports
Go back to:
- Home page for System Module manual
- Home page for Standard ERP manual
Ievads programmā Pirmais Ofiss
Rokasgrāmatas sadaļas lasiet, noklikšķinot uz saitēm lapas kreisajā pusē.HansaWorld Pirmais Ofiss ietver efektīvu grāmatvedības uzskaites sistēmu Windows, Macintosh un Linux vidēm. HansaWorld programmas ir izveidotas tā, lai administrēšanas un grāmatvedības procedūru veikšana būtu iespējami vienkārša un ātra. To darbība ir līdzīga uz visām platformām. Visos gadījumos tiks izmantoti Windows operētājsistēmas attēli.
Teksts kvadrātiekavās - [Saglabāt], [Atcelt] - apzīmē loga pogas nosaukumu.
Šīs rokasgrāmatas informācija var tikt mainīta bez iepriekšēja brīdinājuma un “HansaWorld” par to neuzņemas atbildību. Aprakstītā programma ir sarežģīta informācijas vadības sistēma. Programmas funkcijas var tikt mainītas bez iepriekšēja brīdinājuma. Rokasgrāmata nav paredzēta kā sistēmas faktiskais atainojums, bet gan kā tās iespēju pārskats. Tā var nesaturēt pilnīgi izsmeļošu informāciju visos aspektos. Kaut arī tiek darīts viss, lai publicētā informācija par programmas funkcijām un HansaWorld programmas izmantošanu būtu precīza, pastāv iespēja, ka dažas aprakstītās funkcijas vēl pilnībā nav ieviestas vai noteiktos apstākļos nav pieejamas, vai arī attiecas uz programmas nākamo versiju uzlabojumiem. Rokasgrāmatas saturs un/vai priekšmeta spēkā esamība var tikt mainīta bez iepriekšēja brīdinājuma. “HansaWorld” neuzņemas iespējamo atbildību. Visi ar HansaWorld programmām saistītie darījumi ir pakļauti "HansaWorld” pārdošanas noteikumiem un programmas licences līgumam. Visas tiesības rezervētas.
Ievads darba vidē
Atverot vai izveidojot datu bāzi, tiks parādīta Pirmā Ofisa darba virsma, kuras centrā atrodas Bāzes logs. Tā ikonas tiek izmantotas ātrai pieejai dažādām vietām programmā.Vairumu operāciju Pirmajā Ofisā var veikt trijos dažādos veidos:
- Izvēloties funkciju no izvēlnes;
- Bāzes logā noklikšķinot uz ikonas;
- Izmantojot taustiņu kombinācijas.
Ievads darba sākšanā Pirmajā Ofisā
Ja esat secīgi pildījuši rokasgrāmatas norādījumus, tad šobrīd Pirmajā Ofisā jābūt izveidotai jaunai datu bāzei, kurā ievadīta informācija par kompāniju, pašreizējais finanšu gads, PVN kodu plāns un kontu plāns. Ja tā nav, atgriezieties sadaļā Pirmā Ofisa startēšana.Ievads par kontaktiem
Informācija par klientiem un piegādātājiem tiek glabāta reģistrā Kontakti.Programmas Pirmais Ofiss rokasgrāmatās termins "klients" tiek izmantots, lai aprakstītu reģistra Klienti kartiņu pārdošanas kontekstā, bet terminu "piegādātājs" izmanto pirkšanas kontekstā. "Piegādātājs" nozīmē to, ka klienta kartiņas augšējā daļā ir atzīmēta izvēles rūtiņa 'Piegādātājs'.
Līdzīga tipa klientus var grupēt sagatavošanā Klientu kategorijas. Visiem vienas kategorijas klientiem var piesaistīt vienu cenu lapu un debitoru kontu, kas rēķinos tiks ievietoti pēc noklusējuma, tādējādi ietaupot laiku to norādīšanai katram klientam atsevišķi. Klienta kategorijas definēšana un piesaistīšana vienkāršo arī attiecīgo parametru mainīšanu, piemēram, ja nepieciešams piešķirt citu debitora kontu, jāveic tikai viena izmaiņa (klientu kategorijai), nevis daudzas (katram klientam). Ja informācija ir norādīta gan klientu kategorijai, gan šīs kategorijas klientam, priekšroka tiks dota klienta kartiņā ievadītajai informācijai.
Līdzīgi iegādes pusē iespējams sagrupēt piegādātājus, izmantojot sagatavošanu Piegadātāju kategorijas. Visiem vienas grupas piegādātājiem var piesaistīt kopīgu noklusējuma kreditoru kontu. Uzņēmums, kas ir gan klients, gan piegādātājs, var ietilpt gan sagatavošanā Klientu kategorijas, gan Piegādātāju kategorijas.
Šajā nodaļā vispirms aprakstīta klientu kategoriju definēšana. Pēc tam tiks sniegts detalizēts reģistra Klienti un ar klientiem saistīto atskaišu apraksts.
Programmas iepriekšējās versijās klientu un piegādātāju kartiņas tika glabātas atsevišķos reģistros. šajā versijā abi reģistri ir apvienoti vienā. Pārejot uz šo vai jaunāku versiju, izmantojiet Sistēmas moduļa Apkalpošanas funkciju 'Konvertēt piegādātājus par klientiem', lai apvienotu abu reģistru informāciju. Sīkāku aprakstu skatiet sadaļā Klientu un piegādātāju apvienošana.
Ievads par artikuliem
Reģistrā Artikuli tiek glabāta informācija par piedāvātajām precēm un pakalpojumiem. Tas atrodas Realizācijas un Noliktavas modulī.Līdzīgus artikulus var grupēt artikulu grupās. Visiem vienas grupas artikuliem pēc noklusējuma var piešķirt vienādus realizācijas, izmaksu, kreditoru kontus un PVN kodus, ietaupot laiku to ievadīšanai atsevišķi katram artikulam. Artikulu grupu definēšana un piešķiršana vienkāršo izmaiņu veikšanu, piemēram, ja nepieciešams piešķirt citu izmaksu kontu, jāveic tikai viena izmaiņa (artikulu grupai), nevis daudzas (katram artikulam).
Ja informācija ir norādīta gan artikulu grupai, gan artikulam, kas iekļauts šajā grupā, vērā tiks ņemta tikai tā, kas norādīta atsevišķi artikulam.
Ja informācija norādīta gan par artikulu grupu, gan tai piederošu artikulu, programmā priekšroka tiks dota artikula kartiņā ievadītajiem datiem.
Ievads valūtu uzskaitē
Pirmais Ofiss piedāvā divas valūtu konvertēšanas sistēmas. Katra konvertēšanas metode ir izmantojama atsevišķi vai kopā atkarībā no uzņēmuma vajadzībām.- Vienkāršajā konvertēšanas sistēmā notiek ārvalstu valūtas konvertēšana nacionālajā valūtā, un tā ir piemērojama vairumam pasaules valstu valūtu grāmatojumiem.
- Divu bāzes valūtu trīspusējā sistēma, šajā rokasgrāmatā saukta par “Divu bāzes valūtu sistēmu”. Šīs sistēmas lietotāji ir iedalāmi divās kategorijās:
- Brīvprātīgie
- Divu bāzes valūtu sistēma būs noderīga uzņēmumiem, kuru biroji atrodas divās valstīs un kuriem jāveido atskaites abās valūtās, kā arī to valstu uzņēmumiem, kurās papildus nacionālajai valūtai parasti tiek lietota arī otra valūta (parasti dolāri vai eiro), un Eiropas Savienības valstu uzņēmumiem, kuri salīdzināšanai izmanto savu iepriekšējo nacionālo valūtu.
- Pārejas valstu
- Divu bāzes valūtu sistēma būs noderīga arī tajās valstīs, kuras gatavojas pāriet no nacionālās valūtas uz eiro. Pārejas procesā ir izvirzīta prasība visus grāmatojumus veikt abās valūtās – nacionālajā un eiro. Šajā sistēmā nav iespējams veikt tiešu konvertēšanu no nacionālās valūtas citā ārvalstu valūtā, izņemot eiro. Nacionālā valūta vispirms jākonvertē eiro, un pēc tam to var konvertēt citā ārvalstu valūtā.
- Rokasgrāmatas sastādīšanas laikā vēl neviena valsts negatavojās pāriet uz eiro (neatradās pārejas procesā), bet to bija paredzēts veikt tuvāko gadu laikā. Tāpēc tiks aprakstīts, kā notiks pārejas process un tiks izmantoti dati no kādas Latvijas kompānijas. Šajā kompānijā nacionālā valūta ir LVL (Latvijas lati), bet ārvalstu valūta ir EUR (eiro).
Pārejas valstu sistēmas lietotājiem jāizmanto divu bāzes valūtu sistēma tikai tāpēc, lai saskaņotu grāmatvedību ar Ekonomiskās un monetārās savienības (EMS) noteikumiem, bet brīvprātīgie lietotāji var izmantot divu bāzes valūtu sistēmu daudz elastīgāk, turklāt tie var lietot abas sistēmas vienlaicīgi.
Uzņēmumi ārpus Eiropas Savienības, kuriem ir tirdzniecības sakari ar Eiropas Savienības valstu uzņēmumiem, var izvēlēties, kuru sistēmu lietot. Izvēle būs atkarīga no tirdzniecības apjoma un nepieciešamības veidot atskaites gan nacionālajā valūtā, gan eiro. Šādā gadījumā šie uzņēmumi pieder iepriekš aprakstītajai brīvprātīgo sistēmas lietotāju kategorijai.
Izvēlēties valūtu sistēmu var arī uzņēmumi ārpus Eiropas Savienības, kuriem ir tirdzniecības sakari pārejas valstīs.
- Brīvprātīgie
Ievads Realizācijas modulī
Šis modulis ir galvenais līdzeklis realizācijas uzskaitei un visam, kas ir saistīts ar klientu maksājumiem un klientiem izrakstītajiem rēķiniem. Realizācijas modulis ir saistīts ar vairākiem citiem moduļiem, tas veido un nosūta grāmatojumus uz Finanšu moduli.Introduction to the Stock Module in Standard ERP
The Stock module records every shipment in and out of stock. It interacts with the Sales and Purchase Orders modules, with the Sales Ledger, the Job Costing and Production modules and the Nominal Ledger. The Delivery register will always be updated from Sales Orders, but you can also update stock levels from Sales Invoices and Work Sheets. You can enter Goods Receipts directly to the Goods Receipt register, and you can also create them from Purchase Orders. There are registers you can use to depreciate stock (for example, to remove Items from stock because they have been lost), and to revalue some or all of your stock. You can keep stock in different and independent Locations, and you can move stock between Locations. Several reports give information about the contents and value of your stock.As well as recording stock levels and values of each Item, you can maintain a stock valuation in the Nominal Ledger. Every register in the Stock module can be integrated with the Nominal Ledger, posting to a Stock Account and to a Purchase Accruals Account, Cost of Sales Account, Returned Goods Account or Stock Loss Account as appropriate.
The Stock module was rewritten in version 5.1 of the application. As far as daily use of the Stock module is concerned, this rewriting will cause little or no difference. Most of the changes are behind the scenes, in the way information is stored. If you were using the application prior to this version, you will need to rebuild your stock information before you can start using the Stock module. Please refer to the description of the 'Rebuild Stock' Maintenance function for details.
---
In this section:
- Cost Accounting
- Settings
- Deliveries
- Goods Receipts
- Stock Depreciations
- Stock Movements
- Returned Goods
- Returned Goods to Suppliers
- Stocktaking
- Stock Revaluations
- Maintenance functions
- Forms/Documents
- Reports
- Export functions
- Home page for Standard ERP manual
Ievads Piegādātāju modulī
Šis modulis tiek izmantots neapmaksāto rēķinu uzskaitei un visu to darbību veikšanai, kas saistītas ar ienākošajiem rēķiniem, ko uzņēmums saņem no piegādātājiem.Introduction to the Sales Orders Module
Use the Sales Orders module to record and administer the Orders that you receive from Customers, including issuing Deliveries and raising Invoices. The module is integrated with the Quotations module (you can convert Quotations into Orders), with the Sales Ledger (you can raise Invoices from Orders), with the Stock module (you can issue Deliveries from Orders, which will remove the delivered Items from stock), and with the Job Costing module (you can ship Items from the Sales Orders module and charge them to Projects).Ievads Kases modulī
Kases modulis piedāvā vienkāršu kases ieņēmumu un izdevumu reģistrācijas sistēmu. Katru kases grāmatojumu var ievadīt atsevišķi vai arī visus katras dienas kases ieņēmumus var ievadīt kā vienu grāmatojumu tā, lai uz visiem tiktu attiecināts viens realizācijas un kases vai bankas konts. Līdzīgi vienas dienas maksājumus var ievadīt kā vienu grāmatojumu.Ievads Avansa norēķinu modulī
Šis modulis tiek izmantots, lai reģistrētu uzņēmuma darbinieku ikdienas darbā nepieciešamos avansa norēķinus. Tajā katram darbiniekam tiek uzturēts savs konts, ir iespējams izveidot atsevišķus bankas kontu izrakstus un izmaksāt avansus. Ierakstu veidošana modulī Avansa norēķini notiek līdzīgi kā reģistrā Ienākošie rēķini: tos var ievadīt atsevišķi pa artikuliem.Ievads Pamatlīdzekļu modulī
Šis modulis ļauj pamatlīdzekļus saistīt ar kontiem.Modulī notiek katra pamatlīdzekļa norakstīšanas aprēķināšana atkarībā no tā vērtības un lietotāja noteiktajiem norakstīšanas noteikumiem. Pārsūtīt norakstīšanu uz Finanšu moduli var, atskaitēs redzamās summas ievadot manuāli.
Šajā modulī izveidotās atskaites ietaupa daudz laika, gatavojot galīgos aprēķinus. Tās var izmantot, lai aprēķinātu arī peļņu vai zaudējumus no pamatlīdzekļa realizācijas.
Introduction to SmartApps by HansaWorld - Mobile Data Collection Software
HansaWorld SmartApps is a database tool that allows you to create your own applications for use on the Nokia E90. Example applications might include workforce automation, data collection and on-line reporting. Functions and features include automatic synchronisation in both directions between E90s, or between an E90 and a desktop computer, the ability to create and attach photographs (.jpg files) and sound files (.wav files) to records inside SmartApps applications, report generation, and integration with the E90's barcode scanner.The descriptions of HansaWorld SmartApps on a desktop PC or Mac in these web pages assume familiarity with HansaWorld Enterprise concepts and features such as registers, records, Master Control panel, record windows, browse windows, attachments and the 'Paste Special' feature. If you need more information about these subjects, please refer to the sections of these web pages describing the Work Area.
These web pages are organised as follows:
- Starting HansaWorld SmartApps for the First Time on a Desktop Computer
- Creating SmartApps Applications
- Using an App on a Desktop Computer
- Using an App on a Nokia E90
- Importing Information to an App
- Synchronising Databases
- Backing up HansaWorld SmartApps on a Desktop Computer and Updating to new versions
See also:
- Product page for SmartApps - mobile data collection software by HansaWorld
Intro. al Módulo Órdenes de Compra
Este módulo te permite ingresar e imprimir Órdenes de Compra para su respectiva remisión a tus Proveedores. Dentro de este módulo existe un registro separado para Ítems de Compra, en el cual puedes registrar los precios costo y los plazos principales de distintos Proveedoes frente a un mismo Ítem. Este registro converge plenamente con el registro de Ítems normales en las Órdenes de Compra y Mercaderías Recibidas.También este módulo te permite producir listas de faltantes, sugerencias de compras, diarios de Órdenes y otros informes.
Puedes generar Órdenes de Compra en grupo, ya sea para complementar Órdenes de Venta pendientes o para reponer Ítems que han caído por debajo de su Nivel Mínimo de Stock.
Ievads Noliktavas modulī
Šajā modulī tiek reģistrētas visas noliktavā saņemtās preces un no noliktavas nosūtītās preces. Noliktavas modulis ir saistīts ar Realizācijas un Finanšu moduli. Reģistrs Nos. preces vienmēr tiek atjaunināts saskaņā ar reģistru Klientu pasūtījumi.Visas noliktavas operācijas Noliktavas modulī tiek reģistrētas kā grāmatojumi. Ja nepieciešams, Pirmais Ofiss var automātiski pārrēķināt krājumu vērtības Finanšu modulī. Dažas atskaites sniedz informāciju par noliktavas saturu un vērtību.
Introduction to the Report Generator in the Standard ERP system
The Report Generator module in Standard ERP allows you to design your own reports. This process includes:- providing search criteria in the report specification window to allow users to find the information that they need;
- searching for the information required by the user;
- specifying a sort order for the report;
- calculating subtotals and totals;
- designing the appearance of the report including the elements (column headings, fields, variables, subtotals and totals) that are to be printed, and where they are to be printed (header, body, footer); and
- choosing where the report is to be printed (e.g. to screen, printer or file).
- Fields and Variables
- Report Structure
- Creating a Report
- Organising Reports
- The Report Generator and SmartApps
- Home page for Home page for Standard ERP manual
Introduction to Standard ERP
Standard ERP is an integrated accounting, CRM and ERP tool for working with Sales Order Processing, Stock Control and the Sales, Purchase and Nominal Ledgers, and for keeping track of contacts with Customers, organising mailshots and for planning activities of all kinds.Standard ERP is a modular system. The number of modules available to a user varies with the installation. The minimum configuration (the Accounting package) comprises the System module, the Nominal, Sales and Purchase Ledgers with Multi-Currency capability, and a Calendar and Task Manager that you can use for contact management. To this, the Logistics package adds the Sales Order, Purchase Order and Stock modules. You can add further modules as required, including the Server module that is required in multi-user installations.
The Calendar and Task Manager allow you to record the different tasks and events in the business day, such as customer contacts for sales, service support, consultancy appointments etc. Each task or event is known as an "Activity". You can view, review, change and add Activities at any time, using them as a planning and monitoring tool for a sales force, or as a tool to log telephone calls to a customer service centre, and in many other ways.
Standard ERP contains full internal mail, email and conferencing facilities. These features, together with the External Gateway and web server, mean that users can be online from anywhere at anytime. This means that employees can always be in touch with each other. The program also supports communications methods such as Skype, Asterisk-based SIP (Session Initiation Protocol) and SMS text messaging. Using the Business Communicator window, you can initiate outgoing communications using any of these methods from a single screen. Whichever communications method you use, you can record details about each incoming and outgoing communication as you talk, enabling you to build up a comprehensive communication history about each caller or contact person.
In this introductory section, we will describe the steps you need to follow to get started with Standard ERP. Topics covered include installation (both single- and multi-user) and the creation of a new database (again, both single- and multi-user).
Introduction to Customers, Suppliers and Contact Persons in Standard ERP
Information about your Customers, Suppliers, Contact Persons and all other companies and individuals with whom you have some contact is stored in the Contact register. This register is available in many modules including the Sales and Purchase Orders, the Sales and Purchase Ledgers, and Contracts, Quotations, CRM and Service Orders if installed. Storing Customers, Suppliers, Contact Persons and other companies together in one register means that you can make full use of the Calendar, Task Manager, Mails and Letters with companies and individuals of all kinds. It also means that you will only have to maintain a single record for a company who is both a Customer and a Supplier.Throughout these web pages, the terms "Customer" and "Supplier" both refer to records in the Contact register. Those records do not necessarily represent firms that have purchased goods or services from your business, or sold goods or services to you, and in fact can represent any company that is a potential customer or supplier.
The term "Customer" is usually used when describing the use of a record in the Customer register in a sales context, while "Supplier" is used in a purchase context. "Customer" implies that the Customer box in the header of the Contact record has been ticked while "Supplier" implies that the Supplier box has been ticked. A Contact record can be marked both as a Customer and as a Supplier.
As soon as contact is established between your business and a potential client or supplier, you should record their details in the Contact register. You should register their relationship with you (e.g. "Prospect" or "Lead") using the Contact Classification field on the 'Contact' card of the Contact record. Mark the record as a Customer or a Supplier or both using the check boxes in the header, depending on their potential or actual relationship to your company. These check boxes will allow you to use the record in sales or purchase transactions as appropriate.
The term "Contact Person" is used when referring to an individual person: this may be a private individual or someone who works for a Customer or Supplier. In the latter case, you will have separate records in the Contact register for the Customer or Supplier and for the individual Contact Person. The Contact Person and Customer or Supplier will be linked using the Contact Relations register (described here). Usually you will not tick the Customer or Supplier boxes in the Contact record for a Contact Person unless you will sell directly to or buy directly from them independently of the company they work for.
The term "Contact" is used when referring to any record on the Contact register. A Contact can therefore be a Customer, a Supplier or a Contact Person.
On the sales side, you can group Customers of a similar type together using Customer Categories. Every Customer belonging to a Category can be given the same default Price List, Discount Matrix and Debtor Account, saving you the work of having to specify these in the Contact records for the individual Customers. Defining and assigning Customer Categories also makes modification easier: if you need to change the Discount Matrix, for example, you only need to make one change (to the Customer Category), rather than many (to each of the Customer records). If you specify information both for a Customer Category and in the Contact record of an individual Customer belonging to that Category, the information in the Contact record will take precedence. For example, if you specify a Price List in a Customer Category and in a Customer belonging to that Category, the one in the Customer will be used.
Similarly, on the purchase side you can group Suppliers of a similar type together using Supplier Categories. Every Supplier belonging to the same Category will be given the same default On Account and Creditor Accounts, saving you the work of having to specify these for each one individually. A company that is both a Customer and Supplier can belong both to a Customer Category and to a Supplier Category.
Prior to version 4.1 of the application, Customers and Suppliers were stored in separate registers. In this version, the two registers were made into one. When you update to this or a later version, you can use the 'Convert Suppliers to Customers' Maintenance function in the System module to bring the information in the two registers together. This is described on the Combining Customers and Suppliers page. In 5.0, the Maintenance function was renamed 'Convert Suppliers to Contacts', and in 5.1 it was moved to the Technics module.
In version 5.0, the previously separate Contact Person register was incorporated into the combined Customer/Supplier register, which was re-named the Contact register. When you update to this or a later version, you can use the 'Convert Contact Persons to Contacts' Maintenance function in the Technics module to bring the information in the two registers together. This is described on the Combining Customers and Contact Persons page.
Please refer to the following pages for more information about the Contact register in Standard ERP:
- Settings connected with Contacts
- The Contact register
- Forms connected with Contacts
- Reports connected with Contacts
Go back to:
- Home page for Customers, Suppliers and Contact Persons manual
- Home page for Standard ERP manual
Welcome to the Books by HansaWorld manuals online
Books by HansaWorld is the easy accounting suite for small businesses. The online manual for Books version 6.2 is currently in production.To get help with Books version 6.2:
- Download the PDF manual for Books by HansaWorld version 6.2
- Go to the Books Support page for more help with Books by HansaWorld
- Go back to the HansaManuals.com home page
- Product page for the Books by HansaWorld small business accounting solution
Welcome to the online manuals for Standard CRM
Please begin by clicking on a link on the left...
Standard CRM is a powerful contact management and internal mail system for Mac OS X.
Text in square brackets - [Save], [Cancel] - refers to buttons on screen.
See also:
- Standard CRM product page
Introduction to the CRM by HansaWorld Working Environment
When you create a database or open an existing one, the CRM by HansaWorld desktop will appear, with the Master Control panel in the centre of the screen. You can use the icons in this panel as shortcuts to different parts of the program.
You can carry out most operations in CRM by HansaWorld using up to three different methods:
- Selecting an option from a menu
- Clicking a button in the Master Control panel
- Using a keyboard command
The following topics are included in this section:
- The Master Control Panel
- Windows
- Menus
- Modules and Registers
- Working with Records
- Working with Companies
- Attachments
- Personal Desktop
- Keyboard Shortcuts
Introduction to Items and Pricing in CRM by HansaWorld
The Item register contains information about the products and services that you sell.
Items of a similar type can be grouped together using Item Groups. All Items of the same Group can be given the same VAT Codes, saving you the work of having to specify these for all Items individually. Defining and assigning Item Groups also makes modification easier: if it is necessary to assign a different VAT Code, for example, only one change need be made (to the Item Group), rather than many (to each of the Items).
If you specify information both in an Item Group and in an Item belonging to that Group, the information entered in the Item will take precedence.
---
In this section:
Introduction to Quotations in CRM by HansaWorld
You can use CRM by HansaWorld to create Quotations for sending to Customers and to administer the subsequent follow-up calls. You can specify Contact Dates for each Quotation, making it easy to produce lists of calls to be made on a particular date.
---
In this section:
Introduction to Customers, Suppliers and Contact Persons in CRM by HansaWorld
Information about your Customers, Suppliers and Contact Persons and all other companies and individuals with whom you have some contact is stored in the Contact register. Storing Customers, Suppliers, Contact Persons and other companies and individuals together in one register means that you can make full use of the Calendar, Task Manager, Mails and Letters with companies and individuals of all kinds. It also means that you will only have to maintain a single record for a company who is both a Customer and a Supplier.
Throughout these web pages, the terms "Customer" and "Supplier" are often used when referring to records in the Contact register. Those records does not necessarily represent firms that have purchased goods or services from your business, or sold goods or services to you, and in fact can represent any company that is a potential customer or supplier.
The term "Customer" is usually used when describing the use of a record in the Contact register in a sales context, while "Supplier" is used in a purchase context. "Supplier" implies that the Supplier box in the header of the Contact record has been checked.
As soon as contact is established between your business and a potential client, you should record their details in the Contact register. You can register their relationship with you (e.g. "Prospect" or "Lead") using the Contact Classification field on the 'Contact' card of the Contact record. Mark the record as a Customer or Supplier or both using the check boxes in the header. The Customer check box will allow you to use the Contact as a Customer in Quotations.
The term "Contact Person" is used when referring to an individual person: this may be a private individual or someone who works for a Customer or Supplier. In the latter case, you will have separate records in the Contact register for the Customer or Supplier and for the individual Contact Person. The Contact Person and Customer will be linked using the Customer Relations register (described here).
The term "Contact" is used when referring to any record on the Contact register. A Contact can therefore be a Customer, a Supplier or a Contact Person.
You can group Customers of a similar type together using Customer Categories. Every Customer belonging to a Category can be given the same default Price List, saving you the work of having to specify these in the Contact records for the Customers. Defining and assigning Customer Categories also makes modification easier: if you need to assign a different Price List, for example, you only need to make one change (to the Customer Category), rather than many (to each of the Customer records). If you specify information both for a Customer Category and in the Contact record of an individual Customer belonging to that Category, the information entered in the Contact record will take precedence. For example, if you specify a Price List in a Customer Category and in a Customer belonging to that Category, the one in the Customer will be used.
If you are updating to CRM by HansaWorld from its predecessor FirstContact, please note that prior to version 5.0 of that program, Customers and Suppliers were stored together in the Customer register, and Contact Persons were stored separately in the Contact Person register. In version 5.0, these two registers were combined into one, which was re-named the Contact register. If you are updating to CRM by HansaWorld from version 4.3 or earlier of FirstContact, you will need to use the 'Convert Contact Persons to Contacts' Maintenance function in the Technics module to bring the information in the two registers together. This is described on the Combining Customers and Contact Persons page.
---
In this section:
Introduction to Activities, the Calendar and the Task Manager in CRM by HansaWorld
The Calendar and Task Manager are simple and efficient tools for keeping track of contacts with Customers and for planning activities of all kinds. You can use them to record the different tasks and events in the business day, such as customer contacts for sales, service support, consultancy appointments etc. In CRM by HansaWorld, each task and event is saved as a separate record in the Activity register. To keep your Activities separate from those of other users, you cannot open the Activity register itself unless you have access to the System module. Instead, you should use the Calendar, Task Manager and Personal Calendar report to view, review and change your Activities, and to add new ones. You can use the Activity register as a planning and monitoring tool for a sales force, or as a tool to log telephone calls to a customer service centre, and in many other ways. As with all CRM by HansaWorld features, there is a great deal of flexibility, and different users will adapt it to their own requirements.
---
In this section:
- Examples
- Terminology
- Settings
- The Activity Register
- The Task Manager
- Calendar
- The Personal Calendar Report
- Maintenance
- Documents
- Reports
- Exports
Introduction to Customer Letters in CRM by HansaWorld
The Customer Letter register allows you to send individual letters to Customers and Suppliers, and also to organise and produce mailshots. You can print letters from a Customer Letter record or, subject to you having the necessary hardware and Value Packs, send them by fax or email.
---
In this section:
Welcome to the Books by HansaWorld manuals online
Books by HansaWorld is the easy accounting suite for small businesses for Mac OS X and Windows. It includes fully functional Accounts Receivable, Accounts Payable and General Ledger modules. The level of integration means that the consequences of every transaction are handled automatically. For example, after creating a sales invoice or receiving a payment, your Accounts Receivable and General Ledgers will be updated automatically.
These web pages are divided into the following sections:
- Installation
- Creating a new database
- Master Control panel
- Registration
- Working with Records
- Attachments and Personal Desktop
- Contacts (Customers, Vendors and Contact Persons)
- Items (Products and Services)
- Chart of Accounts
- Invoices
- Receipts
- Purchase Invoices
- Payments
- Transactions (Journal Entries)
- Account Reconciliation
- Opening Balances
- Companies
- Persons (Employees)
- Settings (Preferences)
- Printing documents
- Reports
- Exporting information
- Importing information
- Shutting Down and Backing Up
- Product page for the Books by HansaWorld small business accounting solution
Welcome to the Standard Accounts manuals online
Standard Accounts is the easy accounting suite for small businesses for Mac OS X. It includes fully functional Sales Ledger, Purchase Ledger and Nominal Ledger modules. The level of integration means that the consequences of every transaction are handled automatically. For example, after creating a sales invoice or receiving a payment, your Sales and Nominal Ledgers will be updated automatically.
These web pages are divided into the following sections:
- Installation
- Creating a new database
- Master Control panel
- Working with Records
- Attachments and Personal Desktop
- Contacts (Customers, Suppliers and Contact Persons)
- Items (Products and Services)
- Chart of Accounts
- Invoices
- Receipts
- Purchase Invoices
- Payments
- Transactions (Journal Entries)
- Account Reconciliation
- Opening Balances
- The End of a Financial Year
- Persons (Employees)
- Settings (Preferences)
- Printing documents
- Reports
- Exporting information
- Importing information
- Shutting Down and Backing Up
- Product page for the Standard Accounts small business accounting solution
Welcome to the Standard Invoicing manuals online
Standard Invoicing is the easy invoicing and debt management suite for small businesses for Mac OS X. It allows you to create Invoices easily, to keep track of your debtors and to register incoming Receipts (payments). You can design your own invoices and other documents, incorporating your company logo.
These web pages are divided into the following sections:
- Installation
- Creating a new database
- Master Control panel
- Working with Records
- Attachments and Personal Desktop
- Contacts (Customers and Contact Persons)
- Items (Products and Services)
- Invoices
- Receipts
- Persons (Employees)
- Settings (Preferences)
- Printing documents
- Reports
- Exporting information
- Importing information
- Shutting Down and Backing Up
- Product page for the Standard Invoicing small business accounting solution
Welcome to the Standard Nominal Ledger manuals online
Standard Nominal Ledger is a powerful accounting application for small businesses for Mac OS X.
These web pages are divided into the following sections:
- Installation
- Creating a new database
- Master Control panel
- Working with Records
- Attachments and Personal Desktop
- Chart of Accounts
- Transactions (Journal Entries)
- Opening Balances
- The End of a Financial Year
- Persons (Employees)
- Settings (Preferences)
- Reports
- Exporting information
- Importing information
- Shutting Down and Backing Up
- Product page for the Standard Nominal Ledger small business accounting solution
Welcome to the Standard Contracts manuals online
Standard Contracts is an integrated invoicing and debt management tool for Mac OS X. It is the ideal invoicing solution for companies who charge for services on a regular recurring basis, such as ISPs and property and service rental companies. Standard Contracts allows you to create Invoices easily, to keep track of your debtors and to register incoming Receipts (payments). You can design your own invoices and other documents, incorporating your company logo.
These web pages are divided into the following sections:
- Installation
- Creating a new database
- Master Control panel
- Working with Records
- Attachments and Personal Desktop
- Contacts (Customers and Contact Persons)
- Items (Products and Services)
- Contracts
- Invoices
- Receipts
- Persons (Employees)
- Settings (Preferences)
- Maintenance functions
- Printing documents
- Reports
- Exporting information
- Importing information
- Shutting Down and Backing Up
- Product page for the Standard Contracts small business recurring invoicing solution
Welcome to the Standard POS manuals online
Standard POS is an integrated point of sales tool for small shops and retail outlets for Mac OS X. It allows you to process each sale from start to finish using a single window, including listing the items, receiving payment and printing the receipt.
These web pages are divided into the following sections:
- Installation
- Creating a new database
- Master Control panel
- Working with Records
- Attachments and Personal Desktop
- Items (Products and Services)
- POS Invoices
- Persons (Employees)
- Settings (Preferences)
- Printing documents
- Reports
- Exporting information
- Importing information
- Shutting Down and Backing Up
- Product page for the Standard POS small business point of sales solution
Introduction to Standard ERP
Standard ERP is an integrated accounting, CRM and ERP tool for working with Sales Order Processing, Stock Control and the Sales, Purchase and Nominal Ledgers, and for keeping track of contacts with Customers, organising mailshots and for planning activities of all kinds.
Standard ERP is a modular system. The number of modules available to a user varies with the installation. The minimum configuration (the Accounting package) comprises the System module, the Nominal, Sales and Purchase Ledgers with Multi-Currency capability, and a Calendar and Task Manager that you can use for contact management. To this, the Logistics package adds the Sales Order, Purchase Order and Stock modules. You can add further modules as required, including the Server module that is required in multi-user installations.
The Calendar and Task Manager allow you to record the different tasks and events in the business day, such as customer contacts for sales, service support, consultancy appointments etc. Each task or event is known as an "Activity". You can view, review, change and add Activities at any time, using them as a planning and monitoring tool for a sales force, or as a tool to log telephone calls to a customer service centre, and in many other ways.
Standard ERP contains full internal mail, email and conferencing facilities. These features, together with the External Gateway and web server, mean that users can be online from anywhere at anytime. This means that employees can always be in touch with each other. The program also supports communications methods such as Skype, Asterisk-based SIP (Session Initiation Protocol) and SMS text messaging. Using the Business Communicator window, you can initiate outgoing communications using any of these methods from a single screen. Whichever communications method you use, you can record details about each incoming and outgoing communication as you talk, enabling you to build up a comprehensive communication history about each caller or contact person.
In this introductory section, we will describe the steps you need to follow to get started with Standard ERP. Topics covered include installation (both single- and multi-user) and the creation of a new database (again, both single- and multi-user).
Introduction to Starting Work in Standard ERP
Before starting work with Standard ERP, you should first have created a new database into which you have entered information about your company, the current Fiscal Year, a set of VAT Codes and a Chart of Accounts. If this is not the case, please turn back to the Starting Standard ERP section of these web pages before proceeding.
The following topics are included in this section:
- User Accounts
- Entering the first Customers, Suppliers and Contact Persons
- Entering the first Items
- Entering Opening Balances
Introduction to the Working Environment in Standard ERP
When you create a database or open an existing one, the Standard ERP desktop will appear, with the Navigation Centre in the centre of the screen. You can use the icons in this panel as shortcuts to different parts of the program.
You can carry out most operations in Standard ERP using up to three different methods:
- Selecting an option from a menu
- Clicking a button in the Navigation Centre panel
- Using a keyboard command
The following topics are included in this section:
- The Navigation Centre
- Windows
- Menus
- Modules and Registers
- Working with Records
- Working with Companies
- Keyboard Shortcuts
Introducción a Principios de Contabilidad
Administrar su propio negocio suele ser una tarea gratificante, pero conlleva una serie de obligaciones. Uno es el requisito de mantener sus cuentas contables en los estandares legales requeridos. Los requisitos legales difieren según el tipo de negocio y el país de operación, pero independientemente de estos, puede haber grandes ventajas en tener sus libros en orden. Esta sección describe algunos de los conceptos básicos utilizados en contabilidad y su integración en Standard ERP, de la siguiente manera:
- Documentos Internos y Externos
- Registro Asientos, Incluyendo:
- Plan de Cuentas
- Objectos
- Objectos en Standard ERP
- Jerarquía de Objetos
- Quiénes deben saber sobre su negocio
- Cierre del Año Fiscal
Introduction to the Quotations Module in Standard ERP
Use the Quotations module to create Quotations for sending to Customers and subsequently to convert the Quotations to Orders or Invoices. You can also use the Quotations module to administer the subsequent follow-up calls: you can specify Contact Dates for each Quotation, making it easy to produce lists of calls to be made on a particular date.
The module is fully integrated with the Sales Orders module and the Sales Ledger.
---
The Quotations module in Standard ERP:
- Settings
- The Quotation Register
- The Contact Register
- The Item Register
- The Price Register
- Maintenance
- Forms
- Reports
- Exports
- Home page for Standard ERP manual
Introduction to the Sales Ledger in Standard ERP
The Sales Ledger module in Standard ERP is where you should create and record the Invoices and Credit Notes that you issue to your Customers, and where you can record both the payments that you receive against those Invoices and deposits that you are paid to secure the future delivery of Items. Reports such as the Sales Ledger report, the Open Invoice Customer Statement and the Periodic Customer Statement will use this information to display the credit position of each Customer in real time, while the Receipts Forecast report will use it to help with payment scheduling and cashflow forecasting.
The Sales Ledger is fully integrated with the Nominal Ledger. Transactions generated from Invoices will debit the Debtor Account and credit the Sales and Output VAT Accounts, while Transactions generated from Receipts (recording the payments that you receive from your Customers) will credit the Debtor Account and debit the Bank or Cash Account. The Sales Ledger is also fully integrated with the Sales Orders module, permitting a seamless sales order process workflow in which Invoices can be created from and will remain connected to Sales Orders for goods delivered. You can also create Invoices from many other registers, including Contracts, Projects, Quotations and Service Orders.
---
In this section:
- Settings
- Invoices
- Receipts
- Gift Vouchers
- Loyalty Cards
- Maintenance functions
- Forms/Documents
- Reports
- Export functions
- Home page for Standard ERP by HansaWorld manual
Introducción a Principios de Contabilidad
Administrar su propio negocio suele ser una tarea gratificante, pero conlleva una serie de obligaciones. Uno es el requisito de mantener sus cuentas contables en los estandares legales requeridos. Los requisitos legales difieren según el tipo de negocio y el país de operación, pero independientemente de estos, puede haber grandes ventajas en tener sus libros en orden. Esta sección describe algunos de los conceptos básicos utilizados en contabilidad y su integración en Standard ERP, de la siguiente manera:
- Documentos Internos y Externos
- Registro Asientos, Incluyendo:
- Plan de Cuentas
- Objectos
- Objectos en Standard ERP
- Jerarquía de Objetos
- Quiénes deben saber sobre su negocio
- Cierre del Año Fiscal
Introduction to Starting Work in Standard ERP
Before starting work with Standard ERP, you should first have created a new database into which you have entered information about your company, the current Fiscal Year, a set of VAT Codes and a Chart of Accounts. If this is not the case, please turn back to the Starting Standard ERP section of these web pages before proceeding.
The following topics are included in this section:
- User Accounts
- Entering the first Customers, Suppliers and Contact Persons
- Entering the first Items
- Entering Opening Balances
Introduction to the Working Environment in Standard ERP
When you create a database or open an existing one, the Standard ERP desktop will appear, with the Navigation Centre in the centre of the screen. You can use the icons in this panel as shortcuts to different parts of the program.
You can carry out most operations in Standard ERP using up to three different methods:
- Selecting an option from a menu
- Clicking a button in the Navigation Centre panel
- Using a keyboard command
The following topics are included in this section:
- The Navigation Centre
- Windows
- Menus
- Modules and Registers
- Working with Records
- Working with Companies
- Keyboard Shortcuts
Introduction to Standard ERP
Standard ERP is an integrated accounting, CRM and ERP tool for working with Sales Order Processing, Stock Control and the Sales, Purchase and Nominal Ledgers, and for keeping track of contacts with Customers, organising mailshots and for planning activities of all kinds.
Standard ERP is a modular system. The number of modules available to a user varies with the installation. The minimum configuration (the Accounting package) comprises the System module, the Nominal, Sales and Purchase Ledgers with Multi-Currency capability, and a Calendar and Task Manager that you can use for contact management. To this, the Logistics package adds the Sales Order, Purchase Order and Stock modules. You can add further modules as required, including the Server module that is required in multi-user installations.
The Calendar and Task Manager allow you to record the different tasks and events in the business day, such as customer contacts for sales, service support, consultancy appointments etc. Each task or event is known as an "Activity". You can view, review, change and add Activities at any time, using them as a planning and monitoring tool for a sales force, or as a tool to log telephone calls to a customer service centre, and in many other ways.
Standard ERP contains full internal mail, email and conferencing facilities. These features, together with the External Gateway and web server, mean that users can be online from anywhere at anytime. This means that employees can always be in touch with each other. The program also supports communications methods such as Skype, Asterisk-based SIP (Session Initiation Protocol) and SMS text messaging. Using the Business Communicator window, you can initiate outgoing communications using any of these methods from a single screen. Whichever communications method you use, you can record details about each incoming and outgoing communication as you talk, enabling you to build up a comprehensive communication history about each caller or contact person.
In this introductory section, we will describe the steps you need to follow to get started with Standard ERP. Topics covered include installation (both single- and multi-user) and the creation of a new database (again, both single- and multi-user).
Introduction to the Human Resources Management module in Standard ERP
The Human Resources Management module in Standard ERP allows you to carry out the following tasks:
- register Employees
- register Employment Contracts
- record changes in Employment Contracts
- print Employment Contracts
- manage Leave Applications
- list and report on Employees' skills
- carry out and report on Soft Factor appraisals
- carry out Performance appraisals
Go back to:
- Home page for Standard ERP manual
Introduction to the Purchase Ledger in Standard ERP
The Purchase Ledger module in Standard ERP is where you should record the Purchase Invoices and Credit Notes that you receive from your Suppliers, and where you can record both the Payments that you issue against those Invoices and deposits that you pay out to secure the future delivery of Items. Reports such as the Purchase Ledger report, the Open Invoice Supplier Statement and the Periodic Supplier Statement will use this information to display your credit position with each Supplier in real time, while the Payments Forecast report will use it to help with payment scheduling and cashflow forecasting. Tools such as the 'Create Payments Suggestion' function will also help with payment scheduling by creating Payments for Purchase Invoices based on their Due Dates (or Discount Dates in the case of Invoices with settlement discounts).
The Purchase Ledger is fully integrated with the Nominal Ledger. Transactions generated from Purchase Invoices will credit the Creditor Account and debit the Cost and Input VAT Accounts, while Transactions generated from Payments will debit the Creditor Account and credit the Bank or Cash Account. The Purchase Ledger is also fully integrated with Purchase Orders and Goods Receipts, permitting a seamless purchase order process workflow in which Purchase Invoices can be created from and will remain connected to Purchase Orders for goods received.
---
In this section:
- Settings
- Purchase Invoices
- Payments
- Purchase Order Contracts
- Buybacks
- Maintenance functions
- Documents
- Reports
- Export functions
- Home page for Standard ERP manual
Default Accounts, Tax Templates and VAT Codes
The pages listed below describe how various Accounts, VAT Codes and Tax Templates will be chosen and offered as defaults when you enter sales and purchase transactions. Please follow the links for more information.
- Sales Accounts in sales transactions, including Quotations, Sales Orders and Sales Invoices
- Tax Templates in Purchase Orders, Goods Receipts and Purchase Invoices
- Tax Templates in sales transactions, including Quotations, Sales Orders and Sales Invoices
- VAT Codes in Purchase Orders, Goods Receipts and Purchase Invoices
- VAT Codes in sales transactions, including Quotations, Sales Orders and Sales Invoices
Go back to:
- Home page for Standard ERP manual
Introduction to the Stock Module in Standard ERP
The Stock module records every shipment in and out of stock. It interacts with the Sales and Purchase Orders modules, with the Sales Ledger, the Job Costing and Production modules and the Nominal Ledger. The Delivery register will always be updated from Sales Orders, but you can also update stock levels from Sales Invoices and Work Sheets. You can enter Goods Receipts directly to the Goods Receipt register, and you can also create them from Purchase Orders. There are registers you can use to depreciate stock (for example, to remove Items from stock because they have been lost), and to revalue some or all of your stock. You can keep stock in different and independent Locations, and you can move stock between Locations. Several reports give information about the contents and value of your stock.
As well as recording stock levels and values of each Item, you can maintain a stock valuation in the Nominal Ledger. Every register in the Stock module can be integrated with the Nominal Ledger, posting to a Stock Account and to a Purchase Accruals Account, Cost of Sales Account, Returned Goods Account or Stock Loss Account as appropriate.
The Stock module was rewritten in version 5.1 of the application. As far as daily use of the Stock module is concerned, this rewriting will cause little or no difference. Most of the changes are behind the scenes, in the way information is stored. If you were using the application prior to this version, you will need to rebuild your stock information before you can start using the Stock module. Please refer to the description of the 'Rebuild Stock' Maintenance function for details.
---
In this section:
- Cost Accounting
- Settings
- Deliveries
- Goods Receipts
- Stock Depreciations
- Stock Movements
- Returned Goods
- Returned Goods to Suppliers
- Stocktaking
- Stock Revaluations
- Maintenance functions
- Forms/Documents
- Reports
- Export functions
- Home page for Standard ERP manual
Introduction to Mail in Standard ERP
The Mail facilities in Standard ERP allow users in multi-user systems to:
- send Mail to other users in your Standard ERP system, with attachments if necessary;
- send Mail to Conferences, where it can be read by every user (subject to access restrictions);
- update Mail that has been sent by other users;
- send and receive email (electronic mail is also termed "External Mail" in these web pages, signifying that its original source or final destination is outside the Standard ERP Mail system); and
- chat with other users.
The Email and Conferences module in Standard ERP:
- Setting up the Standard ERP Mail System
- Sending and Receiving Mail
- Chatting with Other Users
- Presentation
- Maintenance functions
- Reports
- Home page for Standard ERP manual
Introduction to the Inter-Company module in Standard ERP
If you have more than one Company in your database, the Inter-Company module can help with the administration of transactions between those Companies. Using the Inter-Company module will mean that when you create a record in one Company, a corresponding record will be created automatically in a second Company, as follows:
- Creating a Purchase Order in one Company will cause a Sales Order to be created in a second Company.
- Creating a Sales Invoice in one Company will cause a Purchase Invoice to be created in a second Company.
- Creating a Nominal Ledger Transaction in one Company will cause a Nominal Ledger Transaction to be created in a second Company.
The Inter-Company module in Standard ERP:
- Orders and Invoices between Companies
- Nominal Ledger Transactions between Companies
- The Inter-Company Account Comparison Report
- Home page for Standard ERP manual
Introduction to the Contracts Module
The Contracts module is designed for use by companies supplying products or services that are invoiced at regular intervals, such as rents, subscriptions or maintenance contracts.
Individual agreements or contracts are recorded in the Contract register, and periodic Invoices are then created when appropriate using a special function. These are passed to the Sales Ledger module, where they are treated as normal Invoices.
The module also provides tools for the management of quoting and tendering for Contracts. A history of modifications to quotations can be maintained, and successful quotations can easily be converted into Contracts.
---
In this section:
- Settings
- Contracts
- Contract Quotations
- Contract Status register
- Service Agreements
- Maintenance functions
- Forms/Documents
- Reports
- Export functions
- Home page for Standard ERP manual
Introduction to the CRM module (Customer Relationship Manager) in Standard ERP
The CRM module (Customer Relationship Manager) is a simple and efficient tool for keeping track of contacts with Customers, organising mailshots and for planning activities of all kinds. You can use the CRM module to record the different tasks and events in the business day, such as customer contacts for sales, service support, consultancy appointments etc. In Standard ERP, each task and event is saved as a separate record in the Activity register. To keep your Activities separate from those of other users, you cannot open the Activity register itself unless you have access to the System module. Instead, you can view, review and change your Activities, and add new ones, using the Calendar, Task Manager and Personal Calendar report. You can use the Activity register as a planning and monitoring tool for a sales force, or as a tool to log telephone calls to a customer service centre, and in many other ways. As with all modules in Standard ERP, there is a great deal of flexibility, and different users will adapt it to their own requirements.
This documentation includes an example and a description of the Activity register, the heart of the time and contact management systems in Standard ERP. To keep your Activities separate from those of other users, you cannot open the Activity register itself (unless you have access to the System module). Instead, you can access the register using the Calendar, the Personal Calendar report and the Task Manager. The Customer Letter and Target Time registers are also described, as are the Workflow Overview and the various forms and reports in the CRM module.
---
In this section:
- CRM Examples
- Terminology in the CRM module
- Structure of the CRM Module and Access Rights
- Settings
- Activities and Tasks
- Task Manager
- Calendar
- Personal Calendar report
- Workflow Overview
- Target Time register
- Customer Letters
- Standard Texts
- Standard Periods
- Opportunities
- Maintenance functions
- Forms/Documents
- Reports
- Export functions
- Home page for Standard ERP manual
- Product page for HansaWorld's ERP CRM software solution
Introduction to the Quotations Module in Standard ERP
Use the Quotations module to create Quotations for sending to Customers and subsequently to convert the Quotations to Orders or Invoices. You can also use the Quotations module to administer the subsequent follow-up calls: you can specify Contact Dates for each Quotation, making it easy to produce lists of calls to be made on a particular date.
The module is fully integrated with the Sales Orders module and the Sales Ledger.
---
The Quotations module in Standard ERP:
- Settings
- The Quotation Register
- The Contact Register
- The Item Register
- The Price Register
- Maintenance
- Forms
- Reports
- Exports
- Home page for Standard ERP manual
The Pricing Module in Standard ERP
Please refer here for details about the Pricing module in Standard ERP.
—
Go back to:
- Home page for Standard ERP manual
Introduction to Multi-Currency in Standard ERP
In Standard ERP, you can record any accounting transaction in any currency. You can maintain a register of Currencies, and keep a history of their respective Exchange Rates for different dates is maintained. You can assign separate Sales and Purchase Currencies to each Customer and Supplier: the ones in which they will be invoiced and in which they issue their Invoices respectively. When you issue or receive a Sales or Purchase Invoice, its value will automatically be converted from the foreign to your home Currency, and all necessary accounting transactions will be created. Accounts receivable and payable can be reported in either Currency.
Two Currency conversion methods are provided. You can use either of these methods exclusively, or you can use them in combination, depending on your requirements. The first method is the simple conversion from a foreign Currency to your home Currency, applicable to the majority of worldwide Currency transactions.
The second method is the dual-base triangulation system, termed the "Dual-Base system" in these web pages. Users of this system fall into two categories:
- Voluntary
- The Dual-Base system will be useful for companies that have offices in two countries that need to report in both Currencies, and for companies operating in countries where there is a second Currency (usually the US Dollar or Euro) in common use in addition to the national one.
- Transitional
- The Dual-Base system will also be useful in countries passing through the process of replacing their home Currencies with the Euro. A requirement of this process is that the value of every transaction should be expressible in both the home Currency and the Euro. Direct conversions from the home Currency to any foreign Currency except the Euro are not possible. Instead, the home Currency should first be converted to the Euro, and there should then be a second conversion to the foreign Currency. At the time of writing, there were no countries undergoing the transition process.
"Transitional" users should use the Dual-Base system exclusively, in order to comply with European Monetary Union (EMU) rules, while "voluntary" users can be more flexible, using Dual-Base and simple conversion systems in combination as required.
Companies outside the Euro zone but trading with it have the choice of using the simple conversion system or the Dual-Base system. This choice will depend on the volume of trade with the Euro zone and on whether they need the ability to produce all reports in both their home Currency and the Euro. Such a use of the Dual-Base system falls into the "voluntary" category described above.
Similarly companies outside the Euro zone and trading with "transitional" countries can choose whether to use the simple conversion system or the Dual-Base system.
Please refer to the following pages for more details about using Currencies in Standard ERP:
- Simple Currency Conversion System
- Dual-Base System
- Currencies and Exchange Rates
- Starting to Use Currencies and Upgrading
- Account Usage and Currencies
- Currencies and Customers and Suppliers
- Transactions in Currency
- Reports
- Exchange Rate Gains and Losses
- Home page for Standard ERP manual
Introduction to the Expenses Module
The Expenses module allows you to administer the necessary expenses incurred by employees of the company in their day-to-day work. Using the Expenses module, you can maintain accounts for each employee, produce individual account statements and issue payments to employees for expense claims and other reasons. If you have the Job Costing module, you can record expenses against Projects, this allows you to include them in Project Invoices and in Project profitability calculations.
---
The Expenses module in Standard ERP:
- Settings
- The Expense Register
- The Personnel Payment Register
- The Person Register and Expenses
- The Mileage Register
- The Daily Allowance Register
- Forms
- Reports
- Home page for Standard ERP manual
Introduction to the Consolidation Module
The Consolidation module will be useful if you need to produce consolidated financial statements for a group of companies. In this context, a group of companies is a collection of parent and subsidiary companies that, through a common source of control, function as a single financial entity.
The aim of consolidated financial statements is to show the performance of the group as if it were a single entity. All intra-group transactions (sales from one group company to another group company, for example) and intra-group balances (inter-company loans, for example) need to be eliminated as otherwise the consolidated financial statements would double-count these balances. Doing so typically requires a complex set of eliminating and consolidating entries to work back from individual financial statements toward a group financial statement that is an accurate representation of operations.
The Consolidation module in Standard ERP is designed so that information in subsidiary companies can be made available to certain reports in the holding company without the need physically to transfer any subsidiary company information to the holding company. This makes it very easy to produce consolidated reports from the holding company, and removes the risk of error inherent in copying information from one company to another. This communication between companies means that the holding and subsidiary companies must reside in the same database. The module supports multi-level consolidation: subsidiary companies can have their own subsidiary companies. Subsidiaries can be wholly or partially owned, and the ownership percentage may change over time.
In this documentation the holding company will be referred to as the "Mother Company" and the subsidiaries as "Daughter Companies". Subsidiaries owned by Daughter Companies will be referred to as "Grand-Daughter Companies".
In some circumstances, the requirement to have the Mother and Daughter Companies in the same database might not be practical. If so, the Consolidation module also contains a 'Consolidation' Export function, which you can use to export Transaction information from a Daughter Company to a text file. You can then import this text file to the Mother Company (in another database).
The basic steps required to set up the Consolidation module are as follows:
- Enter all Companies to the Company register in the System module. Ensure each Company contains its own Chart of Accounts, Fiscal Years, VAT Codes, Nominal Ledger report definitions, Currencies and so on.
If any Companies use the same Chart of Accounts or Currencies, you can choose to share the Account and Currency registers. This will make the same Accounts and Currencies available to those Companies, so you will only need to enter Accounts and Currencies once. Note, however, that if you share the Account register, you will not be able to link Daughter Company Accounts to different Mother Company Accounts. Please refer here for details about sharing registers.
- In the Mother Company, fill in the Daughter Companies setting in the Consolidation module. You should also fill in this setting in any Daughter Companies that themselves have Daughters.
- In all Companies, fill in the Consolidation Settings setting in the Consolidation module. This will determine the Currency that will be used in the consolidated reports.
- In any Daughter Company that is partially owned, enter a record in the Main Owner Percentage register. This will state on a percentage basis how much of the Daughter is owned by the Mother.
- When you produce a consolidated report, the balance of each Daughter Company Account will be added to the balance of the Mother Company Account to which it has been linked. The final step is to establish this link in each Account record in each Daughter Company.
- In some circumstances, each Daughter Company will be a separate cost centre that will be invoiced when it uses resources belonging to another Daughter Company. These internal costs and income should be eliminated from the consolidated accounts so that the figures for the group as a whole are correct. In some cases, you can do this simply by using the same Account as the Sales Account in one Daughter and as the Cost Account in the second Daughter. If this is not possible, you can eliminate the balances of Accounts used for this purpose using the 'Account Auto Elimination' Maintenance function.
You can use the Inter-Company module to help with the process of issuing and recording Invoices between Companies in a group. Please refer here for more details about this module.
See also:
---
Go back to:
- Home page for Standard ERP manual
System Administrator and Technical Pages
The pages listed below describe various technical features in Standard ERP.
---
Go back to:
- Home page for Standard ERP manual
Introduction to the Report Generator in the Standard ERP system
The Report Generator module in Standard ERP allows you to design your own reports. This process includes:
- providing search criteria in the report specification window to allow users to find the information that they need;
- searching for the information required by the user;
- specifying a sort order for the report;
- calculating subtotals and totals;
- designing the appearance of the report including the elements (column headings, fields, variables, subtotals and totals) that are to be printed, and where they are to be printed (header, body, footer); and
- choosing where the report is to be printed (e.g. to screen, printer or file).
- Fields and Variables
- Report Structure
- Creating a Report
- Organising Reports
- The Report Generator and SmartApps
- Home page for Home page for Standard ERP manual
Introduction to the Business Alerts module in Standard ERP
In outline, the Business Alerts module in Standard ERP offers two features:
- It allows you to set up various notifications. For example, key members of staff can be notified when high value and/or low margin Invoices, Orders or Quotations are entered, and Customers can be notified about imminent Deliveries. Key members of staff can also be warned about certain system events such as unexpected server restarts or problems with the email queue. Notification can be by message, Mail or text (SMS) message. Please refer to the descriptions of the settings in the Business Alerts module beginning here for details.
- It allows you to set up approval processes for large-value transactions. In larger organisations, higher value transactions must be approved before they can be proceeded with. Please refer here for details.
The Business Alerts module in Standard ERP:
Go back to:
- Home page for Standard ERP manual
Introduction to the Job Costing module for companies in service industries
The Job Costing module in Standard ERP is designed primarily for companies in service industries, whose turnover is based mainly on the labour of their employees. Such companies often invoice their work by the hour, the day or the week. In many cases, goods and materials are also supplied and charged to Customers. Pricing arrangements can vary considerably from, for example, a set price for a complete Project to varying hourly charges per individual employee, per task and per Customer. A job costing and time billing system must be flexible enough to handle all possible combinations in an easy and helpful manner.
The need for a job costing and time billing system starts to become apparent even in small companies as soon as the task of project administration begins to gain in sophistication. It is often said that when small consulting companies grow beyond 20 to 30 consultants they have reached a threshold. From that moment, further expansion requires more than one full-time manager for sales and administration, and profitability is often affected. By simplifying project administration, Standard ERP allows this threshold to be pushed upwards.
In a business in a service industry, the utilisation of the employees' time is vital for the success of the company. A non-billed hour is lost and can never be recovered. The key to profitability is the constant and systematic administration of Projects, hours worked and billing: the aim of any time billing system must be to aid companies to be more efficient in these areas. But each business has its own ideas about charging and monitoring Projects and employees. Standard ERP therefore has a number of very flexible reports that can give managers the information they require.
Standard ERP's Job Costing module is designed to allow each employee to maintain their own Time Sheets, preferably filling them in on a daily basis. These Time Sheets are monitored by managers, and need to be approved before they can be invoiced, perhaps on a weekly basis. Errors can be corrected and reversals made before the Invoices are raised. There is full control over invoicing, and Time Sheets are fully editable until they have been approved. Employees can also use Activities to record time.
The main function of this module is to accumulate information about the time worked and the materials or services provided for a certain project, task, assignment, client or job. Once this information has been gathered, it can be compared to budget, monitored, adjusted and, in most cases, invoiced. The module thus focuses on income, not on costs. The cost side of each transaction is normally handled in the Nominal Ledger through the use of cost centre or Tag/Object accounting.
Standard ERP's Job Costing module is integrated with the rest of the system. Invoices for services and Projects are passed to the Sales Ledger module, where they are treated as normal Invoices. The Sales Ledger module is in turn integrated with the Nominal Ledger.
The Job Costing module interacts with several other modules in Standard ERP. The following diagram illustrates the registers in the module, together with the other registers involved in the project management process. To the left are the five main registers in the Job Costing module. At the bottom are the registers in other modules that interact with Job Costing, and that provide some of the information that is required for efficient project management. There are also a number of settings that can influence the behaviour of the module.
To use the Job Costing module, you will first define Projects and Budgets in their respective registers. You will then enter Time Sheets and/or Activities, to record the work that has been carried out. This information, together with that concerning chargeable items (expenses, goods and materials, internal resource uses and stock outtakes, recorded in the appropriate register), will be transferred to the Project Transaction register automatically. This register records each chargeable item separately, specifying in detail how quantities and prices are to be invoiced and charged to each Project.
This process is illustrated in the following diagram:
Project Transactions are fully editable before the invoicing process. Draft Invoices produced by this process can precisely reflect the work carried out in completion of a Project and so will be based on the edited Project Transactions. It may be that invoicing based on actual costs in this way will not be appropriate. Instead, you can choose to use a fixed cost invoicing method. This can be accommodated by entering the fixed costs in the Project Budget register. The invoicing routine will automatically detect whether an Invoice should contain actual or fixed costs. In both cases, Invoices will be saved in the Invoice register in the Sales Ledger module. You can edit them before marking them as OK.
Reports regarding employees and time records are available, as well as several reports showing the status of Projects. When printed to screen, the reports have some unique drill-down facilities that make analysis and control fast and easy.
---
The Job Costing module in Standard ERP:
- Example
- Terminology Pricing and Costs
- Settings
- The Project register, including Projects and the Resource Planner
- The Project Budget register
- The Quotation register and the Job Costing module
- The Time Sheet register
- The Project Transaction register
- The Project Schedule register
- The Item register and the Job Costing module
- The Person register and the Job Costing module
- Maintenance
- Forms
- Reports
- Exports
- Home page for Standard ERP manual
Manuals for Discontinued HansaWorld Products
Please refer to the list on the left for online manuals for products that have been discontinued by HansaWorld.Introduction to the Timekeeper module in Standard ERP
In many industries employees are required to record the time that they start work, and the time that their work-day ends. Examples of these industries include shift workers in a factory, and bar staff in a restaurant or bar.
In some cases employees can clock in and out at any time, and in other cases, only within planned shifts.
The Timekeeper module in Standard ERP allows a company to keep track of the times that employees start and end work, and also to control the times that employees are allowed to clock in, using planned shifts.
Within a specific shift, employees can clock in and out normally for events like lunch etc. These clock-in and clock-out activities are handled within the shift, and are reported on separately.
Please refer to the following pages for more details:
Go back to:
- Home page for Standard ERP manual
Introduction to the Webshop and CMS Module in Standard ERP
The Webshop and CMS module allows you to build a website that you can control from Standard ERP. As well as static web pages (web pages containing text and images), the website can include a webshop that will be connected to the Order and Invoice registers and that can use up-to-date stock levels to determine whether Items are available for purchase. When Customers place orders through the webshop, an Order or Invoice will be created immediately and without any intervention, so the only additional processing necessary will be to deliver the Items. You can also allow Customers to view their Orders and Invoices online. The CMS (Content Management System) portion of the module allows you to add a newsfeed or blog to the website.
You will have full control over the appearance of the website as you will be able to incorporate your own CSS and JavaScript. Some pages will include sections that are constructed for you (for example, Product listings in the webshop), but these sections will be divided into <divs> with fixed classes or IDs that you will be able use to control their appearance through your CSS.
This documentation will describe the Webshop and CMS module in Standard ERP, but it will not describe HTML or CSS coding. The example web pages shown in the illustrations include some CSS formatting controlled using built-in <div> classes or IDs and some using <div> classes or IDs that can be added by any user in Standard ERP: the various <div> classes or IDs will be explained under each illustration.
The Home Page option on the 'Technical' card in the Configuration setting in the System module must be selected for the Webshop and CMS module to be activated.
The Webshop and CMS module in Standard ERP:
- Structure of a Web Page
- Making a Website Accessible to Browsers
- Building a Web Page
- Allowing Contacts to Use Your Website - Logging In, Passwords and Accounts
- Languages and Countries
- Browser Errors - Adding an Error Page
- File Management
- Adding a "Contact Us" Page
- Newsfeed and Blog (Content Handler App)
- Adding a Webshop
- Online Reservation App (Online Hotel Room Booking)
- Redirects
- Visitor Statistics
- Pages Based on Device Operating System
- Linking to a Web Client
- Maintenance functions
- Home page for Standard ERP manual
Introducción al Módulo Contabilidad en Standard ERP
El módulo de Contabilidad es el núcleo de un sistema contable. Es donde se registrará cada evento contable que ocurra en la vida del negocio. Cada evento contable estará representado por un registro de un Asiento Contable. Un Asiento Contable puede ser ingresado directamente a la Contabilidad, o puede ser creado a partir de otro registro como una Factura o un Recibo o a partir de una transacción de Stock. La información contenida en las Transacciones se utilizará para elaborar los informes anuales, como el Balance, el Estado de Resultados y el Balance de Prueba. También puede utilizar esta información para la elaboración de presupuestos, previsiones y análisis.
---
El módulo Contabilidad en Standard ERP:
- Opciones
- Registro Asientos
- Registro Simulaciones
- Conciliación de Cuenta
- Registro Presupuesto
- Registro Presup. Revisado
- Registro Saldos Iniciales
- Reconciliación de Bancos
- Mantenimientos
- Formularios
- Informes
- Importaciones
- Exportaciones
- Página Principal para manual Standard ERP
Introduction to the Data Integrity Module
The Data Integrity module contains a number of reports that will help track down the cause of any mismatch between the Nominal Ledger and a Sub System.
To gain access to the Data Integrity module, follow these steps:
- Ensure the Data Integrity option on the 'Technical' card of the Configuration setting in the System module is selected:
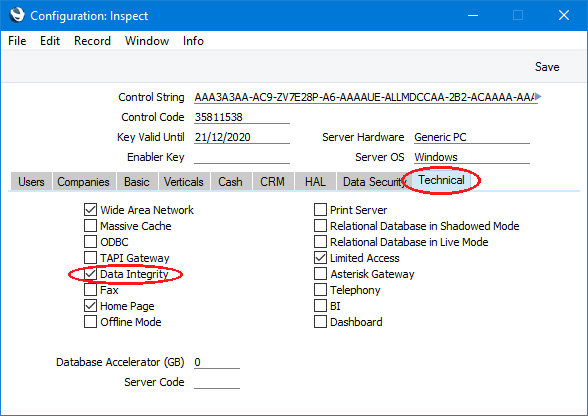
- Assign each Person or Global User who is to use the Data Integrity module to an Access Group in which you have granted full access to this module:
If 'Data Integrity' is not available in the list that appears when you try to change module, the probable reason is that you have logged on as a Person or Global User that does not have access privileges for this module.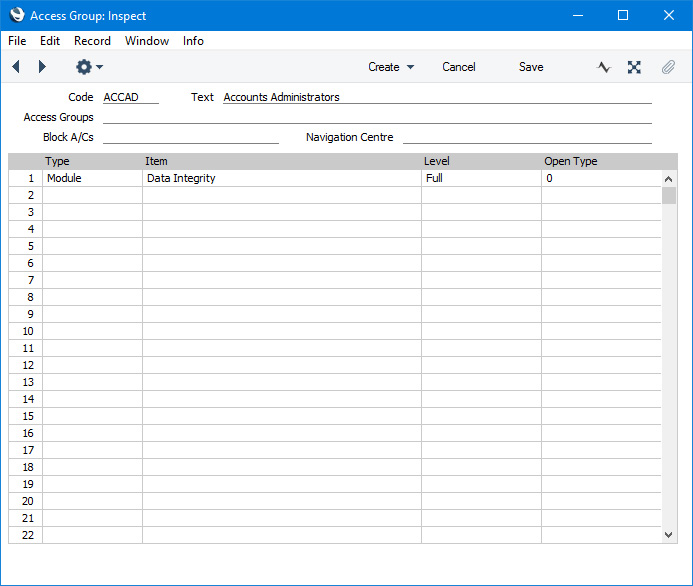
- Access Control (lists Global Users and Persons, showing the Companies that each user has access to, together with the level of access)
- N/L Correction List (also in the Nominal Ledger)
- N/L Correction List, Consolidated (also in the Consolidation module)
- Purchase Ledger Checking (compares the Purchase Ledger report with the balance on the Creditor Account)
- Purchase Ledger Roll Forward (lists transactions from a particular date that post to the Creditor Account)
- Sales Ledger Checking (compares the Sales Ledger report with the balance on the Debtor Account)
- Sales Ledger Roll Forward (lists transactions from a particular date that post to the Debtor Account)
- Subsystems Checking (also in the System module)
- Transaction Checking (also in the System module)
Go back to:
- Home page for Standard ERP manual
Introduction to the Restaurant module in Standard ERP
The Restaurant module in Standard ERP is suitable for use in bars and restaurants where the registration of sales over an extended period often without the use of keyboards is of the highest priority. Sales (recorded in the Bar Tab register) can be parked and returned to at any time, allowing Customers to pay only once, when sales have been concluded. Bar Tabs do not update stock or the Nominal Ledger in real time. You can update stock and the Nominal Ledger periodically (e.g. at the end of every day) using the relevant Maintenance functions. Bar Tabs are included in sales statistics reports such as the Customer/Item Statistics, Item Sales Statistics, Item Statistics and Item Turnover History.
Bar Tabs can be entered using desktop computers and also using suitable tills, cash machines and hand-held devices. These can be connected to external devices such as printers, touch-screen monitors, customer displays and cash drawers. The tills and devices can be connected to the server using one of two connection methods:
- A "live" connection between sales terminals and the server in which sales terminals remain connected to the server throughout their work sessions (i.e. a standard client-server connection). All information is saved in the server database immediately. The steps required to prepare for a live connection are described here.
- A "live synchronised" connection between sales terminals and the server in which sales terminals are connected to the server when the server is available and otherwise act as stand-alone systems. When the connection exists, sales will be saved in the server database immediately and also in the databases on the sales terminals. When the connection does not exist, sales will only be recorded in the databases on the sales terminals. After a period of working offline, these sales will be uploaded to the server automatically when the connection is re-established, at times when the server's workload is low. Any relevant information that has been changed in the server database will also be sent to the sales terminals. While this connection method will result in larger databases on the sales terminals, it will be useful for companies where the network connection is slow or not reliable and where it is essential that the clients can continue working when there is no connection to the server. The term "live-sync" is used to describe this connection in these web pages. The steps required to prepare for a live connection are described here.
The Restaurant module in Standard ERP:
- Preparing for Connection
- Settings related to the Restaurant module
- Configuring the Bar Tab Window
- Workflow
- Maintenance functions (including the Cash Up routine)
- Forms
- Reports
- Exports
- Home page for Standard ERP manual
Introduction to the Production Module
The Standard ERP Production module is designed to facilitate the construction of assembled Items from components. Two types of assembled Item are catered for:
- Items that are assembled on the point of delivery. These Items are never held in stock: the components will be removed from stock when the delivery is made;
- Items that are assembled in advance of delivery and held in stock. Appropriate stock level adjustments will be made for the components and assembled Items at the time of construction or assembly.
In this section:
- Production Examples and Work Flow
- Settings
- Items and the Production Module
- Recipes
- Production Orders
- Productions
- Production Item Alternatives
- Production Operations
- Machine Hours
- Maintenance
- Forms
- Reports
- Home page for Standard ERP manual
Introduction to the Cash Book Module in Standard ERP
The Cash Book module is an easy means of recording incoming and outgoing cash transactions. You can record each cash transaction individually, or you can enter the day's receipts as a single transaction, providing the same Sales and Cash or Bank Account applies to them all. Similarly, you can also enter the day's payments as a single transaction.
---
The Cash Book module in Standard ERP:
- Integration with the Sales and Purchase Ledgers
- Settings
- Cash In and Cash Out registers
- Receipt register (also in the Sales Ledger)
- Payment register (also in the Purchase Ledger)
- Personnel Payment register (also in the Expenses module)
- Simulation register (also in the Nominal Ledger)
- Account Reconciliation (also in the Nominal Ledger)
- Forex Transaction register
- Maintenance
- Forms
- Reports
- Home page for Standard ERP manual
Introduction to the Hotel module in Standard ERP
The Hotel module in Standard ERP is designed to allow hotels to manage Room bookings from initial quotation to invoicing. This includes provisional booking, Room assignment, check-in, adding Items to Guest Accounts (Folios), invoicing and check-out. The module includes a graphical Resource Planner that allows you to see quickly and easily which Rooms are available at a given time and that you can use as the starting point for all work creating and managing Reservations (Room Bookings). Multi-location hotels are fully supported. The 'Nightly Maintenance' routine if run every night will, amongst other functions, update Guest Accounts with the day's Room charges, post a value for Work in Progress (income for the day that will be invoiced in the future) to the Nominal Ledger and create housekeeping Activities for the Rooms that require cleaning. The integration with other modules in Standard ERP means that Invoices once marked as OK are immediately and automatically recorded in the Sales and Nominal Ledgers, making them available to debtor reports if not paid immediately and to all other reports. This integration also allows Restaurant Bookings to be made from the front desk and for Restaurant Bar Tabs and POS Invoices to be assigned to the Room Accounts of Guests staying in the hotel.
Please refer to the following pages for details:
- Preparation
- Settings in the Hotel module
- Using the Resource Planner as a control panel for Reservations (Room Bookings)
- Rooms
- Guests
- Reservation Quotations
- Reservations (Room Bookings) (including checking in and out)
- Guest Accounts/Folios (charging Room charges and Items)
- Group Reservations
- Booking hotel Rooms online through the Standard ERP webshop
- Maintenance functions (including the 'Nightly Maintenance' routine)
- Housekeeping
- Forms
- Reports
- Integration with the SiteMinder online booking portal
- Home page for Standard ERP manual
Introduction to the Inter-Company module in Standard ERP
If you have more than one Company in your database, the Inter-Company module can help with the administration of transactions between those Companies. Using the Inter-Company module will mean that when you create a record in one Company, a corresponding record will be created automatically in a second Company, as follows:
- Creating a Purchase Order in one Company will cause a Sales Order to be created in a second Company.
- Creating a Sales Invoice in one Company will cause a Purchase Invoice to be created in a second Company.
- Creating a Nominal Ledger Transaction in one Company will cause a Nominal Ledger Transaction to be created in a second Company.
The Inter-Company module in Standard ERP:
- Orders and Invoices between Companies
- Nominal Ledger Transactions between Companies
- The Inter-Company Account Comparison Report
- Home page for Standard ERP manual
Introduction to the Rental module in Standard ERP
The Rental module in Standard ERP is designed to allow rental companies to manage rental bookings from initial quotation to invoicing. This includes provisional booking, choice of Rental Item, handing Rental Items over to Customers, adding rental and other charges to the Rental Agreement, receiving Rental Items back from Customers, inspection of Rental Items, invoicing and rental stock history. The 'Charge Reservations' routine if run every night will update Rental Agreements with the day's rental charges. Multi-location rental companies are supported, as Rental Items can be rented from one Location and returned to another. The integration with other modules in Standard ERP means that Invoices once marked as OK are immediately and automatically recorded in the Sales and Nominal Ledgers, making them available to debtor reports if not paid immediately and to all other reports. Each Rental Item can have a corresponding Asset record, allowing it to be included in depreciation calculations and Transactions. There is also close integration between the Rental and Internal Stock modules, and this documentation includes descriptions of many of the features in Internal Stock.
Please refer to the following pages for details:
- Preparation and Workflow
- Settings
- The Stock Transfer register in the Internal Stock module (transferring Items from sales stock to rental stock)
- The Rental Item register (Items for renting out)
- The Rental Quotation register
- The Agreement register (central records from where you will manage the rental process)
- The Rental Reservation register (booking Rental Items for Customers for the rental period)
- The Items Out register in the Internal Stock module (handing Rental Items over to Customers)
- The Collection register (reminders as rental periods end)
- The Items In register in the Internal Stock module (receiving Rental Items back from Customers)
- The Rental Item Inspection register (inspecting Rental Items after rental)
- Maintenance functions
- Forms
- Reports
- Exports
Go back to:
- Home page for Standard ERP manual
Introduction to the Service Orders Module
The Service Orders module in Standard ERP is designed to be used in companies that provide repair services and that require an efficient tool to organise these services.
To use the Service Orders module, you will first define each repair job is recorded as a separate record in the Service Order register. If your company is one that sells and repairs the same Items, the warranty status of repair items will be established automatically (providing as is recommended that you choose to keep the Known Serial Number register updated as this register will supply the warranty information to Service Orders). You can then issue instructions to technicians by creating Work Orders: the technicians will then record the labour and spare parts that they use in the Work Sheet register. This register integrates with the Stock module: marking Work Sheets as OK removes the spare parts used from stock and creates transactions in the Nominal Ledger to update the stock valuation if appropriate. You will be able to generate Purchase Orders for spare parts that are not in stock. Labour and spare parts information will also be transferred automatically from Work Sheets to the Work Sheet Transaction register, which specifies in detail how quantities and prices are to be invoiced and charged to each Service Order. Work Sheet Transactions are fully editable before the invoicing process. Invoices for repairs will be saved in the Invoice register in the Sales Ledger module, where they are treated as normal Invoices. You can also choose to record movements of repair items in and out of the workshops in a dedicated register.
Please refer to the following pages for details:
- Service Order Example and Work Flow
- Note on Terminology
- Settings
- The Service Order register
- The Work Order register
- The Work Sheet register
- The Service Stock Transaction register
- The Work Sheet Transaction register
- The Known Serial Number register
- Maintenance functions
- Forms
- Reports
- Imports
Go back to:
- Home page for Standard ERP manual
Introduction to the Jewellery module in Standard ERP
The Jewellery module in Standard ERP modifies the stock, order processing and retail features in the application to allow them to be used more easily in a high-value retail environment such a jewellery store. As a user of the Jewellery module, you will be able to keep track of each of your jewellery pieces, giving each one a unique number (Serial Number), but at the same time allowing you to have a single SKU code for each style or item. You will be able to produce reports analysing the history of an individual Serial Numbered piece without having to run the reports for every example of the style or item. At the same time, the standard stock, order processing and retail features will mean that you will be able to retrieve information about Customers, see their purchase history, look up stock status, and gather information about employee activities within the company.
The Jewellery module in Standard ERP:
---
Go back to:
- Home page for Standard ERP manual
Introduction to Items and Pricing in Standard ERP
In Standard ERP you should store information about the products and services that you sell in the Item register. This register is accessible from many modules including Sales Orders and Purchase Orders, the Sales Ledger, and the Contracts, Production, Quotations, Service Orders and Job Costing modules if installed.
You can group Items of a similar type together using Item Groups. You can give every Item belonging to the same Group can be given the same default Sales and Cost Accounts, Stock Account and VAT Codes, saving you the work of having to specify these for each Item individually. Defining and assigning Item Groups also makes modification easier: if you need to change the Cost Account, for example, you only need make one change (to the Item Group), rather than many (to each of the Items).
If you specify information both in an Item Group and in an Item belonging to that Group, the information in the Item record will take precedence. For example, if you specify a Cost Account in an Item Group and in an Item belonging to that Item Group, the one in the Item record will be used.
Please refer to the following pages for more details about Items and Pricing in Standard ERP:
- Item Groups
- Items
- Item Settings
- The 'Item Status' Window
- Default Items
- Item Classifications
- Changing the Prices of Items
- Pricing
- Reports connected with Items
- Export functions connected with Items
- Varieties
Go back to:
- Home page for Standard ERP manual
Introduction to the System Module in Standard ERP
The System module in Standard ERP contains settings and registers used collectively by the other modules, including the Chart of Accounts and Tags/Objects. It is also where you can set up and administer access rights and User Accounts.
Please refer to the following pages for details:
- Settings
- Companies
- Persons (User Accounts)
- Chart of Accounts
- Tags/Objects
- Form Templates
- Maintenance functions
- Reports
- Imports
- Exports
Go back to:
- Home page for System Module manual
- Home page for Standard ERP manual
Introduction to the Assets Module in Standard ERP
The Assets module in Standard ERP allows you to record the Assets in your company, to calculate and post depreciation, to revalue Assets and to dispose of Assets. The module is integrated with the Nominal Ledger and with the Rental module.
The Assets module includes functions that will calculate the depreciation for each Asset depending on its value and on user-defined depreciation rules. These rules, which are known as "Depreciation Models" in Standard ERP, allow you to specify depreciation rates, depreciation periods (daily, monthly, quarterly or yearly) and depreciation calculation methods (straight line or declining balance. These functions can create depreciation transactions in the Simulation or Transaction registers, or you can record depreciation in the Nominal Ledger yourself by copying depreciation figures from reports.
You can enter Asset records directly to the Asset register and you can create them remotely from Purchase Invoices and Stock Transfer records. When entering Purchase Invoices, you will be able to use the 'Asset' function on the Create menu (Windows/macOS) or + menu (IOS/Android) to create an Asset record from any Item in a Purchase Invoice. When you purchase an Item that you intend to offer for rent, you will use a Stock Transfer record to transfer the Item from sales stock to rental stock. An Asset record for the Item will be created automatically as part of this process.
Please refer to the following pages for details:
- Example
- Settings
- The Depreciation Model register (setting depreciation rates and calculation methods)
- The Asset Category register
- The Asset register
- The Disposal register (selling Assets and writing them off)
- The Revaluation register (changing the value of Assets)
- The Asset Status register (moving Assets between Departments, changing the Persons responsible for Assets, and recording the stock taking of Assets)
- The Asset Transaction register
- Maintenance functions (including the calculation and posting of deprecation)
- Forms
- Reports
- Exports
Go back to:
- Home page for Standard ERP manual
Introduction to Customers, Suppliers and Contact Persons in Standard ERP
Information about your Customers, Suppliers, Contact Persons and all other companies and individuals with whom you have some contact is stored in the Contact register. This register is available in many modules including the Sales and Purchase Orders, the Sales and Purchase Ledgers, and Contracts, Quotations, CRM and Service Orders if installed. Storing Customers, Suppliers, Contact Persons and other companies together in one register means that you can make full use of the Calendar, Task Manager, Mails and Letters with companies and individuals of all kinds. It also means that you will only have to maintain a single record for a company who is both a Customer and a Supplier.
Throughout these web pages, the terms "Customer" and "Supplier" both refer to records in the Contact register. Those records do not necessarily represent firms that have purchased goods or services from your business, or sold goods or services to you, and in fact can represent any company that is a potential customer or supplier.
The term "Customer" is usually used when describing the use of a record in the Customer register in a sales context, while "Supplier" is used in a purchase context. "Customer" implies that the Customer box in the header of the Contact record has been ticked while "Supplier" implies that the Supplier box has been ticked. A Contact record can be marked both as a Customer and as a Supplier.
As soon as contact is established between your business and a potential client or supplier, you should record their details in the Contact register. You should register their relationship with you (e.g. "Prospect" or "Lead") using the Contact Classification field on the 'Contact' card of the Contact record. Mark the record as a Customer or a Supplier or both using the check boxes in the header, depending on their potential or actual relationship to your company. These check boxes will allow you to use the record in sales or purchase transactions as appropriate.
The term "Contact Person" is used when referring to an individual person: this may be a private individual or someone who works for a Customer or Supplier. In the latter case, you will have separate records in the Contact register for the Customer or Supplier and for the individual Contact Person. The Contact Person and Customer or Supplier will be linked using the Contact Relations register (described here). Usually you will not tick the Customer or Supplier boxes in the Contact record for a Contact Person unless you will sell directly to or buy directly from them independently of the company they work for.
The term "Contact" is used when referring to any record on the Contact register. A Contact can therefore be a Customer, a Supplier or a Contact Person.
On the sales side, you can group Customers of a similar type together using Customer Categories. Every Customer belonging to a Category can be given the same default Price List, Discount Matrix and Debtor Account, saving you the work of having to specify these in the Contact records for the individual Customers. Defining and assigning Customer Categories also makes modification easier: if you need to change the Discount Matrix, for example, you only need to make one change (to the Customer Category), rather than many (to each of the Customer records). If you specify information both for a Customer Category and in the Contact record of an individual Customer belonging to that Category, the information in the Contact record will take precedence. For example, if you specify a Price List in a Customer Category and in a Customer belonging to that Category, the one in the Customer will be used.
Similarly, on the purchase side you can group Suppliers of a similar type together using Supplier Categories. Every Supplier belonging to the same Category will be given the same default On Account and Creditor Accounts, saving you the work of having to specify these for each one individually. A company that is both a Customer and Supplier can belong both to a Customer Category and to a Supplier Category.
Prior to version 4.1 of the application, Customers and Suppliers were stored in separate registers. In this version, the two registers were made into one. When you update to this or a later version, you can use the 'Convert Suppliers to Customers' Maintenance function in the System module to bring the information in the two registers together. This is described on the Combining Customers and Suppliers page. In 5.0, the Maintenance function was renamed 'Convert Suppliers to Contacts', and in 5.1 it was moved to the Technics module.
In version 5.0, the previously separate Contact Person register was incorporated into the combined Customer/Supplier register, which was re-named the Contact register. When you update to this or a later version, you can use the 'Convert Contact Persons to Contacts' Maintenance function in the Technics module to bring the information in the two registers together. This is described on the Combining Customers and Contact Persons page.
Please refer to the following pages for more information about the Contact register in Standard ERP:
- Settings connected with Contacts
- The Contact register
- Forms connected with Contacts
- Reports connected with Contacts
Go back to:
- Home page for Customers, Suppliers and Contact Persons manual
- Home page for Standard ERP manual
Introduction to the MRP Module in Standard ERP
The Material Resource Planning (MRP) module allows you to plan the production and purchase of Items based on Sales Forecasts and on required stock levels.
Having entered sales forecasts and specifying required stock levels for each Item, Maintenance routines will use that information in creating Production and Purchase Order Plans for each week or month. These contain detailed production and purchasing schedules that include both quantities and timetables. Productions with sub-assemblies are fully supported, while Purchase Order Plans will contain the purchasing requirements both for Items that you will buy to resell and for Items that you will use in the planned Productions.
From a Production Plan, you can create either Productions or Production Orders, and from a Purchase Order Plan you can create Purchase Orders. Production and Purchase Order Plans can therefore directly influence your production and purchasing decisions and will help ensure you have sufficient stock at all times to meet Sales Forecasts.
---
The MRP module in Standard ERP:
- Workflow
- The Calculation Formula
- Settings
- Sales Forecasts
- Production Plans
- Purchase Order Plans
- Items
- Purchase Items
- Recipes
- Maintenance functions
- Reports
- Home page for Standard ERP manual