Windows
In HansaWorld Enterprise, you can work with several windows on the screen at the same time. The window that is currently in use is known as the 'active window'. That is the uppermost window, where the title bar is not dimmed.You can move the active window by dragging the title bar, and change its size by dragging the size box in the bottom right-hand corner. Close the window by clicking the close box or by pressing the Esc key on your keyboard. If you are using Mac OS X, clicking the close box of a window while holding down the Alt key will close all windows, while Windows and Linux users can use the 'Close All' function on the Window menu. In addition, you can save attributes such as size, sort order and position for a particular window using the Window menu. The Window menu is described here. If you have several windows open, you can bring each one to the front in turn using the Ctrl-Tab or ⌘-Shift-N keyboard shortcuts.
! | You can have up to 100 windows open at the same time. It is however a good habit to close a window when it is no longer needed. Too many open windows may become confusing. |
There are seven types of window:
- Browse windows
- Record windows
- Report windows
- List windows
- Specification windows
- File dialogue windows
- Business Communicator window
Browse Window
Browse windows are used to display lists of records. Clicking a register button in the Master Control panel will open a browse window listing every record stored in that register. In a browse window, you can search for a certain record and select a specific record for processing. You can have several different browse windows open at any time.
For example, if you click the [Transactions] button in the Master Control panel while working in the Nominal Ledger module, the window that opens is a browse window, entitled 'Transactions: Browse'. This window lists all the Transactions in the register.
You can scroll through the list using the scroll bar on the right. You can scroll down or up a screen at a time by selecting 'Next' or 'Previous' respectively from the Record menu.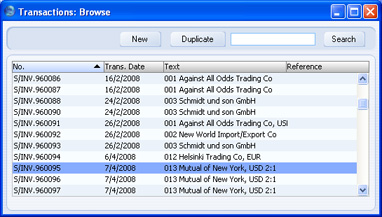
You can change the sort order of the list. Click the heading of the column you want to sort by, and the list will re-sort immediately. The heading of the column will be coloured blue to show the selected sort order. If you click on the heading a second time, the sort order will be reversed.
At the top of each browse window there is an area known as the Button Bar. This contains a set of buttons:

- Operations
- This drop-down menu appears in certain browse windows only. Highlight one or more records in the list (hold down the Shift key while clicking) and then choose a function from this menu. The function will be applied to all highlighted records. The contents of the Operations menu will vary depending on the browse window. Each function is described in full on the appropriate web page.
- [New]
- Windows/Linux keyboard shortcut: Ctrl-N
- Mac OS X keyboard shortcut: ⌘-N
- Click this button to open a new blank record for data entry.
- Mac OS X keyboard shortcut: ⌘-N
- [Duplicate]
- Windows/Linux keyboard shortcut: Ctrl-K
- Mac OS X keyboard shortcut: ⌘-Y
- If you need to create a new record that is a copy of one that already exists, first find the earlier record in the list and highlight it by clicking once. Then, click this button. A new record is opened, a duplicate of that highlighted. In many cases, the new record will contain the current date, not the date of the copied record.
- Mac OS X keyboard shortcut: ⌘-Y
- [Search]
- Use the Search field and button (on the right of the Button Bar) to find a particular record in the list. First, sort the list by the column that you want to use for the search. In the illustration above, for example, the list is sorted by No. allowing you to search for a Transaction with a certain Number. Then, type a letter, word, number, or date in the Search field (there is no need to click in the field before typing). Then press Enter or click [Search]. The first row with an exact match in the sort column (or, if there is no exact match, with the nearest match) will be highlighted. If you are not certain of the exact spelling, use the * character as a wildcard. For example, in the illustration shown above, if you want to find Transactions relating to Mutual of New York but do not know their Customer Number (013), sort the list by the Text column, type "*Mutual" in the Search field and press the Enter key. If the first record found is not the one you want, press the Shift-Enter key combination to search again.
!
It is not possible to delete a record directly from the browse window. You must open the record first.
Some browse windows have three extra buttons in the centre of their Button Bars:
You can use these buttons if the Limited Access module is present, as follows: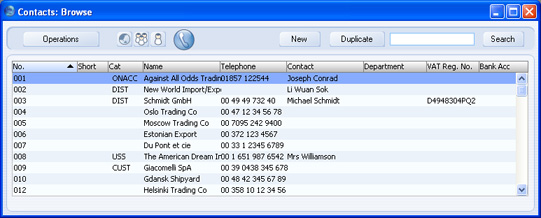

- Lists all records in the register.

- Lists records belonging to members of the same Sales Group as the current user (i.e. records whose Sales Group is the same as that of the current user).

- Lists records belonging to the current user (i.e. records whose Person field contains the initials of the current user).
Finally, some browse windows also have a [Business Communicator] button in the centre of their Button Bars:
This button will appear if the browse window belongs to a register such as the Activity, Invoice and Contact registers where you may need to communicate with a Contact (e.g. with the Contact quoted in an Activity or Invoice). Please refer to the Business Communicator Window page for details.
---
In this chapter:
- Browse window
- Record window
- Report window
- List window
- Specification window
- File dialogue window
- Business Communicator window
Record Window
You will use record windows are used to enter, view and edit individual records. The heading may read 'New', 'Inspect', 'Update' or 'Deleting', depending on the circumstance. All data entry will be made in windows of this type.
A record window is opened when you open a specific record from a browse window by double-clicking, and when you create a new record. Below is the window that is opened when you double-click a row in the 'Invoices: Browse' window.
The record window is where you enter or edit information. Note that certain fields will only accept numbers or uppercase letters, while others cannot be changed at all. In some cases, all characters will be converted to uppercase automatically.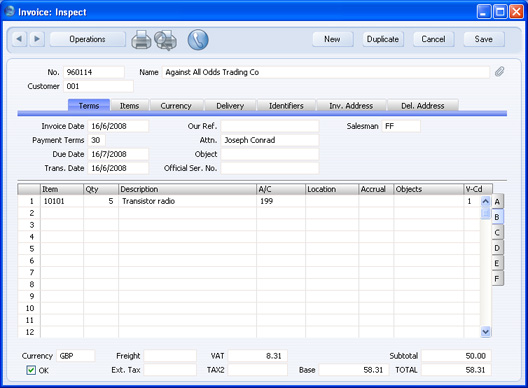
Use the Return, Tab or arrow keys to move from field to field. The Return key moves the cursor to the next editable field, while the arrow keys move to the next field, whether it can be changed or not. You can also use the mouse to click directly in a field to enter or change its data. When you click in a field, its contents will be highlighted, and the contents will be replaced as soon as you start typing. If you click twice in the same field, the insertion point will be placed at the point where you click, allowing you to enter or delete characters at that point.
Some record windows, such as that in the illustration, are divided into two sections: the top half shows details of the parent record (in this case, an Invoice) and the lower half contains the individual items (or rows) that are listed on that Invoice.
Sometimes a record window contains more information than can be shown on screen at once. If this is the case, there will be a series of tabs (marked 'Terms', 'Items', 'Currency', etc in the example of the Invoice illustrated above) that you can click to see more pages of information about the parent record. There may also be a series of flips (marked 'A', 'B', 'C', etc) that you can click to see more information for the rows.
---
In this chapter:
- Browse window
- Record window, including:
- Report window
- List window
- Specification window
- File dialogue window
- Business Communicator window
Record Window - Button Bar
At the top of each record window there is an area known as the Button Bar. This contains a set of buttons:


- Windows/Linux keyboard shortcuts: PgUp and PgDn
- Mac OS X keyboard shortcuts: ⌘-- and ⌘-+
- These are the [Previous Record] (on the left) and [Next Record] buttons. Use them to go from record to record. Once you have opened a record from a list in a browse window, click the [Next Record] button to move to the next record in that list. At the same time everything you may have changed in the record you are leaving will be saved. If you want to cancel the changes, close the record window with the close box or press the [Cancel] button on the right of the Button Bar. Similarly, clicking the [Previous Record] button will open the previous record in the list.
- These buttons have the same effect as selecting 'Previous' and 'Next' from the Record menu.
- Mac OS X keyboard shortcuts: ⌘-- and ⌘-+
- Operations
- In several record windows, such as those for Invoices and Orders, there is an Operations drop-down menu available. This contains different functions depending on the window. For the Invoice record, the following menu items are available:
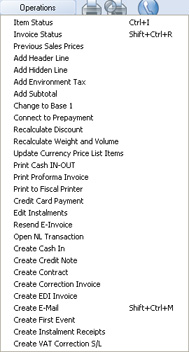
- 'Item Status' shows the stock position for the Item in the current row on the Invoice. 'Create Cash In' allows you to receive cash payment against the current invoice, and 'Invoice Status' opens a window with a summary of the status of the invoice; payments etc.
- Each function is described in full on the appropriate web page.
- 'Item Status' shows the stock position for the Item in the current row on the Invoice. 'Create Cash In' allows you to receive cash payment against the current invoice, and 'Invoice Status' opens a window with a summary of the status of the invoice; payments etc.

- Windows/Linux keyboard shortcut: Ctrl-P
- Mac OS X keyboard shortcut: ⌘-P
- Click this Printer icon to print the current record. The Printer icon will only appear in the Button Bar when the record window contains a record that can be printed, e.g. an Invoice or Purchase Order. The 'Print' command on the File menu has the same function.
- The record will be printed using a Form that you specify using the 'Define Document' function for the document in question. Please refer to the description of this function on the Documents page for details.
- When you start a printout, it will print directly on your selected printer.
- Mac OS X keyboard shortcut: ⌘-P

- Windows/Linux keyboard shortcut: Ctrl-Shift-P
- Mac OS X keyboard shortcut: ⌘-Shift-P
- Clicking the Preview icon will cause the current record to be printed to screen in a new window. This will allow you to see what it will look like when you print it on a printer by clicking the Printer icon immediately to the left.
- Mac OS X keyboard shortcut: ⌘-Shift-P

- In some record windows, such as those for Activities, Invoices and Contacts, there is a [Business Communicator] button in the Button Bar. If you need to call the Contact quoted in the Activity or Invoice or whose Contact record you are viewing, click this button. Please refer to the Business Communicator Window page for details.
- [New]
- Windows/Linux keyboard shortcut: Ctrl-N
- Mac OS X keyboard shortcut: ⌘-N
- Click this button to save the current record and to close it. A new blank record is then opened for data entry.
- Mac OS X keyboard shortcut: ⌘-N
- [Duplicate]
- Windows/Linux keyboard shortcut: Ctrl-K
- Mac OS X keyboard shortcut: ⌘-Y
- Click this button to save the current record and to create a copy of it. The original record is closed and the new copy is opened. In many cases, the new record will contain the current date, not the date of the copied record.
- Mac OS X keyboard shortcut: ⌘-Y
- [Cancel]
- If you have not saved the current record (i.e. the window title is 'New'), click this button to cancel the data entry process and to close the record window. The record will not be saved. If you have previously saved the current record (i.e. the window title is 'Update'), click this button to discard all changes made since it was last saved. In this case, the record window will not be closed.
- [Save]
- Windows/Linux keyboard shortcut: Shift-Enter
- Mac OS X keyboard shortcut: Shift-Enter
- This button saves all changes to the current record but does not close it.
- Mac OS X keyboard shortcut: Shift-Enter
In this chapter:
- Browse window
- Record window, including:
- Button Bar
- Paste Special
- Drag and Drop
- Attachments
- Button Bar
- Report window
- List window
- Specification window
- File dialogue window
- Business Communicator window
Record Window - Row Menu
Many record windows are divided into two sections: the top half shows details relating to the record as a whole (for example, in an Order, the top half will contain details such as the Order Number and Date and the Customer) and the lower half contains a matrix listing the individual items (or rows) that are attached to the record (e.g. in an Order, the matrix will list the ordered Items).
These windows will often have an Operations menu, which contains functions that refer to or affect the record as a whole. For example, in an Order, included on the Operations menu will be an 'Order Status' function that you can use to open a window containing a summary of the status of the Order, listing Deliveries, Invoices and any other connected records. The matrix in these windows will often have its own menu, which contains functions that refer to or affect an individual row in the matrix. This is sometimes known as the "Row Menu".
To use the Row menu, first click in any field in the row in question (i.e. the row to which the function is to be applied), and then right-click (Windows) or Ctrl-click (Mac OS X) the row number (on the left of the row). A menu will appear, where you can select the function that you need:
The functions on the Row menu will vary depending on the record you are looking at, and are described in full on the appropriate web pages.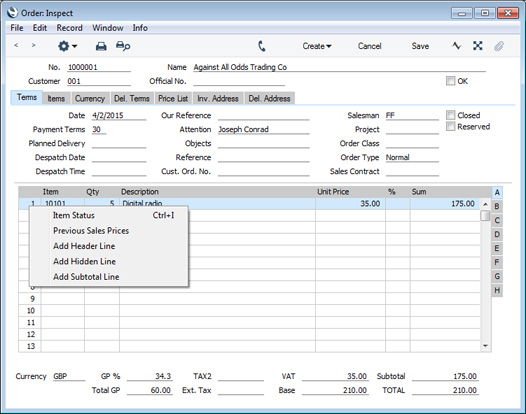
---
Types of window in Standard ERP:
- Browse window
- Record window, including:
- Report window
- List window
- Specification window
- File dialogue window
- Business Communicator window
- Home page for Working Environment manual
- Home page for Standard ERP manual
Record Window - Paste Special
When you enter a new record, you will frequently need to refer to another register or setting. For example, when you enter an Invoice, specifying a Customer Number will bring information about the relevant Customer in from the Contact register (e.g. the name and address of the Customer), while specifying a Payment Term brings information in from the Payment Terms setting. Using the 'Paste Special' command, you can find out the information you require from a selection list quickly and easily (e.g. you can easily choose the correct Customer or Payment Term). Pressing Ctrl-Return or Ctrl-Enter in a field activates the 'Paste Special' feature. Mac OS X users can press ⌘-Return or ⌘-Enter, and PocketPC users can tap in the field with the stylus. The following example shows pasting a Customer Number into an Invoice:
With the cursor placed in the Customer field, press the Ctrl-Enter (Windows and Linux) or ⌘-Enter (Mac OS X) key combination. A new window will open, showing the contents of the register or setting from which you can select a record (in this case, the window will list Customers in the Contact register). This window is similar to a browse window in its behaviour, so you can sort the list by any of the columns by clicking the column heading and use the Search field to find the record you are looking for (using the * wildcard if necessary).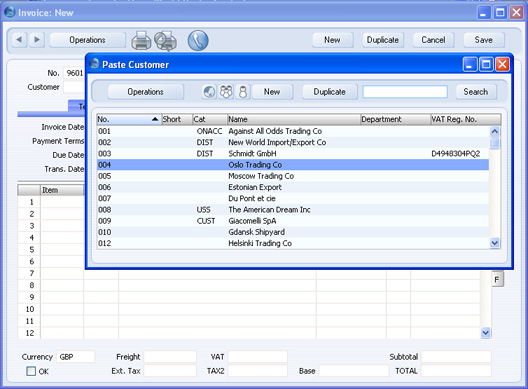
Select the Customer you want by double-clicking or by highlighting and pressing Enter. The Customer Number and other details are transferred to the Invoice screen.
You can make the 'Paste Special' feature more powerful by saving the sort order of the 'Paste Special' list. For example, whenever you need to choose a Customer, you will probably know its Name but not its Number. The first time you use the 'Paste Special' feature to choose a Customer, sort the list by Name and then select 'Save Normal Position' (Windows and Linux)/'Save Position' (Mac OS X) from the Window menu. From now on, the list will be sorted by Name when it opens. Now you can type the first few characters of the Customer Name in a Customer field and then press Ctrl-Enter or ⌘-Enter. When the 'Paste Special' list opens, the highlighted Customer will be the first one to match what was typed. If this is the correct one, all you need do is press the Enter key and carry on typing without interruption. In the example shown below, we typed "OSLO" into the Customer Number field of an Invoice and then pressed Ctrl-Enter. The 'Paste Special' list opens, with the first Customer whose name begins with "OSLO" highlighted:
If the record you are looking for does not exist and so is not shown in the 'Paste Special' list, you can often enter it on the fly. In the 'Paste Special' window, press Ctrl-N or ⌘-N, or click the [New] or [Duplicate] buttons as appropriate. A new Customer screen (in this example) is shown. Enter the new Customer, click [Save] and the new record is saved. At the same time, the Customer Number is entered in the Invoice.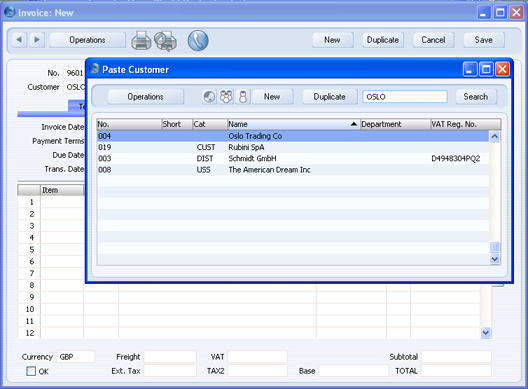
If you are entering an Invoice and realise that your information about the Customer is out of date (they might have changed their address or telephone number, for example), highlight the Customer in the 'Paste Special' window and press F2 (Windows and Linux) or ⌘-Shift-V (Mac OS X). The Customer record is opened, allowing you to make the necessary changes. You can also do this if the Customer Number has already been entered to the Invoice. With the cursor in the Customer Number field, press F2 or ⌘-Shift-V. This feature is available from most fields with a 'Paste Special' link.
You can control the availability to individual users of the F2/⌘-Shift-V feature and of the ability to create records on the fly using the Access Groups setting in the System module.
You can use 'Paste Special' when you are in a date field. When you press Ctrl-Enter or ⌘-Enter, the 'Paste Date' window opens:
The current date is marked with a square and a highlight. Press the Enter or Return key to bring the current date into the date field. If you need a different date, use the arrow keys to move the highlight to the date you need: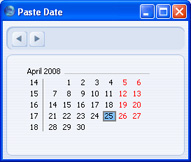
The grey square marks the current date. Use the PgUp and PgDn keys to change to a different month. Press Enter or Return to bring your chosen date into the date field. If dashes appear instead of Week Numbers in the 'Paste Date' window, the probable cause is that there is no record in the Weeks setting in the System module, or the record that is there is incomplete.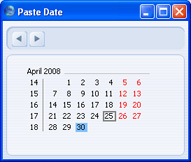
You can also use 'Paste Special' when you are in a time field. Simply press Ctrl-Enter or ⌘-Enter and the current time will be entered straight away.
---
In this chapter:
- Browse window
- Record window, including:
- Button Bar
- Paste Special
- Drag and Drop
- Attachments
- Button Bar
- Report window
- List window
- Specification window
- File dialogue window
- Business Communicator window
Record Window - Drag and Drop
You can also drag and drop records from a browse window or 'Paste Special' list onto the record window of a particular record. For example, you can drag a Customer Number from the 'Contacts: Browse' or the 'Paste Customer' window into an Order or Invoice. With both the 'Contacts: Browse' and 'Invoice: New' windows open, find the correct Customer in the list, click on the Customer Number and drag it to the Customer Number field of the Invoice. You can add Items and information from settings such as Payment Terms to Invoices, Orders and other transactions in the same manner. In the case of Items, you can open the 'Items: Browse' or the 'Paste Item' window and select a range of Items by clicking while holding down the Shift key. Then, drag them to the Item field in the first empty Invoice row.
In certain circumstances, you can also create records by dragging and dropping. For example, you can drag an Order from the 'Orders: Browse' window to the 'Deliveries: Browse' window to create a Delivery for all the Items on the Order. Once you have approved that Delivery, you can then drag the Order from the 'Orders: Browse' window to the 'Invoices: Browse' window to create an Invoice for all delivered Items.
You can also copy lists from spreadsheets or word processing documents. For example, you can copy a list of Item Numbers from a spreadsheet and paste them in the Item field in the first empty Invoice or Order row. All appropriate Item Descriptions, Prices, etc will be brought it automatically. Similarly you can copy a list of Invoice Numbers from a spreadsheet and paste them in a Receipt or Payment.
If you have several Companies, you can transfer information from one Company to another by dragging and dropping between browse windows. For example, when you create a new Company, you can drag all the Accounts from the 'Accounts: Browse' window of an existing Company to that of the new Company. This makes it easy to transfer basic information to the new Company. If you transfer approved accounting transactions of any kind using this method, they will appear as unapproved transactions in the new Company. An approved transaction is one from the Sales Ledger, Purchase Ledger or Stock module that has been posted to the Nominal Ledger.
---
In this chapter:
- Browse window
- Record window, including:
- Button Bar
- Paste Special
- Drag and Drop
- Attachments
- Button Bar
- Report window
- List window
- Specification window
- File dialogue window
- Business Communicator window
Record Window - Attachments
All record windows contain an [Attachments] button, which can take one of two forms:

This button allows you to connect files, notes or other records to any record in HansaWorld Enterprise. These connected objects are known as "Attachments". Please refer to the description of Attachments here for full details.
---
In this chapter:
- Browse window
- Record window, including:
- Button Bar
- Paste Special
- Drag and Drop
- Attachments
- Button Bar
- Report window
- List window
- Specification window
- File dialogue window
- Business Communicator window
Record Window - Changing the Fields in a Record Window
This page describes how to change the attributes of fields and check boxes in record windows.
---
You can change some of the attributes of the fields and check boxes in a record window. For example, you can change field labels, hide fields and make fields mandatory. Follow these steps:
- Log in as a Global User or Person belonging to an Access Group in which Full access has been granted to the 'Field Settings' Action.
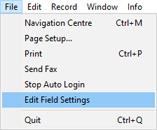
- Choose 'Edit Field Settings' from the File menu. This option will only be available to users with Full access to the 'Field Settings' Action mentioned in step 1.
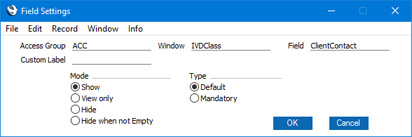
- A 'Field Settings' window will appear:
This window contains an Access Group field and a View changes check box, as follows:
- Access Group
- Paste Special
Access Groups setting, System module
- When you change the attributes of the fields in a record window, you will do so for the members of a particular Access Group. Choose that Access Group here using 'Paste Special' and then press [OK]. Note that the selection of an Access Group is case-sensitive, so it is recommended that you use 'Paste Special' to ensure the spelling and case usage are correct.
- View changes
- When editing the fields in a record window, use this check box to switch between the original version of the window (as originally defined in Standard ERP) and your edited version.
The presence of this 'Field Settings' window signifies that you are in 'Edit Field' mode. While you are in this mode, you will not be able to edit any records. Instead, whenever you open a record window, you will be able to change the attributes of the fields in that record window. As a further reminder that you are in 'Edit Field' mode, the window title of every window that you open will include the word 'Editing' (instead of 'New', 'Inspect', 'Update' or 'Browse').
- Access Group
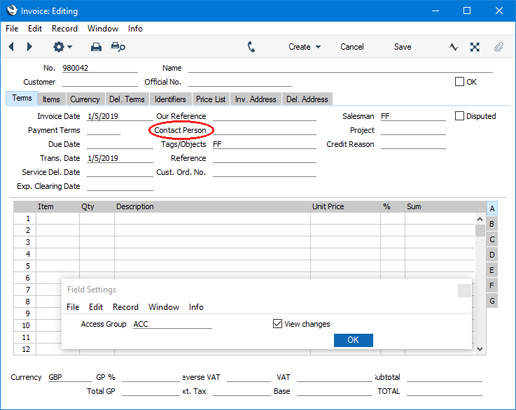
- To change the attributes of the fields in a record window, open the window in the usual way. For example, if you need to change the attributes of a field or fields in the Invoice window, you can either open an existing Invoice from the 'Invoices: Browse' window or you can open an empty new Invoice. When the window opens, you will see it as it will be shown to members of the Access Group specified in step 3.

- Click in the field whose attributes you need to change. This must be a header field, not a row field. You can also click a check box. A second 'Field Settings' window will appear. In the example illustrated below we clicked on the Attention field:
- Access Group
- Paste Special
Access Groups setting, System module
- When you change the attributes of the fields in a record window, you will do so for the members of a particular Access Group. The default here will be the Access Group that you chose in step 3. You can change the Access Group, but do not leave the field empty.
- Window
- This field displays the internal name of the window (the internal name is the name given to the window inside the program) and cannot be changed.
- Field
- The internal name of the field or check box whose attributes you are changing and cannot be changed.
- Custom Label
- If you want to change the name of the field in the window, enter the new name here.
- Mode
- Choose an attribute for the field or check box as follows:
- Show
- The default attribute for the field (as originally defined in Standard ERP) will be used.
- View only
- The field will not be editable. Choosing this option for a check box will have no effect.
- Hide
- The field or check box will not be visible.
- Hide when not Empty
- The field will not be visible if it contains a value. Choosing this option for a check box will have no effect.
- Show
- Type
- Specify whether it should be mandatory for members of the Access Group specified above to enter a value in the field whenever they create or modify a record in the window in question. Choosing this option for a check box will have no effect.
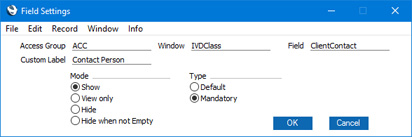
- Access Group
- Press [OK] to save the new field attributes. The second 'Field Settings' window will be closed, and the changes will immediately be visible (in a single-user installation only):
- If you need to compare the original version of the window with your modified version, select and deselect the View changes check box in the first 'Field Settings' window.
- Repeat steps 5 and 6 if you need to change the field attributes of other fields or check boxes.
- If you need to change the field attributes of a field or check box for other Access Groups, the following options are available:
- Change the Access Group in the first 'Field Settings' window and press [OK], as described in step 3. The appearance of the record window (e.g. of the Invoice window) will be changed so that you will be shown what is visible to members of the new Access Group. When you next click on a field or check box, the new Access Group will be the default in the second 'Field Settings' window.
- Change the Access Group in the second 'Field Settings' window.
- Duplicate a record in the Fields Settings setting as described below in step 11 and change the Access Group there.
You must specify an Access Group in the second 'Field Settings' window. Leaving the Access Group field blank in this window will not mean that the field attribute change will be visible to every Access Group.
- Change the Access Group in the first 'Field Settings' window and press [OK], as described in step 3. The appearance of the record window (e.g. of the Invoice window) will be changed so that you will be shown what is visible to members of the new Access Group. When you next click on a field or check box, the new Access Group will be the default in the second 'Field Settings' window.
- To leave 'Edit Field' mode, select 'Edit Field Settings' from the File menu once again.
- The field attribute settings will be saved in the Fields Settings setting in the Technics module. This setting will contain separate records for each window/Access Group combination. An individual record will contain a matrix listing the changed field attributes. If you need to change the field attributes in a particular window for several Access Groups, you can duplicate the record created in steps 5 and 6, and change the Access Group and the options as necessary.
You do not need to be in 'Edit Field' mode to work in the Fields Settings setting. However, note that the Window Class and VcName fields are not editable, so you cannot create a new record in this setting and specify the window or register (VcName). In other words, if there is no record in this setting for a particular window, you must create at least one record for that window following steps 3-6 above. You can then duplicate that record in this setting as needed.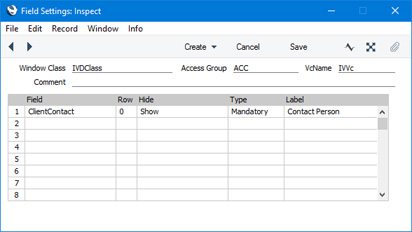
Any records that you add or change in this setting will not take effect until you close Standard ERP and restart. You don't need to restart the server.
Types of window in Standard ERP:
- Browse window
- Record window, including:
- Button Bar
- Row Menu
- Paste Special
- Drag and Drop
- Workflow Manager, Link Manager and Document Manager
- Changing the Fields in a Record Window
- Button Bar
- Report window
- List window
- Specification window
- File dialogue window
- Business Communicator window
- Home page for Working Environment manual
- Home page for Standard ERP manual
Report Window
Report windows are used to display the reports you print to the screen. Below we show an example of a report from the Nominal Ledger module. You can scroll up and down in the window, and search for information in the report.
Below the Button Bar there is a report header, which shows the name of the report and the selection on which it is based. This is important information, since you can produce every report using different selections.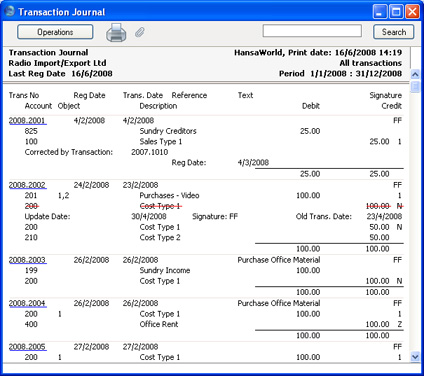
Below this is the report itself, always shown to its full width in its own resizeable window. You can scroll up and down through the report using the scroll bar on the right-hand side or using the Page Down, Page Up, Home and End keys on the keyboard.
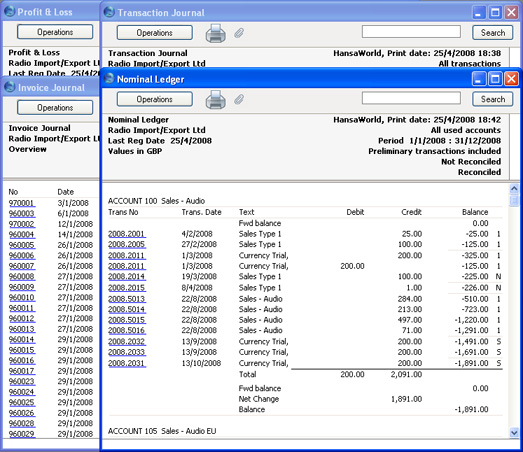
Since each report is shown in its own window, you can print several reports to screen at the same time, totally independently. This gives HansaWorld Enterprise an unmatched reporting power. You can for example show two versions of the Balance Sheet simultaneously, in two different windows. In one you might show the result without simulated transactions and in the other with simulations. You can easily extract information from HansaWorld Enterprise that would require some complicated manoeuvring to obtain from other accounting systems.
There is no practical limit to the number of reports that you can print to screen simultaneously, and you can freely mix reports from the different modules. Since windows in HansaWorld Enterprise are completely independent, you can mix report windows with record windows and lists from different parts of the system.
In the following picture we show an example where four reports from the Nominal Ledger and Sales Ledger are shown at the same time.
---
In this chapter:
- Browse window
- Record window
- Report window, including:
- List window
- Specification window
- File dialogue window
- Business Communicator window
Report Window - Printouts
You can print any report to paper by clicking the Printer icon in the Button Bar of the window containing the report. The page format is set in advance for each report so that the report will fit in a portrait or landscape page.
---
In this chapter:
- Browse window
- Record window
- Report window, including:
- List window
- Specification window
- File dialogue window
- Business Communicator window
Report Window - Searching in Reports
A useful function built in to every report in HansaWorld Enterprise when you print to screen is the ability to search for a text string in a report. The search string may contain any combination of letters and digits occurring in the report.
In this example you might want to search for the Nominal Ledger Transaction resulting from Invoice 960054. Enter "960054" into the Search field on the right of the Button Bar and press the Enter key. HansaWorld Enterprise will search for the first text string in the report that matches the search word, scroll the report to the position where the text was found, and highlight the text. Press the Enter key again to find the next match.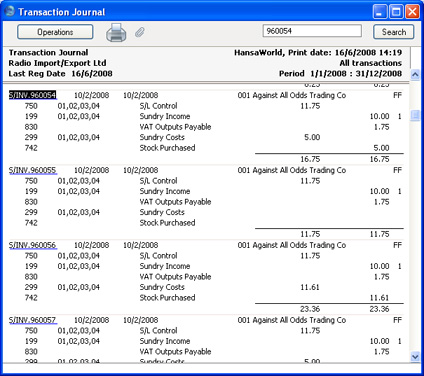
---
In this chapter:
- Browse window
- Record window
- Report window, including:
- List window
- Specification window
- File dialogue window
- Business Communicator window
Report Window - Recalculating Reports
All reports are shown in their own windows. You can leave a report on the screen and go to other windows to do various additions and alterations. If any of these alterations affect the contents of the report, you can easily update the report without closing and recreating it. Bring the report window to the front and select the 'Recalculate' command from the Operations menu (or use the Ctrl-Shift-R/⌘-Shift-R keyboard shortcut). This will update the report, using the same specifications. If you want to produce an updated version of the report using different specifications (e.g. you want to change the report period), select 'Reopen Report Specification' from the Operations menu (or use the Ctrl-Shift-E/⌘-Shift-E keyboard shortcut).---
In this chapter:
- Browse window
- Record window
- Report window, including:
- List window
- Specification window
- File dialogue window
- Business Communicator window
Report Window - Drill-down
HansaWorld Enterprise has a unique drill-down feature in some reports when you print them to screen. For example, when you have a Profit & Loss statement on the screen, you can click on any of the Account Numbers in the report. Subject to you having the necessary access rights, the Nominal Ledger report for the same selection and period is then opened in a separate window, showing all the Transactions that constitute the total amount on the Profit & Loss statement. If you further click on one of the Transaction numbers in the Nominal Ledger report, the Transaction record will open, showing all the details recorded for the event. The following picture shows the result of the above example.
Text with the drill-down feature is shown underlined in a screen report.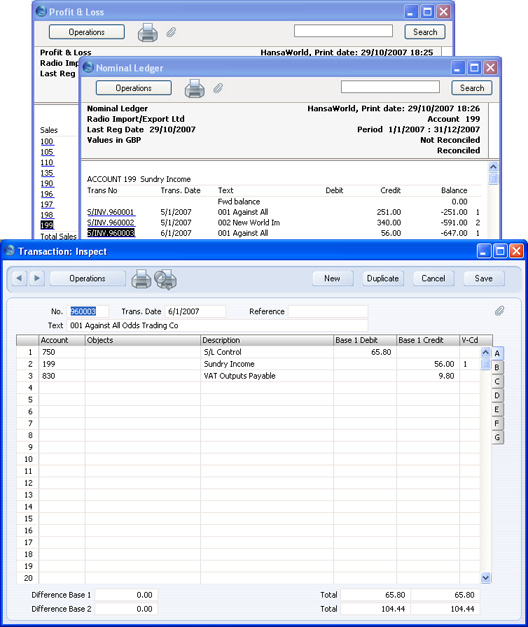
---
In this chapter:
- Browse window
- Record window
- Report window, including:
- List window
- Specification window
- File dialogue window
- Business Communicator window
Report Window - Attaching Reports to Records and the Personal Desktop
The Button Bar of the report window contains an [Attachments] button that allows you to attach a report to a record or to the Personal Desktop. Please refer to the Attachments and Personal Desktop pages for details.
---
In this chapter:
- Browse window
- Record window
- Report window, including:
- Printouts
- Searching
- Recalculating
- Drill-down
- Attaching Reports to Records and the Personal Desktop
- Printouts
- List window
- Specification window
- File dialogue window
- Business Communicator window
List Window
The list window is used whenever you need to choose from a list of options, usually after you select the 'Imports', 'Settings', 'Maintenance', 'Reports' and 'Documents' functions. Double-click your choice in the list, or click it once with the mouse and then press the Enter key.
You can use the scroll bar to find the item that you want, or you can type the first letter of its name. For example, referring to the example illustrated below and assuming 'Customer List' is the item you want, press the letter "C" on your keyboard three times. After the first press, the highlight will move down to the first item beginning with C, 'Credit Notes, Updating Stock'. As you press "C" on your keyboard again, the highlight will move down until 'Customer List' is highlighted. You can now press the Enter key to activate the report.
When the list window contains a list of documents, it will also contain an Operations menu allowing you to assign a Form to each document (the Form contains the design that will be printed). This is described here.
The following example shows the list window from where you can choose a report in the Sales Ledger module.
---
In this chapter:
- Browse window
- Record window
- Report window
- List window
- Specification window
- File dialogue window
- Business Communicator window
Specification Window
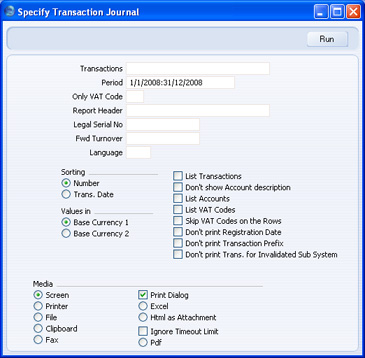
Specification windows allow you to specify the contents of a report or document, or how a Maintenance function is to operate. A specification window will usually appear after you have selected an option in a list window. Once you have entered the report criteria or specified how the Maintenance function is to behave, click [Run]. The example below shows the specification window for the Transaction Journal report.
---
In this chapter:
- Browse window
- Record window
- Report window
- List window
- Specification window
- File dialogue window
- Business Communicator window
File Dialogue Window
HansaWorld Enterprise uses the standard Windows, Linux or Mac OS X file dialogue window when it requires you to select a file for import, or to give a file name to an export file.
---
In this chapter:
- Browse window
- Record window
- Report window
- List window
- Specification window
- File dialogue window
- Business Communicator window
Business Communicator Window
The 'Business Communicator' window allows you to communicate with any Contact (both external and internal) using any method (e.g. telephone, mobile, Skype, SIP, email, text SMS and the chat feature built in to HansaWorld Enterprise).
To open the 'Business Communicator' window, click the [Business Communicator] button in the Master Control panel:
This button can also be found in record and browse windows belonging to registers such as Activities, Invoices and Contacts where you may need to communicate with a Contact (e.g. with the Contact quoted in an Activity or Invoice). Clicking the button here will open the 'Business Communicator' window with the relevant Contact's telephone and mobile numbers, Skype Name, email address and so on shown in the Contact Methods list, ready for you to open communications.
The 'Business Communicator' window contains the following sections:
- The Contact List
- This is a list of the records in the Contact register in your current Company.
- As with all lists of records in HansaWorld Enterprise, you can scroll through the list using the scroll bar on the right, and you can sort the list by clicking a column heading. By default, the list is sorted by Contact Name.
- Use the Search field and button (above the Contact list) to find a particular Contact in the list. First, sort the list by the column that you want to use for the search. In the illustration above, for example, the list is sorted by Name allowing you to search for a particular Contact Name. Then, type the first few characters of the Name in the Search field (there is no need to click in the field before typing). Then press Enter or click [Search]. The first exact match (or, if there is no exact match, the nearest match) will be highlighted. If you are not certain of the exact spelling, use the * character as a wildcard. For example, in the illustration shown above, if you want to find a Contact named Giacomelli but are not sure of their first name, sort the list by the Name column, type "*Giacomelli" in the Search field and press the Enter key. If the first record found is not the one you want, press the Shift-Enter key combination to search again.
- By default, the list shows every record in the Contact register. You can restrict the list so that it only shows your Personal Contacts. To do this, click the button marked 'Company', hold down the mouse, and choose the 'Personal' option. The button text will change to 'Personal'. Repeat the procedure to change the list back to showing every record. A Personal Contact is one where you are the Salesman, or one with your initials in the Address Books field (on the 'User Defined' card). The Address Books field can contain the initials of more than one Person, separated by commas, so a Contact can be the Personal Contact of more than one Person.
- To create a new Contact, click the [New] button above the list. The 'Contact: New' window will open, allowing you to enter the details of the new Contact. By default, the new Contact will be marked as a Customer. To edit an existing Contact, double-click their name in the list. Please refer here for full details about creating and editing Contacts.
- To communicate with a Contact, click their name once in the list. The available communication methods (telephone and mobile numbers, Skype names, etc.) will be shown in the Contact Method list, described below.
- As with all lists of records in HansaWorld Enterprise, you can scroll through the list using the scroll bar on the right, and you can sort the list by clicking a column heading. By default, the list is sorted by Contact Name.
- The Call List
- The Call list in the lower left-hand corner of the 'Business Communicator' window shows the open calls being made by everyone in your HansaWorld Enterprise system. This same list is shown on every client. This list will help you manage calls as you will easily be able to see whether a Person is already engaged before transferring a call to them or inviting them to a conference call. You can also interrupt another Person's call by highlighting it in the list and then clicking the [Hold] or [Hang Up] buttons.
- The Contact Method List
- To communicate with a Contact, click their name once in the Contact list. The available communication methods (telephone and mobile numbers, Skype names, etc.) will be shown in the Contact Method list. Choose a communication method by clicking, and then click the appropriate button below. Please follow the links at the bottom of this page for details about the various communications methods.
- In the cases of Skype, Asterisk, Switchboard and Mobile calls, when a call is established (i.e. when the Contact answers your call and when you answer an incoming call), a new Activity will be opened, allowing you to record the details of the conversation immediately, thus adding the call to the Contact's call history. When the call ends, click the [End Activity] button in the Activity: this will bring an End Time and Cost (Time) in to the Activity and will also save the Activity. Activities are described here.
- If you have more than one Company in your database, the new Activity will usually be created in the Company in which you are currently working. The exception is when you have a Global User record in which a Main CRM Company has been specified, in which case the Activity will be created in the Main CRM Company. Please refer here for details about Global Users.
- In the cases of Skype, Asterisk, Switchboard and Mobile calls, when a call is established (i.e. when the Contact answers your call and when you answer an incoming call), a new Activity will be opened, allowing you to record the details of the conversation immediately, thus adding the call to the Contact's call history. When the call ends, click the [End Activity] button in the Activity: this will bring an End Time and Cost (Time) in to the Activity and will also save the Activity. Activities are described here.
In this chapter:
- Browse window
- Record window
- Report window
- List window
- Specification window
- File dialogue window
- Business Communicator window, including:
Business Communicator Window - Skype
To call a Contact using Skype, first open the 'Business Communicator' window:
Click on the Contact in the Contact list and then: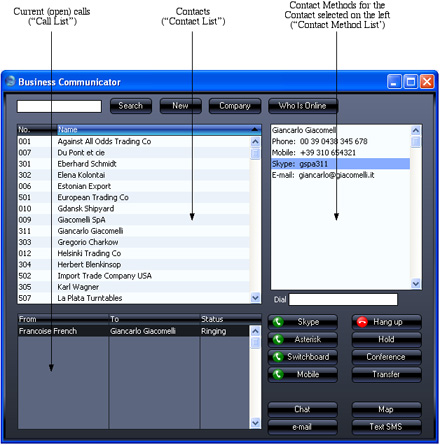
- To make a Skype-to-Skype call, click on their Skype Name in the Contact Method list and then click the [Skype] button.
- To make a SkypeOut call, click on their telephone or mobile number in the Contact Method list (or enter a number in the Dial field) and then click the [Skype] button.
- To open the Skype Chat window, click on their Skype Name in the Contact Method list and then click the [Chat] button.
You can use the [Skype] button to answer an incoming Skype-to-Skype call, as well as doing so in Skype itself. If you already have an open call, it will be put on hold when you click the [Skype] button to answer the new call.
Communication using Skype requires the following:
- The Skype application must be running.
- You must have allowed HansaWorld Enterprise to use Skype. This is described on the 'Interaction with Skype' page.
- To make a SkypeOut call, you must have Skype credits.
- When you make a SkypeOut call, the format of the number you are calling must be as described on the 'Contact Numbers' page.
In this chapter:
- Browse window
- Record window
- Report window
- List window
- Specification window
- File dialogue window
- Business Communicator window, including:
Business Communicator Window - Asterisk
To call a Contact through an Asterisk-based switchboard, first open the 'Business Communicator' window:
Click on the Contact in the Contact list and then click on their telephone or mobile number in the Contact Method list (you cannot call a SIP address using Asterisk). Alternatively, enter a telephone number in the Dial field. Then, click the [Asterisk] button.
A call will be established between you and the Contact. First, your SIP client (softphone (e.g. EyeBeam, X-Lite) or hardphone) will ring. When you answer, the Contact's telephone will ring.
You cannot use the [Asterisk] button to answer an incoming Asterisk call. You can only do this using your soft- or hardphone.
Communication through an Asterisk-based switchboard requires the following:
- You must have configured your HansaWorld Enterprise database to communicate through an Asterisk-based switchboard, as described immediately below.
- You must have a softphone application (e.g. EyeBeam, X-Lite) running and logged in to your Asterisk server, or a hardphone (e.g. USB telephone) correctly connected and logged in.
- Ensure the Asterisk Management Interface has been enabled on your Asterisk server.
- Log in to your HansaWorld Enterprise system as a system administrator with access to the Technics module, as described here.
- Open the SIP Servers setting in the Technics module:
On flip A, enter the following details to allow your HansaWorld Enterprise server to log in to your Asterisk server(s) automatically: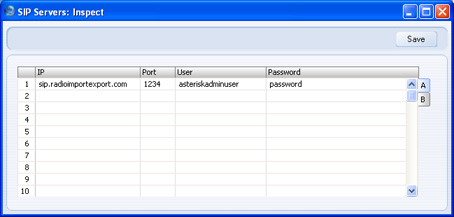
- IP
- Enter the address of the Asterisk server. This can be its IP address or its domain name (e.g. sip.companyname.com).
- Port
- Enter the port number used by the Asterisk Management Interface on the Asterisk server.
- User, Password
- Enter the login details of the administrator account for the Asterisk Management Interface.
- IP
- For each member of staff, create records in the Contact register containing their SIP user names.
The format of these user names must follow the model you used in the IP field in the SIP Servers setting in step 3. For example, if you entered the domain name of the Asterisk server in the IP field, each user name should use the format username@sip.companyname.com. If you entered the server's IP address in the IP field, include the IP address in each user name instead of the domain name (e.g. username@123.123.123.123).
The user names must be registered in the relevant Asterisk server.
The Contact records should also contain Extensions that other members of staff can call within the Asterisk server.
Connect these Contact records to the relevant Person or Global User records using the Contact Code field on the 'Access' card.
- The next step is to ensure incoming calls can be identified correctly so that they can be matched to numbers that are already in the database. For this matching process to be successful, the format of the originating telephone or mobile numbers of incoming calls must be the same as that of numbers in the database. Follow these steps:
- Log in again as a system administrator with access to the Technics module, return to the SIP Servers setting and go to flip B:
HansaWorld Enterprise will use the information in these fields to identify the originating telephone numbers of each incoming call made to each Asterisk server. After identification, it will use the Normalized Phone Numbers setting (step ii below) to attempt to match the telephone number to a record in the Contact register, and to open an Activity for that Contact.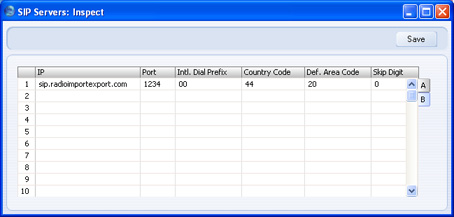
- Intl. Dial Prefix
- Specify the international dialling code that must be dialled from the country where the Asterisk server is located. In Europe, this will be 00.
- Country Code
- Specify the country code of the country where the Asterisk server is located. For example, if the Asterisk server is located in the UK, this will be 44.
- Def. Area Code
- Specify the local area code of the area where the Asterisk server is located. This is only required in countries where you do not need to dial the area code when you are calling numbers in the same area. This is the case in the UK and Sweden.
- Skip Digit
- If the Asterisk server is located in a country where the first digit of telephone numbers is not dialled by incoming international callers, specify that digit here. For example, if the Asterisk server is located in the UK, this will be 0.
- Intl. Dial Prefix
- Having ensured that incoming numbers all use the same format, you should now ensure the Contact numbers in the database also use the same format, so that they can be matched up. To do this, you will use the Telephony Settings setting.
Note that the SIP Servers setting is stored in Company 0, a partition of the database that stores information at database level (i.e. information that is available to every Company). Connecting to an Asterisk server and receiving and identifying incoming calls from that server are database level operations. This means you only need configure flip B of the SIP Servers setting once, and you can do so working in any Company. However, if you have more than one Company, you will need to configure the Telephony Settings setting separately in every Company. This allows for the possibility that different Companies might represent departments in different parts of the country (with different area codes) or even in different countries.
In each Company, open the Telephony Settings setting in the CRM module:
In configuring the Telephony Settings setting, bear in mind the telephone and mobile numbers that are already in the database, and also think about how users will enter telephone and mobile numbers in the future. For example, numbers local to the Company may have been entered without area codes. So, while the location of the Asterisk server will determine what you entered in the SIP Servers setting, the location of the Company will determine the country and area codes here.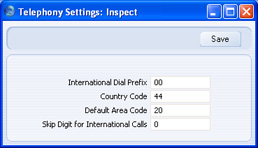
Do not include the Skip Digit in the Default Area Code. For example, if the area code is 020 for London or 0118 for Reading, enter 20 (as shown in the illustration) or 118 respectively.
- If you already have Contacts in your database, you should now ensure that their telephone and mobile numbers are in the correct format. You can do this by running the 'Rebuild Number Recognition Register' Maintenance function. This will not change the numbers in the Contact records themselves. Instead, it will use the Telephony Settings setting to convert all numbers to the correct format and save them in a central setting in Company 0 known as the Normalized Phone Numbers setting.
To run this function, ensure you are in the CRM module, click the [Routines] button in the Master Control panel and then the [Maintenance] button in the 'Routines' window. Double-click 'Rebuild Number Recognition Register' in the subsequent list. The following window appears:
Choose the Erase and Update option and click the [Run] button. All numbers (i.e. telephone, mobile, alt phone and fax numbers) in the Contact register will be converted to the correct format and saved in the Normalized Phone Numbers setting. You can look at the contents of this setting in the CRM module: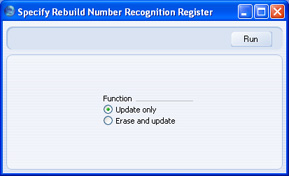
If a Contact for example has the London number 020 3222 1234 in the Contact register, the effect of the Maintenance function will be to add the international dialling prefix, the country code and the area code less skip digit to produce 00442032221234. This will match the incoming number described above in step 5 i. When you receive an incoming call from this number, HansaWorld Enterprise will find it in the Normalized Phone Numbers setting and match it to a record in the Contact register using the Contact Number. The Contact Name will then be shown in the Call list in the 'Business Communicator' window. When you answer the call, a new Activity will be created with the correct Contact Number and Name.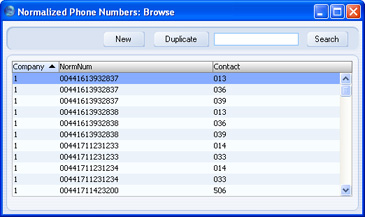
You only need run the 'Rebuild Number Recognition Register' function once, to make sure the Normalized Phone Numbers setting contains numbers for the Contacts already in your database. As you add new records to the Contact register or modify existing ones, the Normalized Phone Numbers setting will be updated automatically.
If you have more than one Company in your database, you need to configure the Telephony Settings setting separately in each Company, but you only need run the 'Rebuild Number Recognition Register' function once, from any Company. All numbers in every Company will be reformatted and copied to the Normalized Phone Numbers setting.
- Periodically, you should use the List Invalid Phone Numbers report in the CRM module to list telephone and mobile numbers containing illegal characters. If you print the report to screen, you can drill down to each Contact to make the correction. You should do this separately in each Company.
- Log in again as a system administrator with access to the Technics module, return to the SIP Servers setting and go to flip B:
In this chapter:
- Browse window
- Record window
- Report window
- List window
- Specification window
- File dialogue window
- Business Communicator window, including:
Business Communicator Window - TAPI (Microsoft Telephony API)
The TAPI gateway allows HansaWorld Enterprise to connect to a switchboard via the Microsoft Telephony API (TAPI).
To call a Contact using this method, first open the 'Business Communicator' window:
Click on the Contact in the Contact list and then click on their telephone or mobile number in the Contact Method list. Alternatively, enter a number in the Dial field. Then, click the [Switchboard] button. The number must be one that can be understood by the switchboard: for example, if you need to dial 9 to get an outside line, include 9 in the number. This means including 9 in every telephone and mobile number in the Contact register.
A call will be established between you and the Contact. First, your telephone (i.e. the telephone with the extension number in your Contact record) will ring. When you answer, the Contact's telephone will ring.
Communication through a switchboard via TAPI requires a TAPI gateway which must be on a Windows computer. This can be your HansaWorld Enterprise server (an "internal" gateway) or a separate machine (an "external" gateway). The switchboard must have "TAPI 2.0 (or later) with third-party support" enabled. This will allow the TAPI gateway to initiate new calls and monitor existing ones for every extension. Without third-party support, the gateway would only be able to do this for one specific user.
The provider of your switchboard will have supplied a TAPI Telephone Service Provider (driver) that must be installed on the internal or external gateway. To install this new driver and to see those already installed, open the Phone and Modem Options control panel in Windows and go to the 'Advanced' card.
To configure an internal gateway, follow these steps:
- Log in to your HansaWorld Enterprise system as a system administrator with access to the Technics module, as described here.
- Open the TAPI Gateway setting in the Technics module:
In the TAPI Service Provider field, use 'Paste Special' to specify the service provider of your TAPI service. 'Paste Special' will list the Telephone Service Providers (drivers) installed in Windows.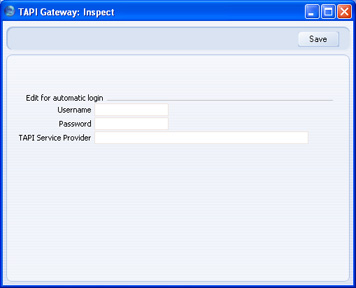
If your TAPI driver is not included in the 'Paste Special' list, the probable reason is that "TAPI 2.0 (or later) with third-party support" has not been enabled on your switchboard. Alternatively, the driver might not be supported by the switchboard. Please refer to the provider of your switchboard for more assistance.
Leave the Username and Password empty.
- Open the Configuration setting in the System module and make sure that the TAPI Gateway option on the 'Technical' card is checked.
- Restart the server.
- Create records in the Contact register for each member of staff, containing their extension numbers. Connect these Contact records to the relevant Person or Global User records using the Contact Code field on the 'Access' card.
- Log in to your main HansaWorld Enterprise system and create a record in the Person register to allow the external gateway to log in. This Person should belong to an Access Group that only has full access to the TAPI Gateway module. Remember to specify a Password for this Person.
If you have several Companies in your database, enter this Person in the first Company.
- Open the Configuration setting in the System module and make sure that the TAPI Gateway option on the 'Technical' card is checked.
- Create records in the Contact register for each member of staff, containing their extension numbers. Connect these Contact records to the relevant Person or Global User records using the Contact Code field on the 'Access' card.
- Change to the gateway machine and install the standard Windows Vista/XP/2003/2000 application. When you launch the "HansaWorld.exe" application, a new database ("HANSA.HDB" file) will be created. Proceed as follows:
- When the 'Welcome to HansaWorld' window appears, do not click any buttons. Instead, close the window by clicking the close box.
- An empty 'Companies: Inspect' window will appear: enter the Company Code and Name of the Company on the main server in which you created the Person in step i. Click the [Save] button.
- Open the TAPI Gateway setting in the Technics module. Specify the service provider of your TAPI service as described in step 2 above. In the Username and Password fields, enter the Signature and Password of the Person that you created in step i.
- Return to the 'Companies: Inspect' inspect window by opening the Company register in the System module. Enter the IP address of the main server. In the Port field, enter the Server Port entered in the Program Mode register in the Technics module in the main database (illustrated on the Progam Mode page). By default, this will be 1200. When you click the [Save] button, the application will quit automatically.
- When the 'Welcome to HansaWorld' window appears, do not click any buttons. Instead, close the window by clicking the close box.
- The Windows Vista/XP/2003/2000 installer in step iv will have installed a slave version of the application ("HansaWorld-Slave.exe") as well as the standard application. Start the slave version of the application using one of the following methods:
- Create a "parameters.txt" file as described in the 'Launching the Server with Parameters ' section on the Loading an Existing Database and Company page. This file should contain the parameter --gateway. Launch the slave application by double-clicking.
- Open the command line and launch the slave application by typing:
- hansaworld-slave --gateway
- Create a "parameters.txt" file as described in the 'Launching the Server with Parameters ' section on the Loading an Existing Database and Company page. This file should contain the parameter --gateway. Launch the slave application by double-clicking.
In this chapter:
- Browse window
- Record window
- Report window
- List window
- Specification window
- File dialogue window
- Business Communicator window, including:
- Skype
- Asterisk
- TAPI (Microsoft Telephony API)
- Mobile Phone
- Text (SMS) Messages
- E-mail
- Managing Calls
- Communicating with Other Users
- Producing a Map
- Contact Numbers
- Skype
Business Communicator Window - Mobile Phone
To call a Contact via your mobile phone, first open the 'Business Communicator' window:
Click on the Contact in the Contact list and then click on their telephone or mobile number in the Contact Method list. Alternatively, enter a number in the Dial field. Then, click the [Mobile] button. Your mobile phone will be activated, and a call will be established between you and the Contact, so the Contact's telephone will ring immediately. You can end the call from the phone or by highlighting the call in the Call list in the 'Business Communicator' window and clicking the [Hang up] button.
Calling a Contact via your mobile phone requires the following:
- You must be using the Business Communicator for Handsets option in the Program Mode register in the Technics module, and you must have specified a Handset Port in the same register.
- You must have the HansaWorld Business Communicator For Handsets application installed on your mobile phone, which must be a Symbian S60 3rd edition device. The application must be running and you must have logged in to your HansaWorld Enterprise server using your usual Signature and Password. This requires you to have entered the IP address of the server and the Handset Port from the previous step in the Company register on the device.
In this chapter:
- Browse window
- Record window
- Report window
- List window
- Specification window
- File dialogue window
- Business Communicator window, including:
Business Communicator Window - Text (SMS) Messages
To send a Text (SMS) message, first open the 'Business Communicator' window:
Click on a Contact in the Contact list and then click the [Text SMS] button. The 'Text SMS' window opens:
The Contact's mobile number will appear in the Phone field. If the 'Text SMS: New' window doesn't open, the probable reason will be that the Contact doesn't have a mobile number.
Enter the message in the Text field and click the [Save] button. Your Signature will appear in the Person field, your mobile number will appear in the From Phone field and the Sent box will be marked automatically, signifying that the message has been sent.
The Person field in the Text SMS record will take your Signature from your Person record. Your mobile number in the From Phone field will be chosen as follows:
- It will be taken from your record in the Contact register containing your mobile phone number, this record being connected to your Global User or Person record using the Contact Code field on the 'Access' card;
- If you do not have a record in the Contact register, or this record does not have a mobile phone number, it will be taken from the Phone 1 or Phone 2 fields (in that order) in your Person record.
- If you have access to more than one Company through Person records in each Company, the Phone 1 or Phone 2 fields in those Person records can supply your mobile number to each Text SMS record. This can also be supplied from records in the Contact register in each Company, connected to each Person record using the Contact Code field on the 'Access' card.
- If you have access to more than one Company through a Global User record, you need a Person record in each Company from which you will send Text (SMS) messages, to supply your Signature and mobile number to the Text SMS records. If you also have a record in the Contact register in each Company, these records will instead supply the mobile number to the Text SMS records. Each of these Contact records must have the same Contact Number. Enter this Contact Number in the Contact Code field on the 'Access' card of your Global User record. Please refer here for details about Global Users.
- The format of the mobile number to which you are sending the Text (SMS) message must be as described on the 'Contact Numbers' page.
- Sending Text (SMS) messages is a chargeable Internet Service. To use it, you must have registered your database using the Automatic Internet Enabler method, as described on the Enabler Key page. Please contact your local HansaWorld representative to sign up for the service and for pricing details.
In this chapter:
- Browse window
- Record window
- Report window
- List window
- Specification window
- File dialogue window
- Business Communicator window, including:
Business Communicator Window - Email
To send an e-mail, first open the 'Business Communicator' window:
Click on the Contact's email address in the Contact Method list and then click the [e-mail] button. By default, a new Mail will be created, with the Contact's email address as the To Address. Please refer to the 'Sending and Receiving Mail' page for details about sending Mails. However, if you are using the Use External Mail Software option in the Mail and Conference Settings setting in the E-mail and Conferences module and you are also using Windows on your client machine, your default mail application (e.g. Eudora, Outlook, etc) will be opened and a new mail will be created, addressed to the Contact's email address.
Sending an email requires the following:
- If you are not using the Use External Mail Software option and/or you are not using Windows, your HansaWorld Enterprise system must be configured to send external mail. Please refer to the 'External Mail' page for details. You must have a Mailbox.
- If you are using the Use External Mail Software option and you are also using Windows, you must have a mail application fully installed and declared to be your default mail application. If this is not the case, the [e-mail] button in the 'Business Communicator' window will behave as if you are not using the Use External Mail Software option (i.e. a new Mail inside HansaWorld Enterprise will be created).
In this chapter:
- Browse window
- Record window
- Report window
- List window
- Specification window
- File dialogue window
- Business Communicator window, including:
Business Communicator Window - Managing Calls
The 'Business Communicator' window offers you various tools that you can use to manage your calls:
- To put a call on hold, highlight it in the Call list and click the [Hold] button. To continue with the call, highlight it again and click the appropriate button for the call method. For example, if it is a Skype call, click the [Skype] button. If another call is in progress, it will be put on hold automatically. You can use the [Hold] button with Skype, Asterisk and Switchboard calls.
- To transfer a call, first highlight it in the Call list and click the [Hold] button. Then find and highlight the person to whom you want to transfer the call in the Contact list and then click the appropriate number or address in the Contact Method list (for example, if you are transferring a Skype call, click the person's Skype name in the Contact Method list). Finally, click the [Transfer] button. Note that you cannot transfer Skype calls that you initiated. You can only transfer Skype calls that you received.
Remember that the Contact list is a list of records in the Contact register. Therefore, to transfer a call to another member of staff, that member of staff must have their own record in the Contact register, and this record must be connected to their Global User or Person record using the Contact Code field on the 'Access' card. If you have more than one Company in your database, the Contact list will list the records in the Contact register in the Company you are currently working in.
- To open a conference call (a call with more than two participants), follow these steps:
- Make or receive a call.
- Put the call on hold.
- Make or receive a second call.
- Click the [Conference] button.
If all calls are on hold, the conference call will not start: you must have one call in progress to open the conference call.
You can use the [Conference] button with calls of all types except Mobile.
- Make or receive a call.
In this chapter:
- Browse window
- Record window
- Report window
- List window
- Specification window
- File dialogue window
- Business Communicator window, including:
Business Communicator Window - Communicating with other users in your HansaWorld Enterprise system
You can communicate with other users in your HansaWorld Enterprise system. Open the 'Business Communicator' window and click the [Who Is Online] button. This will print a report to screen listing the users currently logged in (only users with Mailboxes will be listed, but the list will include users logged in to every Company if you have more than one). Click a user's name in the list, and then choose whether you want to communicate with them using Skype-to-Skype, SkypeOut, email, text (SMS) or the chat feature built in to HansaWorld Enterprise. The chat feature is described here.
---
In this chapter:
- Browse window
- Record window
- Report window
- List window
- Specification window
- File dialogue window
- Business Communicator window, including:
- Skype
- Asterisk
- TAPI (Microsoft Telephony API)
- Mobile Phone
- Text (SMS) Messages
- E-mail
- Managing Calls
- Communicating with Other Users
- Producing a Map
- Contact Numbers
- Skype
Business Communicator Window - Producing a Map showing the Location of a Contact
To see a map showing a Contact's location, first open the 'Business Communicator' window:
Click on the Contact in the Contact list, then click the [Map] button. A new browser window will open in your default browser, using maps.msn.com and the address information in the Contact record to show you where the Contact is. This feature is limited to the countries supported by maps.msn.com, and requires the Contact's address to be entered as follows:
- Field 1: Street address and number
- Field 2: Post code
- Field 3: City
- Field 4: State/Province (optional)
- Field 5: Country
In this chapter:
- Browse window
- Record window
- Report window
- List window
- Specification window
- File dialogue window
- Business Communicator window, including:
Business Communicator Window - Contact Numbers
To call a Contact from the 'Business Communicator' window, you should have entered their telephone or mobile number as follows:
- the only legal characters are numbers, spaces, dashes and the + sign. Do not use full stops or brackets, and do not use alpha characters (e.g. do not place text such as "home" or "work" after telephone numbers.
- enter all numbers as international numbers. You can place + or 00 at the beginning of a number, but + is to be preferred as it is the standard method of signifying international numbers and will not change.
You can use the List Invalid Phone Numbers report in the CRM module to list telephone and mobile numbers containing illegal characters. If you print the report to screen, you can drill down to each Contact to make the correction.
---
In this chapter:
- Browse window
- Record window
- Report window
- List window
- Specification window
- File dialogue window
- Business Communicator window, including:
- Operations