Introduction to Settings in the Point of Sales and User Settings modules
This section describes each setting concerned with Point of Sales in detail. These settings can be found in the Point of Sales and User Settings modules, with some settings in the Sales Ledger also being used.To edit a setting when you are using Windows or Mac OS X, ensure you are in the correct module using the [Switch Module] button in the Navigation Centre or the Ctrl-0 (Windows) or ⌘-0 (Mac OS X) keyboard shortcut. Then click the [Settings] button, also in the Navigation Centre or use the Ctrl-S/⌘-S keyboard shortcuts. A 'Settings' list will appear: double-click the item that you need in the list.
To edit a setting when you are using iOS or Android, ensure you are in the correct module using the [Switch Module] button in the Navigation Centre. Select 'Settings' from the Tools menu (with 'wrench' icon). A 'Settings' list will appear: tap the item that you need in the list.
---
Settings related to Point of Sales:
- Baggers
- Cash Events
- Credit Card Types
- Default Payment Modes
- Drawers
- Dynamic Barcode
- Fields for Creating New Customer
- Fiscal Printer Reports
- Gift Vouchers Settings
- Gift Voucher Types
- Gift Vouchers Issued
- Gift Vouchers Received
- Gift Vouchers Sold
- Local Machine
- Local Machine Payment Modes
- Local Machine Serial Port Devices
- Local Machines
- Local Settings
- Login Options
- Login Shortcuts
- Loyalty Card Membership Level Structure
- Loyalty Card Membership Levels
- Loyalty Points, Loyalty Points per Location
- Loyalty Points Redemption, Loyalty Points Redemption Per Location
- Merchant ID
- Modifiers
- Number Series - Cash Events
- Number Series - Coupons
- Number Series - Gift Vouchers
- Number Series - Gift Vouchers Received
- Number Series - POS Balances
- Number Series - POS Invoices
- Number Series - POS Sessions
- Payment Currencies
- Payment Gateways
- POS Balances
- POS Button Groups
- POS Button Pictures
- POS Buttons
- POS Commands
- POS Sessions
- POS Settings
- Receipt Printer Texts, Receipt Printer Texts per Machine
- Split Items
- Supervisors
- Synchronised Number Series
- Tab Item Groups
- Home page for Point of Sales manual
- Home page for Standard ERP manual
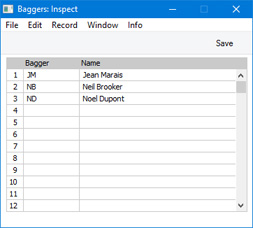
Baggers
Baggers are the members of staff who pack Customers' Items into bags or boxes after they have been scanned by the cashiers.Listing Baggers in this setting will be useful if cashiers will be able to change Baggers while entering POS Invoices. This list of Baggers will provide a look-up list that the cashiers can use to find the correct Bagger quickly and easily. If you need cashiers to be able to change Baggers, add a "Bagger Search" button to the POS Invoice window. This button is described here.
If you need a default Bagger to be assigned to each new POS Invoice, specify the Bagger's Signature on the 'POS' card in the Local Machine setting and select the Default Bagger and Supervisor on POS Invoice option. If you would like the Bagger to be visible in the POS Invoice window, select the Show Bagger on POS Invoice option in the same setting. You will need to do this individually on each till and cash machine (or, for tills that have live-sync connections to the server, in the records for each till in the Local Settingssetting in the Technics module). If a cashier changes the Bagger in a POS Invoice using the "Bagger Search" button, the new Bagger will be copied back to the Local Machine setting, so the change will last until the cashier changes the Bagger again.
To list Baggers, ensure you are in the Point of Sales module using the [Switch Module] button in the Navigation Centre. Then, if you are using Windows or macOS, click the [Settings] button, also in the Navigation Centre. When the 'Settings' list opens, double-click 'Baggers'. If you are using iOS or Android, select 'Settings' from the Tools menu (with 'wrench' icon) and tap 'Baggers' in the 'Settings' list. The 'Baggers: Inspect' window opens: configure it as appropriate and as described below. When the record is complete, click the [Save] button (Windows/macOS) or tap √ (iOS/Android) to save.
- Bagger
- Paste Special
Person register, System module and Global User register, Technics module
- Enter the Signatures of the Baggers, or choose them from the Person or Global User registers using 'Paste Special'.
- It is not necessary for a Bagger to have a record in the Person or Global User registers. If a Bagger does not have a Person or Global User record, simply enter their Signature and Name as appropriate. If cashiers will be able to change Baggers while entering POS Invoices, it is recommended that you use numeric codes as Signatures. The window that the cashiers will use to choose Baggers has a numeric keypad that can be used from a touch screen.
- To make it easy for cashiers to find the Baggers that they need, it is recommended that you enter Baggers in numeric and/or alphabetical order, as shown in the illustration. If you need to insert a row to maintain this order, click on the row number where the insertion is to be made and press the Return key (Windows/Mac OS X) or long tap on a row number and select 'Insert Row' (iOS/Android). When cashiers come to choose a Bagger using the 'Paste Special' function, the Baggers will be shown in the selection list in the order that you have listed them here.
- It is not necessary for a Bagger to have a record in the Person or Global User registers. If a Bagger does not have a Person or Global User record, simply enter their Signature and Name as appropriate. If cashiers will be able to change Baggers while entering POS Invoices, it is recommended that you use numeric codes as Signatures. The window that the cashiers will use to choose Baggers has a numeric keypad that can be used from a touch screen.
- Name
- The Name of the Bagger will appear here after you have entered their Signature in the Bagger field on the left.
Settings related to Point of Sales:
- Introduction
- Baggers
- Drawers
- Dynamic Barcode
- Fields for Creating New Customer
- Gift Vouchers Settings
- Gift Voucher Types
- Gift Vouchers Issued
- Gift Vouchers Received
- Gift Vouchers Sold
- Local Machine Payment Modes
- Local Machines
- Loyalty Card Membership Level Structure
- Loyalty Card Membership Levels
- Loyalty Points, Loyalty Points per Location
- Loyalty Points Redemption, Loyalty Points Redemption Per Location
- Modifiers
- Number Series - Gift Vouchers
- Number Series - Gift Vouchers Received
- Number Series - POS Balances
- Payment Currencies
- POS Balances
- POS Button Groups
- POS Button Pictures
- POS Buttons
- Split Items
- Supervisors
- Synchronised Number Series
- Home page for Point of Sales manual
- Home page for Standard ERP manual
Cash Events
This page describes Cash Events, a setting in the Point of Sales module and a register in the Restaurant module. This description focuses on its use in the Point of Sales module: please refer here if you need a description focusing on the use of Cash Events in the Restaurant module.—
At any time during the working day, you may need to place cash in or remove it from a Till Drawer. Examples include placing a cash float into a Till Drawer, and removing cash and other takings from the Till Drawer to the back office when they reach a certain level. You should use the Cash Events setting in the Point of Sales module to record these cash movements. Cash sales are not Cash Events for this purpose. If you are using work sessions, you should ensure that a Till Drawer is in open session when recording Cash Events for it (if you are using the Require Open Session option in the POS Settings setting, you won't be able to save a Cash Event if the Till Drawer you are using is not in open session).
Cash Events are not recorded in the Nominal Ledger immediately. This will be done later, when you create a POS Balance record and save it after marking it as OK. You can do this yourself or it will be done automatically the next time you run the 'Cash Up' Maintenance function.
You can record Cash Events for a particular Till Drawer using the following methods:
- Cashiers can record Cash Events on the till or cash machine itself, working directly in the Cash Events setting.
- Administrators can record Cash Events separately for each till remotely from a desktop client, again working directly in the Cash Events setting.
You can use this method for tills with live connections to the server and for tills with live-sync connections. However, if you are using work sessions, you should be careful when using this method for live-sync tills. Work sessions cannot be opened remotely for live-sync tills, they can only be opened from the tills themselves. So, if you record a Cash Event remotely for a live-sync till, you must make sure that a work session has been opened on that till first. Using the Require Open Session option will give you a measure of protection. When tills are connected to the server, the POS Session records from those tills will have been synchronised, so the Require Open Session option will be controlled by up-to-date session information. But when tills are not connected to the server, the session information on the server that controls the Require Open Session option may not be up-to-date. In this situation, you should not try to open a session for a till remotely, because any Cash Events that you then enter may not be caught by the cash up routines.
- Cashiers can record Cash Events directly from POS Invoices. To enable this feature, you must add "Put Cash Float" and "Get Cash Float" buttons to the POS Invoice window. The "Put Cash Float" button will move cash and other monies into a till from the back office, while the "Get Cash Float" will move takings from a till to the back office.
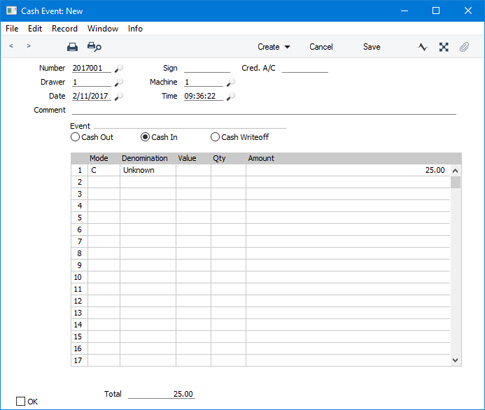
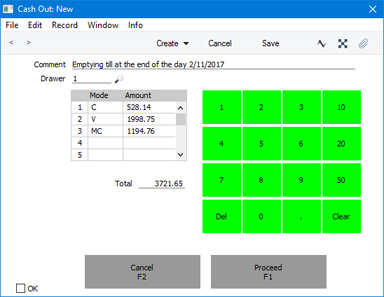
The "Put Cash Float" and "Get Cash Float" buttons will cause simpler versions of the 'Cash Event: New' window illustrated below to open, entitled 'Cash In: New' and 'Cash Out: New' respectively. The simpler nature of these windows will make them easier to use on tills that may not have keyboards.
- When you run the 'Cash Up' Maintenance function for a particular Till/Drawer combination, the function will assume that the contents (cash and other takings) of the specified Drawer have been physically removed to the back office or bank. If you have not already created a Cash Event recording this movement yourself, the 'Cash Up' function will create the Cash Event automatically. If you created a Cashier Count record prior to running the 'Cash Up' function and the value of that Cashier Count is different to the value that should be in the Drawer, the function will create a second Cash Event, writing off the difference (again, assuming you have not already created this Cash Event yourself).

- Number
- Paste Special
Select from another Number Series
- An identifying code for each Cash Event record will be generated automatically, and in most cases there will be no need to change it. The default will be chosen as follows:
- It will be taken from the first valid row in the Number Series - Cash Events setting.
- It will be the next number following on from the last Cash Event entered.
If you have tills with live-sync connections to the server, you must define Number Series for Cash Events for each live-sync till in the Synchronised Number Series setting before connecting those tills to the server for the first time. You must also define separate Number Series for the live tills in the Number Series - Cash Events setting.
- It will be taken from the first valid row in the Number Series - Cash Events setting.
- Sign
- The Signature of the user who created the Cash Event: this will be updated when you save the record.
- Cred. Acc.
- If the Event (below) is "Cash In" or "Cash Out", specify here the Back Office Account that is to be credited (Cash In) or debited (Cash Out) with the value of the Cash Event.
- If you leave this field empty, the Back Office Account specified in the POS Settings setting will be copied here when you mark the Cash Event as OK and save it. This Account will be used as the Back Office Account for every Payment Mode that is listed in the matrix. If you have not specified a Back Office Account in the POS Settings setting, this field will be left blank by default and the amounts will be posted to the Back Office Account(s) specified on flip E of the relevant Payment Mode(s). Therefore, you should only specify a Back Office Account in the POS Settings setting if you want to use the same Back Office Account for every Payment Mode.
- If the Event is "Cash Writeoff", specify the Account that is to be debited with the amount written off. In this case, if you leave the field empty, the Writeoff Account specified in the POS Settings setting will be copied here when you mark the Cash Event as OK and save it. If you have not specified a Writeoff Account in the POS Settings setting and you leave this field empty, the amounts written off will not be recorded in the Nominal Ledger.
- If you leave this field empty, the Back Office Account specified in the POS Settings setting will be copied here when you mark the Cash Event as OK and save it. This Account will be used as the Back Office Account for every Payment Mode that is listed in the matrix. If you have not specified a Back Office Account in the POS Settings setting, this field will be left blank by default and the amounts will be posted to the Back Office Account(s) specified on flip E of the relevant Payment Mode(s). Therefore, you should only specify a Back Office Account in the POS Settings setting if you want to use the same Back Office Account for every Payment Mode.
- Drawer
- Paste Special
Drawers setting, Point of Sales/Restaurant module
- Enter here the Drawer to which the Cash Event applies. You must specify a Drawer before you can save the Cash Event. The Drawer that was used together with the Local Machine Code of the till you are working on in the most recent POS Session will appear here as a default.
- Machine
- Paste Special
Local Machines setting, Point of Sales/Restaurant/Technics module
- Enter here the Local Machine Code of the till to which the Cash Event applies.
- The Local Machine Code of the till you are working on will appear here as a default.
- If you are recording a Cash Event for a Till Drawer remotely from a desktop client, be sure to enter the correct Local Machine Code and Drawer for the till in question before saving.
- The Local Machine Code of the till you are working on will appear here as a default.
- Date
- Paste Special
Choose date
- The Date of the Cash Event: this will be updated when you save the record.
- Time
- Paste Special
Current time
- The Time of the Cash Event: this will be updated when you save the record.
- Comment
- Enter any comment about the Cash Event here.
- Event
- Use these options to specify the type of movement that is represented by the Cash Event.
- Cash Out
- The Cash Event represents the removal of cash, cheques or credit card payments from the Till Drawer to the back office or bank.
- Cash In
- The Cash Event represents the placing of cash or other monies in the Till Drawer.
- Cash Writeoff
- Select this option when the value of cash or other monies in the Till Drawer is less than expected, and you need to account for the difference. You can also use this option if the Till Drawer contains more than expected, in which case you should enter negative figures in the Amount column in the matrix.
The relevant option will be chosen automatically in the 'Cash In: New' and 'Cash Out: New' windows.
- Cash Out
In each row, choose a Payment Mode (e.g. cash). You can then enter the full amount in the Amount field, or you can choose a Denomination (e.g. 10 cent coins) and a Qty (i.e. number of coins or notes), and the Amount will be calculated for you.
- Mode
- Paste Special
Payment Modes setting, Sales/Purchase Ledger
- Each movement into or out of the Till Drawer should have a Payment Mode, representing the type of movement or write-off. For example, when you empty the Drawer at the end of the day, you might use separate Payment Modes for cash, cheques and credit card movements.
- In the 'Cash In: New' and 'Cash Out: New' windows, the Cash Payment Mode specified in the Default Payment Modes setting will be placed in the first row by default.
- If the Cred. Acc. field above is empty and you have not specified a Back Office Account in the POS Settings setting, the Back Office Accounts specified for each Payment Mode (flip E) will be credited when there is a movement into the Drawer or debited when there is a removal. If you have specified a Cred. Acc. in the field above, it will be used instead of the Back Office Accounts for all Payment Modes.
- In the 'Cash In: New' and 'Cash Out: New' windows, the Cash Payment Mode specified in the Default Payment Modes setting will be placed in the first row by default.
- Denomination, Value, Qty
- If you need to record the movement of a quantity of coins or notes, enter the denomination of the coin or note in the Denomination field. Use 'Paste Special' to choose an option.
- If the denomination that you need is not in the 'Paste Special' list, you can instead enter the value of the denomination in the Value field.
- Then enter the quantity of coins or notes in the Qty field. The Amount will be calculated automatically.
- If the denomination that you need is not in the 'Paste Special' list, you can instead enter the value of the denomination in the Value field.
- Amount
- The value of the movement into or out of the Till Drawer or to be written off.
- Total
- The total value of the Cash Event: this will be updated automatically each time you add a payment to the grid.
- OK
- Tick the OK box to approve the Cash Event. Once you have done this and have saved the record, no further changes can be made.
- The OK box is shown in the 'Cash In: New' and 'Cash Out: New' windows, but cashiers do not need to tick it themselves. It will be ticked automatically when they click or touch [Proceed].
- When you next create and mark as OK a POS Balance record (either yourself or using the 'Cash Up' Maintenance function), all approved Cash Events since the previous POS Balance will be recorded in the Nominal Ledger. Please refer here for more details about POS Balances and about the Accounts that will be used in the Nominal Ledger postings.
- The OK box is shown in the 'Cash In: New' and 'Cash Out: New' windows, but cashiers do not need to tick it themselves. It will be ticked automatically when they click or touch [Proceed].
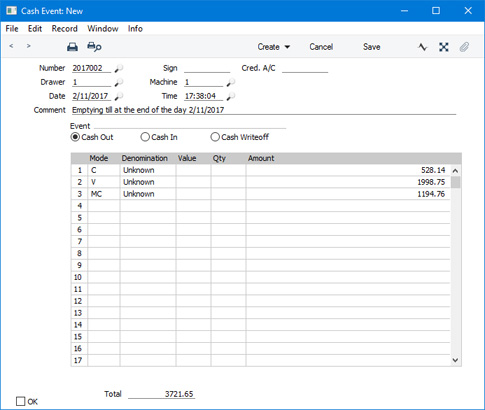
The example Cash Event illustrated above shows the placing of a cash float of 25.00 in a Till Drawer at the beginning of the day. The illustration below shows the removal from the Till Drawer of 528.14 in cash, 1998.75 in Visa receipts and 1194.76 in MasterCard receipts at the end of the day.
- Bematech MP-2100 TH FI
- Brio FisUSBM with Middle Ware (Latvia)
- Brio FM32 with Middle Ware (Latvia)
- CHD Virtual Fiscal Printer (Latvia)
- Citizen ST-05 (Lithuania)
- Empirija FB05 (Lithuania)
- Empirija FB15 (Lithuania)
- Empirija FB15 with Middle Ware (Lithuania)
- FPrint 02K
- POSNET (Poland, POSNET Protocol)
- POSNET (Poland, POSNET Protocol w VAT, from 01/10/2013)
- POSNET HD FV EJ (Poland, POSNET Protocol over TCPIP)
If you need to send an existing Cash Event to a fiscal printer, open it in a record window and choose 'Send to Fiscal Printer' from the Operations menu. This function will only be available if the VAT Law in the Company Info setting is set to "Latvian", "Lithuanian", "Polish" or "Zimbabwean".
As noted earlier in this description, the 'Cash Up' Maintenance function for a particular Till/Drawer combination, the function will assume that the contents (cash and other takings) of the specified Drawer have been physically removed to the back office and will create a suitable Cash Event (Cash Out) automatically. Cash Events created by the 'Cash Up' function will not be sent to fiscal printers, so if this is a requirement you should not use the 'Cash Up' function or you should create the Cash Events yourself before you run the 'Cash Up' function.
If you are working on a live-sync till and the first Cash Event record is not synchronised (not sent to the server), the probable reason is that you have not defined Synchronised Number Series for the Cash Events setting. Please refer here for details.
---
Settings related to Point of Sales:
- Introduction
- Baggers
- Cash Events
- Credit Card Types
- Default Payment Modes
- Drawers
- Dynamic Barcode
- Fields for Creating New Customers
- Fiscal Printer Reports
- Gift Voucher Settings
- Gift Voucher Types
- Gift Vouchers Issued
- Gift Vouchers Received
- Gift Vouchers Sold
- Local Machine
- Local Machine Payment Modes
- Local Machine Serial Port Devices
- Local Machines
- Local Settings
- Login Options
- Login Shortcuts
- Loyalty Card Membership Level Structure
- Loyalty Card Membership Levels
- Loyalty Points, Loyalty Points per Location
- Loyalty Points Redemption, Loyalty Points Redemption Per Location
- Merchant ID
- Modifiers
- Number Series - Cash Events
- Number Series - Coupons
- Number Series - Gift Vouchers
- Number Series - Gift Vouchers Received
- Number Series - POS Balances
- Number Series - POS Invoices
- Number Series - POS Sessions
- Payment Currencies
- Payment Gateways
- POS Balances
- POS Button Groups
- POS Button Pictures
- POS Buttons
- POS Commands
- POS Sessions
- POS Settings
- Receipt Printer Texts, Receipt Printer Texts per Machine
- Split Items
- Supervisors
- Synchronised Number Series
- Tab Item Groups
- Home page for Point of Sales manual
- Home page for Standard ERP manual
Credit Card Types
If you will use Standard ERP to control the processing of credit and debit card payments for POS Invoices, the first configuration step will be to specify your credit card processing partner in the Merchant ID setting in the Point of Sales module. The partner is the payment gateway or payment service provider that you will use to process each payment. Having done that, you should then enter separate records in the Credit Card Types setting in the Point of Sales module for each Credit Card Type supported by the partner. This setting can also be found in the Cheques module.Please refer for more details about using Standard ERP to control the processing of credit and debit card payments for POS Invoices. Precise configuration details will vary depending on your partner. This documentation contains a general guide: for more detailed information, please refer to your local HansaWorld representative.
To work with the Credit Card Types setting, first ensure you are in the POS or Cheques module using the [Switch Module] button in the Navigation Centre. Then, if you are using Windows or Mac OS X, click the [Settings] button, also in the Navigation Centre or use the Ctrl-S/⌘-S keyboard shortcuts and then double-click 'Credit Card Types' in the 'Settings' list. If you are using iOS or Android, select 'Settings' from the Tools menu (with 'wrench' icon) and tap 'Credit Card Types' in the 'Settings' list. When the 'Settings' list opens, double-click or tap 'Credit Card Types'. The 'Credit Card Types: Browse' window opens: open a new record by selecting 'New' from the Create menu (Windows/Mac OS X) or + menu (iOS/Android). When the record is complete, click the [Save] button (Windows/Mac OS X) or tap √ (iOS/Android) to save.
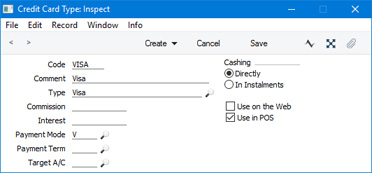
- Code
- Enter the unique Code that will allow you to identify the Credit Card Type from elsewhere in Standard ERP. You can use up to five alphanumeric characters.
- Comment
- Assign a descriptive name to the Credit Card Type. This will be shown in the 'Credit Card Types: Browse' window and the 'Paste Special' list: it should therefore be descriptive enough to make the selection of the correct Credit Card Type easy for all users.
- Type
- Paste Special
Choices of possible entries
- Specify the Credit Card Type here, using 'Paste Special' to choose from a list of options.
- Use on the Web
- Check this box if you have a web shop and you want customers to be able to use the Credit Card Type there. The Credit Card Type will be included in the drop-down menu on your web shop's credit card payment page.
- Use in POS
- Check this box if you want to use the Credit Card Type with POS Invoices.
Settings related to Point of Sales:
- Introduction
- Baggers
- Cash Events
- Credit Card Types
- Default Payment Modes
- Drawers
- Dynamic Barcode
- Fields for Creating New Customers
- Fiscal Printer Reports
- Gift Voucher Settings
- Gift Voucher Types
- Gift Vouchers Issued
- Gift Vouchers Received
- Gift Vouchers Sold
- Local Machine
- Local Machine Payment Modes
- Local Machine Serial Port Devices
- Local Machines
- Local Settings
- Login Options
- Login Shortcuts
- Loyalty Card Membership Level Structure
- Loyalty Card Membership Levels
- Loyalty Points, Loyalty Points per Location
- Loyalty Points Redemption, Loyalty Points Redemption Per Location
- Merchant ID
- Modifiers
- Number Series - Cash Events
- Number Series - Coupons
- Number Series - Gift Vouchers
- Number Series - Gift Vouchers Received
- Number Series - POS Balances
- Number Series - POS Invoices
- Number Series - POS Sessions
- Payment Currencies
- Payment Gateways
- POS Balances
- POS Button Groups
- POS Button Pictures
- POS Buttons
- POS Commands
- POS Sessions
- POS Settings
- Receipt Printer Texts, Receipt Printer Texts per Machine
- Split Items
- Supervisors
- Synchronised Number Series
- Tab Item Groups
- Home page for Point of Sales manual
- Home page for Standard ERP manual
Default Payment Modes
The Default Payment Modes setting is situated in the Point of Sales and Restaurant modules and the Sales Ledger. Please refer here for a description.---
Settings related to Point of Sales:
- Introduction
- Baggers
- Cash Events
- Credit Card Types
- Default Payment Modes
- Drawers
- Dynamic Barcode
- Fields for Creating New Customers
- Fiscal Printer Reports
- Gift Voucher Settings
- Gift Voucher Types
- Gift Vouchers Issued
- Gift Vouchers Received
- Gift Vouchers Sold
- Local Machine
- Local Machine Payment Modes
- Local Machine Serial Port Devices
- Local Machines
- Local Settings
- Login Options
- Login Shortcuts
- Loyalty Card Membership Level Structure
- Loyalty Card Membership Levels
- Loyalty Points, Loyalty Points per Location
- Loyalty Points Redemption, Loyalty Points Redemption Per Location
- Merchant ID
- Modifiers
- Number Series - Cash Events
- Number Series - Coupons
- Number Series - Gift Vouchers
- Number Series - Gift Vouchers Received
- Number Series - POS Balances
- Number Series - POS Invoices
- Number Series - POS Sessions
- Payment Currencies
- Payment Gateways
- POS Balances
- POS Button Groups
- POS Button Pictures
- POS Buttons
- POS Commands
- POS Sessions
- POS Settings
- Receipt Printer Texts, Receipt Printer Texts per Machine
- Split Items
- Supervisors
- Synchronised Number Series
- Tab Item Groups
- Home page for Point of Sales manual
- Home page for Standard ERP manual
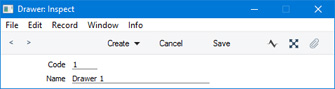
Drawers
The Drawers setting should contain a list of the till drawers in your cash machines and tills. Enter a separate record for each till drawer. You must do this if you are using work sessions, because you will need to specify both a Machine and a Drawer when opening and closing sessions and in cash transactions.After entering a Drawer in this setting, you should configure it as follows:
- Enter a POS Balance record for the Drawer, dated the day before you first use it and with a zero balance (the balance will be calculated to be zero automatically).
- Connect the Drawer to a Local Machine (i.e. to a cash machine or till). You should do this by opening a work session for the Drawer/Local Machine combination. Create a POS Session record and specify the Drawer together with a Local Machine. The Event in the POS Session should be "Open". After saving this record, the Drawer will be assigned to each POS Invoice entered on the till (i.e. each POS Invoice will be recorded as having been entered on the till and the Drawer). If you do not connect a Drawer to a till, POS Invoices entered on that till may be assigned to the wrong Drawer or may not be assigned to a Drawer at all and so will not be included in the cash up routines. The term "Till Drawer" in this documentation refers to a Drawer and Local Machine in combination.
If you will not be using work sessions as part of your usual routine, you should immediately create a second POS Session record for the Drawer/Local Machine combination in which the Event is "Close"
If a till has a live-sync connection to the server, you will need to create these POS Sessions working on the till itself.
To work with Drawers, first ensure you are in the Point of Sales or Restaurant modules. Then, if you are using Windows or Mac OS X, click the [Settings] button in the Navigation Centre (or use the Ctrl-S/⌘-S keyboard shortcut). Double-click 'Drawers' in the resulting list: If you are using iOS or Android, select 'Settings' from the Tools menu (with 'wrench' icon) and tap 'Drawers' in the 'Settings' list. The 'Drawers: Browse' window opens, listing the available Drawers. Select 'New' from the Create menu (Windows/Mac OS X) or + menu (iOS/Android) to create a new record.
---
Settings related to Point of Sales:
- Introduction
- Baggers
- Drawers
- Dynamic Barcode
- Fields for Creating New Customer
- Gift Vouchers Settings
- Gift Voucher Types
- Gift Vouchers Issued
- Gift Vouchers Received
- Gift Vouchers Sold
- Local Machine Payment Modes
- Local Machines
- Loyalty Card Membership Level Structure
- Loyalty Card Membership Levels
- Loyalty Points, Loyalty Points per Location
- Loyalty Points Redemption, Loyalty Points Redemption Per Location
- Number Series - Gift Vouchers
- Number Series - Gift Vouchers Received
- Modifiers
- Number Series - POS Balances
- Payment Currencies
- POS Balances
- POS Button Groups
- POS Button Pictures
- POS Buttons
- Split Items
- Supervisors
- Synchronised Number Series
- Home page for Point of Sales manual
- Home page for Standard ERP manual
Dynamic Barcode
If you sell Items by size or weight, you should use the Dynamic Barcode setting to specify the barcode structure that you use for these Items. The Dynamic Barcode setting is located in the Point of Sales module.When a Customer purchases such an Item, they will first have the Item weighed on a scale. The scale will print a barcode label, containing information such as the Item Number and the weight. This barcode will then be scanned by a cashier (using a "Dynamic Barcode" button), resulting in the correct Item and price being brought into the POS Invoice. Use this setting to record the barcode structure that is used by your scales, so that it will be recognised by your tills.
To define your barcode structure, first ensure you are in the Point of Sales module using the [Switch Module] button in the Navigation Centre. Then, if you are using Windows or Mac OS X, click the [Settings] button, also in the Navigation Centre (or use the Ctrl-S/⌘-S keyboard shortcut). Double-click 'Dynamic Barcode' in the resulting list: If you are using iOS or Android, select 'Settings' from the Tools menu (with 'wrench' icon) and tap 'Dynamic Barcode' in the 'Settings' list. The 'Dynamic Barcode: Inspect' window opens: configure it as appropriate and as described below. When the record is complete, click the [Save] button (Windows/Mac OS X) or tap √ (iOS/Android) to save.
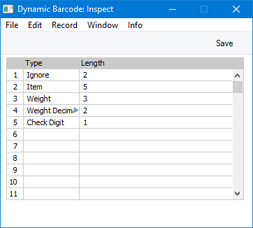
- Ignore
- Digits are not used.
- Item
- The Item Number.
- Weight
- The size or weight of the Item before the decimal point.
- Weight Decimals
- The size or weight of the Item after the decimal point.
- When a barcode is scanned, the Weight and the Weight Decimals will be added together and placed in the Quantity field in the POS Invoice.
- When a barcode is scanned, the Weight and the Weight Decimals will be added together and placed in the Quantity field in the POS Invoice.
- Department
- The department selling the Item.
- Price
- The unit price of the Item, multiplied by 100.
- For example, if the Length is 5, the figure 02599 will appear in a barcode to indicate a price of 25.99.
- If the price is not included in the barcode structure, the price will be determined in the usual way (taken from the relevant Price List or from the Base Price field in the Item record).
- For example, if the Length is 5, the figure 02599 will appear in a barcode to indicate a price of 25.99.
- Check Digit
- The checksum.
| Digits | Information |
| 1-2 | not used |
| 3-7 | Item Number |
| 8-10 | Size or weight (units) |
| 11-12 | Size or weight (decimals) |
| 13 | Checksum |
Using this structure, an example barcode 0010101123454 will represent size or weight 123.45 of Item 10101.
The Dynamic Barcode setting can only hold one record. Therefore every Item that you sell by size or weight should have a barcode that uses the same structure.
---
Settings related to Point of Sales:
- Introduction
- Baggers
- Drawers
- Dynamic Barcode
- Fields for Creating New Customer
- Gift Vouchers Settings
- Gift Voucher Types
- Gift Vouchers Issued
- Gift Vouchers Received
- Gift Vouchers Sold
- Local Machine Payment Modes
- Local Machines
- Loyalty Card Membership Level Structure
- Loyalty Card Membership Levels
- Loyalty Points, Loyalty Points per Location
- Loyalty Points Redemption, Loyalty Points Redemption Per Location
- Modifiers
- Number Series - Gift Vouchers
- Number Series - Gift Vouchers Received
- Number Series - POS Balances
- Payment Currencies
- POS Balances
- POS Button Groups
- POS Button Pictures
- POS Buttons
- Split Items
- Supervisors
- Synchronised Number Series
- Home page for Point of Sales manual
- Home page for Standard ERP manual
Fields for Creating New Customers
This page describes the Fields for Creating New Customers setting in the Point of Sales module.—
If you will allow cashiers, waiters and members of bar staff to create new Customer records in the Contact register from their tills or cash machines, it will probably be the case that they should use a simplified version of the 'Contact: New' window. Use the Fields for Creating New Customers setting in the Point of Sales module to specify the fields that cashiers should see and fill in.
To open the Fields for Creating New Customers setting, ensure you are in the Point of Sales module, open the 'Settings' list and double-click (Windows/macOS) or tap (iOS/Android) 'Fields for Creating New Customers’. The following window will appear:
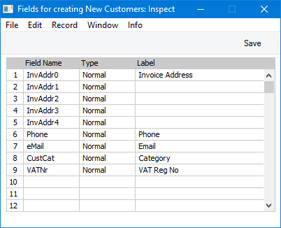
- Field Name
- Paste Special Choices of possible entries
- Use 'Paste Special' to choose the fields that will be visible to cashiers when they add Customers to the 'Contact' register.
- Use 'Paste Special' to choose the fields that will be visible to cashiers when they add Customers to the 'Contact' register.
- Type
- Paste Special
Choices of possible entries
- Specify whether the fields should be enterable or read-only.
- Label
- Enter the label for each field.
If you need to allow cashiers, waiters and members of bar staff to add Customers to the Contact register, place a "Customer Search" button in the POS Invoice or Bar Tab window. The cashier should click or touch this button and then proceed as follows:
- When the 'Search for Customers' window appears, the cashier can enter the name or other details of the new Customer, and then click or touch the [Proceed] button.
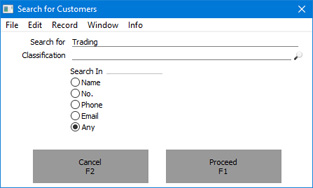
- A list of search results will appear.
If the new Customer is not listed, the cashier should click or touch the [New] button. The 'Customer: New' window will appear, containing the fields listed in the Fields for Creating New Customers setting.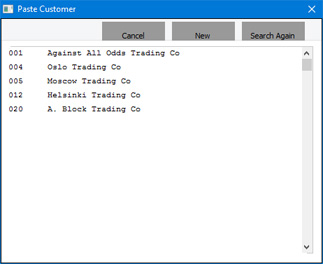
If you have not filled out the Fields for Creating New Customers setting, only the No. and Name fields will be visible.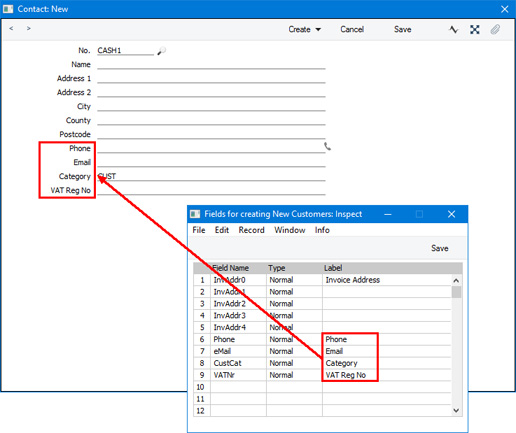
In the example illustrated above, the field labels "Phone", "Email", "Category" and "VAT Reg No" were taken from the Fields for Creating New Customers setting, but the labels for the Address fields were taken from the 'Address' card in the User Defined Field Labels setting in the CRM setting. For the Address fields, the labels in the User Defined Field Labels setting will take precedence over the labels in the Fields for Creating New Customers setting.
- The cashier can now enter the details of the new Customer.
Note that a cashier should not enter new Customers if they are using a till or cash machine that has a live-sync connection to the server. This is because the Fields for Creating New Customers setting will not be sent from the server to the till when the till first connects, and any new Customers entered on the till will not be sent to the server.
If you need cashiers to be able to use the "Customer Search" button but you do not want them to be able to create new Customers (because they are using live-sync tills or for other reasons), assign them to an Access Group in which you have denied access to the 'Creating New Customer from Touch Screen POS Invoice' Action.
---
Settings related to Point of Sales:
- Introduction
- Baggers
- Cash Events
- Credit Card Types
- Default Payment Modes
- Drawers
- Dynamic Barcode
- Fields for Creating New Customers
- Fiscal Printer Reports
- Gift Voucher Settings
- Gift Voucher Types
- Gift Vouchers Issued
- Gift Vouchers Received
- Gift Vouchers Sold
- Local Machine
- Local Machine Payment Modes
- Local Machine Serial Port Devices
- Local Machines
- Local Settings
- Login Options
- Login Shortcuts
- Loyalty Card Membership Level Structure
- Loyalty Card Membership Levels
- Loyalty Points, Loyalty Points per Location
- Loyalty Points Redemption, Loyalty Points Redemption Per Location
- Merchant ID
- Modifiers
- Number Series - Cash Events
- Number Series - Coupons
- Number Series - Gift Vouchers
- Number Series - Gift Vouchers Received
- Number Series - POS Balances
- Number Series - POS Invoices
- Number Series - POS Sessions
- Payment Currencies
- Payment Gateways
- POS Balances
- POS Button Groups
- POS Button Pictures
- POS Buttons
- POS Commands
- POS Sessions
- POS Settings
- Receipt Printer Texts, Receipt Printer Texts per Machine
- Split Items
- Supervisors
- Synchronised Number Series
- Tab Item Groups
- Home page for Point of Sales manual
- Home page for Standard ERP manual
Fiscal Printer Reports
If you are using fiscal printers, at the end of each day you will need to print reports listing the day's transactions. You can use the Fiscal Printer Reports setting in the User Settings module to instruct fiscal printers to print these reports from within Standard ERP. You should do this separately on each till and cash machine that has a connected fiscal printer.The precise operation of the Fiscal Printer Reports setting will depend on the model of fiscal printer that you are using. What follows is a general guide: for more detailed information, please refer to your local HansaWorld representative.
When you open the Fiscal Printer Reports setting, the following window appears:
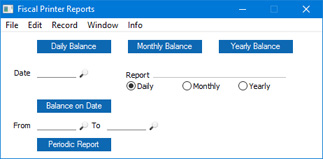
- Daily Balance
- The [Daily Balance] button will instruct most fiscal printers to print a report listing the transactions that were recorded in the printer's memory during the current day. This report is known as a "Z report" in some countries.
- If your fiscal printer is the Empirija FB05 or FB15, you will need to print the Z report both to paper and to an electronic journal file. The electronic journal file should be saved in two locations, which you should specify using the Fiscal Printer Elect. Journal Path and Fiscal Printer Elect. Journal Path 2 fields on the 'POS' card of the Local Machine setting.
If you want to store the electronic Z reports in a folder inside the folder or directory containing the Standard ERP application, you can specify a relative path, such as:
- ZReports
If you want to store the reports somewhere else, use absolute paths with the following syntax:
- Windows
- c:/samplefolder1/samplefolder2/ZReports
- Mac OS X
- /samplefolder1/samplefolder2/ZReports
In all cases, do not add a separator (/) as the final character in the path.
- The Fiscal Printer Elect. Journal Path and Fiscal Printer Elect. Journal Path 2 fields are in the Local Machine setting, so you will need to specify them separately on each till and cash machine. If a till has a live-sync connection to the server, specify the Fiscal Printer Elect. Journal Path and Fiscal Printer Elect. Journal Path 2 in the record for the till in the Local Settings setting in the Technics module. If you leave these fields empty on a particular till, the [Daily Balance] button on that till will cause the printer to print the Z report, but it will not create an electronic Z report.
- As printing the Z report will create electronic journal files, it should be the last report that you print at the end of the day, and it can only be printed once per day.
- There is no need to specify the Fiscal Printer Elect. Journal Path and Fiscal Printer Elect. Journal Path 2 if you are using the Empirija FB15 with Middleware, as the electronic journals will be maintained by the middleware application.
- If you are using POSNET fiscal printers with the POSNET protocol, you can enter a date in the Date field if you need to print a Z report for a past date. If you leave the Date field empty, the report for the current date will be printed.
- For some fiscal printers, an alternative method of printing Z reports is through the "Daily Report" and "Daily Z Report" buttons that you can add to the POS Invoice window. Please refer to the description of these buttons here for a list of supported printers. If you are using the Bematech MP-2100 TH FI fiscal printer, you can only use the "Daily Z Report" button to print Z reports, so in this case be sure to add this button to the POS Invoice window.
- If your fiscal printer is the Empirija FB05 or FB15, you will need to print the Z report both to paper and to an electronic journal file. The electronic journal file should be saved in two locations, which you should specify using the Fiscal Printer Elect. Journal Path and Fiscal Printer Elect. Journal Path 2 fields on the 'POS' card of the Local Machine setting.
- Monthly Balance
- The [Monthly Balance] button will instruct most fiscal printers to print a balance report for the current month. This report is known as an "X report" in some countries.
- If you are using one of the POSNET printers with the POSNET protocol, you can enter a date in the Date field if you need to print an X report for a previous month. If you leave the Date field empty, the report for the current month will be printed.
- If your fiscal printer is the FPrint 02K, you must close the work session before you can print the monthly balance report.
- For the CHD virtual fiscal printer, an alternative method of printing X reports is to use the "Daily Report" button that you can add to the POS Invoice window. If you are using the Bematech MP-2100 TH FI fiscal printer, you can only use the "Daily Report" button to print X reports, so in this case be sure to add this button to the POS Invoice window.
- If you are using one of the POSNET printers with the POSNET protocol, you can enter a date in the Date field if you need to print an X report for a previous month. If you leave the Date field empty, the report for the current month will be printed.
- Yearly Balance
- The [Yearly Balance] button will instruct some fiscal printers to print a balance report for the current year. You can use this button with the FP3000, FPrint 02K and the three POSNET printers with the POSNET protocol.
- If you are using one of the POSNET printers, you can enter a date in the Date field if you need to print a report for a previous year. Only the year will be taken from the date that you specify: the report will always run from January 1. If you leave the Date field empty, the report will run from the start of the current year.
- If your fiscal printer is the FPrint 02K, you must close the work session before you can print the yearly balance report.
- If you are using one of the POSNET printers, you can enter a date in the Date field if you need to print a report for a previous year. Only the year will be taken from the date that you specify: the report will always run from January 1. If you leave the Date field empty, the report will run from the start of the current year.
- Balance on Date
- This button will instruct some fiscal printers to print a balance report for a specified date. Use the Date field above the button to specify the date, and the Report options to specify whether you need a daily, monthly or yearly balance report for the specified date.
- You can use this button with the FP3000 and FPrint 02K printers. In the case of the FPrint 02K, you must close the work session before you can print the report.
- You can use this button with the FP3000 and FPrint 02K printers. In the case of the FPrint 02K, you must close the work session before you can print the report.
- Periodic Report
- The [Periodic Report] button will instruct some fiscal printers to print a report for a specified period. Use the From and To fields above the button to specify the period.
- You can use this button with the Brio FisUSBM, Brio FM32, Citizen ST-05, Empirija FB05 and FB15 (with and without middleware), FPrint 02K and the three POSNET printers with the POSNET protocol. In the case of the FPrint 02K, you must close the work session before you can print the report.
- For the Empirija FB15 (with and without middleware), you can also print periodic reports for the current date using the "Daily Report" button that you can add to the POS Invoice window.
- You can use this button with the Brio FisUSBM, Brio FM32, Citizen ST-05, Empirija FB05 and FB15 (with and without middleware), FPrint 02K and the three POSNET printers with the POSNET protocol. In the case of the FPrint 02K, you must close the work session before you can print the report.
Settings related to Point of Sales:
- Introduction
- Baggers
- Cash Events
- Credit Card Types
- Default Payment Modes
- Drawers
- Dynamic Barcode
- Fields for Creating New Customers
- Fiscal Printer Reports
- Gift Voucher Settings
- Gift Voucher Types
- Gift Vouchers Issued
- Gift Vouchers Received
- Gift Vouchers Sold
- Local Machine
- Local Machine Payment Modes
- Local Machine Serial Port Devices
- Local Machines
- Local Settings
- Login Options
- Login Shortcuts
- Loyalty Card Membership Level Structure
- Loyalty Card Membership Levels
- Loyalty Points, Loyalty Points per Location
- Loyalty Points Redemption, Loyalty Points Redemption Per Location
- Merchant ID
- Modifiers
- Number Series - Cash Events
- Number Series - Coupons
- Number Series - Gift Vouchers
- Number Series - Gift Vouchers Received
- Number Series - POS Balances
- Number Series - POS Invoices
- Number Series - POS Sessions
- Payment Currencies
- Payment Gateways
- POS Balances
- POS Button Groups
- POS Button Pictures
- POS Buttons
- POS Commands
- POS Sessions
- POS Settings
- Receipt Printer Texts, Receipt Printer Texts per Machine
- Split Items
- Supervisors
- Synchronised Number Series
- Tab Item Groups
- Home page for Point of Sales manual
- Home page for Standard ERP manual
Gift Voucher Settings
If you will sell Gift Vouchers that you will take in payment for goods at a later date, you can use the Gift Voucher Settings setting in the Point of Sales module and Sales Ledger to set a default validation period for each Gift Voucher and to specify whether the sale and/or redemption of Gift Vouchers are transactions that qualify for Loyalty Card Points. Please refer here for details about issuing Gift Vouchers.---
Settings related to Point of Sales:
- Introduction
- Baggers
- Cash Events
- Credit Card Types
- Default Payment Modes
- Drawers
- Dynamic Barcode
- Fields for Creating New Customers
- Fiscal Printer Reports
- Gift Voucher Settings
- Gift Voucher Types
- Gift Vouchers Issued
- Gift Vouchers Received
- Gift Vouchers Sold
- Local Machine
- Local Machine Payment Modes
- Local Machine Serial Port Devices
- Local Machines
- Local Settings
- Login Options
- Login Shortcuts
- Loyalty Card Membership Level Structure
- Loyalty Card Membership Levels
- Loyalty Points, Loyalty Points per Location
- Loyalty Points Redemption, Loyalty Points Redemption Per Location
- Merchant ID
- Modifiers
- Number Series - Cash Events
- Number Series - Coupons
- Number Series - Gift Vouchers
- Number Series - Gift Vouchers Received
- Number Series - POS Balances
- Number Series - POS Invoices
- Number Series - POS Sessions
- Payment Currencies
- Payment Gateways
- POS Balances
- POS Button Groups
- POS Button Pictures
- POS Buttons
- POS Commands
- POS Sessions
- POS Settings
- Receipt Printer Texts, Receipt Printer Texts per Machine
- Split Items
- Supervisors
- Synchronised Number Series
- Tab Item Groups
- Home page for Point of Sales manual
- Home page for Standard ERP manual
Gift Voucher Types
If you will sell Gift Vouchers that you will take in payment for goods at a later date and you would like different Payment Modes to be used when you sell Gift Vouchers of different kinds, you can use Gift Voucher Types to specify the Payment Modes that should be used. The Gift Voucher Types setting is in the Point of Sales module. Please refer here for details.---
Settings related to Point of Sales:
- Introduction
- Baggers
- Drawers
- Dynamic Barcode
- Fields for Creating New Customer
- Gift Vouchers Settings
- Gift Voucher Types
- Gift Vouchers Issued
- Gift Vouchers Received
- Gift Vouchers Sold
- Local Machine Payment Modes
- Local Machines
- Loyalty Card Membership Level Structure
- Loyalty Card Membership Levels
- Loyalty Points, Loyalty Points per Location
- Loyalty Points Redemption, Loyalty Points Redemption Per Location
- Modifiers
- Number Series - Gift Vouchers
- Number Series - Gift Vouchers Received
- Number Series - POS Balances
- Payment Currencies
- POS Balances
- POS Button Groups
- POS Button Pictures
- POS Buttons
- Split Items
- Supervisors
- Synchronised Number Series
- Home page for Point of Sales manual
- Home page for Standard ERP manual
Gift Vouchers Issued
If you will sell Gift Vouchers that you will take in payment for goods at a later date, you must first register your Gift Vouchers in the system. To do this, use the Gift Vouchers Issued setting, which is situated in the Point of Sales module and the Sales Ledger. Please refer here for details.---
Settings related to Point of Sales:
- Introduction
- Baggers
- Drawers
- Dynamic Barcode
- Fields for Creating New Customer
- Gift Vouchers Settings
- Gift Voucher Types
- Gift Vouchers Issued
- Gift Vouchers Received
- Gift Vouchers Sold
- Local Machine Payment Modes
- Local Machines
- Loyalty Card Membership Level Structure
- Loyalty Card Membership Levels
- Loyalty Points, Loyalty Points per Location
- Loyalty Points Redemption, Loyalty Points Redemption Per Location
- Modifiers
- Number Series - Gift Vouchers
- Number Series - Gift Vouchers Received
- Number Series - POS Balances
- Payment Currencies
- POS Balances
- POS Button Groups
- POS Button Pictures
- POS Buttons
- Split Items
- Supervisors
- Synchronised Number Series
- Home page for Point of Sales manual
- Home page for Standard ERP manual
Gift Vouchers Received
If you will take Gift Vouchers in payment for goods, those payments will be recorded in the Gift Vouchers Received setting, which is situated in the Point of Sales module and the Sales Ledger. Please refer here for details.---
Settings related to Point of Sales:
- Introduction
- Baggers
- Drawers
- Dynamic Barcode
- Fields for Creating New Customer
- Gift Vouchers Settings
- Gift Voucher Types
- Gift Vouchers Issued
- Gift Vouchers Received
- Gift Vouchers Sold
- Local Machine Payment Modes
- Local Machines
- Loyalty Card Membership Level Structure
- Loyalty Card Membership Levels
- Loyalty Points, Loyalty Points per Location
- Loyalty Points Redemption, Loyalty Points Redemption Per Location
- Modifiers
- Number Series - Gift Vouchers
- Number Series - Gift Vouchers Received
- Number Series - POS Balances
- Payment Currencies
- POS Balances
- POS Button Groups
- POS Button Pictures
- POS Buttons
- Split Items
- Supervisors
- Synchronised Number Series
- Home page for Point of Sales manual
- Home page for Standard ERP manual
Gift Vouchers Sold
If you will sell Gift Vouchers that you will take in payment for goods at a later date, you will usually do so using a "Sell Gift Voucher” button in the POS Invoice window. Each sale of a Gift Voucher will be recorded in the Gift Vouchers Sold setting, which is situated in the Point of Sales module and the Sales Ledger. Please refer here for details.---
Settings related to Point of Sales:
- Introduction
- Baggers
- Drawers
- Dynamic Barcode
- Fields for Creating New Customer
- Gift Vouchers Settings
- Gift Voucher Types
- Gift Vouchers Issued
- Gift Vouchers Received
- Gift Vouchers Sold
- Local Machine Payment Modes
- Local Machines
- Loyalty Card Membership Level Structure
- Loyalty Card Membership Levels
- Loyalty Points, Loyalty Points per Location
- Loyalty Points Redemption, Loyalty Points Redemption Per Location
- Number Series - Gift Vouchers
- Number Series - Gift Vouchers Received
- Modifiers
- Number Series - POS Balances
- Payment Currencies
- POS Balances
- POS Button Groups
- POS Button Pictures
- POS Buttons
- Split Items
- Supervisors
- Synchronised Number Series
- Home page for Point of Sales manual
- Home page for Standard ERP manual
Local Machine
The Local Machine setting in the User Settings module contains various options controlling the behaviour of each till and cash machine.You can configure the Local Machine setting in two ways:
- On tills that have live connections to the server, you must configure this setting separately on each till. This method is described immediately below.
- For tills that have live-sync connections to the server, you should create a separate record for each till in the Local Settings setting in the Technics module. When a till logs in for the first time, the relevant record from the Local Settings setting will be sent to the till automatically, updating the Local Machine setting on that till. If you change the record in the Local Settings setting, the change will be sent to the till as soon as possible. On updating a till to a new version of Standard ERP and starting the new version without a database for the first time, the relevant record will again be sent to the till automatically. This is described in more detail here.

Please follow the links below for details about each card:
- Header and 'Defaults' card
- 'POS' card
- 'POS Appearance' card
Settings related to Point of Sales:
- Introduction
- Baggers
- Cash Events
- Credit Card Types
- Default Payment Modes
- Drawers
- Dynamic Barcode
- Fields for Creating New Customers
- Fiscal Printer Reports
- Gift Voucher Settings
- Gift Voucher Types
- Gift Vouchers Issued
- Gift Vouchers Received
- Gift Vouchers Sold
- Local Machine
- Local Machine Payment Modes
- Local Machine Serial Port Devices
- Local Machines
- Local Settings
- Login Options
- Login Shortcuts
- Loyalty Card Membership Level Structure
- Loyalty Card Membership Levels
- Loyalty Points, Loyalty Points per Location
- Loyalty Points Redemption, Loyalty Points Redemption Per Location
- Merchant ID
- Modifiers
- Number Series - Cash Events
- Number Series - Coupons
- Number Series - Gift Vouchers
- Number Series - Gift Vouchers Received
- Number Series - POS Balances
- Number Series - POS Invoices
- Number Series - POS Sessions
- Payment Currencies
- Payment Gateways
- POS Balances
- POS Button Groups
- POS Button Pictures
- POS Buttons
- POS Commands
- POS Sessions
- POS Settings
- Receipt Printer Texts, Receipt Printer Texts per Machine
- Split Items
- Supervisors
- Synchronised Number Series
- Tab Item Groups
- Home page for Point of Sales manual
- Home page for Standard ERP manual
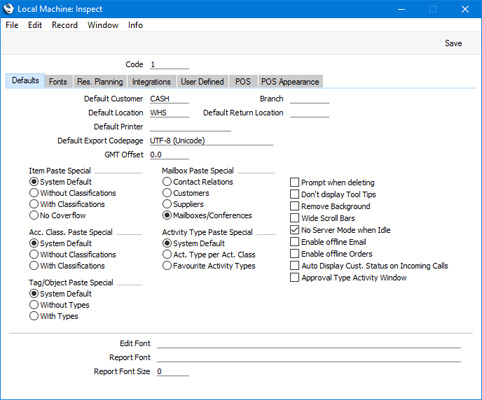
Local Machine - Header and Defaults Card
This page describes the fields and options in the Header and on the 'Defaults' card of the Local Machine setting. Please follow the links below for descriptions of the other cards:- Introduction
- Header and 'Defaults' card
- 'POS' card
- 'POS Appearance' card
- Code
- Paste Special
Local Machines setting, Point of Sales/Restaurant/Technics module
- Use this field to assign a unique identification Code (the "Local Machine Code") to each till.
- The Local Machine Code will be copied to every transaction (e.g. every POS Invoice) recorded on the till. This allows the transactions recorded on each till to be kept separate in reports. You will also need to quote the Local Machine Code in every operation affecting the till (e.g. moving cash floats in and out of the till, opening and closing work sessions, cashing up).
- You will need to restart Standard ERP on a till after specifying its Local Machine Code, in order for it to be fully registered throughout the system.
- If you are in Sweden and you are using the Register Cash Sales in Fiscal Control Unit options in the POS Settings and/or Account Usage S/L settings, you must assign a Local Machine Code to a till before you connect it to a CleanCash device. The first time a till connects to a CleanCash device, the device will become locked to the Standard ERP database on that till. The Local Machine Code will be copied to the device, where it will become the POS-ID. From then on, the Local Machine Code and the POS-ID must match, so you will not be able to move CleanCash devices from till to till. You should also enter the serial number of the device in the Terminal ID field on the 'POS' card of this setting.
- The Local Machine Code will be copied to every transaction (e.g. every POS Invoice) recorded on the till. This allows the transactions recorded on each till to be kept separate in reports. You will also need to quote the Local Machine Code in every operation affecting the till (e.g. moving cash floats in and out of the till, opening and closing work sessions, cashing up).
- Default Customer
- Paste Special
Customers in Contact register
- The Default Customer is the Customer that will be used by default in every new POS Invoice and Bar Tab. This will often be a generic Customer such as 'Cash Sale'.
- You can specify an overall Default Customer in the POS Settings setting in the Point of Sales module This Default Customer will be used on every till and cash machine. If you want to use a different Default Customer on a particular till, specify that Customer in this field on the till in question.
- In both cases, the specified Customer must exist in the Contact register.
Every new POS Invoice and Bar Tab will be created in the name of the Default Customer. If you have added a "Customer Search" button to the POS Invoice and/or Bar Tab windows, you will be able to choose a different Customer if necessary. Specifying a Loyalty Card in a POS Invoice or Bar Tab will also change the Customer.
- Although the Default Customer field is on the 'Defaults' card of the Local Machine setting, it will only be used in POS Invoices and Bar Tabs. New Quotations, Sales Orders and Sales Ledger Invoices will not use the Default Customer.
- You can specify an overall Default Customer in the POS Settings setting in the Point of Sales module This Default Customer will be used on every till and cash machine. If you want to use a different Default Customer on a particular till, specify that Customer in this field on the till in question.
- Branch
- Paste Special
All records in Contact register
- If your business has more than one Branch (e.g. more than one shop), you can use this field to record the Branch where a till or cash machine is located.
- Each Branch must have its own record in the Contact register. These Contact records will allow details such as the Branch address to be printed on documentation, providing you have included the relevant fields in your Form Template designs.
- The Branch specified here will be copied to all Bar Tabs, Deliveries, POS Invoices, Purchase Orders, Reservations, Returned Goods records, Quotations, Sales Invoices, Sales Orders and Stock Movements that you enter on the client machine, till or cash machine. It is a legal requirement in some countries that the Branch origin of these transactions is recorded.
- If you have specified any Sales Tags/Objects in the Contact record for a particular Branch, those Tags/Objects will be copied to Bar Tabs, POS Invoices, Reservations, Quotations, Sales Orders and Sales Invoices. This will allow detailed Branch reporting and analysis in the Nominal Ledger.
- You must specify a Branch in the Local Machine setting on each till if you want to use the Cashier Statistics report.
- Each Branch must have its own record in the Contact register. These Contact records will allow details such as the Branch address to be printed on documentation, providing you have included the relevant fields in your Form Template designs.
- Default Location
- Paste Special Locations setting, Stock module
- When you enter a POS or Sales Ledger Invoice on a till, the Location will be chosen as follows:
- It will be taken from the Person record for the current user ('Sales' card). In a POS environment, it may not be necessary to specify Locations in the cashiers' Person records.
- It will be taken from this field, which is specific to the till or cash machine. In a POS environment, this Location may represent the store in which the till is situated.
When you mark a Sales Ledger Invoice as OK and save, the Items sold will be withdrawn from the specified Location immediately. Items sold in POS Invoices will be withdrawn from the specified Location when you next run the 'Update Stock' Maintenance function in the Point of Sales module.
- The Location will also be chosen as described above in new Goods Receipts, Purchase Orders, Quotations, Sales Orders, Stock Depreciation records, Stock Revaluations, Stocktaking records and Work Sheets unless determined by other records (e.g. a Goods Receipt created from a Purchase Order will take its Location from the Purchase Order). In all cases except POS Invoices, you will be able to change the default choice of Location if necessary.
- When you enter a POS or Sales Ledger Invoice on a till, the Location will be chosen as follows:
- Default Return Location
- Paste Special Locations setting, Stock module
- If you need Items that Customers return to be received into a dedicated Location (for example, a testing area), specify that Location here. This Location will be used in all Returned Goods records and Credit Notes entered on the till or cash machine, in preference to the Default Location specified in the current user's Person record above or in the field above.
- Note that the Default Return Location will not be used in Returns created in the POS environment (i.e. in POS Invoices with negative values created using the "Return" button in the POS Invoice window). Returns will use the Default Location as described above.
- If you need Items that Customers return to be received into a dedicated Location (for example, a testing area), specify that Location here. This Location will be used in all Returned Goods records and Credit Notes entered on the till or cash machine, in preference to the Default Location specified in the current user's Person record above or in the field above.
- Wide Scroll Bars
- Wider scroll bars can make operation on a touch screen easier. This feature is not operational on every operating system.
Settings related to Point of Sales:
- Introduction
- Baggers
- Cash Events
- Credit Card Types
- Default Payment Modes
- Drawers
- Dynamic Barcode
- Fields for Creating New Customers
- Fiscal Printer Reports
- Gift Voucher Settings
- Gift Voucher Types
- Gift Vouchers Issued
- Gift Vouchers Received
- Gift Vouchers Sold
- Local Machine, including:
- Header and 'Defaults' card
- 'POS' card
- 'POS Appearance' card
- Header and 'Defaults' card
- Local Machine Payment Modes
- Local Machine Serial Port Devices
- Local Machines
- Local Settings
- Login Options
- Login Shortcuts
- Loyalty Card Membership Level Structure
- Loyalty Card Membership Levels
- Loyalty Points, Loyalty Points per Location
- Loyalty Points Redemption, Loyalty Points Redemption Per Location
- Merchant ID
- Modifiers
- Number Series - Cash Events
- Number Series - Coupons
- Number Series - Gift Vouchers
- Number Series - Gift Vouchers Received
- Number Series - POS Balances
- Number Series - POS Invoices
- Number Series - POS Sessions
- Payment Currencies
- Payment Gateways
- POS Balances
- POS Button Groups
- POS Button Pictures
- POS Buttons
- POS Commands
- POS Sessions
- POS Settings
- Receipt Printer Texts, Receipt Printer Texts per Machine
- Split Items
- Supervisors
- Synchronised Number Series
- Tab Item Groups
- Home page for Point of Sales manual
- Home page for Standard ERP manual
Local Machine - POS Card
This page describes the fields and options on the 'POS' card of the Local Machine setting. Please follow the links below for descriptions of the other cards:- Introduction
- Header and 'Defaults' card
- 'POS' card
- 'POS Appearance' card
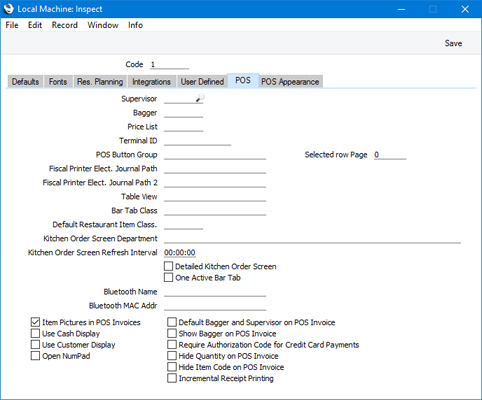
- Supervisor
- Paste Special
Person register, System module and Global User register, Technics module
If you would like a Supervisor to be recorded in every POS Invoice entered on a particular till, enter the Supervisor's Signature here and select the Default Bagger and Supervisor on POS Invoice option below. If a cashier changes the Supervisor in a POS Invoice using the "Supervisor Search" button, the new Supervisor will not be copied to this field, so the change will only apply to the individual POS Invoice.
- Bagger
- Paste Special
Baggers setting, Point of Sales module
- If you would like a Bagger to be recorded in every POS Invoice entered on a particular Till, enter the Bagger's Signature here and select the Default Bagger and Supervisor on POS Invoice option below. If you would like the Bagger to be visible in the POS Invoice window, select the Show Bagger on POS Invoice option below. If a cashier changes the Bagger in a POS Invoice using the "Bagger Search" button, the new Bagger will be copied to this field, so the change will last until the cashier changes the Bagger again.
- Price List
- Paste Special
Price List register, Pricing module
- If you specify a Price List here, it will be used in all POS Invoices recorded on the till unless a separate Price List has been specified for a particular Customer.
- When you create a new POS Invoice, the Price List will be chosen as follows:
- The Price List will be brought in from the card of the Default Customer's Contact record.
- The Price List for the Customer Category to which the Default Customer belongs will be used.
- The Price List specified here in the Local Machine setting will be used.
If you change the Customer in a POS Invoice, the Price List will be changed as well. If you specify a Customer who has a Loyalty Card, the Price List will be brought in from the relevant row in the Loyalty Card Membership Level Structure setting in the Point of Sales module. If the Loyalty Card Membership Level Structure does not supply a Price List or the specified Customer does not have a Loyalty Card, then the Price List will again be chosen as specified above.
- The Price List that you specify here will also be used as described above in Bar Tabs in the Restaurant module. It will also be offered as a default in Hotel Reservations if no Default Price List has been specified in the Hotel Settings setting or for the Default Hotel Customer. Please refer here for more details about the use of this field in Hotel Reservations.
- When you create a new POS Invoice, the Price List will be chosen as follows:
- Terminal ID
- If you are in Sweden and a CleanCash device is attached to the Till, enter the serial number of the device here. This number will begin with the characters "RIHTT".
- In Croatia, the Terminal ID field should contain a second unique identifier for the till. Unlike the Local Machine Code (the first unique identifier for the till), the Terminal ID must only contain numeric characters. The Terminal ID should be printed on sales documentation as part of an Invoice’s Official Number. Please refer to the description of the Legal Record Numbers setting for more details.
- In Croatia, the Terminal ID field should contain a second unique identifier for the till. Unlike the Local Machine Code (the first unique identifier for the till), the Terminal ID must only contain numeric characters. The Terminal ID should be printed on sales documentation as part of an Invoice’s Official Number. Please refer to the description of the Legal Record Numbers setting for more details.
- POS Button Group
- Paste Special
POS Button Groups setting, Point of Sales module
- When configuring the buttons that will appear in the POS Invoice and/or Bar Tab windows, you may need different sets of Buttons to be used, depending on how a particular till or cash machine will be used. For example in a restaurant you might need different sets of buttons to appear on the tills in the food area compared to the tills in the bar. You can implement this using POS Button Groups.
- In this example, you would create one POS Button Group for the food area and one for the bar. Then, create the POS Button records that you need, assigning them each to the relevant Button Group (i.e. assign each POS Button record to the food area or to the bar). Then, use this field to assign a particular till to a Button Group (i.e. to specify whether the till will be used in the food area or the bar). Buttons designed for the food area will not be used on Tills in the bar and vice versa.
- Please refer here for more details.
- In this example, you would create one POS Button Group for the food area and one for the bar. Then, create the POS Button records that you need, assigning them each to the relevant Button Group (i.e. assign each POS Button record to the food area or to the bar). Then, use this field to assign a particular till to a Button Group (i.e. to specify whether the till will be used in the food area or the bar). Buttons designed for the food area will not be used on Tills in the bar and vice versa.
- Selected row Page
- When configuring the buttons that will appear in the POS Invoice window, you may need more buttons than will fit in the window. You will therefore need to divide the buttons into sets (or "pages"), and to include "Display Page" buttons in each set. Cashiers will click or touch the "Display Page" button if they need a different set or page of buttons to be displayed. To define these sets or pages of buttons, you will create separate records in the POS Buttons setting, each with a different Page.
- An option that is available is to have a specific set or page of buttons displayed when a cashier clicks or touches an Item that they have previously added to a POS Invoice (i.e. an Item that is listed in the Panel in a POS Invoice). If you need to use this feature, specify here the page that is to be displayed. If you have specified a POS Button Group in the field to the left, the buttons listed in the POS Button record with the specified Button Group/Page combination will be displayed.
- An option that is available is to have a specific set or page of buttons displayed when a cashier clicks or touches an Item that they have previously added to a POS Invoice (i.e. an Item that is listed in the Panel in a POS Invoice). If you need to use this feature, specify here the page that is to be displayed. If you have specified a POS Button Group in the field to the left, the buttons listed in the POS Button record with the specified Button Group/Page combination will be displayed.
- Fiscal Printer Elect. Journal Path, Fiscal Printer Elect. Journal Path 2
- In Lithuania, if an Empirija FB05 or FB15 fiscal printer is attached to a till, you will need to print a daily Z report both to paper and to an electronic journal file. The electronic journal file should be saved in two locations, which you should specify in these two fields. Please refer to the description of the Fiscal Printer Reports setting here for more details.
- Item Pictures in POS Invoices
- Please refer here for details about this option.
- Default Bagger and Supervisor on POS Invoice
- If you would like a Supervisor and Bagger to be recorded in every POS Invoice entered on a particular till, enter their Signatures in the Supervisor and Bagger fields above and select this option.
- If you have included "Supervisor Search" and/or "Bagger Search" buttons in your POS Invoice window, cashiers will be able to change the Supervisor and/or Bagger in a particular POS Invoice. If a cashier changes the Supervisor, that change will only affect the POS Invoice being entered. The Supervisor in the next POS Invoice will revert to the default. However, if a cashier changes the Bagger, that change will be carried forward to the next POS Invoices.
- If you have included "Supervisor Search" and/or "Bagger Search" buttons in your POS Invoice window, cashiers will be able to change the Supervisor and/or Bagger in a particular POS Invoice. If a cashier changes the Supervisor, that change will only affect the POS Invoice being entered. The Supervisor in the next POS Invoice will revert to the default. However, if a cashier changes the Bagger, that change will be carried forward to the next POS Invoices.
- Use Cash Display
- Selecting the Use Cash Display option will have two effects:
- If you have attached a pole display to a till, you must select this option for information to be shown on the pole display. Please refer here for details about attaching pole displays to tills.
- It causes a message to be displayed at the top of the first POS Invoice created in a work session. Please refer here for details.
- If you have attached a pole display to a till, you must select this option for information to be shown on the pole display. Please refer here for details about attaching pole displays to tills.
- Show Bagger on POS Invoice
- Use this option if you would like the Bagger to be visible in the POS Invoice window. Please refer here for more details.
- Use Customer Display
- Use this option when a till has two built-in displays, one for cashiers and one for customers. When a cashier creates a new POS Invoice, it will cause a second window (entitled 'Customer Display') to be opened as well as the usual 'POS Invoice: New' window. As the cashier adds Items to the POS Invoice, they will be listed in both windows.
- The first time a cashier creates a new POS Invoice on a particular till, the 'Customer Display' window will be opened on top of the 'POS Invoice: New' window. Drag the 'Customer Display' window to the display facing the customer and choose 'Save Position' from the Window menu. This will ensure the 'Customer Display' window will always be opened on the display facing the customer in future.
- The first time a cashier creates a new POS Invoice on a particular till, the 'Customer Display' window will be opened on top of the 'POS Invoice: New' window. Drag the 'Customer Display' window to the display facing the customer and choose 'Save Position' from the Window menu. This will ensure the 'Customer Display' window will always be opened on the display facing the customer in future.
- Require Authorisation Code for Credit Card Payments
- Select this option if you would like it to be mandatory for credit and debit card payments to be accompanied by authorisation codes when they are recorded on a particular till. You will usually use this option when you are using a separate system to process credit and debit card payments and you need cashiers to record authorisation codes against the corresponding POS Invoices. Please refer here for more details.
- Open Numpad
- If you select this option on a particular till, a numeric keypad will open automatically when a cashier activates the "Discount" or "Quantity" POS Commands by clicking or touching a "POS Command" button.
- Hide Quantity on POS Invoice
- Please refer here for details about this option.
- Hide Item Code on POS Invoice
- Please refer here for details about this option.
- Incremental Receipt Printing
- This option will control how receipts will be printed on a receipt printer that is connected to a till.
- If you are not using this option, receipts will be printed in their entirety when POS Invoices are complete (i.e. when the cashier touches or clicks the "Finish" button to close a POS Invoice and open a new one).
- If you are using this option, receipts will be printed as the cashier adds Items to POS Invoices. Printing will be one row behind the cashier. For example, when the cashier adds the second Item to a POS Invoice, the first Item will be printed. When the cashier touches or clicks the "Finish" button, the last Item will be printed together with the totals. This option will be useful if you are using slower printers (for example, dot matrix printers), and you want to avoid queues as Customers wait for receipts to be printed. However, some POS Buttons and Commands cannot be used with incremental printing, as they would allow information that has already been printed to be changed.
- Incremental printing can be used with the Axiohm A777 and Epson TM-T88II receipt printers.
- Please refer here for more details about receipt printers.
- If you are not using this option, receipts will be printed in their entirety when POS Invoices are complete (i.e. when the cashier touches or clicks the "Finish" button to close a POS Invoice and open a new one).
Settings related to Point of Sales:
- Introduction
- Baggers
- Cash Events
- Credit Card Types
- Default Payment Modes
- Drawers
- Dynamic Barcode
- Fields for Creating New Customers
- Fiscal Printer Reports
- Gift Voucher Settings
- Gift Voucher Types
- Gift Vouchers Issued
- Gift Vouchers Received
- Gift Vouchers Sold
- Local Machine, including:
- Header and 'Defaults' card
- 'POS' card
- 'POS Appearance' card
- Header and 'Defaults' card
- Local Machine Payment Modes
- Local Machine Serial Port Devices
- Local Machines
- Local Settings
- Login Options
- Login Shortcuts
- Loyalty Card Membership Level Structure
- Loyalty Card Membership Levels
- Loyalty Points, Loyalty Points per Location
- Loyalty Points Redemption, Loyalty Points Redemption Per Location
- Merchant ID
- Modifiers
- Number Series - Cash Events
- Number Series - Coupons
- Number Series - Gift Vouchers
- Number Series - Gift Vouchers Received
- Number Series - POS Balances
- Number Series - POS Invoices
- Number Series - POS Sessions
- Payment Currencies
- Payment Gateways
- POS Balances
- POS Button Groups
- POS Button Pictures
- POS Buttons
- POS Commands
- POS Sessions
- POS Settings
- Receipt Printer Texts, Receipt Printer Texts per Machine
- Split Items
- Supervisors
- Synchronised Number Series
- Tab Item Groups
- Home page for Point of Sales manual
- Home page for Standard ERP manual
Local Machine - POS Appearance Card
Please refer here for details about using the 'POS Appearance' card in the Local Machine setting when configuring the POS Invoice window.The Local Machine setting and the Point of Sales module:
- Introduction
- Header and 'Defaults' card
- 'POS' card
- 'POS Appearance' card
Go back to:
- Home page for Settings related to the Point of Sales module
- Home page for Point of Sales manual
- Home page for Standard ERP manual
Local Machine Payment Modes
The Local Machine Payment Modes setting should contain a list of the Payment Modes (i.e. the payment methods) that can be used on each Local Machine (i.e. on each till or cash machine). This setting is in the Point of Sales and Restaurant modules.Listing payment methods in the Local Machine Payment Modes setting has several purposes. Please refer to the following pages for details:
- The "Pay" Button - Payments Using Multiple Payment Methods
- Cash Accounts
- Cash Payments and Currencies
- Opening the Cash Drawer
Settings related to Point of Sales:
- Introduction
- Baggers
- Drawers
- Dynamic Barcode
- Fields for Creating New Customer
- Gift Vouchers Settings
- Gift Voucher Types
- Gift Vouchers Issued
- Gift Vouchers Received
- Gift Vouchers Sold
- Local Machine Payment Modes
- Local Machines
- Loyalty Card Membership Level Structure
- Loyalty Card Membership Levels
- Loyalty Points, Loyalty Points per Location
- Loyalty Points Redemption, Loyalty Points Redemption Per Location
- Modifiers
- Number Series - Gift Vouchers
- Number Series - Gift Vouchers Received
- Number Series - POS Balances
- Payment Currencies
- POS Balances
- POS Button Groups
- POS Button Pictures
- POS Buttons
- Split Items
- Supervisors
- Synchronised Number Series
- Home page for Point of Sales manual
- Home page for Standard ERP manual
Local Machine Payment Modes - The "Pay" and "Pay (one Mode)" Buttons - Payments Using Multiple Payment Methods
This page describes using the Local Machine Payment Modes setting in the Point of Sales and Restaurant modules to allow cashiers to accept payments made using multiple payment methods in the same window. Please refer to the following pages for details about other uses for the Local Machine Payment Modes setting:- The "Pay" and "Pay (one Mode)" Buttons - Payments Using Multiple Payment Methods
- Cash Accounts
- Cash Payments and Currencies
- Opening the Cash Drawer
If you need cashiers working with POS Invoices to be able to receive payment from a Customer using more than one payment method (e.g. cash and credit card) in a single window, follow these steps:
- In the POS Buttons setting, add a "Pay" POS Button to the POS Invoice window.
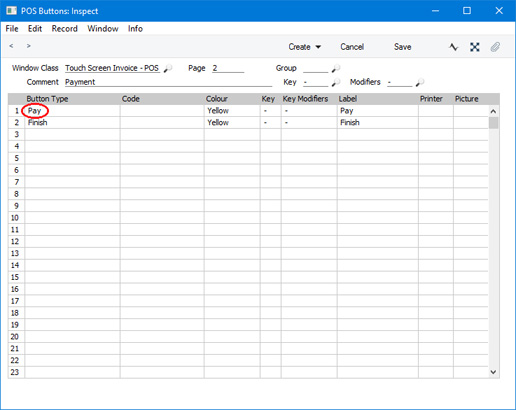
- In the Local Machine Payment Modes setting, list the payment methods that can be used on each till or cash machine. For example, if you have three tills that will accept cash and credit cards, you will need to list these payment methods separately for each till in the setting, as illustrated below (in this example, one till will also accept cheques):
In each row, specify the Payment Mode (i.e. the payment method), the Local Machine (i.e. the till on which the payment method can be used) and the Label. The Label is the text that will identify each payment method to the cashiers. For each Payment Mode that represents credit card payments, use 'Paste Special' from the CC Type field to choose the credit card type. For the Payment Mode that represents cash payments, enter your home Currency in the Currency field. For the purpose of listing payment methods in the 'Payment' window you don't need to specify a Drawer, but doing so will enable some of the other features offered by the Local Machine Payment Modes setting.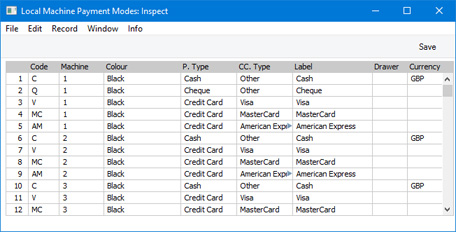
- When a cashier clicks or touches the "Pay" button, a 'Payment' window will open. This window will contain a separate field for each payment method that can be used on the till or cash machine (i.e. the payment methods that you have listed for the till in the Local Machine Payment Modes setting):
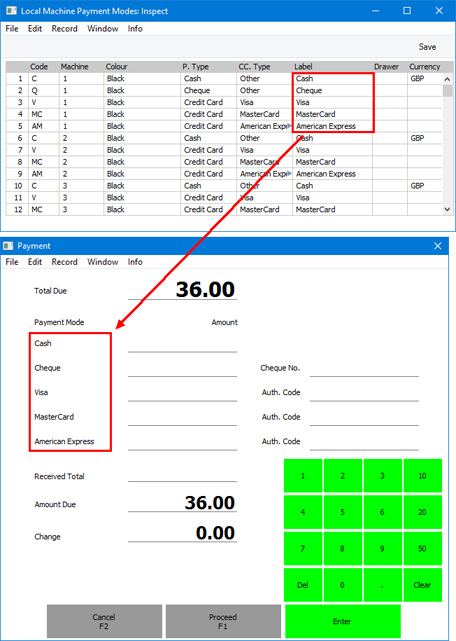
- The cashier should enter the value of the payments made using each payment method in the relevant Amount fields and then click or touch the [Proceed] button. The payments will be added to the POS Invoice.
Note that there only space in the 'Payment' window for a limited number of payment methods. Bear this in mind when deciding whether to offer cashiers a "Pay" button - if you use the Local Machine Payment Modes setting for some of the other features described in this section, you may end up with too many payment methods for the "Pay" window. In this case, you may decide not to offer cashiers a "Pay" button and instead offer them separate buttons for each payment method (e.g. separate "Cash" and "Credit Card" buttons). It will still be possible to receive payments made using more than one payment method, but not in the same window.
- An alternative to the "Pay" button is the "Pay (one Mode)" button. This button requires the same configuration as the "Pay" button (i.e. you must list the Payment Modes that are available to each till or cash machine in the Local Machine Payment Modes setting as described in step 2).
- When a cashier clicks or touches the "Pay (one Mode)" button, a different 'Payment' window will open. This window will contain a separate field for each payment method that can be used on the till or cash machine (i.e. the payment methods that you have listed for the till in the Local Machine Payment Modes setting):
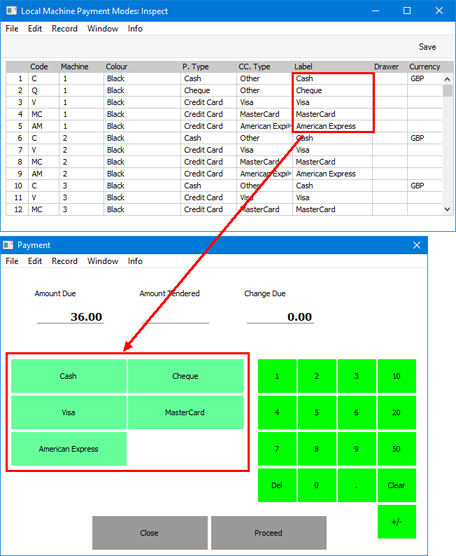
- The cashier should enter the value of the payment in the Amount Tendered field and click or touch the button that represents the relevant payment method. The payment will be added to the POS Invoice, but the 'Payment' window will not close. This allows the cashier to register subsequent payments made using different payment methods. When the cashier has recorded every payment, they can click or touch the [Close] button (to close the 'Payment' window and return to the POS Invoice) or the [Proceed] button (to close the POS Invoice and open a new one).
If a Customer pays the exact full amount using a single payment method, the cashier does not need to enter the amount in the Amount Tendered field. All they need to do is click or touch the button that represents the relevant payment method to add the payment to the POS Invoice. In this case, the 'Payment' window will be closed, so they will need to click or touch the "Finish” button to close the POS Invoice and open a new one.
Settings related to Point of Sales:
- Introduction
- Cash Events
- Credit Card Types
- Default Payment Modes
- Baggers
- Drawers
- Dynamic Barcode
- Fields for Creating New Customers
- Fiscal Printer Reports
- Gift Voucher Settings
- Gift Voucher Types
- Gift Vouchers Issued
- Gift Vouchers Received
- Gift Vouchers Sold
- Local Machine
- Local Machine Payment Modes
- Local Machine Serial Port Devices
- Local Machines
- Local Settings
- Login Options
- Login Shortcuts
- Loyalty Card Membership Level Structure
- Loyalty Card Membership Levels
- Loyalty Points, Loyalty Points per Location
- Loyalty Points Redemption, Loyalty Points Redemption Per Location
- Merchant ID
- Modifiers
- Number Series - Cash Events
- Number Series - Coupons
- Number Series - Gift Vouchers
- Number Series - Gift Vouchers Received
- Number Series - POS Balances
- Number Series - POS Invoices
- Number Series - POS Sessions
- Payment Currencies
- Payment Gateways
- POS Balances
- POS Button Groups
- POS Button Pictures
- POS Buttons
- POS Commands
- POS Sessions
- POS Settings
- Receipt Printer Texts, Receipt Printer Texts per Machine
- Split Items
- Supervisors
- Synchronised Number Series
- Tab Item Groups
- Home page for Point of Sales manual
- Home page for Standard ERP manual
Local Machine Payment Modes - Cash Accounts
This page describes using the Local Machine Payment Modes setting in the Point of Sales and Restaurant modules to ensure cash payments made on different tills or cash machines will be posted to separate Accounts. Please refer to the following pages for details about other uses for the Local Machine Payment Modes setting:- The "Pay" Button - Payments Using Multiple Payment Methods
- Cash Accounts
- Cash Payments and Currencies
- Opening the Cash Drawer
One way to accept cash payments in POS Invoices is to list a cash Payment Mode in the Local Machine Payment Modes setting and then to use the "Pay" or “Pay (one Mode)” buttons as described here. The Account in the cash Payment Mode will be debited with the value of each cash payment.
A second way is to use a dedicated "Cash" button. Follow these steps:
- In the POS Buttons setting, add a "Cash" button to the POS Invoice window. You will need to specify a Payment Mode in the Code field. The Account in this Payment Mode will be debited with the value of each cash payment.
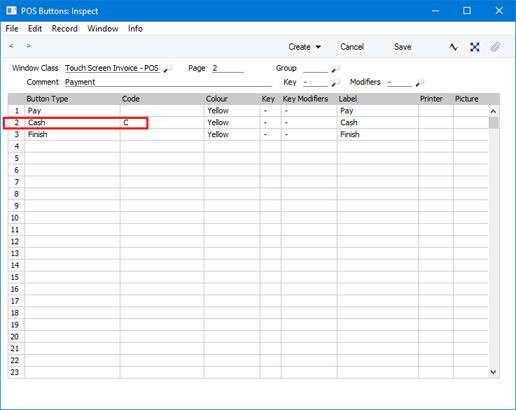
- Using the "Cash" button in step 1 will cause all cash payments to be sent to the same Account. You may want to use different Accounts for tills or cash machines in different departments. You may even want to use a separate Account for each till. If so, go to the Payment Modes setting and enter separate new Payment Modes for each new Account.
- In the Local Machine Payment Modes setting, allocate each of the Payment Modes that you entered in step 2 to a till or cash machine:
In each row, specify the Payment Mode, the Local Machine, the Drawer and the Currency. If a Local Machine has more than one Drawer, enter them all, separated by commas.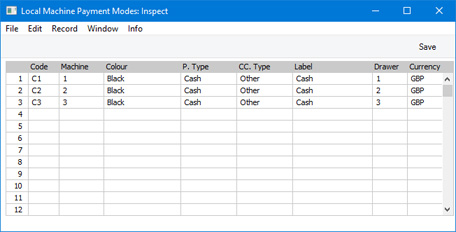
- When a cashier uses the "Cash" button on a particular till, the correct Payment Mode will be used, so the payment will be sent to the appropriate Account.
If the Payment Mode shown in the POS Invoice is not correct, the probable reason is that you did not specify the Drawer or Currency in step 3, or you did so incorrectly.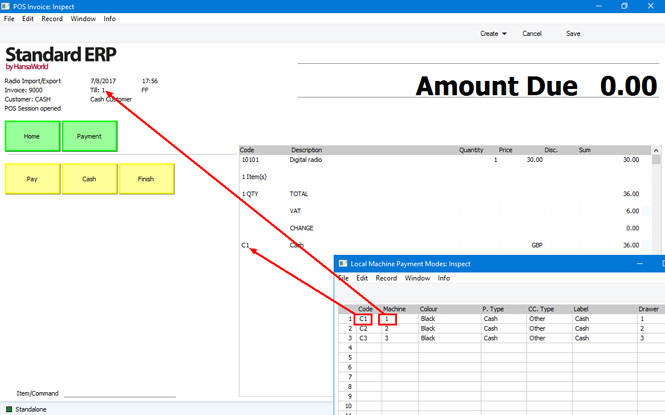
- Listing the various cash Payment Modes in the Local Machine Payment Modes setting will also mean that they will be shown in the 'Payment' window, as described on the The "Pay" Button - Payments Using Multiple Payment Methods page. Payments made through this window will also be sent to the appropriate Account, depending on the till.
Settings related to Point of Sales:
- Introduction
- Baggers
- Drawers
- Dynamic Barcode
- Fields for Creating New Customer
- Gift Vouchers Settings
- Gift Voucher Types
- Gift Vouchers Issued
- Gift Vouchers Received
- Gift Vouchers Sold
- Local Machine Payment Modes
- Local Machines
- Loyalty Card Membership Level Structure
- Loyalty Card Membership Levels
- Loyalty Points, Loyalty Points per Location
- Loyalty Points Redemption, Loyalty Points Redemption Per Location
- Modifiers
- Number Series - Gift Vouchers
- Number Series - Gift Vouchers Received
- Number Series - POS Balances
- Payment Currencies
- POS Balances
- POS Button Groups
- POS Button Pictures
- POS Buttons
- Split Items
- Supervisors
- Synchronised Number Series
- Home page for Point of Sales manual
- Home page for Standard ERP manual
Local Machine Payment Modes - Cash Payments and Currencies
This page describes using the Local Machine Payment Modes setting in the Point of Sales and Restaurant modules to manage cash payments in different Currencies. Please refer to the following pages for details about other uses for the Local Machine Payment Modes setting:- The "Pay" Button - Payments Using Multiple Payment Methods
- Cash Accounts
- Cash Payments and Currencies
- Opening the Cash Drawer
If you need to be able to receive cash payments in POS Invoices in different Currencies, follow these steps:
- List the Currencies that you will accept in the Payment Currencies setting.
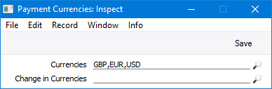
- In the POS Buttons setting, add a "Cash" button to the POS Invoice window. You will need to specify a Payment Mode in the Code field. The Account in this Payment Mode will be debited with the value of each cash payment.

- When a cashier clicks or touches the "Cash" button, a window will open in which they will be able to receive payment and give change in the specified Currencies:
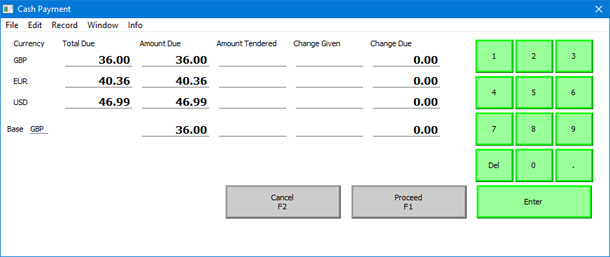
- So far:
- All cash payments will be sent to the same Account.
- The cashier will need to use the "Cash" button to receive a payment that is not in your home Currency i.e. they will not be able to use the "Pay" or "Pay (one Mode)" buttons because those will only receive payments in your home Currency.
If you want to use different Accounts for each Currency and/or to be able to use the "Pay" or “Pay (one Mode)” buttons, the next step is to enter Cash Accounts for each Currency. Specify the Currency in each Account:
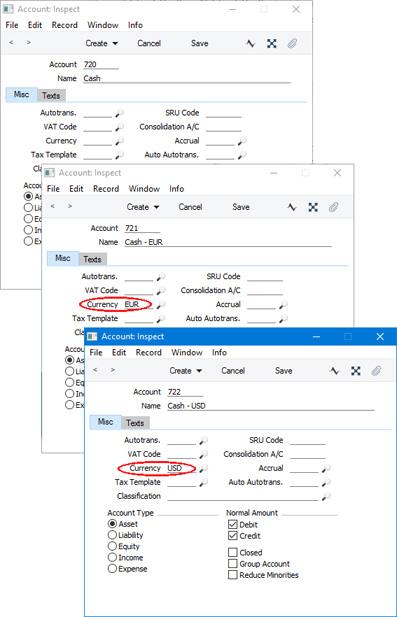
- All cash payments will be sent to the same Account.
- Enter Payment Modes for each Currency, using the Accounts that you entered in step 4:
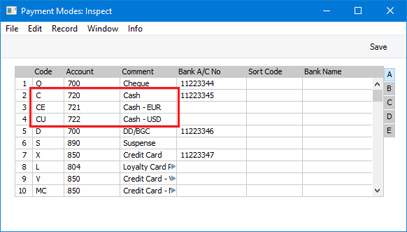
- In the Local Machine Payment Modes setting, connect the new Payment Modes to each till:
In each row, specify the Payment Mode, the Local Machine, the Drawer and the Currency. If a Local Machine has more than one Drawer, enter them all, separated by commas.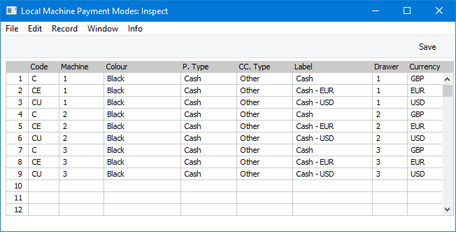
- When a cashier uses the "Cash" button on a particular till to receive payment in a particular Currency, the correct Payment Mode will be used, so the payment will be sent to the appropriate Account.

- Listing the various cash Payment Modes in the Local Machine Payment Modes setting will also mean that they will be shown in the 'Payment' window, as described on the The "Pay" Button - Payments Using Multiple Payment Methods page). Payments made through this window will also be sent to the appropriate Account, depending on the till. If, after closing the 'Payment' window (the window that opens when a cashier presses the "Pay" or "Pay (one Mode)" buttons, the amounts in Currency are not displayed correctly in the POS Invoice (i.e. the remaining outstanding amount or the change amount is not correct), the probable reason is that you did not specify the Currency in the Account as specified in step 4.
Settings related to Point of Sales:
- Introduction
- Baggers
- Drawers
- Dynamic Barcode
- Fields for Creating New Customer
- Gift Vouchers Settings
- Gift Voucher Types
- Gift Vouchers Issued
- Gift Vouchers Received
- Gift Vouchers Sold
- Local Machine Payment Modes
- Local Machines
- Loyalty Card Membership Level Structure
- Loyalty Card Membership Levels
- Loyalty Points, Loyalty Points per Location
- Loyalty Points Redemption, Loyalty Points Redemption Per Location
- Modifiers
- Number Series - Gift Vouchers
- Number Series - Gift Vouchers Received
- Number Series - POS Balances
- Payment Currencies
- POS Balances
- POS Button Groups
- POS Button Pictures
- POS Buttons
- Split Items
- Supervisors
- Synchronised Number Series
- Home page for Point of Sales manual
- Home page for Standard ERP manual
Local Machine Payment Modes - Opening the Cash Drawer
This page describes using the Local Machine Payment Modes setting in the Point of Sales and Restaurant modules to ensure the Drawer in each till and cash machine will be opened whenever a cashier receives a payment. Please refer to the following pages for details about other uses for the Local Machine Payment Modes setting:- The "Pay" Button - Payments Using Multiple Payment Methods
- Cash Accounts
- Cash Payments and Currencies
- Opening the Cash Drawer
When a cashier receives a cash, credit card, cheque, gift voucher or loyalty points in payment for a POS Invoice, the cash drawer in the till or cash machine can be opened automatically. Follow these steps:
- Assign each cashier to an Access Group in which you have granted Full access to the 'Open Cash Drawer' Action.
- Create a record for the cash drawer in the Local Machine Serial Port Devices setting in the Technics module.
- In the Local Machine Payment Modes setting, list the Payment Modes that are to open the cash drawer.
If you are only using the Local Machine Payment Modes setting for the purpose of opening the cash drawer, you only need specify the Payment Mode and the Drawer, and the Drawer can be any character (as illustrated above). Leaving the Local Machine field empty will mean that the cash drawer will be opened on every till and cash machine. The Payment Modes should be the ones listed in the relevant POS Buttons record (e.g. if you are using the "GV" Payment Mode in the POS Buttons record together with the "Gift Voucher" button, enter "GV" here if you want the cash drawer to open when receiving a Gift Voucher in payment).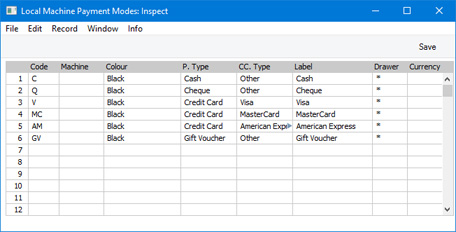
However, if you are also using the Local Machine Payment Modes setting for some of the other features that it enables, you will need to specify a Local Machine, a real Drawer, a Currency (for cash payments) and a CC Type (for credit card payments) as well.
- Whenever a cashier receives payment made using one of the payment methods that you have listed in the Local Machine Payment Modes setting, the cash drawer will be opened automatically. For example, if a cashier receives a cash payment, they will click or touch the "Cash" or "Pay" button, enter the amount received and click or touch the [Proceed] button. At this point, the cash drawer will open.
- If you want to give cashiers the ability to open the cash drawer themselves, add an "Open Cash Drawer” button to the POS Invoice window. The button will only open the cash drawer after it has been opened automatically i.e. a cashier will only be able to use it after they have received a payment made using one of the payment methods that you have listed in the Local Machine Payment Modes setting. For example, the button will be useful if the cashier discovers they have given the wrong change after they have closed the cash drawer.
---
Settings related to Point of Sales:
- Introduction
- Baggers
- Drawers
- Dynamic Barcode
- Fields for Creating New Customer
- Gift Vouchers Settings
- Gift Voucher Types
- Gift Vouchers Issued
- Gift Vouchers Received
- Gift Vouchers Sold
- Local Machine Payment Modes
- Local Machines
- Loyalty Card Membership Level Structure
- Loyalty Card Membership Levels
- Loyalty Points, Loyalty Points per Location
- Loyalty Points Redemption, Loyalty Points Redemption Per Location
- Modifiers
- Number Series - Gift Vouchers
- Number Series - Gift Vouchers Received
- Number Series - POS Balances
- Payment Currencies
- POS Balances
- POS Button Groups
- POS Button Pictures
- POS Buttons
- Split Items
- Supervisors
- Synchronised Number Series
- Home page for Point of Sales manual
- Home page for Standard ERP manual
Local Machine Serial Port Devices
You can attach serial port devices of many kinds to your tills and cash machines. Examples include printers, drawers, credit card terminals, pole displays and fiscal printers and control units. After attaching a serial port device to a till or cash machine, refer to the device's manual and configure the till's operating system to ensure it will communicate with the device. You should then register the device in Standard ERP. Follow these steps:- Working on a desktop client, change to the Technics module and open the Local Machine Serial Port Devices setting. The 'Local Machine Serial Port Devices: Browse' window opens, listing the records in the setting that already exist.
To be able to work in the Technics module, your Person or Global User record should belong to an Access Group that explicitly grants full access to the Technics module.
- Select 'New' from the Create menu (Windows/Mac OS X) or + menu (iOS/Android) to create a new record, or highlight a record similar to the one you want to enter and select 'Duplicate' from the same menu.
- The 'Local Machine Serial Port Device: New' window opens:
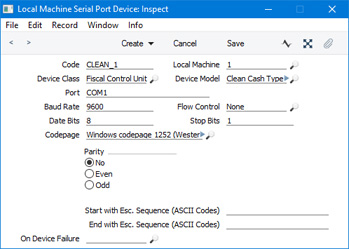
- Code
- Enter a unique Code for the serial device. The Code can consist of up to ten characters, and you can use both numbers and letters.
- Local Machine
- Paste Special
Local Machines setting, Point of Sales/Restaurant/Technics module
- Enter the Local Machine Code of the till or cash machine to which the serial device is or will be attached.
- Device Class
- Paste Special
Choices of possible entries
- Use 'Paste Special' to specify the type of the serial device. The following options are available:
- Receipt Printer
- Use this option if the serial device is a receipt printer.
- Receipt printers are described in more detail here.
- Receipt printers are described in more detail here.
- Fiscal Printer
- As well as printing receipts, a fiscal printer will record each transaction in its memory. This information is usually required by the local tax authority.
- Fiscal printers are described in more detail here.
- Fiscal printers are described in more detail here.
- Fiscal Control Unit
- A fiscal control unit will record each transaction in its memory. This information is usually required by the local tax authority. Example fiscal control units are the CleanCash Types A, and C used in Sweden.
- Pole Display
- A pole display is a separate small screen that displays the name and price of each Item to the Customer as it is scanned by the cashier.
- If you attach a pole display to a till or cash machine, you should also activate the Use Cash Display option in the Local Machine setting in the User Settings module on the till in question (or, if a till has a live-sync connection to the server, in the record for the till in the Local Settings setting in the Technics module). You can then use the Receipt Printer Texts setting in the Point of Sales module to compose a message to be displayed on pole displays when the till is not being used.
- If you need to display cyrillic characters on a pole display, you should use a Posiflex pole display, you should set the Device Model (below) to "Posiflex Pole Display" (not "Generic Pole Display", and you should set the Codepage (also below) to "DOS CP 866 (Cyrillic)".
- If you attach a pole display to a till or cash machine, you should also activate the Use Cash Display option in the Local Machine setting in the User Settings module on the till in question (or, if a till has a live-sync connection to the server, in the record for the till in the Local Settings setting in the Technics module). You can then use the Receipt Printer Texts setting in the Point of Sales module to compose a message to be displayed on pole displays when the till is not being used.
- Drawer
- Use this option if the serial device is a cash machine drawer.
- If you also attach a receipt printer to a till (i.e. if you have separate records in the Local Machine Serial Port Devices setting for the drawer and the receipt printer), the drawer will usually be opened automatically as part of the printing process. Please refer here for more details.
- If you also attach a receipt printer to a till (i.e. if you have separate records in the Local Machine Serial Port Devices setting for the drawer and the receipt printer), the drawer will usually be opened automatically as part of the printing process. Please refer here for more details.
- Credit Card Terminal
- Use this option if the device is a credit card terminal (e.g. Banksys Yomani or Verifone). Please refer here for more details.
- Receipt Printer
- Device Model
- Paste Special
Choices of possible entries
- Use 'Paste Special' to specify the precise model of the serial device.
- Port
- Specify the till's serial port to which the serial device is attached (e.g. "COM1" if the till is a Windows machine).
- If the till is a Mac OS X or Linux machine and does not have a serial port, you will need an RS232-to-USB adapter. Install the driver supplied with the adapter. To discover the port number of the new port, you can use the Network section of System Preferences or type ls /dev/tty.* in a new Terminal window. Then enter the port number in this field (for example, /dev/tty.usbserial or /dev/tty.KeySerial1).
- If the till is a Mac OS X or Linux machine and does not have a serial port, you will need an RS232-to-USB adapter. Install the driver supplied with the adapter. To discover the port number of the new port, you can use the Network section of System Preferences or type ls /dev/tty.* in a new Terminal window. Then enter the port number in this field (for example, /dev/tty.usbserial or /dev/tty.KeySerial1).
- Baud Rate, Flow Control, Data Bits, Stop Bits, Parity
- Refer to the manual for the serial device to specify the appropriate communications settings. In the case of the Flow Control field, you can choose the relevant value using 'Paste Special'.
- Codepage
- Paste Special
Choices of possible entries
- Specify the code page (character encoding system) that is to be used when communicating with the serial device. This information can again often be found in the manual for the serial device.
- Start with Esc. Sequence (ASCII Codes), End with Esc. Sequence (ASCII Codes)
- If required by the serial device, specify the escape sequences that should mark the start and end points of communications with the device. This information can be obtained from the manual for the device. You will need to specify a Start Escape Sequence if the Device Class is "Drawer". If the Device Model is the Empirija FB05 or FB15, the End Escape Sequence should be 114.
- On Device Failure
- Paste Special
Local Machine Serial Port Devices setting, Technics module
- If the Device Class is "Receipt Printer", you can specify here a secondary printer that is to be used if the receipt printer fails. The secondary printer should have its own record in the Local Machine Serial Port Devices setting, and should also be attached to the till or cash machine.
- Code
- When the record is complete, click the [Save] button (Windows/Mac OS X) or tap √ (iOS/Android) to save it, or use the close box to close the record without saving.
- Each record in the Local Machine Serial Port Devices setting is stored in the main database on the server. This setting is a central repository of all the serial port devices you have in your network. A separate setting, the Local Serial Port Devices Cache setting in the User Settings module, contains a list of the serial port devices that are attached to a particular till or cash machine. As this setting is in the User Settings module, it will contain different records on each till.
The Local Serial Port Devices Cache setting will usually be filled automatically. The first time you attempt to use a serial port device, the relevant records (i.e. the records with the relevant Local Machine Code) will be sent from the Local Machine Serial Port Devices setting on the server to the Local Serial Port Devices Cache setting on the till.
In the case of tills and cash machines with live-sync connections to the server, the Local Machine Serial Port Devices setting on each till will be filled automatically as part of the synchronisation process. The first time you attempt to use a serial port device, the Local Serial Port Devices Cache setting will again be filled automatically.
- If you change a record in the Local Machine Serial Port Devices setting, the change will not be fed through to the Local Serial Port Devices Cache setting on the relevant till(s) automatically. Therefore, you must update the till(s) yourself. You can do this by opening the Local Serial Port Devices Cache setting in the User Settings module on each till and deleting the old records. The next time you attempt to use a serial port device, the Local Serial Port Devices Cache setting will again be filled automatically. On tills with live connections to the server, you can also open the Local Serial Port Devices Cache setting and choose 'Synchronise Serial Port Devices' from the Operations menu.
Settings related to Point of Sales:
- Introduction
- Baggers
- Cash Events
- Credit Card Types
- Default Payment Modes
- Drawers
- Dynamic Barcode
- Fields for Creating New Customers
- Fiscal Printer Reports
- Gift Voucher Settings
- Gift Voucher Types
- Gift Vouchers Issued
- Gift Vouchers Received
- Gift Vouchers Sold
- Local Machine
- Local Machine Payment Modes
- Local Machine Serial Port Devices
- Local Machines
- Local Settings
- Login Options
- Login Shortcuts
- Loyalty Card Membership Level Structure
- Loyalty Card Membership Levels
- Loyalty Points, Loyalty Points per Location
- Loyalty Points Redemption, Loyalty Points Redemption Per Location
- Merchant ID
- Modifiers
- Number Series - Cash Events
- Number Series - Coupons
- Number Series - Gift Vouchers
- Number Series - Gift Vouchers Received
- Number Series - POS Balances
- Number Series - POS Invoices
- Number Series - POS Sessions
- Payment Currencies
- Payment Gateways
- POS Balances
- POS Button Groups
- POS Button Pictures
- POS Buttons
- POS Commands
- POS Sessions
- POS Settings
- Receipt Printer Texts, Receipt Printer Texts per Machine
- Split Items
- Supervisors
- Synchronised Number Series
- Tab Item Groups
- Home page for Point of Sales manual
- Home page for Standard ERP manual
Local Machines
The Local Machines setting should contain a list of the cash machines and tills in your Point of Sale environment. Making a list of cash machines and tills is necessary for the following purposes:- It provides a look-up table that will be used whenever you need to specify a Local Machine using 'Paste Special'.
- If you need to produce a report or run a Maintenance function (e.g. the 'Cash Up' report/Maintenance function) for every cash machine and till, the report or function will work from the list of cash machines and tills in this setting.

---
Settings related to Point of Sales:
- Introduction
- Baggers
- Drawers
- Dynamic Barcode
- Fields for Creating New Customer
- Gift Vouchers Settings
- Gift Voucher Types
- Gift Vouchers Issued
- Gift Vouchers Received
- Gift Vouchers Sold
- Local Machine Payment Modes
- Local Machines
- Loyalty Card Membership Level Structure
- Loyalty Card Membership Levels
- Loyalty Points, Loyalty Points per Location
- Loyalty Points Redemption, Loyalty Points Redemption Per Location
- Modifiers
- Number Series - Gift Vouchers
- Number Series - Gift Vouchers Received
- Number Series - POS Balances
- Payment Currencies
- POS Balances
- POS Button Groups
- POS Button Pictures
- POS Buttons
- Split Items
- Supervisors
- Synchronised Number Series
- Home page for Point of Sales manual
- Home page for Standard ERP manual
Local Settings
The Local Machine setting in the User Settings module contains various options controlling the behaviour of each till and cash machine. On tills that have live connections to the server, you must configure this setting separately on each till. You can also do this on tills with live-sync connections to the server, but an alternative is to configure the Local Machine setting for these tills remotely. This has the following advantages:- You can store the configurations of each till in one place, making maintenance and updating easier.
- The responsibility for configuring the Local Machine setting on the tills will be taken away from the cashiers.
- It may not be possible to configure the Local Machine setting on the tills (e.g. if they do not have keyboards).
- If the database on a till is lost, it will be easy to create a new one.
- Working on a desktop client, change to the Technics module. To be able to work in this module, your Person or Global User record should belong to an Access Group that explicitly grants full access to the Technics module.
- Open the Local Machines setting, and create a separate record for each live-sync till. This setting is also in the Point of Sales and Restaurant modules.
- Remaining in the Technics module, open the Local Settings setting and again create a separate record for each live-sync till.
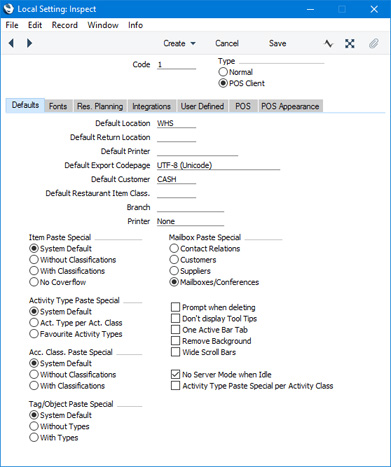
- In the Code field in each record, choose a Local Machine using 'Paste Special'. Set the Type to "POS Client".
Apart from the Code and the Type, all the fields in a record in the Local Settings setting are the same as those in the Local Machine setting. Fill in the fields as though you were working in that setting on each till. Please refer here for descriptions of the fields on the 'Defaults' card, here for details about the 'POS' card and here for details about the 'POS Appearance' card.
- When you connect a live-sync till to the server for the first time, you will assign a Local Machine Code to that till. A local database will be created on the till and when connection is established, all necessary information will be sent from the server to the local database as part of the synchronisation process. Included will be the record in the Local Settings setting with the relevant Local Machine Code. The information in this record will be sent to the Local Machine setting in the local database on the till.
- If you change a record in the Local Settings setting, that change will be sent to the local database on the relevant till the next time it synchronises with the server.
Settings related to Point of Sales:
- Introduction
- Baggers
- Cash Events
- Credit Card Types
- Default Payment Modes
- Drawers
- Dynamic Barcode
- Fields for Creating New Customers
- Fiscal Printer Reports
- Gift Voucher Settings
- Gift Voucher Types
- Gift Vouchers Issued
- Gift Vouchers Received
- Gift Vouchers Sold
- Local Machine
- Local Machine Payment Modes
- Local Machine Serial Port Devices
- Local Machines
- Local Settings
- Login Options
- Login Shortcuts
- Loyalty Card Membership Level Structure
- Loyalty Card Membership Levels
- Loyalty Points, Loyalty Points per Location
- Loyalty Points Redemption, Loyalty Points Redemption Per Location
- Merchant ID
- Modifiers
- Number Series - Cash Events
- Number Series - Coupons
- Number Series - Gift Vouchers
- Number Series - Gift Vouchers Received
- Number Series - POS Balances
- Number Series - POS Invoices
- Number Series - POS Sessions
- Payment Currencies
- Payment Gateways
- POS Balances
- POS Button Groups
- POS Button Pictures
- POS Buttons
- POS Commands
- POS Sessions
- POS Settings
- Receipt Printer Texts, Receipt Printer Texts per Machine
- Split Items
- Supervisors
- Synchronised Number Series
- Tab Item Groups
- Home page for Point of Sales manual
- Home page for Standard ERP manual
Login Options
The Login Options setting in the User Settings module allows you to specify how users will log in to your Standard ERP system. As with most settings and registers in the User Settings module, you will need to configure this setting separately on each client machine.Note that the Login Options setting is not synchronised. So, it will not be sent to any tills with live-sync connections that you may have in your network. You will therefore need to fill in this setting separately on each live-sync client.
To open the Login Options setting, ensure you are in the User Settings module and double-click (Windows/Mac OS X) or tap (iOS/Android) 'Login Options' in the 'Settings' list. The following window will appear:
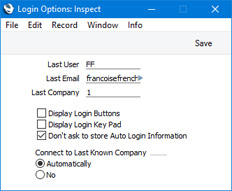
- Last User, Last Email, Last Company
- These fields display the Signature and Standard ID of the last user to log in to your Standard ERP system on the client machine, and the last Company they used.
- Display Login Buttons
- Select this option if you would like the 'Login' window on the client machine to contain buttons representing the users who will log in to your Standard ERP database using the particular client machine. This option will be most useful in a Point of Sales or Restaurant environment, where client machines (i.e. tills and cash machines) may not have full keyboards. Instead of typing their Signature or Standard ID, users will be able to click or touch the appropriate button to log in.
- Use the Login Shortcuts register to specify the users who will be given buttons in the 'Login' window. The colours of the buttons will also taken from the Login Shortcuts register. If you do not create a button for a specific user, that user will still be able to log in using the keyboard as normal.
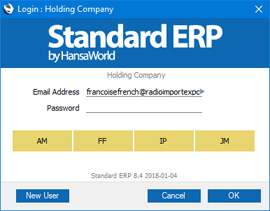
- Use the Login Shortcuts register to specify the users who will be given buttons in the 'Login' window. The colours of the buttons will also taken from the Login Shortcuts register. If you do not create a button for a specific user, that user will still be able to log in using the keyboard as normal.
- Display Login Key Pad
- Select this option if you would like the 'Login' window on the client machine to contain a numeric keypad that users will be able to use to enter their passwords. Its use assumes that passwords will only contain numeric characters. Again, this option will be most useful in a Point of Sales or Restaurant environment, where client machines (i.e. tills and cash machines) may not have full keyboards.
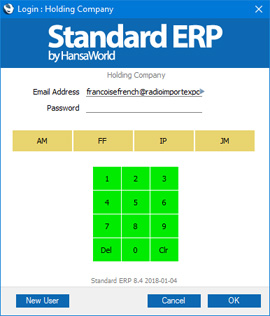
- Connect to Last Known Company
- These options control whether the 'Select Company' window will appear each time a user logs in using the client machine.
- Automatically
- If you select this option, the 'Select Company' window will not appear on logging in. Instead, users will be connected automatically to the last Company used and will be taken straight to the 'Login' window. If a user wants to work in a different Company, they can press the [Cancel] button in the 'Login' window: the 'Select Company' window will then appear. The last Company used will be shown in the Last Company field above.
- No
- The 'Select Company' window will appear every time on logging in.
- Automatically
---
Settings related to Point of Sales:
- Introduction
- Baggers
- Cash Events
- Credit Card Types
- Default Payment Modes
- Drawers
- Dynamic Barcode
- Fields for Creating New Customers
- Fiscal Printer Reports
- Gift Voucher Settings
- Gift Voucher Types
- Gift Vouchers Issued
- Gift Vouchers Received
- Gift Vouchers Sold
- Local Machine
- Local Machine Payment Modes
- Local Machine Serial Port Devices
- Local Machines
- Local Settings
- Login Options
- Login Shortcuts
- Loyalty Card Membership Level Structure
- Loyalty Card Membership Levels
- Loyalty Points, Loyalty Points per Location
- Loyalty Points Redemption, Loyalty Points Redemption Per Location
- Merchant ID
- Modifiers
- Number Series - Cash Events
- Number Series - Coupons
- Number Series - Gift Vouchers
- Number Series - Gift Vouchers Received
- Number Series - POS Balances
- Number Series - POS Invoices
- Number Series - POS Sessions
- Payment Currencies
- Payment Gateways
- POS Balances
- POS Button Groups
- POS Button Pictures
- POS Buttons
- POS Commands
- POS Sessions
- POS Settings
- Receipt Printer Texts, Receipt Printer Texts per Machine
- Split Items
- Supervisors
- Synchronised Number Series
- Tab Item Groups
- Home page for Point of Sales manual
- Home page for Standard ERP manual
Login Shortcuts
The Login Shortcuts register allows you to specify the window that will be opened when a user logs in to your Standard ERP system. In some environments (e.g. POS, Production), users usually won't need access the majority of your Standard ERP database, but instead should be taken immediately to the window that they need when they log in.You can configure the Login Shortcuts register in two ways:
- On client machines and tills that have live connections to the server, you must configure this register separately on each client machine. This method is described immediately below.
- For tills that have live-sync connections to the server, you should create a separate record for each till in the Local Shortcuts setting in the Technics module. When the till logs in for the first time, the relevant record from the Local Shortcuts setting will be sent to the till automatically, updating the Local Shortcuts register on that till. If you change the record in the Local Shortcuts setting on the main server, the change will be sent to the till as soon as possible. On updating a till to a new version of Standard ERP and starting that version without a database for the first time, the relevant record will again be sent to the till automatically.
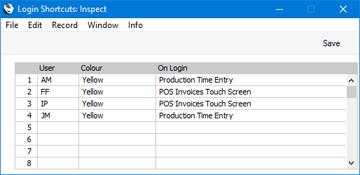
- User
- Paste Special
Person register, System module and Global User register, Technics module
- Enter the Signature of each Person that will use the client machine or till.
- If you are using the Display Login Buttons option in the Login Options setting, the users listed here will be given individual buttons in the 'Login' window, allowing them to log in by touch.
- If you are using the Display Login Buttons option in the Login Options setting, the users listed here will be given individual buttons in the 'Login' window, allowing them to log in by touch.
- Colour
- Paste Special
Choices of possible entries
- If you are using the Display Login Buttons option in the Login Options setting, specify here the colour of each button in the 'Login' window.
- On Login
- Paste Special
Choices of possible entries
- Specify here the window that is to appear when each Person logs in using the client machine. The available options are as follows:
- Master Control
- The Navigation Centre will be opened.
- Bar Tab
- The most recent unfinished Bar Tab in which the user logging in is the Waiter will be opened when that user logs in. If there is no unfinished Bar Tab, a new Bar Tab will be opened instead.
- Resource Month
- The Monthly Room Overview (Resource Planner) will be opened, providing the user logging in has access to the Hotel or Resource Planner modules.
- Production Time Entry
- The 'Production Time Entry' window will be opened.
- POS Invoices Touch Screen
- A new POS Invoice will be opened.
- Activity
- A new Activity will be opened.
- Contacts
- The 'Contacts: Browse' window will be opened.
- Task Manager
- The Task Manager will be opened.
- Business Communicator
- The 'Communication Centre' window will be opened.
Any Persons not listed will see the Navigation Centre when they log in on the client machine or till.
- Master Control
---
Settings related to Point of Sales:
- Introduction
- Baggers
- Cash Events
- Credit Card Types
- Default Payment Modes
- Drawers
- Dynamic Barcode
- Fields for Creating New Customers
- Fiscal Printer Reports
- Gift Voucher Settings
- Gift Voucher Types
- Gift Vouchers Issued
- Gift Vouchers Received
- Gift Vouchers Sold
- Local Machine
- Local Machine Payment Modes
- Local Machine Serial Port Devices
- Local Machines
- Local Settings
- Login Options
- Login Shortcuts
- Loyalty Card Membership Level Structure
- Loyalty Card Membership Levels
- Loyalty Points, Loyalty Points per Location
- Loyalty Points Redemption, Loyalty Points Redemption Per Location
- Merchant ID
- Modifiers
- Number Series - Cash Events
- Number Series - Coupons
- Number Series - Gift Vouchers
- Number Series - Gift Vouchers Received
- Number Series - POS Balances
- Number Series - POS Invoices
- Number Series - POS Sessions
- Payment Currencies
- Payment Gateways
- POS Balances
- POS Button Groups
- POS Button Pictures
- POS Buttons
- POS Commands
- POS Sessions
- POS Settings
- Receipt Printer Texts, Receipt Printer Texts per Machine
- Split Items
- Supervisors
- Synchronised Number Series
- Tab Item Groups
- Home page for Point of Sales manual
- Home page for Standard ERP manual
Loyalty Card Membership Level Structure
If you will use Loyalty Cards in your point of sales environment, you can offer discounts and/or special pricing depending on the Membership Level of a Loyalty Card. To connect discounts and pricing to Loyalty Card Membership Levels, use the Loyalty Card Membership Level Structure setting in the Point of Sales and Restaurant modules. Please refer here for details.---
Settings related to Point of Sales:
- Introduction
- Baggers
- Drawers
- Dynamic Barcode
- Fields for Creating New Customer
- Gift Vouchers Settings
- Gift Voucher Types
- Gift Vouchers Issued
- Gift Vouchers Received
- Gift Vouchers Sold
- Local Machine Payment Modes
- Local Machines
- Loyalty Card Membership Level Structure
- Loyalty Card Membership Levels
- Loyalty Points, Loyalty Points per Location
- Loyalty Points Redemption, Loyalty Points Redemption Per Location
- Modifiers
- Number Series - Gift Vouchers
- Number Series - Gift Vouchers Received
- Number Series - POS Balances
- Payment Currencies
- POS Balances
- POS Button Groups
- POS Button Pictures
- POS Buttons
- Split Items
- Supervisors
- Synchronised Number Series
- Home page for Point of Sales manual
- Home page for Standard ERP manual
Loyalty Card Membership Levels
If you will use Loyalty Cards in your point of sales environment, you can use the Loyalty Card Membership Levels setting to record the various Membership Levels in your Loyalty Card structure. This setting is in the Point of Sales and Restaurant modules. Please refer here for details.---
Settings related to Point of Sales:
- Introduction
- Baggers
- Drawers
- Dynamic Barcode
- Fields for Creating New Customer
- Gift Vouchers Settings
- Gift Voucher Types
- Gift Vouchers Issued
- Gift Vouchers Received
- Gift Vouchers Sold
- Local Machine Payment Modes
- Local Machines
- Loyalty Card Membership Level Structure
- Loyalty Card Membership Levels
- Loyalty Points, Loyalty Points per Location
- Loyalty Points Redemption, Loyalty Points Redemption Per Location
- Modifiers
- Number Series - Gift Vouchers
- Number Series - Gift Vouchers Received
- Number Series - POS Balances
- Payment Currencies
- POS Balances
- POS Button Groups
- POS Button Pictures
- POS Buttons
- Split Items
- Supervisors
- Synchronised Number Series
- Home page for Point of Sales manual
- Home page for Standard ERP manual
Loyalty Points Redemption, Loyalty Points Redemption per Location
If you will use Loyalty Cards in your point of sales environment, you should use the Loyalty Points Redemption setting to specify how the monetary value of points will be calculated when Customers use them to pay POS Invoices and Bar Tabs. If you need a different calculation to be used in a particular Location (e.g. in a particular shop), use the Loyalty Points Redemption per Location setting These settings are both in the Point of Sales and Restaurant modules. Please refer here for details.---
Settings related to Point of Sales:
- Introduction
- Baggers
- Drawers
- Dynamic Barcode
- Fields for Creating New Customer
- Gift Vouchers Settings
- Gift Voucher Types
- Gift Vouchers Issued
- Gift Vouchers Received
- Gift Vouchers Sold
- Local Machine Payment Modes
- Local Machines
- Loyalty Card Membership Level Structure
- Loyalty Card Membership Levels
- Loyalty Points, Loyalty Points per Location
- Loyalty Points Redemption, Loyalty Points Redemption Per Location
- Modifiers
- Number Series - Gift Vouchers
- Number Series - Gift Vouchers Received
- Number Series - POS Balances
- Payment Currencies
- POS Balances
- POS Button Groups
- POS Button Pictures
- POS Buttons
- Split Items
- Supervisors
- Synchronised Number Series
- Home page for Point of Sales manual
- Home page for Standard ERP manual
Merchant ID
If you will use Standard ERP to control the processing of credit and debit card payments for POS Invoices, the first configuration step will be to specify your credit card processing partner in the Merchant ID setting in the Point of Sales module. The partner is the payment gateway or payment service provider that you will use to process each payment. Depending on the partner, you may only need to enter one record in this setting, but if your partner is Authorize.net you may need two, for "card holder present" and "card holder not present". You must have a "card holder not present" Merchant ID record if you want to process credit card payments from a web shop.Please refer here for more details about using Standard ERP to control the processing of credit and debit card payments for POS Invoices. Precise configuration details will vary depending on your partner. This documentation contains a general guide: for more detailed information, please refer to your local HansaWorld representative.
To work with the Merchant ID setting, first ensure you are in the Point of Sales module using the [Switch Module] button in the Navigation Centre. Then, if you are using Windows or Mac OS X, click the [Settings] button, also in the Navigation Centre or use the Ctrl-S/⌘-S keyboard shortcuts and then double-click 'Merchant ID' in the 'Settings' list. If you are using iOS or Android, select 'Settings' from the Tools menu (with 'wrench' icon) and tap 'Merchant ID' in the 'Settings' list. The 'Merchant ID: Browse' window opens: open a new record by selecting 'New' from the Create menu (Windows/Mac OS X) or + menu (iOS/Android). When the record is complete, click the [Save] button (Windows/Mac OS X) or tap √ (iOS/Android) to save.
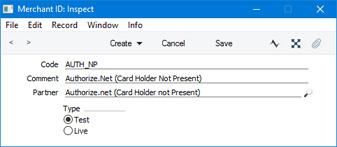
- Code
- Enter a unique identifying code for the Merchant ID record.
- Comment
- Enter a comment to help identify the Merchant ID record in the 'Merchant ID: Browse' window.
- Partner
- Paste Special
Choices of possible entries
Choose a Partner using 'Paste Special'.
- Type
- Use the Test option to test communication with the partner, and change to Live when you are ready to start processing credit card payments.
- It is recommended that you only use the Test option in a test database. If you use the Test option in your live database, you will either need to create test transactions or test using live transactions. Both will render your Sales and Nominal Ledgers inaccurate.
- Similarly, you should only use the Live option in your live database. If you use the Live option in a test database, you will process credit card payments without recording them in your Sales and Nominal Ledgers.
- It is recommended that you only use the Test option in a test database. If you use the Test option in your live database, you will either need to create test transactions or test using live transactions. Both will render your Sales and Nominal Ledgers inaccurate.
Settings related to Point of Sales:
- Introduction
- Baggers
- Cash Events
- Credit Card Types
- Default Payment Modes
- Drawers
- Dynamic Barcode
- Fields for Creating New Customers
- Fiscal Printer Reports
- Gift Voucher Settings
- Gift Voucher Types
- Gift Vouchers Issued
- Gift Vouchers Received
- Gift Vouchers Sold
- Local Machine
- Local Machine Payment Modes
- Local Machine Serial Port Devices
- Local Machines
- Local Settings
- Login Options
- Login Shortcuts
- Loyalty Card Membership Level Structure
- Loyalty Card Membership Levels
- Loyalty Points, Loyalty Points per Location
- Loyalty Points Redemption, Loyalty Points Redemption Per Location
- Merchant ID
- Modifiers
- Number Series - Cash Events
- Number Series - Coupons
- Number Series - Gift Vouchers
- Number Series - Gift Vouchers Received
- Number Series - POS Balances
- Number Series - POS Invoices
- Number Series - POS Sessions
- Payment Currencies
- Payment Gateways
- POS Balances
- POS Button Groups
- POS Button Pictures
- POS Buttons
- POS Commands
- POS Sessions
- POS Settings
- Receipt Printer Texts, Receipt Printer Texts per Machine
- Split Items
- Supervisors
- Synchronised Number Series
- Tab Item Groups
- Home page for Point of Sales manual
- Home page for Standard ERP manual
Modifiers
The Modifiers feature allows you to sell Items with connected accessories or additions. For example, in a restaurant, if a customer orders a meat dish, you can use Modifiers to offer a choice of vegetables and a choice of sauces.To work with Modifiers, follow these steps:
- In the Item register, enter separate Item records for the Main Item and for each of the Modifiers. Continuing the example, you will need separate Items for the meat dish, for each of the vegetable options and for each of the sauce options. You can specify a Base Price for any extra-cost options, or leave the Base Price empty for any options that are included in the price of the main Item.
- The Modifiers setting is in the Point of Sales and Restaurant modules. Add a single record to this setting for each main Item:
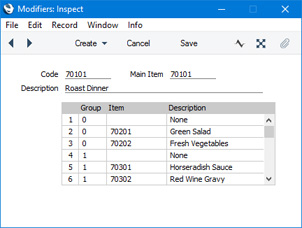
- Code
- Enter the unique Code by which the Modifier is to be identified from elsewhere in Standard ERP. The Code can consist of up to twenty characters, and you can use both numbers and letters.
- Main Item
- Paste Special
Item register
- Use 'Paste Special' to choose the Main Item (the Item that is to be sold together with various options).
- Description
- The Item Description will be brought in from the Item register when you choose a Main Item in the field above.
Use the matrix to list the options that can be sold together with the Main Item. Each of the options should be a separate Item in the Item register.
As shown in the illustration, you can create different groups of options. For example, when selling a meat dish, you might create a group of vegetable options and a group of sauce options. When a Customer purchases the meat dish, they will be able to choose one option from each group i.e. one vegetable option and one sauce option. The Customer will not be able to choose more than one option from each group. In this example, we have added a blank option (with no connected Item) to each group, to allow Customers not to choose any option (i.e. to buy the meat dish with no vegetables and/or no sauces).
- Group
- Use this field to group different options together. Assign the same arbitrary numeric code to the options that should be grouped together.
- To continue the example, the vegetable options should all have the same arbitrary numeric code, and the sauce options should have a different code.
- To continue the example, the vegetable options should all have the same arbitrary numeric code, and the sauce options should have a different code.
- Item
- Paste Special
Item register
- Enter the Item Number of the optional Item.
- Description
- The Item Description will be brought in from the Item register when you specify an Item in the field to the left.
- When a cashier opens the "Modifiers" window to select the options required by the Customer, this Description will be shown added to the phrase "Select Modifier for Item ".
- Code
- Place a "Modifier" button in the POS Invoice or Bar Tab window (using the POS Buttons setting). In the Code column, enter the Code of the Modifier from step 2, and enter a suitable Label:
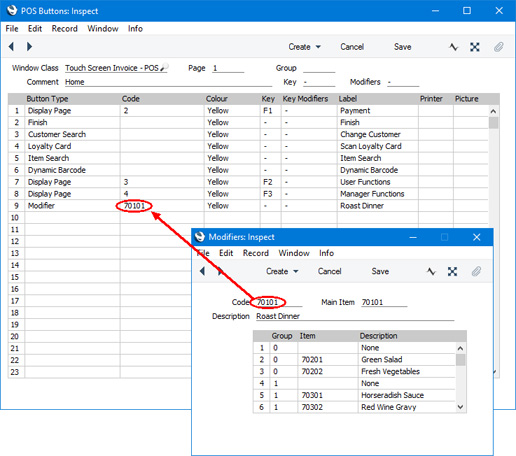
- When a Customer purchases the Main Item, the cashier should not explicitly add that Item to the POS Invoice or Bar Tab. Instead, they should click or touch the "Modifier" button. The window illustrated below will open:
In this window, there will be a separate row for each group of options, and each option will have its own button. The cashier should click or touch one button in each row to select it. In this example, the cashier has selected Green Salad, Red Wine Gravy and Roast Potatoes: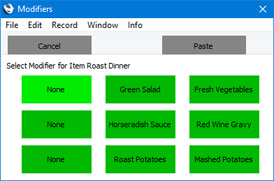
The cashier should then press the [Paste] button to add both the Main Item and the selected options to the POS Invoice or Bar Tab: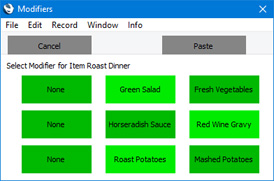
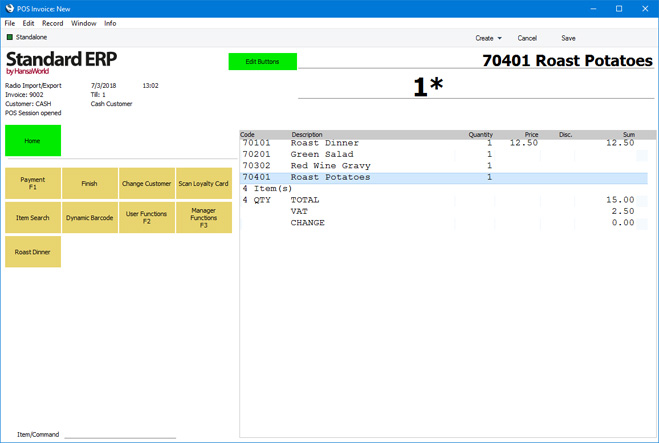
Settings related to Point of Sales:
- Introduction
- Baggers
- Cash Events
- Credit Card Types
- Default Payment Modes
- Drawers
- Dynamic Barcode
- Fields for Creating New Customers
- Fiscal Printer Reports
- Gift Voucher Settings
- Gift Voucher Types
- Gift Vouchers Issued
- Gift Vouchers Received
- Gift Vouchers Sold
- Local Machine
- Local Machine Payment Modes
- Local Machine Serial Port Devices
- Local Machines
- Local Settings
- Login Options
- Login Shortcuts
- Loyalty Card Membership Level Structure
- Loyalty Card Membership Levels
- Loyalty Points, Loyalty Points per Location
- Loyalty Points Redemption, Loyalty Points Redemption Per Location
- Merchant ID
- Modifiers
- Number Series - Cash Events
- Number Series - Coupons
- Number Series - Gift Vouchers
- Number Series - Gift Vouchers Received
- Number Series - POS Balances
- Number Series - POS Invoices
- Number Series - POS Sessions
- Payment Currencies
- Payment Gateways
- POS Balances
- POS Button Groups
- POS Button Pictures
- POS Buttons
- POS Commands
- POS Sessions
- POS Settings
- Receipt Printer Texts, Receipt Printer Texts per Machine
- Split Items
- Supervisors
- Synchronised Number Series
- Tab Item Groups
- Home page for Point of Sales manual
- Home page for Standard ERP manual
Number Series - Cash Events
Whenever you enter a new Cash Event, it will be given a unique identifying number based on a sequential number series.You can have more than one sequential number series running at the same time, or at different times. For example, you may want to use different sequences to represent different departments, or you may want to use different sequences to represent different fiscal or calendar years.
The Number Series - Cash Events setting allows you to take advantage of this feature. Here you can define the number sequences that you would like to use with Cash Events.
To open the Number Series - Cash Events setting, ensure you are in the Point of Sales module and double-click (Windows/Mac OS X) or tap (iOS/Android) 'Number Series - Cash Events' in the 'Settings' list. The following window will appear:
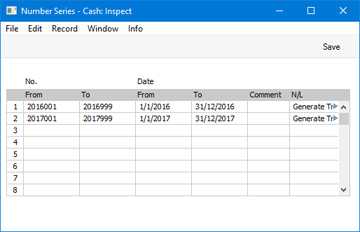
When the setting is complete, click the [Save] button (Windows/Mac OS X) or tap √ (iOS/Android) in the Button Bar to save the changes. To close the window without saving changes, click the close box (Windows/Mac OS X) or tap < (iOS/Android).
When you enter a Cash Event, the next number in the first valid Number Series entered to this setting will be used as a default. You are free to change to the first unused number in any other valid Number Series using 'Paste Special'. However, you will usually create Cash Event records using the "Put Cash Float" and "Get Cash Float" POS Buttons in the POS Invoice window or via the 'Cash Up' Maintenance function. There will be no opportunity to change the number in these records, so a typical use for this setting will be to create separate number sequences for each year.
If you leave the Number Series - Cash Events setting empty, Cash Event Numbers will all be taken from the same sequence, starting at 1 and continuing consecutively. If you want to start from another number, simply specify it in a new Cash Event record before saving.
If you have any tills that use live-sync connections to the server, you must not leave the Number Series - Cash Events setting empty. You must also use the Synchronised Number Series setting to define separate number sequences for each live-sync till, before connecting any of those tills to the server. Please refer here for details.
---
Settings related to Point of Sales:
- Introduction
- Baggers
- Cash Events
- Credit Card Types
- Default Payment Modes
- Drawers
- Dynamic Barcode
- Fields for Creating New Customers
- Fiscal Printer Reports
- Gift Voucher Settings
- Gift Voucher Types
- Gift Vouchers Issued
- Gift Vouchers Received
- Gift Vouchers Sold
- Local Machine
- Local Machine Payment Modes
- Local Machine Serial Port Devices
- Local Machines
- Local Settings
- Login Options
- Login Shortcuts
- Loyalty Card Membership Level Structure
- Loyalty Card Membership Levels
- Loyalty Points, Loyalty Points per Location
- Loyalty Points Redemption, Loyalty Points Redemption Per Location
- Merchant ID
- Modifiers
- Number Series - Cash Events
- Number Series - Coupons
- Number Series - Gift Vouchers
- Number Series - Gift Vouchers Received
- Number Series - POS Balances
- Number Series - POS Invoices
- Number Series - POS Sessions
- Payment Currencies
- Payment Gateways
- POS Balances
- POS Button Groups
- POS Button Pictures
- POS Buttons
- POS Commands
- POS Sessions
- POS Settings
- Receipt Printer Texts, Receipt Printer Texts per Machine
- Split Items
- Supervisors
- Synchronised Number Series
- Tab Item Groups
- Home page for Point of Sales manual
- Home page for Standard ERP manual
Number Series - Coupons
Whenever you enter a new Credit Card Slip, it will be given a unique identifying number based on a sequential number series.
You can have more than one sequential number series running at the same time, or at different times. For example, you may want to use different sequences to represent different departments, or you may want to use different sequences to represent different fiscal or calendar years.
The Number Series - Coupons setting allows you to take advantage of this feature. Here you can define the number sequences that you would like to use with Credit Card Slips.
To open the Number Series - Coupons setting, ensure you are in the Point of Sales module and double-click (Windows/Mac OS X) or tap (iOS/Android) 'Number Series - Coupons' in the 'Settings' list. The following window will appear:
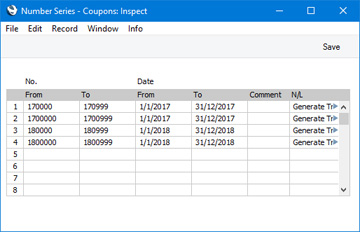
When the setting is complete, click the [Save] button (Windows/Mac OS X) or tap √ (iOS/Android) in the Button Bar to save the changes. To close the window without saving changes, click the close box (Windows/Mac OS X) or tap < (iOS/Android).
When you enter a Credit Card Slip, the next number in the first valid Number Series entered to this setting will be used as a default. You are free to change to the first unused number in any other valid Number Series using 'Paste Special'. However, it will usually be the case that Credit Card Slips will be created automatically when you receive credit and debit card payments. There will be no opportunity to change the number in these records, so a typical use for this setting will be to create separate number sequences for each year.
If you leave the Number Series - Coupons setting empty, Credit Card Slip Numbers will all be taken from the same sequence, starting at 1 and continuing consecutively. If you want to start from another number, simply specify it in a new Credit Card Slip record before saving.
If you have any tills that use live-sync connections to the server, you must not leave the Number Series - Coupons setting empty. You must also use the Synchronised Number Series setting to define separate number sequences for each live-sync till, before connecting any of those tills to the server. Please refer here for details.
---
Settings related to Point of Sales:
- Introduction
- Baggers
- Cash Events
- Credit Card Types
- Default Payment Modes
- Drawers
- Dynamic Barcode
- Fields for Creating New Customers
- Fiscal Printer Reports
- Gift Voucher Settings
- Gift Voucher Types
- Gift Vouchers Issued
- Gift Vouchers Received
- Gift Vouchers Sold
- Local Machine
- Local Machine Payment Modes
- Local Machine Serial Port Devices
- Local Machines
- Local Settings
- Login Options
- Login Shortcuts
- Loyalty Card Membership Level Structure
- Loyalty Card Membership Levels
- Loyalty Points, Loyalty Points per Location
- Loyalty Points Redemption, Loyalty Points Redemption Per Location
- Merchant ID
- Modifiers
- Number Series - Cash Events
- Number Series - Coupons
- Number Series - Gift Vouchers
- Number Series - Gift Vouchers Received
- Number Series - POS Balances
- Number Series - POS Invoices
- Number Series - POS Sessions
- Payment Currencies
- Payment Gateways
- POS Balances
- POS Button Groups
- POS Button Pictures
- POS Buttons
- POS Commands
- POS Sessions
- POS Settings
- Receipt Printer Texts, Receipt Printer Texts per Machine
- Split Items
- Supervisors
- Synchronised Number Series
- Tab Item Groups
- Home page for Point of Sales manual
- Home page for Standard ERP manual
Number Series - Gift Receipts
This page describes the Number Series - Gift Receipts setting in the Point of Sales module.---
Whenever you enter a new Gift Receipt, it will be given a unique identifying number based on a sequential number series.
You can have more than one sequential number series running at the same time, or at different times. For example, you may want to use different sequences to represent different departments, or you may want to use different sequences to represent different fiscal or calendar years.
The Number Series - Gift Receipts setting allows you to take advantage of this feature. Here you can define the number sequences that you would like to use with Gift Receipts.
To open the Number Series - Gift Receipts setting, ensure you are in the Point of Sales module and double-click (Windows/macOS) or tap (iOS/Android) 'Number Series - Gift Receipts' in the 'Settings' list. The following window will appear:
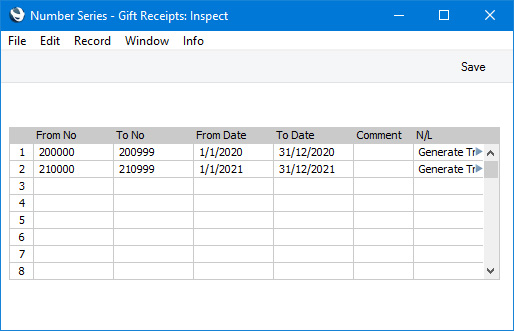
When the setting is complete, click the [Save] button (Windows/macOS) or tap √ (iOS/Android) in the Button Bar to save the changes. To close the window without saving changes, click the close box (Windows/macOS) or tap < (iOS/Android).
When you create a Gift Receipt (which you can only do using a "Gift Receipt" button in the POS Invoice window), the next number in the first valid Number Series entered to this setting will be used as a default. There will be no opportunity to change the default number in these records, so a typical use for this setting will be to create separate number sequences for each year.
If you leave the Number Series - Gift Receipts setting empty, Gift Receipt Numbers will all be taken from the same sequence, starting at 1 and continuing consecutively.
If you have any tills that use live-sync connections to the server, you must not leave the Number Series - Gift Receipts setting empty. You must also use the Synchronised Number Series setting to define separate number sequences for each live-sync till, before connecting any of those tills to the server. Please refer here for details.
---
Go back to:
- Home page for Settings related to the Point of Sales module
- Home page for Point of Sales manual
- Home page for Standard ERP manual
Number Series - Gift Vouchers
The Number Series - Gift Vouchers setting is situated in the Point of Sales module and the Sales Ledger. Please refer here for a description.---
Settings related to Point of Sales:
- Introduction
- Baggers
- Drawers
- Dynamic Barcode
- Fields for Creating New Customer
- Gift Vouchers Settings
- Gift Voucher Types
- Gift Vouchers Issued
- Gift Vouchers Received
- Gift Vouchers Sold
- Local Machine Payment Modes
- Local Machines
- Loyalty Card Membership Level Structure
- Loyalty Card Membership Levels
- Loyalty Points, Loyalty Points per Location
- Loyalty Points Redemption, Loyalty Points Redemption Per Location
- Modifiers
- Number Series - Gift Vouchers
- Number Series - Gift Vouchers Received
- Number Series - POS Balances
- Payment Currencies
- POS Balances
- POS Button Groups
- POS Button Pictures
- POS Buttons
- Split Items
- Supervisors
- Synchronised Number Series
- Home page for Point of Sales manual
- Home page for Standard ERP manual
Number Series - Gift Vouchers Received
The Number Series - Gift Vouchers Received setting is situated in the Point of Sales module and the Sales Ledger. Please refer here for a description.---
Settings related to Point of Sales:
- Introduction
- Baggers
- Drawers
- Dynamic Barcode
- Fields for Creating New Customer
- Gift Vouchers Settings
- Gift Voucher Types
- Gift Vouchers Issued
- Gift Vouchers Received
- Gift Vouchers Sold
- Local Machine Payment Modes
- Local Machines
- Loyalty Card Membership Level Structure
- Loyalty Card Membership Levels
- Loyalty Points, Loyalty Points per Location
- Loyalty Points Redemption, Loyalty Points Redemption Per Location
- Modifiers
- Number Series - Gift Vouchers
- Number Series - Gift Vouchers Received
- Number Series - POS Balances
- Payment Currencies
- POS Balances
- POS Button Groups
- POS Button Pictures
- POS Buttons
- Split Items
- Supervisors
- Synchronised Number Series
- Home page for Point of Sales manual
- Home page for Standard ERP manual
Number Series - POS Balances
Whenever you enter a new POS Balance record, it will be given a unique identifying number based on a sequential number series.You can have more than one sequential number series running at the same time, or at different times. For example, you may want to use different sequences to represent different departments, or you may want to use different sequences to represent different fiscal or calendar years.
The Number Series - POS Balances setting allows you to take advantage of this feature. Here you can define the number sequences that you would like to use with POS Balances.
To open the Number Series - POS Balances setting, ensure you are in the Point of Sales or Restaurant modules and double-click (Windows/Mac OS X) or tap (iOS/Android) 'Number Series - POS Balances' in the 'Settings' list. The following window will appear:
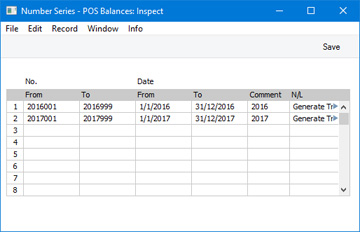
The N/L field gives you a measure of control over whether Nominal Ledger Transactions will be generated automatically when you mark POS Balances in a particular sequence as OK and save them. Using 'Paste Special' from the N/L field brings up a selection list containing two options: "Generate Transactions" and "Do not Generate Transactions". Select the first option if Nominal Ledger Transactions are to be generated and the second if they are not. In effect, this feature is an exclusionary one in that you can only choose to not have Nominal Ledger Transactions created for a particular number sequence. By default, Nominal Ledger Transactions will be created from POS Balances as there is no POS Balance option in the Sub Systems setting in the Nominal Ledger.
When the setting is complete, click the [Save] button (Windows/Mac OS X) or tap √ (iOS/Android) in the Button Bar to save the changes. To close the window without saving changes, click the close box (Windows/Mac OS X) or tap < (iOS/Android).
When you enter a POS Balance record, the next number in the first valid Number Series entered to this setting will be used as a default. You are free to change to the first unused number in any other valid Number Series. However, you will usually create POS Balance records via the 'Cash Up' Maintenance function. There will be no opportunity to change the number in these records, so a typical use for this setting will be to create separate number sequences for each year.
If you leave the Number Series - POS Balances setting empty, POS Balance Numbers will all be taken from the same sequence, starting at 1 and continuing consecutively. If you want to start from another number, simply specify it in a new POS Balance record before saving.
---
Settings related to Point of Sales:
- Introduction
- Baggers
- Drawers
- Dynamic Barcode
- Fields for Creating New Customer
- Gift Vouchers Settings
- Gift Voucher Types
- Gift Vouchers Issued
- Gift Vouchers Received
- Gift Vouchers Sold
- Local Machine Payment Modes
- Local Machines
- Loyalty Card Membership Level Structure
- Loyalty Card Membership Levels
- Loyalty Points, Loyalty Points per Location
- Loyalty Points Redemption, Loyalty Points Redemption Per Location
- Modifiers
- Number Series - Gift Vouchers
- Number Series - Gift Vouchers Received
- Number Series - POS Balances
- Payment Currencies
- POS Balances
- POS Button Groups
- POS Button Pictures
- POS Buttons
- Split Items
- Supervisors
- Synchronised Number Series
- Home page for Point of Sales manual
- Home page for Standard ERP manual
Number Series - POS Invoices
Whenever you enter a new POS Invoice, it will be given a unique identifying number based on a sequential number series.You can have more than one sequential number series running at the same time, or at different times. For example, you may want to use different sequences to represent different departments, or you may want to use different sequences to represent different fiscal or calendar years.
The Number Series - POS Invoices setting allows you to take advantage of this feature. Here you can define the number sequences that you would like to use with POS Invoices.
To open the Number Series - POS Invoices setting, ensure you are in the Point of Sales module and double-click (Windows/Mac OS X) or tap (iOS/Android) 'Number Series - POS Invoices' in the 'Settings' list. The following window will appear:
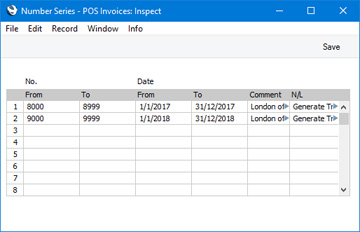
When the setting is complete, click the [Save] button (Windows/Mac OS X) or tap √ (iOS/Android) in the Button Bar to save the changes. To close the window without saving changes, click the close box (Windows/Mac OS X) or tap < (iOS/Android).
When you enter a POS Invoice, the next number in the first valid Number Series entered to this setting will be used as a default. There will be no opportunity to change the default number in these records, so a typical use for this setting will be to create separate number sequences for each year.
If you leave the Number Series - POS Invoices setting empty, POS Invoice Numbers will all be taken from the same sequence, starting at 1 and continuing consecutively.
If you have any tills that use live-sync connections to the server, you must not leave the Number Series - POS Invoices setting empty. You must also use the Synchronised Number Series setting to define separate number sequences for each live-sync till, before connecting any of those tills to the server. Please refer here for details. Also, do not specify number sequences for POS Invoices in the Person records (on the 'Number Series' card) of any users who will enter POS Invoices on tills with live-sync connections to the server.
---
Settings related to Point of Sales:
- Introduction
- Baggers
- Cash Events
- Credit Card Types
- Default Payment Modes
- Drawers
- Dynamic Barcode
- Fields for Creating New Customers
- Fiscal Printer Reports
- Gift Voucher Settings
- Gift Voucher Types
- Gift Vouchers Issued
- Gift Vouchers Received
- Gift Vouchers Sold
- Local Machine
- Local Machine Payment Modes
- Local Machine Serial Port Devices
- Local Machines
- Local Settings
- Login Options
- Login Shortcuts
- Loyalty Card Membership Level Structure
- Loyalty Card Membership Levels
- Loyalty Points, Loyalty Points per Location
- Loyalty Points Redemption, Loyalty Points Redemption Per Location
- Merchant ID
- Modifiers
- Number Series - Cash Events
- Number Series - Coupons
- Number Series - Gift Vouchers
- Number Series - Gift Vouchers Received
- Number Series - POS Balances
- Number Series - POS Invoices
- Number Series - POS Sessions
- Payment Currencies
- Payment Gateways
- POS Balances
- POS Button Groups
- POS Button Pictures
- POS Buttons
- POS Commands
- POS Sessions
- POS Settings
- Receipt Printer Texts, Receipt Printer Texts per Machine
- Split Items
- Supervisors
- Synchronised Number Series
- Tab Item Groups
- Home page for Point of Sales manual
- Home page for Standard ERP manual
Number Series - POS Sessions
Whenever you enter a new POS Session record, it will be given a unique identifying number based on a sequential number series.You can have more than one sequential number series running at the same time, or at different times. For example, you may want to use different sequences to represent different departments, or you may want to use different sequences to represent different fiscal or calendar years.
The Number Series - POS Sessions setting allows you to take advantage of this feature. Here you can define the number sequences that you would like to use with POS Sessions.
To open the Number Series - POS Sessions setting, ensure you are in the Point of Sales module and double-click (Windows/Mac OS X) or tap (iOS/Android) 'Number Series - POS Sessions' in the 'Settings' list. The following window will appear:
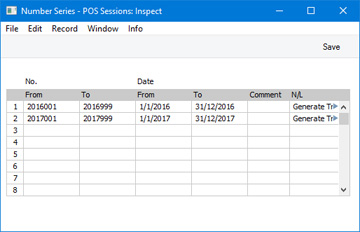
When the setting is complete, click the [Save] button (Windows/Mac OS X) or tap √ (iOS/Android) in the Button Bar to save the changes. To close the window without saving changes, click the close box (Windows/Mac OS X) or tap < (iOS/Android).
When you enter a POS Session record, the next number in the first valid Number Series entered to this setting will be used as a default. You are free to change to the first unused number in any other valid Number Series. However, you will usually create POS Balance records using the "Open Session" and "Close Session" POS Buttons in the POS Invoice and/or Bar Tab windows or via the 'Cash Up' report and Maintenance function. There will be no opportunity to change the number in these records, so a typical use for this setting will be to create separate number sequences for each year.
If you leave the Number Series - POS Sessions setting empty, POS Session Numbers will all be taken from the same sequence, starting at 1 and continuing consecutively. If you want to start from another number, simply specify it in a new POS Session record before saving.
If you have any tills that use live-sync connections to the server, you must not leave the Number Series - POS Sessions setting empty. You must also use the Synchronised Number Series setting to define separate number sequences for each live-sync till, before connecting any of those tills to the server. Please refer here for details.
---
Settings related to Point of Sales:
- Introduction
- Baggers
- Cash Events
- Credit Card Types
- Default Payment Modes
- Drawers
- Dynamic Barcode
- Fields for Creating New Customers
- Fiscal Printer Reports
- Gift Voucher Settings
- Gift Voucher Types
- Gift Vouchers Issued
- Gift Vouchers Received
- Gift Vouchers Sold
- Local Machine
- Local Machine Payment Modes
- Local Machine Serial Port Devices
- Local Machines
- Local Settings
- Login Options
- Login Shortcuts
- Loyalty Card Membership Level Structure
- Loyalty Card Membership Levels
- Loyalty Points, Loyalty Points per Location
- Loyalty Points Redemption, Loyalty Points Redemption Per Location
- Merchant ID
- Modifiers
- Number Series - Cash Events
- Number Series - Coupons
- Number Series - Gift Vouchers
- Number Series - Gift Vouchers Received
- Number Series - POS Balances
- Number Series - POS Invoices
- Number Series - POS Sessions
- Payment Currencies
- Payment Gateways
- POS Balances
- POS Button Groups
- POS Button Pictures
- POS Buttons
- POS Commands
- POS Sessions
- POS Settings
- Receipt Printer Texts, Receipt Printer Texts per Machine
- Split Items
- Supervisors
- Synchronised Number Series
- Tab Item Groups
- Home page for Point of Sales manual
- Home page for Standard ERP manual
Payment Currencies
If you will accept cash payments in various Currencies in your stores, you should use the Payment Currencies setting in the Point of Sales module to list the Currencies that you accept. There is no need to use this setting if you only accept cash payments in your home Currency.To open the Payment Currencies setting, first ensure you are in the Point of Sales module. Then, if you are using Windows or macOS, click the [Settings] button in the Navigation Centre or use the Ctrl-S/⌘-S keyboard shortcuts and then double-click 'Payment Currencies' in the 'Settings' list. If you are using iOS or Android, select 'Settings' from the Tools menu (with 'wrench' icon) and tap 'Payment Currencies' in the 'Settings' list. The window illustrated below will open.
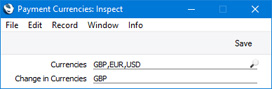
Similarly, list the Currencies that cashiers will be able to use when giving change in the Change in Currencies field. Again, separate the Currencies using commas, and again there is no need to include your home Currency.
After entering your Payment Currencies, click the [Save] button (Windows/macOS) or tap √ (iOS/Android) to save the changes. To close the window without saving changes, click the close box (Windows/macOS) or tap < (iOS/Android).
The Currencies that you list here will be used by the "Cash" button in POS Invoices and Bar Tabs. When you click or touch this button, a window will open in which you can receive payment and give change in the specified Currencies:

To be able to receive cash payments in Point of Sales Invoices and Bar Tabs, you must specify that your home Currency is Base Currency 1 (in the Base Currency setting in the System module). As already mentioned, you do not need to include your home Currency in the Payment Currencies setting as well but usually you will choose to do so. This is because you will need your home Currency to be listed first in the 'Cash Payment' window as illustrated above. If you do not include your home Currency in the Payment Currencies setting, it will be listed last in the 'Cash Payment' window.
If you need cash payments made in different Currencies to be posted to different Cash Accounts, you can achieve this by assigning separate Payment Modes to each Currency in the Local Machine Payment Modes) setting. Please refer here for details. Note that using the Local Machine Payment Modes setting in this way is supported in POS Invoices but not Bar Tabs.
---
Settings related to Point of Sales:
- Introduction
- Baggers
- Cash Events
- Credit Card Types
- Default Payment Modes
- Drawers
- Dynamic Barcode
- Fields for Creating New Customers
- Fiscal Printer Reports
- Gift Voucher Settings
- Gift Voucher Types
- Gift Vouchers Issued
- Gift Vouchers Received
- Gift Vouchers Sold
- Local Machine
- Local Machine Payment Modes
- Local Machine Serial Port Devices
- Local Machines
- Local Settings
- Login Options
- Login Shortcuts
- Loyalty Card Membership Level Structure
- Loyalty Card Membership Levels
- Loyalty Points, Loyalty Points per Location
- Loyalty Points Redemption, Loyalty Points Redemption Per Location
- Merchant ID
- Modifiers
- Number Series - Cash Events
- Number Series - Coupons
- Number Series - Gift Vouchers
- Number Series - Gift Vouchers Received
- Number Series - POS Balances
- Number Series - POS Invoices
- Number Series - POS Sessions
- Payment Currencies
- Payment Gateways
- POS Balances
- POS Button Groups
- POS Button Pictures
- POS Buttons
- POS Commands
- POS Sessions
- POS Settings
- Receipt Printer Texts, Receipt Printer Texts per Machine
- Split Items
- Supervisors
- Synchronised Number Series
- Tab Item Groups
- Home page for Point of Sales manual
- Home page for Standard ERP manual
Payment Gateways
If you will use Standard ERP to control the processing of credit and debit card payments for POS Invoices, the first configuration step will be to specify your credit card processing partner in the Merchant ID setting in the Point of Sales module. The partner is the payment gateway or payment service provider that you will use to process each payment. Having done that, you should then enter separate records in the Payment Gateways setting in the Point of Sales module for each of your merchant account(s). You will need separate Payment Gateway records if you need to process credit card payments from a web shop and to process payments from POS Invoices. If you have several merchant accounts in different Currencies, you will need separate Payment Gateway records for each one (duplicated if necessary for the web shop and POS environments).Please refer here for more details about using Standard ERP to control the processing of credit and debit card payments for POS Invoices. Precise configuration details will vary depending on your partner. This documentation contains a general guide: for more detailed information, please refer to your local HansaWorld representative.
To work with the Payment Gateways setting, first ensure you are in the Point of Sales module using the [Switch Module] button in the Navigation Centre. Then, if you are using Windows or Mac OS X, click the [Settings] button, also in the Navigation Centre or use the Ctrl-S/⌘-S keyboard shortcuts and then double-click 'Payment Gateways' in the 'Settings' list. If you are using iOS or Android, select 'Settings' from the Tools menu (with 'wrench' icon) and tap 'Payment Gateways' in the 'Settings' list. The 'Payment Gateways: Browse' window opens: open a new record by selecting 'New' from the Create menu (Windows/Mac OS X) or + menu (iOS/Android). When the record is complete, click the [Save] button (Windows/Mac OS X) or tap √ (iOS/Android) to save.
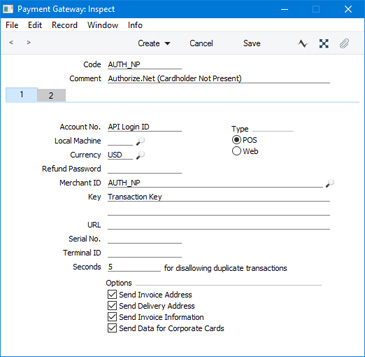
- Code
- Enter a unique identifying Code for the Payment Gateway record. You can use up to five alphanumeric characters.
- For the purposes of Point of Sales, if you have separate Merchant ID records for Cardholder Present and Cardholder Not Present transactions you will also need separate corresponding Payment Gateway records. It is recommended that the Code in the Cardholder Present Payment Gateway should be lower (alphabetically or numerically) than the Code for the Cardholder Not Present Payment Gateway. When a credit or debit card payment for a POS Invoice is processed and if there is a choice of Payment Gateways, the Gateway with the lower Code will be used. A POS Invoice is more likely to be a Cardholder Present transaction.
- For the purposes of Point of Sales, if you have separate Merchant ID records for Cardholder Present and Cardholder Not Present transactions you will also need separate corresponding Payment Gateway records. It is recommended that the Code in the Cardholder Present Payment Gateway should be lower (alphabetically or numerically) than the Code for the Cardholder Not Present Payment Gateway. When a credit or debit card payment for a POS Invoice is processed and if there is a choice of Payment Gateways, the Gateway with the lower Code will be used. A POS Invoice is more likely to be a Cardholder Present transaction.
- Comment
- Assign a descriptive name to the Payment Gateway record. This will be shown in the 'Payment Gateways: Browse' window.
- Local Machine
- Paste Special
Local Machines setting, Point of Sales/Restaurant/Technics module
- If the Type (below) of the Payment Gateway is "POS", you can use this field to specify the Local Machine (i.e. the till or cash machine) that will use the Payment Gateway record.
- When you process a credit card payment, the Payment Gateway with the appropriate Local Machine/Currency combination will be used. If there is no such Payment Gateway, the Gateway record with the appropriate Currency and a blank Local Machine will be used. This will ensure the payment will go to the correct merchant account.
- You can leave this field empty if the Type is "Web".
- When you process a credit card payment, the Payment Gateway with the appropriate Local Machine/Currency combination will be used. If there is no such Payment Gateway, the Gateway record with the appropriate Currency and a blank Local Machine will be used. This will ensure the payment will go to the correct merchant account.
- Currency
- Paste Special
Currency register, System module
- Specify a Currency here. You will need to enter a separate Payment Gateway record for each Currency you want to process. You must have opened separate merchant accounts with your bank in each Currency, and each Currency must have been activated by your partner.
- Note that Authorize.net only supports USD.
- You must use three-character Currency Codes that follow the ISO 4217 standard so that they are recognisable by the partner.
- Note that Authorize.net only supports USD.
- Merchant ID
- Paste Special Merchant ID setting, Point of Sales module
- Use this field to connect the Payment Gateway record to a record in the Merchant ID setting. This will ensure that when you process credit card payments, they will be sent to the appropriate merchant account through the correct partner.
- Use this field to connect the Payment Gateway record to a record in the Merchant ID setting. This will ensure that when you process credit card payments, they will be sent to the appropriate merchant account through the correct partner.
- Seconds for disallowing duplicate transactions
- This field will be used if your partner is Authorize.net. If you try to send the same credit card payment to your partner twice within the number of seconds specified here, Authorize.net will reject the second one. This helps prevent registering the same payment twice by accident or design.
- By default (i.e. if you leave this field empty), the rejection period will be 120 seconds. If you enter 0 (zero) or less, the rejection period will be 0 seconds. The maximum is 28800 seconds.
- By default (i.e. if you leave this field empty), the rejection period will be 120 seconds. If you enter 0 (zero) or less, the rejection period will be 0 seconds. The maximum is 28800 seconds.
- Type
- Use these options to specify whether the Payment Gateway record is to be used to process credit card payments made through the webshop or to process payments from POS Invoices.
- Options
- By default, Standard ERP will send the minimum necessary information about each payment to the partner. But, if your partner is Authorize.net, you may be able to obtain better rates if you send additional information with each payment. Selecting these options will allow you to provide this additional information for each payment, allowing it to be sent to Authorize.net. Extra fields will be added to the 'Credit Card Payment' window (where you will enter a Customer's credit card number and other details before processing a payment).
- Send Invoice Address
- This option will allow you to enter an invoice address for each payment. This will be sent to Authorize.net who will use the credit card Address Verification System to check that the address given to you by a Customer is the one registered for their credit card.
- Send Delivery Address
- This option will allow you to enter a delivery address for each payment. It will not be mandatory to enter a delivery address for every payment.
- Send Invoice Information
- Selecting this option will cause an Invoice Number and description (e.g. "original invoice", "credit invoice") to be sent to Authorize.net with the payment information.
- Send Data for Corporate Cards
- Selecting this option will cause a Customer Order Number, Invoice tax value, Invoice tax exempt status and freight value to be sent to Authorize.net with the payment information.
- Send Invoice Address
---
Settings related to Point of Sales:
- Introduction
- Baggers
- Cash Events
- Credit Card Types
- Default Payment Modes
- Drawers
- Dynamic Barcode
- Fields for Creating New Customers
- Fiscal Printer Reports
- Gift Voucher Settings
- Gift Voucher Types
- Gift Vouchers Issued
- Gift Vouchers Received
- Gift Vouchers Sold
- Local Machine
- Local Machine Payment Modes
- Local Machine Serial Port Devices
- Local Machines
- Local Settings
- Login Options
- Login Shortcuts
- Loyalty Card Membership Level Structure
- Loyalty Card Membership Levels
- Loyalty Points, Loyalty Points per Location
- Loyalty Points Redemption, Loyalty Points Redemption Per Location
- Merchant ID
- Modifiers
- Number Series - Cash Events
- Number Series - Coupons
- Number Series - Gift Vouchers
- Number Series - Gift Vouchers Received
- Number Series - POS Balances
- Number Series - POS Invoices
- Number Series - POS Sessions
- Payment Currencies
- Payment Gateways
- POS Balances
- POS Button Groups
- POS Button Pictures
- POS Buttons
- POS Commands
- POS Sessions
- POS Settings
- Receipt Printer Texts, Receipt Printer Texts per Machine
- Split Items
- Supervisors
- Synchronised Number Series
- Tab Item Groups
- Home page for Point of Sales manual
- Home page for Standard ERP manual
POS Balances
The POS Balances setting is the mechanism that causes the takings and Cash Events recorded for a Till Drawer to be posted to the Nominal Ledger.A POS Balance record states and sets in stone the balance in a Till Drawer at a particular time (i.e. at the end of a work session). You cannot use a POS Balance record to change or otherwise control the balance of a Till Drawer. If you need to change the balance, use a Cash Event.
When you create a POS Balance record for a particular Till Drawer using any of the four methods described below, the balance for that Drawer (i.e. the value of the cash, cheques, credit card payments etc that it contains) will be calculated, based on the Drawer's previous balance and on all Sales Ledger and POS Invoices, Receipts and Cash Events recorded since then. When you mark that POS Balance record as OK and save, a Nominal Ledger Transaction will be created, recording those sales and cash movements in the Nominal Ledger (unless you have prevented the creation of Nominal Ledger Transactions in the Number Series - POS Balances setting).
When entering a POS Balance record, you can choose 'Cash Up Report' from the Operations menu if you need to see the sales transactions and Cash Events that contribute to the Drawer's Balance. Selecting this function will cause a Cash Up report containing this information to be printed to screen. The period of the report will run from the previous POS Balance record for the Drawer to the time of the one you are entering. If you adjust the balance by entering new Cash Events, remember to update the time of the POS Balance record you are entering, so that it will take the new Cash Events into account.
After you mark a POS Balance record as OK and save, you can still use the 'Cash Up Report' Operations menu function. As it will use the same report period as just mentioned, the report will now act as a permanent record of the sales transactions and Cash Events entered since the previous POS Balance record.
As already mentioned, the balance in a POS Balance record is calculated automatically from the Drawer's previous balance and all Sales Ledger and POS Invoices, Receipts and Cash Events recorded since then. This means that before you start using a Till Drawer, you must "prime" it by entering a POS Balance record for it, dated the day before you first use it and with a zero balance (the balance will be calculated to be zero automatically). If you do not "prime" a Till Drawer in this way, the balances shown in the Cash Up report for that Drawer may not be correct. Use methods (1) or (2) below to create these initial POS Balance records.
You can enter a POS Balance for a particular Till Drawer using the following methods:
- On a till that uses a live connection with the server, you can enter a POS Balance on the till itself, working directly in the POS Balances setting. You cannot enter POS Balances on tills with live-sync connections to the server.
- For all tills, you can record POS Balances separately for each Till Drawer remotely from a desktop client, again working directly in the POS Balances setting.
- You can create a POS Balance record from the Cash Up report. When you produce the report for a particular Till/Drawer combination, it will contain a closing balance figure for the Till Drawer. Click (Windows/Mac OS X) or tap (iOS/Android) this figure to create a POS Balance record, containing the same closing balance figure.
- The final method that you can use to create POS Balances is to run the 'Cash Up' Maintenance function for a particular Till/Drawer combination. This function will first create a Cash Event that will move the full balance (including all Payment Modes i.e. payment methods) in the specified Drawer to the back office or bank (assuming you have not already created this Cash Event yourself). If you created a Cashier Count record prior to running the 'Cash Up' function and the value of that Cashier Count is different to the value that should be in the Drawer, the function will create a second Cash Event that writes off the difference (again, providing you have not already created this Cash Event yourself). The function will then close the work session and finally it will create a POS Balance record that will be marked as OK automatically. The Cash Events will mean that this POS Balance will record a zero balance in the Till Drawer.
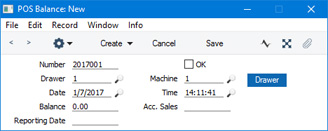
- Number
An identifying code for each POS Balance record will be generated automatically, and in most cases there will be no need to change it. The default will be chosen as follows:- It will be taken from the first valid row in the Number Series - POS Balances setting.
- It will be the next number following on from the last POS Balance entered.
- Drawer
- Paste Special
Drawers setting, Point of Sales/Restaurant module
- It will be taken from the first valid row in the Number Series - POS Balances setting.
- Enter here the Drawer for which you are entering a POS Balance. You must specify a Drawer before you can save the POS Balance record. The Drawer that was used together with the Local Machine Code of the till you are working on in the most recent POS Session appears here as a default.
You can choose a Drawer using 'Paste Special' or by clicking or touching the [Drawer] button on the right.
- Machine
- Paste Special
Local Machines setting, Point of Sales/Restaurant/Technics module
Enter here the Local Machine Code of the till for which you are entering a POS Balance.
- The Local Machine Code of the till you are working on will appear here as a default.
- If you are recording POS Balances separately for each live till remotely on a desktop client, be sure to enter the correct Local Machine Code for the till in question before saving.
- If you are recording POS Balances separately for each live till remotely on a desktop client, be sure to enter the correct Local Machine Code for the till in question before saving.
- Date
- Paste Special
Choose date
- The Date when the POS Balance was created: this will not be updated when you save the record. However, you can update it yourself, in which case the Balance (below) will be updated automatically.
- If you are entering POS Balances yourself (i.e. you are not using the 'Cash Up' Maintenance function), you can only enter one POS Balance for each Local Machine/Drawer combination per day.
- If you are entering POS Balances yourself (i.e. you are not using the 'Cash Up' Maintenance function), you can only enter one POS Balance for each Local Machine/Drawer combination per day.
- Time
- Paste Special
Current time
- The Time when the POS Balance was created: this will not be updated when you save the record. However, you can update it yourself, in which case the Balance (below) will be updated automatically.
- If you are using work sessions and you are creating a POS Balance record yourself (i.e. you are not using the 'Cash Up' Maintenance function), you can only do so after closing a work session. So, the Time in the field must be later than the time when you closed the session for the Till/Drawer combination. The 'Cash Up' function will close the session automatically before creating a POS Balance record.
- If you are using work sessions and you are creating a POS Balance record yourself (i.e. you are not using the 'Cash Up' Maintenance function), you can only do so after closing a work session. So, the Time in the field must be later than the time when you closed the session for the Till/Drawer combination. The 'Cash Up' function will close the session automatically before creating a POS Balance record.
- Balance
- When you specify a Machine and Drawer in the fields above, the balance for that Till/Drawer combination (i.e. the value of cash, cheques, credit card payments etc that it contains) will be calculated, based on the previous balance and all Sales Ledger and POS Invoices, Receipts and Cash Events recorded from then until the specified time. You cannot change this figure directly, but it will be updated if you change the Machine, Drawer or Time.
- If you are not using work sessions, you may find you can speed up the calculation of this figure by selecting the Start from Previous POS Balance option in the POS Settings setting.
- If you are not using work sessions, you may find you can speed up the calculation of this figure by selecting the Start from Previous POS Balance option in the POS Settings setting.
- OK
- To approve a POS Balance record, tick the OK box and save. Having done so, you will no longer be able to change the record.
- When you approve a POS Balance record, a Nominal Ledger Transaction will be created, providing you haven't prevented the creation of Nominal Ledger Transactions in the Number Series - POS Balances setting. This Transaction will record in the Nominal Ledger the sales transactions and Cash Events that contribute to the Balance. Please refer to the 'Nominal Ledger Transactions from POS Balances' section immediately below for details about the Transaction.
- POS Balances created by the 'Cash Up' Maintenance function will be marked as OK automatically. Therefore all such POS Balances will have connected Nominal Ledger Transactions.
- If you need to open the Nominal Ledger Transaction that was created from a POS Balance record, choose 'Open NL Transaction' from the Operations menu.
- When you approve a POS Balance record, a Nominal Ledger Transaction will be created, providing you haven't prevented the creation of Nominal Ledger Transactions in the Number Series - POS Balances setting. This Transaction will record in the Nominal Ledger the sales transactions and Cash Events that contribute to the Balance. Please refer to the 'Nominal Ledger Transactions from POS Balances' section immediately below for details about the Transaction.
- Reporting Date
- In a POS Balance record created by the 'Cash Up' Maintenance function, this field will contain the date when the work session was opened. In a POS Balance record that you create yourself, this field will remain empty.
- If you are using the Use Reporting Date for NL and Reports option in the Restaurant Settings setting in the Restaurant module, this date will be used as the Transaction Date of the Nominal Ledger Transaction created from the POS Balance record. Otherwise (i.e. if you are not using this option or this field is empty), the Date (above) will be used as the Transaction Date of the Nominal Ledger Transaction. If a work session lasts more than one day, this option therefore controls whether the date of the Nominal Ledger Transaction will be determined by the beginning or the end of the work session.
Nominal Ledger Transactions from POS Balances
When you mark a POS Balance record as OK and save, a Nominal Ledger Transaction will be created. This Transaction will record in the Nominal Ledger all the sales transactions and Cash Events that contribute to the Balance (i.e. all the sales transactions and Cash Events for a particular Till Drawer for a particular day or work session).Depending on the events being recorded, the Transaction may include some or all of the elements listed below. The Accounts will be chosen as follows:
Cash Event - Cash In
- Debit
- Account(s) from flip A of the Payment Mode(s) specified in the Cash Event.
- Credit
- Credit Account from the Cash Event. If you did not specify one yourself, this will be the Back Office A/C from the POS Settings setting if there is one.
- Back Office Account(s) from flip E of the Payment Mode(s) specified in the Cash Event.
- Credit Account from the Cash Event. If you did not specify one yourself, this will be the Back Office A/C from the POS Settings setting if there is one.
Cash Event - Cash Out
- Debit
- Credit Account from the Cash Event. If you did not specify one yourself, this will be the Back Office A/C from the POS Settings setting if there is one.
- Back Office Account(s) from flip E of the Payment Mode(s) specified in the Cash Event.
- Credit
- Credit Account from the Cash Event. If you did not specify one yourself, this will be the Back Office A/C from the POS Settings setting if there is one.
- Account(s) from flip A of the Payment Mode(s) specified in the Cash Event.
Cash Event - Cash Write-off
- Debit
- Credit Account from the Cash Event. If you did not specify one yourself, this will be the Writeoff A/C from the POS Settings setting.
- Account(s) from flip A of the Payment Mode(s) specified in the Cash Event.
- Credit
- Credit Account from the Cash Event. If you did not specify one yourself, this will be the Writeoff A/C from the POS Settings setting.
- Account(s) from flip A of the Payment Mode(s) specified in the Cash Event.
POS Invoice and Bar Tab
- Debit
- Account(s) from flip A of the Payment Mode(s) connected in the POS Buttons setting to the button used by the cashier to register the payment.
- Tags/Objects will be taken from the Person record for the Salesman/cashier, from the Contact record for the Branch, from the Contact record for the Customer and from the Tab Item Group record for the till (Local Machine).
- Tags/Objects will be taken from the Person record for the Salesman/cashier, from the Contact record for the Branch, from the Contact record for the Customer and from the Tab Item Group record for the till (Local Machine).
- Credit (Sales)
- If the POS Invoice has a Price List and there is a record in the Price register for the Item/Price List/Customer combination or in the Quantity Dependent Prices setting for the Item/Price List combination (depending on the Type of the Price List), the Sales Account will be taken from that Price or Quantity Dependent Price record.
- It will be taken from the Item record.
- It will be taken from the Item Group to which the Item belongs.
- The Sales Account in the Account Usage S/L setting will be used.
Tags/Objects will be taken from the Item or Item Group. In addition, the Tags/Objects assigned to the debit posting will also be assigned to this posting.
- Credit (VAT)
- If the POS Invoice has a Price List and there is a record in the Price register for the Item/Price List/Customer combination or in the Quantity Dependent Prices setting for the Item/Price List combination (depending on the Type of the Price List), the Sales Account will be taken from that Price or Quantity Dependent Price record.
- The Output VAT Account will be taken from a VAT Code chosen as follows:
- The Sales VAT Code for the Customer will be used.
- It will be taken from the appropriate row for the Item or Item Group in the Price List used in the POS Invoice.
- It will be taken from the Item record.
- It will be taken from the Item Group to which the Item belongs.
- The VAT Code on the 'Sales' card of the Account Usage S/L setting will be used.
If you are using Tax Templates, the Tax Template in each POS Invoice and Bar Tab row will be chosen as described here.
- Tags/Objects will be chosen in the same way as those assigned to the posting to the Sales Account.
- The Sales VAT Code for the Customer will be used.
If change was given to a Customer, the full amount paid by the Customer will be debited to the Account from flip A of the Payment Mode and the change will be credited to the POS Change Account specified in the Account Usage S/L setting. If you have not specified a POS Change Account, then the sale value will be debited to the Account from the Payment Mode, so the change will not be recorded in the Nominal Ledger. Change is never posted from Bar Tabs.
---
Settings related to Point of Sales:
- Introduction
- Baggers
- Drawers
- Dynamic Barcode
- Fields for Creating New Customer
- Gift Vouchers Settings
- Gift Voucher Types
- Gift Vouchers Issued
- Gift Vouchers Received
- Gift Vouchers Sold
- Local Machine Payment Modes
- Local Machines
- Loyalty Card Membership Level Structure
- Loyalty Card Membership Levels
- Loyalty Points, Loyalty Points per Location
- Loyalty Points Redemption, Loyalty Points Redemption Per Location
- Modifiers
- Number Series - Gift Vouchers
- Number Series - Gift Vouchers Received
- Number Series - POS Balances
- Payment Currencies
- POS Balances
- POS Button Groups
- POS Button Pictures
- POS Buttons
- Split Items
- Supervisors
- Synchronised Number Series
- Home page for Point of Sales manual
- Home page for Standard ERP manual
POS Button Groups
When configuring the buttons that will appear in the POS Invoice and/or Bar Tab windows, you may need different sets of Buttons to be used, depending on how a particular till or cash machine will be used. For example in a restaurant you might need different sets of buttons to appear on the tills in the food area compared to the tills in the bar. You can implement this using POS Button Groups.To work with POS Button Groups, follow these steps:
- Working in the POS Button Groups setting in the Point of Sales or Restaurant modules, create a separate record for each area where you need different buttons to be used. Continuing the example, you will need two records, one for the food area and one for the bar. Specify a Code and a Comment for each one:
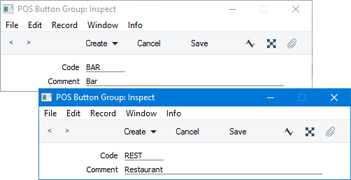
- Create the POS Button records that you need, assigning each one to the relevant Button Group (i.e. assign each POS Button record to the food area or to the bar).
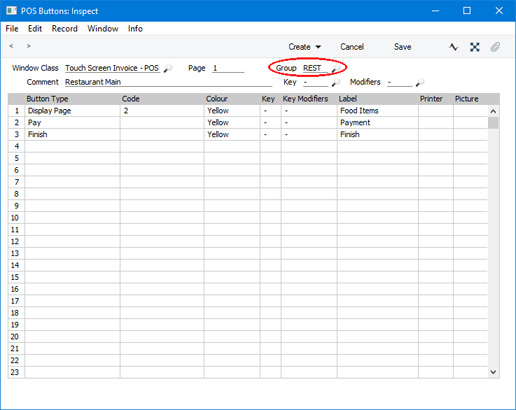
- The next step is to assign each till to a Button Group. Working separately on each till, specify a Button Group on the 'POS’ card in the Local Machine setting in the User Settings module.
If a till will have a live-sync connection with the server, specify the Button Group in the record for the till in the Local Settings setting in the Technics module before connecting the till to the server. The Button Group will then be sent to the till as part of the synchronisation process.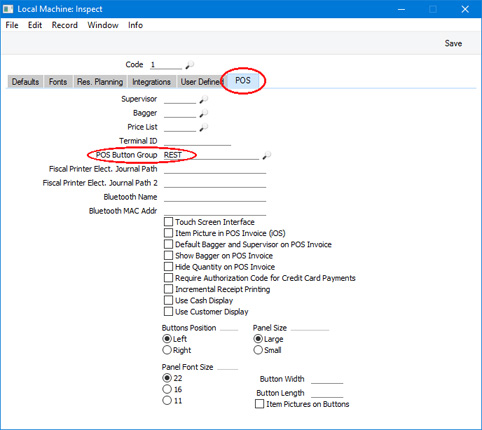
You must ensure that for each Button Group you create a POS Button record in which the Page is "1" (described as a "Page 1" record in this documentation). The "Page 1" record will contain the buttons that will be displayed in new POS Invoices or Bar Tabs. Continuing the example, the "Page 1" record for the food area will contain the buttons that will be displayed in new POS Invoices or Bar Tabs created on tills in the food area, while the "Page 1" record for the bar will contain the buttons that will be displayed in new POS Invoices or Bar Tabs created in the bar. If you are using both POS Invoices and Bar Tabs with the same Button Groups, you will need four "Page 1" records, for POS Invoices/food area, Bar Tabs/food area, POS Invoices/bar and Bar Tabs/bar.
- When you create a new POS Invoice or Bar Tab, the buttons shown in the window will depend on the Button Group of the till you are using:
Buttons designed for the food area will not be used on tills in the bar and vice versa.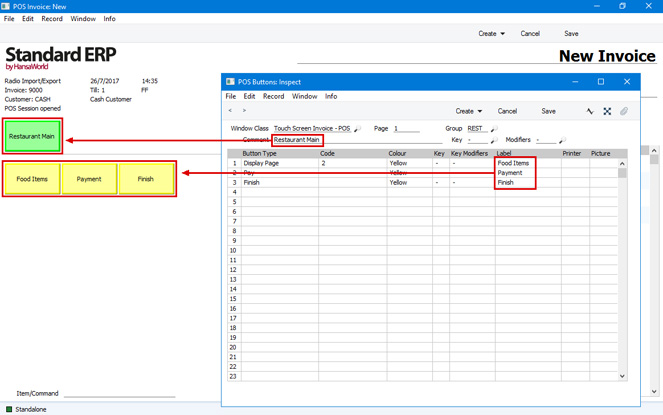
Settings related to Point of Sales:
- Introduction
- Baggers
- Drawers
- Dynamic Barcode
- Fields for Creating New Customer
- Gift Vouchers Settings
- Gift Voucher Types
- Gift Vouchers Issued
- Gift Vouchers Received
- Gift Vouchers Sold
- Local Machine Payment Modes
- Local Machines
- Loyalty Card Membership Level Structure
- Loyalty Card Membership Levels
- Loyalty Points, Loyalty Points per Location
- Loyalty Points Redemption, Loyalty Points Redemption Per Location
- Modifiers
- Number Series - Gift Vouchers
- Number Series - Gift Vouchers Received
- Number Series - POS Balances
- Payment Currencies
- POS Balances
- POS Button Groups
- POS Button Pictures
- POS Buttons
- Split Items
- Supervisors
- Synchronised Number Series
- Home page for Point of Sales manual
- Home page for Standard ERP manual
POS Button Pictures
When you add a POS Button to the POS Invoice or Bar Tab window, you will usually assign a colour and a text label to the button, to indicate the purpose of the button to the user. Alternatively, you can assign an image or picture to the button. For example, you may want buttons that will be used to receive payment to contain currency symbols, or buttons that will be used to add Items to transactions to contain images of the Items.To place images or pictures in buttons, follow these steps:
- Select the Enable Pictures on Buttons option on the 'POS Appearance’ card in the Local Machine setting in the User Settings module. As the Local Machine setting is stored separately in each client database, you will need to select this option on each till or cash machine.
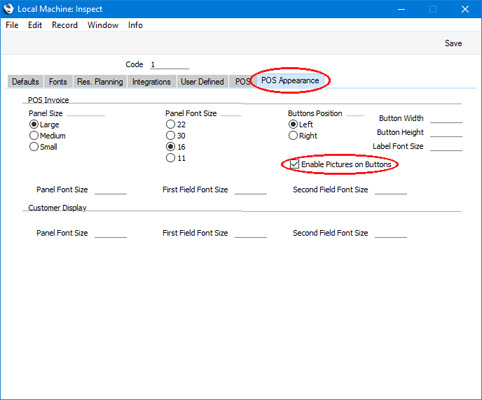
- Working in the POS Button Pictures setting in the Point of Sales module, create a separate record for each image or picture. Specify a Code and a Comment for each one:
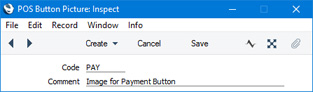
- After saving each POS Button Picture record, open the Document Manager and attach an image file. This should be a JPG or PNG file. BMP files are additionally supported only on Windows clients, but using BMP files is not recommended because their size can have a detrimental effect on the speed with which the button will be drawn.
It is recommended that the size of each image file should be the same as the size of the buttons. The default button size is 93 x 50 pixels (excluding the border), but you can change this using the Button Height and Button Width fields on the 'POS Appearance’ card in the Local Machine setting.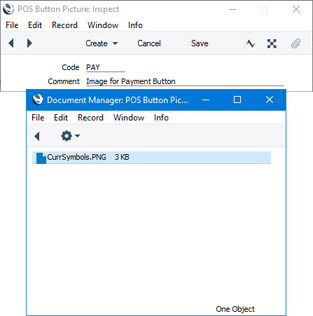
Any pictures that you have attached to Item records will not be used for this purpose. So, if you need buttons to contain images of Items, you will need to create records in the POS Button Pictures setting for those images.
- When you create a record in the POS Buttons setting to place buttons in the POS Invoice or Bar Tab window, use 'Paste Special' from the Picture column to assign a POS Button Picture to each button:
You must also specify a Label in each row in order to be able to save the record, although the Label and Colour won't be used if you have also specified a Picture.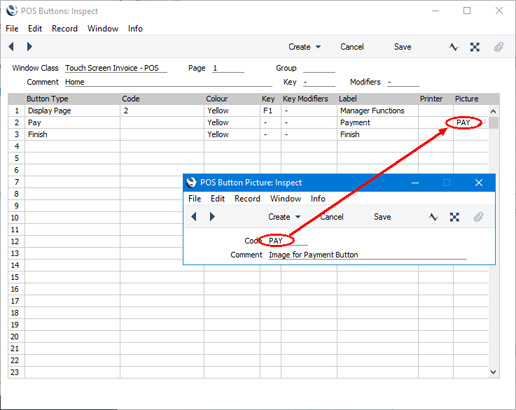
- The images or pictures will appear in the buttons in the POS Invoice or Bar Tab window:
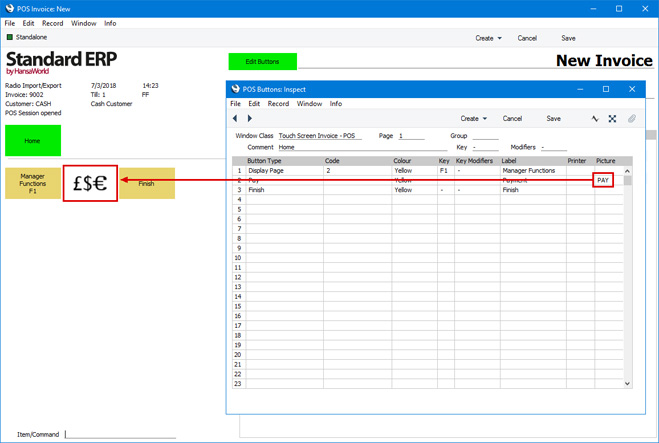
Settings related to Point of Sales:
- Introduction
- Baggers
- Cash Events
- Credit Card Types
- Default Payment Modes
- Drawers
- Dynamic Barcode
- Fields for Creating New Customers
- Fiscal Printer Reports
- Gift Voucher Settings
- Gift Voucher Types
- Gift Vouchers Issued
- Gift Vouchers Received
- Gift Vouchers Sold
- Local Machine
- Local Machine Payment Modes
- Local Machine Serial Port Devices
- Local Machines
- Local Settings
- Login Options
- Login Shortcuts
- Loyalty Card Membership Level Structure
- Loyalty Card Membership Levels
- Loyalty Points, Loyalty Points per Location
- Loyalty Points Redemption, Loyalty Points Redemption Per Location
- Merchant ID
- Modifiers
- Number Series - Cash Events
- Number Series - Coupons
- Number Series - Gift Vouchers
- Number Series - Gift Vouchers Received
- Number Series - POS Balances
- Number Series - POS Invoices
- Number Series - POS Sessions
- Payment Currencies
- Payment Gateways
- POS Balances
- POS Button Groups
- POS Button Pictures
- POS Buttons
- POS Commands
- POS Sessions
- POS Settings
- Receipt Printer Texts, Receipt Printer Texts per Machine
- Split Items
- Supervisors
- Synchronised Number Series
- Tab Item Groups
- Home page for Point of Sales manual
- Home page for Standard ERP manual
POS Buttons
Please refer here for full details about this setting.---
Settings related to Point of Sales:
- Introduction
- Baggers
- Drawers
- Dynamic Barcode
- Fields for Creating New Customer
- Gift Vouchers Settings
- Gift Voucher Types
- Gift Vouchers Issued
- Gift Vouchers Received
- Gift Vouchers Sold
- Local Machine Payment Modes
- Local Machines
- Loyalty Card Membership Level Structure
- Loyalty Card Membership Levels
- Loyalty Points, Loyalty Points per Location
- Loyalty Points Redemption, Loyalty Points Redemption Per Location
- Modifiers
- Number Series - Gift Vouchers
- Number Series - Gift Vouchers Received
- Number Series - POS Balances
- Payment Currencies
- POS Balances
- POS Button Groups
- POS Button Pictures
- POS Buttons
- Split Items
- Supervisors
- Synchronised Number Series
- Home page for Point of Sales manual
- Home page for Standard ERP manual
POS Commands
Please refer here for full details about this setting.---
Settings related to Point of Sales:
- Introduction
- Baggers
- Cash Events
- Credit Card Types
- Default Payment Modes
- Drawers
- Dynamic Barcode
- Fields for Creating New Customers
- Fiscal Printer Reports
- Gift Voucher Settings
- Gift Voucher Types
- Gift Vouchers Issued
- Gift Vouchers Received
- Gift Vouchers Sold
- Local Machine
- Local Machine Payment Modes
- Local Machine Serial Port Devices
- Local Machines
- Local Settings
- Login Options
- Login Shortcuts
- Loyalty Card Membership Level Structure
- Loyalty Card Membership Levels
- Loyalty Points, Loyalty Points per Location
- Loyalty Points Redemption, Loyalty Points Redemption Per Location
- Merchant ID
- Modifiers
- Number Series - Cash Events
- Number Series - Coupons
- Number Series - Gift Vouchers
- Number Series - Gift Vouchers Received
- Number Series - POS Balances
- Number Series - POS Invoices
- Number Series - POS Sessions
- Payment Currencies
- Payment Gateways
- POS Balances
- POS Button Groups
- POS Button Pictures
- POS Buttons
- POS Commands
- POS Sessions
- POS Settings
- Receipt Printer Texts, Receipt Printer Texts per Machine
- Split Items
- Supervisors
- Synchronised Number Series
- Tab Item Groups
- Home page for Point of Sales manual
- Home page for Standard ERP manual
POS Sessions
The first step in a typical working day will be to open a work session for each Till Drawer. Work sessions are stored in the POS Sessions setting, which you can find in the Point of Sales and Restaurant modules. Usually, a work session will be a working day, but it can be any period up to the next time you need to run your cash up routines. Using sessions will help organise and clarify the Cash Up report.Before you use a Till Drawer for the first time, you must open a work session for it. This will connect and lock the Drawer to the till. The Drawer will then be assigned to each POS Invoice entered on the till (i.e. each POS Invoice will be recorded as having been entered on the till and the Drawer). If you do not lock a Drawer to a till, POS Invoices entered on that till may be assigned to the wrong Drawer or may not be assigned to a Drawer at all and so will not be included in the cash up routines.
After opening the first work session for each Till Drawer, proceed as follows:
- If you do not intend to use work sessions as part of your normal routine, close the work sessions for each Till Drawer immediately after opening them. Once you have opened and closed the initial work session for a particular Till Drawer, do not open any more sessions for it.
- If you intend to use work sessions, you can now close and open work sessions for each Till Drawer as necessary. You should not enter any POS Invoices or Cash Events for a particular Till Drawer if it is not in open session because they won't be included in the cash up routines. Selecting the Require Open Session option in the POS Settings setting will ensure you won't be able to save a POS Invoice or Cash Event if the Till Drawer you are using is not in open session (i.e. this option will make work sessions mandatory). If you would like to override the Require Open Session option on a particular till, you can do so in the Tab Item Group register in the User Settings module.
- If you are not using sessions and you have selected the Start from Previous POS Balance option in the POS Settings setting, the 'Cash Up' function will calculate the balance in a Till Drawer using the POS Invoices and Cash Events entered since the last time you ran the function (i.e. since the date and time in the most recent POS Balance for the Till Drawer that has been marked as OK).
- If you are not using sessions and you have not selected the Start from Previous POS Balance option, the 'Cash Up' function will calculate the balance in a Till Drawer using the POS Invoices and Cash Events entered since the original work session that connected the till to the Drawer. The result of the calculation will be the same, but the calculation will be slower.
- If you are using sessions, the 'Cash Up' function will calculate the balance in a Till Drawer using POS Invoices and Cash Events entered since the session was opened. If you use sessions intermittently, there is a risk that you will enter POS Invoices and/or Cash Events in the time between running the 'Cash Up' function and opening a session. These POS Invoices and Cash Events will be 'lost' in the sense that they won't be found by the 'Cash Up' function the next time you run it. You should therefore select the Require Open Session option if you are using work sessions, to ensure that transactions cannot be saved when a till is not in open session.
You can open or close work sessions for a particular Till Drawer using the following methods:
- On a till that uses a live connection with the server, cashiers and waiters can open and close work sessions on the till itself, working directly in the POS Sessions setting.
- For all tills that use live connections with the server, administrators can open and close work sessions separately for each till remotely from a desktop client, again working directly in the POS Sessions setting.
- Cashiers and waiters can open and close work sessions directly from POS Invoices and Bar Tabs. To enable this feature, you must add "Open Session" and "Close Session" buttons to the POS Invoice and/or Bar Tab windows.
Cashiers and waiters can use this method on both live and live-sync tills. In the case of live-sync tills, this will be the most commonly-used and most convenient method, because you must open and close work sessions on these tills themselves. If you have used the Login Shortcuts register in the User Settings module to ensure a new POS Invoice or Bar Tab will be opened automatically on logging in, it will be easy to click or touch an "Open Session" button at the start of a day. Therefore, take care to ensure the POS Invoice and Bar Tab windows contain the relevant buttons.
The first time you click or touch the "Open Session" button on a particular till, the 'POS Session: New' window illustrated below will open, asking you to specify a Drawer. On all subsequent occasions and providing you are not using the Allow Multiple Sessions per Machine option in the POS Settings setting, the "Open Session" and "Close Session" buttons will open and close sessions immediately and automatically, without the 'POS Session: New' window opening. If you are using the Allow Multiple Sessions per Machine option, the 'POS Session: New' window will always open because you will need to connect a Person or Persons to the Drawer.
- You can open or close work sessions from the Cash Up report. When you produce the report for a particular Till/Drawer combination, drill down from the [Open Session] or [Close Session] text links in the report to open or close the work session for the same Till/Drawer combination.
If you are working remotely on a desktop client, you can use this method to open and close work sessions separately for each live till in turn. However, if you are working on a live-sync till, you must produce the report on the till itself. Ensure the POS Invoice or Bar Tab window contains a "Cash Up Report" button, and click or touch this button to produce the report. From there, you can change the session status of the Till Drawer.
- If a work session is open when you run the 'Cash Up' Maintenance function for a particular Till/Drawer combination, the function will close the session automatically.
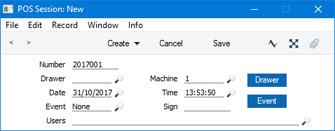
- Number
- An identifying code for each POS Session record will be generated automatically, and in most cases there will be no need to change it. The default will be chosen as follows:
- It will be taken from the first valid row in the Number Series - POS Sessions setting.
- It will be the next number following on from the last POS Session entered.
If you have tills with live-sync connections to the server, you must define Number Series for POS Sessions for each live-sync till in the Synchronised Number Series setting before connecting those tills to the server for the first time. You must also define separate Number Series for the live tills in the Number Series - POS Sessions setting.
- It will be taken from the first valid row in the Number Series - POS Sessions setting.
- Drawer
- Paste Special Drawers setting, Point of Sales/Restaurant module
- Enter here the Drawer whose work session is being started or ended. You must specify a Drawer before you can save the POS Session record. You can choose a Drawer using 'Paste Special' or by clicking or touching the [Drawer] button on the right.
- When you use a Drawer in a POS Session record for the first time, the Drawer becomes linked to the Machine used in that record (specified below). The term "Till Drawer" is used in this documentation when referring to this Drawer/Local Machine combination.
- If you create a POS Session record from the Cash Up report, the default here will be the Drawer for which you produced the report.
- Enter here the Drawer whose work session is being started or ended. You must specify a Drawer before you can save the POS Session record. You can choose a Drawer using 'Paste Special' or by clicking or touching the [Drawer] button on the right.
- Machine
- Paste Special Local Machines setting, Point of Sales/Restaurant/Technics module
- Enter here the Local Machine Code of the till whose work session is being started or ended.
- The Local Machine Code of the till you are working on will usually appear here as a default. However, if you create a POS Session record from the Cash Up report, the default here will be the Machine for which you produced the report.
- If you are opening or closing work sessions separately for each live till remotely from a desktop client, be sure to enter the correct Local Machine Code for the till in question before saving. If you work from Cash Up reports, this will be done for you. Note that the desktop client must have its own Local Machine Code specified in the Local Machine setting in the User Settings module, otherwise you will not be able to save any POS Session records.
- Enter here the Local Machine Code of the till whose work session is being started or ended.
- Date
- Paste Special
Choose date
- The Date when the work session was opened or closed: this will be updated when you save the record.
- Time
- Paste Special
Current time
- The Time when the work session was opened or closed: this will be updated when you save the record.
- Event
- Paste Special
Choices of possible entries
- Specify here whether you are recording the opening or the closing of a particular Till Drawer. You will be prevented from using the same Event twice in succession: if a Till Drawer is already in open session, you will not be able to open it again.
- Sign
- The Signature of the user who created the POS Session: this will be updated when you save the record.
- Users
- Paste Special
Person register, System module and Global User register, Technics module
- If you are using the Allow Multiple Sessions per Machine option in the POS Settings setting, you must specify at least one Person (i.e. at least one cashier or waiter) here before you can save the POS Session. If you need to enter more than one Person, separate them with commas. You cannot use the same Person in more than one open session.
- When a Person logs in and starts creating POS Invoices, those POS Invoices will be assigned to the correct Drawer automatically, provided that Person is mentioned in an open session record at the time.
- Please refer to the description of the Allow Multiple Sessions per Machine option in the POS Settings setting here for details about this field.
- When a Person logs in and starts creating POS Invoices, those POS Invoices will be assigned to the correct Drawer automatically, provided that Person is mentioned in an open session record at the time.
If you are working on a live-sync till and the first POS Session record is not synchronised (not sent to the server), the probable reason is that you have not defined Synchronised Number Series for the POS Sessions setting. Please refer here for details.
---
Settings related to Point of Sales:
- Introduction
- Baggers
- Cash Events
- Credit Card Types
- Default Payment Modes
- Drawers
- Dynamic Barcode
- Fields for Creating New Customers
- Fiscal Printer Reports
- Gift Voucher Settings
- Gift Voucher Types
- Gift Vouchers Issued
- Gift Vouchers Received
- Gift Vouchers Sold
- Local Machine
- Local Machine Payment Modes
- Local Machine Serial Port Devices
- Local Machines
- Local Settings
- Login Options
- Login Shortcuts
- Loyalty Card Membership Level Structure
- Loyalty Card Membership Levels
- Loyalty Points, Loyalty Points per Location
- Loyalty Points Redemption, Loyalty Points Redemption Per Location
- Merchant ID
- Modifiers
- Number Series - Cash Events
- Number Series - Coupons
- Number Series - Gift Vouchers
- Number Series - Gift Vouchers Received
- Number Series - POS Balances
- Number Series - POS Invoices
- Number Series - POS Sessions
- Payment Currencies
- Payment Gateways
- POS Balances
- POS Button Groups
- POS Button Pictures
- POS Buttons
- POS Commands
- POS Sessions
- POS Settings
- Receipt Printer Texts, Receipt Printer Texts per Machine
- Split Items
- Supervisors
- Synchronised Number Series
- Tab Item Groups
- Home page for Point of Sales manual
- Home page for Standard ERP manual
POS Settings
The POS Settings setting contains some miscellaneous options controlling the behaviour of various aspects of the Point of Sales and Restaurant modules. The setting is located in both modules.The options that you choose here will be applied to every till and cash machine in your network. If necessary, you can override some of these options on a particular till, working in the Local Machine setting in the User Settings module on the till in question (or, if a till has a live-sync connection to the server, in the record for the till in the Local Settings setting in the Technics module).
To work with the POS Settings setting, ensure you are in the Point of Sales or Restaurant modules using the [Switch Module] button in the Navigation Centre. Then, if you are using Windows or Mac OS X, click the [Settings] button, also in the Navigation Centre. When the 'Settings' list opens, double-click 'POS Settings'. If you are using iOS or Android, select 'Settings' from the Tools menu (with 'wrench' icon) and tap 'POS Settings' in the 'Settings' list. The 'POS Settings: Inspect' window opens: configure it as appropriate and as described below the illustration. When the record is complete, click the [Save] button (Windows/Mac OS X) or tap √ (iOS/Android) to save.
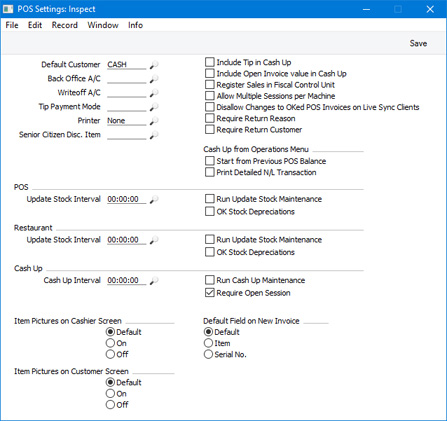
- Default Customer
- Paste Special
Customers in Contact register
- The Default Customer is the Customer that will be used by default in every new POS Invoice and Bar Tab. This will often be a generic Customer such as "Cash Sale".
- You can specify an overall Default Customer in this field. This Default Customer will be used on every till and cash machine. If you want to choose a different Default Customer for a particular till, you can do so using the Default Customer field in the Local Machine setting on the till in question (or, if a till has a live-sync connection to the server, in the record for the till in the Local Settings setting in the Technics module).
- In both cases, the specified Customer must exist as a separate record in the Contact register.
- Every new POS Invoice and Bar Tab will be created in the name of the Default Customer. If you have added a "Customer Search" button to the POS Invoice and/or Bar Tab windows, you will be able to choose a different Customer if necessary. Specifying a Loyalty Card in a POS Invoice or Bar Tab will also change the Customer.
- You can specify an overall Default Customer in this field. This Default Customer will be used on every till and cash machine. If you want to choose a different Default Customer for a particular till, you can do so using the Default Customer field in the Local Machine setting on the till in question (or, if a till has a live-sync connection to the server, in the record for the till in the Local Settings setting in the Technics module).
- Back Office A/C
- Paste Special
Account register, Nominal Ledger/System module
- The Back Office Account is used when you move cash, cheques and credit card payments into and out of your Till Drawers. A movement into a Till Drawer (e.g. placing a cash float into a Till Drawer) will credit the Back Office Account, while a movement out of a Till Drawer (e.g. removing the day's takings from the Drawer to the back office or bank) will debit it.
- You should record movements into and out of your Till Drawers using the Cash Events setting. A Cash Event will not update the Nominal Ledger immediately. This will be done the next time you create a POS Balance record and save it after marking it as OK. You can do this yourself or it will be done automatically the next time you run the Maintenance function.
- The Back Office Account for a particular Cash Event will be chosen as follows:
- The Cred. A/C specified in the Cash Event itself will be used. If you did not specify a Cred A/C in a Cash Event, the Back Office A/C specified here will be copied to the Cash Event when you mark it as OK and save.
- If no Back Office A/C can be copied to the Cash Event (i.e. if you have not specified a Back Office A/C in this field), the Back Office A/C on flip E of the relevant Payment Mode will be used.
Usually, you will only specify a Back Office Account in this setting if you want to use the same Account for every Payment Mode. If you leave this field empty, you should specify Back Office Accounts for each Payment Mode (on flip E).
- You should record movements into and out of your Till Drawers using the Cash Events setting. A Cash Event will not update the Nominal Ledger immediately. This will be done the next time you create a POS Balance record and save it after marking it as OK. You can do this yourself or it will be done automatically the next time you run the Maintenance function.
- Writeoff A/C
- Paste Special
Account register, Nominal Ledger/System module
- As well as using Cash Events to record movements into and out of your Till Drawers, you can use them to write off cash that is missing from Till Drawers. This type of Cash Event is known as a "Writeoff" Cash Event.
- "Writeoff" Cash Events will debit a Write-off Account that will be chosen as follows:
- The Cred. A/C specified in the Cash Event itself will be used. If you did not specify a Cred A/C in a Cash Event, the Writeoff A/C specified here will be copied to the Cash Event when you mark it as OK and save.
- If no Writeoff A/C can be copied to the Cash Event (i.e. if you have not specified a Writeoff A/C in this field), the amounts written off will not be recorded in the Nominal Ledger.
The Writeoff A/C will usually be a Balance Sheet Account (e.g. an Account for discrepancies to be investigated). After investigation, you can enter a Nominal Ledger Transaction to send the discrepancy from the Writeoff A/C to the correct Account.
- "Writeoff" Cash Events will debit a Write-off Account that will be chosen as follows:
- Senior Citizen Disc. Item
- Paste Special
Item register
- If you will be allowing Senior Citizen Discounts to be added to POS Invoices, specify here the Item that will represent those discounts. When you add a Senior Citizen Discount to a POS Invoice, this Item will determine the value of the discount. The VAT Code and Sales Account for that discount will also be taken from the Item.
- The Item should not have a Base Price but instead should have its price calculated by Item Formula. For example, if the Senior Citizen Discount is 20%, use an Item Formula where the % is -20.
- The Item should be a Plain Item.
- If you need to be able to add Senior Citizen Discounts to POS Invoices, add a "Senior Citizen Discount" button to the POS Invoice window.
- The Item should not have a Base Price but instead should have its price calculated by Item Formula. For example, if the Senior Citizen Discount is 20%, use an Item Formula where the % is -20.
- Register Sales in Fiscal Control Unit
- This option should only be used in Sweden, where it is a legal requirement that all cash or credit card payments in shops should be made through a certified POS solution that contains a fiscal control unit. The control unit will record these payments, which can later be read by tax authorities to ensure that a shop's sales have been registered and reported correctly.
- The fiscal control units supported by Standard ERP are the CleanCash Types A and C from RetailInnovation. Each till or cash machine likely to receive cash or credit card payments should be connected to a CleanCash Type A unit via an RS232 serial cable or should be able to reach a shared Type C unit over the network. Standard ERP does not currently support the CleanCash Type B.
- Select this option if you need cash and credit card payments to be recorded in CleanCash fiscal control units. This option applies to POS Invoices, while a similarly named option in the Account Usage S/L setting applies to Sales Ledger Invoices with a "Cash" Type Payment Term (i.e. Sales Ledger Cash Notes). If you are using this option, you should not be able to change Item Descriptions and Unit Prices in Invoices, so you should not add the "Amend Line" button to the POS Invoice window.
- The fiscal control units supported by Standard ERP are the CleanCash Types A and C from RetailInnovation. Each till or cash machine likely to receive cash or credit card payments should be connected to a CleanCash Type A unit via an RS232 serial cable or should be able to reach a shared Type C unit over the network. Standard ERP does not currently support the CleanCash Type B.
- Allow Multiple Sessions per Machine
- Select this option if your tills and cash machines each have more than one Drawer.
- If a till or cash machine has more than one Drawer, you may need more than one work session for that till to be open at a time, one for each Drawer. This will have the following consequences:
- When opening and closing sessions, you will need to specify users as well as Drawers and Machines. This connects users and Drawers. For example, you might open a work session for Machine 1, Drawer 1, Users SJ,AM, and a second session for Machine 1, Drawer 2, Users NM.
- Each POS Invoice will be assigned to the Drawer that is connected to the current user. In the example, if SJ logs in on the Machine and enters a POS Invoice, it will be assigned to Drawer 1 automatically (providing the session is open). If NM logs in and enters a POS Invoice, it will be assigned to Drawer 2 automatically (again, providing the session is open).
- If a Person not connected to any Drawer logs in (in other words, a Person whose last session was closed or a Person that has not been mentioned in any sessions), that Person will not be able to save POS Invoices, providing you are also using the Require Open Session option (below). If you are not using the Require Open Session option, POS Invoices will be saved, but they will not be assigned to a Drawer. It is therefore highly recommended that you use the Require Open Session option if you are also using the Allow Multiple Sessions per Machine option.
- You can only assign a particular Person to a single open session at any one time.
If you do not select this option, it will be assumed that each till and cash machine has a single Drawer. When you enter a POS Invoice on a particular till, it will be assigned automatically to the Drawer for which you most recently opened a work session.
- If a till or cash machine has more than one Drawer, you may need more than one work session for that till to be open at a time, one for each Drawer. This will have the following consequences:
- Require Return Reason
- Select this option if you need it to be mandatory that a Return Reason is specified in every Return. A Return is a POS Invoice with negative values created using the "Return" button in the POS Invoice window. Cashiers will need to use the "Return Reason" button to enter the Return Reason, so be sure to add this button to the POS Invoice window if you need to use this option.
- Require Return Customer
- Select this option if you need it to be mandatory that a Customer is specified in every Return. This means that the Customer in a Return cannot be the Default Customer. A Return is a POS Invoice with negative values created using the "Return" button in the POS Invoice window. If a cashier used the "Return" button from an existing Invoice, the Customer will be transferred from that Invoice to the Return. Otherwise, cashiers will be able to use the "Customer Search" button to specify the Customer, so be sure to add this button to the POS Invoice window if you need to use this option.
- Cash Up from Operations Menu
- Use these options to specify the defaults that you want to be used when you produce the Cash Up report from a POS Invoice or Bar Tab (using the "Cash Up Report" button) or from a POS Balance record (by choosing 'Cash Up Report' from the Operations menu). When you produce the report using one of these methods, it will be printed to screen immediately: no specification window will be opened.
- Start from Previous POS Balance
- This option controls the report period that will be used when you produce the Cash Up report from a POS Invoice or Bar Tab using the "Cash Up Report" button. If you are using this option, the report period will begin on the date of the most recent POS Balance record for the current Till Drawer that has been marked as OK and will end on the current date. If you are not using this option, the period will begin one day before the current day.
- If you produce a Cash Up report from a POS Balance record, the report will always behave as if you are using this option.
- Using this option can be useful if you do not create POS Balance records daily as it will show you how long it has been since you last ran the function. If you do run the function daily, the report will immediately show you if you have forgotten to create a POS Balance record for a particular Till Drawer on a particular day.
- If you are not using work sessions, you may find that selecting this option will speed up the calculation of the Balance figure when entering POS Balance records, and will speed up the operation of the 'Cash Up' Maintenance function. Selecting this option will mean that the calculations will run from the date and time of the most recent previous POS Balance record for the Machine/Drawer combination that has been marked as OK. If you do not select this option, calculations will go back to the date and time of the original work session that connected the till to the Drawer.
- Print Detailed N/L Transaction
- Choose this option if you would like the report to be produced as if you are using the Print N/L Transaction option in the 'Specify Cash Up' window.
- If you produce a Cash Up report from a POS Balance record, the report will always behave as if you are using this option.
- Start from Previous POS Balance
- POS Update Stock Interval, Run Update Stock Maintenance, OK Stock Depreciations
- When a POS Invoice is marked as Finished and saved, stock levels of the sold Items sold will not be updated immediately. This will be done when you run the 'Update Stock' Maintenance function in the Point of Sales module, which you should do periodically and regularly. This function will create Stock Depreciation records for the sold Items, and Goods Receipts for any that have been returned.
- If you would like the 'Update Stock' function to be run automatically, select the Run Update Stock Maintenance option, and specify in the Update Stock Interval field how frequently you would like this to happen. Use the 24-hour clock in the Update Stock Interval field: for example, enter "02:00:00" if you would like the Maintenance function to be run every two hours. You must specify an interval, otherwise the function will not be run. If you need the Stock Depreciation created by the function to be marked as OK automatically, select the OK Stock Depreciations option.
- Note that when the 'Update Stock' function is run automatically because you are using this option, it will only include the current day's POS Invoices. If you need a previous day's POS Invoices to be included, you should run the function yourself and specify a suitable period.
- After changing this field and/or check box, you will need to restart the server for the changes to take effect.
- If you would like the 'Update Stock' function to be run automatically, select the Run Update Stock Maintenance option, and specify in the Update Stock Interval field how frequently you would like this to happen. Use the 24-hour clock in the Update Stock Interval field: for example, enter "02:00:00" if you would like the Maintenance function to be run every two hours. You must specify an interval, otherwise the function will not be run. If you need the Stock Depreciation created by the function to be marked as OK automatically, select the OK Stock Depreciations option.
- Restaurant Update Stock Interval, Run Update Stock Maintenance, OK Stock Depreciations
- As described for POS Invoices above, stock is also not updated automatically from Bar Tabs. Instead, you will need to run the separate Maintenance function in the Restaurant module. Use these options if you would like this function to be run automatically, again as described above.
- Cash Up Interval, Run Cash Up Maintenance
- The 'Cash Up' Maintenance function will create a Cash Event that records the emptying of a specified Till Drawer (i.e. the removal of the cash, cheques, credit card payments, etc to the safe or bank), close the current work session for the Till Drawer (if you are using work sessions) and create and mark as OK a POS Balance. This POS Balance record will cause a Nominal Ledger Transaction to be created for the day's sales and Cash Events. You should run the 'Cash Up' function regularly (e.g. at the end of every day).
- If you would like the 'Cash Up' function to be run automatically, select the Run Cash Up Maintenance option, and specify in the Cash Up Interval field how frequently you would like this to happen. Use the 24-hour clock in the Cash Up Interval field: for example, enter "02:00:00" if you would like the Maintenance function to be run every two hours. You must specify an interval, otherwise the function will not be run.
- When choosing the interval, remember that the 'Cash Up' function will close work sessions for each till (if you are using work sessions). You may need to ensure that when the function is run automatically, it is at a time when closing sessions will not cause too much disruption. If you have live-sync tills that are likely to be operating for long periods while disconnected from the server, take care as well that the automatic running of the function does not close sessions for those tills before they have sent their POS Invoices and Bar Tabs to the server.
- After changing this field and/or check box, you will need to restart the server for the changes to take effect.
- If you would like the 'Cash Up' function to be run automatically, select the Run Cash Up Maintenance option, and specify in the Cash Up Interval field how frequently you would like this to happen. Use the 24-hour clock in the Cash Up Interval field: for example, enter "02:00:00" if you would like the Maintenance function to be run every two hours. You must specify an interval, otherwise the function will not be run.
- Require Open Session
- You can organise your POS work into work sessions. Usually, a work session will be a working day, but it can be any period up to the next time you need to run your cash up routines.
- The first time you use a Till Drawer, you must open a work session. This will lock the Drawer to the till, so that the Drawer will be assigned to each POS Invoice entered on the till. If you do not lock the Drawer to the till, POS Invoices entered on the Machine may be assigned to the wrong Drawer or may not be assigned to a Drawer at all and so will not be included in the cash up routines.
- After the initial opening and closing of a work session for each Till Drawer, it is not then necessary to continue opening and closing sessions on all tills. If you intend to use work sessions, you should select this option, in order to make sure that sessions are used on all tills. You will then be prevented from saving Sales Ledger and POS Invoices and Cash Events if you have not opened a session. If you intend to use work sessions but do not select this option, you risk saving Invoices and Cash Events when tills are not in open session, and these Invoices and Cash Events may excluded from the cashing up routines.
- If you would like to override this option on a particular till, you can do so in the Tab Item Group register in the User Settings module.
- The first time you use a Till Drawer, you must open a work session. This will lock the Drawer to the till, so that the Drawer will be assigned to each POS Invoice entered on the till. If you do not lock the Drawer to the till, POS Invoices entered on the Machine may be assigned to the wrong Drawer or may not be assigned to a Drawer at all and so will not be included in the cash up routines.
- Item Pictures on Cashier Screen
- Use these options to specify whether Item pictures should be shown to cashiers in the POS Invoice window. Selecting "Default" or "On" will enable the feature. You can then decide whether the feature will be used on an individual till or cash machine by selecting the Item Pictures in POS Invoices option on the 'POS' card in the Local Machine setting on that till (or, if a till has a live-sync connection to the server, in the record for the till in the Local Settings setting in the Technics module). Please refer to the description of the Item Pictures in POS Invoices option here for more details.
- Item Pictures on Customer Screen
- Use these options to specify whether Item pictures should be shown to Customers on the customer display. If a till or cash machine has two built-in displays, one for cashiers and one for customers, you should first select the Use Customer Display option in the Local Machine setting if you would like Items to be listed on the customer display as the cashier adds them to a POS Invoice. If a till has a live-sync connection to the server, select the Use Customer Display option in the record for the till in the Local Settings setting in the Technics module. Then, choose "Default" or "On" from this set of options if you would like Item pictures to be displayed on the customer display as well.
- Default Field on New Invoice
- These options allow you to specify which field should be the active one whenever you create a new Sales Ledger Invoice (i.e. which field should contain the insertion point in new Sales Ledger Invoices). If you choose the "Default" option, Customer will be the active field. If you choose the "Item" or "Serial No." option, the relevant field in the first row in the matrix will be active.
Settings related to Point of Sales:
- Introduction
- Baggers
- Cash Events
- Credit Card Types
- Default Payment Modes
- Drawers
- Dynamic Barcode
- Fields for Creating New Customers
- Fiscal Printer Reports
- Gift Voucher Settings
- Gift Voucher Types
- Gift Vouchers Issued
- Gift Vouchers Received
- Gift Vouchers Sold
- Local Machine
- Local Machine Payment Modes
- Local Machine Serial Port Devices
- Local Machines
- Local Settings
- Login Options
- Login Shortcuts
- Loyalty Card Membership Level Structure
- Loyalty Card Membership Levels
- Loyalty Points, Loyalty Points per Location
- Loyalty Points Redemption, Loyalty Points Redemption Per Location
- Merchant ID
- Modifiers
- Number Series - Cash Events
- Number Series - Coupons
- Number Series - Gift Vouchers
- Number Series - Gift Vouchers Received
- Number Series - POS Balances
- Number Series - POS Invoices
- Number Series - POS Sessions
- Payment Currencies
- Payment Gateways
- POS Balances
- POS Button Groups
- POS Button Pictures
- POS Buttons
- POS Commands
- POS Sessions
- POS Settings
- Receipt Printer Texts, Receipt Printer Texts per Machine
- Split Items
- Supervisors
- Synchronised Number Series
- Tab Item Groups
- Home page for Point of Sales manual
- Home page for Standard ERP manual
Receipt Printer Texts, Receipt Printer Texts per Machine
If you will use serial receipt printers to print receipts from Sales Ledger and POS Invoices and Bar Tabs, you can use the Receipt Printer Texts setting to enter standard texts that will be printed on each receipt.The Receipt Printer Texts setting allows you to enter texts that will be printed from every till and cash machine. If you need different texts to be printed from a particular till, create a record for that till in the Receipt Printer Texts per Machine setting. Both settings are located in the Point of Sales module. Please refer here for more details about receipt printers.
You can also use these settings to enter the text that will be shown on any pole displays that are attached to the tills.
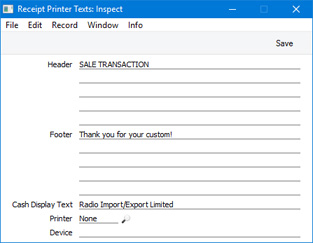
- Header, Footer
- Use these fields to compose the texts that will be printed on receipts when they are printed on receipt printers.
- When composing the header text, bear in mind that receipts printed by the Axiohm A777, EpsonTM-T88II and Epson TM-U210 printers will include your company name, address, company and VAT registration numbers, telephone and fax numbers and web address, all taken from the Company Info setting. Receipts printed by the CHD 6800 will only include your company name.
- When composing the footer text, note that at the end of each receipt printed by the Axiohm A777 and Epson TM-T88II printers, the text "This serves as an OFFICIAL RECEIPT" and "Thank you for shopping" will be printed on separate lines. Receipts printed by the CHD 6800 will only include the text "Thank you for shopping". Receipts printed by the Epson TM-U210 have no pre-defined end texts.
- When composing the header text, bear in mind that receipts printed by the Axiohm A777, EpsonTM-T88II and Epson TM-U210 printers will include your company name, address, company and VAT registration numbers, telephone and fax numbers and web address, all taken from the Company Info setting. Receipts printed by the CHD 6800 will only include your company name.
- Cash Display Text
- Use this field to enter a message that you would like to be shown on screen and on pole displays when a cashier creates the first POS Invoice of their work session. This text could be the name of your shop or a seasonal message.
- The message that will be displayed in this situation will be chosen as follows:
- If there is a record in the Receipt Printer Texts per Machine setting for a particular till, the Cash Display Text in that record will be used. If the Cash Display Text field in that record is empty, then no message will be displayed.
- If there is no record in the Receipt Printer Texts per Machine setting for a particular till, the Cash Display Text in the Receipt Printer Texts setting will be used.
- If the Cash Display Text field in the Receipt Printer Texts setting is empty, the text "Standard ERP" will be used.
As well as entering a message as described above, you must have selected the Use Cash Display option on the 'POS’ card of the Local Machine setting (or, if a till has a live-sync connection to the server, in the record for the till in the Local Settings setting in the Technics module) in order for the message to be displayed.
- The message can be up to 40 characters long. However, if you have attached pole displays to your tills, a shorter limit may be imposed by the pole display. Depending on the model of the pole display, it may be that the message will only be displayed on the first line, imposing a limit of 19 or 20 characters. Please refer here for more details about attaching pole displays to tills.
- The sequence of messages that will be displayed in POS Invoices and on pole displays is as follows:
- When a cashier opens their first new POS Invoice, the message will be selected as described above, providing you are using the Use Cash Display option on the till in question.
- As the cashier adds Items to the POS Invoice, each Item Number, Description, Quantity, Unit Price and Sum will be displayed.
- When the cashier adds a payment, the amount owing will be displayed.
- When the cashier finishes the POS Invoice, a new POS Invoice will be opened. The amount of change from the previous POS Invoice will be displayed.
- The message that will be displayed in this situation will be chosen as follows:
---
Settings related to Point of Sales:
- Introduction
- Baggers
- Cash Events
- Credit Card Types
- Default Payment Modes
- Drawers
- Dynamic Barcode
- Fields for Creating New Customers
- Fiscal Printer Reports
- Gift Voucher Settings
- Gift Voucher Types
- Gift Vouchers Issued
- Gift Vouchers Received
- Gift Vouchers Sold
- Local Machine
- Local Machine Payment Modes
- Local Machine Serial Port Devices
- Local Machines
- Local Settings
- Login Options
- Login Shortcuts
- Loyalty Card Membership Level Structure
- Loyalty Card Membership Levels
- Loyalty Points, Loyalty Points per Location
- Loyalty Points Redemption, Loyalty Points Redemption Per Location
- Merchant ID
- Modifiers
- Number Series - Cash Events
- Number Series - Coupons
- Number Series - Gift Vouchers
- Number Series - Gift Vouchers Received
- Number Series - POS Balances
- Number Series - POS Invoices
- Number Series - POS Sessions
- Payment Currencies
- Payment Gateways
- POS Balances
- POS Button Groups
- POS Button Pictures
- POS Buttons
- POS Commands
- POS Sessions
- POS Settings
- Receipt Printer Texts, Receipt Printer Texts per Machine
- Split Items
- Supervisors
- Synchronised Number Series
- Tab Item Groups
- Home page for Point of Sales manual
- Home page for Standard ERP manual
Split Items
The Split Items setting allows you to sell Items in packs and for cashiers to be able to split those packs so that the contents can also be sold in smaller quantities.For example, you may sell light bulbs individually and in boxes of four. If there are no individual light bulbs on the shelf, a cashier will be able to open a box if a Customer only needs to purchase a single unit.
The Split Items setting is where you should establish the relationship between the pack and the smaller unit. Both the pack and the smaller unit should exist as separate Items in the Item register.
To work with the Split Items setting, first ensure you are in the Point of Sales module using the [Switch Module] button in the Navigation Centre. Then, if you are using Windows or Mac OS X, click the [Settings] button, also in the Navigation Centre and double-click 'Split Items' in the resulting list. If you are using iOS or Android, select 'Settings' from the Tools menu (with 'wrench' icon) and tap 'Split Items' in the 'Settings' list. The 'Split Items: Inspect' window opens, listing the Split Item records that you have already created. Double-click one to modify it or select 'New' from the Create menu (Windows/Mac OS X) or + menu (iOS/Android) to create a new record: configure it as appropriate and as described below. When the record is complete, click the [Save] button (Windows/Mac OS X) or tap √ (iOS/Android) to save.
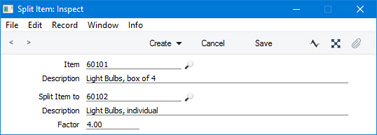
- Item
- Paste Special
Item register
- Enter the Item Number of the larger Item (i.e. the pack). The Item Description will be brought in to the Description field below.
- Split Item to
- Paste Special
Item register
- Enter the Item Number of the smaller Item (i.e. the Item that can be removed from the pack). The Item Description will be brought in to the Description field below.
- Factor
- Specify here how many of the smaller Item are contained in the larger Item. In the example illustration, a box contains four light bulbs, so the Factor is 4.
When you sell a constituent unit in a POS Invoice, subsequently running the 'Update Stock' Maintenance function will cause stock levels to be updated as follows:
- If you hold stock of the constituent unit, its stock level will be reduced by the quantity sold.
- If you do not hold stock of the constituent unit, the relevant quantity of the boxes or packages will be broken up. In other words, the relevant number of units of the box or package Item will be removed from stock and the constituent units will be added to stock. The stock level of the constituent unit will then be reduced by the quantity sold.
If a Customer hands a box or package to a cashier to ask the cashier to break into the package, the cashier needs to be careful only to scan the constituent unit, not the box or package as well. Scanning the box or package will mean that the 'Update Stock' function will remove the box or package from stock twice, because it will assume that the cashier scanned the box or package to sell it, not to break it up. It will then remove a second box or package from stock when it processes the constituent unit, if there are no constituent units in stock.
It is possible to add a "Split Item" button to the POS Invoice window, but in most circumstances this is not recommended because the process described above is more efficient and assumes less knowledge on the part of the cashiers. If you add a "Split Item" button to the POS Invoice window, cashiers can then scan the box or package, click or touch the "Split Item" button to break the Item up and then scan the smaller Item. However, if you do not have any of the constituent unit in stock, the 'Update Stock' function will still remove a box or package from stock automatically. The result will be that too many boxes or packages will be broken up and too many constituent units added to stock. In other words, the cashier will need to know that they should only use the "Split Item" button if there are already some constituent units in stock, and this is knowledge that they probably won't have.
Note that you can only use Split Items in POS Invoices, not in Bar Tabs. The 'Update Stock' function in the Restaurant module is not the same as the 'Update Stock' function in the Point of Sales module, and doesn't support Split Items.
---
Settings related to Point of Sales:
- Introduction
- Baggers
- Drawers
- Dynamic Barcode
- Fields for Creating New Customer
- Gift Vouchers Settings
- Gift Voucher Types
- Gift Vouchers Issued
- Gift Vouchers Received
- Gift Vouchers Sold
- Local Machine Payment Modes
- Local Machines
- Loyalty Card Membership Level Structure
- Loyalty Card Membership Levels
- Loyalty Points, Loyalty Points per Location
- Loyalty Points Redemption, Loyalty Points Redemption Per Location
- Modifiers
- Number Series - Gift Vouchers
- Number Series - Gift Vouchers Received
- Number Series - POS Balances
- Payment Currencies
- POS Balances
- POS Button Groups
- POS Button Pictures
- POS Buttons
- Split Items
- Supervisors
- Synchronised Number Series
- Home page for Point of Sales manual
- Home page for Standard ERP manual
Supervisors
If you add a "Supervisor Search" button to the POS Invoice window, cashiers will be able to change the Supervisor in an individual POS Invoice. The "Supervisor Search" button will open a list of Supervisors from which they can choose the correct one. The list of Supervisors will be taken from this setting. The cashier will not be able to choose someone who is not listed in this setting. This button is described here.If you need a default Supervisor to be assigned to each new POS Invoice, specify the Supervisor's Signature on the 'POS' card in the Local Machine setting and select the Default Bagger and Supervisor on POS Invoice option. You will need to do this individually on each till and cash machine (or, for tills that have live-sync connections to the server, in the records for each till in the Local Settingssetting in the Technics module).
To list Supervisors, ensure you are in the Point of Sales module using the [Switch Module] button in the Navigation Centre. Then, if you are using Windows or macOS, click the [Settings] button, also in the Navigation Centre. When the 'Settings' list opens, double-click 'Supervisors'. If you are using iOS or Android, select 'Settings' from the Tools menu (with 'wrench' icon) and tap 'Supervisors' in the 'Settings' list. The 'Supervisors: Inspect' window opens: configure it as appropriate and as described below. When the record is complete, click the [Save] button (Windows/macOS) or tap √ (iOS/Android) to save.
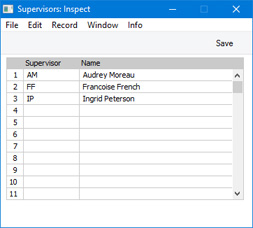
- Supervisor
- Paste Special
Person register, System module and Global User register, Technics module
- Enter the Signatures of the Supervisors, or choose them from the Person or Global User registers using 'Paste Special'.
- If cashiers will be able to change Supervisors while entering POS Invoices, it is recommended that you use numeric codes as Signatures. The window that the cashiers will use to choose Supervisors has a numeric keypad that can be used from a touch screen.
- To make it easy for cashiers to find the Supervisors that they need, it is recommended that you enter Supervisors in numeric and/or alphabetical order, as shown in the illustration. If you need to insert a row to maintain this order, click on the row number where the insertion is to be made and press the Return key (Windows/Mac OS X) or long tap on a row number and select 'Insert Row' (iOS/Android). When cashiers come to choose a Supervisor using the 'Paste Special' function, the Supervisors will be shown in the selection list in the order that you have listed them here.
- If cashiers will be able to change Supervisors while entering POS Invoices, it is recommended that you use numeric codes as Signatures. The window that the cashiers will use to choose Supervisors has a numeric keypad that can be used from a touch screen.
- Name
- The Name of the Supervisor will appear here after you have entered their Signature in the Supervisor field on the left.
Settings related to Point of Sales:
- Introduction
- Baggers
- Drawers
- Dynamic Barcode
- Fields for Creating New Customer
- Gift Vouchers Settings
- Gift Voucher Types
- Gift Vouchers Issued
- Gift Vouchers Received
- Gift Vouchers Sold
- Local Machine Payment Modes
- Local Machines
- Loyalty Card Membership Level Structure
- Loyalty Card Membership Levels
- Loyalty Points, Loyalty Points per Location
- Loyalty Points Redemption, Loyalty Points Redemption Per Location
- Modifiers
- Number Series - Gift Vouchers
- Number Series - Gift Vouchers Received
- Number Series - POS Balances
- Payment Currencies
- POS Balances
- POS Button Groups
- POS Button Pictures
- POS Buttons
- Split Items
- Supervisors
- Synchronised Number Series
- Home page for Point of Sales manual
- Home page for Standard ERP manual
Synchronised Number Series
Each time you create a POS Invoice on a desktop client or on a till with a live connection to the server, the Invoice Number of that POS Invoice will be determined by the Number Series - POS Invoices setting, a setting that is stored in the main server database. This setting will send the first unused Invoice Number to the desktop client or live till, ensuring that a particular Invoice Number is only used once. This also ensures that all POS Invoices will have Numbers from the same sequence, irrespective of the machine on which they were created.This method of determining the Invoice Numbers of new POS Invoices cannot be used for POS Invoices created on tills with live-sync connections to the server. At the moment when you create a POS Invoice on a live-sync till, that till might not be connected to the server and so will not be able to refer to the Number Series - POS Invoices setting on the server for the next Invoice Number. An alternative method of ensuring the uniqueness of Invoice Numbers is therefore required, and is provided by the Synchronised Number Series setting.
When a live-sync till logs in to the server for the first time, a batch of unused Invoice Numbers will be sent to that till from the Synchronised Number Series setting on the server. This batch of Invoice Numbers will be stored in the Number Series - POS Invoices setting on that till, and will be used when new POS Invoices are created. When the batch of numbers has been used up, another batch will be sent to the till from the server.
In configuring the Synchronised Number Series setting, you should specify the first Invoice Number to be used, you should specify how large each batch should be, and you should specify when the next batch should be sent.
As an example, you might specify that the first Invoice Number to be used is 1000, the size of the batch is 50 and the next batch should be sent when there are 20 free numbers left. When the first live-sync till logs in, numbers 1000-1049 will be sent to its Number Series - POS Invoices setting. The second live-sync till to log in will receive 1050-1099, the third one will receive 1100-1149 and so on. If the second till is the fastest at raising Invoices, it will reach the point of requiring a new batch most quickly (when it reaches Invoice 1080) and it will then receive the next 50 available numbers, 1150-1199.
Once you have configured the Synchronised Number Series setting in this way and after the first live-sync till has logged in, you cannot change the start point of the number sequence. In this example, the sequence began with Invoice Number 1000 and continued from there. You will, for example, not be able to change to a sequence beginning with 10000 at the beginning of the next financial year. Instead, once it has started, the sequence will continue automatically ad infinitum from its original start point of 1000. This is to remove the possibility of using the same Invoice Number more than once. You can however change at any time the size of the batch and the point at which the next batch will be sent.
If you also have desktop clients or tills with live connections to the server, you should take care when configuring the Synchronised Number Series setting. As mentioned in the previous paragraph, once the Synchronised Number Series has been initiated by the first live-sync till, you can't interrupt it or set a new start point. Therefore, it is recommended that you start the Synchronised Number Series from a relatively high number, and use lower numbers in the Number Series - POS Invoices setting on the server. As a result, the desktop clients and live tills will create POS Invoices with relatively low Invoice Numbers, and the live-sync tills will create POS Invoices with relatively high Invoice Numbers. If the live-sync tills will create POS Invoices with lower numbers, there is a risk that they will eventually catch up with old Invoices created by the live tills, resulting in duplicate Invoice Numbers.
This description has so far described using the Synchronised Number Series setting to generate Invoice Numbers for POS Invoices. You should also use this setting to generate unique identifying numbers for Cash Events, Credit Card Slips, Deferred CC Transactions, Gift Receipts, Gift Vouchers Issued and Received and POS Sessions (i.e. records that will be created on live-sync clients where there should be no possibility of the same identifying number being used more than once).
If you do not define a Synchronised Number Series for a particular register, tills will usually not be able to send records in that register to the server. For example, if you do not define Synchronised Number Series for POS Sessions, the first till on which a session was opened will send POS Session record number 1 to the server. The second till will then try to send its own POS Session record number 1 to the server. This attempt will fail, because a POS Session record number 1 already exists. If you had defined Synchronised Number Series for POS Sessions, the POS Session record created on the second till would not have been given the number 1.
If you are using Synchronised Number Series for live-sync tills, you must also use the standard Number Series settings for the live tills (Number Series - POS Invoices, Number Series - POS Sessions, etc). For example, if you leave the Number Series - POS Invoices setting empty, a POS Invoice that is entered on a live till will be assigned an Invoice Number that follows on from the last Invoice entered. In this context, the last Invoice entered is the one with the highest Invoice Number, which is likely to be one that was sent to the server from a live-sync till. If you enter a POS Invoice on a live till, it will therefore "steal" an Invoice Number from the sequence assigned to a live-sync till. The next Invoice created on that live-sync till will therefore have a duplicate Invoice Number, so it won't be possible to send that Invoice to the server.
Also, if you are using Synchronised Number Series for live-sync tills, you must not specify a number sequence for POS Invoices on the 'Number Series' card of the Person record for any user who will enter POS Invoices on live-sync tills. If you do, the user in question will not be able to save any POS Invoices on live-sync tills because an Invoice will try to take its Number from the sequence specified in their Person record. This Invoice Number will probably not be inside the sequence in the Number Series - POS Invoices setting on the till in question.
The Synchronised Number Series setting is in the Technics module. Working on a desktop client before any live-sync tills have logged into the server, change to this module using the [Switch Module] button in the Navigation Centre or the Ctrl-0 (zero)/⌘-0 keyboard shortcut. Then, if you are using Windows or Mac OS X, click the [Settings] button in the Navigation Centre, and then double-click 'Synchronised Number Series' in the 'Settings' list. If you are using iOS or Android, select 'Settings' from the Tools menu (with 'wrench' icon) and tap 'Synchronised Number Series' in the 'Settings' list. When the 'Synchronised Number Series: Browse' window opens, select 'New' from the Create menu (Windows/Mac OS X) or + menu (iOS/Android) to create a new record, or double-click an existing record to modify it. When the record is complete, click the [Save] button (Windows/Mac OS X) or tap √ (iOS/Android) to save it, or click [Cancel] or tap < to discard all changes.
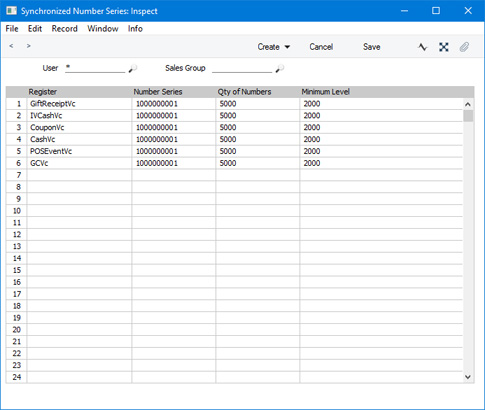
- User
- Paste Special
Person register, System module and Global User register, Technics module
- Sales Group
- Paste Special
Sales Groups setting, System module
- Use these fields to assign different Number Series specifications to different users.
- You cannot leave the User field empty. Instead, you should enter * to mean "all users". In many cases, it will be sufficient to enter a single record in this setting, with * as the User and a blank Sales Group. This will apply the same settings to all users and is the recommended configuration.
- If you need different settings for some users, an example configuration might be to have three records in the Synchronised Number Series setting as follows:
User Sales Group SJ (blank) * 1 * (blank)
On synchronisation, SJ's till will receive number series determined by the first record. Users belonging to Sales Group 1 will receive number series determined by the second record. All other users will receive number series determined by the third record.
- If you have defined different number sequence start points in these records, they will be ignored once the first till has logged in. However, the batch sizes and minimum levels will be applied as specified, and you will be able to change these at any time.
- To illustrate this, and continuing the example, the three records might contain the following specifications for POS Invoices:
No. Srs Qty Min Level 1000 1000 500 2000 2000 1000 3000 3000 1500
If the first user to log in belongs to Sales Group 1, their till will receive 2000-3999. SJ's till on logging in next will receive 4000-4999. This follows on from the previous till and therefore ignores the 1000 in SJ's Number Series field, but it obeys the 1000 in their Qty of Numbers field. - You cannot leave the User field empty. Instead, you should enter * to mean "all users". In many cases, it will be sufficient to enter a single record in this setting, with * as the User and a blank Sales Group. This will apply the same settings to all users and is the recommended configuration.
- Register
- Paste Special
Choices of possible entries
- Choose a register using 'Paste Special'. You should enter rows for the following registers:
- GiftReceiptVc
- Gift Receipts
- IVCashVc
- POS Invoices
- CouponVc
- Credit Card Slips
- POSEventVc
- POS Sessions
- CashVc
- Cash Events
- GCRVc
- Gift Vouchers Received
- GiftReceiptVc
- Number Series
- The start point of the number sequence. Changing this number in any Synchronised Number Series record after at least one live-sync till has logged in will have no effect.
- Qty of Numbers
- Specify here the size of the batch of numbers that is to be sent to the live-sync tills when needed.
- It is recommended that you use fairly large batch sizes, for two reasons:
- The batch size should be large enough to cover periods when the server is not available. For example, if it is possible that the server might not be available for three days, the batch should be large enough to allow the tills to create records for at least three days.
- Small batch sizes will mean that it will be necessary for new batches to be sent to the tills very frequently. Filling the Number Series settings on those tills with many rows may eventually have a detrimental effect on performance.
- It is recommended that you use fairly large batch sizes, for two reasons:
- Minimum Level
- Specify here the point at which the next batch of numbers is to be sent to a live-sync till. For example, if the Qty of Numbers is 5000 and the Minimum Level is 2000, 5000 numbers will be sent to each till. When a particular till has used 3000 of those numbers and therefore has 2000 remaining, the next batch of 5000 will be sent.
---
Settings related to Point of Sales:
- Introduction
- Baggers
- Drawers
- Dynamic Barcode
- Fields for Creating New Customer
- Gift Vouchers Settings
- Gift Voucher Types
- Gift Vouchers Issued
- Gift Vouchers Received
- Gift Vouchers Sold
- Local Machine Payment Modes
- Local Machines
- Loyalty Card Membership Level Structure
- Loyalty Card Membership Levels
- Loyalty Points, Loyalty Points per Location
- Loyalty Points Redemption, Loyalty Points Redemption Per Location
- Modifiers
- Number Series - Gift Vouchers
- Number Series - Gift Vouchers Received
- Number Series - POS Balances
- Payment Currencies
- POS Balances
- POS Button Groups
- POS Button Pictures
- POS Buttons
- Split Items
- Supervisors
- Synchronised Number Series
- Home page for Point of Sales manual
- Home page for Standard ERP manual
Tab Item Groups
The Tab Item Group register in the User Settings module contains various options that determine how each till or cash machine will behave.Unlike most settings and registers in the User Settings module, Tab Item Groups are stored in the database on the server. You should enter a separate record to this register for each till or cash machine.
Note that the Tab Item Group register is not synchronised. So, it will not be sent to any tills with live-sync connections that you may have in your network. You will therefore need to fill in this register separately on each live-sync client.
To edit the Tab Item Group register, ensure you are in the User Settings module and open the list of registers from the Navigation Centre. Then double-click (Windows/Mac OS X) or tap (iOS/Android) 'Tab Item Groups' in the resulting list. The 'Tab Item Groups: Browse' window opens, listing the records that are already in the register:
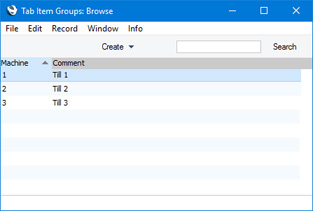
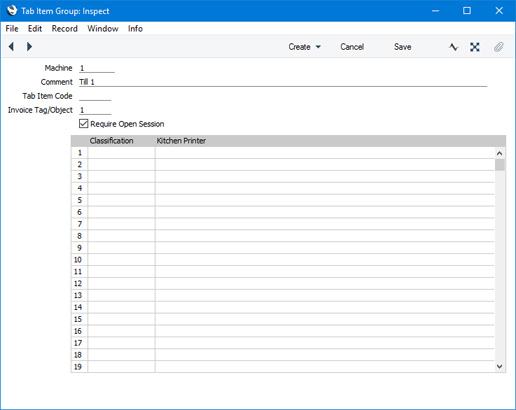
- Machine
- Paste Special
Local Machines setting, Point of Sales/Restaurant/Technics module
- Enter the Local Machine Code of the till or cash machine to which the Tab Item Group record is to apply. Only one record can be entered for each till.
- Comment
- Enter a descriptive comment for the Tab Item Group record, to be shown in the 'Item Groups for Machines: Browse' window.
- Tab Item Code
- Paste Special
Item register
- If you have added an "On Hotel Guest Account" button to the POS Invoice and/or Bar Tab windows, cashiers and waiters will be able to charge a POS Invoice and/or a Bar Tab to a Hotel Reservation. The value of the POS Invoice or Bar Tab will be added to the room account, and from there to overall Invoice for the room.
- By default, the "On Hotel Guest Account" button will copy the Items from a POS Invoice or Bar Tab to the Hotel Reservation, so that they are listed individually on the room account. However, if you specify an Item in this field on a particular till or cash machine, the "On Hotel Guest Account" button will add a single line to the room account with the Item Number and Name and the total value of the POS Invoice or Bar Tab.
- By default, the "On Hotel Guest Account" button will copy the Items from a POS Invoice or Bar Tab to the Hotel Reservation, so that they are listed individually on the room account. However, if you specify an Item in this field on a particular till or cash machine, the "On Hotel Guest Account" button will add a single line to the room account with the Item Number and Name and the total value of the POS Invoice or Bar Tab.
- Invoice Tag/Object
- Paste Special
Tag/Object register, Nominal Ledger/System module
- If you specify a Tag/Object here, it will be copied to all Sales Ledger and POS Invoices entered on the till or client machine. You can only specify one Tag/Object for each till.
- When Nominal Ledger Transactions are generated from Sales Ledger Invoices, the Tag/Object specified here will be assigned to the credit postings to the Sales and VAT/tax Account(s), the debit posting to the Cost Account (if you are using cost accounting), and the debit posting to the Debtor Account (if you are using the Tags/Objects on Debtor Account option in the Account Usage S/L setting).
- When Nominal Ledger Transactions are generated from POS Invoices (through POS Balances), the Tag/Object specified here will be assigned to the credit postings to the Sales and VAT/Tax Account(s) and the debit posting to the Cash or other Account (i.e. the Account from the Payment Mode).
- When Nominal Ledger Transactions are generated from Sales Ledger Invoices, the Tag/Object specified here will be assigned to the credit postings to the Sales and VAT/tax Account(s), the debit posting to the Cost Account (if you are using cost accounting), and the debit posting to the Debtor Account (if you are using the Tags/Objects on Debtor Account option in the Account Usage S/L setting).
- Require Open Session
- Default taken from
POS Settings
- You can organise your POS work into work sessions. Usually, a work session will be a working day, but it can be any period up to the next time you need to run your cash up routines.
- The first time you use a Till Drawer, you must open a work session. This will lock the Drawer to the till, so that the Drawer will be assigned to each POS Invoice entered on the till. If you do not lock the Drawer to the till, POS Invoices entered on the Machine may be assigned to the wrong Drawer or may not be assigned to a Drawer at all and so will not be included in the cash up routines.
- After the initial opening and closing of a work session for each Till Drawer, it is not then necessary to continue opening and closing sessions on all tills. If you intend to use work sessions, you should select the Require Open Session option, in order to make sure that sessions are used on all tills. You will then be prevented from saving Sales Ledger and POS Invoices and Cash Events if you have not opened a session. If you intend to use work sessions but do not select this option, you risk saving Invoices and Cash Events when tills are not in open session, and these Invoices and Cash Events may excluded from the cashing up routines.
- You can choose whether to use the Require Open Session option at a global level in the POS Settings setting. If you would like to override this option on a particular till or client machine, select this option in the Tab Item Group record for that till.
- The first time you use a Till Drawer, you must open a work session. This will lock the Drawer to the till, so that the Drawer will be assigned to each POS Invoice entered on the till. If you do not lock the Drawer to the till, POS Invoices entered on the Machine may be assigned to the wrong Drawer or may not be assigned to a Drawer at all and so will not be included in the cash up routines.
Settings related to Point of Sales:
- Introduction
- Baggers
- Cash Events
- Credit Card Types
- Default Payment Modes
- Drawers
- Dynamic Barcode
- Fields for Creating New Customers
- Fiscal Printer Reports
- Gift Voucher Settings
- Gift Voucher Types
- Gift Vouchers Issued
- Gift Vouchers Received
- Gift Vouchers Sold
- Local Machine
- Local Machine Payment Modes
- Local Machine Serial Port Devices
- Local Machines
- Local Settings
- Login Options
- Login Shortcuts
- Loyalty Card Membership Level Structure
- Loyalty Card Membership Levels
- Loyalty Points, Loyalty Points per Location
- Loyalty Points Redemption, Loyalty Points Redemption Per Location
- Merchant ID
- Modifiers
- Number Series - Cash Events
- Number Series - Coupons
- Number Series - Gift Vouchers
- Number Series - Gift Vouchers Received
- Number Series - POS Balances
- Number Series - POS Invoices
- Number Series - POS Sessions
- Payment Currencies
- Payment Gateways
- POS Balances
- POS Button Groups
- POS Button Pictures
- POS Buttons
- POS Commands
- POS Sessions
- POS Settings
- Receipt Printer Texts, Receipt Printer Texts per Machine
- Split Items
- Supervisors
- Synchronised Number Series
- Tab Item Groups
- Home page for Point of Sales manual
- Home page for Standard ERP manual