Introduction to the Employment Contracts register
Whenever you hire an Employee, you should create an Employment Contract. The Contract should contain the terms and conditions that have been agreed between the company and the Employee, such as Salary, Leave Scheme, Job Title, Start Date and End Date (if the Contract is fixed term and this is known in advance). You will be able to print the Contract and, when both parties have signed it, you should mark it as OK so that no further changes are possible. If you to change one or more provisions (e.g. the Employee's salary is increased and/or their Job Title changes because of a promotion), you should register an Employment Contract Change against the Contract.---
The Employment Contract register in Standard ERP:
- Introduction
- Entering an Employment Contract
- Printing an Employment Contract
- Operations menu
- Create menu
- Registering an Employment Contract Change
- Home page for Human Resources Management manual
- Home page for Standard ERP manual
Entering an Employment Contract
To open the Employment Contract register, first ensure you are in the Human Resources Management module. Then, if you are using Windows or Mac OS X, click the [Registers] button in the Navigation Centre and then double-click 'Employment Contracts' in the resulting list. If you are using iOS or Android, tap the [Registers] button in the Navigation Centre and then tap 'Employment Contracts' in the 'Registers' list. The 'Employment Contracts: Browse' window will be opened, listing the Employment Contracts that you have already entered.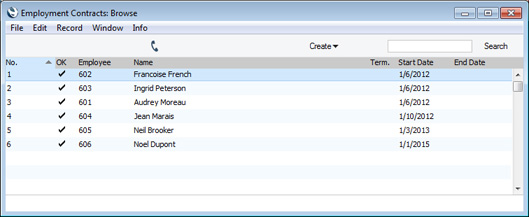
To enter a new Employment Contract, select 'New' from the Create menu (Windows/Mac OS X) or the + menu (iOS/Android). You can also use the Ctrl-N (Windows) or ⌘-N (Mac OS X) keyboard shortcut. Alternatively, highlight or open an Employment Contract similar to the one you want to enter, and select 'Duplicate' from the same menu. If you don't want to open the 'Employment Contracts: Browse' window before creating a new record, you can also use the + menu in the Navigation Centre (all platforms).
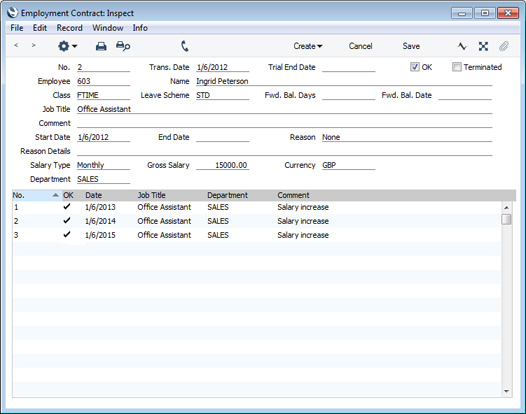
The 'Employment Contract: New' window will be opened, empty if you selected 'New' or containing a duplicate of the highlighted Employment Contract. Complete the Employment Contract record as appropriate and as described below the picture, then save it using the [Save] button (Windows/Mac OS X) or by tapping √ (iOS/Android). You can then close it using the close box (Windows/Mac OS X) or by tapping < (iOS/Android). Then, close the browse window using the close box or < again.
- No.
- Paste Special
Select from another Number Series
- The unique identifying number of the Employment Contract. The default will be chosen as follows:
- It will be taken from the first valid row in the Number Series - Employment Contracts setting.
- It will be the next number following on from the last Employment Contract entered.
- You will not be able to save an Employment Contract if the No. does not belong to a valid number sequence. A valid number sequence is one for the period in which the Transaction Date of the Employment Contract falls and with unused numbers, so this problem will most usually occur at the beginning of a new calendar or financial year.
- If you are working in a multi-user system, the Employment Contract Number will be assigned when you save the Employment Contract for the first time, chosen as described above and providing you have not already specified a number yourself.
- It will be taken from the first valid row in the Number Series - Employment Contracts setting.
- Trans. Date
- Paste Special
Choose date
- The date of the Employment Contract. This will default to the date when you saved the Employment Contract for the first time.
- Trial End Date
- Paste Special
Choose date
If the Employment Contract includes a trial period, specify here the date when the trial period ends.
- If you need to review all Contracts with trial periods ending on a particular date or in a particular period, you can produce a list of such Contracts using the Employment Contract List report.
- OK
- When you have agreed the Contract with the Employee, you can mark it as OK and save it. This will prevent further changes being made to the Contract (except to the Terminated check box and the End Date, Reason and Reason Details fields). If you need to change a Contract (e.g. you need to change a Salary or Job Title), you should use the 'Employment Contract Change' function on the Create menu (Windows/Mac OS X) or + menu (iOS/Android) to create a record in the Employment Contract Change register.
- You can use Access Groups to prevent certain users from marking Employment Contracts as OK. To do this, deny them access to the 'OK Employment Contracts' Action.
- You can use Access Groups to prevent certain users from marking Employment Contracts as OK. To do this, deny them access to the 'OK Employment Contracts' Action.
- Terminated
- If you need to end a Contract, you should mark it as Terminated. You will also need to specify an End Date, Reason and Reason Details before saving. After saving, you will no longer be able to change these fields.
- Employee
- Paste Special
Employees in Employee/Contact register
- Use 'Paste Special' to choose the Employee from the Employee/Contact register.
- Name
- The Employee's Name will be brought in automatically when you enter the Employee Number.
- Class
- Paste Special
Employment Contract Classes setting, Human Resources Management module
- Enter the Employment Contract Class for the Contract (if any). Employment Contract Classes allow you to categorise Contracts for reporting or prioritising. Examples might be Permanent Positions, Temporary Positions and Fixed Term Contracts.
- Leave Scheme
- Paste Special
Leave Schemes setting, Human Resources Management module
- The Leave Schemes setting is where you should define the various holiday allowances in use in your company. Specify here the Leave Scheme that contains the holiday allowance that you are offering the Employee.
- Fwd. Bal. Days
- This field allows you to change the initial holiday allowance that you are offering the Employee. Enter an additional number of days: this can be a positive or negative figure.
- The figure that you enter here will only apply to the first leave type listed in the Leave Scheme specified above (i.e. the leave type in the first row in the Leave Scheme record). For example, if the first row in a Leave Scheme offers 28 days' paid holiday and the second row offers five days' unpaid holiday and you use the Fwd. Bal. Days field to give an Employee an extra two days' allowance, the Employee's paid holiday allowance will be extended to 30 days, but their unpaid holiday allowance will remain five days.
- The figure that you enter here will only apply to the first leave type listed in the Leave Scheme specified above (i.e. the leave type in the first row in the Leave Scheme record). For example, if the first row in a Leave Scheme offers 28 days' paid holiday and the second row offers five days' unpaid holiday and you use the Fwd. Bal. Days field to give an Employee an extra two days' allowance, the Employee's paid holiday allowance will be extended to 30 days, but their unpaid holiday allowance will remain five days.
- Fwd. Bal. Date
- Paste Special
Choose date
- Enter the date when the figure in the Fwd. Bal. Days field is to take effect.
- Job Title
- Paste Special
Job Titles setting, CRM module/Human Resources Management module
- Specify here the Job Title that is subject to the Employment Contract.
- If there is a Job Title in the Contact record for the Employee ('Comments' card), it will be copied here when you specify the Employee in the field above.
- If there is a Job Title in the Contact record for the Employee ('Comments' card), it will be copied here when you specify the Employee in the field above.
- Comment
- Use this field to record any additional comments about the Employment Contract.
- Start Date
- Paste Special
Choose date
- The date when the Employee is to start work.
- End Date
- Paste Special
Choose date
- This field can have two purposes.
- First, in a Contract for a fixed term position, you can specify the end of the term here.
- Second, you must enter an End Date if you mark a Contract as Terminated. For this reason, you can edit the End Date field in a Contract that has been marked as OK.
- First, in a Contract for a fixed term position, you can specify the end of the term here.
- Reason
- Paste Special
Choices of possible entries
- If you mark the Contract as Terminated, you must enter a reason for the termination here. You can edit this field in a Contract that has been marked as OK.
- As you must choose a pre-set Reason using 'Paste Special', you can use this field to categorise the Contract termination. You can then produce a Head Count report if you need to analyse the Reasons for each Contract termination.
- As you must choose a pre-set Reason using 'Paste Special', you can use this field to categorise the Contract termination. You can then produce a Head Count report if you need to analyse the Reasons for each Contract termination.
- Reason Details
- If you mark the Contract as Terminated, you must enter a description about the termination here. You can edit this field in a Contract that has been marked as OK.
- While you should use the Reason field above to categorise each Contract termination, you should use this field to record specific details about a particular Contract termination.
- While you should use the Reason field above to categorise each Contract termination, you should use this field to record specific details about a particular Contract termination.
- Salary Type
- Paste Special
Choices of possible entries
- Specify here whether the salary will be paid monthly, yearly, weekly or fortnightly.
- Gross Salary
- Enter the agreed salary here.
- Currency
- Paste Special
Currency register, System module
- Specify here the Currency in which the salary is to be paid.
- Department
- Paste Special
Departments setting, Human Resources Management module/Assets module/System module
- If the Employment Contract is for a position in a particular Department in your company, specify that Department here.
- Matrix
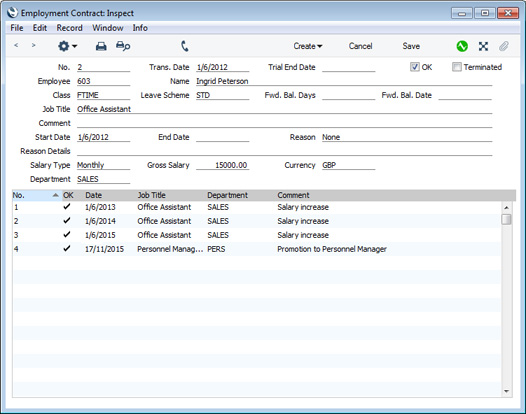
- After marking an Employment Contract as OK and saving, no further changes to the Contract will be possible (except to the Terminated check box and the End Date, Reason and Reason Details fields). If you need to change a Contract (e.g. you need to change a Salary or Job Title), you should use the 'Employment Contract Change' function on the Create menu (Windows/Mac OS X) or + menu (iOS/Android) to create a record in the Employment Contract Change register. Every Employment Contract Change that you create in this way will be listed in the matrix that occupies much of the Employment Contract window (Windows/Mac OS X only). Please refer to the description of the 'Employment Contract Change' function here for more details.
- As with all lists in Standard ERP, you can sort this one by clicking on a column heading. If you need to open a particular Employment Contract Change, double-click a line in this list.
The Employment Contract register in Standard ERP:
- Introduction
- Entering an Employment Contract
- Printing an Employment Contract
- Operations menu
- Create menu
- Home page for Human Resources Management manual
- Home page for Standard ERP manual
Printing Employment Contracts
There are two ways to print an Employment Contract.- While entering or inspecting an Employment Contract, click the Printer icon in the Button Bar or, if you want to print to screen, click the Preview icon (Windows/Mac OS X only). You can also select 'Print' from the File menu (all platforms).
- Ensure you are in the Human Resources Management module, and then:
- If you are using Windows or Mac OS X, click the [Forms] button in the Navigation Centre or use the use the Ctrl-D (Windows)/⌘-D (Mac OS X) key combination. Double-click 'Employment Contract' in the 'Forms' list window or highlight it and press the Enter key.
- If you are using iOS or Android, tap the [Routines] button in the Navigation Centre and then tap [Forms]. Tap 'Employment Contract' in the 'Forms' list window.
Enter the Employment Contract Number (or range of Employment Contract Numbers) to be printed and press [Run]. - If you are using Windows or Mac OS X, click the [Forms] button in the Navigation Centre or use the use the Ctrl-D (Windows)/⌘-D (Mac OS X) key combination. Double-click 'Employment Contract' in the 'Forms' list window or highlight it and press the Enter key.
- Design the Employment Contract Form Template using the Form Template register in the System module. Use the 'Properties' function on the Operations menu to name the Form (in this description, we have used the name "EMPL_CONT") and to assign it a Form Type of "Employment Contract". You might want to design different Form Templates for use with different Languages. Full instructions for using the Form Template register can be found in the 'System Module' manual, and a full list of the fields you can include in the Form Template design can be found here.
- Having designed the Employment Contract Form Template, you should now specify that it should be used when printing Employment Contracts. Select the Human Resources Management module using the [Switch Module] button in the Navigation Centre or the Ctrl-0 (Windows) or ⌘-0 (Mac OS X) keyboard shortcuts.
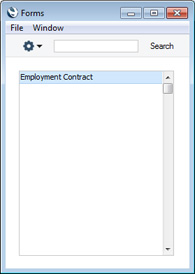
- Click the [Forms] button in the Navigation Centre or use the Ctrl-D/⌘-D key combination. The 'Forms' list window will be opened: highlight 'Employment Contract'.
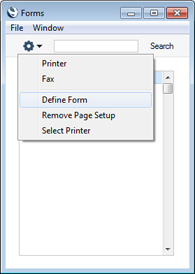
- Select 'Define Form' from the Operations menu (with "cog" icon):
- In the subsequent 'Form Definition' window, enter "EMPL_CONT" in the Form Template field in the first row (you can use 'Paste Special' to ensure the spelling is correct).
If you have designed different Form Templates for use with different Languages in step 1 above, enter the Form Template Code of each one on separate rows in the grid. In the Lang. field of each row, enter the appropriate Language. You can use 'Paste Special' to open a list of Languages from which you can choose the correct one. In the example illustrated below, we have specified in row 2 that the "EMPL_CONT_FR" Form Template will be used for French-speaking Employees (the Lang. is "FR"), and in row 1 that the "EMPL_CONT" Form Template will be used for all other Employees (the Lang. is blank). You should always have a row where the Lang. is blank, where you specify the default Form Template (to be used if an Employee's Language cannot be matched to a Form Template Language, and when an Employee doesn't have a Language).
If you only want to be able to print Employment Contracts that have been marked as OK, enter "OKed" in the Status column in every row in the 'Form Definition' window. This will prevent the printing of Employment Contracts that have not yet been marked as OK.
You can also use this feature to use a different Form Template when printing Employment Contracts that have not been marked as OK, as shown below: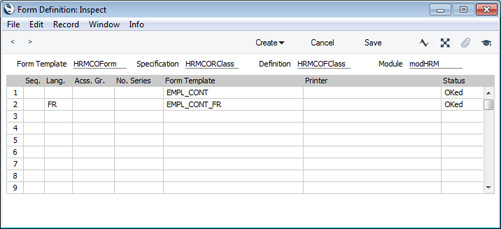
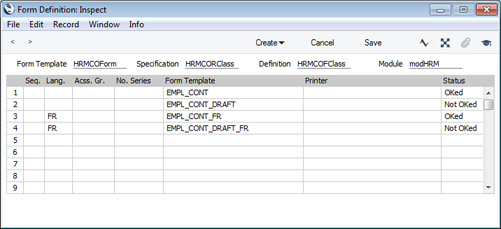
- If you need to print a document with several pages, you will need to create a separate Form Template for each page. For example, you might need to print the Contract itself (i.e. printing information from an individual Employment Contract record) together with terms and conditions. In this situation, use the Seq. column in the 'Form Definition' window:
In this example, two Form Templates will be printed: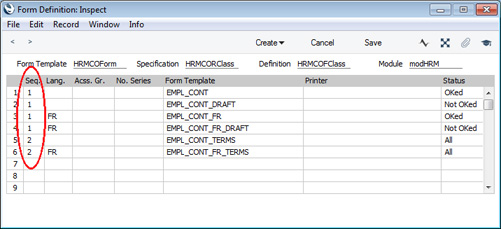
- The first Form Template to be printed will be chosen from EMPL_CONT, EMPL_CONT_DRAFT, EMPL_CONT_FR and EMPL_CONT_FR_DRAFT, depending on the Language of the Employee and on whether the Contract has been marked as OK. These four Form Templates all have "1" in the Seq. column, meaning that only one of these Form Templates will be printed depending on circumstances, and that the selected Form Template will be the first one to be printed.
- The second Form Template to be printed will be chosen from EMPL_CONT_TERMS and EMPL_CONT_FR_TERMS, depending on the Language of the Employee. These two Form Templates both have "2" in the Seq. column, meaning that only one of these Form Templates will be printed depending on circumstances, and that the selected Form Template will be the second one to be printed.
- The first Form Template to be printed will be chosen from EMPL_CONT, EMPL_CONT_DRAFT, EMPL_CONT_FR and EMPL_CONT_FR_DRAFT, depending on the Language of the Employee and on whether the Contract has been marked as OK. These four Form Templates all have "1" in the Seq. column, meaning that only one of these Form Templates will be printed depending on circumstances, and that the selected Form Template will be the first one to be printed.
- Click [Save] to save the Employment Contract Form definition. From now on, the Employment Contract Form Template that you have designed will be used when you print Employment Contracts using the 'Forms' function and the Printer icon. If you have designed more than one Form Template, the correct one will be used depending on the Language of the Employment Contract.
The Employment Contract register in Standard ERP:
- Introduction
- Entering an Employment Contract
- Printing an Employment Contract
- Operations menu
- Create menu
- Home page for Human Resources Management manual
- Home page for Standard ERP manual
Operations Menu
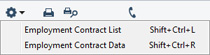
Note that in Standard ERP version 8.0, some functions that were previously on the Operations menu were moved to the Create menu (Windows/Mac OS X) or + menu (iOS/Android). This menu is described here.
Please follow these links for details about each function on the Operations menu:
The Employment Contract register in Standard ERP:
- Introduction
- Entering an Employment Contract
- Printing an Employment Contract
- Operations menu
- Create menu
- Home page for Human Resources Management manual
- Home page for Standard ERP manual
Operations Menu - Employment Contract List
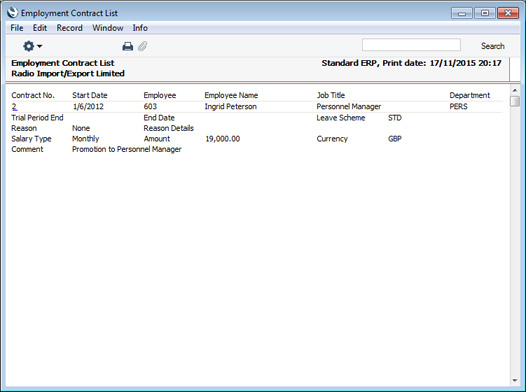
The 'Employment Contract List' command prints a report to screen summarising all aspects of the Employment Contract currently open in a record window.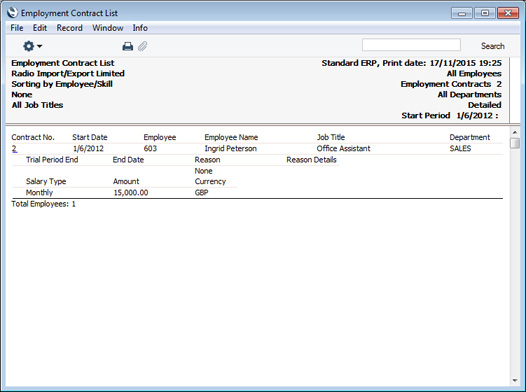
You can also produce an Employment Contract List from the [Reports] button in the Navigation Centre. Please refer here for details.
---
The Employment Contract register in Standard ERP:
- Introduction
- Entering an Employment Contract
- Printing an Employment Contract
- Operations menu, including:
- Employment Contract List
- Employment Contract Data
- Employment Contract List
- Create menu
- Home page for Human Resources Management manual
- Home page for Standard ERP manual
Operations Menu - Employment Contract Data
The 'Employment Contract Data' command prints a report to screen displaying the current provisions of the Employment Contract currently open in a record window. This includes changes that have been implemented using Employment Contract Changes (in the example illustrated below, the Salary has been changed from 15,000.00 in the original Contract to 18,000.00):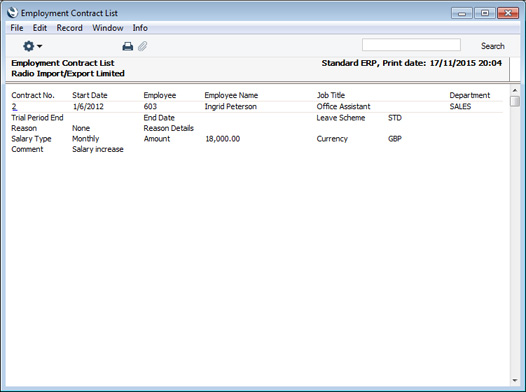
---
The Employment Contract register in Standard ERP:
- Introduction
- Entering an Employment Contract
- Printing an Employment Contract
- Operations menu, including:
- Employment Contract List
- Employment Contract Data
- Employment Contract List
- Create menu
- Home page for Human Resources Management manual
- Home page for Standard ERP manual
Create Menu
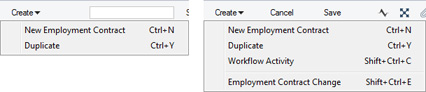
'New' and 'Duplicate' are standard functions that are provided on every Create and + menu. Use these functions to create new records, in this case in the Employment Contract register. Please follow these links for details about the other functions:
The Employment Contract register in Standard ERP:
- Introduction
- Entering an Employment Contract
- Printing an Employment Contract
- Operations menu
- Create menu
- Home page for Human Resources Management manual
- Home page for Standard ERP manual
Create Menu - Workflow Activity
The Workflow Activity function allows you to create Activities from Employment Contracts. This can be useful if, for example, you need to schedule a call to an Employee regarding a Contract, or you need to schedule a Contract review.You can also use Activities with suitable Activity Types to manage grievances and disciplinary issues. In this case it is recommended that you use the Task Manager Access setting in the System module to restrict access to the Activities, to help maintain confidentiality. You might choose to create such Activities from Employment Contracts or from Employee records.
When you select the function, the following screen appears, where you can create a new Activity:
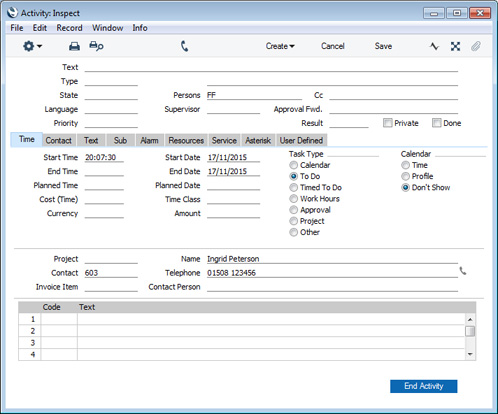
After amendment if necessary, save the record in the Activity register by clicking the [Save] button (Windows/Mac OS X) or by tapping √ (iOS/Android). You can then close it using the close box (Windows/Mac OS X) or by tapping < (iOS/Android). Alternatively, if you no longer require the Activity, remove it using the 'Delete' function on the Record menu (which has a 'cog' icon if you are using iOS or Android). In either case, you will be returned to the Employment Contract window.
The Employment Contract and the Activity will be connected to each other through the Link Manager and Workflow Manager. When reviewing the Activity, you can return to the Employment Contract quickly and easily using the Link Manager in the Activity, while you can open the Activity from the Employment Contract using the Workflow Manager.
You must save an Employment Contract record at least once before you can create an Activity from it. This is to ensure that the links mentioned in the previous paragraph can be established.
Please refer here for full details about the 'Activity: Inspect' window.
---
The Employment Contract register in Standard ERP:
- Introduction
- Entering an Employment Contract
- Printing an Employment Contract
- Operations menu
- Create menu, including:
- Workflow Activity
- Employment Contract Change
- Workflow Activity
- Home page for Human Resources Management manual
- Home page for Standard ERP manual
Create Menu - Employment Contract Change
Once you have agreed an Employment Contract with an Employee and both parties have signed it, you should mark the relevant Employment Contract record in Standard ERP as OK and save it. This will ensure that the agreed details cannot be changed.There will be occasions when some of the provisions in a Contract will change. For example, the Salary or Job Title might change. In this situation, you cannot make the change to the Contract itself. Instead, you need to create a new record in a separate register, the Employment Contract Change register. This will ensure the original Contract details remain on file, and will also provide a change history for the Contract.
To register an Employment Contract Change, follow these steps:
- Open the Employment Contract that is to be changed. The Contract must already have been marked as OK and saved.
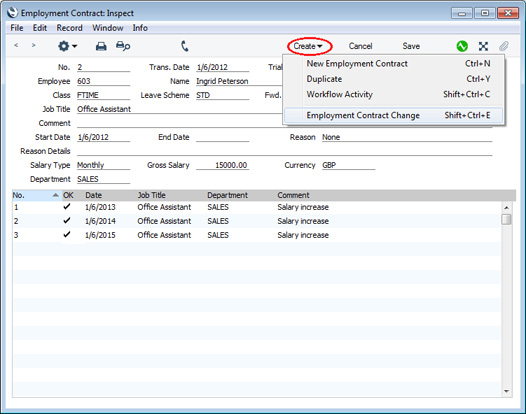
- Choose 'Employment Contract Change' from the Create menu (Windows/Mac OS X) or from the + menu (iOS/Android):
- The following window will open, where you can register the change:
The new record will be opened in a window entitled 'Employment Contract Change: New'. This means that it has not yet been saved. All details in the Employment Contract Change will be copied from the most recent previous Employment Contract Change or from the Employment Contract if there are no previous Changes (the Comment, Fwd. Bal Days, Fwd. Bal. Date and Reason will not be copied).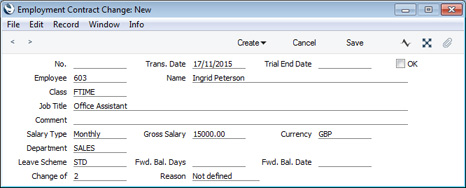
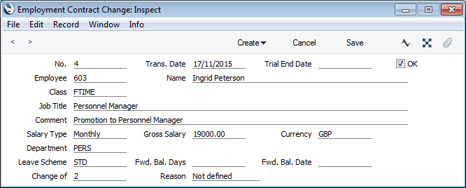
- Enter the new details as appropriate and, when they are agreed with the Employee, mark the Employment Contract Change as OK and save. The ability to mark an Employment Contract Change as OK is subject to access rights.
- The Employment Contract Change will be listed in the matrix in the Employment Contract:
- If you need to see the latest provisions in a Contract including all Contract Changes, open the Employment Contract record and choose 'Employment Contract Data' from the Operations menu. The following report will be printed to screen:
The Employment Contract register in Standard ERP:
- Introduction
- Entering an Employment Contract
- Printing an Employment Contract
- Operations menu
- Create menu, including:
- Workflow Activity
- Employment Contract Change
- Workflow Activity
- Home page for Human Resources Management manual
- Home page for Standard ERP manual