Wprowadzenie
System Hansa umożliwia pracę z wieloma oknami na ekranie równocześnie. Oknoaktualnie wykorzystywane, widoczne na pierwszym planie to 'aktywne okno'.
Pasek tytułowy okna aktywnego nie jest wyszarzony.

Aktywne okno można przesuwać na ekranie przeciągając myszą jego pasek. Można zmienić wielkość okna przeciągająć jego krawędzie w stosownym kierunku lub wykorzystując przycisk w prawym górnym rogu okna. Aby zamknąć okno należy kliknąć przycisk krzyżyk w prawym górnym rogu okna. Kliknięcie przycisku krzyżyk na Macintoshu, przy wciśniętym klawiszu Alt zamyka wszystkie okna w systemie. Korzystając z funkcji menu Okno można ustawić atrybuty okna: rozmiar i położenie. Zbyt duża liczba otwartych okien na ekranie może być przyczyną bałaganu oraz wielu pomyłek.
! | System pozwala na otwarcie 100 okien na ekranie równocześnie. Dobrym przyzwyczajeniem jest zamykanie okna, kiedy jest nieużywane. Zbyt duża liczba otwartych okien na ekranie może być przyczyną bałaganu oraz wielu pomyłek. |
W systemie można wyróżnić sześć typów okien:
- okno przeglądu
- okno karty/rekordu
- okno raportu
- okno listy
- okno parametrów
- okno dialogowe wyboru pliku
Okno przeglądu
Okno przeglądu wyświetla listę dostępnych kart (rekordów). Jeśli klikniesz przycisk kartoteki w Oknie Głównym, otworzy się okno przeglądu z listą wszystkich rekordów zapisanych w kartotece. W oknie przeglądu można przeszukiwać listę dostępnych kart oraz otwierać karty w celu dalszego przetwarzania. W tym samym czasie można otworzyć kilka różnych okien przeglądu.Na przykład, jeśli klikniesz przycisk [Operacje] w Oknie Głównym w module System (lub jeśli wybierzesz 'Operacje' z menu Kartoteki) pojawi się okno przeglądu 'Operacje:Przeglądanie'. Okno zawiera listę wszystkich operacji w tej kartotece.
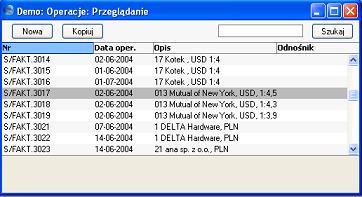
Listę kart można sortować według jednej z kolumn. Kliknij nagłówek kolumny według, której ma nastapić sortowanie, a lista zostanie automatycznie przesortowana. Nagłówek kolumny według której następuje sortowanie jest zaznaczony kolorem niebieskim. Ponowne kliknięcie nagłówka kolumny spowoduje odwrócenie porządku sortowania.
W górnej części okna przeglądu znajduje się pasek przycisków. Pasek składa się z następujących przycisków:

- Specjalne
- W niektórych oknach przeglądu dostępne jest rozwijane menu. Zaznacz jeden lub więcej kart (przytrzymaj klawisz Shift, a następnie kliknij kolejne pozycje na liście), a następnie wybierz polecenie z menu Specjalne. Polecenie odnosi się do zaznaczonej karty/kart. Polecenia menu Specjane są różne w zależności od okna przeglądu. Więcej informacji na ten temat w dalszej części podręcznika.
- Rozwijane menu zawiera te same polecenia co menu Specjalne na głównym pasku narzędzi.
- Rozwijane menu zawiera te same polecenia co menu Specjalne na głównym pasku narzędzi.
- [Nowa]
- Skrót klawiaturowy Windows/Linux: Ctrl-N
- Skrót klawiaturowy Macintosh: ⌘-N
- Kliknij przycisk, aby otworzyć nową kartę.
- Skrót klawiaturowy Macintosh: ⌘-N
- [Kopiuj]
- Skrót klawiaturowy Windows/Linux: Ctrl-K
Skrót klawiaturowy Macintosh: ⌘-Y
- Kliknij przycisk, aby skopiować zaznaczoną kartę na liście. System kopiuje kartę z aktualną datą , a nie z datą z bazowej karty.
- Kliknij przycisk, aby skopiować zaznaczoną kartę na liście. System kopiuje kartę z aktualną datą , a nie z datą z bazowej karty.
- [Szukaj]
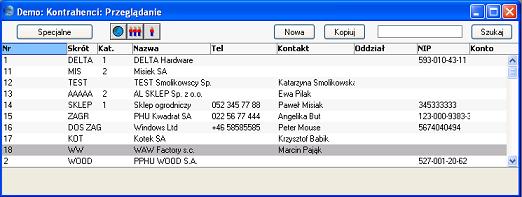
- Wykorzystaj pole oraz przycisk Szukaj (w prawym, górnym rogu na pasku przycisków), aby odszukać właściwą kartę na liście. System przeszukuje dane w zaznaczonej kolumnie w oknie przeglądu. W powyższym przykładzie, lista kart sortowana jest po numerach (zaznaczona kolumna Nr), dlatego można odnaleźć kartę o konkretnym numerze. W pole Szukaj można wpisać: literę, wyraz, datę, numer, a następnie kliknąć przycisk [Szukaj] lub nacisnąć klawisz Enter. System poszuka odpowiednika w zaznaczonej kolumnie. System zatrzyma się na pozycji z odpowiednikiem, a jeśli nie ma odpowiednika wybierze najbardziej zbliżoną kartę. Jeśli nie mamy pewności co do właściwej pisowni szukanej nazwy można wykorzystać znak *. Na przykład, jeśli w poniższym oknie przeglądu chcesz odszukać kartę dla Mutual of New York, ale nie pamiętasz numeru kontrahenta (013), przesortuj listę w kolumnie Nazwa wpisując w pole Szukaj "*Mutual", a następnie kliknij klawisz Enter. Jeśli pierwszy odszukany rekord, nie jest tym rekordem, którego szukasz, kliknij kombinację klawiszy Shift-Enter, aby odnaleźć kolejny rekord spełniający kryteria.
i nacisnąć klawisz Enter.
! | System nie pozwala usunąć karty bezpośrednio w oknie przeglądu. Karta musi być otwarta. |
Niektóre okna przeglądu mają dodatkowo trzy przyciski:

- Wyświetla wszystkie karty w kartotece.

- Wyświetla karty należące do Grupy Sprzedaży do której przypisany jest użytkownik (pole Grupa Sprzedawców jest takie same na karcie Osoby oraz na karcie).

- Wyświetla karty przypisane do danego użytkownika (inicjały użytkownika przypisane są do karty).
Dostęp do listy kart w oknie przeglądu można ograniczyć do grupy lub do użytkownika na karcie Osoby. Więcej informacji na ten temat w
dalszej części podręcznika.Okno karty (rekordu)
Okno karty służy do wprowadzania, wyświetlania oraz edytowania pojedynczego zapisu w kartotece. W nagłówku okna w zależności od okoliczności pojawia się: 'Nowa karta', 'Podgląd', 'Uaktualnianie' lub 'Usuwanie'. Wszystkie dane w systemie rejestrowane są w oknie karty.
Aby otworzyć okno karty kliknij dwukrotnie właściwą pozycję na liście w oknie przeglądu lub zaznacz właściwy rekord i naciśnij klawisz Enter. Poniższa ilustracja pokazuje przykładowe okno, które pojawiło się po wybraniu pozycji na liście w oknie 'Faktury:Przeglądanie".
Okno karty wykorzystuje się do wprowadzania lub modyfikowania danych. W niektóre pola w oknie karty można wprowadzić tylko cyfry, w innych tylko duże litery, a niektórych nie można zmieniać wogóle. W niektórych polach wszystkie wprowadzone litery będą automatycznie zamienione na duże litery.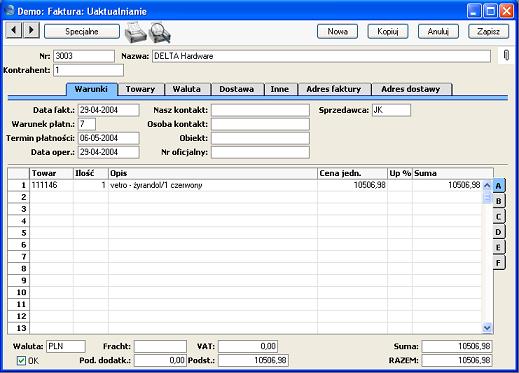
Klawisze Return, Tab oraz strzałki umożliwiają przemieszczanie się pomiędzy polami na karcie. Klawisz Return przesuwa kursor do następnego pola, które można edytować. Wszystkie pole na karcie można wybrać bezpośrednio przy pomocy myszki. Jeśli użytkownik kliknie w konkretne pole, zawartość pola zostanie podświetlona, a następnie usunięta po rozpoczęciu edycji. Jeśli użytkownik dwukrotnie kliknie w wybrane pole, pojawi się kursor umożliwiający wprowadznie nowych danych lub edycję istniejących.
Niektóre okna kart (jak w naszym przykładzie są podzielone na dwie części:górną - nagłówek okna, który pokazuje nadrzędne parametry oraz dolną, która wyświetla poszczególne wiersze.
Niektóre okna rekordów zawierają wiele informacji, które od razu można wyświetlić na ekranie. Informacje zapisane są w w seriach zakładek (w naszym przypadku są to zakładki: 'Warunki', 'Towary', 'Waluta', 'Dostawa', Inne' itd..). W innych przypadkach zakładki mogą być oznaczone ( 'A', 'B', 'C', itd.).
Pasek przycisków
W górnej części każdego okna karty znajduje się pasek przycisków. Pasek składa się z następujących przyciskow:


- Windows/Linux skrót klawiaturowy: PgUp and PgDn
- Macintosh skrót klawiaturowy: ⌘-- oraz ⌘-+
- Przyciski oznaczają: [Poprzednia] (przycisk z lewej strony) oraz [Następna karta] (z prawej strony). Przyciski umożliwiają przechodzenie pomiędzy kartami w kartotece. Jeśli otworzysz dowolną kartę w kartotece, kliknij przycisk [Następna], aby przejść do kolejnej karty w tej kartotece. Wszystkie informacje wprowadzone lub zmodyfikowane na karcie zostaną zapisane w momencie przejścia do kolejnej karty. Jeśli nie chcesz uaktualnić karty, kliknij przycisk krzyżyk, aby anulować wprowadzone zmiany albo naciśnij przycisk [Anuluj] na pasku przycisków. Podobnie, jeśli otworzysz dowolną kartę w kartotece, kliknij przycisk [Poprzednia], aby przejść do poprzedniej karty w kartotece.
- Przyciski odpowiadają poleceniom 'Następna', 'Poprzednia' z menu Karta.
- Macintosh skrót klawiaturowy: ⌘-- oraz ⌘-+
- Specjalne
- W niektórych oknach kart dostępne jest rozwijane menu (np. na karcie faktury lub zamówienia). Polecenia menu Specjane są różne w zależności od karty. Dla karty faktury dostępne są następujące pozycje:
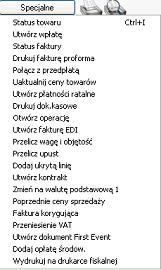
- 'Status towaru' pokazuje stan magazynowy towaru z zaznaczonego wiersza na fakturze. 'Utworz wpłatę' tworzy dokument KP do faktury, a 'Status faktury' otwiera okno z informacją o statusie faktury oraz wszystkich płatnościach do tej faktury.
- Więcej informacji na temat menu Specjalne w dalszej części podręcznika
- Rozwijane menu w oknie karty zawiera te same polecenie co menu Specjalne na głównym pasku narzędzi.
- 'Status towaru' pokazuje stan magazynowy towaru z zaznaczonego wiersza na fakturze. 'Utworz wpłatę' tworzy dokument KP do faktury, a 'Status faktury' otwiera okno z informacją o statusie faktury oraz wszystkich płatnościach do tej faktury.

- Windows/Linux skrót klawiaturowy: Ctrl-P
- Macintosh skrót klawiaturowy: ⌘-P
- Kliknij ikonę Drukarki, aby wydrukować bieżącą kartę. Ikona Drukarki pojawia się na pasku przycisków tylko wtedy, gdy okno karty zawiera informacje, ktore można bezpośrednio wydrukować (np. karta faktury lub zamówienia).
Odpowiednikiem ikony Drukarki jest polecenie 'Drukuj' z menu Plik na głównym pasku narzędzi.
- Po wybraniu polecenie 'Drukuj' dokumenty są drukowane na domyślnej drukarce; nie pokazuje się okno dialogowe wydruku.
- Macintosh skrót klawiaturowy: ⌘-P

- Windows/Linux skrót klawiaturowy: Ctrl-Shift-P
- Macintosh skrót klawiaturowy: ⌘-Shift-P
- Kliknij ikonę Podglądu wydruku, aby zobaczyć podgląd wydruku dokumentu na ekranie w nowym oknie.
- Macintosh skrót klawiaturowy: ⌘-Shift-P
- [Nowa]
- Windows/Linux skrót klawiaturowy: Ctrl-N
- Macintosh skrót klawiaturowy: ⌘-N
- Kliknij przycisk, aby zapisać oraz zamknąć aktualnie wykorzystywaną kartę oraz otworzyć nową kartę do edycji.
- Macintosh skrót klawiaturowy: ⌘-N
- [Kopiuj]
- Windows/Linux skrót klawiaturowy:Ctrl-K
- Macintosh skrót klawiaturowy:⌘-Y
- Kliknij przycisk, aby zapisać aktualnie wykorzystywaną kartę, a następnie utworzyć kopię tej karty. System kopiuje kartę z aktualną datą , a nie z datą z bazowej karty.
- Macintosh skrót klawiaturowy:⌘-Y
- [Anuluj]
- Macintosh skrót klawiaturowy: ⌘-B
- Jeśli bieżąca karta nie została wcześniej zapisana w kartotece, kliknij ten przycisk, aby anulować wprowadzone informacje i zamknąć kartę. Jeśli bieżacą karta została wcześniej zapisana w kartotece kliknij ten przycisk, aby anulować wszystkie wprowadzone zmiany od momentu ostatniego zapisania karty. W tej sytuacji okno karty nie zostanie zamknięte.
- Jeśli bieżąca karta nie została wcześniej zapisana w kartotece, kliknij ten przycisk, aby anulować wprowadzone informacje i zamknąć kartę. Jeśli bieżacą karta została wcześniej zapisana w kartotece kliknij ten przycisk, aby anulować wszystkie wprowadzone zmiany od momentu ostatniego zapisania karty. W tej sytuacji okno karty nie zostanie zamknięte.
- [Zapisz]
- Windows/Linux skrót klawiaturowy: Shift-Enter
- Macintosh skrót klawiaturowy: Shift-Enter
- Kliknij przycisk, aby zapisać wszystkie wprowadzone zmiany. Przycisk [Zapisz] nie zamyka okna karty.
- Macintosh skrót klawiaturowy: Shift-Enter
Record Window - Row Menu
Many record windows are divided into two sections: the top half shows details relating to the record as a whole (for example, in an Order, the top half will contain details such as the Order Number and Date and the Customer) and the lower half contains a matrix listing the individual items (or rows) that are attached to the record (e.g. in an Order, the matrix will list the ordered Items).
These windows will often have an Operations menu, which contains functions that refer to or affect the record as a whole. For example, in an Order, included on the Operations menu will be an 'Order Status' function that you can use to open a window containing a summary of the status of the Order, listing Deliveries, Invoices and any other connected records. The matrix in these windows will often have its own menu, which contains functions that refer to or affect an individual row in the matrix. This is sometimes known as the "Row Menu".
To use the Row menu, first click in any field in the row in question (i.e. the row to which the function is to be applied), and then right-click (Windows) or Ctrl-click (Mac OS X) the row number (on the left of the row). A menu will appear, where you can select the function that you need:
The functions on the Row menu will vary depending on the record you are looking at, and are described in full on the appropriate web pages.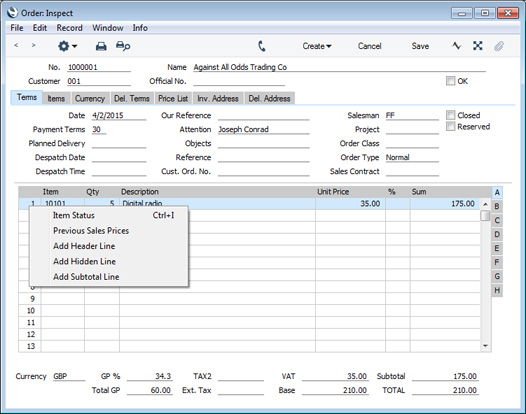
---
Types of window in Standard ERP:
- Browse window
- Record window, including:
- Report window
- List window
- Specification window
- File dialogue window
- Business Communicator window
- Home page for Working Environment manual
- Home page for Standard ERP manual
Polecenie 'Wstaw'
Użytkownik wprowadzając jakąś informację do systemu odwołuje się często do zdefiniowanych wcześniej ustawień i informacji. Na przykład, jeśli wprowadza
fakturę, pole Odbiorca odsyła do informacji zarejestrowanych w kartotece Odbiorcy (np. nazwy oraz adresu odbiorcy), a pole Warunki płatności odsyła do informacji zdefiniowanych w ustawieniu Warunki płatności.
Polecenie 'Wstaw' pozwala w szybki i prosty sposób wybrać potrzebne informacje z listy wyboru. Aby uaktywnić polecenie 'Wstaw' w aktywnym oknie kliknij kombinację klawiszy Ctrl-Return lub Ctrl-Enter; na Macintoshu ⌘-Return lub ⌘-Enter; na PocketPC kliknij wskaźnikiem w odpowiednie pole. Poniższy przykład pokazuje proces wstawianie numeru odbiorcy na kartę faktury:
Ustaw kursor w polu Odbiorca, a następnie kliknij kombinację klawiszy Ctrl-Enter (Windows oraz Linux) lub ⌘-Enter (Macintosh). Pojawi się lista wyboru dla danego pola (w naszym przykładzie będzie to kartoteka Odbiorców). Okno listy wyboru jest zbliżone do okna przeglądu; dane można sortować według jednej z kolumn (po zaznaczeniu nagłówka kolumny) oraz można wykorzystywać pole Szukaj do odszukania karty (w razie potrzeby można wykorzystać znak *).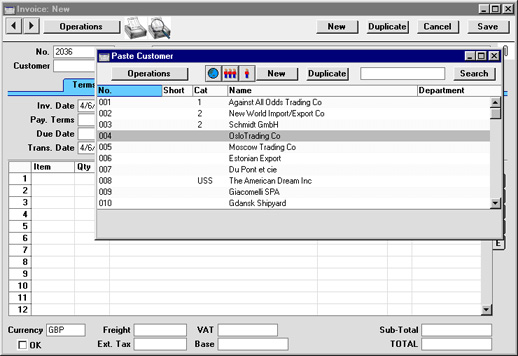
Dwukrotnie kliknij właściwą pozycję na liście lub zaznacz pozycję oraz naciśnij klawisz Enter. Wszystkie informacje dotyczące odbiorcy zostaną automatycznie wstawione na fakturę.
Jeśli ustalimy porządek sortowania na liście wyboru to korzystanie z polecenia 'Wstaw' będzie jeszcze bardziej efektywne. Na przykład,wstawiając odbiorcę na fakturę najczęściej znamy jego nazwę ,ale nie znamy numeru w kartotece. Jeśli po wybraniu polecenia 'Wstaw' na liście wyboru zaznaczysz kolumnę Nazwa według, której dane będą sortowane, a następnie wybierzesz polecenie 'Zachowaj pozycje' (Windows oraz Linux)/'Zapisz pozycję' (Macintosh) z menu Okno, możesz wprowadzić pierwsze litery nazwy odbiorcy w pole Odbiorca na karcie faktury, a następnie kliknąć Ctrl-Enter lub ⌘-Enter. Lista wyboru otworzy się na pierwszej pozycji, która zawiera w swojej nazwie litery wprowadzone w pole Odbiorca. Jeśli wskazana pozycja jest właściwa kliknij Enter, aby wstawić dane na fakturę. W poniższym przykładzie, w pole Odbiorca na karcie faktury wpisano "OSLO", a następnie wykorzystano skrót klawiaturowy Ctrl-Enter. Na liście wyboru system ustawił się na pierwszej pozycji, która rozpoczyna się na "OSLO":
Jeśli rekord, którego szuka użytkownik nie został jeszcze zdefiniowany w kartotece lub ustawieniu można go szybko wprowadzić na liście wyboru. Po wybraniu polecenia 'Wstaw' na liście kliknij Ctrl-N lub ⌘-N. W naszym przykładzie pojawi się nowa karta Odbiorcy. Wprowadzić stosowne dane o odbiorcy, a następnie kliknij [Zapisz]. Nowa karta zostanie zapisana w kartotece, a wprowadzone dane zostaną automatycznie wprowadzone na fakturę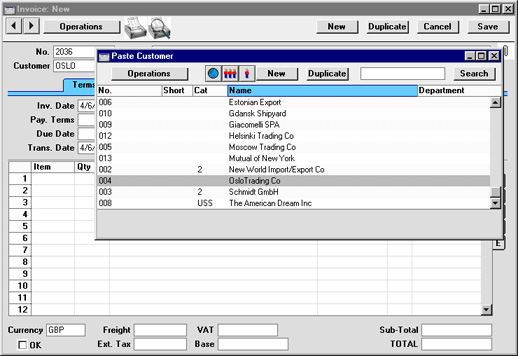
Jeśli w momencie wprowadzania faktury okaże się , że informacje o Odbiorcy są nieaktualne (np. zmienil się adres lub numer telefonu) można zaktualizować dane bezpośrednio na liście wyboru. Kliknij
F2 (Windows/Linux) lub ⌘-Shift-V (Macintosh). System otworzy kartę Odbiorcy umożliwiając wprowadzenie stosownych zmian na tej karcie. Dane Odbiorcy można zaktualizować po wstawieniu numeru Odbiorcy na karcie faktury. Należy ustawić kursor w polu Odbiorca, a następnie kliknąć F2 lub ⌘-Shift-V. Właściwość jest dostępna prawie we wszystkich polach, w których można wykorzystać polecenie 'Wstaw'.
Wykorzystywanie funkcji F2/⌘-Shift-V oraz możliwość definiowania nowych rekordów na liście wyboru przez użytkownika może być ograniczone przez Grupę dostępu w module System.
Polecenie 'Wstaw' można wykorzystać w polu Data lub Czas, aby wprowadzić bieżącą datę /aktualny czas. Kliknij Ctrl-Enter lub ⌘-Enter, aby wprowadzić bieżącą datę lub aktualny czas.
Funkcja 'Drag and Drop'
Inną metodą łączenia informacji pomiędzy kartotekami lub ustawieniami jest funkcja 'Drag and Drop'. Informacje można przeciągnąć z okna przeglądu kartoteki do okna karty innej kartoteki. Na przykład, numer Odbiorcy można przeciągnąć z okna 'Odbiorcy: Przeglądanie' na kartę faktury. W tym celu otwórz okna 'Odbiorcy: Przeglądanie' oraz 'Faktura:Nowa karta', znajdź właściwego Odbiorcę na liście, kliknij numer Odbiorcy, a następnie przeciągnij numer do pola numer Odbiorcy na karcie faktury. W ten sam sposób można wprowadzać/przeciągać towary oraz inne ustawienia (np. Warunki płatności) na faktury, zamówienia oraz inne dokumenty. W przypadku towarów można wybrać jakiś zakres towarów przytrzymując klawisz Shift, a następnie przeciągnąć zaznaczone pozycje do pola Towar w pierwszym wolnym wierszu na karcie faktury.
Funkcja 'Drag and Drop' umożliwia również tworzenie nowych kart. Na przykład kartę Zamówienia można przeciągnąć z okna 'Zamówienia:Przeglądanie' do okna 'Przyjęcia towaru:Przeglądanie', aby utworzyć dokument PZ dla wszystkich towarów z zamówienia. Po zatwierdzeniu oraz zapisaniu dokumentu PZ, kartę Zamówienie można przeciągnąć z okna 'Zamówienia:Przeglądanie' do okna 'Faktury:Przeglądanie', aby utworzyc fakturę sprzedaży na wszystkie towary.
Jeśli w bazie danych zdefiniowano kilka firm, funkcja 'Drag and Drop' umożliwia transfer informacji z okna przeglądu kartoteki jednej firmy, do okna przeglądu kartoteki drugiej firmy. Na przykład, można przeciągnąć konta księgowe z okna 'Plan kont:Przeglądanie' istniejącej firmy do drugiej firmy (np. właśnie tworzonej w bazie danych). W ten sposób funkcja 'Drag and Drop' pozwala na prosty transfer podstawowych informacji do nowej firmy.Jeśli transferujemy zatwierdzone dokumenty księgowe pomiędzy firmami w bazie danych, zostaną one przeniesione jako dokumenty niezatwierdzone.
Dokumenty zatwierdzone to np. dokumenty Księgi Sprzedaży, Księgi Zakupy lub Magazynu do których istnieją operacje księgowe w Księdze Głównej.
Załączniki
Wszystkie okna kart posiadają przycisk [Załączniki], który może przybierać w systemie dwie formy:

Przycisk umożliwia załączanie plików, notatek oraz inych rekordów do każdej karty w systemie. Wszystkie załączone pozycje nazywane są w systemie Hansa 'Załącznikami'. Więcej informacji na ten temat znajdziesz w
dalszej części podręcznika.Record Window - Changing the Fields in a Record Window
This page describes how to change the attributes of fields and check boxes in record windows.
---
You can change some of the attributes of the fields and check boxes in a record window. For example, you can change field labels, hide fields and make fields mandatory. Follow these steps:
- Log in as a Global User or Person belonging to an Access Group in which Full access has been granted to the 'Field Settings' Action.
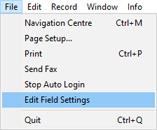
- Choose 'Edit Field Settings' from the File menu. This option will only be available to users with Full access to the 'Field Settings' Action mentioned in step 1.
- A 'Field Settings' window will appear:
This window contains an Access Group field and a View changes check box, as follows:
- Access Group
- Paste Special
Access Groups setting, System module
- When you change the attributes of the fields in a record window, you will do so for the members of a particular Access Group. Choose that Access Group here using 'Paste Special' and then press [OK]. Note that the selection of an Access Group is case-sensitive, so it is recommended that you use 'Paste Special' to ensure the spelling and case usage are correct.
- View changes
- When editing the fields in a record window, use this check box to switch between the original version of the window (as originally defined in Standard ERP) and your edited version.
The presence of this 'Field Settings' window signifies that you are in 'Edit Field' mode. While you are in this mode, you will not be able to edit any records. Instead, whenever you open a record window, you will be able to change the attributes of the fields in that record window. As a further reminder that you are in 'Edit Field' mode, the window title of every window that you open will include the word 'Editing' (instead of 'New', 'Inspect', 'Update' or 'Browse').
- Access Group
- To change the attributes of the fields in a record window, open the window in the usual way. For example, if you need to change the attributes of a field or fields in the Invoice window, you can either open an existing Invoice from the 'Invoices: Browse' window or you can open an empty new Invoice. When the window opens, you will see it as it will be shown to members of the Access Group specified in step 3.

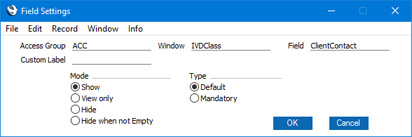
- Click in the field whose attributes you need to change. This must be a header field, not a row field. You can also click a check box. A second 'Field Settings' window will appear. In the example illustrated below we clicked on the Attention field:
- Access Group
- Paste Special
Access Groups setting, System module
- When you change the attributes of the fields in a record window, you will do so for the members of a particular Access Group. The default here will be the Access Group that you chose in step 3. You can change the Access Group, but do not leave the field empty.
- Window
- This field displays the internal name of the window (the internal name is the name given to the window inside the program) and cannot be changed.
- Field
- The internal name of the field or check box whose attributes you are changing and cannot be changed.
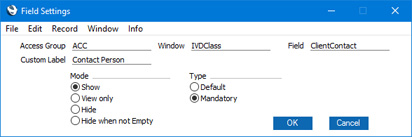
- Custom Label
- If you want to change the name of the field in the window, enter the new name here.
- Mode
- Choose an attribute for the field or check box as follows:
- Show
- The default attribute for the field (as originally defined in Standard ERP) will be used.
- View only
- The field will not be editable. Choosing this option for a check box will have no effect.
- Hide
- The field or check box will not be visible.
- Hide when not Empty
- The field will not be visible if it contains a value. Choosing this option for a check box will have no effect.
- Show
- Type
- Specify whether it should be mandatory for members of the Access Group specified above to enter a value in the field whenever they create or modify a record in the window in question. Choosing this option for a check box will have no effect.
- Access Group
- Press [OK] to save the new field attributes. The second 'Field Settings' window will be closed, and the changes will immediately be visible (in a single-user installation only):
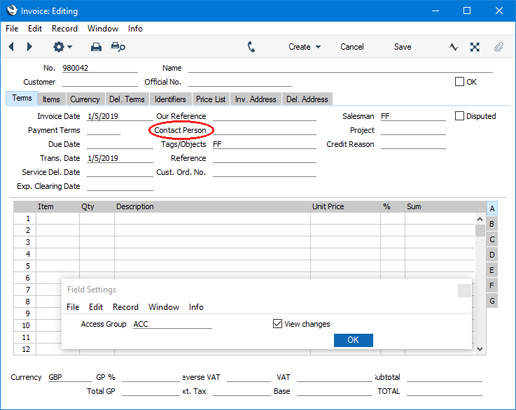
- If you need to compare the original version of the window with your modified version, select and deselect the View changes check box in the first 'Field Settings' window.
- Repeat steps 5 and 6 if you need to change the field attributes of other fields or check boxes.
- If you need to change the field attributes of a field or check box for other Access Groups, the following options are available:
- Change the Access Group in the first 'Field Settings' window and press [OK], as described in step 3. The appearance of the record window (e.g. of the Invoice window) will be changed so that you will be shown what is visible to members of the new Access Group. When you next click on a field or check box, the new Access Group will be the default in the second 'Field Settings' window.
- Change the Access Group in the second 'Field Settings' window.
- Duplicate a record in the Fields Settings setting as described below in step 11 and change the Access Group there.
You must specify an Access Group in the second 'Field Settings' window. Leaving the Access Group field blank in this window will not mean that the field attribute change will be visible to every Access Group.
- Change the Access Group in the first 'Field Settings' window and press [OK], as described in step 3. The appearance of the record window (e.g. of the Invoice window) will be changed so that you will be shown what is visible to members of the new Access Group. When you next click on a field or check box, the new Access Group will be the default in the second 'Field Settings' window.
- To leave 'Edit Field' mode, select 'Edit Field Settings' from the File menu once again.
- The field attribute settings will be saved in the Fields Settings setting in the Technics module. This setting will contain separate records for each window/Access Group combination. An individual record will contain a matrix listing the changed field attributes. If you need to change the field attributes in a particular window for several Access Groups, you can duplicate the record created in steps 5 and 6, and change the Access Group and the options as necessary.
You do not need to be in 'Edit Field' mode to work in the Fields Settings setting. However, note that the Window Class and VcName fields are not editable, so you cannot create a new record in this setting and specify the window or register (VcName). In other words, if there is no record in this setting for a particular window, you must create at least one record for that window following steps 3-6 above. You can then duplicate that record in this setting as needed.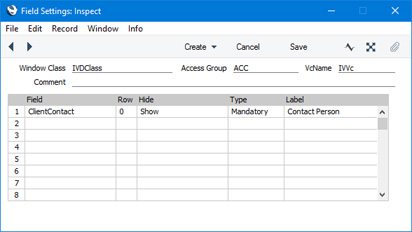
Any records that you add or change in this setting will not take effect until you close Standard ERP and restart. You don't need to restart the server.
Types of window in Standard ERP:
- Browse window
- Record window, including:
- Button Bar
- Row Menu
- Paste Special
- Drag and Drop
- Workflow Manager, Link Manager and Document Manager
- Changing the Fields in a Record Window
- Button Bar
- Report window
- List window
- Specification window
- File dialogue window
- Business Communicator window
- Home page for Working Environment manual
- Home page for Standard ERP manual
Okno raportu
Okno raportu służy do wyświetlania na ekranie raportów utworzonych w systemie. Poniższa ilustracja pokazuje przykładowy raport utworzony w module Księga Główna. Raport można przewijać w górę i w dół w celu przeglądania jego zawartości.
Poniżej paska przycisków znajduje się nagłówek raportu, który wyświetla informacje o nazwie raportu oraz jego parametrach. Są to bardzo istotne informacje, ponieważ wszystkie raporty w systemie można generować dla wielu różnych parametrów.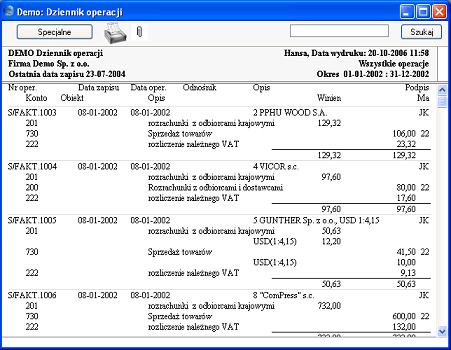
Poniżej nagłówka znajduje się część właściwa raportu zawsze dopasowana do pełnej szerokości okna. Użytkownik może zmienić rozmiary okna (wysokość/szerokość). Może również przewijać raport w górę oraz w dół wykorzystując pasek przewijania znajdujący się po prawej stronie okna raportu. Jeśli okno raportu jest wąskie to treść raportu może być ściśnięta, a tym samym mało czytelna. Zwiększając rozmiary okna można rozszerzyć treść raportu.
Na ekranie można uruchomić wiele, niezależnych raportów w tym samym czasie, ponieważ każdy raport otwiera się w swoim własnym oknie. Taka możliwość daje systemowi Hansa 'niezrównaną siłę raportowania'. Można na przykład wyświetlić jednocześnie dwie wersje raportu
Bilans w dwóch różnych oknach. Na jednym raporcie można uwzględnić symulacje, a na drugim pokazać wyniki bez symulacji. System umożliwia przez to łatwy dostęp do informacji, które w innych systemach wymagają skomplikowanych manewrów.
Nie ma żadnych ograniczeń dotyczących ilości wyświetlonych raportów na ekranie, można dowolnie przemieszać raporty z różnych modułów. Wszystkie okna w systemie Hansa są całkowicie niezależne od siebie, dlatego okna raportów można przemieszać z oknami kart oraz listami z różnych części systemu.
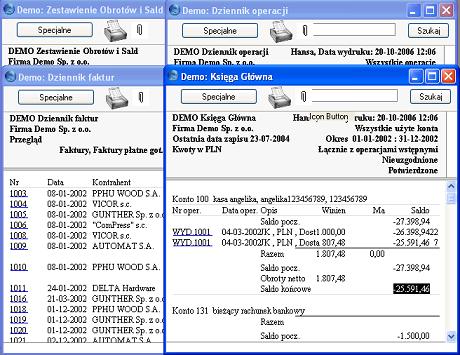
Poniższa ilustracja pokazuje cztery raporty z modułów Księga Sprzedaży oraz Księga Główna wyświetlone na ekranie jednocześnie.
Wydruk raportu
Aby wydrukować raport kliknij ikonę Drukarki na pasku przycisków w oknie raportu. Przed wykonaniem wydruku należy określić format wydruku strony.
Funkcja 'Szukaj'
Kolejną użyteczną funkcją wbudowaną we wszystkie raporty dostępne w systemie Hansa i uruchomione na ekranie jest funkcja 'Szukaj'. Funkcja pozwala odszukać określony łańcuch tekstowy w raporcie. Szukany łańcuch tekstowy może zawierać kombinację liter oraz cyfr występujących w raporcie.
Aby odnaleźć operację księgową do faktury 913 w powyższym przykładzie, wprowadź "913" w pole Szukaj w prawym rogu na pasku przycisków, a następnie kliknij przycisk Enter. System przewinie raport do pierwszego miejsca w którym występuje odpowiednik szukanego łańcucha tekstowego, a znaleziony odpowiednik zostanie podświetlony. Kliknij klawisz Enter, aby odszukać kolejny odpowiednik.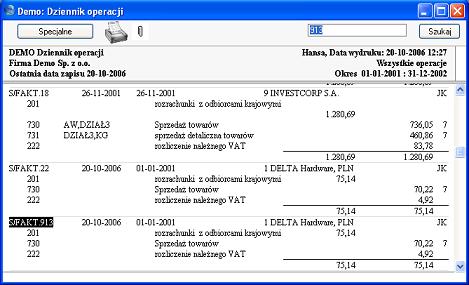
Przeliczanie danych raportu
Wszystkie raporty w systemie Hansa są wyświetlane w osobnych oknach. Użytkownik może pozostawić raport na ekranie i przejść do innego okna, aby wprowadzić nowe dane lub zmodyfikować istniejące parametry. Jeśli takie zmiany mają wpływ na zawartość raportu można dokonać aktualizacji danych raportu wykorzystując polecenia menu Specjalne w oknie raportu. W aktywnym oknie raportu wybierz 'Przelicz' (albo wykorzystaj skrót klawiaturowy Ctrl-Shift-R/⌘-Shift-R), aby uaktualnić dane raportu przy użyciu tych samych parametrów. Wybierz polecenie 'Otwórz okno parametrów', aby zdefiniować nowe parametry raportu i uaktualnić dane raportu według nowych parametrów.
Drill -down
Funkcjonalność Drill-down umożliwia podglądanie szczegółów raportów wyświetlonych na ekranie. Po wykonaniu raportu Rachunek zysków i strat możesz kliknąć dowolny numer konta na raporcie. Jeśli posiadasz odpowiednie prawa dostępu zdefiniowane w systemie do raportów Księgi Głównej, pojawi się raport Księga Główna z listą wszystkich operacji na tym koncie dla określonych parametrów i okresu. Jeśli klikniesz dowolną operację księgową w raporcie Księga Główna, otworzy się karta operacji księgowej ze szczegółami zdarzenia księgowego. Poniższa ilustracja pokazuje poszczególne etapy naszego przykładu zastosowania funkcjonalności Drill-down:
Funkcjonalność Drill-down dotyczy podkreślonych szczegółów raportu.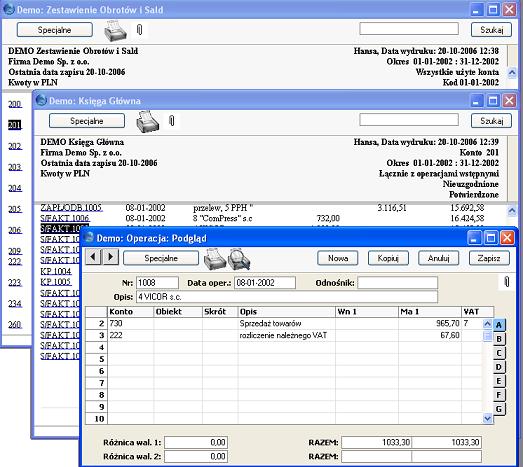
Załączanie raportów do kart oraz pulpitu osobistego
Pasek przycisków okna raportu zawiera ikonę [Spinacza], która pozwala na załączenie raportu do karty lub do pulpitu osobistego. Aby uzyskać wiecej szczegółów na ten temat, przejdź do instrukcji Załączanie raportów do kart oraz Raporty na pulpicie osobistym.
---
W tym rozdziale:
- Okno przeglądania
- Okno karta
- Okno raportu, w tym:
- Wydruki
- Wyszukiwanie
- Przeliczanie
- Drill-down - szczegóły
- Załączanie raportów do kart oraz pulpitu osobistego
- Wydruki
- Okno lista
- Okno parametrów
- Okno dialogowe
- Okno komunikatora biznesowego
Okno z listą
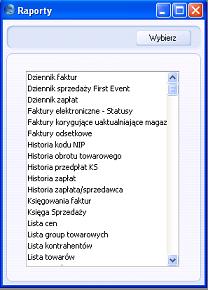
Okno z listą wykorzystywane jest przy wyborze pozycji z listy na różnych etapach pracy z systemem, zwykle podczas korzystania z funkcji:
'Importów', 'Ustawień', 'Obsługi', 'Raportów' oraz 'Dokumentów'.
Kliknij dwukrotnie wybraną pozycję na liście albo zaznacz, a następnie naciśnij klawisz Enter.
Możesz wykorzystać pasek przewijania z prawej strony okna do odnalezienia właściwej pozycji na liście lub wpisać pierwszą literę nazwy szukanej pozycji. Jeśli w oknie Raportów Księgi Sprzedaży chcesz odszukać raport 'Lista odbiorców', kliknij literę "L" na klawiaturze trzy razy. Po pierwszym kliknięciu zostanie podświetlona pierwsza pozycja na liście raporów rozpoczynająca się na literę "L" -' Lista cen'. Po drugim kliknięciu litery "L" zostanie podświetlona kolejna pozycja, w naszym przykładzie 'Lista grup towarowych'. Kolejne, trzecie kliknięcie podświetli właściwą pozycję na liście - 'Listę odbiorców'. Kliknij klawisz Enter, aby otworzyć parametry raportu 'Lista odbiorców'.
W oknie z listą dokumentów można zdefiniować formularze wydruku dla poszczególnych dokumentów korzystając z funkcji menu Specjalne ('Definicja formularza'). Więcej informacji na ten temat w
dalszej części podręcznika.
Poniższa ilustracja pokazuje okno z listą raportów dostępnych w module Księga Sprzedaży.
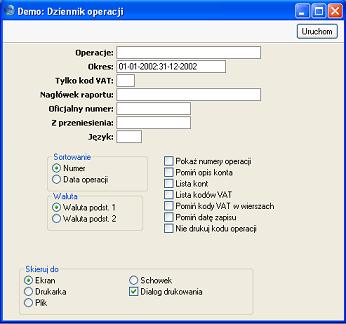
Okno parametrów
Okno parametrów pozwala zdefiniować parametry raportu, dokumentu lub funkcji Obsługi. Okno parametrów pojawia się zwykle po wybraniu pozycji w oknie z listą. Po wprowadzeniu parametrów kliknij przycisk [Uruchom]. Poniższa ilustracja przedstawia okno parametrów raportu Dziennik operacji.
Okno dialogowe wyboru pliku
System Hansa wykorzystuje standardowe okno dialogowe wyboru pliku dostępne na platformie Windows oraz Macintosh do wskazywania pliku do importu oraz do nadawania nazwy plikom przy eksportach.
W niektórych systemach operacyjnych system Hansa wykorzystuje własne okno dialogowe wyboru pliku (np. Macintosh OS X):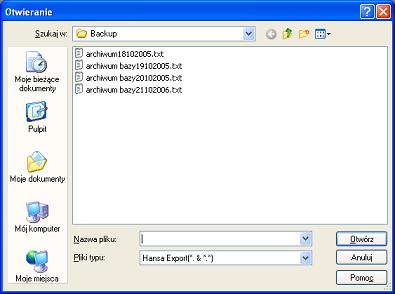
Kiedy okno dialogowe wyboru pliku zostanie otwarte po raz pierwszy, główna część okna zawiera listę plików i katalogów dostępnych w folderze z aplikacją Hansy. Nazwy wszystkich folderów są wyświetlone w <>. Kliknij dwukrotnie nazwę katalogu, aby zobaczyć jego zawartość. Kliknij dwukrotnie pierwszą pozycję na liście (...), aby przejść poziom wyżej. Kliknij przycisk [Pulpit], aby przejść na pulpit użytkownika oraz [Backup], aby przejść do folderu Backup znajdującego się w katalogu zawierającym aplikację Hansy.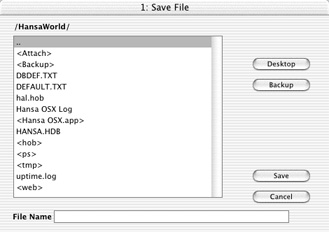
Business Communicator Window
The 'Business Communicator' window allows you to communicate with any Contact (both external and internal) using any method (e.g. telephone, mobile, Skype, SIP, email, text SMS and the chat feature built in to HansaWorld Enterprise).
To open the 'Business Communicator' window, click the [Business Communicator] button in the Master Control panel:
This button can also be found in record and browse windows belonging to registers such as Activities, Invoices and Contacts where you may need to communicate with a Contact (e.g. with the Contact quoted in an Activity or Invoice). Clicking the button here will open the 'Business Communicator' window with the relevant Contact's telephone and mobile numbers, Skype Name, email address and so on shown in the Contact Methods list, ready for you to open communications.
The 'Business Communicator' window contains the following sections:
- The Contact List
- This is a list of the records in the Contact register in your current Company.
- As with all lists of records in HansaWorld Enterprise, you can scroll through the list using the scroll bar on the right, and you can sort the list by clicking a column heading. By default, the list is sorted by Contact Name.
- Use the Search field and button (above the Contact list) to find a particular Contact in the list. First, sort the list by the column that you want to use for the search. In the illustration above, for example, the list is sorted by Name allowing you to search for a particular Contact Name. Then, type the first few characters of the Name in the Search field (there is no need to click in the field before typing). Then press Enter or click [Search]. The first exact match (or, if there is no exact match, the nearest match) will be highlighted. If you are not certain of the exact spelling, use the * character as a wildcard. For example, in the illustration shown above, if you want to find a Contact named Giacomelli but are not sure of their first name, sort the list by the Name column, type "*Giacomelli" in the Search field and press the Enter key. If the first record found is not the one you want, press the Shift-Enter key combination to search again.
- By default, the list shows every record in the Contact register. You can restrict the list so that it only shows your Personal Contacts. To do this, click the button marked 'Company', hold down the mouse, and choose the 'Personal' option. The button text will change to 'Personal'. Repeat the procedure to change the list back to showing every record. A Personal Contact is one where you are the Salesman, or one with your initials in the Address Books field (on the 'User Defined' card). The Address Books field can contain the initials of more than one Person, separated by commas, so a Contact can be the Personal Contact of more than one Person.
- To create a new Contact, click the [New] button above the list. The 'Contact: New' window will open, allowing you to enter the details of the new Contact. By default, the new Contact will be marked as a Customer. To edit an existing Contact, double-click their name in the list. Please refer here for full details about creating and editing Contacts.
- To communicate with a Contact, click their name once in the list. The available communication methods (telephone and mobile numbers, Skype names, etc.) will be shown in the Contact Method list, described below.
- As with all lists of records in HansaWorld Enterprise, you can scroll through the list using the scroll bar on the right, and you can sort the list by clicking a column heading. By default, the list is sorted by Contact Name.
- The Call List
- The Call list in the lower left-hand corner of the 'Business Communicator' window shows the open calls being made by everyone in your HansaWorld Enterprise system. This same list is shown on every client. This list will help you manage calls as you will easily be able to see whether a Person is already engaged before transferring a call to them or inviting them to a conference call. You can also interrupt another Person's call by highlighting it in the list and then clicking the [Hold] or [Hang Up] buttons.
- The Contact Method List
- To communicate with a Contact, click their name once in the Contact list. The available communication methods (telephone and mobile numbers, Skype names, etc.) will be shown in the Contact Method list. Choose a communication method by clicking, and then click the appropriate button below. Please follow the links at the bottom of this page for details about the various communications methods.
- In the cases of Skype, Asterisk, Switchboard and Mobile calls, when a call is established (i.e. when the Contact answers your call and when you answer an incoming call), a new Activity will be opened, allowing you to record the details of the conversation immediately, thus adding the call to the Contact's call history. When the call ends, click the [End Activity] button in the Activity: this will bring an End Time and Cost (Time) in to the Activity and will also save the Activity. Activities are described here.
- If you have more than one Company in your database, the new Activity will usually be created in the Company in which you are currently working. The exception is when you have a Global User record in which a Main CRM Company has been specified, in which case the Activity will be created in the Main CRM Company. Please refer here for details about Global Users.
- In the cases of Skype, Asterisk, Switchboard and Mobile calls, when a call is established (i.e. when the Contact answers your call and when you answer an incoming call), a new Activity will be opened, allowing you to record the details of the conversation immediately, thus adding the call to the Contact's call history. When the call ends, click the [End Activity] button in the Activity: this will bring an End Time and Cost (Time) in to the Activity and will also save the Activity. Activities are described here.
In this chapter:
- Browse window
- Record window
- Report window
- List window
- Specification window
- File dialogue window
- Business Communicator window, including:
Business Communicator Window - Skype
To call a Contact using Skype, first open the 'Business Communicator' window:
Click on the Contact in the Contact list and then: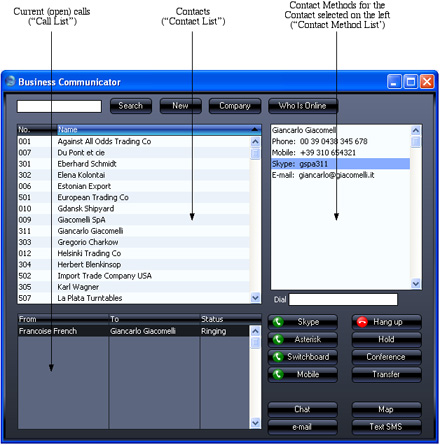
- To make a Skype-to-Skype call, click on their Skype Name in the Contact Method list and then click the [Skype] button.
- To make a SkypeOut call, click on their telephone or mobile number in the Contact Method list (or enter a number in the Dial field) and then click the [Skype] button.
- To open the Skype Chat window, click on their Skype Name in the Contact Method list and then click the [Chat] button.
You can use the [Skype] button to answer an incoming Skype-to-Skype call, as well as doing so in Skype itself. If you already have an open call, it will be put on hold when you click the [Skype] button to answer the new call.
Communication using Skype requires the following:
- The Skype application must be running.
- You must have allowed HansaWorld Enterprise to use Skype. This is described on the 'Interaction with Skype' page.
- To make a SkypeOut call, you must have Skype credits.
- When you make a SkypeOut call, the format of the number you are calling must be as described on the 'Contact Numbers' page.
In this chapter:
- Browse window
- Record window
- Report window
- List window
- Specification window
- File dialogue window
- Business Communicator window, including:
Business Communicator Window - Asterisk
To call a Contact through an Asterisk-based switchboard, first open the 'Business Communicator' window:
Click on the Contact in the Contact list and then click on their telephone or mobile number in the Contact Method list (you cannot call a SIP address using Asterisk). Alternatively, enter a telephone number in the Dial field. Then, click the [Asterisk] button.
A call will be established between you and the Contact. First, your SIP client (softphone (e.g. EyeBeam, X-Lite) or hardphone) will ring. When you answer, the Contact's telephone will ring.
You cannot use the [Asterisk] button to answer an incoming Asterisk call. You can only do this using your soft- or hardphone.
Communication through an Asterisk-based switchboard requires the following:
- You must have configured your HansaWorld Enterprise database to communicate through an Asterisk-based switchboard, as described immediately below.
- You must have a softphone application (e.g. EyeBeam, X-Lite) running and logged in to your Asterisk server, or a hardphone (e.g. USB telephone) correctly connected and logged in.
- Ensure the Asterisk Management Interface has been enabled on your Asterisk server.
- Log in to your HansaWorld Enterprise system as a system administrator with access to the Technics module, as described here.
- Open the SIP Servers setting in the Technics module:
On flip A, enter the following details to allow your HansaWorld Enterprise server to log in to your Asterisk server(s) automatically: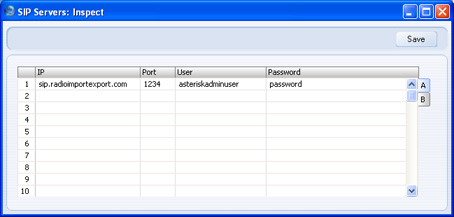
- IP
- Enter the address of the Asterisk server. This can be its IP address or its domain name (e.g. sip.companyname.com).
- Port
- Enter the port number used by the Asterisk Management Interface on the Asterisk server.
- User, Password
- Enter the login details of the administrator account for the Asterisk Management Interface.
- IP
- For each member of staff, create records in the Contact register containing their SIP user names.
The format of these user names must follow the model you used in the IP field in the SIP Servers setting in step 3. For example, if you entered the domain name of the Asterisk server in the IP field, each user name should use the format username@sip.companyname.com. If you entered the server's IP address in the IP field, include the IP address in each user name instead of the domain name (e.g. username@123.123.123.123).
The user names must be registered in the relevant Asterisk server.
The Contact records should also contain Extensions that other members of staff can call within the Asterisk server.
Connect these Contact records to the relevant Person or Global User records using the Contact Code field on the 'Access' card.
- The next step is to ensure incoming calls can be identified correctly so that they can be matched to numbers that are already in the database. For this matching process to be successful, the format of the originating telephone or mobile numbers of incoming calls must be the same as that of numbers in the database. Follow these steps:
- Log in again as a system administrator with access to the Technics module, return to the SIP Servers setting and go to flip B:
HansaWorld Enterprise will use the information in these fields to identify the originating telephone numbers of each incoming call made to each Asterisk server. After identification, it will use the Normalized Phone Numbers setting (step ii below) to attempt to match the telephone number to a record in the Contact register, and to open an Activity for that Contact.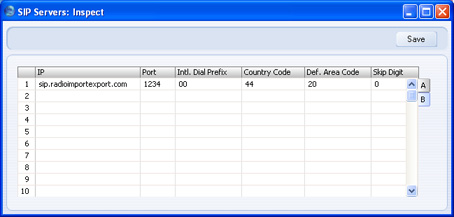
- Intl. Dial Prefix
- Specify the international dialling code that must be dialled from the country where the Asterisk server is located. In Europe, this will be 00.
- Country Code
- Specify the country code of the country where the Asterisk server is located. For example, if the Asterisk server is located in the UK, this will be 44.
- Def. Area Code
- Specify the local area code of the area where the Asterisk server is located. This is only required in countries where you do not need to dial the area code when you are calling numbers in the same area. This is the case in the UK and Sweden.
- Skip Digit
- If the Asterisk server is located in a country where the first digit of telephone numbers is not dialled by incoming international callers, specify that digit here. For example, if the Asterisk server is located in the UK, this will be 0.
- Intl. Dial Prefix
- Having ensured that incoming numbers all use the same format, you should now ensure the Contact numbers in the database also use the same format, so that they can be matched up. To do this, you will use the Telephony Settings setting.
Note that the SIP Servers setting is stored in Company 0, a partition of the database that stores information at database level (i.e. information that is available to every Company). Connecting to an Asterisk server and receiving and identifying incoming calls from that server are database level operations. This means you only need configure flip B of the SIP Servers setting once, and you can do so working in any Company. However, if you have more than one Company, you will need to configure the Telephony Settings setting separately in every Company. This allows for the possibility that different Companies might represent departments in different parts of the country (with different area codes) or even in different countries.
In each Company, open the Telephony Settings setting in the CRM module:
In configuring the Telephony Settings setting, bear in mind the telephone and mobile numbers that are already in the database, and also think about how users will enter telephone and mobile numbers in the future. For example, numbers local to the Company may have been entered without area codes. So, while the location of the Asterisk server will determine what you entered in the SIP Servers setting, the location of the Company will determine the country and area codes here.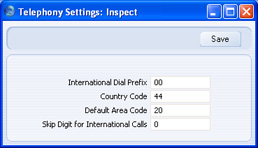
Do not include the Skip Digit in the Default Area Code. For example, if the area code is 020 for London or 0118 for Reading, enter 20 (as shown in the illustration) or 118 respectively.
- If you already have Contacts in your database, you should now ensure that their telephone and mobile numbers are in the correct format. You can do this by running the 'Rebuild Number Recognition Register' Maintenance function. This will not change the numbers in the Contact records themselves. Instead, it will use the Telephony Settings setting to convert all numbers to the correct format and save them in a central setting in Company 0 known as the Normalized Phone Numbers setting.
To run this function, ensure you are in the CRM module, click the [Routines] button in the Master Control panel and then the [Maintenance] button in the 'Routines' window. Double-click 'Rebuild Number Recognition Register' in the subsequent list. The following window appears:
Choose the Erase and Update option and click the [Run] button. All numbers (i.e. telephone, mobile, alt phone and fax numbers) in the Contact register will be converted to the correct format and saved in the Normalized Phone Numbers setting. You can look at the contents of this setting in the CRM module: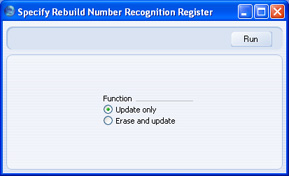
If a Contact for example has the London number 020 3222 1234 in the Contact register, the effect of the Maintenance function will be to add the international dialling prefix, the country code and the area code less skip digit to produce 00442032221234. This will match the incoming number described above in step 5 i. When you receive an incoming call from this number, HansaWorld Enterprise will find it in the Normalized Phone Numbers setting and match it to a record in the Contact register using the Contact Number. The Contact Name will then be shown in the Call list in the 'Business Communicator' window. When you answer the call, a new Activity will be created with the correct Contact Number and Name.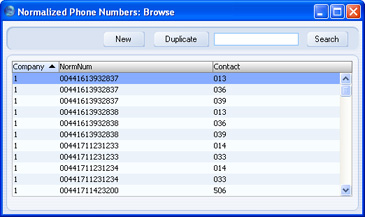
You only need run the 'Rebuild Number Recognition Register' function once, to make sure the Normalized Phone Numbers setting contains numbers for the Contacts already in your database. As you add new records to the Contact register or modify existing ones, the Normalized Phone Numbers setting will be updated automatically.
If you have more than one Company in your database, you need to configure the Telephony Settings setting separately in each Company, but you only need run the 'Rebuild Number Recognition Register' function once, from any Company. All numbers in every Company will be reformatted and copied to the Normalized Phone Numbers setting.
- Periodically, you should use the List Invalid Phone Numbers report in the CRM module to list telephone and mobile numbers containing illegal characters. If you print the report to screen, you can drill down to each Contact to make the correction. You should do this separately in each Company.
- Log in again as a system administrator with access to the Technics module, return to the SIP Servers setting and go to flip B:
In this chapter:
- Browse window
- Record window
- Report window
- List window
- Specification window
- File dialogue window
- Business Communicator window, including:
Business Communicator Window - TAPI (Microsoft Telephony API)
The TAPI gateway allows HansaWorld Enterprise to connect to a switchboard via the Microsoft Telephony API (TAPI).
To call a Contact using this method, first open the 'Business Communicator' window:
Click on the Contact in the Contact list and then click on their telephone or mobile number in the Contact Method list. Alternatively, enter a number in the Dial field. Then, click the [Switchboard] button. The number must be one that can be understood by the switchboard: for example, if you need to dial 9 to get an outside line, include 9 in the number. This means including 9 in every telephone and mobile number in the Contact register.
A call will be established between you and the Contact. First, your telephone (i.e. the telephone with the extension number in your Contact record) will ring. When you answer, the Contact's telephone will ring.
Communication through a switchboard via TAPI requires a TAPI gateway which must be on a Windows computer. This can be your HansaWorld Enterprise server (an "internal" gateway) or a separate machine (an "external" gateway). The switchboard must have "TAPI 2.0 (or later) with third-party support" enabled. This will allow the TAPI gateway to initiate new calls and monitor existing ones for every extension. Without third-party support, the gateway would only be able to do this for one specific user.
The provider of your switchboard will have supplied a TAPI Telephone Service Provider (driver) that must be installed on the internal or external gateway. To install this new driver and to see those already installed, open the Phone and Modem Options control panel in Windows and go to the 'Advanced' card.
To configure an internal gateway, follow these steps:
- Log in to your HansaWorld Enterprise system as a system administrator with access to the Technics module, as described here.
- Open the TAPI Gateway setting in the Technics module:
In the TAPI Service Provider field, use 'Paste Special' to specify the service provider of your TAPI service. 'Paste Special' will list the Telephone Service Providers (drivers) installed in Windows.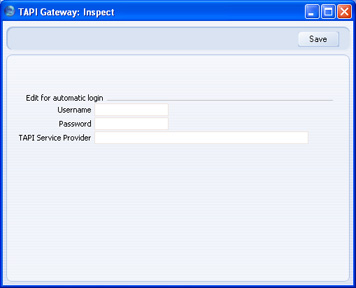
If your TAPI driver is not included in the 'Paste Special' list, the probable reason is that "TAPI 2.0 (or later) with third-party support" has not been enabled on your switchboard. Alternatively, the driver might not be supported by the switchboard. Please refer to the provider of your switchboard for more assistance.
Leave the Username and Password empty.
- Open the Configuration setting in the System module and make sure that the TAPI Gateway option on the 'Technical' card is checked.
- Restart the server.
- Create records in the Contact register for each member of staff, containing their extension numbers. Connect these Contact records to the relevant Person or Global User records using the Contact Code field on the 'Access' card.
- Log in to your main HansaWorld Enterprise system and create a record in the Person register to allow the external gateway to log in. This Person should belong to an Access Group that only has full access to the TAPI Gateway module. Remember to specify a Password for this Person.
If you have several Companies in your database, enter this Person in the first Company.
- Open the Configuration setting in the System module and make sure that the TAPI Gateway option on the 'Technical' card is checked.
- Create records in the Contact register for each member of staff, containing their extension numbers. Connect these Contact records to the relevant Person or Global User records using the Contact Code field on the 'Access' card.
- Change to the gateway machine and install the standard Windows Vista/XP/2003/2000 application. When you launch the "HansaWorld.exe" application, a new database ("HANSA.HDB" file) will be created. Proceed as follows:
- When the 'Welcome to HansaWorld' window appears, do not click any buttons. Instead, close the window by clicking the close box.
- An empty 'Companies: Inspect' window will appear: enter the Company Code and Name of the Company on the main server in which you created the Person in step i. Click the [Save] button.
- Open the TAPI Gateway setting in the Technics module. Specify the service provider of your TAPI service as described in step 2 above. In the Username and Password fields, enter the Signature and Password of the Person that you created in step i.
- Return to the 'Companies: Inspect' inspect window by opening the Company register in the System module. Enter the IP address of the main server. In the Port field, enter the Server Port entered in the Program Mode register in the Technics module in the main database (illustrated on the Progam Mode page). By default, this will be 1200. When you click the [Save] button, the application will quit automatically.
- When the 'Welcome to HansaWorld' window appears, do not click any buttons. Instead, close the window by clicking the close box.
- The Windows Vista/XP/2003/2000 installer in step iv will have installed a slave version of the application ("HansaWorld-Slave.exe") as well as the standard application. Start the slave version of the application using one of the following methods:
- Create a "parameters.txt" file as described in the 'Launching the Server with Parameters ' section on the Loading an Existing Database and Company page. This file should contain the parameter --gateway. Launch the slave application by double-clicking.
- Open the command line and launch the slave application by typing:
- hansaworld-slave --gateway
- Create a "parameters.txt" file as described in the 'Launching the Server with Parameters ' section on the Loading an Existing Database and Company page. This file should contain the parameter --gateway. Launch the slave application by double-clicking.
In this chapter:
- Browse window
- Record window
- Report window
- List window
- Specification window
- File dialogue window
- Business Communicator window, including:
- Skype
- Asterisk
- TAPI (Microsoft Telephony API)
- Mobile Phone
- Text (SMS) Messages
- E-mail
- Managing Calls
- Communicating with Other Users
- Producing a Map
- Contact Numbers
- Skype
Business Communicator Window - Mobile Phone
To call a Contact via your mobile phone, first open the 'Business Communicator' window:
Click on the Contact in the Contact list and then click on their telephone or mobile number in the Contact Method list. Alternatively, enter a number in the Dial field. Then, click the [Mobile] button. Your mobile phone will be activated, and a call will be established between you and the Contact, so the Contact's telephone will ring immediately. You can end the call from the phone or by highlighting the call in the Call list in the 'Business Communicator' window and clicking the [Hang up] button.
Calling a Contact via your mobile phone requires the following:
- You must be using the Business Communicator for Handsets option in the Program Mode register in the Technics module, and you must have specified a Handset Port in the same register.
- You must have the HansaWorld Business Communicator For Handsets application installed on your mobile phone, which must be a Symbian S60 3rd edition device. The application must be running and you must have logged in to your HansaWorld Enterprise server using your usual Signature and Password. This requires you to have entered the IP address of the server and the Handset Port from the previous step in the Company register on the device.
In this chapter:
- Browse window
- Record window
- Report window
- List window
- Specification window
- File dialogue window
- Business Communicator window, including:
Business Communicator Window - Text (SMS) Messages
To send a Text (SMS) message, first open the 'Business Communicator' window:
Click on a Contact in the Contact list and then click the [Text SMS] button. The 'Text SMS' window opens:
The Contact's mobile number will appear in the Phone field. If the 'Text SMS: New' window doesn't open, the probable reason will be that the Contact doesn't have a mobile number.
Enter the message in the Text field and click the [Save] button. Your Signature will appear in the Person field, your mobile number will appear in the From Phone field and the Sent box will be marked automatically, signifying that the message has been sent.
The Person field in the Text SMS record will take your Signature from your Person record. Your mobile number in the From Phone field will be chosen as follows:
- It will be taken from your record in the Contact register containing your mobile phone number, this record being connected to your Global User or Person record using the Contact Code field on the 'Access' card;
- If you do not have a record in the Contact register, or this record does not have a mobile phone number, it will be taken from the Phone 1 or Phone 2 fields (in that order) in your Person record.
- If you have access to more than one Company through Person records in each Company, the Phone 1 or Phone 2 fields in those Person records can supply your mobile number to each Text SMS record. This can also be supplied from records in the Contact register in each Company, connected to each Person record using the Contact Code field on the 'Access' card.
- If you have access to more than one Company through a Global User record, you need a Person record in each Company from which you will send Text (SMS) messages, to supply your Signature and mobile number to the Text SMS records. If you also have a record in the Contact register in each Company, these records will instead supply the mobile number to the Text SMS records. Each of these Contact records must have the same Contact Number. Enter this Contact Number in the Contact Code field on the 'Access' card of your Global User record. Please refer here for details about Global Users.
- The format of the mobile number to which you are sending the Text (SMS) message must be as described on the 'Contact Numbers' page.
- Sending Text (SMS) messages is a chargeable Internet Service. To use it, you must have registered your database using the Automatic Internet Enabler method, as described on the Enabler Key page. Please contact your local HansaWorld representative to sign up for the service and for pricing details.
In this chapter:
- Browse window
- Record window
- Report window
- List window
- Specification window
- File dialogue window
- Business Communicator window, including:
Business Communicator Window - Email
To send an e-mail, first open the 'Business Communicator' window:
Click on the Contact's email address in the Contact Method list and then click the [e-mail] button. By default, a new Mail will be created, with the Contact's email address as the To Address. Please refer to the 'Sending and Receiving Mail' page for details about sending Mails. However, if you are using the Use External Mail Software option in the Mail and Conference Settings setting in the E-mail and Conferences module and you are also using Windows on your client machine, your default mail application (e.g. Eudora, Outlook, etc) will be opened and a new mail will be created, addressed to the Contact's email address.
Sending an email requires the following:
- If you are not using the Use External Mail Software option and/or you are not using Windows, your HansaWorld Enterprise system must be configured to send external mail. Please refer to the 'External Mail' page for details. You must have a Mailbox.
- If you are using the Use External Mail Software option and you are also using Windows, you must have a mail application fully installed and declared to be your default mail application. If this is not the case, the [e-mail] button in the 'Business Communicator' window will behave as if you are not using the Use External Mail Software option (i.e. a new Mail inside HansaWorld Enterprise will be created).
In this chapter:
- Browse window
- Record window
- Report window
- List window
- Specification window
- File dialogue window
- Business Communicator window, including:
Business Communicator Window - Managing Calls
The 'Business Communicator' window offers you various tools that you can use to manage your calls:
- To put a call on hold, highlight it in the Call list and click the [Hold] button. To continue with the call, highlight it again and click the appropriate button for the call method. For example, if it is a Skype call, click the [Skype] button. If another call is in progress, it will be put on hold automatically. You can use the [Hold] button with Skype, Asterisk and Switchboard calls.
- To transfer a call, first highlight it in the Call list and click the [Hold] button. Then find and highlight the person to whom you want to transfer the call in the Contact list and then click the appropriate number or address in the Contact Method list (for example, if you are transferring a Skype call, click the person's Skype name in the Contact Method list). Finally, click the [Transfer] button. Note that you cannot transfer Skype calls that you initiated. You can only transfer Skype calls that you received.
Remember that the Contact list is a list of records in the Contact register. Therefore, to transfer a call to another member of staff, that member of staff must have their own record in the Contact register, and this record must be connected to their Global User or Person record using the Contact Code field on the 'Access' card. If you have more than one Company in your database, the Contact list will list the records in the Contact register in the Company you are currently working in.
- To open a conference call (a call with more than two participants), follow these steps:
- Make or receive a call.
- Put the call on hold.
- Make or receive a second call.
- Click the [Conference] button.
If all calls are on hold, the conference call will not start: you must have one call in progress to open the conference call.
You can use the [Conference] button with calls of all types except Mobile.
- Make or receive a call.
In this chapter:
- Browse window
- Record window
- Report window
- List window
- Specification window
- File dialogue window
- Business Communicator window, including:
Business Communicator Window - Communicating with other users in your HansaWorld Enterprise system
You can communicate with other users in your HansaWorld Enterprise system. Open the 'Business Communicator' window and click the [Who Is Online] button. This will print a report to screen listing the users currently logged in (only users with Mailboxes will be listed, but the list will include users logged in to every Company if you have more than one). Click a user's name in the list, and then choose whether you want to communicate with them using Skype-to-Skype, SkypeOut, email, text (SMS) or the chat feature built in to HansaWorld Enterprise. The chat feature is described here.
---
In this chapter:
- Browse window
- Record window
- Report window
- List window
- Specification window
- File dialogue window
- Business Communicator window, including:
- Skype
- Asterisk
- TAPI (Microsoft Telephony API)
- Mobile Phone
- Text (SMS) Messages
- E-mail
- Managing Calls
- Communicating with Other Users
- Producing a Map
- Contact Numbers
- Skype
Business Communicator Window - Producing a Map showing the Location of a Contact
To see a map showing a Contact's location, first open the 'Business Communicator' window:
Click on the Contact in the Contact list, then click the [Map] button. A new browser window will open in your default browser, using maps.msn.com and the address information in the Contact record to show you where the Contact is. This feature is limited to the countries supported by maps.msn.com, and requires the Contact's address to be entered as follows:
- Field 1: Street address and number
- Field 2: Post code
- Field 3: City
- Field 4: State/Province (optional)
- Field 5: Country
In this chapter:
- Browse window
- Record window
- Report window
- List window
- Specification window
- File dialogue window
- Business Communicator window, including:
Business Communicator Window - Contact Numbers
To call a Contact from the 'Business Communicator' window, you should have entered their telephone or mobile number as follows:
- the only legal characters are numbers, spaces, dashes and the + sign. Do not use full stops or brackets, and do not use alpha characters (e.g. do not place text such as "home" or "work" after telephone numbers.
- enter all numbers as international numbers. You can place + or 00 at the beginning of a number, but + is to be preferred as it is the standard method of signifying international numbers and will not change.
You can use the List Invalid Phone Numbers report in the CRM module to list telephone and mobile numbers containing illegal characters. If you print the report to screen, you can drill down to each Contact to make the correction.
---
In this chapter:
- Browse window
- Record window
- Report window
- List window
- Specification window
- File dialogue window
- Business Communicator window, including: