Introduction to Contact Settings
There are several settings concerned with Customers, Suppliers and Contact Persons:- Customer Categories;
- Classification Types;
- Contact Classifications;
- Contact Settings;
- Info on Customer Status Report;
- Info on Supplier Status Report;
- Job Titles;
- Number Series - Contacts;
- Supplier Categories; and
- User Defined Fields - Contacts.
Kliendiklassid
Kliendiklassid kirjeldatakse Müügireskontro vastavas seadistuses. Mine Müügireskontrosse ja vali kas Fail-menüüs või põhiaknas Seadistused. Avanenud nimekirjas tee hiirega topeltklõps real Kliendiklassid. Uue kaardi sisestamiseks klõpsa Uus. Olemasoleva kaardi muutmiseks tee sellel topeltklõps.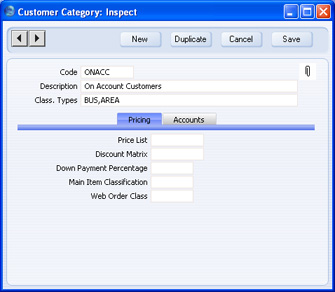
Päis
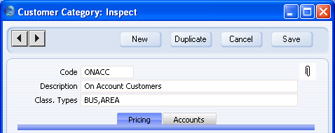
- Kood
- Anna Kliendiklassile ainulaadne kood.
- Nimetus
- Sisesta Klassi kirjeldus.
- Nõua klassifikaatoreid tüüpidest
- Ctrl-Enter
Klassifikaatorite tüüpide seadistus, Kliendihalduse moodul
- Kui sisestad siia Klassifikaatori tüübi või mitu komadega eraldatud tüüpi ning määrad, et mingi Kontakt kuulub antud Klassi, pead enne Kontaktikaardi salvestamist sellele andma siin näidatud Tüüpi Klassifikaatori.
Kui jätad nõutud Tüüpi Klassifikaatori sisestamata, antakse Kontakti salvestamisel järgmine hoiatus:
Kui oled näidanud antud Klassi kuulumise Kontaktikaardil enne, kui sisestad siia Klassifikaatori tüübi, pead nõutud Tüüpi Klassifikaatori sisestama järgmine kord, kui Kontaktikaardi avad.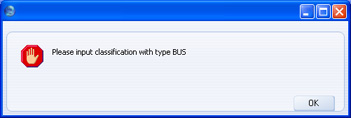
Klassifikaatoritest loe palun siit.
See väli kontrollib ka Abistava klassifikaatori sisestuse funktsiooni.
Hinnakujunduse kaart
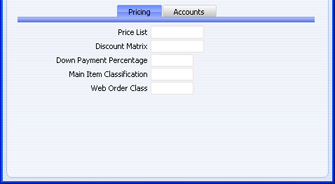
- Hinnakiri
- Ctrl-Enter
Hinnakirjade register, Hindade moodul
- Sisestub vaikimisi Klientidele, Pakkumistele, Tellimustele, Arvetele
- Siia sisestatud Hinnakirjast võetakse hinnad antud Klassi kuuluvatele Klientidele esitatud Tellimustele ja Arvetele. Hinnakirju kirjeldatakse Artiklite ja hindade juhendis.
- Siia sisestatud Hinnakirjast võetakse hinnad antud Klassi kuuluvatele Klientidele esitatud Tellimustele ja Arvetele. Hinnakirju kirjeldatakse Artiklite ja hindade juhendis.
- Hinnaalandusmaatriks
- Ctrl-Enter
Hinnaalandusmaatriksite register, Hindade moodul
- Sisestub vaikimisi Klientidele, Pakkumistele, Tellimustele, Arvetele
- Siin näidatud Hinnaalandusmaatriksi alusel arvutatakse allahindlused antud Klassi kuuluvatele Klientidele. Hinnaalandusmaatrikseid kirjeldatakse Artiklite ja hindade juhendis.
- Siin näidatud Hinnaalandusmaatriksi alusel arvutatakse allahindlused antud Klassi kuuluvatele Klientidele. Hinnaalandusmaatrikseid kirjeldatakse Artiklite ja hindade juhendis.
- Ettemaksu protsent
- Antud Klassi kuuluvatele Klientidele esitatavate Müügitellimustest koostatud Ettemaksuarvete väärtus on siin näidatud protsent Tellimuse kogusummast. See summa ümardatakse lähima täisarvuni.
- Kui see väli on tühi või Klient ei kuulu ühtegi Klassi, võetakse protsent Müügitellimuste mooduli Ettemaksude seadistusest.
- Ettemaksuarve väärtus arvutatakse Tellimuse kogusummalt. Valik, kas aluseks võetakse kogusumma koos või ilma käibemaksuta, tehakse Ettemaksude seadistuses.
- Kui see väli on tühi või Klient ei kuulu ühtegi Klassi, võetakse protsent Müügitellimuste mooduli Ettemaksude seadistusest.
- Peamine artikli klassifikaator
- Ctrl-Enter
Artikliklassifikaatorite seadistus, Laomoodul
- Kui kasutad HansaWorld Enterprise’i Veebipoe võimalust, võid soovida pakkuda erinevatele Klientidele erinevat kaupa. Selleks anna vastavatele Artiklitele sama Klassifikaator ning seejärel määra see Klassifikaator soovitud Klientidele või Kliendiklassidele. Nii näevad need Kliendid Veebipoodi sisenedes vaid vastavat Klassifikaatorit kandvaid Artikleid.
- Kui ka Kliendile on määratud Klassifikaator, arvestatakse seda enne Kliendiklassile antud Klassifikaatorit.
- Kui Kliendile ega Kliendiklassile ei ole Klassifikaatorit määratud, kasutatakse Klassifikaatorit koodiga MAIN. Kui Esituse gruppi koodiga MAIN ei ole või on Kliendile või Kliendiklassile määratud olematu Klassifikaator, ei näe Klient sisse logides Artikleid.
- Kui ka Kliendile on määratud Klassifikaator, arvestatakse seda enne Kliendiklassile antud Klassifikaatorit.
- Veebitellimuste klass
- Ctrl-Enter
Tellimuste klasside seadistus, Müügitellimuste moodul
- Sisesta Tellimuse klass, mida soovid kasutada antud Klassi kuuluvate Klientide poolt HansaWorld Enterprise’i Veebipoe kaudu esitatud Tellimustel. Tellimustele sisestub see Klass automaatselt.
- Veebitellimuse klassi saad määrata vaid Kliendiklassile, mitte üksikule Kliendile. Seepärast on soovitatav koondada kõik Veebipoe Kliendid Kliendiklassidesse, kui tahad eristada ja analüüsida nende esitatud Tellimusi vastavalt Tellimuse klassile.
- Tavalistel Tellimustel (otse Müügitellimuste registrisse sisestatud või Pakkumistest koostatud seda Tellimuse klassi ei kasutata.
- Veebitellimuse klassi saad määrata vaid Kliendiklassile, mitte üksikule Kliendile. Seepärast on soovitatav koondada kõik Veebipoe Kliendid Kliendiklassidesse, kui tahad eristada ja analüüsida nende esitatud Tellimusi vastavalt Tellimuse klassile.
Kontode kaart
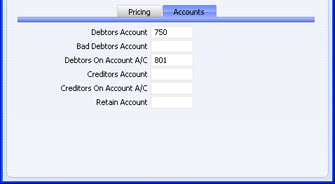
- Müügivõlakonto
- Ctrl-Enter
Kontode register, Finants/Üldine moodul
- Määra Müügivõlakonto, mida debiteeritakse antud Klassi kuuluvale Kliendile esitatavatest Arvetest koostatavtel finantskannetel.
- Müügivõlakonto saab määrata vaid Kliendiklassile, mitte üksikule Kliendile. Kui Klassile ei ole Müügivõlakontot antud, kasutatakse Müügivõlakontot Müügireskontro seadistusest Lausendamine M/R.
- Kui Kliendiklassi ei saa salvestada, võib olla põhjuseks see, et kasutad Müügireskontros Allsüsteemide kontrolli võimalust ning siin näidatud konto pole määratud Müügivõla kontrollkontoks. Allsüsteemi kontrolli valik tehakse seadistuses Lausendamine M/R ning kontrollkontod määratakse Üldise mooduli Allsüsteemide kontrollkontode seadistuses.
- Müügivõlakonto saab määrata vaid Kliendiklassile, mitte üksikule Kliendile. Kui Klassile ei ole Müügivõlakontot antud, kasutatakse Müügivõlakontot Müügireskontro seadistusest Lausendamine M/R.
- Vähetõen. laek. müügivõla konto
- Ctrl-Enter
Kontode register, Finants/Üldine moodul
- Hooldusfunktsiooniga Vähetõenäoliselt laekuvad võlad kantakse Arve tasumata summa ülal määratud Müügivõlgade kontolt Vähetõenäoliselt laekuvate müügivõlgade kontole. Siin määra konto, millele kantakse antud Klassi kuuluvate Klientide tasumata Arved.
- Nagu Müügivõlakonto, saab ka Vähetõenäoliselt laekuvate müügivõlgade konto määrata vaid Kliendiklassile, mitte üksikule Kliendile. Kui Klassile ei ole Vähetõenäoliselt laekuvate müügivõlgade kontot antud, kasutatakse Vähetõenäoliselt laekuvate müügivõlgade kontot Müügireskontro seadistusest Lausendamine M/R.
- Nagu Müügivõlakonto, saab ka Vähetõenäoliselt laekuvate müügivõlgade konto määrata vaid Kliendiklassile, mitte üksikule Kliendile. Kui Klassile ei ole Vähetõenäoliselt laekuvate müügivõlgade kontot antud, kasutatakse Vähetõenäoliselt laekuvate müügivõlgade kontot Müügireskontro seadistusest Lausendamine M/R.
- Müügi ettemaksu konto
- Ctrl-Enter
Kontode register, Finants/Üldine moodul
- Seda kontot kasutatakse, kui Klient tasub kauba eest ettemaksuna (enne Arve esitamist). Selleks peab igal sellisel Kliendil olema märgitud valik Ettemaks. Kui antud Klassi kuuluv Klient tasub Ettemaksu, krediteeritakse selle summas siin näidatud kontot. Kui koostad seejärel Arve ning seod selle Ettemaksuga, debiteeritakse sama kontot vaikimisi Müügivõlakonto asemel. Ettemaksude kohta loe palun lähemalt Müügireskontro juhendi Ettemaksude osast.
- Ettemaksu konto saab määrata vaid Kliendiklassile, mitte üksikule Kliendile. Kui Klassile ei ole Ettemaksu kontot antud, kasutatakse Ettemaksu kontot Müügireskontro seadistusest the Lausendamine M/R.
- Ettemaksu konto saab määrata vaid Kliendiklassile, mitte üksikule Kliendile. Kui Klassile ei ole Ettemaksu kontot antud, kasutatakse Ettemaksu kontot Müügireskontro seadistusest the Lausendamine M/R.
- Ostuvõlakonto
- Ctrl-Enter
Kontode register, Finants/Üldine moodul
- Määra siin Ostuvõlakonto, mida krediteeritakse antud Klassi kuuluva Hankija poolt esitatud Ostuarvetest koostatud finantskannetel.
- Seda kontot kasutatakse vaid juhul, kui Hankija kuulub antud Kliendiklassi ja samal ajal mitte ühessegi Hankija klassi. Kui Ostuvõlakonto on määratud nii Hankijale kui ka Kliendiklassile, kuhu Hankija kuulub, kasutatakse Hankijale määratud Kontot. Kui Hankijale ega Klassile ei ole Ostuvõlakontot antud, kasutatakse Ostuvõla-, Ettemaksu või Kassakontot seadistusest Lausendamine O/R.
- Kui Kliendiklassi ei saa salvestada, võib olla põhjuseks see, et kasutad Ostureskontros Allsüsteemide kontrolli võimalust ning siin näidatud konto pole määratud Ostuvõla kontrollkontoks. Allsüsteemi kontrolli valik tehakse seadistuses Lausendamine O/R ning kontrollkontod määratakse Üldise mooduli Allsüsteemide kontrollkontode seadistuses.
- Seda kontot kasutatakse vaid juhul, kui Hankija kuulub antud Kliendiklassi ja samal ajal mitte ühessegi Hankija klassi. Kui Ostuvõlakonto on määratud nii Hankijale kui ka Kliendiklassile, kuhu Hankija kuulub, kasutatakse Hankijale määratud Kontot. Kui Hankijale ega Klassile ei ole Ostuvõlakontot antud, kasutatakse Ostuvõla-, Ettemaksu või Kassakontot seadistusest Lausendamine O/R.
- Ostu ettemaksu konto
- Ctrl-Enter
Kontode register, Finants/Üldine moodul
- Seda kontot kasutatakse, kui tasud Hankijale kauba eest ettemaksuna (enne Ostuarve saamist). Selleks peab igal sellisel Hankijal olema märgitud valik Ettemaks. Kui vormistad antud Klassi kuuluvale Hankijale Ettemaksu, debiteeritakse selle summas siin näidatud kontot. Kui seejärel esitatakse Ostuarve ning Sa seod selle Ettemaksuga, krediteeritakse sama Kontot vaikimisi Ostuvõlakonto asemel. Ettemaksude kohta loe palun lähemalt Ostureskontro juhendi Ettemaksude osast.
- Seda Kontot kasutatakse vaid juhul, kui Hankija kuulub antud Kliendiklassi ja samal ajal mitte ühessegi Hankija klassi. Kui Hankijale on määratud erinev Ostu ettemaksu konto, kasutatakse seda siin määratud konto asemel. Kui Hankijale ega Klassile, kuhu Hankija kuulub, ei ole Ettemaksukontot antud, kasutatakse Ettemaksu kontot seadistusest ( Lausendamine O/R.
Customer Categories - Web Card
This page describes the fields on the 'Web' card of the Customer Category record. Please follow the links below for descriptions of the other cards:- Introduction
- Header
- 'Pricing' card
- 'Accounts' card
- 'Web' card
- 'BI' card
- Assisted Classification Entry
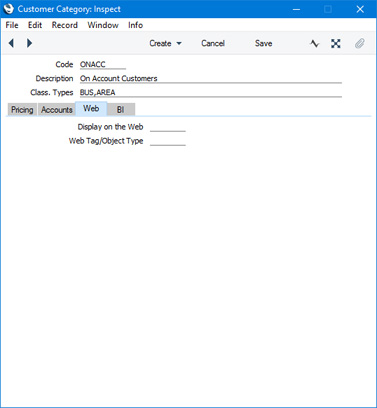
- Display on the Web
- Paste Special
Display on the Web setting, Web Shop and CMS module
- If you are using the Standard ERP Web Shop, you can use the Display on the Web setting to specify how much information about stock levels will be shown to visitors to the web shop, which payment methods will be shown, and whether Delivery Modes will be displayed.
- If you specify a Display on the Web record in this field, this will control the information that will be shown to Customers that belong to the Category after they have logged in. You can also specify Display on the Web records at the Customer level. If you do not specify a Display on the Web record at the Category level or at the Customer level, information will be displayed as follows:
- Stock information will be controlled by the Show Item Stock Levels options in the Webshop Settings setting.
- Payment methods will be controlled by the Webshop Company Settings setting.
- Delivery Modes will be controlled by the Show Delivery Modes option in the Webshop Company Settings setting.
- If you specify a Display on the Web record in this field, this will control the information that will be shown to Customers that belong to the Category after they have logged in. You can also specify Display on the Web records at the Customer level. If you do not specify a Display on the Web record at the Category level or at the Customer level, information will be displayed as follows:
Settings related to Contacts:
- Customer Categories, including:
- Header
- 'Pricing' card
- 'Accounts' card
- 'Web' card
- 'BI' card
- Assisted Classification Entry
- Home page for Customers, Suppliers and Contact Persons manual
- Home page for Standard ERP manual
Customer Categories - BI Card
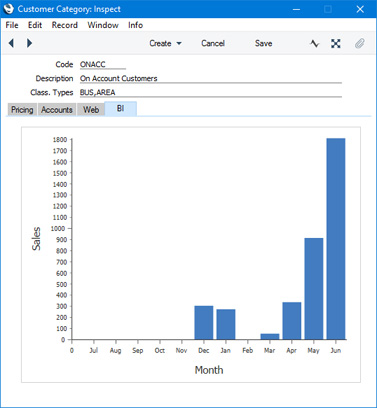
This page describes the 'BI' card of the Customer Category record. Please follow the links below for descriptions of the other cards:- Introduction
- Header
- 'Pricing' card
- 'Accounts' card
- 'Web' card
- 'BI' card
- Assisted Classification Entry
---
Settings related to Contacts:
- Customer Categories, including:
- Header
- 'Pricing' card
- 'Accounts' card
- 'Web' card
- 'BI' card
- Assisted Classification Entry
- Home page for Customers, Suppliers and Contact Persons manual
- Home page for Standard ERP manual
Abistav klassifikaatori sisestus
HansaWorld Enterprise’is saab Kontakte grupeerida kas Klasside või Kontakti klassifikaatorite abil. Kontakt võib kuuluda vaid ühte Klassi, kuid talle saab anda mitu erinevat Klassifikaatorit. Klassifikaatoritega saab Kontakte grupeerida mitme erineva näitaja alusel. Näiteks saad Klassifikaatoritega määrata, et tegemist on potentsiaalse kliendiga ning et tema krediidireiting on 3.Kui kasutad nii Klasse kui Klassifikaatoreid, aitab Abistava klassifikaatori sisestuse funktsioon valida registreeritavale Kontaktile õiged Klassifikaatorid:
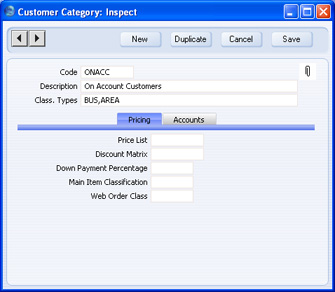
- Kliendiklassi kaardi päises on väli Nõua klassifikaatoreid tüüpidest. Kui näitad seal Klassifikaatori tüübi või mitu komadega eraldatud tüüpi ja seejärel määrad mingi Kontakti kuuluvaks sellesse Klassi, pead enne Kontaktikaardi salvestamist määrama Kontaktile antud Tüüpi või Tüüpidesse kuuluva Klassifikaatori. Näiteks tuleb pildil toodud Klassi kuuluvatele Kontaktidele anda BUS ja AREA Tüüpi Klassifikaatorid:
- Antud Klassi kuuluva Kontakti registreerimisel vali Klassifikaatorite väljal Ctrl-Enter või ⌘-Enter klahvikombinatsioon nagu tavaliselt. Kuna valitud Klassile on määratud kohustuslikud Klassifikaatorite tüübid, avaneb tavalise valikuakna asemel Abistava klassifikaatori sisestuse aken:
Pildil toodud Klassile on määratud kaks Klassifikaatorite tüüpi. Abistava klassifikaatori sisestuse aknas on väli kummagi Tüübi kohta. (Klassile saab anda kuni seitse Klassifikaatorite tüüpi.)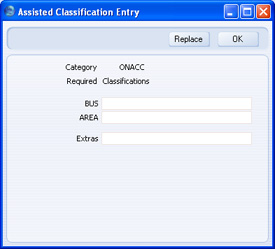
- Vali kumbagi Tüüpi kuuluvad Klassifikaatorid Ctrl-Enteriga. Ctrl-Enter nimekirjas näed vaid määratud Tüüpi Klassifikaatoreid. Muud Tüüpi Klassifikaator määra vajadusel Lisade väljal.
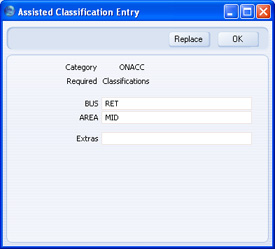
- Kui sulged Abistava klassifikaatori sisestuse akna, klikkides [OK], lisatakse valitud Klassifikaatorid Kontaktile eelnevalt määratud Klassifikaatoritele. Kui klikid [Asenda], kustutatakse eelnevalt antud Klassifikaatorid.
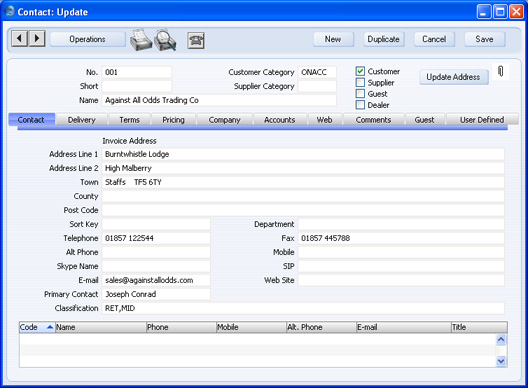
Klassifikaatorite tüübid
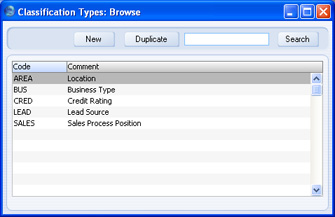
Klassifikaatorite tüüpide abil saab Kontakti klassifikaatoreid grupeerida.Klassifikaatorite tüübid kirjeldatakse vastavas Kliendihalduse mooduli seadistuses. Kliendihalduse moodulis vali kas Fail-menüüst või põhiaknas Seadistused. Avanenud nimekirjas tee hiirega topeltklõps real Klassifikaatorite tüübid.
On võimalik määrata, et kõikidele Kontaktidele antaks teatud Tüüpi Klassifikaator. Lähemalt loe palun Kliendiklassi kaardi päise kirjeldusest.
Kontakti klassifikaatorid
Selles Kliendihalduse mooduli seadistuses kirjelda Klassifikaatorid, mille abil saab kliente grupeerida, näiteks vastavalt nende seosele Sinu firmaga (nt potentsiaalne, teenus-, jaeklient). Klassifikaatorid sisesta Kontaktikaardi 'Kontakti' kaardile Klassifikaatorite väljale, kus võib näidata ka mitu Klassifikaatorit. Näiteks saad Klassifikaatoritega määrata, et tegemist on potentsiaalse kliendiga ning et tema krediidireiting on 3.Klassifikaatoritega saab kliente grupeerida erinevatel alustel kui Kliendiklassidega. Klass näitab tavaliselt, mis tüüpi ettevõtlusega klient tegeleb. Kliendile saab määrata mitu Klassifikaatorit, kuid ta võib kuuluda vaid ühte Kliendiklassi.
Klassifikaatorite alusel on võimalik tellida mitmeid Kliendihalduse mooduli aruandeid (ning Artikli EL sisese käibe aruande Müügireskontros). Samuti saad Klassifikaatoreid kasutada masspostitusel Kliendihalduse mooduli Kliendikirjade registrist.
Kontakti klassifikaatorid saab jagada Tüüpidesse, mis kirjeldatakse vastavas Kliendihalduse mooduli seadistuses.
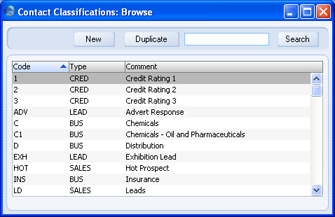
Salvestatud kaardil Koodi käsitsi muuta ei saa. Kood muuda Üldise mooduli seadistustes Konverteerimine ??? Master ja Konverteerimine – Kontakti klassifikaatorid. Muudetakse Klassifikaatori koodi nii antud seadistuses kui teistes registrites, kus vastavat Klassifikaatorit on kasutatud.
Kontakti seadistused
Selles Müügireskontro seadistuses määratakse mitmed vaikimisi valikud uutel Kontaktikaartidel.Mine Müügireskontrosse ja vali kas Fail-menüüst või põhiaknas Seadistused. Avanenud nimekirjas tee topeltklõps real Kontakti seadistused. Avaneb aken Kontakti seadistused: Vaata:
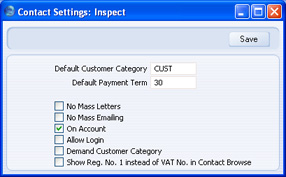
- Vaikimisi kliendiklass
- Ctrl-Enter
Kliendiklasside seadistus, Müügireskontro
- Siin näidatud Kliendiklass sisestub automaatselt uutele Kontaktide registrisse sisestatud kaartidele. See Klass ei sisestu Kontaktidele, mis on koostatud Operatsioonide menüü käsklusega Koosta kontaktisik (st kui lisad Kliendile või Hankijale Kontaktisiku).
- Vaikimisi tasumisviis
- Ctrl-Enter
Tasumistingimuste seadistust, Müügireskontro
- Siin määratud Tasumistingimus sisestub automaatselt uute Kontaktide Müügi tasumistingimuseks.
- Ära koosta masskirju, Ära koosta mass e-maile, Ettemaks, Sisenemine lubatud
- Siin tehtud valikud on vaikimisi uutel Kontaktidel märgitud.
- Nõua kliendiklassi
- Märgi see valik, kui soovid, et kõik Kliendid peavad kuuluma Kliendiklassi.
- Näita Sirvi aknas Reg.nr 1 asemel KMKR nr.
- Märgi see valik, kui tahad, et KMKR numbri asemel näidataks Kontaktide sirvimisaknas ja Klientide ning Hankijate valikuakendes Reg. numbrit 1. Selle valiku jõustumiseks pead tegema HansaWorld Enterprise’ile restardi.
Info in Customer Status Report
The Customer Status report shows the current account status of a particular Customer.You can produce the Customer Status report using the following methods:
- In the Sales Ledger or CRM module, click the [Reports] button in the Master Control panel and choose to produce the Customer Status report;
- Open the Contact record for a Customer and choose 'Customer Status' from the Operations menu;
- Highlight one or more Customers in the 'Contacts: Browse' window and choose 'Customer Status' from the Operations menu;
- Activate 'Paste Special' from the Customer Number field in a record such as an Order or Invoice, highlight one or more Customers in the list and choose 'Customer Status' from the Operations menu;
- Open an Activity where the Customer field contains a Customer (not a Supplier) and choose 'Customer Status' from the Operations menu;
- Open a Contract, Invoice, Quotation or Service Order in which a Customer has been specified and choose 'Customer Status' from the Operations menu (in the case of Contracts and Service Orders, you can also choose 'Customer Status' from the browse window); and
- Open the 'Business Communicator' window, highlight one or more Customers in the Contact List and click the [Customer Status] button.
If you produce the report using the other methods, by default the information in the report will be as described in the previous paragraph. However, if you create a record for yourself in the Info in Customer Status Report setting, you can choose to have more information shown in the report, such as lists of recent Activities, Contract Quotations, Contracts, Quotations and Orders, and monthly sales figures for the past year. As you can save a separate record in this setting for each Person, you can control how much of this additional information will be shown to different users. You can effectively give each user a different report definition, allowing each user to customise the report to their particular requirements.
Simply creating a record for yourself in the Info in Customer Status Report setting will add the Customer's address, Sales Warning if there is one, Credit Limit and turnover for the first period in the Reporting Periods setting to the top of the report. The remainder of the report will then follow the specification in your Info in Customer Status Report record. If you are using the Invoices Open until Due Date only option in the Credit Limit setting and a Customer has at least one overdue Invoice, their Credit Limit will be shown to be 0.00 in the report.
The Info in Customer Status Report setting is in the CRM module. To work with this setting, use the [Switch Module] button in the Navigation Centre to enter the CRM module and then click the [Settings] button, also in the Navigation Centre. Double-click 'Info in Customer Status Report' in the resulting list. To create a new record, either select 'New' from the Create menu, or highlight a record in the list that is similar to the one that you are about to create and select 'Duplicate' from the same menu. When the record is complete, click the [Save] button in the Button Bar to save changes and close it using the close box, or click the close box if you don't want to save changes.
The Info in Customer Status Report setting is spread over three cards. To view specific cards, click one of the numbered tabs:

---
Settings related to Contacts:
- Introduction
- Customer Categories
- Classification Types
- Contact Classifications
- Contact Settings
- Info in Customer Status Report
- Info in Supplier Status Report
- Job Titles
- Number Series - Contacts
- Supplier Categories
- User Defined Fields - Contacts.
- Home page for Customers, Suppliers and Contact Persons manual
- Home page for Standard ERP manual
Info in Customer Status Report - Header
This page describes the fields in the header of each record in the Info in Customer Status report setting. Please click the following links for descriptions of the other cards:- Introduction
- Header
- Card 1
- Card 2
- Card 3
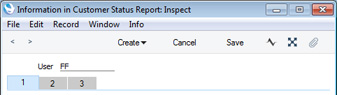
- User
- Paste Special
Person register, System module
- Enter the user's Signature in the User field, using 'Paste Special' if necessary. You will only be able to enter one record for a particular Person.
- When the user specified here produces a Customer Status report, the information included in the report will be determined by the instructions in the Info in Customer Status Report record as described on the following pages.
Settings related to Contacts:
- Introduction
- Customer Categories
- Classification Types
- Contact Classifications
- Contact Settings
- Info in Customer Status Report, including:
- Info in Supplier Status Report
- Job Titles
- Number Series - Contacts
- Supplier Categories
- User Defined Fields - Contacts.
- Home page for Customers, Suppliers and Contact Persons manual
- Home page for Standard ERP manual
Info in Customer Status Report - Card 1
This page describes the fields on card 1 of each record in the Info in Customer Status report setting. Please click the following links for descriptions of the other cards:- Introduction
- Header
- Card 1
- Card 2
- Card 3
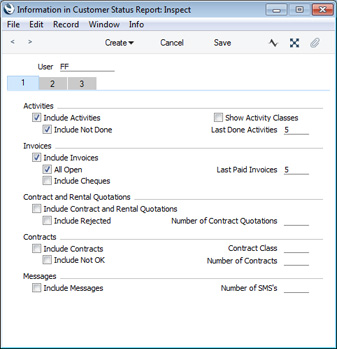
- Include Activities
- Check this box if a list of Done Activities is to be included in the Customer Status report. If you want to exclude Activities with particular Activity Types from the report, use the Exclude Activity Types field on card 2.
- Include Not Done
- If the list of Activities in the Customer Status report is to include Activities that are not Done, select this option. This means Activities of all kinds will be listed. For this option to have any effect, you must also select the Include Activities option. The Exclude Activity Types field on card 2 also applies to Activities that are not Done.
- Show Activity Classes
- The Include Activities option will add a list of individual Activities to the Customer Status report. If you select this option, individual Activities will not be listed but instead there will be a list of Activity Classes. You will be able to click on an Activity Class in the report to produce a separate report listing the Activities belonging to that Class. This is a useful option in cases where the number of Activities would otherwise make the Customer Status report very long. If you use this option, the Include Not Done option will be treated as being off, and the Last Done Activities field will be treated as being blank.
- Last Done Activities
- Specify here the maximum number of Done Activities that will be shown in the report. The most recent Done Activities will be shown. If you are also using the Include Not Done box, all such Activities that are later than the earliest Done Activity will also be shown. Leave the field blank to list all Activities.
- Include Invoices
- Select this option if Invoices are to be listed in the Customer Status report. You must also specify which Invoices are to be included by selecting the All Open option and, if necessary, by entering a number in the Last Paid Invoices field.
- All Open
- Check this box if open (unpaid) Invoices are to be listed.
- Last Paid Invoices
- If you want the most recently paid Invoices to be listed in the report, specify here how many are to be included. You must select the Include Invoices and All Open options as well. Only Accepted Cheques will be included.
- Include Cheques
- Check this box if you would like cheques received from each Customer to be shown in the report. You must also select the Include Invoices and All Open options, and the Cheques module should be present. Only Accepted Cheques will be included.
- Include Contract and Rental Quotations
- Select this option if Contract and Rental Quotations are to be included in the Customer Status report (in separate sections).
- Include Rejected
- Check this box if you want Rejected Rental Quotations to be included in the listing (otherwise, only Open and Accepted Rental Quotations will be included). The listing of Contract Quotations will not be affected.
- Number of Contract Quotations
- Specify here the maximum number of Contract and Rental Quotations that will be shown in the report. For example, if you enter "5", up to five Contract Quotations and up to five Rental Quotations will be shown in the report.
- Include Contracts
- Select this option if Contracts are to be included in the Customer Status report.
- Contract Class
- Paste Special
Contract Classes setting, Contracts module
- Enter a Contract Class here to restrict the listing to Contracts belonging to that Class.
- Include Not OK
- Check this box if you want Contracts that have not been marked as OK to be included in the listing.
- Number of Contracts
- Specify here the maximum number of Contracts that will be shown in the report.
- Include Messages, Number of SMSes
- Select this option if Text (SMS) Messages sent to the Customer are to be included in the Customer Status report. In the Number of SMSes field, specify the maximum number of Text (SMS) Messages that will be listed, starting with the most recent. No Messages will be listed if you do not enter a number.
Settings related to Contacts:
- Introduction
- Customer Categories
- Classification Types
- Contact Classifications
- Contact Settings
- Info in Customer Status Report, including:
- Info in Supplier Status Report
- Job Titles
- Number Series - Contacts
- Supplier Categories
- User Defined Fields - Contacts.
- Home page for Customers, Suppliers and Contact Persons manual
- Home page for Standard ERP manual
Info in Customer Status Report - Card 2
This page describes the fields on card 2 of each record in the Info in Customer Status report setting. Please click the following links for descriptions of the other cards:- Introduction
- Header
- Card 1
- Card 2
- Card 3
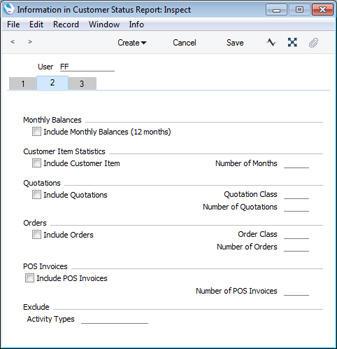
report when it is produced by the user specified in the header.
- Include Monthly Balances (12 months)
- Check this box if you want monthly sales totals for the past year to be shown in the report. This information will be taken from approved Invoices.
- Include Customer Item, No. of Months
- If you want to list the Items purchased by each Customer over a particular period, check the Include Customer Item box and enter the period in the No. of Months field. The check box will have no effect if the No. of Months field is blank. This information will be taken from approved Invoices.
- Include Quotations
- Check this box if the Customer Status report should include a list of Quotations. The check box will have no effect if the Number of Quotations field is blank.
- Quotation Class
- Paste Special
Quotation Classes setting, Quotations module
- Enter a Quotation Class here to restrict the listing to Quotations belonging to that Class.
- Number of Quotations
- Specify here the maximum number of Quotations that will be shown in the report, starting with the most recent. No Quotations will be listed if you do not enter a number.
- Include Orders
- Select this option if a list of Sales Orders is to be included in the Customer Status report. This option will have no effect if you leave the Number of Orders field blank.
- Order Class
- Paste Special
Order Classes setting, Sales Orders module
- Enter an Order Class here to restrict the listing to Orders belonging to that Class.
- Number of Orders
- Specify here the maximum number of Orders that will be shown in the report, starting with the most recent. No Orders will be listed if you do not enter a number.
- Include POS Invoices, Number of POS Invoices
- Select the Include POS Invoices option if a list of POS Invoices is to be included in the Customer Status report and, in the Number of POS Invoices field, specify the maximum number of POS Invoices that will be listed, starting with the most recent. No POS Invoices will be listed if you do not enter a number.
- Exclude Activity Types
- Paste Special
Activity Types setting, CRM module
- If you are using the Include Activities and Include Not Done options on card 1, you can choose to remove Activities with particular Activity Types from the report. Enter the Activity Types that you want excluded here, separated by commas.
Settings related to Contacts:
- Introduction
- Customer Categories
- Classification Types
- Contact Classifications
- Contact Settings
- Info in Customer Status Report, including:
- Info in Supplier Status Report
- Job Titles
- Number Series - Contacts
- Supplier Categories
- User Defined Fields - Contacts.
- Home page for Customers, Suppliers and Contact Persons manual
- Home page for Standard ERP manual
Info in Customer Status Report - Card 3
This page describes the fields on card 3 of each record in the Info in Customer Status report setting. Please click the following links for descriptions of the other cards:- Introduction
- Header
- Card 1
- Card 2
- Card 3
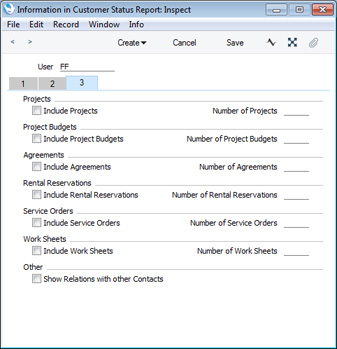
In each case, activate an option by ticking a check box on the left. Then specify the maximum number of records that are to be listed in the report using the field on the right. No records will be listed if you select an option but do not specify a maximum number.
- Show Relations with other Contacts
- This option will list all a Customer's Contact Persons in the Customer Status report. If you print the report to screen, you will be able to open individual Contact Person records using the Drill-down feature.
Settings related to Contacts:
- Introduction
- Customer Categories
- Classification Types
- Contact Classifications
- Contact Settings
- Info in Customer Status Report, including:
- Info in Supplier Status Report
- Job Titles
- Number Series - Contacts
- Supplier Categories
- User Defined Fields - Contacts.
- Home page for Customers, Suppliers and Contact Persons manual
- Home page for Standard ERP manual
Info ‘Hankija hetkeseisu’ aruandes
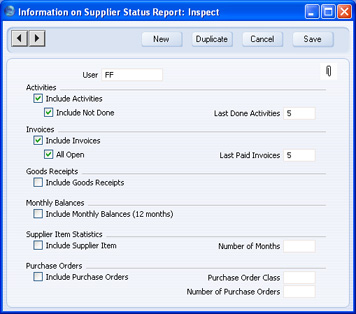
Selles seadistuses määra, millised andmed esitatakse Hankija hetkeseisu aruandes, mis tellitakse erinevate kasutajate poolt akende Kontaktid: Sirvi ja Kontakt: Vaata Operatsioonide menüüst.Igale kasutajale saab sisestada oma kaardi, mis tähendab, et töötajad saavad kohandada aruande vastavalt oma vajadustele. Neid kaarte näed aknas Info ’Hankija hetkeseisu’ aruandes: Sirvi. Uue kaardi sisestamiseks kliki [Uus] või vali kaart, mille sarnast soovid sisestada ja tee sellest koopia, klikkides [Koopia].
Avaneb järgmine aken. Seadistuse salvestamiseks sulge aken sulgemisruudust ja luba muudatused salvestada.
- Kasutaja
- Ctrl-Enter
Isikute register, Üldine moodul
- Sisesta töötaja initsiaalid, kasutades vajadusel Ctrl-Enter klahvikombinatsiooni. Igale kasutajale saad registreerida vaid ühe kaardi.
- K.a. tegevused
- Märgi see valik, kui soovid aruandes näha Tehtud Tegevusi, kui aruande tellib Kasutaja väljal määratud töötaja.
- K.a. tegemata
- Märgi see valik, kui soovid aruandes näha ka Tegevusi, mis ei ole Tehtuks märgitud. See tähendab, et aruandes näeb kõiki Tegevusi. Märgitud peab olema ka valik K.a. tegevused.
- iimati tehtud tegevusi
- Siin määra maksimaalne arv Tehtud Tegevusi, mida aruandes näeb. Aruandesse kaasatakse kõige hiljutisemad Tehtud Tegevused. Kui oled märkinud valiku K.a. tegemata, näidatakse aruandes ka kõiki selliseid tegemata Tegevusi, mis toimusid varaseimast Tehtud Tegevusest hiljem. Jäta väli tühjaks, kui soovid näha kõiki Tegevusi.
- K.a. arved
- Märgi see valik, kui soovid aruandes näha Ostuarveid. Täpsusta, milliseid arveid soovid aruandes näha, märkides valiku Kõik tasumata ja/või sisestades numbri väljale Viimati tasutud arved.
- Kõik tasumata
- Märgi see valik, kui soovid aruandes näha tasumata Arveid.
- Viimati tasutud arved
- Kui soovid aruandes näha tasutud Arveid, määra siin nende arv.
- K.a. laosissetulekud
- Märgi see valik, kui soovid aruandes näha Laosissetulekuid.
- K.a. kuusaldod (12 kuud)
- Märgi see valik, kui soovid aruandes näha möödunud aasta kuusaldosid. Siia võetakse andmed kinnitatud Ostuarvetelt.
- K.a. hankija/artikkel, Kuude arv
- Kui soovid aruandes näha igalt Hankijalt teatud ajavahemikul ostetud Artikleid, märgi valik K.a. hankija/artikkel ning sisesta periood Kuude arvu väljale. Ilma kuude arvu määramata aruandes Artikleid ei näe. Siia võetakse andmed kinnitatud Laosissetulekutelt.
- K.a. ostutellimused
- Märgi see valik, kui soovid aruandes näha Ostutellimusi. Sisestama pead ka Ostutellimuste arvu.
- Ostutellimuste klass
- Ctrl-Enter
Ostutellimuste klasside seadistus, Ostutellimuste moodul
- Määra, millisesse Klassi kuuluvaid Ostutellimusi tahad aruandes näha.
- Ostutellimuste arv
- Siin määra aruandesse kaasatud Ostutellimuste maksimaalne arv, alustades kõige hilisemast. Kui jätad välja tühjaks, Ostutellimusi aruandes ei näe.
Ametikirjeldused
Seda seadistust kasutatakse Kontaktide ja Kliendikirjade registrites.Kontaktisikute kohta on võimalik tellida aruandeid ning organiseerida masspostitust vastavalt nende ametitele. Seetõttu ei ole soovitatav antud seadistusse sisestada isikute tegelikke ametinimetusi (mis on firmati väga erinevad), vaid üldistavaid ametikirjeldusi.
Topeltklõps Kliendihalduse mooduli seadistuste nimekirjas real Ametikirjeldused avab järgmise akna:
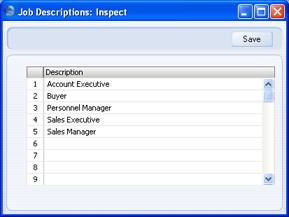
Sisesta ametikirjeldused tähestikulises järjekorras. Ametikirjelduse sisestamiseks soovitud kohale nimekirja kliki rea numbril ja vajuta klaviatuuril Enter klahvi. Uuele Kontaktile ametikirjelduse määramisel esitatakse Ctrl-Enteriga ametid samas järjekorras, nagu need on siia seadistusse sisestatud. Vali klaviatuuril algustäht ja leiad kiiresti soovitud ametikirjelduse.
Number Series - Contacts
Each Contact has its own unique identifying number, based on a sequential series. When you enter a new Contact, the next number in the sequence will be used. If required, you can have a number of such sequences running concurrently, perhaps representing different types of Contact (e.g. Customer, Supplier or Contact Person) or different departments.Use this setting to define these sequences, or Number Series. The different series should not overlap. If you leave the setting empty, Contact Numbers will start at 1 and continue consecutively. If you want to start from another number, simply specify it in a new Contact record before saving.
Once you have defined number sequences for Contacts, you can optionally use the Number Series Defaults setting in the System module to specify the number sequence that is to be used by default. The first new Contact that you enter will take its Number from the number sequence specified in the Number Series Defaults setting or otherwise from the first valid Number Series in this setting. For a particular Contact, any user can change to the first unused number in any other valid Number Series using 'Paste Special'.
When you save each Contact for the first time, its Contact Number will also be saved in the Number Series Defaults setting. So, if you used 'Paste Special' to change to another Number Series, that Number Series will provide the default Number for the next new Contact.
You should define Number Series - Contacts using the setting in the Sales Ledger. Use the [Module] button in the Master Control panel to enter the Sales Ledger and then click the [Settings] button, also in the Master Control panel. Double-click 'Number Series - Contacts' in the resulting list. The following window appears:
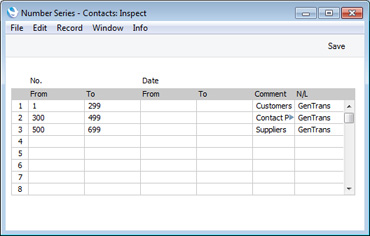
Note that you can only enter numeric characters in the Number Series - Contacts setting, but Contact Numbers can also contain alpha characters. So, you can only set numeric number sequences, but when entering Contacts you can use alpha characters providing you remain within the sequence. For example, if you have a sequence of 1-100, you will be able to use Contact Numbers 1, 1A, 1B, 2 and so on, but not A1 or B1. You will also be able to use Contact Numbers with leading zeros (001, 002 and so on), but you will need to set this format in the first Contact you enter or in the Number Series Defaults setting, not in the Number Series setting. The format will be remembered for subsequent Contacts.
---
Settings related to Contacts:
- Introduction
- Customer Categories
- Classification Types
- Contact Classifications
- Contact Settings
- Info in Customer Status Report
- Info in Supplier Status Report
- Job Titles
- Number Series - Contacts
- Supplier Categories
- User Defined Fields - Contacts.
- Home page for Customers, Suppliers and Contact Persons manual
- Home page for Standard ERP manual
Hankijate klassid
Sama tüüpi Hankijad saad grupeerida klassidesse. Toimingutel samasse Klassi kuuluvate Hankijatega võib kasutada sama vaikimisi Ostuvõlakontot, nii et seda ei pea määrama igale Hankijale eraldi.Hankija klassid kirjeldatakse Ostureskontro vastavas seadistuses. Mine Ostureskontrosse ja vali kas Fail-menüüs või põhiaknas Seadistused. Avanenud nimekirjas tee hiirega topeltklõps real Hankija klassid. Avanenud nimekirjas näed registreeritud klasse. Uue kaardi sisestamiseks kliki [Uus]. Kaardi salvestamiseks kliki [Salvesta].
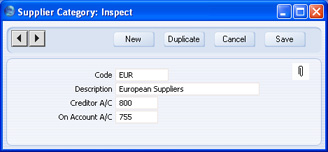
- Kood
- Anna Hankija klassile ainulaadne kood.
- Nimetus
- Sisesta klassi kirjeldus.
- Võlakonto
- Ctrl-Enter
Kontode register, Finants/Üldine moodul
- Määra Ostuvõlakonto, mida krediteeritakse antud klassi kuuluvate Hankijate esitatud Ostuarvetest koostatavatel finantskannetel.
- Kui Ostuvõlakonto on määratud nii Hankijale kui ka Hankija klassile, kuhu Hankija kuulub, kasutatakse Hankijale määratud kontot. Kui aga ei klassile ega Hankijale ei ole Ostuvõlakontot antud, kasutatakse Ostuvõlakontot seadistusest Lausendamine O/R.
- Kui Hankija klassi ei lase salvestada, võib olla põhjuseks, et kasutad Ostureskontros allsüsteemide kontrolli võimalust ning siin näidatud konto pole määratud Ostuvõla kontrollkontoks. Allsüsteemi kontrolli valik tehakse seadistuses Lausendamine O/R ning kontrollkontod määratakse Üldise mooduli Allsüsteemide kontrollkontode seadistuses.
- Kui Ostuvõlakonto on määratud nii Hankijale kui ka Hankija klassile, kuhu Hankija kuulub, kasutatakse Hankijale määratud kontot. Kui aga ei klassile ega Hankijale ei ole Ostuvõlakontot antud, kasutatakse Ostuvõlakontot seadistusest Lausendamine O/R.
- Ettemaksu konto
- Ctrl-Enter
Kontode register, Finants/Üldine moodul
- Seda kontot kasutatakse, kui tasud Hankijale kauba eest ettemaksuna (enne Ostuarve saamist). Selleks peab igal sellisel Hankijal olema Kontaktikaardi 'Tingimuste' kaardil märgitud valik Ettemaks. Kui koostad antud klassi kuuluvale Hankijale Ettemaksu, debiteeritakse selle summas siin näidatud kontot. Kui saad seejärel Ostuarve ning seod selle Ettemaksuga, krediteeritakse sama kontot vaikimisi Ostuvõlakonto asemel. Ettemaksude kohta loe palun lähemalt siit.
- Kui Hankijale on antud erinev Ostu ettemaksu konto, kasutatakse seda siin määratud konto asemel. Kui ei Hankijale ega klassile, kuhu Hankija kuulub, ei ole Ettemaksu kontot antud, kasutatakse Ettemaksu kontot seadistusest Lausendamine O/R.
Omakirjeldatud väljad - kontaktid
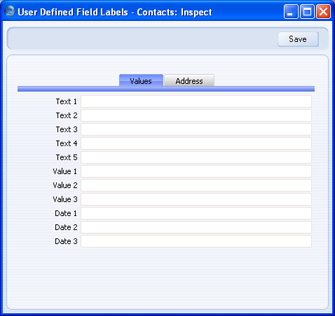
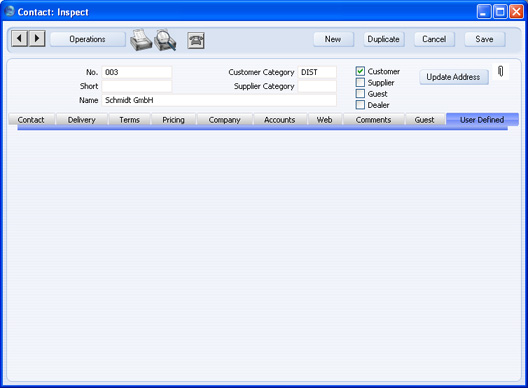
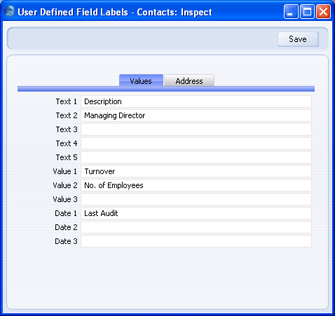
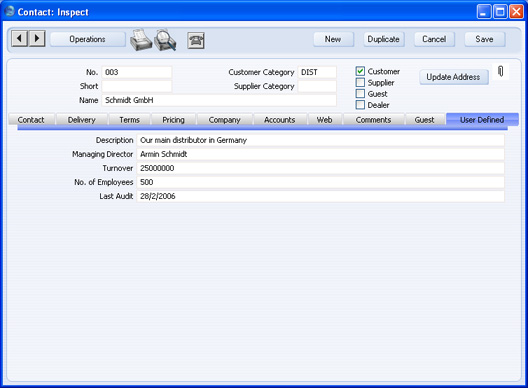
Tavaliselt mahub Kontaktikaardile kogu vajalik informatsioon. Kuid võib juhtuda, et vaja läheb täiendavaid välju lisainfo registreerimiseks. Sellisel juhul saab antud seadistuses lisada välju Kontaktikaardi Omakirjeldatud kaardile.Mine Kliendihalduse moodulisse ja vali kas Fail-menüüs või põhiaknas Seadistused. Avanenud nimekirjas tee topeltklõps real Omakirjeldatud väljad - kontaktid. Avaneb aken Omakirjeldatud väljad - kontaktid: Vaata. Tee soovitud muudatused ja salvesta ning sulge seadistus. Sulge aken sulgemisruudust, kui ei soovi muudatusi salvestada.
Väljade kaart
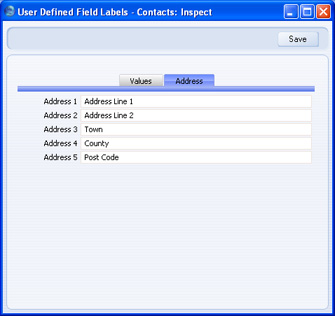
Aadresside kaart
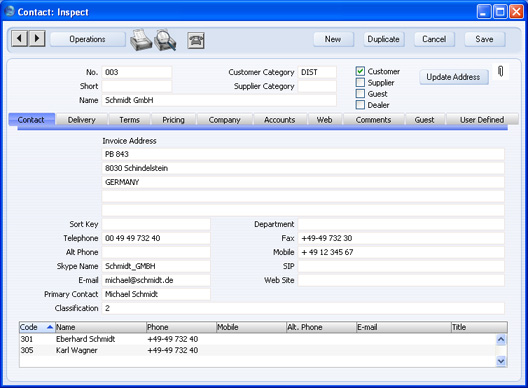
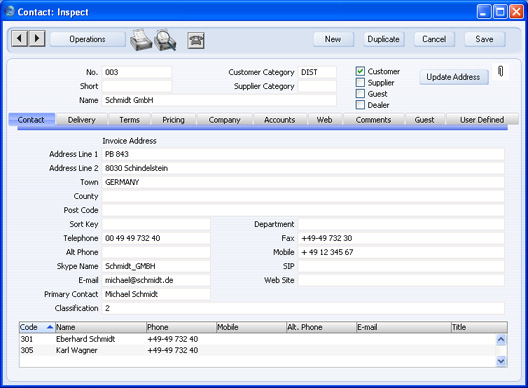
Siin anna nimetused aadressiväljadele Kontaktikaartidel ja Arvete 'Arveaadressi' kaardil. Kui Aadresside kaart seadistuses Omakirjeldatud väljad – kontaktid on tühi, ei ole Kontaktikaartide 'Kontakti' ega 'Lähetuse' kaartidel ega Arvete 'Arveaadressi' kaardil aadressiväljadel nimetusi: