Kulutuste register
Kulutuste registris salvestatakse iga töötaja nõudmised tehtud kulutuste osas. Tavaliselt koostatakse igale töötajale iga kulutuse kohta uus kaart (nt üks kaart töötaja kohta kuus).Kui soovid näidata andmeid sõidu kohta, millega seoses kulutusi tehti, tuleks esmalt luua uus kaart Sõidulehtede registrisse. Sel juhul saad Sa viidata Sõidulehele Kulutuse kaardi D-osal. Sõidulehe kogukulu sisestub automaatselt Kulutuse kaardile. Sõidulehtede seadistusest sisestuvad Kulutusele Artikkel, Konto ja Nimetus.
Kulutuste registri avamiseks mine Kulutuste moodulisse ja vali põhiaknast Kulutuste register.
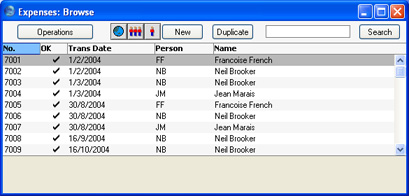
Avaneb aken Kulutused: Sirvi, milles näed eelnevalt sisestatud Kulutusi. Kinnitatud Kulutused (st millest on koostatud Finantskanne) on märgitud linnukesega.
Kulutuse sisestamine
Uue Kulutuse sisestamiseks klõpsa Uus või kasuta Ctr-N (Windows ja Linux) või -N (Macintosh) klahvikombinatsiooni. Võid valida ka olemasoleva Kulutuse, mille sarnast soovid sisestada, ning teha sellest koopia, klõpsates Koopia.Avaneb aken Kulutus: Uus, mis on tühi, kui klõpsasid Uus või sisaldab koopiat Sinu poolt valitud olemasolevast Kulutusest.
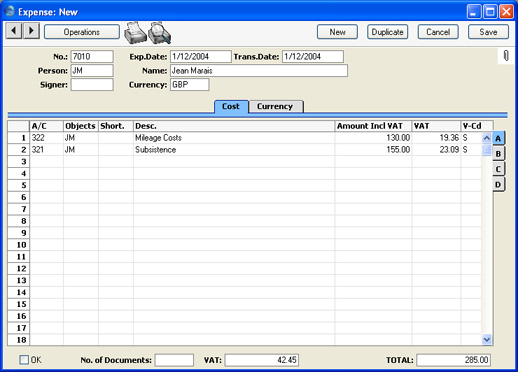

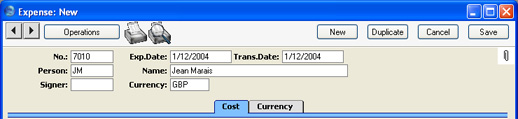
Päis
- Nr.
- Ctrl-Enter
Vali numbriseeriatest
- Kulutuse ainulaadne registreerimisnumber. Uue kaardi sisestamisel võtab HansaWorld seadistusest Numbriseeriad - Kulutused esimesest numbriseeriast järgmise vaba numbri. Seda numbrit saad vahetada, kuid mitte juba kasutatud numbri vastu. Kui programmil on kasutajaid mitu, ei anta Kulutusele numbrit enne, kui kaart on salvestatud.
- Kulutuse kp.
- Ctrl-Enter
Vali kuupäev
- Töötaja nõudmise kuupäev.
- Kande kp.
- Ctrl-Enter
Vali kuupäev
- Kulutuse registreerimise kuupäev. Selle kuupäevaga koostatakse Kulutusest Finantskanne. Vaikimisi sisestub siia Kulutuse kp. väljale sisestatud kuupäev.
- Isik
- Ctrl-Enter
Isikute register, Üldine moodul
- Sisestub vaikimisi Hetke kasutaja
- Sisesta töötaja initsiaalid või vali need Ctrl-Enter klahvikombinatsiooniga. Enteri vajutamisel sisestub töötaja nimi automaatselt paremal asuvale Nime väljale.
- Sisesta töötaja initsiaalid või vali need Ctrl-Enter klahvikombinatsiooniga. Enteri vajutamisel sisestub töötaja nimi automaatselt paremal asuvale Nime väljale.
- Nimi
- Töötaja Nimi sisestub, kui oled sisestanud tema initsiaalid Töötaja väljale.
- Allkirjastaja
- Sisesta Kulutuse kinnitava töötaja initsiaalid. Kui Sa oled Kulutuste seadistuses ära märkinud valiku Nõua allkirjastajat, peab Kulutuse kinnitamiseks see väli olema täidetud.
Siia väljale Sa sisestust trükkida ei saa. Selle asemel vali Operatsioonide menüüst 'Allkirjasta', misjärel kanduvad siia Sinu initsiaalid.
Üldise mooduli Kasutajagruppide seadistuses on võimalik teatud töötajatelt võtta ära õigus kasutada Allkirjastamise funktsiooni.
- Valuuta
- Ctrl-Enter
Valuutade register, Üldine moodul
- Sisestub vaikimisi Vaikimisi baasvaluuta
- Kulutuse võid sisestada ükskõik millises Valuutas. Ühe Kulutuse raames saad kasutada vaid ühte Valuutat. Valuuta määramisel sisestub Kulutuse 'Valuuta' kaardile Kande kuupäeval kehtinud Kurss, mida saad vajadusel korrigeerida.
Kõik Kulutuses esitatud summad peavad olema määratud Valuutas. Kui Kulutusest koostatakse Finantskanne, konverteeritakse summad kohalikku valuutasse.
- Kulutuse võid sisestada ükskõik millises Valuutas. Ühe Kulutuse raames saad kasutada vaid ühte Valuutat. Valuuta määramisel sisestub Kulutuse 'Valuuta' kaardile Kande kuupäeval kehtinud Kurss, mida saad vajadusel korrigeerida.
Kulude kaart
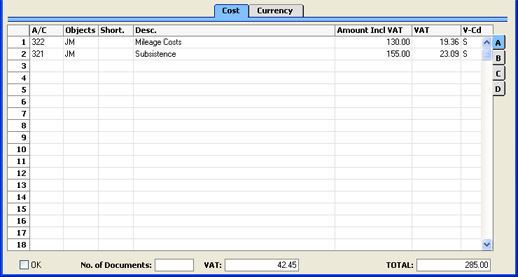

Osa A
- Konto
- Ctrl-Enter
Kontode register, Üldine moodul/Finants
- Sisesta Kulukonto, mida debiteeritakse Kulutusest koostatud Finantskandes. Kui oled siin Konto numbri sisestanud, sisestub Konto nimetus automaatselt Sisu väljale. Konto valimisel kasuta Ctrl-Enter klahvikombinatsiooni.
Konto sisestub automaatselt, kui määrad ära Konto lühikoodi väljal Lühik..
Siin võid sisestada ka Automaatkande koodi. Automaatkandeid kasutatakse sagedasti ette tulevate kannete sisestamise automatiseerimiseks, mis lihtsustab Su tööd ja samas tagab, et alati kasutatakse õigeid kontosid. Automaatkannetest loe lähemalt Finantsmoodulit käsitlevast juhendist. Automaatkandeks võiks olla näiteks kanne, millel Kuluartikli hind jaotatakse erinevatele Objektidele protsentuaalselt.
Kui Sa sisestad D-osale Sõidulehe, sisestub siia Sõidulehtede seadistuses määratud Artikli Kulukonto. Kui Sõidulehel Artiklit määratud ei ole, sisestub siia Konto Sõidulehtede seadistustest.
- Objektid
- Ctrl-Enter
Objektide register, Finants/Üldine moodul
- Reale saad sisestada kuni 20 komadega eraldatud Objekti. Need kantakse ka antud Kulutusest koostatud Finantskande deebetpoolele ning neid saad kasutada oma tuluüksuse aruandluses. Erinevate Objektidega saad eristada osakondi, kuluüksusi või tootetüüpe. See võimaldab paindlikult analüüsida Finantsaruandeid.
Pane tähele, et Üldise mooduli Isikute registris saad iga töötaja siduda Objektiga. Need Objektid sisestuvad automaatselt Kulutusest koostatud Finantskannete kreeditpoolele.
Kui Sa sisestad B-osale Projekti, mis on seotud mingi Objektiga, sisestub see Objekt automaatselt siia väljale. Teine võimalus Objekti sisestamiseks on valida Konto lühikood Objektide väljast paremal asuval väljal Lühik.
Kui Sa sisestad D-osale Sõidulehe, sisestuvad siia Objektid Sõidulehe päisest.
- Lühik.
- Ctrl-Enter
Kontode lühikoodide seadistus, Finants
- Lühikoodide kasutamine vähendab eksimisvõimalust Konto ning Objektide valimisel. Samuti saad Lühikoode kasutada juhul, kui ei soovi, et töötajatel, kes salvestavad ise Ostuarveid ja Kulutusi, oleks juurdepääs Kontode või Objektide registritele (see tähendab, et neil ei ole võimalik Kontosid ega Objekte valida Ctrl-Enter klahvikombinatsiooniga). Lühikoodi sisestamisel sisestuvad vajalikud Konto ja Objektid automaatselt.
- Sisu
- Sisestub vaikimisi
Kontolt
- Konto nimetus. Seda teksti saad vajadusel muuta.
Kui Sa sisestad D-osale Sõidulehe, sisestub siia Konto nimetuse asemel Nimetus Sõidulehtede seadistusest.
- Summa KM-ga
- Siin sisesta Kulutuse summa koos käibemaksuga. Kui oled määranud Kulutusele mingi Valuuta, peab see summa olema vastavas Valuutas.
Kui Sa sisestad D-osale Sõidulehe, sisestub siia summa Sõidulehe jalusest väljalt Kokku, kulu.
- KM
- Käibemaks arvestatakse Summa KM-ga ja KM-koodi väljadele sisestatud andmete alusel.
- KM-k
- Ctrl-Enterl
Käibemaksukoodide seadistus, Finants
- Siin saad valida KM-koodi Finantsmooduli Käibemaksukoodide seadistusest. Selle valikuga määrad ära antud Kulutuse puhul kasutatava käibemaksumäära ja debiteeritava KM Konto.
Vaikimisi pakutakse siia koodi Konto kaardilt või Lausendamine (O/R) seadistusest. Kui Sa sisestad D-osale Sõidulehe, sisestub vaikimisi Kohalik KM-kood Sõidulehtede seadistuses märgitud Artiklilt.
- Artikkel
- Ctrl-Enter
Artiklite register
- Siin sisesta ostetud Artikli kood. Kui oled Kulutuse rea sidunud Projektiga, kasutatakse seda informatsiooni Projektiarvestuse moodulis.
Kui Sa sisestad D-osale Sõidulehe, sisestub siia Artikkel Sõidulehtede seadistusest. See Artikkel määrab ära Konto ja KM-koodi A-osal.
- Kogus
- Ostetud kogus.
- Kui Sa sisestad D-osale Sõidulehe, sisestub siia summa Sõidulehe jalusest väljalt Kokku, km.
- Kui Sa sisestad D-osale Sõidulehe, sisestub siia summa Sõidulehe jalusest väljalt Kokku, km.
- Proj.
- Ctrl-Enter
Projektide register, Projektiarvestuse moodul
- Projekti number, millega võid Kulutuse rea siduda. Kulutuse kinnitamisel koostatakse igale reale Projekti kanne, millele kanduvad Projekti number, Artikli number ja Kogus. Nõnda lisandub Kulutuse summa Projekti maksumusele ning Projekti Kliendilt nõutakse sisse Kulutuse rea maksumus vastavalt Projektile määratud arve koostamise meetodile.
Loe lähemalt.
- Kui Projekt on seotud Objektiga, sisestub see Kulutuse A-osa Objektide väljale.
Kui Sa sisestad D-osale Sõidulehe, sisestub siia Projekt Sõidulehe päisest. - Kui Projekt on seotud Objektiga, sisestub see Kulutuse A-osa Objektide väljale.
Siin asuvaid välju kasutatakse, kui Kulutusega kaasnevad Laekumised või Arved. Väljale Dok. originaalnr. saad sisestada Arve või Laekumise numbri. Hankija valikul kasuta Ctrl-Enter klahvikombinatsiooni. Hankija väli on ainult informatsiooni talletamiseks - Ostureskontrot see ei muuda.
Osa D
- Sõiduleht
- Ctrl-Enter
Sõidulehtede register, Kulutuste moodul
- Kui soovid näidata andmeid sõidu kohta, millega seoses kulutusi tehti, tuleks esmalt luua uus kaart Sõidulehtede registrisse. Seejärel sisesta siia Sõidulehe number. Sõidulehe jalusest väljadelt Kokku, kulu ja Kokku, km sisestuvad andmed vastavalt Kulutuse A-osa Summa KM-ga ja B-osa Koguse väljadele. Sõidulehe päisest kanduvad andmed väljadelt Objektid ja Projekt vastavalt Kulutuse A-osa Objektide ja B-osa Projekti väljadele. KM-kood sisestub Sõidulehtede seadistuses määratud Artiklilt. Konto väljale kandub selle Artikli Kulukonto või Konto Sõidulehtede seadistusest. Sisu väljale sisestub informatsioon Sõidulehtede seadistuse Nimetuse väljalt.
- Kui oled sisestanud D-osale Sõidulehe, aga väljad Summa KM-ga, Kogus, Konto, Objektid ja Sisu jäävad tühjaks, on tõenäoliselt põhjuseks see, et Sul on sisestamata Artikkel Sõidulehtede seadistustes. Kui soovid siduda Kulutusi Sõidulehtedega, pead siin määrama Artikli.
- Kinnita
- Kui Sa märgid selle valiku ja salvestad kaardi, klõpsates Salvesta, on Kulutus kinnitatud ja koostatakse vastav Finantskanne. Seejärel pole Sul enam võimalik Kulutust muuta.
- Dokumentide arv
- Siin sisesta kviitungite või muude Kulutust tõendavate dokumentide arv. See väli on ainult informatsiooni talletamiseks.
- KM
- KM summa, mis arvestatakse Kulutuse ridade alusel.
- KOKKU
- Kulutuse kogumaksumus, valuutas ja maksud kaasa arvatud.
Valuuta kaart

- Valuuta
- Ctrl-Enter
Valuutade register, Üldine moodul
- Sisestub vaikimisi Vaikimisi kasutatav baasvaluuta
- Kulutuse võid sisestada ükskõik millises Valuutas. Ühe Kulutuse raames saad kasutada vaid ühte Valuutat.
Kõik Kulutuses esitatud summad peavad olema määratud Valuutas. Kulutusest koostatavas Finantskandes näed summasid nii välis- kui kohalikus valuutas (ning vajadusel ka Baasvaluutas 2).
- Kulutuse võid sisestada ükskõik millises Valuutas. Ühe Kulutuse raames saad kasutada vaid ühte Valuutat.
- Kurss
- Sisestub vaikimisi
Baasvaluuta kursside seadistusest ja/või Valuutakursside registrist, Üldine moodul
- Siin sisestab HansaWorld automaatselt määratud Valuuta Kande Kuupäeval kehtiva kursi.
Valuuta konverteerimisel rakendatakse ühte kahest alljärgnevast meetodist. Topeltvaluutade süsteem võib sobida firmadele, millel on kontorid kahes erinevas riigis, mis peavad esitama aruandlust mõlema riigi valuutas; firmadele, mis tegutsevad riikides, kus lisaks rahvuslikule valuutale on üldkäibes ka teine valuuta (tavaliselt USA dollar või Euro); ning firmadele, mis kuuludes eurotsooni on säilitanud võrdluseks vana kohaliku valuuta. Teine meetod on Lihtne konverteerimine välisvaluutast kohalikku valuutasse, mida kasutatakse enamuse valuutatehingute puhul kogu maailmas.
- Valuutakursid (Topeltvaluutade süsteem)
- Kui kasutatakse Topeltvaluutade süsteemi, näed siin vasakpoolsetele Baasvaluuta 1 ja Baasvaluuta 2 väljadele sisestatud kahe Baasvaluuta vahelist kurssi (võetakse viimati sisestatud kaardilt Baasvaluuta kursside seadistusest).
Pane tähele, et Euroopa Rahaliidu (ERL) eeskirjad sätestavad, et kursid peavad olema alati väljendatud ühe Euro suhtena kohalikku või välisvaluutasse.
- Valuutakursid (Lihtsa konverterimise süsteem)
- Lihtsa konverteerimise puhul kasutatakse ainult Kursi välja ja parempoolset Baasvaluuta 1 välja näitamaks välis- ja kohaliku valuuta vahelist kurssi.
Näited leiad ‘Valuuta’ juhendist.
Entering an Expense Record - Misc Card
This page describes the fields on the 'Misc' card of the Expense record. Please follow the links below for descriptions of the other cards:
- Header
- 'Cost' card
- 'Currency' card
- 'Misc' card

- Approval Status
- You can use the Approval Rules register in the Business Alerts module to configure an approval process that Expense records must pass through. For example, particular managers may need to check and approve every Expense record in which the TOTAL is greater than a certain value. If you are using such an approval process, this field will display the stage in the process that a particular Expense record has reached.
If an Expense record needs to pass through an approval process, the following functions will be disabled until the approval process has been completed:
- Printing the Expense record.
- Marking the Expense record as OK.
- Creating a Mail from the Expense record.
In brief, the Approval Status of an Expense record can be any of the following:
- Not Required
- The Expense record does not need to pass through an approval process, so the functions listed above will be available immediately.
- Not Requested
- The Expense record does need to pass through an approval process, and you have not yet started that process. To start the process, save any changes and then choose 'Request Approval' from the Operations menu (Windows/Mac OS X) or Tools menu (iOS/Android).
- Pending
- The Expense record has been entered into the approval process, and is waiting to be approved or rejected. If you need to check the progress of the approval process, select Expense Status' from the Operations or Tools menu.
- If the Status of the Expense record is Pending, you will usually not be able to modify it. If you need certain users to be able to modify Pending records, use Access Groups to grant them Full access to the 'Change Record Header when Approval Status is Pending' and/or 'Change Record Matrix when Approval Status is Pending' Actions.
- If the Status of the Expense record is Pending, you will usually not be able to modify it. If you need certain users to be able to modify Pending records, use Access Groups to grant them Full access to the 'Change Record Header when Approval Status is Pending' and/or 'Change Record Matrix when Approval Status is Pending' Actions.
- Approved
- The approval process has been completed and the Expense record has been approved. The functions listed above will be available.
- Rejected
- The approval process has been completed and the Expense record has been rejected.
Please refer here for full details.
- Printing the Expense record.
The Expense register in Standard ERP:
- Introduction
- Entering an Expense record, including:
- Header
- 'Cost' card
- 'Currency' card
- 'Misc' card
- Header
- Inspecting Expense records, Marking as OK and Posting to the Nominal Ledger
- Expenses in Currency
- Error Messages
- Invalidating Expenses
- Registering Expenses Using Purchase Invoices
- Operations menu
- Create menu
- Home page for Expenses module manual
- Home page for Standard ERP manual
Kulutuste vaatamine ja kinnitamine
Kui Kulutust ei kinnitatud kohe sisestamisel, siis selleks, et Finantsi tekiks vastav kanne, tuleb see kinnitada hiljem. Kinnitamisel Kulutus lukustatakse, mis tähendab, et seda ei saa enam hiljem muuta.
Kulutuse kinnitamiseks on kaks moodust—
- Ava Kulutuse kaart ja aseta linnuke ruutu Kinnita; või
- Märgi ära üks või mitu Kulutuse kaarti aknas Kulutused: Sirvi ning vali Operatsioonide menüüst Kinnita.
Deebetpoole Objektid võetakse Kulutuse ridadelt, Kreeditpoole Objektid aga Isiku kaardi Preemia osalt.
Kui kanne on koostatud, saad seda vaadata, valides käskluse 'Ava finantskanne' Kulutuse Operatsioonide menüüst.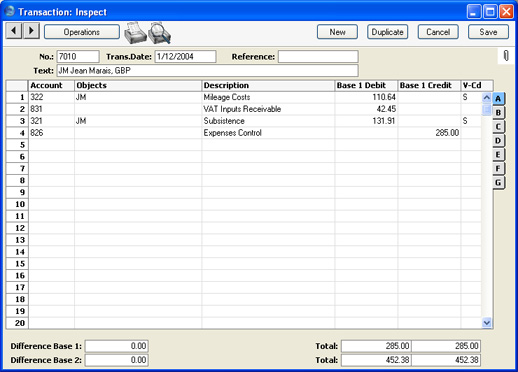
Kulutused valuutas
Kui Sa sisestad Kulutuse valuutas, kehtivad antud Valuuta ja Kurss kõikidele Kulutuse ridadele. Seega tuleks iga Valuuta ja Kursi jaoks sisestada eraldi Kulutuse kaart.
Näiteks esitab töötaja nõude tehtud kulutuste osas, mis on dateeritud 31. jaanuariga. Nõudele on lisatud kviitung 100,00 USD-le 7. jaanuari kuupäevaga, mil 1 USD-le vastas EEK 13,2 (Baasvaluuta 1). Seega oli kviitungi maksumus selle väljastamisel EEK 1320,00. Kuid 31. jaanuari seisuga (nõude esitamise kuupäev) on 1 USD kurss EEK 13,4, mis tähendab, et 100,00 USD maksab EEK1340,00.
Kulutus sisesta alljärgnevalt. Päisesse sisesta nõude esitamise kuupäev (31. jaanuar) ning Valuutana määra ära USD???
C-osale sisesta kviitungi väljastamise kuupäev (7. jaanuar)—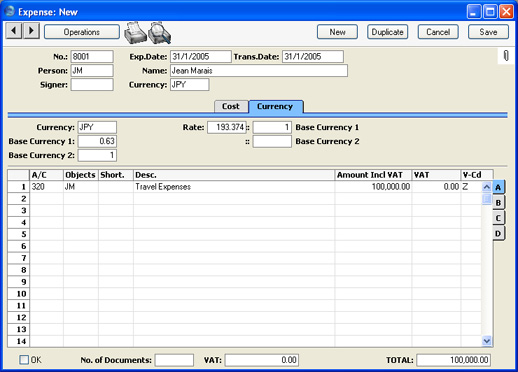
Ülaltoodud pildil on näha Kurss Valuuta kaardil, milleks on 31. jaanuaril kehtinud kurss. Antud näite puhul on Kulutuse ja Kande kuupäevad samad. Kui need erineksid, oleks Kursiks Kande kuupäeva kehtinud kurss.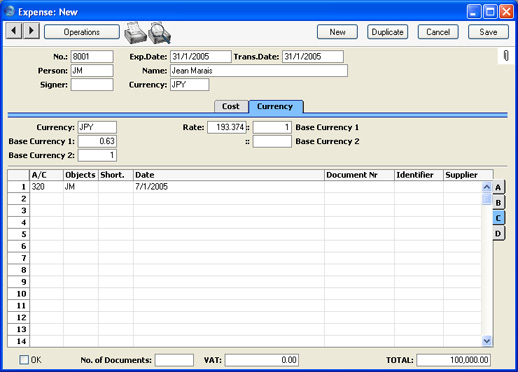
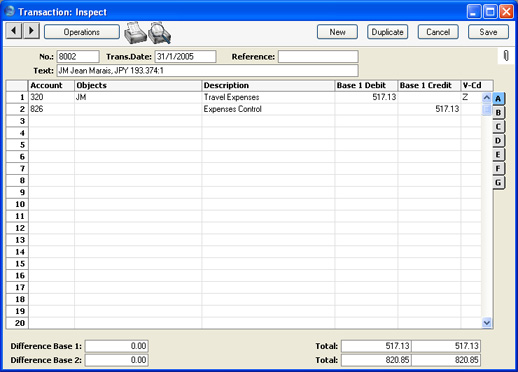
Kui Kulutus on kinnitatud ja salvestatud, sõltub Finantskanne sellest, kas Kulutuse seadistustes on tehtud valik Kasuta kuluarvestusel kulutuse kuupäeva kurssi. Kui see valik on märgitud, arvestatakse kohustus töötaja ees (näites Konto 2620) kasutades Kulutuse kuupäeva Kurssi (31. jaanuar), samas kui Kulukontole (näites Konto 6990) tehtud kande summa arvestatakse kasutades kviitungite väljastamise kuupäeva (7. jaanuar) Kurssi. Kursivahe kohta koostatakse kanne seadistuses Lausendamine (MR) määratud Kursi ümardamise kontole—
Kui see valik ei ole märgitud, arvestatakse nii kohustus töötaja ees kui ka Kulukontole tehtava kande summa, kasutades Kulutuse kuupäeval (31. jaanuar) kehtinud kurssi—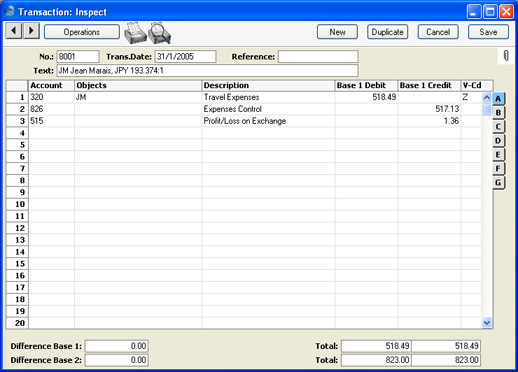
Veateated
Kulutuse kinnitamisel koostatakse automaatselt Finantskanne.
Kui kaardi kinnitamisel ilmub ekraanile veateade, tähendab see, et mingis seadistuses on viga. Kõik Kulutuse kaardile sisestatud Kontod peavad olemas olema ka Üldise mooduli Kontode registris. Kasutatud KM-koodid peavad olema kirjeldatud vastavas seadistuses. Kulutuse esitanud Isiku kaardi 'Preemia' osal peab olema määratud Konto. Seda Kontot krediteeritakse vastavas Finantskandes.
Ilma et peaksid Kulutuse eelnevalt sulgema, saad vead parandada, lisades puuduva Konto Üldise mooduli Kontode registrisse või tehes vajalikud parandused seadistustes.
Raamatupidamisvigade ärahoidmiseks ei koosta programm kandeid olematutele Kontodele.
Kulutuste tühistamine
Kulutuse kaardi saad tühistada, kui avad Kulutus: Vaata akna ja valid Kaart-menüüst käsu Tühista. Nõnda ei kajastu antud Kulutus aruandluses ning kõik Kulutusega seotud Finantskanded tühistatakse samuti. Tühistatud Kulutuse kaardil on kõik väljadele sisestatud andmed punase joonega läbi kriipsutatud. Läbikriipsutused on näha ka Kulutus: Vaata aknas.
Kinnitamata Kulutust tühistada ei saa. Samuti ei saa tühistada Kulutust, mille Kande kuupäev on varasem Üldises moodulis Kuu lukustamise seadistustes määratud kuupäevast
‘Lukusta teised registrid’.
Kulutuse tühistamisel kustutatakse Kulutusest koostatud Projektikanne. Kulutust, mille Projektikandest on arve juba koostatud, tühistada ei saa.Registering Expenses Using Purchase Invoices
If an employee pays and claims an expense that should be assigned to a Supplier, you can process it in two ways:
- You can record the expense in an Expense record and specify the Supplier and Invoice Number on flip C (use the Document No. field for the Invoice Number).
- You can record the expense in a Purchase Invoice.
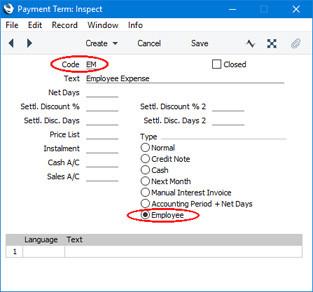
- Create a Payment Term in which the Type is "Employee":
- Enter a new Purchase Invoice and specify the Supplier and cost in the usual way.
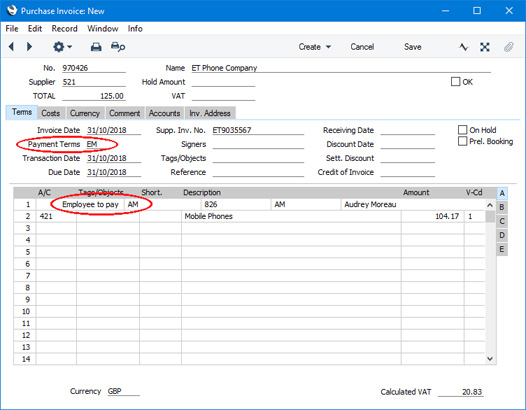
- Specify the Payment Term from step (i). A row will be added to the Purchase Invoice where you can enter the Signature of the Person who paid the Invoice:
- When you mark the Purchase Invoice as OK and save, the resulting Nominal Ledger Transaction will credit the Account from the relevant Person record ('Accounts' card). The Person's Tag/Object will be assigned to the credit posting(s).
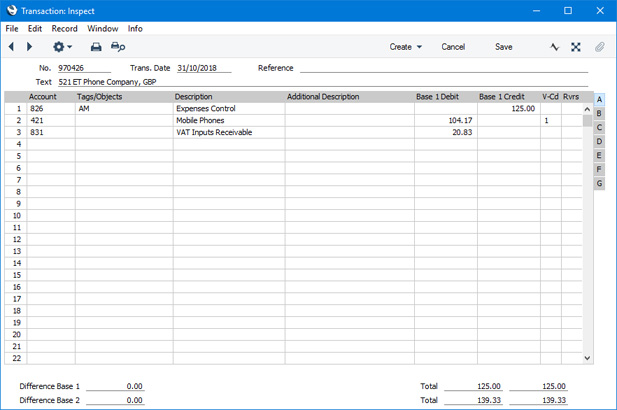
- As suggested by the Nominal Ledger Transaction, the Purchase Invoice will immediately be treated as paid so in that respect it is similar to a Cash Note.
- The Purchase Invoice will be included in the Periodic Personnel Statement for the Person (marked as "P/INV") and in the Periodic Supplier Statement for the Suppler (marked as "CASH"). It will also be included in Purchase Ledger VAT reports.
The Expense register in Standard ERP:
- Introduction
- Entering an Expense record
- Inspecting Expense records, Marking as OK and Posting to the Nominal Ledger
- Expenses in Currency
- Error Messages
- Invalidating Expenses
- Registering Expenses Using Purchase Invoices
- Operations menu
- Create menu
- Home page for Expenses module manual
- Home page for Standard ERP manual
Operatsioonide menüü

Ülaltoodud piltidel näed Kulutuse kaartide Operatsioonide menüüsid. Vasakpoolne on akna Kulutused: Sirvi Operatsioonide menüü. Märgi ära üks või mitu Kulutuse kaarti (hoia all Shift-klahvi ja märgi vahemik) ning vali menüüst Kinnita. Parempoolne on akende Kulutus: Uus või Kulutus: Vaata Operatsioonide menüü.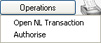
Kinnita
Seda käsklust saad kasutada akna Kulutused: Sirvi Operatsioonide menüüs. Siin saad Kulutusi kinnitada. Antud valik on võrdne Kinnita valiku märkimisega Kulutuse kaardil. Pea meeles, et kinnitamisel koostatakse iga Kulutuse kohta vastavad Finantskanded ning et kinnitatud Kulutust Sa enam muuta ei saa.Ava finantskanne
Kui Kulutus on kinnitatud ja salvestatud, koostatakse sellest Finantskanne, eeldusel, et oled nõnda määranud Üldise mooduli Allsüsteemide seadistuses. Selle käskluse valimisel saad koostatud kannet vaadata.
Kanne avatakse ekraanil eraldi aknas.
Allkirjasta
Kulutus sisestatud, võid selle enne kinnitamist allkirjastada. Kui oled Kulutuse seadistustes märkinud valiku Nõua allkirjastajat, pead Kulutuse enne kinnitamist allkirjastama. Selleks vali Operatsioonide menüüst käsklus Allkirjasta. Kulutuse päisesse Allkirjastaja väljale sisestuvad Sinu initsiaalid. Seejärel pane linnuke Kinnita väljale Kulutuse jaluses ning salvesta kaart, klõpsates Salvesta.
Üldise mooduli Kasutajagruppide seadistustes on võimalik teatud töötajatelt võtta ära õigus kasutada Allkirjastamise funktsiooni. Selleks mine Üldisesse moodulisse ja ava vastava grupi kaart Kasutajagruppide seadistustest. Kui sellel on määratud, et antud grupil õigused puuduvad, kasuta ruudustikku, andmaks Kasutajagrupi liikmetele luba teatud funktsioonide kasutamiseks:
Ülaltoodud pildil on Kasutajagrupi ???ADMIN’ liikmetele antud täielik juurdepääs Kulutuste moodulile, selleks et nad saaksid oma Kulutused ise sisestada. Kuid Allkirjastamise funktsiooni kasutamisõigust neile antud pole.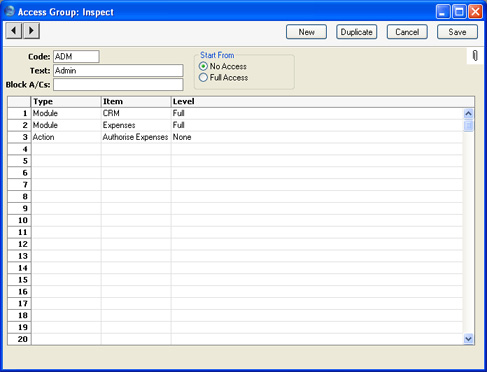
Kui Kasutajagrupile on antud täielikud õigused, kasuta ruudustikku, võtmaks Kasutajagrupi liikmetelt õigus teatud funktsioonide kasutamiseks:
Juhul, kui Operatsioonide menüü Kulutuse kinnitamise funktsiooni ei ole ruudustikku sisestatud, sõltub õigus funktsiooni kasutada märgitud Õiguste valikust. Kui on märgitud, et õigused Puuduvad, ei saa Kasutajagrupi liikmed Kulutusi allkirjastada. Kui on valitud Täielikud õigused, on liikmetel allkirjastamise õigus.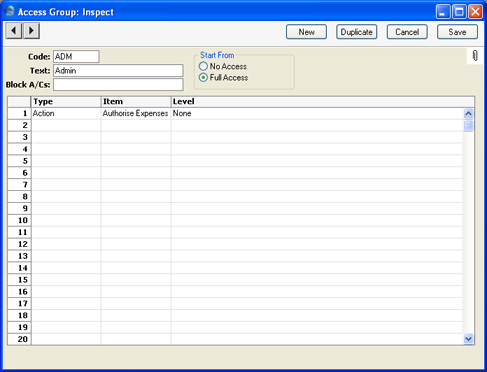
Põhjaliku Kasutajagruppide seadistuste kirjelduse leiad Üldist moodulit käsitlevast juhendist.Operations Menu - Expense - Expense Status
This page describes the 'Expense Status' function on the Operations menu in the Expense record window. If you are using iOS or Android, the 'Expense Status' function is on the Tools menu (with 'wrench' icon).
---
The 'Expense Status' command will be useful when an Expense record needs to go through an approval process before you can mark it as OK or print it. If you need to monitor the approval process for a particular Expense record, open the Expense record in a record window and then select 'Expense Status' from the Operations menu (Windows/Mac OS X) or Tools menu (iOS/Android). A report will be printed to screen, listing any Approval Request Activities that have been created from the Expense record and the status of each one. Please refer to the description of the Approval Status field on the 'Misc' card of the Expense window for brief details about the approval process and here for full details.
---
The Expense register in Standard ERP:
- Introduction
- Entering an Expense record
- Inspecting Expense records, Marking as OK and Posting to the Nominal Ledger
- Expenses in Currency
- Error Messages
- Invalidating Expenses
- Registering Expenses Using Purchase Invoices
- Operations menu, including:
- OK
- Open NL Transaction
- Authorise
- Expense Status
- Connect to Personnel Payment
- Request Approval
- Cancel Approval Request
- OK
- Create menu
- Home page for Expenses module manual
- Home page for Standard ERP manual
Operations Menu - Expense - Connect to Personnel Payment
This page describes the 'Connect to Personnel Payment' function on the Operations menu in the Expense record window. If you are using iOS or Android, the 'Connect to Personnel Payment' function is on the Tools menu (with 'wrench' icon).
---
If you have used a Personnel Payment to issue a payment to an employee before receiving their expense claim, you can use the 'Connect to Personnel Payment' function to connect the Personnel Payment and the expense claim. Follow these steps:
- Enter the Personnel Payment in the usual way, mark it as Ordered and OK and save.
- Enter the Expense record, again in the usual way, ensuring you specify a Person in the header.
- When the Expense record is complete (i.e. when you have added every row and amount), select 'Connect to Personnel Payment' from the Operations menu (Windows/Mac OS X) or Tools menu.
- The Expense record will be saved, and a new row will be added, containing the phrase "Pers. Pay. No.":
From the field to the right of this phrase, use 'Paste Special' to bring up a list of open Personnel Payments issued to the Person in the Expense record. An open Personnel Payment is one that has not yet been fully allocated to an Expense. If a Personnel Payment record contains more than one payment to the Person, the payments will be listed individually in the 'Paste Special' window.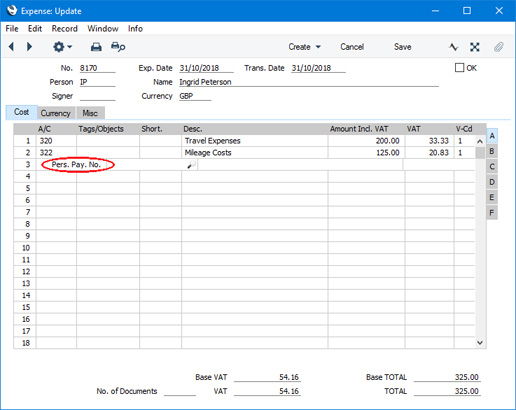
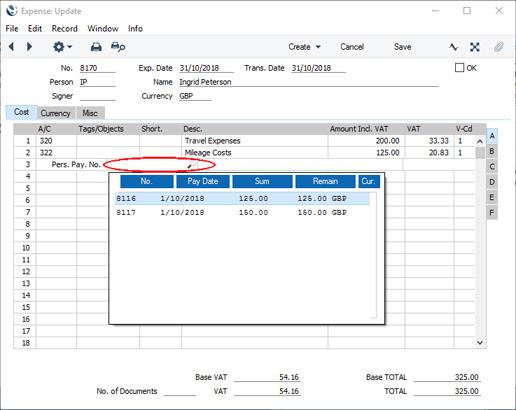
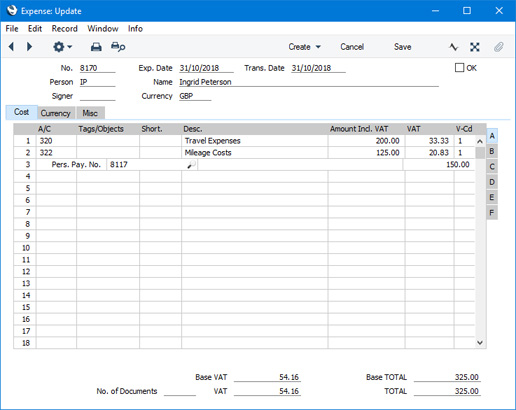
- Select a Personnel Payment from the list. The Personnel Payment Number will be added to the special Personnel Payment row, as will the open value of the Personnel Payment or the TOTAL from the Expense footer, whichever is the lower:
- Note that if a Personnel Payment record contains more than one payment to the Person, you will only have connected to one of those payments i.e. you will have connected to one row in the Personnel Payment. Repeat steps 4-5 if you want to connect to a second row in the Personnel Payment, or if you want to connect to a row in a second, different, Personnel Payment.
- After saving the Expense record again, it will no longer be possible to change the Person in the header. This will ensure the Expense record and the connected Personnel Payment remain related to the same Person.
- When you mark the Expense record as OK and save, the open value of the Personnel Payment will be reduced by the value in the special Personnel Payment row.
Note that it is important to ensure that the Expense record is complete before selecting the 'Connect to Personnel Payment' function. If the Expense record is incomplete when you select the function to the extent that the TOTAL is not the full value, this will be the amount that will be placed in the special Personnel Payment row. When you mark the Expense record as OK and save it, the open value of the Personnel Payment will be reduced by this value.
If you select 'Connect to Personnel Payment' before the Expense is complete (it may be that a late change is required) you can either change the amount shown in the special Personnel Payment row or you can delete the special Personnel Payment row and use 'Connect to Personnel Payment' once again. If you choose the former option, you will be prevented from entering an amount that is greater than the open value of the Personnel Payment, or greater than the TOTAL of the Expense record.
The Expense register in Standard ERP:
- Introduction
- Entering an Expense record
- Inspecting Expense records, Marking as OK and Posting to the Nominal Ledger
- Expenses in Currency
- Error Messages
- Invalidating Expenses
- Registering Expenses Using Purchase Invoices
- Operations menu, including:
- OK
- Open NL Transaction
- Authorise
- Expense Status
- Connect to Personnel Payment
- Request Approval
- Cancel Approval Request
- OK
- Create menu
- Home page for Expenses module manual
- Home page for Standard ERP manual
Operations Menu - Expense - Request Approval
This page describes the 'Request Approval' function on the Operations menu in the Expense record window. If you are using iOS or Android, the 'Request Approval' function is on the Tools menu (with 'wrench' icon).
---
If an Expense record has to pass through an approval process before you can mark it as OK or print it, use this function to begin that approval process. Please refer to the description of the Approval Status field on the 'Misc' card of the Expense window for brief details about the approval process and here for full details.
---
The Expense register in Standard ERP:
- Introduction
- Entering an Expense record
- Inspecting Expense records, Marking as OK and Posting to the Nominal Ledger
- Expenses in Currency
- Error Messages
- Invalidating Expenses
- Registering Expenses Using Purchase Invoices
- Operations menu, including:
- OK
- Open NL Transaction
- Authorise
- Expense Status
- Connect to Personnel Payment
- Request Approval
- Cancel Approval Request
- OK
- Create menu
- Home page for Expenses module manual
- Home page for Standard ERP manual
Operations Menu - Expense - Cancel Approval Request
This page describes the 'Cancel Approval Request' function on the Operations menu in the Expense record window. If you are using iOS or Android, the 'Cancel Approval Request' function is on the Tools menu (with 'wrench' icon).
---
If an Expense record needs to go through an approval process before you can mark it as OK or print it and you have started that approval process by selecting 'Request Approval' from the Operations menu (Windows/Mac OS X) or Tools menu (iOS/Android), you will no longer be able to modify the Expense record. So, if you realise the Expense record contains an error, you must cancel the approval process before you can correct the error. To do this, open the Expense record and choose 'Cancel Approval Request' from the Operations or Tools menu. You will now be able to amend the Expense record and then restart the approval process by once again choosing 'Request Approval'.
If you cannot cancel the approval process, the probable reasons are:
- The Approval Status of the Expense record (visible on the 'Misc' card) is not Pending.
- You may have configured the approval process (using the Approval Rules register in the Business Alerts module) so that it does not allow cancellation.
- You cannot cancel the approval process if at least one Approval Person has approved the Expense record.
---
The Expense register in Standard ERP:
- Introduction
- Entering an Expense record
- Inspecting Expense records, Marking as OK and Posting to the Nominal Ledger
- Expenses in Currency
- Error Messages
- Invalidating Expenses
- Registering Expenses Using Purchase Invoices
- Operations menu, including:
- OK
- Open NL Transaction
- Authorise
- Expense Status
- Connect to Personnel Payment
- Request Approval
- Cancel Approval Request
- OK
- Create menu
- Home page for Expenses module manual
- Home page for Standard ERP manual
Create Menu - Expenses
The Create menus for Expenses are shown above. On the left is the Create menu for the 'Expenses: Browse' window. On the right is the Create menu for the 'Expense: New' and 'Expense: Inspect' windows. If you are using iOS or Android, you can access the Create menu functions through the + menu.
'New' and 'Duplicate' are standard functions that are provided on every Create and + menu. Use these functions to create new records, in this case in the Expense register. Please follow the links below for details about the other functions:
---
The Expense register in Standard ERP:
- Introduction
- Entering an Expense record
- Inspecting Expense records, Marking as OK and Posting to the Nominal Ledger
- Expenses in Currency
- Error Messages
- Invalidating Expenses
- Registering Expenses Using Purchase Invoices
- Operations menu
- Create menu
- Home page for Expenses module manual
- Home page for Standard ERP manual
Create Menu - Expense - Workflow Activity
This page describes the 'Workflow Activity' function on the Create menu in the Expense record window. If you are using iOS or Android, the 'Workflow Activity' function is on the + menu.
---
Creating an Activity from an Expense record can be useful when you need to schedule a follow-up task related to that record.
You can create an Activity from an Expense record using the following methods:
- Open the Expense record in a record window and select 'Workflow Activity' from the Create or + menu. Save any changes you have made to the Expense record before selecting the function.
- Open the Expense record in a record window and then open the 'Workflow Manager' window. Click or tap the [+] button in this window to create a new Activity.
The new record will be opened in a window entitled 'Activity: Inspect'. This means that it has already been saved and is being opened for checking.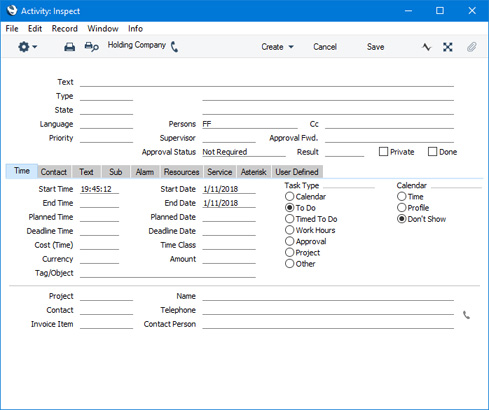
The new Activity will contain the following information:
- No default Activity Type will be offered.
- The Task Type will be To Do.
- The Calendar Type will be Don't Show.
- The Symbol will be Other.
- The Start Date and Time of the Activity will be the current date and time.
- The Person will be the current user. As the Task Type will be To Do, the Activity will be placed in the current user's Task Manager.
The Expense record and the Activity will be connected to each other through the Link Manager and Workflow Manager. When reviewing the Activity, you can return to the Expense record quickly and easily using the Link Manager in the Activity, while you can open the Activity from the Expense record using the Workflow Manager.
You must save an Expense record at least once before you can create an Activity from it. This is to ensure that the links mentioned in the previous paragraph can be established.
The 'Activity: Inspect' window is fully described here.
---
The Expense register in Standard ERP:
- Introduction
- Entering an Expense record
- Inspecting Expense records, Marking as OK and Posting to the Nominal Ledger
- Expenses in Currency
- Error Messages
- Invalidating Expenses
- Registering Expenses Using Purchase Invoices
- Operations menu
- Create menu, including:
- Workflow Activity
- Workflow Activity
- Home page for Expenses module manual
- Home page for Standard ERP manual
Create Menu - Expense - Email
This page describes the 'Email' function on the Create menu in the Expense record window. If you are using iOS or Android, the 'Email' function is on the + menu.
---
The 'Email' function allows you to create a Mail from an Expense record.
To create a Mail from an Expense record, first open the Expense record in a record window and then select 'Email' from the Create menu (Windows/Mac OS X) or + menu (iOS/Android). The following window will appear, where you can create a new Mail:
The new record will be opened in a window entitled 'Mail: Inspect'. This means that it has already been saved and is being opened for checking. The details in the Mail will be as follows: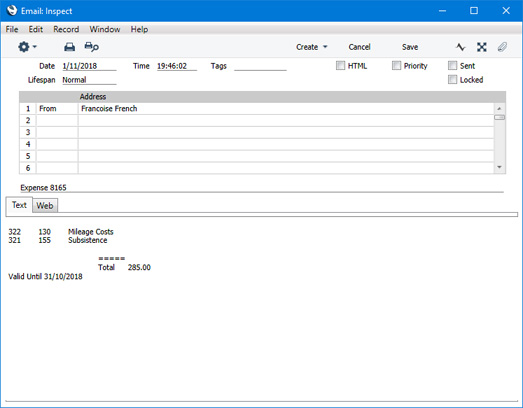
- The sender of the Mail will be the current user.
- No default recipient will be offered.
- The Subject and Text of the Mail will be taken from the fields in the header of the record in the Mail Texts setting in the Email and Conferences module in which the Form is "Expenses", as follows:
- The Subject in the mail will be composed from the Subject in the Mail Text record (which should have a trailing space), the text "Expense" and the Expense Number. For example, if the Subject in the Mail Text record is "Please find attached " (with trailing space), the Subject of the Mail will be "Please find attached Expense XXXX" (where XXXX is the Expense Number).
- The Text of the Mail will be built up as follows:
- The initial text will be taken from the Standard Text record quoted in the First Text field in the Mail Text record.
- Depending on the Do not put Record Details in Mail Body option in the Mail Text record, the rows in the Expense record will then be listed, followed by the Expense TOTAL.
- The final text will be taken from the Standard Text record quoted in the Last Text field in the Mail Text record. It is recommended that the first line in this Standard Text record should be a carriage return, to ensure that the text in the mail is neatly spaced.
If either Standard Text record is in HTML format, the Mail will be in HTML format as well.
If there is no suitable record in the Mail Texts setting, the Subject of the Mail will be "Expense XXXX" (where XXXX is the Expense Number). The Text of the Mail will contain the rows in the Expense record, followed by the Expense TOTAL.
Note that the Expense record does not have a Language field. Therefore, if you enter a record in the Mail Texts setting in which the Form is "Expenses", you only need fill in the fields in the header of that record. Any rows with different Languages that you add to the matrix will not be used when creating Mails.
- A PDF version of the Expense record will be attached to the Mail, accessible through the Document Manager. This requires you to have designed a Form Template to be used when printing Expense records, and to have assigned that Form Template to the Expense form using the 'Define Form' function. When you design the Form Template, you may need to use Styles that will embed fonts in PDF files (this will depend on the fonts you use). You may also need to choose a code page and page setup, which you can do in the Form Template Properties. Please refer here designing Form Templates.
- The Expense record itself will also be connected to the Mail through its Link Manager, and similarly the Mail will be connected to the Expense. This allows you to open the Mail quickly and easily when reviewing the Expense, or to open the Expense record from the Mail.
- The Subject in the mail will be composed from the Subject in the Mail Text record (which should have a trailing space), the text "Expense" and the Expense Number. For example, if the Subject in the Mail Text record is "Please find attached " (with trailing space), the Subject of the Mail will be "Please find attached Expense XXXX" (where XXXX is the Expense Number).
If the function does not create a Mail, the probable causes are:
- The current user does not have a Mailbox.
- The Expense record has not been saved.
- The Approval Status of the Expense record does not allow a Mail to be created from it. If you need Expense records to pass through an approval process before you can create Mails from them, you can configure such a process using the Approval Rules register in the Business Alerts module. Please refer to the description of the Approval Status field on the 'Misc' card of the Expense record for brief details about the approval process and here for full details.
---
The Expense register in Standard ERP:
- Introduction
- Entering an Expense record
- Inspecting Expense records, Marking as OK and Posting to the Nominal Ledger
- Expenses in Currency
- Error Messages
- Invalidating Expenses
- Registering Expenses Using Purchase Invoices
- Operations menu
- Create menu, including:
- Workflow Activity
- Workflow Activity
- Home page for Expenses module manual
- Home page for Standard ERP manual
- Valuutakursid (Topeltvaluutade süsteem)