Introduction to Forms in the Cash Book Module
The 'Forms' function allows you to print particular records or documents in batches.Each separate document that you can print contains two elements, the "Form" and the "Form Template". The Form element extracts the relevant information from the database and places it in printable fields, while the Form Template is the graphic layout design of the printed output i.e. it determines where on the page the printable fields will be placed.
To begin printing forms, first ensure you are in the Cash Book module. Then, if you are using Windows or macOS, click the [Forms] button in the Navigation Centre or use the Ctrl-D (Windows)/ ⌘-D (macOS) key combination. If you are using iOS or Android, tap the [Routines] button in the Navigation Centre and then tap [Forms]. The window illustrated below appears, listing the forms that you can print from the Cash Book module.
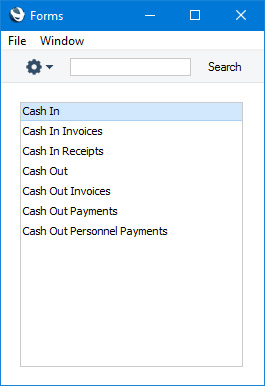
- If you are using Windows or macOS, double-click the form name in the list or highlight it and press the Enter key. If you are using iOS or Android, tap the form name in the list. In both cases, a specification window will then appear, where you can determine the records that you want to be printed (e.g. which Cash transactions are to be printed). The specification windows for each form are described in detail on the pages describing each form.
- Click or tap [Run] to print the documents.
- Close the 'Forms' window using the close box (Windows/macOS) or by tapping < (iOS/Android).
Before you can print a form, you must connect it to a Form Template. The Form Template contains the layout of the printed output. If necessary you can connect a form to more than one Form Template: for example, you might need a particular form to be able to produce printed output in different Languages determined by the Language of the Customer. To connect a form to a Form Template, follow this procedure, which you must carry out using Windows or macOS:
- For each option, design a Form Template using the Form Template register in the System module. A file containing samples of each Form Template is supplied with Standard ERP: if you want to use these samples as the basis for your own designs, import the "UKForms.txt" file as described on the Importing Set-up Data page.
- Change to the Cash Book module and open the 'Forms' list window by clicking the [Forms] button in the Navigation Centre or using the Ctrl-D (Windows)/⌘-D (macOS) key combination.
- Highlight each item in the list in turn and for each one select 'Define Form' from the Operations menu. In the subsequent 'Form Definition' window, assign a Form Template (or more than one Form Template) to each form. The 'Form Definition' window is fully described here. For example, each form can be printed using different Form Templates, determined perhaps by the Number Series of the Cash In or Cash Out record.
- You only need use the 'Define Form' function once. Afterwards, Form Template selection will be automatic.
You can often possible print forms from a range of records, such as a range of Cash In or Cash Out records. To do this, enter the lowest and highest values of the range, separated by a colon. For example, to print Productions 001 to 010, enter "001:010" in the Cash In or Cash Out Number field. Depending on the field, the sort used might be alpha or numeric. In the case of an alpha sort, a range of 1:2 would also include 100, 10109, etc.
Please follow the links below for details about the forms in the Cash Book module:
- Cash In, Cash Out
- Cash In Invoices, Cash In Receipts, Cash Out Invoices, Cash Out Payments, Cash Out Personnel Payments
- Cash In Collection, Cash Out Collection
- and please refer here for a list of standard fields that you can include in almost every Form Template
Go back to:
- Home page for Cash Book module manual
- Home page for Standard ERP manual
Cash In, Cash Out
This page describes the Cash In and Cash Out forms in the Cash Book module.---
The Cash In and Cash Out forms allow you to print records from the Cash In and Cash Out registers respectively.
A file containing samples of Form Templates suitable for use with each form is supplied with Standard ERP. This file includes sample Cash In and Cash Out Form Templates which have the Form Codes "CSHIN" and "CSHOUT" respectively. The Form Types of these Form Templates are "Cash In" and "Cash Out".
You can print cash transactions using the following methods:
- After opening a Cash In or Cash Out record in a record window, click the Printer icon in the Button Bar (Windows/macOS only) or select 'Print' from the File menu (all platforms). If you want to print to screen, click the Preview icon (Windows/macOS only).
- Open the 'Cash In: Browse' or 'Cash Out: Browse' windows, select one or more cash transactions in the list and then select 'Print' from the File menu. Documents for the selected records will then be printed.
If you are using Windows or macOS, you can highlight several cash transactions in the list by holding down the Shift key while clicking. If you need to apply a function to a number of Invoices that aren't in a range, highlight them while holding the Ctrl (Windows) or ⌘ (macOS) keys before selecting the function. If you are using iOS or Android, you can highlight a single record in the browse window by searching for it, so you will only be able to print a single record at a time using this method.
- Open the list of forms in the Cash Book module. If you are using Windows or macOS, you can do this by clicking the [Forms] button in the Navigation Centre or using the Ctrl-D/⌘-D keyboard shortcut. If you are using iOS or Android, tap the [Routines] button in the Navigation Centre and then tap [Forms]. Then double-click or tap 'Cash In' or 'Cash Out' as appropriate in the 'Forms' list.
The 'Specify Cash In' or 'Specify Cash Out' (depending on which option you selected in the previous paragraph) window will be shown.
Enter the Cash In or Cash Out Number of the single cash transaction that you need to be printed, or the highest and lowest Cash In or Cash Out Numbers of a range of transactions separated by a colon (:). You must specify a Cash In or Cash Out Number or range of Numbers: if you leave this field empty, no forms will be printed.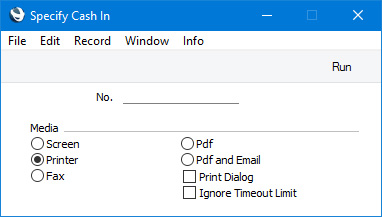
Press [Run] to start the printout.
Header Fields
These fields will be printed once per Cash In or Cash Out.| Field in Form Template | Prints (from Cash In or Cash Out) |
| Address | Name (if you are using the Organisation name option in the Form Settings setting) and Address. This information will be printed on separate lines, so you should specify a Line Height for this field. Use the Form Settings setting to set the format of this field (e.g. to specify whether blank lines will be printed, whether parts of the address will be printed on the same line, etc.) |
| Address 1 | First line of Address |
| Address 2 | Second line of Address |
| Address 3 | Third line of Address |
| Address 5 | Fourth line of Address |
| Address 6 | Fifth line of Address |
| Comment | Specification |
| Comment 2 | Comment (only used in the Cash Out form) |
| Corresponding Mode | Expense A/C |
| Corresponding Mode Account | Account from the connected Expense Account record |
| Currency | Currency from the cash transaction or, if blank, Base Currency 1 |
| Currency Name | Name from the Currency record |
| Customer Name | Name (i.e. Customer or Supplier Name) |
| Customer Number | Customer (Cash In) or Supplier (Cash Out) |
| Day | The day from the Date. For example, the day from 2 January 2021 will be printed as "2" |
| Invoice Number | In a cash transaction that was created from an Invoice or Receipt, prints the No. of the originating record (e.g. Invoice Number or Receipt Number) (only used in the Cash In form) |
| Month | The month from the Date. For example, the month from 2 January 2021 will be printed as "1" |
| Month in words | The name of the month in the Date, taken from the record in the Days and Months setting in the System module for the Language in the Cash In or Cash Out record or, if that is blank, in the current user's Person record |
| Official Serial Number | Official No. |
| Payment Mode | Pay Mode |
| Payment Mode 2 | Comment from the Payment Mode |
| Payment Mode TAX Value | Total (only used in the Cash In form) |
| Payment Mode Total Including TAX | Tax (only used in the Cash In form) |
| Payment Number for Russia | Prints the No. of the Cash In or Cash Out record with the first three characters removed |
| Person | Person |
| Reference | Reference |
| Security Account | Account from the connected Expense Account record |
| Serial Number (Number Series) | No. |
| Signature | Name from the current user's Person record |
| Subtotal with VAT | Net + VAT (only used in the Cash In form) |
| Sum | Net |
| TAX Sum | Tax (only used in the Cash In form) |
| To Pay | Total |
| To Pay in Base Currency 1 | Total, converted to Base Currency 1 |
| To Pay in Base Currency 2 | Total, converted to Base Currency 2 |
| To Pay in Text | Prints the Total as a phrase. The phrase is constructed using the relevant record in the Values in Text setting for the Language in the current user's Person record or in the Company Info setting |
| Transaction Date (transdate) | Date |
| VAT | VAT |
| Year | The year from the Date. For example, the year from 2 January 2021 will be printed as "2021" |
Customer/Supplier Information
The following fields print information taken from the record in the Contact register for the Customer (Cash In) or Supplier (Cash Out)| Field in Form Template | Prints (from the Contact record for the Customer or Supplier) |
| Bank Account | Bank Account (only used in the Cash Out form) |
| Bank Name | Name from the Bank record specified in the Account Operator field (only used in the Cash Out form) |
| Customer Registration No. 1 | Reg. No. 1 |
| Customer Registration No. 2 | Reg. No. 2 |
| Customer VAT Reg. Number | VAT Reg. No. |
| Supplier VAT Reg. Number | VAT Reg. No. (only used in the Cash Out form) |
Invoice Information
If a Cash In record was created from a Sales Invoice, the following fields will print information taken from the originating Invoice:| Field in Form Template | Prints (from Invoice) |
| Invoice Number | No. |
| Sales Account | Prints a list of the Sales Accounts and VAT Output Accounts used in the Invoice, separated by commas. If the Cash In being printed was not created from a Sales Invoice, this field will print the Account from the connected Expense Account record |
| Sub Currency | Currency |
| Sub Currency Name | Name from the Currency record |
| Sub Customer Code | Customer No. |
| Sub Customer Name | Customer Name |
| Total in Base Currency 1, row | Base |
| Total Row | Base |
| Transaction Date | Trans. Date |
Person Information
The following fields print information taken from the record in the Person register for the Person specified in the cash transaction| Field in Form Template | Prints (from Person record) |
| Our Reference (ourref) | Our Ref |
| Person Account | Account |
| Person Comment | Comment |
| Person ID | Personal ID |
| Person Specification | Specification |
| Salesman Name | Name |
Purchase Invoice Information
If a Cash Out record was created from a Purchase Invoice, the following fields will print information taken from the originating Invoice:| Field in Form Template | Prints (from Purchase Invoice) |
| Invoice Number | No. |
| Sales Account | Prints a list of the Cost Accounts and VAT Input Accounts used in the Purchase Invoice, separated by commas. If the Cash Out being printed was not created from a Purchase Invoice, this field will print the Account from the connected Expense Account record |
| Sub Currency | Currency |
| Sub Currency Name | Name from the Currency record |
| Sub Customer Code | Supplier No. |
| Sub Customer Name | Supplier Name |
| Total in Base Currency 1, row | Base |
| Total Row | Base |
| Transaction Date | Trans. Date |
Row Fields
These fields will be printed once per row (on the 'Payments' card), so remember to specify a Line Height and to set the Format to "Matrix".| Field in Form Template | Prints (from Cash In or Cash Out row) |
| Bank Name 2 | If the Type is "Cheque" or "Own Cheque", prints the Name (Bank Name) from the connected Cheque or Own Cheque record (only used in the Cash Out form) |
| Bank Name per Row | If the Type is "Cheque", prints the Name (Bank Name) from the connected Cheque record (only used in the Cash In form) |
| Cheque Number | If the Type is "Cheque", prints the Cheque No. from the connected Cheque record. In the Cash Out form only, if the Type is "Own Cheque", prints the Cheque No. from the connected Own Cheque record |
| Corresponding Mode, Row | Expense A/C from flip B |
| Corresponding Mode Account, Row | Account from the connected Expense Account record |
| Description 1 | Comment from flip B |
| Invoice Number 2 | Number from flip A |
| Order Number | Order from flip A |
| Payment Mode, row | Prints the Pay. Mode from flip B or, if blank, from the 'Amounts' card |
| Payment Mode Comment, Row | Prints the Comment from the Payment Mode specified on flip B or, if blank, from the Payment Mode specified on the 'Amounts' card |
| Row Sum | Sum from flip A |
| Supplier Invoice Number | If the Type is "Purchase Invoice", prints the Supp. Inv. No. of the Purchase Invoice (only used in the Cash Out form) |
| Tag/Object | Tags/Objects from flip A |
| Text Type | Type from flip A |
Please refer here for details about the standard fields that you can also include in the Form Template.
---
Go back to:
- Home page for Forms in the Cash Book module
- Home page for Cash Book module manual
- Home page for Standard ERP manual
Cash In Invoices, Cash In Receipts, Cash Out Invoices, Cash Out Payments, Cash Out Personnel Payments
This page describes the Cash In Invoices, Cash In Receipts, Cash Out Invoices, Cash Out Payments and Cash Out Personnel Payments forms in the Cash Book module.---
There is a legal requirement in the Baltic States to keep printed records of all cash transactions. To satisfy this requirement, various 'Print Cash IN-OUT' functions are provided on the Operations menus (Windows/macOS) or Tools menus (iOS/Android) in the Invoice, Receipt, Purchase Invoice, Payment and Personnel Payment record windows. You can use these functions to print the cash transactions from these registers.
These options in the 'Forms' list in the Cash Book module are primarily provided to allow you to specify the Form Templates that are to be used by the various 'Print Cash IN-OUT' functions. The forms are connected to the 'Print Cash IN-OUT' functions as follows:
| Form | 'Print Cash IN-OUT' function |
| Cash In Invoice | Invoice |
| Cash In Receipt | Receipt |
| Cash Out Invoice | Purchase Invoice |
| Cash Out Payment | Payment |
| Cash Out Personnel Payment | Personnel Payment (Expenses module) |
You can only specify the Form Templates that will be used by each 'Print Cash IN-OUT' function using Windows or macOS, not iOS or Android. Highlight each option in turn in the 'Forms' list and select 'Define Form' from the Operations menu. In the subsequent 'Form Definition' window, specify a Form Template using 'Paste Special' if necessary. The 'Form Definition' window is described here. Each 'Print Cash IN-OUT' function uses a separate Form Template, so you should specify a Form Template for each form (i.e. for each 'Print Cash IN-OUT' function) that you are likely to use. If you have not specified a Form Template for a particular form, the message "No form defined. Please check the form definition" will be displayed when you try to print a document using the connected 'Print Cash IN-OUT' function. If you are shown this message after selecting a 'Print Cash IN-OUT' function, make sure that you assign a Form Template to the correct form.
Please follow the links in the table above to refer to the descriptions of the individual 'Print Cash IN-OUT' functions for lists of the fields that you can include in the Form Templates that will be used by these forms
You can also use these forms to print transactions from the respective registers in batches (effectively the equivalent of using a 'Print Cash IN-OUT' function to print many records at once). For example, to print a range of Invoices, double-click (Windows/macOS) or tap (iOS/Android) 'Cash In Invoices' in the 'Forms' list. When the specification window appears, enter the first and last Invoice Number separated by a colon (:) and press the [Run] button. Every Invoice in the range will be printed, irrespective of its Payment Term.
---
Go back to:
- Home page for Forms in the Cash Book module
- Home page for Cash Book module manual
- Home page for Standard ERP manual
Cash In Collection, Cash Out Collection
The Cash In Collection and Cash Out Collection forms were removed in version 7.3 of the application.---
Go back to:
- Home page for Forms in the Cash Book module
- Home page for Cash Book module manual
- Home page for Standard ERP manual