Introduction to the Personnel Payment Register
Use the Personnel Payment register to issue expenses payments and cash advances to your employees and members of personnel. In operation, it is similar to the Payment register in the Purchase Ledger. A single Personnel Payment record can include payments to more than one member of personnel, issued from different bank accounts (i.e. using different Payment Modes), provided they use a single Currency.You can also issue payments to members of personnel using the Cash Out register in the Cash Book module and, if necessary, receive payments from them using the Cash In register. In both cases, add rows to the 'Payments' card in which the Type is "Personnel Payment".
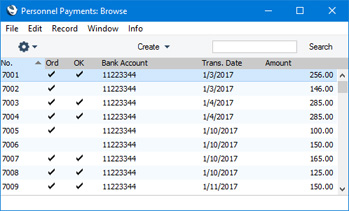
To open the Personnel Payment register, first ensure you are in the Expenses or Cash Book module. Then, if you are using Windows or Mac OS X, click the [Registers] button in the Navigation Centre and then double-click 'Personnel Payments' in the resulting list. If you are using iOS or Android, tap the [Registers] button in the Navigation Centre and then tap 'Personnel Payments' in the 'Registers' list. The 'Personnel Payments: Browse' window will be opened, showing the Personnel Payments that you have already entered.
---
The Personnel Payment register in Standard ERP:
- Introduction
- Entering a Personnel Payment
- Inspecting Personnel Payments, Marking as OK and Posting to the Nominal Ledger
- Printing Payment Forms and Cheques
- Invalidating Personnel Payments
- Operations menu
- Create menu
Go back to:
- Home page for Expenses module manual
- Home page for Standard ERP manual
Entering a Personnel Payment
To enter a new Personnel Payment, first open the Personnel Payment register as described here, then select 'New' from the Create menu (Windows/Mac OS X) or the + menu (iOS/Android). You can also use the Ctrl-N (Windows) or ⌘-N (Mac OS X) keyboard shortcut. Alternatively, highlight a Payment similar to the one you want to enter and select 'Duplicate' from the same menu. If you don't want to open the 'Payments: Browse' window before creating a new record, you can also use the + menu in the Navigation Centre (all platforms).The 'Personnel Payment: New' window will be opened, empty if you selected 'New' or containing a duplicate of the highlighted Payment.
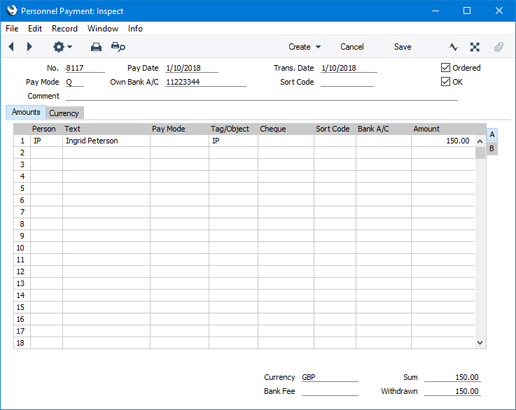

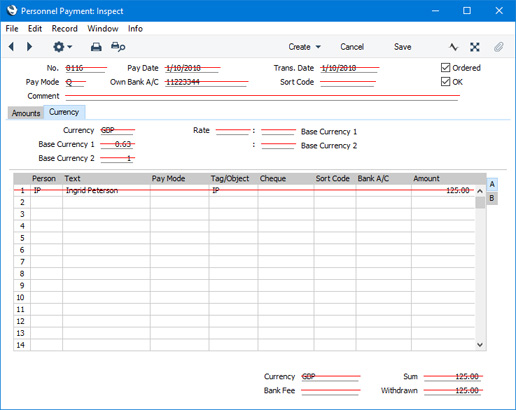
If you are using iOS or Android, the two tabs will be marked 'Items' and 'Details'. 'Details' is the equivalent of the 'Currency' card in Windows and Mac OS X.
Complete the Personnel Payment record as described on the pages listed below on the pages describing each card, then save it using the [Save] button (Windows/Mac OS X) or by tapping √ (iOS/Android). The window title will change from 'Personnel Payment: New' to 'Personnel Payment: Inspect'. You must save all changes you have made before you can print a Personnel Payment or send it by email.
Please follow the links below for details about each card in the Personnel Payment record:
- Header
- 'Amounts' card
- 'Currency' card
The Personnel Payment register in Standard ERP:
- Introduction
- Entering a Personnel Payment, including:
- Header
- 'Amounts' card
- 'Currency' card
- Header
- Inspecting Personnel Payments, Marking as OK and Posting to the Nominal Ledger
- Printing Payment Forms and Cheques
- Invalidating Personnel Payments
- Operations menu
- Create menu
Go back to:
- Home page for Expenses module manual
- Home page for Standard ERP manual
Entering a Personnel Payment - Header
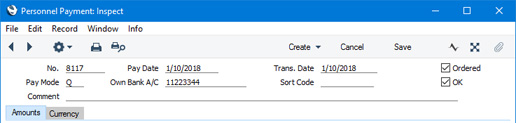
This page describes the fields in the Header of the Personnel Payment record. Please follow the links below for descriptions of the other cards:- Header
- 'Amounts' card
- 'Currency' card
- No.
- Paste Special
Select from another Number Series
- The unique identifying number of the Personnel Payment record. The default will be chosen as follows:
- It will be taken from the first valid row in the Number Series - Personnel Payments setting.
- It will be the next number following on from the last Personnel Payment record entered.
- You can change the default, but not to a number that has already been used. If you have defined at least one number sequence in the Number Series - Personnel Payments setting, the number you change to must be inside a valid number sequence.
- You will not be able to save a Personnel Payment if the No. does not belong to a valid number sequence. A valid number sequence is one for the period in which the Transaction Date falls and with unused numbers, so this problem will most usually occur at the beginning of a new calendar or financial year.
- If you are working in a multi-user system, the Personnel Payment Number will be assigned when you save the Personnel Payment record for the first time, chosen as described above and providing you have not already specified a number yourself.
- If you have used the Payment Modes setting to define separate number sequences for each Payment Mode and are using the Common Number Series option in the Cash Book Settings setting, the Personnel Payment Number will be determined by the default Payment Mode and will change if you change the Payment Mode. Number sequences defined in the Payment Modes setting are not shown in the 'Paste Special' list.
- It will be taken from the first valid row in the Number Series - Personnel Payments setting.
- Pay Date
- Paste Special
Choose date
- The date when you want the Payment to be executed.
- Trans Date
- Paste Special
Choose date
- This date will be used as the Transaction Date in the Nominal Ledger Transaction that will be created from the Personnel Payment.
- If you are not using the Allow Trans. Date Changing option in the Transaction Settings setting in the Nominal Ledger, this date must be the same as the Payment Date and cannot be changed independently.
- If you are not using the Allow Trans. Date Changing option in the Transaction Settings setting in the Nominal Ledger, this date must be the same as the Payment Date and cannot be changed independently.
- Pay Mode
- Paste Special
Payment Modes setting, Sales/Purchase Ledger
- The Payment Mode represents both the method of payment (e.g. cheque, credit card or cash) and the Account from which the payment will be issued (e.g. a particular bank account or petty cash). It determines the Nominal Ledger Account that will be credited with the value of the Payment.
- If the Account in the Payment Mode is one in which you have specified a Currency, that Currency will be brought in to the Currency field in the footer, and you will only be able to use that Currency in the Personnel Payment. If you have not specified a Currency in the Account, you will be able to use any Currency in the Personnel Payment.
- The 'Paste Special' list will display the current balances of the Accounts specified in each Payment Mode. If you have Payment Modes representing different bank accounts, this will help you choose the one that will issue the Payment.
- You can issue payments to different members of personnel from a single Personnel Payment record. You can also issue payments with different Payment Modes, by specifying Payment Modes in the individual Payment rows. If a Payment row has its own Payment Mode, the Nominal Ledger Account in that Payment Mode will be credited from that row.
- If you have used the Payment Modes setting to define separate number sequences and are using the Common Number Series option in the Cash Book Settings setting for each Payment Mode, the Personnel Payment Number will be determined by the default Payment Mode and will change if you change the Payment Mode.
- If you pay a member of personnel using cash, you can record your payment using a Personnel Payment with an appropriate Payment Mode (one that credits the Cash Account), or you can use the Cash Out register in the Cash Book module ('Payments' card). This is described in the 'Cash Book' manual.
- If the Account in the Payment Mode is one in which you have specified a Currency, that Currency will be brought in to the Currency field in the footer, and you will only be able to use that Currency in the Personnel Payment. If you have not specified a Currency in the Account, you will be able to use any Currency in the Personnel Payment.
- Own Bank A/C
- Default taken from
Payment Mode
- The number of the bank account from where you will issue the Payment.
- Sort Code
- Default taken from
Payment Mode
- The Sort Code (branch number) of the bank where the account from where you will issue the Payment is held.
- Comment
- Use this field if you need to add a comment to a Personnel Payment record.
- Ordered
- The Ordered and OK check boxes are provided to allow for the delay between the issuing of a Payment and the clearing of the funds from your company's bank account. Ticking the Ordered box indicates that you have issued a Payment, while ticking the OK box indicates that the funds have been cleared. You must therefore tick the Ordered box before the OK box.
- Once you have issued a Payment, it may occasionally transpire that the funds were not cleared from your company's bank account (perhaps because the cheque bounced or was lost). If you are using Windows or Mac OS X, highlight each row in the Payment in turn by clicking the row number and then press the Backspace key. If you are using iOS or Android, long tap on the row number on the left of the relevant row and select 'Delete Row' from the resulting menu. A red line will be drawn through the row, invalidating it. You can also invalidate an entire Payment by marking it as OK, saving it, and then selecting 'Invalidate' from the Record menu (which has a 'cog' icon if you are using iOS or Android).
- Once you have issued a Payment, it may occasionally transpire that the funds were not cleared from your company's bank account (perhaps because the cheque bounced or was lost). If you are using Windows or Mac OS X, highlight each row in the Payment in turn by clicking the row number and then press the Backspace key. If you are using iOS or Android, long tap on the row number on the left of the relevant row and select 'Delete Row' from the resulting menu. A red line will be drawn through the row, invalidating it. You can also invalidate an entire Payment by marking it as OK, saving it, and then selecting 'Invalidate' from the Record menu (which has a 'cog' icon if you are using iOS or Android).
- OK
- When you tick this box and click the [Save] button (Windows/Mac OS X) or tap √ (iOS/Android) to save the record, a Nominal Ledger Transaction will be generated if you have so determined in the Sub Systems setting in the Nominal Ledger and in the Number Series - Personnel Payments setting. This Transaction will credit the Bank Account specified for the Payment Mode and debit the Account(s) specified on the 'Accounts' card of the relevant Person record(s). No further modifications to the Payment will be possible. The Payment will now appear in Periodic Personnel Statements produced for the individual(s) in question.
The Personnel Payment register in Standard ERP:
- Introduction
- Entering a Personnel Payment, including:
- Header
- 'Amounts' card
- 'Currency' card
- Header
- Inspecting Personnel Payments, Marking as OK and Posting to the Nominal Ledger
- Printing Payment Forms and Cheques
- Invalidating Personnel Payments
- Operations menu
- Create menu
Go back to:
- Home page for Expenses module manual
- Home page for Standard ERP manual
Entering a Personnel Payment - Amounts Card
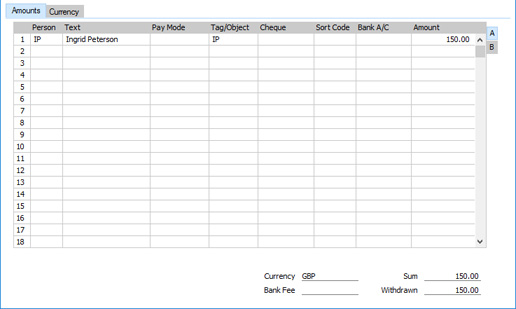
This page describes the fields on the 'Amounts' card of the Personnel Payment record. Please follow the links below for descriptions of the other cards:- Header
- 'Amounts' card
- 'Currency' card
You can pay several members of personnel in a single Personnel Payment record, and/or make payments using different Payment Modes. The Payment Mode represents the payment method (i.e. cheque, cash or credit card) and also determines the Bank or Cash Account that will be credited with the value of the payments. You can only use a single Currency in a particular Personnel Payment record.
If you are using Windows or Mac OS X, you can add a row to a Payment by clicking in any field in the first blank row and entering appropriate text. To remove a row, click on the row number on the left of the row and press the Backspace key. To insert a row, click on the row number where the insertion is to be made and press Return.
If you are using iOS or Android, you can add rows by tapping the + button below the matrix. To remove a row, long tap on the row number on the left of the row and select 'Delete Row' from the resulting menu. To insert a row, long tap on the row number where the insertion is to be made and select 'Insert Row' from the resulting menu.
Flip A
- Person
- Paste Special
Person register, System module and Global User register, Technics module
- Enter the Signature of the Person receiving the payment or advance.
- If you have more than one Company in your database, the employee that you specify here should have a Person record in the Company in which you are working. In the Nominal Ledger Transaction resulting from a Personnel Payment, the Amount in the Personnel Payment row will be debited to the Account specified in the Person record of the Person entered here. If you specify a Global User who does not have a Person record in the Company in which you are working, it will not be possible to establish the Account that should be debited.
- If you have more than one Company in your database, the employee that you specify here should have a Person record in the Company in which you are working. In the Nominal Ledger Transaction resulting from a Personnel Payment, the Amount in the Personnel Payment row will be debited to the Account specified in the Person record of the Person entered here. If you specify a Global User who does not have a Person record in the Company in which you are working, it will not be possible to establish the Account that should be debited.
- Text
- Enter any text describing the transaction. The name of the Person being paid will be brought in as a default.
- Pay Mode
- Paste Special
Payment Modes setting, Sales/Purchase Ledger
- Enter a Payment Mode, if different from the Payment Mode entered in the header. This allows different payments on the same Personnel Payment to be credited to different bank or cash Accounts.
- If the Account in the Payment Mode in the header is one in which you have specified a Currency, you should not specify a Payment Mode that requires a different Currency in a row.
- If the Account in the Payment Mode in the header is one in which you have specified a Currency, you should not specify a Payment Mode that requires a different Currency in a row.
- Tags/Objects
- Paste Special
Tag/Object register, System module
- Default taken from Person
- You can assign up to 20 Tags/Objects, separated by commas, to a Personnel Payment row and all transactions generated from it. You might define separate Tags/Objects to represent different departments, cost centres or product types. This provides a flexible method of analysis that can be used in Nominal Ledger reports.
- In the Nominal Ledger Transaction generated from a Payment, the Tags/Objects specified here will be assigned to the debit posting to the Account specified in the Person record of the Person being paid. Any Tags/Objects specified in the Payment Mode will be assigned to the credit posting to the Bank or Cash Account.
- You can assign up to 20 Tags/Objects, separated by commas, to a Personnel Payment row and all transactions generated from it. You might define separate Tags/Objects to represent different departments, cost centres or product types. This provides a flexible method of analysis that can be used in Nominal Ledger reports.
- Cheque
- Paste Special
Own Cheque register, Cheques module (if present)
- Record the number of the cheque used for the Personnel Payment here.
- If you have specified a Payment Mode whose Type is "Own Cheques" (either in a particular Personnel Payment row or in the Personnel Payment header), this will signify that you wish to issue payment using a cheque that you have recorded in the Own Cheque register in the Cheques module. Enter here the Serial Number (i.e. not the Cheque Number) of the Own Cheque record that you wish to use. You can use the following methods to choose the Own Cheque:
- Place the insertion point in the Payment row and select 'Prepare Cheque' from the Operations menu (Windows/Mac OS X) or Tools menu (iOS/Android). This function will try to find a blank Own Cheque that it can use. Failing that, it will create a new one. In both cases, it will copy the Currency and Amount to the Own Cheque. If there are several Payment rows paying the same Person, the total Amount from all these rows will be copied to the Own Cheque. The Serial Number of the Own Cheque will be copied to the selected Payment row. In this context, a blank Own Cheque is one that is Unused, with a blank Bank Account and with no Amount. To create an Own Cheque with no Amount, use the 'Create Own Cheques' Maintenance function in the Cheques module.
- In some companies, it can be normal practice for a bookkeeper to create Own Cheques with Amounts (i.e. to create cheques to pay specific Purchase Invoices or Expense claims), and for another person to enter the Payments and Personnel Payments. This person cannot use 'Prepare Cheque' because this function won't connect Payment rows to Own Cheques with Amounts. Instead, they should use 'Paste Special' from the Cheque field to choose the appropriate Own Cheque. The Amount in the row will be changed to the value of the Own Cheque.
- When you enter a Payment in which the Type of the Payment Mode is "Own Cheques", you can leave the Cheque No. field in each row blank when you first save the Payment. However, when you mark the Payment as Ordered, you will then need to specify cheque numbers before you will be able to save again. On marking the Payment as OK and saving, the Status of the relevant Own Cheques will be changed to Issued.
- If you have specified a Payment Mode whose Type is "Own Cheques" (either in a particular Personnel Payment row or in the Personnel Payment header), this will signify that you wish to issue payment using a cheque that you have recorded in the Own Cheque register in the Cheques module. Enter here the Serial Number (i.e. not the Cheque Number) of the Own Cheque record that you wish to use. You can use the following methods to choose the Own Cheque:
- To Bank A/C
- The bank account of the payee is brought in from the 'Accounts' card of the Person record.
- Sort Code
- The branch number of the bank holding the payee's bank account will be brought in from the 'Accounts' card of the Person record.
- Amount
- The amount paid out, in the Currency specified in the footer.
Flip B
- Reference Number
- This field should be used by certain state companies in Estonia to record the RK Reference for each Personnel Payment row. This reference can be generated automatically depending on how you have configured the RiigiTarkvara setting in the Nominal Ledger (only available in Estonia i.e. if the VAT Law in the Company Info setting is "Estonian").
Footer
- Currency
- Paste Special
Currency register, System module
- Default taken from Account specified in the Payment Mode, or Default Base Currency
- The Currency to be used in the payment i.e. the Currency of the bank or cash Account from where the payment will be issued.
- If you have specified a Currency in the bank or cash Account (i.e. in the Account specified in the Payment Mode in the header), that Currency will be brought in to this field, and you will only be able to use that Currency. If you have not specified a Currency in the Payment Mode Account, you will be able to use any Currency in the Personnel Payment.
- You can only use one Currency in a Personnel Payment record.
- The exchange rate will be shown on the 'Currency' card where you can modify it for an individual Personnel Payment record if necessary.
- The Currency to be used in the payment i.e. the Currency of the bank or cash Account from where the payment will be issued.
- Bank Fee
- Enter any fee charged by the bank for a Personnel Payment, in the Currency specified above. Bank fees will be debited to the Bank Fee Account specified on the 'Creditors' card of the Account Usage P/L setting.
- Sum
- The sum of all the payments entered above, in Currency.
- Withdrawn
- The total value of the payment, i.e. the amount actually withdrawn from the bank or cash Account in your home Currency, including any Bank Fees.
The Personnel Payment register in Standard ERP:
- Introduction
- Entering a Personnel Payment, including:
- Header
- 'Amounts' card
- 'Currency' card
- Header
- Inspecting Personnel Payments, Marking as OK and Posting to the Nominal Ledger
- Printing Payment Forms and Cheques
- Invalidating Personnel Payments
- Operations menu
- Create menu
Go back to:
- Home page for Expenses module manual
- Home page for Standard ERP manual
Entering a Personnel Payment - Currency Card
This page describes the fields on the 'Currency' card of the Personnel Payment record. Please follow the links below for descriptions of the other cards:- Header
- 'Amounts' card
- 'Currency' card

- Currency
- Paste Special
Currency register, System Module
- Default taken from Account specified in the Payment Mode, or Default Base Currency
- You can record a Personnel Payment in any Currency, although you can only use one Currency in an individual Personnel Payment record.
- All Amounts that you enter in Personnel Payment rows should be in the Currency specified in this field. The resulting Nominal Ledger Transaction will include figures in both foreign and home Currencies (and in the second Base Currency if appropriate).
- You can record a Personnel Payment in any Currency, although you can only use one Currency in an individual Personnel Payment record.
- Exchange Rates
- Default taken from
Base Currency Rates setting and/or Exchange Rate register, System module
- By default, these fields will display the exchange rates for the specified Currency on the Transaction Date of the Personnel Payment.
- If you change the Transaction Date (either directly or by changing the Pay Date), the exchange rates will change automatically. You can also change the exchange rates in an individual Personnel Payment yourself. If you wish to prevent the changing of exchange rates, select the Prevent Base Rate Changes and/or Prevent Foreign Rate Changes options in each Currency record. If you are using these options, the exchange rates in a Personnel Payment will still be changed if you change the Transaction Date.
- One of two conversion methods will be used. The Dual-Base system will be useful for companies that have offices in two countries that need to report in both Currencies, for companies operating in countries where there is a second Currency (usually the US Dollar or Euro) in common use in addition to the national one, and for companies in the Euro zone who retain their old national Currency for comparison purposes. The second method is a simple conversion from the foreign Currency to the home Currency, applicable to the majority of worldwide Currency transactions. These are described below.
- Exchange Rates (Dual-Base System)
- If you are using the Dual-Base system, the Base Currency 1 and 2 fields on the left will show in the form of a ratio the exchange rate between the two base Currencies (taken from the record in the Base Currency Rates setting that applies on the Transaction Date).
- If the Currency is not Base Currency 1 or 2, the Rate and right-hand Base Currency 1 or Base Currency 2 fields will show the exchange rate between that Currency and Base Currency 1 or 2.
- Note that European Monetary Union (EMU) regulations specify that the ratios must always show how many units of the home or foreign Currency can be bought with one Euro.
- If the Currency is not Base Currency 1 or 2, the Rate and right-hand Base Currency 1 or Base Currency 2 fields will show the exchange rate between that Currency and Base Currency 1 or 2.
- Exchange Rates (Simple Currency Conversion System)
- In the case of a simple currency conversion system, the Rate and right-hand Base Currency 1 fields will show a simple exchange rate between the foreign and home Currencies.
- If you change the Transaction Date (either directly or by changing the Pay Date), the exchange rates will change automatically. You can also change the exchange rates in an individual Personnel Payment yourself. If you wish to prevent the changing of exchange rates, select the Prevent Base Rate Changes and/or Prevent Foreign Rate Changes options in each Currency record. If you are using these options, the exchange rates in a Personnel Payment will still be changed if you change the Transaction Date.
The Personnel Payment register in Standard ERP:
- Introduction
- Entering a Personnel Payment , including:
- Inspecting Personnel Payments, Marking as OK and Posting to the Nominal Ledger
- Printing Payment Forms and Cheques
- Invalidating Personnel Payments
- Operations menu
- Create menu
Go back to:
- Home page for Expenses module manual
- Home page for Standard ERP manual
Inspecting Personnel Payments, Marking as OK and Posting to the Nominal Ledger
After entering a Personnel Payment and checking that it is correct, you should mark it first as Ordered and then as OK. Depending on the payment method you are using, you can tick the Ordered and OK boxes at the same time. But if you are paying by cheque, there will be a delay between the ordering of the Payment and the clearing of the funds from your company's bank account, so you may need to tick the OK box at a later date.In such a situation, when you issue the cheque, enter the Payment in the usual way and tick the Ordered box but not the OK box. This causes the Personnel Payment record to be locked, so that, after saving, you will no longer be able to change it. If you are using Windows or Mac OS X, you can order several Payments at once by highlighting them in the 'Payments: Browse' window and selecting 'Order' from the Operations menu.
When you receive a statement from the bank, you can reconcile it with the ordered Personnel Payments. When a Payment agrees with your bank statement, tick the OK check box and save it. If so defined in the Sub Systems setting in the Nominal Ledger and in the Number Series - Personnel Payments setting, a Nominal Ledger transaction will be generated. Again, if you are using Windows or Mac OS X, you can mark several Payments at once as OK by highlighting them in the 'Payments: Browse' window and selecting 'OK' from the Operations menu.
If an Ordered Payment is not included on the statement (perhaps because the cheque bounced or was lost), highlight the relevant rows in the Payment in turn by clicking the row number and then press the Backspace key (Windows/Mac OS X) or long tap on the row number on the left of the relevant row and select 'Delete Row' from the resulting menu (iOS/Android). A red line will be drawn through the row. When you mark the Payment as OK and save, rows with red lines will not be included in the resulting Nominal Ledger Transaction. If the Payment contains many rows and you need to apply a red line to every one, a short cut is to mark it as OK, save it and then use the 'Invalidate' function on the Record menu (which has a 'cog' icon if you are using iOS or Android).
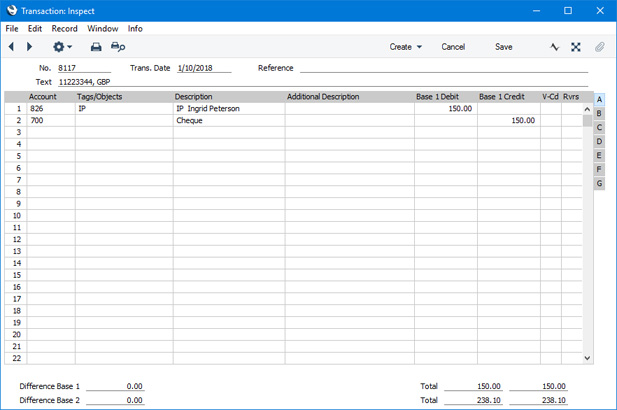
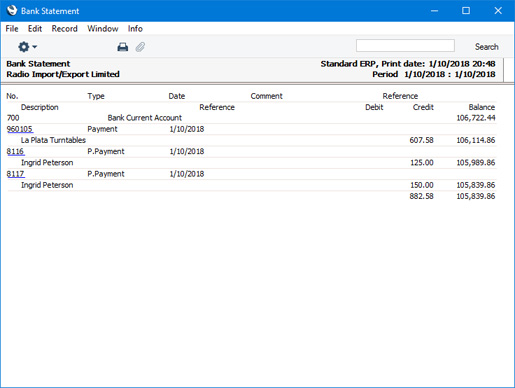
An example Nominal Ledger Transaction created from a Personnel Payment record is illustrated below. In normal circumstances, the Transaction will include a single credit posting to the bank or cash Account specified in the Payment Mode (or more than one credit posting if you have specified Payment Modes in any of the rows). The Transaction will include separate debit postings corresponding to the rows in the Personnel Payment, posting to the Accounts specified in the Person records of the members of personnel being paid.
Tags/Objects on the debit side will be taken from the corresponding row in the Personnel Payment, while those on the credit side will be taken from the Payment Mode.
---
The Personnel Payment register in Standard ERP:
- Introduction
- Entering a Personnel Payment
- Inspecting Personnel Payments, Marking as OK and Posting to the Nominal Ledger
- Printing Payment Forms and Cheques
- Invalidating Personnel Payments
- Operations menu
- Create menu
Go back to:
- Home page for Expenses module manual
- Home page for Standard ERP manual
Printing Payment Forms and Cheques from Personnel Payments
This page describes printing Personnel Payments in the Expenses module.---
You will often need often need to print certain documents associated with Personnel Payments. These may be remittance advices, cheques or documents used to gain internal authorisation for a Payment.
Note that if you need to print a remittance advice and/or a cheque, only a single document can be printed from a particular Personnel Payment. So, you will need to enter separate Personnel Payment records for each member of personnel being paid if you need separate documents to be printed for each Person. If a Personnel Payment record contains payments to more than one Person, separate payment forms will not be printed for each one.
If you want to print a remittance advice and a cheque together, you can do so, providing some set-up work has been carried out in advance. You can choose to print two Form Templates from the same form (as described below), or you can design a Form Template that combines a remittance advice with a cheque.
To determine the Form Template that will be used when you print the Payment, follow the steps described below using Windows or Mac OS X (not iOS or Android). In this example, we describe the configuration that is needed for a remittance advice and a separate cheque to be printed one after the other:
- Using the Form Template register in the System module, design the remittance advice and the cheque. Use the 'Properties' function on the Operations menu to name the Form Templates (in this description, we have used the names "PERS_REM_ADVICE" and "PERS_CHEQUE" respectively) and to assign them both the Form Type "Personnel Payment Receipt". A full list of the fields you can include in the Form Template design can be found here.
A file containing samples Form Templates is supplied with Standard ERP. This file includes "REM_ADVICE" and "REM_CHEQUE" that are intended for use in the Purchase Ledger. You may be able to duplicate these Form Templates and use them as the basis for your "PERS_REM_ADVICE" and "PERS_CHEQUE" designs. When doing so, change the Form Type to "Personnel Payment Receipt" to make sure the appropriate fields are available for inclusion in the designs. "REM_ADVICE" is a standard remittance advice, and "REM_CHEQUE" is a remittance advice incorporating a cheque.
- Select the Expenses module using the [Switch Module] button in the Navigation Centre or the Ctrl-0 (Windows and Linux) or ⌘-0 (Mac OS X) keyboard shortcut.
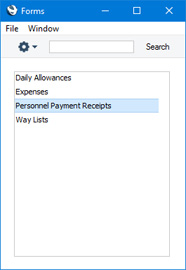
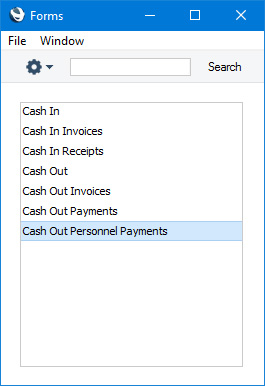
- Click the [Forms] button in the Navigation Centre or use the Ctrl-D/⌘-D keyboard shortcut. The 'Forms' list window will be opened showing a list of available documents. Highlight 'Personnel Payment Receipts'.
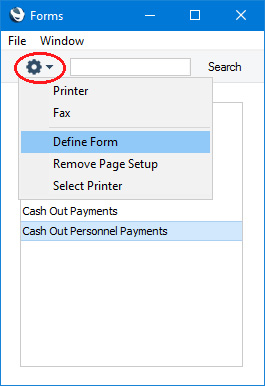
- Select 'Define Form' from the Operations menu (with the "cog" icon):

- Use the Sequence column in the subsequent 'Form Definition' window is used to determine the order in which the Form Templates will be printed. If, for example, you need a remittance advice to be printed first, on the first line enter "1" as the Sequence Number and "PERS_REM_ADVICE" as the Form Template (you can use 'Paste Special' from the Form Template field to ensure the spelling is correct). On the second line, enter "2" as the Sequence Number and "PERS_CHEQUE" as the Form Template. You can use the Printer column to print the two Form Templates on different printers if necessary: you may have a dedicated printer for your cheque stationery. You can, of course, specify on a third line that an internal authorisation document is also to be printed.
If you only want to be able to print Payments that have been marked as OK, enter 'OKed' in the Status column in every row in the 'Form Definition' window. This will prevent the printing of Payments that have not yet been marked as OK. Note however that this will also prevent the printing of Payments that have been marked as Ordered but not OK.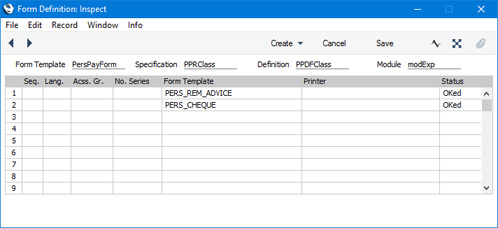
- Click [Save] to save the Payment Form definition. From now on, whenever you print a Personnel Payment Receipt, the remittance advice and the cheque will be printed, on different printers.
- When viewing an individual Personnel Payment record, click the Printer icon (Windows/Mac OS X) or select 'Print' from the File menu (all platforms). If you want to print to screen, click the Preview icon (Windows/Mac OS X only).
- If you need to print several Personnel Payments at once, first ensure you are in the Expenses module. Then, if you are using Windows or Mac OS X, click the [Forms] button in the Navigation Centre and double-click 'Personnel Payment Receipts' in the subsequent list. If you are using iOS or Android, tap the [Routines] button in the Navigation Centre and then tap [Forms]. Tap 'Personnel Payment Receipts' in the 'Forms' list window. Enter the Personnel Payment Number (or a range of numbers) to be printed and press the [Run] button.
The Personnel Payment register in Standard ERP:
- Introduction
- Entering a Personnel Payment
- Inspecting Personnel Payments, Marking as OK and Posting to the Nominal Ledger
- Printing Payment Forms and Cheques
- Invalidating Personnel Payments
- Operations menu
- Create menu
Go back to:
- Home page for Expenses module manual
- Home page for Standard ERP manual
Invalidating Personnel Payments
This page describes invalidating Personnel Payment records.---
In some circumstances it can be appropriate to invalidate a Personnel Payment. To do this, open the Personnel Payment in a record window and select 'Invalidate' from the Record menu (which has a 'cog' icon if you are using iOS or Android). This function will remove the Personnel Payment record from all reports; any associated Nominal Ledger Transaction will be removed from the Nominal Ledger as well. An invalidated Personnel Payment record is easily distinguished because all fields have red lines drawn through them. These red lines are also shown in the 'Personnel Payments: Browse' window.
You can use Access Groups to prevent certain users from invalidating Personnel Payments. To do this, deny them access to the 'Invalidate Personnel Payments' Action.
You can also invalidate individual rows in a Personnel Payment. If you are using Windows or Mac OS X, simply highlight the row by clicking the row number and press the Backspace key on your keyboard. If you are using iOS or Android, long tap on the row number on the left of the row and select 'Delete Row' from the resulting menu. You can only invalidate individual rows in Personnel Payments that have been marked as Ordered but not marked as OK.
If the Type of the Payment Mode in a Personnel Payment is "Own Cheques", note that the Own Cheques that are connected to invalidated Personnel Payment rows will not be marked as Cancelled automatically. You will need to mark the Own Cheques as Cancelled yourself.
---
The Personnel Payment register in Standard ERP:
- Introduction
- Entering a Personnel Payment
- Inspecting Personnel Payments, Marking as OK and Posting to the Nominal Ledger
- Printing Payment Forms and Cheques
- Invalidating Personnel Payments
- Operations menu
- Create menu
Go back to:
- Home page for Expenses module manual
- Home page for Standard ERP manual
Operations Menu - Personnel Payments

If you are using Windows or Mac OS X, you can open the Operations menu by clicking the button with the 'cog' icon (shown highlighted in the illustration above). If you are using iOS or Android, you can access the Operations menu functions through the Tools menu (with 'wrench' icon).
Before using the functions on the Operations menu in the 'Personnel Payments: Browse' window, you should highlight a record or records in the browse window. The function will then be applied to that record or records. If you are using Windows or Mac OS X, you can highlight several Personnel Payments in the list by holding down the Shift key while clicking. If you need to apply a function to a number of Personnel Payments that aren't in a range, highlight them while holding the Ctrl (Windows) or ⌘ (Mac OS X) keys before selecting the function. If you are using iOS or Android, you can highlight a single record in the browse window by searching for it, so you can only apply these functions to a single record at a time.
Please follow the links below for details about each function on the Operations menu:
The Personnel Payment register in Standard ERP:
- Introduction
- Entering a Personnel Payment
- Inspecting Personnel Payments, Marking as OK and Posting to the Nominal Ledger
- Printing Payment Forms and Cheques
- Invalidating Personnel Payments
- Operations menu
- Create menu
Go back to:
- Home page for Expenses module manual
- Home page for Standard ERP manual
Operations Menu - Personnel Payments - Order
This page describes the 'Order' function on the Operations menu in the 'Personnel Payments: Browse' window. If you are using iOS or Android, the 'Order' function is on the Tools menu (with 'wrench' icon).---
The 'Order' command is only available on the Operations menu in the 'Personnel Payments: Browse' window. You can use it when you need to mark Personnel Payments as Ordered from the 'Personnel Payments: Browse' window.
If you are using Windows or Mac OS X, you can use this function to mark Personnel Payments as Ordered in batches. Simply highlight a range of Personnel Payments in the browse window and select the function. To highlight a range of Personnel Payments, click the top one in the range and then hold down the Shift key and click the last one. If you need to apply the function to a number of Personnel Payments that aren't in a range, highlight them while holding the Ctrl (Windows) or ⌘ (Mac OS X) keys before selecting the function.
If you are using iOS or Android, you can only highlight a single Personnel Payment at a time, by searching for it, so you can only mark a single Personnel Payment as OK at a time.
When you select the function, each highlighted Personnel Payment will be marked as Ordered immediately.
---
The Personnel Payment register in Standard ERP:
- Introduction
- Entering a Personnel Payment
- Inspecting Personnel Payments, Marking as OK and Posting to the Nominal Ledger
- Printing Payment Forms and Cheques
- Invalidating Personnel Payments
- Operations menu, including:
- Create menu
Go back to:
- Home page for Expenses module manual
- Home page for Standard ERP manual
Operations Menu - Personnel Payments - OK
This page describes the 'OK' function on the Operations menu in the 'Personnel Payments: Browse' window. If you are using iOS or Android, the 'OK' function is on the Tools menu (with 'wrench' icon).---
The 'OK' command is only available on the Operations menu in the 'Personnel Payments: Browse' window. It allows you to mark Personnel Payments as OK from the 'Payments: Browse' window.
If you are using Windows or Mac OS X, you can use this function to mark Payments as OK in batches. Simply highlight a range of Payments in the browse window and select the function. To highlight a range of Personnel Payments, click the top one in the range and then hold down the Shift key and click the last one. If you need to apply the function to a number of Payments that aren't in a range, highlight them while holding the Ctrl (Windows) or ⌘ (Mac OS X) keys before selecting the function.
If you are using iOS or Android, you can only highlight a single Payment at a time, by searching for it, so you can only mark a single Payment as OK at a time.
When you select the function, each highlighted Payment will be marked as OK immediately (except those that have not yet been marked as Ordered). Remember that, if so defined in the Sub Systems setting in the Nominal Ledger and in the Number Series - Personnel Payments setting, this action will cause Nominal Ledger Transactions to be created for each Personnel Payment in the selection and that therefore once it has been carried out you will no longer be able to modify those Personnel Payments.
---
The Personnel Payment register in Standard ERP:
- Introduction
- Entering a Personnel Payment
- Inspecting Personnel Payments, Marking as OK and Posting to the Nominal Ledger
- Printing Payment Forms and Cheques
- Invalidating Personnel Payments
- Operations menu, including:
- Create menu
Go back to:
- Home page for Expenses module manual
- Home page for Standard ERP manual
Operations Menu - Personnel Payment - Print Cash IN-OUT
This page describes the 'Print Cash IN_OUT' function on the Operations menu in the Personnel Payment record window. If you are using iOS or Android, the 'Print Cash IN-OUT' function is on the Tools menu (with 'wrench' icon).---
You will usually use the 'Print Cash IN-OUT' command for Personnel Payments with a cash Payment Mode, when you need to print a cash receipt for your records. There is a legal requirement in the Baltic States to keep printed records of all cash transactions. This function requires the Cash Book module to be present.
You must save a Personnel Payment before you can use this function, but you do not need to mark it as OK.
If a Personnel Payment includes payments issued to more than one Person, separate documents will be printed for each Person.
You can also print cash receipts in batches. To do so, first change to the Cash Book module using the [Switch Module] button in the Navigation Centre. Then, if you are using Windows or macOS, click the [Forms] button in the Navigation Centre and double-click 'Cash Out Personnel Payments' in the 'Forms' list window. If you are using iOS or Android, tap the [Routines] button in the Navigation Centre and then tap [Forms]. Tap 'Cash Out Personnel Payments' in the 'Forms' list window. In all cases, enter the Payment Number (or range of Numbers) that you want to be printed and press [Run].
To specify the Form Template that will be used when you print Cash Out Personnel Payments both singly and in batches, follow these steps using Windows or macOS (not iOS or Android):
- Design the cash document using the Form Template register in the System module. Use the 'Properties' function on the Operations menu to name the Form Template (in this description, we have used the name "CASH_OUT_PERS_PAYM") and to assign it a Form Type of "Cash Out Personnel Payments".
- Select the Cash Book module using the [Switch Module] button in the Navigation Centre.
- Click the [Forms] button in the Navigation Centre. The 'Forms' list window will be opened: highlight 'Cash Out Personnel Payments'.
- Select 'Define Form' from the Operations menu (with "cog" icon):
- In the subsequent 'Form Definition' window, enter "CASH_OUT_PERS_PAYM" in the Form Template in of the first line (you can use 'Paste Special' to ensure the spelling is correct).

- Click [Save] to save the form definition. From now on, the Form Template that you have designed will be used, from the 'Forms' function in the Cash Book module and when selecting 'Print Cash IN-OUT' from the Operations or Tools menu item when viewing a Personnel Payment.
| Field in Form Template | Prints (from Personnel Payment) |
| Header Fields (these print once per document i.e. once for each Person included in a Personnel Payment) | |
| Address | Comment from the Person record for the Person being paid |
| Address 1 | Specification from the Person record for the Person being paid |
| Address 2 | Personal ID from the Person record for the Person being paid |
| Comment | Name of the Person being paid, from the Text field in the matrix in the Personnel Payment |
| Currency | Base Currency 1 |
| Currency Name | Name from the Currency record for Base Currency 1 |
| Customer Name | Comment from the Person record for the Person being paid |
| Day | The day from the Trans. Date. For example, the day from 2 January 2021 will be printed as "2" |
| Month | The month from the Trans. Date. For example, the month from 2 January 2021 will be printed as "1" |
| Month in words | The name of the month in the Trans. Date, taken from the record in the Days and Months setting in the System module for the Language in the current user's Person record |
| Our Reference (ourref) | Our Ref from the Person record for the Person being paid |
| Payment Number for Russia | Prints the No. of the Personnel Payment with the first three characters removed |
| Person | Signature of the Person being paid |
| Person Account | Account from the Person record for the Person being paid |
| Person Comment | Comment from the Person record for the Person being paid |
| Person ID | Personal ID from the Person record for the Person being paid |
| Person Specification | Specification from the Person record for the Person being paid |
| Salesman Name | Name of the Person being paid, from their Person record |
| Serial Number (Number Series) | No. |
| Signature | Name from the current user's Person record |
| To Pay | The total sum issued to a Person |
| To Pay in Base Currency 1 | The total sum issued to a Person, converted to Base Currency 1 |
| To Pay in Base Currency 2 | The total sum issued to a Person, converted to Base Currency 2 |
| To Pay in Text | Prints the total sum issued to a Person as a phrase. The phrase is constructed using the relevant record in the Values in Text setting for the Language in the current user's Person record or in the Company Info setting |
| Transaction Date (transdate) | Trans. Date |
| Year | The year from the Trans. Date. For example, the year from 2 January 2021 will be printed as "2021" |
| Payment Table (The following fields allow you to add a table to the Form Template listing the payments in a Personnel Payment that you issued to a particular Person. You should specify a Line Height in these fields, and set the Format to "Header".) | |
| Credit Value | Amount |
| Invoice Number 2 | Personnel Payment Number |
Please refer here for details about the standard fields that you can also include in the Form Template.
---
The Personnel Payment register in Standard ERP:
- Introduction
- Entering a Personnel Payment
- Inspecting Personnel Payments, Marking as OK and Posting to the Nominal Ledger
- Printing Payment Forms and Cheques
- Invalidating Personnel Payments
- Operations menu, including:
- Order
- OK
- Print Cash IN-OUT
- Open NL Transaction
- Bank Statement
- Prepare Cheque
- Print Cheques
- Order
- Create menu
Go back to:
- Home page for Expenses module manual
- Home page for Standard ERP manual
Operations Menu - Personnel Payment - Open NL Transaction
This page describes the 'Open NL Transaction' function on the Operations menu in the Personnel Payment record window. If you are using iOS or Android, the 'Open NL Transaction' function is on the Tools menu (with 'wrench' icon).---
When you mark a Personnel Payment as OK and save it, a Nominal Ledger Transaction will be created (if so defined in the Sub Systems setting in the Nominal Ledger and in the Number Series - Personnel Payments setting). The 'Open NL Transaction' function allows you to view that Transaction from the Personnel Payment.
When you select the function from the Operations menu (Windows/Mac OS X) or Tools menu (iOS/Android), the Transaction will be opened in a new window.
You can use Access Groups to prevent certain users from opening Transactions from Payments. To do this, deny them access to the 'Open Transactions from Operations Menu' Action or to the Nominal Ledger altogether.
---
The Personnel Payment register in Standard ERP:
- Introduction
- Entering a Personnel Payment
- Inspecting Personnel Payments, Marking as OK and Posting to the Nominal Ledger
- Printing Payment Forms and Cheques
- Invalidating Personnel Payments
- Operations menu, including:
- Order
- OK
- Print Cash IN-OUT
- Open NL Transaction
- Bank Statement
- Prepare Cheque
- Print Cheques
- Order
- Create menu
Go back to:
- Home page for Expenses module manual
- Home page for Standard ERP manual
Operations Menu - Personnel Payment - Bank Statement
This page describes the 'Bank Statement' function on the Operations menu in the Personnel Payment record window. If you are using iOS or Android, the 'Bank Statement' function is on the Tools menu (with 'wrench' icon).---
It can be useful to see a list of the transactions posting to the Bank or Cash Account and the balance of that Account on the day of the Personnel Payment. The 'Bank Statement' function produces a report showing this information.
When you select the function, the following window opens:
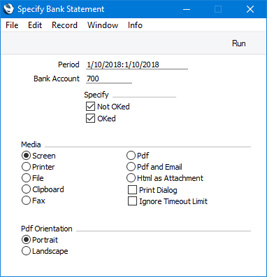
- Period
- Paste Special
Reporting Periods setting
- The report will list the transactions posting to the Bank or Cash Account during the period specified here. The default is the Transaction Date of the Personnel Payment.
- Bank Account
- Paste Special
Account register, Nominal Ledger/System module
- Specify the Account whose transactions and balance you wish to see. The default is the Account in the Payment Mode specified in the Personnel Payment header.
- Specify
- Use these options to specify whether Receipts, Payments and Personnel Payments that have and/or have not been marked as OK will be shown in the report. Nominal Ledger Transactions will always be shown, irrespective of the options chosen here.
You can also produce the Bank Statement report from the Nominal Ledger.
---
The Personnel Payment register in Standard ERP:
- Introduction
- Entering a Personnel Payment
- Inspecting Personnel Payments, Marking as OK and Posting to the Nominal Ledger
- Printing Payment Forms and Cheques
- Invalidating Personnel Payments
- Operations menu, including:
- Order
- OK
- Print Cash IN-OUT
- Open NL Transaction
- Bank Statement
- Prepare Cheque
- Print Cheques
- Order
- Create menu
Go back to:
- Home page for Expenses module manual
- Home page for Standard ERP manual
Operations Menu - Personnel Payment - Prepare Cheque
This page describes the 'Prepare Cheque' function on the Operations menu in the Personnel Payment record window. If you are using iOS or Android, the 'Prepare Cheque' function is on the Tools menu (with 'wrench' icon).---
If you have the Cheques module, you can use the 'Prepare Cheque' function to connect an individual Personnel Payment row to an unused Own Cheque record (in the Own Cheque register in the Cheques module). If there is no unused Own Cheque record, a new one will be created.
To use the 'Prepare Cheque' function, first create a new Personnel Payment and specify the Person(s) that you want to pay. Make sure that you specify a Payment Mode in which the Type is "Own Cheques", either in the Personnel Payment header or in a particular Personnel Payment row. Place the insertion point in the row that you wish to connect to an Own Cheque record. The Cheque field in this row must be empty. Then, choose 'Prepare Cheque' from the Operations menu (Windows/Mac OS X) or Tools menu (iOS/Android).
If there is a suitable unused Own Cheque (i.e. Unused, with a blank Bank Account and with no Amount), it will be opened for inspection and checking. To create Own Cheques without Amounts, use the 'Create Own Cheques' Maintenance function in the Cheques module. If there is no suitable unused Own Cheque, a new one will be opened. The window titles will be 'Own Cheque: Update' in the first case, meaning that the record contains unsaved changes, and 'Own Cheque: New' in the second case, meaning that the record has not yet been saved.
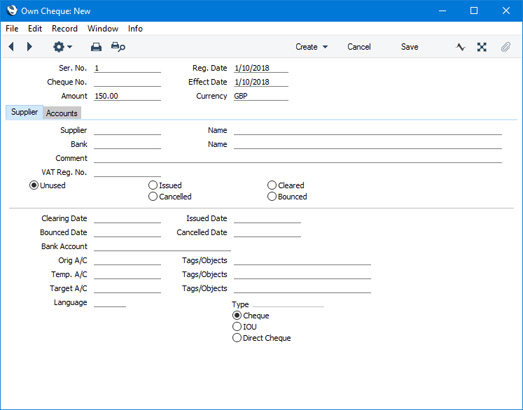
After amendment if necessary, save the record in the Own Cheque register by clicking the [Save] button (Windows/Mac OS X) or tapping √ (iOS/Android) in the Button Bar. If the function created a new Own Cheque, you will need to specify a Cheque No. before saving. The Own Cheque window will be closed, returning you to the Personnel Payment. The Serial Number of the Cheque record will be copied to the Cheque field in the Personnel Payment row. To print the cheque(s) from the Personnel Payment, use the 'Print Cheques' function immediately below this one on the Operations/Tools menu.
If a Cheque is not opened when you select the function, the probable reasons are:
- The insertion point is in a Personnel Payment row that already has a Cheque Number.
- The Type of the Payment Mode applying to the selected Personnel Payment row is not "Own Cheques".
- The Personnel Payment has been marked as Ordered or OK. This indicates that a cheque has already been sent.
The Personnel Payment register in Standard ERP:
- Introduction
- Entering a Personnel Payment
- Inspecting Personnel Payments, Marking as OK and Posting to the Nominal Ledger
- Printing Payment Forms and Cheques
- Invalidating Personnel Payments
- Operations menu, including:
- Order
- OK
- Print Cash IN-OUT
- Open NL Transaction
- Bank Statement
- Prepare Cheque
- Print Cheques
- Order
- Create menu
Go back to:
- Home page for Expenses module manual
- Home page for Standard ERP manual
Operations Menu - Personnel Payment - Print Cheques
This page describes the 'Print Cheques' function on the Operations menu in the Personnel Payment record window. If you are using iOS or Android, the 'Print Cheques' function is on the Tools menu (with 'wrench' icon).---
If you specify the Serial Numbers of Own Cheque records in the Cheque field in each row in a Personnel Payment, you can then use the 'Print Cheque' function to print those Own Cheques immediately, without the need to change to the Cheques module. You will usually use this function from a Personnel Payment that has a Payment Mode in which the Type is "Own Cheques", in which case you must connect each Personnel Payment row to an Own Cheque. An easy way to do this is to use the 'Prepare Cheque' function immediately above this one on the Operations/Tools menu. There is no need to save a Personnel Payment before using this function, or to mark it as Ordered or OK.
You can also print Own Cheques in batches. To do so, first change to the Cheques module using the [Switch Module] button in the Navigation Centre. Then, if you are using Windows or Mac OS X, click the [Forms] button, also in the Navigation Centre and double-click 'Own Cheques' in the 'Forms' list window. If you are using iOS or Android, tap the [Routines] button in the Navigation Centre and then tap [Forms]. Tap 'Own Cheques' in the 'Forms' list window. In all cases, enter the Serial Number (or range of Numbers) (i.e. not Cheque Numbers) of the Own Cheques that you want to be printed and press [Run].
To specify the Form Template that will be used when you print Own Cheques both singly and in batches, follow these steps using Windows or Mac OS X (not iOS or Android):
- Design the cheque document using the Form Template register in the System module. Use the 'Properties' function on the Operations menu to name the Form Template (in this description, we have used the name "OWN_CHEQUE") and to assign it a Form Type of "Own Cheques". Full instructions for using the Form Template register can be found in the 'System Module' manual.
- Select the Cheques module using the [Switch Module] button in the Navigation Centre.
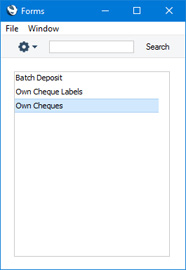
- Click the [Forms] button in the Navigation Centre. The 'Forms' list window will be opened: highlight 'Own Cheques'.
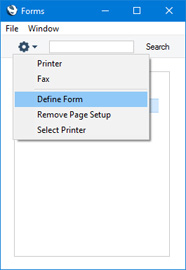
- Select 'Define Form' from the Operations menu.
- In the subsequent 'Form Definition' window, enter "OWN_CHEQUE" in the Form Template field in the first row (you can use 'Paste Special' to ensure the spelling is correct).
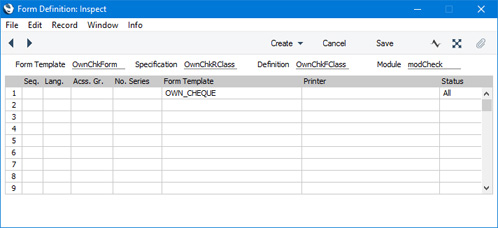
- Click [Save] to save the Form definition. From now on, the Form Template that you have designed will be used, from the 'Forms' function in the Cheques module and when selecting 'Print Cheques' from the Operations/Tools menu when viewing a Personnel Payment.
---
The Personnel Payment register in Standard ERP:
- Introduction
- Entering a Personnel Payment
- Inspecting Personnel Payments, Marking as OK and Posting to the Nominal Ledger
- Printing Payment Forms and Cheques
- Invalidating Personnel Payments
- Operations menu, including:
- Order
- OK
- Print Cash IN-OUT
- Open NL Transaction
- Bank Statement
- Prepare Cheque
- Print Cheques
- Order
- Create menu
Go back to:
- Home page for Expenses module manual
- Home page for Standard ERP manual
Create Menu - Personnel Payments
The Create menus for Personnel Payments are shown above. On the left is the Create menu for the 'Personnel Payments: Browse' window. On the right is the Create menu for the 'Personnel Payment: New' and 'Personnel Payments: Inspect' windows. If you are using iOS or Android, you can access the Create menu functions through the + menu.
'New' and 'Duplicate' are standard functions that are provided on every Create and + menu. Use these functions to create new records, in this case in the Personnel Payment register. Please follow the links below for details about the other functions:
---
The Personnel Payment register in Standard ERP:
- Introduction
- Entering a Personnel Payment
- Inspecting Personnel Payments, Marking as OK and Posting to the Nominal Ledger
- Printing Payment Forms and Cheques
- Invalidating Personnel Payments
- Operations menu
- Create menu
Go back to:
- Home page for Expenses module manual
- Home page for Standard ERP manual
Create Menu - Personnel Payment - Workflow Activity
This page describes the 'Workflow Activity' function on the Create menu in the Personnel Payment record window. If you are using iOS or Android, the 'Workflow Activity' function is on the + menu.
---
Creating an Activity from a Personnel Payment can be useful when you need to schedule a follow-up task related to it.
You can create an Activity from a Personnel Payment using the following methods:
- Open the Personnel Payment in a record window and select 'Workflow Activity' from the Create or + menu. Save any changes you have made to the Personnel Payment record before selecting the function.
- Open the Personnel Payment in a record window and then open the 'Workflow Manager' window. Click or tap the [+] button in this window to create a new Activity.
The new record will be opened in a window entitled 'Activity: Inspect'. This means that it has already been saved and is being opened for checking.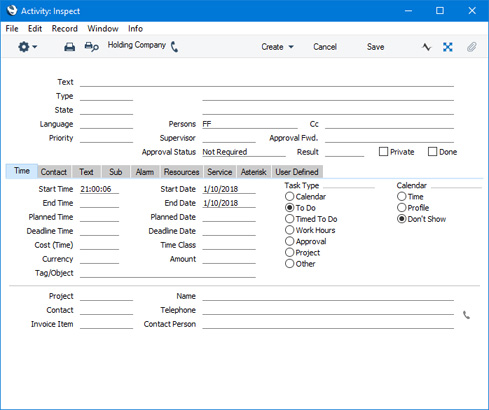
The new Activity will contain the following information:
- No default Activity Type will be offered.
- The Task Type will be To Do.
- The Calendar Type will be Don't Show.
- The Symbol will be Other.
- The Start Date and Time of the Activity will be the current date and time.
- The Person will be the current user. As the Task Type will be To Do, the Activity will be placed in the current user's Task Manager.
The Personnel Payment and the Activity will be connected to each other through the Link Manager and Workflow Manager. When reviewing the Activity, you can return to the Personnel Payment quickly and easily using the Link Manager in the Activity, while you can open the Activity from the Personnel Payment using the Workflow Manager.
You must save a Personnel Payment at least once before you can create an Activity from it. This is to ensure that the links mentioned in the previous paragraph can be established.
The 'Activity: Inspect' window is fully described here
---
The Personnel Payment register in Standard ERP:
- Introduction
- Entering a Personnel Payment
- Inspecting Personnel Payments, Marking as OK and Posting to the Nominal Ledger
- Printing Payment Forms and Cheques
- Invalidating Personnel Payments
- Operations menu
- Create menu, including:
- Workflow Activity
- Email(s)
- Workflow Activity
Go back to:
- Home page for Expenses module manual
- Home page for Standard ERP manual
Create Menu - Personnel Payment - Email(s)
This page describes the 'Email(s)' function on the Create menu in the Personnel Payment record window. If you are using iOS or Android, the 'Email(s)' function is on the + menu.
---
The 'Email' function allows you to create Mails from a Personnel Payment. Separate Mails will be created for each row in the Payment. You can only create Mails from Personnel Payments that have been marked as OK.
To create a Mail from a Personnel Payment, first open the Personnel in a record window and then select 'Email(s)' from the Create menu (Windows/Mac OS X) or + menu (iOS/Android). The relevant Mails will be created and placed in your Mailbox. The Mails will not be opened for checking. An example is illustrated below:
The Mails will be composed as follows: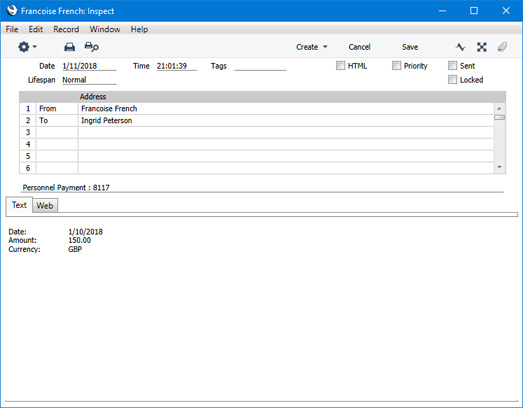
- The sender of each Mail will be the current user.
- The Recipient of each Mail will be the Person specified in each Personnel Payment row. Mails will not be sent to Persons who do not have Mailboxes.
- The Subject and Text of the Mail will be taken from the fields in the header of the record in the Mail Texts setting in the Email and Conferences module in which the Form is "Personnel Payments", as follows:
- The Subject in the mail will be composed from the Subject in the Mail Text record (which does not need to have a trailing space), the text "Personnel Payment : " and the Personnel Payment Number. For example, if the Subject in the Mail Text record is "Please find attached" (without trailing space), the Subject of the Mail will be "Please find attached Personnel Payment : XXXX" (where XXXX is the Personnel Payment Number).
- The Text of the Mail will be built up as follows:
- The initial text will be taken from the Standard Text record quoted in the First Text field in the Mail Text record.
- Depending on the Do not put Record Details in Mail Body option in the Mail Text record, the Transaction Date of the Personnel Payment, the Amount from the row and the Currency will then be listed.
- The final text will be taken from the Standard Text record quoted in the Last Text field in the Mail Text record. It is recommended that the first line in this Standard Text record should be a carriage return, to ensure that the text in the mail is neatly spaced.
- The Subject in the mail will be composed from the Subject in the Mail Text record (which does not need to have a trailing space), the text "Personnel Payment : " and the Personnel Payment Number. For example, if the Subject in the Mail Text record is "Please find attached" (without trailing space), the Subject of the Mail will be "Please find attached Personnel Payment : XXXX" (where XXXX is the Personnel Payment Number).
- Introduction
If either Standard Text record is in HTML format, the Mail will be in HTML format as well.
If there is no suitable record in the Mail Texts setting, the Subject of the Mail will be " Personnel Payment : XXXX" (where XXXX is the Personnel Payment Number). The Text of the Mail will contain the Transaction Date of the Personnel Payment, the Amount from the row and the Currency.
Note that the Personnel Payment record does not have a Language field. Therefore, if you enter a record in the Mail Texts setting in which the Form is "Personnel Payments", you only need fill in the fields in the header of that record. Any rows with different Languages that you add to the matrix will not be used when creating Mails.
If the function does not create Mails, the probable causes are:
- The current user does not have a Mailbox.
- None of the Persons listed in the Personnel Payment have Mailboxes.
- The Personnel Payment has not been marked as OK or saved.
---
The Personnel Payment register in Standard ERP:
- Introduction
- Entering a Personnel Payment
- Inspecting Personnel Payments, Marking as OK and Posting to the Nominal Ledger
- Printing Payment Forms and Cheques
- Invalidating Personnel Payments
- Operations menu
- Create menu, including:
- Workflow Activity
- Email(s)
- Workflow Activity
Go back to:
- Home page for Expenses module manual
- Home page for Standard ERP manual