Arvete register
Arvete registris registreeritakse firma müügitegevus. Alati kui toimub müük, tuleb sisestada Arve, see välja trükkida ja Kliendile saata. Arvete registril on seega mitu funktsiooni:- Kliendile saadetud Arve on nõue tasumise kohta;
- Registris olevad tasumata Arved on aluseks võlgade jälgimisele ja aruandlusele; ning
- Igast Arvest saad koostada Finantskande, mille põhjal tekivad käibe ja müügivõlgade näitajad kuu- ja aastaaruandlusse. Kui soovid, võid Kannetel pidada ka kuluarvestust, mis võimaldab Finantsmoodulis laotoimingutest ülevaadet saada. Kanded koostatakse automaatselt ning see ei nõua Sinult mingit lisatööd.
- Tavalised Arved väljastatakse, kui kaup on lähetatud või teatud tööd tehtud ning selle eest ei ole veel tasutud. Selliste Arvete tasumine registreeritakse Laekumiste registris.
- The Sularahaarve väljastatakse, kui kauba või tehtud tööde eest tasutakse koheselt. Kui Sularahaarve Arvete registrisse sisestatakse, käsitleb HansaWorld seda kohe tasutud Arvena ja seega ei ole vaja enam Laekumist registreerida. HansaWorld teab ka, millistele kontodele selline toiming kanda (debiteeritakse Kassa kontot, mitte Müügivõlgade kontot).
- Ettemaks makstakse teatud kaupade või teenuste eest enne nende tegelikku kättesaamist. Ettemaksuarved võid sisestada nagu kirjeldatud 1. punktis eespool. Kui raha saadakse enne Arve väljastamist, tuleb see registreerida Laekumiste registris Ettemaksu Laekumisena. Sellise Laekumise saad hiljem väljastatud Arvega siduda. Teiseks võimaluseks on sisestada Sularahaarve nagu kirjeldatud 2. punktis.
- Kreeditarveid kasutatakse Arvetel tehtud vigade parandamiseks või valesti koostatud Arvete tühistamiseks. Tegelikkuses on need negatiivsed Arved, millega vähendatakse käibe ja müügivõlgade näitajaid. Konteeringud Finantsmoodulis teeb HansaWorld taas automaatselt vastavatele kontodele.
Arvete registrisse uue Arve sisestamiseks on järgmised võimalused:
- Arved võid sisestada otse Arvete registrisse. See meetod sobib kõigi ülalkirjeldatud müügitehingute tüüpide puhul.
- Arveid võid koostada muudest registritest, näiteks Tellimustest ja Teenindustellimustest - tavalised ja Ettemaksuarved. Ettemaksuarveid võib koostada ka Laekumistest.
- Arveid saad koostada korraga suurel hulgal, kasutades vastavat hooldusfunktsiooni. Seda meetodit kasutatakse tavaliste Arvete koostamisel Tellimustest ja Projektidest, ning Viivisarvete koostamisel (viivise kohta hilinenud maksete eest).
Arvete registri avamiseks mine Müügireskontrosse ja vali põhiaknas Arved.
Avanenud aknas näed eelnevalt sisestatud Arveid.
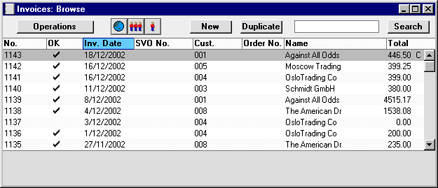
Nagu kõigi sirvimisakende puhul, saad ka siin sorteerida kaarte iga veeru väärtuse järgi, klõpsates selle pealkirjal. Teine klõps samal pealkirjal reastab veeru teisipidi. Selle veeru pealkiri, mille väärtuse järgi kaarte otsida saad, värvub siniseks. Nimekirjas üles-alla liikumiseks on kerimisribad akna servas. Samuti võid otsida vajalikku kaarti, sisestades otsitava sõna akna ülemises paremas nurgas olevale väljale ja klõpsates Otsi. HansaWorld otsib märgitud sõna sinise pealkirjaga veerust.
Neli põhitegevust Arvete registris on:
Arvete sisestamine
HansaWorld pakub mitmeid võimalusi Sinu töö lihtsustamiseks Arvete sisestamisel. Näiteks võid Kuupäeva väljale kuupäeva sisestamiseks kasutada Ctrl-Enter klahvikombinatsiooni. Sama kombinatsiooniga saad Arvele valida ka Artikli koodi, Kliendi koodi, Tasumistingimuse jne.Uue Arve sisestamiseks klõpsa Uus või kasuta klahvikombinatsiooni Ctrl-N (Windows ja Linux) või Apple-N (Macintosh). Võid ka valida juba sisestatud Arve, mille sarnast uut Arvet soovid koostada ning klõpsata Koopia.
Avaneb aken Arve: Uus, mis on tühi, kui klõpsasid Uus või sisaldab koopiat Sinu poolt valitud Arvest. Koopia puhul on Arve- ja Kandekuupäevaks uuel Arvel käesolev kuupäev, mitte selle Arve kuupäevad, mida kopeerisid. Samuti arvutatakse uus Laekumistähtaeg.
! | Sa ei ole kohustatud kasutama HansaWorldi poolt vaikimisi pakutavaid väärtusi. Enamuse väljade puhul saad neid väärtusi vastavalt vajadusele muuta. Sinu tehtud muudatused kehtivad ainult sellel Arvel. |
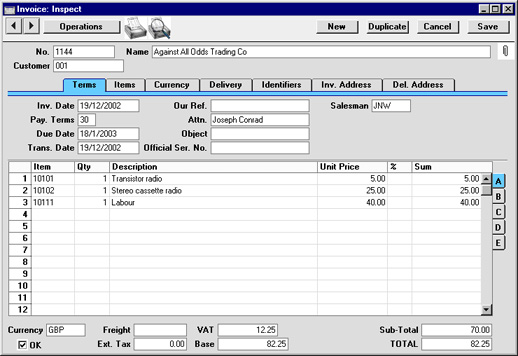
Kuna kogu Arvele sisestatav info ei mahu korraga ekraanile ära, on Arve kaart jagatud seitsmeks osaks. Igal osal on nähtav päis, kus näed Arve numbrit, Kliendi numbrit ja nime ning seitset alltoodud nuppu, millel klõpsates saad liikuda Arve erinevate osade vahel.

Kui kasutad ka Müügitellimuste moodulit, koostatakse enamus Arveid ilmselt Müügitellimustest, kasutades Operatsioonide menüü funktsiooni Koosta arve. Kui nii, siis näed, et enamus Arve välju täidetakse automaatselt vastavalt Tellimusele. Arve saad koostada ka vedades soovitud Tellimuse Müügitellimuste sirvimisaknast Arvete sirvimisaknasse.
Arve trükkimiseks klõpsa Printeri ikoonile. Eelvaate vaatamiseks ekraanil klõpsa Eelvaate ikoonile.
Mitmekasutaja süsteemi puhul antakse Arvele number selle esmakordsel salvestamisel. Arvele saad muudatusi sisse viia kuni see pole kinnitatud. Kinnitamisel koostatakse Arvest Kanne ja seda ei saa enam muuta.
Päis

- Nr
- Ctrl-Enter
Vali määratud numbriseeriast või seadistusest Numbriseeriad -Arved.
- Kui oled numbriseeriad sidunud Keeltega, võib Arve number Kliendi sisestamisel sõltuvalt Kliendi Keelest muutuda.
- Kui oled Kassa mooduli Kassaraamatu seadistustes märkinud valiku Ühised numbriseeriad, võib Arve number muutuda, kui sisestad Tasumistingimuse väljale Tasumisviisi või kui kasutad Klienti, kellele on Tasumistingimuse väljale sisestatud Tasumisviisi kood. Lähemalt loe palun siit.
- Vaikimisi sisestunud Arve numbrit võid muuta, aga mitte juba kasutatud numbri vastu. Kui töötad mitmekasutaja süsteemiga, antakse Arvele number selle salvestamisel.
- Kui oled Kassa mooduli Kassaraamatu seadistustes märkinud valiku Ühised numbriseeriad, võib Arve number muutuda, kui sisestad Tasumistingimuse väljale Tasumisviisi või kui kasutad Klienti, kellele on Tasumistingimuse väljale sisestatud Tasumisviisi kood. Lähemalt loe palun siit.
- Klient
- Ctrl-Enter
Kliendid Kontaktide registris
- Sisesta Kliendi number või kasuta Ctrl-Enter klahvikombinatsiooni. Enteri vajutamisel sisestuvad Kliendi nimi, aadress ja muu informatsioon vastavatele väljadele.
- Kui Kliendiga on seotud Vaikimisi artikli kaart (Kliendikaardi Hindade kaardil), sisestuvad Kliendi määramisel Arvele kõik sellel kaardil toodud Artiklid. Pane tähele, et sellistele Artiklitele ei ole määratud koguseid; need tuleb enne Arve trükkimist ja kinnitamist ise sisestada.
- Kui Kliendi nimel on Ettemaks, mida ei ole veel ühegi Arvega seotud, ilmub ekraanile hoiatus Kliendi koodi sisestamisel. Ettemaksude kohta loe palun siit.
- Kui Kliendiga on seotud Vaikimisi artikli kaart (Kliendikaardi Hindade kaardil), sisestuvad Kliendi määramisel Arvele kõik sellel kaardil toodud Artiklid. Pane tähele, et sellistele Artiklitele ei ole määratud koguseid; need tuleb enne Arve trükkimist ja kinnitamist ise sisestada.
- Nimi
- Kliendi nimi sisestub Kliendi koodi sisestamisel.
Tingimuste kaart

- Arve kp
- Ctrl-Enter
Vali kuupäev
- Vaikimisi sisestub arvuti kella kuupäev.
- Meie esindaja
- Kasuta seda välja, kui soovid eristada Arveid muul alusel kui numbri järgi. Vaikimisi sisestub siia nimi hetkekasutaja Isikukaardi Numbriseeriate kaardi väljalt Meie esindaja.
- Müügimees
- Ctrl-Enter
Isikute register, Üldine moodul
- Sisestub vaikimisi Kliendikaardilt või hetkekasutaja Isikukaardilt
- Siia tuleb märkida selle müügi eest vastutav Müügimees: mitmeid Müügireskontro aruandeid on võimalik tellida Müügimeeste lõikes. Müüdud Artiklitele on võimalik lisada komisjonitasu, kasutades selleks kas Artiklikaardi Hindade kaardil või Isikukaardi Preemia kaardil määratud Preemia %. Peale Arve kinnitamist saab Müügimeest muuta.
- Siia tuleb märkida selle müügi eest vastutav Müügimees: mitmeid Müügireskontro aruandeid on võimalik tellida Müügimeeste lõikes. Müüdud Artiklitele on võimalik lisada komisjonitasu, kasutades selleks kas Artiklikaardi Hindade kaardil või Isikukaardi Preemia kaardil määratud Preemia %. Peale Arve kinnitamist saab Müügimeest muuta.
- Tasumistingimus
- Ctrl-Enter
Tasumistingimuste seadistus, Müügi/Ostureskontro
- Sisestub vaikimisi Kliendikaardilt
- Siia sisestatud Tasumistingimus määrab Arve Laekumistähtaja (allpool) ning lisaks sellele tagab, et Arvetele trükitakse õige Tasumistingimuse kirjeldus (vajadusel Kliendi Keeles). Müügireskontro seadistusse sisestatud Tasumistingimused võimaldavad panna paika ka Kassa-alede süsteemi.
- Määrates igale Arvele Tasumistingimuse, lood aluse võlgnevuste jälgimise aruandluseks.
- Tasumistingimuste põhjal eristatakse Sularahaarved ja Kreeditarved tavalistest Arvetest. Kasutades Ctrl-Enter klahvikombinatsiooni, vali Tasumistingimuseks vastavalt Sularaha või Kreeditarve. Kui Arve kinnitatakse ja salvestatakse, koostatakse vastav Finantskanne. Sularahaarvete korral debiteeritakse Kassa kontot (määratud seadistuses Lausendamine M/R), mitte Müügivõlgade kontot, Kreeditarvete, korral on kanne vastupidine alusarvest tehtud kandele.
- Sularahaarved loetakse koheselt tasutuks ning need ei jookse müügivõlgnevuste aruandlusse. Nende Arvete kohta ei ole vaja Laekumisi sisestada.
- Kui valid Tasumistingimuseks Kreedit, sisestub Arve tabeli esimesele reale tekst Kreedit arvele. Sisesta Arve number, mida soovid krediteerida, kasutades vajadusel Ctrl-Enter klahvikombinatsiooni, et näha kõiki laekumata Arveid. Kui oled seadistuses Lausendamine M/R märkinud valiku Kasuta kreeditarvetel eraldi müügikontosid, kasutatakse tavaliste asemel kreedit Müügikontosid ja KM koode, mis võetakse vastava Artikliklassi kaardi Kreeditkontode kaardilt või seadistusest Lausendamine (M/R). Kui Kreeditarve koostati Arve kopeerimise teel, muutuvad Tasumistingimuseks ‘Kreeditarve’ sisestamisel Arvele kaasatud Artiklite Müügikontod ja KM koodid automaatselt.
- Kui kasutatakse Tasumistingimust ‘Sularaha’ või ‘Kreedit’, ei trükita seda Arvet tavalisele blanketile. Kasutatakse vastavalt Sularahaarve või Kreeditarve dokumendimalli. Arvete välja trükkimisest loe palun siit.
- Balti riikides soovitakse tihti kasutada Arvete, Laekumiste ja Kassasissetulekuorderite puhul samu numbriseeriaid. Selleks tuleb kirjeldada numbriseeriad Tasumisviiside seadistuse C osal vasakpoolsetel väljadel Alates/Kuni ja märkida Kassa mooduli Kassaraamatu seadistustes valik Ühised numbriseeriad. Seejärel sisesta antud väljale Tasumisviis: Arve number asendatakse numbriga vastavast seeriast. Kui Arve kinnitatakse, käsitletakse seda tasutud Arvena ning Müügivõlgade kontot ei konteerita. Selle asemel debiteeritakse Tasumisviisi kontot (st Panga või Kassa kontot). Teatud programmiseadistuse korral saab Tasumisviise näha Ctrl-Enter nimekirjas.
- Siia sisestatud Tasumistingimus määrab Arve Laekumistähtaja (allpool) ning lisaks sellele tagab, et Arvetele trükitakse õige Tasumistingimuse kirjeldus (vajadusel Kliendi Keeles). Müügireskontro seadistusse sisestatud Tasumistingimused võimaldavad panna paika ka Kassa-alede süsteemi.
- Nende esindaja
- Ctrl-Enter
Kliendi kontaktisikud, Müügireskontro
- Sisestub vaikimisi Kliendikaardilt
- Sisesta isik, kes Kliendi firmas Arvega tegeleb.
- Sisesta isik, kes Kliendi firmas Arvega tegeleb.
- Laekumistähtaeg
- Ctrl-Enter
Vali kuupäev
- Laekumistähtaja arvutab HansaWorld, kasutades Arve kuupäeva ja Tasumistingimust. Selleks kuupäevaks peab Arve olema tasutud.
- Kui Tasumistingimusega määratakse tasumine osamaksetena, näed siin viimase osamakse kuupäeva.
- Kui Tasumistingimusega määratakse tasumine osamaksetena, näed siin viimase osamakse kuupäeva.
- Objekt
- Ctrl-Enter
Objektide register, Üldine moodul
- Arvele ja sellest koostatud Kannetele saab sisestada kuni 20 komadega eraldatud Objekti. Erinevate Objektidega võid tähistada osakondi, kulukohti või toote tüüpe. Objektid võimaldavad Finantsaruandlust paindlikult liigendada.
- Kõigil Arvest koostatud Finantskannetel võetakse siin toodud Objektid Müügikonto(de) kreeditkonteeringule ja Kulukonto deebetkonteeringule (kui kasutatakse kuluarvestust), ja Müügivõlgade konto deebetkonteeringule (kui kasutad seadistuses Lausendamine M/R valikut Objekt müügivõlgadele).
- Kliendikaardil märgitud Objektid sisestuvad siia vaikimisi nagu ka Objektid hetkekasutaja Isikukaardilt.
- Kõigil Arvest koostatud Finantskannetel võetakse siin toodud Objektid Müügikonto(de) kreeditkonteeringule ja Kulukonto deebetkonteeringule (kui kasutatakse kuluarvestust), ja Müügivõlgade konto deebetkonteeringule (kui kasutad seadistuses Lausendamine M/R valikut Objekt müügivõlgadele).
- Kande kp
- Finantskandele antav Kande kuupäev. See on alati sama, mis Arve kuupäev ja seda muuta ei saa.
- Ametlik seerianr.
- Ctrl-Enter
Vali numbriseeriatest
- Mõnedes riikides nõutakse, et igale Arvele antaks ametlik seerianumber. Selle numbri võib eelnevalt blankettidele trükkida. Sinu firmale antud numbriseeria tuleb sisestada seadistusse Ametlik arvete numbriseeria: vaikimisi sisestub siia järgmine vaba number sellest seeriast. Seda saad muuta: Arve salvestamisel kontrollib HansaWorld kas valitud number on numbriseerias olemas.
- Ametlikku seerianumbrit näed aknas Aseta laekumata arve, mis lubab Arveid siduda Laekumistega, kasutades Arve numbrit või Ametlikku seerianumbrit.
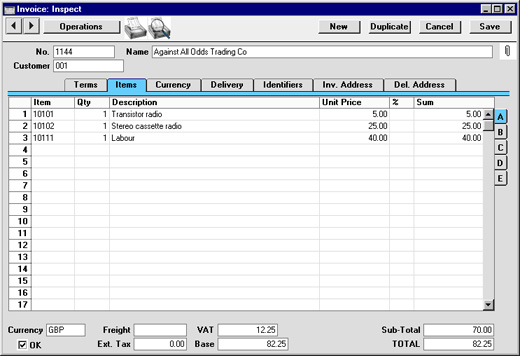
Artiklite kaart
Artiklite kaardi tabelisse sisesta Artiklid, mille eest Arve esitatakse. Tabel on jagatud viieks osaks. Klõpsates nuppudel A-E, vahetuvad tabeli kaks või kolm parempoolset tulpa.
Arvele ridade lisamiseks mine esimesele vabale reale ja sisesta soovitud andmed. Rea kustutamiseks klõpsa reanumbril ja vajuta Backspace-klahvi klaviatuuril. Rea sisestamiseks teiste ridade vahele klõpsa reanumbril, kuhu soovid uut rida lisada ja vajuta klaviatuuril Enter.
Arvele saab Artikleid lisada ka avades Artiklite sirvimisakna, valida seal soovitud Artiklid, klõpsates neil, hoides samal ajal all Shift-klahvi ning seejärel vedada need Arve tabeli esimese vaba rea Artikli väljale.
Osa A
- Artikkel
- Ctrl-Enter
Artiklite register
- Sisesta Artikli kood või ribakood. Hind, kirjeldav jm informatsioon sisestub automaatselt Artiklikaardilt. Kui jätad selle välja täitmata, võid Nimetuse väljale kirjutada vabalt valitud teksti lisakommentaariks, mis trükitakse ka Arve dokumendile.
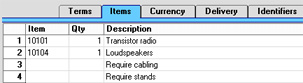
- Kui Artikkel on Struktuurartikkel, millel on märgitud valik Aseta sisestamisel komponendid, sisestuvad Koguse määramisel selle komponendid eraldi ridadele. Kui nüüd Kogust muudad, jälgi, et muudad ka komponentide Koguseid.
- Kui Kliendiga on seotud Vaikimisi artikli kaart (Kliendikaardi Hindade kaardil), sisestuvad Kliendi määramisel Arvele kõik sellel kaardil toodud Artiklid. Pane tähele, et sellistele Artiklitele ei ole määratud koguseid; need tuleb enne Arve trükkimist ja kinnitamist ise sisestada.
- Kui Artikkel on Struktuurartikkel, millel on märgitud valik Aseta sisestamisel komponendid, sisestuvad Koguse määramisel selle komponendid eraldi ridadele. Kui nüüd Kogust muudad, jälgi, et muudad ka komponentide Koguseid.
- Kogus
- Sisesta müüdud ühikute arv. Vajuta Enter ja arvutatakse Summa ning kursor liigub järgmise rea Artikli väljale.
- Rea Summa arvutamiseks peab Artiklile olema sisestatud Kogus.
- Kui Arved koostatakse Tellimustest, sisestub vaikimisi Koguseks lähetatud kogus. Vajadusel saad seda vähendada. Kui soovid teha Arvet suuremale kogusele kui lähetati, pead Arvele lisama uue rea. Jälgi, et Arvel oleks märgitud valik Muuda ladu, et laoseisud muudetaks vastavalt ning et vajadusel koostataks lisatud koguste kohta ka kulukanded Finantsmoodulisse. See valik kehtib ainult nende Arve ridade kohta, mis ei ole Tellimusega seotud.
- Rea Summa arvutamiseks peab Artiklile olema sisestatud Kogus.
- Nimetus
- Sisestub vaikimisi
Artiklikaardilt
- Sellel väljal näed Artikli nimetust, mis sisestub Artiklite registrist. Kui soovid sisestada lisakirjeldust, saad seda teha: ruumi on kuni 100 tähemärgi jaoks. Vajadusel võid kasutada ka järgmisi ridu.
- Kui oled Artiklikaardi Tekstide kaardile sisestanud selle nimetuse erinevates keeltes, valitakse sobiv tõlge vastavalt Arve Keelele. Lisaks võtab HansaWorld Artiklikaardi Tekstide kaardilt ka kõik sellised read, millele ei ole Keele koodi määratud ja sisestab need Arvele Nimetuse väljale, kasutades vajadusel järgmisi ridu.
- Kui oled Artiklikaardi Tekstide kaardile sisestanud selle nimetuse erinevates keeltes, valitakse sobiv tõlge vastavalt Arve Keelele. Lisaks võtab HansaWorld Artiklikaardi Tekstide kaardilt ka kõik sellised read, millele ei ole Keele koodi määratud ja sisestab need Arvele Nimetuse väljale, kasutades vajadusel järgmisi ridu.
- Ühikuhind
- Ühikuhind vastavalt sellele Kliendile kehtivale Hinnakirjale sisestub automaatselt. Kui Kliendile ei ole Hinnakirja määratud või ei ole antud Artiklit Hinnakirjas, kasutatakse Baashinda Artiklikaardilt. Kui selle Hinnakirja hinnad sisaldavad käibemaksu või kui oled seadistuses Lausendamine M/R määranud, et Baashinnad sisaldavad käibemaksu (või käibemaksu ja maksu), sisestub ka Ühikuhind koos käibemaksuga (ja maksuga).
- Kui Arvele on määratud Valuuta ja vahetuskurss, sisestub Ühikuhind vastavas Valuutas (st see on vastavalt konverteeritud).
- Kui Arvele on määratud Valuuta ja vahetuskurss, sisestub Ühikuhind vastavas Valuutas (st see on vastavalt konverteeritud).
- %
- Allahindlusprotsent. Kui Kliendile on määratud Hinnaalandusmaatriks, mis hõlmab antud Artiklit, sisestub allahindlusprotsent vastavalt Artikli koodile ja Kogusele. Seda saad vajadusel üksiku Arve jaoks muuta. Kui Arvele kehtib Hinnaalandusmaatriks, näed seda Arve Lähetuse kaardil.
- Hinnaalandusmaatriksid võimaldavad automaatselt rakendada allahindlusi, mis põhinevad väärtusel, kogusel, kaalul või mahul. Kui Hinnaalandusmaatriks kehtib Artikliklassile, mitte üksikutele Artiklitele ning Arvel kasutatakse enam kui ühte sellesse Klassi kuuluvat Artiklit, tuleb neile allahindlus arvutada kogu Klassi koguse peale kokku. Selleks vali Arve Operatsioonide menüüst käsklus Arvuta hinnaalandus ümber, kui kogu Arve on valmis. Seda funktsiooni saad kasutada ka siis, kui enne Arve kinnitamist tehakse muudatusi Hinnaalandusmaatriksis endas.
- Üldise mooduli Ümardamise seadistuses saad määrata, kas hinnaalandus arvutatakse Ühikuhinnalt enne Kogusega korrutamist või rea kogusummalt. Teatud situatsioonis (kui Ühikuhind on väga väike ja Kogus väga suur) võib hinnaalanduse summa olenevalt ümardamisel kasutatavast arvutusmeetodist erineda. Täpsema kirjelduse ja näite leiad siit.
- Siia sisestatud protsent võib olla kas Hinnaalandus, Juurdehindlus või Juurdehindluse protsent. Vastav valik määratakse Üldise mooduli Hinnaalanduse seadistuses.
- Hinnaalandusmaatriksid võimaldavad automaatselt rakendada allahindlusi, mis põhinevad väärtusel, kogusel, kaalul või mahul. Kui Hinnaalandusmaatriks kehtib Artikliklassile, mitte üksikutele Artiklitele ning Arvel kasutatakse enam kui ühte sellesse Klassi kuuluvat Artiklit, tuleb neile allahindlus arvutada kogu Klassi koguse peale kokku. Selleks vali Arve Operatsioonide menüüst käsklus Arvuta hinnaalandus ümber, kui kogu Arve on valmis. Seda funktsiooni saad kasutada ka siis, kui enne Arve kinnitamist tehakse muudatusi Hinnaalandusmaatriksis endas.
- Summa
- Rea summa kokku: Kogus korrutatud Ühikuhinnaga miinus allahindlus. Summa muutmisel arvutab HansaWorld automaatselt allahindlusprotsendi ümber. Kui selle Hinnakirja hinnad sisaldavad käibemaksu või kui oled seadistuses Lausendamine M/R määranud, et Baashinnad sisaldavad käibemaksu (või käibemaksu ja maksu), sisestub ka Ühikuhind koos käibemaksuga (ja maksuga).
- Summa ümardatakse üles- või allapoole vastavalt reeglitele, mille oled Valuutale määranud Üldise mooduli seadistuses Valuuta ümardamine.
- Konto
- Ctrl-Enter
Kontode register, Finants/Üldine moodul
- Siin näed Artikli Müügikontot, mida krediteeritakse Arvest koostataval Finantskandel. Vaikimisi pakutakse kontot Hindade registrist vastavalt Artikli/Hinnakirja kombinatsioonile. Kui sellist Hinna kaarti ei ole või ei ole sellel Müügikontot määratud, võetakse konto Artiklikaardilt, Artikliklassilt või seadistusest Lausendamine M/R.Üsikul Arvel saad seda vajadusel muuta.
- Kui kasutatakse Kreeditarve-tüüpi Tasumistingimust (määratakse ülalpool) ning seadistuses Lausendamine M/R on märgitud valik Kasuta kreeditarvetel eraldi müügikontosid, kasutatakse tavalise Müügikonto asemel kreedit Müügikontot. See konto võetakse vastava Artikliklassi Kreeditkontode kaardilt või seadistusest Lausendamine M/R.
- Kui kasutatakse Kreeditarve-tüüpi Tasumistingimust (määratakse ülalpool) ning seadistuses Lausendamine M/R on märgitud valik Kasuta kreeditarvetel eraldi müügikontosid, kasutatakse tavalise Müügikonto asemel kreedit Müügikontot. See konto võetakse vastava Artikliklassi Kreeditkontode kaardilt või seadistusest Lausendamine M/R.
- Per. mudel
- Ctrl-Enter
Periodiseerimise mudelite seadistus, Finantsmoodul
- Antud välja täpse kirjelduse ja näite leiad siit.
- Objektid
- Ctrl-Enter
Objektide register, Finants/Üldine moodul
- Sisestub vaikimisi Artiklilt
- Artiklireale saab sisestada kuni 20 komadega eraldatud Objekti, mis kantakse ka Arvest koostatud Finantskannetele. Erinevate Objektidega võid tähistada osakondi, kulukohti või toote tüüpe. Objektid võimaldavad Finantsaruandlust paindlikult liigendada.
- Kõigil Arvest koostatud Finantskannetel võetakse siin toodud Objektid Müügikonto kreeditkonteeringule ja Kulukonto deebetkonteeringule (kui kasutatakse kuluarvestust). Siia sisestatud Objektid lisatakse Arve Tingimuste kaardil toodud Objektidele.
- Artiklireale saab sisestada kuni 20 komadega eraldatud Objekti, mis kantakse ka Arvest koostatud Finantskannetele. Erinevate Objektidega võid tähistada osakondi, kulukohti või toote tüüpe. Objektid võimaldavad Finantsaruandlust paindlikult liigendada.
- KM-k
- Ctrl-Enter
Käibemaksukoodide seadistus, Finantsmoodul
- Siia sisestatud käibemaksukood määrab Artikli puhul kasutatava KM määra ja krediteeritava KM konto. Vaikimisi pakutakse KM koodi Kliendikaardilt. Kui seal ei ole KM koodi määratud, võetakse see Artiklikaardilt, Artikliklassilt või seadistusest Lausendamine M/R. Vajadusel saad vaikimisi sisestunud KM koodi üksikul Arvel muuta.
- Kui kasutatakse Kreeditarve-tüüpi Tasumistingimust ning seadistuses Lausendamine M/R on märgitud valik Kasuta kreeditarvetel eraldi müügikontosid, kasutatakse tavalise Müügikonto asemel kreedit Müügikontot. See konto võetakse vastava Artikliklassi Kreeditkontode kaardilt või seadistusest Lausendamine (M/R).
- Kui oled seadistuses Lausendamine (M/R) märkinud valiku KM-koodi kontroll, peab siia sisestatud KM kood olema sama Müügikontole Kontode registris määratud KM koodiga. Kui need KM koodid on erinevad, Arvet salvestada ei saa.
- Kui kasutatakse Kreeditarve-tüüpi Tasumistingimust ning seadistuses Lausendamine M/R on märgitud valik Kasuta kreeditarvetel eraldi müügikontosid, kasutatakse tavalise Müügikonto asemel kreedit Müügikontot. See konto võetakse vastava Artikliklassi Kreeditkontode kaardilt või seadistusest Lausendamine (M/R).
- Ostuhind
- Sisestub vaikimisi
Artiklikaardilt (Ostuhind + Lisakulu)
- Ühiku Ostuhinda kasutatakse Müügikatte arvutamisel. Vajadusel saad seda muuta.
- Müügikate
- Arverea Müügikate saadakse lahutades Summast Kogusega korrutatud Ostuhinna. Seega on see absoluutsuurus, mitte protsent.
- FIFO
- Rea Artiklite keskmine FIFO ühikuhind. Rea Artiklite FIFO laoväärtuste kogusummat näed Arve D osal. Need numbrid sisestuvad automaatselt Arve kinnitamisel, kuid ainult Laoartiklite puhul ja Arvetel, mis ei ole koostatud Müügitellimustest. Müügitellimustest koostatud Arvete puhul näed FIFO väärtusi vastaval Lähetusel.
- Seerianr.
- Ctrl-Enter
Laoartiklite seerianumbrid
- Kui Artiklite puhul on vaja näidata Seerianumbreid, võib need sisestada siia.
- Seerianumbritega Artiklid sisestatakse Arvele eraldi ridadele Kogusega 1. Nii saad need Laost korrektselt maha kanda.
- Kui Ladu ei ole määratud, näed Ctrl-Enter nimekirjas kõigis Ladudes olevate Artiklite Seerianumbreid koos märkega, millises Laos iga Artikkel on. Kui aga Arve Tingimuste kaardil on Ladu määratud, näidatakse ainult selle Lao Seerianumbreid.
- Kui soovid, et Ctrl-Enter valikuaknas näidataks ka Parim enne kuupäevi, märgi Müügireskontro Artikli seadistustes valik Näita ‘parim enne’ kuupäevi. Parim enne kuupäevad sisestatakse Lao mooduli seadistuses Partiitekstied.
- Ctrl-Enter nimekirja ei näe, kui kasutad Lao mooduli Laoseadistustes valikut Ära nõua seerianumbrit laosissetulekul. Sellele vaatamata tuleb Seerianumber määrata, nagu ka peab sisestama Koguseks 1, kuid kasutatud Seerianumbri õigsust ei kontrollita (st kas see on hetkel laos olemas).
- Pea meeles, et Seerianumbrid tuleb sisestada käsitsi, need ei sisestu automaatselt FIFO järgi.
- Lao mooduli seadistuse Kuluarvestus valik Seerianumbripõhine kulu konteerimine kontrollib, kuidas Seerianumbri valik mõjutab FIFO välja Arve C osal ja kulusummat Arvest koostatud kandel. Kui Sa seda valikut ei kasuta, näidatakse FIFO väljal kõige vanemat Ostuhinda, isegi kui valitud Seerianumber ei ole vanim. Kui see valik on märgitud, näidatakse FIFO väljal valitud Seerianumbri tegelikku Ostuhinda.
- Seerianumbritega Artiklid sisestatakse Arvele eraldi ridadele Kogusega 1. Nii saad need Laost korrektselt maha kanda.
- Hinnafaktor
- Sisestub vaikimisi
Artiklikaardilt
- Hinnafaktorit kasutatakse Artikli Ühikuhinna ümberarvutamiseks. Näiteks kui tavaliselt ostetakse Artiklit karpides, milles on 24 ühikut, võid Artiklikaardile sisestada Hinnafaktoriks 24. Artikli Ühikuhind on siis karbi hind, milles on 24 ühikut. Hinnafaktor võetakse Arvele Artiklikaardilt ning see mõjutab Arve Summat vastavalt. Seda võib muuta ning HansaWorld arvutab Summa vastavalt ümber. Valem, mida kasutatakse on: Summa = (Kogus/Hinnafaktor) * Ühikuhind.
- Retsept
- Ctrl-Enter
Retseptide seadistus, Lao moodul
- Sisestub vaikimisi Artiklikaardilt
- Kui Artikli tüübiks on Struktuurartikkel, sisestub siia selle Retsept, mis võetakse Artiklikaardilt. Struktuurartikkel on Artikkel, mis pannakse ostetud komponentidest kokku Sinu firmas: Retseptil näidatakse selle komponendid vajaminevate kogustega. Retseptid kirjeldatakse Lao mooduli Retseptide seadistuses.
- Kui Artikli tüübiks on Struktuurartikkel, sisestub siia selle Retsept, mis võetakse Artiklikaardilt. Struktuurartikkel on Artikkel, mis pannakse ostetud komponentidest kokku Sinu firmas: Retseptil näidatakse selle komponendid vajaminevate kogustega. Retseptid kirjeldatakse Lao mooduli Retseptide seadistuses.
- ReaFIFO
- Real olevate Artiklite FIFO laoväärtus kokku. See number sisestub automaatselt Arve kinnitamisel, kuid ainult Laoartiklite puhul ja Arvetel, mis ei ole koostatud Müügitellimustest. Arvete puhul, mis on koostatud läbi Müügitellimuste, näidatakse FIFO väärtusi vastavatel Lähetustel.
- Koef.
- Sisestub vaikimisi
Artiklikaardilt
- Siin näidatakse Artikli Ühiku koefitsient, mis võetakse Artiklikaardi Lao kaardilt. Kui jälgid Laos koguseid erinevates mõõtühikutes, näitab see koefitsient nende ühikute suhet.
- Ühik, Ühiku kogus, Ühiku ühikuhind
- Antud väljade abil saad müüa Artiklit, kasutades Artiklikaardi Hindade kaardil määratust erinevat Ühikut.
- Kui siia sisestatakse Ühik, millele on antud Koguse faktor, muutuvad arverea Kogus ja hind vastavalt. Näiteks müüakse Artiklit tavaliselt ühekaupa. Kui müüd nüüd 24 sellist Artiklit, võid sisestada Ühikuks ‘Tosin’ (st Koguse faktor on 12) ja Ühiku koguse väljale 2. Kogus Arve A osal muutub vastavalt 24-ks (st 2 x 12) ja hinda muudetakse vastavalt. Ühiku ühikuhind näitab ühe tosina hinda (st ühe uue Ühiku hinda).
- Ühiku valimiseks kasuta Ctrl-Enter klahvikombinatsiooni.
- Koguse, Kaalu ja Mahu kogusumma ümberarvutamiseks Arve Lähetuse kaardil kasuta Operatsioonide menüü käsklust Arvuta kaal ja maht ümber.
- Kui siia sisestatakse Ühik, millele on antud Koguse faktor, muutuvad arverea Kogus ja hind vastavalt. Näiteks müüakse Artiklit tavaliselt ühekaupa. Kui müüd nüüd 24 sellist Artiklit, võid sisestada Ühikuks ‘Tosin’ (st Koguse faktor on 12) ja Ühiku koguse väljale 2. Kogus Arve A osal muutub vastavalt 24-ks (st 2 x 12) ja hinda muudetakse vastavalt. Ühiku ühikuhind näitab ühe tosina hinda (st ühe uue Ühiku hinda).
- Laius, Kõrgus, Sügavus
- Sisestub vaikimisi
Artiklikaardilt
- siit.

- Kinnita
- Selle valiku märkimisega Arve kinnitatakse ja sisestatakse Müügireskontrosse. Samuti koostatakse vastav Finantskanne. Kui kasutad ka Lao moodulit ja Arve sisestati otse (mitte ei koostatud Müügitellimusest), muudetakse Arvele kaasatud Laoartiklite laoseisu vastavalt. Kinnitatud Arvet enam muuta ei saa. Erandina sellest üldisest reeglist saad muuta väljasid Märgukirjatase ja Viimane märgukirja kp. ning valikuid Ära arvesta viivist, Ära koosta märgukirju ja Vaidlustatud Lähetuse kaardil ja Müügimehe välja Tingimuste kaardil.
- Valuuta
- Ctrl-Enter
Valuutade register, Üldine moodul
- Sisestub vaikimisi Kliendilt või Vaikimisi baasvaluuta
- Arve Valuuta: vahetuskurssi näed Arve Valuuta kaardil, kus saad seda vajadusel üksiku Arve jaoks muuta. Jälgi, et õige Valuuta oleks valitud enne, kui Arvele Artikleid sisestad, et hinnad õigesti ümber arvutataks. Kui selle unustad, saad tagantjärele hindade korrigeerimiseks kasutada Operatsioonide menüü käsklust Arvuta hinnakirja artiklid ümber (enne antud funktsiooni käivitamist salvesta Arve). Kui soovid teha Arve kohalikus Valuutas, jäta see väli täitmata (juhul kui Sa ei ole seadistanud Vaikimisi baasvaluutat, mida muidu pakutaks vaikimisi ja käsitletaks kohaliku Valuutana).
- Kui Kliendikaardi Hindade kaardil on määratud Valuuta, saad Arvel kasutada vaid seda Valuutat.
- Arve Valuuta: vahetuskurssi näed Arve Valuuta kaardil, kus saad seda vajadusel üksiku Arve jaoks muuta. Jälgi, et õige Valuuta oleks valitud enne, kui Arvele Artikleid sisestad, et hinnad õigesti ümber arvutataks. Kui selle unustad, saad tagantjärele hindade korrigeerimiseks kasutada Operatsioonide menüü käsklust Arvuta hinnakirja artiklid ümber (enne antud funktsiooni käivitamist salvesta Arve). Kui soovid teha Arve kohalikus Valuutas, jäta see väli täitmata (juhul kui Sa ei ole seadistanud Vaikimisi baasvaluutat, mida muidu pakutaks vaikimisi ja käsitletaks kohaliku Valuutana).
- Transp.
- Igale Arvele saad lisada kindla transpordikulude summa (või Artiklite kogukaalu alusel arvutatud summa), kasutades Transpordikulude seadistust. Kui kasutad seda võimalust, sisestub siia vastav summa Kliendi koodi sisestamisel (või kui muudad mõnel arvereal Kogust). Seda numbrit saad vajadusel muuta. KM kood ja Müügikonto transpordikulude jaoks võetakse Transpordikulude seadistusse sisestatud Artiklikaardilt.
- Kui Sa Transpordikulude seadistust ei kasuta, sisesta vajadusel transpordikulu summa käsitsi. Sellisel juhul käibemaksu ei arvutata ja summa kantakse Kliendi käibemaksutsoonile määratud Müügikontole (määratud seadistuses Lausendamine M/R).
- Kui Sa Transpordikulude seadistust ei kasuta, sisesta vajadusel transpordikulu summa käsitsi. Sellisel juhul käibemaksu ei arvutata ja summa kantakse Kliendi käibemaksutsoonile määratud Müügikontole (määratud seadistuses Lausendamine M/R).
- Lisamaks
- KM koodide seadistamisel Finantsmoodulis on võimalik määrata lisamaksu, nt keskkonnamaksu arvutus. Kui Arvel kasutatakse KM koodi, millele on kirjeldatud selline lisamaks, näidatakse selle maksu summa siin väljal. Arvele Artiklite lisamisel arvutatakse see summa ümber. Arve kinnitamisel krediteeritakse lisatasu summas vastavale KM koodile määratud Maksukontot.
- KM
- Arve käibemaks kokku.
- Käibemaksusumma ümardatakse üles- või allapoole vastavalt reeglitele, mille oled Valuutale määranud Üldise mooduli seadistuses Valuuta ümardamine. setting in the System module). If no Currency has been specified, or the Currency in question has not been entered in the Valuuta ümardamine Kui Valuutat ei ole määratud, või ei ole määratud Valuutat sisestatud Valuuta ümardamise seadistusse, ümardatakse summa vastavalt Üldise mooduli Ümardamise seadistuses määratud reeglitele.
- Arvest koostatud Finantskandel kantakse ümardamisel saadud kasum või kahjum seadistuses Lausendamine (M/R) määratud Ümardamise kontole.
- Käibemaks arvutatakse arveridade ümardatud summadelt.
- Käibemaksusumma ümardatakse üles- või allapoole vastavalt reeglitele, mille oled Valuutale määranud Üldise mooduli seadistuses Valuuta ümardamine. setting in the System module). If no Currency has been specified, or the Currency in question has not been entered in the Valuuta ümardamine Kui Valuutat ei ole määratud, või ei ole määratud Valuutat sisestatud Valuuta ümardamise seadistusse, ümardatakse summa vastavalt Üldise mooduli Ümardamise seadistuses määratud reeglitele.
- Baas
- See on Arve kogusumma koos käibemaksuga kohalikus Valuutas (ehk Baasvaluutas 1, mis määratakse Üldise mooduli seadistuses Baasvaluuta Seda välja kasutatakse ainult siis, kui Arvele on määratud Valuuta ja see ei ole Baasvaluuta 1.
- Summa
- Arve kogusumma ilma käibemaksuta.
- KOKKU
- Arve kogusumma koos käibemaksuga.
- See summa ümardatakse üles- või allapoole vastavalt reeglitele, mille oled Valuutale määranud Üldise mooduli seadistuses Valuuta ümardamine. Kui Valuutat ei ole määratud, või määratud Valuutat ei ole sisestatud Valuuta ümardamise seadistusse, ümardatakse summa vastavalt Üldise mooduli Ümardamise seadistuses määratud reeglitele. Arvest koostatud Finantskandel kantakse ümardamisel saadud kasum või kahjum seadistuses Lausendamine M/R määratud Ümardamise kontole.
Entering an Invoice - Items Card Part 2 (Flips C-G)
This page describes the fields on flips C-G of the 'Items' card of the Invoice record. Please click the following links for descriptions of the other cards:- Header
- 'Terms' card
- 'Items' card Part 1 (Flips A and B)
- 'Items' card Part 2 (Flips C-G)
- 'Items' card Part 3 (Footer)
- 'Currency' card
- 'Del. Terms' card
- 'Identifiers' card
- 'Price List' card
- 'Inv. Address' card
- 'Del. Address' card
Flip C
- Cost
- The unit Cost Price of the Item used in Gross Profit and Margin calculations.
- In an Invoice that you enter directly to the Invoice register, the default offered in each row will be chosen as follows:
- If an Item is Serial Numbered at the Batch or Unit level, you are using the Cost Price for Serial Number option for that Item and you are using the Use Actual Cost Price for GP Cost option in the Cost Accounting setting in the Stock module, the appropriate Cost Price for the Serial Number will be brought in to this field when you specify a Serial Number on flip D.
- If the Price List of the Invoice is one whose Type is "BuyBack", the Cost Price will be taken from the record in the Price register for the Item/Price List/Customer combination.
- The Cost Price from the Item record will be used.
If you need the figure that is brought in to be the Cost Price of the Item plus its Extra Cost, select the Include Item Extra Cost in Cost option in the Cost Accounting setting in the Stock module.
- It will be copied from the originating row in the Order.
The Cost Price in an Order will have been chosen using the same three numbered points described above. However, if you are using the Update GP on Order when Delivering option in the Order Settings setting in the Sales Orders module, it will have been updated to the unit cost of sales value used in the Delivery. The actual cost of sales value of the delivered Item will therefore be copied to the Invoice
- It can be calculated by adding the Cost Price from the Item record to its Extra Cost. If you wish to use this option, select the Update GP at Invoicing option in the Cost Accounting setting in the Stock module. This can be more accurate if you are routinely updating Items' Cost Prices from Goods Receipts and are using back-to-back Purchase Orders. In this situation, you will probably enter a Sales Order and create a Purchase Order from it, and the subsequent Goods Receipt will update the Cost Price in the Item record, all before creating the Invoice. If you are using this option, this latest Cost Price will be copied from the Item record to the Invoice when you do create it.
- If you duplicate an Invoice, the new Invoice will contain the latest Cost Price from the Item register, and the Gross Profit will be recalculated accordingly. The Cost Price in the original Invoice will not be transferred to the new Invoice.
- You can prevent certain users from changing Cost Prices in an Invoice using Access Groups, by denying them access to the 'Change Cost on Invoice Rows' Action. You can also hide the Cost field altogether, by denying access to the 'View Item's Cost Price' Action. This will hide the GP % field, the Cost B2, GP and FIFO fields immediately below, the Row FIFO field on flip D and the GP % and Total GP fields in the footer, and will hide the same fields in Orders and Quotations as well.
- In an Invoice that you enter directly to the Invoice register, the default offered in each row will be chosen as follows:
- Cost B2
- The unit Cost Price of the Item, converted to Base Currency 2. This figure will be used in the GP Invoices report if you produce it using the Cost Price B2 option.
- GP
- The Gross Profit for the Invoice row is calculated by subtracting the Cost Price (multiplied by the Quantity) from the Sum. The figure is therefore absolute, not a percentage. You cannot change this figure yourself, but it will be recalculated if you change the Quantity, the Unit or Cost Price or the % discount.
- FIFO
- The average unit cost of sales of the Items in the row. The total value will be shown in the Row FIFO field on flip D.
- In an Invoice that you enter directly to the Invoice register, these figures will be calculated automatically when you mark the Invoice as OK and save, but they will only be shown for Stocked Items (they will also be shown for Plain and Service Items if you are using the Cost Accounting for Plain and Service Items option in the Cost Accounting setting in the Stock module).
- The calculation of this figure will usually use the Cost Model specified in the relevant Item or Item Group record. If that Cost Model is Default, the Primary Cost Model specified in the Cost Accounting setting will be used. Despite its name, the field will therefore show the unit FIFO, LIFO, Weighted Average or other value of the Item, depending on the Cost Model. The exception is when the Item requires Serial Numbers and you are using the Cost Price for Serial Number option in the Cost Accounting setting: please refer to the description of the Serial No. field on flip D below for details.
- In the case of Invoices that you have generated from Sales Orders and Deliveries, cost of sales values will be copied from flip C of the appropriate Delivery record.
- When you mark the Invoice as OK and save, the value in the Row FIFO field on flip D may be credited to the Stock Account and debited to the Cost of Sales Account in the resulting Nominal Ledger Transaction. These postings will be made if the Invoice row was not created from a Sales Order and if the Update Stock box on the 'Del. Terms' card is ticked. These postings will also be made if the Invoice row was created from a Sales Order or a Delivery and you have chosen to have cost of sales transactions created from Invoices and not from Deliveries. Please refer to the Cost Accounting Transactions from Deliveries and Invoices' page for more details.
- In an Invoice that you enter directly to the Invoice register, these figures will be calculated automatically when you mark the Invoice as OK and save, but they will only be shown for Stocked Items (they will also be shown for Plain and Service Items if you are using the Cost Accounting for Plain and Service Items option in the Cost Accounting setting in the Stock module).
Flip D
- Salesmen
- Paste Special
Person register, System module and Global User register, Technics module
- If necessary, you can specify a different Salesman or Salesmen (separated by commas) for each row of the Invoice.
- The Bonus, Salesman report will assign any commission for the row in question to the Salesman specified in the row only (i.e. not to the Salesman specified in the header). However, the 'Workflow Activity' function will not create Activities for the row Salesmen, and the Invoice will not be recognised as belonging to the row Salesmen by the Limited Access feature.
- The Bonus, Salesman report will assign any commission for the row in question to the Salesman specified in the row only (i.e. not to the Salesman specified in the header). However, the 'Workflow Activity' function will not create Activities for the row Salesmen, and the Invoice will not be recognised as belonging to the row Salesmen by the Limited Access feature.
- Serial No.
- Paste Special
Serial Numbers of Items in stock
- If the Item uses Serial Numbers at the unit or batch level, you must enter a valid Serial Number here.
- For Items with Serial Numbers at the Unit level, you must enter an appropriate number of separate rows each with a Quantity of one. This enables you to enter Serial Numbers individually, and ensures their correct removal from stock.
- For Items with Serial Numbers at the Batch level, you only need enter a single Invoice row with the appropriate Quantity. You can enter a single Serial/Batch Number, providing you have a sufficient quantity in stock with that Serial Number. If this is not the case, you will be told there is insufficient stock when you try to save the Invoice.
- If you enter a Serial Number in a new row, other details such as the Item Number and Name, pricing information, Location and, if appropriate, Position will be brought in automatically.
- If you have not specified a Location in the Invoice, the 'Paste Special' list will show the Serial Numbers of Items in every Location, with an indication of the Location in which each Serial Number is stored. However, if you have specified a Location on the 'Del. Terms' card or on flip B of the row, the 'Paste Special' list will only show the Serial Numbers stored in that Location.
- If you would like the Best Before date and/or Batch Status of each Serial Number to be shown in the 'Paste Special' list, select the Show Best Before Dates and/or Show Batch Status options respectively in the Item Settings setting in the Sales Ledger. Please refer to the description of the Batch Specifications setting in the Stock modulefor details about Best Before Dates and here for details about Batch Statuses.
- The 'Paste Special' list will not be available if you are using the No Serial No. on Goods Receipts option in the Stock Settings setting. In this case, you must still enter a Serial Number and, if the Item has Serial Numbers at the Unit level, the Quantity must still be one, but no check will be carried out that the Serial Number you have used is valid (i.e. one that is currently in stock).
- No default Serial Numbers will be offered, so you will need to enter them yourself. There is no automatic FIFO allocation.
- The cost of sales value of an Item with Serial Numbers is controlled by the Cost Price for Serial Number option. This option is in the Cost Accounting setting in the Stock module, but you can override it in individual Item and Item Group records ('Cost Model' card in both cases). If you are not using this option, the cost of sales value will be calculated using the usual Cost Model, even though this may not be appropriate for the Serial Number chosen (e.g. if you are using the FIFO Cost Model, the oldest cost of sales value will be used, even if the chosen Serial Number is not the oldest one). If you are using the Cost Price for Serial Number option, the cost of sales value will be the actual Cost Price of the selected Serial Number. The cost of sales value will be placed in the FIFO field on flip C when you mark the Invoice as OK and save.
- An Invoice created from an Order can mirror the Order (i.e. it can contain a single row for the Serial Numbered Item with the Quantity from the Order and with no Serial Numbers) or it can mirror the Delivery (i.e. it can contain a number of rows each with a Quantity of one, showing each Serial Number). The latter case will be useful if you need to have the Serial Numbers printed on Invoices as well as on Delivery Notes. If you need the Invoice to mirror the Delivery, select the Invoice based on Delivery option in the Order Settings setting in the Sales Orders module or, if you don’t want to use this option, create the Invoice from the Delivery..
- For Items with Serial Numbers at the Unit level, you must enter an appropriate number of separate rows each with a Quantity of one. This enables you to enter Serial Numbers individually, and ensures their correct removal from stock.
- P.Factor
- Default taken from
Item
- The Price Factor is the quantity of the Item that can be bought by the Unit Price. For example, if the Unit Price of an Item refers to a box of 24 units, its Price Factor will be 24. Specifying a Price Factor for such an Item is only necessary if it will be sold in individual units (e.g. if you will break into the box of 24 to sell a single unit). The Price Factor will be used to calculate the price of a single unit (in this example, the Price Factor will be 24).
- When you use an Item with a Price Factor in an Invoice row, the Quantity that you specify on flip A should be the quantity of individual units, not the quantity of boxes. When you enter a Quantity, the Sum will be calculated using the formula (Quantity/Price Factor) * Unit Price.
- The Unit Price field on flip A (and the Base Price field in the Item record) can only support three decimal places. Using a Price Factor can be useful if you need to use more. For example, if the price per unit is 0.0001, you can enter 0.01 as the Unit Price and 100 as the Price Factor. This will result in a Sum of 0.0001 when the quantity is one.
- When you use an Item with a Price Factor in an Invoice row, the Quantity that you specify on flip A should be the quantity of individual units, not the quantity of boxes. When you enter a Quantity, the Sum will be calculated using the formula (Quantity/Price Factor) * Unit Price.
- Recipe
- Default taken from
Item
- If the Item is a Structured Item whose Paste Components During Entry box has not been ticked, its Recipe will be recorded here, brought in from the Item record. A Structured Item is essentially an Item that will be assembled by your company on the point of delivery from components held in stock: its Recipe lists those components with quantities. You should not change the contents of this field. Please refer here for more details about Recipes.
- Row FIFO
- The total cost of sales value of the Items on this Invoice row. The cost of sales value per unit is shown in the FIFO field on flip C: please refer to the description of this field above for more details.
- In multi-user systems, you can prevent certain users from viewing Cost Prices in Quotations, Orders and Invoices using Access Groups, by denying them access to the 'View Item's Cost Price' Action. In an Invoice, this will hide the Row FIFO field, the Cost, Cost B2, GP and FIFO fields on flip C and the GP % and Total GP fields in the footer.
Flip E
- Unit, Unit Qty, Unit Pr. of Unit
- These fields allow you to sell an Item using a different Unit to the one specified on the 'Pricing' card of the Item record.
- If you enter a Unit that has a Qty Factor, the Quantity and pricing for the Invoice row will change accordingly. For example, an Item is usually sold in single units. If you sell two dozen of them, you can enter the Unit representing one dozen (i.e. one whose Qty Factor is "12") in this Unit field and "2" in the Unit Qty field. The Quantity on flip A will change to "24" (i.e. 2 x 12) and the pricing will be adjusted accordingly. The Unit Price of Unit field will show the price for one dozen (i.e. the price of one of the new Unit).
- Use 'Paste Special' from the Unit field to choose from a list of Units.
- If you enter a Unit that has a Qty Factor, the Quantity and pricing for the Invoice row will change accordingly. For example, an Item is usually sold in single units. If you sell two dozen of them, you can enter the Unit representing one dozen (i.e. one whose Qty Factor is "12") in this Unit field and "2" in the Unit Qty field. The Quantity on flip A will change to "24" (i.e. 2 x 12) and the pricing will be adjusted accordingly. The Unit Price of Unit field will show the price for one dozen (i.e. the price of one of the new Unit).
- Width, Height, Depth
- Default taken from
Item
- These fields contain the dimensions of the Item. You can use them together with the Unit Qty field if the Item is sold by area or volume. Please refer to the description of the Units setting for details and an example.
Flip F
- Cust. Item No.
- If you know the Customer's code for the Item (i.e. the Customer's equivalent of the Item Number), you can enter it in this field. For a more permanent record, you can enter this code in the Customer Items setting in the Sales Orders module. After having done so, it will be brought in to this field in future Invoices automatically.
- If you need this code to be printed on Invoice documentation, add the "Customer Item Code" field to the Form Template.
- If you need this code to be printed on Invoice documentation, add the "Customer Item Code" field to the Form Template.
- Coeff
- Default taken from
Item
- The Unit Coefficient of the Item is shown here, taken from the 'Stock' card of the Item. If you are maintaining stock quantities using different units of measurement, this coefficient is the ratio between those units of measurement.
- Cred. Row
- If an Invoice is a Credit Note that will update stock levels and the Nominal Ledger stock valuation, you should ensure the Cred. Row (Credited Row) field in each row is filled in. The Cred. Row field should contain the (row number - 1) of the corresponding row in the Invoice that is being credited. For example, this field should contain "0" when referring to row 1 in the Invoice being credited, while it should contain "1" when referring to row 2 in the Invoice being credited, and so on.
- If you create a Credit Note from an Invoice using the 'Credit Note' function on the Create menu, the Cred. Row field in each row in the Credit Note will be filled in automatically.
- If you create a Credit Note by duplicating an Invoice and changing the Payment Term, the Cred. Row field in each row in the Credit Note will remain empty. However, you can enter a row number yourself if you want to connect a row in the Credit Note to the corresponding row in the Invoice, and you must do so in every row if the Credit Note will update stock. Again, enter "0" to refer to row 1 in the Invoice being credited, enter "1" to refer to row 2 in the Invoice being credited, and so on.
- A Credit Note will update stock (i.e. it will update stock levels and the Nominal Ledger stock valuation) if the Update Stock box on the 'Del. Terms' card is ticked. This box will be ticked by default if you are using the Credit Invoices Update Stock option in the Optional Features setting in the System module, and you can also tick it yourself in an individual Credit Note.
- By connecting a row in a Credit Note to a row in the Invoice being credited, the Cred. Row field ensures the Item can be brought back into stock in a way that obeys the Original Cost on Returned Goods and options in the Cost Accounting setting in the Stock module. Without the Cred. Row field, it would not be possible to ascertain the original cost or position.
- The Cred. Row field will also ensure that you cannot enter a Quantity or Sum in a row in a Credit Note that is greater than those figures in the corresponding row in the Invoice being credited. If you try to save a Credit Note in which the Quantity or Sum in a row is too high, the message "Too high quantity" or "Too high Amount" (as appropriate) will appear. The "Too high quantity" message will also appear when the Cred. Row field is empty (i.e. when the Credit Note will update stock and when you have not connected a row to a row in the Invoice being credited).
- If a Credit Note will update stock but is not crediting a particular Invoice (i.e. you have not specified an Invoice to be credited in the "Credit of Invoice" row), then you can leave the Cred. Row field empty. The Items will be brought into stock as new items in the FIFO/LIFO Queue, and the cost will be the Cost Price from each Item record.
- If a Credit Note will not update stock but the Cred. Row field in a row contains a value, the check that the Sum in that row is not greater than the Sum in the corresponding row in the Invoice being credited will still be carried out. However, the Quantity will not be checked.
- Please refer here for more details about Credit Notes.
- If you create a Credit Note from an Invoice using the 'Credit Note' function on the Create menu, the Cred. Row field in each row in the Credit Note will be filled in automatically.
- Environ. Tax
- Please refer to the description of the Environment Tax setting here for a full description of this field.
Flip G
- Customs No., Country of Origin
- In some countries such as Argentina, Mexico and Russia, it is a legal requirement that the Customs Number and Country of Origin are attached to the sales document when an imported Item is sold.
- If you sell an Item that is Serial Numbered (at the Unit or Batch level), the Customs Number and Country of Origin will be brought in from flip F of the Goods Receipt row that brought the Item into stock.
- If you sell an Item that is not Serial Numbered, it will not be possible to bring this information in automatically but you will be able to enter it yourself. Use 'Paste Special' to choose the Country of Origin.
- If you need this information printed on Invoices, add the "Customs Declaration Number" and "Country of Origin" fields to the Form Template design. In the case of a Serial Numbered Item, you can also have the Customs Declaration Date printed, taken from flip F of the Goods Receipt row that brought the Item into stock. This will be printed by the "Customs Declaration Date" field.
- If you sell an Item that is Serial Numbered (at the Unit or Batch level), the Customs Number and Country of Origin will be brought in from flip F of the Goods Receipt row that brought the Item into stock.
---
The Invoice register in Standard ERP:
- Introduction
- Entering an Invoice, including:
- Header
- 'Terms' card
- 'Items' card Part 1 (Flips A and B)
- 'Items' card Part 2 (Flips C-G)
- 'Items' Part 3 card (Footer)
- 'Currency' card
- 'Del. Terms' card
- 'Identifiers' card
- 'Price List' card
- 'Inv. Address' card
- 'Del. Address' card
- Header
- Entering an Invoice - Examples
- Controlling Prices in Invoices
- Inspecting Invoices, Marking as OK and Posting to the Nominal Ledger
- Nominal Ledger Transactions from Invoices
- Error Messages
- Printing Invoices
- Accruals in the Sales Ledger
- Cash Notes in the Sales Ledger
- Credit Notes
- Operations menu
- Create menu
- Row menu
- Home page for Sales Ledger manual
- Home page for Standard ERP manual
Entering an Invoice - Items Card Part 3 (Footer)
This page describes the fields in the Footer of the 'Items' card of the Invoice record. Please click the following links for descriptions of the other cards:- Header
- 'Terms' card
- 'Items' card Part 1 (Flips A and B)
- 'Items' card Part 2 (Flips C-G)
- 'Items' card Part 3 (Footer)
- 'Currency' card
- 'Del. Terms' card
- 'Identifiers' card
- 'Price List' card
- 'Inv. Address' card
- 'Del. Address' card
Footer

- Currency
- Paste Special
Currency register, System module
- Default taken from Contact record for the Customer (Sales Currency) or Default Base Currency
- The Currency of the Invoice: the exchange rate is shown on the 'Currency' card where you can change it for an individual Invoice if necessary. Leave the field blank to use your home Currency (unless you have set a Default Base Currency, in which case this will be offered as a default and should be treated as your home Currency).
- If the Contact record for the Customer has a Sales Currency specified on the 'Pricing' card, you can only use that Currency. Otherwise, you can use any Currency.
- If you change the Currency after adding Items to the Invoice, the prices of those Items will be converted automatically and immediately using the appropriate Exchange Rate for the date of the Invoice, providing you are using the Update Prices on records with Currency when changing Dates option in the Item Settings setting in the Sales Ledger. This option will also cause prices to be updated if the Exchange Rate changes when you change the Invoice Date. Prices will not be updated if you change the Exchange Rate itself. At any time, you can use the 'Update Currency Price List Items' function on the Operations menu to recalculate all prices in the Invoice.
- The Currency of the Invoice: the exchange rate is shown on the 'Currency' card where you can change it for an individual Invoice if necessary. Leave the field blank to use your home Currency (unless you have set a Default Base Currency, in which case this will be offered as a default and should be treated as your home Currency).
- GP %
- The overall gross profit for the Invoice, shown as a percentage.
- In multi-user systems, you can prevent certain users from viewing the GP % in Quotations, Orders and Invoices using Access Groups, by denying them access to the 'View Item's Cost Price' Action. In an Invoice, this will hide the Cost field, the Total GP field immediately below, the Cost Price, Cost B2, GP and FIFO fields on flip C of the matrix and the Row FIFO field on flip D.
- In multi-user systems, you can prevent certain users from viewing the GP % in Quotations, Orders and Invoices using Access Groups, by denying them access to the 'View Item's Cost Price' Action. In an Invoice, this will hide the Cost field, the Total GP field immediately below, the Cost Price, Cost B2, GP and FIFO fields on flip C of the matrix and the Row FIFO field on flip D.
- Total GP
- The total gross profit of the Items on the Invoice: this does not include any profit in the Freight value, as set in the Freight or Freight/Weight Calculation settings.
- Tax2
- This field is used in Argentina.
- If the Invoice has a Region on its 'Inv. Address' card, and the Region is one where a Regional Perception Tax is charged on at least one of the Items on the Invoice, the amount of that tax will be shown in this field, in the Currency of the Invoice. That amount will be recalculated as you add Items to the Invoice.
- When you mark the Invoice as OK and save it, the Tax2 will be credited to the Account specified in the appropriate Regional Perception Tax record. If you have specified a Min. (minimum Regional Perception Tax amount), and the Tax2 in an Invoice is less than this minimum amount, this field will be blank. This field will also be blank if the Customer is one whose No Region Perceptions box has been ticked ('Terms' card).
- If the Invoice has a Region on its 'Inv. Address' card, and the Region is one where a Regional Perception Tax is charged on at least one of the Items on the Invoice, the amount of that tax will be shown in this field, in the Currency of the Invoice. That amount will be recalculated as you add Items to the Invoice.
- Ext. Tax
- When you define VAT Code records using the setting in the Nominal Ledger, you can use the fields on flip B to specify that an additional tax, such as an environmental tax, is to be levied. This additional tax is usually termed "Extra Tax".
- If the VAT Code in any of the rows of the Invoice is one that you have configured to include Extra Tax, the amount of that tax will be shown in this field, in the Currency of the Invoice. That amount will be recalculated as you add Items to the Invoice.
- When you mark the Invoice as OK and save it, this Extra Tax will be credited to the Tax Account specified for the appropriate VAT Code. The debit posting will depend on whether you are using the Total not including Ext. Tax option on the 'VAT / Tax' card of the Account Usage S/L setting. If you are not using this option, the Extra Tax will be included in the TOTAL of the Invoice and will therefore be included in the debit posting to the Debtor Account. If you are using this option, the Extra Tax will not be included in the TOTAL, and it will be debited to the Tax on Sales Account, also as specified on the 'VAT / Tax' card of the Account Usage S/L setting. You will therefore need to use this option if the Extra Tax is one that will not be paid by Customers.
- If you have specified a Tax Min. (minimum Extra Tax amount) for a VAT Code, and the Extra Tax in an Invoice is less than this minimum amount, this field will be blank. This field will also be blank if the Customer is one whose No Extra Tax box has been checked ('Terms' card).
- Please refer to the description of flip B of the VAT Codes setting for more details about how the Extra Tax figure is calculated together with examples.
- If the VAT Code in any of the rows of the Invoice is one that you have configured to include Extra Tax, the amount of that tax will be shown in this field, in the Currency of the Invoice. That amount will be recalculated as you add Items to the Invoice.
- VAT, Tax
- The VAT total for the Invoice (or tax total if you are using the Use Tax Templates for Tax Calculation option in the Transaction Settings setting in Nominal Ledger).
- This figure will be rounded up or down according to the Default for Calculated Values rounding rules set in the Round Off setting in the System module.
- In the Nominal Ledger Transaction resulting from an Invoice, any amounts lost or gained in this rounding process will be posted to the Round Off Loss or Round Off Gain Accounts specified in the Account Usage S/L setting, as appropriate.
- This figure will be rounded up or down according to the Default for Calculated Values rounding rules set in the Round Off setting in the System module.
- Base
- The Base is the Invoice total including VAT in your home Currency (or in Base Currency 1 as defined in the Base Currency setting in the System Module). The field will not be used if the Currency of the Invoice is blank.
- Subtotal
- The total value of the Invoice rows (i.e. the total of the values in the Sum field).
- This figure will include VAT (and TAX) if the Price List specified is one that is Inclusive of VAT or if you have specified on the 'VAT / Tax' card of the Account Usage S/L setting that Base Prices include VAT (or VAT and TAX).
- The Subtotal will be rounded up or down according to the Default for Calculated Values rounding rules in the Round Off setting in the System module.
- This figure will include VAT (and TAX) if the Price List specified is one that is Inclusive of VAT or if you have specified on the 'VAT / Tax' card of the Account Usage S/L setting that Base Prices include VAT (or VAT and TAX).
- TOTAL
- The total for the Invoice, including VAT.
- This figure will be rounded up or down according to the Total rounding rules set for the Currency/Payment Term combination in the Currency Round Off setting in the System module. If that setting does not contain an entry for that combination, the Total rounding rules in the Round Off setting also in the System module will be applied. In the Nominal Ledger Transaction resulting from an Invoice, any amounts lost or gained in this rounding process are posted to the Round Off Loss or Round Off Gain Accounts specified in the Account Usage S/L setting, as appropriate.
- If you are using the Disallow Negative Totals on Sales option in the Account Usage S/L setting, you will not be able to mark an Invoice as OK and save it if the TOTAL is negative.
- This figure will be rounded up or down according to the Total rounding rules set for the Currency/Payment Term combination in the Currency Round Off setting in the System module. If that setting does not contain an entry for that combination, the Total rounding rules in the Round Off setting also in the System module will be applied. In the Nominal Ledger Transaction resulting from an Invoice, any amounts lost or gained in this rounding process are posted to the Round Off Loss or Round Off Gain Accounts specified in the Account Usage S/L setting, as appropriate.
---
The Invoice register in Standard ERP:
- Introduction
- Entering an Invoice, including:
- Header
- 'Terms' card
- 'Items' card Part 1 (Flips A and B)
- 'Items' card Part 2 (Flips C-G)
- 'Items' card Part 3 (Footer)
- 'Currency' card
- 'Del. Terms' card
- 'Identifiers' card
- 'Price List' card
- 'Inv. Address' card
- 'Del. Address' card
- Header
- Entering an Invoice - Examples
- Controlling Prices in Invoices
- Inspecting Invoices, Marking as OK and Posting to the Nominal Ledger
- Nominal Ledger Transactions from Invoices
- Error Messages
- Printing Invoices
- Accruals in the Sales Ledger
- Cash Notes in the Sales Ledger
- Credit Notes
- Operations menu
- Create menu
- Row menu
- Home page for Sales Ledger manual
- Home page for Standard ERP manual
Valuuta kaart

- Valuuta
- Ctrl-Enter
Valuutade register, Üldine moodul
- Sisestub vaikimisi Kliendilt või Vaikimisi baasvaluuta
- Arve Valuuta (seda näed ka Arve jaluses) esitatakse koos vahetuskursiga, mida saad vajadusel üksiku Arve jaoks muuta. Jälgi, et õige Valuuta oleks valitud enne, kui Arvele Artikleid sisestad, et hinnad õigest konverteeritaks. Kui selle unustad, saad tagantjärele hindade korrigeerimiseks kasutada Operatsioonide menüü funktsiooni Arvuta hinnakirja artiklid ümber (enne funktsiooni käivitamist salvesta Arve). Kui soovid teha Arve kohalikus Valuutas, jäta see väli tühjaks (juhul kui Sa ei ole määranud Vaikimisi baasvaluutat, mida muidu pakutaks vaikimisi ja käsitletaks kohaliku Valuutana).
- Arve Valuuta (seda näed ka Arve jaluses) esitatakse koos vahetuskursiga, mida saad vajadusel üksiku Arve jaoks muuta. Jälgi, et õige Valuuta oleks valitud enne, kui Arvele Artikleid sisestad, et hinnad õigest konverteeritaks. Kui selle unustad, saad tagantjärele hindade korrigeerimiseks kasutada Operatsioonide menüü funktsiooni Arvuta hinnakirja artiklid ümber (enne funktsiooni käivitamist salvesta Arve). Kui soovid teha Arve kohalikus Valuutas, jäta see väli tühjaks (juhul kui Sa ei ole määranud Vaikimisi baasvaluutat, mida muidu pakutaks vaikimisi ja käsitletaks kohaliku Valuutana).
- Kurss
- Sisestub vaikimisi
Baasvaluuta kursside seadistus ja/või Valuutakursside register, Üldine moodul
- Siia sisestuvad valitud Valuuta hetkekursid. Jälgi, et need oleksid õiged, enne kui Arvele Artikleid sisestad, et hinnad õigesti ümber arvutataks.
- Kui valuutaarved koostatakse Tellimustest, võetakse valuutakursid Tellimuselt, kui seadistuses Lausendamine M/R pole märgitud valikuid Muuda arve koostamisel baasvaluutakurssi ja Muuda arve koostamisel valuutakurssi. Vastasel juhul kasutatakse hetkel kehtivaid Baasvaluuta- ja Valuutakurssi, kuigi Artiklite hindasid Valuutas ei muudeta. Nõnda esitatakse Kliendile arve küll kokkulepitud summale, kuid Arve väärtus kohalikus Valuutas (ning Finantsmoodulis) erineb Tellimuse väärtusest. Kui tahad uuendada Arve hindasid vastavalt uuele Baasvaluuta- ja Valuutakursile (ning säilitada algne väärtus Finantsmoodulis kohalikus Valuutas), salvesta Arve ja seejärel anna Operatsioonide menüüst käsklus Arvuta hinnakirja artiklid ümber.
- Valuuta konverteerimisel rakendatakse ühte kahest alljärgnevast meetodist. Topeltvaluutade süsteem võib sobida firmadele, millel on kontorid kahes erinevas riigis, mis peavad esitama aruandlust mõlema riigi valuutas; firmadele, mis tegutsevad riikides, kus lisaks rahvuslikule valuutale on üldkäibes ka teine valuuta (tavaliselt USA dollar või Euro); ning firmadele, mis kuuludes eurotsooni on säilitanud võrdluseks vana kohaliku valuuta. Teine meetod on Lihtne konverteerimine välisvaluutast kohalikku valuutasse, mida kasutatakse enamuse valuutatehingute puhul kogu maailmas.
- Valuutakursid (Topeltvaluutade süsteem)
- Näiteks on Arvel määratud Valuutaks Euro. Baasvaluuta 1 on kohalik valuuta (GBR) ja Baasvaluuta 2 on Euro. Kui kasutatakse Topeltvaluutade süsteemi, näed siin vasakpoolsetele Baasvaluuta 1 ja Baasvaluuta 2 väljadele sisestatud kahe Baasvaluuta vahelist kurssi (võetakse viimati sisestatud kaardilt Baasvaluuta kursside seadistusest). Alltoodud näites vastab 1 Eurole 0,63 GBR.
- Pane tähele, et Euroopa Rahaliidu (ERL) eeskirjad sätestavad, et kursid peavad olema alati väljendatud ühe Euro suhtena kohalikku või välisvaluutasse.
- Pane tähele, et Euroopa Rahaliidu (ERL) eeskirjad sätestavad, et kursid peavad olema alati väljendatud ühe Euro suhtena kohalikku või välisvaluutasse.
- Valuutakursid (Lihtsa konverteerimise süsteem)
- Lihtsa konverteerimise puhul kasutatakse ainult Kursi välja ja parempoolset Baasvaluuta 1 välja näitamaks välis- ja kohaliku valuuta vahelist kurssi. Alltoodud näites on kohalik valuuta USD ja välisvaluuta JPY. 1 USD-le vastab 122,15 JPY.
- Kui valuutaarved koostatakse Tellimustest, võetakse valuutakursid Tellimuselt, kui seadistuses Lausendamine M/R pole märgitud valikuid Muuda arve koostamisel baasvaluutakurssi ja Muuda arve koostamisel valuutakurssi. Vastasel juhul kasutatakse hetkel kehtivaid Baasvaluuta- ja Valuutakurssi, kuigi Artiklite hindasid Valuutas ei muudeta. Nõnda esitatakse Kliendile arve küll kokkulepitud summale, kuid Arve väärtus kohalikus Valuutas (ning Finantsmoodulis) erineb Tellimuse väärtusest. Kui tahad uuendada Arve hindasid vastavalt uuele Baasvaluuta- ja Valuutakursile (ning säilitada algne väärtus Finantsmoodulis kohalikus Valuutas), salvesta Arve ja seejärel anna Operatsioonide menüüst käsklus Arvuta hinnakirja artiklid ümber.

- Veel näiteid leiad siit.
Lähetuse kaart
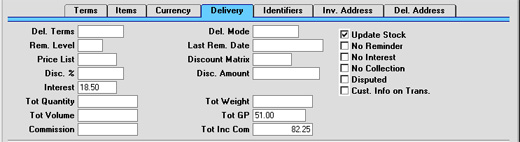
- Lähetustingimus
- Ctrl-Enter
Lähetustingimuste seadistus, Müügitellimuste moodul
- Sisestub vaikimisi Kliendilt
- Sisesta siia Arve Lähetustingimus. Seda välja kasutatakse rahvusvaheliste Klientide puhul: võimalikud näited oleksid CIF või FOB.
- Igale Lähetustingimusele saad anda kirjeldused erinevates Keeltes: Arvel kasutatav Keel määrab, milline tõlge Arve dokumendile trükitakse.
- Sisesta siia Arve Lähetustingimus. Seda välja kasutatakse rahvusvaheliste Klientide puhul: võimalikud näited oleksid CIF või FOB.
- Lähetusviis
- Ctrl-Enter
Lähetusviiside seadistus, Müügitellimuste moodul
- Sisestub vaikimisi Kliendilt
- Sisesta Arvele Lähetusviis. Võimalikud näited oleksid Post või Kuller, või kullerteenuse osutaja nimi, kes Arvel olevad kaubad kohale toimetab.
- Igale Lähetusviisile saad anda kirjeldused erinevates Keeltes: Arvel kasutatav Keel määrab, milline tõlge Arve dokumendile trükitakse.
- Samuti saad iga Lähetusviisiga siduda erinevad Arve dokumendid, millel tood ära näiteks vastavad maksmisjuhised. Selleks sisesta dokumendi kirjeldusaknas Lähetusviis Keele väljale. Dokumentide kirjeldamisest on lähemalt juttu siin.
- Sisesta Arvele Lähetusviis. Võimalikud näited oleksid Post või Kuller, või kullerteenuse osutaja nimi, kes Arvel olevad kaubad kohale toimetab.
- Märgukirjatase
- Märgukirjatase näitab, mitu Märgukirja on Arve kohta trükitud. Seda välja saad muuta käsitsi või tehakse seda automaatselt iga kord kui prinditakse Märgukiri või Kliendi väljavõte.
- Märgukirjad trükitakse, kasutades Dokumentide funktsiooni. Iga üle aja läinud Arve kohta trükitakse eraldi Märgukiri, millel toodud teade võib olla erineva rangusastmega vastavalt juba väljastatud Märgukirjade hulgale. Need teated sisestatakse Märgukirjatekstide seadistuses. Järjekordse Märgukirja trükkimisel sõltub selle tekst Arve Märgukirjatasemest. Näiteks kui Arve Märgukirjatase on 2, võetakse teade Märgukirjatekstide seadistuse väljalt Märgukiri 2 jne. Kolmest suurema Märgukirjataseme puhul prinditakse küll Märgukiri, kuid see ei sisalda mingit teadet.
- Arvele Märgukirjade trükkimiseks ei tohi olla märgitud valik Ära koosta märgukirju.
- Seda välja saad peale Arve kinnitamist muuta.
- Märgukirjad trükitakse, kasutades Dokumentide funktsiooni. Iga üle aja läinud Arve kohta trükitakse eraldi Märgukiri, millel toodud teade võib olla erineva rangusastmega vastavalt juba väljastatud Märgukirjade hulgale. Need teated sisestatakse Märgukirjatekstide seadistuses. Järjekordse Märgukirja trükkimisel sõltub selle tekst Arve Märgukirjatasemest. Näiteks kui Arve Märgukirjatase on 2, võetakse teade Märgukirjatekstide seadistuse väljalt Märgukiri 2 jne. Kolmest suurema Märgukirjataseme puhul prinditakse küll Märgukiri, kuid see ei sisalda mingit teadet.
- Viimane märgukirja kp
- Siin näed kuupäeva, mil trükiti viimane märgukiri või antud Arvet hõlmav kliendi väljavõte. Seda välja saad peale Arve kinnitamist muuta.
- Hinnakiri
- Ctrl-Enter
Hinnakirjade register, Hindade moodul
- Sisestub vaikimisi Kliendilt, Kliendiklassilt või Tasumistingimuselt.
- Sisesta Hinnakiri, mis määrab ära Arvel kasutatavad hinnad. Veendu, et oled valinud õige Hinnakirja enne Arvele ridade sisestamist: kui unustad, saad kasutada Operatsioonide menu käsklust Arvuta hinnakirja artiklid ümber. millega muudad enne Hinnakirja määramist sisestatud Artiklite hindasid. Enne funktsiooni käivitamist salvesta Arve.
- Arvele rea lisamisel ning Artikli sisestamisel otsib HansaWorld kas Hindade või Koguseale hindade registrist kaarti, mis vastab määratud Artikli ja Hinnakirja kombinatsioonile ja võtab sellelt Ühikuhinna. Kui sellist kaarti ei ole, kasutatakse Artikli Baashinda. Kui on määratud Hinnaalanduse tüüpi Hinnakiri, kasutatakse Hindade registrit. Muudel juhtudel kasutatakse Koguseale hindade registrit.
- Artikliridade Ühikuhinnad ja Summad on koos käibemaksuga, kui määratud Hinnakiri sisaldab käibemaksu.
- Uue Arve koostamisel otsib HansaWorld sobivat Hinnakirja kõigepealt Kliendikaardilt. Kui Kliendile pole Hinnakirja määratud, võetakse Hinnakiri Kliendiklassilt, millesse Klient kuulub. Kui ka Kliendiklassile pole Hinnakirja määratud või Klient ei kuulu Klassi, kasutatakse Kliendile määratud Tasumistingimuse kaarti. Kui antud Arvel hiljem Tasumistingimust muudetakse, muudetakse Hinnakirja vaid juhul, kui Hinnakirja väli oli siiani tühi.
- Sisesta Hinnakiri, mis määrab ära Arvel kasutatavad hinnad. Veendu, et oled valinud õige Hinnakirja enne Arvele ridade sisestamist: kui unustad, saad kasutada Operatsioonide menu käsklust Arvuta hinnakirja artiklid ümber. millega muudad enne Hinnakirja määramist sisestatud Artiklite hindasid. Enne funktsiooni käivitamist salvesta Arve.
- Hinnaalandusmaatriks
- Sisestub vaikimisi
Kliendilt või Kliendiklassilt
- Kui Arvele kehtib Hinnaalandusmaatriks, näeb seda siin. Seda välja muuta ei saa. Hinnaalandusmaatrikseid kasutatakse kogusest sõltuvate allahindluste määramiseks.
- Viivis
- Sisestub vaikimisi
Kliendilt või Viivise seadistusest, Müügireskontro
- Kui Arve tasumisega on üle aja viivitatud, võib viivise nõudmiseks kasutada hooldusfunktsiooni Koosta viivisarved. Viivise arvutamiseks kasutatakse aasta viivise protsenti, kui viivist arvutatakse, kasutades Arve kuupäeval kehtivat viivisemäära. See number võetakse kas Kliendikaardilt või Viivise seadistusest, kuid seda saad vajadusel konkreetsel Arvel muuta. Viivisarveid ei koostata, kui Viivise võimalus Kliendikaardi Tingimuste kaardil on märkimata või kui Arvel on märgitud valik Ära arvesta viivist. Viivise määrasid ja arvutamist kirjeldatakse Viivise seadistust käsitlevas osas eespool.
- Kogus kokku
- Siin näed Arvel olevate Artiklite kogust kokku. Kui see number on mingil põhjusel vale, kasuta selle ümberarvutamiseks Operatsioonide menüü käsklust Arvuta kaal ja maht ümber.
- Kaal kokku
- Sisestub vaikimisi
Artiklitelt
- Sellel väljal on arvutatud summa, mis põhineb Arve Kogusel ja Artiklite Kaalul. Kui ühe Artikli Kaalu muudetakse või on see number mingil muul põhjusel vale, kasuta selle ümberarvutamiseks Operatsioonide menüü käsklust Arvuta kaal ja maht ümber.
- Maht kokku
- Sisestub vaikimisi
Artiklitelt
- Sellel väljal on arvutatud summa, mis põhineb Arve Kogusel ja Artiklite mahul. Kui ühe Artikli mahtu muudetakse või on see number mingil muul põhjusel vale, kasuta selle ümberarvutamiseks Operatsioonide menüü käsklust Arvuta kaal ja maht ümber.
- MK kokku
- Arve Artiklite müügikate kokku: ei sisalda Transpordikulu kasumit, vastavalt seadistuses Transpordikulud või Transpordikulude/kaalu arvutus määratule.
- Teenustasu, Kokku teen.-ga
- Neid välju kasutatakse Venemaal. Lähemalt küsi palun kohalikult HansaWorldi esindajalt.
- Muuda ladu
- Sisestub vaikimisi
seadistusest Lausendamine M/R, Müügireskontro
- Kasuta seda valikut, kui soovid, et Arve kinnitamisel vähendataks Artiklite laoseise vastavalt. See puudutab ainult Laoartikleid. Laoseisu kontrollitakse vaid siis, kui Laoseadistustes on märgitud valik Luba lähetada rohkem, kui oli tellitud. Seda funktsiooni kasutatakse ainult juhul kui kasutad ka Lao moodulit.
- Kui see valik on märgitud, tehakse Arve kinnitamisel koostatavatele Finantskannetele ka kulukonteeringud (kui pead laoarvestust Finantsmoodulis).
- Antud valiku mõlemad võimalused toimivad ainult juhul, kui kaup lähetatakse Arvega ilma vastavate Müügitellimusteta.
- Kui Arved koostatakse Tellimustest, ja soovid teha Arvet suuremale Kogusele kui lähetati, pead Arvele lisama uue rea. Jälgi, et Arvel oleks märgitud valik Muuda ladu, et laoseisud muudetaks vastavalt ning et vajadusel koostataks lisatud koguste kohta ka kulukanded Finantsmoodulisse. Sellisel juhul kehtib see valik ainult nende arveridade kohta, mis ei ole Tellimusega seotud.
- Kui Arved koostatakse Projektidest, seda valikut kasutada ei saa. Seepärast ära lisa sellistele Arvetele uusi ridasid.
- Pane tähele, et Kreeditarve koostamisel lülitatakse see valik automaatselt välja, olenemata sellest, mis on märgitud seadistuses Lausendamine M/R. Kui kasutad kuluarvestust (pead laoarvestust Finantsmoodulis), peabki see valik jääma välja lülitatuks, kuna muidu muudetakse laoväärtust vale FIFO hinnaga. Sellest, kuidas Kreeditarved Ladu muudavad, loe palun lähemalt lõigust Kreeditarved ja ladu.
- Kui see valik on märgitud, tehakse Arve kinnitamisel koostatavatele Finantskannetele ka kulukonteeringud (kui pead laoarvestust Finantsmoodulis).
- Ära koosta märgukirju
- Kui Kliendikaardi Tingimuste kaardil on märgitud valik Märgukirjad, on sellele Kliendile võimalik saata Märgukirju kõigi tasumata Arvete kohta. Kui soovid, et mingi Arve kohta Märgukirju ei koostataks, märgi see valik. Märgukirju trükitakse, kasutades Märgukirja dokumenti.
- Arved, millel on Märgukirjade võimalus märkimata, võivad jääda välja teatud aruannetest ja dokumentidest, nagu näiteks aruanded Kliendi väljavõte tasumata arved ja Müügireskontro.
- Arved, millel on Märgukirjade võimalus märkimata, võivad jääda välja teatud aruannetest ja dokumentidest, nagu näiteks aruanded Kliendi väljavõte tasumata arved ja Müügireskontro.
- Ära arvesta viivist
- Kui Kliendikaardi Tingimuste kaardil on märgitud valik Viivis, on sellele Kliendile võimalik koostada Viivisarveid kõigi tasumata Arvete kohta. Kui soovid, et mingi Arve kohta Viivisarveid ei koostataks, märgi antud valik. Viivisarveid koostatakse, kasutades hooldusfunktsiooni Koosta viivisarved.
- Kogumiseta
- Seda valikut kasutatakse Soomes. Lähemalt küsi palun oma kohalikult HansaWorldi esindajalt. Arved, millel on see valik märgitud, võivad jääda välja teatud aruannetest ja dokumentidest, nagu näiteks aruanded Kliendi väljavõte tasumata arved and the Müügireskontro.
- Vaidlustatud
- Märgi antud valik, kui Arve on vaidlustatud.
- Vaidlustatud Arved võivad jääda välja teatud aruannetest ja dokumentidest, nagu näiteks aruanded Kliendi väljavõte tasumata arved ja Müügireskontro. Siiski saab sellisele Arvele koostada Viivisarveid ja Märgukirju, juhul kui pole märgitud valikuid Ära arvesta viivist ja Ära koosta märgukirju. Valikuid Vaidlustatud, Ära arvesta viivist ja Ära koosta märgukirju saab märkida ka peale Arve kinnitamist.
- Kui Arve tasumisega on juba kaua hilinetud, saab võla kanda Müügivõlgade kontolt Vähetõenäoliselt laekuvate võlgade kontole, kasutades hooldusfunktsiooni Vähetõenäoliselt laekuvad võlad. See funktsioon märgib Arve Vaidlustatuks ja nii ei kanta võlasummat sellele kontole uuesti järgmine kord hooldusfunktsiooni Vähetõenäoliselt laekuvad võlad kasutamisel. Samuti ei kanta võlasummat juhul, kui märgid Arvel ise valiku Vaidlustatud.
- Kui töötad mitmekasutaja süsteemiga, saad Kasutajagruppe kasutades teatud kasutajatelt võtta võimaluse märkida Arveid Vaidlustatuks.
- Vaidlustatud Arved võivad jääda välja teatud aruannetest ja dokumentidest, nagu näiteks aruanded Kliendi väljavõte tasumata arved ja Müügireskontro. Siiski saab sellisele Arvele koostada Viivisarveid ja Märgukirju, juhul kui pole märgitud valikuid Ära arvesta viivist ja Ära koosta märgukirju. Valikuid Vaidlustatud, Ära arvesta viivist ja Ära koosta märgukirju saab märkida ka peale Arve kinnitamist.
- Info kande E-osale
- Kui Arvest koostatakse automaatselt Finantskanne, märgi antud valik, kui soovid, et Kande E osal näeks Arve numbrit, Laekumistähtaega ja Klienti. See kehtib vaid Müügivõlgade konto kannetele.
- Kui oled seadistuses Lausendamine M/R märkinud valiku Info kande E-osale, on antud valik vaikimisi märgitud.
Tellimuse kaart
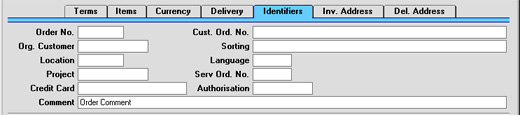
- Tellimus nr.
- Kui Arved koostatakse Tellimustest, kasutades automaatset Arvete koostamise funktsiooni, sisestub siia vastava Tellimuse number.
- Kliendi tellimuse nr
- Sisesta siia Kliendi Ostutellimuse number. Kui Arve koostatakse Tellimusest, sisestub selle number automaatselt.
- Originaalklient
- Kui Arve on koostatud Tellimusest ja Tellimuse esitanud Kliendi Arved tuleb saata kolmandale poolele, nagu näiteks liisingfirma, sisestatakse siia Tellimuse esitanud Kliendi kood.
- Sort. indeks
- Sisestub kas Arve aluseks olevale Tellimusele või Kliendile määratud Sorteerimisindeks. Sellel väljal on vaid informatiivne tähtsus.
- Ladu
- Ctrl-Enter
Ladude seadistus, Lao moodul
- Kui soovid, et Arvel olevad Artiklid lähetataks teatud kindlast Laost, määra see Ladu siin. Muidu võidaks kaupa võtta ükskõik millisest Laost.
- Kui Laoseadistustes on määratud Põhiladu, võetakse kaup sealt, kui Arvel ei ole määratud muud Ladu. Kui aga samas seadistuses on märgitud valik Nõua ladu, peab Arvel Ladu olema määratud.
- Vaikimisi sisestub Ladu hetkekasutaja Isikukaardi Preemia kaardilt.
- Kui Artikli hetkeseisu aken on ekraanil avatud, näidatakse selles Artiklite koguseid siin määratud Laos.
- Kui Laoseadistustes on määratud Põhiladu, võetakse kaup sealt, kui Arvel ei ole määratud muud Ladu. Kui aga samas seadistuses on märgitud valik Nõua ladu, peab Arvel Ladu olema määratud.
- Keel
- Ctrl-Enter
Keelte seadistus, Üldine moodul
- Sisestub vaikimisi Kliendilt
- Keele kood määrab, milliseid tekste erinevatest registritest ja seadistustest kasutatakse: näiteks Artikli nimetus, Tasumistingimuste ja Tasumisviiside kirjeldused, dokumendimalli valik jne. Jäta see väli tühjaks, kui soovid kasutada baaskeelt.
- Keele kood määrab, milliseid tekste erinevatest registritest ja seadistustest kasutatakse: näiteks Artikli nimetus, Tasumistingimuste ja Tasumisviiside kirjeldused, dokumendimalli valik jne. Jäta see väli tühjaks, kui soovid kasutada baaskeelt.
- Projekt
- Kui Arved on koostatud Projektidest, kasutades Projektiarvestuse mooduli hooldusfunktsiooni Koosta projektiarved, sisestub siia vastava Projekti kood. Seda välja muuta ei saa.
- Kui Arve on seotud Projektiga, trükitakse see tavalise Arve dokumendi asemel Projektiarve dokumendile. Lähemalt loe palun lõigust Arvete välja trükkimine.
- Projektidest koostatud Arvetel võetakse maha valik Muuda ladu.
- Kui Arve on seotud Projektiga, trükitakse see tavalise Arve dokumendi asemel Projektiarve dokumendile. Lähemalt loe palun lõigust Arvete välja trükkimine.
- Teenindustellimus
- Sellel väljal on number, kui Arve koostati Teenindustellimusest. Seda kasutatakse ainult juhul, kui kasutad Hooldusteeninduse moodulit. Seda välja käsitsi muuta ei saa.
- Pane tähele, et Teenindustellimustega seotud Arved tuleb koostada Hooldusteeninduse mooduli kaudu, kasutades Teenindustellimuse Operatsioonide menüü käsklust Koosta arve.
- Pane tähele, et Teenindustellimustega seotud Arved tuleb koostada Hooldusteeninduse mooduli kaudu, kasutades Teenindustellimuse Operatsioonide menüü käsklust Koosta arve.
- Krediitkaart
- Ctrl-Enter
Krediitkaartide register, Tshekkide moodul
- Kui Arve tasutakse krediitkaardiga, sisesta siia selle number. Klientide krediitkaartide numbrid saad salvestada Tshekkide mooduli Krediitkaartide registris.
- Autoriseerimine
- Kui Arve tasutakse krediitkaardiga, sisesta siia kinnituskood.
- Viide
- Sisestub vaikimisi
Kliendilt
- Sisesta siia kommentaar Arve kohta: selle võib Arve dokumendile printida. Vaikimisi sisestub siia Kliendikaardil määratud Tellimuse kommentaar. Seda välja saad peale Arve kinnitamist muuta.
Entering an Invoice - Price List Card
This page describes the fields on the 'Price List' card of the Invoice record. Please click the following links for descriptions of the other cards:- Header
- 'Terms' card
- 'Items' card Part 1 (Flips A and B)
- 'Items' card Part 2 (Flips C-G)
- 'Items' card Part 3 (Footer)
- 'Currency' card
- 'Del. Terms' card
- 'Identifiers' card
- 'Price List' card
- 'Inv. Address' card
- 'Del. Address' card
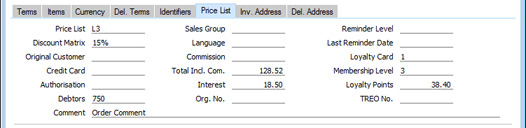
- Price List
- Paste Special
Price List register, Pricing module
- Specify here the Price List that will determine the prices used in the Invoice.
- If you change the Price List after adding Items to the Invoice, the prices of those Items will be updated automatically and immediately. At any time, you can also use the 'Update Currency Price List Items' function on the Operations menu to update all prices in the Invoice.
- When you create a new Invoice and specify a Customer, the Price List will be chosen as follows:
- If the Customer has a Loyalty Card, it will be brought in from the relevant row in the Loyalty Card Membership Level Structure setting in the Point of Sales module.
- It will be brought in from the 'Pricing' card of the Customer's Contact record.
- The Price List for the Customer Category to which the Customer belongs will be used.
- The Price List will be taken from the Sales Pay. Term record allocated to the Customer. If you change the Payment Term in an Invoice, the Price List in that Invoice will be changed if a Price List has been specified in the Payment Term.
- If the Price List specified is one that is Inclusive of VAT, the Unit Prices and Sums in each Invoice row will include VAT.
- When you add a row to the Invoice and specify an Item, the Unit Price will be chosen as follows, assuming the Type of the Price List is "Discount":
- The Unit Price will be taken from the Price record with the relevant Item/Price List/Customer combination.
- It will be taken from the Price record with the relevant Item/Price List combination where the Customer field is empty.
- The Base Price from the Item record will be used.
- The Unit Price will be taken from the Quantity Dependent Price record with the relevant Item/Price List combination.
- The Base Price from the Item record will be used.
- In multi-user systems, you can prevent certain users from changing the Price List in Quotations, Orders and Invoices using Access Groups, by denying them access to the 'Change Prices' Action).
- If you change the Price List after adding Items to the Invoice, the prices of those Items will be updated automatically and immediately. At any time, you can also use the 'Update Currency Price List Items' function on the Operations menu to update all prices in the Invoice.
- Discount Matrix
- Paste Special
Discount Matrix register, Pricing module
- If there is a Discount Matrix applying to an Invoice, it will be shown here. You can use Discount Matrices to administer quantity discounts: please refer to here for more details..
- When you create a new Invoice and specify a Customer, the Discount Matrix will be chosen as follows:
- If the Customer has a Loyalty Card, it will be brought in from the relevant row in the Loyalty Card Membership Level Structure setting in the Point of Sales module.
- It will be brought in from the 'Pricing' card of the Customer's Contact record.
- The Discount Matrix for the Customer Category to which the Customer belongs will be used.
- By default, you cannot change this field. If you wish to allow users to be able to change the Discount Matrix in Invoices, assign them an Access Group in which you have granted Full access to the 'Change Discount Matrix on Invoice' Action.
- If you change the Discount Matrix after adding Items to the Invoice, the discounts and sums for those Items will be updated automatically and immediately.
- If the Discount Matrix is one that calculates quantity discounts based on Item Group quantities rather than Item quantities, the calculated discount for an Item may become incorrect if you specify another Item belonging to the same Item Group in a later row in the Invoice. To cater for this, be sure to select 'Recalculate Discount' from the Operations menu when the Invoice is complete. This will recalculate the discount percentage for each Item in the Invoice.
- When you create a new Invoice and specify a Customer, the Discount Matrix will be chosen as follows:
- Original Customer
- This field will be used in the situation where you have created an Invoice from an Order, Delivery or Quotation and the ordering Customer is one for whom Invoices are to be sent to a third party such as a leasing company. In this situation, the Customer in the Invoice will be the third party, and the Customer Number of the ordering Customer will be placed here. This field cannot be changed.
- Credit Card
- Paste Special
Credit Card register, Cheques module (if installed)
- If the Invoice is being paid using a credit card, enter its number here. Known credit card numbers for each Customer can be stored in the Credit Card register in the Cheques module.
- If you have entered a Payment Mode with the same Code as the Payment Term used in the Invoice, and the Type of that Payment Mode is "Credit Card", you will not be able to save the Invoice if this field is empty or if it contains a Credit Number that does not exist in the Credit Card register.
- If you have entered a Payment Mode with the same Code as the Payment Term used in the Invoice, and the Type of that Payment Mode is "Credit Card", you will not be able to save the Invoice if this field is empty or if it contains a Credit Number that does not exist in the Credit Card register.
- Authorisation
- If the Invoice is being paid using a credit card, record the authorisation code here once it has been obtained.
- Debtors Account
- Paste Special
Account register, Nominal Ledger/System module
- The Debtor Account specified here will be debited when you mark the Invoice as OK and save and it is then posted to the Nominal Ledger. The default will be chosen as follows:
- The Debtors Account specified in the Customer Category to which the Customer belongs will be used.
- The Debtors Account entered in the Account Usage S/L setting will be used.
- The Cash Account will be taken from the Payment Term specified in the Invoice:
- The Cash Account entered in the Account Usage S/L setting will be used.
- The Bad Debtors Account specified in the Customer Category to which the Customer belongs will be used.
- The Bad Debtors Account entered in the Account Usage S/L setting will be used.
- The Debtors Account specified in the Customer Category to which the Customer belongs will be used.
- Comment
- Default taken from
Contact record for the Customer (Order Comment)
- Record here any comment about this Invoice: it will be printed on the Invoice document if you have included the "Invoice Comment" field in your Form Template design. You can change this field after you have marked the Invoice as OK and saved.
- Sales Group
- Paste Special
Sales Groups setting, System module
- Default taken from Salesman
- The Sales Group will be brought in from the Person record when you specify a Salesman (on the 'Terms' card). If you are using the Limited Access feature, you can use this field to prevent a user from seeing every Invoice in the 'Invoices: Browse' window by restricting their view to their own Invoices or to those of their Sales Group.
- Please click here for full details about the Limited Access feature.
- The Sales Group will be brought in from the Person record when you specify a Salesman (on the 'Terms' card). If you are using the Limited Access feature, you can use this field to prevent a user from seeing every Invoice in the 'Invoices: Browse' window by restricting their view to their own Invoices or to those of their Sales Group.
- Language
- Paste Special
Languages setting, System module
- Default taken from Contact record for the Customer
- The Language determines the Item Descriptions that will be shown on the 'Items' card, and the text for the Payment Term, Delivery Term and Delivery Mode that will be printed on forms. Leave the field blank to use your home Language.
- You can also use the Language to determine the Form Template that will be used when you print the Invoice, and the printer that will be used to print it. This can include sending the form to a fax machine, if your hardware can support this feature. Do this in the 'Form Definition' window for the Invoice form, as described here. You can change the Language before printing the Invoice even if it has been marked as OK, to ensure it is printed on the correct printer or fax machine.
- The Language determines the Item Descriptions that will be shown on the 'Items' card, and the text for the Payment Term, Delivery Term and Delivery Mode that will be printed on forms. Leave the field blank to use your home Language.
- Commission, Tot Inc Com
- These fields are used in Russia. Please refer to your local HansaWorld representatives for details.
- Interest
- Default taken from
Contact record for the Customer or Interest setting, Sales Ledger
- If payment for an Invoice is late, you can use the 'Create Interest Invoices' Maintenance function to charge interest. The figure in this field is the annual rate that this function will use to calculate the interest on the Invoice, if you have specified in the Interest setting that interest is to be calculated using the interest rate applicable at the Invoice Date. This figure will be brought in from the Customer or from the Interest setting but you can change it for an individual Invoice if necessary. Interest Invoices will not be created if the Interest check box on the 'Terms' card of the Contact record for the Customer is not ticked or if the No Interest check box in an Invoice (on the 'Identifiers' card) is ticked. Please refer to the description of the Interest setting for details about interest rates and calculation.
- Org. No.
- If an Invoice is a Credit Note, this field will display the Invoice Number of the Invoice being credited.
- This field is for information only. It also helps ensure features such as the ability to print Credit Notes operate correctly. You should not change this field. If you need to change the Invoice Number of the Invoice being credited, you should not do so here and instead should do so in the first row of the matrix on the 'Items' card.
- This field is for information only. It also helps ensure features such as the ability to print Credit Notes operate correctly. You should not change this field. If you need to change the Invoice Number of the Invoice being credited, you should not do so here and instead should do so in the first row of the matrix on the 'Items' card.
- Reminder Level
- This Reminder Level indicates how many Reminders have been printed for an Invoice and how many times it has been included in an Open Invoice Customer Statement.
- The Reminder Level in an Invoice will be updated automatically whenever you print a Reminder for the Invoice or include it in a statement, providing you select the Increase Reminder Level option when printing. The Reminder Level will not be increased even if you use the Increase Reminder Level option if you print statements for a past date, or if the Invoice is not yet due for payment when you include it in a statement. You can also change the Reminder Level in an Invoice yourself, and you can do this after you have marked the Invoice as OK.
- You can print Reminders using the Reminders form. When you print a Reminder for an Invoice, a reminder message will be included, provided you have added the "Reminder Text" field to the Form Template design and providing you have composed three reminder messages in the Reminder Texts setting. The message that will be printed will be of increasing severity depending on the Reminder Level of the Invoice. For example, if the Reminder Level of the Invoice is 2, the message will be taken from the Reminder 2 field in the Reminder Texts setting, and so on.
- Reminders will not be printed for an Invoice in which you have ticked the No Reminder box on the 'Identifiers' card.
- When you print a Debtors Letter or an Open Invoice Customer Statement for a particular Customer, that Customer's open Invoices will be listed together on a single page. The Reminder Levels of all the Invoices in the Letter or Statement will be checked and the reminder message for the highest Level will be printed on the form (in the "Reminder Level (remtext)" field).
- The Reminder Level in an Invoice will be updated automatically whenever you print a Reminder for the Invoice or include it in a statement, providing you select the Increase Reminder Level option when printing. The Reminder Level will not be increased even if you use the Increase Reminder Level option if you print statements for a past date, or if the Invoice is not yet due for payment when you include it in a statement. You can also change the Reminder Level in an Invoice yourself, and you can do this after you have marked the Invoice as OK.
- Last Reminder Date
- As mentioned above, the Reminder Level in an Invoice will be updated automatically whenever you print a Reminder for the Invoice or include it in a statement, providing you select the Increase Reminder Level option when printing. This field displays the date when the Reminder Level was last updated in this way. You can also change this field yourself, even in an Invoice that has been marked as OK.
- Loyalty Card
- Paste Special
Loyalty Card register, POS module/Loyalty Cards setting, Restaurant module
- If the Customer has a Loyalty Card, it will be shown here. You can also choose a Loyalty Card using 'Paste Special', in which case the Customer details will be brought in automatically. If specifying a Loyalty Card changes the Price List and/or Discount Matrix, the prices of any Items already in the Invoice will be recalculated automatically. Please refer here for details about Loyalty Cards.
- Membership Level
- This field displays the Membership Level of the Customer's Loyalty Card. This is for information only and cannot be changed.
- Loyalty Points
- The number of Loyalty Points earned by the Invoice. Whenever you add or change an Invoice row, this figure will be updated automatically.
- TREO No.
- TREO (Tax Remission Export Office) Orders are used in Kenya and other East African countries. If a manufacturing company receives a Sales Order from an export Customer, then any components purchased for manufacturing the Items on the Sales Order will be exempt from tax and customs duties. Such a Sales Order must be marked with a Control Code supplied by the tax authority and with the expiry date of that Control Code, which you should enter in these fields. This Control Code will be copied this field in all Invoices resulting from the Order.
The Invoice register in Standard ERP:
- Introduction
- Entering an Invoice, including:
- Header
- 'Terms' card
- 'Items' card Part 1 (Flips A and B)
- 'Items' card Part 2 (Flips C-G)
- 'Items' card Part 3 (Footer)
- 'Currency' card
- 'Del. Terms' card
- 'Identifiers' card
- 'Price List' card
- 'Inv. Address' card
- 'Del. Address' card
- Header
- Entering an Invoice - Examples
- Controlling Prices in Invoices
- Inspecting Invoices, Marking as OK and Posting to the Nominal Ledger
- Nominal Ledger Transactions from Invoices
- Error Messages
- Printing Invoices
- Accruals in the Sales Ledger
- Cash Notes in the Sales Ledger
- Credit Notes
- Operations menu
- Create menu
- Row menu
- Home page for Sales Ledger manual
- Home page for Standard ERP manual
Arveaadressi kaart
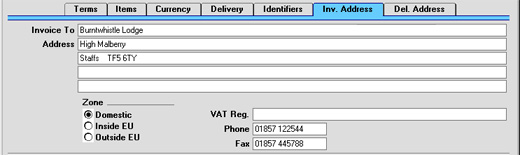
Lähetusaadressi kaart
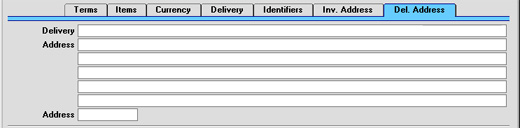
- Lähetusaadress
- Sisestub vaikimisi
Kliendilt
- Sisesta siia Lähetusaadress, kui see erineb Arveaadressist või tavalisest Lähetusaadressist Kliendikaardi Lähetuse kaardilt.
- Aadress
- Ctrl-Enter
Lähetusaadresside seadistus, Müügitellimuste moodul
- Kui Kliendil on erinevaid Lähetusaadresse (nt palju harukontoreid), saad need registreerida Müügitellimuste mooduli Lähetusaadresside seadistuses. Vali Arvele sobiv, kasutades Ctrl-Enter klahvikombinatsiooni. Täielik Lähetusaadress sisestub ülalolevatele väljadele. Tavaliselt näed Ctrl-Enter valikuaknas ainult selle Kliendi Lähetusaadresse ning Lähetusaadresse, millele pole Klienti määratud. Kui tahad nimekirjas näha kõiki Lähetusaadresse, märgi Müügitellimuste mooduli Tellimuste seadistuses valik Aseta kõik lähetusaadressid.
Näited
Nüüd vaatame näidete abil, kuidas Arve välju kasutatakse.Müügireskontro põhiaknas ava Arvete register. Avaneb aken Arve: Uus, millel näed Arve numbrit ja kuupäeva. Kursor vilgub Kliendi väljal. Vali Ctrl-Enter (Windows ja Linux) või Apple-Enter (Macintosh) klahvikombinatsioon Klientide valikuakna avamiseks.
Vali Klient, tehes soovitud real hiirega topeltklõps (või liikudes soovitud reale ja vajutades Enter). Vajuta veelkord Enter ja Kliendi nimi ning aadress sisestuvad vastavatele väljadele.
Uuesti Enter vajutades liigud Artikli väljale tabeli vasakus ülanurgas. Taas saad kasutada Ctrl-Enter klahvikombinatsiooni Artikli valimiseks. Vali Artikkel topeltklõpsuga. Vajuta Enter, et sisestuks ka muu Artikli kohta käiv info (Artikli nimetus, Baashind, Müügikonto number ja KM kood).
Sisesta müüdud Kogus ja vajuta Enter. Summa, KM ja kogusumma arvutatakse automaatselt ning kursor liigub järgmisele reale. Korda seda protseduuri iga Artikli sisestamiseks.
Kui Arvel on vaja sisse viia muudatusi, paranda välju nagu tavaliselt. Kuna Arve ei ole salvestatud, võid selle tühistada, klõpsates Jäta või sulgedes Arve sulgemisruudust. Viimasel juhul küsib HansaWorld, kas soovid Arve registreerida:

Kui kõik Artiklid on sisestatud, tuleb Arve kontrollida. Klõpsa Salvesta Arve salvestamiseks ning seejärel klõpsa Printeri ikoonile prooviarve välja trükkimiseks. Kui soovid näha väljatrüki näidist ekraanil, klõpsa Eelvaate ikoonile.
Kuni Arve ei ole kinnitatud, on seda võimalik muuta.
Entering an Invoice - Settlement Discount Examples
You can offer a settlement discount to a Customer to encourage them to pay an Invoice by a specified date. Follow these steps:- Create a record in the Payment Terms setting containing the details of the settlement discount. Enter the discount percentage in the Settl. Discount % field and the number of days for which the settlement discount offer is valid in the Settl. Disc Days field:
The Type should be "Normal", and you should also specify the number of Net Days to allow Due Dates to be calculated.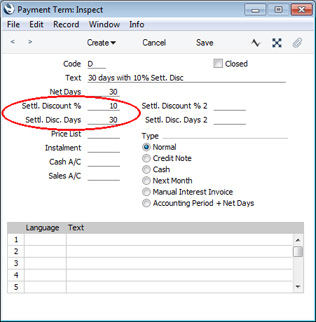
If you need to configure a two-stage Settlement Discount, use the Settl. Discount % 2 and Settl. Disc Days 2 fields as well. For example, you may need to offer a 10% Discount for payment within 10 days and a 5% Discount for payment within the following 20 days. If so, use the Settl. Discount % and Settl. Disc. Days fields for the first stage (10% Discount for payment within 10 days), and the Settl. Discount % 2 and Settl. Disc. Days 2 fields for the second stage (5% Discount for payment within the following 20 days). Settl. Disc. Days 2 counts from the Invoice Date, so in this example it should be 30.
- Specify Settlement Discount Accounts on the 'Sales' card of the Account Usage S/L setting. If necessary, you can enter different Accounts to be used depending on the VAT Zone of the Customer:
The value of the settlement discount will be debited to the Settlement Discount Account when the Customer pays the Invoice.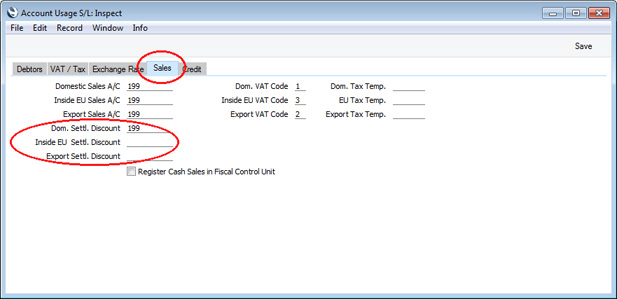
- Enter the Invoice in the usual way.
The settlement discount will be calculated using the formula:
- TOTAL x Settlement Discount %
Field in Form Template Prints Discounted VAT VAT - VAT on Settlement Discount (i.e. the VAT total of the Invoice - the VAT element in the Settlement Discount) (will print the VAT total in Invoices with no Settlement Discount). You should only use this field if you have specified a Settl. Discount VAT Account (steps 7 and 8 below) If Settlement Discount If an Invoice qualifies for a Settlement Discount, this field will print the phrase that you enter as the Field Argument If Settlement Discount 2 If an Invoice qualifies for a second Settlement Discount, this field will print the phrase that you enter as the Field Argument Settlement Discount Settlement Discount amount Settlement Discount Date Prints the date on which the Settlement Discount expires Settlement Discount in Base 1 Settlement Discount amount, converted to Base Currency 1 Settlement Discount in Base 2 Settlement Discount amount, converted to Base Currency 2 Settlement Discount Total TOTAL - Settlement Discount amount Settlement Discount 2 Second Settlement Discount amount Settlement Discount 2 Date Prints the date on which the second Settlement Discount expires Settlement Discount 2 in Base 1 Second Settlement Discount amount, converted to Base Currency 1 Settlement Discount 2 in Base 2 Second Settlement Discount amount, converted to Base Currency 2 Settlement Discount 2 Total TOTAL - second Settlement Discount amount To Pay after Settlement Discount TOTAL - Settlement Discount amount To Pay after Settlement Discount in Base 1 TOTAL - Settlement Discount amount, converted to Base Currency 1 To Pay after Settlement Discount in Base 2 TOTAL - Settlement Discount amount, converted to Base Currency 2 To Pay after Half Settlement Discount TOTAL - (Settlement Discount amount / 2) Total VAT of Settlement Discount VAT on Settlement Discount (i.e. the VAT element in the Settlement Discount) (will be empty in Invoices with no Settlement Discount). You should only use this field if you have specified a Settl. Discount VAT Account (steps 7 and 8 below)
- Mark the Invoice as OK and save. The settlement discount will not affect the postings in the Nominal Ledger.
- When you receive payment from the Customer, create a new record in the Receipt register. When you specify the Invoice Number, an extra row containing the settlement discount will be added to the Receipt automatically, providing the Transaction Date is on or before the Discount Date. The Received and Bank Amount will be changed to the outstanding amount less the settlement discount:
The Receipt register is described in more detail here.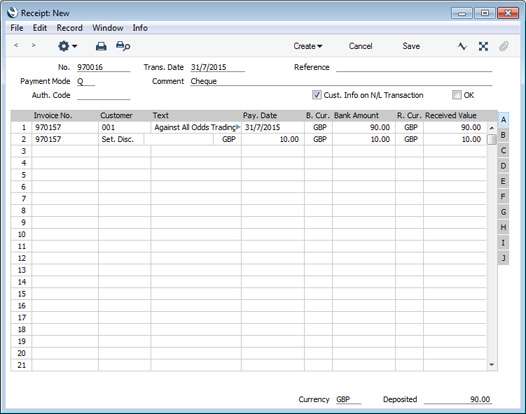
- Mark the Receipt as OK and save. In the resulting Nominal Ledger Transaction, the settlement discount will be debited to the Settlement Discount Account that you specified in step 2:
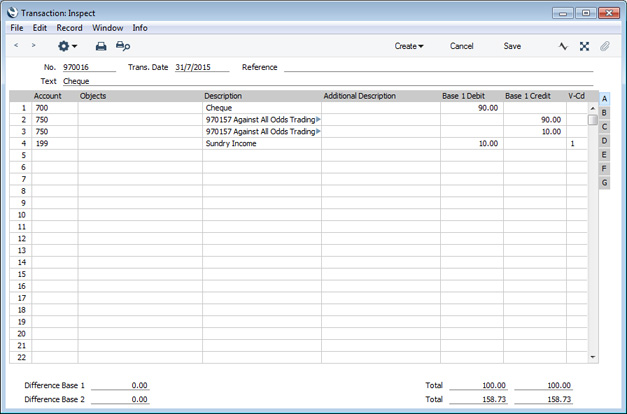
- In some countries, the posting of the settlement discount from the Receipt should include a VAT element. If you need such a posting, specify a Settl. Discount VAT Account on the 'VAT / Tax' card of the Account Usage S/L setting:
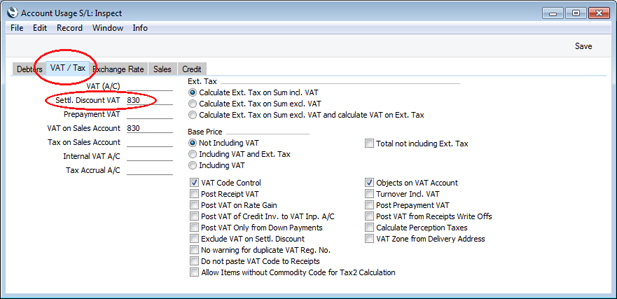
- The existence of a Settl. Discount VAT Account means that the settlement discount less VAT will be debited to the Settlement Discount Account that you specified in step 2, and the VAT element will be debited to the Settlement Discount VAT Account:
The VAT element will be calculated using the following formula (with example figures in brackets):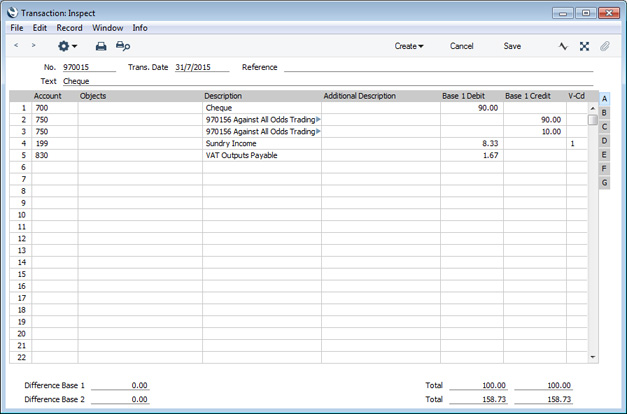
The VAT total in this equation will be taken from the VAT field in the footer of the Invoice being paid.Settlement Discount (10.00) * Invoice VAT Total (16.67) Invoice Total (including VAT) (100.00)
- The settlement discount in step 3 was calculated by applying the settlement discount percentage to the Invoice TOTAL, as follows:
- total row Amounts (83.33) + VAT (16.67) = TOTAL (100.00)
- TOTAL (100.00) * Sett. Discount (10%) = 10.00
- total row Amounts (83.33) - Sett. Discount (10%) = 75.00
- 75.00 * VAT (20%) = 15.00
- total row Amounts (83.33) + VAT (15.00) = TOTAL (98.33)
- 75.00 * VAT (20%) = 15.00
You should also remove any Settl. Discount VAT Account from the Account Usage S/L setting so that there is no VAT element in the posting of settlement discount from a Receipt (as described in steps 7 and 8 above).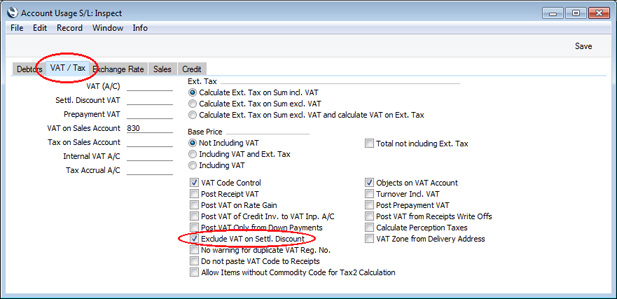
- total row Amounts (83.33) + VAT (16.67) = TOTAL (100.00)
- Illustrated below is an Invoice with a settlement discount calculated as described in the previous step:
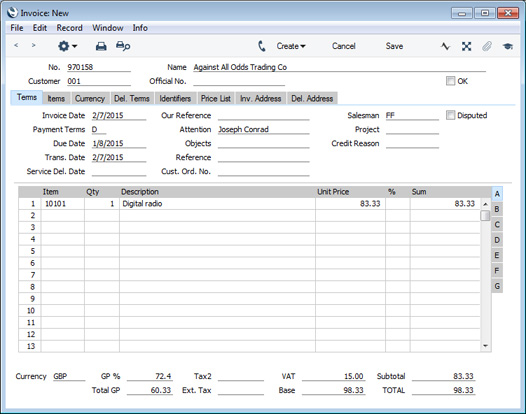
- When you receive payment from the Customer, the settlement discount will be deducted as already described in step 5:
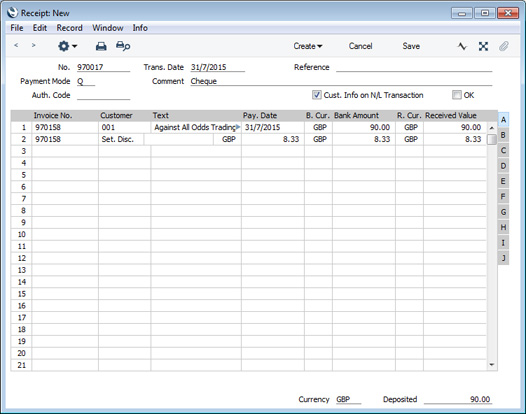
- In the Nominal Ledger Transaction resulting from the Receipt, the settlement discount will be debited to the Settlement Discount Account, again as already described. There will be no VAT element as the Settl. Discount VAT Account field in the Account Usage S/L setting should be empty:
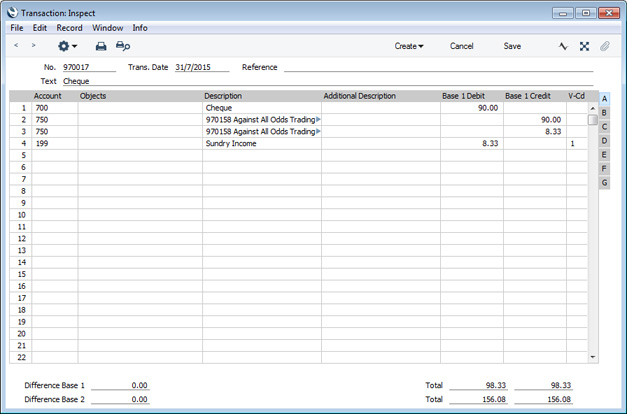
The Invoice register in Standard ERP:
- Introduction
- Entering an Invoice
- Entering an Invoice - Examples, including:
- Settlement Discount Examples
- Controlling Prices in Invoices
- Inspecting Invoices, Marking as OK and Posting to the Nominal Ledger
- Nominal Ledger Transactions from Invoices
- Error Messages
- Printing Invoices
- Accruals in the Sales Ledger
- Cash Notes in the Sales Ledger
- Credit Notes
- Operations menu
- Create menu
- Row menu
- Home page for Sales Ledger manual
- Home page for Standard ERP manual
Entering an Invoice - Reverse Charge VAT in Sales Invoices
The calculation of VAT in an Invoice depends on its VAT Zone, which in turn depends on the VAT Zone specified for the Customer in the Contact register. When you specify the Customer in an Invoice, the VAT Zone will be set accordingly, and will be visible on the 'Inv. Address' card: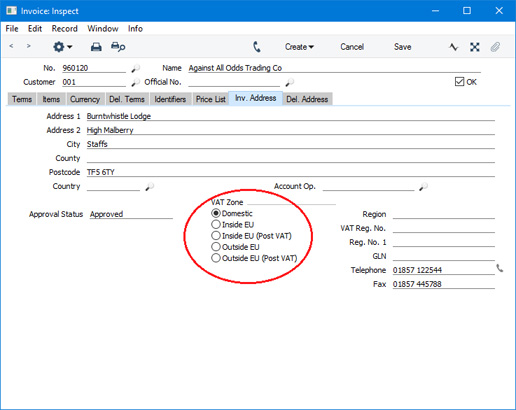
When issuing an Invoice to a Customer in the "Inside EU" Zone, you will not charge VAT. The Customer will pay VAT to their tax authority at the domestic rate that would apply had they purchased the Items from a local Supplier. This is sometimes known as the "reverse charge" procedure.
There may be occasions when you need to use the reverse charge procedure in an Invoice that you issue to a domestic Customer. You will not charge VAT in the Invoice and will not account for the VAT to the tax authority. The Customer will account for and pay the VAT. This feature is only available in Lithuania, Poland and the UK (i.e. it is available when the VAT Law in the Company Info setting is "Lithuanian", "Polish" or "Default").
To use the reverse charge procedure in a domestic Invoice, follow these steps:
- In the VAT Codes setting in the Nominal Ledger, create a VAT Code for domestic reverse charge VAT (VAT Code 7 in the illustration below). The VAT percentage in this VAT Code should be the rate at which VAT would be charged in a normal calculation.
If the use of the reverse charge procedure in an Invoice depends on the value of that Invoice, use the Min. and/or Max. Amounts on flip F to specify that value. For example, in the UK, a sale of mobile phones or computer chips can be subject to the reverse charge procedure if the value of the sale is greater than 5000.00. In this case the Minimum should be 5000.00, as shown in the illustration below:
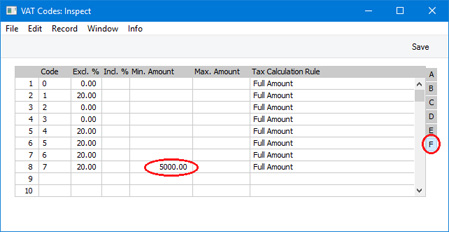
- In the Item records for the Items that you can sell on a reverse charge basis, specify the reverse charge VAT Code on the 'A/C' card:
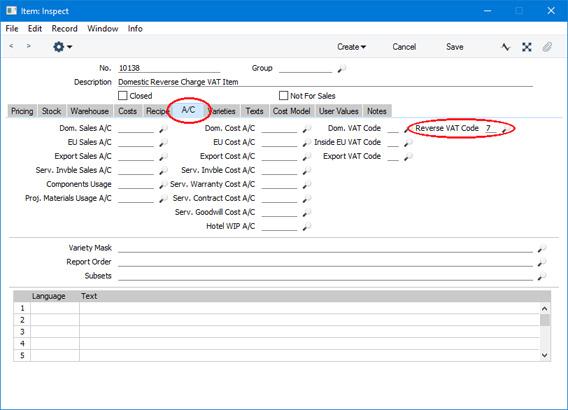
- In order to be able to issue a reverse charge Invoice to a Customer, the Contact record for that Customer must satisfy the following requirements:
- On the 'Company' card, the Type must be "Company". If the Type is "Person", VAT in Invoices will be calculated on a normal basis, not on the reverse charge basis.
- Also on the 'Company' card, you must specify a VAT Reg. No. It is a legal requirement that you must obtain a Customer's VAT registration number before you can issue a reverse charge Invoice to them.
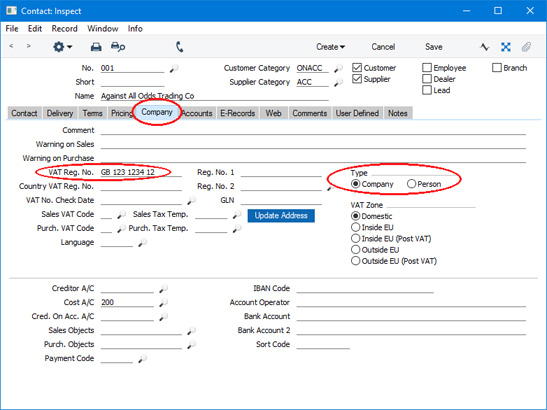
- An option is to select the Reverse VAT option on the 'Terms' card. This option will mean that the use of the reverse charge procedure in an Invoice will not be dependent on the value of the Invoice. In other words, when you sell a reverse charge Item to the Customer, the reverse charge procedure will always be used (i.e. the Min. and Max. Amounts specified in the VAT Code (step 1 above) will be ignored).
Continuing the UK mobile phone example, the reverse charge procedure can usually only be used in an individual Invoice if its value is greater than 5000.00. However, you can also use the reverse charge procedure if you have received an order whose value is greater than 5000.00 that you will deliver and invoice in stages, some or all of which have values of less than 5000.00. Selecting this option will allow you to invoice each stage using the reverse charge procedure.
You can prevent users from the changing the Reverse VAT box in Contact records using Access Groups, by denying them access to the 'Qualify for Reverse VAT' Action.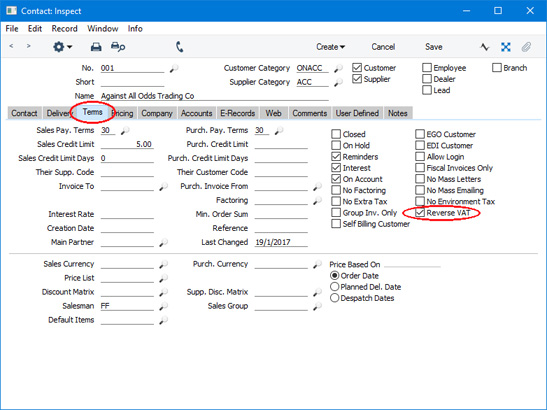
- You can only use the reverse charge procedure in a Quotation, Order or Invoice in which prices exclude VAT. So, if your default setting (specified on the 'VAT / Tax' card of the Account Usage S/L setting) is that Base Prices include VAT (or VAT and TAX), you must assign a Price List in which prices exclude VAT to the Customer.
- On the 'Company' card, the Type must be "Company". If the Type is "Person", VAT in Invoices will be calculated on a normal basis, not on the reverse charge basis.
- When you print a Quotation, Order or Invoice in which you have used the reverse charge procedure, you must have a reference printed on the document to make it clear that the reverse charge applies and that the Customer is required to account for the VAT. You can do this by including the fields listed below in your Form Template designs:
Field in Form Template Prints Header Fields (these print once per Invoice) Reverse VAT text In Lithuania, this field will be printed on an Invoice or Credit Note if every row has a Reverse VAT Code (see step 5 below). It prints the text "Atvirkštinis PVM, PVMĮ 96 str.". In Poland, this field will be printed on an Invoice or Credit Note if any row has a Reverse VAT Code (see step 5 below). It prints the text "Odwrócony VAT". In the UK, this field will be printed on an Invoice or Credit Note as follows:
- In an Invoice in which every row has a Reverse VAT Code (see step 5 below), it will print the text "Reverse charge: Customer to account to HMRC for the reverse charge output tax".
- In an Invoice in which some rows have a Reverse VAT Code, it will print the text "Reverse charge: Customer to account to HMRC for the reverse charge output tax on the VAT exclusive price of items marked reverse charge".
- In a Credit Note in which every row has a Reverse VAT Code, it will print the text "Reverse charge: Customer to account to HMRC for the output tax adjustment".
- In a Credit Note in which some rows have a Reverse VAT Code, it will print the text "Reverse charge: Customer to account to HMRC for the adjustment to reverse charge output tax on the VAT exclusive price of items marked reverse charge".
Reverse VAT amount This field will print the amount in the Reverse VAT field in the Quotation, Order or Invoice i.e. it prints the VAT amount that the Customer should pay to the tax authority. Row Fields (these print once per row, so remember to specify a Line Height and to set the Format to "Matrix") Reverse VAT Code This field will print the Reverse VAT Code in each row. Row reverse VAT text In Lithuania and the UK, this field will print the text "Subject to Reverse VAT Charge" for each row that has a Reverse VAT Code, only in Invoices and Credit Notes in which not every row has a Reverse VAT Code.
- In an Invoice in which every row has a Reverse VAT Code (see step 5 below), it will print the text "Reverse charge: Customer to account to HMRC for the reverse charge output tax".
- Enter Quotations, Orders and Invoices in the usual way. If you add an Item in which you have specified a Reverse VAT Code (step 2 above) to the transaction, that Reverse VAT Code will be brought in to the Rvrs field on flip B, providing the Sum in the row satisfies any minimum or maximum requirements specified in the VAT Codes setting (step 1 above) or providing the Customer is one where you have ticked the Reverse VAT option (step 3 iii above). The Reverse VAT field in the footer will display the VAT that the Customer should pay to the tax authority on the reverse charge basis:
If the Item has a Reverse VAT Code but the Rvrs field remains empty, this will usually be because the Sum in the row does not satisfy the minimum or maximum requirements. It could also be because the Type of the Customer is "Person" (step 2 i above). If the Rvrs field is empty, the row will not be subject to the reverse charge procedure.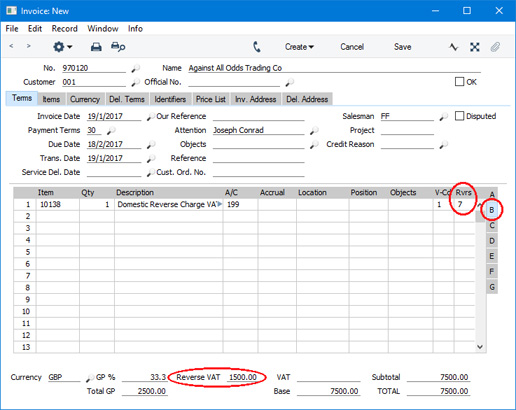
The Rvrs and Reverse VAT fields will be updated whenever you change the quantity or price in a row and as you add or remove rows (the minimum and maximum requirements in the VAT Codes setting apply to the Invoice as a whole, not to individual rows, so adding a row could cause the Rvrs field to be updated in an earlier row).
- Usually, the Customer's VAT Reg. No. will be brought in to the Quotation, Order or Invoice. If you have not specified a VAT Reg. No. in the Contact record for the Customer (step 2 ii above), the VAT Reg. No. field in the Quotation, Order or Invoice will remain empty. This will mean that it will not be possible to save the record.
- If you are entering an Invoice and you mark it as OK and save, no VAT will be posted from the rows with Reverse VAT Codes (i.e. from the rows in which the Rvrs field is not empty). The Reverse VAT Code from each Invoice row will be copied to the Rvrs field in the corresponding Transaction row:
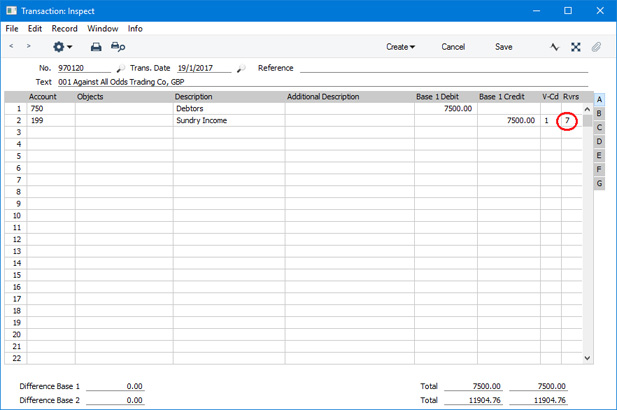
- If you need to create a Credit Note from an Invoice in which you have used the reverse charge procedure, you will not be able to change anything in the matrix in the Credit Note. In other words, you must credit such an Invoice in full, you cannot partially credit such an Invoice.
The Invoice register in Standard ERP:
- Introduction
- Entering an Invoice
- Entering an Invoice - Examples, including:
- Settlement Discount Examples
- Reverse Charge VAT in Sales Invoices
- Settlement Discount Examples
- Controlling Prices in Invoices
- Inspecting Invoices, Marking as OK and Posting to the Nominal Ledger
- Nominal Ledger Transactions from Invoices
- Error Messages
- Printing Invoices
- Accruals in the Sales Ledger
- Cash Notes in the Sales Ledger
- Credit Notes
- Operations menu
- Create menu
- Row menu
- Home page for Sales Ledger manual
- Home page for Standard ERP manual
Controlling Prices in Invoices
There are several methods that you can use to control prices in Invoices:- To prevent all changes to the Unit Price, % and Sum fields in every Quotation, Order and Invoice row, assign users an Access Group in which you have denied access to the 'Change Unit Prices' Action (i.e. in which you have set the access level to "None").
- If you need to prevent users from changing the Price List in a Quotation, Order or Invoice, assign them an Access Group in which you have denied access to the 'Change Prices' Action.
- By default, you cannot change the Discount Matrix in an Invoice. If you wish to allow users to be able to change the Discount Matrix in Invoices only, assign them an Access Group in which you have granted Full access to the 'Change Discount Matrix on Invoice' Action.
- You can prevent users from entering a price (i.e. a unit price less discount) that is below a specified minimum in any Quotation, Order or Invoice. To do this, specify a Minimum Price List in each user's Person record. If it is necessary to sell an Item at a price that is below the minimum, a manager can confirm the price using the 'Manager's Discount Override' function on the Operations menu.
- In Invoices only, you can prevent users from entering a Unit Price that is less than the cost of the Item, by assigning them an Access Group in which you have granted Full access to the 'Disallow Prices Lower than Cost Price' Action. The cost of the Item will be determined using the FIFO field on flip C of the relevant Invoice row or, if that is blank or zero, using the Cost Price of the Item. If you are using this option, you may also need to prevent users from changing the Cost Price in Invoice rows, which you can again do using Access Groups, by denying access to the 'Change Cost on Invoice Rows' Action.
- If you are using the Disallow Negative Row Sums on Sales option in the Account Usage S/L setting, you will not be able to mark an Order or Invoice as OK and save it or save a Quotation if the Sum in any row is negative. In Invoices only, you can also prevent users from entering negative Unit Prices, by assigning them an Access Group in which you have denied access to the 'Negative Unit Price on an SL Invoice' Action.
- Similarly, if you are using the Disallow Negative Totals on Sales option, also in the Account Usage S/L setting, you will not be able to mark an Order or Invoice as OK and save it or save a Quotation if the TOTAL is negative.
- By default, you cannot enter negative quantities in Invoices. If you wish to allow them, select the Allow Negative Quantities in Invoices option in the Optional Features setting in the System module. This can be useful to facilitate returns in a retail environment.
- You can have a responsible Person or Persons notified every time a sales person attempts to mark as OK and save a Sales Invoice or save a Quotation or Sales Order in which there is at least one Item with a gross profit that is lower than a specified percentage. The notification will be by Mail and Activity. Specify the percentage in the GP below minimum Alerts setting in the Business Alerts module, and specify the responsible Person or Persons in each Location record. To prevent the saving of any Invoice, Order or Quotation that would trigger such a notification, assign each sales person an Access Group in which you have granted Full access to the 'Disallow Selling Below Minimum GP' Action. Please refer to the description of the GP below minimum Alerts setting for more details.
The Invoice register in Standard ERP:
- Introduction
- Entering an Invoice
- Entering an Invoice - Examples
- Controlling Prices in Invoices
- Inspecting Invoices Marking as OK and Posting to the Nominal Ledger
- Nominal Ledger Transactions from Invoices
- Error Messages
- Printing Invoices
- Accruals in the Sales Ledger
- Cash Notes in the Sales Ledger
- Credit Notes
- Operations menu
- Create menu
- Row menu
- Home page for Sales Ledger manual
- Home page for Standard ERP manual
Arvete vaatamine ja kinnitamine
Enne Arve saatmist Kliendile tuleb see kontrollida ja kinnitada. Kinnitamise tulemusena kantakse Arve Müügireskontrosse. Kui Arve on kinnitatud, koostatakse sellest Finantskanne, kui oled nii määranud Finantsmooduli Allsüsteemide seadistuses. Kandele antakse number, mis on sama mis Arve number.
Müügireskontro on seadistatud toimima nii, et Laekumisi on võimalik registreerida ainult kinnitatud Arvetele. Arve kinnitamiseks on kaks võimalust:
- Kui Arve on ekraanil avatud, märgi valik Kinnita.
- Vali Arve aknas Arved: Sirvi ja anna Operatsioonide menüüst käsklus Kinnita. Hoides all Shift-klahvi, saad korraga valida hulga Arveid ning need kõik korraga kinnitada.
- Korraga suure hulga Arvete kinnitamiseks kasuta hooldusfunktsiooni Kinnita arved.
! | Peale Arve kinnitamist saad sellel muuta vaid Müügimeest, Viimase märgukirja kuupäeva, Märgukirjataset ja Kommentaari. |
Arvete kinnitamisel saad lasta nendest automaatselt koostada Tegevused. Seda saad määrata Kliendihalduse mooduli seadistuses Tegevuste tüübid allsüsteemid. Iga sellise Tegevuse tüübiks on Tööülesanne ja Sümboliks Muu. Tegevuse Alguskuupäevaks on Arve Laekumiskuupäev ja Isikuks Arve Müügimees. Hetkekasutaja initsiaalid sisestuvad Tegevuse Koopia väljale.
Finantskanded arvetest
Kui Arve on kinnitatud ja salvestatud, koostatakse sellest automaatselt Finantskanne, kui oled vastavalt määranud Finantsmooduli Allsüsteemide seadistuses. Finantskannete kohta loe palun lähemalt siit.Kui Kanne on koostatud, saad seda kohe vaadata, kasutades Operatsioonide menüü käsklust Ava finantskanne.
Veateated
Kui kinnitad Arveid, koostatakse nendest automaatselt Finantskanded, kui oled vastavalt määranud Finantsmooduli Allsüsteemide seadistuses. Kui ekraanile ilmub veateade, tähendab see, et mõned Kontod või muud seadistused on valed. Kõik Kontod, mida Arvel kasutatakse ja mis sisestusid vaikimisi seadistusest Lausendamine M/R, Artiklitelt, Artikliklassidelt, Klientidelt või Kliendiklassidelt, peavad eksisteerima ka Kontode registris (nähtav Üldises ja Finantsmoodulis). Samuti peavad olema kirjeldatud numbriseeriad jooksvaks arvestusaastaks ja KM koodid.
Kui Arve on ekraanil avatud, saad vead parandada, lisades puuduva Konto Kontode registrisse või asendades Konto, mida Arvel kasutati.
Kandeid ei koostata Kontodele, mida ei ole olemas, et ära hoida arvestusvigu.
Arvete välja trükkimine
Arve trükkimiseks võib olla erinevaid põhjusi: proovitrükk Arve kontrollimiseks enne kinnitamist, koopia arhiveerimiseks või originaalarve Kliendile saatmiseks.Proovitrüki väljastamiseks salvesta Arve ja klõpsa enne selle kinnitamist Printeri ikoonil. Arvele trükitakse tekst Proovitrükk. Nõnda ei aja proovitrükki originaalarvega segi. Kuna Arve ei ole veel kinnitatud, saad sisse viia vajalikud parandused, kui leiad proovitrükil vigu. Sama kehtib ka Kreeditarvete kohta.
Lõplike Arvete trükkimiseks toimi järgnevalt:
- Vali Fail menüüst või põhiaknast Dokumendid. Tee topeltklõps real Arved.
Avaneb aken Määra arved.
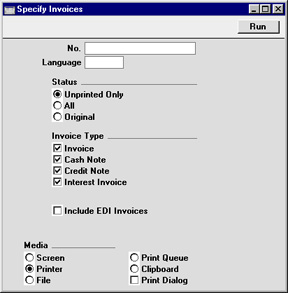
- Sisesta Arve number või kooloniga eraldatud numbrivahemik. Vali, millised Arved trükitakse.
- Ainult trükkimata
- Selle valikuga jäetakse välja Arved, mida on juba kord välja trükitud.
- Kõik
- Trükitakse kõik valitud vahemikku kuuluvad Arved. Eelnevalt välja trükitud Arvetele trükitakse tekst Koopia.
- Originaaltrükk
- Selle valikuga trükitakse samuti kõik valitud vahemikku kuuluvad Arved. Eelnevalt välja trükitud Arved trükitakse uuesti välja originaalarvetena ning neile ei trükita teksti Koopia.
- Ainult trükkimata
- Klõpsa Käivita trükkimise alustamiseks või tühista valikud, sulgedes akna sulgemisruudust.
Arveid on võimalik kinnitamisel ka automaatselt välja trükkida. Selleks on Üldises moodulis seadistus Automaatsed trükkimised.
Olenemata sellest, millist meetodit kasutad, määratakse Dokumendimall alljärgnevalt:
- Mine Üldise mooduli Dokumendimallide registrisse ja kujunda Arvele dokument, millele anna nimeks ‘ARVE’. Vali Operatsioonide menüüst Info ning määra dokumendi tüübiks Arve. HansaWorldi pakutavat näidisdokumenti saad muuta vastavalt oma vajadustele.
- Mine Müügireskontro moodulisse.
- Vali põhiaknast või Fail menüüst Dokumendid. Avanenud nimekirjas märgi ära Arved.
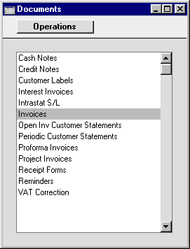
- Vali Operatsioonide menüüst käsklus Kirjelda dokument.
- Avanenud aknas sisesta esimesele reale Dokumendimalli väljale ‘ARVE’ (sisestusvigade vältimiseks kasuta Ctrl-Enter klahvikombinatsiooni).

- Akna salvestad, klõpsates Salvesta. Edaspidi kasutatakse siin määratud malli, kui trükid dokumendid välja Dokumentide registrist või klõpsates Printeri ikoonil, v.a. 7. punktis kirjeldatud juhtudel.
- Korda eelpool kirjeldatud kuut punkti ka Sularahaarvetele, Kreeditarvetele, Viivisarvetele ja Projektiarvetele dokumendimallide määramiseks. Neid kasutatakse nii Dokumentide kui Printeri ikooni kaudu trükkimisel Arve standarddokumendi asemel järgmistel juhtudel:
- Sularahaarve
- Kui Arvel on Sularaha Tasumistingimus, kasutatakse Arve dokumendi asemel alati Sularahaarve dokumenti.
- Kreeditarve
- Kui Arvel on Kreeditarve Tasumistingimus, kasutatakse Arve dokumendi asemel alati Kreeditarve dokumenti.
- Viivisarve
- Kui Arve koostati, kasutades hooldusfunktsiooni Koosta viivisarved, kasutatakse Arve dokumendi asemel alati Viivisarve dokumenti.
- Projektiarve
- Kui Arve Projekti väljal on Projekti kood, kasutatakse Arve dokumendi asemel alati Projektiarve dokumenti.
- Sularahaarve
Arved erinevates keeltes
Kui Sul on näiteks Kliendid nii Eestis kui Prantsusmaal ning soovid väljastada Arveid vastavates keeltes, toimi järgnevalt:- Kujunda Üldise mooduli Dokumendimallide registris eestikeelne ja prantsuskeelne Arve mall ning anna neile nimeks vastavalt ???ARVE’ ja ‘INVFRE’. Dokumendimalli Operatsioonide menüü käsklusega Info määra dokumenditüübiks Arve (mõlemal juhul).
- Mine Müügireskontrosse.
- Ava põhiaknast või Fail menüüst Dokumentide register. Avanenud aknas märgi ära Arved.
- Vali Operatsioonide menüüst käsklus Kirjelda dokument.
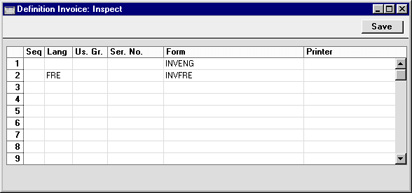
- Esimesele reale sisesta Arve malli koodi, mida kasutad kohalike Klientide puhul (‘ARVE’). Kasuta Ctrl-Enter klahvikombinatsiooni, et valida võimalike dokumendimallide seast ja vältida sisestusvigu. Teisel real vali Keele väljale prantsuse keele kood ning dokumendimalliks vali prantsuskeelne mall ‘INVFRE’.
Keele väljal võid kasutada ka fiktiivseid Keelekoode ning kasutada seda funktsiooni mingil muul otstarbel. Üheks näiteks oleks erineva kujundusega Arvete kasutamine eri tüüpi müügitehingute puhul. Selleks kujunda fiktiivne Keelekood, mida kasuta Arvele sobiva kujunduse valimisel. Sellele väljale võid sisestada ka Lähetusviisi koodi ning niimoodi kasutada erineva kujundusega Arveid vastavalt Lähetusviisidele.
- Arve kirjelduse salvestamiseks klõpsa Salvesta. Nüüd saavad prantsuskeelsed Kliendid automaatselt oma Arved prantsuskeelsel mallil ‘INVFRE’ ja kohalikud Kliendid eestikeelsel mallil ‘ARVE’. Seda funktsiooni saad kasutada peaaegu kõigi HansaWorldi dokumentide puhul.
Saatelehtede väljastamine, kui ei kasutata Müügitellimusi
Kui Sa ei kasuta Müügitellimuste moodulit, saad ülalkirjeldatud Dokumendi kirjeldamise aknas määrata, et Saatelehed trükitaks koos Arvetega. Kui kasutad Lao moodulit, muudetakse Arve kinnitamisel müüdud Artiklite kogused Laos eeldusel, et need Artiklid on tüübilt Laoartiklid ning et Arvel on märgitud valik Muuda ladu. Toimi järgnevalt:- Kontrolli, kas Üldise mooduli Dokumendimallide registris on olemas dokumendimallid ‘ARVE’ ja ‘SAATELEHT’. Kujunda need vastavalt oma vajadustele. Määra dokumenditüüp Arve või Saateleht, kasutades Operatsioonide menüü käsklust Info.
- Nagu eespool kirjeldatud, mine Müügireskontrosse ja vali põhiaknast Dokumendid. Nimekirjas märgi ära Arved.
- Vali Operatsioonide menüüst käsklus Kirjelda dokument.
- Tulbas Jrk määratakse, millises järjekorras erinevad dokumendid trükitakse. Kui soovid, et Saateleht trükitaks esimesena, sisesta esimesele reale Jrk väljale järjekorranumbriks 1 ja Dokumendimalli väljale ‘SAATELEHT’ (sisestusvigade vältimiseks kasuta Ctrl-Enter klahvikombinatsiooni). Teisele reale sisesta Jrk väljale järjekorranumbriks 2 ja Dokumendimalli väljale ‘ARVE’. Printeri väljal saad vajadusel määrata erinevate dokumentide trükkimiseks erinevad printerid.
- Klõpsa Salvesta Arve kirjelduse salvestamiseks. Nüüd väljastatakse Arve trükkimisel alati kõigepealt Saateleht ja seejärel Arve. Seda funktsiooni saad kombineerida Keelekoodidega, ning rakendada saad seda pea kõigi HansaWorldi dokumentide puhul.
Periodiseerimine
Tavaliselt konteeritakse Finantskandel iga arverea Summa vastavale Müügikontole. See ei tarvitse aga sobida, kui Arve esitatakse teenuse või lepingu eest, mis kestab pikema perioodi. Sellisel juhul võiks summa Müügikontole kanda järk-järgult kogu teenuse osutamise või lepingu perioodi jooksul.Näiteks väljastad Sa Arve teeninduslepingu eest, mis kehtib ühe aasta ja maksab 120. Võimalik, et Sa ei soovi oma Müügikontot kohe 120 ulatuses krediteerida, vaid soovid seda teha aasta jooksul (lepinguperioodi jooksul) 10 ulatuses iga kuu, eriti kui lepinguperiood ulatub järgmisse arvestusaastasse.
Finantsmooduli seadistust Periodiseerimise mudelid kasutatakse selliste valemite kirjeldamiseks, mille alusel Arve summad järk-järgult Müügikonto kreeditisse kantakse. Antud näites kasutame valemit 12 igakuise kande jaoks, igaüks 8.33% (st 1/12 kogusummast):
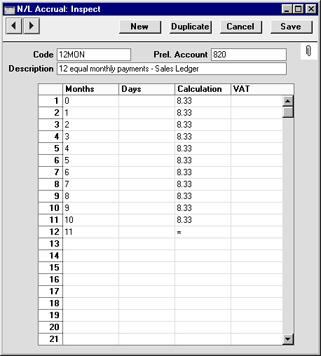
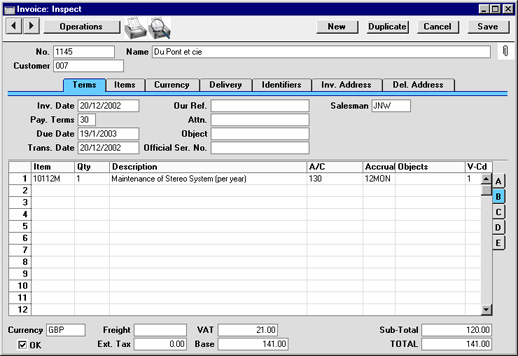
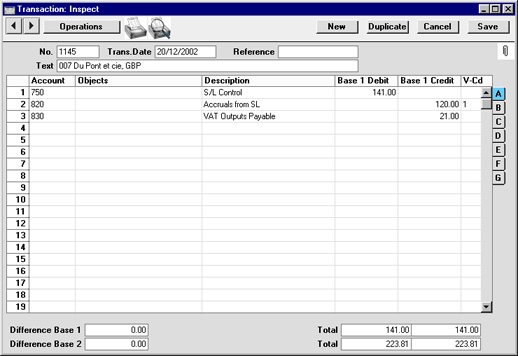
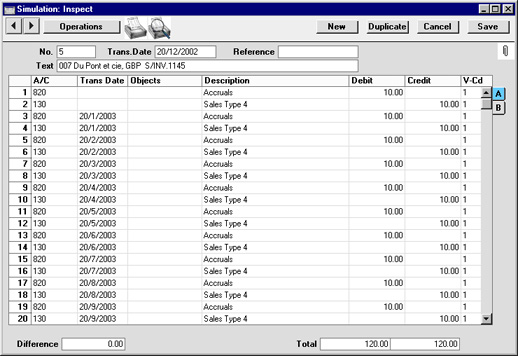
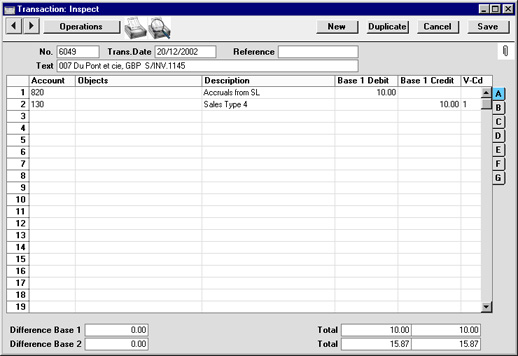
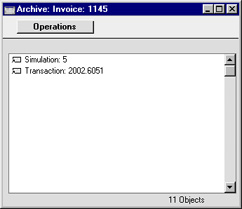
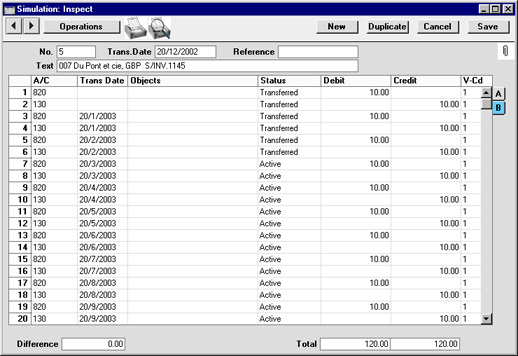
Cash Notes in the Sales Ledger
A Cash Note is an Invoice that is immediately to be treated as being paid. It differs from a normal Invoice in that it does not affect your Debtor Account or appear in any of your debt-chasing reports: instead, a debit posting for the Invoice value will be made directly to your Cash Account.To enter a Cash Note, follow the usual procedure for entering Invoices, with just one exception: change the Payment Terms (using the 'Paste Special' function if necessary) to refer to a Payment Term record of Type "Cash":
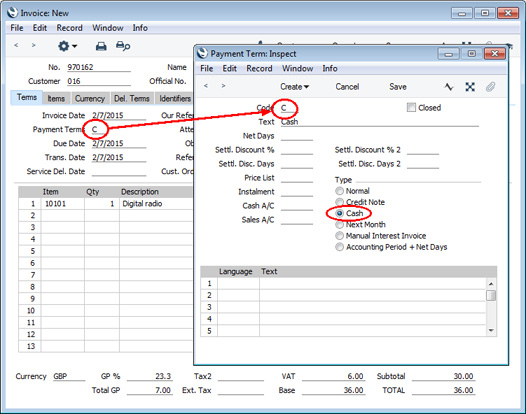
Click the OK check box when you are sure the Cash Note is correct. As with ordinary Invoices, you must approve Cash Notes by checking the OK check box and saving, for them to be posted to the Sales Ledger. In the resulting Nominal Ledger Transactions, the Cash Account will be debited:
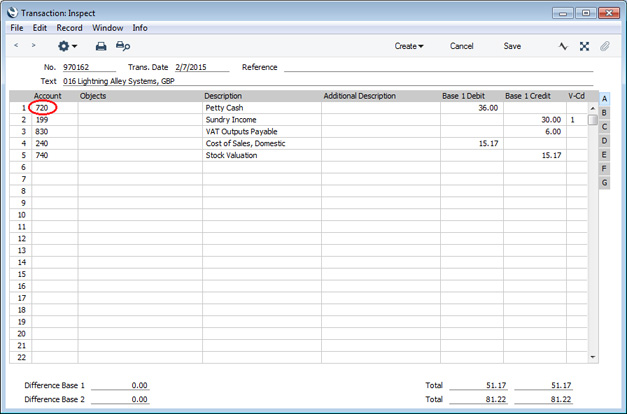
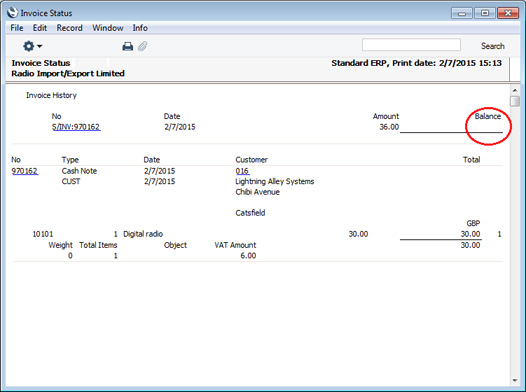
If you need to register a partial payment by cash or credit card when entering an Invoice, use the 'Add Cash Line' or 'Add Credit Card Line' functions on the Row menu.
---
The Invoice register in Standard ERP:
- Introduction
- Entering an Invoice
- Entering an Invoice - Examples
- Controlling Prices in Invoices
- Inspecting Invoices, Marking as OK and Posting to the Nominal Ledger
- Nominal Ledger Transactions from Invoices
- Error Messages
- Printing Invoices
- Accruals in the Sales Ledger
- Cash Notes in the Sales Ledger
- Credit Notes
- Operations menu
- Create menu
- Row menu
- Home page for Sales Ledger manual
- Home page for Standard ERP manual
Kreeditarved
Kui soovid krediteerida väljastatud Arvet, toimi järgnevalt:- Vali põhiaknast Arved. Avaneb aken Arved: Sirvi, milles näed kõiki eelnevalt registreeritud Arveid.
- Klõpsa Uus või kasuta vastavat klahvikombinatsiooni. Võid ka märkida nimekirjas Arve, mida soovid krediteerida ning klõpsata Koopia.
Pane tähele, et kui krediteeritav Arve on Viivisarve või Projektist koostatud Ettemaksuarve, pead klõpsama Uus. Neid tüüpi Arveid ei saa krediteerida alusarvete kopeerimise teel.
- Avaneb aken Arve: Uus. Sisesta Arve nagu tavaliselt, kuid määra Tasumistingimuseks ‘K’ (Kreeditarve). Arve esimesele reale ilmub tekst Kreedit arvele. Sisesta krediteeritava Arve number, kasutades tasumata Arvete nimekirja nägemiseks Ctrl-Enter klahvikombinatsiooni. Arve määramine on kohustuslik, kui oled seadistuses Lausendamine MR märkinud valiku Ära luba ilma numbrita kreeditarveid. Samuti peab krediteeritav Arve olema kinnitatud.
Pea meeles, et eelnevalt peab olema Tasumistingimuste seadistuses kirjeldatud Tasumistingimus koodiga K ja tüübiga Kreeditarve.
- Ülejäänud ridadele saad sisestada krediteeritavad Artiklid ja kogused. Kui oled seadistuses Lausendamine MR märkinud valiku Kasuta kreeditarvetel eraldi müügikontosid, kasutatakse tavaliste asemel kreedit Müügikontosid ja KM koode, mis võetakse vastava Artikliklassi Kreeditkontode kaardilt või seadistusest Lausendamine MR. Kui Kreeditarve koostati Arve kopeerimise teel, muutuvad Tasumistingimuseks ‘Kreeditarve??? sisestamisel Arvele kaasatud Artiklite Müügikontod ja KM koodid automaatselt.
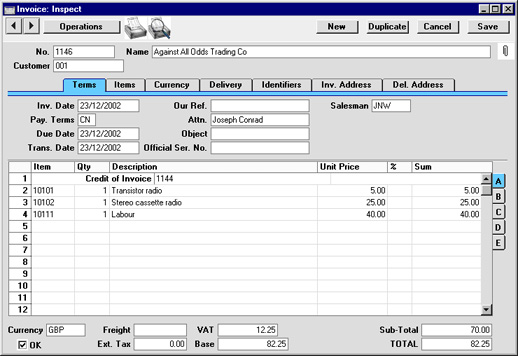
- Kinnita Kreeditarve, kui oled kindel, et kõik on õige. Nagu ka tavaliste Arvete puhul, peavad Kreeditarved olema kinnitatud, et need Müügireskontrosse kantaks ja et neist Finantskanded koostataks, kui oled vastavalt määranud Finantsmooduli Allsüsteemide seadistuses.
Arve osaline krediteerimine
Sageli on vaja krediteerida vaid osa Arvest. Enamuse programmide puhul tuleb selleks esmalt tühistada kogu originaalarve ning seejärel teha uus Arve õigete Artiklitega. Kuna enamuses programmides puudub Arve kopeerimise võimalus, võib osaline krediteerimine võtta väga palju aega. HansaWorldis on seda teha väga lihtne.
Arve osaliseks krediteerimiseks tee sellest kõigepealt koopia ja sisesta Tasumistingimuseks K (Kreeditarve). Edasi toimi järgnevalt:
- Kustuta Arvelt kõik read, mida Sa ei soovi krediteerida. Osuta reanumbrile kogu rea aktiveerimiseks ning vajuta Backspace-klahvi klaviatuuril. Tee nii, kuni Arvel on vaid read, mida soovid krediteerida.
- Kui reasiseselt on vaja muuta Artikli kogust, muuda Kogus nii, et Kreeditarvele jääks krediteeritav kogus.
- Kui oled kindel Kreeditarve õigsuses, märgi jaluses Kinnita ja klõpsa Salvesta arve salvestamisek.
Originaalarvelt andmete võtmine kreeditarvele
Ülalkirjeldatud viisil koostatud Kreeditarve väljastatakse originaalarve tühistamiseks. Mõnedes riikides (nt Poola) ei kasutata Kreeditarveid Arvete tühistamiseks, vaid nende parandamiseks.Kui tahad seda võimalust kasutada, koosta Kreeditarve alusarve kopeerimise teel nagu eespool kirjeldatud. Kui oled Tasumistingimuseks määranud Kreeditarve, vajuta tabulaatorklahvile ning seejärel anna Operatsioonide menüüst käsklus Koosta parandusarve. Arve read kopeeritakse ning jagatakse kahte veergu, pealkirjadega Enne ja Pärast. Enne veerus on read alusarvelt, Pärast veerus aga read paranduste tegemiseks (märgitud tähega K). Tee soovitud muudatused, sisestades õiged kogused ja/või hinnad. Alltoodud näites esitati originaalarve kolme Artiklit 10101 ja kolme Artiklit 10102 kohta, kui tegelikult oleks Arvel pidanud olema kaks Artiklit 10101 ja üks Artikkel 10102. Ridadel Pärast veerus on vastavad parandused tehtud. Artikli 10111 kogus oli originaalarvel õige, nii et viimast rida selles veerus parandatud ei ole:
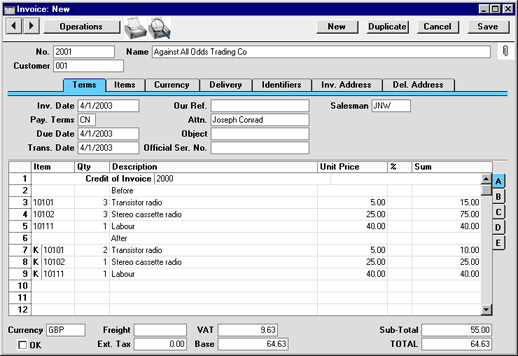
Esimesele reale sisesta parandatava Arve number ning kinnita, salvesta ja trüki Parandusarve välja nagu tavaliselt.
Vaikimisi on määratud, et Parandusarve ei muuda laoseise ega -väärtusi (selles suhtes on see sarnane Kreeditarvele). Lähemalt loe palun osast Kreeditarved ja ladu. Parandusarvel ei ole soovitav koguseid suurendada, kuna laoväärtused ei pruugi õigesti muutuda. Selle asemel koosta lisakoguse kohta uus Arve.
Kreeditarved ja numbriseeriad
Kui soovid Kreeditarvetel kasutada omaette Numbriseeriat, toimi järgmiselt:- Sisesta esimesele vabale reale seadistuses Numbriseeriad - Arved Kreeditarvetel kasutatav Numbriseeria.
Pane tähele: kui antud seadistus on tühi, kirjelda esimesel real Numbriseeriad Arvetele ning sisesta Kreeditarvetel kasutatavad Numbriseeriad järgmisele reale.
- Selle Numbriseeria esimene number sisesta Kreeditarved, (M/R) väljale Üldise mooduli seadistuses Numbriseeriad vaikimisi. Numbriseeria jõustumiseks pead tegema programmile restardi.
- Kreeditarvele vastava Tasumistingimuse (Kreeditarve) määramisel antakse sellele järgmine vaba number õigest Numbriseeriast.
Kreeditarved ja ladu
Kui kasutad FIFO laoarvestust ja/või kuluarvestust (pead laoarvestust Finantsmoodulis), võib Kreeditarve väljastamisega kaasneda kaks probleemi:- Mõnede Kreeditarvetega kaasneb kaupade Lattu tagasi võtmine, mõnedega mitte; ning
- FIFO arvutamine muutub võimatuks, kuna tagastatavate kaupade tegelikku väärtust on raske tuvastada. Näiteks kui Sa ostad kolm Artiklit hindadega 10.00, 11.00 ja 12.00, ning müüd neist kaks, oleksid nende FIFO väärtused vastavalt 10.00 ja 11.00. Kui üks neist tagastatakse, ei ole programmil millegi põhjal otsustada, kas see on 10.00 või 11.00 maksev Artikkel.
- Kui tagastatav Artikkel väljastati Müügitellimusest koostatud Lähetusega, mine tagasi Müügitellimuse juurde ning sisesta kaart Tagastatud kaupade registrisse, kasutades Operatsioonide menüü käsklust Koosta tagastatud kaubad. Kui see on tehtud, võid kas teha uue Lähetuse asenduskaupadega või, kui asenduskaupa ei soovita, koostada uue Arve negatiivsele kogusele (sisuliselt Kreeditarve), kasutades Tellimuse Operatsioonide menüü käsklust Koosta arve. Laoseisud muudetakse Tagastatud kaupade kaardiga. Samuti muudetakse laotoimingud Finantsmoodulis, kui kasutad kuluarvestust (määratud Finantsmooduli Allsüsteemide seadistuses.
- Kui Müügitellimust ei ole, väljastati tagastatav Artikkel algselt Arvega. See Arve tuleb kõigepealt krediteerida. Kui Tasumistingimuseks sisestatakse Kreeditarve, lülitatakse välja valik Muuda ladu. Seda ei tohiks uuesti sisse lülitada, kuna seega läheks laoväärtuste jälgimine Finantsmoodulis valeks: kasutatakse valet FIFO väärtust (järgmise Laoartikli väärtust, meie näites 12.00). Kinnita Kreeditarve (et muudetaks Müügireskontro ja Müügivõlgade, KM ning Müügikonto saldod Finantsmoodulis). Seejärel võta Artikkel Lattu tagasi, kasutades Laosissetulekute registrit Lao moodulis. Sellega muudetakse laoseisud korrektselt ning, kui oled teinud vastavad määratlused Allsüsteemide seadistuses, ka laoväärtused Finantsmoodulis.
Arvete tühistamine
Teatud juhtude on otstarbekas Arve tühistada, avades Arve ekraanile ja kasutades Kaardi menüü käsklust Tühista. Sellega kõrvaldatakse Arve Müügireskontrost ning Arvest koostatud Finantskanne. Tühistatud Arve on lihtsalt eristatav, kuna kõiki välju läbivad punased jooned. Neid punaseid jooni näed ka aknas Arved: Sirvi.See funktsioon on mõeldud kasutamiseks situatsioonides, kus Arvetele on numbrid ette antud (nt blankettidele trükitud) ning kui ei soovita koostada Kreeditarvet. Seda ei ole soovitatav kasutada, kui tahetakse, et Arve tühistamine mõjutaks ka Ladu. Sel juhul tuleb teha Kreeditarve ja võtta kaup lattu tagasi Laosissetulekuga või Tagastatud kauba kaardiga.
Arvet ei saa tühistada, kui see on tasutud, kui see ei ole kinnitatud või kui selle Arve kuupäev on varasem Üldise mooduli seadistuses Kuu lukustamine määratud Lukusta müügiarved kuupäevast.
Operatsioonide menüü
Ülaltoodud piltidel näed Arvete Operatsioonide menüüsid. Vasakul on akna Arved: Sirvi Operatsioonide menüü: enne funktsiooni valimist märgi nimekirjas ära üks või mitu Arvet (hoia all Shift-klahvi, kui klõpsad soovitud Arvetel). Paremal on akende Arve: Uus ja Arve: Vaata Operatsioonide menüü.Kinnita
See käsklus on ainult akna Arved: Sirvi Operatsioonide menüüs. Selle käsklusega saad Arve kinnitada ning seega võrdub see Arvel valiku Kinnita märkimisega. Saad valida Arvete vahemiku (hoia Shift-klahvi all, kui valid vahemikku) ning kinnitada need kõik korraga. Pea meeles, et kui oled vastavalt määratlenud Finantsmooduli Allsüsteemide seadistuses, koostatakse Arvete kinnitamisel neist Finantskanded ning neid Arveid enam muuta ei saa.Trüki proformaarve
Selle käsklusega saad väljastada Proformaarve. Seda on vaja, kui soovid, et Arve eest ette makstaks. Proformaarve erineb tavalisest Arvest väliselt selle poolest, et Arve numbri ees on sõna Proforma ning ka kinnitamata Arvetele ei trükita teksti Proovitrükk. Kasutatav dokumendimall määratakse järgmiselt:
- Üldise mooduli Dokumendimallide registris kujunda Proformaarvele mall ja anna sellele nimeks ‘PROF_ARVE’. Vali Operatsioonide menüüst Info ning määra dokumendi tüübiks Proformaarved. HansaWorldiga on kaasas näidisdokumendimallid, mida saad vastavalt oma vajadustele muuta.
- Mine Müügireskontrosse.
- Ava Fail menüüst või põhiaknast Dokumendid. Avanenud aknas märgi ära Proformaarved.
- Vali Operatsioonide menüüst käsklus Kirjelda dokument.
- Avanenud aknas sisesta Dokumendimalli väljale ‘PROF_ARVE’ (sisestusvigade vältimiseks kasuta Ctrl-Enter klahvikombinatsiooni).
- Akna salvestamiseks klõpsa Salvesta. Edaspidi kasutatakse Dokumentide funktsiooniga või Operatsioonide menüüst printimiskäsu andmisel automaatselt määratud Dokumendimalli.
Vaata arve hetkeseisu
Selle käsklusega esitatakse kiire aruanne, mida saad tellida ainult selle menüü kaudu. Aruandes võetakse kokku kogu Arvet puudutav informatsioon, sh Artiklid ja laekumisajalugu. Alltoodud näites on Arve krediteeritud (koostatud Kreeditarve).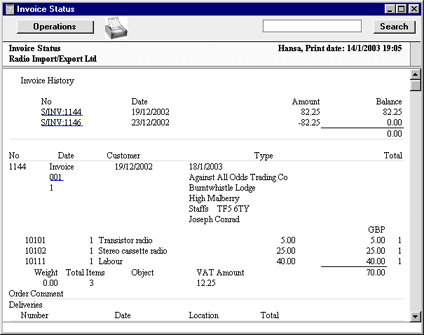
Operations Menu - Invoice - Customer Status
The 'Customer Status' function prints to screen a Customer Status report, which shows the account status of the Customer in the Invoice currently on screen in a record window.In its basic form, this report will first show the Customer Number, Name and telephone number. This information will be followed by a list of the Customer's Contact Classifications. The five most recently paid Invoices will then be listed, as will all open (unpaid) Invoices.
You can have much more information shown in the report, such as lists of recent Activities, Contract Quotations, Contracts, Quotations and Orders, and monthly sales figures for the past year. To have this extra information shown in the report, create a record for yourself in the Info in Customer Status Report setting in the CRM module. As you can create separate records in this setting for each user, you can control how much of this additional information will be shown to different users. You can effectively give each user a different report definition.
Simply creating a record for yourself in the Info in Customer Status Report setting will add the Customer's address, Warning on Sales if there is one, Credit Limit and turnover for the first period in the Reporting Periods setting to the top of the report. The remainder of the report will then follow the specification in your Info in Customer Status Report record. If you are using the Invoices Open until Due Date only option in the Credit Limit setting and a Customer has at least one overdue Invoice, their Credit Limit will be shown to be 0.00 in the report.
If the appearance of the Customer Status report is not as you expect (i.e. the Customer's address, Warning on Sales if there is one, Credit Limit and turnover are not shown, and the report only lists Invoices), the probable cause is you do not have a record in the Info in Customer Status Report setting.
As well as using the 'Customer Status' function described here, you can also produce a Customer Status report using the following methods:
- Activate 'Paste Special' from the Customer Number field in a record such as an Order or Invoice, highlight one or more Customers in the list and choose 'Customer Status' from the Operations menu;
- Open an Activity where the Customer field contains a Customer (not a Supplier) and choose 'Customer Status' from the Operations menu;
- Open the Contact record for a Customer and choose 'Customer Status' from the Operations menu;
- Open the 'Business Communicator' window, highlight one or more Customers in the Contact List and click the [Customer Status] button; and
- In the Sales Ledger, click the [Reports] button in the Navigation Centre and choose to produce the Customer Status report.
The Customer Status report has the Standard ERP Drill-down feature. You can open many records such as Contact Persons, Activities, Quotations and Invoices from the report by clicking in the appropriate places (i.e. on Contact Person names, on Activity Dates and on Quotation and Invoice Numbers). You can also click on a Person's Signature to open an Activities, Persons report for that Person. Text with the drill-down feature is shown underlined in the report. If you have a record in the Info in Customer Status Report setting, the report will also contain a [New Activity] text button that you can click to create an empty new Activity and a [Credit History] text button that will open a separate report showing the Customer's credit history. This is a chargeable Cloud Service: to use it you must have registered your database in Estonia using the Automatic Internet Enabler method, as described on the Enabler Key page. You must also have entered a Reg No 1 on the 'Company' card of the Contact record for the Customer whose credit history you are interested in.
---
The Invoice register in Standard ERP:
- Introduction
- Entering an Invoice
- Entering an Invoice - Examples
- Controlling Prices in Invoices
- Inspecting Invoices, Marking as OK and Posting to the Nominal Ledger
- Nominal Ledger Transactions from Invoices
- Error Messages
- Printing Invoices
- Accruals in the Sales Ledger
- Cash Notes in the Sales Ledger
- Credit Notes
- Operations menu, including:
- OK
- Print Proforma Invoices
- Invoice Status
- Customer Status
- Item Search
- Add Environment Tax
- Change to Base 1
- Connect to Prepayment
- Recalculate Discount
- Recalculate Weight and Volume
- Update Currency Price List Items
- Print Cash IN-OUT
- Send to Fiscal Device
- Edit Instalments
- Resend E-Invoice
- Open NL Transaction
- Manager's Discount Override
- Open Tax Matrix
- Request Approval
- Cancel Approval Request
- OK
- Create menu
- Row menu
- Home page for Sales Ledger manual
- Home page for Standard ERP manual
Operations Menu - Invoice - Item Search
You can use the 'Item Search' function to search for Items that you can then add to the Invoice. This function is therefore an alternative to the 'Paste Special' feature. Place the insertion point in the Item field in any row and then select 'Search' from the Operations menu. The following window opens: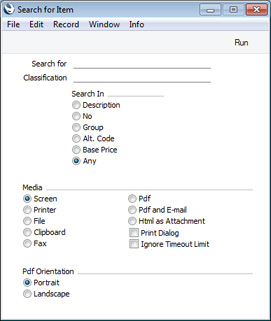
- Search for
- Enter here the string (e.g. part of an Item Number or Name) that you are looking for. You must make an entry in this field, otherwise no search will be carried out.
- Classification
- Paste Special
Item Classifications setting, Sales Ledger
- If you enter an Item Classification here, the search for the string that you specified in the field above will be restricted to Items belonging to that Classification.
- Search In
- Specify the field in which you want to search.
---
The Invoice register in Standard ERP:
- Introduction
- Entering an Invoice
- Entering an Invoice - Examples
- Controlling Prices in Invoices
- Inspecting Invoices, Marking as OK and Posting to the Nominal Ledger
- Nominal Ledger Transactions from Invoices
- Error Messages
- Printing Invoices
- Accruals in the Sales Ledger
- Cash Notes in the Sales Ledger
- Credit Notes
- Operations menu, including:
- OK
- Print Proforma Invoices
- Invoice Status
- Customer Status
- Item Search
- Add Environment Tax
- Change to Base 1
- Connect to Prepayment
- Recalculate Discount
- Recalculate Weight and Volume
- Update Currency Price List Items
- Print Cash IN-OUT
- Send to Fiscal Device
- Edit Instalments
- Resend E-Invoice
- Open NL Transaction
- Manager's Discount Override
- Open Tax Matrix
- Request Approval
- Cancel Approval Request
- OK
- Create menu
- Row menu
- Home page for Sales Ledger manual
- Home page for Standard ERP manual
Operations Menu - Invoice - Add Environment Tax
Please refer to the description of the Environment Tax setting for a full description of this function.---
The Invoice register in Standard ERP:
- Introduction
- Entering an Invoice
- Entering an Invoice - Examples
- Controlling Prices in Invoices
- Inspecting Invoices, Marking as OK and Posting to the Nominal Ledger
- Nominal Ledger Transactions from Invoices
- Error Messages
- Printing Invoices
- Accruals in the Sales Ledger
- Cash Notes in the Sales Ledger
- Credit Notes
- Operations menu, including:
- OK
- Print Proforma Invoices
- Invoice Status
- Customer Status
- Item Search
- Add Environment Tax
- Change to Base 1
- Connect to Prepayment
- Recalculate Discount
- Recalculate Weight and Volume
- Update Currency Price List Items
- Print Cash IN-OUT
- Send to Fiscal Device
- Edit Instalments
- Resend E-Invoice
- Open NL Transaction
- Manager's Discount Override
- Open Tax Matrix
- Request Approval
- Cancel Approval Request
- OK
- Create menu
- Row menu
- Home page for Sales Ledger manual
- Home page for Standard ERP manual
Muuda baasvaluutaks 1
Kui Arvel kasutatakse välisvaluutat, saad selle funktsiooniga kergesti kõik Arve väärtused ümber arvutada kohalikku valuutasse (Baasvaluuta 1).Funktsioon ei toimi, kui Arve on kinnitatud või kui Üldise mooduli Baasvaluuta seadistuses pole määratud Baasvaluutat 1.
Seo ettemaksuga
Lähemalt loe selle funktsiooni kohta palun osast Ettemaksud.Arvuta hinnaalandus ümber
Kui Arvele sisestatakse Artikkel ja sellele määratakse Kogus, antakse reale automaatselt allahindlusprotsent, kui selle Artikli kohta kehtib mingi Hinnaalandusmaatriks. Allahindlusprotsenti arvestatakse Summa arvutamisel. Kui Arvele kehtib mingi Hinnaalandusmaatriks, näed seda Arve Lähetuse kaardil.Hinnaalandusmaatrikseid kasutatakse automaatseks koguselise hinnaalanduse arvutamiseks. Sellised hinnaalandused võivad põhineda rea summal, kogusel, kaalul või mahul. Kui Hinnaalandusmaatriks käib mingi Artikliklassi, mitte üksikute Artiklite kohta, ning Arvel on rohkem kui üks Artikkel samast Klassist, tuleb hinnaalandust arvestada kõigi sama Klassi Artiklite pealt kokku. Selleks vali Operatsioonide menüüst käsklus Arvuta hinnaalandus ümber, kui Arve on valmis. Seda funktsiooni võid kasutada ka siis, kui Hinnaalandusmaatriksit ennast muudetakse enne Arve kinnitamist.
Arvuta kaal ja maht ümber
Artiklite lisamisel Arvele näed nende Kogust, Kaalu ja Mahtu kokku Arve Lähetuse kaardil. Need summad arvutatakse vastavalt Arvel olevatele kogustele ja Artiklikaartidel toodud infole. Kui mõne Artikli Kaalu või Mahtu muudetakse või on kogusummad valed mõnel muul põhjusel, saad need ümber arvutada, kasutades antud funktsiooni.Arvuta hinnakirja artiklid ümber
Võib juhtuda, et sisestad pika Arve kogemata vale Valuuta, vahetuskursi või Hinnakirjaga, või muutub valuutakurss enne Arve kinnitamist märkimisväärselt. Sellisel juhul ei ole vaja Arvet uuesti sisestada. Muuda Valuuta, Kurss või Hinnakiri, salvesta Arve ning käivita see funktsioon. Kõik hinnad arvutatakse vastavalt ümber.See funktsioon ei toimi kinnitatud Arvete puhul.
Trüki kassaorder
Seda käsklust kasutatakse tavaliselt Sularahaarvete puhul. Trükitakse Sissetulekuorderid, mille saad panna oma kaustadesse või anda Kliendile. Balti riikides on nõutud, et kõigi kassatoimingute kohta oleksid olemas dokumendid paberkandjal. Selle funktsiooni kasutamise eelduseks on Kassa mooduli olemasolu.Kui soovid välja trükkida suure hulga Sissetulekuordereid korraga, mine Kassa moodulisse. Ava põhiaknas või Fail menüüst Dokumendid. Avanenud aknas tee hiirega topeltklõps real Kassasissetulekud - arved. Määra Arve number (või numbrivahemik), mille kohta soovid kassaordereid trükkida ja klõpsa Käivita.
Ükskõik kas trükid ordereid ühekaupa või korraga suurel hulgal, määratakse kasutatav dokumendimall järgmiselt:
- Üldise mooduli Dokumendimallide registris kujunda kassadokumendile mall ja anna sellele nimeks ‘KSO_ARVE’. Vali Operatsioonide menüüst Info ning määra dokumendi tüübiks KSO arved.
- Mine Kassa moodulisse.
- Ava Fail menüüst või põhiaknast Dokumendid. Avanenud aknas märgi ära KSO arved.
- Vali Operatsioonide menüüst käsklus Kirjelda dokument.
- Avanenud aknas sisesta Dokumendimalli väljale ‘KSO_ARVE’ (sisestusvigade vältimiseks kasuta Ctrl-Enter klahvikombinatsiooni).
- Akna salvestamiseks klõpsa Salvesta. Edaspidi trükitakse Kassasissetulekuorderid siin määratud dokumendimallile nii Dokumentide funktsiooni kui Arve Operatsioonide menüüd kasutades.
Operations Menu - Invoice - Send to Fiscal Device
A fiscal printer is a device that prints receipts from point-of-sale and cash transactions, as well as recording those transactions in an internal memory. This information can later be read by tax authorities to ensure that a shop's sales have been registered and reported correctly. In countries where fiscal printers are used, they should be attached to every cash machine and till in a point-of-sale environment.
When you enter an Invoice that should be printed on a Fiscal Printer, you should tick the Fiscal Invoice box on the 'Del. Terms' card. This will usually be the case if the Type of the Payment Term is "Cash". This box will be ticked by default in an Invoice if you have ticked the Fiscal Invoices Only box on the 'Terms' card of the Contact record for the Customer.
When you mark as OK and save an Invoice in which you have ticked the Fiscal Invoice box, it will be sent to, printed by and recorded in the fiscal printer. If for some reason this process fails, you can repeat it by selecting this 'Send to Fiscal Device' function from the Operations menu.
In Sweden, it is a legal requirement that all cash or credit card payments in shops should be made through a certified POS solution that contains a fiscal control unit (CleanCash). Each time you approve and save a Cash Note, it will be sent to and recorded in the CleanCash device. The device will send back a control code that will be stored in the Official No. field. The Cash Note will then be printed automatically. The law allows you to print a single copy of a Cash Note. To print this copy, open the Cash Note and choose 'Send to Fiscal Device' from the Operations menu. The Cash Note will again be sent to the CleanCash device (this time with type "kopia"). The device will send back a second control code, which will be saved in the Official No. 2 field. The copy of the Cash Note will then be printed, with the second control code being printed in the "Official Serial Number" field. No further printing of the Cash Note will be possible.
You can use Access Groups to prevent certain users from reprinting Fiscal Invoices. To do this, deny them access to the 'Print to Fiscal Printer' Action.
Please refer to your HansaWorld representative for details about which fiscal printers are supported and about configuring Standard ERP so that it will communicate with fiscal printers.
---
The Invoice register in Standard ERP:
- Introduction
- Entering an Invoice
- Entering an Invoice - Examples
- Controlling Prices in Invoices
- Inspecting Invoices, Marking as OK and Posting to the Nominal Ledger
- Nominal Ledger Transactions from Invoices
- Error Messages
- Printing Invoices
- Accruals in the Sales Ledger
- Cash Notes in the Sales Ledger
- Credit Notes
- Operations menu, including:
- OK
- Print Proforma Invoices
- Invoice Status
- Customer Status
- Item Search
- Add Environment Tax
- Change to Base 1
- Connect to Prepayment
- Recalculate Discount
- Recalculate Weight and Volume
- Update Currency Price List Items
- Print Cash IN-OUT
- Send to Fiscal Device
- Edit Instalments
- Resend E-Invoice
- Open NL Transaction
- Manager's Discount Override
- Open Tax Matrix
- Request Approval
- Cancel Approval Request
- OK
- Create menu
- Row menu
- Home page for Sales Ledger manual
- Home page for Standard ERP manual
Operations Menu - Invoice - Edit Instalments
When you mark as OK and save an Invoice in which the Payment Term refers to a record in the Instalments setting, the relevant number of Instalments will be created automatically. This function allows you to edit those Instalments (e.g. change a value or a date). Please refer to step 7 in the example on the Instalments page for more details.
---
The Invoice register in Standard ERP:
- Introduction
- Entering an Invoice
- Entering an Invoice - Examples
- Controlling Prices in Invoices
- Inspecting Invoices, Marking as OK and Posting to the Nominal Ledger
- Nominal Ledger Transactions from Invoices
- Error Messages
- Printing Invoices
- Accruals in the Sales Ledger
- Cash Notes in the Sales Ledger
- Credit Notes
- Operations menu, including:
- OK
- Print Proforma Invoices
- Invoice Status
- Customer Status
- Item Search
- Add Environment Tax
- Change to Base 1
- Connect to Prepayment
- Recalculate Discount
- Recalculate Weight and Volume
- Update Currency Price List Items
- Print Cash IN-OUT
- Send to Fiscal Device
- Edit Instalments
- Resend E-Invoice
- Open NL Transaction
- Manager's Discount Override
- Open Tax Matrix
- Request Approval
- Cancel Approval Request
- OK
- Create menu
- Row menu
- Home page for Sales Ledger manual
- Home page for Standard ERP manual
Operations Menu - Invoice - Resend E-Invoice
In some countries and depending on configuration, you can have Invoices sent electronically automatically when you mark them as OK and save.
It is recommended that you check regularly to ensure that this process has been successful for every Invoice. You can do this using the following methods:
- Open an individual Invoice and choose 'Invoice Status' from the Operations menu. The stage that the Invoice has reached in the process will be displayed towards the top of the resulting report (no status will be displayed if the Invoice has not yet been sent).
- In Argentina only, open an individual Invoice and open the Link Manager. The relevant Electronic Record Status records will have been attached automatically.
- Produce the Detailed version of the Electronic Invoice Status report.
- Produce an Invoice Media Status report. If you choose 'E-Invoices' as the Function and select the Not Received by Recipient E-Invoices Only option, the report will only list E-Invoices that have not been received (you must choose at least one Invoice Type option as well).
Note: this function should not be used in Argentina or Mexico. Instead, you should use 'Send Argentinean E-Invoice' or 'Send Mexican E-Invoice' as appropriate. These functions will be added to the Operations menu if the VAT Law in the Company Info setting is "Argentinean" or "Mexican".
Sending Invoices electronically is a chargeable Cloud Service: please refer to your local HansaWorld representative for details.
---
The Invoice register in Standard ERP:
- Introduction
- Entering an Invoice
- Entering an Invoice - Examples
- Controlling Prices in Invoices
- Inspecting Invoices, Marking as OK and Posting to the Nominal Ledger
- Nominal Ledger Transactions from Invoices
- Error Messages
- Printing Invoices
- Accruals in the Sales Ledger
- Cash Notes in the Sales Ledger
- Credit Notes
- Operations menu, including:
- OK
- Print Proforma Invoices
- Invoice Status
- Customer Status
- Item Search
- Add Environment Tax
- Change to Base 1
- Connect to Prepayment
- Recalculate Discount
- Recalculate Weight and Volume
- Update Currency Price List Items
- Print Cash IN-OUT
- Send to Fiscal Device
- Edit Instalments
- Resend E-Invoice
- Open NL Transaction
- Manager's Discount Override
- Open Tax Matrix
- Request Approval
- Cancel Approval Request
- OK
- Create menu
- Row menu
- Home page for Sales Ledger manual
- Home page for Standard ERP manual
Ava finantskanne
Kui Arve on kinnitatud ja salvestatud, koostatakse sellest Finantskanne, kui oled vastavalt määranud Finantsmooduli Allsüsteemide seadistuses. Selle käsklusega saad koostatud Kannet kohe vaadata.
Funktsiooni valimisel avatakse Kanne eraldi aknas.
Operations Menu - Invoice - Manager's Discount Override
You can prevent users from saving an Invoice if they have entered a price (i.e. a unit price less discount) in any row that is below a specified minimum for the Item. To do this, follow these steps:
- Create a Price List (using the Price List register in the Pricing module).
- Create records in the Price register for each Item that is to have a minimum price, and specify the minimum price in the Price field in each one. Assign each Price record to the Price List from step 1.
- Open the Person records for each sales person and specify the Price List in the Minimum Price List field on the 'Sales' card.
In some circumstances, you may wish to allow the saving of an Invoice with at least one row in which the Unit Price less Discount is below the minimum. In order to allow the Invoice to be saved, a manager must approve the price. A manager in this context is a Person with a Discount Password, set using the 'Change Discount Password' function on the Operations menu of the 'Persons: Browse' window.
To approve the price, the manager should follow these steps:
- Click in any field in the row in which the Unit Price less Discount is less than the minimum.
- Select this 'Manager's Discount Override' function from the Operations menu. The 'Manager's Override for Discount' window will open:
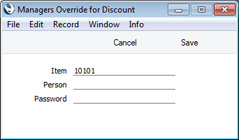
- Enter their Signature and Discount Password (not log-in password) and click the [Save] button.
- Repeat the previous steps for each row in which the Unit Price less Discount is less than the minimum.
You can also specify a Minimum Price List in the manager's Person record. This will have two consequences:
- The manager will not be able to use the 'Manager's Discount Override' function to approve a price that is lower than the minimum specified in their Minimum Price List; and
- After the manager has approved a price in an Invoice row, the price specified in their Minimum Price List will become the new minimum for that row.
---
The Invoice register in Standard ERP:
- Introduction
- Entering an Invoice
- Entering an Invoice - Examples
- Controlling Prices in Invoices
- Inspecting Invoices, Marking as OK and Posting to the Nominal Ledger
- Nominal Ledger Transactions from Invoices
- Error Messages
- Printing Invoices
- Accruals in the Sales Ledger
- Cash Notes in the Sales Ledger
- Credit Notes
- Operations menu, including:
- OK
- Print Proforma Invoices
- Invoice Status
- Customer Status
- Item Search
- Add Environment Tax
- Change to Base 1
- Connect to Prepayment
- Recalculate Discount
- Recalculate Weight and Volume
- Update Currency Price List Items
- Print Cash IN-OUT
- Send to Fiscal Device
- Edit Instalments
- Resend E-Invoice
- Open NL Transaction
- Manager's Discount Override
- Open Tax Matrix
- Request Approval
- Cancel Approval Request
- OK
- Create menu
- Row menu
- Home page for Sales Ledger manual
- Home page for Standard ERP manual
Operations Menu - Invoice - Open Tax Matrix
In some countries, Tax Templates are used instead of VAT Codes. VAT Codes should be used where each sales and purchase transaction (e.g. each row in an Invoice) is taxed at a single rate, while Tax Templates should be used where different taxes and/or several tax rates are applied to one transaction (e.g. to one row).
If you need to use Tax Templates, you should first choose the Use Tax Templates for Tax Calculation option in the Transaction Settings setting in the Nominal Ledger. This option will cause a Tax Template field ("T-Cd") to appear on flip B of the matrix instead of the VAT Code field ("V-Cd").
Because a particular Tax Template can include several tax rates, it can be difficult to see at a glance how the tax figure in an Invoice is calculated. Selecting this function will cause a new window to be opened, displaying the tax calculation, as follows:
- If you place the insertion point in an Invoice row, the function will display the tax calculation for that row.
- If you place the insertion point in a header field, the function will display the tax calculation for the Invoice as a whole. This is shown in the illustration below.
Selecting this function will have no effect if you are not using Tax Templates (i.e. you have not selected the Use Tax Templates for Tax Calculation option in the Transaction Settings setting).
---
The Invoice register in Standard ERP:
- Introduction
- Entering an Invoice
- Entering an Invoice - Examples
- Controlling Prices in Invoices
- Inspecting Invoices, Marking as OK and Posting to the Nominal Ledger
- Nominal Ledger Transactions from Invoices
- Error Messages
- Printing Invoices
- Accruals in the Sales Ledger
- Cash Notes in the Sales Ledger
- Credit Notes
- Operations menu, including:
- OK
- Print Proforma Invoices
- Invoice Status
- Customer Status
- Item Search
- Add Environment Tax
- Change to Base 1
- Connect to Prepayment
- Recalculate Discount
- Recalculate Weight and Volume
- Update Currency Price List Items
- Print Cash IN-OUT
- Send to Fiscal Device
- Edit Instalments
- Resend E-Invoice
- Open NL Transaction
- Manager's Discount Override
- Open Tax Matrix
- Request Approval
- Cancel Approval Request
- OK
- Create menu
- Row menu
- Home page for Sales Ledger manual
- Home page for Standard ERP manual
Operations Menu - Invoice - Request Approval
If an Invoice has to pass through an approval process before you can mark it as OK (and before you can print it), use this function to begin that approval process. Please refer to the description of the Approval Status field on the 'Inv. Address' card of the Invoice window for brief details about the approval process and here for full details.
---
The Invoice register in Standard ERP:
- Introduction
- Entering an Invoice
- Entering an Invoice - Examples
- Controlling Prices in Invoices
- Inspecting Invoices, Marking as OK and Posting to the Nominal Ledger
- Nominal Ledger Transactions from Invoices
- Error Messages
- Printing Invoices
- Accruals in the Sales Ledger
- Cash Notes in the Sales Ledger
- Credit Notes
- Operations menu, including:
- OK
- Print Proforma Invoices
- Invoice Status
- Customer Status
- Item Search
- Add Environment Tax
- Change to Base 1
- Connect to Prepayment
- Recalculate Discount
- Recalculate Weight and Volume
- Update Currency Price List Items
- Print Cash IN-OUT
- Send to Fiscal Device
- Edit Instalments
- Resend E-Invoice
- Open NL Transaction
- Manager's Discount Override
- Open Tax Matrix
- Request Approval
- Cancel Approval Request
- OK
- Create menu
- Row menu
- Home page for Sales Ledger manual
- Home page for Standard ERP manual
Operations Menu - Invoice - Cancel Approval Request
If an Invoice needs to go through an approval process before you can mark it as OK (and before you can print it) and you have started that approval process by selecting 'Request Approval' from the Operations menu, you will no longer be able to modify the Invoice. So, if you realise the Invoice contains an error, you must cancel the approval process before you can correct the error. To do this, open the Invoice and choose 'Cancel Approval Request' from the Operations menu. You will now be able to amend the Invoice and then restart the approval process by once again choosing 'Request Approval'.
If you cannot cancel the approval process, the probable reasons are:
- The Approval Status of the Invoice (visible on the 'Inv. Address' card) is not Pending.
- You may have configured the approval process (using the Approval Rules register in the Business Alerts module) so that it does not allow cancellation.
- You cannot cancel the approval process if at least one Approval Person has approved the Invoice.
---
The Invoice register in Standard ERP:
- Introduction
- Entering an Invoice
- Entering an Invoice - Examples
- Controlling Prices in Invoices
- Inspecting Invoices, Marking as OK and Posting to the Nominal Ledger
- Nominal Ledger Transactions from Invoices
- Error Messages
- Printing Invoices
- Accruals in the Sales Ledger
- Cash Notes in the Sales Ledger
- Credit Notes
- Operations menu, including:
- OK
- Print Proforma Invoices
- Invoice Status
- Customer Status
- Item Search
- Add Environment Tax
- Change to Base 1
- Connect to Prepayment
- Recalculate Discount
- Recalculate Weight and Volume
- Update Currency Price List Items
- Print Cash IN-OUT
- Send to Fiscal Device
- Edit Instalments
- Resend E-Invoice
- Open NL Transaction
- Manager's Discount Override
- Open Tax Matrix
- Request Approval
- Cancel Approval Request
- OK
- Create menu
- Row menu
- Home page for Sales Ledger manual
- Home page for Standard ERP manual
Create Menu - Invoices
The Create menus for Invoices are shown above. On the left is the Create menu for the 'Invoices: Browse' window. On the right is the Create menu for the 'Invoice: New' and 'Invoice: Inspect' windows.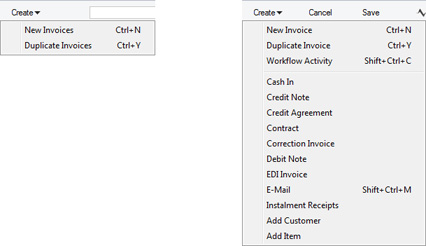
'New' and 'Duplicate' are standard functions provided on the Create menu on every window that allow you to create new records, in this case in the Invoice register. Please click the links below for details about the other functions:
- Workflow Activity
- Cash In
- Credit Note
- Credit Agreement
- Contract
- Correction Invoice
- Debit Note
- EDI Invoice
- E-Mail
- Instalment Receipts
- VAT Correction S/L
- Add Customer
- Add Item
The Invoice register in Standard ERP:
- Introduction
- Entering an Invoice
- Entering an Invoice - Examples
- Controlling Prices in Invoices
- Inspecting Invoices, Marking as OK and Posting to the Nominal Ledger
- Nominal Ledger Transactions from Invoices
- Error Messages
- Printing Invoices
- Accruals in the Sales Ledger
- Cash Notes in the Sales Ledger
- Credit Notes
- Operations menu
- Create menu
- Row menu
- Home page for Sales Ledger manual
- Home page for Standard ERP manual
Create Menu - Invoice - Workflow Activity
The 'Workflow Activity' function allows you to create Activities from Invoices. This can be useful if, for example, you need to schedule a call as the Due Date of an Invoice approaches, to check that it will be paid.
When you select the function, the following screen appears, where you can create a new Activity:
The new record will be opened in a window entitled 'Activity: Inspect'. This means that it has already been saved and is being opened for checking. The new Activity will contain the following information: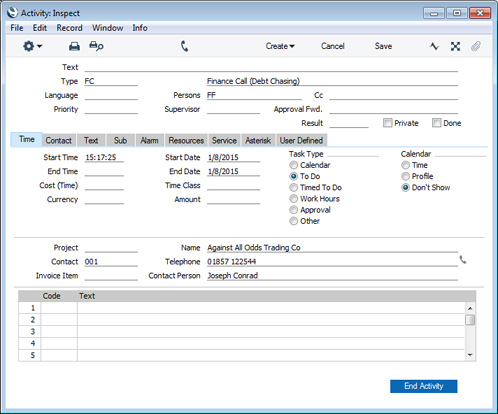
- The Activity Type will be taken from the Activity Types, Subsystems setting in the CRM module.
- The setting of the Done check box will also be taken from the Activity Types, Subsystems setting.
- The Task Type will be To Do.
- The Symbol will be Other.
- The Start and End Dates will be the Due Date of the Invoice.
- Customer details will be taken from the Invoice.
- The Person will be the Salesman from the Invoice, and the Signature of the current user (if the current user is not the Salesman) will appear in the Cc field. As the Task Type will be To Do, the Activity will be placed in the Salesman's and the current user's Task Managers.
The Invoice and the Activity will be connected to each other through the Link Manager and Workflow Manager. When reviewing the Activity, you can return to the Invoice quickly and easily using the Link Manager in the Activity, while you can open the Activity from the Invoice using the Workflow Manager.
You must save an Invoice at least once before you can create an Activity from it. This is to ensure that the links mentioned in the previous paragraph can be established.
You can choose to have Activities created automatically from Invoices when you save them after marking them as OK. This is controlled using the Activity Types, Subsystems setting in the CRM module. In the Generate Activities column in that setting, choose the Automatically option for Sales Invoices, and specify the Activity Type to be used:
Please refer here for full details about the 'Activity: Inspect' window.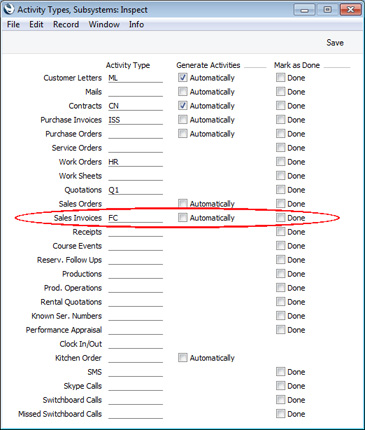
---
The Invoice register in Standard ERP:
- Introduction
- Entering an Invoice
- Entering an Invoice - Examples
- Controlling Prices in Invoices
- Inspecting Invoices, Marking as OK and Posting to the Nominal Ledger
- Nominal Ledger Transactions from Invoices
- Error Messages
- Printing Invoices
- Accruals in the Sales Ledger
- Cash Notes in the Sales Ledger
- Credit Notes
- Operations menu
- Create menu, including:
- Workflow Activity
- Cash In
- Credit Note
- Credit Agreement
- Contract
- Correction Invoice
- Debit Note
- EDI Invoice
- E-Mail
- Instalment Receipts
- VAT Correction S/L
- Add Customer
- Add Item
- Workflow Activity
- Row menu
- Home page for Sales Ledger manual
- Home page for Standard ERP manual
Koosta kassasissetulek
Mõnedes riikides tuleb sularahatehingud registreerida järjestikuste numbritega. Selle käsklusega registreeritakse sellised tehingud Kassa mooduli Sissetulekuorderite registris. Käskluse valimisel avaneb järgmine aken, milles näed uut Sissetulekuorderit:
Uus Sissetulekuorder avatakse aknas Kassasissetulekuorder: Uus. See kaart ei ole veel salvestatud. Tee vajalikud muudatused ja salvesta kaart, klõpsates Salvesta ning sulge see sulgemisruudust. Kui Arve Tasumistingimuse väljale on määratud Tasumisviis, sisestub see ka Sissetulekuorderile. Muidu sisestub vaikimisi Tasumisviis Kassa mooduli Kassaraamatu seadistustest. Sealt võetakse ka vaikimisi Korrespondeerumisviis. Kui Kassaraamatu seadistustes ei ole neid vaikimisi valikuid määratud, pead enne Sissetulekuorderi salvestamist sisestama sellele Tasumisviisi ja Korrespondeerumisviisi. Kui Sissetulekuorderit enam vaja pole, klõpsa Jäta. Mõlemal juhul viiakse Sind tagasi Arve aknasse.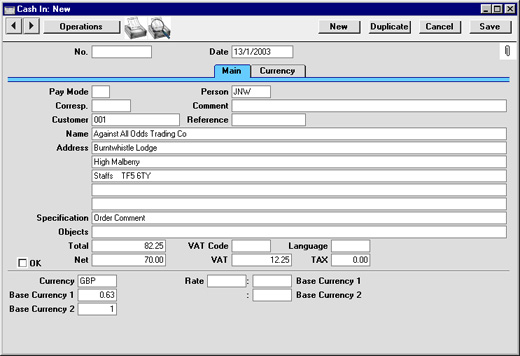
Kui märgid valiku Kinnita enne kaardi salvestamist, Sissetulekuorder kinnitatakse. Kui oled seadistanud programmi nii, et Sissetulekuorderitest koostatakse Finantskanded, koostatakse vastav Kanne (määratakse Finantsmooduli Allsüsteemide seadistuses). Seda Sissetulekuorderit enam muuta ei saa. Käibemaksu kohta eraldi kannet ei tehta, isegi kui Kassaraamatu seadistustes on märgitud valik Konteeri käibemaks, kuna KM kanne on juba koostatud Arvelt.
Enne Sissetulekuorderi koostamist peab Arve olema salvestatud ja kinnitatud.
Sissetulekuordereid saab koostada igat tüüpi Arvetest, kuid kui soovid neid koostada vaid Sularahaarvetest, märgi Kassaraamatu seadistustes valik Kasuta koondkassaordereid. Samuti ei luba antud valik Arvele koostada mitut Sissetulekuorderit ega orderil väärtust muuta (st Arve ja Sissetulekuorderi väärtused peavad olema samad).
Loe siit akna Kassasissetulekuorder: Uus ja hooldusfunktsiooni Koosta koondkassasissetulekud kohta. T Hooldusfunktsiooni saad kasutada Arvetest korraga suure hulga Sissetulekuorderite koostamiseks. Sissetulekuorderid koostatakse vaid Sularahaarvetest.
Selle funktsiooni toimimine eeldab Kassa mooduli kasutamist.
Create Menu - Invoice - Credit Note
Use this function to create a Credit Note from an Invoice. Please refer to the Credit Notes page for details.
---
The Invoice register in Standard ERP:
- Introduction
- Entering an Invoice
- Entering an Invoice - Examples
- Controlling Prices in Invoices
- Inspecting Invoices, Marking as OK and Posting to the Nominal Ledger
- Nominal Ledger Transactions from Invoices
- Error Messages
- Printing Invoices
- Accruals in the Sales Ledger
- Cash Notes in the Sales Ledger
- Credit Notes
- Operations menu
- Create menu, including:
- Workflow Activity
- Cash In
- Credit Note
- Credit Agreement
- Contract
- Correction Invoice
- Debit Note
- EDI Invoice
- E-Mail
- Instalment Receipts
- VAT Correction S/L
- Add Customer
- Add Item
- Workflow Activity
- Row menu
- Home page for Sales Ledger manual
- Home page for Standard ERP manual
Create Menu - Invoice - Credit Agreement
You can use this function to create a Credit Agreement from an Invoice. Please refer to your local HansaWorld representative for more details.
---
The Invoice register in Standard ERP:
- Introduction
- Entering an Invoice
- Entering an Invoice - Examples
- Controlling Prices in Invoices
- Inspecting Invoices, Marking as OK and Posting to the Nominal Ledger
- Nominal Ledger Transactions from Invoices
- Error Messages
- Printing Invoices
- Accruals in the Sales Ledger
- Cash Notes in the Sales Ledger
- Credit Notes
- Operations menu
- Create menu, including:
- Workflow Activity
- Cash In
- Credit Note
- Credit Agreement
- Contract
- Correction Invoice
- Debit Note
- EDI Invoice
- E-Mail
- Instalment Receipts
- VAT Correction S/L
- Add Customer
- Add Item
- Workflow Activity
- Row menu
- Home page for Sales Ledger manual
- Home page for Standard ERP manual
Koosta leping
Selle funktsiooniga koostatakse Arvest Leping. See on mugav firmadele, kes müüvad nii tooteid kui pakuvad ka müügijärgset hooldusteenust: alati kui müüakse mingi toode, saab sellele kohe (või millalgi hiljem) ka teeninduslepingu registreerida. Kogu vajalik informatsioon (Klient, Artiklid ja seerianumbrid) kantakse automaatselt Lepingute registrisse, hoides kokku aega ja vähendades võimalust teha sisestusvigu. Et funktsioon toimiks, tuleb Arve salvestada, kuid Arve ei pea olema kinnitatud.
Funktsiooni valimisel koostatakse Lepingute registrisse (Lepingute moodulis) uus kaart. See avatakse eraldi aknas pealkirjaga Leping: Vaata. Leping on koostatud ja salvestatud, kuid vajadusel saad seda muuta ning seejärel kinnitada.
Koefitsient, Klass, Perioodi tüüp ja Arve tegemise instruktsioonid sisestuvad uue Lepingu Kuupäevade kaardile Lepingute mooduli seadistusest Kliendi lepinguseadistused vastava Kliendi kaardilt. Kui selles seadistuses ei ole vastava Kliendi kohta kaarti, võetakse need andmed sama mooduli seadistusest Lepinguseadistused.
Igale Artiklile on võimalik anda vastav Lepinguartikkel, mis määratakse Artiklikaardi Retsepti kaardil. Lepinguartikli kohta peab Artiklite registris olema eraldi kaart, millel on näidatud Artikli hooldustasu. Uuele lepingule võetakse Arvelt vaid need Artiklid, millele on määratud Lepinguartiklid. Selliste Artiklite Lepinguartiklid lisatakse Lepingu Artiklite kaardile koos originaalartikli seerianumbriga (E osal). Lepingule kantakse ka Arve Kogused. Kui Arvel ei ole Artikleid, millele oleks määratud Lepinguartikkel, ei koostata sellest Arvest Lepingut.
Pane tähele, et uus Leping on kinnitamata ja sellel puudub Alguskuupäev. Seega ei saa sellest kohe Arveid koostada.
Lähemalt loe akna Leping: Vaata ja Lepingutele Arvete koostamise kohta Lepingute moodulit käsitlevast juhendist.
Koosta parandusarve
Antud funktsiooni koha loe palun osast Kreeditarved.Create Menu - Invoice - Debit Note
This function is designed for use in Argentina. A Debit Note is an Invoice that a company can issue when it needs to charge a Customer for costs such as finance costs for bounced cheques and charges for freight if they should be paid by the Customer. Usually a Debit Note will be related to a previous Invoice. A company can also issue a Debit Note if the prices in the previous Invoice were lower than they should have been.
Before using this function, you should first create a Payment Term in which the Type is "Manual Interest Invoice".
To create a Debit Note from an Invoice, first open the Invoice in a record window and then select 'Debit Note' from the Create menu. A new Debit Note will be created and opened in a window entitled 'Invoice Inspect'. This means that it has already been saved and is being opened for checking.
The Debit Note will be a duplicate of the original Invoice, with these exceptions: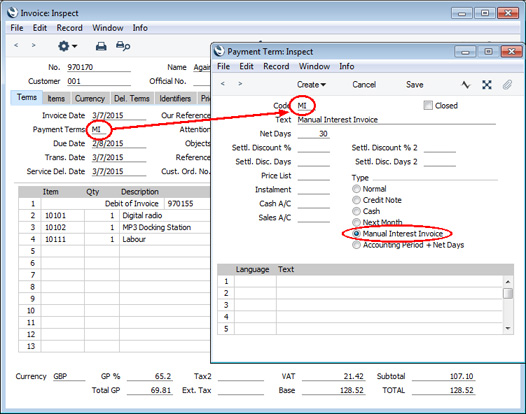
- A new row containing the phrase "Debit of Invoice" will have been inserted as the first row of the grid on the 'Items' card, pushing any existing rows down. The field to the right of this phrase will contain the Number of the original Invoice.
- The Payment Term will be the first record alphabetically with the Type "Manual Interest Invoice" in the Payment Terms setting.
- If you have specified in the Number Series Defaults setting in the System Module that Interest Invoices will use a different Number Series to standard Invoices, the Invoice Number will be taken from that Number Series. Otherwise it will be taken from the first valid number sequence in the Number Series - Invoices setting as normal.
Click the OK check box when you are sure the Debit Note is correct and save it. As with ordinary Invoices, this will cause the Sales Ledger to be updated and, if so defined in the Sub Systems setting in the Nominal Ledger and in the Number Series - Invoices setting, a Nominal Ledger Transaction to be created.
As a Debit Note has a "Manual Interest Invoice" Payment Term, it will be printed using the Interest Invoice Form Template instead of the standard Invoice Form Template. Please refer to the Printing Invoices page for more details.
If the function does not create a Debit Note when expected, the probable reason is that the original Invoice has not yet been marked as OK.
---
The Invoice register in Standard ERP:
- Introduction
- Entering an Invoice
- Entering an Invoice - Examples
- Controlling Prices in Invoices
- Inspecting Invoices, Marking as OK and Posting to the Nominal Ledger
- Nominal Ledger Transactions from Invoices
- Error Messages
- Printing Invoices
- Accruals in the Sales Ledger
- Cash Notes in the Sales Ledger
- Credit Notes
- Operations menu
- Create menu, including:
- Workflow Activity
- Cash In
- Credit Note
- Credit Agreement
- Contract
- Correction Invoice
- Debit Note
- EDI Invoice
- E-Mail
- Instalment Receipts
- VAT Correction S/L
- Add Customer
- Add Item
- Workflow Activity
- Row menu
- Home page for Sales Ledger manual
- Home page for Standard ERP manual
Koosta EDI arve
EDI (Electronic Data Interchange ehk elektrooniline andmevahetus) moodulit kasutatakse Tellimuste vastuvõtmiseks ja Arvete väljastamiseks kindlas formaadis elektroonilisel teel. Kui kasutad seda moodulit, kasuta seda funktsiooni Arve salvestamiseks EDI Arvena. Klient peab olema registreeritud EDI Kliendina (Kliendikaardi Tingimuste kaardil). Lähemalt küsi palun kohalikult HansaWorldi esindajalt.Create Menu - Invoice - E-Mail
You can use this function to create a Mail containing details of the Invoice, which you can use to send the Invoice to the Customer by email.
When you select the function, the following screen appears, in which you can create a new Mail:
A new record will be opened in a window entitled 'Mail: Inspect'. This means that it has already been saved and is being opened for checking. The details in the Mail will be as follows: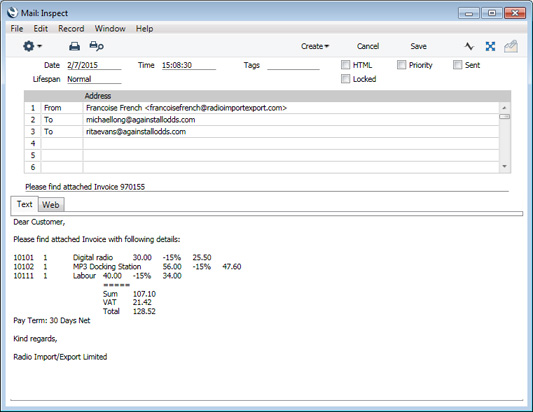
- The sender of the Mail will be the current user. If the current user doesn't have a Mailbox, the sender will be the From System Mailbox specified in the Mail and Conference Settings setting in the E-mail and Conferences module. If there is no From System Mailbox, no Mail will be created.
- The Recipient of the Mail will be chosen as follows:
- If the Customer in the Invoice has a record in the Additional Email Recipients setting in the CRM module, the Mail will be sent to the Contact Persons listed with the Form Type "Invoice" in that record.
- If the Customer does not have a record in the Additional Email Recipients setting or its record in that setting has no Contact Persons with the Form Type "Invoice", the Mail will be sent to the Email Address of the Contact Person quoted in the Attention field in the Invoice.
- If the Contact Person quoted in the Attention field in the Invoice does not have an Email Address or there is no Contact Person in the Attention field, the Mail will be sent to the Email Address specified in the Contact record for the Customer.
- If the above points are not satisfied, no Mail will be created.
- If the Customer in the Invoice has a record in the Additional Email Recipients setting in the CRM module, the Mail will be sent to the Contact Persons listed with the Form Type "Invoice" in that record.
- The Subject and Text of the Mail will be taken from the record in the Mail Texts setting in the E-mail and Conferences module in which the Form is "Invoices". If the Invoice has a Language and the Mail Text record contains a row for that Language, the Subject and Text will be determined by the fields in that row. Otherwise, they will be determined by the fields in the Mail Text header, as follows:
- The Subject in the mail will be composed from the Subject in the Mail Text record (which should have a trailing space), the text "Invoice" or "Credit Note" and the Invoice Number. For example, if the Subject in the Mail Text record is "Please find attached " (with trailing space), the Subject of the Mail will be "Please find attached Invoice XXXX" (where XXXX is the Invoice Number).
- The Text of the Mail will be built up as follows:
- The initial text will be taken from the Standard Text record quoted in the First Text field in the Mail Text record.
- Depending on the Do not put Record Details in Mail Body option in the Mail Text record, the Items in the Invoice will then be listed, followed by the Invoice totals and the Payment Term.
- The final text will be taken from the Standard Text record quoted in the Last Text field in the Mail Text record. It is recommended that the first line in this Standard Text record should be a carriage return, to ensure that the text in the mail is neatly spaced.
- The initial text will be taken from the Standard Text record quoted in the First Text field in the Mail Text record.
If there is no suitable record in the Mail Texts setting, the Subject and Text will be taken from the Invoice Mail Settings setting in the Sales Ledger, in the same way as described above, The Subject in this setting should not have a trailing space. If the Invoice Mail Settings setting is empty, the Subject of the Mail will be "Invoice XXXX" or "Credit Note XXXX" (where XXXX is the Invoice Number). The Text of the Mail will be constructed as described in step ii above.
- The Subject in the mail will be composed from the Subject in the Mail Text record (which should have a trailing space), the text "Invoice" or "Credit Note" and the Invoice Number. For example, if the Subject in the Mail Text record is "Please find attached " (with trailing space), the Subject of the Mail will be "Please find attached Invoice XXXX" (where XXXX is the Invoice Number).
- A PDF version of the Invoice will be attached to the Mail, accessible through the Document Manager. This requires you to have designed Form Templates to be used by each type of Invoice (i.e. Invoice, Credit Note, Cash Note, Interest Invoice and Project Invoice), and to have assigned those Form Templates to each Invoice Form using the 'Define Form' function. When you design the Form Templates, you may need to use Styles that will embed fonts in PDF files (this will depend on the fonts you use). You may also need to choose a code page and page setup, which you can do in the Form Template Properties. Please refer here for details about designing Form Templates, and here for a list of the fields you can include in the Form Templates used by the various Invoice forms.
- The Invoice record itself will also be attached to the Mail through its Link Manager, and similarly the Mail will be attached to the Invoice. This allows you to open the Mail quickly and easily when reviewing the Invoice, or to open the Invoice from the Mail.
- The status of the Invoice will change to Printed. So, if you send it by email again or print it, the word "Copy" will be printed diagonally across the page as a watermark (unless you are using the No Test Printout option in the Optional Features setting in the System module).
If the function does not create a Mail, the probable causes are:
- The current user does not have a Mailbox.
- No suitable recipient email address was found.
- The Invoice has not been saved.
- The Approval Status of the Invoice does not allow a Mail to be created from it. If you need Invoices to pass through an approval process before you can create Mails from them, you can configure such a process using the Approval Rules register in the Business Alerts module. Please refer to the description of the Approval Status field on the 'Inv. Address' card for brief details about the approval process and here for full details.
If you are using the Use External Mail Software option in the Mail and Conference Settings setting, the Mail will not be created inside Standard ERP as described above. Instead, it will be created in your default mail application (e.g. Eudora, Outlook, etc).
If you need to send several Invoices by email, use the 'Create Mails from Invoices' Maintenance function.
---
The Invoice register in Standard ERP:
- Introduction
- Entering an Invoice
- Entering an Invoice - Examples
- Controlling Prices in Invoices
- Inspecting Invoices, Marking as OK and Posting to the Nominal Ledger
- Nominal Ledger Transactions from Invoices
- Error Messages
- Printing Invoices
- Accruals in the Sales Ledger
- Cash Notes in the Sales Ledger
- Credit Notes
- Operations menu
- Create menu, including:
- Workflow Activity
- Cash In
- Credit Note
- Credit Agreement
- Contract
- Correction Invoice
- Debit Note
- EDI Invoice
- E-Mail
- Instalment Receipts
- VAT Correction S/L
- Add Customer
- Add Item
- Workflow Activity
- Row menu
- Home page for Sales Ledger manual
- Home page for Standard ERP manual
Koosta osaliste maksete laekuminsed
Seda funktsiooni kasutatakse, kui Kliendiga on kokku lepitud, et Arve tasutakse osamaksetena. Funktsiooni valimisel avaneb järgmine aken:
Täida väljad nagu näidatud. Klõpsates Käivita, koostatakse vastav arv kinnitamata Laekumisi. Neid saad kinnitada vastavalt raha laekumisele. Arvet käsitletakse laekumata Arvena ja see jookseb aruandesse Kliendi väljavõte, tasumata arved kuni kõik Laekumised on kinnitatud.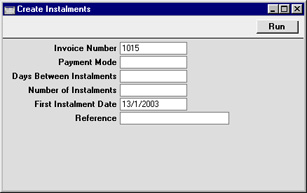
Enne funktsiooni käivitamist peab Arve olema kinnitatud.
Koosta käibemaksuparandus
Mõnedes riikides (nt Poola ja Ukraina) võib Arvest Finantskande koostamisel Müügi KM Konto konteeringu edasi lükata. See võib olla vajalik, kui Arve esitatakse enne kaupade kättetoimetamist. Antud funktsiooniga on seda lihtne teha.
Enne funktsiooni käivitamist salvesta Arvel kõik muudatused ning kinnita Arve. Samuti peab igale Arvel kasutatud KM koodile olema määratud Müügi KM paranduse Konto KM koodi kaardi C osal.
Funktsiooni käivitamisel koostatakse uus kaart seadistusse Käibemaksu parandused, (M/R). Kaart avatakse eraldi aknas ning see pole salvestatud.
Sisesta Kande kuupäeva väljale uus KM kande kuupäev. Seejärel märgi valik Kinnita ja salvesta kaart.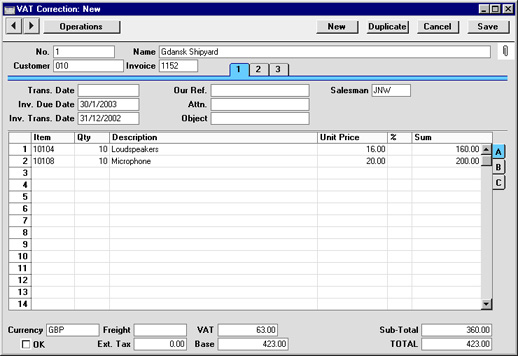
Finantsmoodulis kajastub kande parandus kahel viisil:
- Originaalarvest koostatud Kandel asendatakse kanne Müügi KM Kontole kandega Müügi KM paranduse Kontole.
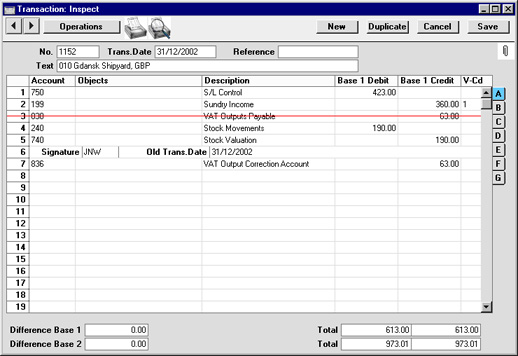
- Käibemaksu paranduse kaardist koostatakse uus Kanne, millega tühistatakse kanne KM paranduse Kontole ja krediteeritakse Müügi KM Kontot.
Eelnevaid KM paranduse kaarte saad vaadata Müügireskontro seadistuses Käibemaksu parandused (M/R), kuhu saad ka kaarte otse sisestada: uuele KM paranduse kaardile Arve numbri määramisel sisestub ülejäänud informatsioon Arve kohta automaatselt.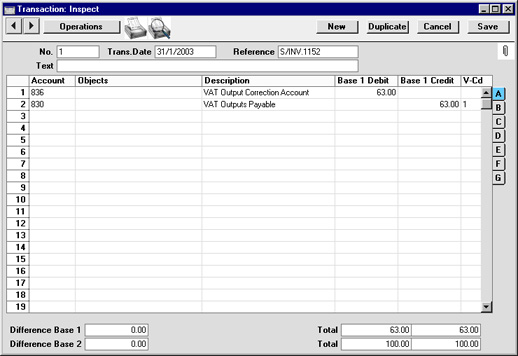
Kinnitatud KM parandusel saad vajadusel muuta kuupäeva. Selleks ava KM paranduse kaart, vali Operatsioonide menüüst käsklus Muuda kande kuupäeva ja määra uus kuupäev.
Create Menu - Invoice - Add Customer
The 'Add Customer' function provides an easy way of creating a new Customer record in the Contact register while looking at an Invoice. When you select the function, the 'Contact: New' window will be opened immediately. The Customer check box will be ticked by default. Enter the new Customer's details and click [Save]. The new Customer will be saved, the window will be closed and the new Customer Number and other details will be entered in the Invoice. Please refer here for full details about the Contact register.
---
The Invoice register in Standard ERP:
- Introduction
- Entering an Invoice
- Entering an Invoice - Examples
- Controlling Prices in Invoices
- Inspecting Invoices, Marking as OK and Posting to the Nominal Ledger
- Nominal Ledger Transactions from Invoices
- Error Messages
- Printing Invoices
- Accruals in the Sales Ledger
- Cash Notes in the Sales Ledger
- Credit Notes
- Operations menu
- Create menu, including:
- Workflow Activity
- Cash In
- Credit Note
- Credit Agreement
- Contract
- Correction Invoice
- Debit Note
- EDI Invoice
- E-Mail
- Instalment Receipts
- VAT Correction S/L
- Add Customer
- Add Item
- Workflow Activity
- Row menu
- Home page for Sales Ledger manual
- Home page for Standard ERP manual
Create Menu - Invoice - Add Item
The 'Add Item' function provides an easy way of creating a new Item record while looking at an Invoice. When you select the function, the 'Item: New' window will be opened immediately. Enter the new Item's details and click [Save]. The new Item will be saved, the window will be closed and the new Item Number and other details will be entered in the first empty row in the Invoice. Please refer here for full details about the Item register.
---
The Invoice register in Standard ERP:
- Introduction
- Entering an Invoice
- Entering an Invoice - Examples
- Controlling Prices in Invoices
- Inspecting Invoices, Marking as OK and Posting to the Nominal Ledger
- Nominal Ledger Transactions from Invoices
- Error Messages
- Printing Invoices
- Accruals in the Sales Ledger
- Cash Notes in the Sales Ledger
- Credit Notes
- Operations menu
- Create menu, including:
- Workflow Activity
- Cash In
- Credit Note
- Credit Agreement
- Contract
- Correction Invoice
- Debit Note
- EDI Invoice
- E-Mail
- Instalment Receipts
- VAT Correction S/L
- Add Customer
- Add Item
- Workflow Activity
- Row menu
- Home page for Sales Ledger manual
- Home page for Standard ERP manual
Create Menu - Invoice - Receipt
This page describes the 'Receipt' function on the Create menu in the Invoice record window. If you are using iOS or Android, the 'Receipt' function is on the + menu.
---
The 'Receipt' function allows you to create a Receipt from an Invoice. This Receipt will record the receiving of a payment against the Invoice from the Customer.
Before you can create a Receipt from an Invoice, you must mark the Invoice as OK and save. Then select 'Receipt’ from the Create menu (Windows/macOS) or + menu (iOS/Android). The following window will appear, in which you can create a new Receipt:
A new record will be opened in a window entitled 'Receipt: New'. This means that it has not yet been saved. The new Receipt will contain the following default values: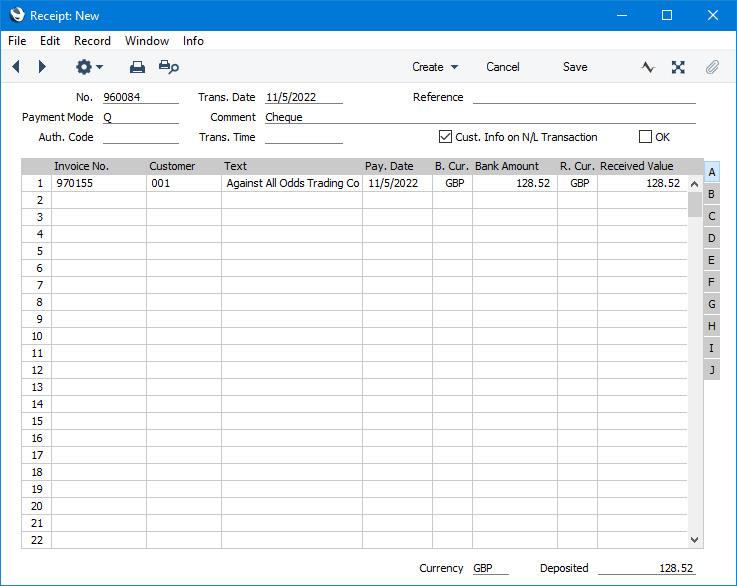
- The Trans. Date in the header and the Pay. Date in the row will be the current date.
- The Payment Mode will be the first Payment Mode listed in the Payment Modes setting.
- The Receipt will contain a single row in which the Bank Amount and Received Value fields contain the full outstanding value of the Invoice. The Bank Currency will be the Currency specified in the Payment Mode Account, or Base Currency 1. The Received Currency will be the Invoice Currency.
If you want to prevent particular users from creating Receipts from Invoices using this function, assign them to an Access Group in which you have denied access to the 'Invoice to Receipt' Action.
Please refer here for full details about the Receipt register.
---
The Invoice register in Standard ERP:
- Introduction
- Entering an Invoice
- Entering an Invoice - Examples
- Controlling Prices in Invoices
- Inspecting Invoices, Marking as OK and Posting to the Nominal Ledger
- Nominal Ledger Transactions from Invoices
- Error Messages
- Printing Invoices
- Accruals in the Sales Ledger
- Cash Notes in the Sales Ledger
- Credit Notes
- Operations menu
- Create menu, including:
- Workflow Activity
- Cash In
- Credit Note
- Credit Agreement
- Contract
- Correction Invoice
- Debit Note
- EDI Invoice
- Email
- Instalment Receipts
- VAT Correction S/L
- Add Customer
- Add Item
- Receipt
- Row menu
- Home page for Sales Ledger manual
- Home page for Standard ERP manual
Row Menu - Invoice
The matrix in the Invoice window has its own menu, which contains functions that refer to or affect an individual row in the matrix. This is sometimes known as the "Row Menu".
To use the Row menu, first click in any field in the row in question (i.e. the row to which the function is to be applied), and then right-click (Windows) or Ctrl-click (Mac OS X) the row number (on the left of the row). A menu will appear, where you can select the function that you need:
Please click the links below for details about each function on the Row menu: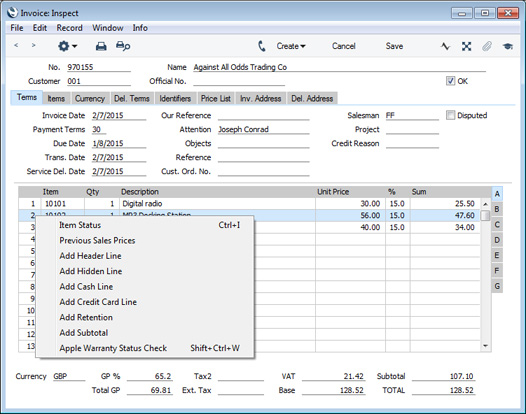
- Item Status
- Previous Sales Prices
- Add Header Line
- Add Hidden Line
- Add Cash Line
- Add Credit Card Line
- Add Subtotal
The Invoice register in Standard ERP:
- Introduction
- Entering an Invoice
- Entering an Invoice - Examples
- Controlling Prices in Invoices
- Inspecting Invoices, Marking as OK and Posting to the Nominal Ledger
- Nominal Ledger Transactions from Invoices
- Error Messages
- Printing Invoices
- Accruals in the Sales Ledger
- Cash Notes in the Sales Ledger
- Credit Notes
- Operations menu
- Create menu
- Row menu
- Home page for Sales Ledger manual
- Home page for Standard ERP manual
Vaata artikli hetkeseisu
Selle käsklusega saad kohe informatsiooni Arvel oleva Artikli kohta, mille väljal kursor vilgub või mille oled valinud Ctrl-Enter valikuaknas. Eraldi aknas näidatakse Artikli kogust Laos, Tellimustel ning võimalikku lähetatavat kogust..
Lähemalt loe selle funktsiooni kohta siit.
Vaata eelmisi müügihindu
Selle funktsiooniga väljastatakse aruanne Arvel toodud Artikli eest Kliendilt eelnevalt küsitud hindade kohta. Aseta kursor soovitud arvereale ja vali käsklus Operatsioonide menüüst. Aruandes näed iga erineva hinna kohta viimatiesitatud Arvet.Row Menu - Invoice - Add Header Line
You can use the 'Add Header Line' function when you need to insert a row above the Invoice Items where you can enter some descriptive text. You can use this function at any time while entering the Invoice, as follows:
- Place the insertion point anywhere in a row in the grid on the 'Items' card (or highlight the entire row by clicking on the row number). Open the Row menu by right-clicking (Windows) or ctrl-clicking (Mac OS X) the row number, and select this function. A special "Header" row will be inserted in the grid above the row containing the insertion point.
- Place the insertion point in any field outside the grid on the 'Items' card and select this function. A special "Header" row will be inserted in the grid as the first row.
When you design the Form Template to be used when printing Invoices, you can specify that the special "Header" row will be printed in a different Style to the rows containing the Items (e.g. font, font size, etc). To do this, use the 'Row Styles' function on the Operations menu of the Form Template window.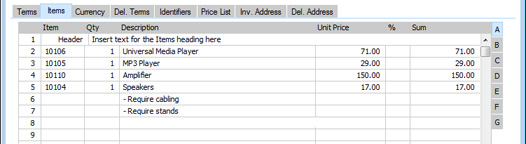
---
The Invoice register in Standard ERP:
- Introduction
- Entering an Invoice
- Entering an Invoice - Examples
- Controlling Prices in Invoices
- Inspecting Invoices, Marking as OK and Posting to the Nominal Ledger
- Nominal Ledger Transactions from Invoices
- Error Messages
- Printing Invoices
- Accruals in the Sales Ledger
- Cash Notes in the Sales Ledger
- Credit Notes
- Operations menu
- Create menu
- Row menu, including:
- Home page for Sales Ledger manual
- Home page for Standard ERP manual
Lisa varjatud rida
Seda funktsiooni kasuta, kui soovid, et teatud read ei kajastuks Arve väljatrükil.
Sisesta Arve nii, et read, mida soovid välja trükkida, jääksid varjatud ridadest ülespoole. Vii kursor esimesele reale, mida Sa ei soovi väljatrükil näha. Selleks ei saa olla Arve esimene rida. Vali Operatsioonide menüüst käsklus Lisa varjatud rida ja sisestatakse uus rida. Seda rida ja kõiki sellele järgnevaid ridu Arvele ei trükit.
Row Menu - Invoice - Add Cash Line
The 'Add Cash Line' function allows you to register a cash payment against an Invoice. This function is therefore an alternative to entering the Invoice as a Cash Note, with these advantages:
- You can use the 'Add Cash Line' function when the Invoice has only been partially paid.
- A cash payment registered using the 'Add Cash Line' function will appear in the Cash Receipts report (a Cash Note will not appear in that report as it is not possible to assign a Payment Mode to a Cash Note).
By default, the "Cash" line will assume that the cash payment is for the full value of the Invoice. You can change the value of the payment if necessary.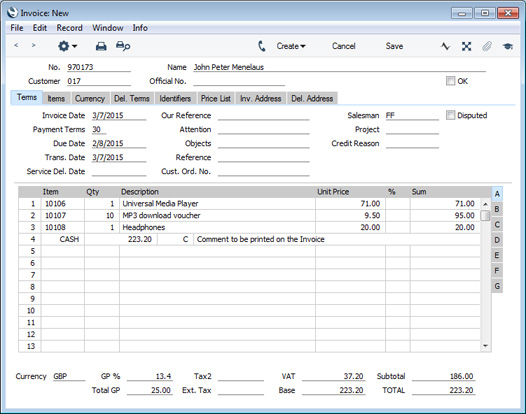
The Payment Mode in the "Cash" line will be chosen as follows:
- It will be taken from the relevant row in the Local Machine Payment Modes setting in the Point of Sales and Restaurant modules. The relevant row is the first row in the setting in which the Currency/Local Machine combination matches the Invoice and in which the Payment Type is "Cash".
- The Cash Pay. Mode in the Default Payment Modes setting will be used.
When you mark the Invoice as OK and save, the value of the payment will be debited to the Account specified in the Payment Mode. If the payment was for the full value of the Invoice, the Invoice will be treated as fully paid and so will not appear in any of your debt-chasing reports. If the payment was partial, the remaining value will be debited to the Debtor Account, and the Invoice will be regarded as open to that extent.
---
The Invoice register in Standard ERP:
- Introduction
- Entering an Invoice
- Entering an Invoice - Examples
- Controlling Prices in Invoices
- Inspecting Invoices, Marking as OK and Posting to the Nominal Ledger
- Nominal Ledger Transactions from Invoices
- Error Messages
- Printing Invoices
- Accruals in the Sales Ledger
- Cash Notes in the Sales Ledger
- Credit Notes
- Operations menu
- Create menu
- Row menu, including:
- Home page for Sales Ledger manual
- Home page for Standard ERP manual
Row Menu - Invoice - Add Credit Card Line
The 'Add Credit Card Line' function allows you to register a credit card payment against an Invoice. This function is therefore an alternative to entering the Invoice as a Cash Note, with these advantages:
- You can use the 'Add Credit Card Line' function when the Invoice has only been partially paid.
- A credit card payment registered using the 'Add Credit Card Line' function will appear in the Cash Receipts report (a Cash Note will not appear in that report as it is not possible to assign a Payment Mode to a Cash Note).
By default, the "CC" line will assume that the cash payment is for the full value of the Invoice. You can change the value of the payment if necessary.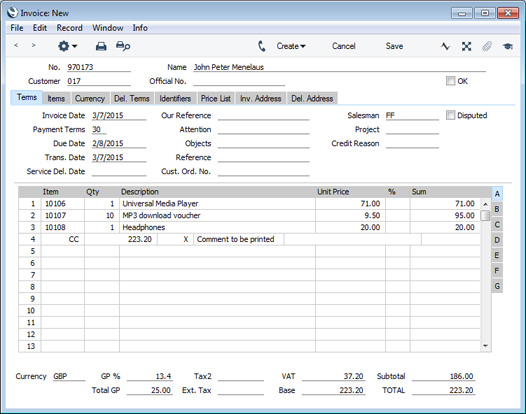
The Payment Mode in the "CC" line will be chosen as follows:
- It will be taken from the relevant row in the Local Machine Payment Modes setting in the Point of Sales and Restaurant modules. The relevant row is the first row in the setting in which the Currency/Local Machine combination matches the Invoice and in which the Payment Type is "Credit Card".
- The Cred. Card Pay. Mode in the Default Payment Modes setting will be used.
When you mark the Invoice as OK and save, the value of the payment will be debited to the Account specified in the Payment Mode. If the payment was for the full value of the Invoice, the Invoice will be treated as fully paid and so will not appear in any of your debt-chasing reports. If the payment was partial, the remaining value will be debited to the Debtor Account, and the Invoice will be regarded as open to that extent.
Note that this function only registers the credit card payment against the Invoice. It does not process the payment with your credit card processing partner or your bank. To do this, use this function to add the credit card line, save the Invoice but do not mark it as OK and then use the 'Credit Card Payment' function on the Operations menu.
---
The Invoice register in Standard ERP:
- Introduction
- Entering an Invoice
- Entering an Invoice - Examples
- Controlling Prices in Invoices
- Inspecting Invoices, Marking as OK and Posting to the Nominal Ledger
- Nominal Ledger Transactions from Invoices
- Error Messages
- Printing Invoices
- Accruals in the Sales Ledger
- Cash Notes in the Sales Ledger
- Credit Notes
- Operations menu
- Create menu
- Row menu, including:
- Item Status
- Previous Sales Prices
- Add Header Line
- Add Hidden Line
- Add Cash Line
- Add Credit Card Line
- Add Subtotal
- Item Status
- Home page for Sales Ledger manual
- Home page for Standard ERP manual
Row Menu - Invoice - Add Subtotal
The 'Add Subtotal' function allows you to add rows displaying subtotals to an Invoice.
First, place the insertion point anywhere in a row in the grid on the 'Items' card (or highlight the entire row by clicking on the row number). Then, open the Row menu by right-clicking (Windows) or ctrl-clicking (Mac OS X) the row number and select this function. A special "Subtotal" row will be inserted in the grid above the row containing the insertion point (row 8 in the illustration below). A subtotal will be placed in the Sum field in this new row, the sum of the previous rows. In the field to the left of the Sum you can type some explanatory text, which will be shown on the Invoice when it is printed. If the Invoice already has a "Subtotal" row, only the Items below that row will be included in the new subtotal.
When you design the Form Template to be used when printing Invoice, you can specify that the special "Subtotal" row will be printed in a different Style to the rows containing the Items (e.g. font, font size, etc). To do this, use the 'Row Styles' function on the Operations menu of the Form Template window.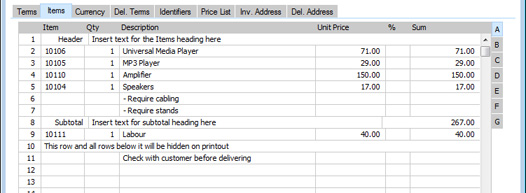
---
The Invoice register in Standard ERP:
- Introduction
- Entering an Invoice
- Entering an Invoice - Examples
- Controlling Prices in Invoices
- Inspecting Invoices, Marking as OK and Posting to the Nominal Ledger
- Nominal Ledger Transactions from Invoices
- Error Messages
- Printing Invoices
- Accruals in the Sales Ledger
- Cash Notes in the Sales Ledger
- Credit Notes
- Operations menu
- Create menu
- Row menu, including:
- Home page for Sales Ledger manual
- Home page for Standard ERP manual
- Workflow Activity
- Introduction