Introduction to Settings in the System Module
The System module contains the following settings: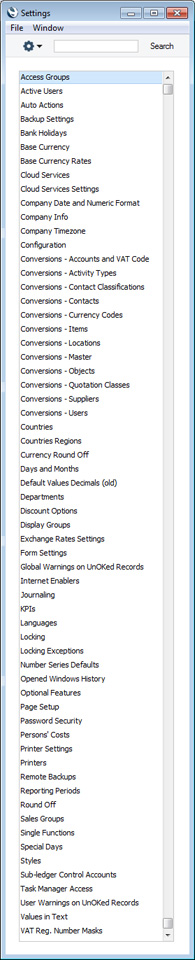
To edit a setting when you are using iOS or Android, ensure you are in the System module using the [Switch Module] button in the Navigation Centre. Select 'Settings' from the Tools menu (with 'wrench' icon). A list similar to the one shown above appears. Then, tap the item that you need in the list.
---
Please follow the links below for details about each setting:
- Access Groups
- Active Users
- Auto Actions
- Bank Holidays
- Base Currency
- Base Currency Rates
- Company Date and Numeric Format
- Company Info
- Configuration
- Conversions - Master, Conversions - Accounts and VAT Code
- Conversions - Master, Conversions - Activity Types
- Conversions - Master, Conversions - Contact Classifications
- Conversions - Master, Conversions - Contacts
- Conversions - Master, Conversions - Currency Codes
- Conversions - Master, Conversions - Items
- Conversions - Master, Conversions - Locations
- Conversions - Master
- Conversions - Master, Conversions - Suppliers
- Conversions - Master, Conversions - Objects
- Conversions - Master, Conversions - Users
- Countries
- Countries Regions
- Currency Round Off
- Days and Months
- Departments
- Discount Options
- Display Groups
- Exchange Rates Settings
- Form Settings
- Global Warnings on UnOKed Records
- Internet Enablers
- Journaling
- KPIs
- Languages
- Locking
- Locking Exceptions
- Number Series Defaults
- Opened Windows History
- Optional Features
- Password Security
- Printers
- Reporting Periods
- Round Off
- Sales Groups
- Single Functions
- Special Days
- Styles
- Sub-Ledger Control Accounts
- Task Manager Access
- User Warnings on UnOKed Records
- Values in Text
- VAT Number Masks
- Weeks
- Home page for System Module manual
- Home page for Standard ERP manual
Access Groups
Access Groups allow you to control the access that different users have to your Standard ERP system. For example, you may want to grant a particular user access to the Sales and Purchase Ledgers while preventing them from entering the Nominal Ledger. After configuring your Access Groups, whenever you enter a record to the Person register for a new user, you should assign that Person to the relevant Access Group.You can use Access Groups to control access to your Standard ERP database in one of two ways:
- You can exclude a Person from everywhere in your Standard ERP database except those areas that you list in that Person's Access Groupi.e. you specify what the Person can do. This is known as "Starting from No Access".
- You can allow a Person to go everywhere in your Standard ERP database except to those areas that you list in that Person's Access Group i.e. you specify what the Person cannot do. This is known as "Starting from Full Access".
Note that you can only control a Person's access by assigning them to an Access Group. Persons that do not belong to an Access Group will have full access to your Standard ERP database.
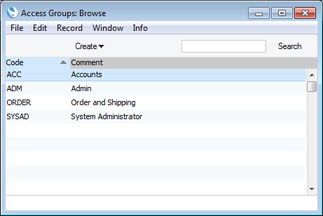
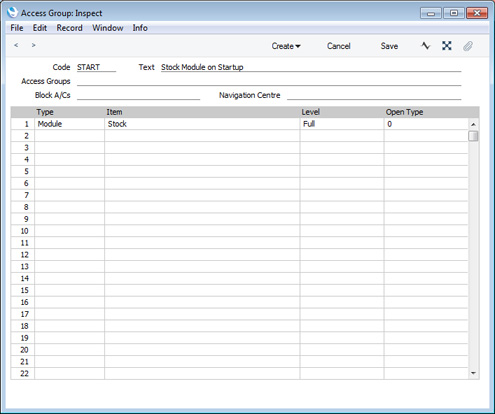
To work with Access Groups, first use the [Switch Module] button in the Master Control panel to enter the System module and then click the [Settings] button, also in the Master Control panel. Double-click 'Access Groups' in the resulting list to open the 'Access Groups: Browse' window. This window will display a list of the Access Groups that are already in the system:
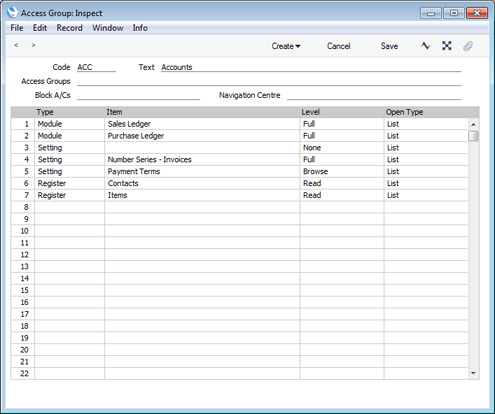
Members of this Access Group will only have access to two modules - the Sales Ledger and the Purchase Ledger. The first row of the grid gives access to the Sales Ledger, so this will be the active module when members log in to your Standard ERP database.
If the Access Group only contained the first two rows, its members would be allowed access to every area of those modules (i.e. every register, setting, report, form, Maintenance function, etc). However in this case, the third row with its blank Item denies access to all settings in both modules. The fourth row gives access back to one particular setting, the Number Series - Invoices setting, while row 5 gives Browse access to a second setting, Payment Terms. This allows members of the Access Group to open the 'Payment Terms: Browse' window but not to open individual records or to create new ones. You need to give some level of access to Payment Terms if you want members of the Access Group to be able to choose a Payment Term using 'Paste Special' when entering Invoices.
Rows 6 and 7 give Read access to the Contact and Item registers. This allows members of the Access Group to be able to open individual Contact and Item records, but not to be able to create new ones. Again, some level of access is needed to allow members to be able to choose Customers and Items using 'Paste Special' when entering Invoices.
The Access Group record contains the following fields:
- Code
- Use this field to assign a unique identifier to each Access Group. You can use up to five alpha-numeric characters.
- Text
- Enter a description of the Access Group, to be shown in the 'Access Groups: Browse' and 'Paste Special' windows.
- Access Groups
- Paste Special
Access Groups setting, System module
- You can use this field if you are creating an Access Group that will include access rights that you have already defined in another Access Group. Specify that Access Group here. You can enter several Access Groups, separated by commas.
- For example, you might already have one Access Group giving access to the Sales Ledger and one giving access to the Purchase Ledger. If you now need to create a third Access Group giving access to both Ledgers, you can enter the two previous Access Groups here, saving you the need of listing the registers, settings and so on in the matrix once again. It also reduces the maintenance burden: if you make a change in the Access Group giving access to the Sales Ledger, you won't need to make the same change in the Access Group giving access to both Ledgers.
- The access rights in the Access Group that you specify in this field will have priority over those that you specify in the matrix below. For example, if you deny access to the Number Series - Invoices setting in the grid below, and you enter an Access Group in this field in which you have given full access to the same setting, then users will have full access to the setting. If you list several Access Groups in this field with varying levels of access to that setting, then access will be given as specified in the last-named Access Group. For example, if you enter Access Groups A, B and C, then C will have priority over A and B and over the matrix below.
- For example, you might already have one Access Group giving access to the Sales Ledger and one giving access to the Purchase Ledger. If you now need to create a third Access Group giving access to both Ledgers, you can enter the two previous Access Groups here, saving you the need of listing the registers, settings and so on in the matrix once again. It also reduces the maintenance burden: if you make a change in the Access Group giving access to the Sales Ledger, you won't need to make the same change in the Access Group giving access to both Ledgers.
- Block A/Cs
- Please refer to the Block Accounts page for details about this field.
The access right that you specify in the row with the highest number will be given priority. For example, if you deny access to all settings on row 1 and then give access to the Payment Terms setting on row 2, then members of the Access Group will have access to Payment Terms. However, if you give access to the Payment Terms setting on row 1 and deny access to all settings on row 2, then members of the Access Group will not have access to Payment Terms. You can use this order of priority to set a general rule (e.g. a rule for settings as a whole) and then to make exceptions (e.g. for Payment Terms).
- Type
- Paste Special
Choices of possible entries
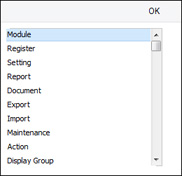
- The first step is use the Type field to specify the area of your database to which you are controlling access (for example, module, register, setting, report, document, etc.). Use 'Paste Special' to open a list of the Types available:
- Item
- Paste Special
Choices of possible entries
- Having specified the Type, use the Item field to name the specific component whose access you are controlling. Again, use 'Paste Special' to open a list of the components available. The 'Paste Special' list will vary, depending on the Type.
- For example, if you entered "Module" in the Type field, the 'Paste Special' list from the Item field will contain a list of modules:
The list will show every module in Standard ERP, including those that you may not have installed. Make sure you only select modules that are included in your particular installation of Standard ERP.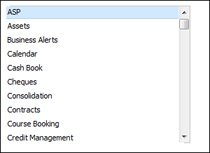
- If you enter "Action" in the Type field, the 'Paste Special' list from the Item field will contain a list of functions to which you can restrict access if necessary. These include the checking of the OK box in transactions of all kinds, the Operations menu functions and some miscellaneous features such as deleting records.
Note that, as indicated by their names, some of these Actions will Allow access, while others will Disallow access. Make sure you make an appropriate entry in the Level field to the right.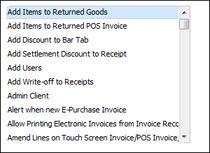
- If you enter "Reports" in the Type field, 'Paste Special' from the Item field will list all reports, and so on.
- You can leave the Item field empty if you want to apply the Level to all sub-components of the specified Type. For example, if the Type is "Reports", the Item is empty and the Level is "None", members of the Access Group will have no access to any report. You can then list individual reports on subsequent rows with a Level of "Full" to give access only to those reports listed.
- For example, if you entered "Module" in the Type field, the 'Paste Special' list from the Item field will contain a list of modules:
- Level
- Paste Special
Choices of possible entries
- Use the Level field to specify the level of access that you are allowing to the Item. A further 'Paste Special' list displays the available options:
You can use the following two options with any Type:
- Full
- Allows full access to the Item.
- None
- Denies all access to the Item.
- If the Type is "Document", this Level will allow users to print forms from browse and record windows, but not from elsewhere. For example, a user with no access to the Invoice document will be able to print an Invoice record by opening it and clicking the Printer icon, and by highlighting it in the 'Invoices: Browse' window and selecting 'Print' from the File menu. They will not be able to choose the 'Invoices' option in the 'Forms' list , so they won't be able to print a range of Invoices, and they won't have access to the 'Form Definition' window (i.e. they will not be able to change the Form Template used when Invoices are printed).
- Browse
- Allows users to open the register or setting and to see the records it contains in a list. Users will be able to search the list. Users will not be able to open, modify or create individual records.
- Browse/New
- Allows users to open the register or setting and to see the records it contains in a list. Users will be able to search the list. Users will not be able to open or modify individual records, but they will be able to create new ones (although not by duplicating existing ones).
- Read
- Allows users to open the register or setting and to see the records it contains in a list. Users will be able to search the list. Users will be able to open individual records but not to modify them or to create new ones.
You can also use this Level when the Type is "Report", in which case users will be able to print the report to screen but not to a printer or to a text file (i.e. users will not be able to print the report using any of the Media options in the report specification window except Screen).
- Read/New
- Allows users to open the register or setting and to see the records it contains in a list. Users will be able to search the list. Users will be able to open individual records but not to modify them. They will be able to create new records (including by duplicating existing ones).
Be careful when granting access to Items and Locations. Items is a setting in the Stock module but a register in many other modules. You may need separate rows for Items as a setting and for Items as a register. Similarly, Locations is a setting in the Stock module but a register in the Warehouse Management module. If you need to grant Browse or Read access to Locations so that they can be chosen using 'Paste Special', you should do so as a register.
- Full
- Open Type
- Paste Special
Choices of possible entries
- You can only use the Open Type if the Type is "Register". This field controls what will happen when a member of the Access Group opens a register, as follows:
- List
- The register's browse window will open, listing the records in the register.
- New Record
- An empty record window will open, allowing the user to create a new record in the register immediately. To open the register's browse window from this record window, the user should use the F3 (Windows and Linux) or ⌘-Shift-G (Mac OS X) key combination.
- List
Settings in the System module:
- Access Groups
- Active Users
- Auto Actions
- Bank Holidays
- Base Currency
- Base Currency Rates
- Company Date and Numeric Format
- Company Info
- Configuration
- Conversions - Master, Conversions - Accounts and VAT Code
- Conversions - Master, Conversions - Activity Types
- Conversions - Master, Conversions - Contact Classifications
- Conversions - Master, Conversions - Contacts
- Conversions - Master, Conversions - Currency Codes
- Conversions - Master, Conversions - Items
- Conversions - Master, Conversions - Locations
- Conversions - Master
- Conversions - Master, Conversions - Suppliers
- Conversions - Master, Conversions - Objects
- Conversions - Master, Conversions - Users
- Countries
- Countries Regions
- Currency Round Off
- Days and Months
- Departments
- Discount Options
- Display Groups
- Exchange Rates Settings
- Form Settings
- Global Warnings on UnOKed Records
- Internet Enablers
- Journaling
- KPIs
- Languages
- Locking
- Locking Exceptions
- Number Series Defaults
- Opened Windows History
- Optional Features
- Password Security
- Printers
- Reporting Periods
- Round Off
- Sales Groups
- Single Functions
- Special Days
- Styles
- Sub-Ledger Control Accounts
- Task Manager Access
- User Warnings on UnOKed Records
- Values in Text
- VAT Number Masks
- Weeks
- Home page for System Module manual
- Home page for Standard ERP manual
Access Groups - Active Module on Log-in
This page describes using Access Groups to determine the module that users will see when they log in to your Standard ERP system. Please click the following links for more details about other aspects of Access Groups:- The Access Groups Setting
- Active Module on Log-in
- System Administrator
- Block Accounts
By default, the Nominal Ledger will be the first module that you will see when you log in to Standard ERP. If you want another module to be active on log-in, you can change this default using Access Groups. Simply specify that module in the first row of the matrix.
If the only purpose of the Access Group is to specify the active module on log-in (i.e. you do not want to restrict access in any way), there’s no need to enter anything else in the matrix, as shown in the illustration below.
If the Access Group will be more complex, you should still use the first row to determine the active module on log-in.
---
Settings in the System module:
- Access Groups, including:
- Active Module on Log-in
- System Administrator
- Block Accounts
- Active Module on Log-in
- Active Users
- Auto Actions
- Bank Holidays
- Base Currency
- Base Currency Rates
- Company Date and Numeric Format
- Company Info
- Configuration
- Conversions - Master, Conversions - Accounts and VAT Code
- Conversions - Master, Conversions - Activity Types
- Conversions - Master, Conversions - Contact Classifications
- Conversions - Master, Conversions - Contacts
- Conversions - Master, Conversions - Currency Codes
- Conversions - Master, Conversions - Items
- Conversions - Master, Conversions - Locations
- Conversions - Master
- Conversions - Master, Conversions - Suppliers
- Conversions - Master, Conversions - Objects
- Conversions - Master, Conversions - Users
- Countries
- Countries Regions
- Currency Round Off
- Days and Months
- Departments
- Discount Options
- Display Groups
- Exchange Rates Settings
- Form Settings
- Global Warnings on UnOKed Records
- Internet Enablers
- Journaling
- KPIs
- Languages
- Locking
- Locking Exceptions
- Number Series Defaults
- Opened Windows History
- Optional Features
- Password Security
- Printers
- Reporting Periods
- Round Off
- Sales Groups
- Single Functions
- Special Days
- Styles
- Sub-Ledger Control Accounts
- Task Manager Access
- User Warnings on UnOKed Records
- Values in Text
- VAT Number Masks
- Weeks
- Home page for System Module manual
- Home page for Standard ERP manual
Access Groups - System Administrator
This page provides some suggestions regarding the configuration of the Access Group for the System Administrator. Please click the following links for more details about other aspects of Access Groups:- The Access Groups Setting
- Active Module on Log-in
- System Administrator
- Block Accounts
In multi-user systems, it is recommended that at least one member of staff acts as a system administrator, able to use the Technics module on a client machine when other users are logged in. To implement this, the Person record for that administrator should belong to an Access Group that explicitly grants full access to the Technics module:
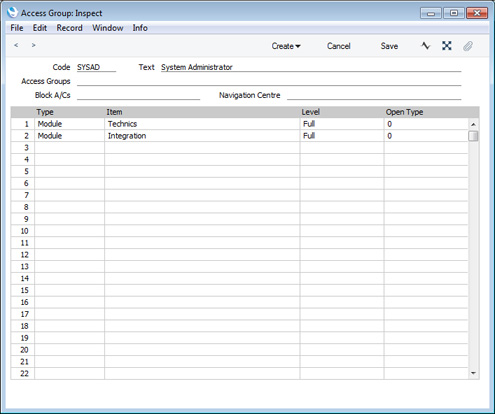
The Technics module is unusual in that you must explicitly include it in an Access Group to gain access to it. If you have not listed the Technics module in an Access Group, access will not be given, even for a Person that Starts from Full Access.
Other modules that you must include in an Access Group to gain access are Integration, which contains various functions that you can use to export information from your Standard ERP database, Data Integrity and Database Maintenance.
---
Settings in the System module:
- Access Groups, including:
- Active Module on Log-in
- System Administrator
- Block Accounts
- Active Module on Log-in
- Active Users
- Auto Actions
- Bank Holidays
- Base Currency
- Base Currency Rates
- Company Date and Numeric Format
- Company Info
- Configuration
- Conversions - Master, Conversions - Accounts and VAT Code
- Conversions - Master, Conversions - Activity Types
- Conversions - Master, Conversions - Contact Classifications
- Conversions - Master, Conversions - Contacts
- Conversions - Master, Conversions - Currency Codes
- Conversions - Master, Conversions - Items
- Conversions - Master, Conversions - Locations
- Conversions - Master
- Conversions - Master, Conversions - Suppliers
- Conversions - Master, Conversions - Objects
- Conversions - Master, Conversions - Users
- Countries
- Countries Regions
- Currency Round Off
- Days and Months
- Departments
- Discount Options
- Display Groups
- Exchange Rates Settings
- Form Settings
- Global Warnings on UnOKed Records
- Internet Enablers
- Journaling
- KPIs
- Languages
- Locking
- Locking Exceptions
- Number Series Defaults
- Opened Windows History
- Optional Features
- Password Security
- Printers
- Reporting Periods
- Round Off
- Sales Groups
- Single Functions
- Special Days
- Styles
- Sub-Ledger Control Accounts
- Task Manager Access
- User Warnings on UnOKed Records
- Values in Text
- VAT Number Masks
- Weeks
- Home page for System Module manual
- Home page for Standard ERP manual
Access Groups - Block Accounts
This page describes the Block Accounts field in the Access Group record. Please click the following links for more details about other aspects of Access Groups:- The Access Groups Setting
- Active Module on Log-in
- System Administrator
- Block Accounts
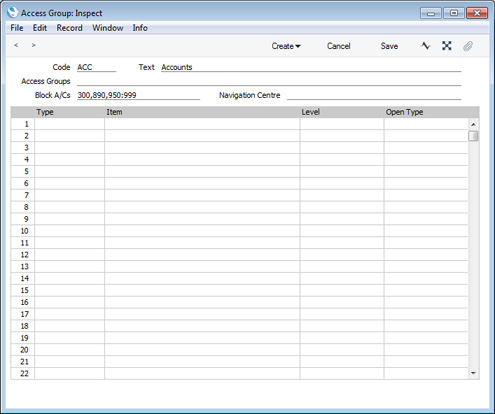
You can use the Block A/Cs field in an Access Group to prevent details of particular Accounts being shown in the Account Reconciliation and Nominal Ledger reports when they are produced by members of the Access Group. It will also prevent details of those Accounts being shown in the Account Reconciliation window. For example, you can use this field to prevent members of the Access Group seeing the details of salary payments when carrying out bank reconciliation.
You can enter a range of Accounts, a number of individual Accounts separated by commas, or a number of ranges of Accounts, again separated by commas. If you need to use 'Paste Special" to enter several Accounts, type the comma or colon before opening the 'Paste Special' list. This will cause Standard ERP to add the next Account to those already entered. Otherwise, the previous Account will be overwritten.
---
Settings in the System module:
- Access Groups, including:
- Active Module on Log-in
- System Administrator
- Block Accounts
- Active Module on Log-in
- Active Users
- Auto Actions
- Bank Holidays
- Base Currency
- Base Currency Rates
- Company Date and Numeric Format
- Company Info
- Configuration
- Conversions - Master, Conversions - Accounts and VAT Code
- Conversions - Master, Conversions - Activity Types
- Conversions - Master, Conversions - Contact Classifications
- Conversions - Master, Conversions - Contacts
- Conversions - Master, Conversions - Currency Codes
- Conversions - Master, Conversions - Items
- Conversions - Master, Conversions - Locations
- Conversions - Master
- Conversions - Master, Conversions - Suppliers
- Conversions - Master, Conversions - Objects
- Conversions - Master, Conversions - Users
- Countries
- Countries Regions
- Currency Round Off
- Days and Months
- Departments
- Discount Options
- Display Groups
- Exchange Rates Settings
- Form Settings
- Global Warnings on UnOKed Records
- Internet Enablers
- Journaling
- KPIs
- Languages
- Locking
- Locking Exceptions
- Number Series Defaults
- Opened Windows History
- Optional Features
- Password Security
- Printers
- Reporting Periods
- Round Off
- Sales Groups
- Single Functions
- Special Days
- Styles
- Sub-Ledger Control Accounts
- Task Manager Access
- User Warnings on UnOKed Records
- Values in Text
- VAT Number Masks
- Weeks
- Home page for System Module manual
- Home page for Standard ERP manual
Access Groups - Sorting Rows in an Access Group
This page describes sorting rows in an Access Group record. Please refer to the following pages for more details about other aspects of Access Groups:- The Access Groups Setting
- Active Module on Log-in
- System Administrator
- Block Accounts
- Sorting Rows in an Access Group
When working with Access Groups, bear in mind that the access right that you specify in the row with the highest number will be given priority. For example, if you deny access to all settings on row 1 and then give access to the Payment Terms setting on row 2, then members of the Access Group will have access to Payment Terms. However, if you give access to the Payment Terms setting on row 1 and deny access to all settings on row 2, then members of the Access Group will not have access to Payment Terms. You can use this order of priority to set a general rule (e.g. a rule for settings as a whole) and then to make exceptions (e.g. for Payment Terms). To help organise an Access Group record in this way you can sort the rows by selecting 'Sort' from the Operations menu (Windows/macOS) or Tools menu (iOS/Android). You do not need to save an Access Group before sorting the rows.
The function will sort the rows in an Access Group using the following principles:
- If the Type in the first row is "Module", that row will remain as the first row. This will preserve the specified module as being the one that is shown to members of the Access Group when they log in.
- Other rows will be sorted by Type (in the order Module, Register, Setting, Report, Form, Export, Import, Maintenance, Action, Display Group) then alphabetically.
- Rows granting access will be placed above those that deny access. If there are contradicting rows (e.g. rows that grant and deny access to the same setting), the lower rows will be given priority as mentioned in the introductory paragraph, so the sort will deny access.
- If there are duplicate rows that may or may not be contradicting, there will be a beep and the insertion point will then be placed in the first duplicate row. You can therefore use the 'Sort' function to find duplicate rows. After correcting the duplicate, select 'Sort' again to be shown the next duplicate.
- The Access Groups Setting
- Active Module on Log-in
- System Administrator
- Block Accounts
- Sorting Rows in an Access Group
Go back to:
- Home page for Settings in the System module
- Home page for System Module manual
- Home page for Standard ERP manual
Usuarios Activos
Esta opción lista los usuarios vigentes en una instalación de red (multiusuario).Impresiones Automáticas
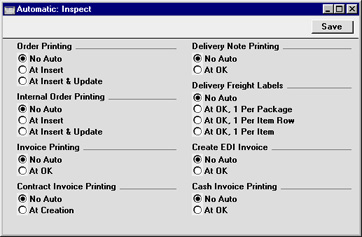
Esta opción determina las normas para impresión automática de documentos.Los documentos en cuestión son Confirmación de Orden/Reconocimiento, Orden Interna, la Nota de Entrega, la Etiqueta de Flete y la Factura. La opción por defecto es no imprimir ningún documento automáticamente.
Puedes decidir que se impriman Órdenes u Órdenes Internas cada vez que sean guardadas la primera vez o después de cada alteración. Para Facturas, Etiquetas de Flete y Notas de Entrega, el documento se puede imprimir cada vez que una Factura o Nota de Entrega sea aprobada y guardada. Para el caso de Etiquetas de Flete, si optas ‘Al dar OK, 1 por Fila Ítem’ o ‘Al dar OK, 1 por Ítem’, puedes prevenir que las etiquetas se impriman para ciertos ítems. A fin de lograr esto, debes colocar estos Ítems en un Grupo de Ítem cuya casilla “No Imprimir Etiq. Flete p/Grupo” esté tildada. También, puedes imprimir Facturas automáticamente cuando éstas sean creadas usando el comando 'Crear Factura' desde el menú Operaciones de un Contrato. Al momento de imprimir, estas Facturas estarán sin aprobar todavía, por lo tanto el documento de impresión llevará el mensaje “Impresión de Prueba”.
Finalmente, las Facturas Contado se pueden imprimir automáticamente desde el módulo Ventas cuando sean aprobadas y guardadas.
Backup Settings
Please refer to the Remote Back-ups and Journaling pages for full details about this setting.---
Go back to:
- Home page for Settings in the System module
- Home page for System Module manual
- Home page for Standard ERP manual
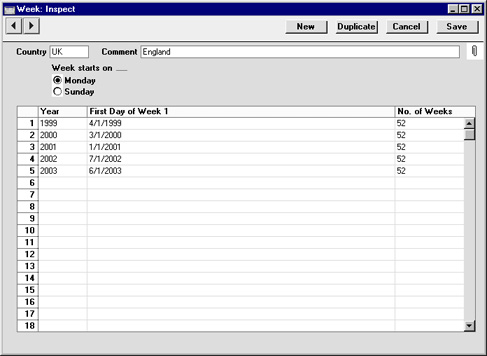
Bank Holidays
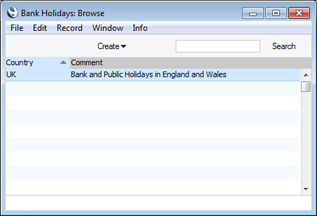
Use the Bank Holidays setting to specify which days of the week are working days and to list the public holidays during the year. This information will be used by the various scheduling functions in Standard ERP.Usually you will only need a single record in this setting. The Country in this record should be the same as the Country in the Company Info setting.
To work with this setting, first ensure you are in the System module. Then, if you are using Windows or Mac OS X, click the [Settings] button in the Navigation Centre and then double-click 'Bank Holidays' in the 'Settings' list. If you are using iOS or Android, select 'Settings' from the Tools menu (with 'wrench' icon) and tap 'Bank Holidays' in the 'Settings' list. The 'Bank Holidays: Browse' window will open. This contains a list of the records already entered to this setting.
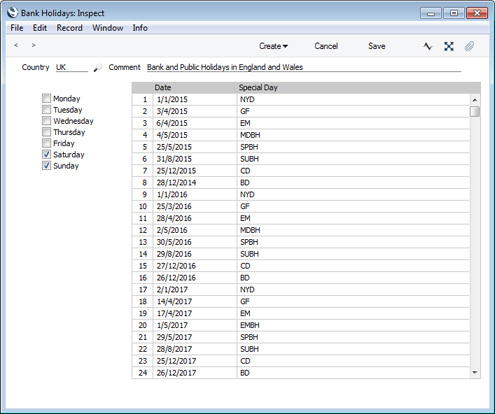
- Country
- Paste Special
Countries setting, System module
- Comment
- Enter any comment about the record, to be shown in the browse window.
- Days of the Week
- Tick the boxes of non-working days. For example, if you normally work Monday - Friday and not Saturday or Sunday, tick the boxes for Saturday and Sunday.
- Date
- Paste Special
Choose date
- Enter the date of each public holiday.
- Special Day
- Paste Special
Special Days setting, System module
- Enter the name of each public holiday.
Settings in the System module:
- Access Groups
- Active Users
- Auto Actions
- Bank Holidays
- Base Currency
- Base Currency Rates
- Company Date and Numeric Format
- Company Info
- Configuration
- Conversions - Master, Conversions - Accounts and VAT Code
- Conversions - Master, Conversions - Activity Types
- Conversions - Master, Conversions - Contact Classifications
- Conversions - Master, Conversions - Contacts
- Conversions - Master, Conversions - Currency Codes
- Conversions - Master, Conversions - Items
- Conversions - Master, Conversions - Locations
- Conversions - Master
- Conversions - Master, Conversions - Suppliers
- Conversions - Master, Conversions - Objects
- Conversions - Master, Conversions - Users
- Countries
- Countries Regions
- Currency Round Off
- Days and Months
- Departments
- Discount Options
- Display Groups
- Exchange Rates Settings
- Form Settings
- Global Warnings on UnOKed Records
- Internet Enablers
- Journaling
- KPIs
- Languages
- Locking
- Locking Exceptions
- Number Series Defaults
- Opened Windows History
- Optional Features
- Password Security
- Printers
- Reporting Periods
- Round Off
- Sales Groups
- Single Functions
- Special Days
- Styles
- Sub-Ledger Control Accounts
- Task Manager Access
- User Warnings on UnOKed Records
- Values in Text
- VAT Number Masks
- Weeks
- Home page for System Module manual
- Home page for Standard ERP manual
Moneda Base
Por favor, haz clic aquí para detalles completos de esta opción.Cotización Moneda Base
Por favor, haz clic aquí para detalles completos de esta opción.Cloud Security
This page describes the Cloud Security setting in the System module.---
The Cloud Security setting in the System module contains a single option that you can use to prevent any users from downloading any files relating to your server from their MyStandard pages.
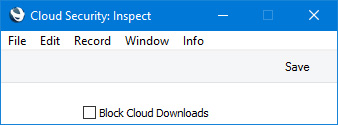
- List of Backups
- It will not be possible to use 'List of Backups' to list the back-up files stored in the "Backup" folder on the server. The list that appears when you select 'List of Backups' will be empty.
- File Manager
- It will not be possible to use 'File Manager' to list the files and folders stored in the folder containing the server application. The list that appears when you select 'File Manager' will be empty.
- View Log
- It will not be possible to use 'View Log' to view any of the server log files. If you select any of the 'View Log' options, the message "There was no log file found" will appear.
Settings in the System module:
- Access Groups
- Active Users
- Auto Actions
- Bank Holidays
- Base Currency
- Base Currency Rates
- Cloud Security
- Company Date and Numeric Format
- Company Info
- Configuration
- Conversions - Master, Conversions - Accounts and VAT Code
- Conversions - Master, Conversions - Activity Types
- Conversions - Master, Conversions - Contact Classifications
- Conversions - Master, Conversions - Contacts
- Conversions - Master, Conversions - Currency Codes
- Conversions - Master, Conversions - Items
- Conversions - Master, Conversions - Locations
- Conversions - Master
- Conversions - Master, Conversions - Suppliers
- Conversions - Master, Conversions - Tags/Objects
- Conversions - Master, Conversions - Users
- Countries
- Countries Regions
- Currency Round Off
- Days and Months
- Departments
- Discount Options
- Display Groups
- Exchange Rates Settings
- Form Settings
- Global Warnings on UnOKed Records
- Internet Enablers
- Journaling
- KPIs
- Languages
- Locking
- Locking Exceptions
- Nature of Business
- Number Series Defaults
- Opened Windows History
- Optional Features
- Password Security
- Printers
- Reporting Periods
- Round Off
- Sales Groups
- Single Functions
- Special Days
- Styles
- Sub-Ledger Control Accounts
- Task Manager Access
- User Warnings on UnOKed Records
- Values in Text
- VAT Reg. Number Masks
- Weeks
- Home page for System Module manual
- Home page for Standard ERP manual
Company Date and Numeric Format
The Company Date and Numeric Format setting is where you can ensure your Standard ERP installation displays, prints and exports dates and numbers using your preferred formats.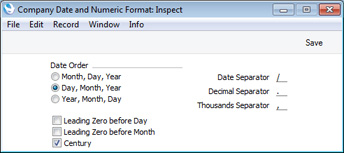
If you need the Thousands Separator to be displayed on screen, select the Display Thousand Separator option in the Optional Features setting in the System module. The Thousands Separator will always be displayed in reports and in forms.
In a single-user system, whenever you make a change in this setting, its effect will be immediate and universal.
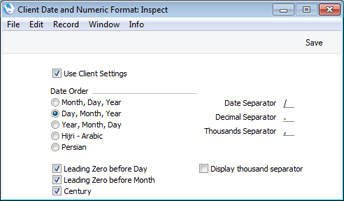
In a multi-user system, you can change the Company Date and Numeric Format setting from a client machine, but the changes will not take effect until you restart the client. You can also have different date and numeric formats on a particular client machine, and a particular user can have their own formats as well. To choose date and numeric formats for a client machine, use the Client Date and Numeric Format setting in the User Settings module, working on that machine. These formats will be used on that machine irrespective of the Person logging in (unless the Person has their own formats). Be sure to tick the Use Client Settings box before saving, to activate the setting.
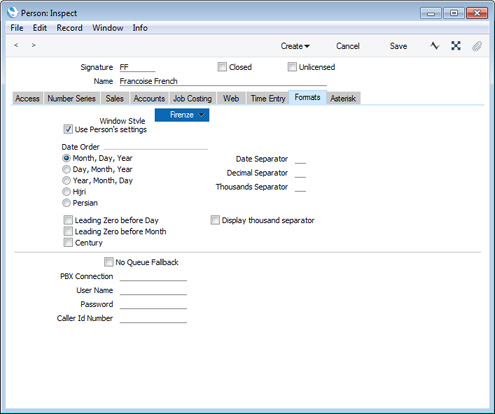
To choose date and numeric formats for a particular user, use the 'Formats' card of their Person record. The user will see dates and numbers displayed in these formats irrespective of the client machine they are using, even if the machine has its own Client Date and Numeric Format. Be sure to tick the Use Person's Settings box before saving, to activate the setting, and to quit Standard ERP and restart for the change to take effect.
Dates and Export Files
Be careful when opening a Standard ERP Export file in Microsoft Excel with the intention of editing it before importing it to a new database. Under certain circumstances, Excel will, when opening a text file, convert some variables that it interprets as dates into its own internal date format. Where you are expecting a date to appear in the spreadsheet you may see a number such as "35475". When you save the spreadsheet again as a text file these variables will not be converted back to date format. So, if you import this text file into your Standard ERP database, the dates will be wrong. To avoid this problem, make sure you use the third step of Excel's Import Wizard to set all imported columns to 'text' format (highlight all the columns in the Data Preview area using the Shift key and select 'Text' as the Column Data Format).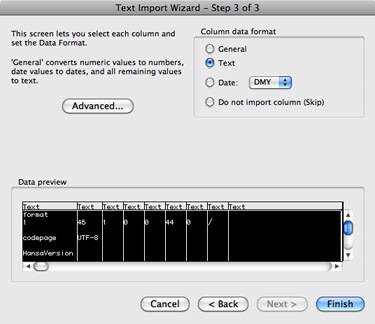
---
Settings in the System module:
- Access Groups
- Active Users
- Auto Actions
- Bank Holidays
- Base Currency
- Base Currency Rates
- Company Date and Numeric Format
- Company Info
- Configuration
- Conversions - Master, Conversions - Accounts and VAT Code
- Conversions - Master, Conversions - Activity Types
- Conversions - Master, Conversions - Contact Classifications
- Conversions - Master, Conversions - Contacts
- Conversions - Master, Conversions - Currency Codes
- Conversions - Master, Conversions - Items
- Conversions - Master, Conversions - Locations
- Conversions - Master
- Conversions - Master, Conversions - Suppliers
- Conversions - Master, Conversions - Objects
- Conversions - Master, Conversions - Users
- Countries
- Countries Regions
- Currency Round Off
- Days and Months
- Departments
- Discount Options
- Display Groups
- Exchange Rates Settings
- Form Settings
- Global Warnings on UnOKed Records
- Internet Enablers
- Journaling
- KPIs
- Languages
- Locking
- Locking Exceptions
- Number Series Defaults
- Opened Windows History
- Optional Features
- Password Security
- Printers
- Reporting Periods
- Round Off
- Sales Groups
- Single Functions
- Special Days
- Styles
- Sub-Ledger Control Accounts
- Task Manager Access
- User Warnings on UnOKed Records
- Values in Text
- VAT Number Masks
- Weeks
- Home page for System Module manual
- Home page for Standard ERP manual
Información de Empresa
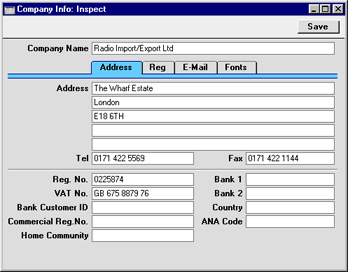
Esta opción se utiliza para ingresar el nombre, la dirección y otros datos particulares de tu empresa como el número telefónico, fax, banco y número de cuenta bancaria. Esta información se imprimirá apropiadamente en todos los documentos.Para abrir esta opción, haz clic en ‘Información de Empresa’. Veamos los campos de esta opción:
Company Info - Address Card
This page describes the fields on the 'Address' card of the Company Info setting. Please follow the links below for descriptions of the other cards:- Introduction
- 'Address' card
- 'Reg' card
- 'Email' card
- 'Fonts' card
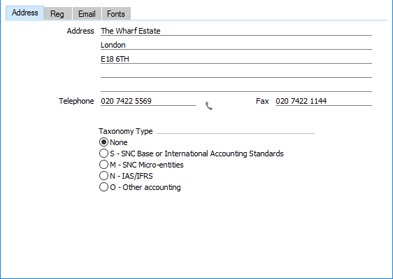
- Address
- Fields for Form Templates
Own Address, Own Address 2
- Enter your company's address in these fields.
- If you want to give a name to each of the individual address lines, use the 'Address' card of the User Defined Fields - Contacts setting in the CRM module.
- In Finland, enter your company's address in the first two Address fields (street in the first field, post code and town in the second field) and the Country field (on the 'Reg' card). The Country must use the two-character ISO 3166 format (i.e. "FI").
- Similarly, in Germany, Latvia and Spain, enter your company's address in the first two Address fields, and the Country using the two-character ISO 3166 format. In Poland, use the first three Address fields.
- To ensure the Address will be printed on documentation, add the "Own Address" or "Own Address 2" fields to your Form Template designs. The "Own Address" field will include the Company Name (from the header in this setting) in the address, while the "Own Address 2" field will not. So, if you need the Business Name to be printed instead of the Company Name, use the "Own Address 2" field. In both fields, the address will be printed on separate lines, so in both cases you should specify a Line Height. Use the Form Settings setting in the System module to specify whether blank lines will be printed, whether parts of the address will be printed on the same line, etc.
- Please refer here for more details about adding fields to Form Templates, including specifying Line Heights.
- If you want to give a name to each of the individual address lines, use the 'Address' card of the User Defined Fields - Contacts setting in the CRM module.
- Telephone
- Field for Form Templates
Own Telephone Number
- Enter your company's telephone number here.
- When adding the "Own Telephone Number" field to your Form Template designs, enter "N" as the Field Argument if you need the telephone number to be printed without spaces or other non-numeric characters.
- You can enter your company's email and web addresses on the 'Email' card of this setting.
- When adding the "Own Telephone Number" field to your Form Template designs, enter "N" as the Field Argument if you need the telephone number to be printed without spaces or other non-numeric characters.
- Fax
- Field for Form Templates
Own Fax Number
- Enter your company's fax number here.
- Taxonomy Type
- This set of options is used in Portugal. Choose the account classification reference (TaxonomyReference) used by your company. This information will be included in 'SAFT' export files, and will determine the account classification codes (TaxonomyCodes) that will also be included in 'SAFT' files.
Settings in the System module:
- Access Groups
- Active Users
- Auto Actions
- Bank Holidays
- Base Currency
- Base Currency Rates
- Cloud Security
- Company Date and Numeric Format
- Company Info, including:
- Configuration
- Conversions - Master, Conversions - Accounts and VAT Code
- Conversions - Master, Conversions - Activity Types
- Conversions - Master, Conversions - Contact Classifications
- Conversions - Master, Conversions - Contacts
- Conversions - Master, Conversions - Currency Codes
- Conversions - Master, Conversions - Items
- Conversions - Master, Conversions - Locations
- Conversions - Master
- Conversions - Master, Conversions - Suppliers
- Conversions - Master, Conversions - Tags/Objects
- Conversions - Master, Conversions - Users
- Countries
- Countries Regions
- Currency Round Off
- Days and Months
- Departments
- Discount Options
- Display Groups
- Exchange Rates Settings
- Form Settings
- Global Warnings on UnOKed Records
- Internet Enablers
- Journaling
- KPIs
- Languages
- Locking
- Locking Exceptions
- Nature of Business
- Number Series Defaults
- Opened Windows History
- Optional Features
- Password Security
- Printers
- Reporting Periods
- Round Off
- Sales Groups
- Single Functions
- Special Days
- Styles
- Sub-Ledger Control Accounts
- Task Manager Access
- User Warnings on UnOKed Records
- Values in Text
- VAT Number Masks
- Weeks
- Home page for System Module manual
- Home page for Standard ERP manual
- Solapa Reg.
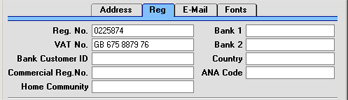
- Banco 1, Banco 2
- Estos dos campos sirven para registrar el número de cuenta bancaria principal de tu empresa (si es necesario usar los campos, hazlo). De este modo, esta información podrá ser impresa en cualquier documentación según corresponda.
- ID Cliente Ban.
- Este es un número de identificación para establecer comunicaciones automáticas con ciertas instituciones crediticias en algunos países. Por favor, contacta tu representante HansaWorld local para más detalles.
- País
- Pegado Especial
opción Países, módulo Sistema.
- El sistema es capaz de verificar todo Número IVA ingresado para Clientes y Proveedores con el objetivo de asegurar que se cumpla con el formato oficial de su país. Para clientes y proveedores cuyo país no esté especificado, esta validación utilizará el País ingresado aquí. Por favor, revisa la descripción de la opción Máscara de Nro. Registro IVA para detalles completos de esto.
- Nro. Reg. Com. (comercial)
- La funcionalidad Interestatal se utiliza para recoger estadísticas del comercio físico de mercaderías (ej: el movimiento real de mercaderías) entre los distintos países de la Unión Europea (EU). Si tu empresa está localizada en un país de la EU y su comercio con empresas en otros países de la EU es mayor al valor límite, será necesario enviar un informe Interestatal periódicamente a las autoridades pertinentes. Puedes hacer esto imprimiendo un documento o exportando un archivo de texto. En ambos casos, el informe deberá llevar el nombre de tu empresa y la dirección (según los datos respectivos en la solapa ‘Dirección’), tu Número IVA y una identificación de la empresa o sucursal. Para este último dato, debes usar este campo. Es decir, que debes crear una identificación por separado para cada sucursal/agencia en caso de tener que presentar reintegros de distintas sucursales utilizando el mismo Número IVA.
- Cód. ANA
- Aquí debes registrar el número único de identificación asignado a tu empresa por la Asociación de Numeración de Artículos. Esto es indispensable en caso de usar el módulo EDI (Electronic Data Interchange)(Intercambio Electrónico de Datos). Por favor, consulta tu representante HansaWorld local para más detalles.
Company Info - Email Card
This page describes the fields on the 'Email' card of the Company Info setting. Please follow the links below for descriptions of the other cards:- Introduction
- 'Address' card
- 'Reg' card
- 'Email' card
- 'Fonts' card

- Email
- Field for Form Templates
Own Email
- Enter your company's email address here, to be printed on documentation and included in official reports.
- WWW Address
- Field for Form Templates
Own WWW Address
- Enter your company's web address here, to be printed on documentation and included in official reports.
- CEO Name
- Enter the name of your company's CEO here.
- In Italy, the contents of this field will be included in files created by the 'Periodic VAT Declaration' Export function in the Nominal Ledger.
- In Italy, the contents of this field will be included in files created by the 'Periodic VAT Declaration' Export function in the Nominal Ledger.
- CEO
- Paste Special
Customers in Contact register
- Field for Form Templates Manager / CEO
- In Lithuania and Norway, enter a record in the Contact register representing the CEO of your company. Then, enter the Contact Number of that Contact record in this field. The Contact Name in this record will be included in 'SAFT' export files.
- In Argentina, use this field if you will be sending hotel and restaurant Invoices as e-invoices. These e-invoices should include information about the CEO of the company, in the <Opcionalales> tag. Enter a record in the Contact register representing the CEO and enter at least the VAT Reg. No., Doc. Type and Profession. Then, enter the Contact Number of that Contact record in this field.
- In Lithuania and Norway, enter a record in the Contact register representing the CEO of your company. Then, enter the Contact Number of that Contact record in this field. The Contact Name in this record will be included in 'SAFT' export files.
- Chief Accountant
- Field for Form Templates
Chief Accountant
- In Bolivia, the Chief Accountant will be included in VAT Report Purchases and VAT Report Sales reports.
- In Italy, the Chief Accountant will be exported in the <CodiceFiscale> tag inside <Dichiarante> in files created by the 'Periodic VAT Declaration' Export function in the Nominal Ledger if you have ticked the Outsourced to Acc. Bureaux box on the 'Reg' card.
- In Latvia, the Chief Accountant will be included in files created by the 'VAT Annual' Export function in the Nominal Ledger.
- In Lithuania, Norway and Portugal, the Chief Accountant will be included in 'SAFT' export files.
- In Italy, the Chief Accountant will be exported in the <CodiceFiscale> tag inside <Dichiarante> in files created by the 'Periodic VAT Declaration' Export function in the Nominal Ledger if you have ticked the Outsourced to Acc. Bureaux box on the 'Reg' card.
- Line of Business
- Field for Form Templates
Own Line of Business
- In Brazil, the Line of Business will be exported as the Código do Serviço Federal (positions 672-675 in lines in which the Tipo do registro is 20) in files created by the 'Fiscal Note for Services' Export function in the Sales Ledger. The Line of Business will also be included in the <CNAE> tag in e-invoices.
- In Portugal, the Line of Business will be included in Fiscal Year Depreciation and Fiscal Year Write-Offs reports produced from the Assets module.
- In Portugal, the Line of Business will be included in Fiscal Year Depreciation and Fiscal Year Write-Offs reports produced from the Assets module.
- Share Capital
- Field for Form Templates
Own Share Capital
- In Portugal, it is mandatory that the value of a company's share capital is printed on all documentation.
Settings in the System module:
- Access Groups
- Active Users
- Auto Actions
- Bank Holidays
- Base Currency
- Base Currency Rates
- Cloud Security
- Company Date and Numeric Format
- Company Info, including:
- Configuration
- Conversions - Master, Conversions - Accounts and VAT Code
- Conversions - Master, Conversions - Activity Types
- Conversions - Master, Conversions - Contact Classifications
- Conversions - Master, Conversions - Contacts
- Conversions - Master, Conversions - Currency Codes
- Conversions - Master, Conversions - Items
- Conversions - Master, Conversions - Locations
- Conversions - Master
- Conversions - Master, Conversions - Suppliers
- Conversions - Master, Conversions - Tags/Objects
- Conversions - Master, Conversions - Users
- Countries
- Countries Regions
- Currency Round Off
- Days and Months
- Departments
- Discount Options
- Display Groups
- Exchange Rates Settings
- Form Settings
- Global Warnings on UnOKed Records
- Internet Enablers
- Journaling
- KPIs
- Languages
- Locking
- Locking Exceptions
- Nature of Business
- Number Series Defaults
- Opened Windows History
- Optional Features
- Password Security
- Printers
- Reporting Periods
- Round Off
- Sales Groups
- Single Functions
- Special Days
- Styles
- Sub-Ledger Control Accounts
- Task Manager Access
- User Warnings on UnOKed Records
- Values in Text
- VAT Number Masks
- Weeks
- Home page for System Module manual
- Home page for Standard ERP manual
- Solapa Fuentes
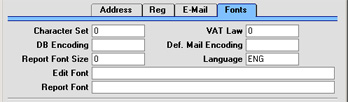
- Juego de Caracteres
- Este campo se utiliza para controlar la clasificación en el sistema. En el Reino Unido, deberá colocarse en cero. En los países donde el alfabeto es diferente, la clasificación con códigos ASCII produce una lista que no está en orden alfabético correcto. Este campo se utiliza para superar este problema.
- Ley de IVA
- Este campo se utiliza para garantizar que el comportamiento del sistema concuerde con ciertos acuerdos locales en el país donde se está ejecutando. Se puede utilizar los siguientes valores:
Bielorusia 46 Dinamarca 7 Estonia 27 Finlandia 13 Francia 1 Alemania 2 Hungría 26 Islandia 15 Irlanda (República de) 35 Italia 3 Letonia 28 Lituania 24 Holanda 4 Noruega 9 Polonia 25 Portugal 8 Rusia 32 España 6 Suecia 5 Ucrania 45 Reino Unido 0 (cero) - Codificación BD
- Si usas el sistema para enviar y recibir e-mails, esta campo deberá ser colocado en “mac” (todos los casos más bajos) si el servidor utiliza un procesador PowerPC (ej: AS/400, AIX, Macintosh, Z-series). Si el servidor está basado en Intel, el campo deberá dejarse en blanco. En Rusia, ingresa ???asir” para servidores PowerPC y “cp1251” para servidores Intel.
- Codificación Mail
- Todos los correos están codificados para proteger caracteres especiales en el texto. Esto permite que el destinatario lea estos caracteres tal como fueron escritos. En tal sentido, si usas el sistema para enviar y recibir e-mails, la codificación estándar ISO-8859-1 (Western European) se utilizará si dejas el campo en blanco. Si necesitas utilizar una codificación estándar diferente, debes especificarla aquí. Por ejemplo, los usuarios en Rusia deberán ingresar “koi8-r” en este campo. Por favor, consulta tu representante HansaWorld local para mayor información.
- Editar Fuente, Fuente Informe, Tam. Fuente Informe
- Estos campos te permiten seleccionar distintas fuentes para tus registros e informes respectivamente. Si no especificas nada en estos campos, el usará la fuente por defecto. La fuente por defecto ofrece un buen nivel de legibilidad y deberá ser cambiada sólo si existen buenas razones para hacerlo. En las versiones que no están en inglés, estos campos se utilizan para seleccionar fuentes con paquetes de caracteres especiales.
- Idioma
- Pegado Especial
opción Idiomas, módulo Sistema
- Cuando se impriman cantidades en documentos usando palabras (en vez de cifras), éstas pueden ser impresas en diferentes idiomas utilizando las reglas definidas en la opción ‘Valores en Palabras’ (módulo Sistema). En la mayoría de los casos, el Idioma utilizado será determinado por el Idioma del Cliente o Proveedor en cuestión. Para clientes y proveedores cuyo Idioma no esté especificado, se utilizará el Idioma ingresado aquí. Por favor, revisa la descripción de la opción Valores en Palabras para mayores detalles de esto.
Company Info - Mail Address Card
This page describes the fields on the 'Mail Address' card of the Company Info setting. Please follow the links below for descriptions of the other cards:- Introduction
- 'Address' card
- 'Reg' card
- 'Email' card
- 'Fonts' card
- 'Mail Address' card
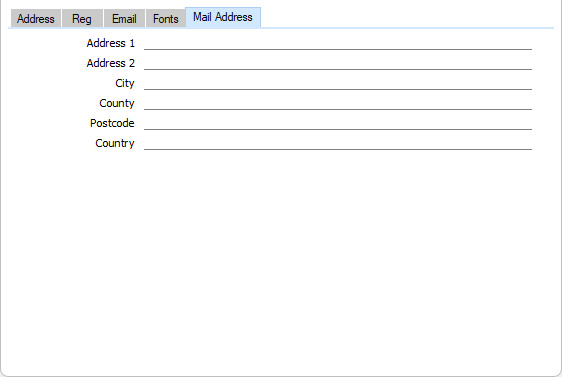
- Address
- Field for Form Templates
Own Mail Address
- If your company has different registration and correspondence addresses, enter the correspondence address in these fields.
- If you want to give a name to each of the individual address lines (as has been done in the illustration above), use the 'Address' card of the User Defined Fields - Contacts setting in the CRM module.
- To ensure the Address will be printed on documentation, add the "Own Mail Address" field to your Form Template designs. This field will not include the Company Name (from the header in this setting) in the address. If you need the Company or Business Name to be printed, add the "Own Name" or "Own Business Name" fields respectively as well. The address will be printed on separate lines so you should specify a Line Height. Use the Form Settings setting in the System module to specify whether blank lines will be printed, whether parts of the address will be printed on the same line, etc.
- Please refer here for more details about adding fields to Form Templates, including specifying Line Heights.
- If you want to give a name to each of the individual address lines (as has been done in the illustration above), use the 'Address' card of the User Defined Fields - Contacts setting in the CRM module.
- Country
- Paste Special
Countries setting, System module
- Field for Form Templates Own Mail Address Country Code
- Enter the Country in which the correspondence address is located.
- Introduction
- 'Address' card
- 'Reg' card
- 'Email' card
- 'Fonts' card
- 'Mail Address' card
Go back to:
- Home page for Settings in the System module
- Home page for System Module manual
- Home page for Standard ERP manual
Configuración
Esta opción ha sido creada para registrar los detalles de la implementación hecha en una empresa (módulos comprados, empresas, usuarios, etc.). Luego de configurar correctamente esta opción, HansaWorld genera un Código de Control el cual deberá ser citado cada vez que sea necesario solicitar una nueva Clave Enabler.La opción ‘Configuración´ se describe en detalle en la página Módulos, Usuarios y Empresas y Solicitud de Claves por Internet.
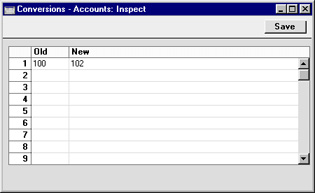
Conversiones - Cuentas y Códigos IVA (Conv. Maestro)
Estas dos opciones te permiten trasladar montos desde una o más Cuentas hacia una Cuenta diferente. Supongamos que has estado usando la Cuenta 100 para la venta de un producto particular y por alguna razón deseas usar la Cuenta 102 de ahora en adelante. Pues bien, estas opciones te permiten reemplazar la Cuenta 100 en todas aquellas transacciones donde haya sido usada (esto se comprobará principalmente en el registro Asientos). De este modo, el sistema usará la Cuenta 102 y recalculará todos los montos previos (de la anterior cuenta) para que los informes respectivos reflejen la transferencia. Para realizar esta recodificación se debe realizar el siguiente procedimiento:- Crear un Back-up de toda tu Base de Datos y luego salir de la aplicación.
- Eliminar el archivo “Hansa.HDB” de la carpeta o directorio que contiene tu aplicación HansaWorld. Cerciórate que los archivos "DBDef.txt" y "Default.txt" estén presentes.
- Entrar nuevamente al sistema. Verás que no existe ninguna carpeta llamada “Hansa.HDB” lo cual significa que se ha creado una nueva Base de Datos. Ingresa los datos respectivos de tu empresa en la ventana de diálogo “Información de Empresa” (esto es, un código y un nombre), pulsa el botón [Guardar] y luego haz doble clic en la empresa que acabas de crear.
- Cuando aparezca la ventana ‘Archivos Disponibles Importación’, ciérrala usando la x en la esquina superior derecha (no debes importar nada todavía).
- Ve al módulo Sistema y abre la opción ‘Conversiones – Cuentas y Códigos IVA’. Allí, simplemente especifica el número de la cuenta antigua y la cuenta nueva (por favor, observa la ilustración más abajo) y finalmente pulsa el botón [Guardar]:
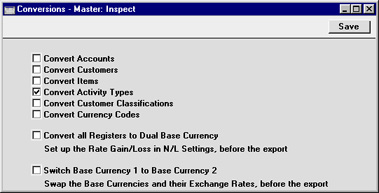
- Como siguiente paso, abre la opción ‘Conversiones – Maestro’ y tilda la casilla ‘Convertir Cuentas’ y luego pulsa el botón [Guardar]:

- Finalmente, usa ya sea la función de Importación llamada 'Automático' o 'Automático Búsqueda manual de archivo' para importar el backup respectivo. Luego de esto, deberás salir del sistema en caso que se te lo pida.
- Lo que hará el sistema al ejecutar una de la dos funciones de Importación es renumerar las cuentas implicadas y las reinscribirá en el registro Cuentas. En nuestro ejemplo, la Cuenta 100 recibirá un nuevo número (o código) que será 102. Si la Cuenta 102 ya existe, se borrará la Cuenta 100. Luego de esta acción automática, deberás verificar el registro Cuentas para asegurarte que todo el procedimiento haya sido exitoso.
- Luego de esto, produce un informe Mayor en función a una las cuentas y verifica que todos los Asientos hayan sido convertidos tal cual se esperaba.
- El siguiente paso consiste en revisar y modificar (si es necesario) todas las definiciones de los informes contables en donde se haya usado algunas de las cuentas implicadas (en nuestro ejemplo).
- Abre nuevamente la opción ‘Conversiones – Maestro’ y retira el tilde de la casilla ‘Convertir Cuentas’.
- Abre nuevamente la opción ???Conversiones – Cuentas y Códigos IVA’ y elimina todo lo que habías especificado (fila por fila).
Cabe aclarar que si tienes más de una empresa en tu Base de Datos, las conversiones se aplican a todas las empresas. No obstante, si deseas que las conversiones se apliquen solo a una de tus empresas, por favor realiza el mismo procedimiento descrito anteriormente con las siguientes consideraciones:
- Antes de realizar el primer paso – estando en la Empresa en la que ha de recaer la conversión – debes especificar los códigos de la cuenta vieja y la cuenta nueva en la opción ‘Conversiones – Cuentas y Códigos IVA’. Cerciórate que esta opción esté vacía en todas las demás empresas; o si deseas que se ejecute una conversión diferente en otra empresa, especifica asimismo los códigos de las cuentas en cuestión.
- Omite el paso 5.
Las demás casillas disponibles en la opción ???Conversiones – Maestro’ se explican en las siguientes páginas:
- Convertir Tipos Actividades;
- Convertir Códigos Monedas;
- Convertir Contactos;
- Convertir Clasificaciones de Contacto;
- Convertir Ítems;
- Convertir a Sistema Doble Moneda; y
- Cambiar Moneda Base 1 por Moneda Base 2.
- Conversiones - Tipos de Actividad
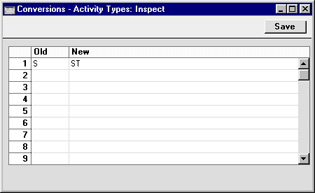
Esta opción - en combinación con la opción ‘Conversiones – Maestro’ – te permite cambiar los Tipos de Actividad en todas las Actividades. Suponiendo que has estado usando el Tipo de Actividad “S” y por alguna razón decides usar el Tipo de Actividad “ST???. Pues bien, puedes hacerlo usando esta opción. El procedimiento correcto es el siguiente:- Crear un backup de tu empresa y salir de la aplicación.
- Eliminar el archivo “Hansa.HDB” de la carpeta o directorio que contiene tu aplicación HansaWorld. Cerciórate que los archivos "DBDef.txt" y "Default.txt" estén presentes.
- Volver a entrar al sistema. Verás que no existe ninguna carpeta llamada “Hansa.HDB” lo cual significa que se ha creado una nueva Base de Datos. Ingresa los datos respectivos de tu empresa en la ventana de diálogo “Información de Empresa” (esto es, un código y un nombre), pulsa el botón [Guardar] y luego haz doble clic en la empresa que acabas de crear.
- Cuando aparezca la ventana ‘Archivos Disponibles Importación???, ciérrala usando la x en la esquina superior derecha (no debes importar nada todavía).
- Ve al módulo Sistema y abre la opción ‘Conversiones – Tipos de Actividad’. Allí, simplemente especifica los números respectivos de la Actividad antigua y la Actividad nueva (observa la ilustración más abajo) y finalmente pulsa el botón [Guardar].
- Como siguiente paso, abre la opción ‘Conversiones – Maestro’ y tilda la casilla ‘Convertir Tipos Actividades’ y luego pulsa el botón [Guardar]:
- Finalmente, usa ya sea la función de Importación llamada 'Automático' o 'Automático Búsqueda manual de archivo' para importar el backup respectivo. Luego esto, deberás salir del sistema en caso que se te lo pida.
- Lo que hará el sistema es superponer el nuevo Tipo de Actividad en todas las Actividades con el Tipo de Actividad considerado como “viejo”. Es decir, las Actividades con el tipo “S” ahora serán de tipo “ST” y en lo posterior, cualquier actividad de tipo “S” será automáticamente convertida en tipo “ST” (por ejemplo, en el registro Tiempo Objetivo).
Si ya existe el Tipo de Actividad “ST” y está correctamente inscrito en la opción ‘Tipos de Actividad’ (módulo CRM), el sistema borrará el Tipo de Actividad “S”. Si no es así, el Tipo de Actividad “S” será automáticamente “ST”.
- Abre nuevamente la opción ‘Conversiones – Maestro’ y retira el tilde de la casilla ‘Convertir Tipos Actividades’.
- Abre nuevamente la opción ‘Conversiones – Tipos de Actividad’ y elimina todo lo que habías especificado (fila por fila).
- Antes de realizar el primer paso – estando en la empresa en la que ha de recaer la conversión – debes especificar los respectivos Tipos de Actividad (nuevo y viejo) en la opción ‘Conversiones – Tipos de Actividad’. Cerciórate que esta opción esté vacía en todas las demás empresas; o si deseas que se ejecute una conversión diferente en otra empresa, especifica asimismo los Tipos de Cuenta en cuestión.
- Omite el paso 5.
- Conversiones - Clasificaciones de Contacto
Esta opción se usa igualmente en combinación con la opción ‘Conversiones – Maestro’ con el objetivo de modificar la Clasificación de Contacto en los contactos, personas de contacto y Cartas a Clientes. Asimismo, la opción Clasificaciones de Contactos será actualizada también.Para esto, debes realizar el procedimiento descrito en Conversiones – Tipos de Actividad pero esta vez usando la opción ‘Conversiones – Clasificaciones de Contacto’ y deberás tildar la casilla ‘Convertir Clasificaciones de Contacto’ en la opción ‘Conversiones – Maestro’ (paso 6).
- Conversiones - Contactos
Esta opción – en combinación con la opción ???Conversiones – Maestro’ – se utiliza del mismo modo que las Conversiones –Tipos de Actividad pero esta vez el objetivo consiste en modificar el Código de un Contacto. Por ejemplo, puedes hacer que el Contacto “001” sea “002” y que todas las transacciones previas y posteriores (ej. Cotizaciones, Órdenes, Facturas y Actividades) reflejen esta modificación.El procedimiento es el mismo descrito para las Conversiones – Tipos de Actividad pero esta vez se usa la opción ‘Conversiones – Contactos’ tomando en cuenta lo siguiente:
- En el paso 5, la opción ‘Conversiones – Contactos’ puede ser usada para ejecutar una modificación sencilla del Código de Contacto; y puede también servir para agregar un prefijo o sufijo a los Códigos de Contacto existentes. Así:
Antiguo Nuevo Resultado + A "A" se colocará delante de todos los Códigos de Contacto - A "A" se colocará al final de todos los Códigos de Contacto Es decir, que el prefijo o sufijo recaerá en todos los Contactos inscritos en la base de datos.
- En el paso 6, debes tildar la casilla ‘Convertir Contactos’ en la opción ‘Conversiones – Maestro’.
- La función de Importación que ejecutes según el procedimiento correcto, logrará convertir el código de contacto respectivo en todas las situaciones donde haya sido usado (por ej. registro Contactos y registro Asientos)).
Si el nuevo Código de Contacto (“002” en nuestro ejemplo) ya existía en la anterior base de datos, éste será eliminado. En tal circunstancia, verás que el código del Contacto “001” en todas las Órdenes y Facturas será automáticamente “002”, sin embargo el nombre de Contacto no cambiará. Si el nuevo código de contacto no existía en la anterior base de datos, el código antiguo de contacto será modificado y ahora será “002”.
- Conversiones - Códigos de Monedas
Esta opción – en combinación con la opción ???Conversiones – Maestro’ – puede ser utilizada para modificar el Código de una Moneda. Así, la modificación respectiva recaerá sobre Cotizaciones, Órdenes, Facturas y Asientos.El procedimiento es el mismo descrito en la anterior página (Conversiones – Tipos de Actividad). Esta vez, se usa la opción ‘Conversiones – Códigos de Monedas’ y se tilda la casilla ‘Convertir Códigos Monedas’ en la opción ‘Conversiones – Maestro’ (paso 6).
- Conversiones - Ítems
Esta opción se usa igualmente en combinación con la opción ‘Conversiones – Maestro’ con el objetivo de modificar el Código de Ítem. Por ejemplo, puedes modificar el código del ítem “10101” para que sea “10102” de tal manera que todas las transacciones como ser Cotizaciones, Órdenes, Facturas, Entregas y Mercaderías Recibas reflejen esta modificación.Para esto, debes realizar el procedimiento descrito en las Conversiones - Tipos de Actividad pero esta vez usando la opción ‘Conversiones – Ítem’ y deberás tildar la casilla ‘Convertir Ítems’ en la opción ‘Conversiones – Maestro’ (paso 6).
Conversions - Master, Conversions - Locations
This page describes the Conversions - Master and Conversions - Locations settings in the System module.---
The Conversions - Master and Conversions - Locations settings together allow you to change the Location Code in a Location record. For example, you can change Location Code "WHS" to "WHS_1", and the Location Code in all transactions such as Quotations, Orders, Invoices, Deliveries and Goods Receipts will be changed as well. Follow these steps:
- Change to the System module and open the Conversions - Locations setting. Enter each pair of old and new Location Codes as shown in the illustration below. In the example illustrated, we will change "WHS" (the old Location Code) to "WHS_1" (the new Location Code):
The new Location Code does not have to exist in the Locations setting. In this example, if "WHS_1" is not an existing Location, Location "WHS" will be changed to "WHS_1" by the conversion process and so "WHS" will no longer exist. If "WHS_1" is an existing Location, Location "WHS" will be deleted. In effect, this will mean that you are merging "WHS" with "WHS_1".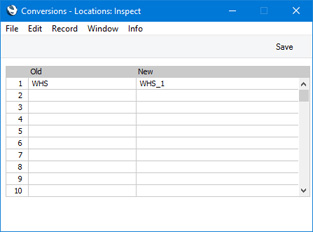
Although it is possible to merge Locations as just described, it is not recommended that you do so. The FIFO/LIFO queues for the Items in the merged Location will not be correct, and the Weighted Average setting will be corrupted. This will mean that the valuation in the Stock List will not be correct.
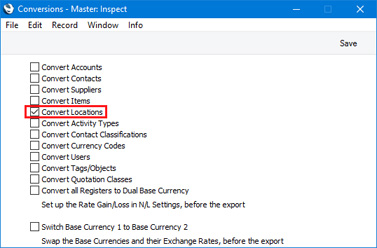
- Remaining in the System module, open the Conversions - Master setting and select the Convert Locations option:
- Make a text or timed back-up of your database and quit Standard ERP.
- Remove the Standard ERP database file (named "Hansa.HDB") from the folder or directory containing your Standard ERP application.
- Launch Standard ERP again. Because there is now no "Hansa.HDB" file, the 'Welcome to Standard ERP' window will appear. Select the [Restore from Backup] option.
- When the 'Import files available' window appears, choose to import the back-up file that you created in step 3.
- During the import process, Location records will be updated as required. In the example, the Code of Location WHS will be changed to WHS_1. References to Location WHS will be replaced with WHS_1 in all records (including Sales and Purchase Ledger transactions and Stock records).
The Location and Service Location fields in Person records, the Purchase and Via Location fields in Location records and the Main and Service Location fields in the Stock Settings setting will not be updated.
The Default Location and Default Return Location fields in the Local Machine setting in the User Settings module will not be updated. This is because the Local Machine setting is stored locally in the databases on each client machine, and the conversion routine is not able to access these local databases.
- Return to the Conversions - Master setting in the System module and turn off the option to Convert Locations.
- Return to the Conversions - Locations setting and delete everything line by line.
If the Locations setting is shared, you should repeat steps 1 and 2 above in every Company that shares it. For example, if you have three Companies and Companies 2 and 3 are sharing the Locations setting, follow steps 1 and 2 in Companies 2 and 3.
If the Locations setting is shared and is stored in Company 0 (i.e. in the Shared Registers setting in the Technics module, the In Company field is empty), you should again repeat steps 1 and 2 above in every Company that shares the register. Then, follow the procedure described above, but replace steps 5 and 6 with the following:
- Launch Standard ERP again. Because there is now no "Hansa.HDB" file, the 'Welcome to Standard ERP' window will appear. Then:
- Close the 'Welcome to Standard ERP window using the close box .
- You will be prompted to enter a new Company: a Code and Name will be sufficient. Press [Save].
- You will be presented with a blank screen: quit Standard ERP and restart.
- Repeat steps 1 and 2.
- Close the 'Welcome to Standard ERP window using the close box .
- Ensure you are in the System module and use the 'Automatic' or 'Manual file search' import functions to import the back-up file that you created in step 3.
---
Settings in the System module:
- Introduction
- Access Groups
- Active Users
- Auto Actions
- Bank Holidays
- Base Currency
- Base Currency Rates
- Cloud Security
- Company Date and Numeric Format
- Company Info
- Configuration
- Conversions - Master, Conversions - Accounts and VAT Code
- Conversions - Master, Conversions - Activity Types
- Conversions - Master, Conversions - Contact Classifications
- Conversions - Master, Conversions - Contacts
- Conversions - Master, Conversions - Currency Codes
- Conversions - Master, Conversions - Items
- Conversions - Master, Conversions - Locations
- Conversions - Master
- Conversions - Master, Conversions - Suppliers
- Conversions - Master, Conversions - Tags/Objects
- Conversions - Master, Conversions - Users
- Countries
- Countries Regions
- Currency Round Off
- Days and Months
- Departments
- Discount Options
- Display Groups
- Exchange Rates Settings
- Form Settings
- Global Warnings on UnOKed Records
- Internet Enablers
- Journaling
- KPIs
- Languages
- Locking
- Locking Exceptions
- Number Series Defaults
- Opened Windows History
- Optional Features
- Password Security
- Printers
- Reporting Periods
- Round Off
- Sales Groups
- Single Functions
- Special Days
- Styles
- Sub-Ledger Control Accounts
- Task Manager Access
- User Warnings on UnOKed Records
- Values in Text
- VAT Number Masks
- Weeks
- Home page for System Module manual
- Home page for Standard ERP manual
Conversions - Master
This page describes the Conversions - Master setting in the System module.---
The Conversions - Master setting in the System module allows you to change a particular piece of information in all records in the database. Usually you will use it together with a second setting where you will specify the information that will be changed. For example, if you need to change the Contact Number of a Contact, you will specify the old and new Contact Numbers in the Conversions - Contacts setting and tick the Convert Contacts option in the Conversions - Master setting. Then, create a text or timed back-up and import that back-up in to a new database. In the new database, the old Contact Number will have been replaced by the new one in the relevant Contact record and in all records related to the Contact (e.g. Sales and Purchase Invoices, Sales and Purchase Orders, Activities, stock transactions, etc).
The Conversions - Master setting contains the following options:
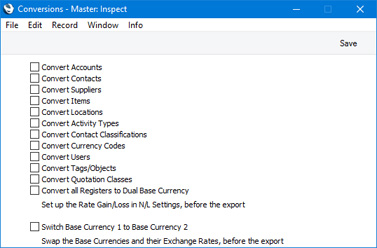
- Convert Accounts
- Convert Contacts
- Convert Suppliers
- Convert Items
- Convert Locations
- Convert Activity Types
- Convert Contact Classifications
- Convert Currency Codes
- Convert Users
- Convert Tags/Objects
- Convert all Registers to Dual Base Currency
- Switch Base Currency 1 to Base Currency 2
Settings in the System module:
- Introduction
- Access Groups
- Active Users
- Auto Actions
- Bank Holidays
- Base Currency
- Base Currency Rates
- Cloud Security
- Company Date and Numeric Format
- Company Info
- Configuration
- Conversions - Master, Conversions - Accounts and VAT Code
- Conversions - Master, Conversions - Activity Types
- Conversions - Master, Conversions - Contact Classifications
- Conversions - Master, Conversions - Contacts
- Conversions - Master, Conversions - Currency Codes
- Conversions - Master, Conversions - Items
- Conversions - Master, Conversions - Locations
- Conversions - Master
- Conversions - Master, Conversions - Suppliers
- Conversions - Master, Conversions - Tags/Objects
- Conversions - Master, Conversions - Users
- Countries
- Countries Regions
- Currency Round Off
- Days and Months
- Departments
- Discount Options
- Display Groups
- Exchange Rates Settings
- Form Settings
- Global Warnings on UnOKed Records
- Internet Enablers
- Journaling
- KPIs
- Languages
- Locking
- Locking Exceptions
- Number Series Defaults
- Opened Windows History
- Optional Features
- Password Security
- Printers
- Reporting Periods
- Round Off
- Sales Groups
- Single Functions
- Special Days
- Styles
- Sub-Ledger Control Accounts
- Task Manager Access
- User Warnings on UnOKed Records
- Values in Text
- VAT Number Masks
- Weeks
- Home page for System Module manual
- Home page for Standard ERP manual
Conversions - Master, Conversions - Suppliers
The Conversions - Suppliers setting is described on the Combining Customers and Suppliers page.---
Settings in the System module:
- Introduction
- Access Groups
- Active Users
- Auto Actions
- Bank Holidays
- Base Currency
- Base Currency Rates
- Cloud Security
- Company Date and Numeric Format
- Company Info
- Configuration
- Conversions - Master, Conversions - Accounts and VAT Code
- Conversions - Master, Conversions - Activity Types
- Conversions - Master, Conversions - Contact Classifications
- Conversions - Master, Conversions - Contacts
- Conversions - Master, Conversions - Currency Codes
- Conversions - Master, Conversions - Items
- Conversions - Master, Conversions - Locations
- Conversions - Master
- Conversions - Master, Conversions - Suppliers
- Conversions - Master, Conversions - Tags/Objects
- Conversions - Master, Conversions - Users
- Countries
- Countries Regions
- Currency Round Off
- Days and Months
- Departments
- Discount Options
- Display Groups
- Exchange Rates Settings
- Form Settings
- Global Warnings on UnOKed Records
- Internet Enablers
- Journaling
- KPIs
- Languages
- Locking
- Locking Exceptions
- Number Series Defaults
- Opened Windows History
- Optional Features
- Password Security
- Printers
- Reporting Periods
- Round Off
- Sales Groups
- Single Functions
- Special Days
- Styles
- Sub-Ledger Control Accounts
- Task Manager Access
- User Warnings on UnOKed Records
- Values in Text
- VAT Number Masks
- Weeks
- Home page for System Module manual
- Home page for Standard ERP manual
Conversions - Master, Conversions - Tags/Objects
This page describes the Conversions - Master and Conversions - Tags/Objects settings in the System module. For clarity, the term "Object" has been used in this description.---
The Conversions - Master and Conversions - Tags/Objects settings together allow you to change the Code in an Object record. The Object in all transactions such as Quotations, Orders, Invoices, Deliveries and Nominal Ledger Transactions will be changed as well. For example, using these settings, you can change Object "A" in every record in which it has been used to Object "AA". Follow these steps:
- Change to the System module and open the Conversions - Tags/Objects setting. Enter each pair of old and new Object Codes as shown in the illustration below. In the example illustrated, we will change "A" (the old Object Code) to "AA" (the new Object Code):
The new Object Code does not have to exist in the Object register. In this example, if "AA" is not an existing Object Code, Object Code "A" will be changed to "AA" by the conversion process and so "A" will no longer exist. If "AA" is an existing Object Code, Object "A" will be deleted. In effect, this will mean that you are merging "A" with "AA".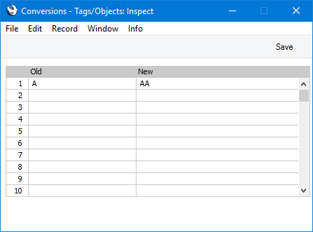
- Remaining in the System module, open the Conversions - Master setting and select the Convert Tags/Objects option:
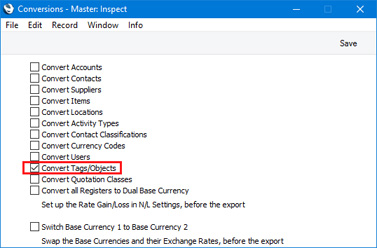
- Make a text or timed back-up of your database and quit Standard ERP.
- Remove the Standard ERP database file (named "Hansa.HDB") from the folder or directory containing your Standard ERP application.
- Launch Standard ERP again. Because there is now no "Hansa.HDB" file, the 'Welcome to Standard ERP' window will appear. Select the [Restore from Backup] option.
- When the 'Import files available' window appears, choose to import the back-up file that you created in step 3.
- During the import process, Object records will be updated as required. References to the old Currency will be replaced with the new Currency in all records (including Sales, Purchase and Nominal Ledger transactions and Sales Order records).
Note that use of the old Object Code in some settings (settings of types 1 and 2 as described here) will not be updated. Examples include Transaction Settings and Payment Modes. You will need to update these settings yourself to ensure that they contain valid Object Codes.
- Return to the Conversions - Master setting in the System module and turn off the option to Convert Tags/Objects.
- Return to the Conversions - Tags/Objects setting and delete everything line by line.
If the Tag/Object register is shared, you should repeat steps 1 and 2 above in every Company that shares it. For example, if you have three Companies and Companies 2 and 3 are sharing the Tag/Object register, follow steps 1 and 2 in Companies 2 and 3.
If the Tag/Object register is shared and is stored in Company 0 (i.e. in the Shared Registers setting in the Technics module, the In Company field is empty), you should again repeat steps 1 and 2 above in every Company that shares the register. Then, follow the procedure described above, but replace steps 5 and 6 with the following:
- Launch Standard ERP again. Because there is now no "Hansa.HDB" file, the 'Welcome to Standard ERP' window will appear. Then:
- Close the 'Welcome to Standard ERP window using the close box .
- You will be prompted to enter a new Company: a Code and Name will be sufficient. Press [Save].
- You will be presented with a blank screen: quit Standard ERP and restart.
- Repeat steps 1 and 2.
- Close the 'Welcome to Standard ERP window using the close box .
- Ensure you are in the System module and use the 'Automatic' or 'Manual file search' import functions to import the back-up file that you created in step 3.
---
Settings in the System module:
- Introduction
- Access Groups
- Active Users
- Auto Actions
- Bank Holidays
- Base Currency
- Base Currency Rates
- Cloud Security
- Company Date and Numeric Format
- Company Info
- Configuration
- Conversions - Master, Conversions - Accounts and VAT Code
- Conversions - Master, Conversions - Activity Types
- MAILLINK(HW0107SETTINGS_Conversions_Customer_Classifications,Conversions - Master, Conversions - Contact Classifications)
- Conversions - Master, Conversions - Contacts
- Conversions - Master, Conversions - Currency Codes
- Conversions - Master, Conversions - Items
- Conversions - Master, Conversions - Locations
- Conversions - Master
- Conversions - Master, Conversions - Suppliers
- Conversions - Master, Conversions - Tags/Objects
- Conversions - Master, Conversions - Users
- Countries
- Countries Regions
- Currency Round Off
- Days and Months
- Departments
- Discount Options
- Display Groups
- Exchange Rates Settings
- Form Settings
- Global Warnings on UnOKed Records
- Internet Enablers
- Journaling
- KPIs
- Languages
- Locking
- Locking Exceptions
- Number Series Defaults
- Opened Windows History
- Optional Features
- Password Security
- Printers
- Reporting Periods
- Round Off
- Sales Groups
- Single Functions
- Special Days
- Styles
- Sub-Ledger Control Accounts
- Task Manager Access
- User Warnings on UnOKed Records
- Values in Text
- VAT Number Masks
- Weeks
- Home page for System Module manual
- Home page for Standard ERP manual
Conversions - Master, Conversions - Users
This page describes the Conversions - Master and Conversions - Users settings in the System module.---
You can use the Conversions - Master and Conversions - Users settings to change the Signature (initials) in a Person record. For example, you can change Person "FF" to "FS" (perhaps because the Person married), and the Signature in all records such as Quotations, Orders, Invoices, Deliveries and Goods Receipts will be changed as well. Follow these steps:
- Change to the System module and open the Conversions - Users setting. Enter each pair of old and new Signatures as shown in the illustration below. In the example illustrated, we will change "FF" (the old Signature) to "FS" (the new Signature):
The new Signature does not have to exist in the Person register. In this example, if "FS" is not an existing Signature, Signature "FF" will be changed to "FS" by the conversion process and so "FF" will no longer exist. If "AA" is an existing Signature, Person "FF" will be deleted. In effect, this will mean that you are merging "FF" with "FS".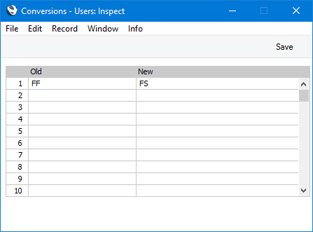
- Remaining in the System module, open the Conversions - Master setting and select the Convert Users option:
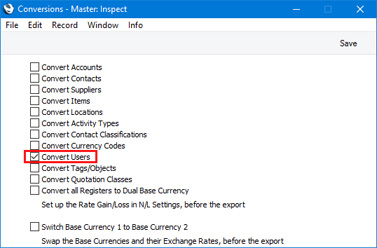
- Make a text or timed back-up of your database and quit Standard ERP.
- Remove the Standard ERP database file (named "Hansa.HDB") from the folder or directory containing your Standard ERP application.
- Launch Standard ERP again. Because there is now no "Hansa.HDB" file, the 'Welcome to Standard ERP' window will appear. Select the [Restore from Backup] option.
- When the 'Import files available' window appears, choose to import the back-up file that you created in step 3.
- During the import process, Person records will be updated as required. References to the old Signature will be replaced with the new Signature in all records (including Sales, Purchase and Nominal Ledger transactions and Sales Order records).
Note that Mailboxes will not be updated. You will need to update Mailboxes yourself to ensure that they contain valid Signatures.
- Return to the Conversions - Master setting in the System module and turn off the option to Convert Users.
- Return to the Conversions - Users setting and delete everything line by line.
If the Person register is shared, you should repeat steps 1 and 2 above in every Company that shares it. For example, if you have three Companies and Companies 2 and 3 are sharing the Person register, follow steps 1 and 2 in Companies 2 and 3.
If the Person register is shared and is stored in Company 0 (i.e. in the Shared Registers setting in the Technics module, the In Company field is empty), you should again repeat steps 1 and 2 above in every Company that shares the register. Then, follow the procedure described above, but replace steps 5 and 6 with the steps listed below.
If you are using Global Users, you should also replace steps 5 and 6 with the steps listed below because Global Users are stored in Company 0:
- Launch Standard ERP again. Because there is now no "Hansa.HDB" file, the 'Welcome to Standard ERP' window will appear. Then:
- Close the 'Welcome to Standard ERP window using the close box .
- You will be prompted to enter a new Company: a Code and Name will be sufficient. Press [Save].
- You will be presented with a blank screen: quit Standard ERP and restart.
- Repeat steps 1 and 2.
- Close the 'Welcome to Standard ERP window using the close box .
- Ensure you are in the System module and use the 'Automatic' or 'Manual file search' import functions to import the back-up file that you created in step 3.
---
Settings in the System module:
- Introduction
- Access Groups
- Active Users
- Auto Actions
- Bank Holidays
- Base Currency
- Base Currency Rates
- Cloud Security
- Company Date and Numeric Format
- Company Info
- Configuration
- Conversions - Master, Conversions - Accounts and VAT Code
- Conversions - Master, Conversions - Activity Types
- MAILLINK(HW0107SETTINGS_Conversions_Customer_Classifications,Conversions - Master, Conversions - Contact Classifications)
- Conversions - Master, Conversions - Contacts
- Conversions - Master, Conversions - Currency Codes
- Conversions - Master, Conversions - Items
- Conversions - Master, Conversions - Locations
- Conversions - Master
- Conversions - Master, Conversions - Suppliers
- Conversions - Master, Conversions - Tags/Objects
- Conversions - Master, Conversions - Users
- Countries
- Countries Regions
- Currency Round Off
- Days and Months
- Departments
- Discount Options
- Display Groups
- Exchange Rates Settings
- Form Settings
- Global Warnings on UnOKed Records
- Internet Enablers
- Journaling
- KPIs
- Languages
- Locking
- Locking Exceptions
- Number Series Defaults
- Opened Windows History
- Optional Features
- Password Security
- Printers
- Reporting Periods
- Round Off
- Sales Groups
- Single Functions
- Special Days
- Styles
- Sub-Ledger Control Accounts
- Task Manager Access
- User Warnings on UnOKed Records
- Values in Text
- VAT Number Masks
- Weeks
- Home page for System Module manual
- Home page for Standard ERP manual
Países
Esta opción se usa para definir la escritura correcta del nombre de cada país (en diferentes idiomas). Este dato se puede utilizar para producir documentos en diferentes idiomas.Abre la opción ‘Países’ para ver la lista de países existentes en tu base de datos. A continuación vemos un registro individual creado para el país de Finlandia:
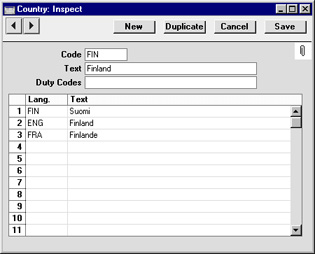
El campo ‘Código Impuestos??? se utiliza cuando el módulo Aduanas está instalado. Por favor, consulta tu representante local HansaWorld.
Countries Regions
This page describes the Countries Regions setting in the System module.---
The Countries Regions setting will be useful if you are using the Hotel module. It allows you to construct a look-up table for the Region field in the header of the Country record. This look-up table could be a list of continents or of other regional descriptions as necessary.
When adding records to the Countries setting, the Region field will allow you to assign each Country to a Region (e.g. a continent or other regional description). This information will be used by the Nationality Statistics report in the Hotel module, which can list the number of Guests from each Country, the number of Guests from each Region or both.
To open the Countries Regions setting, first ensure you are in the System module. Then, if you are using Windows or macOSX, click the [Settings] button in the Navigation Centre or use the Ctrl-S/⌘-S keyboard shortcuts and then double-click 'Countries Regions' in the 'Settings' list. If you are using iOS or Android, select 'Settings' from the Tools menu (with 'wrench' icon) and tap 'Countries Regions' in the 'Settings' list. The 'Countries Regions: Browse' window will open, listing the Country Regions records that you have previously entered.
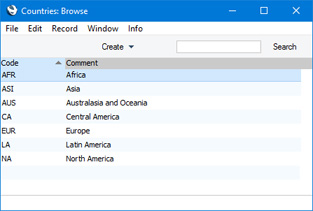
---
Settings in the System module:
- Introduction
- Access Groups
- Active Users
- Auto Actions
- Bank Holidays
- Base Currency
- Base Currency Rates
- Cloud Security
- Company Date and Numeric Format
- Company Info
- Configuration
- Conversions - Master, Conversions - Accounts and VAT Code
- Conversions - Master, Conversions - Activity Types
- Conversions -
Master, Conversions - Contact Classifications
- Conversions - Master, Conversions - Contacts
- Conversions - Master, Conversions - Currency Codes
- Conversions - Master, Conversions - Items
- Conversions - Master, Conversions - Locations
- Conversions - Master
- Conversions - Master, Conversions - Suppliers
- Conversions - Master, Conversions - Tags/Objects
- Conversions - Master, Conversions - Users
- Countries
- Countries Regions
- Currency Round Off
- Days and Months
- Departments
- Discount Options
- Display Groups
- Exchange Rates Settings
- Form Settings
- Global Warnings on UnOKed Records
- Internet Enablers
- Journaling
- KPIs
- Languages
- Locking
- Locking Exceptions
- Nature of Business
- Number Series Defaults
- Opened Windows History
- Optional Features
- Password Security
- Printers
- Reporting Periods
- Round Off
- Sales Groups
- Single Functions
- Special Days
- Styles
- Sub-Ledger Control Accounts
- Task Manager Access
- User Warnings on UnOKed Records
- Values in Text
- VAT Reg. Number Masks
- Weeks
- Home page for System Module manual
- Home page for Standard ERP manual
Redondeo de Moneda
Por favor, haz clic aquí para detalles completos de esta opción.Days and Months
This page describes the Days and Months setting in the System module.---
The Days and Months setting allows you to record the names of the days and months in various Languages. This will be useful if you have added the "Month in words" field to your Form Templates. You can use the "Month in words" field in many Form Templates when you need the name of a month to be printed in a form in the relevant Language (e.g. in the Language of a Customer or Supplier).
To work with this setting, first ensure you are in the System module. Then, if you are using Windows or macOS, click the [Settings] button in the Navigation Centre and then double-click 'Days and Months' in the 'Settings' list. If you are using iOS or Android, select 'Settings' from the Tools menu (with 'wrench' icon) and tap 'Days and Months' in the 'Settings' list. The 'Days and Months: Browse' window will open. This contains a list of the records already entered to this setting.
Double-click (Windows/macOS) or tap (iOS/Android) on a line to open the edit window, or add a new record by selecting 'New' from the Create menu (Windows/macOS) or the + menu (iOS/Android). When the record is complete, click the [Save] button (Windows/macOS) or tap √ (iOS/Android) to save it, or use the close box (Windows/macOS) or < (iOS/Android) to close it without saving changes.
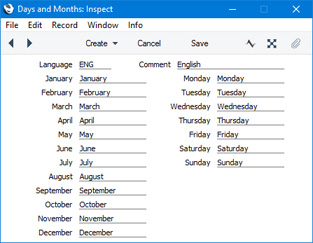
---
Settings in the System module:
- Introduction
- Access Groups
- Active Users
- Auto Actions
- Bank Holidays
- Base Currency
- Base Currency Rates
- Cloud Security
- Company Date and Numeric Format
- Company Info
- Configuration
- Conversions - Master, Conversions - Accounts and VAT Code
- Conversions - Master, Conversions - Activity Types
- Conversions -
Master, Conversions - Contact Classifications
- Conversions - Master, Conversions - Contacts
- Conversions - Master, Conversions - Currency Codes
- Conversions - Master, Conversions - Items
- Conversions - Master, Conversions - Locations
- Conversions - Master
- Conversions - Master, Conversions - Suppliers
- Conversions - Master, Conversions - Tags/Objects
- Conversions - Master, Conversions - Users
- Countries
- Countries Regions
- Currency Round Off
- Days and Months
- Departments
- Discount Options
- Display Groups
- Exchange Rates Settings
- Form Settings
- Global Warnings on UnOKed Records
- Internet Enablers
- Journaling
- KPIs
- Languages
- Locking
- Locking Exceptions
- Nature of Business
- Number Series Defaults
- Opened Windows History
- Optional Features
- Password Security
- Printers
- Reporting Periods
- Round Off
- Sales Groups
- Single Functions
- Special Days
- Styles
- Sub-Ledger Control Accounts
- Task Manager Access
- User Warnings on UnOKed Records
- Values in Text
- VAT Reg. Number Masks
- Weeks
- Home page for System Module manual
- Home page for Standard ERP manual
Departments
Please refer here for details about this setting.---
Settings in the System module:
- Introduction
- Access Groups
- Active Users
- Auto Actions
- Bank Holidays
- Base Currency
- Base Currency Rates
- Cloud Security
- Company Date and Numeric Format
- Company Info
- Configuration
- Conversions - Master, Conversions - Accounts and VAT Code
- Conversions - Master, Conversions - Activity Types
- Conversions -
Master, Conversions - Contact Classifications
- Conversions - Master, Conversions - Contacts
- Conversions - Master, Conversions - Currency Codes
- Conversions - Master, Conversions - Items
- Conversions - Master, Conversions - Locations
- Conversions - Master
- Conversions - Master, Conversions - Suppliers
- Conversions - Master, Conversions - Tags/Objects
- Conversions - Master, Conversions - Users
- Countries
- Countries Regions
- Currency Round Off
- Days and Months
- Departments
- Discount Options
- Display Groups
- Exchange Rates Settings
- Form Settings
- Global Warnings on UnOKed Records
- Internet Enablers
- Journaling
- KPIs
- Languages
- Locking
- Locking Exceptions
- Nature of Business
- Number Series Defaults
- Opened Windows History
- Optional Features
- Password Security
- Printers
- Reporting Periods
- Round Off
- Sales Groups
- Single Functions
- Special Days
- Styles
- Sub-Ledger Control Accounts
- Task Manager Access
- User Warnings on UnOKed Records
- Values in Text
- VAT Reg. Number Masks
- Weeks
- Home page for System Module manual
- Home page for Standard ERP manual
Discount Options
Use this setting to specify how discounts are to be calculated in Hansa (in Contracts, Invoices, Quotations, Sales Orders, Work Sheets and Project Budgets).To open the Discount Options setting, ensure you are in the System module and then click the [Settings] button in the Navigation Centre. Double-click 'Discount Options' in the 'Settings' list. The 'Discount Options: Inspect' window will open:
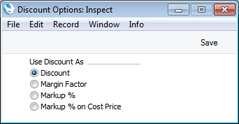
- Discount
- 200 - (200 x 10%) = 180
- Margin Factor
- 200 x 10% = 20
- Markup %
- 200 + (200 x 10%) = 220
- Markup % on Cost Price
- 150 + (150 x 10%) = 165
Note that this setting does not affect Purchase Orders, Purchase Quotations or Purchase Order Contracts, which always use the 'Discount' method.
---
Settings in the System module:
- Access Groups
- Active Users
- Auto Actions
- Bank Holidays
- Base Currency
- Base Currency Rates
- Company Date and Numeric Format
- Company Info
- Configuration
- Conversions - Master, Conversions - Accounts and VAT Code
- Conversions - Master, Conversions - Activity Types
- Conversions - Master, Conversions - Contact Classifications
- Conversions - Master, Conversions - Contacts
- Conversions - Master, Conversions - Currency Codes
- Conversions - Master, Conversions - Items
- Conversions - Master, Conversions - Locations
- Conversions - Master
- Conversions - Master, Conversions - Suppliers
- Conversions - Master, Conversions - Objects
- Conversions - Master, Conversions - Users
- Countries
- Countries Regions
- Currency Round Off
- Days and Months
- Departments
- Discount Options
- Display Groups
- Exchange Rates Settings
- Form Settings
- Global Warnings on UnOKed Records
- Internet Enablers
- Journaling
- KPIs
- Languages
- Locking
- Locking Exceptions
- Number Series Defaults
- Opened Windows History
- Optional Features
- Password Security
- Printers
- Reporting Periods
- Round Off
- Sales Groups
- Single Functions
- Special Days
- Styles
- Sub-Ledger Control Accounts
- Task Manager Access
- User Warnings on UnOKed Records
- Values in Text
- VAT Number Masks
- Weeks
- Home page for System Module manual
- Home page for Standard ERP manual
Grupos a Mostrar
Esta opción te permite segmentar a tus empleados para representar diferentes tipos de trabajo o departamentos. Los Grupos a Mostrar ayudan a la planificación de recursos y permiten clasificar mejor las actividades (módulo CRM). Muchos informes del módulo CRM pueden ser filtrados por Grupos a Mostrar. Uno de ellos es el informe Estadísticas Hora Empleado pues compara el trabajo ejecutado por los diferentes Grupos a Mostrar.Para agregar un nuevo Grupo a Mostrar, simplemente empieza a especificar los detalles usando la primer fila vacía de la matriz. Luego, pulsa el botón [Guardar]. A continuación tenemos una descripción de la lógica que se debe seguir para crear un Grupo a Mostrar:
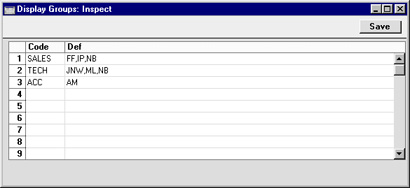
- Código
- En esta columna debes especificar un código único de identificación para el Grupo a Mostrar. Se puede usar hasta cinco caracteres alfanuméricos.
- Personas
- Pegado Especial
registro Personas, módulo Sistema
- En esta columna, debes especificar las iniciales de cada Persona que pertenece al Grupo de Acceso (separadas por comas).
- Toma en cuenta que Pegado Especial deberá ser usado luego de insertar la coma, de lo contrario se sobrescribirá las iniciales de la anterior persona que especificaste.
- Notemos – al observar la ilustración – que una Persona puede pertenecer a más de un Grupo a Mostrar.
- Toma en cuenta que Pegado Especial deberá ser usado luego de insertar la coma, de lo contrario se sobrescribirá las iniciales de la anterior persona que especificaste.
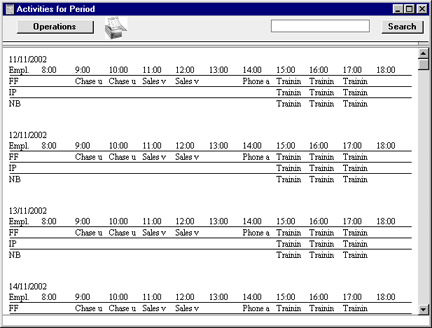
Exchange Rates Settings
Please refer here for full details about this setting.---
Settings in the System module:
- Access Groups
- Active Users
- Auto Actions
- Bank Holidays
- Base Currency
- Base Currency Rates
- Cloud Security
- Company Date and Numeric Format
- Company Info
- Configuration
- Conversions - Master, Conversions - Accounts and VAT Code
- Conversions - Master, Conversions - Activity Types
- Conversions - Master, Conversions - Contact Classifications
- Conversions - Master, Conversions - Contacts
- Conversions - Master, Conversions - Currency Codes
- Conversions - Master, Conversions - Items
- Conversions - Master, Conversions - Locations
- Conversions - Master
- Conversions - Master, Conversions - Suppliers
- Conversions - Master, Conversions - Tags/Objects
- Conversions - Master, Conversions - Users
- Countries
- Countries Regions
- Currency Round Off
- Days and Months
- Departments
- Discount Options
- Display Groups
- Exchange Rates Settings
- Form Settings
- Global Warnings on UnOKed Records
- Internet Enablers
- Journaling
- KPIs
- Languages
- Locking
- Locking Exceptions
- Nature of Business
- Number Series Defaults
- Opened Windows History
- Optional Features
- Password Security
- Printers
- Reporting Periods
- Round Off
- Sales Groups
- Single Functions
- Special Days
- Styles
- Sub-Ledger Control Accounts
- Task Manager Access
- User Warnings on UnOKed Records
- Values in Text
- VAT Reg. Number Masks
- Weeks
- Home page for System Module manual
- Home page for Standard ERP manual
Form Settings
This page describes the Form Settings setting in the System module.---
The Form Settings setting allows you to control how addresses will be printed in forms. The setting affects the following form fields in most (but not all) forms: "Address"; "Address with Attention" (only when printed from Reservations); "Delivery Address"; "Delivery Address 2" (only when printed from Orders); "From Address"; "Invoice Address"; "Invoice To Address"; "Invoice To, jewellery"; "Location Address"; "Order Address"; "Order Delivery Address"; "Ordering Customer Name and Address"; "Own Address"; "Own Address 2"; "Premise Address"; "Shipment Address"; "Shipment Address 2"; "To Address" and "Via Location Address".
To open the Forms Setting setting, first ensure you are in the System module. Then, if you are using Windows or Mac OS X, click the [Settings] button in the Navigation Centre and double-click 'Form Settings' in the 'Settings' list. If you are using iOS or Android, select 'Settings' from the Tools menu (with 'wrench' icon) and tap 'Form Settings' in the 'Settings' list. Select options as described below. Then, to save changes and close the window, click the [Save] button (Windows/Mac OS X) or tap √ (iOS/Android). To close the window without saving changes, click the close box (Windows/Mac OS X) or tap < (iOS/Android).
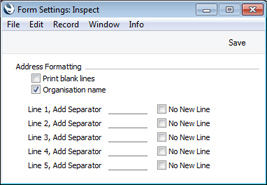
- Print Blank Lines
- By default, blank lines in addresses will not be printed in address fields. Use this option if you want the blank lines to be printed.
- In the illustration below, the "Address" field in the Invoice on the right was printed using this option:
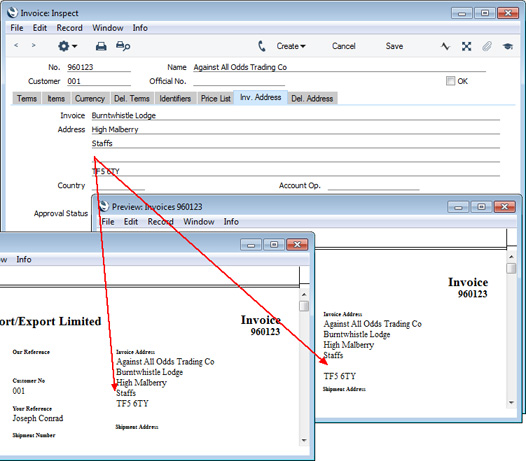
- In the illustration below, the "Address" field in the Invoice on the right was printed using this option:
- Organisation Name
- Use this option if you want the Customer Name to be printed as the first line of the address.
- In the illustration below, the "Address" field in the Invoice on the right was printed using this option:
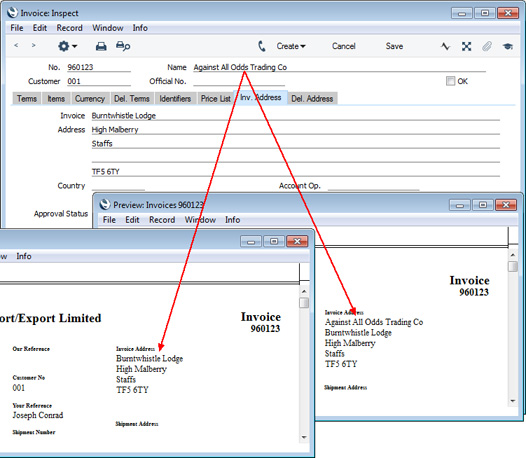
- In the illustration below, the "Address" field in the Invoice on the right was printed using this option:
- Line, Add Separator, No New Line
- By default, each line of an address will be printed on a separate line in address fields. In some countries, it will be normal practice to print some address lines together on the same line. For example, in the US, the town, state and ZIP code should all be printed on the same line.
- If you need address lines to be printed on the same line, tick the No New Line option for the second and subsequent lines, and specify the separator, which might be a space or a comma followed by a space. You must enter a space as the separator if you need one.
- In the example illustrated below (a US address), the third, fourth and fifth lines of the address should all be printed on the same line. So, tick the No New Line option for lines four and five. In other words, no new line will be printed before the fourth line of the address, and no new line will be printed before the fifth line of the address. In this case, the separator between the third and fourth lines will be a comma and space, and the separator between the fourth and fifth lines will be a space. In the illustration below, the "Address" field in the Invoice on the right was printed using these options, while the Invoice on the left was printed without using these options:
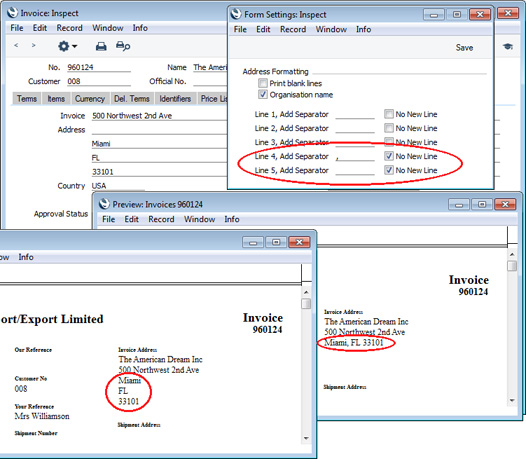
- If you need address lines to be printed on the same line, tick the No New Line option for the second and subsequent lines, and specify the separator, which might be a space or a comma followed by a space. You must enter a space as the separator if you need one.
Settings in the System module:
- Access Groups
- Active Users
- Auto Actions
- Bank Holidays
- Base Currency
- Base Currency Rates
- Company Date and Numeric Format
- Company Info
- Configuration
- Conversions - Master, Conversions - Accounts and VAT Code
- Conversions - Master, Conversions - Activity Types
- Conversions - Master, Conversions - Contact Classifications
- Conversions - Master, Conversions - Contacts
- Conversions - Master, Conversions - Currency Codes
- Conversions - Master, Conversions - Items
- Conversions - Master, Conversions - Locations
- Conversions - Master
- Conversions - Master, Conversions - Suppliers
- Conversions - Master, Conversions - Objects
- Conversions - Master, Conversions - Users
- Countries
- Countries Regions
- Currency Round Off
- Days and Months
- Departments
- Discount Options
- Display Groups
- Exchange Rates Settings
- Form Settings
- Global Warnings on UnOKed Records
- Internet Enablers
- Journaling
- KPIs
- Languages
- Locking
- Locking Exceptions
- Number Series Defaults
- Opened Windows History
- Optional Features
- Password Security
- Printers
- Reporting Periods
- Round Off
- Sales Groups
- Single Functions
- Special Days
- Styles
- Sub-Ledger Control Accounts
- Task Manager Access
- User Warnings on UnOKed Records
- Values in Text
- VAT Number Masks
- Weeks
- Home page for System Module manual
- Home page for Standard ERP manual
Global Locking
Please refer to the description of the Locking setting for details about this setting.---
Go back to:
- Home page for Settings in the System module
- Home page for System Module manual
- Home page for Standard ERP manual
Global Warnings on UnOKed Records
The integration between the different modules in Enterprise by HansaWorld means that Nominal Ledger Transactions can be generated automatically when you mark as OK and save records in other ledgers and registers. These other ledgers and registers have been given the term "Sub Systems" in the program and these manuals. For example, when you approve an Invoice in the Sales Ledger, this can cause a Nominal Ledger Transaction to be generated automatically, debiting a Debtor Account and crediting a Sales Account and, if appropriate, a VAT Account.When you enter a Sub System record such as an Invoice, you can save it as many times as necessary before marking it as OK. This can be useful if, for example, you want to check that the record is correct before committing it to the Nominal Ledger.
On the other hand, there may be situations where you need Sub System records to be marked as OK immediately. This may be the case if you are printing Invoices on stationery with pre-printed Official Serial Numbers, in which case you need to be sure that the Official Serial Numbers on the stationery and in the Invoice records correspond. This can also be the case in stock registers, especially if you are using a Queued Cost Model. In this situation, you must make certain that you enter all stock transactions in strict chronological order. Failure to do this may cause your FIFO/LIFO queue to become incorrect. You should not, for example, enter a Delivery with yesterday's date if you have already entered an outgoing stock transaction of any kind (e.g. Delivery, Stock Depreciation) with today's.
You can use the Global Warnings on UnOKed Records setting to help ensure Sub System records are always marked as OK immediately. In a multi-user system, the options that you choose in this setting will apply to every user, but you can set different options for a particular user. To choose options for a particular user, use the User Warnings on UnOKed Records setting in the System module and enter separate records for each user. The user will be given warnings irrespective of the client machine they are using.
To open the Global Warnings on UnOKed Records setting, ensure you are in the System module and click the [Settings] button in the Master Control panel. Then, double-click 'Global Warnings on UnOKed Records' in the 'Settings' list. The following window opens:
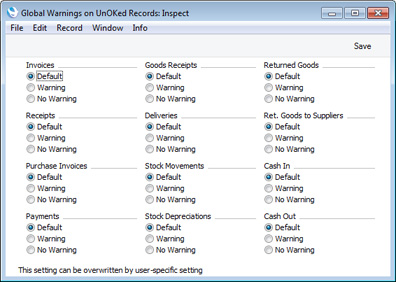
To set warning options for a particular user, ensure you are in the System module and click the [Settings] button in the Master Control panel. Then, double-click 'User Warnings on UnOKed Records' in the 'Settings' list. To create a new record, click the [New] button in the Button Bar, or highlight a record in the list that is similar to the one that you are about to create and click [Duplicate].
The following window opens:
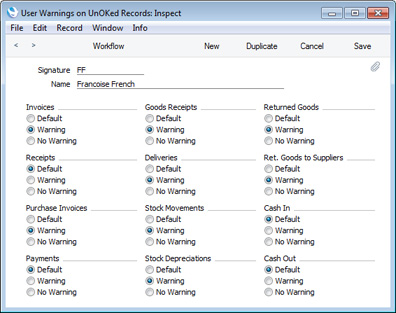
- Signature
- Paste Special
Person register, System module
- Specify the user, using 'Paste Special' if necessary. You will only be able to enter one record for a particular Person.
- Name
- The Person's Name will be brought in when you enter their Signature in the field above.
- Default
- When the user saves a record that had not been marked as OK, a warning will be or will not be given, depending on how you have configured the Global Warnings on UnOKed Records setting.
- Warning
- When the user saves a record that had not been marked as OK, a warning will be given.
- No Warning
- When the user saves a record that had not been marked as OK, a warning will not be given.
If a particular user does not have access to the System module, they can create or change their own record in the User Warnings on UnOKed Records setting by changing to the User Settings module and opening the Warnings on UnOKed Records setting. The user will be shown their own record from the User Warnings setting. Any changes that the user makes will update this record. If the user does not have a record in the User Warnings setting, one will be created when they close the window and choose to save changes. The user will not be able to change any other user's records from the User Settings module.
If you specify that a warning will be issued whenever you try to save a record that you have not marked as OK, the record will be saved, and then the following warning will appear:
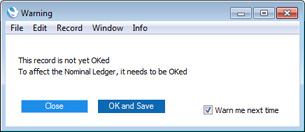
- Close
- The warning will be closed, and the record will be left as it is.
- OK and Save
- The warning will be closed, the record will be marked as OK and saved again, and the appropriate Nominal Ledger Transaction will be created.
- Warn me next time
- Uncheck this option if you want to prevent the warning appearing in the future when you save records in the same register that you have not marked as OK. This will update your record in the User Warnings on UnOKed Records setting i.e. it will not affect any other users.
Settings in the System module:
- Access Groups
- Active Users
- Auto Actions
- Bank Holidays
- Base Currency
- Base Currency Rates
- Company Date and Numeric Format
- Company Info
- Configuration
- Conversions - Master, Conversions - Accounts and VAT Code
- Conversions - Master, Conversions - Activity Types
- Conversions - Master, Conversions - Contact Classifications
- Conversions - Master, Conversions - Contacts
- Conversions - Master, Conversions - Currency Codes
- Conversions - Master, Conversions - Items
- Conversions - Master, Conversions - Locations
- Conversions - Master
- Conversions - Master, Conversions - Suppliers
- Conversions - Master, Conversions - Objects
- Conversions - Master, Conversions - Users
- Countries
- Countries Regions
- Currency Round Off
- Days and Months
- Departments
- Discount Options
- Display Groups
- Exchange Rates Settings
- Form Settings
- Global Warnings on UnOKed Records
- Internet Enablers
- Journaling
- KPIs
- Languages
- Locking
- Locking Exceptions
- Number Series Defaults
- Opened Windows History
- Optional Features
- Password Security
- Printers
- Reporting Periods
- Round Off
- Sales Groups
- Special Days
- Styles
- Sub-Ledger Control Accounts
- Task Manager Access
- User Warnings on UnOKed Records
- Values in Text
- VAT Number Masks
- Weeks
- Home page for System Module manual
- Home page for Enterprise by HansaWorld manual
Solicitud de Claves por Internet
Por favor, haz clic aquí para detalles completos de esta opción.Journaling
Please refer to the Journaling page for full details about this setting.---
Settings in the System module:
- Access Groups
- Active Users
- Auto Actions
- Bank Holidays
- Base Currency
- Base Currency Rates
- Cloud Security
- Company Date and Numeric Format
- Company Info
- Configuration
- Conversions - Master, Conversions - Accounts and VAT Code
- Conversions - Master, Conversions - Activity Types
- Conversions - Master, Conversions - Contact Classifications
- Conversions - Master, Conversions - Contacts
- Conversions - Master, Conversions - Currency Codes
- Conversions - Master, Conversions - Items
- Conversions - Master, Conversions - Locations
- Conversions - Master
- Conversions - Master, Conversions - Suppliers
- Conversions - Master, Conversions - Tags/Objects
- Conversions - Master, Conversions - Users
- Countries
- Countries Regions
- Currency Round Off
- Days and Months
- Departments
- Discount Options
- Display Groups
- Exchange Rates Settings
- Form Settings
- Global Warnings on UnOKed Records
- Internet Enablers
- Journaling
- KPIs
- Languages
- Locking
- Locking Exceptions
- Nature of Business
- Number Series Defaults
- Opened Windows History
- Optional Features
- Password Security
- Printers
- Reporting Periods
- Round Off
- Sales Groups
- Single Functions
- Special Days
- Styles
- Sub-Ledger Control Accounts
- Task Manager Access
- User Warnings on UnOKed Records
- Values in Text
- VAT Reg. Number Masks
- Weeks
- Home page for System Module manual
- Home page for Standard ERP manual
KPIs
KPIs are Key Performance Indicators, visible in the bottom right-hand corner of the Master Control panel. KPIs summarise the activity of the company in specified areas during the current week, month or year, and compare that activity with the previous period. By default, KPI figures will be updated automatically every hour, to keep you up-to date.Depending on how an individual KPI has been configured, you may be able to click on it in your Master Control panel and be taken to a web page. A useful web page might be your HansaWorld SmartView page where you can analyse the statistics in more detail. Please refer to your local HansaWorld representative for more information about HansaWorld SmartView. If no web page has been assigned to a KPI, clicking on it will open a report showing how the KPI figure has been calculated. For example, clicking on a "Sales Excluding VAT" or "Sales Including VAT" KPI will cause an Invoice Journal report covering the relevant period to be opened.
You can configure your company's KPIs so that different ones will be seen by different users. So, if someone else logs in to Enterprise by HansaWorld on your machine using the [Login] button in the Master Control panel, your KPIs will disappear, to be replaced with theirs.
Use the KPIs setting to configure the Key Performance Indicators that will be shown in each user's Master Control panel. To work with this setting, follow these steps:
- The KPI feature is an extra-cost addition to the standard Enterprise by HansaWorld system. The first step is therefore to specify the number of KPIs you have purchased in the field on the 'Basic' card of the Configuration setting in the System module:
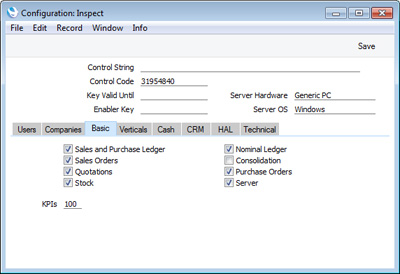
- The second step is to configure your KPIs. Remaining in the System module, open the KPIs setting and create a new record:
Complete the record as follows: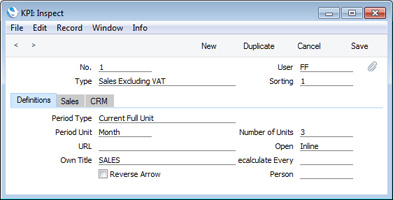
Header
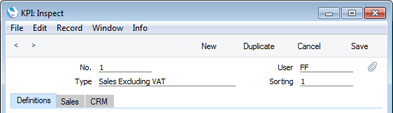
- No.
- The unique identifier for the KPI record, generated automatically.
- User
- Paste Special
Person register, System module
- Specify here the Person in whose Personal Desktop the KPI is to appear. You can enter more than one Person, separated by commas.
- If you need to use 'Paste Special' to enter several Persons, type the comma or colon before opening the 'Paste Special' list. This will cause the next Person to be added to those already entered. Otherwise, the previous Person will be overwritten.
- If you enter more than one Person, this will cause the KPI record to take up more than one of your KPI "slots". For example, if you have purchased 100 KPIs and you enter a KPI record containing three Persons in its User field, this KPI record will occupy three of those 100 KPIs.
- If you need to use 'Paste Special' to enter several Persons, type the comma or colon before opening the 'Paste Special' list. This will cause the next Person to be added to those already entered. Otherwise, the previous Person will be overwritten.
- Type
- Paste Special
Choices of possible entries
- Use this field to specify the figure that will be monitored by the KPI. The following options are available:
- Activities Cost Time
- The total Cost (Time) from Time Activities with Start Dates falling within the period. A Time Activity is one where the Task Type is Calendar and the Calendar Type is Time. If an Activity has more than Person, it will be included in the KPI figure once for each Person. Clicking the KPI in the Master Control panel will open the Activities, Persons report.
- Cost of Sales
- The total cost of sales from approved Invoices dated during the period. Clicking the KPI will not open a report.
- GP%
- The gross margin of approved Invoices dated during the period. Clicking the KPI will open the GP, Invoices report.
- No. of Activities
- The number of Time Activities with Start Dates falling within the period. If an Activity has more than Person, it will be included in the KPI figure once for each Person. Clicking the KPI will open the Activities, Persons report.
- No. of Orders
- The number of Sales Orders dated during the period. Closed Orders are not included. Clicking the KPI will open the Order Journal report.
- No. of Quotations
- The number of Quotations dated during the period. Closed and Rejected Quotations are not included. Clicking the KPI will open the Quotation Journal report.
- Outstanding Orders
- The value excluding VAT of Sales Orders dated during the period. Invoiced and Closed Orders are not included. Clicking the KPI will open the Outstanding Orders report (this report doesn't have a period selection so the figures it shows will not match the KPI figures).
- Outstanding Quotations
- The value excluding VAT of Quotations dated during the period. Closed and Rejected Quotations are not included. Clicking the KPI will open the Pipeline report (this report doesn't have a period selection so the figures it shows will not match the KPI figures).
- P/L Due
- The outstanding total from unpaid Purchase Invoices that have exceeded their Payment Terms (i.e. whose Due Date has passed). This figure can also be seen at the bottom of the Purchase Ledger report. Clicking the KPI will open the Purchase Ledger report.
- P/L On Acc.
- The On Account balance in the Purchase Ledger, including open On Account Payments and open Prepayments for all Suppliers. This figure can also be seen at the bottom of the Purchase Ledger report. Clicking the KPI will open the Purchase Ledger report using the Only On Account option.
- Receipts
- The value of Receipts taken during the period. Clicking the KPI will not open a report.
- Sales Excluding VAT
- The value excluding VAT of approved Invoices dated during the period. Clicking the KPI will open the Invoice Journal report.
- Sales Including VAT
- The value including VAT of approved Invoices dated during the period. Clicking the KPI will open the Invoice Journal report.
- S/L Due excluding Disputed Invoices
- The outstanding total from unpaid Invoices that have exceeded their Payment Terms (i.e. whose Due Date has passed) and that have not been marked as Disputed. Clicking the KPI will open the Sales Ledger report using the Exclude Disputed option.
- S/L Due
- The outstanding total from unpaid Invoices that have exceeded their Payment Terms (i.e. whose Due Date has passed). This figure can also be seen at the bottom of the Sales Ledger report. Clicking the KPI will open the Sales Ledger report.
- S/L On Acc.
- The On Account balance in the Sales Ledger, including open On Account Receipts and open Prepayments for all Customers. This figure can also be seen at the bottom of the Sales Ledger report. Clicking the KPI will open the Sales Ledger report using the Only On Account option.
- Activities Cost Time
- Sorting
- Use this field to control the order in which the KPIs will be listed in the User's Personal Desktop. For example, a KPI with "1" in its Sorting field will be listed above a KPI whose Sorting is "2". You should only enter whole numbers in this field.
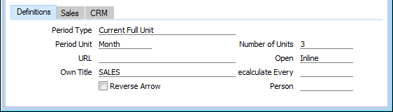
- Period Type
- Paste Special
Choices of possible entries
- The KPI display in the User's Personal Desktop includes figures for a Previous period (in the column headed "Prev.") and for the Current period (in the column headed "Current").
- This field controls how the Prev. and Current periods relate to each other. For example, if the current date is 10 June, the Period Length (below) is "Month" and the Number of Units is 1, the Prev. and Current figures will be calculated as follows, depending on the option in this field:
- -
- Current: 10 June - 10 June
- Previous: 10 June - 10 June
- Previous: 10 June - 10 June
- Until Current Date
- Current: 11 May - 10 June
- Previous: 11 April - 10 May
- Previous: 11 April - 10 May
- Current Full Unit
- Current: 1 June - 30 June
- Previous: 1 May - 31 May
- Previous: 1 May - 31 May
- Current Unit, Until Current Date
- Current: 1 June - 10 June
- Previous: 1 May - 10 May
- This field controls how the Prev. and Current periods relate to each other. For example, if the current date is 10 June, the Period Length (below) is "Month" and the Number of Units is 1, the Prev. and Current figures will be calculated as follows, depending on the option in this field:
- Period Unit
- Paste Special
Choices of possible entries
- Use this field to specify whether the KPI will display weekly, monthly or yearly figures.
- URL
- If you want the User to be taken to a web page when they click the KPI in their Personal Desktop, specify the URL of that web page here. A useful URL might be your HansaWorld SmartView page where you can analyse the statistics in more detail. Please refer to your local HansaWorld representative for more information about HansaWorld SmartView.
- You must include the http:// or https:// in the URL that you enter in this field.
- If you leave this field empty, clicking the KPI will open a report showing how the KPI figure has been calculated. The reports that will be opened from each KPI Type are included in the descriptions of the Type options above.
- You must include the http:// or https:// in the URL that you enter in this field.
- Own Title
- Specify the name of the KPI, to be shown in the KPI Display in the Personal Desktop.
- Reverse Arrow
- This check box controls the arrow that is shown in the Trend column in the Personal Desktop. By default, if the Current figure is larger than the Prev. figure, the Trend column will contain an upward-pointing arrow. This will be appropriate if the KPI is one where a larger Current figure is a positive trend (e.g. "No. of Quotations" or "Sales Including VAT"). In some cases, however, a larger Current figure is a negative trend (e.g. "S/L Due") and therefore a downward-pointing arrow is more appropriate. Use the Reverse Arrow option in these cases.
- Number of Units
- This field is related to the Period Unit field above: use it to specify how many Period Units are to be included in the Current and Prev. in the KPI Display.
- For example, if the Period Type is "Month" and you enter "3" in this field, the Current period will cover the current quarter and the Prev. period will cover the previous quarter.
- For example, if the Period Type is "Month" and you enter "3" in this field, the Current period will cover the current quarter and the Prev. period will cover the previous quarter.
- Open
- Paste Special
Choices of possible entries
- If you have specified a URL in the field on the left and the User clicks the KPI in their Personal Desktop, they will be taken to the relevant web page. If you enter "Inline" here, the web page will be opened in a new window inside Enterprise by HansaWorld. If you enter "External" here, the web page will be opened in the User's default browser.
- Recalculate Every
- By default, the KPI figures in the User's Personal Desktop will be updated once an hour. If you would like them to be updated more (or less) often, specify here the time between updates that you need. Use the format hh:mm:ss.
- If you need an immediate update of the KPIs in your Personal Desktop, click the following button at the top of the list (Mac OS X only):

- If you need an immediate update of the KPIs in your Personal Desktop, click the following button at the top of the list (Mac OS X only):
- Person
- Paste Special
Person register, System module
- Use this field if you need KPI figures to be calculated for a particular Person or Persons.
- For example, if the Type is "No. of Orders", leaving this field empty will mean the KPI will display the total number of Orders created during the period and the previous period. If you enter a Person's Signature, the KPI will display the number of Orders created by that Person.
- Unless the Type is "Activities Cost Time" or "No. of Activities", you can enter more than one Person, separated by commas. If you need to use 'Paste Special' to enter several Persons, type the comma or colon before opening the 'Paste Special' list. This will cause the next Person to be added to those already entered. Otherwise, the previous Person will be overwritten.
- For the following Types, the KPI figure will be calculated from Sales Invoices where the specified Person (or one of the specified Persons) is the Salesman:
- Cost of Sales
- Sales Excluding VAT
- Sales Including VAT
- S/L Due
- S/L Due excluding Disputed Invoices
- GP%
For the following Types, the KPI figure will be calculated from Purchase Invoices where the specified Person (or one of the specified Persons) is the Salesman:
- P/L Due
For the following Types, the KPI figure will be calculated from Quotations where the specified Person (or one of the specified Persons) is the Salesman:
- No. of Quotations
- Outstanding Quotations
For the following Types, the KPI figure will be calculated from Sales Orders where the specified Person (or one of the specified Persons) is the Salesman:
- No. of Orders
- Outstanding Orders
For the following Types, the KPI figure will be calculated for Customers and Suppliers in whose Contact records the specified Person (or one of the specified Persons) is the Salesman:
- P/L on Acc.
- S/L on Acc.
For the following Types, the KPI figure will be calculated from Time Activities where the specified Person is included in the Persons field. You should not specify more than one Person in the KPI: if you do, the KPI figure will be zero:
- Activities Cost Time
- No. of Activities
- For example, if the Type is "No. of Orders", leaving this field empty will mean the KPI will display the total number of Orders created during the period and the previous period. If you enter a Person's Signature, the KPI will display the number of Orders created by that Person.

- Item
- Paste Special
Item register
- Use this field if you need KPI figures to be calculated for a particular Item.
- For example, if the Type is "No. of Orders", leaving this field empty will mean the KPI will display the total number of Orders created during the period and the previous period. If you enter an Item Number, the KPI will display the number of Orders containing that Item.
- You can use this field with the following KPI Types:
- Cost of Sales
- GP %
- No. of Orders
- No. of Quotations
- Outstanding Orders
- Outstanding Quotations
- Sales Excluding VAT
- Sales Including VAT
- For example, if the Type is "No. of Orders", leaving this field empty will mean the KPI will display the total number of Orders created during the period and the previous period. If you enter an Item Number, the KPI will display the number of Orders containing that Item.
- Classification
- Paste Special
Item Classifications setting, Sales Ledger
- Use this field if you need KPI figures to be calculated for Items belonging to a particular Classification. It operates in the same manner as the Item field described immediately above, and can be used with the same KPI Types.
- If you enter a number of Classifications separated by commas, KPI figures will be calculated for the Items belonging to all the Classifications listed.
- If you enter a number of Classifications separated by commas, KPI figures will be calculated for the Items belonging to all the Classifications listed.
- Group
- Paste Special
Item Group register, Sales Ledger
- Use this field if you need KPI figures to be calculated for Items belonging to a particular Item Group. It operates in the same manner as the Item field described immediately above, and can be used with the same KPI Types.
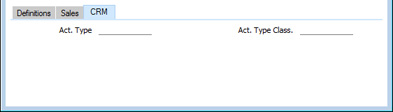
- Act. Type
- Paste Special
Activity Types setting, CRM module
- Use this field if you need KPI figures to be calculated for a particular Activity Type.
- For example, if the Type is "No. of Activities", leaving this field empty will mean the KPI will display the total number of Activities created during the period and the previous period. If you enter an Activity Type, the KPI will display the number of Activities with that Activity Type.
- You can use this field with the following KPI Types:
- Activities Cost Time
- No. of Activities
- For example, if the Type is "No. of Activities", leaving this field empty will mean the KPI will display the total number of Activities created during the period and the previous period. If you enter an Activity Type, the KPI will display the number of Activities with that Activity Type.
- Act. Type Class.
- Paste Special
Activity Classes setting, CRM module
- Use this field if you need KPI figures to be calculated for Activities with Activity Types belonging to a particular Activity Class. It operates in the same manner as the Act. Type field described immediately above, and can be used with the same KPI Types.
- No.
- Save the KPI record. As soon as you do so the KPI will be added to the User's Personal Desktop:
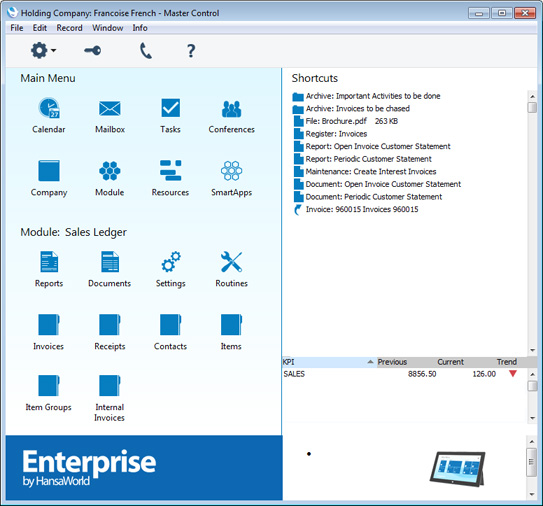
Settings in the System module:
- Access Groups
- Active Users
- Auto Actions
- Bank Holidays
- Base Currency
- Base Currency Rates
- Company Date and Numeric Format
- Company Info
- Configuration
- Conversions - Master, Conversions - Accounts and VAT Code
- Conversions - Master, Conversions - Activity Types
- Conversions - Master, Conversions - Contact Classifications
- Conversions - Master, Conversions - Contacts
- Conversions - Master, Conversions - Currency Codes
- Conversions - Master, Conversions - Items
- Conversions - Master, Conversions - Locations
- Conversions - Master
- Conversions - Master, Conversions - Suppliers
- Conversions - Master, Conversions - Objects
- Conversions - Master, Conversions - Users
- Countries
- Countries Regions
- Currency Round Off
- Days and Months
- Departments
- Discount Options
- Display Groups
- Exchange Rates Settings
- Form Settings
- Global Warnings on UnOKed Records
- Internet Enablers
- Journaling
- KPIs
- Languages
- Locking
- Locking Exceptions
- Number Series Defaults
- Opened Windows History
- Optional Features
- Password Security
- Printers
- Reporting Periods
- Round Off
- Sales Groups
- Special Days
- Styles
- Sub-Ledger Control Accounts
- Task Manager Access
- User Warnings on UnOKed Records
- Values in Text
- VAT Number Masks
- Weeks
Go back to:
- Home page for System Module manual
- Home page for Enterprise by HansaWorld manual
Documentos
Esta opción te permite definir varios Idiomas para luego asignarlos a clientes o proveedores. Básicamente, esta opción se utiliza para garantizar que el sistema use siempre el Formulario correcto (Formularios en francés para clientes franceses, Formularios en portugués para clientes portugueses, etc.). En adición, los códigos de documentos se pueden usar para mostrar la traducción correcta de los ítems, Términos de Pago, Términos de Entrega, etc. en toda la documentación respectiva.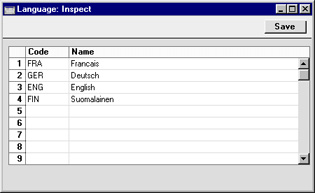
Bloquear
Esta opción te permite cerrar un periodo contable para que ya no ingresen registros con fechas que caen dentro del periodo (ni asientos corregidos). Para esto, simplemente deberás especificar aquí diferentes fechas “tope”. Luego de esto, ninguna transacción cuya fecha sea igual o anterior a la fecha “tope” será registrada. Considerando que el Bloqueo se realiza al especificar una sola fecha, se debe bloquear meses o periodos en orden cronológico.No obstante, el sistema no te obliga a cerrar meses o periodos. Esta opción es un recurso que puede ser utilizado si es necesario.
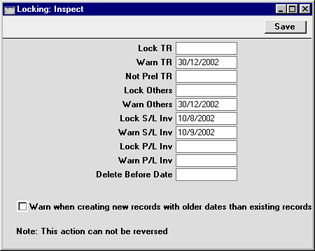
- Bloquear Transacciones
- Al especificar una fecha aquí, no se permitirá el ingreso de Asientos cuya fecha sea igual o anterior. Esto se aplica solamente a Asientos ingresados directamente en el registro Asientos (módulo Contabilidad).
- Si te das cuenta que un Asiento cuya fecha cae dentro de un mes cerrado contiene un error, podrás únicamente corregirlo usando el comando ‘Marca de Corrección’ desde el menú Operaciones de su registro individual. Por favor, revisa la página Corrección de Asientos para mayores detalles.
- Si intentas registrar un Asiento con una fecha igual o anterior a la fecha “tope”, el sistema mostrará el siguiente mensaje:

- Si te das cuenta que un Asiento cuya fecha cae dentro de un mes cerrado contiene un error, podrás únicamente corregirlo usando el comando ‘Marca de Corrección’ desde el menú Operaciones de su registro individual. Por favor, revisa la página Corrección de Asientos para mayores detalles.
- Aviso en Transacciones
- Si especificas una fecha aquí, el sistema mostrará un mensaje cuando alguien intente registrar un Asiento cuya fecha sea igual o anterior a esta fecha. Esto se aplica solamente a Asientos ingresados directamente en el registro Asientos (módulo Contabilidad).
- Si alguien intenta registrar un Asiento con una fecha igual o anterior a la fecha especificada en el campo ‘Aviso en Transacciones’, el sistema mostrará el siguiente mensaje:
- Si alguien intenta registrar un Asiento con una fecha igual o anterior a la fecha especificada en el campo ‘Aviso en Transacciones’, el sistema mostrará el siguiente mensaje:
- Sin Transacciones Preliminares
- Si usas Asientos Preliminares (esto está determinado por las Opciones Asientos) y especificas una fecha aquí, sólo aquellos Asientos cuya fecha sea posterior a esta fecha serán tratados como Asientos Preliminares (es decir, “modificables???). Todos los Asientos cuya fecha sea igual o anterior a esta fecha no serán modificables.
- Si la fecha del campo ‘Sin Transacciones Preliminares’ es posterior a la fecha del campo ‘Bloquear Transacciones’, el sistema aceptará que cualquier persona registre Asientos cuya fecha caiga entre estas dos fechas. Tales Asientos serán tratados como Asientos normales tan pronto sean guardados (nunca serán modificables).
- Si la fecha del campo ‘Sin Transacciones Preliminares’ es posterior a la fecha del campo ‘Bloquear Transacciones’, el sistema aceptará que cualquier persona registre Asientos cuya fecha caiga entre estas dos fechas. Tales Asientos serán tratados como Asientos normales tan pronto sean guardados (nunca serán modificables).
- Bloquear Otros
- Si especificas una fecha aquí, no se permitirá el ingreso de cualquier transacción cuya fecha sea igual o anterior. Estamos hablando de todos los registros excepto Facturas y Facturas de Compra.
- Aviso en Otros
- Si especificas una fecha aquí, el sistema mostrará un mensaje cuando alguien intente registrar algún movimiento (en casi todos los registros) con una fecha igual o anterior. Esto excluye Facturas y Facturas de Compra.
- Bloquear Facturas de Venta
- Si especificas una fecha aquí, no se permitirá el ingreso de Facturas de Venta cuya fecha sea igual o anterior.
- Aviso en Facturas de Venta
- Si especificas una fecha aquí, el sistema mostrará un mensaje cuando alguien intente registrar una Factura de Venta con una fecha igual o anterior a esta fecha.
- Bloquear Facturas de Compra
- Si especifica su una fecha aquí, no se permitirá el ingreso de Facturas de Compara cuya fecha sea igual o anterior.
- Aviso en Facturas de Compra
- Si especificas una fecha aquí, el sistema mostrará un mensaje cuando alguien intente registrar una Factura de Compra con una fecha igual o anterior a esta fecha.
!
Luego de bloquear las cuentas en una fecha cualquiera, no se puede ingresar Asientos con fecha anterior y no puedes alterar aquellos ya ingresados.
- Permitir Borrar Registros Antes de
- Generalmente, no es posible borrar Asientos Contables, sin embargo puedes especificar una fecha aquí para que el sistema acepte la eliminación de Asientos (y otros registros) cuya fecha sea anterior a esta fecha. Esto puede darse en caso que el espacio de tu disco duro esté limitado y las cuentas de la gestión pasada hayan sido colocadas en un archivo.
- Luego de tener este permiso para borrar, puedes usar el comando ‘Borrar’ desde el menú Archivo para borrar Asientos y otros registros individuales. Para borrar registros en grupo, usa la función de Mantenimiento 'Eliminar Transacciones Antiguas' (módulo Sistema).
!
Asegúrate de tener un backup de tu base de datos antes de proceder a borrar transacciones antiguas.
- Luego de tener este permiso para borrar, puedes usar el comando ‘Borrar’ desde el menú Archivo para borrar Asientos y otros registros individuales. Para borrar registros en grupo, usa la función de Mantenimiento 'Eliminar Transacciones Antiguas' (módulo Sistema).
- Mensaje al crear nuevos registros c/fechas previas que los reg. existentes.
- Puedes tildar esta casilla para que el sistema muestre un mensaje cada vez que haya un intento por registrar algo y eventualmente ya exista otro registro individual con una fecha posterior en el mismo registro (el registro individual existente puede estar aprobado o no). En mensaje es el siguiente:
- Como ves, es solo una advertencia que te da la libertad de guardar y aprobar nuevos registros a pesar que su fecha sea anterior a la del último en se registrado.
Cuando un periodo o mes esté bloqueado, deberás imprimir y archivar todos los informes administrativos (ej. Balance, Estado de Resultados, etc.). Tal es el caso que no es para nada apropiado reabrir el periodo para registrar nuevas transacciones. Sin embargo, en algunos casos excepcionales, puede resultar apropiado cambiar la fecha “tope” por una fecha anterior. Si deseas realizar esto, debes pertenecer a un Grupo de Acceso que tenga pleno acceso a la acción ‘Permitir Cambiar Bloqueo’ (ver siguiente ilustración).
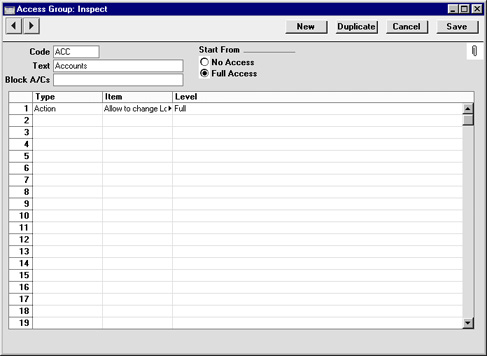
Locking Exceptions
This page describes the Locking Exceptions setting in the System module.---
After closing a period by setting a lock date in the Locking setting, you usually cannot re-open that period. You can only advance the lock dates, you cannot change them so that they are earlier. After you have printed and filed the management reports (e.g. Balance Sheet, Profit & Loss report, etc) for a period and locked it, it will usually not be appropriate to re-open the period to post new transactions. However, there can be some exceptional circumstances when you need to post a transaction to a closed period. For example, your lock date might be October 31 and you might need to post a transaction to September. Two options are available:
- Log in as a Global User or Person belonging to an Access Group in which Full access has been granted to the 'Change System Locking' Action. You will now be able to change any of the lock dates in the Locking setting to earlier dates.
In the example, you will need to set the lock date back to September 30 (or to a date in September prior to the date that you need). This will re-open October as well as September, and it will re-open those months for all users.
- Use Locking Exceptions.
In the example, you will be able to re-open the precise date or dates in September that you need, without re-opening October as well. The date or dates will only be re-opened for particular users.
- Open the Locking Exceptions setting in the System module and add a row for the period that you need to re-open:

- Start Date, End Date
- Paste Special
Choose date
- Use these fields to specify the period that is to be re-opened.
- Action
- Paste Special
Choices of possible options
Choose whether you want to remove a lock or a warning. Usually you will need to remove a lock.
- Register
- Paste Special
Choices of possible options
Specify which register is to be unlocked. The following options are available:
- All
- Removes all lock or warn dates for the specified period.
- Transactions
- Removes the Lock or Warn Transactions date for the specified period.
- Purchase Invoices
- Removes the Lock or Warn Purchase Invoices date for the specified period.
- Sales Invoices
- Removes the Lock or Warn Sales Invoices date for the specified period.
- Activities
- Removes the Lock or Warn Activities date for the specified period.
- Other
- Removes the Lock or Warn Others date for the specified period.
- Start Date, End Date
- Log in as a Global User or Person belonging to an Access Group in which Full access has been granted to the relevant 'Lock Exceptions' Action. For example, if you set the Register to "Transactions" in step 1, you will need Full access to the 'Lock Exceptions for Transactions' Action. Each Register option except "All" has a corresponding Access Group Action as shown in the illustration below. If you chose "All" as the Register option in step 1, you will need Full access to all five 'Lock Exceptions' Actions:
The period that you specified in step 1 will only be re-opened to users with Full access to these Access Group Actions. The period will remain closed to other users.
- Enter the transactions that you need to the re-opened period. If you entered a row in the Locking Exceptions setting that removed a lock date but you did not enter a second row removing a warn date, you may be given "Month Checked" messages when entering the transactions, but you will be able to save them.
- Return to the Locking Exceptions setting and remove the row(s) that re-opened the period. This will close the period once again.
Settings in the System module:
- Access Groups
- Active Users
- Auto Actions
- Bank Holidays
- Base Currency
- Base Currency Rates
- Cloud Security
- Company Date and Numeric Format
- Company Info
- Configuration
- Conversions - Master, Conversions - Accounts and VAT Code
- Conversions - Master, Conversions - Activity Types
- Conversions - Master, Conversions - Contact Classifications
- Conversions - Master, Conversions - Contacts
- Conversions - Master, Conversions - Currency Codes
- Conversions - Master, Conversions - Items
- Conversions - Master, Conversions - Locations
- Conversions - Master
- Conversions - Master, Conversions - Suppliers
- Conversions - Master, Conversions - Tags/Objects
- Conversions - Master, Conversions - Users
- Countries
- Countries Regions
- Currency Round Off
- Days and Months
- Departments
- Discount Options
- Display Groups
- Exchange Rates Settings
- Form Settings
- Global Warnings on UnOKed Records
- Internet Enablers
- Journaling
- KPIs
- Languages
- Locking
- Locking Exceptions
- Locking Exceptions
- Nature of Business
- Number Series Defaults
- Opened Windows History
- Optional Features
- Password Security
- Printers
- Reporting Periods
- Round Off
- Sales Groups
- Single Functions
- Special Days
- Styles
- Sub-Ledger Control Accounts
- Task Manager Access
- User Warnings on UnOKed Records
- Values in Text
- VAT Reg. Number Masks
- Weeks
- Home page for System Module manual
- Home page for Standard ERP manual
Nature of Business
This page describes the Nature of Business setting in the System module.---
The Nature of Business setting allows you to construct a look-up table for the Business Nature field on the 'Company' card of the Contact record and on the 'Reg.' card in the Company Info setting.
To open the Nature of Business setting, first ensure you are in the System module. Then, if you are using Windows or macOS, click the [Settings] button in the Navigation Centre or use the Ctrl-S/⌘-S keyboard shortcuts and then double-click 'Nature of Business' in the 'Settings' list. If you are using iOS or Android, select 'Settings' from the Tools menu (with 'wrench' icon) and tap 'Nature of Business' in the 'Settings' list. The 'Nature of Business: Browse' window will open, listing the Nature of Business records that you have previously entered.
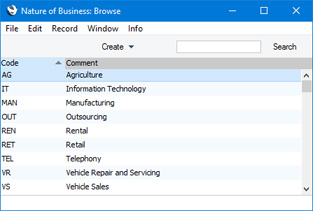
---
Settings in the System module:
- Access Groups
- Active Users
- Auto Actions
- Bank Holidays
- Base Currency
- Base Currency Rates
- Cloud Security
- Company Date and Numeric Format
- Company Info
- Configuration
- Conversions - Master, Conversions - Accounts and VAT Code
- Conversions - Master, Conversions - Activity Types
- Conversions - Master, Conversions - Contact Classifications
- Conversions - Master, Conversions - Contacts
- Conversions - Master, Conversions - Currency Codes
- Conversions - Master, Conversions - Items
- Conversions - Master, Conversions - Locations
- Conversions - Master
- Conversions - Master, Conversions - Suppliers
- Conversions - Master, Conversions - Tags/Objects
- Conversions - Master, Conversions - Users
- Countries
- Countries Regions
- Currency Round Off
- Days and Months
- Departments
- Discount Options
- Display Groups
- Exchange Rates Settings
- Form Settings
- Global Warnings on UnOKed Records
- Internet Enablers
- Journaling
- KPIs
- Languages
- Locking
- Locking Exceptions
- Nature of Business
- Number Series Defaults
- Opened Windows History
- Optional Features
- Password Security
- Printers
- Reporting Periods
- Round Off
- Sales Groups
- Single Functions
- Special Days
- Styles
- Sub-Ledger Control Accounts
- Task Manager Access
- User Warnings on UnOKed Records
- Values in Text
- VAT Number Masks
- Weeks
- Home page for System Module manual
- Home page for Standard ERP manual
Number Series Defaults
This page describes the Number Series Defaults setting in the System module.—
You can define the number sequences (known as "Number Series") that you want be used when generating Order Numbers, Invoice Numbers, Transaction Numbers and so on. If you have not defined a Number Series for a particular register, the sequence will begin at 1 and continue consecutively. For example, if you have not defined a Number Series for Invoices, the first Invoice that you enter will carry the Invoice Number 1, the second one will be Number 2, and so on. If you change the sequence at any time, the sequence will continue from that point. For example, if you change the Number of the first Invoice from 1 to 1000 before you save it for the first time, the next Invoice will be given the Number 1001.
For many registers, you can define a Number Series, or several Number Series that are to run concurrently. For example, the Number Series - Invoices setting allows you to define Number Series for Invoices. Defining a Number Series involves specifying the first and last Numbers and the period during which the Number Series can be used. The period can be open-ended.
Having defined Number Series for a particular register, each new record in that register will by default take its Number from the first current Number Series in the setting. When entering a record, you will be able to change to the first unused number in any other current Number Series using 'Paste Special'.
Depending on the register, if you have defined several number sequences in the relevant Number Series setting, you can specify here in the Number Series Defaults setting which sequence is to be used as the default when you create new records. A different sequence will be used if the current user has a Number Series specified on the 'Number Series' card of their record in the Person register.
To open the Number Series Defaults setting, ensure you are in the System module using the [Switch Module] button in the Navigation Centre and click the [Settings] button, also in the Navigation Centre. The 'Settings' list opens: double-click 'Number Series Defaults'. Click [Save] to save any changes and close, or the close box to close without saving changes.
In a single-user system, you will need to quit and restart (or log in again using the button in the Navigation Centre) for the changes you make in this setting to take effect. In a multi-user system, you will only be able to make a change in this setting if you are the only user logged in. You will then need to quit and restart (or log in again) for the change to take effect, but there will be no need to restart the server.
The illustration below shows a Number Series - Invoices setting in which we have defined three number sequences for Invoices for the year 2015:
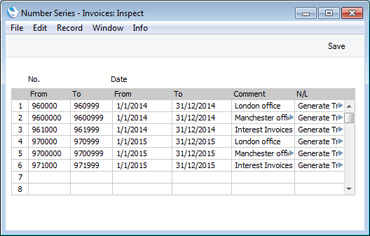
If we want to use a different Number Series as the overall default, we can choose one in the Number Series Defaults setting. In the illustration below, we have specified that the second sequence (9700000 - 9700999) is be used as the overall default in standard Invoices. Enter the first number in the sequence (9700000 in this example) in the Invoices field. We have also specified that we want to use the third sequence for Interest Invoices:
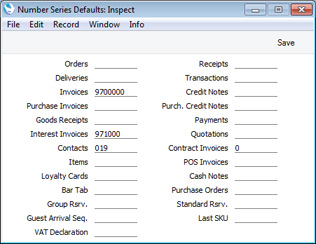
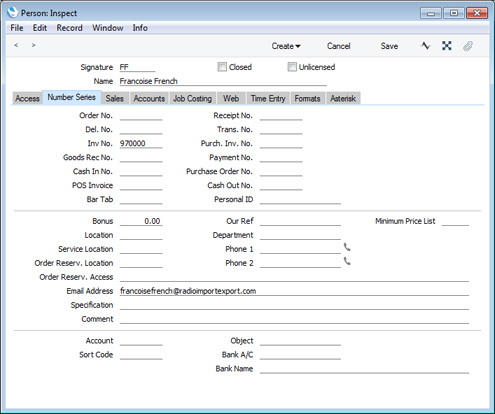
---
Settings in the System module:
- Access Groups
- Active Users
- Auto Actions
- Bank Holidays
- Base Currency
- Base Currency Rates
- Company Date and Numeric Format
- Company Info
- Configuration
- Conversions - Master, Conversions - Accounts and VAT Code
- Conversions - Master, Conversions - Activity Types
- Conversions - Master, Conversions - Contact Classifications
- Conversions - Master, Conversions - Contacts
- Conversions - Master, Conversions - Currency Codes
- Conversions - Master, Conversions - Items
- Conversions - Master, Conversions - Locations
- Conversions - Master
- Conversions - Master, Conversions - Suppliers
- Conversions - Master, Conversions - Objects
- Conversions - Master, Conversions - Users
- Countries
- Countries Regions
- Currency Round Off
- Days and Months
- Departments
- Discount Options
- Display Groups
- Exchange Rates Settings
- Form Settings
- Global Warnings on UnOKed Records
- Internet Enablers
- Journaling
- KPIs
- Languages
- Locking
- Locking Exceptions
- Number Series Defaults
- Opened Windows History
- Optional Features
- Password Security
- Printers
- Reporting Periods
- Round Off
- Sales Groups
- Single Functions
- Special Days
- Styles
- Sub-Ledger Control Accounts
- Task Manager Access
- User Warnings on UnOKed Records
- Values in Text
- VAT Number Masks
- Weeks
- Home page for System Module manual
- Home page for Standard ERP manual
Opened Windows History
This page describes the Opened Windows History setting in the System module.---
The Opened Windows History setting is a list of the windows that you have previously opened. In a multi-user system, it only lists the windows that have been opened in the client database that you are using, not the windows that have been opened on other client machines.
To open the Opened Windows History setting, first ensure you are in the System module. Then, if you are using Windows or macOS, click the [Settings] button in the Navigation Centre and then double-click 'Opened Windows History' in the 'Settings' list. If you are using iOS or Android, select 'Settings' from the Tools menu (with 'wrench' icon) and tap 'Opened Windows History' in the 'Settings' list. The 'Opened Windows History' window will open:
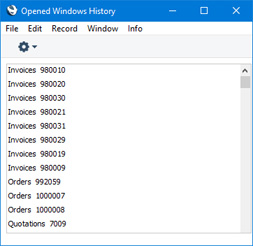
If you need to return to a window, double-click or tap it in the list. If you would like to add a window to your Personal Desktop, highlight it in the list and select 'Send to Desktop' from the Operations menu (Windows/macOS) or Tools menu (iOS/Android).
---
Settings in the System module:
- Access Groups
- Active Users
- Auto Actions
- Bank Holidays
- Base Currency
- Base Currency Rates
- Cloud Security
- Company Date and Numeric Format
- Company Info
- Configuration
- Conversions - Master, Conversions - Accounts and VAT Code
- Conversions - Master, Conversions - Activity Types
- Conversions - Master, Conversions - Contact Classifications
- Conversions - Master, Conversions - Contacts
- Conversions - Master, Conversions - Currency Codes
- Conversions - Master, Conversions - Items
- Conversions - Master, Conversions - Locations
- Conversions - Master
- Conversions - Master, Conversions - Suppliers
- Conversions - Master, Conversions - Tags/Objects
- Conversions - Master, Conversions - Users
- Countries
- Countries Regions
- Currency Round Off
- Days and Months
- Departments
- Discount Options
- Display Groups
- Exchange Rates Settings
- Form Settings
- Global Warnings on UnOKed Records
- Internet Enablers
- Journaling
- KPIs
- Languages
- Locking
- Locking Exceptions
- Nature of Business
- Number Series Defaults
- Opened Windows History
- Optional Features
- Password Security
- Printers
- Reporting Periods
- Round Off
- Sales Groups
- Single Functions
- Special Days
- Styles
- Sub-Ledger Control Accounts
- Task Manager Access
- User Warnings on UnOKed Records
- Values in Text
- VAT Reg. Number Masks
- Weeks
- Home page for System Module manual
- Home page for Standard ERP manual
Optional Features
The Optional Features setting contains some miscellaneous options controlling the behaviour of various aspects of your Standard ERP database.The Optional Features setting is unusual in that it affects the entire database. So, if you have more than one Company, choosing an option in this setting in one Company will affect every other Company as well.
To open the Optional Features setting, first ensure you are in the System module. Then, if you are using Windows or macOS, click the [Settings] button in the Navigation Centre and then double-click 'Optional Features' in the 'Settings' list. If you are using iOS or Android, select 'Settings' from the Tools menu (with 'wrench' icon) and tap 'Optional Features' in the 'Settings' list. The 'Optional Features: Inspect' window will open.
When the setting is complete, click the [Save] button (Windows/macOS) or tap √ (iOS/Android) to save, or use the close box (Windows/macOS) or < (iOS/Android) to close the window without saving changes.
The Optional Features setting is spread over four cards. To view specific cards, click or tap one of the four named tabs:

- 'Options' card
- 'Unsupported' card
- 'Security' card
- 'Performance' card
Settings in the System module:
- Access Groups
- Active Users
- Auto Actions
- Bank Holidays
- Base Currency
- Base Currency Rates
- Cloud Security
- Company Date and Numeric Format
- Company Info
- Configuration
- Conversions - Master, Conversions - Accounts and VAT Code
- Conversions - Master, Conversions - Activity Types
- Conversions - Master, Conversions - Contact Classifications
- Conversions - Master, Conversions - Contacts
- Conversions - Master, Conversions - Currency Codes
- Conversions - Master, Conversions - Items
- Conversions - Master, Conversions - Locations
- Conversions - Master
- Conversions - Master, Conversions - Suppliers
- Conversions - Master, Conversions - Tags/Objects
- Conversions - Master, Conversions - Users
- Countries
- Countries Regions
- Currency Round Off
- Days and Months
- Departments
- Discount Options
- Display Groups
- Exchange Rates Settings
- Form Settings
- Global Warnings on UnOKed Records
- Internet Enablers
- Journaling
- KPIs
- Languages
- Locking
- Locking Exceptions
- Nature of Business
- Number Series Defaults
- Opened Windows History
- Optional Features
- Password Security
- Printers
- Reporting Periods
- Round Off
- Sales Groups
- Single Functions
- Special Days
- Styles
- Sub-Ledger Control Accounts
- Task Manager Access
- User Warnings on UnOKed Records
- Values in Text
- VAT Reg. Number Masks
- Weeks
- Home page for System Module manual
- Home page for Standard ERP manual
Optional Features - Options Card
This page describes the fields on the 'Options' card in the Optional Features setting. Please follow the links below for descriptions of the other cards:- Introduction
- 'Options' card
- 'Unsupported' card
- 'Security' card
- 'Performance' card
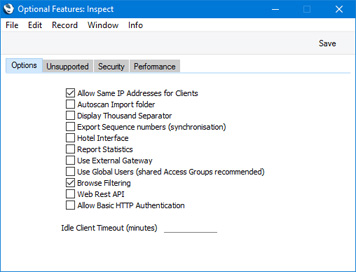
- Allow Same IP Addresses for Clients
- Use this option if you want to log on to your Standard ERP server more than once from the same IP address (i.e. from more than one Standard ERP client on a single machine). This can sometimes be useful for testing. If you change this option, it will not take effect until you restart the server.
- Autoscan Import Folder
- Select this option if you would like information to be imported to your Standard ERP database automatically. If you are using this option, the contents of any files that you place in the 'Import' folder in the folder containing your Standard ERP server application will be imported automatically. Please refer to the 'Importing Information Automatically' section on the Imports page for details.
- If you change this option, it will not take effect until you restart the server.
- If you change this option, it will not take effect until you restart the server.
- Display Thousand Separator
- Select this option if you would like the thousand separator to be displayed on screen. The thousand separator will always be displayed in reports and in forms.
- You can set this option differently on a particular client machine, and a particular user can set this option individually as well.
- To set this option for a particular client machine, use the Client Date and Numeric Format setting in the User Settings module, working on the machine in question. Be sure to tick the Use Client Settings box before saving, to activate the setting.
- To set this option for a particular user, use the 'Formats' card of their Person record. The user will see dates and numbers displayed in these formats irrespective of the client machine they are using, even if the machine has its own Client Date and Numeric Format. Be sure to tick the Use Person's Settings box before saving, to activate the setting,
- To specify the character that is to be used as the thousand separator, use the Company Date and Numeric Format setting in the System module. This thousand separator will always be used in forms (to ensure consistency in printed documentation), but you can choose a different thousand separator to be used on screen and in reports on a particular client machine, and a particular user can choose their own thousand separator as well. Again, use the Client Date and Numeric Format setting or the 'Formats' card of the relevant Person record respectively, as mentioned above.
- If you change this option, you will need to restart your Standard ERP client or single-user system for it to take effect. In a multi-user system, there is no need to restart the server.
- You can set this option differently on a particular client machine, and a particular user can set this option individually as well.
- Export Sequence numbers (synchronisation)
- This option ensures that sequence numbers are included in database text backup files. You must use this option if any Standard ERP clients will use "live-sync" connections with the server. A "live synchronised" connection can be appropriate for sales terminals in a point of sales system. The sales terminals will connect to the server when the server is available and otherwise act as stand-alone systems. Information is saved in the server database immediately when the connection exists, and at other times in the databases on the sales terminals. After a period of working offline, synchronisation of information between the server and the sales terminals will occur automatically when the connection is re-established, at times when the server's workload is low. Please refer here for more details about this option.
- Hotel Interface
- There are two versions of the Resource Planner and Reservation windows. One is suitable for use when administering in-house resources (e.g. booking conference rooms and company resources) and the other is suitable for use at the front desk in a hotel. Select this option if you need to use the hotel versions of these two windows. Please refer here for more details about the Hotel module.
- If you change this option, you will need to restart your Standard ERP client or single-user system for it to take effect. In a multi-user system, there is no need to restart the server.
- If you change this option, you will need to restart your Standard ERP client or single-user system for it to take effect. In a multi-user system, there is no need to restart the server.
- Report Statistics
- Select this option if you need statistics to be printed at the end of each report. These statistics will include the time taken to produce the report. This option can be useful if you are using single-thread parallel reporting. Please refer to the 'Parallel Reporting' section on the Reports page for details.
- There is no need for a restart after changing this option.
- There is no need for a restart after changing this option.
- Use External Gateway
- If you will be using a Gateway to fetch incoming mail from your POP3 account(s), select this option. Please refer to the External Mail page for details.
- Use Global Users (shared Access Groups recommended)
- If you have more than one Company in your database and you want a user to have access to some or all of those Companies, you can create a Global User record for that user. This will make it easier to manage that user's access rights, passwords, Calendar and Task Manager.
- By default, a user will log in to your Standard ERP as a Person. This means they will only be able to log in to the Company containing their Person record, and they will use the password that is connected to that Person record. If that user needs to be able to log in to more than Company, they will need Person records in each of those Companies. These Person records can have the same Signature and StandardID, but the user will need to set separate passwords for each one.
- An option is to create a Global User record for that user. If you create any Global User records, you should also select this option. This will mean that when the user logs in, it will be as a Global User and not as a Person. The user will be able to log in to any Company listed in their Global User record, and they will use the password that is connected to that Global User record (i.e. they will only need to set their password once, and they will use it for every Company). Users who do not have Global User records will still log in as Persons.
- Please refer to the User Accounts when you have more than one Company page for details.
- By default, a user will log in to your Standard ERP as a Person. This means they will only be able to log in to the Company containing their Person record, and they will use the password that is connected to that Person record. If that user needs to be able to log in to more than Company, they will need Person records in each of those Companies. These Person records can have the same Signature and StandardID, but the user will need to set separate passwords for each one.
- Browse Filtering
- When searching for particular records in browse and 'Paste Special' windows, you can use one of two methods:
- You can search for the first instance of a text string in the current sort column.
- You can enter the search string and as you do so, non-matching records will be removed from the list. This is known as "Browse Filtering".
- Select this option if you would like to use Browse Filtering in all browse and 'Paste Special' windows.
- You can use Browse Filtering in some registers and standard searching in others. Use the Register Search Mode setting in the Technics module to specify a search method for each register.
- Please refer to the 'Searching in Browse Windows' section on the Browse Window page for more details about both search methods, including illustrated examples.
- There is no need for a restart after changing this option.
- You can search for the first instance of a text string in the current sort column.
- Web Rest API
- Select this option if you need third-party applications to be able to communicate with your database using the Standard ERP REST API. Please refer here for details about the Standard ERP REST API.
- Allow Basic HTTP Authentication
- This option allows third-party applications to be able to connect to your database through the Standard ERP REST API using basic HTTP authentication.
- This option is provided to allow you to become familiar with the Standard ERP REST API and for testing. It allows you to make API requests to your database from a browser or terminal window/command prompt. You should not use this option in your live system as the communications are not well encrypted and you will need to include your Signature and password in plain test in the requests.
- This option is provided to allow you to become familiar with the Standard ERP REST API and for testing. It allows you to make API requests to your database from a browser or terminal window/command prompt. You should not use this option in your live system as the communications are not well encrypted and you will need to include your Signature and password in plain test in the requests.
- Idle Client Timeout (minutes)
- If you would like Standard ERP clients to be logged out automatically from the server if they have been idle or inactive for some time, specify the period of inactivity here (in minutes). A Standard ERP client application will be closed after it has been idle for the specified time. If you leave this field empty, idle clients will not be logged out automatically, providing the connection is alive. If a connection is dead, the client will be logged out from the server after ten minutes.
- Changes to this field will not take effect until you restart the server.
Settings in the System module:
- Access Groups
- Active Users
- Auto Actions
- Bank Holidays
- Base Currency
- Base Currency Rates
- Cloud Security
- Company Date and Numeric Format
- Company Info
- Configuration
- Conversions - Master, Conversions - Accounts and VAT Code
- Conversions - Master, Conversions - Activity Types
- Conversions - Master, Conversions - Contact Classifications
- Conversions - Master, Conversions - Contacts
- Conversions - Master, Conversions - Currency Codes
- Conversions - Master, Conversions - Items
- Conversions - Master, Conversions - Locations
- Conversions - Master
- Conversions - Master, Conversions - Suppliers
- Conversions - Master, Conversions - Tags/Objects
- Conversions - Master, Conversions - Users
- Countries
- Countries Regions
- Currency Round Off
- Days and Months
- Departments
- Discount Options
- Display Groups
- Exchange Rates Settings
- Form Settings
- Global Warnings on UnOKed Records
- Internet Enablers
- Journaling
- KPIs
- Languages
- Locking
- Locking Exceptions
- Nature of Business
- Number Series Defaults
- Opened Windows History
- Optional Features, including:
- 'Options' card
- 'Unsupported' card
- 'Security' card
- 'Performance' card
- 'Options' card
- Password Security
- Printers
- Reporting Periods
- Round Off
- Sales Groups
- Single Functions
- Special Days
- Styles
- Sub-Ledger Control Accounts
- Task Manager Access
- User Warnings on UnOKed Records
- Values in Text
- VAT Reg. Number Masks
- Weeks
- Home page for System Module manual
- Home page for Standard ERP manual
Optional Features - Unsupported Card
This page describes the fields on the 'Unsupported' card in the Optional Features setting. Please follow the links below for descriptions of the other cards:- Introduction
- 'Options' card
- 'Unsupported' card
- 'Security' card
- 'Performance' card

- Allow Import with Multiple Users
- By default, you will only be able to use the 'Automatic' and 'Manual file search' Import functions in the System module when you are the only user that is logged in to your database. Select this option if you would like to be able use these functions when more than one user is logged in. It will still not be possible to import information if any user is modifying a record or setting (i.e. if any user has a window open with the title 'Update'). Users will not be able to work while an import is taking place. You can use the Active Users setting in the System module to check how many users are logged in and to see if any are modifying records.
- Another way to import information is to select the Autoscan Import folder option on the 'Options' card of this setting. If you are using this option, the contents of any files that you place in the 'Import' folder in the folder containing your Standard ERP server application will be imported automatically. The automatic import will always take place, even if more than one user is logged in at the time (i.e. irrespective of whether the Allow Import with Multiple Users option is ticked).
- Please refer to the Imports page for more details about importing information into your Standard ERP database.
- If you change this option, it will not take effect until you restart the server.
- Another way to import information is to select the Autoscan Import folder option on the 'Options' card of this setting. If you are using this option, the contents of any files that you place in the 'Import' folder in the folder containing your Standard ERP server application will be imported automatically. The automatic import will always take place, even if more than one user is logged in at the time (i.e. irrespective of whether the Allow Import with Multiple Users option is ticked).
- Client Driven Forms, Client Driven Reports
- In a multi-user system, forms and reports will by default be processed on the server and then sent to the client for display or printing. Other work will be queued while the server is processing a form or report. If you select this option, forms and reports will be processed on the client machines. A client will need to send many requests to the server, but in between those requests the server will be able to process other work. These options can therefore be useful if large form or report processing tasks will frequently delay the completion of other tasks. These options have now largely been superseded by the Forms on Threads and Parellel Reports options on the 'Performance' card.
- If you change these options, they will not take effect until you restart the server.
- If you change these options, they will not take effect until you restart the server.
- Credit Invoices Update Stock
- If you have ticked the Update Stock box on the 'Delivery' card of an Invoice, stock levels and the Nominal Ledger stock valuation will be updated from that Invoice when you mark it as OK and save. By default, the Update Stock box will be ticked if you are using the Invoices Update Stock option in the Account Usage S/L setting. However, even if you are using the Invoices Update Stock option, the Update Stock box will not be ticked if the Invoice is a Credit Note. If you would like the Update Stock box to be ticked by default in Credit Notes, select this option. Please refer here for more details.
- There is no need for a restart after changing this option.
- There is no need for a restart after changing this option.
- Goods Receipt from Credit Invoices
- Select this option if you would like a Goods Receipt to be created automatically whenever you mark a Credit Note as OK and save. Selecting this option will mean that Goods Receipts will be created automatically from every Credit Note except those connected to Invoices that were created from Sales Orders. The new Goods Receipts will be marked as OK automatically, so there will be no opportunity to check or change the stock value. Please refer here for more details.
- There is no need for a restart after changing this option.
- There is no need for a restart after changing this option.
- No Test printout
- Some forms will be printed with watermarks in the following circumstances:
- When you print a record that has not been marked as OK, the text "Test Printout" will be printed on the page as a watermark. This is to avoid this print-out being confused with the final version, which you will print after marking the record as OK and saving.
- When you print a record that you have already printed, the text "Copy" will be printed on the page as a watermark.
- When you print a record that you have invalidated, the text "Invalidated" will be printed on the page as a watermark.
Use this option if you want to turn off the watermark feature (but note that you cannot turn off the "Invalidated" watermark).
- The following forms have the watermark feature:
- Bar Tab
- "Test Printout", "Copy" and "Invalidated"
- Cash Note
- "Test Printout", "Copy" and "Invalidated"
- Credit Note
- "Test Printout", "Copy" and "Invalidated"
- Customer Letter
- "Test Printout"
- Delivery Note
- "Copy"
- Interest Invoice
- "Test Printout", "Copy" and "Invalidated"
- Invoice
- "Test Printout", "Copy" and "Invalidated"
- Payment Forms
- "Test Printout"
- POS Invoice
- "Test Printout", "Copy" and "Invalidated"
- Production Order
- "Test Printout"
- Proforma Invoice
- "Test Printout" (this watermark cannot be switched off)
- Project Invoice
- "Test Printout", "Copy" and "Invalidated"
- Receipt Forms
- "Test Printout" and "Copy"
- Stock Movement
- "Copy"
- VAT Correction S/L
- "Test Printout" and "Copy"
- There is no need for a restart after changing this option.
- When you print a record that has not been marked as OK, the text "Test Printout" will be printed on the page as a watermark. This is to avoid this print-out being confused with the final version, which you will print after marking the record as OK and saving.
- Allow Negative Quantities on Invoices
- When entering Invoices, it will usually not be possible to use negative quantities in any row. Select this option if you would like negative quantities to be allowed. This can be useful to facilitate returns in a retail environment.
- Be careful using this option in Invoices that Update Stock. If the Quantity in an Invoice row is negative, the Item in that row will be received into stock, at a cost determined by its Cost Model. If the Cost Model is Queued the cost will always be zero, and if the Cost Model is Weighted Average the cost will be zero if you currently have no units in stock. Please refer here for more details about Cost Models. The Allow Negative Quantities on Invoices option does not allow negative quantities to be used with Serial Numbered Items.
- There is no need for a restart after changing this option.
- Be careful using this option in Invoices that Update Stock. If the Quantity in an Invoice row is negative, the Item in that row will be received into stock, at a cost determined by its Cost Model. If the Cost Model is Queued the cost will always be zero, and if the Cost Model is Weighted Average the cost will be zero if you currently have no units in stock. Please refer here for more details about Cost Models. The Allow Negative Quantities on Invoices option does not allow negative quantities to be used with Serial Numbered Items.
Settings in the System module:
- Access Groups
- Active Users
- Auto Actions
- Bank Holidays
- Base Currency
- Base Currency Rates
- Cloud Security
- Company Date and Numeric Format
- Company Info
- Configuration
- Conversions - Master, Conversions - Accounts and VAT Code
- Conversions - Master, Conversions - Activity Types
- Conversions - Master, Conversions - Contact Classifications
- Conversions - Master, Conversions - Contacts
- Conversions - Master, Conversions - Currency Codes
- Conversions - Master, Conversions - Items
- Conversions - Master, Conversions - Locations
- Conversions - Master
- Conversions - Master, Conversions - Suppliers
- Conversions - Master, Conversions - Tags/Objects
- Conversions - Master, Conversions - Users
- Countries
- Countries Regions
- Currency Round Off
- Days and Months
- Departments
- Discount Options
- Display Groups
- Exchange Rates Settings
- Form Settings
- Global Warnings on UnOKed Records
- Internet Enablers
- Journaling
- KPIs
- Languages
- Locking
- Locking Exceptions
- Nature of Business
- Number Series Defaults
- Opened Windows History
- Optional Features, including:
- 'Options' card
- 'Unsupported' card
- 'Security' card
- 'Performance' card
- 'Options' card
- Password Security
- Printers
- Reporting Periods
- Round Off
- Sales Groups
- Single Functions
- Special Days
- Styles
- Sub-Ledger Control Accounts
- Task Manager Access
- User Warnings on UnOKed Records
- Values in Text
- VAT Reg. Number Masks
- Weeks
- Home page for System Module manual
- Home page for Standard ERP manual
Optional Features - Security Card
This page describes the fields on the 'Security' card in the Optional Features setting. Please follow the links below for descriptions of the other cards:- Introduction
- 'Options' card
- 'Unsupported' card
- 'Security' card
- 'Performance' card
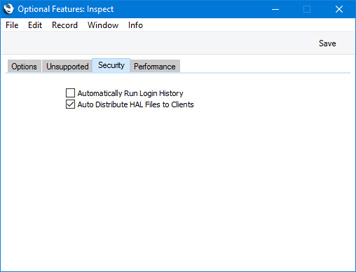
- Auto Distribute HAL Files to Clients
- If you are using HAL to add bespoke features or windows to your Standard ERP system, you will need the HAL files to reside both on the server and on all client machines. An easy way to manage the distribution of these files to the client machines is to use the HAL Rules setting in the Technics module. When a user logs in from a client machine, the server will check that the correct HAL files are present on the client machine and that those files are the latest versions. If there is any discrepancy, the latest HAL files will be copied to the client machine as part of the log-in process. If you would like to use this feature, you should configure the HAL Rules setting, and you should select this option.
- If you change this option, it will not take effect until you restart the server.
Settings in the System module:
- Access Groups
- Active Users
- Auto Actions
- Bank Holidays
- Base Currency
- Base Currency Rates
- Cloud Security
- Company Date and Numeric Format
- Company Info
- Configuration
- Conversions - Master, Conversions - Accounts and VAT Code
- Conversions - Master, Conversions - Activity Types
- Conversions - Master, Conversions - Contact Classifications
- Conversions - Master, Conversions - Contacts
- Conversions - Master, Conversions - Currency Codes
- Conversions - Master, Conversions - Items
- Conversions - Master, Conversions - Locations
- Conversions - Master
- Conversions - Master, Conversions - Suppliers
- Conversions - Master, Conversions - Tags/Objects
- Conversions - Master, Conversions - Users
- Countries
- Countries Regions
- Currency Round Off
- Days and Months
- Departments
- Discount Options
- Display Groups
- Exchange Rates Settings
- Form Settings
- Global Warnings on UnOKed Records
- Internet Enablers
- Journaling
- KPIs
- Languages
- Locking
- Locking Exceptions
- Nature of Business
- Number Series Defaults
- Opened Windows History
- Optional Features, including:
- 'Options' card
- 'Unsupported' card
- 'Security' card
- 'Performance' card
- 'Options' card
- Password Security
- Printers
- Reporting Periods
- Round Off
- Sales Groups
- Single Functions
- Special Days
- Styles
- Sub-Ledger Control Accounts
- Task Manager Access
- User Warnings on UnOKed Records
- Values in Text
- VAT Reg. Number Masks
- Weeks
- Home page for System Module manual
- Home page for Standard ERP manual
Optional Features - Performance Card
This page describes the fields on the 'Performance' card in the Optional Features setting. Please follow the links below for descriptions of the other cards:- Introduction
- 'Options' card
- 'Unsupported' card
- 'Security' card
- 'Performance' card
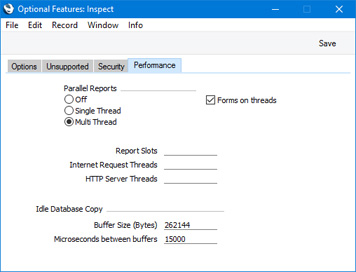
- Parallel Reports, Report Slots
- The Parallel Reports options and the Report Slots field allow you to move the production of reports away from the main processing thread in the server to their own dedicated threads. Please refer to the Reports page for details.
- If you change this option, it will not take effect until you restart the server.
- If you change this option, it will not take effect until you restart the server.
- Forms on threads
- In multi-user systems, a user printing many forms may cause performance to suffer for the other users. In this situation, you can use the Forms on Threads option to move the printing of forms away from the main processing thread in the server to their own dedicated threads. This will help optimise performance for all users. Please refer to the Forms page for details.
- If you change this option, it will not take effect until you restart the server.
- If you change this option, it will not take effect until you restart the server.
- Internet Request Threads
- This field governs the number of parallel Cloud Service requests that can be made. By default (i.e. if this field is empty), up to three parallel Cloud Service requests can be made. Usually there will be no need to change this value, but you can do so this by entering a number between one and 100 here.
- If you change this value, it will not take effect until you restart the server.
- If you change this value, it will not take effect until you restart the server.
- HTTP Server Threads
- If you are using the Standard ERP Web Shop, use this field to specify how many parallel web shop requests can be made to the server (i.e. how many dedicated threads will be used to handle these requests). It is usually recommended that you set this to a number between three and ten. The default is zero, so web shop requests will be handled by the main thread in the server.
- Idle Database Copy
- If you are using the Continuous Database Copy feature, you can use these fields to control the database copy speed. Please refer to the Database Duplication page for details.
Settings in the System module:
- Access Groups
- Active Users
- Auto Actions
- Bank Holidays
- Base Currency
- Base Currency Rates
- Cloud Security
- Company Date and Numeric Format
- Company Info
- Configuration
- Conversions - Master, Conversions - Accounts and VAT Code
- Conversions - Master, Conversions - Activity Types
- Conversions - Master, Conversions - Contact Classifications
- Conversions - Master, Conversions - Contacts
- Conversions - Master, Conversions - Currency Codes
- Conversions - Master, Conversions - Items
- Conversions - Master, Conversions - Locations
- Conversions - Master
- Conversions - Master, Conversions - Suppliers
- Conversions - Master, Conversions - Tags/Objects
- Conversions - Master, Conversions - Users
- Countries
- Countries Regions
- Currency Round Off
- Days and Months
- Departments
- Discount Options
- Display Groups
- Exchange Rates Settings
- Form Settings
- Global Warnings on UnOKed Records
- Internet Enablers
- Journaling
- KPIs
- Languages
- Locking
- Locking Exceptions
- Nature of Business
- Number Series Defaults
- Opened Windows History
- Optional Features, including:
- 'Options' card
- 'Unsupported' card
- 'Security' card
- 'Performance' card
- 'Options' card
- Password Security
- Printers
- Reporting Periods
- Round Off
- Sales Groups
- Single Functions
- Special Days
- Styles
- Sub-Ledger Control Accounts
- Task Manager Access
- User Warnings on UnOKed Records
- Values in Text
- VAT Reg. Number Masks
- Weeks
- Home page for System Module manual
- Home page for Standard ERP manual
Page Setup
This page describes the Page Setup setting in the System module.---
The Page Setup setting in the System module allows you to specify how page setups for forms will be saved. Please refer to the Page Setup page for more details about page setups for forms.
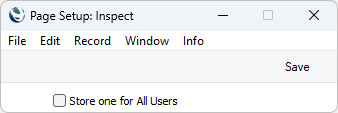
- Store one for All Users
- Select the Store one for All Users option if you need there to be a universal page setup for each form. This universal page setup will be used by all users.
- If you do not select this option, each user will be able to save their own page setup for each form. Each user that will print a particular form will therefore need to set their own page setup for that form.
- In both cases, the page setup for a particular form is platform-specific. So, if you are not using the Store one for All Users option and if a user is likely to print a particular document on more than one platform (for example, from Windows and macOS machines), that user should set separate page setups for each platform (from a machine of each type). If you are using the Store one for All Users option, there will be a universal page setup for Windows users and one for macOS users.
- If you do not select this option, each user will be able to save their own page setup for each form. Each user that will print a particular form will therefore need to set their own page setup for that form.
Go back to:
- Home page for Settings in the System module
- Home page for System Module manual
- Home page for Standard ERP manual
Control de Contraseñas
Esta opción te permite establecer algunas reglas para las contraseñas (o claves de acceso). Estos criterios se aplican a todas las claves manejadas por cada usuario y a cada Contacto (para que se conecten a tu Web Shop si es tu caso).Para abrir esta opción, haz doble clic en ‘Control de Contraseñas’. Así se abrirá la ventana ‘Clave: Ver’:
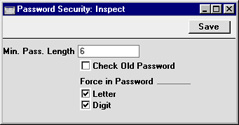
Si tildas la casilla ‘Nueva y Vieja Clave deben ser diferentes’, todos los usuarios estarán obligados a usar otra combinación de caracteres para conformar su clave. Si tildas la casilla ‘Letra’, implica que cada clave tenga al menos una letra mayúscula.
Print Conditions
Print Conditions allow you to specify that particular elements will be printed on Form Templates only if particular conditions are met. Please refer to the Conditional Printing of Elements page for details.---
Go back to:
- Home page for Settings in the System module
- Home page for System Module manual
- Home page for Standard ERP manual
Impresoras
Esta opción ha sido diseñada para el uso de impresoras aparte de la impresora principal establecida en el Panel de Control de Windows o Macintosh. La opción ‘Impresoras’ te permite derivar las tareas de la impresora principal hacia otra impresora.Esto resulta práctico cuando por ejemplo deseas imprimir informes en una impresora láser y documentos (ej. facturas) en un impresora matricial (usando material de escritorio como material de pre-impresión).
Las impresoras definidas en esta opción se utilizan para la impresión de documentos. Los informes siempre se imprimen por defecto en la impresora especificada en la primera fila de la matriz. Si configuras esta opción según las recomendaciones dadas en esta página, ésta será la impresora establecida en el Panel de Control (Windows) o en el Selector (Macintosh) de tu computadora. Los usuarios de Windows pueden derivar los informes a una impresora específica abriendo una lista de informes y resaltando uno de ellos. Luego, debes seleccionar ‘Configurar Página…’ desde el menú Archivo y escoger la impresora que deseas.
Abre la opción ‘Impresoras’. La ventana ‘Impresora: Ver’ muestra todas las impresoras inscritas en tu sistema. Lo único que debes hacer para registrar una nueva impresora es especificarla en la primera fila en blanco de la matriz y luego [Guardar]. Si no deseas guardar los cambios, pulsa la x en la esquina superior derecha de la ventana.

Como ya mencionamos, la impresora inscrita en la primera fila de la matriz se usará como la impresora por defecto. Es decir, será la impresora que se usará cuando no haya ninguna impresora especificada para un documento en particular. Se recomienda dejar la primera fila en blanco (sólo especificar el código – como en la ilustración). Esto quiere decir, que se usará por defecto primeramente la impresora establecida en el Panel de Control (Windows) o el Selector (Macintosh).
Para cada impresora disponible, las especificaciones en cada columna de la matriz deben obedecer la siguiente lógica
- Código
- Aquí debes especificar un nombre de tu elección para la impresora. Para la impresión de documentos, este código se usará para determinar dónde se realizará la impresión (en qué impresora). Abre aquí para ver un ejemplo.
- IP/Puerto Servidor de Impresión
- Aquí debes especificar la dirección IP completa de la computadora a la que está conectada la impresora. Si la impresora está conectada a una impresora en servidor, ese servidor debe estar activado y el sistema debe estar en ejecución.
- En el ejemplo ilustrado, la impresora
"PSERVER" está conectada a un servidor de impresión cuya dirección IP es 192.20.20.20, mientras la impresora "ACCT" está conectada a una computadora con dirección IP 192.20.20.22. La impresora "POR DEFECTO" no tiene una dirección IP, lo cual significa que está conectada a tu propia computadora. Reiteramos, la primera fila de la opción ‘Impresoras’ no deberá tener ninguna Dirección IP (o Puerto Servidor IP).
- La Dirección IP de una computadora puede ser obtenida en el Panel de Control de Comunicaciones.
- El servidor de impresión del sistema y la tercer columna de la matriz se describen aquí en gran detalle.
- En el ejemplo ilustrado, la impresora
- Pto. Hardw.
- Aquí debes especificar el puerto que usa la computadora especificada en la columna inmediatamente a la izquierda. Se puede usar las siguientes especificaciones:
- Blank o P
- Al dejar el Puerto en blanco (o especificar el carácter “P”) hará que se use la impresora por defecto para la computadora respectiva (es decir, se usará la impresora que ha sido establecida en el Panel de Control de Windows y en el Selector de Macintosh). En este caso, se necesitarán los instaladores incorporados de la impresora.
- LPT1 - LPT5
- Esto hará que se imprima directamente en un puerto paralelo (solo en Windows) cuya dirección IP aparece en la columna ‘IP/Puerto Servidor de Impresión’. Aquí, debes especificar el número del puerto (en medio de LPT1 y LPT5). Se ignorará el instalador de impresión Windows.
- COM1 - COM5
- Esto hará que se imprima directamente en un puerto serial (solo en Windows) cuya dirección IP aparece en la columna ‘IP/Puerto Servidor de Impresión’. Aquí debes especificar el número del puerto (en medio de COM1 y COM5). Se ignorará el instalador de impresión Windows.
- En algunas instalaciones NT4 de Windows, el dato respectivo del puerto serial puede respectar el uso de mayúsculas o minúsculas. A veces por ejemplo se reconocerá “com1” mientras que "COM1" fallará.
- En algunas instalaciones NT4 de Windows, el dato respectivo del puerto serial puede respectar el uso de mayúsculas o minúsculas. A veces por ejemplo se reconocerá “com1” mientras que "COM1" fallará.
- LP0 - LP3
- Hará que se imprima directamente en un puerto paralelo (solo Linux) cuya dirección IP aparece en la columna ‘IP/Puerto Servidor de Impresión’. Aquí debes especificar el número de puerto (en medio de LP0 y LP3).
- 1 o 5
- Hará que se imprima directamente en el puerto de la impresora (solo Macintosh) cuya dirección IP aparece en la columna ‘IP/Puerto Servidor de Impresión’. Aquí debes especificar “1” o “5”. Usa “1” si la impresora se comunica a 9.6kbps (estándar) o "5" si la impresora se comunica a 57kbps. Se ignorará el instalador incorporado de impresión Macintosh.
- F
- Esto significa que la máquina cuya dirección IP aparece en la columna ‘IP/Puerto Servidor de Impresión’ es un Servidor de Fax. En la tercera columna de la matriz, debes especificar el número de puerto de Servidor Fax Hansa. Éste deberá ser el puerto especificado en el campo ‘Puerto Serv. Impresión’ del registro Modo Programa (módulo Técnico).
- En todos aquellos casos en los que un Puerto sea indicado, el sistema enviará solamente información variable (de un documento) a través de dicho puerto. Toda la información en texto y formatos se perderá, pero la posición física en la página se conservará. Por lo tanto se asume que se está usando material de escritorio como material de pre-impresión.
- Cabe aclarar que si tienes una impresora instalada (usando el instalaador del Panel de Control en Windows o el Selector en Macintosh) pero imprimes directamente en un puerto serial/paralelo, el instalador puede interferir con la impresión directa desde el sistema. Si tienes problemas a causa de esto, intenta desinstalar los instaladores de impresión.
- Blank o P
- Selección de Impresoras
Los documentos del sistema son definibles por cada usuario. Este proceso puede empezar por especificar la impresora que se utiliza para un documento en particular. Por ejemplo, puedes imprimir un documento en una impresora que siempre está lista con el material correcto (el tamaño de papel correcto).Para el ejemplo que daremos en esta página, usaremos la ventana de definición de una Factura, pero el procedimiento puede ser aplicado para cualquiera de los documentos definibles por usuario con los que cuenta el sistema.
Luego de inscribir todas las impresoras de tu instalación (ver aquí), ve al módulo Ventas y abre la lista de Documentos desde el Panel de Control. Resalta ‘Facturas’ y luego selecciona ‘Definir Documento’ desde el menú Operaciones:
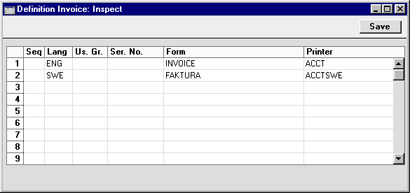
Los formularios "FAKTURA" y "INVOICE" han sido diseñados en el registro Formularios según lo descrito aquí.
Si la columna ‘Impresora’ queda en blanco (en todas las filas de la ventana ‘Definir Documento’), se usará la primera impresora definida en la opción ‘Impresoras’.
- Configuración de un Servidor de Impresión
En instalaciones extensas, puede resultar ventajoso configurar un servidor de impresión. De este modo, hay más garantías de que la impresión de documentos se realizará con normalidad. En este sentido, puedes hacer que tu sistema HansaWorld actúe como servidor de impresión. Así, se interrogará periódicamente al servidor de datos para los respectivos trabajos de impresión.Cuando un usuario imprime un documento, éste es retenido en el servidor de datos hasta que la siguiente interrogación del servidor de impresión. Luego, el documento es extraído del servidor de datos por el servidor de impresión. Por lo tanto, el servidor de datos queda disponible para la siguiente tarea (de procesamiento de datos) rápidamente, mientras que el servidor de impresión se encarga de las comunicaciones con la impresora.
Tu copia de HansaWorld que actúa como servidor de impresión debe estar en una máquina exclusiva (no en la misma máquina que el servidor de datos u otras máquinas cliente). Puedes conectar hasta 6 impresoras a esta máquina y ésta debe tener sus propias copias de seguridad (backups por separado).
Para configurar el servidor de impresión HansaWorld, el procedimiento es el siguiente:
- Crea una nueva base de datos en la máquina que ha de ser exclusiva para tu servidor de impresión. Para esto, sigue las instrucciones de la página Creación de una Base de Datos nueva. Solo necesitas una empresa, por tanto especifica un nombre coherente como ser “Servidor Hansa de Impresión”.
- Ve al módulo Sistema y abre la opción ‘Manejo del Sistema’. Asegúrate que la casilla ‘Servidor’ esté tildada. Esto hará que tengas que solicita una nueva Clave Enabler para la base de datos del servidor de impresión.
- Ve al módulo Técnico y abre el registro Modo Programa.
- Completa la información en las solapas ‘Servidor’ y ‘Servidor Impresión’. Usa la siguiente lógica:
Solapa Servidor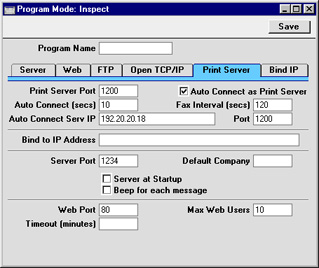
- Puerto Servidor
- Especifica aquí un código arbitrario de cuatro dígitos para identificar la base de datos. Toma en cuenta que a pesar del propósito exclusivo de la base que estás creando, aun así se requiere un Número de Puerto para activar el TCP/IP. El puerto especificado aquí deberá ser único (es decir, debe ser diferente al Puerto Servidor especificado en el servidor de datos).
- Puerto Serv. Impresión
- Especifica aquí el mismo Puerto Servidor especificado en el registro Modo Programa pero de la base de datos del servidor de datos. Esto sirve para que el servidor de impresión localice la copia correcta de la aplicación HansaWorld en el servidor. Si estás usando la funcionalidad de servidor paralelo, deberás especificar entonces el Puerto Servidor del distribuidor.
- Una consecuencia de este dato es que si tienes más de un máquina servidora de datos (con bases de datos distintas), necesitarás un servidor de impresión por separado para cada una.
- Una consecuencia de este dato es que si tienes más de un máquina servidora de datos (con bases de datos distintas), necesitarás un servidor de impresión por separado para cada una.
- Auto Conex. Serv. IP
- Aquí debe ir especificada la dirección IP de la máquina servidora de datos. Este dato se puede obtener del software de control TCP/IP del servidor. Este dato sirve para que el servidor de impresión localice al servidor de datos correcto (si por ejemplo hay dos máquinas) dentro de la instalación. Si estás usando la funcionalidad servidor paralelo, deberás especificar la dirección IP del distribuidor.
- Conexión Auto. (seg)
- Como ya mencionamos, el servidor de impresión interroga periódicamente al servidor de datos sobre los trabajos de impresión. En tal sentido, debes especificar aquí – especificando el tiempo en segundo ??? la periodicidad con la que esto ha de suceder (10 segundos es el tiempo recomendado).
- Intervalos Fax (seg.)
- Este campo se utiliza únicamente para los servidores de fax. Por favor, lee la página Configuración de un Servidor de Fax para más detalles.
- Puerto
- El dato de este campo debe ser igual al del campo ‘Puerto Serv. Impresión’.
- Conexión Auto. Servidor Impresión
- Esta casilla debe estar tildada en la máquina servidora de impresión para garantizar que se verifiquen frecuentemente los trabajos de impresión que vienen del servidor de datos.
- Puerto Servidor
- Luego de haber completado la información de las solapas ‘Servidor’ y ‘Servidor Impresión’, pulsa el botón [Guardar]. Si has especificado números de puerto por primera vez (o si has cambiado aquellos existentes), debes salir del sistema para que los cambios tengan efecto.
- Si has utilizado la opción Operaciones Automáticas (módulo Técnico) en la máquina principal servidora de datos (para crear backups diarios o para establecer que el sistema inicie o se cierre automáticamente), deberás usar la misma opción en el servidor de impresión para cerrarlo durante este lapso de tiempo. El servidor de impresión interroga periódicamente al servidor de datos y por ende, el servidor de impresión no obtendrá ninguna respuesta cuando el servidor de datos está ejecutando un backup de sí mismo o se haya cerrado.
Toma en cuenta también que si has utilizado la opción ‘Operaciones Automáticas’ en el servidor de datos para crear un backup diario, la Hora Cerrar BD en el servidor de impresión deberá ser ajustada a 3 minutos antes de la hora especificada en el servidor de datos. Por otro lado, la Hora Abrir BD en el servidor de impresión deberá ser ajustada a unos cuantos minutos después que el proceso de backup en la el servidor de datos haya finalizado.
Si has utilizado la opción ‘Operaciones Automáticas’ en el servidor principal de datos para cerrar la base de datos durante la noche (tal vez para que corra un tercer mecanismo de backup), toma en cuenta que la Hora Cerrar BD en el servidor de impresión deberá ser ajustada a 3 minutos antes de la hora en el servidor de datos. Y, la Hora Abrir BD en el servidor de impresión deberá ajustada a unos cuantos minutos después de la Hora Abrir BD especificada en el servidor de datos.
En ambos casos, la Hora Abrir BD en el servidor de impresión deberá ser anterior a la hora en que los usuarios comienzan a conectarse al servidor de datos.
- Como paso final, debes seleccionar ya sea ‘Servidor’ o ‘Gateway Externo’ desde el listado de módulos para que aparezca la ventana ‘Estado Servidor’. Solo recién de esto, el servidor de impresión podrá ser dejado como un ente autónomo.
Se recomienda ‘Gateway Externo’ puesto que puedes pasar de ahí al módulo Técnico para revisar los seteos si es necesario. Si optas por esto, debes retornar nuevamente al módulo Gateway Externo cuando hayas acabado. El objetivo es evitar que aparezcan mensajes que podrían impedir que el programa siga ejecutándose. En el Servidor y en Gateway Externo, estos mensajes serán remitidos al archivo log y no aparecerán en pantalla.
- Al ir al servidor de datos (o a una de las máquinas clientes con acceso al módulo Sistema), verás que las opción ‘Impresoras’ habrá sido configurada para habilitar correctamente el servidor de impresión. Si decides hacer esto en el servidor para comprobar que toda está bien, debes cerciorarte que no haya ningún otro usuario conectado. Para esto, selecciona ‘Salir, Quitar Autoservidor’ desde el menú Archivo y reinicia al sistema. Luego de eso podrás modificar la opción ???Impresoras. Si tu servidor no tiene un interfaz gráfico, deberás modificar esta opción desde una máquina cliente.
La primera fila de esta opción deberá quedar en blanco (excepto el código) como en la ilustración. Esto hará que se use por defecto la impresora seleccionada en el Panel de Control (Windows) o Selector (Macintosh).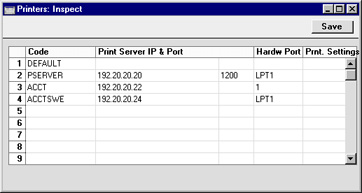
En la ilustración, el servidor de impresión ha sido especificado en la segunda fila de la matriz. La dirección IP en la máquina servidora de impresión ha sido especificada en la columna ‘IP/Puerto Servidor de Impresión’ y la columna ‘Puerto’ muestra el mismo número especificado en el campo ‘Puerto Serv. Impresión’ en el registro Modo Programa pero en la servidor de impresión (paso 4). De ahí en más, puedes usar el Puerto Hardware para indicarle al servidor de impresión cuál será la impresora a ser usada. Si tienes varias impresoras en tu instalación que están conectadas al servidor de impresión, deberás especificar en filas separadas cada una de ellas; y especificar los Puertos Hardware respectivos para hacer que los documentos se impriman en la impresora correcta.
Cuando hayas completado la opción ‘Impresoras’, guárdala pulsando el botón [Guardar].
- Finalmente, sigue las instrucciones detalladas en la página Selección de Impresoras – luego, define el documento respectivo que se ha de imprimir a través del servidor de impresión.
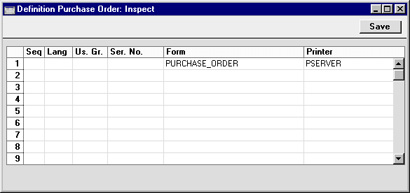
- Configuración de un Servidor de Fax
En instalaciones extensas, puede resultar ventajoso configurar un servidor de fax para la emisión de documentos enviados vía fax a sus destinatarios. En este sentido, puedes hacer que tu sistema HansaWorld actúe como un servidor de fax. De este modo, al igual que el Servidor de Impresión, tu servidor de fax interrogará al servidor de datos sobre los trabajos de fax. Cuando un usuario imprime un documento que ha de ser enviado por fax, éste es retenido en el servidor de datos hasta la siguiente interrogación del servidor de fax. Luego, el documento es extraído del servidor de datos por el servidor de fax. Por lo tanto, el servidor de datos queda disponible para la siguiente tarea (de procesamiento de datos) rápidamente, mientras que el servidor de fax se encarga de las comunicaciones con la máquina fax destinataria.Tu copia de HansaWorld que actúa como servidor de fax debe estar en una máquina exclusiva (no en la misma máquina que el servidor de datos u otras máquinas cliente). Toma en cuenta que esta máquina puede ser la misma que se está siendo usada como servidor de impresión. En este caso, debes recordar que podría generarse una tardanza en la impresión del algún documento cuando otro documento esté siendo enviado por fax. La máquina deberá ser una Macintosh que contiene o está conectada a un módem de fax y con una dirección IP fija. El sistema operativo debe ser OS 9.
Además, considerando que el servidor de fax estará en una máquina diferente, éste deberá tener sus propias copias de seguridad (backups).
Para configurar el servidor de fax HansaWorld, el procedimiento es el siguiente:
- Crea una nueva base de datos en la máquina que ha de ser exclusiva para tu servidor de fax. Para esto, sigue las instrucciones de la página Creación de una Base de Datos nueva. Solo necesitas una empresa, por tanto especifica un nombre coherente como ser “Servidor Hansa Fax”.
- Ve al módulo Sistema y abre la opción ‘Manejo del Sistema’. Asegúrate que la casilla ‘Servidor’ esté tildada y la casilla ‘Fax’ también. Esto hará que tengas que solicitar una nueva Clave Enabler para la base de datos el servidor de fax.
- Ve al módulo Técnico y abre el registro Modo Programa.
- Completa la información en las solapas ‘Servidor’ y ‘Servidor Impresión’ tal cual se describió para el Servidor de Impresión. El campo ‘Intervalos Fax (seg.)’ corresponde al tiempo (en segundos) que el servidor de fax esperará entre fax y fax. Toma en cuenta que el servidor de fax está totalmente ocupado cuando envía un fax y no puede ser usado así que es necesario que haya un intervalo para que tú puedas revisar la cola de fax (si es necesario). Si dejas en blanco el campo ‘Intervalos Fax (seg.)’, el intervalo será 30 segundos.
Una vez hecho esto, pulsa el botón [Guardar]. Si usaste un puerto nuevo de servidor o si cambiaste el número de puerto que había, deberás salir del sistema y volver a ingresar para que los cambios tengan efecto.
Si ya has configurado tu servidor de impresión y deseas que el mismo sea el servidor de fax, ignora esta orden.
- Estando todavía en el módulo Técnico, abre las ‘Opciones de Fax’:
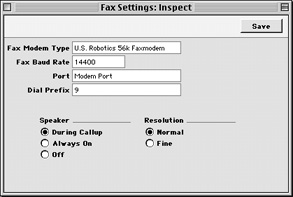
- Tipo de Fax
- Pegado Especial
selecciona un dato
- Este campo sirve para especificar el tipo de fax (el módem) que está conectado a tu máquina servidora de fax. Si tu módem de fax no está listado en la lista Pegado Especial, por favor contacta tu representante local HansaWorld (“US Robotics 56K” se utiliza para la mayoría de los módems.
- Precio por Baudio de Fax
- Pegado Especial
selecciona un dato
- Aquí debes especificar la velocidad de tu módem de fax (expresado en bps).
- Puerto
- Pegado Especial
selecciona un dato
- Aquí debes especificar el puerto de hardware para la comunicación entre el servidor de fax y el módem.
- Prefijo de Llamada
- Si el módem necesita discar un número (para acceder a una línea exterior) antes de número de fax, debes especificar ese número aquí.
- Altavoz
- Puedes elegir una de estas alternativas para establecer el momento en que deseas oir el sonido del módem.
- Resolución
- Estas alternativas sirven para seleccionar la resolución de los documentos de fax.
- Tipo de Fax
- Si has utilizado la opción Operaciones Automáticas (módulo Técnico) en la máquina principal servidora de datos (para crear backups o establecer que el sistema inicie o se cierre automáticamente), deberás usar la misma opción en el servidor de fax para cerrarlo durante este lapso de tiempo. El servidor de fax interroga periódicamente al servidor de datos y por ende, el servidor de fax no obtendrá ninguna respuesta cuando el servidor de datos esté ejecutando un backup de sí mismo o se haya cerrado
Toma en cuenta también que si has utilizado la opción ‘Operaciones Automáticas’ en el servidor de datos para crear un backup diario, la Hora Cerrar BD en el servidor de fax deberá se ajustada a 3 minutos antes de la hora especificada en el servidor de datos. Por otro lado, la Hora Abrir BD en el servidor de fax deberá ser ajustada a unos cuentos minutos después que el proceso backup en el servidor de datos haya finalizado.
Si has utilizado la opción ‘Operaciones Automáticas’ en la máquina principal servidora de datos para que el sistema se cierre durante la noche (tal vez para que corra un tercer mecanismo de backup), toma en cuenta que la Hora Cerrar BD en el servidor de fax deberá ser ajustada a 3 minutos antes de la Hora Cerrar BD especificada en el servidor de datos. Y, la Hora Abrir BD en el servidor de fax deberá se ajustada a unos cuentos minutos después de la Hora Abrir BD especificada en el servidor de datos.
En ambos casos, la Hora Abrir BD especificada en el servidor de fax deberá ser anterior a la hora en que los usuarios comienzan a conectarse el servidor de datos.
En ambos casos, la Hora Abrir BD en el servidor de fax deberá ser anterior a la hora en que los usuarios comienzan a conectarse al servidor de datos.
- Como paso final, debes seleccionar ‘Servidor’ desde el listado de módulos para que aparezca la ventana ‘Estado Servidor’. Solo recién de esto, el servidor de fax podrá ser dejado como un ente autónomo. Se recomienda el ‘Gateway Externo’ puesto que puedes pasar de ahí al módulo Técnico para revisar los seteos si es necesario. Si optas por esto, debes retornar nuevamente al módulo Gataway Externo cuando hayas acabado. El objetivo es evitar que aparezcan mensajes que podrían impedir que el programa siga ejecutándose. En el Servidor y en el Gateway Externo, estos mensajes serán remitidos al archivo log y no aparecerán en pantalla.
- Al ir al servidor de datos (o cualquiera de las máquinas cliente con acceso al módulo Sistema), abre la opción ‘Manejo de Sistema’ y asegúrate que la casilla ‘Fax’ esté tildada. Consecuentemente, podrías necesitar una nueva Clave Enabler para la base de datos principal. Si decides hacer esto para comprobar que todo está bien, debes cerciorarte que no haya ningún otro usuario conectado. Para esto, selecciona ‘Salir, Quitar Autoservidor’ desde el menú Archivo y reinicia el sistema. Luego de esto podrás modificar la opción ‘Manejo de Sistema’. Si tu servidor no tiene un interfaz gráfico, tendrás que modificar esta opción (y la opción ‘Impresoras’) desde una máquina cliente. (paso 9).
- La opción ‘Impresoras’ – a partir de este momento – deberá estar configurada para hace que el servidor de fax esté disponible.
Como ves, La primera fila de la matriz en la opción ‘Impresoras’ deberá quedar en blanco (excepto el código). Esto significa que se usará por defecto la impresora seleccionada en el Panel de Control (Windows) y Selector (Macintosh).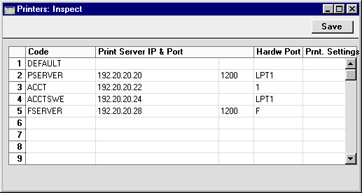
Como vimos en la ilustración, el servidor de fax fue especificado en la última fila de la matriz. La dirección IP del servidor de fax ha sido especifica en la columna ‘IP/Puerto Servidor de Impresión’ y el número de la columna ‘Puerto’ es el mismo especificado en el campo ‘Puerto Serv. Impresión’ del registro Modo Programa en el servidor de fax (paso 4). El Puerto Hardware ha sido ajustado a “F” para indicarle al servidor de fax que se habrá de usar el módem. Notemos que se están usando máquinas por separado como servidores de faz y servidores de impresión.
Cuando hayas completado la opción ‘Impresoras’, guárdala pulsando el botón [Guardar].
- Finalmente, sigue las instrucciones detalladas en la página Selección de Impresoras – luego, define el documento que se ha de imprimir a través del servidor de fax; y especifica que la impresión provendrá del servidor de fax (usando el campo ‘Impresora’).
En la anterior ilustración, podemos ver que las Órdenes de Compra se imprimirán primero a través del servidor de impresión (para que haya una copia fiel) y luego se usará el servidor de fax. El número de fax será extraído del registro individual del Contacto (ej. un proveedor). Toma en cuenta que debido a que un mismo documento estará siendo impreso dos veces, el campo ‘Sec.’ se usará para especificar cuál es el orden de impresión.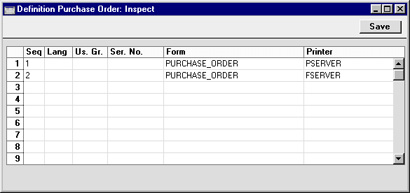
Cabe aclarar que ninguna imagen incluida en el formulario (es decir, archivos PICT y EPS en Macintosh o BMP en Windows) será enviada por fax.
Toma también en cuenta que los números de fax no deberán contener espacios, barras u otros caracteres no numéricos. Para quitar estos caracteres, puedes usar la función de Mantenimiento 'Actualizar Números de Fax' (módulo Técnico).
Cuando un usuario ejecuta un documento que se ha de enviar por fax, éste es retenido en el servidor de datos hasta la siguiente interrogación hecha por el servidor de fax. Luego, el documento es extraído por el servidor de fax en donde dicho documento es colocado en una cola de impresión. Para ver la cola de impresión en el servidor de fax, puedes abrir el registro Cola Fax en el módulo Técnico.
El registro Cola Fax tiene las siguientes características:
- Las Facturas y Cotizaciones se colocan en la Cola con mayor prioridad que las Cartas a Clientes.
- Los faxes bien enviados serán eliminados automáticamente de la cola.
- Si un fax no es enviado en el primer intento, se realizarán dos intentos más. Luego de esto, toma en cuenta que no será todavía quitado de la cola sino quedará allí para que reintentes enviarlo o para su eliminación. La columna ‘Fallo’ en la ventana ‘Fax en Cola: Hojear’ muestra la cantidad de intentos realizados para enviar un fax.
- Para intentar enviar un fax fallido, abre el registro individual del Fax y selecciona ‘Reintentar Fax’ desde el menú Operaciones (puedes cambiar el número de fax antes de realizar esto). Si deseas que se realicen tres intentos más para enviar el fax, ajusta el número de intentos a cero y guarda el registro. Para tratar de enviar todos los faxes fallidos, selecciona ‘Reintentar Todos’ desde el menú Operaciones de la ventana ‘Fax en Cola: Hojear’.
- Para pausar toda la actividad relacionada al envío de fax, selecciona ‘Agrega Pausa Tarea Fax’ desde el menú Operaciones de la ventana ‘Fax en Cola: Hojear’. De este modo, el sistema agregará un registro de fax ficticio a la cabeza de la Cola de Fax. Este será un candado que impedirá el envío de otros faxes hasta que borres el fax ficticio. Toma en cuenta que el servidor de fax está completamente ocupado cuando envía un fax, así que deberás utilizar este comando (‘Agregar Pausa Tarea Fax’) en caso que necesites trabajar en la máquina servidora de fax (por ejemplo, cuando necesites revisar los contenidos del fax).
- Para borrar un fax de la Cola de Fax, ábrelo y selecciona ‘Borrar Tarea Fax’ desde el menú Operaciones. Para borrar todos los faxes existentes en la cola, selecciona el comando ‘Remover Todo Fax en Cola’ desde el menú Operaciones de la ventana ‘Fax en Cola: Hojear’.
Remote Backups
Please refer to the Remote Back-ups page for full details about this setting.---
Go back to:
- Home page for Settings in the System module
- Home page for System Module manual
- Home page for Standard ERP manual
Periodos de Informes
Esta opción sirve para nombrar y definir ciertos periodos de tiempo. Estos periodos deberán coincidir con los lapsos de tiempo que generalmente utilizas para producir informes. Una vez definidos, los periodos de informe te permiten usar Pegado Especial desde la ventana de especificación de la mayoría de los informes. Por ejemplo, si deseas producir informes mensuales, deberás definir periodos de informe para cada vez.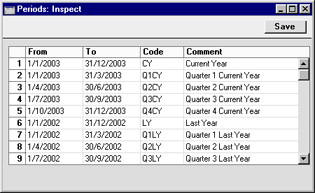
Para registrar un nuevo periodo de informe, utiliza la fila en blanco que está inmediatamente después del último periodo de informe definido y luego especifica los detalles respectivos. Finalmente, pulsa [Guardar].
Cabe aclarar que el periodo de informe que está en la primera fila de la matriz, se ofrecerá siempre por defecto en las distintas ventanas de especificación. Por consiguiente, algunas veces querrás alterar esto para lo cual simplemente deberás ingresar el periodo de informe que más te convenga en la primera fila de la matriz.
Para borrar un periodo de informe, resalta toda la fila y luego presiona la tecla Espacio Atrás. Para recorrer el primer periodo de informe de la matriz y habilitar la primer fila para uno que tú desees ingresar, resalta la primera fila y luego presiona la tecla Enter.
Round Off
This page describes the Round Off setting in the System module.---
Use the Round Off setting to control how different figures will be rounded.
Rounding throughout the system. When you enter a Sub System record (i.e. a record that will eventually post to the Nominal Ledger, such as an Invoice or Purchase Invoice), several figures in that record will be subject to the rounding process. When you then mark the record as OK and save, causing a Nominal Ledger Transaction to be created automatically, any amounts lost or gained due to the rounding process will be posted to the Round Off Gain or Round Off Loss Accounts specified in the Account Usage S/L setting. These Accounts will be used in Transactions generated from all Sub System records (e.g. in Transactions generated from both Sales and Purchase Invoices).
There are two settings that control rounding: this one, and the Currency Round Off setting, also in the System module. When you enter a Sub System record, rounding rules will be taken from the row in the Currency Round Off setting for the Currency/Payment Term/Register combination. If there is no row in the Currency Round Off setting for that combination, rounding rules will be taken from this setting. The Currency Round Off setting only affects rounding for VAT, row sums and totals.
To open the Round Off setting, ensure you are in the System module using the [Module] button in the Master Control panel and click the [Settings] button, also in the Master Control panel. The 'Settings' list opens: double-click 'Round Off'. When the 'Round Off: Inspect' window opens, enter your requirements for the rounding process as necessary. Click [Save] to save and close, or the close box to close without saving changes.
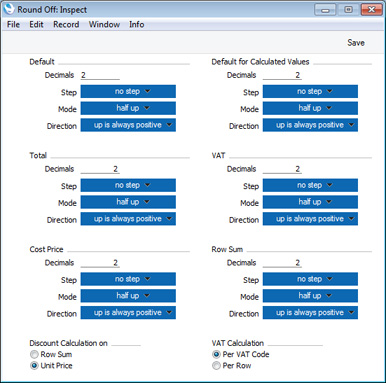
- Decimals
- Specify the number of decimal places that you need. Example values are:
- 2
- Rounds to two decimal places.
- 1
- Rounds to one decimal place.
- 0
- Rounds to the nearest whole number.
- -1
- Rounds to the nearest 10.
- -2
- Rounds to the nearest 100.
- 2
- Step
- Choose an option from the Step pop-up to specify the rounding increment, as follows:
- no step
- A rounding increment of 1 will be used. For example, if you are rounding to two decimal places, values after rounding will follow the sequence 0.00, 0.01, 0.02, 0.03 and so on. 0.023 will be rounded to 0.02 using this option.
- 5
- A rounding increment of 5 will be used. For example, if you are rounding to two decimal places, values after rounding will follow the sequence 0.00, 0.05, 0.10, 0.15 and so on. 0.023 will be rounded to 0.00 using this option.
- 2.5
- A rounding increment of 2.5 will be used. For example, if you are rounding to two decimal places, values after rounding will follow the sequence 0.00, 0.025, 0.05, 0.075 and so on. 0.023 will be rounded to 0.025 using this option. Note that this option will sometimes result in one extra decimal place than specified being used.
- no step
- Mode
- Choose an option from the Mode pop-up to specify how 0.5 will be rounded. The options are:
- half up
- 0.5 will be rounded up to 1.0 when rounding to zero decimal places.
- half down
- 0.5 will be rounded down to 0.0 when rounding to zero decimal places.
- to even
- 0.5 will be rounded to the nearest even whole number. For example, when rounding to zero decimal places, 1.5 will be rounded to 2, 2.5 will be rounded to 2, 3.5 will be rounded to 4.
- to odd
- 0.5 will be rounded to the nearest odd whole number. For example, when rounding to zero decimal places, 1.5 will be rounded to 1, 2.5 will be rounded to 3, 3.5 will be rounded to 3.
- truncate
- Rounding will be carried out by removing decimals. For example, 1.999 will be rounded to 1.99 (when rounding to two decimal places), to 1.9 (one decimal place) or to 1 (zero decimal places).
- half up
- Direction
- The Direction will only be used if the Mode is "half up" or "half down". It specifies what "up" and "down" mean for negative numbers.
- up is always positive
- If the Mode is “half up”,-1.5 will be rounded up to -1, +1.5 will be rounded up to 2.
- If the Mode is “half down”, -1.5 will be rounded down to -2, +1.5 will be rounded down to 1.
- If the Mode is “half down”, -1.5 will be rounded down to -2, +1.5 will be rounded down to 1.
- up is away from zero
- If the Mode is “half up”, -1.5 will be rounded up to -2, +1.5 will be rounded up to 2.
- If the Mode is “half down”, -1.5 will be rounded down to -1, +1.5 will be rounded down to 1.
- This option will ensure a negative record will completely cancel a positive one.
- If the Mode is “half down”, -1.5 will be rounded down to -1, +1.5 will be rounded down to 1.
- up is always positive
- Default
- The Default section has the following effects:
- It controls the number of decimals that will be displayed in Price fields and in fields with calculated values (e.g. Sum). For example, if the Default number of decimals is 4, four decimals will always be displayed. So, a value of 1 will be displayed as 1.0000, and 1.25 will be displayed as 1.2500.
- It sets the maximum number of decimals that can be used anywhere in this setting (except the Cost Price section). For example, if the Default number of decimals is 4, the Row Sum will be rounded to four decimal places, even if you specified in the relevant section of this setting that it should be rounded to six.
- The Quantity field in all matrices will not follow the number of decimal places specified here. This field can support up to three decimal places. For example, if you enter "1", "1" will be displayed in the field, if you enter "1.123", "1.123" will be displayed in the field, and so on. If you enter "1.1234", then it will be rounded to three decimal places following the Default rules for Step, Mode and Direction.
- The Unit Price field in all matrices can also support up to three decimal places, and will always display a minimum of two (even if the Default number of decimals is less than two). For example, if you enter "1", "1.00" will be displayed in the field, if you enter "1.123", "1.123" will be displayed in the field, and so on. If you enter "1.1234", then it will be rounded to three decimal places following the Default rules for Step, Mode and Direction. If the Default number of decimals is greater than three, then the appropriate number of trailing zeros will be added to the figures. For example, if the Default number of decimals is five and you enter "1.12", "1.12000" will be displayed.
- It controls the number of decimals that will be displayed in Price fields and in fields with calculated values (e.g. Sum). For example, if the Default number of decimals is 4, four decimals will always be displayed. So, a value of 1 will be displayed as 1.0000, and 1.25 will be displayed as 1.2500.
- Default for Calculated Values
- This section controls the rounding of calculated figures not mentioned elsewhere in this setting (for example, figures resulting from Currency conversions). The number of decimals should not be more than the Default number of decimals specified above.
- Total
- This section controls the rounding of the figures shown in the TOTAL field below all matrices. The number of decimals should not be more than the Default number of decimals specified above.
- VAT
- This section controls the rounding of the VAT calculation in each matrix row (but the figures shown in the VAT field below all matrices are rounded using the Calculated Values section above). The number of decimals should not be more than the Default number of decimals specified above.
- Calc Cost Value
- This section allows you to determine the rounding method to be used when stock values are calculated.
- Whenever the Weighted Average or Queued value of an Item is updated (e.g. when you mark a Goods Receipt as OK and save it), the calculation will use the rounding method specified here. Weighted Average or Queued values will then be shown in the Stock List report and will be used to calculate the values of outgoing stock transactions.
- If you have chosen to have the Cost Prices of your Items updated automatically from Goods Receipts, the updating of Item Cost Prices will also use this rounding method.
- The number of decimals that you specify here can be more than the Default number of decimals specified above.
- The Currency Round Off setting does not contain rounding options for Cost Prices. Therefore, rounding rules for Cost Prices will always be taken from this Round Off setting.
- Whenever the Weighted Average or Queued value of an Item is updated (e.g. when you mark a Goods Receipt as OK and save it), the calculation will use the rounding method specified here. Weighted Average or Queued values will then be shown in the Stock List report and will be used to calculate the values of outgoing stock transactions.
- Row Sum
- These options control the rounding used in the calculation of the figures shown in the Sum field (Qty * Unit Price) in all matrices and consequently in the Subtotal field below matrices as well. The number of decimals should not be more than the Default number of decimals specified above.
- Discount Calculation
- This group of options allows you to determine how discounts are calculated in sales transactions (i.e. in Quotations, Sales and Purchase Orders, Invoices, Contracts, Work Sheets and Project Budgets). In certain circumstances (where there is a very small unit price and a large quantity), the two alternatives can produce different results due to rounding. If you choose the Row Sum option, the discount will be calculated after the multiplication of the unit price and the quantity. If you choose the Unit Price option, the discount will be applied to the unit price before it is multiplied by the quantity.
- For example, you receive an Order for 20,000 items priced at 0.05 with a 25% discount. Using the Row Sum option, the calculated discount is 250:
- 20000 x 0.05 = 1000. 25% of 1000 = 250
- Using the Unit Price option, the calculated discount is 200:
- 25% of 0.05 rounded to two decimal places is 0.01. 0.01 x 20000 is 200
- For example, you receive an Order for 20,000 items priced at 0.05 with a 25% discount. Using the Row Sum option, the calculated discount is 250:
- VAT Calculation
- Specify here how VAT is to be rounded off.
- Per VAT Code
- VAT subtotals will be calculated for each VAT Code used in a transaction. These subtotals will then be rounded as determined in the Currency Round Off setting or using the option chosen above (whichever is appropriate). The subtotals will then be added together to produce the overall VAT total.
- Per Row
- The VAT amount for each individual transaction row will be rounded as determined in the Currency Round Off setting or using the option chosen above (whichever is appropriate). These amounts will then be added together to produce the overall VAT total.
- Note that the transaction row sum will be rounded as determined in the Currency Round Off setting or using the option chosen above (whichever is appropriate) before the VAT calculation is carried out.
- Per VAT Code
Settings in the System module:
- Access Groups
- Active Users
- Auto Actions
- Bank Holidays
- Base Currency
- Base Currency Rates
- Company Date and Numeric Format
- Company Info
- Configuration
- Conversions - Master, Conversions - Accounts and VAT Code
- Conversions - Master, Conversions - Activity Types
- Conversions - Master, Conversions - Contact Classifications
- Conversions - Master, Conversions - Contacts
- Conversions - Master, Conversions - Currency Codes
- Conversions - Master, Conversions - Items
- Conversions - Master, Conversions - Locations
- Conversions - Master
- Conversions - Master, Conversions - Suppliers
- Conversions - Master, Conversions - Objects
- Conversions - Master, Conversions - Users
- Countries
- Countries Regions
- Currency Round Off
- Days and Months
- Departments
- Discount Options
- Display Groups
- Exchange Rates Settings
- Form Settings
- Global Warnings on UnOKed Records
- Internet Enablers
- Journaling
- KPIs
- Languages
- Locking
- Locking Exceptions
- Number Series Defaults
- Opened Windows History
- Optional Features
- Password Security
- Printers
- Reporting Periods
- Round Off
- Sales Groups
- Single Functions
- Special Days
- Styles
- Sub-Ledger Control Accounts
- Task Manager Access
- User Warnings on UnOKed Records
- Values in Text
- VAT Number Masks
- Weeks
- Home page for System Module manual
- Home page for Standard ERP manual
Grupos de Ventas
Los Grupos de Venta se utilizan para dividir a los empleados de tu empresa en células (o equipos). Estos grupos podrán ser utilizados siempre y cuando el módulo Acceso Limitado esté instalado.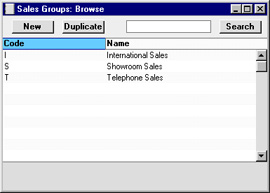
La forma de asignar un Grupo de Venta a una persona es especificando el código del Grupo de Venta en el campo respectivo del registro individual de persona (registro Personas – solapa 'Accesos'):
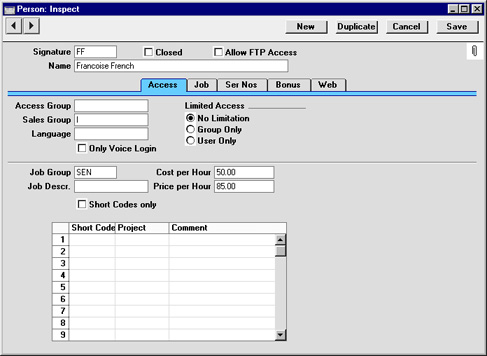
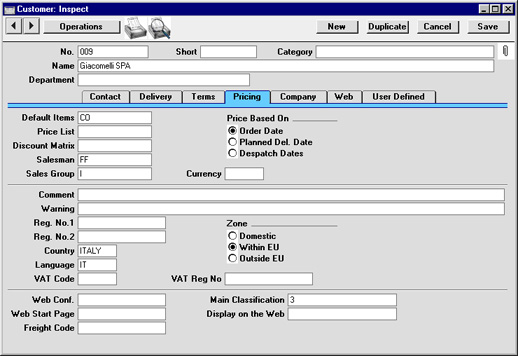
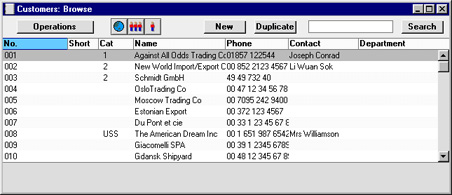

- Lista todos los registros individuales dentro del registro principal (ej. todas las Ordenes de Venta).

- Lista los registros individuales pertenecientes a los miembros de un mismo Grupo de Venta.

- Lista los registros individuales pertenecientes a la persona que está actualmente conectada.
- Sin Límite
- Hará que la persona pueda ver todos los registros individuales de un registro principal. Además, la persona podrá reducir el listado en función a los registros individuales de su Grupo de Venta o aquellos personales.
- Solo Grupo
- Hará que la persona solamente pueda ver los registros individuales de su Grupo de Acceso. Además, la persona podrá reducir el listado en función a aquellos registros personales.
- Solo Usuario
- Hará que la persona solamente pueda ver sus propios registros individuales.
Single Functions
There are two methods that you can use to control the access that your employees have to your Standard ERP database: Access Groups and Single Functions. An employee with an Access Group can be given access to any part of the system, while one belonging to a Single Function (a "Single Function" User) can only be given access to a limited number of Standard ERP functions (up to a maximum of three). "Single Function" Users are therefore much more restricted in what they can do, so they are treated differently for licensing purposes.If you have any Single Function Users, you should use this setting to define the various combinations of functions available to them. For example, you might have some Single Function Users that can only enter Orders, and some that can enter Orders and Quotations. In this case you would enter two records in this setting, one granting access to the Order register only and the other to the Order and Quotation registers. You should then enter the Single Function Users themselves in the Person register as Named Users, specifying the appropriate Single Function for each one using the field on the 'Access' card.
To work with the Single Functions setting, ensure you are in the System module and then open the ‘Settings’ list by clicking the [Settings] button in the Navigation Centre or using the Ctrl-S/⌘-S keyboard shortcut. Double-click 'Single Functions' in the resulting 'Settings' list to open the 'Single Functions: Browse' window. This lists the Single Function records that have already been entered: to enter a new record, select ‘New’ from the Create menu in the Button Bar. The 'Single Function: New' window appears: enter the details as appropriate and click [Save] to save the new record.
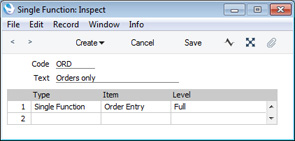
- Code
- Enter the unique Code by which the Single Function record is to be identified from elsewhere in Standard ERP. The Code may consist of up to five characters, and you can use both numbers and letters.
- Text
- Assign a descriptive name to the Single Function record. This will be shown in the 'Single Functions: Browse' window and the 'Paste Special' list.
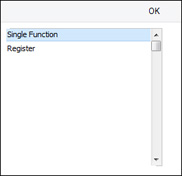
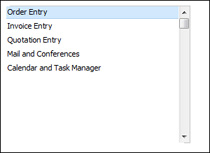
Finally, use the last column to determine the access level of the Group. A further 'Paste Special' list displays the available options:
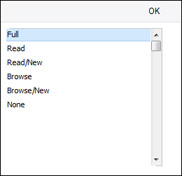
- Browse
- Allows access to the browse and 'Paste Special' windows only. Searches can be performed. Records cannot be entered or modified.
- Browse/New
- Allows access to the browse and 'Paste Special' windows and the creation of new records. Existing records cannot be viewed, changed or copied.
- Read
- Allows access to the browse window and the double-clicking of items so that they can be viewed in an inspect window. Records cannot be entered or modified.
- Read/New
- Allows access to the browse window and the double-clicking of items so that they can be viewed in an inspect window. New records can be created. Existing records cannot be modified, but they can be copied.
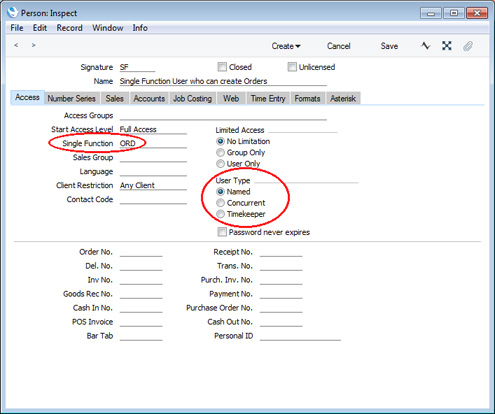
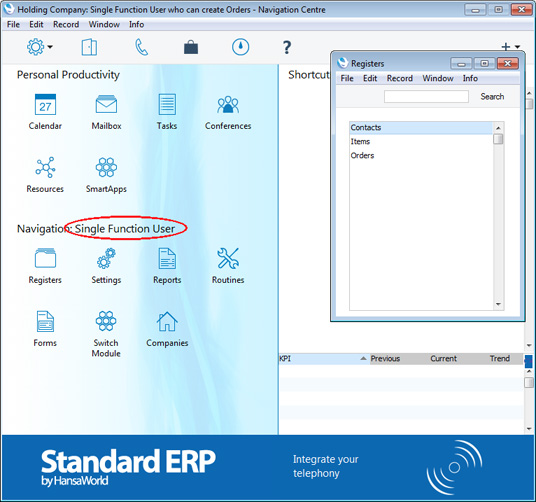
Settings in the System module:
- Access Groups
- Active Users
- Auto Actions
- Base Currency
- Base Currency Rates
- Company Date and Numeric Format
- Company Info
- Configuration
- Conversions - Master, Conversions - Accounts and VAT Code
- Conversions - Master, Conversions - Activity Types
- Conversions - Master, Conversions - Contact Classifications
- Conversions - Master, Conversions - Contacts
- Conversions - Master, Conversions - Currency Codes
- Conversions - Master, Conversions - Items
- Conversions - Master, Conversions - Locations
- Conversions - Master
- Conversions - Master, Conversions - Suppliers
- Conversions - Master, Conversions - Objects
- Conversions - Master, Conversions - Users
- Countries
- Countries Regions
- Currency Round Off
- Days and Months
- Departments
- Discount Options
- Display Groups
- Exchange Rates Settings
- Form Settings
- Global Warnings on UnOKed Records
- Internet Enablers
- Journaling
- KPIs
- Languages
- Locking
- Locking Exceptions
- Number Series Defaults
- Opened Windows History
- Optional Features
- Password Security
- Printers
- Reporting Periods
- Round Off
- Sales Groups
- Single Functions
- Styles
- Sub-Ledger Control Accounts
- Task Manager Access
- User Warnings on UnOKed Records
- Values in Text
- VAT Number Masks
- Weeks
- Home page for System Module manual
- Home page for Standard ERP manual
Special Days
This page describes the Special Days setting in the System module.---
The Special Days setting allows you to list your national public holidays. This setting will be used as a look-up table by the Bank Holidays, Bank Holidays for Sales Forecast and Customers' Bank Holidays settings.
To work with this setting, first ensure you are in the System module. Then, if you are using Windows or macOS, click the [Settings] button in the Navigation Centre and then double-click 'Special Days' in the 'Settings' list. If you are using iOS or Android, select 'Settings' from the Tools menu (with 'wrench' icon) and tap 'Special Days' in the 'Settings' list. The 'Special Days: Browse' window will open. This contains a list of the records already entered to this setting.
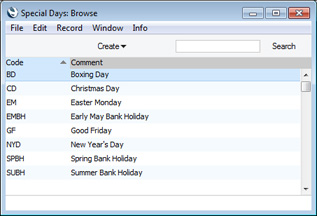

- Code
- Enter a unique code for the Special Day.
- Comment
- Enter the name of the Special Day.
---
Settings in the System module:
- Access Groups
- Active Users
- Auto Actions
- Bank Holidays
- Base Currency
- Base Currency Rates
- Company Date and Numeric Format
- Company Info
- Configuration
- Conversions - Master, Conversions - Accounts and VAT Code
- Conversions - Master, Conversions - Activity Types
- Conversions - Master, Conversions - Contact Classifications
- Conversions - Master, Conversions - Contacts
- Conversions - Master, Conversions - Currency Codes
- Conversions - Master, Conversions - Items
- Conversions - Master, Conversions - Locations
- Conversions - Master
- Conversions - Master, Conversions - Suppliers
- Conversions - Master, Conversions - Objects
- Conversions - Master, Conversions - Users
- Countries
- Countries Regions
- Currency Round Off
- Days and Months
- Departments
- Discount Options
- Display Groups
- Exchange Rates Settings
- Form Settings
- Global Warnings on UnOKed Records
- Internet Enablers
- Journaling
- KPIs
- Languages
- Locking
- Locking Exceptions
- Number Series Defaults
- Opened Windows History
- Optional Features
- Password Security
- Printers
- Reporting Periods
- Round Off
- Sales Groups
- Single Functions
- Special Days
- Styles
- Sub-Ledger Control Accounts
- Task Manager Access
- User Warnings on UnOKed Records
- Values in Text
- VAT Number Masks
- Weeks
- Home page for System Module manual
- Home page for Standard ERP manual
Styles
This page describes the Styles setting in the System module.---
Use the Styles setting to define the different font Styles that you will use in the Fields and Text objects in your Form Templates, ensuring a consistency of appearance.
The Styles setting is in the System module. To open this setting, ensure you in this module and then click the [Settings] button in the Master Control panel. Double-click 'Styles' in the 'Settings' list in the System module to open the 'Styles: Browse' window and see a list of the Styles you have previously entered.
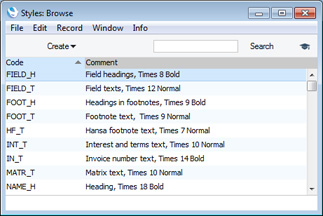
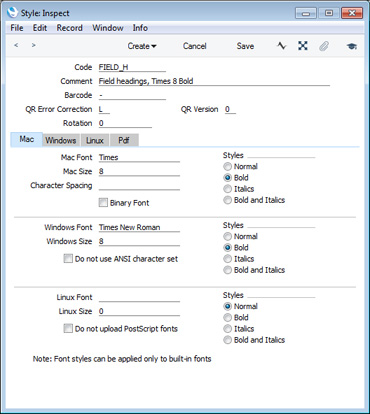
- Code
- The code for the Style.
- Comment
- Any description.
- The Comment will be shown in the 'Paste Special' list that you will use when assigning Styles to Fields and Text objects in Form Templates, so it should be descriptive enough to make the selection of the correct Style easy for all users.
- The Comment will be shown in the 'Paste Special' list that you will use when assigning Styles to Fields and Text objects in Form Templates, so it should be descriptive enough to make the selection of the correct Style easy for all users.
- Barcode
- Paste Special
Choices of possible entries
- If you will use the Style to print barcodes, specify the barcode format here. The available options are "Code 128', "Code 39', "EAN 13" and "QR Code".
- If you choose "Code 128', "Code 39' or "EAN 13", you must also specify a barcode font on the 'Mac', 'Windows', 'Linux' and 'Pdf' cards. Fonts in the IDAutomation family are supported. Do not specify a font if you choose "QR Code".
- If you choose "Code 128', "Code 39' or "EAN 13", you must also specify a barcode font on the 'Mac', 'Windows', 'Linux' and 'Pdf' cards. Fonts in the IDAutomation family are supported. Do not specify a font if you choose "QR Code".
- QR Error Correction
- Paste Special Choices of possible entries
- If the Barcode field contains "QR Code", specify the level of error correction that you want to be incorporated in the printed QR Codes. Possible values are "L" (Low), "M" (Medium), "Q" (Quartile) and "H" (High.).
- If the Barcode field contains "QR Code", specify the level of error correction that you want to be incorporated in the printed QR Codes. Possible values are "L" (Low), "M" (Medium), "Q" (Quartile) and "H" (High.).
- QR Version
- If the Barcode field contains "QR Code", use this field to specify the version or module configuration of the QR Codes that will be printed. You can enter a numeric value between 1 (QR Codes will contain 21 x 21 modules) and 40 (QR Codes will contain 177 x 177 modules). This choice will depend on the quantity of information being printed and on the error correction level. When choosing a larger version number, be sure to leave enough space in the Form Template for the QR Code to be printed.
- Rotation
- If you need text to be printed at an angle, specify the angle here.
- Mac/Windows/Linux Font
- Paste Special
Fonts available on your computer
- The name of the font, as it appears in the Windows directory or the System folder.
- Mac/Windows/Linux Size
- The font size in points.
- Styles
- Select one of the available style types.
- Character Spacing
- This is used when printing bank giro forms, where a fixed character spacing is required. Specify here the spacing in pixels from the start of one character to the start of the next. Usually this will be six pixels or less.
- You can only use Styles with a Character Spacing in Fields and Text objects with a left or right justification. The Character Spacing will have no effect in Fields and Text objects with a centre justification.
- This feature is Mac OS X only.
- You can only use Styles with a Character Spacing in Fields and Text objects with a left or right justification. The Character Spacing will have no effect in Fields and Text objects with a centre justification.
- Do not use ANSI character set
- Use this option if the Style is to use a non-standard character set (for example, that used in barcodes).
Pdf card
If you will use a Style in a Form Template that you will print to pdf files, you should fill in the fields on the 'Pdf' card, especially if the Style uses a non-standard font. The standard fonts are Times New Roman PS MT, Arial MT, Courier, Symbol and Zapf Dingbats (Windows) and Times, Helvetica, Courier, Symbol and Zapf Dingbats (Mac OS X). Most pdf readers are able to read and print these fonts. If the Style uses a non-standard font, you will need to have that font embedded in pdf files, so that the font can be read and printed by pdf readers. This is particularly important for barcode fonts.You can create pdf files from Standard ERP using two methods:
- Open a record, click the Printer icon and, in the print dialogue window, choose to print to pdf. In this case, the pdf will be generated by the operating system, which will embed any fonts as necessary.
- Other methods of creating pdf files include:
- Click the [Forms] button in the Navigation Centre, double-click a document in the list and choose 'Pdf' as the Media option in the specification window;
- Open a record such as an Invoice or Quotation and choose 'Create E-Mail' from the Operations menu. A pdf file of the record (e.g. the Invoice or Quotation) will be attached to the Mail; and
- Run a Maintenance function such as 'Create Mails from Invoices' in the Sales Ledger. Again, pdf files will be attached to the Mails.
In all three cases (Forms, Create menu functions, Maintenance functions), the pdf will be generated by Standard ERP, which will embed fonts following the instructions on the 'Pdf' cards of the relevant Style records. In a multi-user system, the pdf file will sometimes be generated by the client (e.g. from the Create menu) and sometimes by the server (e.g. Maintenance functions).
If a Pdf file is generated by Standard ERP and you find that the Times font has been used where you are expecting a different font, then it is likely that you need to use the 'Pdf' card in the relevant Style record to embed the intended font in the Pdf file.
- Click the [Forms] button in the Navigation Centre, double-click a document in the list and choose 'Pdf' as the Media option in the specification window;

- Font File
- Paste Special
Opens the standard 'Open File' dialogue that you can use to locate the font file
- Specify the path to the font file. You can do this using an absolute path (C:/Hansa/fonts/test.ttf) or a relative path (fonts/test.ttf), relative to the directory or folder containing the Standard ERP application.
- As previously mentioned, in a multi-user system, pdf files can sometimes be generated by a client application and sometimes by the server. Therefore it is recommended that you enter a relative path in this field and that you store the font files inside the directory or folder containing the Standard ERP application on the server and on all clients. The relative path will then point to the font file in all situations.
- The font file must be an OpenType font with the .ttf extension or a Type 1 Post Script font with the .afm or .pfa extensions. Other font formats are not supported.
- As previously mentioned, in a multi-user system, pdf files can sometimes be generated by a client application and sometimes by the server. Therefore it is recommended that you enter a relative path in this field and that you store the font files inside the directory or folder containing the Standard ERP application on the server and on all clients. The relative path will then point to the font file in all situations.
- Pdf Built-in font
- Paste Special
Choices of possible entries
- If you want to embed one of the standard fonts in pdf files, specify that font here. This will usually be because the Style uses one of the standard fonts and you want to embed that font in pdf files. This will help ensure the Style prints as you expect, but will also slightly increase the size of the pdf file.
- If you specify both a Pdf Built-in font and a Font File in the field above, the Pdf Built-in font will be used.
- If you specify both a Pdf Built-in font and a Font File in the field above, the Pdf Built-in font will be used.
- Pdf Size
- The font size in points.
- Styles
- Select one of the available style types.
Note that the .ttf extension does not guarantee that the font is an OpenType font, as this extension is also used with TrueType fonts. If you are using Windows, you can confirm the font format by checking the file properties or the file icon, which should contain the letter "O". If you are using Mac OS X, use the Font Book application to confirm the font format. If there is still a problem (i.e. the Pdf font is not visible in a pdf file and has been replaced by Times), check the hansa.log file for error messages.
If you will use a Form Template to create pdf files, as well as specifying the fonts that will be embedded as described here, you should also specify a PDF Code page for that Form Template and, if appropriate, specify that pdf files will be created in landscape format. Please refer here for details.
---
Settings in the System module:
- Access Groups
- Active Users
- Auto Actions
- Bank Holidays
- Base Currency
- Base Currency Rates
- Company Date and Numeric Format
- Company Info
- Configuration
- Conversions - Master, Conversions - Accounts and VAT Code
- Conversions - Master, Conversions - Activity Types
- Conversions - Master, Conversions - Contact Classifications
- Conversions - Master, Conversions - Contacts
- Conversions - Master, Conversions - Currency Codes
- Conversions - Master, Conversions - Items
- Conversions - Master, Conversions - Locations
- Conversions - Master
- Conversions - Master, Conversions - Suppliers
- Conversions - Master, Conversions - Objects
- Conversions - Master, Conversions - Users
- Countries
- Countries Regions
- Currency Round Off
- Days and Months
- Departments
- Discount Options
- Display Groups
- Exchange Rates Settings
- Form Settings
- Global Warnings on UnOKed Records
- Internet Enablers
- Journaling
- KPIs
- Languages
- Locking
- Locking Exceptions
- Number Series Defaults
- Opened Windows History
- Optional Features
- Password Security
- Printers
- Reporting Periods
- Round Off
- Sales Groups
- Single Functions
- Special Days
- Styles
- Sub-Ledger Control Accounts
- Task Manager Access
- User Warnings on UnOKed Records
- Values in Text
- VAT Number Masks
- Weeks
- Home page for System Module manual
- Home page for Standard ERP manual
Control de Cuentas Sub-Diario
Esta opción sirve para especificar las Cuentas que constituyen parte fundamental de tu estructura de control de sub-diario. Para dar validación a esto desde los módulos Ventas y Compras, debes tildar la casilla ‘Control de Sub Diario’ en las opciones Manejo de Ctas. Ventas y Manejo de Cuentas de Compra respectivamente.Una vez establecidas las cuentas correctas de tus transacciones y habiendo configurado correctamente esta opción, habrás logrado establecer un mecanismo de prevención para que los usuarios no usen cuentas indebidas (es decir, para que no las especifiquen manualmente) directamente en el registro Asientos. De ahí en más, solo será posible arrojar datos a las cuentas correctas (ej. para el lado de ventas>>Cuentas Deudores). Si alguien trata de remitir montos directamente desde el registro Asientos hacia una cuenta sujeta al Control de Cuentas, recibirá una alerta del sistema.
No obstante, aunque estés usando Control de Cuentas de Sub diario, todavía podrás registrar Recibos y Pagos por diario en tu Libro Mayor. La ventaja será que nadie podrá usar una Cuenta Deudor o Acreedor accidentalmente o incorrectamente en otros Asientos Contables. No habrá forma de incurrir en imprecisiones. Para más detalles de esto, por favor revisa la descripción de la pestaña E de los Asientos Contables (aquí).
Las Cuentas de Control Deudores y Acreedores especificadas en las opciones Manejo de Ctas. Ventas y Manejo de Cuentas de Compras quedarán automáticamente protegidas. Por lo tanto, todas las demás Cuentas que desees incluir en este mecanismo de control (por ej. aquellas no usadas en el registro Asientos), deberán ser ingresadas en la opción ‘Control de Cuentas Sub-Diario’.
En la matriz de esta opción, especifica la categoría de cada cuenta en la columna ‘Cód.’. Existen dos categorías válidas de cuentas: 1 para cuentas a cobrar (deudores) y 2 para cuentas por pagar (acreedores). En la columna ‘Cuenta’, debes especificar el código de cuenta de la Cuenta de Control cuyo uso – en el registro Asientos – estará prohibido (si es necesario usa Pegado Especial).
El texto respectivo será insertado por el sistema dependiendo de la categoría de cuenta seleccionada.
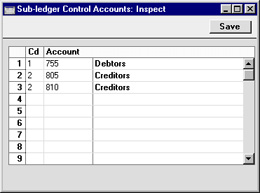
De ahí en más, cada ves que haya un intento por usar una de las cuentas “protegidas”, el sistema mostrará el siguiente mensaje de error:
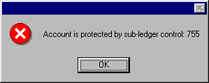
Task Manager Access
Please refer here for details about the Task Manager Access setting.---
Settings in the System module:
- Access Groups
- Active Users
- Auto Actions
- Bank Holidays
- Base Currency
- Base Currency Rates
- Cloud Security
- Company Date and Numeric Format
- Company Info
- Configuration
- Conversions - Master, Conversions - Accounts and VAT Code
- Conversions - Master, Conversions - Activity Types
- Conversions - Master, Conversions - Contact Classifications
- Conversions - Master, Conversions - Contacts
- Conversions - Master, Conversions - Currency Codes
- Conversions - Master, Conversions - Items
- Conversions - Master, Conversions - Locations
- Conversions - Master
- Conversions - Master, Conversions - Suppliers
- Conversions - Master, Conversions - Tags/Objects
- Conversions - Master, Conversions - Users
- Countries
- Countries Regions
- Currency Round Off
- Days and Months
- Departments
- Discount Options
- Display Groups
- Exchange Rates Settings
- Form Settings
- Global Warnings on UnOKed Records
- Internet Enablers
- Journaling
- KPIs
- Languages
- Locking
- Locking Exceptions
- Nature of Business
- Number Series Defaults
- Opened Windows History
- Optional Features
- Password Security
- Printers
- Reporting Periods
- Round Off
- Sales Groups
- Single Functions
- Special Days
- Styles
- Sub-Ledger Control Accounts
- Task Manager Access
- User Warnings on UnOKed Records
- Values in Text
- VAT Reg. Number Masks
- Weeks
- Home page for System Module manual
- Home page for Standard ERP manual
User Warnings on UnOKed Records
Please refer to the description of the Global Warnings on UnOKed Records setting for details about this setting.---
Settings in the System module:
- Access Groups
- Active Users
- Auto Actions
- Bank Holidays
- Base Currency
- Base Currency Rates
- Company Date and Numeric Format
- Company Info
- Configuration
- Conversions - Master, Conversions - Accounts and VAT Code
- Conversions - Master, Conversions - Activity Types
- Conversions - Master, Conversions - Contact Classifications
- Conversions - Master, Conversions - Contacts
- Conversions - Master, Conversions - Currency Codes
- Conversions - Master, Conversions - Items
- Conversions - Master, Conversions - Locations
- Conversions - Master
- Conversions - Master, Conversions - Suppliers
- Conversions - Master, Conversions - Objects
- Conversions - Master, Conversions - Users
- Countries
- Countries Regions
- Currency Round Off
- Days and Months
- Departments
- Discount Options
- Display Groups
- Exchange Rates Settings
- Form Settings
- Global Warnings on UnOKed Records
- Internet Enablers
- Journaling
- KPIs
- Languages
- Locking
- Locking Exceptions
- Number Series Defaults
- Opened Windows History
- Optional Features
- Password Security
- Printers
- Reporting Periods
- Round Off
- Sales Groups
- Special Days
- Styles
- Sub-Ledger Control Accounts
- Task Manager Access
- User Warnings on UnOKed Records
- Values in Text
- VAT Number Masks
- Weeks
- Home page for System Module manual
- Home page for Enterprise by HansaWorld manual
Values in Text
This page describes the Values in Text setting in the System module.---
There will be occasions when you need amounts to be printed on forms in words rather than figures, for example when printing cheques. The Values in Text setting is where you should specify the words and rules to be used. You can enter a separate record in this setting for each Language.
To work with this setting, first ensure you are in the System module. Then, if you are using Windows or Mac OS X, click the [Settings] button in the Navigation Centre and then double-click 'Values in Text' in the 'Settings' list. If you are using iOS or Android, select 'Settings' from the Tools menu (with 'wrench' icon) and tap 'Values in Text' in the 'Settings' list. The 'Values in Text: Browse' window will open. This contains a list of the records already entered to this setting, one for each Language. Double-click (Windows/Mac OS X) or tap (iOS/Android) on a line to open the edit window, or add a new record by selecting 'New' from the Create menu (Windows/Mac OS X) or the + menu (iOS/Android).
When the record is complete, click the [Save] button (Windows/Mac OS X) or tap √ (iOS/Android) to save it, or use the close box (Windows/Mac OS X) or < (iOS/Android) to close it without saving changes.
Please follow the links below for details about each part of the setting:
- Introduction
- Header and Card 1
- Card 2
- Printing Amounts in Words in Forms
- Fields that use the Values in Text setting
Settings in the System module:
- Access Groups
- Active Users
- Auto Actions
- Bank Holidays
- Base Currency
- Base Currency Rates
- Company Date and Numeric Format
- Company Info
- Configuration
- Conversions - Master, Conversions - Accounts and VAT Code
- Conversions - Master, Conversions - Activity Types
- Conversions - Master, Conversions - Contact Classifications
- Conversions - Master, Conversions - Contacts
- Conversions - Master, Conversions - Currency Codes
- Conversions - Master, Conversions - Items
- Conversions - Master, Conversions - Locations
- Conversions - Master
- Conversions - Master, Conversions - Suppliers
- Conversions - Master, Conversions - Objects
- Conversions - Master, Conversions - Users
- Countries
- Countries Regions
- Currency Round Off
- Days and Months
- Departments
- Discount Options
- Display Groups
- Exchange Rates Settings
- Form Settings
- Global Warnings on UnOKed Records
- Internet Enablers
- Journaling
- KPIs
- Languages
- Locking
- Locking Exceptions
- Number Series Defaults
- Opened Windows History
- Optional Features
- Password Security
- Printers
- Reporting Periods
- Round Off
- Sales Groups
- Single Functions
- Special Days
- Styles
- Sub-Ledger Control Accounts
- Task Manager Access
- User Warnings on UnOKed Records
- Values in Text
- VAT Number Masks
- Weeks
- Home page for System Module manual
- Home page for Standard ERP manual
Values in Text - Header and Card 1
This page describes the header and card 1 of the Values in Text setting. Please follow these links for descriptions of the other parts of the setting:- Introduction
- Header and Card 1
- Card 2
- Printing Amounts in Words in Forms
- Fields that use the Values in Text setting
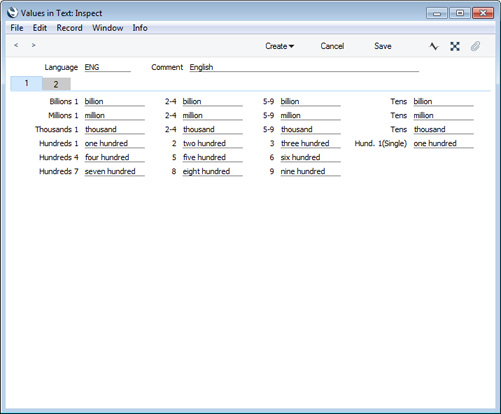
- Language
- Paste Special Languages setting, System module
- You can enter separate records in the Values in Text setting for each Language. Specify the Language here.
- You can enter separate records in the Values in Text setting for each Language. Specify the Language here.
- Comment
- Enter a name for the Values in Text record, to be shown in the 'Values in Text: Browse' window.
- Billions
- Use these fields to specify the words for "billion", as follows:
- 1
- Enter the word for one billion, suitable for use in phrases such as "one billion pounds".
- 2-4
- Enter the word for a billion to be used when an amount is between two and four billion, suitable for use in phrases such as "two billion pounds".
- 5-9
- Enter the word for a billion to be used when an amount is between five and nine billion, suitable for use in phrases such as "five billion pounds".
- Tens
- Enter the word for a billion to be used when an amount is a number of tens of billions, suitable for use in phrases such as "ten billion pounds".
- 1
- Millions, Thousands
- Use these fields to specify the words for "million" and "thousands" in a similar manner to that used for "billion" described above.
- Hundreds
- Use these fields to specify the words for "hundred". In each field you should enter the word for the number of hundreds as well as the word "hundred" itself. The Hund .1 (Single) field is used for one hundred when it's not followed by any tens or units (e.g. 100.00, 100.10, 2100.00), while the Hundreds 1 field is used at other times (e.g. 101.00, 110.00 and 2110.00).
- Introduction
- Header and Card 1
- Card 2
- Printing Amounts in Words in Forms
- Fields that use the Values in Text setting
Settings in the System module:
- Access Groups
- Active Users
- Auto Actions
- Bank Holidays
- Base Currency
- Base Currency Rates
- Company Date and Numeric Format
- Company Info
- Configuration
- Conversions - Master, Conversions - Accounts and VAT Code
- Conversions - Master, Conversions - Activity Types
- Conversions - Master, Conversions - Contact Classifications
- Conversions - Master, Conversions - Contacts
- Conversions - Master, Conversions - Currency Codes
- Conversions - Master, Conversions - Items
- Conversions - Master, Conversions - Locations
- Conversions - Master
- Conversions - Master, Conversions - Suppliers
- Conversions - Master, Conversions - Objects
- Conversions - Master, Conversions - Users
- Countries
- Countries Regions
- Currency Round Off
- Days and Months
- Departments
- Discount Options
- Display Groups
- Exchange Rates Settings
- Form Settings
- Global Warnings on UnOKed Records
- Internet Enablers
- Journaling
- KPIs
- Languages
- Locking
- Locking Exceptions
- Number Series Defaults
- Opened Windows History
- Optional Features
- Password Security
- Printers
- Reporting Periods
- Round Off
- Sales Groups
- Single Functions
- Special Days
- Styles
- Sub-Ledger Control Accounts
- Task Manager Access
- User Warnings on UnOKed Records
- Values in Text
- VAT Number Masks
- Weeks
- Home page for System Module manual
- Home page for Standard ERP manual
Values in Text - Card 2
This page describes card 2 of the Values in Text setting. Please follow these links for descriptions of the other parts of the setting:- Introduction
- Header and Card 1
- Card 2
- Printing Amounts in Words in Forms
- Fields that use the Values in Text setting
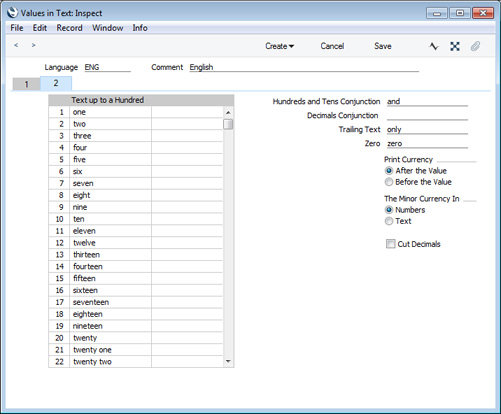
- Text up to a Hundred
- Use this grid to enter words for each number between one and 99.
- In Languages that do not have genders, use the left-hand column only, as shown in the illustration. In Languages where each number has separate masculine and feminine forms to agree with Currency names of different genders, enter the masculine form in the left-hand column and the feminine form in the right-hand column.
- In Languages that do not have genders, use the left-hand column only, as shown in the illustration. In Languages where each number has separate masculine and feminine forms to agree with Currency names of different genders, enter the masculine form in the left-hand column and the feminine form in the right-hand column.
- Hundreds and Tens Conjunction
- Enter here the word that is to appear between the hundreds and the tens in any amount. In English, the word "and" is used (for example, one hundred and twenty).
- Decimals Conjunction
- Enter here the word that is to appear between the Major and Minor Currency amounts. The Minor Currency is the one hundredth part of the Currency (for example, pence, cents or öre). In English, the word "and" can again be used (for example five pounds and forty pence), but you can also leave the field empty (five pounds forty pence).
- Trailing Text
- Enter here any text that is to appear after the amount. For example, some users might require the word "only" to appear after the amount on their cheques.
- Zero
- Enter here the word to be used for zero.
- Print Currency
- Use these options to specify whether the word for the Currency should appear before the amount or after it. In the latter case, it will appear before the Minor Currency amount. For example, ?5.40 can be written as pounds five forty pence or as five pounds forty pence. The word for the Currency itself ("pounds" in the example) will be taken from the Currency register, also in the System module.
- The Minor Currency In
- The Minor Currency is the one hundredth part of the Currency (for example, pence, cents or öre). Use these options to specify whether the amount is to be printed in words or figures. For example, ?5.40 can be written as five pounds forty pence or as five pounds 40 pence. The word for the Minor Currency (e.g. the word "pence") will be taken from the Currency register.
- Cut Decimals
- Select this option if you do not want Minor Currency amounts to be printed. For example, if you are using this option, an amount of ?5.40 will be printed as five pounds. Unlike the other fields and check boxes described above, this option affects amounts both in words and in figures. You should only use it with Currencies where there are no Minor Currency values e.g. in Byelorussia.
- Introduction
- Header and Card 1
- Card 2
- Printing Amounts in Words in Forms
- Fields that use the Values in Text setting
Settings in the System module:
- Access Groups
- Active Users
- Auto Actions
- Bank Holidays
- Base Currency
- Base Currency Rates
- Company Date and Numeric Format
- Company Info
- Configuration
- Conversions - Master, Conversions - Contact Classifications
- Conversions - Master, Conversions - Contacts
- Conversions - Master, Conversions - Currency Codes
- Conversions - Master, Conversions - Items
- Conversions - Master, Conversions - Locations
- Conversions - Master
- Conversions - Master, Conversions - Suppliers
- Conversions - Master, Conversions - Objects
- Conversions - Master, Conversions - Users
- Countries
- Countries Regions
- Currency Round Off
- Days and Months
- Departments
- Discount Options
- Display Groups
- Exchange Rates Settings
- Form Settings
- Global Warnings on UnOKed Records
- Internet Enablers
- Journaling
- KPIs
- Languages
- Locking
- Locking Exceptions
- Number Series Defaults
- Opened Windows History
- Optional Features
- Password Security
- Printers
- Reporting Periods
- Round Off
- Sales Groups
- Single Functions
- Special Days
- Styles
- Sub-Ledger Control Accounts
- Task Manager Access
- User Warnings on UnOKed Records
- Values in Text
- VAT Number Masks
- Weeks
- Home page for System Module manual
- Home page for Standard ERP manual
Values in Text - Card 3
This page describes card 3 of the Values in Text setting. Please follow these links for descriptions of the other parts of the setting:- Introduction
- Header and Card 1
- Card 2
- Card 3
- Printing Amounts in Words in Forms
- Fields that use the Values in Text setting
If you are entering a Values in Text record for a Language that does not use the Western Arabic numeral system (0, 1, 2, 3, 4, etc.), the fields on card 3 allow you to enter suitable numerals for the Language together with the relevant Thousand and Decimal Separators:
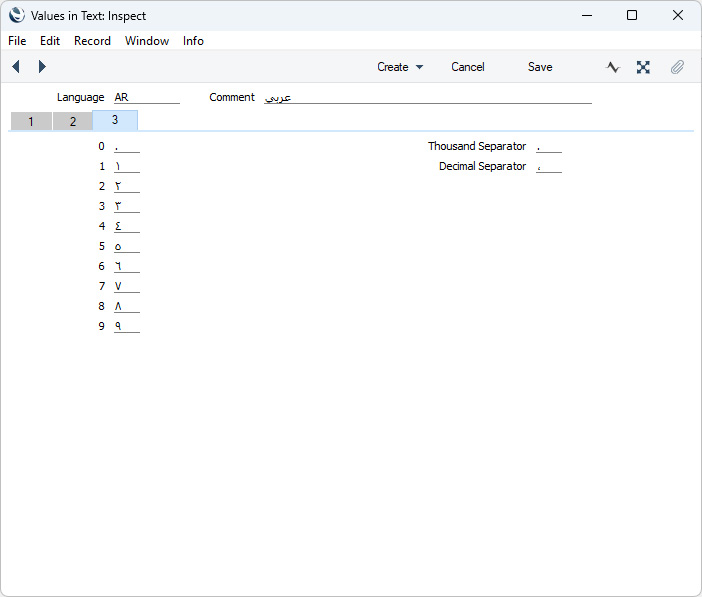
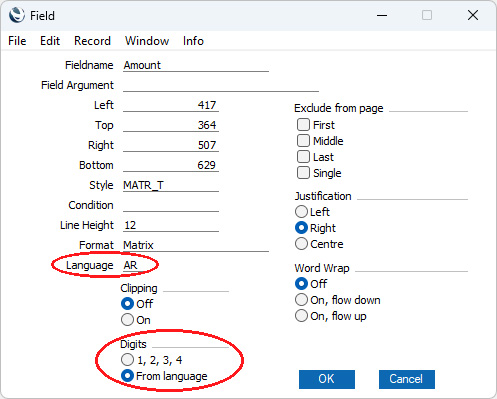
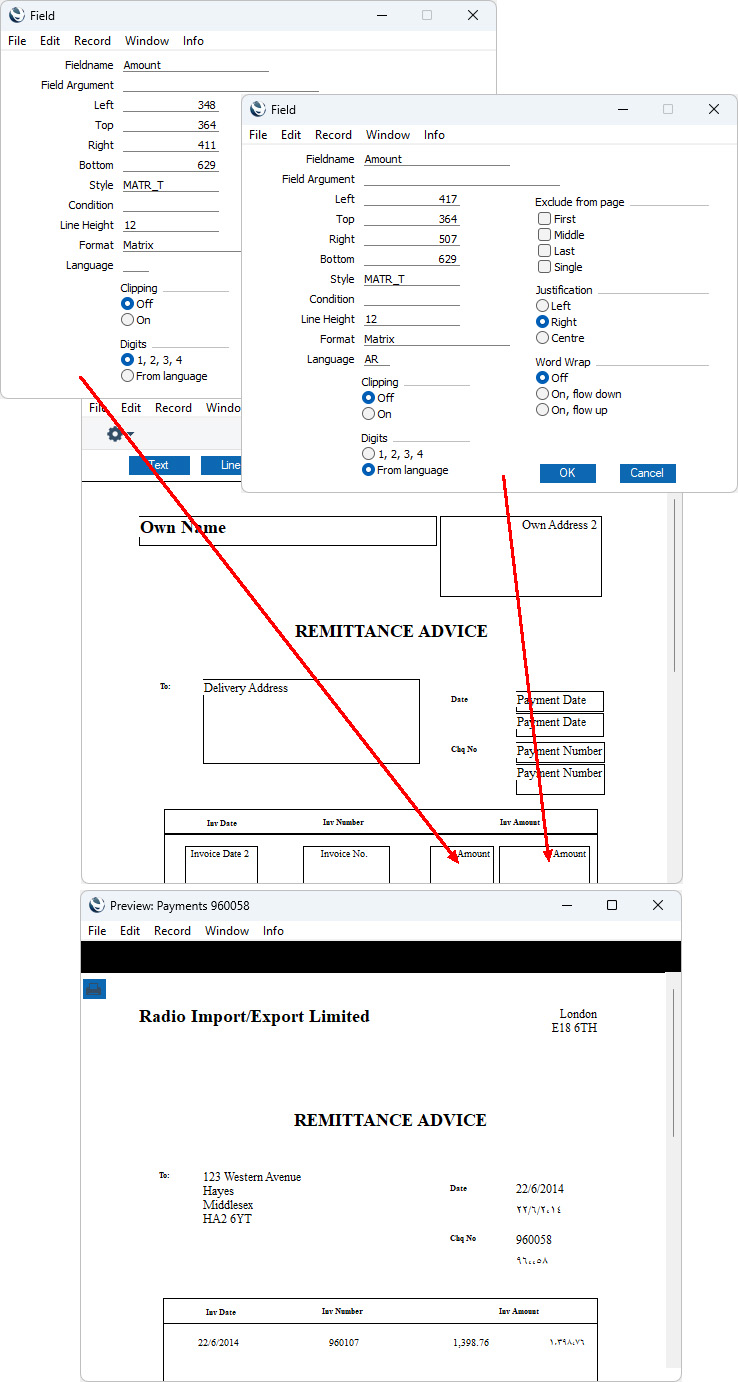
You can use this feature in any Form Template field that is likely to print numerals (e.g. dates, Customer Numbers and Names and Item Numbers as well as prices, quantities and other numeric values, as shown for the Date, Chq No and Amount fields in the illustration above). If you have specified on card 2 in the relevant Values in Text record that the Minor Currency will be printed as Numbers, this includes "Amount in Text" fields (please refer to the Printing Amounts in Words in Forms page for an illustration). However, the feature is limited to the Form Templates that you will use to print the following forms: Invoices of all kinds (i.e. including Cash Notes, Credit Notes, Interest Invoices, Proforma Invoices and Project Invoices), POS Invoices, Bar Tabs of all kinds (i.e. including Bar Tab Kitchen Orders and Bar Tab Receipts), Receipt Forms and Payment Forms.
Please follow the links below for more details about the Values in Text setting:
- Introduction
- Header and Card 1
- Card 2
- Card 3
- Printing Amounts in Words in Forms
- Fields that use the Values in Text setting
Go back to:
- Home page for Settings in the System module
- Home page for System Module manual
- Home page for Standard ERP manual
Values in Text - Including Amounts in Words in Forms
This page describes how to print amounts in words rather than figures in forms, using information entered in the Values in Text setting. Please follow these links for descriptions of the other parts of this setting:- Introduction
- Header and Card 1
- Card 2
- Printing Amounts in Words in Forms
- Fields that use the Values in Text setting
When you need amounts to be printed on a form in words as defined in the Values in Text setting, follow the steps below. You can only follow this process using Windows or Mac OS X, not iOS or Android.
- In the System module, open the Form Template register by clicking the [Registers] button in the Navigation Centre and double-clicking 'Form Templates' in the resulting list.
- A list of Form Templates is opened. Find the one that is to feature the amount in words and double-click, or select 'New' from the Create menu in the Button Bar to create a new Form Template.
- You can include fields that will print amounts in words in Form Templates of many types. Please refer to the Fields that use the Values in Text setting page for a full list.
To add a field that will print an amount in words in your Form Template, click the [Field] button and then draw a box where the amount in words is to appear. In the dialogue box that opens when you release the mouse button, place the insertion point in the Fieldname field and use 'Paste Special' to bring up a list of fields.
Depending on the Form Type, the name of the field that will print the amount in words will usually be "Amount in Text" (as in the illustration) or "To Pay in Text". Double-click one of these as appropriate. Design the rest of the Form Template (full details are to be found here) and save it. An example (intended for printing on pre-printed stationery) is shown below: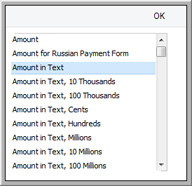
When printed, it will look like this: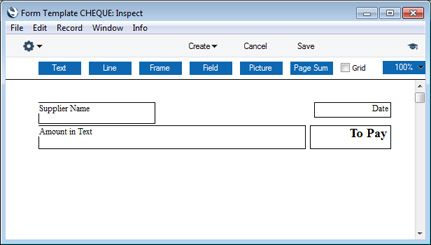

- The Values in Text record for the Language specified in the record being printed will be used. In some cases (e.g. Payments and Receipts), the record being printed won't itself have a Language so the Language from the connected Supplier or Customer will be used.
- If the record being printed doesn't have a Language field or that field is empty, the Values in Text record for the Language specified in the current user's Person record will be used.
- The Language specified in the Company Info setting will be used.
Including Amounts in Words in Cheques
When printing cheques in some countries, the amount in words is broken down so that the word for each digit is printed separately, sometimes in its own box. An example is shown in the illustration below: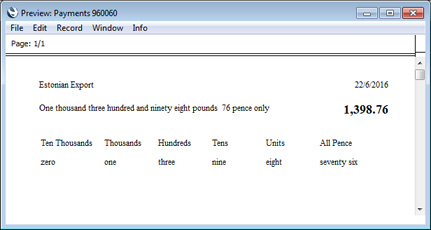
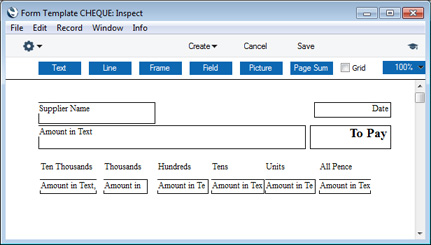
- Amount in Text
- The full amount is printed in words.
- Amount in Text, Cents
- Both digits after the decimal point are printed in words. This is always printed in words, even if it was specified on card 2 of the relevant Value in Text record that the Minor Currency is to be printed as a number.
- Amount in Text, Units
- The first digit before the decimal point is printed in words (the units).
- Amount in Text, Tens
- The second digit before the decimal point is printed in words (the tens).
- Amount in Text, Hundreds
- The third digit before the decimal point is printed in words (the hundreds).
- Amount in Text, Thousands
- The fourth digit before the decimal point is printed in words (the thousands).
- Amount in Text, 10 Thousands
- The fifth digit before the decimal point is printed in words.
- Amount in Text, 100 Thousands
- The sixth digit before the decimal point is printed in words.
- Amount in Text, Millions
- The seventh digit before the decimal point is printed in words.
- Amount in Text, 10 Millions
- The eighth digit before the decimal point is printed in words.
- Amount in Text, 100 Millions
- The ninth digit before the decimal point is printed in words.
Please follow the links below for more details about the Values in Text setting:
- Introduction
- Header and Card 1
- Card 2
- Printing Amounts in Words in Forms
- Fields that use the Values in Text setting
Settings in the System module:
- Access Groups
- Active Users
- Auto Actions
- Bank Holidays
- Base Currency
- Base Currency Rates
- Company Date and Numeric Format
- Company Info
- Configuration
- Conversions - Master, Conversions - Accounts and VAT Code
- Conversions - Master, Conversions - Activity Types
- Conversions - Master, Conversions - Contact Classifications
- Conversions - Master, Conversions - Contacts
- Conversions - Master, Conversions - Currency Codes
- Conversions - Master, Conversions - Items
- Conversions - Master, Conversions - Locations
- Conversions - Master
- Conversions - Master, Conversions - Suppliers
- Conversions - Master, Conversions - Objects
- Conversions - Master, Conversions - Users
- Countries
- Countries Regions
- Currency Round Off
- Days and Months
- Departments
- Discount Options
- Display Groups
- Exchange Rates Settings
- Form Settings
- Global Warnings on UnOKed Records
- Internet Enablers
- Journaling
- KPIs
- Languages
- Locking
- Locking Exceptions
- Number Series Defaults
- Opened Windows History
- Optional Features
- Password Security
- Printers
- Reporting Periods
- Round Off
- Sales Groups
- Single Functions
- Special Days
- Styles
- Sub-Ledger Control Accounts
- Task Manager Access
- User Warnings on UnOKed Records
- Values in Text
- VAT Number Masks
- Weeks
- Home page for System Module manual
- Home page for Standard ERP manual
Values in Text - Fields that use the Values in Text setting
This page lists the fields that you can include in Form Templates when you need amounts to be printed in words or phrases using information entered in the Values in Text setting. Please follow these links for descriptions of the other parts of this setting:- Introduction
- Header and Card 1
- Card 2
- Printing Amounts in Words in Forms
- Fields that use the Values in Text setting
The fields listed below are all fields that you can include in Form Templates when you need amounts to be printed in words or phrases constructed using a Values in Text record.
| Form | Field | Prints in words |
| Bar Tabs | To Pay in Text | Total |
| Cash In | To Pay in Text | Total |
| Cash In Receipts | To Pay in Text | Total |
| Cash Out | To Pay in Text | Total |
| Cash Out Invoices | To Pay in Text | Total |
| Cash Out Payments | To Pay in Text | Total |
| Cash Out Personnel Payments | To Pay in Text | Total |
| Cheque Documents | Amount in Text | Sum of the Invoice Values for a Supplier |
| Amount in Text, Cents | The digits after the decimal point in the sum of the Invoice Values for a Supplier | |
| Amount in Text, Units | The first digit before the decimal point in the sum of the Invoice Values for a Supplier | |
| Amount in Text, Tens | The second digit before the decimal point in the sum of the Invoice Values for a Supplier | |
| Amount in Text, Hundreds | The third digit before the decimal point in the sum of the Invoice Values for a Supplier | |
| Amount in Text, Thousands | The fourth digit before the decimal point in the sum of the Invoice Values for a Supplier | |
| Amount in Text, 10 Thousands | The fifth digit before the decimal point in the sum of the Invoice Values for a Supplier | |
| Amount in Text, 100 Thousands | The sixth digit before the decimal point in the sum of the Invoice Values for a Supplier | |
| Amount in Text, Millions | The seventh digit before the decimal point in the sum of the Invoice Values for a Supplier | |
| Amount in Text, 10 Millions | The eighth digit before the decimal point in the sum of the Invoice Values for a Supplier | |
| Amount in Text, 100 Millions | The ninth digit before the decimal point in the sum of the Invoice Values for a Supplier | |
| To Pay in Text | Sum of the Invoice Values for a Supplier | |
| To Pay in Text in Base 1 | Sum of the Invoice Values for a Supplier, expressed in Base Currency 1 | |
| To Pay in Text in Base 2 | Sum of the Invoice Values for a Supplier, expressed in Base Currency 2 | |
| Total Sum in Text | Sum of the Bank Amounts for a Supplier | |
| Contracts | To Pay in Text | TOTAL |
| Contract Quotations | To Pay in Text | Cost |
| Credit Agreements | To Pay in Text | Total Value |
| Daily Allowances | Amount in Text | TOTAL |
| Delivery Notes/ Picking Lists | Number of Items in Text | The number of different Items in the Delivery |
| To Pay in Text | Total value from the Order | |
| VAT Total | VAT Total from the Order | |
| Electronic Purchase Invoices | Amount in Text | TOTAL |
| Expenses | Amount in Text | TOTAL |
| Amount in Text, Base Currency 1 | TOTAL, expressed in Base Currency 1 | |
| Gift Vouchers | Amount in Text | Value |
| Internal Invoices | Amount in Text | TOTAL |
| Row Number in Text | Row number (only printed if the row has an Item Number) | |
| To Pay in Text | TOTAL | |
| VAT in Text | VAT Total | |
| Internal Orders | To Pay in Text | TOTAL |
| Invoices | Amount in Text | TOTAL |
| Amount in Text, Base Currency 1 | TOTAL, expressed in Base Currency 1 | |
| Amount in Text, Base Currency 2 | TOTAL, expressed in Base Currency 2 | |
| Number of Items in Text | The number of different Items in the Invoice | |
| Quantity in Text | Total quantity | |
| Row Number in Text | Row number (only printed if the row has an Item Number) | |
| To Pay in Text | TOTAL - the total value of any Prepayments connected to the Invoice | |
| VAT in Text | VAT Total | |
| Orders | Amount in Text, Base Currency 1 | TOTAL, expressed in Base Currency 1 |
| Amount in Text, Base Currency 2 | TOTAL, expressed in Base Currency 2 | |
| Number of Items in Text | The number of different Items in the Order | |
| To Pay in Text | TOTAL | |
| Own Cheques | Amount in Text | Amount |
| Amount in Text with asterisk | Amount formatted for Argentina, for example, "One Hundred *******" | |
| Amount in Text with Parentheses (Mexico) | Amount formatted for Mexico, for example, "(One Hundred M.N.)" | |
| Payment Forms | Amount in Text | Payment per Supplier option: Sum of the Invoice Values for a Supplier Payment option: Invoice Value |
| Amount in Text, Cents | Payment per Supplier option: The digits after the decimal point in the sum of the Invoice Values for a Supplier Payment option: The digits after the decimal point in the Invoice Value | |
| Amount in Text, Units | Payment per Supplier option: The first digit before the decimal point in the sum of the Invoice Values for a Supplier Payment option: The first digit before after the decimal point in the Invoice Value | |
| Amount in Text, Tens | Payment per Supplier option: The second digit before the decimal point in the sum of the Invoice Values for a Supplier Payment option: The second digit before after the decimal point in the Invoice Value | |
| Amount in Text, Hundreds | Payment per Supplier option: The third digit before the decimal point in the sum of the Invoice Values for a Supplier Payment option: The third digit before after the decimal point in the Invoice Value | |
| Amount in Text, Thousands | Payment per Supplier option: The fourth digit before the decimal point in the sum of the Invoice Values for a Supplier Payment option: The fourth digit before after the decimal point in the Invoice Value | |
| Amount in Text, 10 Thousands | Payment per Supplier option: The fifth digit before the decimal point in the sum of the Invoice Values for a Supplier Payment option: The fifth digit before after the decimal point in the Invoice Value | |
| Amount in Text, 100 Thousands | Payment per Supplier option: The sixth digit before the decimal point in the sum of the Invoice Values for a Supplier Payment option: The sixth digit before after the decimal point in the Invoice Value | |
| Amount in Text, Millions | Payment per Supplier option: The seventh digit before the decimal point in the sum of the Invoice Values for a Supplier Payment option: The seventh digit before after the decimal point in the Invoice Value | |
| Amount in Text, 10 Millions | Payment per Supplier option: The eighth digit before the decimal point in the sum of the Invoice Values for a Supplier Payment option: The eighth digit before after the decimal point in the Invoice Value | |
| Amount in Text, 100 Millions | Payment per Supplier option: The ninth digit before the decimal point in the sum of the Invoice Values for a Supplier Payment option: The ninth digit before after the decimal point in the Invoice Value | |
| To Pay in Text | Payment per Supplier option: Sum of the Invoice Values for a Supplier Payment option: Invoice Value | |
| To Pay in Text in Base 1 | Payment per Supplier option: Sum of the Invoice Values for a Supplier, expressed in Base Currency 1 Payment option: Invoice Value, expressed in Base Currency 1 | |
| To Pay in Text in Base 2 | Payment per Supplier option: Sum of the Invoice Values for a Supplier, expressed in Base Currency 2 Payment option: not printed | |
| Total Sum in Text | Payment per Supplier option: Sum of the Bank Amounts for a Supplier Payment option: not printed | |
| Personnel Payment Receipts | To Pay in Text | Sum |
| POS Invoices | Amount in Text | TOTAL |
| Row Number in Text | Row number (only printed if the row has an Item Number) | |
| To Pay in Text | TOTAL | |
| Production Operation Picking Lists | Number of Items in Text | The number of different Items in the Production Operation, including both In Items and Out Items |
| Purchase Invoice Forms | Amount in Text | TOTAL |
| Amount in Text, Base Currency 1 | TOTAL, expressed in Base Currency 1 | |
| Amount in Text, Base Currency 2 | TOTAL, expressed in Base Currency 2 | |
| Purchase Orders | To Pay in Text | TOTAL |
| Purchase Order Contracts | To Pay in Text | TOTAL |
| Purchase Order Quotations | To Pay in Text | TOTAL |
| Receipt Forms | To Pay in Text | Sum of the Invoice Values for a Customer (with any Settlement Discounts or Bank Fees deducted) |
| To Pay in Text in Base 1 | Sum of the Invoice Values for a Customer (with any Settlement Discounts or Bank Fees deducted), expressed in Base Currency 1 | |
| Rental Quotations | Amount in Text | TOTAL |
| To Pay in Text | TOTAL | |
| Quotations | Amount in Text | TOTAL |
| Amount in Text, Base Currency 1 | TOTAL, expressed in Base Currency 1 | |
| To Pay in Text | TOTAL | |
| Service Orders | To Pay in Text | total of (Qty * Item Sales Price including VAT) for all rows |
| Simulations | Amount in Text, Credit Value in Base Currency 1 | Total Credit (from the footer), expressed in Base Currency 1 |
| Amount in Text, Debit Value in Base Currency 1 | Total Debit (from the footer), expressed in Base Currency 1 | |
| Stock Movements | To Pay in Text | total of (Recvd Qty * R. New Unit Price) for all rows |
| Transactions | Amount in Text, Credit Value in Base Currency 1 | Total Credit (from the footer), expressed in Base Currency 1 |
| Amount in Text, Credit Value in Base Currency 2 | Total Credit (from the footer), expressed in Base Currency 2 | |
| Amount in Text, Debit Value in Base Currency 1 | Total Debit (from the footer), expressed in Base Currency 1 | |
| Amount in Text, Debit Value in Base Currency 2 | Total Debit (from the footer), expressed in Base Currency 2 |
- Introduction
- Header and Card 1
- Card 2
- Printing Amounts in Words in Forms
- Fields that use the Values in Text setting
Settings in the System module:
- Access Groups
- Active Users
- Auto Actions
- Bank Holidays
- Base Currency
- Base Currency Rates
- Company Date and Numeric Format
- Company Info
- Configuration
- Conversions - Master, Conversions - Accounts and VAT Code
- Conversions - Master, Conversions - Activity Types
- Conversions - Master, Conversions - Contact Classifications
- Conversions - Master, Conversions - Contacts
- Conversions - Master, Conversions - Currency Codes
- Conversions - Master, Conversions - Items
- Conversions - Master, Conversions - Locations
- Conversions - Master
- Conversions - Master, Conversions - Suppliers
- Conversions - Master, Conversions - Objects
- Conversions - Master, Conversions - Users
- Countries
- Countries Regions
- Currency Round Off
- Days and Months
- Departments
- Discount Options
- Display Groups
- Exchange Rates Settings
- Form Settings
- Global Warnings on UnOKed Records
- Internet Enablers
- Journaling
- KPIs
- Languages
- Locking
- Locking Exceptions
- Number Series Defaults
- Opened Windows History
- Optional Features
- Password Security
- Printers
- Reporting Periods
- Round Off
- Sales Groups
- Single Functions
- Special Days
- Styles
- Sub-Ledger Control Accounts
- Task Manager Access
- User Warnings on UnOKed Records
- Values in Text
- VAT Number Masks
- Weeks
- Home page for System Module manual
- Home page for Standard ERP manual
Máscaras de Nro. Registro IVA
Los Nros. de Registro IVA son formateados de manera distinta de acuerdo a su país de emisión. Por ejemplo, Los Números IVA en Bélgica comienzan con “BE” y contienen seis dígitos seguidos de un guión, luego otros dos dígitos, luego dos caracteres alfa y finalmente un “9”. Dadas estas particularidades en cada país, el sistema puede asegurarse que los Nros. IVA registrados en el sistema estén correctamente formateados.Además, para cada país con el que tienes intercambios comerciales, debes usar una fila por separado – en esta opción – para especificar el formato correcto (Máscara Nro. Registro IVA). Cuando en un país haya más de una posibilidad, cada una de esas máscaras deberá ser registrada en diferentes filas con su comentario respectivo. Puedes usar Pegado Especial desde la columna ‘País’ para insertar el código correcto de país.
El formato del Número IVA se define en la columna ‘Másc.’. Por ejemplo, para el formato de Número IVA que se utiliza en Bélgica, tendríamos la siguiente máscara: "BE######-##??9" en donde # significa cualquier combinación de números y ? significa cualquier carácter (numérico o alfa). # es obtenido al presionar Option-3 en Macintosh.
Cabe mencionar que la verificación para validar el dato respecta el uso de mayúsculas o minúsculas. Por lo tanto, asegúrate de usar correctamente mayúsculas o minúsculas.
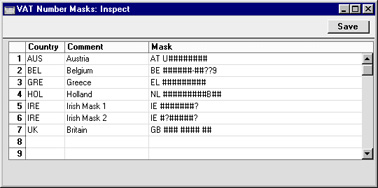
La validación se ejecuta asimismo cuando un Nro. IVA es especificado directamente en una Factura.
Semanas
Esta opción se utiliza para definir los Números de Semana que se muestran en la vista semestral y mensual del Calendario. Los Números de Semana pueden variar dependiendo del país y del año.Para abrir la opción ???Semanas’, haz doble clic en su nombre dentro del listado de opciones del módulo Sistema. La ventana ‘Semanas: Hojear’ muestra todas las semanas existentes. Para modificar una de ellas, ábrela con doble clic. Para crear una nueva, pulsa el botón [Crear].