Introduction to the Task Manager in Standard ERP
The Task Manager is a list of Activities whose main purpose is to act as a "To Do" list. It lists the Activities that you need to carry out by the end of the day, including Activities from previous days that you have not completed yet. By default, only To Do Activities are included in the list. Usually, these will be Activities representing short tasks, such as telephone calls, that you need to carry out on a particular day. The term "Task" is sometimes used in this documentation when referring to a To Do Activity i.e. an Activity that will be shown in the Task Manager.From the Task Manager, you can open an Activity by double-clicking (Windows/Mac OS X) or tapping (iOS/Android) it in the list. You can then remind yourself of the details of the Activity before carrying it out. When you have completed the task, you can mark the Activity as Done. When you save the Activity, it will immediately and automatically be removed from the Task Manager. If, as a result of carrying out the Activity, you need to schedule another one for a future time, you can also create the new follow-up Activity from the Task Manager.
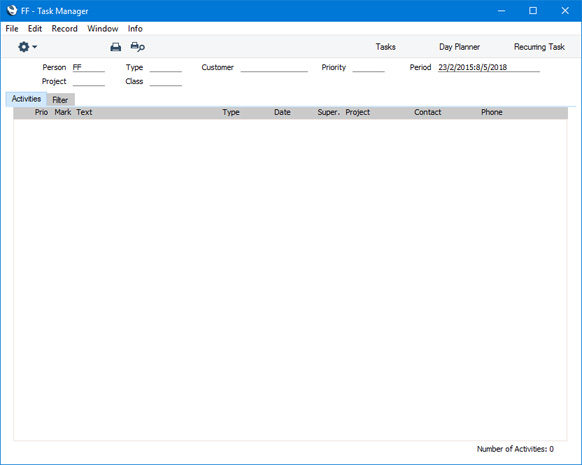
To open the Task Manager, click (Windows/Mac OS X) or tap (iOS/Android) the [Tasks] button in the Navigation Centre:

Your Task Manager will be opened, showing your To Do Activities. These are Activities in which the Task Type is To Do, the Start Date is the current date or earlier and that have not been marked as Done.
The [Tasks] button will include a red counter if you have Tasks that should have been carried out before today, or a green counter if you have Tasks that should be carried out today. If you have Tasks that should have been carried out before today, the Task Manager will be opened automatically when you log in.
- Introduction
- Task Manager - Header
- Task Manager - 'Activities' card
- Task Manager - 'Filter' card
- Task Manager - Button Bar
- Recurring Tasks
- Printing the Task Manager
- Task Manager Access
Go back to:
- Home page for CRM module manual
- Home page for Standard ERP manual
Using the Task Manager - Header
This page describes the header of the Task Manager window. The header is only available if you are using Windows or Mac OS X. It is not available if you are using iOS or Android. Please follow the links below for descriptions of the other parts of the Task Manager window:---

- Person, Type, Customer, Priority, Period, Project, Class
- If the list of Activities is a long one, you can use these fields in any combination to reduce the number of Activities that are shown. For example, to list sales calls, enter the appropriate Activity Type in the Type field and press Tab or Return. To further reduce the list to show top priority sales calls, enter the appropriate Priority Code in the Priority field and press Tab or Return once more.
- Private Activities will be included in the list. It is not possible to hide Private To Do Activities altogether, but you can use the Task Manager Access setting to prevent other users from reading your Private Activities from the Task Manager window.
- You can use 'Paste Special' from the Person, Type, Customer, Period, Project and Class fields to ensure the correct entry.
- Private Activities will be included in the list. It is not possible to hide Private To Do Activities altogether, but you can use the Task Manager Access setting to prevent other users from reading your Private Activities from the Task Manager window.
The Task Manager in Standard ERP:
- Introduction
- Task Manager - Header
- Task Manager - 'Activities' card
- Task Manager - 'Filter' card
- Task Manager - Button Bar
- Recurring Tasks
- Printing the Task Manager
- Task Manager Access
- Home page for CRM module manual
- Home page for Standard ERP manual
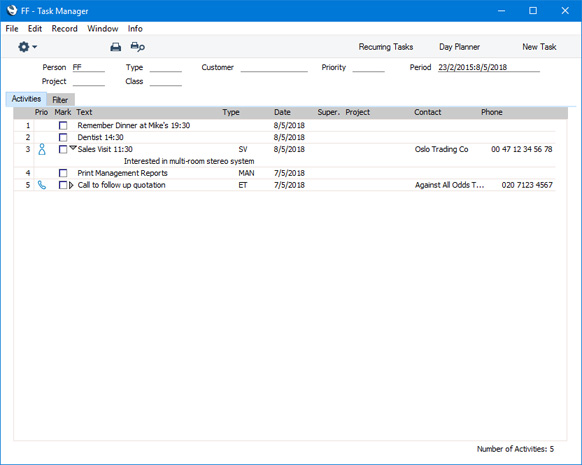
Using the Task Manager - Activities Card
This page describes the 'Activities' card in the Task Manager window. Please follow the links below for descriptions of the other parts of the Task Manager window:- Header
- Task Manager - 'Activities' card
- Task Manager - 'Filter' card
- Task Manager - Button Bar

If you are using Windows or Mac OS X, you can change the Activities that are shown in this list in two ways:
- You can use the fields in the header.
- You can use the radio buttons on the 'Filter' card if you need to see Activities that would not be shown by default (e.g. Done Activities or Activities whose Task Types are not To Do).
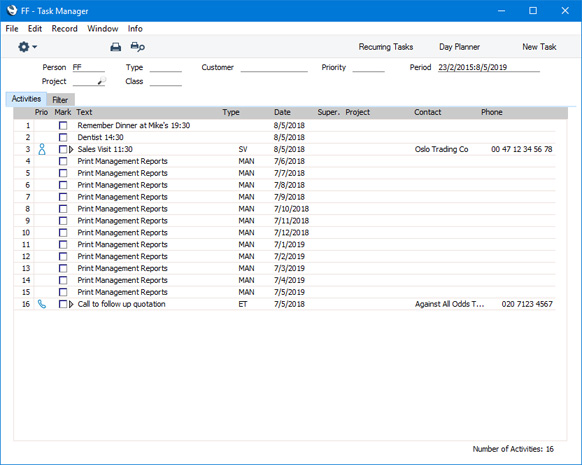
- Prio
- This column shows the Priority of each Activity (taken from the field in the header of the Activity window). It also displays a small image that is determined by the Symbol option chosen in each Activity (on the 'Alarm' card).
- Mark
- The check boxes in this column have two purposes.
- First, they signify whether Activities have been marked as Done. By default, the Task Manager only shows Activities that have not been marked as Done, so the check boxes in this column will usually not be ticked.
- Second, you can use these check boxes to mark Activities before applying a function on the Operations menu to those Activities. For example, if you need to mark an Activity as Done, tick the check box in the 'Mark' column in the appropriate row and then select 'Save Changes' from the Operations menu. You can mark several Activities as Done before selecting an Operations menu function.
- Take care when marking Activities and then selecting a function from the Operations menu. If you have specified on the 'Filter' card that the Task Manager should include Done Activities, the check boxes in the 'Mark' column will be ticked for those Activities. If you select a function from the Operations menu, it may be applied to the Done Activities as well as the Activities that you have explicitly selected.
- First, they signify whether Activities have been marked as Done. By default, the Task Manager only shows Activities that have not been marked as Done, so the check boxes in this column will usually not be ticked.
- Type
- This column displays the Activity Type of each Activity.
- Date
- This column displays the Start Date of each Activity.
- Task
- This column contains the Text from the header of each Activity.
- If you are using Windows or Mac OS X, there will be a small arrow to the left of this Text if any notes and comments have been entered on the 'Text' card of an Activity. Click this arrow to read the comments. This has been done in the fourth row in the illustration above.
- If you are using Windows or Mac OS X, there will be a small arrow to the left of this Text if any notes and comments have been entered on the 'Text' card of an Activity. Click this arrow to read the comments. This has been done in the fourth row in the illustration above.
- Supervisor
- This column displays the Supervisor from the header of each Activity.
- Project
- This column shows the Project from the 'Contact' card of each Activity.
- Contact
- This column contains the Customer or Supplier Name from the 'Contact' card of the Activity.
- Phone
- This column shows the Customer or Supplier Telephone Number from the 'Contact' card of each Activity.
The Task Manager in Standard ERP:
- Introduction
- Task Manager - Header
- Task Manager - 'Activities' card
- Task Manager - 'Filter' card
- Task Manager - Button Bar
- Recurring Tasks
- Printing the Task Manager
- Task Manager Access
- Home page for CRM module manual
- Home page for Standard ERP manual
Using the Task Manager - Filter Card
This page describes the 'Filter' card in the Task Manager window. The 'Filter' card is only available if you are using Windows or Mac OS X. It is not available if you are using iOS or Android. Please follow the links below for descriptions of the other parts of the Task Manager window:- Header
- Task Manager - 'Activities' card
- Task Manager - 'Filter' card
- Task Manager - Button Bar
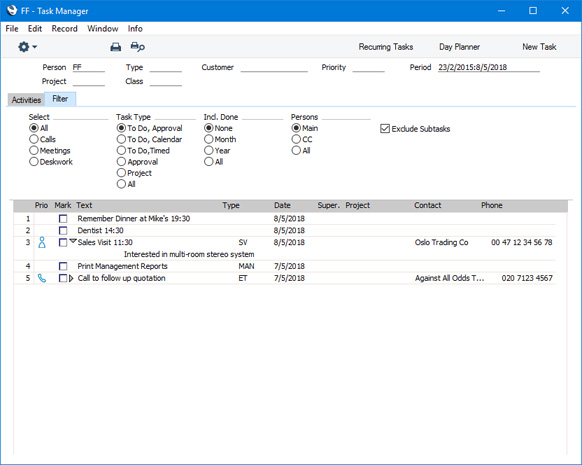
- Select
- Use these options to list Activities with different Symbols.
- Task Type
- Use these options to list Activities with different Task Types.
- Incl. Done
- Choose one of these options if you would like Done Activities to be listed (in addition to those that are not Done). The Done Activities will be marked with a tick in the Done column. You can choose to include all Done Activities, or those whose Start Dates are in the past month or year.
- Persons
- By default, the Task Manager lists the Activities entered for the Person whose Signature appears in the header (i.e. Activities with this Signature in their Persons fields). Use these options to change this to the Activities with this Signature in their Cc fields, or in both their Persons and Cc fields.
- Exclude Subtasks
- You can connect subsidiary Activities ("Sub Tasks") to an Activity (the "Main Task"). For example, you might create a Main Task to represent a project, and then add Sub Tasks that represent the individual jobs that need to be carried out to complete the project.
- Use this option to specify whether Sub Tasks should be included in the Task Manager.
- Please refer to the description of the 'Sub' card in the Activity record here for more details about Main Tasks and Sub Tasks.
- Use this option to specify whether Sub Tasks should be included in the Task Manager.
The Task Manager in Standard ERP:
- Introduction
- Task Manager - Header
- Task Manager - 'Activities' card
- Task Manager - 'Filter' card
- Task Manager - Button Bar
- Recurring Tasks
- Printing the Task Manager
- Task Manager Access
- Home page for CRM module manual
- Home page for Standard ERP manual
Using the Task Manager - Button Bar
This page describes the Button Bar in the Task Manager window. The Button Bar is only available if you are using Windows or Mac OS X. It is not available if you are using iOS or Android. Please follow the links below for descriptions of the other parts of the Task Manager window:- Header
- Task Manager - 'Activities' card
- Task Manager - 'Filter' card
- Task Manager - Button Bar

- Recurring Tasks
- Use this button to manage Recurring Tasks. Please refer here for details.
- Day Planner
- Click this button to open the Day Planner.
- New Task
- Click this button to create a new Activity. Its Task Type will be To Do, and its Symbol will be Other. You can also use the Ctrl-N or ⌘-N keyboard shortcut. When you save the new Activity, it will immediately and automatically be added to the Task Manager, providing it meets your chosen filter criteria.
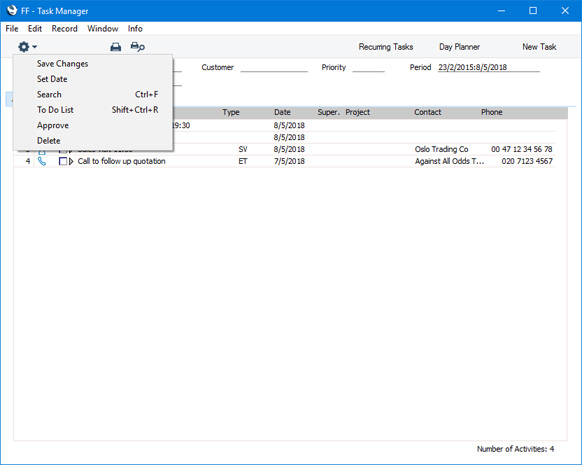
- Save Changes
- You can use the check boxes in the 'Mark' column in the Task Manager to mark Activities as Done when you have completed them. If you tick a check box, the corresponding Activity will not be marked as Done immediately. To do this, you must save the Task Manager by selecting 'Save Changes' from the Operations menu. You can also use the Shift-Enter key combination or select 'Save' from the Record menu. You can mark several Activities as Done before saving. Selecting 'Save Changes' will not close the Task Manager.
- Set Date
- The 'Set Date' function allows you to change the Start and End Dates in Activities from the Task Manager.
- To use this function, first select the Activities whose dates you need to change by ticking the relevant check boxes in the Mark column. Then select 'Set Date' from the Operations menu. The following window opens:
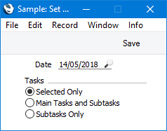
- Selected Only
- The Start and End Dates in the marked Activities will be changed.
- Main Tasks and Subtasks
- The Start and End Dates in the marked Activities will be changed. If a marked Activity is a Main Task, the Start and End Dates in its connected Sub Tasks will be changed as well.
- Subtasks Only
- The Start and End Dates in a marked Activity will only be changed if that Activity is a Sub Task. If a marked Activity is a Main Task, its Start and End Dates will not be changed, but the dates in its connected Sub Tasks will. If a marked Activity is not a Main Task or a Sub Task, its dates will not be changed.
Please refer here for more details about Main Tasks and Sub Tasks.
- To use this function, first select the Activities whose dates you need to change by ticking the relevant check boxes in the Mark column. Then select 'Set Date' from the Operations menu. The following window opens:
- Search
- You can use the 'Search' function to search for Activities that are listed in the Task Manager. When you select 'Search' from the Operations menu, the following window will open:
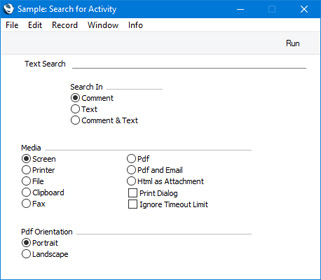
- Text Search
- Enter here the text string that you are looking for.
- Search In
- Use these options to specify the field in which you want to search. Choose the Comment option if you want to search in the Text field in the header of each Activity, or the Text option to search in the matrix on the 'Text' card.
Press [Run] to activate the search. A report will be printed to screen, listing the Activities found. The report will only list Activities that are included in the Task Manager. It will not list Activities that do not match the criteria specified in the header or on the 'Filter' card of the Task Manager. You can open the Activities that are listed in the report by drilling down.
- Text Search
- To Do List
- If you need to print a list of the Tasks shown in the Task Manager, use any of the following methods:
- Select 'Print' from the File menu.
- Use the Printer or Preview icons at the top of the Task Manager window.
- Select 'To Do List' from the Operations menu.
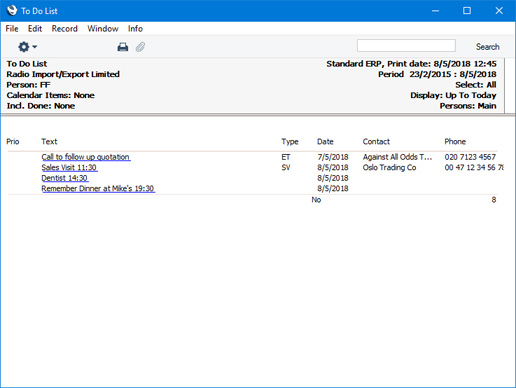
The first two methods will print a To Do List immediately. The third method will open the following dialogue box where you can specify that you want to print a To Do List for a user and/or period different to those specified in the header of the Task Manager:
The Overview option will produce a report showing the Priority, Text, Activity Type, Start Date, Contact Name and Telephone Number of each Activity (as illustrated on the Printing the Task Manager page. The Comments only option will produce a report that only displays the Text of each Activity.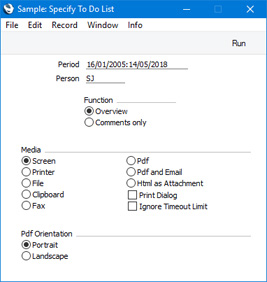
- Select 'Print' from the File menu.
- Approve
- An "Approval Request Activity" is an Activity that will have been created from other registers using the 'Request Approval' function. By default, Approval Request Activities will be shown in the Task Manager.
- It will be necessary to create Approval Request Activities if you have used the Approval Rules register in the Business Alerts module to configure approval processes that records of particular kinds must pass through before they can be marked as OK. For example, managers may need to check and approve every Invoice in which the TOTAL is greater than a certain value. If you are using such an approval process, a Person creating a record that needs to be approved will initiate the approval process by selecting 'Request Approval' from the Operations menu while viewing that record.
- An option available to the Person who will check and approve each record (e.g. the manager who will check and approve each Invoice) is to approve from the Task Manager. This will mean that there is no need to remember the Results that you need to use to approve a record.
- To approve from the Task Manager, first select the Approval Request Activities by ticking the relevant check boxes in the Mark column. Then select 'Approve' from the Operations menu.
- Please refer here for more details about Approval Request Activities including an illustrated example.
- It will be necessary to create Approval Request Activities if you have used the Approval Rules register in the Business Alerts module to configure approval processes that records of particular kinds must pass through before they can be marked as OK. For example, managers may need to check and approve every Invoice in which the TOTAL is greater than a certain value. If you are using such an approval process, a Person creating a record that needs to be approved will initiate the approval process by selecting 'Request Approval' from the Operations menu while viewing that record.
- Delete
- The 'Delete' function allows you to delete Activities from the Task Manager.
- To use this function, first select the Activities that you want to delete by ticking the relevant check boxes in the Mark column. Then select 'Delete' from the Operations menu.
The Task Manager in Standard ERP:
- Introduction
- Task Manager - Header
- Task Manager - 'Activities' card
- Task Manager - 'Filter' card
- Task Manager - Button Bar
- Recurring Tasks
- Printing the Task Manager
- Task Manager Access
- Home page for CRM module manual
- Home page for Standard ERP manual
Recurring Tasks
This page describes using Recurring Tasks in the Task Manager.---
Recurring tasks are the tasks that you need to carry out on regular basis. An example might be producing management reports, which you need to do every month.
You can create Recurring Tasks from the Task Manager if you are using Windows or Mac OS X. The Recurring Tasks feature is not supported on iOS or Android. Follow these steps:
- Open the Task Manager.
- Click the [Recurring Tasks] button in the Button Bar.
The Task Manager will now list Recurring Tasks. This version of the Task Manager is termed the "Recurring Task Overview" in this documentation:
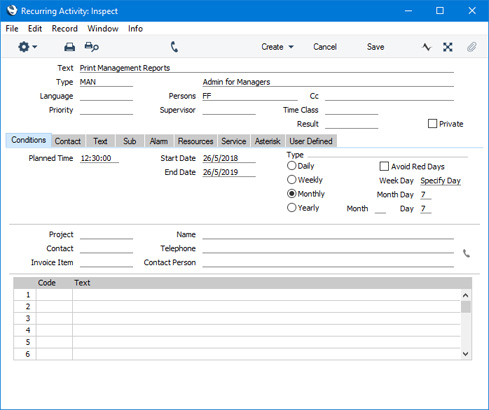
- To create a new Recurring Task, press the [Recurring Task] button (the right-hand button in the Button Bar). The 'Recurring Activity: New' window will open:
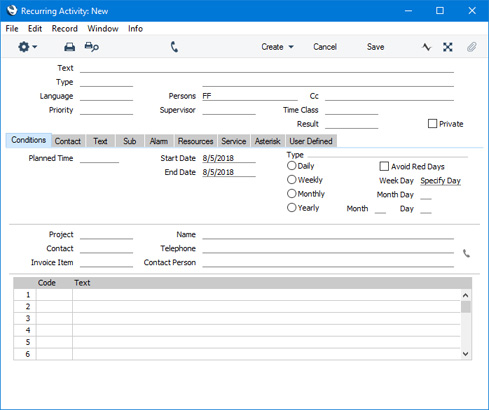
- Fill in the details such as Activity Type and Persons in the same way as for an Activity or Task.
- Use the fields and options on the 'Conditions' card to specify how often the Recurring Activity should be carried out, as follows:
- Planned Time
- Paste Special
Current time
- As an option, specify the time when the Recurring Activity is to be carried out.
- Start Date, End Date
- Paste Special
Choose date
- Use these fields to specify the period over which the Recurring Activities are to be carried out. For example, if they are to be carried out over the next year, enter an End Date that is one year in the future.
- You must specify an End Date: the period cannot be open-ended.
- You must specify an End Date: the period cannot be open-ended.
- Type
- Use these options to specify the days on which the Recurring Activities are to be carried out.
- The Avoid Red Days option requires you to have defined the working days of the week and public holidays in the Bank Holidays setting in the System module. If you select this option, a Recurring Activity that would be scheduled for a Red Day will be removed from the schedule. It won't be moved to the next day.
- Planned Time
- When you save the Recurring Activity record, it will be added to the Recurring Task Overview:
If you need to view or edit the Recurring Activity record, double-click it in the Recurring Task Overview.
- To change the Task Manager back to the list of tasks, press the [Tasks] button in the Button Bar. If you change the Period of the Task Manager so that it ends in the future, the new Recurring Tasks will be included:
- When you carry out the task on the first scheduled date, double-click or tap the Recurring Task for that date. The task will be opened in a window that is entitled 'Activity: New'.
This is because Recurring Tasks are "virtual" tasks. Individual Activities do not exist yet. The Planned Time field will be filled in if you specified a time in step 5. After carrying out the task, enter the details including a Result and tick the Done box as usual. When you save, the "virtual" task will be replaced in the Task Manager by the saved Activity (i.e. by a "real" task).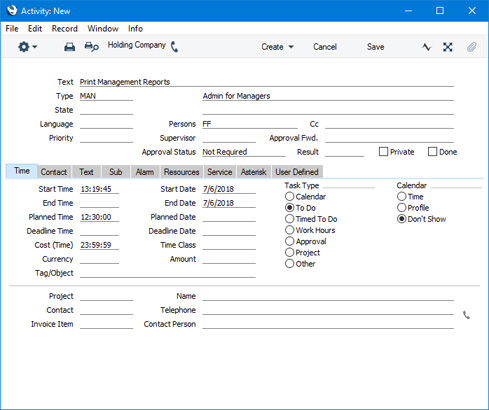
- You can return to the Recurring Activity record from step 5 at any time to edit it. As the Recurring Tasks are "virtual" tasks, any changes you make will appear in the Task Manager immediately because there are no "real" tasks to update. Any "real" task that you may have created from "virtual" tasks as described in the previous step will not be updated.
---
The Task Manager in Standard ERP:
- Introduction
- Task Manager - Header
- Task Manager - 'Activities' card
- Task Manager - 'Filter' card
- Task Manager - Button Bar
- Recurring Tasks
- Printing the Task Manager
- Task Manager Access
- Home page for CRM module manual
- Home page for Standard ERP manual
Printing the Task Manager
This page describes printing a list of Tasks from the Task Manager.---
If you are using Windows or Mac OS X, you can print a list of the Tasks shown in the Task Manager. To do this, choose 'Print' from the File menu (all platforms). You can also click the Printer icon on the left-hand side of the Button Bar.
To print the list of Activities to screen, click the Preview icon.
If you want to print a To Do List for a user and/or period different to those specified in the header of the Task Manager, select 'To Do List' from the Operations menu.
When printed to screen, the list of Activities has the Standard ERP Drill-down feature. Click on the Text of any Activity in the report to open the corresponding Activity record.
The Task Manager in Standard ERP:
- Introduction
- Task Manager - Header
- Task Manager - 'Activities' card
- Task Manager - 'Filter' card
- Task Manager - Button Bar
- Recurring Tasks
- Printing the Task Manager
- Task Manager Access
- Home page for CRM module manual
- Home page for Standard ERP manual
Task Manager Access
This page describes using the Task Manager Access setting to control access to your Task Manager.---
If you tick the Private check box in a Calendar or Timed To Do Activity that has your Signature in its Persons field, that Activity will appear in your Personal Calendar report and in any Calendar view when viewed by you, but not when viewed by any other user. The Activity will also be excluded from many other reports when they are produced by other users.
However, a Private To Do Activity will appear in your Task Manager when viewed by other users, and other users will be able to open the Activity to read it. It is not possible to hide Private To Do Activities altogether, but you can prevent other users from reading them using the Task Manager Access setting in the System module.
Each record in this setting will control access to a particular user's Task Manager:
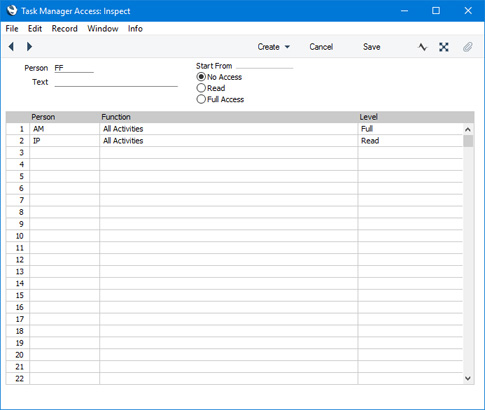
Use the Start From options to set the default level of access to the Person's Task Manager, as follows:
- No Access
- Users will see the Tasks listed in the Person's Task Manager, but they won't be able open those Tasks.
- Read
- Users will be able to open the Tasks in the Person's Task Manager, but they won't be able to edit them. Tasks will be shown in reports.
- Full Access
- Users will be able to edit the Tasks in the Person's Task Manager.If you need there to be any exceptions to the default level of access, list them in the matrix.
In the example illustrated above, it has been specified that the default level of access to FF's Task Manager is No Access. Exceptions have been made for AM, who will have Full access, and for IP, who will have Read access.
Giving a user No Access to a Person's Task Manager will also have the following effects:
- The user will not see that Person's Timed To Do Activities in the Day Planner.
- The user will not see that Person's To Do and Timed To Activities in the Activities, Contacts and Activities, Persons reports.
- The user will not see the Person's Approval Request Activities in Status reports. For example, if an Approval Request Activity has been created from a Purchase Order, the status of that Activity will usually be shown in the Purchase Order Status report. If a user does not have access to the Task Manager of the Person who will approve the Purchase Order, they will not see the Approval Request Activity in the Purchase Order Status report.
- The user will not see that Person's Timed To Do Activities in the Day Planner.
The Task Manager in Standard ERP:
- Introduction
- Task Manager - Header
- Task Manager - 'Activities' card
- Task Manager - 'Filter' card
- Task Manager - Button Bar
- Recurring Tasks
- Printing the Task Manager
- Task Manager Access
- Home page for CRM module manual
- Home page for Standard ERP manual