Wprowadzenie do kartoteki Firmy
Jeśli przedsiębiorstwo posiada kilka samodzielnych oddziałów lub pomocniczych jednostek, które prowadzą oddzielną księgowość to każdy z tych oddziałów można zdefiniować jako osobną firmę w bazie danych wykorzystując kartotekę Firmy w module System. Jeśli w bazie danych zdefniujemy więcej niż jedną firmę to każda z tych firm będzie całkowicie niezależna od pozostałych: nie będzie żadnych uwspólnionych informacji, aczkolwiek możliwe będzie przenoszenie danych pomiędzy firmami przy użyciu funkcjiexportów oraz importów. W każdej firmie można prowadzić osobne księgi, a archiwum tekstowe można wykonywać osobno dla każdej firmy lub łącznie dla całej bazy danych.
Firmy w bazie danych należy definiować wówczas, kiedy zamierzamy prowadzić osobną księgowość w każdej z firm lub chcemy rozróżnić poszczególne oddziały. Jeśli wszystkie oddziały/firmy pomocnicze wykorzystują ten sam plan kont , nie ma sensu definiować osobnych firm w bazie danych.
Po uruchomieniu systemu po raz pierwszy należy zdefiniować firmę w bazie danych. Więcej informacji na ten temat patrz: Tworzenie nowej firmy w bazie danych.
! | Po uruchomieniu systemu Hansa po raz pierwszy należy zdefiniować przynajmniej jedną firmę w bazie danych. |
Liczba firm, które można zdefiniować w bazie danych jest ograniczona w ustawieniu Konfiguracja (w module System). W nowej bazie danych zawsze będzie to 1 firma. Użytkownik może zdefiniować więcej firm w ustawieniu w zależności od potrzeb. Każda zmiana liczby firm w bazie danych wymaga wprowadzenia nowego
klucza rejestracyjnego. Jeśli każda firma w bazie danych będzie prowadziła oddzielną księgowość, nie ma sensu definiować osobnych firm dla oddziałów/firm pomocniczych, które są jej integralną częścią.
Wprowadzanie firm
Pierwszą czynnością jaką należy wykonać po utworzeniu bazy danych jest wprowadzenie firmy. Więcej informacji na ten temat patrz:Tworzenie nowej firmy w bazie danych.
Jeśli system Hansa został uruchomiony, a istnieje potrzeba zmiany lub dodania nowych informacji w kartotece Firmy, upewnij się, ze pracujesz w module System, a następnie kliknij przycisk [Firmy] w Oknie Głównym lub wybierz 'Firmy' z menu Kartoteki. Pojawi się okno 'Firmy:Podgląd' to samo, które jest wykorzystywane do wprowadzenia firmy przy pierwszym uruchomieniu systemu. Więcej informacji na ten temat patrz: Zmiana i dodanie firmy.
Firmy można dodawać w dowolnym momencie, ale każda zmiana liczby firm w bazie danych wymaga wprowadzenia nowego klucza rejestracyjnego.
Ze względów bezpieczeństwa system zostanie zamknięty po wprowadzeniu zmian w kartotece Firmy. Aby kontunuować pracę należy uruchomić system ponownie.
W konfiguracji wielostanowiskowej informacje w kartotece Firmy można zmienić lub dodać z aplikacji serwera lub klienta w trybie 'Klient administracyjny'.
! | Jeśli definiujesz firmy w bazie danych plik tekstowy "Default.txt" musi znajdować się w katalogu Hansy. |
Fields in the Company Register
This page describes the fields in the Company register. Please also refer to the Adding Companies for details about adding Companies to a Standard ERP database.---
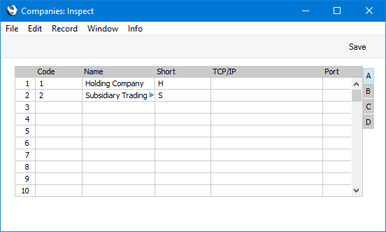
In a client-server system, separate Company registers will be maintained in the server database and in the databases on each client machine. In a client database, the purpose of the Company register is to allow you to find, connect to and log in to each Company on the server. The Company register in a client database will be updated each time you connect to the server, so there will be no need to edit it.
If you open the Company register on a client machine, you will be shown the Company register that is stored locally in the client database. If you need to see the Company register that is stored in the server database, change to "Admin Client" mode before opening the Company register.
Please refer to the Adding Companies page for more details about editing the Company register and here for more details about "Admin Client" mode.
Flip A
- Code
- Assign a unique code to each Company. This must be a number between 1 and 99.
- Name
- The company name that you enter here will be shown in the 'Select Company' window. This is the window where you will choose the Company you want to work with each time you log in to Standard ERP, so you should choose Names that will make choosing Companies easy for all users. The 'Select Company' window is described on the Working with Companies page.
- Short
- If you have more than one Company in your database, you can switch between Companies in a work session, leaving windows from each Company open. The Short Code will be included in every window title to indicate the Company to which the information in the window belongs. If you only have one Company, you may decide not to specify a Short Code, in which case window titles will not include a Company indicator. If you add a second Company later, you will be able to specify Short Codes for both Companies when doing so.
- You can use up to ten characters in a Short Code.
- When you create a new database, you will be able to specify a Short Code when naming the first Company. If you do not specify a Short Code at this time, the first ten characters of the Company Name will be used as a default Short Code. You can remove or change this default Short Code if necessary.
A few registers and settings in Standard ERP are stored in Company 0, a partition of the database that stores information available in every Company. This means that these registers will be used by all Companies, that any change you make will immediately be available to all Companies, and that it doesn’t matter in which Company you are working when you need to work in these registers and settings. An easy way to spot a register or setting that is stored in Company 0 is that there will be no Short Code in the window title of any window connected to the register or setting.
- You can use up to ten characters in a Short Code.
- TCP/IP
- In the Company register in a client database, the IP address of the server machine will be shown in this field. This allows the client application to locate the correct server on the network.
- Leave this field empty in the Company register in the server database and in a single-user database.
- Leave this field empty in the Company register in the server database and in a single-user database.
- Port
- In the Company register in a client database, the Server Port from the Program Mode register in the server database will be shown in this field. This allows the client application to locate the correct server application (if there is more than one).
- Leave this field empty in the Company register in the server database and in a single-user database.
Flip B
- Encryption Key
- All communications between clients and the server are encrypted using a built-in Encryption Key. If you would like an Encryption Key of your own to be used, enter your key in this field.
- Status
- Please refer to the Closing Companies page for details about this field.
Flip C
The fields on flip C will only be used in a single-user installation of Standard ERP. If you leave Standard ERP running, these fields will allow you to connect to it from outside the office using a home computer or a compatible mobile phone. Please refer to the Connecting to a Single-user Database page for details.Flip D
- Mode
- In the Company register in a client database, the Mode field indicates the type of connection that the client database has with the server. Usually, the Mode will be "Local", but it will be "Live Sync" in the case of a live-sync connection. Please refer here for details about live-sync connections
The Company register in Standard ERP:
- Introduction
- Adding Companies
- Fields in the Company Register
- Working with Companies
- Closing Companies
- Shared Registers
- Connecting to a Single-User Database from Outside the Office
- "Admin Client" Mode
See also:
- Consolidation module - To be used to produce consolidated reports that include many or all Companies in a database
- Inter Company module - To be used when sending Invoices between Companies in a database
Go back to:
- Home page for System Module manual
- Home page for Standard ERP manual
Praca z firmami
Jeśli w bazie danych zdefiniowano więcej niż jedną firmę, po uruchomieniu systemu należy wskazać firmę do pracy. Po uruchomieniu systemu automatycznie pojawi się okno 'Wybór firmy:Podgląd':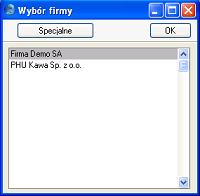
Aby zmienić firmę w trakcie pracy nie trzeba kończyć pracy z aktualną firmę i restartować system. Z menu Plik należy wybrać 'Firmy'. Pojawi się okno 'Wybór firmy' z listą wszystkich zdefiniowanych firm w bazie danych, w którym można wskazać nową firmę do pracy.
W instalacjach wielostanowiskowych należy wybrać dowolną firmę, a następnie uruchomić serwer. Użytkownicy mogą wówczas pracować z dowolną firmą zdefiniowaną w bazie danych.
Working with Companies
This page describes working with Companies in a multi-Company database. Please also refer to the Adding Companies for details about adding Companies to a Standard ERP database.---
A Standard ERP database can contain more than one Company. This feature can be useful if your business is one where there are separate departments or subsidiary companies that keep separate accounts. Their data can be stored in a single database, in separate partitions known as "Companies".
You should only use this feature to differentiate between different departments if you intend to account for each of them separately. If you keep a single set of accounts covering your whole organisation, you only need have a single Company in your database.
Companies are stored in the Company register in the System module. You can add new Companies at any time: this process is described on the Changing and Adding Companies page. Adding a new Company will mean that you will have to apply for a new Enabler Key.
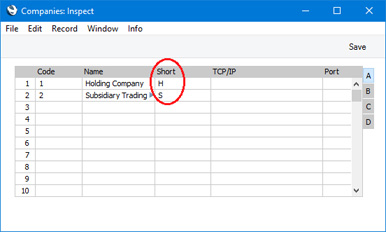
If you have more than one Company in your Company register, it is recommended that you specify a Short Code for each one:
The following methods for choosing the Company are available:
- The last Company you used will be loaded by default, and you will be taken to the 'Login' window immediately after starting the application.
- You can choose the Company that you will work in, using the 'Select Company' window that will appear when you start the application. After choosing a Company, you will be taken to the 'Login' window.
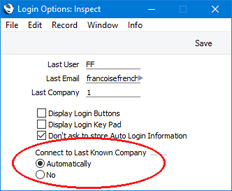
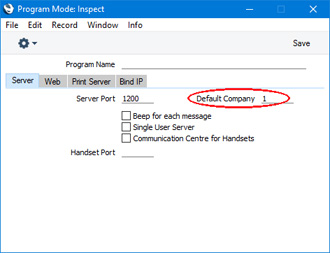
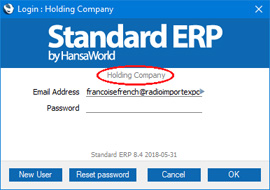
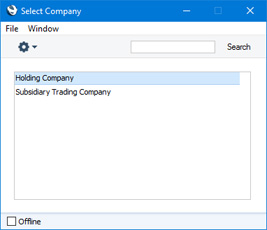
If you have chosen not to be logged in to the last known Company (method 2 towards the top of this page), the 'Select Company' window will be the first window to appear when you start the Standard ERP application.
Once you have logged in, the Short Code of the Company ("H" in the example illustrated) will be included in the title of every window, while the full Company Name will be included in the title of the Navigation Centre:
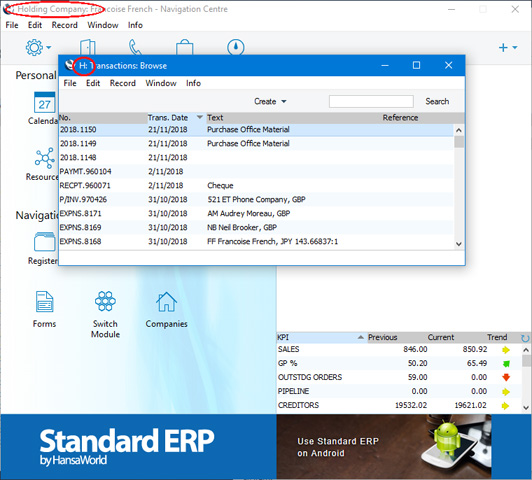
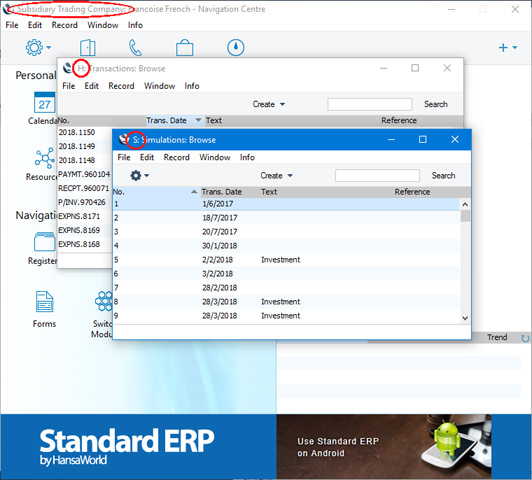
Note that if you are logged into two Companies as described here, you will take up two user "slots". For example, if you have purchased ten users, this means that ten employees can be logged in to your Standard ERP system at any one time. However, if one employee is logged in to two Companies at the same time, this will count as two of those ten log-ins.
Usually, each Company will be completely separate: there will be no common information. If you want to copy information from one Company to another, you can do so using one of two methods:
- By dragging and dropping. For example, to copy a Contact record from one Company to another, open the 'Contacts: Browse' window in the first Company, change to the second Company using the [Companies] button in the Navigation Centre or the Ctrl-O/⌘-O keyboard shortcut, and open the 'Contacts: Browse' window in that Company as well. Then click on the relevant Contact record and drag it from one browse window to the other. This method is suitable for copying individual records. The Payment Terms used in the copied Contact must exist in both Companies.
- Using the export and import functions in the System module. This method is suitable for transferring the entire contents of a register or setting from one Company to another.
---
The Company register in Standard ERP:
- Introduction
- Adding Companies
- Fields in the Company Register
- Working with Companies
- Shared Registers
- Closing Companies
- Connecting to a Single-User Database from Outside the Office
- "Admin Client" Mode
See also:
- Consolidation module - To be used to produce consolidated reports that include many or all Companies in a database
- Inter Company module - To be used when sending Invoices between Companies in a database
Go back to:
- Home page for System Module manual
- Home page for Standard ERP manual
Shared Registers
This page describes sharing registers (i.e. sharing information) between Companies in a multi-Company database.---
You can choose to make the information in certain registers available to every Company in your database. Such registers are termed "Shared Registers".
For example, you may choose to make the Contact register a Shared Register so that you use the same Contact list in all your Companies. This will mean that all Contacts will be available to all Companies. You will not be able to isolate a particular single Contact so that it can only be used by a particular single Company. However, you will be able to make the same Contact list available to four of your Companies and have a completely separate Contact list in a fifth Company.
If you are using Global Users, it is strongly recommended that you share the Access Groups setting, to make the same Access Groups available to every Company. The Global Users feature allows Users to log in to several Companies using the same password and StandardID or Signature and is described in more detail here.
To set up a Shared Register, follow these steps:
- Working in any Company, enter the Technics module by selecting 'Technics' using the [Switch Module] button in the Navigation Centre. To be able to do this, you should have logged in as a Person that has access to the Technics module: this is controlled using Access Groups. In a client-server system, you should be the only user logged in.
- Open the 'Settings' list using the [Settings] button in the Navigation Centre or the Ctrl-S (Windows) or ⌘-S (macOS) keyboard shortcut. If you are using iOS or Android, select 'Settings' from the 'Tools' menu (with 'wrench' icon).
- Double-click (Windows/macOS) or tap (iOS/Android) 'Shared Registers' in the list. The following window opens:
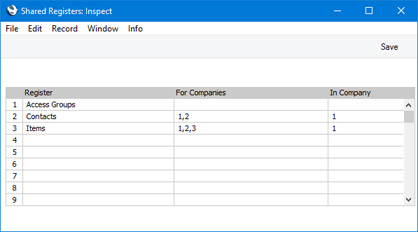
- List the registers that you want to be shared in the Registers column. Use the 'Paste Special' feature (Ctrl-Enter/⌘-Enter) to ensure each register is spelt correctly (an incorrect spelling will mean that the register will not be shared).
- Use the For Companies column to specify the Companies that will be able to use the shared register: enter the Codes of each Company that will share the register, separated by commas.
In the example illustrated above, Companies 1 and 2 will share the Contact register, while Companies 1, 2 and 3 will share the Item register. Company 3 will have its own, separate, Contact register. When you enter a new Contact in Company 1, for example, it will immediately be made available for use in Company 2. When you enter a new Item in Company 2, it will immediately be made available for use in Companies 1 and 3.
If you leave the For Companies field empty for a particular register, that register will be made available to every Company. This is the case for the Access Groups setting in the example illustrated above.
- Use the In Company column to specify the Company in which the shared register will be stored.
In the example illustrated above, the shared Contact and Item registers will be stored in Company 1. Note that you cannot store the shared Contact register in Company 3, because that Company will have its own Contact register.
If you leave the In Company field empty for a particular register, that register will be stored in Company 0. Company 0 is a partition of the database usually used to store information that is available to every Company (Mails, Mailboxes and Conferences are always stored in Company 0). This is the case for the Access Groups setting in the example illustrated above.
- Click the [Save] button to save and close the window, or click the close box if you don't want to save changes. Any changes will be implemented immediately: there's no need to restart.
If you share the Account register, only the static information in the Account register (e.g. Account Number and Name, Account Type and so on) will be shared. There will not be a single balance for each Account made up from the Transactions in all Companies. Separate account balances will be maintained for each Account in each Company. If you want there to be a single balance for each Account made up from the Transactions in all Companies, use the Consolidation module.
It is possible to remove a register from the Shared Registers setting, you should proceed with care. Before doing so, you may want to copy the records in the shared register to the separate Companies. To do this, use the 'Unshare Registers' Maintenance function in the Technics module. You will need to log in to every Company first. For example, the Contact register stored in Company 1 is shared between Companies 1, 2 and 3, and the Contact register stored in Company 4 is shared between Companies 4 and 5. The 'Unshare Registers' function will copy the Contacts in Company 1 to Companies 2 and 3, and the Contacts in Company 4 to Company 5. Attachments will be copied as well including links to other records if those records are in registers that are also shared. After running this function, you can then remove the register from the Shared Registers setting, and you should then restart Standard ERP. If you remove the register from the Shared Registers setting without running the 'Unshare Registers' function first, you will no longer be able to use any records entered since you first shared the register, but you will regain access to any records that were previously in each Company.
You can also share blocks. There are two types of block: the setting that is a set of fields and check boxes (e.g. Account Usage S/L, Account Usage P/L, Locking); and the setting that is a series of rows (e.g. Payment Modes, VAT Codes). To do this, use the Shared Blocks setting in the Technics module, following the same steps as described above for the Shared Registers setting. You cannot apply the 'Unshare Registers' function to a block.
---
The Company register in Standard ERP:
- Introduction
- Adding Companies
- Fields in the Company Register
- Working with Companies
- Shared Registers
- Closing Companies
- Connecting to a Single-User Database from Outside the Office
- "Admin Client" Mode
See also:
- Consolidation module - To be used to produce consolidated reports that include many or all Companies in a database
- Inter Company module - To be used when sending Invoices between Companies in a database
Go back to:
- Home page for System Module manual
- Home page for Standard ERP manual
Closing Companies
This page describes closing Companies in a multi-Company database when those Companies are no longer needed.---
If you have more than one Company in your database, there may be occasions where you need to close a Company, to prevent anyone logging in and therefore to prevent further use.
If you are working from a client machine and will log in to a server, follow all the steps listed below. If you are working in a single-user database, start from step 3.
- Log in as a user with access to the Technics module. Please refer here for details about gaining access to the Technics module.
- Change to "Admin Client" mode. To do this, change to the Technics module, open the Program Mode register and choose 'Admin Client' from the Operations menu (with 'cog' icon, Windows/macOS) or Tools menu (with 'wrench' icon, iOS/Android).
If you are not in "Admin Client" mode when you close a Company, the Company will be closed in the local database on your client machine and not in the main database on the server.
Please refer here for more information about "Admin Client" mode.
- Open the Company register. You can do this using one of two methods:
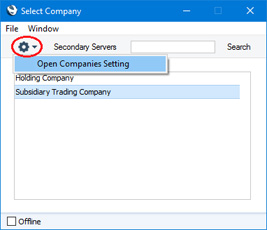
- Working in any module, click (Windows/macOS) or tap (iOS/Android) the [Companies] button in the Navigation Centre. When the 'Select Company' window opens, choose 'Open Companies Setting' from the Operations or Tools menu:
- Working in the System module, click (Windows/macOS) or tap (iOS/Android) the [Registers] button in the Navigation Centre and select 'Companies' in the resulting list.
- Working in any module, click (Windows/macOS) or tap (iOS/Android) the [Companies] button in the Navigation Centre. When the 'Select Company' window opens, choose 'Open Companies Setting' from the Operations or Tools menu:
- When the 'Companies: Inspect' window opens, go to flip B and open 'Paste Special' from the Status field in the relevant row. You can close a Company by choosing "Inactive" or "Deleted":
Both options will close a Company by removing it from the 'Select Company' window. This means that it will no longer be possible to log in to the Company. The difference between "Inactive" or "Deleted" is that an Inactive Company will be included in database text back-ups, while a Deleted Company will not. This means that a Deleted Company will become an empty shell in any future database that you create by importing a text back-up. An Inactive Company should be included in the number of Companies (Multi User Non-Consolidated, Multi User Non-Consolidated or Single User as appropriate) in the Configuration setting, while a Deleted Company does not need to be included.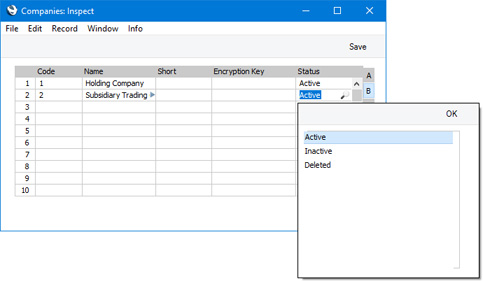
You can change the Status back to "Active" at any time if necessary.
You must close a Company by changing its Status: do not do so removing the row from the 'Companies: Inspect' window, especially if the Company to be closed is not the one in the last row. Some functions in Standard ERP (especially those connected with the Link Manager and Document Manager) rely on the row numbers occupied by each Company, not on each Company's Company Code. If you delete a row in the 'Companies: Inspect' window, the Companies in the lower rows will move up, so their row numbers will be reduced by one. This will cause corruptions in the Link Manager and Document Manager.
Do not close the Company that you are currently working in. Log in to another Company first. The default option in the Login Options setting in the User Settings module is to connect to the last known Company automatically. If you have closed the last known Company, you will no longer be able to connect to it. This will especially be an issue in a single-user database. In a client-server database, you will be able to correct the issue by removing the Hansa.HDB file from the folder containing the Standard ERP client application and then establishing a new connection to the server, but this is not possible with a single-user database.
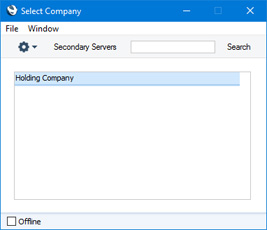
- The closed Company will be removed from the 'Select Company' window immediately (in a single-user database) or the next time you log in (if you will log in to a server from a client machine):
The Company register in Standard ERP:
- Introduction
- Adding Companies
- Fields in the Company Register
- Working with Companies
- Shared Registers
- Closing Companies
- Connecting to a Single-User Database from Outside the Office
- "Admin Client" Mode
See also:
- Consolidation module - To be used to produce consolidated reports that include many or all Companies in a database
- Inter Company module - To be used when sending Invoices between Companies in a database
Go back to:
- Home page for System Module manual
- Home page for Standard ERP manual
Connecting to a Single-user Database from Outside the Office
This page describes connecting to a single-user database from outside the office using a home computer or mobile device.---
If you have a single-user database and are using Windows, you can connect to it from outside the office e.g. using a home computer or from a compatible (iOS or Android) mobile device. Follow these steps:
- Enter your VAT registration number in the Company Info setting in the System module.
- Ensure you have registered your database using the Automatic Internet Enabler method, as described on the Enabler Key page.
- An optional step is to specify a Sub-code. When you are out of the office and attempt to connect to your database, the connection will be made through your VAT registration number. If there are several separate databases with the same VAT registration number (e.g. they are running in different departments of an organisation such as a university), a secondary connection criterion (the Sub-code) will be used to ensure you are connected to the correct database.
To specify a sub-code, change to the Technics module, open the My IP Address setting and specify a Sub-code. This can be any arbitrary code to distinguish the database from the others with the same VAT registration number.
If 'Technics' is not included in the list of modules that is opened by the [Switch Module] button in a single-user system, the probable reason is that the Server option in the Configuration setting has not been selected.
- Change to the User Settings module and, on the 'Defaults' card of the Local Machine setting, make sure that you have turned off the No Server Mode when Idle option.
If the No Server Mode when Idle option is not selected, your Standard ERP database will go into "Server" mode if you have not being using it for ten minutes. The 'Idle Server Status' window will appear: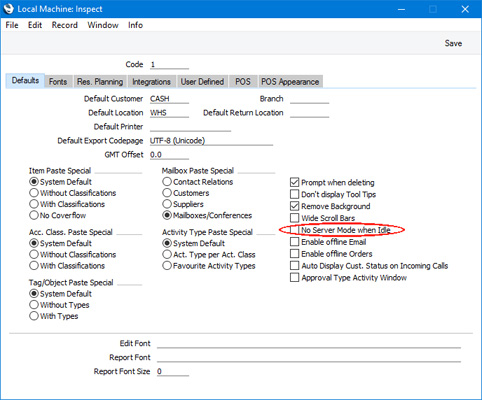
"Server" mode is only supported in Windows versions of Standard ERP.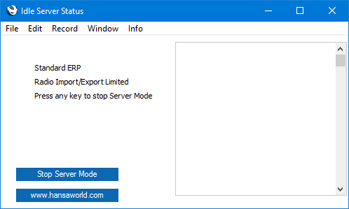
On returning to work, you can leave "Server" mode by pressing any key on your keyboard or the [Stop Server Mode] button in the 'Idle Server Status' window.
While your Standard ERP database is in "Server" mode, you can connect to it while away from the machine, subject to the computer's firewall allowing incoming connections to Standard ERP and to you being able to access the machine's IP address from outside the office. Depending on the operating system, you may be asked to allow incoming connections when you launch the application or when it goes into "Server" mode for the first time.
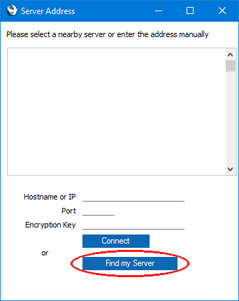
- Outside the office, launch Standard ERP on your home computer or compatible mobile device. When the 'Welcome to Standard ERP' window appears, select the [Connect to Existing Company] option and, when the 'Server Address' window opens, press the [Find my Server] button:
- An abbreviated 'Companies: Inspect' window will open, showing the fields from flip C of the full 'Companies: Inspect' window. Enter the Company details as they are in your single-user database, including the VAT registration number from step 1 above, the country where your company is registered in your HansaWorld contract and, if you specified one, the Sub-code from step 3. Use 'Paste Special' to choose the country of registration.
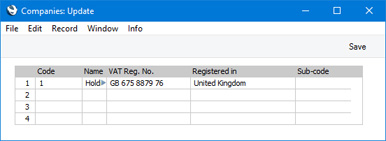
- On saving, you will be returned to the 'Welcome to Standard ERP' window. Press [Connect to Existing Company], [Find my Server] and [Save] again.
- The 'Login' window will appear. You have now connected to your single-user database and can log in as normal.
The Company register in Standard ERP:
- Introduction
- Adding Companies
- Fields in the Company Register
- Working with Companies
- Shared Registers
- Closing Companies
- Connecting to a Single-User Database from Outside the Office
- "Admin Client" Mode
See also:
- Consolidation module - To be used to produce consolidated reports that include many or all Companies in a database
- Inter Company module - To be used when sending Invoices between Companies in a database
Go back to:
- Home page for System Module manual
- Home page for Standard ERP manual
Klient administracyjny
W konfiguracji wielostanowiskowej większość czynności wykonana z aplikacji klienta zostanie zapisana na serwerze, a informacje będą od razu dostępne dla pozostałych klientów. Na przykład, modyfikacja ustawienia Drukarki z aplikacji klienta natychmiast wpłynie na działanie innych klientów. Wyjątek stanowią ustawienia: Adresy E-mail; Serwery POP3, Ustawienia bramki zewnętrznej w module Technicznym oraz Formaty dat i liczb, Ustawienia wydruku i kartoteka Firmy w module System.Powyższe ustawienia i kartoteki można modyfikować w bazie danych wprowadzając zmiany bezpośrednio z poziomu serwera lub z aplikacji klienta w trybie 'Klient administracyjny'. Drugą metodę można wykorzystać w sytuacji, kiedy serwer nie posiada interfejsu graficznego lub, gdy praca z poziomu serwera jest niewygodna (np. serwer znajduje się w innym budynku).
Aby uruchomić klienta w trybie 'Klient administracyjny' wybierz 'Firma' z menu Plik, następnie 'Otwórz kartotekę firm' z menu Specjalne oraz ponownie polecenie 'Klient administracyjny' z menu Specjalne. Aby zmodyfikować kartotekę Firmy na serwerze, zamknij okno 'Firmy:Podgląd', a następnie otwórz ponownie. System pokaże wówczas Firmy na serwerze. Po wprowadzeniu ustawień należy przejść z trybu 'Klient administracyjny' do trybu 'Zwykły klient' stosując taką samą sekwencję poleceń jak wcześniej.
! | Tryb 'Klient administracyjny' należy opuścić od razu po dokonaniu stosownych zmian w ustawieniach. |
Przed wybraniem trybu 'Klient administracyjny' należy upewnić się, że żaden klient nie jest zalogowany do bazy danych. Jeśli kartoteka Firmy zostanie zmodyfikowana to serwer zostanie zamknięty. Należy zamknąć również klienta.