Introduction to the Delivery Register
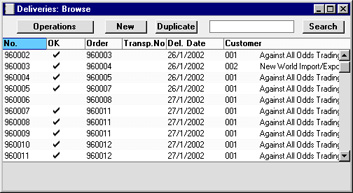
This register holds one record per Delivery. A Delivery is always connected with a Sales Order, and it can be either a full (final) Delivery or a part Delivery. The register cannot be used if the Sales Orders module is not present.To view Deliveries already entered, select 'Deliveries' from the Registers menu in the Stock module, or click the [Deliveries] button in the Master Control panel. The 'Deliveries: Browse' window is opened:
Entering a Delivery
A new Delivery must be created in the Sales Orders module. With a Sales Order open, select the 'Delivery' command from the Operations menu. This creates a new Delivery record. For the command to have any effect, all changes to the Sales Order must first have been saved (use the [Save] button). You can also create a Delivery by dragging an Order from the 'Orders: Browse' window to the 'Deliveries: Browse' window.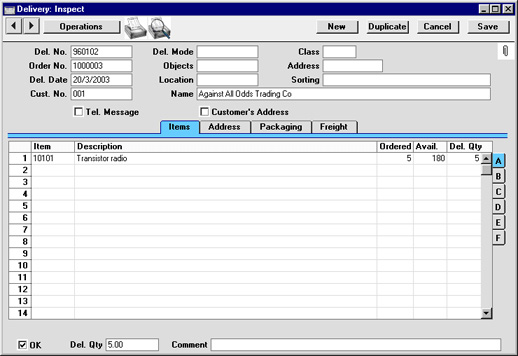
Entering a Delivery - Header
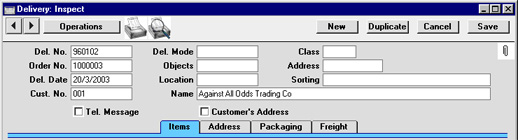
- Del. No.
- Paste Special
Select from another Number Series
- The serial number of the current Delivery. The default is the next unused number from the number sequence allocated on the 'Ser Nos' card of the user's Person record or from the Number Series - Deliveries setting. You may change this number, but not to one that has already been used.
- Del. Mode
- Paste Special
Delivery Modes setting, Sales Orders module
- The Delivery Mode from the Order. For each Delivery Mode record you can specify an appropriate description in different Languages: the Language for the Delivery (on the 'Freight' card) will therefore determine the translation to be printed on the Delivery Note.
- You can also set up different versions of the Delivery Note document for each Delivery Mode, perhaps incorporating appropriate payment instructions. To do this, enter the Delivery Mode in the Language field when defining documents. Document definition is described here.
- You can prevent Freight Labels being printed for Deliveries with particular Delivery Modes. To do this, check the Do Not Print Freight Labels option in the Delivery Mode record, using the setting in the Sales Orders module
- You can also set up different versions of the Delivery Note document for each Delivery Mode, perhaps incorporating appropriate payment instructions. To do this, enter the Delivery Mode in the Language field when defining documents. Document definition is described here.
- Class
- Paste Special
Order Classes setting, Sales Orders module
- Enter the Order Class for the Delivery (if any). Order Classes permit the analysis of Deliveries for reporting or prioritising. Note that the Order Class of the Sales Order is not transferred to the Delivery.
- Order No.
- The serial number for the Sales Order from which the Delivery record was created. This field cannot be changed.
- Objects
- Paste Special
Object register, Nominal Ledger/System module
- Default taken from Order, 'Date' card
- Up to 20 Objects, separated by commas, can be assigned to this Delivery and all transactions generated from it. You might define separate Objects to represent different departments, cost centres or product types. This provides a flexible method of analysis that can be used in Nominal Ledger reports.
- By default, the Objects entered here are taken from the Order from which the Delivery was issued, but they can be changed if necessary.
- In any Nominal Ledger Transactions generated from this Delivery, any Objects specified here will be assigned to the debit posting.
- Up to 20 Objects, separated by commas, can be assigned to this Delivery and all transactions generated from it. You might define separate Objects to represent different departments, cost centres or product types. This provides a flexible method of analysis that can be used in Nominal Ledger reports.
- Address
- Paste Special
Delivery Addresses setting, Sales Orders module
- If the Customer is one with several Delivery Addresses (e.g. it has several branches), these can be recorded in the Delivery Addresses setting in the Sales Orders module. Select the correct one for this Delivery using the 'Paste Special' function. The full Delivery Address will be brought in to the fields on the 'Address' card. Usually, only Delivery Addresses for this Customer and those with no Customer specified will be included in the 'Paste Special' list. If you would like all the 'Paste Special' list to contain all Delivery Addresses, check the Paste All Delivery Addresses box in the Order Settings setting in the Sales Orders module.
- Del. Date
- Paste Special
Current Date
- The date of the Delivery. This can default to the current date or to the Planned Delivery Date of the Order, depending on which Delivery Date Based On option has been selected on the 'Delivery' card of the Customer record.
- Location
- Paste Special
Locations setting, Stock module
- Default taken from Order
- The Location from which the Delivery is made. In calculating default Delivery Quantities for each row, the stock levels for each Item in the Location specified are referred to. If no Location is specified, the stock balance across all Locations will be checked, unless a Main Location has been specified in the Stock Settings setting. In this case, leaving the field blank means that the default Location will be used.
- A Location can be specified for any of the Delivery rows, overriding that entered here.
- This field must contain a value if the Require Location option is on in the Stock Settings setting.
- If the 'Item Status' window is on screen, the quantities shown will refer to the Location specified here.
- The Location from which the Delivery is made. In calculating default Delivery Quantities for each row, the stock levels for each Item in the Location specified are referred to. If no Location is specified, the stock balance across all Locations will be checked, unless a Main Location has been specified in the Stock Settings setting. In this case, leaving the field blank means that the default Location will be used.
- Sorting
- This field contains the Sort Key from the originating Order. This is for information only.
- Cust. No.
- The customer number from the Order. This field cannot be changed.
- Name
- The Customer Name from the Order.
- Tel. Message
- If it is necessary to remind your warehouse or delivery staff to call the Customer to arrange this Delivery, check this box. Depending on how your delivery documentation has been designed, an X can be printed to ensure this task is carried out.
- Customer's Address
- When you print a Delivery Note, Picking List or Freight Label for a Delivery, the address that will be printed will usually be the one shown on the 'Address' card of the Delivery record. Check this box if you would like the Invoice Address (from the 'Inv. Addr' card of the originating Order) to be printed instead.
Entering a Delivery - Items Card
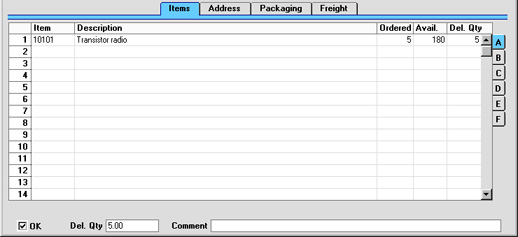
Flip A
- Item
- The Item Number from the Order. This field cannot be changed.
- Description
- The Item Name from the Order.
- Ordered
- The ordered quantity. This field cannot be changed.
- Avail.
- The quantity available in the selected Location at the moment when the Delivery is created. The field will be blank for Plain Items (Items for which a stock history is not maintained) and Service Items, as for these there is no stock balance figure. This field cannot be changed.
- The calculation of this figure is controlled by the Decrease Available on Deliveries options in the Stock Settings setting. The free stock figure for each Item can be reduced by the quantities on previous Deliveries when they are created or when they are approved. So, if the second option is used, the figure in this field will include delivery quantities from previous unapproved Deliveries.
- The calculation of this figure is controlled by the Decrease Available on Deliveries options in the Stock Settings setting. The free stock figure for each Item can be reduced by the quantities on previous Deliveries when they are created or when they are approved. So, if the second option is used, the figure in this field will include delivery quantities from previous unapproved Deliveries.
- Del. Qty
- As a default, Hansa assumes you wish to ship as many Items as possible. Therefore, for Stocked Items, if the stock balance is greater than the ordered quantity, the ordered quantity is suggested. Usually, if the balance is less than ordered quantity, the stock balance (in the selected Location) is suggested. If the balance is zero or negative, zero will be entered. For Plain and Service Items, as no stock balance figure is kept, the ordered quantity is always suggested.
- This figure can be changed if necessary: the change will also be recorded in the Del 1 and Del 2 fields of the relevant Order row.
- If you wish to prevent the shipping of a quantity greater than that in stock (i.e. if you do not want to allow negative stock), switch on the Do Not Allow Over Delivery option in the Stock Settings setting.
- If you would like the default value always to be the ordered quantity, even if there is insufficient stock, use the Always Deliver option in the Stock Settings setting.
- If you would like to be able to deliver a greater Quantity than was ordered, use the Allow Del Qty greater than Ordered option in the Stock Settings setting.
- This figure can be changed if necessary: the change will also be recorded in the Del 1 and Del 2 fields of the relevant Order row.
- Serial No.
- Paste Special
Serial Numbers of Items in stock
- If the Item uses Serial Numbers or batch numbers, a valid number must be entered here.
- For Serial Numbered Items, if the Order Quantity is greater than 1, the Delivery will contain an appropriate number of separate rows each with a Quantity of one to allow you to enter Serial Numbers individually. On returning to the Order, only the Serial Number of the last Item will be visible.
- If no Location is specified, the 'Paste Special' list will show the Serial Numbers of Items in all Locations, with an indication of the Location in which each Item is stored. However, if you have specified a Location in the header or on flip B of the 'Items' card, only those Serial Numbers stored in that Location will be shown.
- If you would like Best Before dates to be shown in the 'Paste Special' list, switch on the Show Best Before Dates option in the Item Settings setting in the Sales Ledger. Best Before Dates are entered using the Batch Specifications setting in the Stock module.
- The 'Paste Special' list will not be shown if you are using the No Serial No. on Goods Receipts option in the Stock Settings setting. In this case, you must still enter a Serial Number and the Quantity must still be one, but no check will be carried out that the Serial Number you have used is valid (i.e. one that is currently in stock).
- Note that Serial Numbers must be allocated manually: there is no automatic FIFO allocation. However, in the case of Items that use batch numbers, Serial Numbers will be brought in automatically if you are using the Automatically set Batch Number on Delivery option in the Stock Settings setting. If the Delivery is not approved immediately, batch Serial Numbers can be updated using the 'Refill Batch No. Items' function on the Operations menu.
- The Cost Price for Serial No option in the Cost Accounting setting in the Stock module controls how the choice of Serial Number affects the Row FIFO field on flip C and the value of any cost accounting element in the Nominal Ledger Transaction resulting from the Invoice. If this option is not in use, the oldest Cost Price will be added to the Row FIFO field, even where the Serial Number chosen is not the oldest one. If this option is in use, the actual Cost Price of the selected Serial Number will be added to the Row FIFO field.
- For Serial Numbered Items, if the Order Quantity is greater than 1, the Delivery will contain an appropriate number of separate rows each with a Quantity of one to allow you to enter Serial Numbers individually. On returning to the Order, only the Serial Number of the last Item will be visible.
- Best Before
- Default taken from
Batch SpecificationsBatch Specifications setting, Stock module
- In the case of perishable goods, enter a Best Before date here. The default is entered once a Serial Number has been chosen.
- Location
- Paste Special
Locations setting, Stock module
- A separate stock Location can be entered for each row of the Delivery.
- Recipe
- The Recipe for Structured Items is entered here. This field cannot be changed.
- Row FIFO
- This field records the FIFO value of the row and is calculated automatically when the Delivery is approved.
- Base Price
- This field shows the unit Base Price (retail price) of the Item in the home Currency, taken from the Item record.
- Coeff.
- Default taken from
Item
- The Unit Coefficient of the Item is shown here, taken from the 'Stock' card of the Item. If you are maintaining stock quantities using different units of measurement, this coefficient is the ratio between those units of measurement.
- Source
- Paste Special
Sources setting, Stock module
- Default taken from Order
- This field can be used to record the origin of the Item (e.g. the manufacturer).
- This field can be used to record the origin of the Item (e.g. the manufacturer).
- Despatch Date, Time
- The despatch date and time for this Delivery row can be recorded here.
- Objects
- Paste Special
Object register, Nominal Ledger/System module
- Default taken from Order row
- Up to 20 Objects, separated by commas, can be assigned to this Item and all transactions generated from it. You might define separate Objects to represent different departments, cost centres or product types. This provides a flexible method of analysis that can be used in Nominal Ledger reports.
- By default, the Objects entered here are taken from the Order row to which the Delivery row corresponds, but they can be changed if necessary.
- In any Nominal Ledger Transactions generated from this Delivery, any Objects specified here will be assigned to the debit posting. This assignment will merge these Objects with those of the parent Delivery (shown in the header). They will also be assigned to the credit posting if the Object for Stock Account option in the Cost Accounting setting is in use.
- Up to 20 Objects, separated by commas, can be assigned to this Item and all transactions generated from it. You might define separate Objects to represent different departments, cost centres or product types. This provides a flexible method of analysis that can be used in Nominal Ledger reports.
- Width, Height, Depth
- Default taken from
Item
- These fields contain the dimensions of the Item.
- If the Item is one that is sold by area or volume, you can have the Delivered Quantity calculated by multiplying the dimensions together. If you would like to use this feature, first check the Enable Quantity Calculation box in the Item Settings setting in the Sales Ledger. Then, check the Calculate Quantity box for the Unit that has been assigned to the Item. If the Item is sold by area, choose the Two Dimensions option in the Unit record, and the Delivered Quantity will be calculated once you have entered the Width and Height. If the Item is sold by volume, choose the Three Dimensions option in the Unit record, and the Delivered Quantity will be calculated once you have entered the Width, Height and Depth. Please refer to the page describing the Units setting for details and an example.
- Packages
- Enter the number of Packages for this row. This together with the Pack Type (below) can be printed on Delivery documentation to allow the Customer to ascertain quickly that the correct number and type of packages has been delivered. The total number of Packages for the Delivery is shown on the 'Packaging' card.
- P. Type
- Paste Special
Pack Types setting, Stock module
- Specify here the type of Package used to deliver this Item (e.g. envelope or box).
- Package Desc
- The Name of the Pack Type is shown here after you have entered the Pack Type above.
- Excise
- This field can be used to record any consignment or customs number of the outgoing shipment for this Item. This number can be printed on the Delivery Note and on the Invoice that relates to this Delivery.
- OK
- Check this box to approve the Delivery. When the approved Delivery has been saved it can no longer be altered. Stock levels may be amended, depending on the Decrease Available on Deliveries options in the Stock Settings setting (they are otherwise amended when the Delivery is created). If you have determined that cost accounting transactions are to be created at the point of delivery, stock transactions in the Nominal Ledger will now be raised (they may otherwise be raised after invoicing). Cost accounting transactions from Deliveries are described here.
- The Delivery must be approved before it can be invoiced from the Order.
- References in these web pages to approved Deliveries are to those whose OK check box is on.
- The Delivery must be approved before it can be invoiced from the Order.
- Del. Qty
- This shows the total number of Items delivered.
- Comment
- Any comment entered here can be printed on the Freight Label.
Entering a Delivery - Packaging Card

- Packages
- The number of packages used to make up the Delivery is calculated automatically from the number for each row (shown on flip F of the 'Items' card). Alternatively a total number of packages can be entered manually. This information can be printed on the Freight Label.
- Transport No.
- An optional transport number, e.g. bill of lading no. This information can be printed on the Freight Label and is shown in the 'Deliveries: Browse' window.
- Weight
- Default taken from
Items
- This field will contain a calculated value based on the Delivery Quantity and the Weight of the Items. If the Weight of one of the Items is changed or if this figure becomes inaccurate for any other reason, use the 'Calculate Weight' function on the Operations menu to update this field.
- Volume
- Default taken from
Items
- This field will contain a calculated value based on the Delivery Quantity and the Volume of the Items. If the Volume of one of the Items is changed or if this figure becomes inaccurate for any other reason, use the 'Calculate Weight' function on the Operations menu to update this field.
- From City
- If appropriate, specify here the city from which the Delivery is to be made. This information can appear on delivery documentation.
- To City
- If appropriate, specify here the city to which the Delivery is to be made. This information can appear on delivery documentation.
- From Dock
- If appropriate, specify here the port or airport from which the Delivery is to be made. This information can appear on delivery documentation.
- To Dock
- If appropriate, specify here the port or airport to which the Delivery is to be made. This information can appear on delivery documentation.
- Transport Directives
- If appropriate, enter any special handling instructions for the Delivery here. This information can appear on delivery documentation.
Entering a Delivery - Address Card
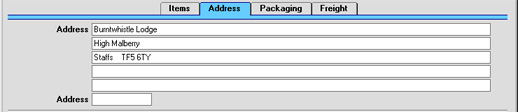
- Address
- Default taken from
Sales Order
- The Delivery Address, taken from the 'Del Addr.' card of the Order which, in turn, is taken from the 'Delivery' card of the Customer. It can be changed for this Delivery if necessary.
- The lower Address field is a repeat of that in the header. If the Customer is one with several Delivery Addresses use the 'Paste Special' list to select the correct one. The full Delivery Address will be brought in to the fields above.
Entering a Delivery - Freight Card
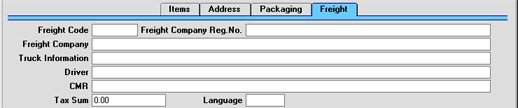
- Freight Code
- Paste Special
Freight Companies setting, Stock module
- The Freight Code refers to a record in the Freight Companies setting where information is stored regarding the courier or haulage companies that your business uses to deliver goods to its Customers. In some countries, it is a legal requirement that this information be printed on Delivery documentation.
- Enter the appropriate Freight Code of the Freight Company used for this Delivery. When it is entered, the Freight Company Registration Number, Freight Company, Truck Information, Driver and CMR Text are brought in from the Freight Companies setting. They can be changed here for this Delivery only. For descriptions of these fields, please refer to the page describing that setting here.
- Enter the appropriate Freight Code of the Freight Company used for this Delivery. When it is entered, the Freight Company Registration Number, Freight Company, Truck Information, Driver and CMR Text are brought in from the Freight Companies setting. They can be changed here for this Delivery only. For descriptions of these fields, please refer to the page describing that setting here.
- Tax Sum
- When defining VAT Code records using the setting in the Nominal Ledger, it is possible to specify that an additional tax, such as an environmental tax, be levied. If the VAT Code of any of the rows of the originating Order is one where such an additional tax has been defined, the amount of that tax will be shown in this field. The figure is shown here for information only.
- Language
- Paste Special
Languages setting, System module
- Default taken from Sales Order
- The Language Code determines the text to be transferred from various registers and settings, for example the Item Name, text for Delivery Terms and Delivery Mode, and the selection of document forms etc. Leave the field blank to use the home Language.
Inspecting and Approving Deliveries
Before a Delivery goes out it needs to be prepared and approved. The first step is to print the Picking List. This is done by clicking the Printer icon in the Button Bar. When the Delivery is finally OK, click the OK check box and press the [Save] button. Once this has been done, you will no longer be able to modify the Delivery. You will then be able to create an Invoice for the Delivery (from the Order screen).You can also approve several Delivery records at once by highlighting them in the 'Deliveries: Browse' window and selecting 'OK' from the Operations menu. To highlight several Delivery records, click on the first Delivery to be approved, hold down the Shift key and click on the last.
On approval, stock levels may be amended, depending on the Decrease Available on Deliveries options in the Stock Settings setting (they are otherwise amended when the Delivery is created). Also, if defined in the Sub Systems setting in the Nominal Ledger, a cost accounting Transaction will be created in the Nominal Ledger. Please refer here for details of the Accounts used by this Transaction.
Nominal Ledger Transactions From Deliveries
When a Delivery record is approved and saved, a Nominal Ledger Transaction will be generated automatically if you have so determined in the Sub Systems setting in the Nominal Ledger, if a Cost Model has been chosen and if at least one of the Items on the Delivery is a Stocked Item. Please refer here for full details of this Transaction.If a Delivery contains several Items that use the same Cost and/or Stock Account, the resulting Nominal Ledger Transaction can contain separate double-sided postings for each Item, or a single accumulated posting. If you would like to use the first method, check the Separate Transaction rows per Item box in the Cost Accounting setting.
Once the Transaction has been generated, you can look at it straight away using the Open NL Transaction' function on the Operations menu.
Deliveries from the Sales Ledger
It is possible to deliver goods from stock without a Delivery. This can be done by entering Invoices directly to the Invoice register (i.e. without first entering a related Sales Order). On the 'Delivery' card of the Invoice, there is an Update Stock check box, which will be on by default if the Invoice Update Stock option in the Account Usage S/L setting is on. If it is on, an Invoice for a Stocked Item will generate an "invisible" Delivery transaction. The result of such an event is that the stock balance of the Item is altered, but there will be no Delivery transaction generated in the Delivery register. The stock change is, however, visible in the Item History report in the Stock module. If you are using cost accounting (maintaining stock values in the Nominal Ledger), stock postings (the equivalent of those in Transactions generated from Deliveries) will be included in the Transaction created from the Invoice.The Invoice Update Stock check box is only relevant for Deliveries issued from an Invoice (i.e. when there is no related Sales Order).
Printing Picking Lists and Delivery Notes
If you click the Printer icon in the Button Bar with a Delivery in the active window, a document will be printed. If the Delivery is not approved, a Picking List is printed. If the Delivery is approved, a Delivery Note is printed. If you want to print to screen, click the Preview icon.To print Delivery Notes or Picking Lists in batches, click the [Documents] button in the Master Control panel or select 'Documents' from the File menu. Double-click 'Delivery Notes' or 'Picking Lists' in the 'Documents' list window. Indicate the Delivery Number (or range of Delivery Numbers) to be printed and press [Run].
Delivery Notes can also be printed automatically on approval. This is controlled using the Auto Actions setting in the System module.
However Picking Lists or Delivery Notes are printed, the Form used is determined as follows:
- Using the Form register in the System module, design the Delivery Note or Picking List as appropriate and name it "DELIVERY_NOTE" or "PICKING_LIST". Use the 'Properties' function on the Operations menu to assign Document Types of "Delivery Note" and "Picking List" respectively. Samples are supplied with Hansa: these can be modified to suit your requirements. You might want to design different Forms for use with different Languages or Delivery Modes.
- Select the Stock module using the Modules menu.
- Click the [Documents] button in the Master Control panel or select 'Documents' from the File menu. The 'Documents' list window is opened: highlight 'Delivery Notes.
- Select 'Define Document' from the Operations menu.
- In the subsequent window, enter "DELIVERY_NOTE" in the Form field of the first line (you can use 'Paste Special' to ensure the spelling is correct).
- If you have designed different Forms for use with different Languages or Delivery Modes in step 1 above, enter the Form Code of each one on separate rows in the grid. In the Lang. field of each row, enter the appropriate Language or Delivery Mode. 'Paste Special' can be used to open a list of Languages from which the correct one can be chosen.
- Click [Save] to save the Form definition.
- Repeat steps 3-7 above, this time highlighting 'Picking Lists' in the 'Documents' list window and entering "PICKING_LIST" in the 'Define Document' window. From now on, the Forms that you have designed will be used, from the 'Documents' function and from the Printer icon. "PICKING_LIST" will be used when a Delivery is not approved, otherwise "DELIVERY_NOTE" will be used. If you have designed more than one Form, the correct one will be used depending on the Language of the Customer or the Delivery Mode of the Delivery.
Operations Menu

Operations Menu - OK
This command is available on the Operations menu only from the 'Deliveries: Browse' window. It permits the approving of a Delivery and is therefore the equivalent of checking the OK box in the Delivery record. You can also select several Deliveries (hold down the Shift key to select a range of Deliveries in the list) and approve them all at once. Remember that, if so defined in the Sub Systems Error in Link (HW0303DEL_Nominal,Nominal Ledger Transactions to be created for each Delivery in the selection and that therefore once it has been carried out you will no longer be able to modify those Deliveries. Stock levels may be amended, depending on the Decrease Available on Deliveries options in the Stock Settings setting (they are otherwise amended when the Delivery is created).Operations Menu - Print Freight Labels
Select this command to print Freight Labels for the current Delivery. Freight Labels can also be printed using the 'Documents' function or automatically on approval. The last option is controlled using the Auto Actions setting in the System module.You can prevent Freight Labels being printed for certain Items. To do this, place these Items in an Item Group whose Do Not Print Freight Labels for this Group option is switched on.
You can also prevent Freight Labels being printed for Deliveries with particular Delivery Modes. To do this, check the Do Not Print Freight Labels option in the Delivery Mode record, using the setting in the Sales Orders module.
Operations Menu - Calculate Weight
When a Delivery is created from a Sales Order, its total Weight and Volume is shown on the 'Packaging' card, calculated from the Delivery Quantity and from the Item records. If the Weight or Volume of an Item is changed or if these figures become inaccurate for any other reason, they can be recalculated using this function.Operations Menu - Open NL Transaction
Once a Delivery has been approved and saved, if so defined in the Sub Systems setting in the Nominal Ledger, a Nominal Ledger Transaction is created. This function allows you to view that Transaction.On selecting the function, the Transaction will be opened in a new window.
Operations Menu - ASG Export
This function is used in Sweden. Please refer to your local Hansa representative for details.Winedi eksport
Seda funktsiooni kasutatakse Norras. Lähemalt küsi palun oma HansaWorldi esindajalt.Operations Menu - Refill Batch No. Items
If you are using the Automatically set Batch Number on Delivery option in the Stock Settings setting, Serial Numbers and Best Before Dates will be brought in automatically whenever you create a Delivery. This applies to Items that are Serial Numbered at the Batch level only. If you do not approve the Delivery immediately, these default Serial Numbers may become incorrect. You can update them using this function.For example, you have in stock a batch of ten Items with Serial Number 1 and a batch of ten with Serial Number 2, and you receive an Order for eight. When the Delivery is created, it will contain one row with a Delivery Quantity of eight and Serial Number 1. This Delivery is left unapproved and you then receive a second Order for three. The resulting second Delivery will contain one row with a Delivery Quantity of three and Serial Number 1. If either of these Deliveries is approved, the other will become incorrect. For example, if the first Delivery is approved, you will only have two items with Serial Number 1 left. So, when you come to approve the second Delivery, you will be warned that you have insufficient stock. You can then apply this function. The Delivery Quantity of the first row will be changed to two, and a second row will be added, with a Delivery Quantity of one and Serial Number 2.
For this function to have any effect, three conditions must be met:
- The Automatically set Batch Number on Delivery box in the Stock Settings setting must be checked.
- You must place the cursor in the row with the incorrect Serial Number. So, in a large Delivery, you may need to use this function several times.
- Usually, when the time comes to approve a Delivery, you will try to do so without checking stock levels. When you check the OK box and save, you will be warned that you have insufficient stock. This warning will place the cursor in the appropriate row, thus satisfying condition 2 above. However, you must then remove the check from the OK box before you can use this function successfully.
Operations Menu - Return Goods
This function is used when goods that you have delivered to your Customer are returned to you. When this happens, open the Delivery and select 'Return Goods' from the Operations menu. For the function to have any effect, all changes to the Delivery must first have been saved (use the [Save] button), and it must have been approved. An alternative method is to open the Order from which the Delivery was created and select 'Returned Goods' from the Operations menu.If you are using a FIFO stock system and/or cost accounting (maintaining stock values in the Nominal Ledger), the difficulty with the returning of goods to stock is that the system cannot know the actual cost (FIFO value) of the goods being returned. The purpose of the Returned Goods register is to allow the user to intervene in this process, so that the correct FIFO values can be recorded.
A new record is created in the Returned Goods register (in the Stock module). It is opened in a new window, entitled 'Returned Goods: Inspect'. This means that it has been created and saved and is being opened for amendment and approval.
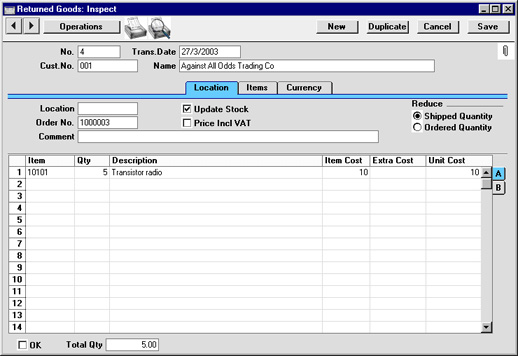
Enter the returned Quantity for each Item and remove any Items not returned by clicking on the row number to the left and pressing the Backspace key. If necessary, change the Cost Price to the true value of the returned Item.
If an Item being returned is a Structured Item, you should list its components in the Return, not the Structured Item itself. Structured Items are built the moment the Delivery is made and are not kept in stock themselves. Therefore, they should not be included on a Return. Only the components should be listed on the Return: this will ensure they are correctly received back into stock.
If the goods were returned because they were faulty (i.e. the Customer requires a replacement), choose to reduce the shipped quantity using the options on the right-hand side of the screen. Then, once the Returned Goods record has been approved, you can reopen the Order and raise another Delivery for the appropriate quantity to fulfil the Order. In this instance you may choose not to update the stock levels and to write off the Items using the Stock Depreciation register. If you need to return the Items to your Supplier, it is recommended that you update stock levels and then enter a Stock Depreciation record.
Alternatively, the goods may have been returned without a replacement being required (perhaps the Order has been cancelled). In this case, choose to reduce the ordered quantity and to update stock levels. Once the Returned Goods record has been approved, on viewing the Order both the Order Quantity and the Delivery Quantity will have been reduced. If the Order has been invoiced, selecting 'Invoice' from the Operations menu of the Order screen once again will create an Invoice for a negative quantity, effectively crediting the original Invoice. An alternative method of crediting the original Invoice is to use the 'Create Credit Note' Operations menu function on the Returned Goods screen. This will create a Credit Note with appropriate Payment Terms and a reference to the Invoice being credited.
When the Returned Goods record is complete, click the OK check box. This signifies that the Return has been approved. Once this has been done, you will no longer be able to modify the Returned Goods record. You will not be able to raise a credit Invoice for the goods that have been returned until the record has been approved. A stock transaction in the Nominal Ledger will be created if you have so determined using the Sub Systems setting in the Nominal Ledger.
A possible method of working might be to generate a Returned Goods record when the Customer contacts you to send back the delivered Items. The Number of the Returned Goods record can then be issued as a Returns Number. When the Items arrive, the record can be approved: this will alter the stock levels accordingly.
Please click here for a full description of the screen, including detailed information about any Nominal Ledger Transactions created when the Return is approved.
To close the screen and return to the Delivery, click the close box. You will be asked if you want to save any changes. The Del 1 and Del 2 fields of the originating Order (visible on flip D) will be updated automatically (as will the Order Quantity on flip A if you have so chosen).
Trüki lao komplekteerimisleht
Seda funktsiooni kasutatakse koos Laohalduse mooduliga. Sellisel juhul koostatakse Lähetused hooldusfunktsiooniga Koosta tellimustest lähetused. Sama funktsiooniga koostatakse Laoliikumised, millega tõstetakse kaup nende Asukohast Laos Noppepiirkonda lähetuseks. Selle funktsiooniga saad trükkida välja Komplekteerimislehe, millel näed Artiklite asukohta laos. Komplekteerimislehe alusel saavad laotöötajad viia kauba Noppepiirkonda lähetuseks. Ekraanile avatud Komplekteerimislehelt saad avada Laoliikumise, millel saad vajadusel muuta Asukoha (eeldusel, et Laoliikumine ei ole märgitud Vastu võetuks).Koosta tagastatud kaubad
Seda funktsiooni kasutatakse, kui Klient tagastab lähetatud kaubad. Ava Lähetus ja vali Operatsioonide menüüst käsklus Koosta tagastatud kaubad. Selle funktsiooni kasutamiseks peab Lähetus olema salvestatud ja kinnitatud. Võid avada ka Tellimuse, millest Lähetus koostati ning valida Operatsioonide menüüst käskluse Koosta tagastatud kaubad, eeldusel et Kuluarvestuse seadistuses ei ole märgitud valikuid Algne laosisset. ostuhind tagast. kaupadel ja Sisesta kulujärjekorda algsele positsioonile ja/või Tellimuste seadistuste valikut Ära luba tellimusest koostada tagastatud kaupade kaarti.Kuluarvestuse seadistuse valik Algne laosisset. ostuhind tagast. kaupadel. Näiteks Kulujärjekorra kulumudeli (FIFO või LIFO) puhul tuleb kaup võtta tagasi lattu väärtusega, mis oli sellel lähetuse hetkel. Kaalutud keskmise või Ostuhinna kulumudeli korral võivad lähetuse ja tagastuse vahepeal Kaalutud keskmine või Ostuhind muutuda.
Funktsiooni käivitamisel koostatakse Tagastatud kaupade registrisse uus kaart (Laomoodulis). See avatakse omaette aknas Tagastatud kaubad: Vaata. Kaart on salvestatud ning nüüd võid seda muuta ja kinnitada.
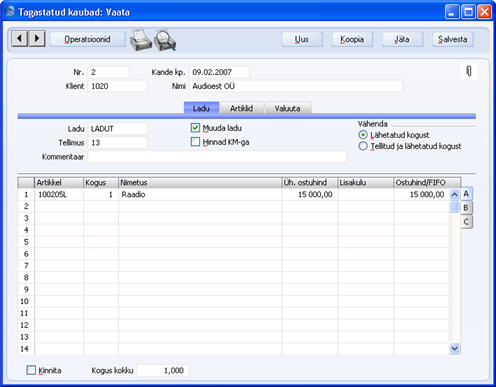
Sisesta tagastatud kogused ja kustuta Artiklid, mida ei tagastatud, klõpsates reanumbril ja vajutades Backspace-klahvi. Lähetatud kogusest suuremat kogust tagastada ei saa. Kui Kuluarvestuse seadistuses ei ole märgitud valikuid Algne laosisset. ostuhind tagast. kaupadel ja/või Sisesta kulujärjekorda algsele positsioonile, saad vajadusel tagastatud kauba Ühiku ostuhinda muuta või määrata kauba Lattu tagasi võtmisel tekkinud Lisakulu.
Kui tagastatav Artikkel on Struktuurartikkel, pead Tagastamisele märkima selle komponendid, mitte Struktuurartikli. Struktuurartiklid komplekteeritakse lähetamise hetkel ning neid ei hoita Laos. Seega ei saa neid ka tagasi Lattu võtta. Tagastatud kauba kaardil näidatakse ainult Struktuurartikli komponendid, mis Lattu tagasi võetakse
Kui kaup tagastati mingi vea või defekti tõttu (st Klient soovib asenduskaupa), märgi valik Vähenda lähetatud kogust kaardi paremas servas. Kui oled Tagastamise kinnitanud, võid avada Tellimuse ning koostada sellest uue Lähetuse vastava koguse kohta. Sellisel juhul võid Artiklite laoseise mitte muuta ning Artiklid Laost maha kanda. Kui pead Artiklid oma Hankijale tagastama, on soovitatav need siiski esmalt Lattu tagasi võtta ning seejärel koostada Tagastamine hankijale (kui kaup osteti Ostutellimuse alusel) või Laomahakandmine (kui Ostutellimust ei ole).
Kui asenduskaupa ei soovita, (nt Tellimus tühistati), märgi valikud Vähenda tellitud kogust ja Muuda ladu. Kui Tagastamise kaart kinnitatakse, vähendatakse Tellimusel nii tellitud kui lähetatud kogused. Kui Tellimusest on väljastatud Arve, koostatakse nüüd kreeditarve Arve Operatsioonide menüü käsklusega Koosta kreeditarve (Arve on Lähetuse ja Tellimusega seotud Kirjaklambriga). Selle käsklusega koostatakse sobiva Tasumistingimusega Kreeditarve viitega krediteeritavale Arvele. Arve krediteerimiseks võid kasutada ka Tagastatud kaupade Operatsioonide menüü käsklust Koosta kreeditarve.
Kui Tagastatud kaupade kaart on valmis, kinnita see. Kinnitatud kaarti ei saa enam muuta. Tagastatud kaupade kohta ei saa Kreeditarvet koostada enne, kui Tagastamine on kinnitatud. Kui oled vastavalt seadistanud Allsüsteemide seadistuses Finantsis ning seadistuses Numbriseeriad - Tagastatud kaubad koostatakse Tagastamise kaardi kinnitamisel sellest Kanne.
Tagastamise võid sisestada kohe, kui Klient kauba tagastamise soovist teatab. Kui kaup kohale jõuab, kinnitatakse kaart, millega muudetakse ka Artiklite laoseisud.
Palun loe lähemalt Tagastatud kaupade ja Kannete kohta.
Sulge aken sulgemisruudust. Nüüd näed ekraanil taas Lähetust. Programm küsib, kas soovid muudatused salvestada. Lähetatud kogused Tellimuse D osal muudetakse automaatselt (nagu ka kogus Tellimuse A osal, kui oled märkinud vastava valiku). Muudatuste nägemiseks võib olla vajalik Tellimus sulgeda.
Operations Menu - Item Status
This function provides instant feedback for the Item shown in the Delivery row containing the cursor or highlighted in the 'Paste Special' window listing Items. Information displayed in a new window includes the quantity in stock, the quantity on order and the quantity shippable.Please click here for full details of this function.
Jaga rida
Kui seerianumbreid kandvate Artiklite puhul on Tellimuse kogus suurem kui üks, sisestub Lähetusele vastav arv ridu kogusega ‘1’, mis võimaldab igale Artiklile tema seerianumbri märkida. Tellimusel näed vaid viimase Artikli seerianumbrit.Partiinumbreid kandvate Artiklite puhul on Lähetusel üks rida, millel näed kogust Müügitellimuselt. Võid sisestada vaid ühe Seeria-/Partiinumbri, kui antud Artiklit on Laos piisav kogus. Kui kaupa ei ole laos piisavalt, näed Lähetuse salvestamisel ekraanil hoiatust. Sellisel juhul anna antud käsklus. Rida jagatakse kaheks ning uuele reale saad määrata teise Seerianumbri. Mõlemad lähetuseread jäävad algse tellimusereaga seotuks ning rea Lähetatud kogused on õiged.
Seda funktsiooni saad kasutada eespool kirjeldatud funktsiooni Täida partiinumbrid asemel, kui Laoseadistustes pole märgitud valikut Automaatne partiinumber lähetusele. Toome sama näite. Laos on 10-ne partii Seerianumbriga 1 ja 10-ne partii Seerianumbriga 2. Tellitakse 8 artiklit. Lähetusel on üks rida Lähetatud kogusega 8 ja automaatselt sisestub Seerianumbriks 1, kui oled märkinud valiku Automaatne partiinumber lähetusele. Kui seda valikut märgitud ei ole, vaikimisi Seerianumbrit ei anta, kuid selle saad valida Ctrl-Enteriga ise. Lähetust ei kinnitata. Seejärel saad uue tellimuse, seekord kolme artikli kohta. Uue tellimuse kohta koostataval Lähetusel on üks rida Lähetatud kogusega 3 ja, olenevalt valikust Automaatne partiinumber lähetusele, sisestub Seerianumber 1 automaatselt või sisestad selle ise. Ühe Lähetuse kinnitamisel muutub teine valeks. Näiteks kui Sa kinnitad esimese Lähetuse, jääb lattu vaid 2 artiklit Seerianumbriga 1. Kui nüüd soovid kinnitada ka teist Lähetust, näed hoiatust, et laos ei ole piisavalt kaupa. Seepeale käivita antud funktsioon. Esimese rea Lähetatud kogus vähendatakse kaheks ning lisatakse teine rida kogusega 1. Uuele reale vaikimisi Seerianumbrit ei sisestu; vali Ctrl-Enteriga Seerianumbriks 2.
Nagu ka funktsiooni Täida partiinumbrid puhul, aseta hiirekursor vale Seerianumbriga reale. Suurel Lähetusel võib olla vajalik funktsioon käivitada mitu korda.
Ära unusta enne funktsiooni käivitamast võtta maha valik Kinnita.