Introduction to Exports in the System Module
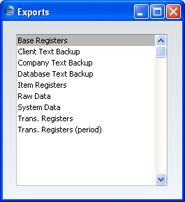
You can export several different types of data from FirstOffice. You can incorporate the exported information in external programs such as spreadsheets, word processors etc. Apart from those created by the Back-up functions, all exports are output in simple text format, with fields separated by tabs.To produce an export file, select the 'Exports' item on the File menu or click the [Exports] button in the Master Control panel. The window illustrated below appears. This lists the Exports that you can produce from the System module. Double-click the appropriate item. A specification window will then appear, where you can decide the contents of the export file. Click [Run] and a 'Save File' dialogue box will appear, where you can name the file and determine where it is to be saved.
Company Text Backup, Database Text Backup
These functions provide you with an effective way to back up your data. They copy all data from the program to a separate file. You can also copy or duplicate the database file (1office.HDB) on your hard disk, but FirstOffice's method has two advantages:- The back-up file takes up very little space.
- The back-up file is independent of the program version. IT CAN ALWAYS BE USED, whereas a new version of the FirstOffice program (for reasons of internal updates in the program) may have difficulties in reading old database files.
! | Use FirstOffice's built-in back-up feature to guarantee a successful restoration. |
This is how you back up your data:
- In the System module, select 'Exports' from the File menu or click the [Exports] button in the Master Control panel. The 'Exports' list is shown.
- Select 'Company Text Back-up' (if you wish to back up the data in the database relating to the single Company currently selected) or 'Database Text Back-up' (if you wish to back up the whole database) in the 'Exports' window and press the Enter key. In a single-user system, you can use the [Backup] button in the Master Control panel as a short cut to the 'Database Text Back-up' option.
Usually you should use the 'Database Text Back-up' option, as this is the only choice that backs up the entire database. You must use it regularly for your safety and peace of mind. Some registers and settings (e.g. the Configuration setting and, if you are using the CRM and Mail Value Pack, Mailboxes and Conferences) are stored at database level, not Company level. These will not be exported by the 'Company Text Back-up' option, even if your database only contains a single Company. The 'Company Text Back-up' option is intended for use in the situation where you need to move all the information relating to a specific Company from one database to another.
In a multi-user system, you cannot use the 'Database Text Back-up' option on a client machine. You can only use it on the server machine, when no other user is logged in. On the server, select 'Quit, Remove Autoserver' from the File menu and restart FirstOffice. Then, choose the System module using the [Select Module] button in the Master Control panel. If it is not convenient to work from the server, use the Timed Operations setting in the Technics module. This will be the case if your server does not have a graphical interface, or if it is in another room or building.
- The "Specify Text Backup" window appears where you can describe the back-up file using up to 40 characters. This description will be shown in the list of importable files shown by the 'Imports' function. Click [Run] to proceed.
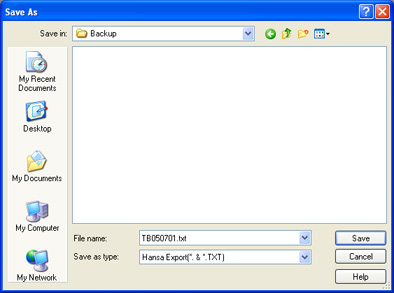
- FirstOffice opens a standard dialogue box where you can name and place the export file. Enter the name of the file in the filename area and locate it in the appropriate directory in the usual way.
The name of the back-up should include the date the back-up was made (e.g. TC0711 for Training Company and date). If you are intending to restore from the back-up file using the 'Automatic' function, add a .txt extension but do not include any spaces or other non-alphabetic characters in the file name (the 'Automatic manual file search' function can import files with names that include non-alphabetic characters and without extensions). Then, click [Save].
It is recommended that you store the back-up file in a folder or directory named "Backup" which should be in the same folder or directory as the FirstOffice application. All back-up files in this folder will be shown in a list of importable files if it becomes necessary to restore from a back-up.
- A message window informs you about the progress of the export.
- When the export is finished, you are brought back to the 'Exports' list. Close it using the close box.
! | Make a rule to take a safety back-up EVERY DAY! Your database can be damaged, through hardware failures, power cuts and other reasons. A back-up file is a safety guarantee against loss of data and loss of work, should anything go wrong. |
Note that, for reasons of security and unlike the other export files produced by FirstOffice's Export functions, the files created by the 'Company Text Backup' and 'Database Text Backup' functions are encrypted files, not text files.
Company Text Backup, Database Text Backup - Restoring from a Back-up
To restore from a back-up, you must first create a new database. Then import the back-up file using the 'Imports' function on the File menu in the System module.Restoration from a safety back-up is a non-destructive process, i.e. the back-up file is not affected by the reading process. This means that you can use the same back-up file more than once.
Restoring from a back-up is done in the following way:
- Move the old database (named "1Office.HDB") to another folder/directory, to avoid mixing things up. Rename it so that you know what it contains.
- Delete the database file "1Office.HDB" from the folder or directory with your FirstOffice application, but make sure that the "DBDef.txt" and "Default.txt" files are present in that folder. Double-clicking the FirstOffice application now will force it to create a new database.
!
It is important to restore to a new, empty database, to avoid mixing the restored data with the old, damaged database.
- In the System module, choose 'Imports' from the File menu. The 'Imports' window is shown.
- Select 'Automatic' and press the Enter key (or double-click on 'Automatic').
FirstOffice opens a list of back-up files. To be included in this list, a back-up file must be stored in the "Backup" or "Setup" folder or directory which should be in the same folder or directory as the FirstOffice application.
In the list, the filename of each back-up file is shown together with the date it was saved and any comment added when it was created (see step 3 in the previous section).
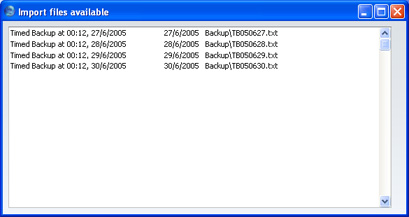
- Highlight the file you want to import (the back-up to which you wish to revert) and press the Enter key (or double-click on the name of the file).
- A message window informs you about the progress of the import.
- When the import has finished, FirstOffice will shut down for reasons of security if the imported file contains any Person register records. Restart the program and you will then be ready to continue working.
! | Copy the old database to another folder/directory or remove it, to avoid mixing things up. |
If the Restoration Appears to Fail
Files whose name contains a space will be shown in the list of available back-up files, but FirstOffice will not be able to import them successfully. If the name of your back-up file contains a space (or it is not shown in the list of available files because it is not stored in the "Backup" or "Setup" folder or directory, or because its name does not have a .txt extension), continue with these steps:
- If it is still open, close the list of available import files using the close box.
- In the System module, choose 'Imports' from the File menu. The 'Imports' window is shown:
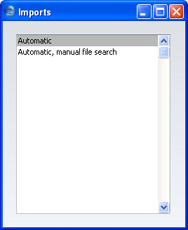
- Select 'Automatic, manual file search' and press the Enter key (or double-click on 'Automatic, manual file search').
FirstOffice opens a standard dialogue box with a list of the files in the current folder of the current volume. To find the back-up file, scroll through the list or select another folder or volume in the normal way.
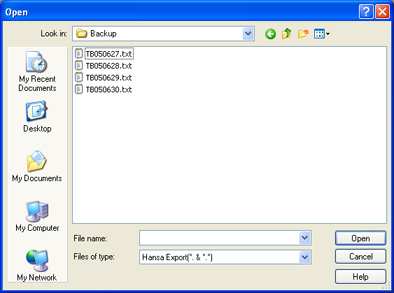
- Once you have found the file you want to import (the back-up to which you wish to revert) and click [Open] or [Select] (depending on the operating system), or double-click on the name of the file.
A message window informs you about the progress of the import.
- When the import has finished, FirstOffice will then close for reasons of security if the back-up file contains at least one record in the Person register. Restart the program: you are now ready to continue working.
Client Text Backup
You should use this function on client machines only for backing up information that is stored locally. This information will not be included in the normal daily back-up file made from the server. As very little is stored locally (e.g. Companies), the resulting back-up file will usually be very small. For example, window settings saved by each user using the 'Save Normal Position' function on the Window menu (i.e. window positions, sizes and sort orders) are stored on the client machines. All information in the User Settings module is also stored on the client machines. Company information is also stored on client machines, so if there are several Companies in a client (i.e. it is capable of logging on to several servers), then it is advisable to create a Client Text Backup periodically.If the local machine has not been backed up before, you must create a second Company, to be used for backing up only. Follow these steps:
- Select 'Company' from the File menu. The 'Select Company' window appears. Select 'Open Company Register' from the Operations menu.
- The 'Companies: Inspect' window appears. On the second row, enter a new Company. This should be a local Company, so leave the TCP/IP and Port fields blank.
- Save the new Company by clicking the [Save] button in the Button Bar. For security reasons, FirstOffice quits automatically. Restart FirstOffice, and choose to use the new, second, Company. You might wish to enter a single record in the Person register with a password, again for security reasons.
- If you are on the logged on to the server, quit FirstOffice.
- Restart FirstOffice and choose to use the second Company. You cannot change Companies using the 'Company' function on the File menu because the two Companies are on different machines.
Client Text Backup - Restoring from a Client Text Back-up
Whenever you update to a new version of FirstOffice, the new version should be installed on the server and all clients, as described here. If there are several Companies in the client (i.e. it is capable of logging on to several servers), it will probably be easier for you to recreate them by importing the Client Text Backup file into the new client database rather than by typing them in to the Company register manually. Also, if special window settings and/or settings in the User Settings module have been saved on a local machine, you may want to ensure these are still used after the update. To do this, you should import the Client Text Backup file that you created from the old version following the instructions above. If you do not have any special window settings, have not used the User Settings module and if the Company register is easy to recreate manually, there is no need to import a Client Text Backup file, because no other important information is stored locally.Importing a Client Text Backup is done on the client machine in the usual way. Install the new version of FirstOffice on the client, ensure there is no 1Office.HDB file in the folder containing the program and start the program. If the 'Import files available' window appears, import the Client Text Backup from there. Otherwise, change to the System module using the [Select Module] button in the Master Control panel, and select 'Imports' from the File menu.
When the import finishes, you will need to quit FirstOffice and restart before you can log in to the server.
Base Registers
In a similar manner to the 'System Data' export, this function allows you to export the records from any base register.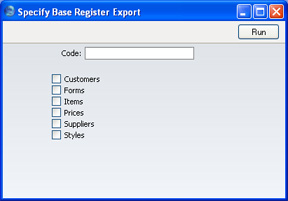
Files created by this export can be imported to other FirstOffice Companies or databases using the 'Automatic' or 'Automatic manual file search' import functions in the System module.
Item Base Registers
In a similar manner to the 'System Data' export, this function allows you to export the records from any base register related to Items.Some of the registers in the 'Specify Base Registers Export' window may not be used in your version of FirstOffice. An attempt to export information from registers not present will result in an empty file.
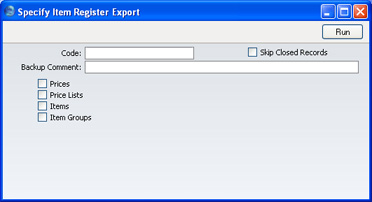
Files created by this export can be imported to other FirstOffice Companies or databases using the 'Automatic' or 'Automatic manual file search' import functions in the System module.
Raw Data
This export is used for system maintenance, and requires a FirstOffice system expert to be used correctly.If the database has somehow become damaged, you will be prompted to create a Raw Data export. You should do so, and you should then attempt to create a Database Text Backup as well. The Raw Data option exports data in byte order, while the Database Text Backup exports data in record order, on a register-by-register basis.
You can import a Raw Data export file in the usual way, using the 'Automatic' or 'Automatic manual file search' options. However, because of the way the Raw Data export file is structured, no indexes will be created. Therefore, as soon as the Raw Data file has been imported, you must immediately create a Database Text Backup and import that file to a new database. This will ensure the data is properly indexed.
System Data
You can use this function to export basic information from a database. This is a practical tool when you want to create a new Company that will use the same basic accounts structure as your existing ones.You can save much work by simply copying repeated data such as the Chart of Accounts and afterwards changing whatever is different between the two Companies.
The System Data export is saved as an ordinary text file, and you can import it to the new Company using the 'Automatic' or 'Automatic manual file search' Import functions in the System module.
Click the [Exports] button in the Master Control panel in the System module and double-click 'System Data' in the 'Exports' list. The 'Specify System Data Export' window is opened:
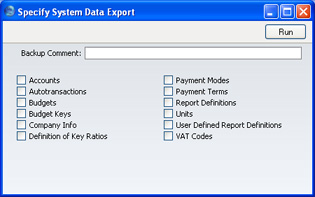
Enter a name for the file and click [Save] or press the Enter key.
A message window informs you about the progress of the export. The process can be interrupted at any time by pressing Esc (Windows) or ⌘-Period (Macintosh).
When the export has finished, you may close the 'Exports' window with the close box.
Transaction Registers
In a similar manner to the 'Base Registers' and 'System Data' functions, records in FirstOffice's transaction registers can be exported. Just as is the case with the Base Registers, if your installation does not use some of the registers, an attempt to export data from a register that is not present will result in an empty file.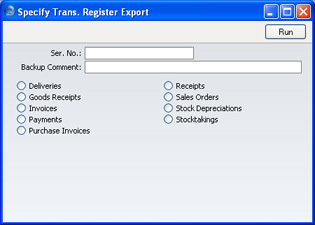
Transaction Registers (Period)
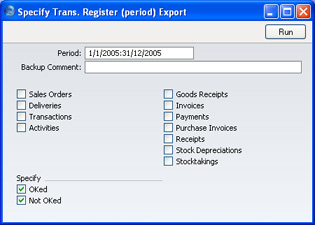
This export allows you to export all records within selected transaction registers for a certain time period. FirstOffice has a multi-year database, where all transactions are saved in full. After a few years, as the database grows, the time required to create a back-up increases. With this feature, you can reduce the time needed to carry out the daily back-up by only backing up those transactions that fall within a specified period, for example the current year only. If using this function, you should ensure you create a full back-up at the end of the previous financial year. To restore the database, you should import two files: the "historical" archive back-up, and the most recent back-up file from the current year. In both cases, use the 'Automatic' or 'Automatic manual file search' import functions in the System module.To use this feature, check the registers you need to back up, and set the time period and use the Backup Comment to describe the back-up file (up to 40 characters are permitted). This description will be shown in the list of importable files shown by the 'Imports' function. Click [Run] to proceed.