Backing Up
Al final del día de trabajo con Standard ERP, le recomendamos realizar un back-up. Es una excelente idea guardar una copia de este archivo en un lugar seguro. Puede llegar a paracer innecesario realizar un back-up diario, pero considerando el tiempo mínimo que lleva hacerlo es un tiempo muy bien invertido en el caso de que se presente algún problema en el disco duro.La creación de Backups de sus datos es particularmente importante cuando, como en el caso de una base de datos Standard ERP de su empresa, la información financiera de su empresa está comprometida. Si por algún motivo pierde toda su información, se encontrará en una posición muy incómoda, sin todas las facturas, recibos, informes, etc. Asegúrese de realizar un back-up cada vez que trabaje con la contabilidad de su empresa. Denomine a las copias de forma sistemática según fechas, de forma que le sea fácil restaurar su base de datos, si ocurriese un accidente.
Si su computadora se infecta con un virus, es necesario que trate de establecer la fecha cuando fue infectada. En este caso debería restaurar los datos de un back-up creado antes de la fecha de la infección. De otra forma corre el riesgo de re-infectar su máquina.
Standard ERP incluye varias métodos para hacer que la tarea de crear backups regularmente más fácil y más eficiente. Estas son:
- El método de ”Back-ups de Texto" copiará los datos en su base de datos a un archivo separado de back-up.
La ventaja de este método es que el back-up es independientes de las versiones del programa. Esto significa que restaurar desde un back-up tendrá éxito, incluso si ha actualizado la versión de su aplicación Standard ERP desde que realizó un back-up. Back-ups de Texto son relativamente pequeños, lo que los hace fáciles de administrar.
Las desventajas de este método son que ambas la creación del back-up y la restauracion desde el son bastante lentas en sistemas demasiado grandes, y la base de datos no se puede usar mientras se crea el backup.
Puede crear Back-ups de texto como se describe aquí, o puede hacer que se creen automáticamente todos los días a la misma hora, como se describe aquí.
- Puede usar un Software Especializado para Backups para copiar el archivo de la base de datos ("HANSA.HDB") a cintas que pueden almacenarse fuera del sitio. Estos archivos de back-up no será independiente de las versiones del programa, por lo que restaurar desde un back-up puede que no sea exitoso si ha actualizado la versión de su aplicación Standard ERP desde que realizó el backup. Dependiendo del back-up software, puede que no sea posible usar la base de datos mientras el back-up esta siendo creado.
Backing Up usando un Software Especializado de Back-up se describe aquí.
- El método de "Duplicación de Base de Datos" hará copias del archivo de la base de datos ("HANSA.HDB"). Puede hacer copias automáticamente a la misma hora una o dos veces al día, o puede hacer copias continuamente.
La ventaja de este método es que la base de datos todavía se puede usar mientras se está copiando. Cualquier registro guardado entre el comienzo del proceso de copia y el final se incluirán en la copia. La desventaja es que restaurar desde un back-up puede que no sea exitosa si ha actualizado la versión de su aplicación Standard ERP desde que realizó el back-up.
Si utiliza este método, debe asegurarse de que el disco duro que contiene su base de datos Standard ERP siempre tenga espacio para el archivo "HANSA.HDB" y tres copias.
Se describe la duplicación de la base de datos aquí.
- La función "Journaling" significa que cada registro nuevo o modificado se guardará tanto en la base de datos como en un archivo de journal separado. Si necesita volver a una copia antigua de la base de datos, puede "aplicar" el journal. Esto extraerá del journal todos los registros creados o modificados desde que se realizó la copia anterior de la base de datos y colocarlos en esa base de datos.
Usando journaling para restaurar datos es mucho más rápido que restaurar desde un Back-ups de Texto, especialmente en sistemas grandes, ya que no necesitará volver a ingresar ningún dato manualmente. Sin embargo, requiere una gestión cuidadosa tanto de las copias antiguas de la base de datos como del archivo journal.
Si utiliza este método, debe asegurarse de que el disco duro que contiene su base de datos StandardERP siempre tenga espacio para el archivo "HANSA.HDB" y el archivo journal.
Se describe Journaling aquí.
En sistemas más grandes donde la base de datos estará en uso constante, se altamente recomienda que utilice la duplicación de bases de datos y el journal en combinación como su estrategia principal de backup. Sin embargo, aún debe crear back-up de texto regularmente (quizás mensual o anual) para propósitos de archivar. Podrás usar estos back-ups junto con las nuevas versiones de la aplicación Standard ERP si necesita ver el contenido de su base de datos desde una fecha en particular. También deberá crear un back-ups de Texto como parte del proceso de actualización a una nueva versión de la aplicación (se describe aquí).
Cualquiera que sea el método que use para hacer un backup de su base de datos, también debe realizar pruebas periódicas para asegurarse de que puede restaurar su base de datos desde el back-up o copias de bases de datos.
! | Compruebe regularmente que puede restaurar desde sus archivos de backup. |
---
En este capítulo:
- Introducción
- Back-ups de Texto
- Backup Cronometrado Automático
- Back-ups Remotos
- Backing Up Usando Software Especializado de Back-up
- Duplicación de Base de Datos
- Journaling
- Restaurando desde un Back-up
- The Raw Data Export
- Updating to New Versions of Standard ERP
- Página de inicio para Introducción e Instalación manual
- Página de inicio para Standard ERP manual
Back-up de Texto
El método de ”Back-ups de Texto" para backing up copiará los datos en su base de datos a un archivo de backup separado. Siempre podrá recrear su base de datos a partir de dicho archivo back-up, incluso si ha actualizado la versión de su aplicación Standard ERP desde que hizo el back-up.Para crear un back-up de texto, sigua los siguentes pasos:
- Usa el botón de [Cambiar Modulo] en el Centro de Navigation o el Ctrl-0 (cero) (Windows) o ⌘-0 (Mac OS X) atajo de teclado para ir adentro del Modulo de Sistema.
- Clic el botón [Rutinas] en el Centro de Navigation y luego [Exportación]. Alternativamente, usa el Ctrl-E (Windows) o ⌘-E (Mac OS X) atajo de teclado. La ventana 'Exportaciones' se abrira:
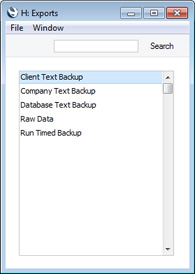
- Haga doble clic 'Backup de Texto de Empresa’ (si desea hacer un backup de los datos en la base de datos relacionados con la única empresa actualmente seleccionada) o 'Backup de Texto de Base de Datos’ (si desea hacer un backup de toda la base de datos) desde la ventana ’Exportación’. ‘Ejecutar Backup Programado’ también hará un backup de toda la base de datos.
Usualmente, debes usar las opciones ’Backup de Texto de Base de Datos' o 'Ejecutar Backup Programado', ya que estas son las únicas opciones que hacen backup toda la base de datos. Debe usar uno de estos regularmente para su seguridad y tranquilidad. Algunos registros y opciónes (e.g. configuración, E-mail y Conferencias) se almacenan a nivel de base de datos, no al nivel de empresa. Estos no serán exportados por la opción 'Backup de Texto de Empresa’, aunque su base de datos solo contenga una sola Empresa. Adjuntos tampoco será exportado por la opción 'Backup de Texto de Empresa'. Esta opción está diseñada para usarse en la situación en la que necesita mover toda la información relacionada con una Empresa específica de una base de datos a otra.
En un sistema multi-usuario, no podrás usar la opción 'Backup de Texto de Base de Datos’ en una máquina cliente (no se incluirá en la lista 'Exportaciones' ilustrada en el paso 2). Solo puede usarlo en la máquina del servidor, cuando ningún otro usuario está conectado y cuando accede a la base de datos del servidor utilizando la aplicación GUI. Si no es conveniente trabajar desde el servidor, use la opción ‘Ejecutar Backup Programado’ desde el cliente (o la opción Backup Cronometrado Automático). Ambos métodos guardarán archivos de backup de texto en el servidor.
Si está utilizando la aplicación del servidor de línea de comandos (Mac OS X o Linux), puedes usar la opción 'Ejecutar Backup Programado' y Backup Cronometrado Automático features desde el cliente, o puede crear un backup en el servidor escribiendo en la Terminal:
- ./StandardERPServer --backup (Linux 32-bit),
- ./StandardERPServer64 --backup (Linux 64-bit) o
- ./StandardERPServer --backup (Mac OS X)
- Esto iniciará la aplicación del servidor Standard ERP, que luego creará un backup y luego se cerrará.
- Esto supone que la aplicación se llama "StandardERPServer" o "StandardERPServer64". Si este no es el caso, escriba el nombre de la aplicación después "./"
- ./StandardERPServer64 --backup (Linux 64-bit) o
Si está utilizando la aplicación de servicio (Windows), necesitará colocar el --backup parámetro en un archivo ”parameters.txt" antes de iniciar la aplicación, como se describe en la ‘Iniciando del servidor con parámetros ' sección en la pagina Cargando una Base de Datos y una Compañía Existentes. When the back-up file is complete, the application will quit (you may need to monitor the log file (named "hansa.log") or the service 'Properties' window to see when the application quits). Elimina el parámetro --backup de el "parameters.txt" antes de reiniciar la aplicación.
- ./StandardERPServer --backup (Linux 32-bit),
- Si seleccionó la opción 'Backup de Texto de Base de Datos', la ventana 'Specify Database Text Backup' aparecerá. Si seleccionó la opción 'Ejecutar Backup Programado', una ventana similar titulada 'Specify Run Timed Text Backup' aparecerá. En ambos casos, ingrese una descripción del archivo de backup que está por crear. Podrás usar hasta 40 caracteres. Si luego necesita restaurar desde un backup, esta descripción se mostrará en la lista de archivos importables para ayudarlo a seleccionar el correcto.
Ingrese una descripción apropiada y haga clic [Ejecutar].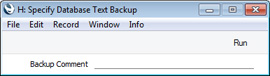
- Si está utilizando la opción 'Backup de Texto de Base de Datos' y tienes más de una empresa, ahora se le pedirá que inicie sesión en cualquiera que aún no haya utilizado en esta sesión de trabajo. Por razones de seguridad, si no puede iniciar sesión en cada una de las empresas, el procedimiento de back-up será detenido. Después de iniciar sesión en cada empresa, volva a la ventana ‘Specify Database Text Backup' ilustrado en el paso 4 para continuar con el procedimiento del backup (la ventana 'Specify Database Text Backup' estará ocultado detrás del Centro de Navegación).
Si está utilizando la opción 'Ejecutar Backup Programado', no necesitará iniciar sesión en todas las empresas. En un sistema multi-usario, esta opción guardará el archivo de backup en el servidor para poder controlar el acceso al archivo de backup desde una máquina cliente.
- Si estás usando la opción ‘Backup de Texto de Base de Datos’, se abrirá una caja de diálogo, permitiéndote nombrar y colocar el archivo de exportación. Ingrese el nombre del archivo en el área de nombre de archivo y ubíquelo en la carpeta o directorio apropiado de la manera habitual. The name of the back-up should include the date. For ease of importing later, it is recommended that you give the name of your back-up file a .txt extension. More details are on esta pagina. Luego haga clic en[Guardar].
Se recomienda guardar el archivo de back en una carpeta o directorio llamado “backup” que debe estar en la carpeta o directorio que contiene la aplicación Standard ERP. All back-up files in this folder will be shown in a list of importable files if it becomes necessary to restore from a back-up.
Si está utilizando la opción 'Ejecutar Backup Programado', no se le preguntara que nombre y coloque el archivo de exportación. El archivo se nombrado TBYYMMDD.TXT, donde YYMMDD es la fecha actual, y su ubicación estará determinada por la opción Operations Automáticas en el modulo Tecnico.
Una ventana de mensaje le informara sobre el progreso de la exportación.
! | Bajo ninguna circunstancia debe editar o cambiar un back-up con otro programa. |
---
En este capítulo:
- Introducción
- Back-ups de Texto
- Backup Cronometrado Automático
- Back-ups Remotos
- Backing Up Usando Software Especializado de Back-up
- Duplicación de Base de Datos
- Journaling
- Restaurando desde un Back-up
- The Raw Data Export
- Updating to New Versions of Standard ERP
- Página de inicio para Introducción e Instalación manual
- Página de inicio para Standard ERP manual
Backup Cronometrado Automático
La importancia de establecer una rutina regular para crear backups no se puede enfatizar lo suficiente. Como todos los sistemas financieros, Standard ERP utiliza una base de datos de un solo archivo en la que se almacenan todos sus datos sobre clientes, facturas, contabilidad, etc. Si pierdes ese archivo, ha perdido no solo un solo documento, sino toda su información contable y del cliente.Para facilitar esta tarea, Standard ERP contiene una función de backup cronometrada que permite crear automáticamente un archivo de backup de texto de la base de datos todos los días. Para especificar cuándo se crearán los archivos de backup y dónde se almacenarán, siga los pasos escritos abajo.
- Seleccione 'Técnico’ usando el botón [Cambiar Modulo] en el Centro de navegación o el Ctrl-0 (cero) (Windows) o ⌘-0 (Mac OS X) atajo de teclado. En sistemas multiusuario, si está trabajando desde una máquina cliente, debe iniciar sesión como administrador del sistema (i.e. como una persona que tiene acceso al módulo Técnico) como esta describido aquí.
Sí 'Técnico' no se incluye en la lista de módulos cuando hace clic en [Cambiar Modulo] en un sistema de usuario único, esto probablemente se deba a que no se ha otorgado acceso al módulo Servidor en la opción Configuración.
- Hace clic el botón [Opciónes] en el Centro de navegación o el Ctrl-S or ⌘-S atajo de teclado. Double-clic 'Operaciones Automaticas’. Aparece la siguiente ventana:
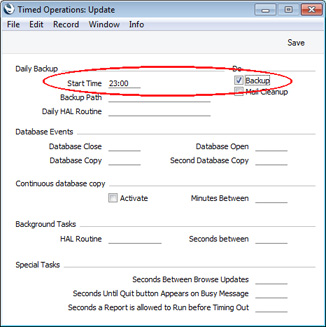
- Hora Inicio(el momento en que se realizará el backup) al tiempo apropiado, cuando es probable que nadie use Standard ERP. Use el reloj de 24 horas y coloque dos puntos (:) entre la hora y el minuto. El backup se creará a la hora especificada, incluso si todavía hay usuarios conectados a su sistema Standard ERP. Sin embargo, dichos usuarios encontrarán que la velocidad de operación se reduce mucho mientras se crea el backup. Por lo tanto, es muy recomendable que especifique un horario fuera del horario laboral, para minimizar tales inconvenientes.
- Especifique la ruta del backup en la base de datos, que determina en qué parte del disco duro del servidor se guardarán los archivos de backup. Si deja este campo en blanco, los backups se guardarán en la carpeta que contiene la aplicación Standard ERP.
Los siguientes ejemplos muestran la sintaxis correcta para la ruta del backup en la base de datos. Puede usar \ o / como separador entre los nombres de carpeta en Windows, Linux and Mac OS X. Tenga en cuenta que el separador aparece como el carácter final en la ruta.
Es recomendable guardar el backup en una carpeta o directorio llamada “Backup” que debe estar en la carpeta o directorio que contiene la aplicación Standard ERP. Todos los archivos de backup en esta carpeta se mostrarán en una lista de archivos importables si es necesario restaurar desde un backup. Puedes hacer esto usando una ruta relativa:
- Backup/
- Windows
- c:/samplefolder1/samplefolder2/Backup/
- Mac OS X
- /samplefolder1/samplefolder2/Backup/
- Finalmente en la Opciones, Operaciones Automaticas, marque la Backup casilla para activar la función de Backup Cronometrado:
- Hace clic en el botón [Guardar] ien la barra de botones para guardar las especificaciones del backup.
---
En este capítulo:
- Introducción
- Back-ups de Texto
- Backup Cronometrado Automático
- Back-ups Remotos
- Backing Up Usando Software Especializado de Back-up
- Duplicación de Base de Datos
- Journaling
- Restaurando desde un Back-up
- Exportación de Datos sin Procesar
- Actualización a nueva version de Standard ERP
- Página de inicio para Introducción e Instalación manual
- Página de inicio para Standard ERP manual
Back-ups Remotos
La funcionalidad de Backup Cronometrado Automático en Standard ERP significa que un archivo de Back-up de Texto de Base de Datos se creará automáticamente todos los días. La función de back-ups Remotos provee seguridad adicional al garantizar que una copia adicional de cada archivo de backup diario se almacenará fuera del sitio en un servidor remoto. Siempre se recomienda que almacene archivos back-up en más de un disco duro y en más de una ubicación. Mientras puede usar esta función backups remotos como una herramienta para ayudar con esto, debe conservar sus propias copias de sus archivos de back-up y no depender únicamente del servidor remoto.La funcionalidad de backups remotos es un servicio de nube cobrado proveído por HansaWorld. Consulte a su representante local de HansaWorld para obtener información sobre precios y detalles sobre cómo registrarse para el servicio.
Para comenzar a usar backups remotos, siga estos pasos:
- Siga las instrucciones en la página Backup Cronometrado Automático para configurar la función de backup programado. Esto es necesario porque cada vez que un archivo de back-up es creado usando la función de Backup Cronometrado, sera copiado automáticamente al servidor remoto. Archivos de Back-up creados usando la opción 'Back-up de Texto de Base de Datos' no serán copiados en el servidor remoto. De cualquier modo la opción, de ‘Back-up de Texto de Base de Datos' no se puede usar desde una máquina cliente en un sistema multi-usuario.
- Seleccione 'Sistema’ usando el botón [Cambiar Modulo] en el Centro de navegación o el Ctrl-0 (zero) (Windows) o ⌘-0 (Mac OS X) atajo de tecla.
- Haga Clic el botón [Opcion] ien el Centro de navegación o use el Ctrl-S or ⌘-S atajo de tecla. Haga doble-clic en la ventana ’Opciones de Backup’. Aparecera la siguiente ventana:
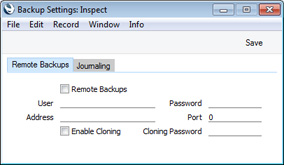
- Cuando te registras para el backups remotos, se le proveerá la información del usuario, contraseña, dirección y puerto. Ingrese esa información aquí y marque la casilla Back-ups Remotos.
- Haga clic el botón [Guardar] en la barra de botones para guardar las especificaciones del backup.
- En un sistema de usuario-único, cierre su base de datos Standard ERP y reinicie. Si está trabajando en un cliente en un sistema multi-usuario, ignora este paso.
- Después de haber seguido los pasos anteriores, cada vez que se crea un archivo de backup cronometrado, primero se guardará en su disco duro y luego se cargará en el servidor remoto. La opción de Estado de Trabajo en el módulo del sistema le mostrará el progreso de la carga.
- Si necesita recuperar un archivo de backup del servidor remoto, debes usar una base de datos de un usuario-unico. No puede hacerlo desde un cliente en un sistema multi-usuario. Se asume que necesita recuperar el archivo de backup porque su sistema principal se ha dañado o perdido.
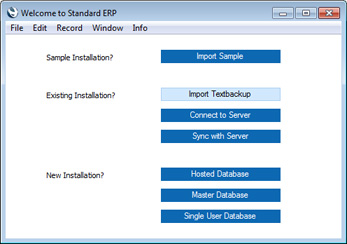
Para crear una nueva Base de Datos de usuario-unico, coloque su aplicación de Standard ERP y la carpeta "hob" folder en una nueva carpeta con los archivos "dbdef.txt" y "default.txt" e inicie la aplicación. Cuando aparece la ventana 'Welcome to Standard ERP', haga clic el botón [Single User Database] y siga las instrucciones en la página Creating a New Database - Single-user.
- Ingrese sus detalles en la opción de opción backup cómo se describe en los pasos 4-6 anteriores.
- Abra la Opción de Backups remotos en el módulo del sistema. La ventana 'Back-ups Remotos' se abrirá, enlistando los archivos de back-up que están en el servidor remoto:
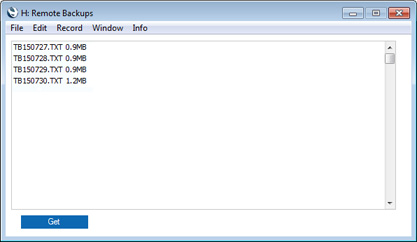
- Haga clic en el archivo de backup más reciente (o el archivo de backup más reciente que sabes que no está dañado) y haga clic en el botón [Get]. El archivo de back-up se descargará a su computadora, a una carpeta llamada “Descargas” que estará dentro de la carpeta o directorio que contiene su aplicación de Standard ERP. Puede controlar el progreso de la descarga utilizando la Opción de Estado de Trabajo, cómo mencionado en el paso 7.
- Por favor refiérase a la página Restaurando desde un Back-up para obtener detalles sobre cómo recrear su base de datos desde el archivo de backup.
En este capítulo:
- Introducción
- Back-ups de Texto
- Backup Cronometrado Automático
- Back-ups Remotos
- Backing Up Usando Software Especializado de Back-up
- Duplicación de Base de Datos
- Journaling
- Restaurando desde un Back-up
- The Raw Data Export
- Updating to New Versions of Standard ERP
- Página de inicio para Introducción e Instalación manual
- Página de inicio para Standard ERP manual
Backing Up Usando Software Especializado de Back-up
Como se describe aquí, recomendamos encarecidamente que utilice el Back-ups de Texto o Duplicación de Base de Datos instalaciones integradas en StandardERP como la parte principal de su estrategia de backup. La función de back-up de texto en particular es más económica en término de espacio de disco y es más reliable en qué el éxito de una restauración está garantizado incluso si la versión de su aplicación Standard ERP haya cambiado. La función de Duplicación de Base de Datos te permite continuar usando la Base de Datos mientras esta haciendo back up.Sin embargo, ulgunos usuarios quizas prefieran confiar en un software de backup especializado como Retrospect para producir los backups que puedan almacenarse fuera del sitio. Tal software a veces puede fallar al crear un archivo de backup si los archivos que se están backing up todavía están en uso. Por ejemplo, un usuario se puede haber ido a casa y olvidado cerrar sesión(o haber dejado su máquina produciendo un informe) y esto puede hacer que falle el backup.
Para atender esta eventualidad, puede cambiar el estado de la base de datos en el momento en que se realizará un backup para que, en lo que cometido al software de backup, parece no estar en uso. Para hacer eso, siga estos pasos:
- Seleccioné 'Tecnico’ usando el botón [Cambiar Modulo] en el Centro de Navigacion o el Ctrl-0 (cero) (Windows) o ⌘-0 (Mac OS X) atajo de teclado. Luego, hags clic en el botón [Opciones] en el Centro de Navigacion o use el Ctrl-S o ⌘-S de atajo de teclado.
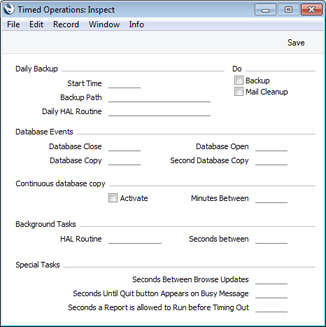
- Haga Double-clic 'Operaciones Automaticas’. Aparece la siguiente ventana:

- Establezca el Tiempo de cierre de la base de datos en unos minutos antes del momento en que el software de backup está programado para comenzar a funcionar. Use el reloj de 24 horas y coloque dos puntos (:) entre medio de la hora y el minuto.
- Establezca el Tiempo de apertura de la base de datos en unos minutos después del momento en que el software de backup está programado para finalizar el trabajo..
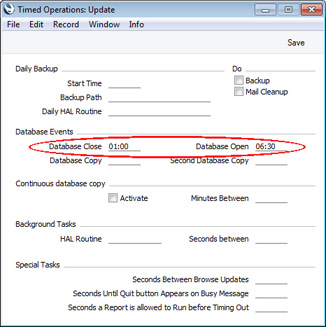
- Si también ha especificado una Hora de inicio, no debe estar entre las Horas de apertura y cierre de la base de datos. The database is dormant during this period, so such a Start Time will have no effect.
- Haga clic en el botón [Guardar] en la barra de Botónes y guarde los cambios.
---
En este capítulo:
- Introducción
- Back-ups de Texto
- Backup Cronometrado Automático
- Backups Remotos
- Backing Up Usando Software Especializado de Back-up
- Duplicación de Base de Datos
- Journaling
- Restaurando desde un Back-up
- Exportación de Datos sin Procesar
- Updating to New Versions of Standard ERP
- Página de inicio para IIntroducción e Instalación manual
- Página de inicio para Standard ERP manual
Duplicación de Base de Datos
En algunas circunstancias, puede no ser práctico crear archivos de backup de texto todos los días utilizando back-up facilities construido en Standard ERP oBacking Up Usando Software Especializado de Back-up. Si la base de datos es muy grande y / o se requiere acceso las 24 horas, puede que no sea conveniente reducir la velocidad de la operación o evitar que los usuarios inicien sesión por completo mientras se crean los archivos de backup. En esta situación puedes usar la función de Duplicación de Datos para crear copias del (archivo de "HANSA.HDB") de Base de Datos Automáticamente .Recuerde que ya no podrá usar el archivo antiguo de “HANSA.HDB" si has actualizado la versión de la aplicación de Standard ERP. Por lo tanto, la duplicación de la base de datos puede desempeñar un papel importante en su rutina de backup, pero aún debe crear un Back-ups de Texto cuando esté a punto de actualizar a una nueva versión, y si desea crear una copia del archivo de la base de datos que desea poder leer en el futuro. Cómo actualizar se describe aquí. Por supuesto, puede usar un script para mover la base de datos duplicada a otra máquina, renombrarla como "HANSA.HDB", iniciar la aplicación del servidor de línea de comandos y crear un Back-up de Texto. Para crear un verdadero back-up, el script también debe mover los otros contenidos de la carpeta que contiene la aplicación Standard ERP, especialmente la carpeta "Attach”.
Si estas usando journaling, debe hacerlo en combinación con la función de duplicación de la base de datos.
La función de duplicación de Base de Datos creará una copia de su base de datos y la almacenará en la carpeta que contiene su aplicación de Standard ERP. Este proceso por resultado creara los siguientes archivos:
- En mientras se crea la primera copia, el archivo se llamará "HANSA.HDB.TEMP".
- Cuando se complete la copia, el archivo pasará a ser llamado "HANSA.HDB.COPY".
- Cuando comience la segunda copia, se creará un segundo archivo llamado "HANSA.HDB.TEMP".
- Cuando se completa la segunda copia, el archivo se llamara "HANSA.HDB.COPY". El anterior "HANSA.HDB.COPY" pasará a ser llamado "HANSA.HDB.OLD". Si ya hay un "HANSA.HDB.OLD", sera eliminado.
Siga los siguentes pasos para configurar la función de duplicación de la base de datos:
- Seleccioné ‘Tecnico’ usando el botón [Cambiar Modulo] en el Centro de Navegación o el Ctrl-0 (cero) (Windows) o ⌘-0 (Mac OS X) atajo de teclado. Luego, haga clic en el botón [Opciones] en el Centro de Navegación o el Ctrl-S o ⌘-S atajo de teclado.
- Haga Double-clic en 'Timed Operations'. Aparecera la siguiente ventana:

- Ingrese en el campo Copia de la base de datos la hora en que desea que se copie la base de datos. Use el reloj de 24 horas y coloque dos puntos (:) entre la hora y el minuto. Si desea que la base de datos se copie dos veces al día, ingrese la segunda vez en el campo Segunda copia de la base de datos (debe ser posterior a la primera copia).
Si estás también usando la opción Backup para crear un Back-up de Texto diaria, Asegurase que el back-up de Texto es creado a diferente tiempo que a la copia. No deben ser creados al mismo tiempo..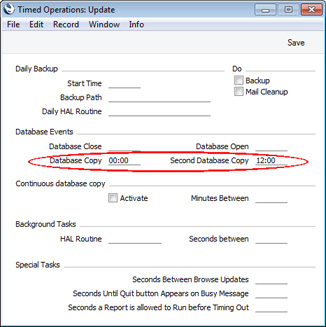
- Si acaso dos copias al día no es suficiente, use la función de copia de base de datos continua. Haga tick en la caja Activate y ingrese el numero de minutos entre copias. Este es el número de minutos entre el momento en que finalizó la última copia y el comienzo de la siguiente copia.
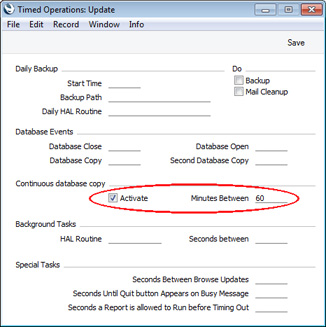
- Haga clic en el botón [Guardar] en la barra de botones para guardar los cambios. Si activó la función Copia de base de datos continua, la primera copia comenzará inmediatamente.
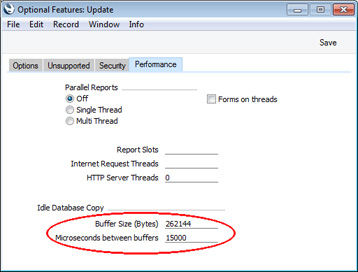
Para cambiar la velocidad de copia de la base de datos, abra la Opción Funcionalidades Opcionales en el módulo de Sistema y vaya a la tarjeta 'Rendimiento':
---
En este capítulo:
- Introducción
- Back-ups de Texto
- Backup Cronometrado Automático
- Backups Remotos
- Backing Up Usando Software Especializado de Back-up
- Duplicación de Base de Datos
- Journaling
- Restaurando desde un Back-up
- Exportación de Datos sin Procesar
- Updating to New Versions of Standard ERP
- Página de inicio para Introducción e Instalación manual
- Home page for Standard ERP manual
Journaling
Un sistema ocupado donde muchos usuarios guardan constantemente grandes cantidades de registros puede causar problemas para una estrategia de backup que se basa en un archivo Back-up de Texto que se crea una vez al día y / o al copiar la base de datos dos veces al día. El volumen de nuevos registros significa que el archivo Back-up de Texto o copia de la base de datos rápidamente pasa a estar desactualizado. ISi necesita volver a un backup, it will be difficult and time-consuming if not impossible to recreate the records entered since the text back-up or database copy was made. The journaling feature is designed to address this problem. If you are using this feature, every new record and every modification will be saved in the database and in a separate journal file. If you need to revert to an older copy of the database, you will be able to "apply" the journal. "Applying" the journal means importing the recent new records and modifications to the older copy of the database from the journal file. This will be much faster and more complete than recreating the recent records manually, or extracting them from the damaged database.Debes usa la función journal junta con la función Duplicación de Base de Datos. If your database becomes damaged, you should revert to the most recent (undamaged) duplicate and apply the journal. It is not possible to revert to a text back-up and apply the journal. Therefore, if you are using journaling, you must make sure you are duplicating the database regularly. The text back-up will play a much less important role in your back-up strategy.
El archivo del journal aumentará de tamaño muy rápidamente., especially si importa grandes cantidades de datos mientras se ejecuta el registro en journal. Por lo tanto, debe tener especial cuidado para controlar el nivel de disco duro libre en el servidor si está utilizando esta función.
---
En esta sección:
- Introducción a Journaling
- Comenzando Journaling
- Aplicando el Journal
- Administrar Archivos de Journal
- Introduction to Backing Up
- Back-ups de Texto
- Backup Cronometrado Automático
- Backups Remotos
- Backing Up Usando Software Especializado de Back-up
- Duplicación de Base de Datos
- Restaurando desde un Back-up
- Exportación de Datos sin Procesar
- Updating to New Versions of Standard ERP
- Página de inicio para Introducción e Instalación manual
- Página de inicio para Standard ERP manual
Journaling - Starting Journaling
- You can start the journal feature using one of two methods:
- Launch the command line application on the server by typing:
- ./StandardERPServer --start-journaling (Linux 32-bit),
- ./StandardERPServer64 --start-journaling (Linux 64-bit) or
- ./StandardERPServer --start-journaling (Mac OS X)
- Starts the Standard ERP server application and marks the database as journaled. A new folder named "journal" will be created in the folder containing the Standard ERP server application, and in that folder a journal file named "J0000001.HJN" will be created.
- ./StandardERPServer64 --start-journaling (Linux 64-bit) or
- ./StandardERPServer --start-journaling (Linux 32-bit),
- If the server is already running and you don't want to restart it, log in from a client, change to the System module and open the Journaling setting:
Click the [Start Journaling] button. A new folder named "journal" will be created in the folder containing the Standard ERP server application, and a journal file named "J0000001.HJN" will be created in that folder.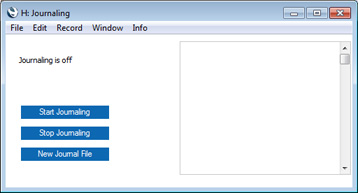
You can also use the Journaling setting to start journaling in a single-user system.
- Launch the command line application on the server by typing:
- Referring to the Database Duplication page, establish a regular database duplication routine. If you need to revert to an old database, you must do so to one that was created after you started journaling. You cannot revert to a text back-up.
- Log on from clients in the usual way and begin work. Every change will be saved in the database and in the "J0000001.HJN" file.
- The next time you launch the command line or service application on the server, do so in the usual way (i.e. there is no need to use the --start-journaling parameter again). A message will be shown in the Terminal (Mac OS X and Linux) and in the log file as a reminder that journaling is in operation. You can also monitor this from a client by referring to the Journaling setting in the System module.
!
Never move, edit or rename the journal file or the "journal" folder. Make a copy of the journal file if you want to back it up.
- If you need to update to a new version of Standard ERP, you must do so by creating a text back-up from the old version, creating a new database using the new version and importing the text back-up. Full details are on the Updating to New Versions of Standard ERP page. A side effect of importing a text back-up will be that journaling will be switched off. Therefore, after updating you must restart journaling as described above in steps 1-3 above. Before doing so, make sure that the "journal" folder in the folder containing the Standard ERP server application is empty or removed altogether.
In this section:
- Introduction to Journaling
- Starting Journaling
- Applying the Journal
- Managing Journal Files
- Introduction to Backing Up
- Text Back-ups
- Automatic Timed Back-ups
- Remote Back-ups
- Backing Up Using Specialist Back-up Software
- Database Duplication
- Restoring from a Back-up
- The Raw Data Export
- Updating to New Versions of Standard ERP
- Home page for Introduction and Installation manual
- Home page for Standard ERP manual
Journaling - Applying the Journal
If you need to revert to an old database, follow these steps:- The old database must be one that was created after you started journaling. If you are using the database duplication feature, the most recent database copy will be named "HANSA.HDB.COPY".
Before reverting to this old database, you may wish to check that it does not contain the damage that caused you to revert to it. You must carry out this check using a copy of the "HANSA.HDB.COPY" file. If you use the "HANSA.HDB.COPY" file itself for this check, you will no longer be able to apply the journal successfully because you will break the synchronicity between the database and the journal. You must not even open the "HANSA.HDB.COPY" file or log in to it, let alone save any records before applying the journal.
To carry out this check, follow these steps:
- Create a copy of the folder containing the Standard ERP server application.
- Place a copy of the "HANSA.HDB.COPY" database in the folder from point (a).
- Rename "HANSA.HDB.COPY" to "HANSA.HDB". This database was created after you started journaling but does not contain the most recent changes and additions that are in the journal file. The database and the journal file are therefore out of synchronisation, so you must turn off journaling in order to check the database.
- Ensure there is no "journal" folder in the folder from point (a) or at least that you have kept a copy in a separate folder.
- Launch the command line application on the server by typing:
- ./StandardERPServer --stop-journaling --i-know-this-is-dangerous (Linux 32-bit),
- ./StandardERPServer64 --stop-journaling --i-know-this-is-dangerous (Linux 64-bit) or
- ./StandardERPServer --stop-journaling --i-know-this-is-dangerous (Mac OS X)
- Starts the Standard ERP server application and stops journaling. --i-know-this-is-dangerous is a check to ensure that you do want to stop journaling. Note that this will delete all journal files in the "journal" folder, hence the need to remove it as described in point (d).
- ./StandardERPServer64 --stop-journaling --i-know-this-is-dangerous (Linux 64-bit) or
- ./StandardERPServer --stop-journaling --i-know-this-is-dangerous (Linux 32-bit),
- You now either log in from a client or close the server and open the database using the GUI application, as described on the Shutting Down page.
- Check the database as required.
- Because database duplication is activated in the test database, a new file named “HANSA.HDB.COPY” will be created. This file can be discarded: do not confuse it with the “HANSA.HDB.COPY” that you will use for the reversion
!
Make sure you have an untouched "HANSA.HDB" file and journal file at all times.
- Create a copy of the folder containing the Standard ERP server application.
- When you are sure that the "HANSA.HDB.COPY" file does not contain any damage, place it in the folder containing the Standard ERP server application and ensure it is named "HANSA.HDB". Remember that this must be a database that is untouched by any testing. Similarly, the "J0000001.HJN" journal file in the "journal" folder must also be one untouched by any testing. It is recommended that you keep copies of both files, at least until you are sure the journal has been applied successfully, in case of a power failure or hardware problem occurring while the journal is being applied. Then, launch the command line application on the server by typing:
- ./StandardERPServer --apply-journal (Linux 32-bit),
- ./StandardERPServer64 --apply-journal (Linux 64-bit) or
- ./StandardERPServer --apply-journal
- Starts the Standard ERP server application and imports everything in the journal file that is not already in the database. The application will then quit.
- ./StandardERPServer64 --apply-journal (Linux 64-bit) or
!
You must apply the journal immediately after reverting to the copy. If you open the copy and allow users to log in before applying the journal, the data in both the database and the journal file will be corrupted.
- ./StandardERPServer --apply-journal (Linux 32-bit),
- The final step is to stop and restart journaling. Restart the command line or service application using the --stop-journaling --i-know-this-is-dangerous parameters. Note that this will delete the "J0000001.HJN" file from the "journal" folder so, if you need to keep it along with the corresponding "HANSA.HDB.COPY", make copies first. Then either log in from a client and start journaling from the Journaling setting in the System module or close the server and then restart the command line or service application again, this time using the --start-journaling parameter. After logging on from clients, every change will, as before, be saved in the database and in a new "J0000001.HJN" file.
In this section:
- Introduction to Journaling
- Starting Journaling
- Applying the Journal
- Managing Journal Files
- Introduction to Backing Up
- Text Back-ups
- Automatic Timed Back-ups
- Remote Back-ups
- Backing Up Using Specialist Back-up Software
- Database Duplication
- Restoring from a Back-up
- The Raw Data Export
- Updating to New Versions of Standard ERP
- Home page for Introduction and Installation manual
- Home page for Standard ERP manual
Journaling - Managing Journal Files
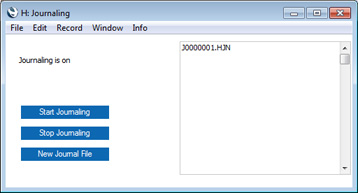
In a busy system with many users, it is likely that the journal file will grow in size very quickly. To prevent journal files becoming too large, you can use the Journaling setting in the System module to create new journal files periodically. Large journal files, as well as being cumbersome, will increase the time required to apply the journal.You can create new journal files yourself, or you can have them created automatically. To create a new journal file yourself, first open the Journaling setting. The journal file(s) that are currently in the "journal" folder will be listed on the right. In this example, we are still using the first journal file "J0000001.HJN":

It is recommended that you establish a routine for creating new journal files, for example having a new one created once a week. It is also recommended that you have the new files created automatically. To do this, open the Backup Settings setting in the System module and go to the 'Journaling' card:
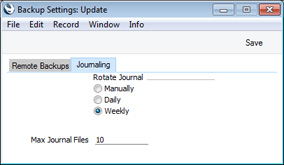
- Rotate Journal
- Use these options to specify whether you would like a new journal file to be created every day or every week.
- After changing from Manually for the first time, you should restart the server to activate the change.
- After changing from Manually for the first time, you should restart the server to activate the change.
- Max Journal Files
- Specify here how many journal files you would like to keep in the "journal" folder. For example, if you decide to keep 10 journal files as shown in the illustration, when the eleventh journal file "J0000011.HJN" is created, the first one "J0000001.HJN" will be deleted.
- Please refer to the following paragraphs when deciding on how many journal files to keep.
- You can leave this field blank if you do not want old journal files to be deleted automatically when new ones are created.
- Please refer to the following paragraphs when deciding on how many journal files to keep.
| Journal File | Date Created |
| J0000001.HJN | June 1 |
| J0000002.HJN | June 8 |
| J0000003.HJN | June 15 |
| J0000004.HJN | June 22 |
| J0000005.HJN | June 29 |
| J0000006.HJN | July 5 |
| J0000007.HJN | July 12 |
If the most recent database copy is from July 5, a date on which a new journal file was created, you should assume that "J0000005.HJN" will also be required when you apply the journal, because this may be the "current" journal file for that database. The "current" journal file is the one in which the last record was stored. When you create "J0000006.HJN", "J0000005.HJN" will remain the "current" journal file for the brief period until the next record is saved. This will be saved in "J0000006.HJN", which will then become the "current" journal file. If the database copy was made in the brief period before that record was saved, then "J0000005.HJN" will still be the "current" journal file in that database and so must be present in the "journal" folder when you apply the journal.
When you apply the journal, a message stating that "Current journal file not last file in journal folder J0000XXX.HJN" will be shown in the Terminal (Mac OS X and Linux) and in the log. In this message, "J0000XXX.HJN" is the "current" journal file for the database copy i.e. the earliest journal file that must be present in the "journal" folder. In the example, if you are reverting to a database copy created on July 10, this will be "J0000006.HJN". If "J0000006.HJN" is present in the "journal" folder, the journal will be applied. If it is not present, the journal will not be applied, and the Terminal and log will contain further messages, including "hole detected in journal". You should place "J0000006.HJN" in the "journal" folder and re-apply the journal.
The latest possible version of each journal file must be present in the "journal" folder when you apply the journal. As already mentioned, in the example, if you are reverting to a database copy created on July 10, you will need "J0000006.HJN" and "J0000007.HJN". This means the final version of "J0000006.HJN" as it was on July 12 at the moment that you created "J0000007.HJN", not any copy that you may have created on July 10 at the time of copying the database. A July 10 copy of "J0000006.HJN" will not be complete.
---
In this section:
- Introduction to Journaling
- Starting Journaling
- Applying the Journal
- Managing Journal Files
- Introduction to Backing Up
- Text Back-ups
- Automatic Timed Back-ups
- Remote Back-ups
- Backing Up Using Specialist Back-up Software
- Database Duplication
- Restoring from a Back-up
- The Raw Data Export
- Updating to New Versions of Standard ERP
- Home page for Introduction and Installation manual
- Home page for Standard ERP manual
Restoring from a Back-up
In the unlikely event that your database becomes damaged, you will need to attempt to recreate it. As part of this process, you should revert to a text back-up or database copy, and begin to use it as quickly as possible, to keep the interruption to your company's daily work to a minimum. Also as part of this process, you should attempt to recover any data that was entered to the damaged database after the text back-up or database duplicate was created.If you are using journaling, please refer to this page for details about how to proceed. Using journaling will allow you to create a new "live" database much more quickly than the method described below. If you are not using journaling, the recommended course of action is as follows:
- Revert to the most recent undamaged text back-up or database duplicate, as follows:
- If you are able to revert to a database duplicate, simply copy the duplicate into the folder containing the Standard ERP server application and rename it to "HANSA.HDB". Log in to check that the duplicate is undamaged.
- If you need to revert to a text back-up, follow the procedure described later on this page. In large systems, reverting to a text back-up will take some time.
- If you are able to revert to a database duplicate, simply copy the duplicate into the folder containing the Standard ERP server application and rename it to "HANSA.HDB". Log in to check that the duplicate is undamaged.
- The database that results from step 1 will become your "live" database. You should now make room in this database for the recent data that you will recover from the damaged database.
Open all relevant Number Series settings and in each case create a new number sequence that leaves a large gap after the last used number. In the case of Contacts and Items, you can do this in the Number Series Defaults setting in the System module.
- Allow users to log in to the database and to start work, but ensure they only carry out the most essential tasks. You may feel the need to restrict access to the less frequently used tasks using Access Groups.
- You can now attempt to recreate any data that was entered to the damaged database after the last database duplicate or text back-up was made. This may require you to attempt to create a Database Text Back-up or Raw Data export file from the damaged database. Then, import the information in this file to a test database. Find the recently entered data in this test database and export it using the relevant Export routine in the Integration module. The Transaction Registers Export will be particularly useful, as it allows you to export a specified range of records from every Sub System. Finally, import this data to the database created in step 1 (the new "live" database). The Raw Data feature is described here, while using the Export routines is described here.
If you are unable to create a Database Text Back-up or Raw Data export from the damaged database, you will need to refer to any paper records and to enter the data manually to the new "live" database.
Note that if you are using journaling, applying the journal to the most recent database duplicate will be a much faster and more certain method of recreating the data that was entered to the damaged database after the last database duplicate or text back-up was made. You will therefore not need to run both "live" and test systems side-by-side as described in steps 2-4 above, unless you feel the need to ascertain that you have recreated all the data.
We will now describe in detail how to restore a database from a text back-up file, as mentioned in step 1ii above. For reasons of speed, it is recommended that you carry out the process of restoring from a back-up on the server machine in multi-user systems, using the command line (Linux or Mac OS X) or service (Windows) application. If this is not possible, use a single client machine and then copy the database file (named "HANSA.HDB") to the server. If you have separate back-up files for different Companies, they should be imported individually. Attempting to import them simultaneously using different client machines could result in data being lost.
Restoring from a back-up is done in the following way:
- Move the old database (named "HANSA.HDB") away from the folder or directory containing the Standard ERP application. Rename it so that you know what it contains.
- Delete the database file "HANSA.HDB" from the folder or directory containing your Standard ERP application. Double-clicking the application now will force it to create a new database, as described here.
!
It is important to restore to a new, empty database, to avoid mixing the restored data with the old, damaged database.
The "DBDEF.TXT" and "DEFAULT.TXT" files should always be present in the same directory/folder as the Standard ERP application. They contain some important data used when setting up the new database and creating new Companies. If these files are missing, your Standard ERP application may not work the way you expect it to do!
- It is recommended for reasons of speed that you use the command line or service application to import the text back-up file. Proceed to step 9 below. If this is not possible, launch the GUI Standard ERP application as normal. When the 'Welcome to Standard ERP' window appears, click the [Import Textbackup] button:
- The 'Import files available' window opens. This is a list of text back-up files. To be included in this list, a text back-up file must be stored in the folder or directory containing the Standard ERP application or in the "Backup" or "Setup" folders inside that folder. It must also have a .txt extension.
In the list, the filename of each text back-up file is shown together with the date it was saved and any description added when it was created (see step 4 on this page).
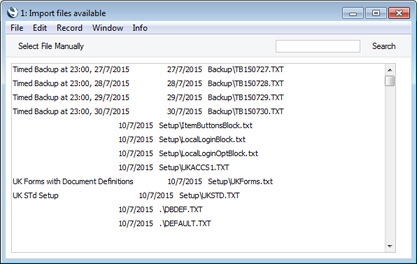
- Highlight the file you want to import (the back-up to which you wish to revert) and press the Enter key (or double-click on the name of the file). The back-up data will be imported.
- Click the [Select File Manually] button in the top left-hand corner of the 'Import files available' window.
- When the 'Open File' dialogue box opens, locate and open the back-up file in the normal way.
The back-up data will be imported.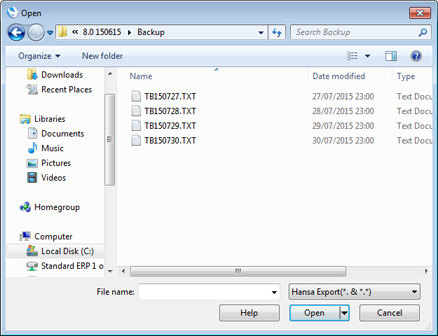
- If you are working on a Linux or Mac OS X server using the command line application, launch the application by typing:
- ./StandardERPServer Backup/TBXXXXXX.TXT (Linux 32-bit),
- ./StandardERPServer64 Backup/TBXXXXXX.TXT (Linux 64-bit) or
- ./StandardERPServer Backup/TBXXXXXX.TXT (Mac OS X)
- Starts the Standard ERP server application and imports the back-up or example data file TBXXXXXX.TXT. In this example, this file is in the "Backup" folder inside the folder containing the Standard ERP server application.
- ./StandardERPServer64 Backup/TBXXXXXX.TXT (Linux 64-bit) or
- ./StandardERPServer (Linux 32-bit),
- ./StandardERPServer64 (Linux 64-bit) or
- ./StandardERPServer (Mac OS X)
- ./StandardERPServer64 (Linux 64-bit) or
If your machine has sufficient RAM, the back-up file will be imported significantly more quickly if you use the "Massive Cache" feature to increase the size of the memory cache. You can do this by placing an extra parameter in the command line or in the "parameters.txt" file, as follows:
- ./StandardERPServer --db-cache=1G Backup/TBXXXXXX.TXT
By default, the Standard ERP server application uses a cache size of 12 MB. By increasing the size of this cache, you will improve the speed of operation because data that is in the cache can be accessed much more quickly than data on disk. Data in the cache is data that has already been used during the work session. The optimum size of the cache will vary, depending on the server type, RAM size and operating system, and can only be established through experimentation. A good guideline, especially for Windows servers and for servers with smaller RAM sizes, is never to assign more than 40% of the machine's RAM size to the cache. If the cache is too large, the memory available for other tasks may not be enough. If the machine then runs out of memory, it will start using its hard disk as extra memory. This will cause it to slow down significantly and may also increase instability. If the server is a 32-bit machine, the maximum cache size is between 1 and 3.5 GB, depending on machine and operating system. If the server is a 64-bit machine with a 64-bit capable operating system (Mac OS X or Linux) and a large amount of RAM and if you are using the 64-bit version of Standard ERP, then the 40% guideline becomes less important. For example, if the server has 12 GB RAM, you could assign up to 10 GB to the cache.
If you do increase the cache size significantly, there will be a pause between the import finishing and the application closing. During this time, the cache contents will be written to disk. The larger the cache, the longer this will take.
- ./StandardERPServer Backup/TBXXXXXX.TXT (Linux 32-bit),
In this chapter:
- Introduction
- Text Back-ups
- Automatic Timed Back-ups
- Remote Back-ups
- Backing Up Using Specialist Back-up Software
- Database Duplication
- Journaling
- Restoring from a Back-up
- The Raw Data Export
- Updating to New Versions of Standard ERP
- Home page for Introduction and Installation manual
- Home page for Standard ERP manual
The Raw Data Export
If your database somehow becomes damaged while you are using it, you will be prompted to create a Raw Data export. You should do so, using the Raw Data Export function in the System module or, if you are working on the server, by launching the server application with the --rawdata parameter. The Raw Data option exports data in byte order, while the Database Text Backup option exports data in record order, on a register-by-register basis. When a database is damaged, the Raw Data option may create an export file where the Database Text Backup option fails.If you need to revert to a back-up, you should do so in this order of priority:
- If you are using journaling, you should revert to the most recent undamaged copy of the database and apply the journal.
- If you are not using journaling, but you are regularly duplicating your database, you should revert to the most recent undamaged copy of the database and recreate the data entered since the duplicate was made.
- If you are not using journaling or database duplication, you should revert to the most recent text back-up of the database that does not contain any damage and recreate the data entered since the duplicate was made.
Do not under any circumstances regard the file created by the Raw Data export as a means of successfully rebuilding your database. Restoration from a Raw Data file is extremely unlikely to produce a useable database. At the very best, use a Raw Data file as a reference to help recreate the data entered since the last successful back-up, as mentioned in points ii and iii above. Due to the method used to create the Raw Data file, and due to the fact that a Raw Data file will be created from a damaged database, it will not contain any user passwords, it is likely that many settings will be missing, it probably will not contain any user accounts, and many records may be missing or incomplete. For example, many records may be missing from the Contact or Transaction registers, and data may be missing from hidden fields in stock transactions, making it impossible to rebuild stock or obtain an accurate stock valuation.
If you need to create a test database from a Raw Data file for use as a reference, use the GUI application to follow these steps:
- Make sure the folder or directory containing your Standard ERP application does not contain a "HANSA.HDB" file and launch the application.
- When the 'Welcome to Standard ERP' window appears, click the [Master Database] or [Single User Database] button as appropriate. Follow the instructions on the Creating a New Database - Server or the Creating a New Database - Single-user pages respectively.
- Referring to the 'Single-user' section on the Changing and Adding Companies page, create all the Companies as they were in the damaged database (in particular, the Codes must be the same as they were in the damaged database).
- Create all Fiscal Years exactly as they were in the damaged database (in every Company).
- In every Company, configure the Company Date and Numeric Format setting in the System module as follows:
- Date Order
- Month, Day, Year
- All three check boxes
- ticked
- Date separator
- / or -
- Decimal separator
- . (a single full stop, not a comma)
- Thousand separator
- space (one single space)
- Date Order
- Ensure you are in the System module and use the Ctrl-Shift-I/⌘-Shift-I keyboard shortcut to open the 'Imports' window. Choose one of the options depending on where the Raw Data file is located and import it.
If the Raw Data file is large, you may prefer to use the command line (Linux or Mac OS X) or service (Windows) application for this step, as the speed benefit will be significant.
- Even if the Raw Data file is imported successfully, the database will not be useable because no indexes will be created. Therefore, you must immediately create a Database Text Backup and import that file to a new database. This will ensure the data is properly indexed. Again, you may prefer to use the command line (Linux or Mac OS X) or service (Windows) application to import the file.
- As mentioned in the introduction to this section, restoration from a Raw Data file will usually result in an incomplete database. You should only regard it as a test database that will help you with the process of re-entering information to the new "live" database. You may be able to do this by exporting from the test database using the relevant Export routine in the Integration module. The Transaction Registers Export will be particularly useful, as it allows you to export a specified range of records from every Sub System. If there is no suitable Export routine for the information that is missing from the new "live" database, use the test system as a guide enter the data manually to the new "live" database.
! | Never build a "live" database from a Raw Data file! |
In this chapter:
- Introduction
- Text Back-ups
- Automatic Timed Back-ups
- Remote Back-ups
- Backing Up Using Specialist Back-up Software
- Database Duplication
- Journaling
- Restoring from a Back-up
- The Raw Data Export
- Updating to New Versions of Standard ERP
- Home page for Introduction and Installation manual
- Home page for Standard ERP manual
Updating to New Versions of Standard ERP
The latest version of Standard ERP is always available for downloading at www.standardinstall.com.Inevitably, new versions will incorporate significant structural changes. Because of this, it cannot be guaranteed that they will be able to use database files ("HANSA.HDB" files) created by previous versions. You must export a text back-up file from the old database and import it to a new database created using the new version of the program.
Before updating, you should first check that the new version is compatible with your hardware and operating system(s). You should then set up a test environment where you will be able to run the existing version and the new version side-by-side. Create new databases using both versions, and import the same text back-up to both new databases. This will allow you to print the most important reports from both versions and compare them accurately, since both versions contain the same data. You should then ensure that every user logs in to the new version to check that their main processes are operating as expected, and to get used to any changes in workflow that may be required. Test every step including printing documents, creating Nominal Ledger Transactions from Sub Systems and reporting. When you are satisfied with the data integrity of the new version and that every user is familiar with it, you can update the live system.
To update to a new version of Standard ERP, follow these steps:
- Create a Database Text Backup from your live system as usual using the old application.
- Install the new version of the application in the test environment, create a new database and import the text back-up file as follows:
- Follow the procedure described on the Installation page to download the new version of Standard ERP and install it on the server and clients in your test environment.
- Ensure that the folder or directory containing the new application on the test server also contains the "DBDEF.TXT" and "DEFAULT.TXT" files, but not a "HANSA.HDB" file. Ensure it also contains a folder or directory named "Backup" which in turn contains the text back-up file created in step 1, and that the name of this file has a .txt extension.
- Copy the following folders and their contents from the HansaWorld folder on your live server to the folder containing the new application on the test server: "Attach"; "Halcust"; "Shared"; "tmp"; "web" and "webcust". You may not have all of these folders in your installation: if so, copy the ones that you do have and don't worry about those that are missing. Copy logo files as well. Do NOT copy the "Hob" folder.
In particular, you must make sure you copy the "Attach" folder to the new Standard ERP folder before you proceed to step 2iv. The way in which attached files are named was changed in version 5.3 070723. If you are updating to this version or newer from an older version, the files in the "Attach" folder will be renamed by the updating process to comply with the new naming convention. If you do not copy the "Attach" folder to the new Standard ERP folder until after updating, the files in that folder will not be renamed and therefore the Attachment links will be broken (you will not be able to open attached files from the Document Manager with the paper clip icon). In this case, repeat the update ensuring the "Attach" folder is in place first. Please click here for more details about Attachments and the Document Manager.
If you have a "Halcust" folder, it will contain bespoke code that changes the way Standard ERP operates. You should not assume that this bespoke code will be compatible with new versions of the program. Therefore, before updating you must consult with HansaWorld Support to ensure compatibility and to have the code re-written if necessary. You can find the telephone number of your local office at www.hansaworld.com/en/world-wide-contacts/. Having done this, ensure the "Halcust" folder is in the new HansaWorld folder before you proceed to step 2iv. Bespoke code can change the structure of the database. If you do not copy the "Halcust" folder to the new HansaWorld folder until after updating, the new "HANSA.HDB" file will given a standard database structure and may crash when you try to use it with the "Halcust" folder present.
- Referring to the Restoring from a Back-up page, launch the new Standard ERP application to create a new database as follows:
- If you choose to create the new database using the GUI application, when the 'Welcome to Standard ERP' window appears, click the [Import Textbackup] button to import the back-up created by the previous version of Standard ERP.
- If you choose to create the new database using the command line application (Linux or Mac OS X), launch the application by typing:
- ./StandardERPServer Backup/TBXXXXXX.TXT (Linux 32-bit)
- ./StandardERPServer64 Backup/TBXXXXXX.TXT (Linux 64-bit)
- ./StandardERPServer Backup/TBXXXXXX.TXT (Mac OS X)
- ./StandardERPServer64 Backup/TBXXXXXX.TXT (Linux 64-bit)
- ./StandardERPServer Backup/TBXXXXXX.TXT (Linux 32-bit)
- If you choose to create the new database using the service application (Windows), place the path and name of the back-up file (Backup/TBXXXXXX.TXT in this example) in a "parameters.txt" file before launching the application, as described in the ' Launching the Server with Parameters ' section on the Loading an Existing Database and Company page. The application will quit when the import finishes (you may need to monitor the log file (named "hansa.log") or the service 'Properties' window to see when the application quits). Remove the path and name of the back-up file from the "parameters.txt" file. If necessary, restart the application in the usual way.
If your machine has sufficient RAM, the back-up file will be imported significantly more quickly if you increase the cache size. Please refer to step 10 on the Restoring from a Back-up page for details.
- If you choose to create the new database using the GUI application, when the 'Welcome to Standard ERP' window appears, click the [Import Textbackup] button to import the back-up created by the previous version of Standard ERP.
- If you have not done so already install the new Standard ERP application on the client machines that will be part of the test system. If you have any Client Text Backup files, import them to the new databases on the relevant machines as per step 2iv above. Then, open the Company register on each client and enter the IP address of the test server. If you did not import a Client Text Backup file, use the [Connect to Server] button in the 'Welcome to Standard ERP' window to locate and connect to the test server.
- If the new version includes one or more of the revisions listed at the end of this page, update your data as required. You may find it advantageous to increase the cache size while updating your data.
- Follow the procedure described on the Installation page to download the new version of Standard ERP and install it on the server and clients in your test environment.
- Install your existing version of the application in the test environment, create a new database and import the text back-up file as follows:
- Create a new folder or directory on the test server (or on a separate test server) and copy into it from the HansaWorld folder on your live server the old version of the application and the "Attach", "Halcust", "tmp", "web" and "webcust" folders. This time copy the "Hob" folder as well.
- Ensure that the folder or directory containing the old application on the test server also contains "DBDEF.TXT" and "DEFAULT.TXT" files, but not a "HANSA.HDB" file. Ensure it also contains a folder or directory named "Backup" which in turn contains the back-up file created in step 1, and that the name of this file has a .txt extension.
- Import this back-up as described in step 2iv above, but note that you will not be able to use the "parameters.txt" method if your old version is older than 5.4.
- Running two databases on the same server machine is usually not recommended or supported for reasons of speed, but this is less important in a test environment. If you do have both the old and new applications on the same server machine, you should change the Port Number in one of the databases, to enable the clients to log in to the correct one. Please refer to the Program Mode Register page for details.
- If you have not done so already, install the old Standard ERP application on the client machines that will be part of the test system. If you have any Client Text Backup files, import them to the new databases on the relevant machines as per step 2iv above. Then, open the Company register on each client and enter the IP address of the test server (and the Port Number if you changed it on the server in step 3iv above). If you did not import a Client Text Backup file, use the [Connect to Server] button in the 'Welcome to Standard ERP' window to locate and connect to the test server (note that the 'Welcome to Standard ERP' window was introduced in version 5.2).
- Create a new folder or directory on the test server (or on a separate test server) and copy into it from the HansaWorld folder on your live server the old version of the application and the "Attach", "Halcust", "tmp", "web" and "webcust" folders. This time copy the "Hob" folder as well.
- Print the reports you usually use from both the old and new versions and compare them. At a minimum, you should print and compare the Trial Balance, Profit & Loss and Balance Sheet from the Nominal Ledger, the Sales Ledger report (with and without a recent date) and the Open Invoice and Periodic Customer Statements from the Sales Ledger, the Purchase Ledger report (with and without a recent date) and the Open Invoice and Periodic Supplier Statements from the Purchase Ledger, and the Stock List (with and without a recent date) and Item History from the Stock module. If you are using the Job Costing module, print the Project Status report as well. You only need print the longer reports to show the most commonly used Customers, Suppliers and Items. If a report contains a new option in the new version, turn it off so that you can compare like with like.
You may also want to print and compare the Record Count report in the Technics module. This report lists the number of records in each register. However, be careful when interpreting this report: it includes support registers (hidden registers whose contents are not included in text back-up files but recalculated on import). The structure of support registers may change from version to version, so the number of records they contain may vary. Support registers are shown with zeroes in the Imp/Exp Level column in the report.
For the comparison to be accurate, you should not have worked in either system after importing the text back-up. This will ensure the data in the old and new databases is identical.
- When you are satisfied with the reports, you should now ensure that every user logs in to the new version to check that their main processes are operating as expected, and to get used to any changes in workflow that may be required. Test every step including printing documents, creating Nominal Ledger Transactions from Sub Systems and reporting. This is especially imperative if you have a "Halcust" folder, in which case you should test the bespoke code as much as possible.
- When you are sure that the new version is operating as expected, create a new Database Text Backup from your live system and repeat step 2 above to update your live system.
If you are using the service application on a Windows server, installing a new version will automatically update the service registry, removing the old version from the list and replacing it with the new version.
If you have many client machines, you may want to use the auto update feature described here. This feature will cause the version on the client machines to be updated automatically the next time they connect to the server.
- In the new live system, open the Timed Operations setting in the Technics module. Check that all times are correct and are expressed using the 24-hour clock. If you are using the automatic timed back-up feature, make sure the Backup Path is correct.
- If you are using the journaling feature, you will need to start journaling after updating to a new version. Ensure the folder containing the application does not also contain a "journal" folder and start journaling as described on the Journaling page.
- If you need to remove the old version of the application and you are using Windows, be sure to do so using the Programs and Features Control Panel.
In this chapter:
- Introduction
- Text Back-ups
- Automatic Timed Back-ups
- Remote Back-ups
- Backing Up Using Specialist Back-up Software
- Database Duplication
- Journaling
- Restoring from a Back-up
- The Raw Data Export
- Updating to New Versions of Standard ERP, including:
- Home page for Introduction and Installation manual
- Home page for Standard ERP manual
Updating to New Versions of Standard ERP - Updating Clients Automatically
When you update to a new version of Standard ERP, you should ensure that you are update to the same new version on the server and on all client machines. If you have many client machines in your network, updating them manually can be a laborious job. To make this task easier, you can use the auto update feature that will cause the version on the client machines to be updated automatically the next time they connect to the server.To configure the auto update feature, follow the steps below. If you updated your server application to the new version as described here, the auto update feature will already have been configured for Windows .NET and Mac OS X clients. If these are the only clients you are using, ignore steps 1-8 and proceed to step 9.
- Set up a new Standard ERP installation on a client machine, with no database (no .hdb file). Create a folder or directory named "clientmp" and place it in the folder containing the Standard ERP application.
- Inside "clientmp", create one sub-folder or sub-directory for each client platform that you need, as follows:
Folder For Client Application Name books Books Mac Books.app hansaraamaosx HansaRaama Mac (only used in Estonia) HansaRaama.app hansaraamawin HansaRaama Windows (only used in Estonia) HansaRaama.EXE hansaraamawindowsnet HansaRaama Windows .Net (only used in Estonia) HansaRaama.EXE linuxxt Linux XT HansaWorld linuxwine Linux Wine HansaWorld.EXE macosx Mac OS X HansaWorld.app win98 Windows 98/NT HansaWorld.EXE wince Windows CE HansaWorld.EXE windows Windows 2000/XP HansaWorld.EXE windowsnet Windows .Net HansaWorld.EXE - Copy the following files into the sub-folders or sub-directories from step 2:
- The "DBDEF.TXT" and "DEFAULT.TXT" files;
- The new version of the relevant Standard ERP application for the operating system. This must be named as shown in the list in step 2 (the names are case-sensitive). Depending on how you have configured your operating system, the file extensions may not be visible.
- The new "Hob" folder (which should contain the "serverip.dat" file from step 1, as this will ensure you don't need to repeat step 1 each time you update); and
- (optionally) a file named "AUTOUPDATEIMPORT.TXT", which can contain information that will be imported to each client database.
- The "windowsnet" folder should also contain the following files: "Boo.HtmlEditor.Shared.dll", "ColorPicker.dll" and "HtmlAgilityPack.dll".
- The "DBDEF.TXT" and "DEFAULT.TXT" files;
- Create a folder or directory named "clients" in the folder containing the Standard ERP application that you are using.
- Start the Standard ERP application and change to the Database Maintenance module. To gain access to the Database Maintenance module, grant yourself full access to it in your Access Group and log in again.
Run the 'Create Autoupdate Clients' Maintenance function:
Tick the Client options that you need (each option should have its own folder as listed in step 2), specify the Folder (if different to step 4) and click the [Run] button.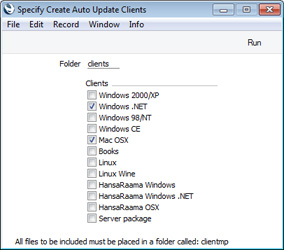
The Maintenance function will create separate .ha files for each Client option, saving them in the "clients" folder (for example, "windows.ha", "windowsnet.ha" and "macosx.ha").
- Open the 'About' window from the Info menu (Windows) or the Standard ERP menu (Mac OS X) and make a note of the build number. You can also copy the build number from the log file (a line containing the version and build such as "8.0 2015-07-19 (build 80020801)" will have been written to the log file in step 5).
- On the server machine, create a folder or directory named "updateclients" in the folder containing the Standard ERP server application.
- Copy the .ha files from the "clients" folder into the "updateclients" folder created in the previous step.
- Update your Standard ERP server application to the new version as described here, and then launch this application as normal.
- Log in from a client using the new version and change to the Technics module. To do this, you should be working on a client and you should have logged in as a system administrator (i.e. as a Person that has access to the Technics module) as described here.
Open the Available Client Version setting in the Technics module:
If you updated your server application to the new version as described here, the auto update feature will automatically have been configured for Windows .NET and Mac OS X clients. As a result, the Mac OS X Available and Windows .NET Available fields will already be filled in with the relevant build number, as shown in the illustration. You may see a different build number than the one in the illustration (build 80020801 refers to version 8.0 150719: each dated version has its own build number).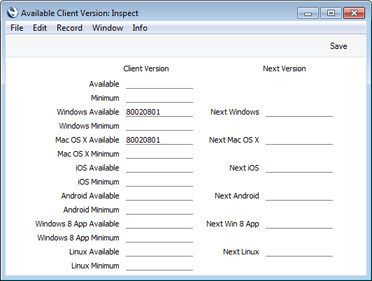
If you have clients on other platforms and have created .ha files for those platforms, you can either enter the Build number of the server application in one or both of the top two fields (Available or Minimum), or you can enter it in the specific field(s) for the platform(s). Use the build number from step 6.
When a client logs in using a version that is earlier than the one specified in these fields, the client will be asked to update. If the client version is earlier than the Minimum version, the update will be mandatory (i.e. the new version is the minimum that can be used). If the client version is earlier than the Available version, the update will not be mandatory (i.e. the new version is the latest one available).
The top two fields set an overall default that you can override using one of the specific platform fields. For example, if you specify an Available version and a Mac OS X Available version, the Available version will be used for all platforms except Mac OS X. Usually it is recommended that every client use the same version so using the top two fields will be sufficient (and using the Minimum field (mandatory updates) will also help with this aim).
If the new version contains structural changes compared to the old, the update will be set as mandatory automatically, irrespective of whether you used the Minimum or Available fields.
- On a client machine, launch the old Standard ERP client application.
- After choosing the company, you will be told that a newer client is available, and whether the update is mandatory:
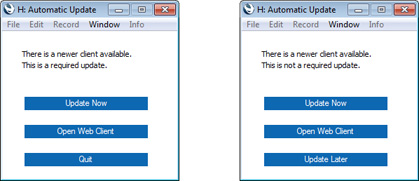
- Click the [Update Now] button. Your client application will be updated, as follows:
- Your client database will be backed up;
- The new client application, "Hob" folder and any other files will be downloaded to your client folder;
- The old client application, "Hob" folder, database and other files will be moved to a folder named "oldver"; and
- The new client application will be launched and the client text back-up imported.
- Your client database will be backed up;
- The [Open Web Client] button will open a new tab in your default browser that will connect to your server. Please refer to the 'Allowing Logging in from a Browser (Web Client)' section on the Program Mode page for more details about the Web Client.
- Log in as normal.
- Log in to your main server from a client and change to the Technics module. To do this, you should be working on a client and you should have logged in as a system administrator (i.e. as a Person that has access to the Technics module) as described here.
- Check the Web Port by opening the Program Mode register in the Technics module and going to the 'Web' card. If you need to specify a Web Port on the server or change the one that is there, you will need to restart the server for the change to take effect. Typical Web Ports are 1080 and 8033.
- Create a text file named "serverip.dat" that contains the server's IP address and Web Port in the following format, on a single line:
- IP address:web port
- Place the "serverip.dat" file in the "Hob" folders on every client.
- Follow steps 1-6 above to create .ha files for the platforms that you need.
- On the server machine, create a folder or directory named "web" in the folder containing the Standard ERP server application.
- Copy the "clients" folder (from step 4) into the "web" folder created in the previous step.
- Follow steps 9-10 above on the server and steps i-iv on each client.
In this chapter:
- Introduction
- Text Back-ups
- Automatic Timed Back-ups
- Remote Back-ups
- Backing Up Using Specialist Back-up Software
- Database Duplication
- Journaling
- Restoring from a Back-up
- The Raw Data Export
- Updating to New Versions of Standard ERP, including:
- Updating Clients Automatically
- Major Updates
- Updating Clients Automatically
- Home page for Introduction and Installation manual
- Home page for Standard ERP manual
Updating to New Versions of Standard ERP - Major Updates
Listed below are some major revisions that have been made to Standard ERP. When you update for the first time to a version that contains one of these revisions, you will need to update your data, usually by running a Maintenance function.| Version | Revision | More Information |
| 3.8 | Assets module: Fixed Asset register replaced by Asset register | Description of Export to new Fixed Assets Module function |
| 4.1 | Customers and Suppliers combined into a single register | Combining Customers and Suppliers page |
| 4.1 | Definition of Key Financial Ratio and VAT Reports: change in syntax used in formulae | Defining Key Financial Ratios page |
| 5.0 | Customers/Suppliers and Contact Persons combined into a single register | Combining Customers and Contact Persons page |
| 5.1 | Stock module rewritten | Description of Rebuild Stock function |
| 5.3 070723 | Change in naming convention for attached files | Point 2iii on the Updating to New Versions of Standard ERP page (update is automatic, requiring no user intervention) |
| 6.1 090510 | Currency added to Job Costing module | Use the 'Change Project Currency' Maintenance function in the Job Costing module to add Currencies to existing Projects |
| 8.0 141120 | Approval Request Activities given a dedicated Task Type, "Approval" | Run the 'Change Approval Activities Task Type' Maintenance function in the Technics module to change the Task Type in existing Activities |
---
In this chapter:
- Introduction
- Text Back-ups
- Automatic Timed Back-ups
- Remote Back-ups
- Backing Up Using Specialist Back-up Software
- Database Duplication
- Journaling
- Restoring from a Back-up
- The Raw Data Export
- Updating to New Versions of Standard ERP, including:
- Updating Clients Automatically
- Major Updates
- Updating Clients Automatically
- Home page for Introduction and Installation manual
- Home page for Standard ERP manual