Introduction to Forms in the Purchase Orders Module
The 'Forms' function allows you to print particular records or documents in batches.Each separate document that you can print contains two elements, the "Form" and the "Form Template". The Form element extracts the relevant information from the database and places it in printable fields, while the Form Template is the graphic layout design of the printed output i.e. it determines where on the page the printable fields will be placed.
To begin printing, first ensure you are in the Purchase Orders module. Then, if you are using Windows or Mac OS X, click the [Forms] button in the Navigation Centre or use the Ctrl-D (Windows)/⌘-D (Mac OS X) key combination. If you are using iOS or Android, tap the [Routines] button in the Navigation Centre and then tap [Forms]. A window similar to the one illustrated below appears, listing the forms that you can print from the Purchase Orders module.
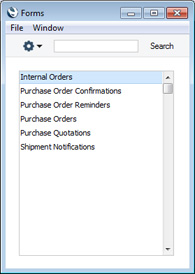
- If you are using Windows or Mac OS X, double-click the form name or highlight it and press the Enter key. If you are using iOS or Android, tap the form name. In both cases, a specification window will then appear, where you can determine the records that you want to be printed (e.g. which Purchase Orders are to be printed). The specification windows for each form are described in detail on the pages describing each form.
- Click or tap [Run] to print the forms.
- Close the 'Forms' window using the close box (Windows/Mac OS X) or by tapping < (iOS/Android).
Before you can print a form, you must connect it to a Form Template. The Form Template contains the layout of the printed output. If necessary you can connect a form to more than one Form Template: for example, you might need a particular form to be able to produce printed output in different Languages determined by the Language of the Supplier. To connect a form to a Form Template, follow this procedure, which you must carry out using Windows or Mac OS X:
- For each option, design a Form Template using the Form Template register in the System module. A file containing samples of each Form Template is supplied with Standard ERP: if you want to use these samples as the basis for your own designs, import the "UKForms.txt" file as described on the Importing Sample Data page.
- Change to the Purchase Orders module and open the Forms' list window by clicking the [Forms] button in the Navigation Centre or using the Ctrl-D/⌘-D key combination.
- Highlight each item in the list in turn and for each one select 'Define Form' from the Operations menu. In the subsequent 'Form Definition' window, assign a Form Template (or more than one Form Template) to each form. The 'Form Definition' window is fully described here.
- You only need use the 'Define Form' function once. Afterwards, Form Template selection will be automatic.
You can often print forms from a range of records, such as a range of Purchase Order Numbers. To do this, enter the lowest and highest values of the range, separated by a colon. For example, to print Purchase Orders 001 to 010, enter "001:010" in the Purchase Order Number field. Depending on the field, the sort used might be alpha or numeric. In the case of an alpha sort, a range of 1:2 would also include 100, 10109, etc.
---
Please follow the links below for details about each form:
- Introduction
- Standard Fields for inclusion in all Form Templates
- Internal Orders
- Purchase Orders
- Purchase Order Confirmations, Purchase Order Requirements
- Purchase Order Quotations
- Shipment Notifications
- Home page for Purchase Orders manual
- Home page for Standard ERP manual
Standard Fields
There are a number of standard fields that you can include in the Form Templates that will be used by the forms in the Purchase Orders module. These fields are:| Field in Form Template | Prints |
| These fields print information from the Company Info setting: | |
| Chief Accountant | Chief Accountant |
| Copy Type | When you design a Form Template, you can use the 'Copies' function on the Operations menu to specify that more than one copy will be printed, and that each copy will be marked with specified text (e.g. "Office Copy", "Customer Copy", etc). This field will print the specified text |
| Date | The date when the Form was printed |
| Document for Training Purposes | Prints the phrase "Document for training purposes Only". This field will only be printed from sample databases. |
| Invalid Invoice | Prints the phrase "Document not valid as an invoice" (prints blank in Sales Cash Notes, Sales Credit Notes, Sales Interest Invoices, Sales Internal Invoices, Sales Invoices, Sales Proforma Invoices and Project Invoices) |
| Manager / CEO | CEO |
| Own Address | Company Name and Address. This information will be printed on separate lines, so you should specify a Line Height for this field. Use the Form Settings setting to set the format of this field (e.g. to specify whether blank lines will be printed, whether parts of the address will be printed on the same line, etc.) |
| Own Address 2 | Address. This information will be printed on separate lines, so you should specify a Line Height for this field. Use the Form Settings setting to set the format of this field (e.g. to specify whether blank lines will be printed, whether parts of the address will be printed on the same line, etc.) |
| Own ANA Code | ANA Code |
| Own Bank 1 | Bank 1 |
| Own Bank 2 | Bank 2 |
| Own Bank Code | Bank Code. This information will only be printed if there is a record in the Banks setting in the Purchase Ledger for the Bank Code specified in the Company Info setting |
| Own Bank Customer ID | Bank Customer ID |
| Own Business Name | Business Name |
| Own Commercial Registration Number | Commercial Reg.No. |
| Own Country Code | ISO Code from the record in the Countries setting for the Country or, if blank, the Country |
| Own E-mail | |
| Own Fax Number | Fax |
| Own GLN | GLN (this field is only visible if the VAT Law in the Company Info setting is set to "Norwegian") |
| Own Home Community | Home Community |
| Own Line of Business | Line of Business |
| Own Name | Company Name |
| Own Registration Number | Reg. No. |
| Own Share Capital | Share Capital |
| Own Telephone Number | Telephone. If you enter "N" as the Field Argument, the Telephone Number will be printed without spaces or other non-numeric characters. |
| Own VAT Reg. Number | VAT Reg. No. |
| Own WWW Address | WWW Address |
| Page Number | Page number |
| Period | The period from the Form's specification window |
| Product Name | The name of the product you are using (i.e. Standard ERP) |
| Short Underline | _______________ |
| Time | The time when the Form was printed |
| These fields print information from the record in the Banks setting in the Purchase Ledger for the Bank Code specified in the Company Info setting: | |
| Own Bank Account (IBAN) | Account (IBAN) |
| Own Bank Address | Address. This information will be printed on separate lines, so you should specify a Line Height for this field |
| Own Bank Address 1 | First line of the Address |
| Own Bank Address 2 | Second line of the Address |
| Own Bank Address 3 | Third line of the Address |
| Own Bank Address 4 | Fourth line of the Address |
| Own Bank Address 5 | Fifth line of the Address |
| Own Bank BIC (SWIFT) | BIC (SWIFT) |
| Own Bank Corr. Acc. | Expense Account |
| Own Bank Clearing | Clearing |
| Own Bank Name | Name |
| Own Bank Sorting | Sort Key |
---
Forms in the Purchase Orders module:
- Introduction
- Standard Fields for inclusion in all Form Templates
- Internal Orders
- Purchase Orders
- Purchase Order Confirmations, Purchase Order Requirements
- Purchase Order Quotations
- Shipment Notifications
- Home page for Purchase Orders manual
- Home page for Standard ERP manual
Órdenes Internas
Puedes utilizar este documento para imprimir Órdenes Internas con el fin de facilitar el proceso de aprobación y autorización.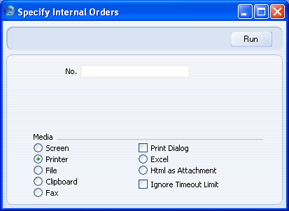
También puedes imprimir una sola Orden Interna desde una ventana de registro. Para hacer esto, pulsa el icono de la Impresora; también puedes obtener una vista de impresión pulsando el icono Vista Preliminar.
Órdenes de Compras
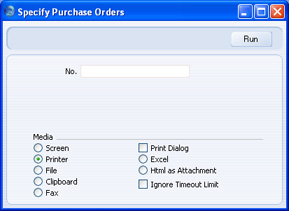
También puedes imprimir una sola Orden de Compra desde una ventana de registro pulsando el icono de la Impresora; también puedes tener una vista preliminar pulsando el icono Vista Preliminar.
Cuando diseñes el Formulario a ser usado para la impresión de Órdenes de Compra, puedes utilizar el campo ‘Argumento’ en los campos “Precio Unitario”, “Precio por Unidad (incl. Precio Factor)”, “Suma”, “IVA” y “A Pagar”. Esto se realiza para especificar la cantidad de cifras decimales que serán impresas. Por ejemplo, si el IVA en una Orden de Compra es 1.47, el campo “IVA” imprimirá 1.50 si tiene un Argumento de Campo de 1. Por otro lado, el campo “A Pagar” refleja el total de la Orden de Compra incluyendo IVA.
Confirmaciones/Recordatorios Órdenes de Compra
Estas documentos son muy semejantes al documento 'Órdenes de Compra'. Mediante este documento puedes imprimir Órdenes de Compra usando diferentes Formularios dependiendo de los requerimientos particulares.Cotizaciones Órdenes de Compra
Puedes imprimir una Cotización para colocarla como un expediente.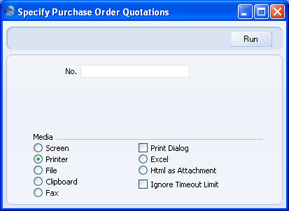
También puedes imprimir una sola Cotización de Orden de Compra desde una ventana de registro pulsando el icono de la Impresora; o también puedes tener una vista de impresión pulsando el icono Vista Preliminar.
Cuando diseñas el Formulario a ser utilizado para la impresión de Cotizaciones Órdenes de Compra, puedes utilizar el Campo de Argumento en los campos “Suma”, “IVA” y “A Pagar”. Esto se hace para especificar la cantidad la cantidad de cifras decimales que se imprimirán. Por ejemplo, si el IVA en una Orden de Compra es 1.47, el campo “IVA” imprimirá 1.50 si tiene un campo de Argumento de 1. Por su parte, el campo “A Pagar” refleja el total de la Cotización Orden de Compra incluyendo IVA.
Shipment Notifications
This form allows you to print a hard copy of any record entered in the Shipment Notification register.You can also print an individual Shipment Notification by opening the record and clicking the Printer icon (Windows/Mac OS X) or selecting 'Print' from the File menu (all platforms). To print a Shipment Notification to screen, click the Preview icon (Windows/Mac OS X only).
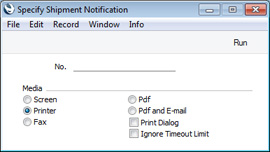
- No.
- Enter the Shipment Notification Number if you wish to print a single record, or a range of numbers separated by a colon (:) if you wish to print several. You must specify a Shipment Notification Number or range of Numbers: if you leave this field empty, no records will be printed.
| Header Fields (these print once per Shipment Notification) | |
| Field in Form Template | Prints (from Shipment Notification) |
| Address | Name (if you are using the Organisation Name option in the Form Settings setting) and Address. This information will be printed on separate lines, so you should specify a Line Height for this field. Use the Form Settings setting to set the format of this field (e.g. to specify whether blank lines will be printed, whether parts of the address will be printed on the same line, etc.) |
| Comment | Comment |
| Customer Name | Name |
| Customer Number | Customer |
| Delivery Date | Del. Date |
| Object | Objects |
| Order Number (ordnummer) | Order No. |
| Payment Number for Russia | Prints the No. of the Invoice with the first three characters removed |
| Stock Serial Number | No. |
| Total Quantity (totqty) | Sum of the Del. Qtys from each row |
| The following fields print information taken from the record in the Contact register for the Customer specified in the Shipment Notification. | |
| Field in Form Template | Prints (from Customer) |
| Account Operator | Account Operator |
| Bank Account | Bank Account |
| Customer Freight Number | Freight No. |
| Customer Registration No. 1 | Reg. No. 1 |
| Customer Registration No. 2 | Reg. No. 2 |
| Customer Telephone Number | Telephone |
| Customer VAT Reg. Number | VAT Reg. No. |
| Department | Department |
| From Address | Name and Invoice Address. This information will be printed on separate lines, so you should specify a Line Height for this field |
| Mobile | Mobile |
| VAT Reg. Number | VAT Reg. No. |
| Row Fields (these print once per row, so remember to specify a Line Height and to set the Format to "Matrix") | |
| Field in Form Template | Prints (from Shipment Notification row) |
| Cost Account, Row | Cost of Sales |
| Description 1 | Description |
| Item Code | Item |
| Item Price | Base Price from the Item record |
| Object, row | Objects |
| Order Quantity | Ordered |
| Price | Unit Price (field not visible in the interface) |
| Purchase Accrual Account | Purch. Accruals |
| Quantity | Del. Qty |
| Serial Number (serienr) | Serial No. |
| Sum, base price | Del. Qty * Base Price from the Item record (i.e. total sales value of the row) |
| Sum, Price | Del. Qty * value in the "Price" row field (i.e. total cost of the row) |
Please refer here for details of the standard fields that you can also include in the Form Template.
---
Forms in the Purchase Orders module:
- Introduction
- Standard Fields for inclusion in all Form Templates
- Internal Orders
- Purchase Orders
- Purchase Order Confirmations, Purchase Order Requirements
- Purchase Order Quotations
- Shipment Notifications
- Home page for Purchase Orders manual
- Home page for Standard ERP manual